portable wireless pa amplifier - eafg.es
TRANSCRIPT

User Manual / Manual de Instrucciones
Rev 1.0
WAP 650
PORTABLE WIRELESS PA AMPLIFIER
EQUIPSON, S.A.
Avda. El Saler, 14 - Pol. Ind. L´Alteró
46460 - Silla (Valencia) Spain
Tel. +34 96 121 63 01 Fax + 34 96 120 02 42


Read these instructions.
Keep these instructions.
Heel all warnings.
Do not use this unit near water or rain.
Clean only with dry cloth. For stubbon stains, use a soft cloth dampened with a weak solution of mild detergent and water. Dry the unit immediately afterwards with a clean cloth. Do not use abrasive cloth, thinners, alcohol or other chemical solvents, they may damage the finish or remove the panel lettering.
Do not block any ventilation openings. The ventilation shall not be impeded by covering the openings with items, such books, curtains, etc.
Do not install near any heat sources like radiators or other units (including amplifiers) that produce heat.
Do no defeat the safety purpose of the polarized or grounding type plug, it is provided for your safety. If the provided plug does not fit into your outlet, consult electrician for replacement of the obsolete outlet.
Protect the power cord from being walked on or pinched particularly at plugs, convenience receptacles, and the point where they are exit from the unit. If the power cord is damaged, contact with your dealer for replace it.
Only use attachments accessories specified by the manufacture.
Unplug the unit during lighting storms or when unused for long period of time.
If the unit comes with AC adaptor, make sure the adaptor is not covered by cloth or soft material, keep it uncovered all the time.
Refer all servicing to qualified service personnel.Servicing is required when the unit has been damaged in any way, such as power supply cord or plug is damaged, liquid has been spilled or objects have fallen into the apparatus, the unit has been exposed to rain or moisture, does not operate normally, or has been dropped.
For the handheld or lapel microphone, do not use them under storm weather, especially in the rain and wet, it might get thunder shock.
DETAILED SAFETY INSTRUCTIONS
SAFETY INSTRUCTIONS
CAUTION
RISKOFELECTRICSHOCKDONOTOPEN
WARNING:
CAUTION: To reduce the risk of electric shock, do not remove the cover of the device. There is not serviciable elements inside it. For service purpose, refer to qualified personnel.
In order to reduce the risk of fire or electric shock, do no expose this unit to rain or moisture.
This symbol, alert you the presence of unisolated dangerous voltage inside the enclosure, that can representate a risk of electric shock.
This symbol alerts you to important operating and maintenance instructions in the accompanying literature.
EN
Page 1 User Manual WAP 650
ES
No hay sonido1. Uno de interruptores de encendido está apagado, compruebe las alimentaciones y asegúrese que están en marcha.2. Los mandos de control de volumen están en su posición mínima. Asegúrese de obtener el sonido adecuado.3. El cable del micrófono de solapa está roto.
PRECAUCION
Extraiga la batería de 9V para evitar daños en los componentes del emisor si no va usar la unidad durante un periodo prolongado de tiempo.
ESPECIFICACIONES TECNICAS
Alimetnación: AC :220V/50 Hz - 1.0 A DC 12 V (Batería recargable incorporada de 7.0AH ) / Alimentador externo DC 12V - 3.5 A (no incluido).Potencia de salida: 120 W max.Altavoces: 1 x 2 ohm full range 8" y 1 x 1.5" piezoelectricoCanales: Doble canalRango de frecuencia: Banda VHF ( 4 grupos diferentes)Sensibilidad: 10 dB uV (S/N 60 dB )Modo de Oscilación: +/- 0.005% oscilación de cuerzoRango: 35 m.T.H.D.: Menos de 5%Temperatura de uso: - 25º C a 45º CDimensiones: 322 x 170 x 435 mm (LxAnxAl)Peso: 7.2 Kg
Este símbolo en su equipo o embalaje, indica que el presente producto
no puede ser tratado como residuos domésticos normales, sino que deben
entregarse en el correspondiente punto de recogida de equipos electrónicos
y eléctricos. Asegurándose de que este producto es desechado
correctamente, Ud. está ayudando a prevenir las consecuencias negativas
para el medio ambiente y la salud humana que podrían derivarse de la
incorrecta manipulación de este producto. EL reciclaje de materiales
ayuda a conservar las reservas naturales. Para recibir más información,
sobre el reciclaje de este producto, contacte con su ayuntamiento, su
punto de recogida más cercano o el distribuidor donde adquirió el producto.
Página 16 Manual de Instrucciones WAP 650

CAUTIONS
This unit can produce electronic magnetic field due to its speaker, please, let the unit far from PC, or TV over 60 cm, otherwise this magnetic field will affect their picture and voice.
After use, please pull out the power cable from the power socket.
For the built-in rechargeable battery: 1. Should be charged over 8 hours before use, make sure it can be supplied power at any time. 2. Should be charged over 8 hours after use to protect the battery and the power supply.
Please replace the same specific battery if the built-in 12 V/ 7 AH battery was damaged otherwise will damage the unit; handle this damaged battery appropriate to avoid pollue the environment.
Please do not use this unit if the following circumstances happen, refer servicing to qualified personnel only. 1. Power cable or power socket be damaged. 2. The unit was drenched by rain or other obstacles inside it. 3. Some components were damaged.
Do not dismantle this product. The maintenance and inspection should be carried out by a qualified technician to avoid the risk of electric shock.
Be sure to switch off the system main power after use, otherwise the battery will be over discharged and it can damage the rechargeable battery, shorting the battery life.
After use the wireless transmitter, please take the battery out of it to avoid battery leaking to damage the transmitter.
CONTENTS
WAP-650Main receivingPA amplifier
Transmitter
Power Cable
Headset MIC
Handheldwireless MIC
If the shipping carton is found to be damaged, notify the delivery company immediately. Save the damage carton as evidence for the delivery company to inspect.Please contact with your supplier for further information.
Page 2 User Manual WAP 650
Lavalier Microphone
EN
FUNCIONAMIENTO CON LAS ENTRADAS AUX
FUNCIONAMIENTO DE LA SALIDA AUX
COMO CARGAR LA BATERIA DE 7 AH INCORPORADA
COMO CARGAR LA PILA RECARGABLE DE 8.4V
COMO SUSTITUIR LA BATERIA DE 7 AH INCORPORADA
Hay 3 entradas AUX. Puede conectar un CD p dispositivo Mp3 externo en estas tomas para ejecutar fuentes de audio externas. Su nivel de volumen puede ser controlado con el mando respectivo.
La toma AUX Output puede ser conectada a un sistema de grabación. Puede grabar mientras usa el amplificador.
1. Se recomienda recargar la batería durante 12 horas en su primer uso. 2. Pulse el interruptor a “OFF/Charge” y la batería se recargará a un nivel de tensión y corriente constante. 3. El indicador de carga cambiará su brillo con la carga de la batería. El LED se apagará cuando la carga se complete. Cuando la batería está casi descargada, el sistema emitirá un zumbido para que recargue la batería de inmediato. Recárguela unas 8 horas antes de volver a usarla. Con la carga completa puede funcionar unas 10 horas.
1. Coloque una pila recargable de 8.4 V en su recinto y con la polaridad correcta. 2. Las pilas recargables de 8.4 V pueden ser cargadas en cualquiera de estas situaciones: a) Con alimentación AC, puede cargarse independiente de la posición del interruptor. b) Con alimentación DC power, pero la unidad en marcha con la batería interna o alimentador externo. 3. El LED de carga se ilumina mientras se carga. El tiemo de carga debe ser superior a 8 horas. 4. NOTAS: a) No coloque una pila no recargable de 9V para su carga, podría explotar. b) Asegúrese de la polaridad de la pila para evitar daños. c) El recinto de colocación de la pila es adecuado para la pila, en su colocación no la fuerce y asegúrese que está en su posición y polaridad correctas.
1. Después de que la batería de 7 AH se haya cargado completamente, ésta se irá descargando por el uso. Si el tiempo de funcionamiento se reduce ostensiblemente y la batería se descarga con rapidez, significa que la batería debe sustituirse. 2. Abra el puerta que tapa la batería, retire la batería mala y sustitúyala por otra nueva. Conecte los cable correctamente . Cierre la tapa y cargue la nueva batería al menos 8 horas.
NOTAS: La polaridad + - de la batería incorporada de 7 AH debe colocarse en la posición correcta o no funcionará. Maneje la batería descartada apropiadamente para proteger el medio ambiente.
RESOLUCION DE PROBLEMASSi tiene algún problema con el sistema, compruebe la alimentación y baterías de los micrófonos y baterías recargables. Si está usando una pila de 9V nueva, asegúrese de su correcta polaridad.
Pitidos en el altavoz.1. Ajuste el volumen del altavoz al mínimo.2. Ajuste el volumen del emisor a su nivel mínimo.3. Cambie la dirección del altavoz para evitar realimentaciones.4. Lleve los controles de tono a su posición mínima.
Ruidos o paros abruptos1. Batería incorporada con carga baja, por favor, use alimentación AC para alimentar el sistema.2. Compruebe el cable de conexión al altavoz, puede estar roto.3. Posible interferencia con la frecuencia de otra transmisión. Contacte con su distribuidor para cambiar los canales y mejorar la recepción.
Página 15 Manual de Instrucciones WAP 650
ES

FEATURESSMD electronic components and SMT technology used in building this amplifier.Dual channel system.VHF band and 4 different groups (8 possible frequencies) for choose.The system works on three types power sources: AC power and built-in 7 AH rechargeable battery and external DC 12 V power (not included).4 Wired/ 2 wireless microphones can be used at same time.Bass and Treble controlsDigital echo3 AUX inputs for connecting MD/CD/MP3 devices.AUX output.USB/SD slot.Power source capacity LED indicator.DC 12V / DC 8.4 V rechargeable battery recharging LED indicators.Wireless microphone RF LED1 and LED 2 indicators.Low voltage circuit protection for the built-in rechargeable battery to avoid the damage of it in case of incorrect operation.Tripod stand jack at the bottom of the unit.
SYSTEM DESCRIPTION
Loop play Button
Play/Pause LED
Stop Button
USB Slot
Backward Button
SD/USB Optional Button
SD / MMC slot
Loop play LED
Play/pause Button
Fordward Button
Page 3 User Manual WAP 650
EN
FUNCIONAMIENTO CON EL MICRO CON CABLE
OPFUNCIONAMENTO CON LOS CONTROLES BASS Y TREBLE
FUNCIONAMIENTO DEL ECHO DIGITAL
FUNCIONAMIENTO CON EL REPRODUCTOR USB/SD PLAYER
Tel reproductor MP3 del amplificador inalámbrico, posee 2 tipos de interfaces: Puerto USB 2.0 y ranura para tarjetas SD/MMC.Ambas pueden ejecutar ficheros de audio en formato MP3.
INSERTANDO SOLO UN DISCO USB O TARJETA SD:
1. Inserte un disco USB en el puerto USB. Configure el volumen con el mando USB/SD volume, presione la tecla para comenzar. El indicador USB se ilumina. Para pausar, presione la tecla otra vez. Para detener la ejecución pulse STOP. 2. Inserte una tarjeta SD en el puerto adecuado. Configure el volumen con el mando USB/SD volume, presione la tecla para comenzar. El indicador de tarjeta SD se ilumina. Para pausar, presione la tecla otra vez. Para detener la ejecución pulse STOP.
INSERTANDO UN DISCO USB Y UNA TARJETA SD SIMULTANEAMENTE:
1. Inserte un disco USB y una tarjeta SD a la vez. Configure el volumen USB/SD. 2. Presione la tecla para reproducir. El LED play/pause se enciende. Si ha insertado un disco USB antes que la tarjeta, la unidad dará prioridad a las pistas del disco USB.Si necesita cambiar a una pista de la tarjeta SD, presione la tecla USB/SD y pulse el botón para reproducir. Para pausar, pulse el botón otra vez y para detener la reproducción, pulse STOP.
II
II
II
IIII
II
II
Ajuste el mando de volumen USB/SD a la posición correcta. Ajustando este mando, puede hacer la calidad del sonido mas agradable. Presione la tecla para ejecutar la siguiente pista, presionando la tecla 2 veces, se ejecutará la pista anterior.
I I
NOTA
1. El slot para tarjetas SD sólo puede leer tarjetas con una capacidad igual o superior a 64 MB.2. Para extraer el disco USB o tarjeta SD con seguridad, debe primero pulsar la tecla STOP y apagar el volumen USB/SD, y entonces extraer el disco o tarjeta.
Despliegue las antenas a su máxima longitud con el punto de obtener un rango efectivo y el mejor resultado.No coloque el micrófono directamente frente al altavoz, podría causar realimentaciones y molestos ruidos.
Conecte el micrófono a las tomas marcadas para ello. Encienda el interruptor del micrófono, podrá oír su voz de inmediato. En total, pueden conectar 4 micrófonos de este tipo a la vez.
Mueva los mandos Bass y Treble desde elmínimo asl máximo para ajustar el nivel a su elección.
Mueva el mando ECHO del mínimo al máximo para ajustar este nivel a su gusto. Si escucha un pitido elevado, ajuste el mando ECHO a menor nivel.
Modos de ejecución Loop
1. Pulse MODE una vez, el LED MODE parpadeará lentamente, el reproductor MP3 reproducirá cíclicamente la pista en ejecución.2. Pulse MODE dos veces, el LED MODE parpadeará rápidamente, el reproductor MP3 reproducirá cíclicamente los ficheros de carpeta actual en ejecución.3. Pulse MODE tres veces, el LED MODE estará encendido, el reproductor MP3 reproducirá ciclicamente todos los ficheros del USB o tarjeta SD4. Pulse MODE una cuarta vez, el LED MODE se apagará borrando la función cíclica, ejecutará todos los ficheros y se detendrá.
Página 14 Manual de Instrucciones WAP 650
ES

SYSTEM OPERATION
OPERATION WITH AC POWER
1. Plug in the AC power to the outlet. Make sure you are using the correct voltage or the stated voltage on on the unit. 2. Switch the main power ON, the LED on the body will be lit. After using the system, make sure to turn the main power OFF to avoid over charge the built-in battery. 3. When the AC power cut off suddenly, the built-in battery will power the system to work no delay.
OPERATION WITH DC POWER
1. Turn on the main switch ON and the power LED will indicate the battery work properly. The LED indicating level will decrease with the growth of the operating time.
CAUTION
CAUTION
CAUTION
CAUTION
You must plug the system off the main power if you are not going to use it for a period of time.
Before start to use the unit, the built-in 7 AH rechargeable battery must be full charged over 8 hours.
Be sure to switch off the system main power after use, otherwise the battery will be over discharged and it can damage the rechargeable battery, shorting the battery life.
When the unit is operating and occur noisy interruption and distortion voice, indicates the weak built-in battery, you must replace the DC power to AC and charge the main unit.
Page 4 User Manual WAP 650
EN
PRECAUCION
PRECAUCION
Después de usar la unidad, asegúrese de apagar la alimentación para evitar daños en la batería.
Extraiga la pila si no vas usar la unidad durante un tiempo.
2. Esta unidad incorpora un circuito de protección para la batería incorporada y evitar daños en caso de un funcionamiento incorrecto. Cuando se está usando el receptor, si la tensión en la batería es menor de 9 +/- 0.5V, se apagará automáticamente mediente el circuito de protección y necesitará usar alimentación AC para recargar la batería.
PRECAUCION
Si el LED parpadea, significa que la pila está en buen estado. Si el LED se enciende, significa que la carga de la pila es baja, lo mejor es sustituirla. Si el LED no se enciende ni parpadea, la pila está vacía o con la polaridad invertida.
FUNCIONAMIENTO CON EL MICROFONO LAVALIER
1. Abra el compartimento de la pila deslizando la tapa. 2. Inserte la pila en su compartimento respetando la correcta polaridad. 3. Conecte el micrófono Lavalier en el emisor. 4. Pulse el interruptor del emisor, cuando se encienda el LED, estará preparado para funcionar. 5. Sea cuidadoso al ajustar el nivel del emisor, empiece con poco volumen y auméntelo poco a poco. 6. Después de su uso, retire la pila del emisor para evitar que se descarge y dañe al propio emisor.
FUNCIONAMIENTO CON EL MICROFONO DE MANO
1. Abra la cubierta de la batería 2. Coloque la pila en su compartimento asegurándose previamente de la correcta polaridad. 3. Pulse el interruptor a ON, ahora puede usar el micrófono.
Cubierta
Cubierta
Volumen
LED Power
Interruptor alimentación
Conector MIC
Receptáculo dela pila de 9V
PRECAUCION
Asegúrese de apagar la alimentación después de su uso, si no la batería se descargará, dañándola y acortando su vida útil.
RejillaLED
Interruptor
Empuñadura
Alojamientode la pila
Pila 9V
Tapa portapilas
Cerrar
Abrir
Página 13 Manual de Instrucciones WAP 650
ES
CAUTION
CAUTION
After to use it, please make sure to switch off the main power to avoid battery damages.
Take the battery out if you are not going to use it for a period of time.
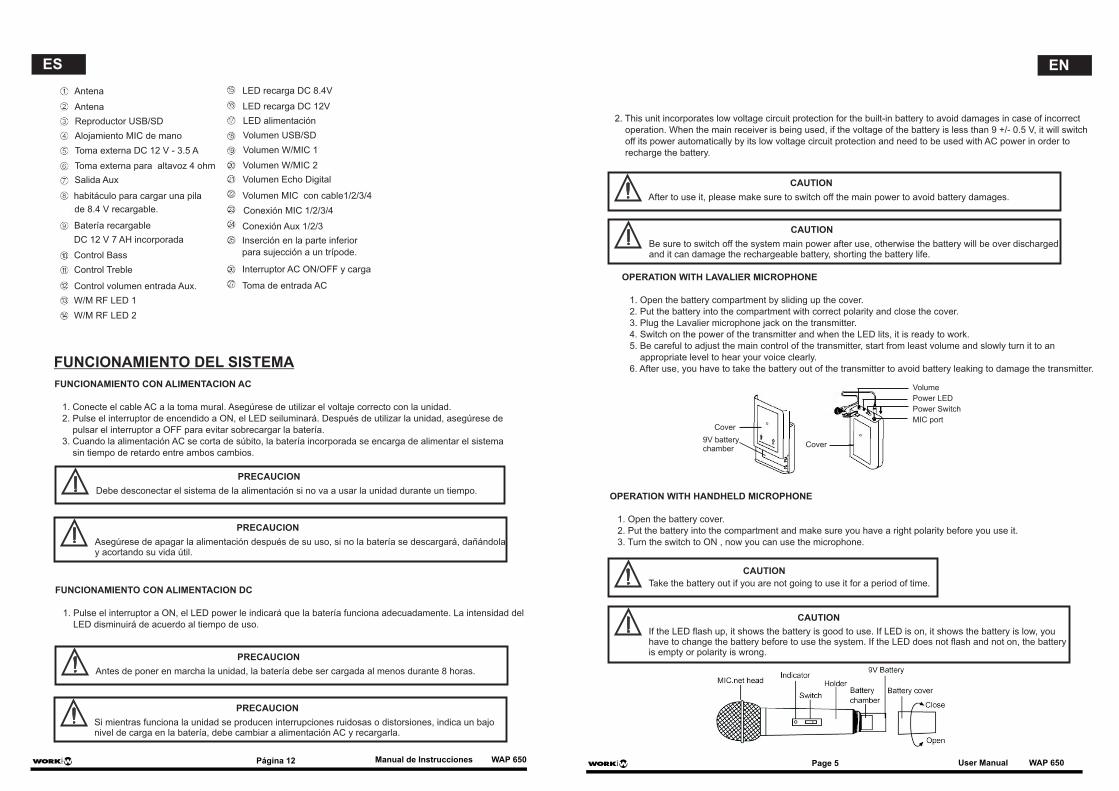
2. This unit incorporates low voltage circuit protection for the built-in battery to avoid damages in case of incorrect operation. When the main receiver is being used, if the voltage of the battery is less than 9 +/- 0.5 V, it will switch off its power automatically by its low voltage circuit protection and need to be used with AC power in order to recharge the battery.
CAUTION
CAUTION
Be sure to switch off the system main power after use, otherwise the battery will be over discharged and it can damage the rechargeable battery, shorting the battery life.
If the LED flash up, it shows the battery is good to use. If LED is on, it shows the battery is low, you have to change the battery before to use the system. If the LED does not flash and not on, the battery is empty or polarity is wrong.
OPERATION WITH LAVALIER MICROPHONE
1. Open the battery compartment by sliding up the cover. 2. Put the battery into the compartment with correct polarity and close the cover. 3. Plug the Lavalier microphone jack on the transmitter. 4. Switch on the power of the transmitter and when the LED lits, it is ready to work. 5. Be careful to adjust the main control of the transmitter, start from least volume and slowly turn it to an appropriate level to hear your voice clearly. 6. After use, you have to take the battery out of the transmitter to avoid battery leaking to damage the transmitter.
OPERATION WITH HANDHELD MICROPHONE
1. Open the battery cover. 2. Put the battery into the compartment and make sure you have a right polarity before you use it. 3. Turn the switch to ON , now you can use the microphone.
Cover
Cover
Volume
Power LED
Power Switch
MIC port
9V battery chamber
Page 5 User Manual WAP 650
EN
FUNCIONAMIENTO DEL SISTEMA
FUNCIONAMIENTO CON ALIMENTACION AC
1. Conecte el cable AC a la toma mural. Asegúrese de utilizar el voltaje correcto con la unidad. 2. Pulse el interruptor de encendido a ON, el LED seiluminará. Después de utilizar la unidad, asegúrese de pulsar el interruptor a OFF para evitar sobrecargar la batería. 3. Cuando la alimentación AC se corta de súbito, la batería incorporada se encarga de alimentar el sistema sin tiempo de retardo entre ambos cambios.
FUNCIONAMIENTO CON ALIMENTACION DC
1. Pulse el interruptor a ON, el LED power le indicará que la batería funciona adecuadamente. La intensidad del LED disminuirá de acuerdo al tiempo de uso.
PRECAUCION
PRECAUCION
PRECAUCION
PRECAUCION
Debe desconectar el sistema de la alimentación si no va a usar la unidad durante un tiempo.
Antes de poner en marcha la unidad, la batería debe ser cargada al menos durante 8 horas.
Asegúrese de apagar la alimentación después de su uso, si no la batería se descargará, dañándola y acortando su vida útil.
Si mientras funciona la unidad se producen interrupciones ruidosas o distorsiones, indica un bajo nivel de carga en la batería, debe cambiar a alimentación AC y recargarla.
Antena LED recarga DC 8.4V
Reproductor USB/SD LED alimentación
Antena LED recarga DC 12V
Alojamiento MIC de mano Volumen USB/SD
Toma externa DC 12 V - 3.5 A Volumen W/MIC 1
Toma externa para altavoz 4 ohm Volumen W/MIC 2
Salida Aux Volumen Echo Digital
habitáculo para cargar una pila Volumen MIC con cable1/2/3/4
Conexión MIC 1/2/3/4 de 8.4 V recargable.
Batería recargable Conexión Aux 1/2/3
DC 12 V 7 AH incorporada Inserción en la parte inferior
Control Bass
Control Treble Interruptor AC ON/OFF y carga
para sujección a un trípode.
Control volumen entrada Aux. Toma de entrada AC
W/M RF LED 1
W/M RF LED 2
Página 12 Manual de Instrucciones WAP 650
ES

OPERATION WITH WIRED MICROPHONE
OPERATION WITH BASS & TREBLE CONTROLS
OPERATION WITH DIGITAL ECHO
OPERATION WITH USB/SD PLAYER
The MP3 player of the wireless PA amplifier provides 2 types of interfaces: USB 2.0 port and SD/MMC car slot. Both of them can play MP3 format sound files.
INSERTING USB DISK OR SD CARD ALONE:
1. Insert USB disk into USB port and turn on the USB/SD volume switch, then press the button to start playing. The USB indicator turns bright. To pause playing, please press the button again. To stop playing press the STOP button. 2. Insert SD card into SD card slot, and turn on the USB/SD volume switch, then press the button to start playing, the SD card indicator turns bright. To pause playing, please press the STOP button.
INSERTING USB DISK AND SD CARD SIMULTANEOUSLY:
1. Insert USB disk and SD card into USB port and SD card slot respectively. Turn on the USB/SD volume switch.
2. Press the button to start playing. The play/pause LED turns bright. If you insert USB disk first and SD card after, the amplifier will play in priority the songs in USB disk. If you need to change to play the songs in the SD card, press the USB/SD switch button, then press the button to play. To pause playing, press the button once again. To stop playing press the STOP button.
II
II
IIII
II
II
Adjust USB/SD volume knob to a proper volume. Adjusting tone knobs can make the sound quality more pleasing.Press button to play the next song, and press twice the button to play the last one.
Modes of Loop-play
I I
NOTICE
1. The SD card slot can only read the SD card whose capacity is equal to or bigger than 64 MB.2. To draw out the USB disk or SD card safely ater playing, you should first press the stop button, turn off the USB/SD volume switch, and then draw out the USB disk or SD card.
Deploy the antennas to the highest point in order to get an effective range and best result.Do not put the microphone directaly towards the speaker of the main receiver in near distance. or it will occurscreaming feedback.
Plug the microphone to the wired mic input jack. Turn on the MIC switch, then you can hear your voice immediately. Total 4 wired microphone can be used at the same time.
Move the Bass or Treble knob for minimum to maximum to adjust their level to your desire.
Move ECHO knob for minimum to maximum to adjust their level to your desire. If you hear screaming sound, adjust the ECHO knob in less volume.
Page 6 User Manual WAP 650
1. Push the MODE once, the MODE LED flashes slowly, MP3 player will cycle play the music which is playing.2. Push the MODE twice, the MODE LED flashes quickly, MP3 player will cycle play the folder which is playing.3. Push the MODE triple, the MODE LED lights all time, the MP3 player will cycle play all the files in the USB and SD card.4. Push the MODE fourth, the MODE LED dims, delete the cycle play function, MP3 player will stop automatically after it read and play all the files in the USB or SD card.
EN
CARACTERISTICASComponentes electrónicos SMD y tecnología SMT usado en el diseño este amplificador.Sistema VHF dual. 4 grupos (8 frecuencias) disponibles a elegir. El sistema opera con 3 tipos de alimentación: Aliment. AC, Batería recargable incorporada de 7 AH y alimentador externo DC 12 V (no incluido).4 micrófonos con cable/2 inalámbricos pueden ser usados al mismo tiempo.Controles Bass y Treble.Echo digital.3 entradas AUX para el conexionado de dispositivos MD/CD/MP3.Salida AUX.Puerto USB/SDIndicador LED de alimentación.Indicadores LED que marca el proceso de recarga de la batería incorporada de 12V y el cargador de 8.4 V.Circuito de protección de baja tensión para evitar que la batería recargable se pueda dañar en caso de manejo incorrecto.Inserción en la parte inferior para su colocación sobre un trípode.
DESCRIPCION DEL SISTEMA
Botón modo Loop
LED Play/Pause
Botón Stop
Slot USB
Botón Backward
Botón de selección SD/USB
Puerto SD / MMC
LED modo Loop
Botón Play/pause
Botón Fordward
Página 11 Manual de Instrucciones WAP 650
ES

OPERATION WITH AUX INPUT
OPERATION WITH AUX OUTPUT
HOW TO CHARGE THE BUILT-IN 7AH BATTERY
HOW TO CHARGE THE 8.4V RECHARGEABLE BATTERY
HOW TO REPLACE THE BUILT-IN 7AH BATTERY
There are 3 AUX inputs. volume knob can be controlled.
You can connect a CD, external MP3 into this jack to play external audio sources. Its
AUX Output could be connected to a recording system. You can record while using the amplifier system.
1. It is recommended to charge the battery for the first time use for 12 hours. 2. Turn the main switch to “OFF/Charge” and the battery will be charged wit a consistent current and voltage. 3. The charging indicator will change from bright to dim with the battery charging, the LED will off when the battery is fully charged. When the battery is getting low, you will hear a buzz reminder from the system, asking you to charge the battery immediately. Recharge the battery over 8 hours before you are going to use it. When it is full charged over 8 hours, it can operate for more than 10 hours.
1. Put the 8.4V rechargeable battery into the charging chamber in correct polarity. 2. The 8.4 V rechargeable battery can be charged in the below two situations: a) In AC power, it can be charged in the ON or OFF situation of the main unit. b) In DC power, but the unit is ON, which is supplied by the built-in 7 AH rechargeable battery or external 12 V DC, it can be charged. 3. The charging LED lights while it is charging. The charged time should be over 8 hours. 4. NOTES: a) Do not put the unrechargeable 9V battery inside the charger for charging, it can explode. b) Make sure the polarity is correct or it may damage the battery. c) The charger chamber has the limited position assembly for correct put in battery. If you can not easily put in the battery, do no force into the chamber, be carefully and check the correct polarity and position, then install the battery again.
1. After the 7AH rechargeable battery is full charged the main unit will operate with several hours running down the charge. If this operating time is been reduced in time and the battery draining very quicky, that means the battery must be replaced. 2. Open the battery chamber door, then take out the old battery and put a new inside. Connect its wire correctly and settle the battery. Put the battery chamber door and charge the new battery over 8 hours.
NOTES: The + - polarity of the built-in 7 AH battery must in correct direction or it can not work.
Handle the damaged battery appropriate to avoid pollue the environment.
TROUBLESHOOTINGIf you have any problem with the system, please check the main power and batteries for microphone sets and rechargeable built-in battery. If you are using a new 9 V battery, make sure you have put it in a correct position.
Screaming from the speaker.1. Adjust the speaker volumen to the minimum.2. Adjust the transmitter volume control to a low level.3. Change the speaker direction to avoid direct feedback.4. Turn the tone controls to the lowest level.
Noise or abrupt stop1. Built-in battery low, please use AC power instead to power the system.2. Check the cable connection to the speaker. The cable might be broken.3. Possible frequency interference with another transmission. Contact with your dealer in order to change channels for better reception.
Page 7 User Manual WAP 650
ENPRECAUCIONES
Esta unidad puede producir campos electromagnéticos debido al altavoz, por favor coloque la unidad alejada de PCs o TV unos 60mcm, si no el campo magnético podría afectar a la imagen y sonido de estas unidades.
Después de utilizar la unidad, desconecte el cable de la toma mural.
Para la batería recargable incorporada: 1. Debería ser cargada más de 8 horas antes de usarla, asegúrese que está alimentada todo el tiempo. 2. Debe ser cargada al menos 8 horas después de su uso para proteger la batería y el alimentador.
Por favor, sustituya la batería incorporada por otra del mismo modelo (12 V /7 AH) si ésta se daña, si no podrá dañarse la unidad, maneje la batería dañada adecuadamente para evitar contaminar el medio ambiente.
Por favor, no use la unidad si ocurren estas circunstancias, diríjase sólo a un técnico especializado: 1. Cable de red o alimentación dañados. 2. La unidad se ha mojado por la lluvia o han caído objetos en su interior. 3. Algunos componentes se han dañado.
No desmantele el producto. El mantenimiento e inspección debe ser llevado a cabo por personal cualificado para evitar el riesgo de descargas eléctricas.
Asegúrese de apagar la alimentación después de su uso, si no la batería se descargaría y podría dañarse, acortando la vida útil de la batería.
Después de usar un emisor inalámbrico, retire la pila para evitar su descarga y que pueda dañar el emisor.
CONTENIDO
WAP-650Amplificador PAy receptor
Emisor de petaca
Cable de alimentación.
Micro de cabeza
Micro inalámbricode mano
Si el embalaje se encuentra dañado, notifíquelo de inmediato a la agencia de transporte. Conserve la caja como evidencia ante la inspección de la compañía de trasporte. Por favor, contacte con su distribuidor para información adicional.
Página 10 Manual de Instrucciones WAP 650
ES
Micrófono Lavalier

No Voice heard1. One of the powers is not turned, check all power sources and make sure they are all ON.2. The volume control knobs are turned to lowest level. Make sure they are proper in sound.3. Lavalier cable is broken.
CAUTION
Take out the 9V battery to avoid damages in the components of the transmitter if you are not going to use it for a period of time.
TECHNICAL SPECIFICATIONS
Power Supply: AC power 220V/50 Hz - 1.0 A DC 12 V (Built-in 7.0AH rechargeable battery) / External DC 12V - 3.5 A.Peak of music power: 120 W max.Loudspeaker: 1 x 2 ohm full range 8" speaker & 1 x 1.5" hornChannels: Double channelsFrequecy range: VHF band ( 8 different groups)Sensitivity: 10 dB uV (S/N 60 dB above)Oscillating mode: +/- 0.005% quartz oscillating locked.Range: 35 m.T.H.D.: Less than 5%Working temperature: - 25º C to 45º CDimensions: 322 x 170 x 435 mm (LxWxH)Weight: 7.2 Kg
This symbol on the product or on its packaging indicates that this productshall not be trated as household waste. Instead it shall be handed over to the applicable collection point for the recycling of electrical an electronicequipment. By ensuring this product is disposed of correctly, you will help prevent potential negative consequences for the environment and human health, which could otherwise be caused by inappropriate waste handling of this product. The recycling of amterials will help to conserve natural resources. For more detailed information sabout recycling of this product, please contact your local city office, your household waste disposal service or the shop where you purchased the product.
Page 8 User Manual WAP 650
EN
Lea estas instrucciones.
Conserve este manual.
Tenga presente todas las precauciones.
No use esta unidad cerca del agua o bajo la lluvia.
Limpie la unidad sólo con un paño seco. Para limpieza más profunda, use un paño humedecido con una solución de detergente y agua. Seque la unidad inmediatamente. No use paños abrasivos, disolventes alcohol u otros productos químicos, podrían dañar el acabado o borrar las letras del panel.
No bloquee las salidas de ventilación. Las ventilación no debe ser impedida cubriendo las salidas con libros, cortinas, etc.
No lo instale cerca de fuentes de calor como radiadores u otras unidades (incluyendo amplificadores) que produzcan calor.
No retire el terminal de seguridad en la toma de alimentación. Este terminal está colocado por su seguridad. Si la toma de red no acepta el conector, consulte con un electricista para proceder a cambiar la toma mural.
Proteja el cable de red de ser pisado o pinzado, particularmente en tomas y en el punto donde sale desde la unidad. Si el cable de red se daña, contacte con su distribuidor para cambiarlo.
Use únicamente los accesorios especificados por el fabricante.
Desconecte la unidad durante las tormentas eléctricas o si no va a ser usado durante largo tiempo.
Para la reparación y servicio de la unidad, diríjase a personal cualificado.La reparación será necesaria cuando la unidad se haya dañado, por ejemplo la alimentación, el cable, haya entrado líquidos u otros objetos dentro de la unidad, ésta haya sido expuesta a la lluvia o humedad, no funcione aparentemente normal o haya caído.
Micro de mano y solapa, no los use durante tormentas especialmente en la lluvia o humedad, pueden introducir ruidos indeseados en el amplificador.
Instrucciones Detalladas de Seguridad
INSTRUCCIONES DE SEGURIDAD
CAUTION
RISKOFELECTRICSHOCKDONOTOPEN
ADVERTENCIA:
PRECAUCION: Para reducir el riesgo de descarga eléctrica, no retire la tapa (o parte posterior) de launidad. No hay elementos de control para el usuario en el interior. En caso de averiao revisión, ésta debe ser realizada por personal autorizado.
Para reducir el riesgo de fuego o descargas eléctricas, no exponga la unidad a lalluvia o la humedad.
Este símbolo, cuando aparece en el manual, le advierte de la presencia de una tensión peligrosa sin aislar dentro de la unidad y que puede ser suficiente para constituir un riesgo de descarga eléctrica.
Este símbolo, cuando aparece en el manual, le advierte sobre una instrucción importante para el uso ymantenimiento de la unidad.
Este símbolo en su equipo o embalaje, indica que el presente producto
no puede ser tratado como residuos domésticos normales, sino que deben
entregarse en el correspondiente punto de recogida de equipos electrónicos
y eléctricos. Asegurándose de que este producto es desechado
correctamente, Ud. está ayudando a prevenir las consecuencias negativas
para el medio ambiente y la salud humana que podrían derivarse de la
incorrecta manipulación de este producto. EL reciclaje de materiales
ayuda a conservar las reservas naturales. Para recibir más información,
sobre el reciclaje de este producto, contacte con su ayuntamiento, su
punto de recogida más cercano o el distribuidor donde adquirió el producto.
Página 9 Manual de Instrucciones WAP 650
ES