portes de douche rectangulaire - technoform.ca - portes inspiration.pdf · isd201612‐05...
TRANSCRIPT

FABRIQUÉE EN CHINE ET IMPORTÉE PAR | MADE IN CHINA AND IMPORTED BY
INDUSTRIES TECHNOFORM LTÉE ISD201612‐05
Portes de douche rectangulaire
INSPIRATION ‐ CELEBRATION
Rectangular Shower Doors
MANUEL D'INSTALLATION
INSTALLATION MANUAL
MODÈLES | MODELS:
ISD48CC ‐ ISD60CC ‐ CSK4832 ‐ CSK4836 ‐ CSK6032
450.699.2424 – 1 877.377.4494 450.699.8484 [email protected] www.technoform.ca 2 ISD201612‐05
AVANT DE COMMENCER | BEFORE GETTING STARTED
IMPORTANT : Si vous installez la porte avec le panneau de côté (vendu séparément), veuillez vous servir du manuel se trouvant dans la boîte du panneau de côté et non celui‐ci.
Ce manuel traite de l’installation et de l’entretien de votre nouvelle porte de douche Technoform. Veuillez en lire le contenu avant d’entamer l’installation. Par la suite, assurez‐vous de le conserver dans un lieu sûr pour référence future.
Nous vous recommandons d'être deux personnes pour procéder à l'installation de la porte de douche.
Retirez le produit de son emballage et assurez‐vous que toutes les pièces s'y trouvent et que le produit est en bon état. Si l’inspection révèle que le produit est endommagé ou qu’il y a un défaut de fabrication, veuillez communiquer avec le distributeur. La garantie ne couvre pas les dommages ou les défauts de finition une fois le produit installé. La responsabilité quant aux dommages survenus lors du transport cesse lorsque le produit est transféré au transporteur. Toute plainte liée à un dommage dû au transport doit être directement soulevée auprès du transporteur.
Il faut prendre soin de protéger le produit, en particulier les panneaux de verre, durant la manutention et l’installation.
Attendez 24 heures après l'installation avant d'utiliser la douche (jusqu'à ce que le silicone soit sec).
Ne PAS utiliser de la force excessive pour ouvrir et fermer les panneaux de verre.
IMPORTANT: If you are installing the door with the side panel (sold separately), please use the manual
inserted in the box of the side panel instead of this one.
This guide covers the installation process as well as the maintenance of your new Technoform shower door. Please read it carefully prior to installation. You should then keep it in a safe place for future reference.
We recommend that you have two people on hand to proceed with the shower door installation.
Remove the product from its packaging and make sure that all of the parts are accounted for and that the product is in good condition. Should the inspection reveal that the product is damaged or that it has a manufacturing defect, contact the distributor at once. The warranty does not cover damages or finishing defects once the product has been installed. The responsibility for shipping damages ceases upon delivery of the product in good order to the carrier. All complaints regarding damages due to shipping must be made directly to the carrier.
You must protect the product, in particular the glass panels, during moving and/or installation.
Wait 24 hours after the installation before using the shower (until silicone is dry).
Do NOT use excessive force to open or close the glass shower panels.
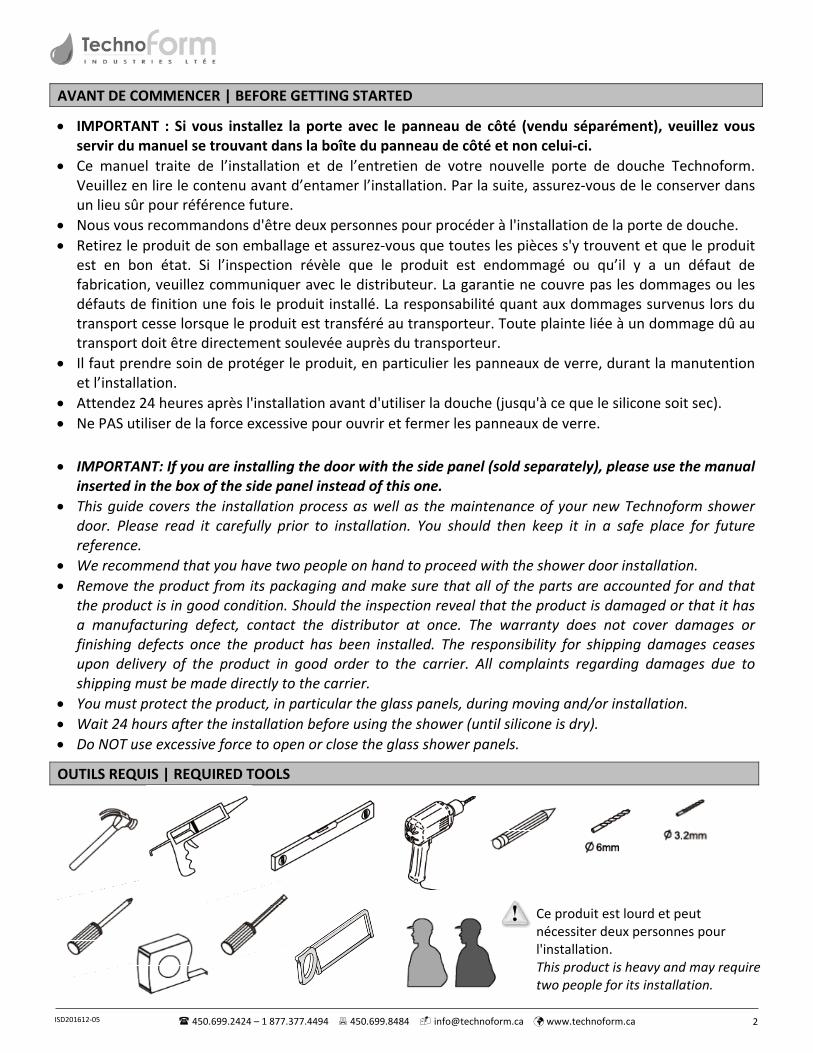
OUTILS REQUIS | REQUIRED TOOLS
Ce produit est lourd et peut nécessiter deux personnes pour l'installation. This product is heavy and may require two people for its installation.

450.699.2424 – 1 877.377.4494 450.699.8484 [email protected] www.technoform.ca 3 ISD201612‐05
PIÈCES | PARTS
No. Description Qté | Qty No. Description Qté | Qty
1 Montant mural | Wall jamb 1 12 Roulette | Roller 2
2 Panneau fixe | Fixed panel 1 13 Rail | Track 1
3 Porte en verre | Glass door 1 14 Bloc d'extrémité pour rail | Track end block 2
4 Joint d'étanchéité pour porte | Door gasket 2
15 Couvert pour bloc d'extrémité pour rail | Track end block cover
2
5 Joint d'étanchéité avec rabat pour porte | Door gasket with flap
2
16 Cache‐vis | Screw cover cap 4
5A Joint d'étanchéité pour panneau fixe | Fixed panel gasket
1
17 Cheville |Wall plug 8
6 Poignée | Handle 1 18 Vis ronde Robertson M4X35 round head screw 4
7 Bouton de verrouillage | Locking knob 2 19 Vis ronde Robertson M4X8 round head screw 4
8 Pièce pour attache du rail | Track attachment part 1 20 Vis plate Robertson M4X35 flat head screw 8
9 Bloc d'extrémité pour gouttière (gauche et droit) | Drip rail end block (left and right)
2
21 Clef Allen | Allen key 2
10 Bloc coulissant pour gouttière (gauche et droit) | Drip rail sliding block (left and right)
2
22 Clef d'ajustement | Adjustment key 1
11 Gouttière | Drip rail 1
23 Joint d'étanchéité pour bas de porte | Bottom door gasket
1
450.699.2424 – 1 877.377.4494 450.699.8484 [email protected] www.technoform.ca 4 ISD201612‐05
ÉTAPES À SUIVRE | STEPS TO FOLLOW
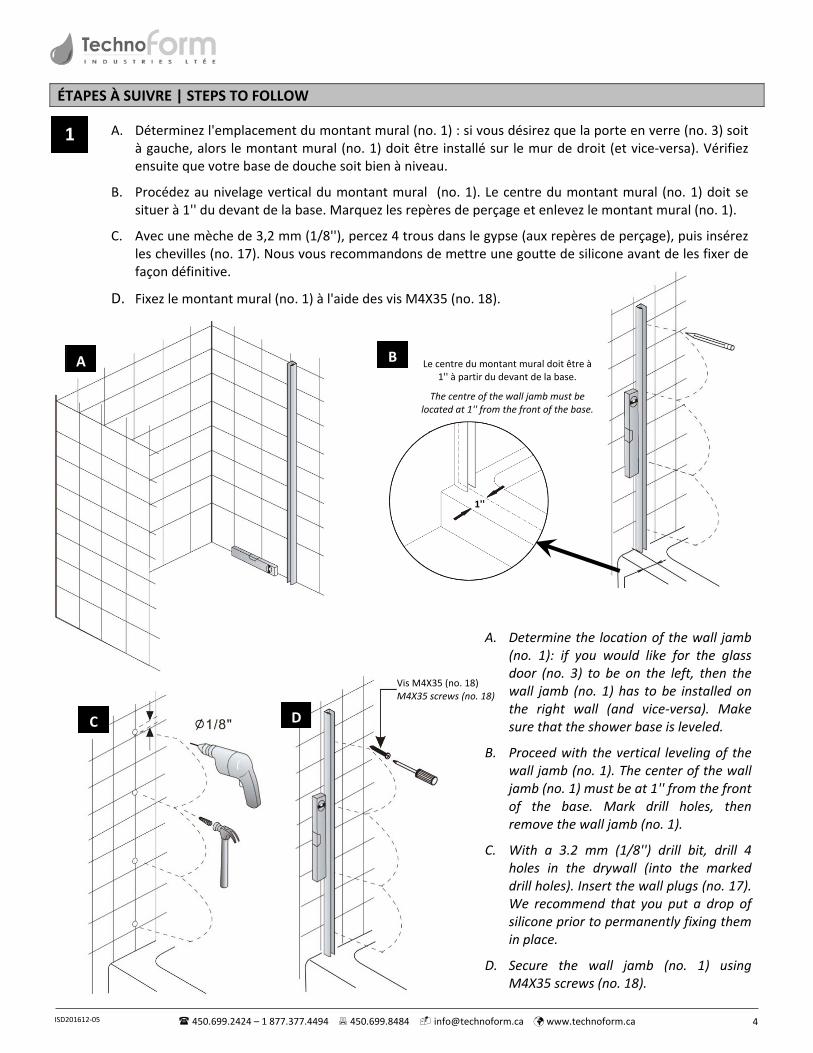
1 A. Déterminez l'emplacement du montant mural (no. 1) : si vous désirez que la porte en verre (no. 3) soit à gauche, alors le montant mural (no. 1) doit être installé sur le mur de droit (et vice‐versa). Vérifiez ensuite que votre base de douche soit bien à niveau.
B. Procédez au nivelage vertical du montant mural (no. 1). Le centre du montant mural (no. 1) doit se situer à 1'' du devant de la base. Marquez les repères de perçage et enlevez le montant mural (no. 1).
C. Avec une mèche de 3,2 mm (1/8''), percez 4 trous dans le gypse (aux repères de perçage), puis insérez les chevilles (no. 17). Nous vous recommandons de mettre une goutte de silicone avant de les fixer de façon définitive.
D. Fixez le montant mural (no. 1) à l'aide des vis M4X35 (no. 18).
A. Determine the location of the wall jamb (no. 1): if you would like for the glass door (no. 3) to be on the left, then the wall jamb (no. 1) has to be installed on the right wall (and vice‐versa). Make sure that the shower base is leveled.
B. Proceed with the vertical leveling of the wall jamb (no. 1). The center of the wall jamb (no. 1) must be at 1'' from the front of the base. Mark drill holes, then remove the wall jamb (no. 1).
C. With a 3.2 mm (1/8'') drill bit, drill 4 holes in the drywall (into the marked drill holes). Insert the wall plugs (no. 17). We recommend that you put a drop of silicone prior to permanently fixing them in place.
D. Secure the wall jamb (no. 1) using M4X35 screws (no. 18).
A B
C D
Le centre du montant mural doit être à 1'' à partir du devant de la base.
The centre of the wall jamb must be located at 1'' from the front of the base.
1''
Vis M4X35 (no. 18) M4X35 screws (no. 18)
450.699.2424 – 1 877.377.4494 450.699.8484 [email protected] www.technoform.ca 5 ISD201612‐05
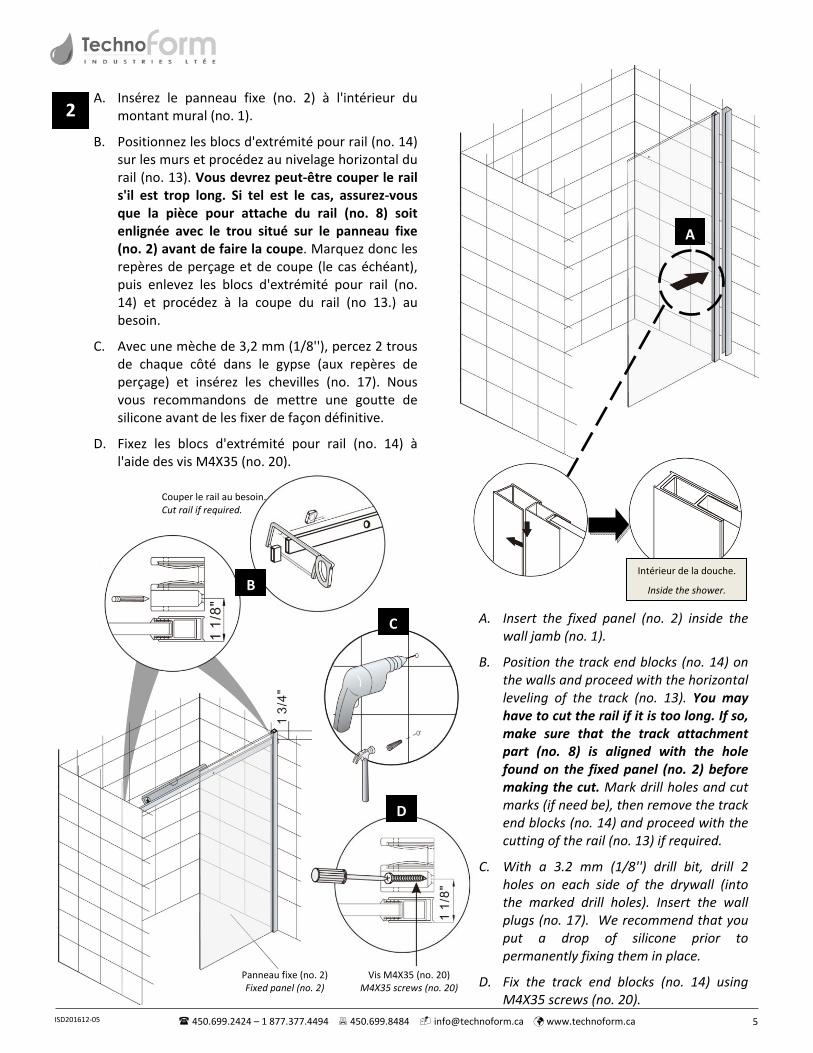
2 A. Insérez le panneau fixe (no. 2) à l'intérieur du
montant mural (no. 1).
B. Positionnez les blocs d'extrémité pour rail (no. 14) sur les murs et procédez au nivelage horizontal du rail (no. 13). Vous devrez peut‐être couper le rail s'il est trop long. Si tel est le cas, assurez‐vous que la pièce pour attache du rail (no. 8) soit enlignée avec le trou situé sur le panneau fixe (no. 2) avant de faire la coupe. Marquez donc les repères de perçage et de coupe (le cas échéant), puis enlevez les blocs d'extrémité pour rail (no. 14) et procédez à la coupe du rail (no 13.) au besoin.
C. Avec une mèche de 3,2 mm (1/8''), percez 2 trous de chaque côté dans le gypse (aux repères de perçage) et insérez les chevilles (no. 17). Nous vous recommandons de mettre une goutte de silicone avant de les fixer de façon définitive.
D. Fixez les blocs d'extrémité pour rail (no. 14) à l'aide des vis M4X35 (no. 20).
A. Insert the fixed panel (no. 2) inside the wall jamb (no. 1).
B. Position the track end blocks (no. 14) on the walls and proceed with the horizontal leveling of the track (no. 13). You may have to cut the rail if it is too long. If so, make sure that the track attachment part (no. 8) is aligned with the hole found on the fixed panel (no. 2) before making the cut. Mark drill holes and cut marks (if need be), then remove the track end blocks (no. 14) and proceed with the cutting of the rail (no. 13) if required.
C. With a 3.2 mm (1/8'') drill bit, drill 2 holes on each side of the drywall (into the marked drill holes). Insert the wall plugs (no. 17). We recommend that you put a drop of silicone prior to permanently fixing them in place.
D. Fix the track end blocks (no. 14) using M4X35 screws (no. 20).
A
D
B Intérieur de la douche.
Inside the shower.
C
Vis M4X35 (no. 20) M4X35 screws (no. 20)
Panneau fixe (no. 2) Fixed panel (no. 2)
Couper le rail au besoin. Cut rail if required.

450.699.2424 – 1 877.377.4494 450.699.8484 [email protected] www.technoform.ca 6 ISD201612‐05
3
A. Insérez les deux couverts pour blocs
d'extrémité pour rail (no. 15) sur le rail (no. 13) et déposez le rail sur les blocs d'extrémité pour rail (no. 14), puis serrez les vis de retenues à l'aide de la clef Allen (no. 21).
B. Installez la pièce pour attache du rail (no. 8) entre le panneau fixe (no. 2) et le rail (no. 13).
C. Installez les roulettes (no. 12) sur la porte (no. 3) à l'aide de la clef d'ajustement (no. 22). Notez que la quincaillerie est fournie dans la boîte avec les roulettes (no. 12).
D. Déposez la porte (no. 3) sur le rail (no. 13).
A. Insert both track end block covers (no. 15) on the track (no. 13) and put the track on the track end blocks (no. 14), then tight the retaining screws with the help of the Allen key (no. 21).
B. Install the track attachment part (no. 8) between the fixed panel (no. 2) and the track (no. 13).
C. Install the rollers (no. 12) on the door (no. 3) using the adjustment key (no. 22). Note that hardware is supplied in the box with the rollers (no. 12).
D. Position the door (no. 3) on the rail (no. 13).
A
C
D
B
Roulette (no. 12) Roller (no. 12)
Panneau fixe (no. 2) Fixed panel (no. 2)

450.699.2424 – 1 877.377.4494 450.699.8484 [email protected] www.technoform.ca 7 ISD201612‐05
3
4
Bouton de verrouillage
(no. 7)
Locking knob (no.7)
A. Installez les boutons de verrouillage (no. 7) sur la porte (no. 3) et laissez un espace libre de 1/8" sous le rail (no. 13).
B. Positionnez le bloc d'extrémité pour gouttière (no. 9) sur la base de douche, puis mettez la gouttière (no 11) en place. ATTENTION : Après avoir effectué l'étape C, vous verrez si la gouttière est trop longue et si elle devra, par conséquent, être coupée.
C. Positionnez le bloc coulissant pour gouttière (no. 10) sur la base de douche.
D. Coupez la gouttière au besoin et repositionnez les 3 pièces (nos. 9, 10 et 11) sur la base. Marquez les repères de perçage du bloc d'extrémité (no. 9) et du bloc coulissant (no. 10), puis enlevez les 3 pièces (nos. 9, 10 et 11).
E. À l'aide d'une mèche de 3,2 mm (1/8''), percez 4 trous dans la base de douche (aux repères de perçage). Repositionnez le bloc d'extrémité (no. 9), puis appliquez un cordon de silicone en dessous de la gouttière (no. 11) avant de la fixer définitivement en place.
F. Positionnez le bloc coulissant (no. 10). Fixez ensuite le bloc d'extrémité et le bloc coulissant à l'aide de vis M4X35 (no. 20). Nous vous recommandons de mettre une goutte de silicone avant de les fixer de façon définitive.
A. Install the locking knobs (no. 7) on the door (no. 3) and leave a gap of 1/8" below the track (no. 13).
B. Position the drip rail end block (no. 9) on the shower base, then put the drip rail (no. 11) in place. ATTENTION: Following Step C, you will be able to determine if the drip rail is too long and therefore needs to be cut.
C. Position the drip rail sliding block (no. 10) on the shower base.
D. Cut the drip rail (no. 11) if need be, then reposition the 3 parts (nos. 9, 10 and 11) on the shower base. Mark drill holes of the end block (no. 9) and sliding block (no. 10), then remove the 3 parts (nos. 9, 10 and 11).
E. With a 3.2 mm (1/8'') drill bit, drill 4 holes in the shower base (into the marked drill holes). Reposition the end block (no. 9), then apply a bead of silicone under the drip rail (no. 11) before permanently putting it in place.
F. Put the sliding block (no. 10) in place. Fix the end block (no. 9) and the sliding block (no. 10) using M4X35 screws (no. 20). We recommend that you put a drop of silicone prior to permanently fixing them in place.
A B
C
C
B
D E F

450.699.2424 – 1 877.377.4494 450.699.8484 [email protected] www.technoform.ca 8 ISD201612‐05
5 A. Installez la poignée (no. 6) sur la porte (no. 3) à
l'aide de la quincaillerie fournie dans la boîte de la poignée.
B. Procédez à l'ajustement de la porte (no. 3) à l'aide des vis située à l'arrière des roulettes (no. 12). Ajustez les roulettes (no. 12) de manière à ce que la porte (no. 3) soit parallèle au panneau fixe (no. 2) ‐ voir image B‐1. Ne serrez pas les roulettes (no. 12) de façon excessive car les boutons de verrouillage (no. 7) pourraient se coincer ou se briser.
C. Percez 4 trous équidistants de 3,2 mm (1/8'') à l'intérieur du montant mural (no. 1), puis fixez la structure sur le montant mural (no. 1) à l'aide des vis M4X8 (no. 19). Mettez ensuite les caches‐vis (no. 16).
A. Install the handle (no. 6) on the door (no. 3) using the hardware supplied in the box of the handle.
B. Proceed with the adjustment of the door (no. 3) using the screws found on the back of the rollers (no. 12). Adjust the rollers (no. 12) so that the door (no. 3) is parallel to the fixed panel (no. 2) ‐ see image B‐1. Do not overtight the rollers (no. 12) as locking knobs (no. 7) may jam or break.
C. Drill 4 equally‐spaced holes of 3.2 mm (1/8'') inside the wall jamb (no. 1), then fix the structure on the wall jamb (no. 1) using M4X8 screws (no. 19). Put the screw cover caps (no. 16).
B‐1
Percez les trous à partir de l'intérieur de la douche.
Drill holes from the inside of the shower.
B B‐1
Poignée
Inspiration
Handle
Poignée
Celebration
Handle
C A
B
Intérieur de la douche.
Inside the shower.
A

450.699.2424 – 1 877.377.4494 450.699.8484 [email protected] www.technoform.ca 9 ISD201612‐05
6 A. Installez le joint d'étanchéité pour
porte (no. 4) sur la porte (no. 3).
B. Installez le joint d'étanchéité avec rabat (no. 5) de l'autre côté de la porte (no. 3).
C. Installez le joint d'étanchéité pour panneau fixe (no. 5A) sur le panneau fixe (no. 2).
D. Installez le joint d'étanchéité pour bas de porte (no. 23).
E. À partir de l'extérieur de la douche, appliquez un cordon de silicone le long du montant mural (no. 1) et poursuivez sur la base du panneau fixe (no. 2) et sur le long de la gouttière (no. 11).
F. Attendez 24 heures après l'installation avant d'utiliser la douche (jusqu'à ce que le silicone soit sec).
E
A
B
C
D
A
BC
C) Pièce ‐ Part 5AA) Pièce ‐ Part 4
D) Pièce ‐ Part 23
B) Pièce ‐ Part 5
D
A. Install the door gasket (no. 4) on the door (no. 3).
B. Install the door gasket with flap (no. 5) on the other side of the door (no. 3).
C. Install the fixed panel gasket (no. 5A) on the fixed panel (no. 2).
D. Install the bottom door gasket (no. 23).
E. From the outside of the shower, apply a bead of silicone along the wall jamb (no. 1), then continue along the base of the fixed panel (no. 2) and along the drip rail (no. 11).
F. Wait 24 hours after the installation before using the shower (until silicone is dry).
IMPORTANT : Le silicone doit être appliqué à partir de l'extérieur de la douche seulement.
IMPORTANT: The silicone must only be put from the outside of the shower.
F
HEURES HOURS
450.699.2424 – 1 877.377.4494 450.699.8484 [email protected] www.technoform.ca 10 ISD201612‐05
NETTOYAGE | MAINTENANCE
En utilisant un linge doux, nous recommandons l’usage d’un détergent (non récurant) ou d’une eau savonneuse chaude. Toujours bien rincer après chaque nettoyage et sécher avec un linge humide ou chamois. Éviter toujours l’usage d’abrasif rude, d’un tampon à récurer métallique ou à surface rugueuse.
The manufacturer suggests using only mild detergents or warm soapy water applied with a soft cloth for regular cleaning. Always rinse well after cleaning and dry by blotting with a damp cloth or chamois. The use of scouring pads, gritty cloths and harsh abrasive cleaners should always be avoided.
GARANTIE | WARRANTY
Nos produits sont garantis contre tout défaut de fabrication à partir de la date d’achat indiquée sur le coupon de caisse du consommateur. Industries Technoform Ltée offre une garantie limitée de trois (3) ans sur ses portes de douche. Cette garantie s’adresse au propriétaire original et n’est donc pas transférable à un autre consommateur. Elle porte sur le produit, mais n’inclut pas la main d’œuvre et ne comprend pas les frais de déplacement, les frais d’installation ou de désinstallation, ni les frais de transport. À sa discrétion, le manufacturier assurera à ses frais le remplacement ou la réparation de tout produit défectueux durant la période de garantie si l’installation est conforme (n’inclut pas les frais mentionnés ci‐dessus). La garantie ne s’applique pas aux taches causées par une eau ferreuse ou dure. Cette garantie ne couvre pas les dommages causés par un usage abusif, la négligence, le mauvais usage, les bris résultant de chocs, de mauvaises manutentions, de modifications du produit, de l’utilisation de produits chimiques ou abrasifs. Si tel était le cas, cette garantie serait révoquée sans aucun autre recours. Cette garantie n’est valide que si les instructions d’installation ont été suivies et que l’installation est conforme au manuel d’installation. Cette garantie se limite au choix du manufacturier concernant le remplacement ou la réparation. Aucune indemnité ne pourra être réclamée à la suite d’un accident survenu lors de l’installation ou lors de l’usage du produit. Our products are guaranteed against any manufacturing defect from the date of purchase indicated on the consumer sales receipt. Technoform Industries Ltd offers a limited warranty of three (3) years on its shower doors. This warranty is limited to the original owner and is not transferable to another consumer. The warranty is applicable for the product only and does not cover labour charges, travel expenses, the cost of installation or removal, as well as carrier fees. At its discretion, the manufacturer will, at its own expense, replace or repair any defective product during the warranty period if the installation is compliant (does not include the aforementioned costs). The warranty does not apply to stains caused by ferrous or hard water. This warranty does not cover damage caused by abuse, neglect, misuse, breakage resulting from shocks, improper handling, modifications made to the product, usage of abrasive or chemical products. If that were the case, the guarantee would be revoked without further recourse. This warranty is valid only if the installation instructions have been followed and that the installation is compliant with the instruction manual. This warranty is limited to the choice of the manufacturer regarding the replacement or repair. No compensation may be claimed as a result of an accident during installation or during the use of the product.