position management & anu delegation in the … delegations... · hr administrators guide...
TRANSCRIPT
HR Administrators guide
POSITION MANAGEMENT & ANU DELEGATION in the HRMS POSITION MANAGEMENT & ANU DELEGATION in the HRMS ................... 1
SECTION A: Maintain position and delegation data within position management .............................................................................. 2
1. Creating a new position with delegation ........................................ 2 2. Assigning delegations to a new position ...................................... 10 3. Updating position delegations .................................................... 13 4. Inactivating a position that holds delegations .............................. 16 5. Inactivating delegations held by a position .................................. 18 6. Employee delegation inquiry: looking up delegations held by an
employee ............................................................................... 20 7. POI delegation inquiry: looking up delegations held by a POI (nee
VaHA) ................................................................................... 22 SECTION B: HRMS ANU Delegations menu ................................ 25
1. Assign delegations to short-term acting ..................................... 25 2. Authorise short-trm acting dlgn ................................................ 29 3. Update position delegations ..................................................... 31 4. Authorise Position Delegations .................................................. 35 End of guide ............................................................................... 36
30 March 2017, Page 1 of 36
HR Administrators guide
SECTION A: Maintain position and delegation data within position management 1. Creating a new position with delegation To create positions, use the Position Data component in HRMS. A position is uniquely identified by a "Position Number”. This number is automatically issued by HRMS at the time of position creation. It represents a job in the University, independent of any particular employee. A person holding a position is known as "Incumbent", also referred to as "Occupant". When an incumbent leaves a position, the position remains "vacant" to be filled gain. A new position number should not be created for the person who filled the vacancy. The same position number should be used to assign to the person who filled the vacancy. This way, specific attributes such as position title, job code, full/part-time, department ID, location code, reports-to, salary plan and grade, will automatically flow through to the incumbent's job data. As delegation becomes an intrinsic element of a position, using position number correctly will enable the position incumbent to inherit the delegation promptly and accurately. Follow the process below to create a new position, generate a position number, and assign delegation to the new position.
1 Navigate to: Main Menu > Organisational Development > Position Management > Maintain Positions/Delegations > Add/Update Position Info
2 Select the Add a New Value tab.
30 March 2017, Page 2 of 36
HR Administrators guide
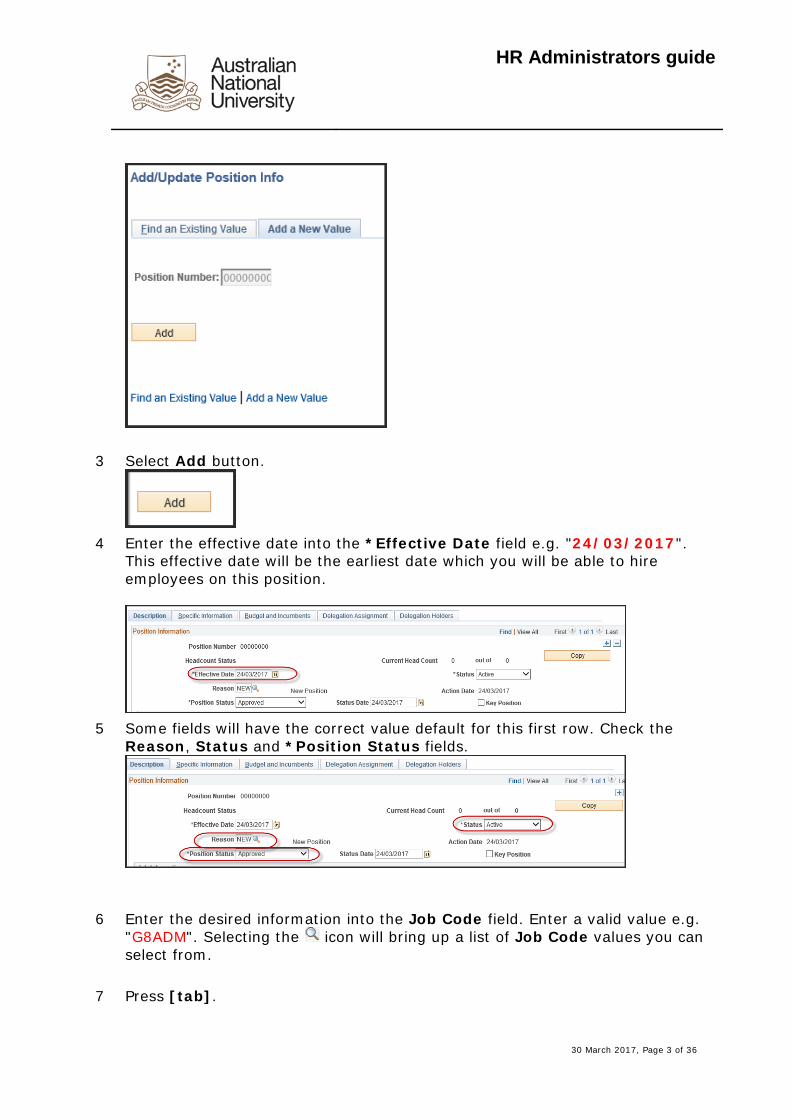
3 Select Add button.
4 Enter the effective date into the *Effective Date field e.g. "24/03/2017".
This effective date will be the earliest date which you will be able to hire employees on this position.
5 Some fields will have the correct value default for this first row. Check the
Reason, Status and *Position Status fields.
6
Enter the desired information into the Job Code field. Enter a valid value e.g. "G8ADM". Selecting the icon will bring up a list of Job Code values you can select from.
7
Press [tab].
30 March 2017, Page 3 of 36

HR Administrators guide
Pressing the tab button will allow data from the Job Code to flow through to the position.
8
Enter the desired information into the Department field. Enter a valid value e.g. "PH600". Selecting the icon will bring up a list of Department values you can select from.
9 Press [tab]. Pressing the tab button will allow data from the department to flow through to the position.
10 Enter the desired information into the Reports To field. Enter a valid value e.g. "18002". This allows you to select the supervisor that all people on this position will report to. Selecting the icon will bring up a list of Reports To values you can select from.
11 Press [tab]. Pressing the tab button will allow data related to the Reports To position to flow through.
12 Check the Full/Part Time fields. Do not change these to the preferred option. Please note: Positions within HRMS can be either full-time or casual. They are made part-time through the employee’s work schedule.
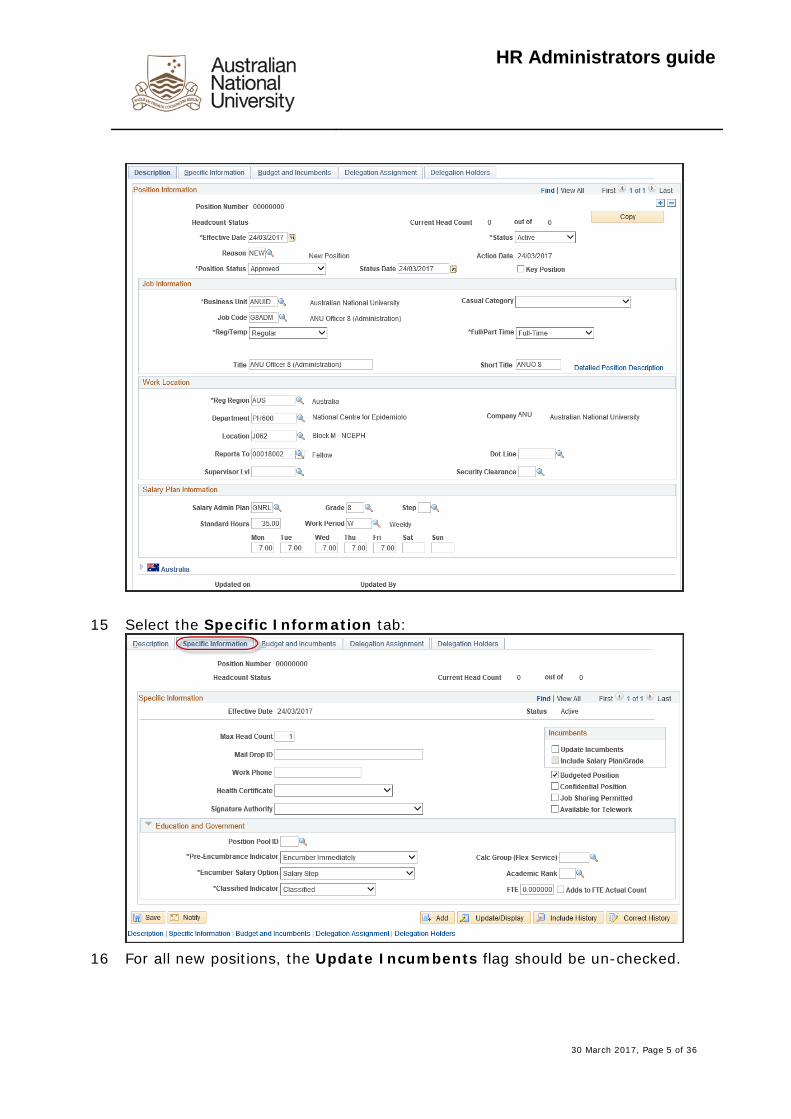
13 Check the Salary Plan Information section to ensure the details are correct. These details will flow through to Job Data when a person is connected to this position:
14 Your screen should look something like the following:
30 March 2017, Page 4 of 36
HR Administrators guide
15 Select the Specific Information tab:
16 For all new positions, the Update Incumbents flag should be un-checked.
30 March 2017, Page 5 of 36
HR Administrators guide
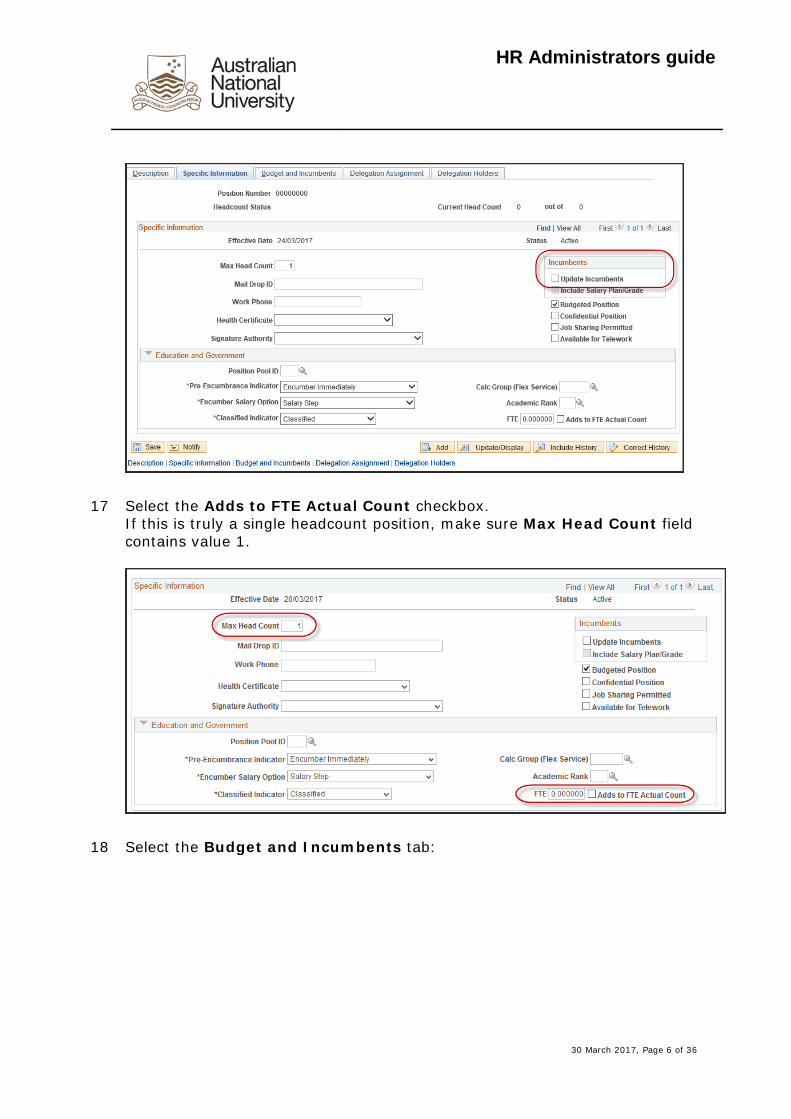
17
Select the Adds to FTE Actual Count checkbox. If this is truly a single headcount position, make sure Max Head Count field contains value 1.
18 Select the Budget and Incumbents tab:
30 March 2017, Page 6 of 36
HR Administrators guide
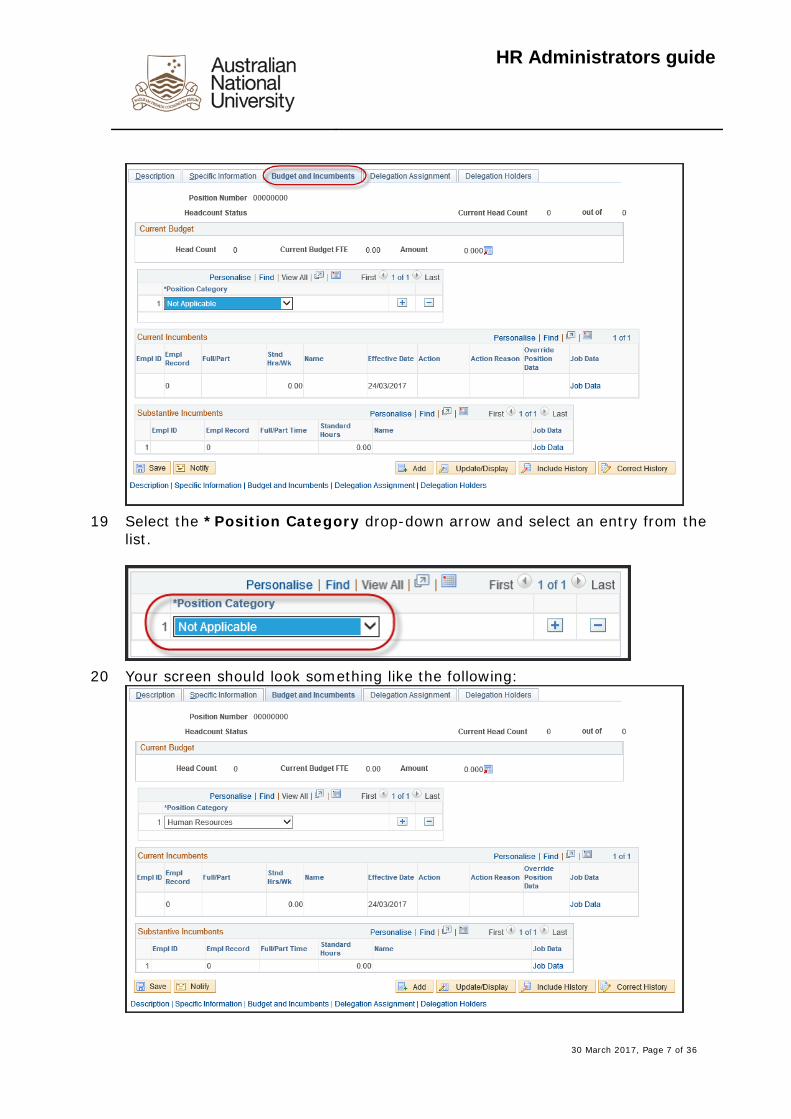
19 Select the *Position Category drop-down arrow and select an entry from the
list.
20 Your screen should look something like the following:
30 March 2017, Page 7 of 36
HR Administrators guide
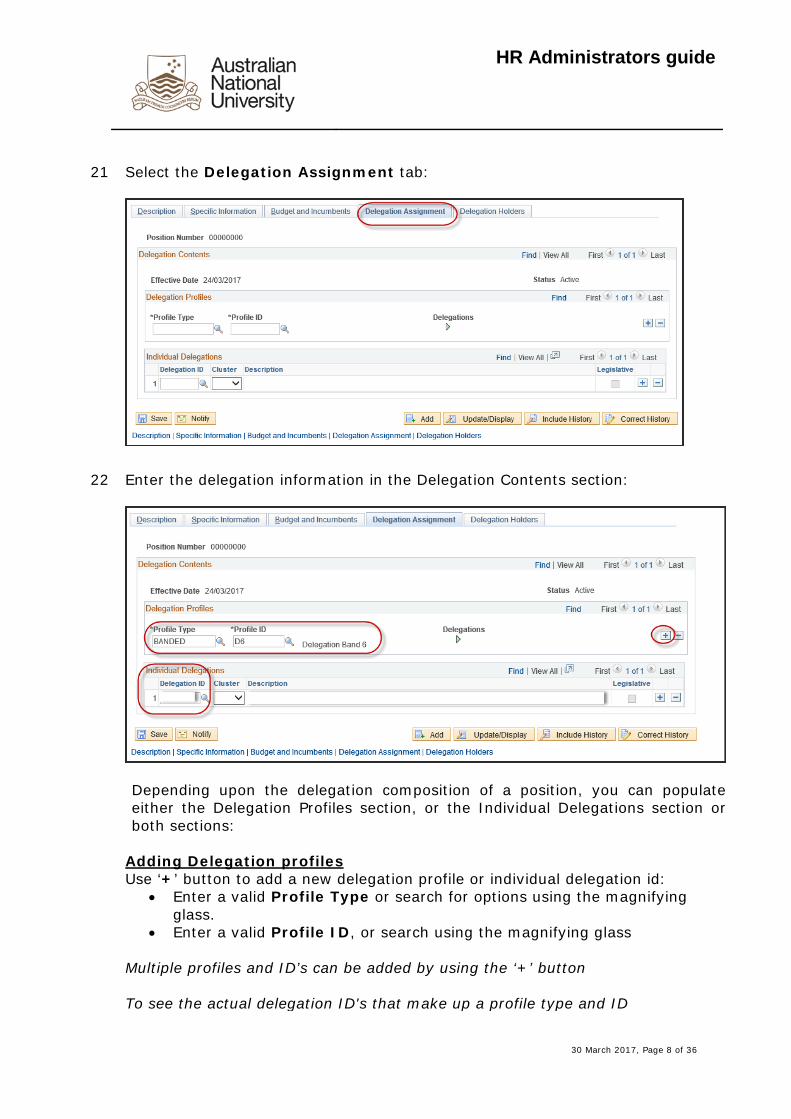
21 Select the Delegation Assignment tab:
22 Enter the delegation information in the Delegation Contents section:
Depending upon the delegation composition of a position, you can populate either the Delegation Profiles section, or the Individual Delegations section or both sections:
Adding Delegation profiles Use ‘+’ button to add a new delegation profile or individual delegation id:
• Enter a valid Profile Type or search for options using the magnifying glass.
• Enter a valid Profile ID, or search using the magnifying glass Multiple profiles and ID’s can be added by using the ‘+’ button To see the actual delegation ID's that make up a profile type and ID
30 March 2017, Page 8 of 36
HR Administrators guide
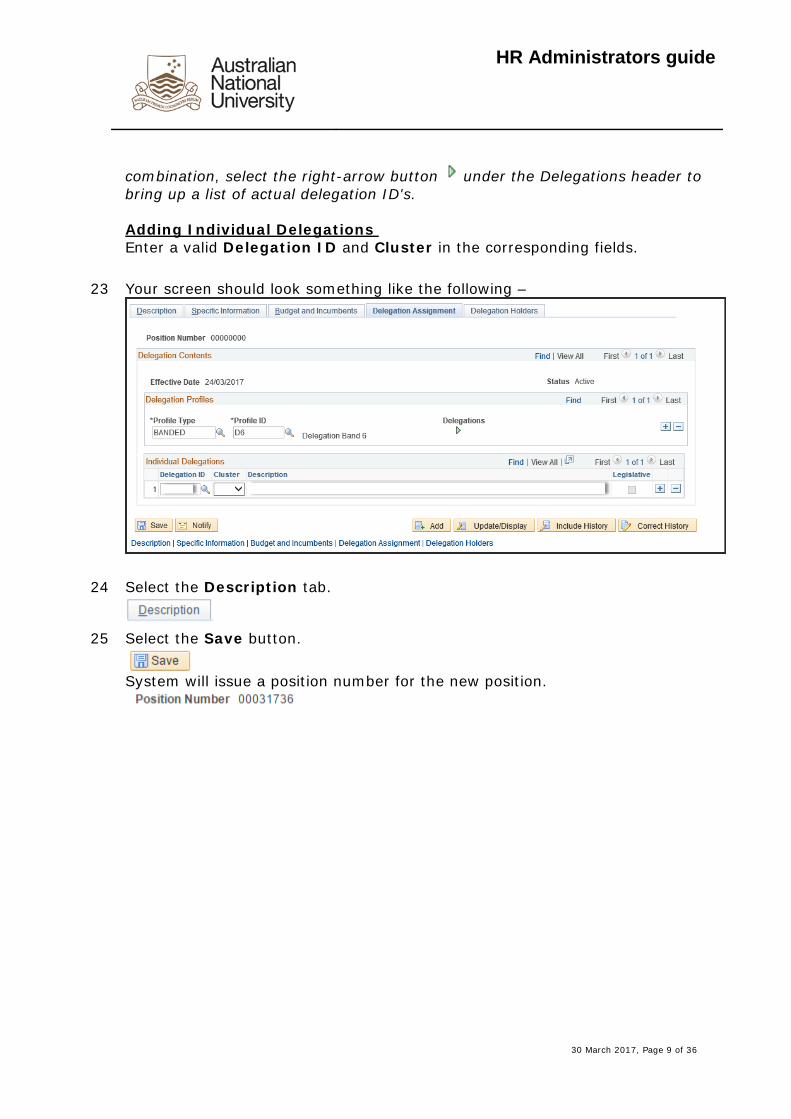
combination, select the right-arrow button under the Delegations header to bring up a list of actual delegation ID's. Adding Individual Delegations Enter a valid Delegation ID and Cluster in the corresponding fields.
23 Your screen should look something like the following –
24 Select the Description tab.
25 Select the Save button.
System will issue a position number for the new position.
30 March 2017, Page 9 of 36
HR Administrators guide
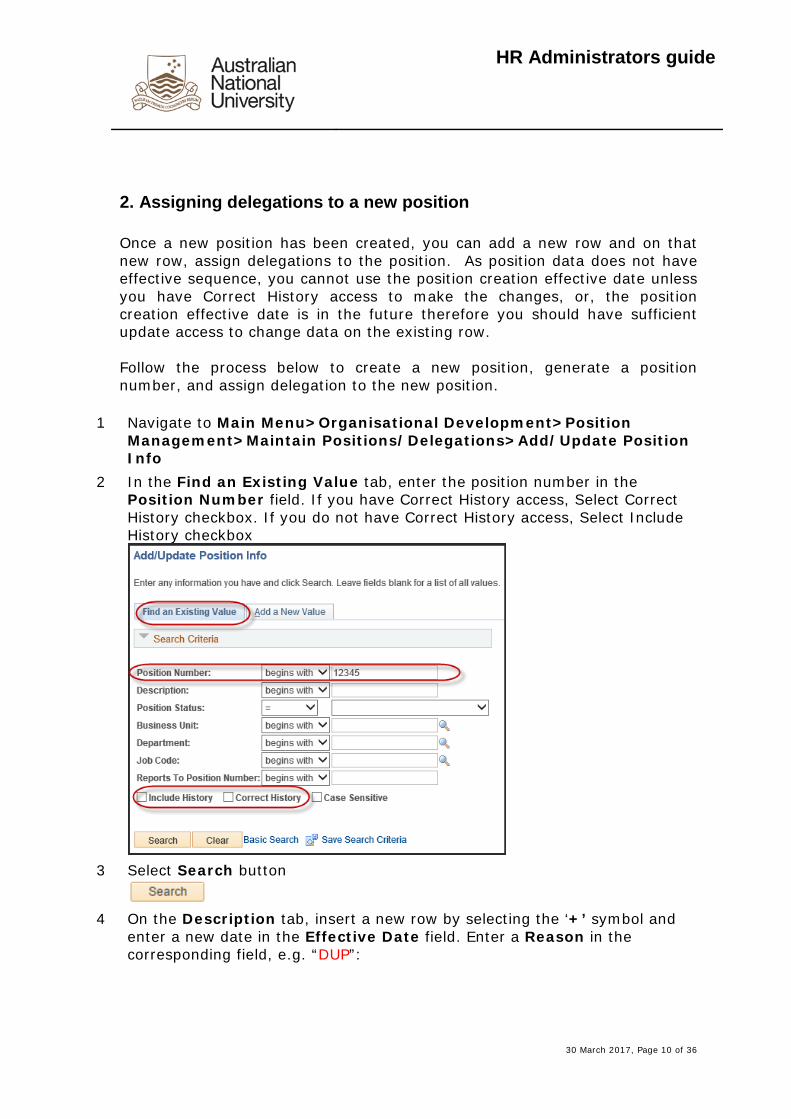
2. Assigning delegations to a new position Once a new position has been created, you can add a new row and on that new row, assign delegations to the position. As position data does not have effective sequence, you cannot use the position creation effective date unless you have Correct History access to make the changes, or, the position creation effective date is in the future therefore you should have sufficient update access to change data on the existing row. Follow the process below to create a new position, generate a position number, and assign delegation to the new position.
1 Navigate to Main Menu>Organisational Development>Position Management>Maintain Positions/Delegations>Add/Update Position Info
2 In the Find an Existing Value tab, enter the position number in the Position Number field. If you have Correct History access, Select Correct History checkbox. If you do not have Correct History access, Select Include History checkbox
3 Select Search button
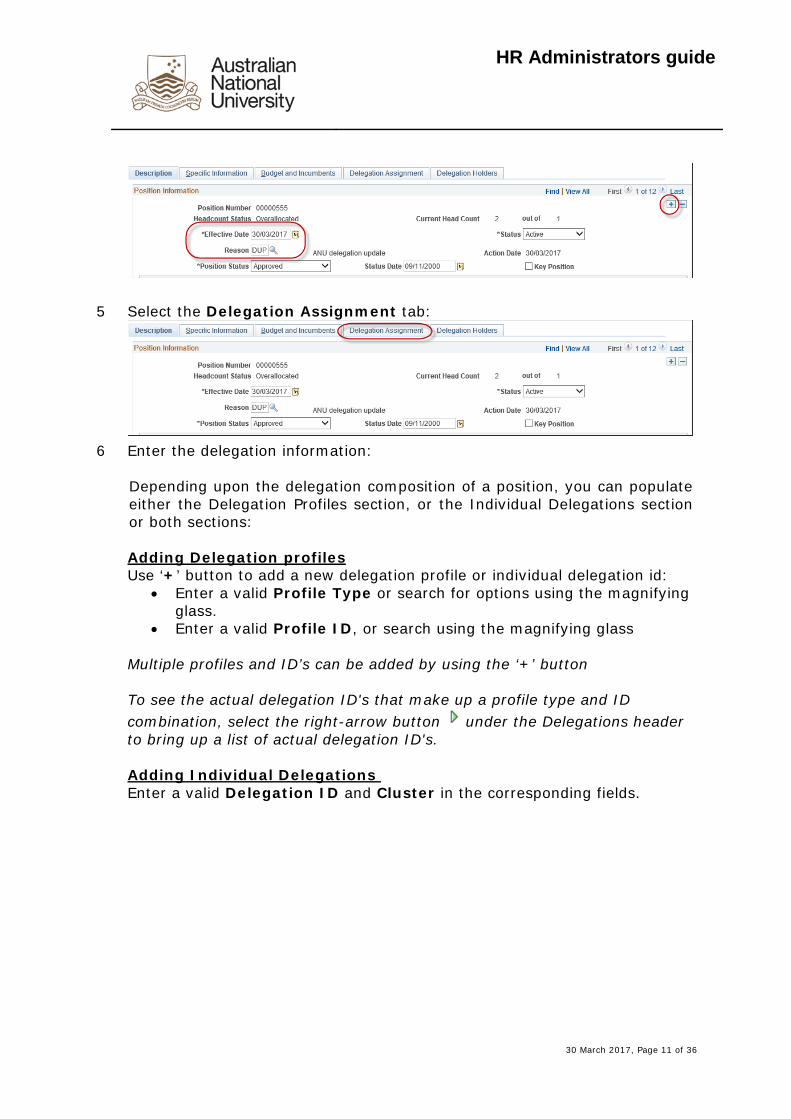
4 On the Description tab, insert a new row by selecting the ‘+’ symbol and
enter a new date in the Effective Date field. Enter a Reason in the corresponding field, e.g. “DUP”:
30 March 2017, Page 10 of 36
HR Administrators guide
5 Select the Delegation Assignment tab:
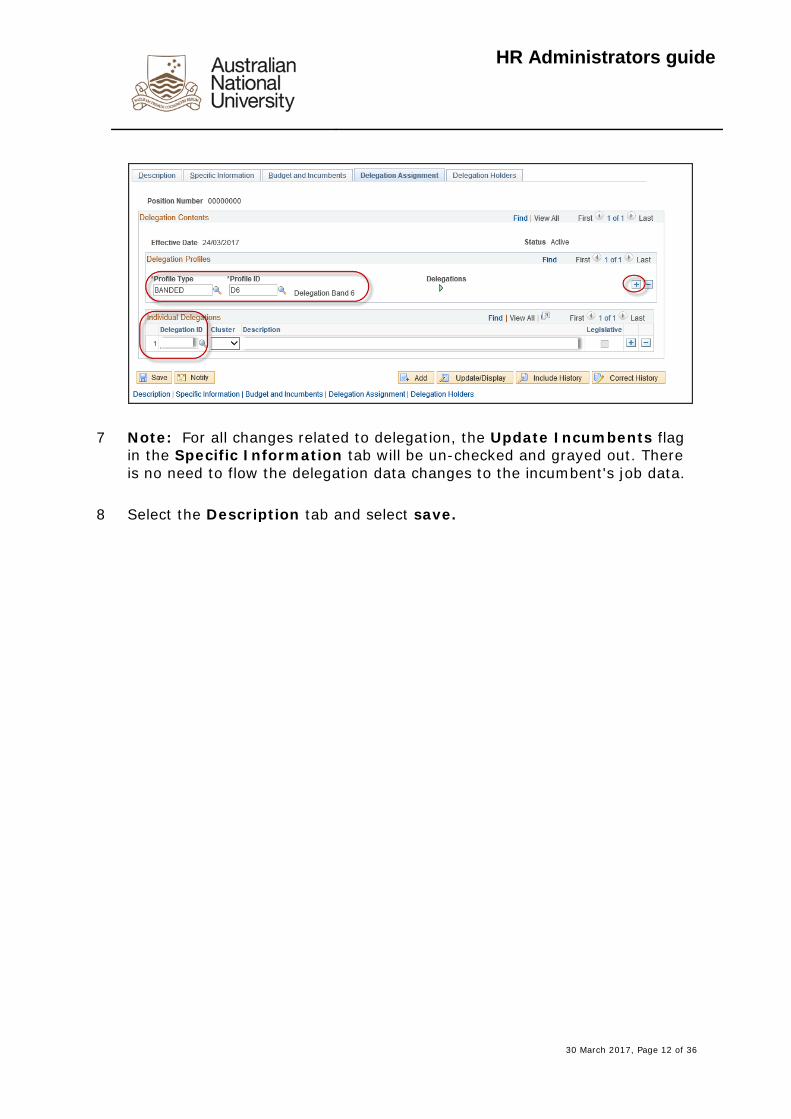
6 Enter the delegation information:
Depending upon the delegation composition of a position, you can populate either the Delegation Profiles section, or the Individual Delegations section or both sections: Adding Delegation profiles Use ‘+’ button to add a new delegation profile or individual delegation id:
• Enter a valid Profile Type or search for options using the magnifying glass.
• Enter a valid Profile ID, or search using the magnifying glass Multiple profiles and ID’s can be added by using the ‘+’ button To see the actual delegation ID's that make up a profile type and ID combination, select the right-arrow button under the Delegations header to bring up a list of actual delegation ID's. Adding Individual Delegations Enter a valid Delegation ID and Cluster in the corresponding fields.
30 March 2017, Page 11 of 36
HR Administrators guide
7 Note: For all changes related to delegation, the Update Incumbents flag in the Specific Information tab will be un-checked and grayed out. There is no need to flow the delegation data changes to the incumbent's job data.
8 Select the Description tab and select save.
30 March 2017, Page 12 of 36
HR Administrators guide
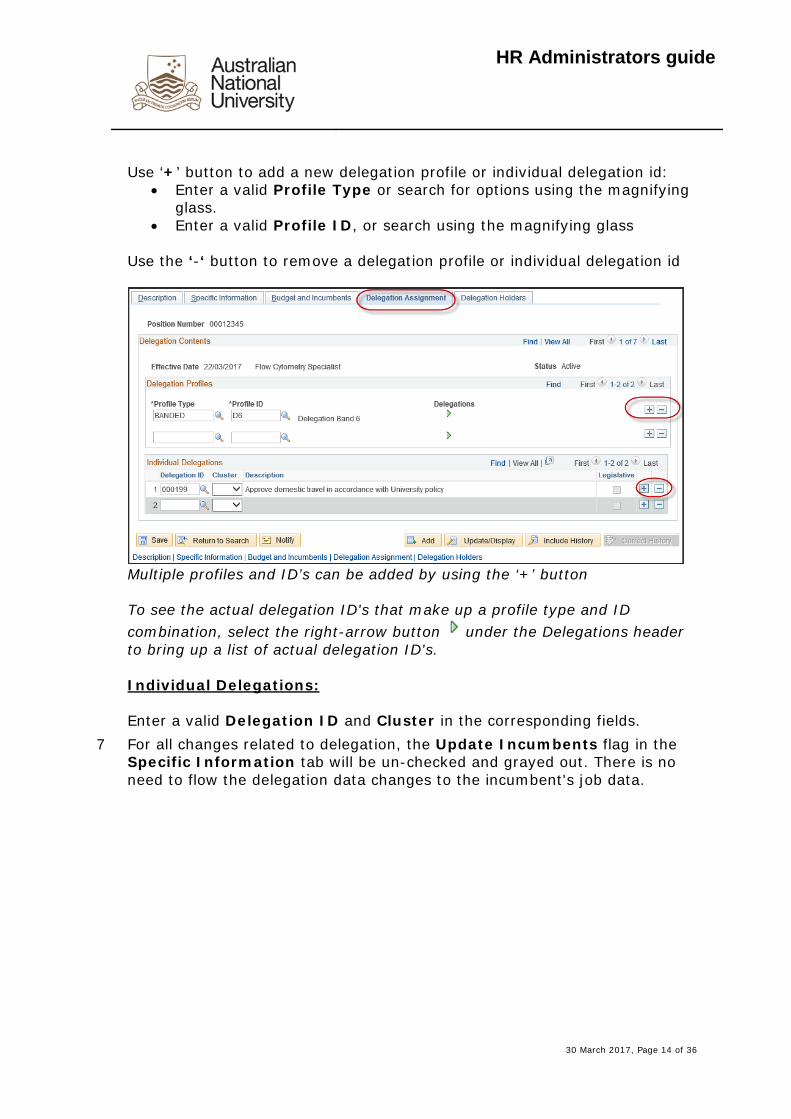
3. Updating position delegations
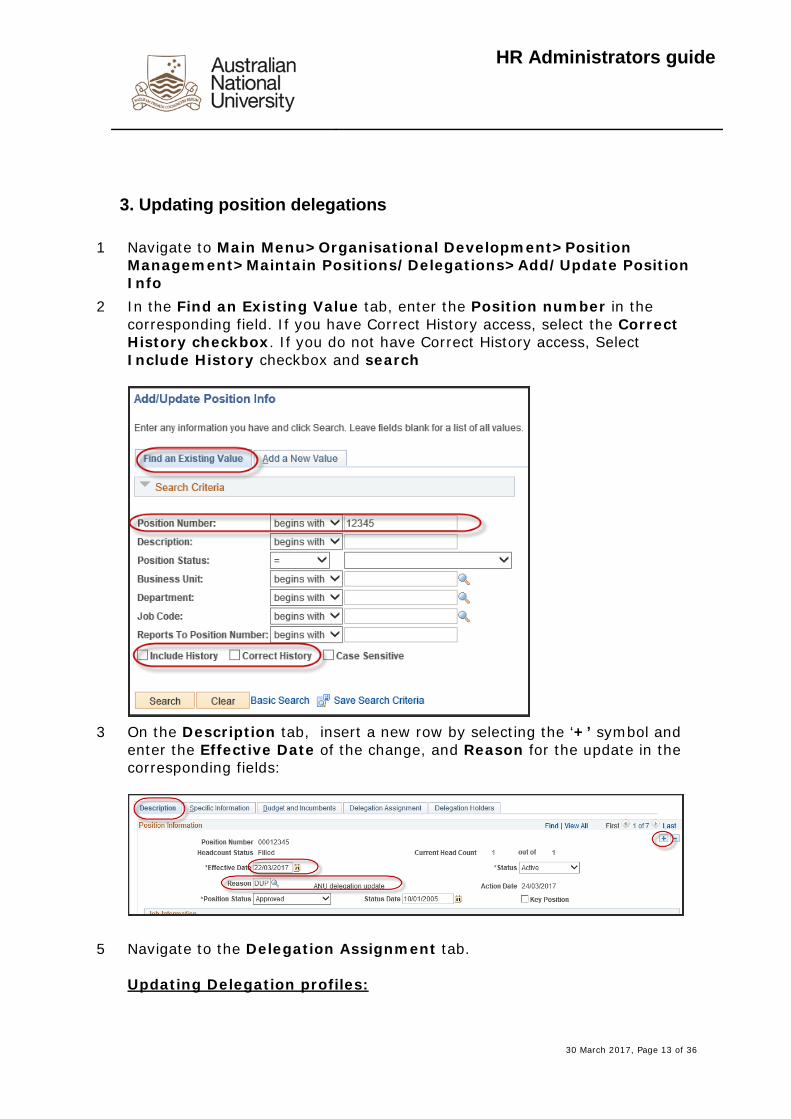
1 Navigate to Main Menu>Organisational Development>Position Management>Maintain Positions/Delegations>Add/Update Position Info
2 In the Find an Existing Value tab, enter the Position number in the corresponding field. If you have Correct History access, select the Correct History checkbox. If you do not have Correct History access, Select Include History checkbox and search
3 On the Description tab, insert a new row by selecting the ‘+’ symbol and
enter the Effective Date of the change, and Reason for the update in the corresponding fields:
5 Navigate to the Delegation Assignment tab. Updating Delegation profiles:
30 March 2017, Page 13 of 36
HR Administrators guide
Use ‘+’ button to add a new delegation profile or individual delegation id:
• Enter a valid Profile Type or search for options using the magnifying glass.
• Enter a valid Profile ID, or search using the magnifying glass Use the ‘-‘ button to remove a delegation profile or individual delegation id
Multiple profiles and ID’s can be added by using the ‘+’ button To see the actual delegation ID's that make up a profile type and ID combination, select the right-arrow button under the Delegations header to bring up a list of actual delegation ID's. Individual Delegations: Enter a valid Delegation ID and Cluster in the corresponding fields.
7 For all changes related to delegation, the Update Incumbents flag in the Specific Information tab will be un-checked and grayed out. There is no need to flow the delegation data changes to the incumbent's job data.
30 March 2017, Page 14 of 36
HR Administrators guide
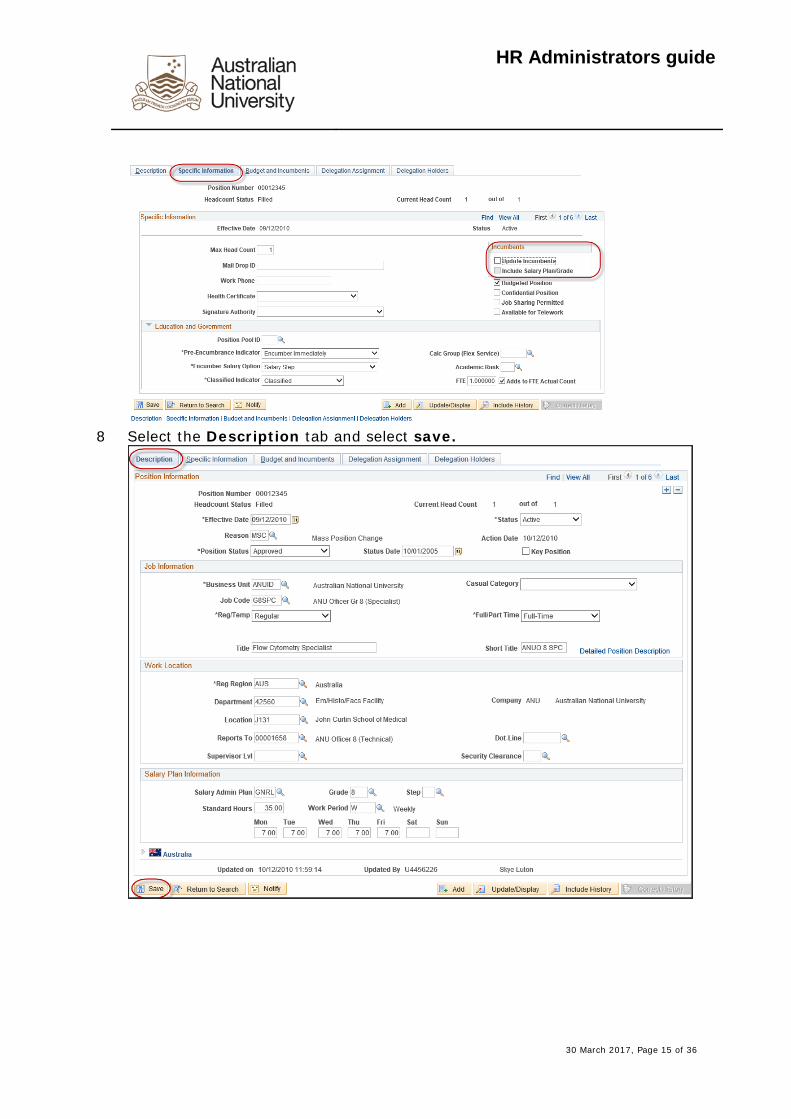
8 Select the Description tab and select save.
30 March 2017, Page 15 of 36
HR Administrators guide
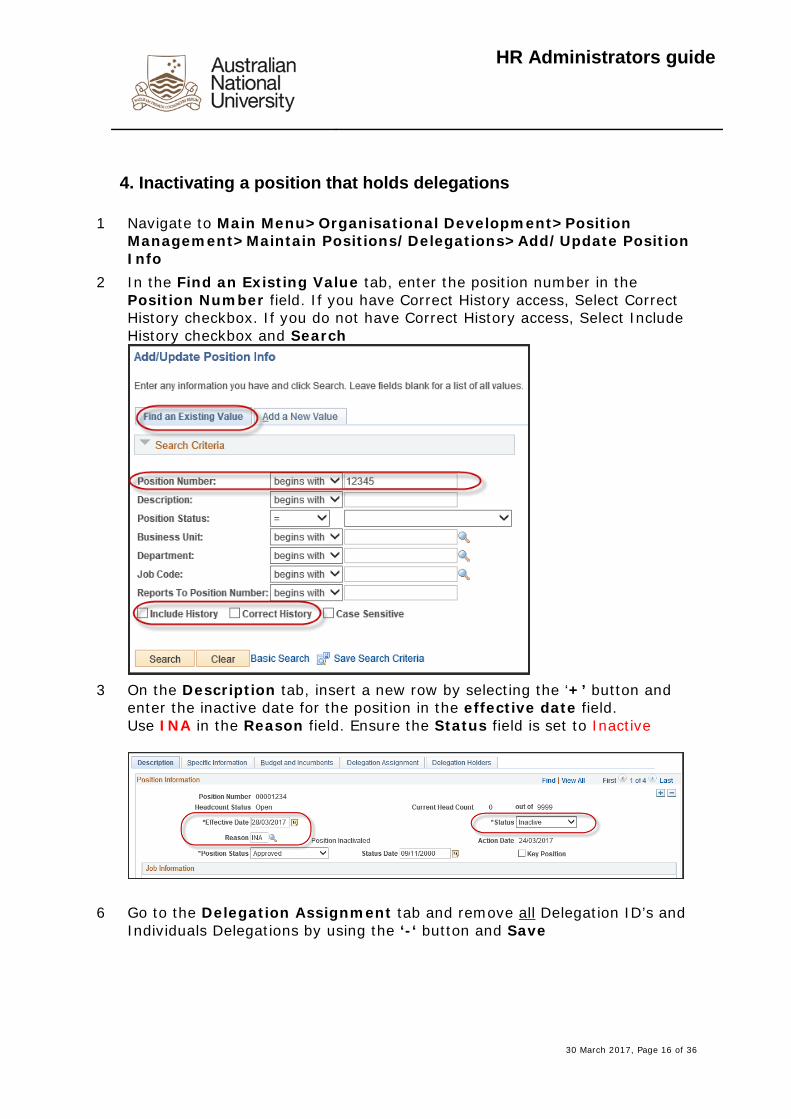
4. Inactivating a position that holds delegations
1 Navigate to Main Menu>Organisational Development>Position Management>Maintain Positions/Delegations>Add/Update Position Info
2 In the Find an Existing Value tab, enter the position number in the Position Number field. If you have Correct History access, Select Correct History checkbox. If you do not have Correct History access, Select Include History checkbox and Search
3 On the Description tab, insert a new row by selecting the ‘+’ button and
enter the inactive date for the position in the effective date field. Use INA in the Reason field. Ensure the Status field is set to Inactive
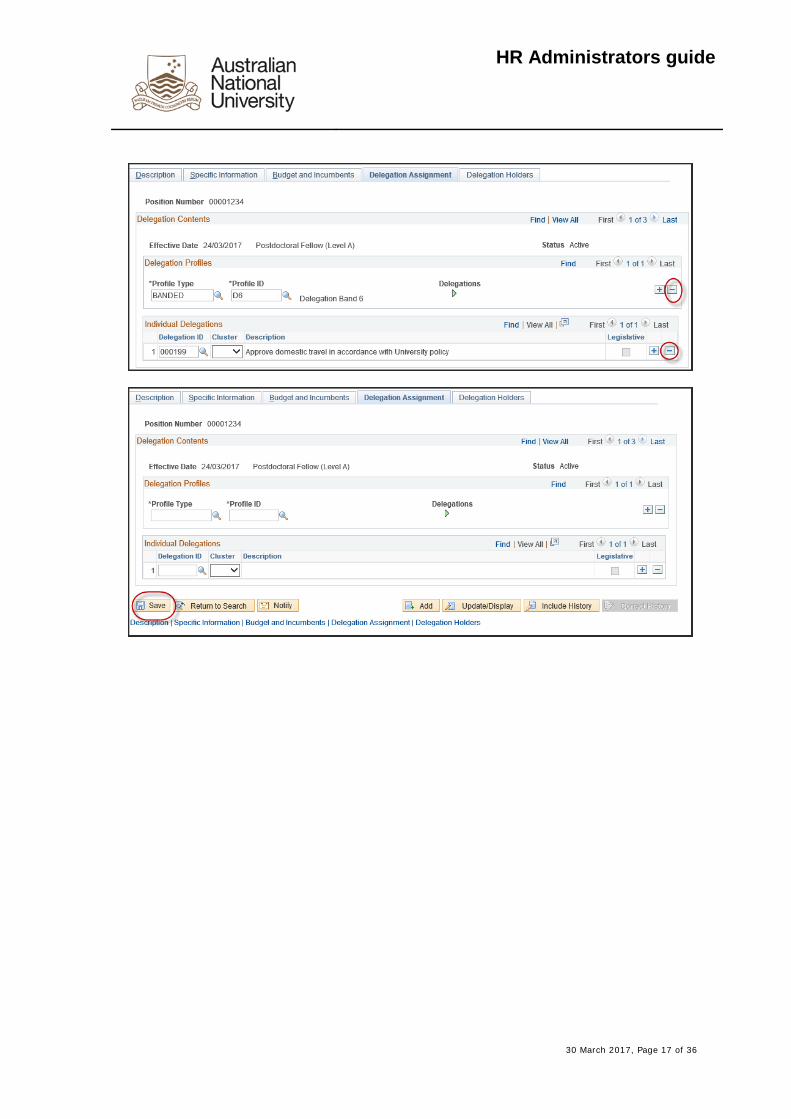
6 Go to the Delegation Assignment tab and remove all Delegation ID’s and Individuals Delegations by using the ‘-‘ button and Save
30 March 2017, Page 16 of 36
HR Administrators guide
30 March 2017, Page 17 of 36
HR Administrators guide
5. Inactivating delegations held by a position
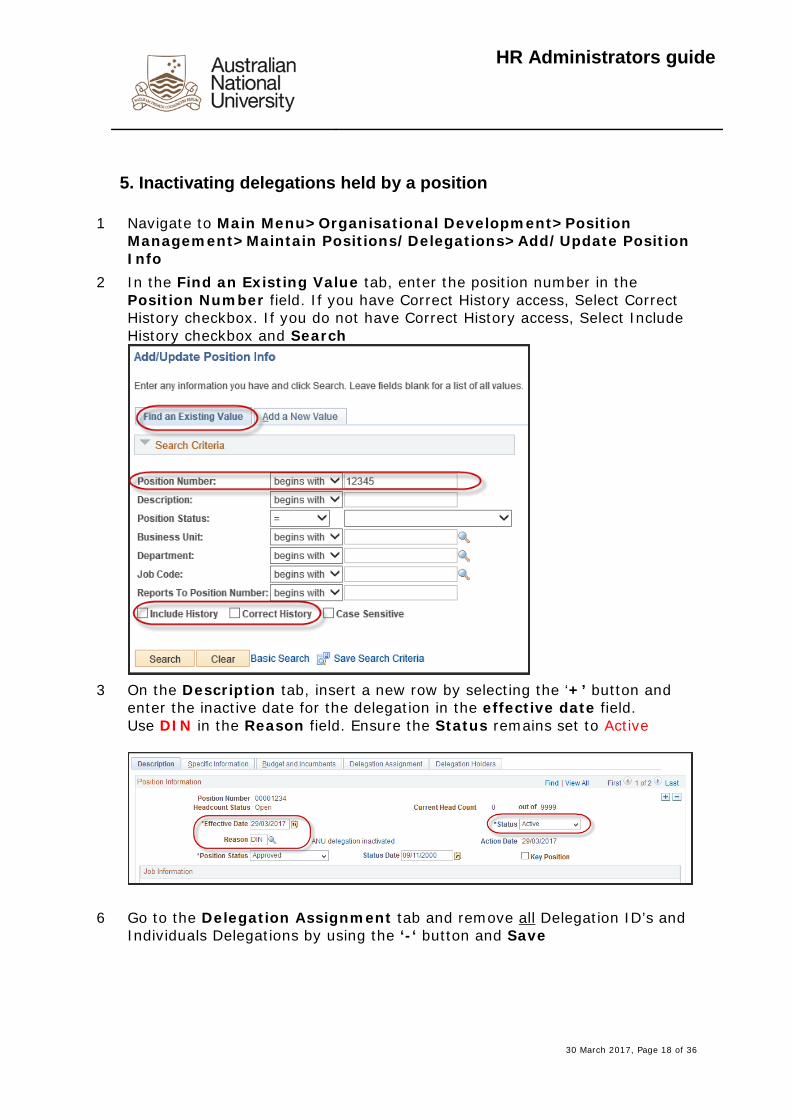
1 Navigate to Main Menu>Organisational Development>Position Management>Maintain Positions/Delegations>Add/Update Position Info
2 In the Find an Existing Value tab, enter the position number in the Position Number field. If you have Correct History access, Select Correct History checkbox. If you do not have Correct History access, Select Include History checkbox and Search
3 On the Description tab, insert a new row by selecting the ‘+’ button and
enter the inactive date for the delegation in the effective date field. Use DIN in the Reason field. Ensure the Status remains set to Active
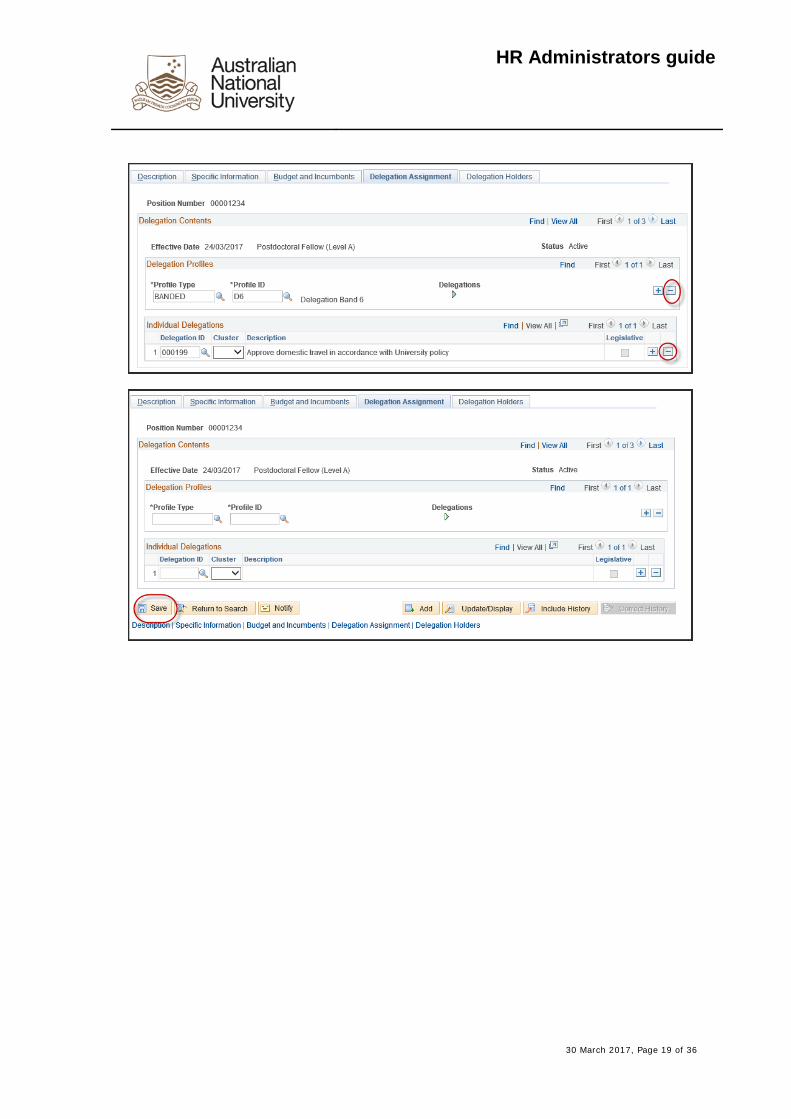
6 Go to the Delegation Assignment tab and remove all Delegation ID’s and Individuals Delegations by using the ‘-‘ button and Save
30 March 2017, Page 18 of 36
HR Administrators guide
30 March 2017, Page 19 of 36
HR Administrators guide
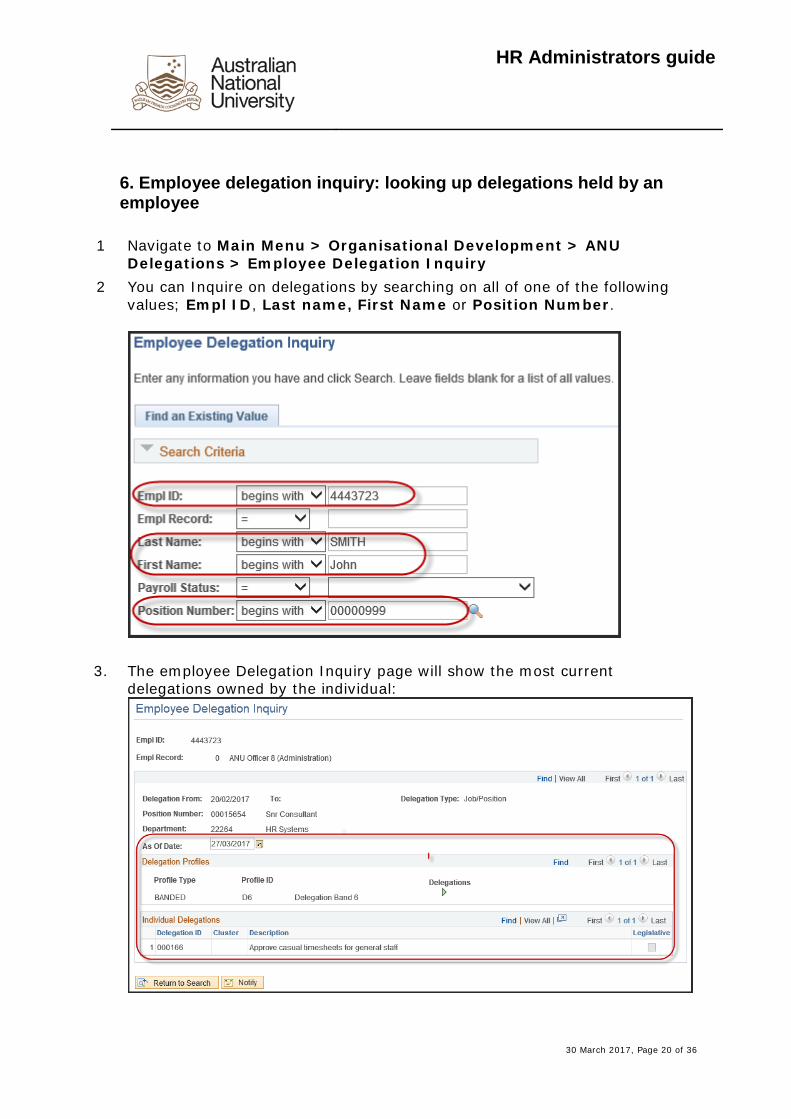
6. Employee delegation inquiry: looking up delegations held by an employee
1 Navigate to Main Menu > Organisational Development > ANU Delegations > Employee Delegation Inquiry
2 You can Inquire on delegations by searching on all of one of the following values; Empl ID, Last name, First Name or Position Number.
3. The employee Delegation Inquiry page will show the most current delegations owned by the individual:
30 March 2017, Page 20 of 36
HR Administrators guide
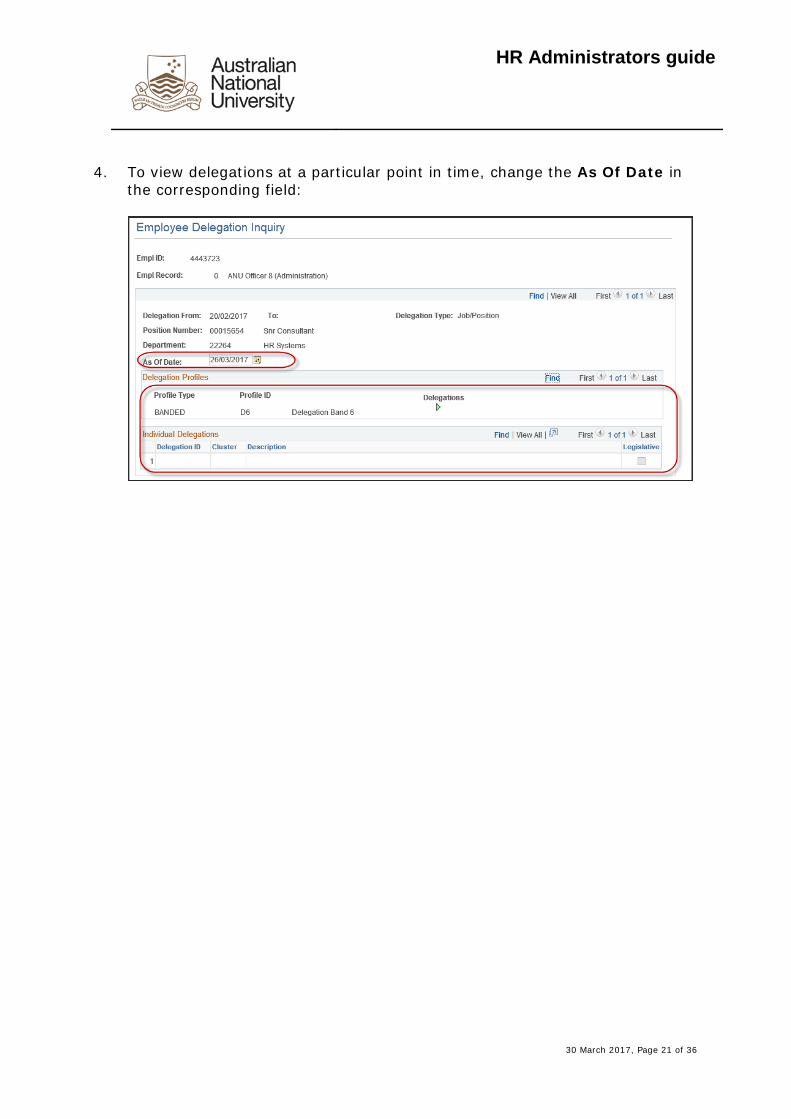
4. To view delegations at a particular point in time, change the As Of Date in the corresponding field:
30 March 2017, Page 21 of 36
HR Administrators guide
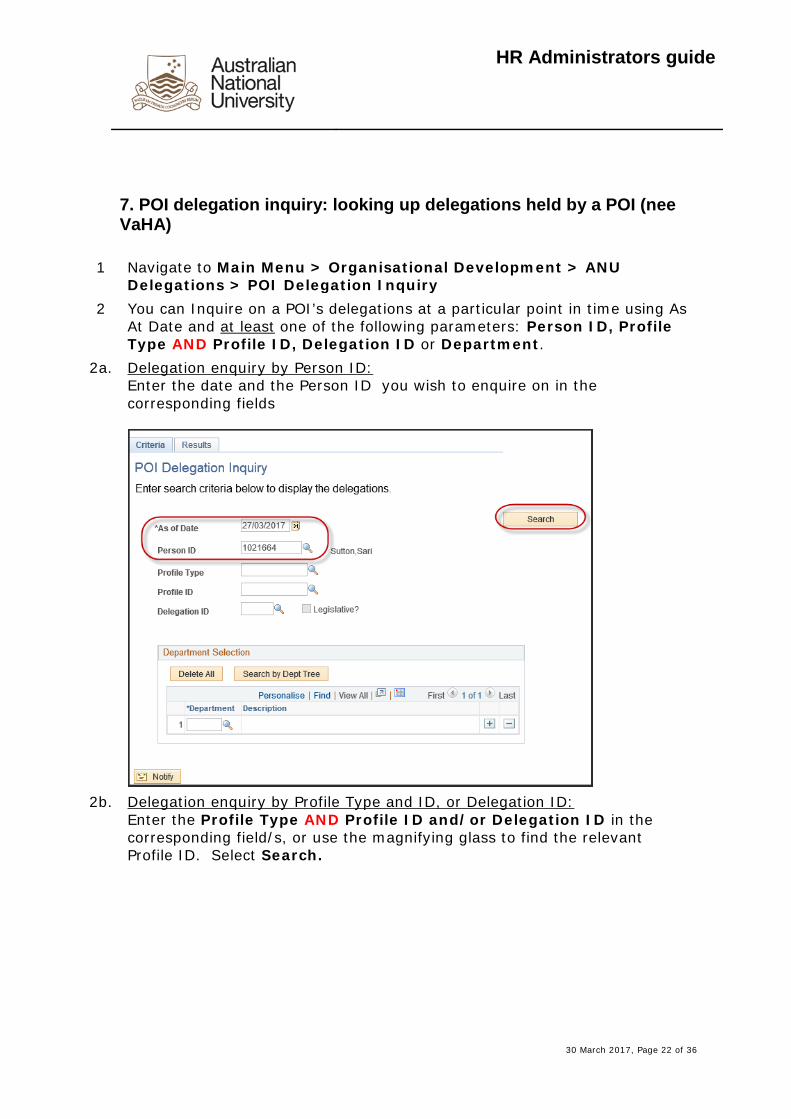
7. POI delegation inquiry: looking up delegations held by a POI (nee VaHA)
1 Navigate to Main Menu > Organisational Development > ANU Delegations > POI Delegation Inquiry
2 You can Inquire on a POI’s delegations at a particular point in time using As At Date and at least one of the following parameters: Person ID, Profile Type AND Profile ID, Delegation ID or Department.
2a. Delegation enquiry by Person ID: Enter the date and the Person ID you wish to enquire on in the corresponding fields
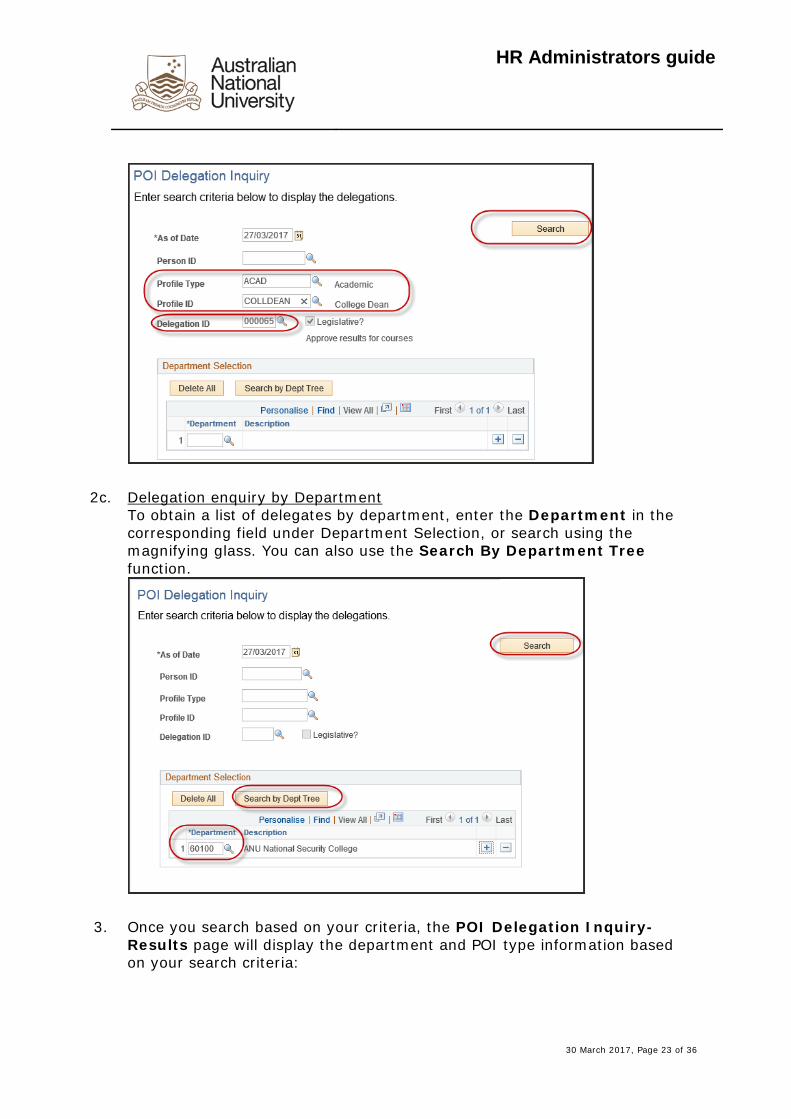
2b. Delegation enquiry by Profile Type and ID, or Delegation ID:
Enter the Profile Type AND Profile ID and/or Delegation ID in the corresponding field/s, or use the magnifying glass to find the relevant Profile ID. Select Search.
30 March 2017, Page 22 of 36
HR Administrators guide
2c. Delegation enquiry by Department To obtain a list of delegates by department, enter the Department in the corresponding field under Department Selection, or search using the magnifying glass. You can also use the Search By Department Tree function.
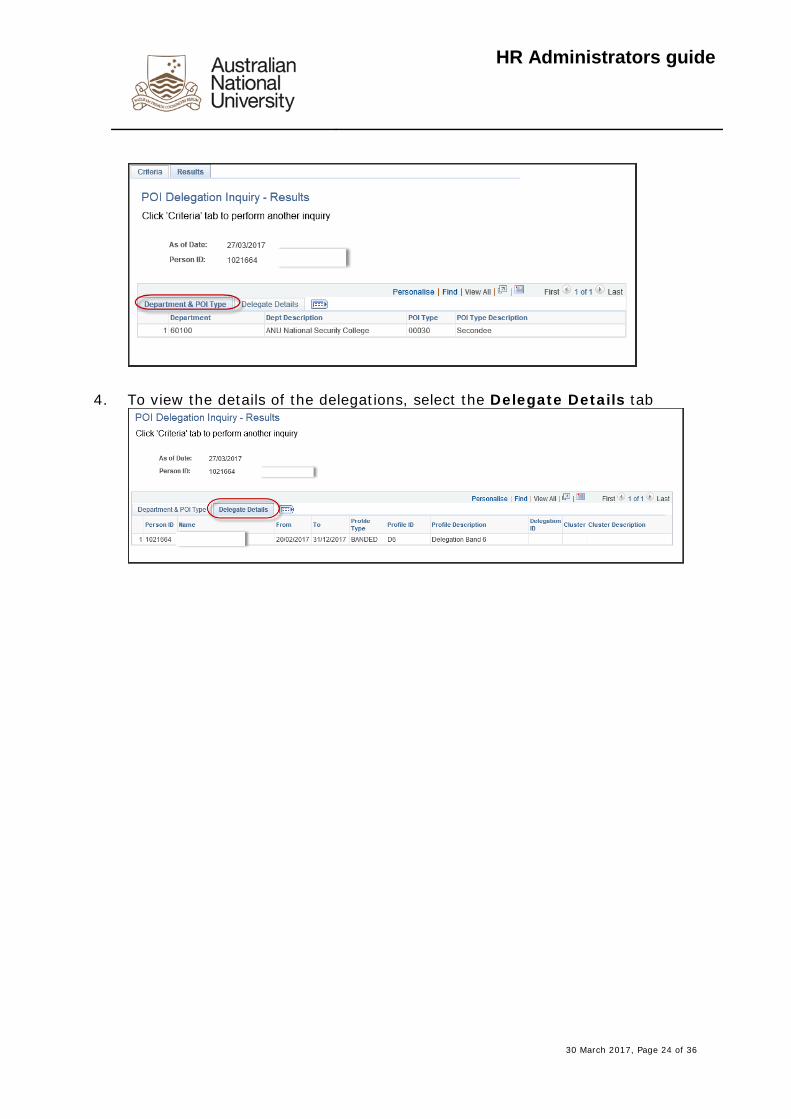
3. Once you search based on your criteria, the POI Delegation Inquiry- Results page will display the department and POI type information based on your search criteria:
30 March 2017, Page 23 of 36
HR Administrators guide
4. To view the details of the delegations, select the Delegate Details tab
30 March 2017, Page 24 of 36
HR Administrators guide
SECTION B: HRMS ANU Delegations menu
Section B - HRMS ANU Delegations menu: use this to initiate, submit and action (authorise or decline) delegation requests to assign delegations to existing positions, assign short-term acting delegations, assign delegations to a POI, generate delegation extract and report, inquire on delegation assignment.
1. Assign delegations to short-term acting
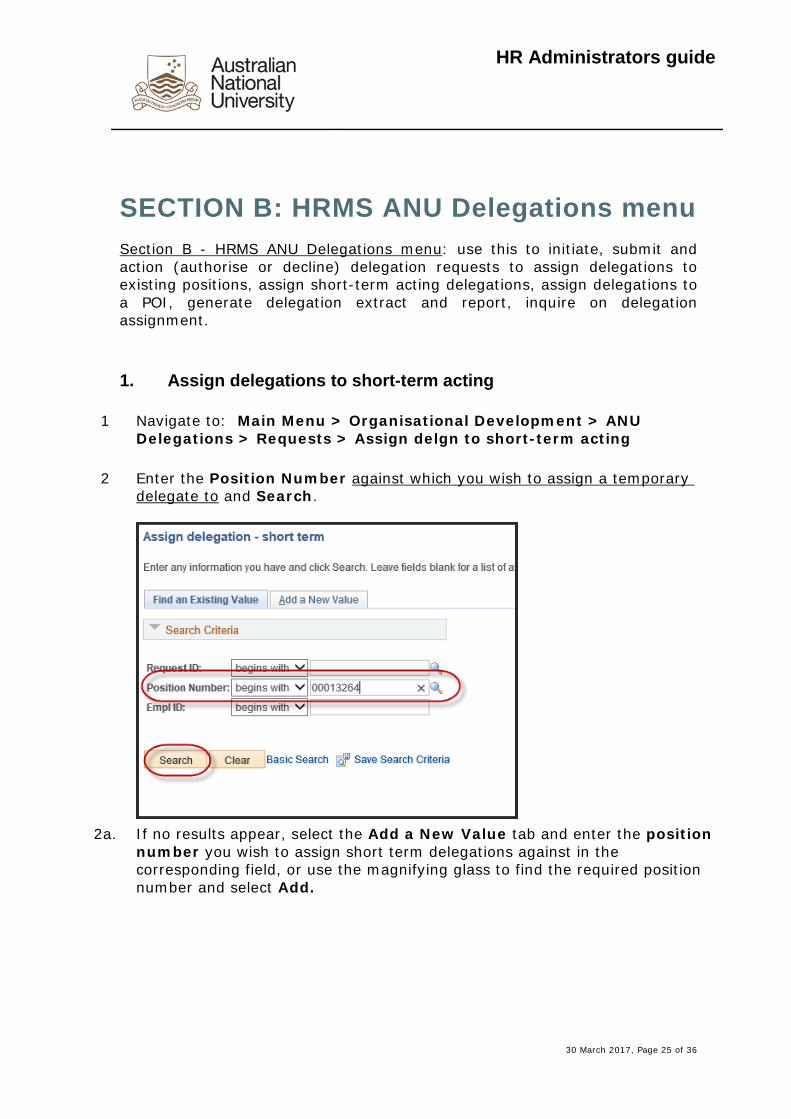
1 Navigate to: Main Menu > Organisational Development > ANU Delegations > Requests > Assign delgn to short-term acting
2 Enter the Position Number against which you wish to assign a temporary delegate to and Search.
2a. If no results appear, select the Add a New Value tab and enter the position
number you wish to assign short term delegations against in the corresponding field, or use the magnifying glass to find the required position number and select Add.
30 March 2017, Page 25 of 36
HR Administrators guide
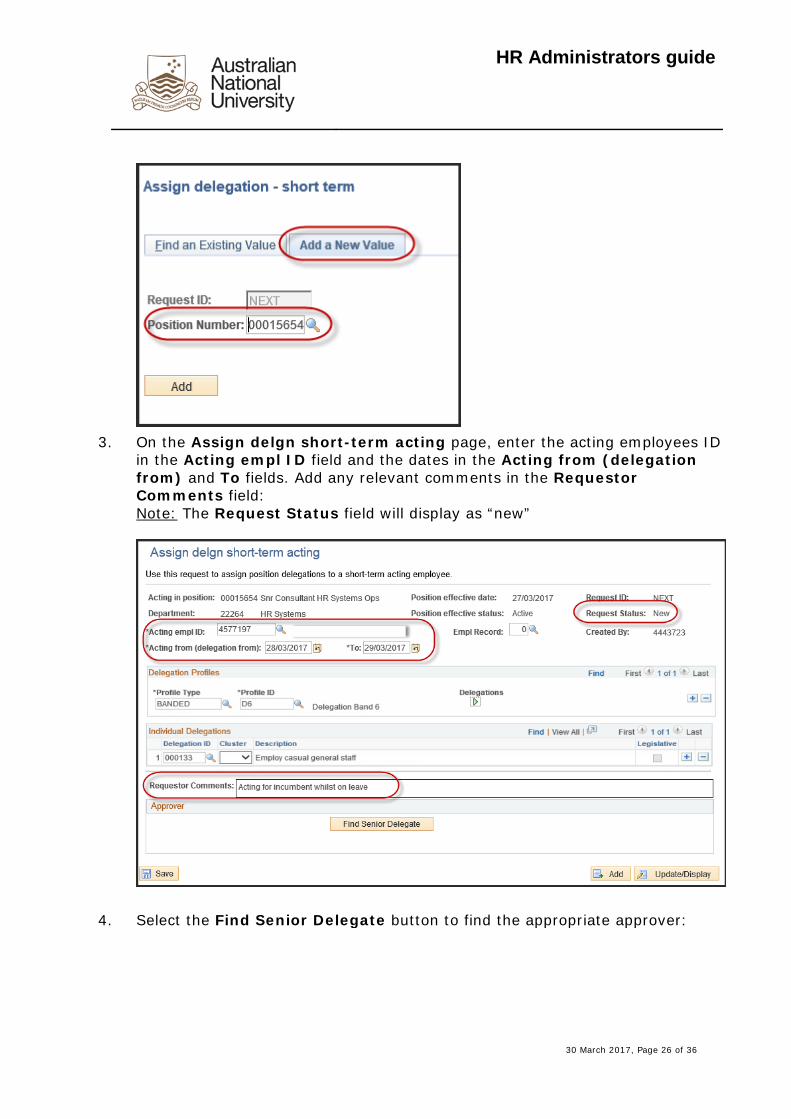
3. On the Assign delgn short-term acting page, enter the acting employees ID
in the Acting empl ID field and the dates in the Acting from (delegation from) and To fields. Add any relevant comments in the Requestor Comments field: Note: The Request Status field will display as “new”
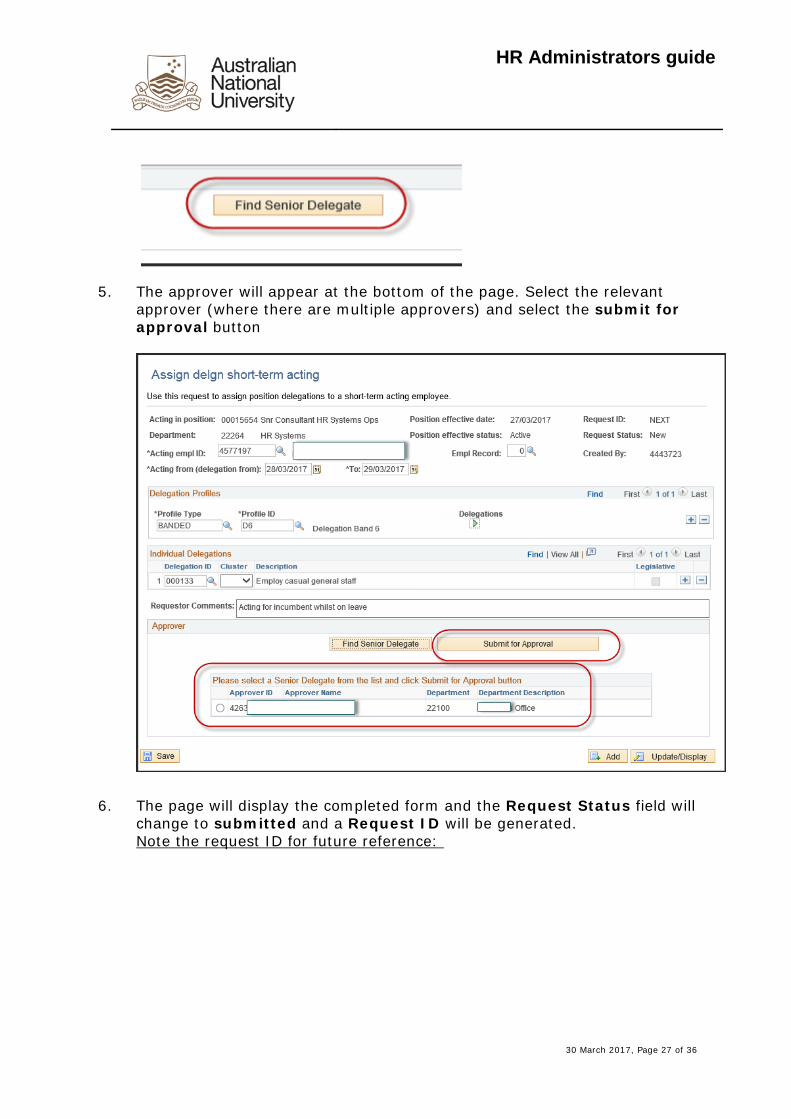
4. Select the Find Senior Delegate button to find the appropriate approver:
30 March 2017, Page 26 of 36
HR Administrators guide
5. The approver will appear at the bottom of the page. Select the relevant
approver (where there are multiple approvers) and select the submit for approval button
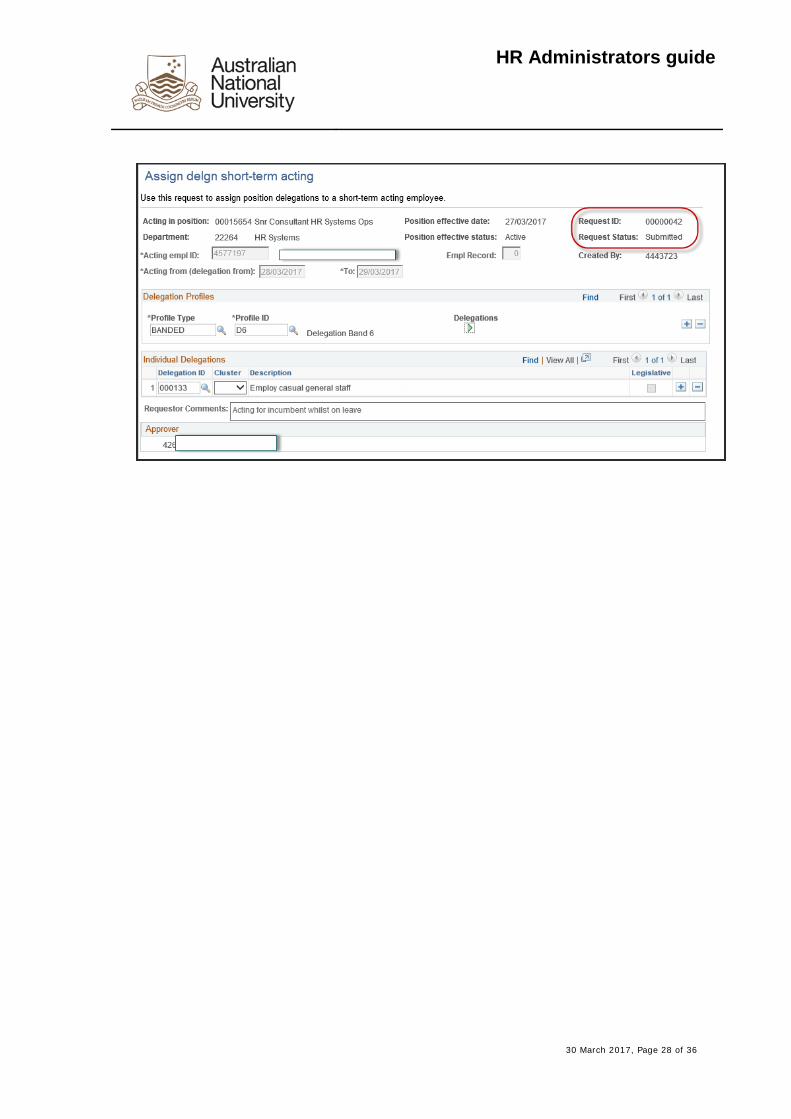
6. The page will display the completed form and the Request Status field will change to submitted and a Request ID will be generated. Note the request ID for future reference:
30 March 2017, Page 27 of 36
HR Administrators guide
30 March 2017, Page 28 of 36
HR Administrators guide
2. Authorise short-trm acting dlgn
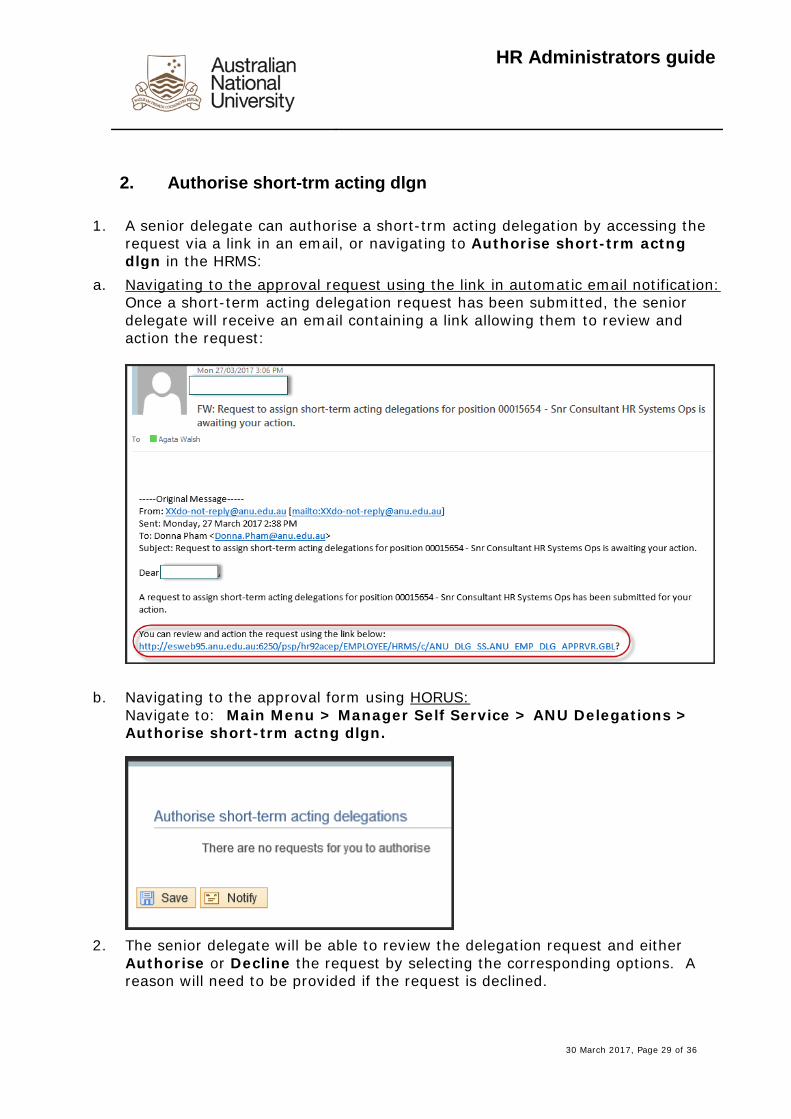
1. A senior delegate can authorise a short-trm acting delegation by accessing the request via a link in an email, or navigating to Authorise short-trm actng dlgn in the HRMS:
a. Navigating to the approval request using the link in automatic email notification: Once a short-term acting delegation request has been submitted, the senior delegate will receive an email containing a link allowing them to review and action the request:
b. Navigating to the approval form using HORUS: Navigate to: Main Menu > Manager Self Service > ANU Delegations > Authorise short-trm actng dlgn.
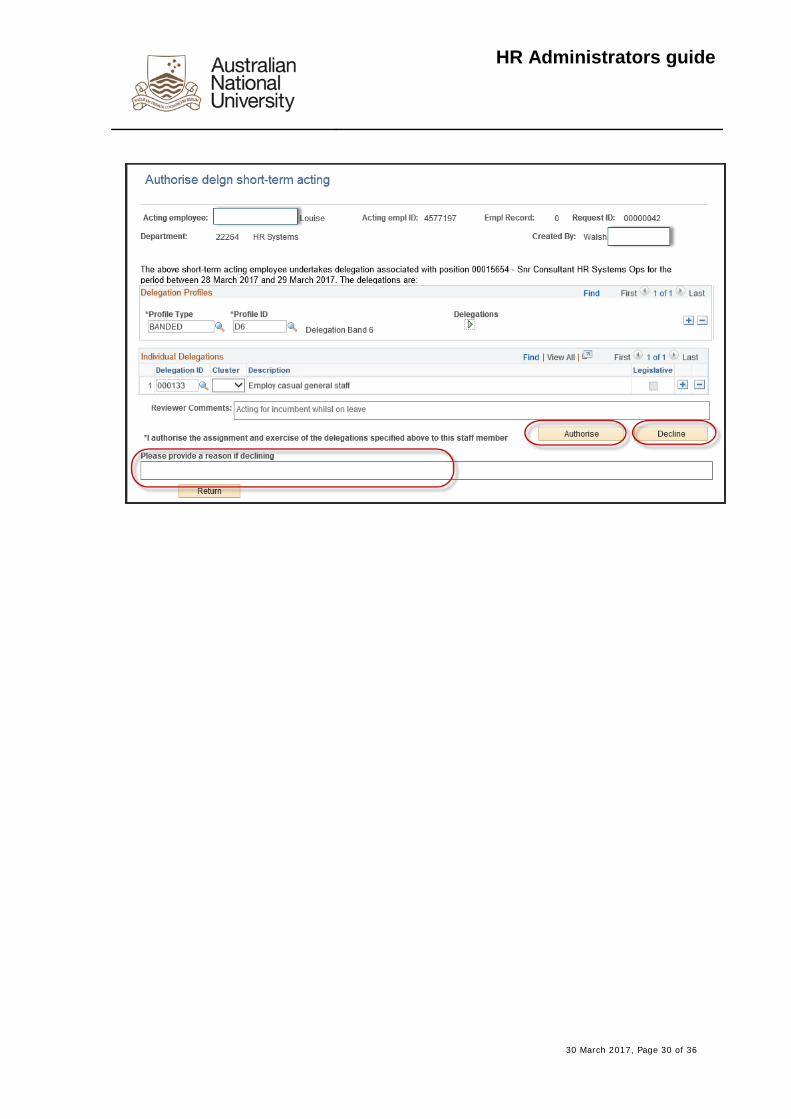
2. The senior delegate will be able to review the delegation request and either
Authorise or Decline the request by selecting the corresponding options. A reason will need to be provided if the request is declined.
30 March 2017, Page 29 of 36
HR Administrators guide
30 March 2017, Page 30 of 36
HR Administrators guide
3. Update position delegations
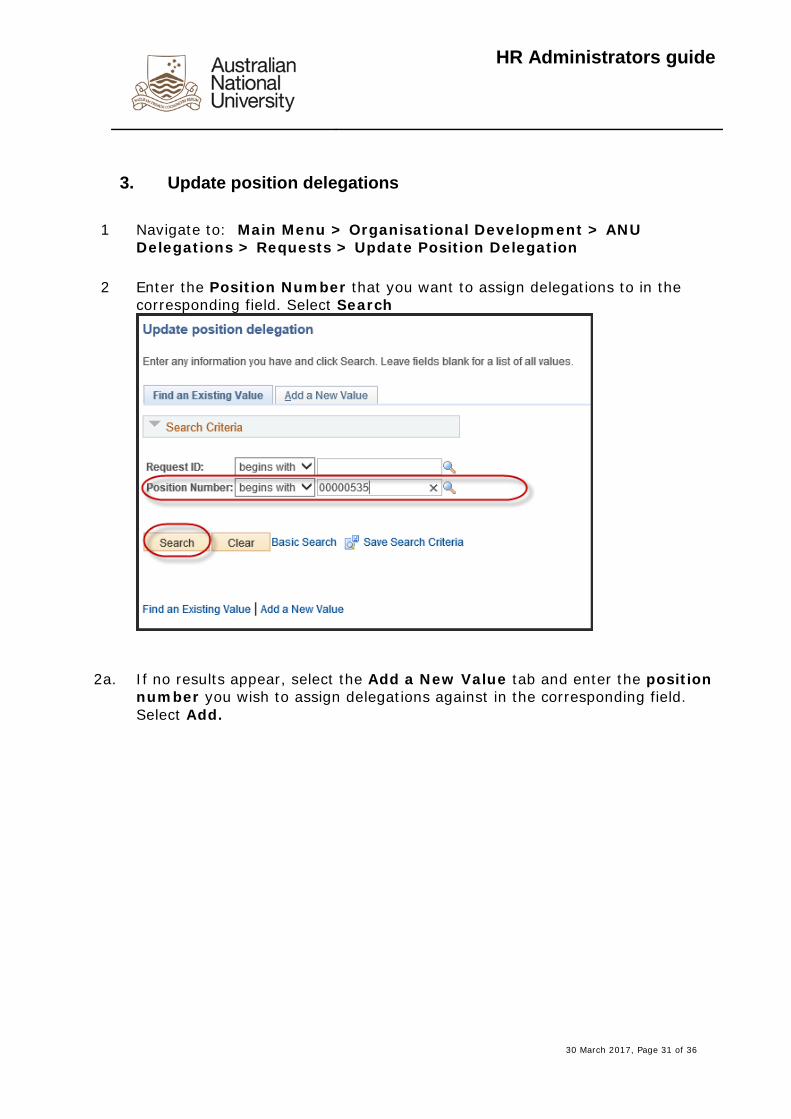
1 Navigate to: Main Menu > Organisational Development > ANU Delegations > Requests > Update Position Delegation
2 Enter the Position Number that you want to assign delegations to in the corresponding field. Select Search
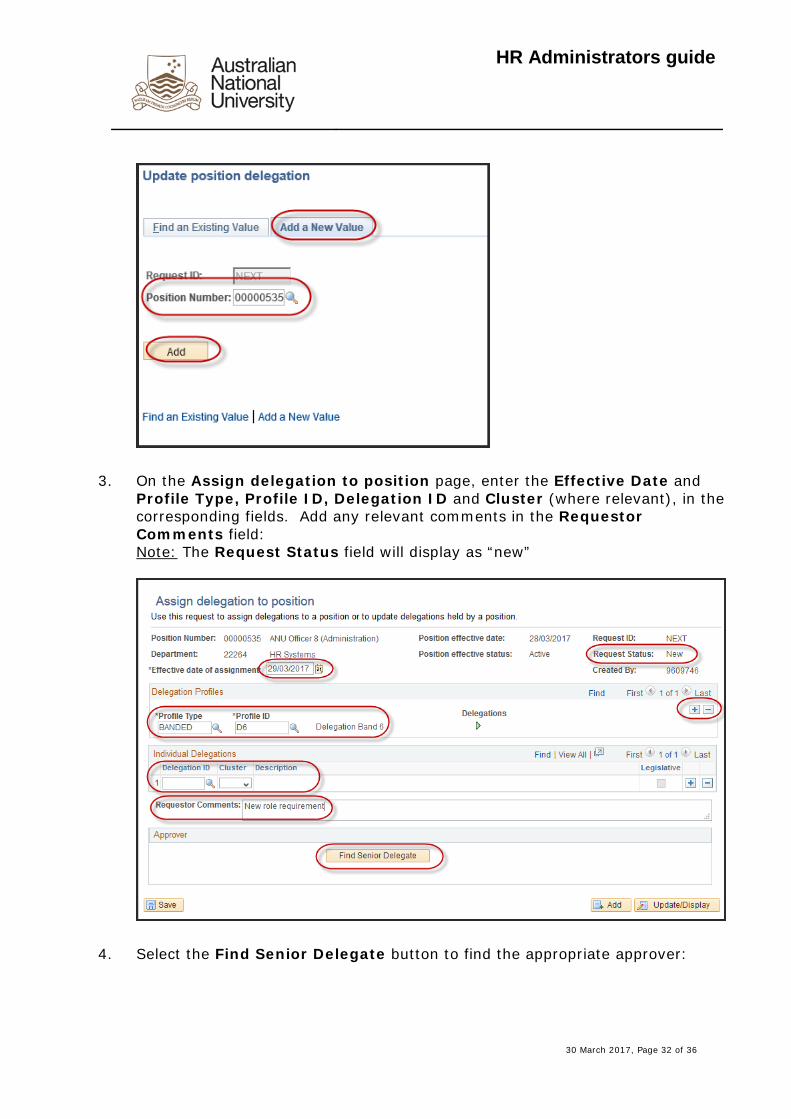
2a. If no results appear, select the Add a New Value tab and enter the position number you wish to assign delegations against in the corresponding field. Select Add.
30 March 2017, Page 31 of 36
HR Administrators guide
3. On the Assign delegation to position page, enter the Effective Date and Profile Type, Profile ID, Delegation ID and Cluster (where relevant), in the corresponding fields. Add any relevant comments in the Requestor Comments field: Note: The Request Status field will display as “new”
4. Select the Find Senior Delegate button to find the appropriate approver:
30 March 2017, Page 32 of 36
HR Administrators guide
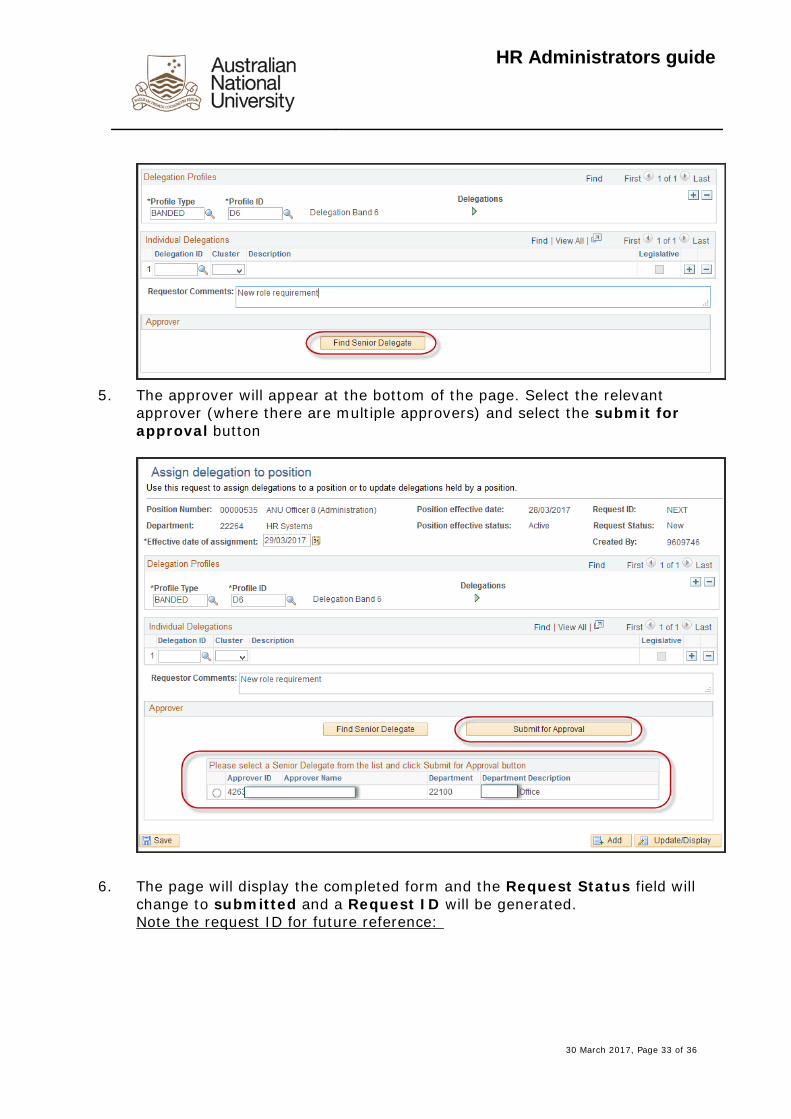
5. The approver will appear at the bottom of the page. Select the relevant
approver (where there are multiple approvers) and select the submit for approval button
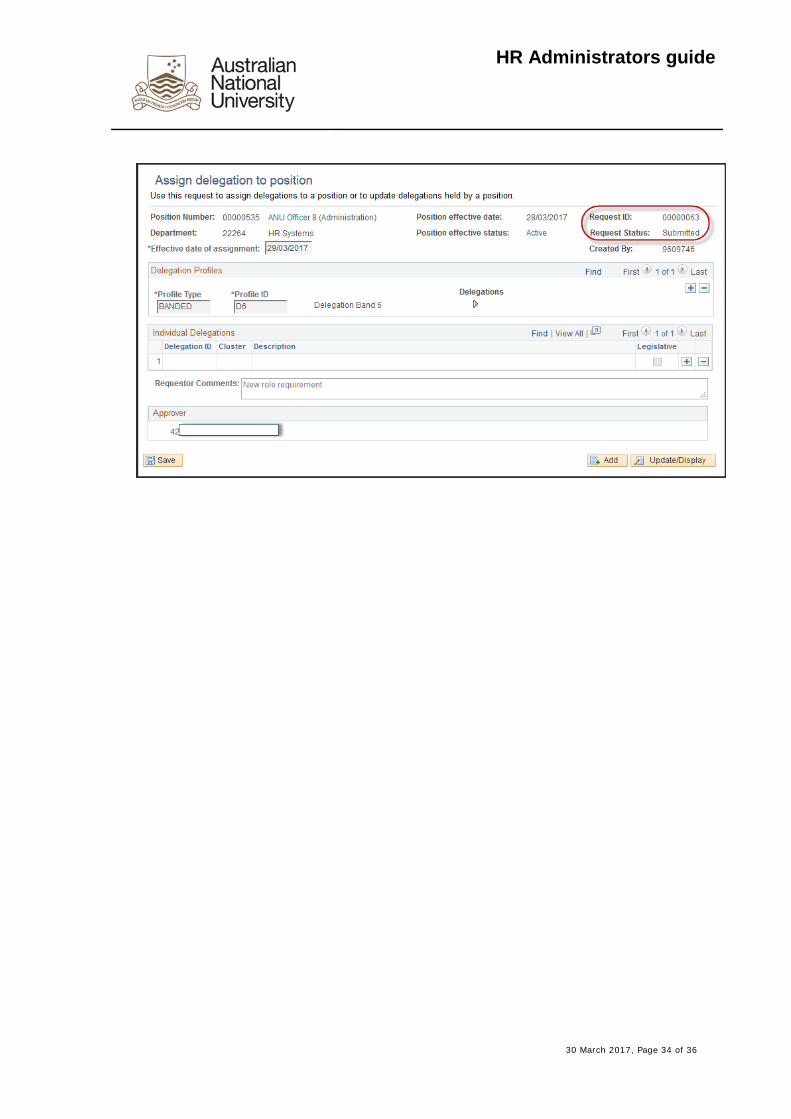
6. The page will display the completed form and the Request Status field will change to submitted and a Request ID will be generated. Note the request ID for future reference:
30 March 2017, Page 33 of 36
HR Administrators guide
30 March 2017, Page 34 of 36
HR Administrators guide
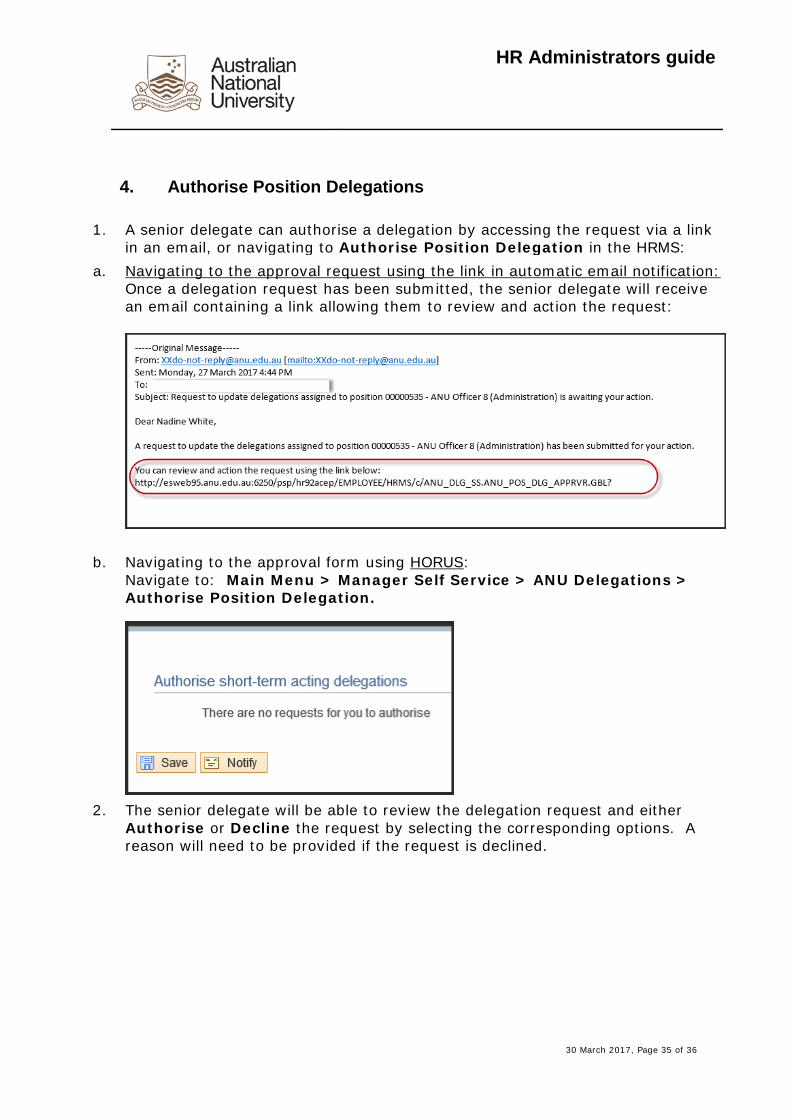
4. Authorise Position Delegations
1. A senior delegate can authorise a delegation by accessing the request via a link in an email, or navigating to Authorise Position Delegation in the HRMS:
a. Navigating to the approval request using the link in automatic email notification: Once a delegation request has been submitted, the senior delegate will receive an email containing a link allowing them to review and action the request:
b. Navigating to the approval form using HORUS: Navigate to: Main Menu > Manager Self Service > ANU Delegations > Authorise Position Delegation.
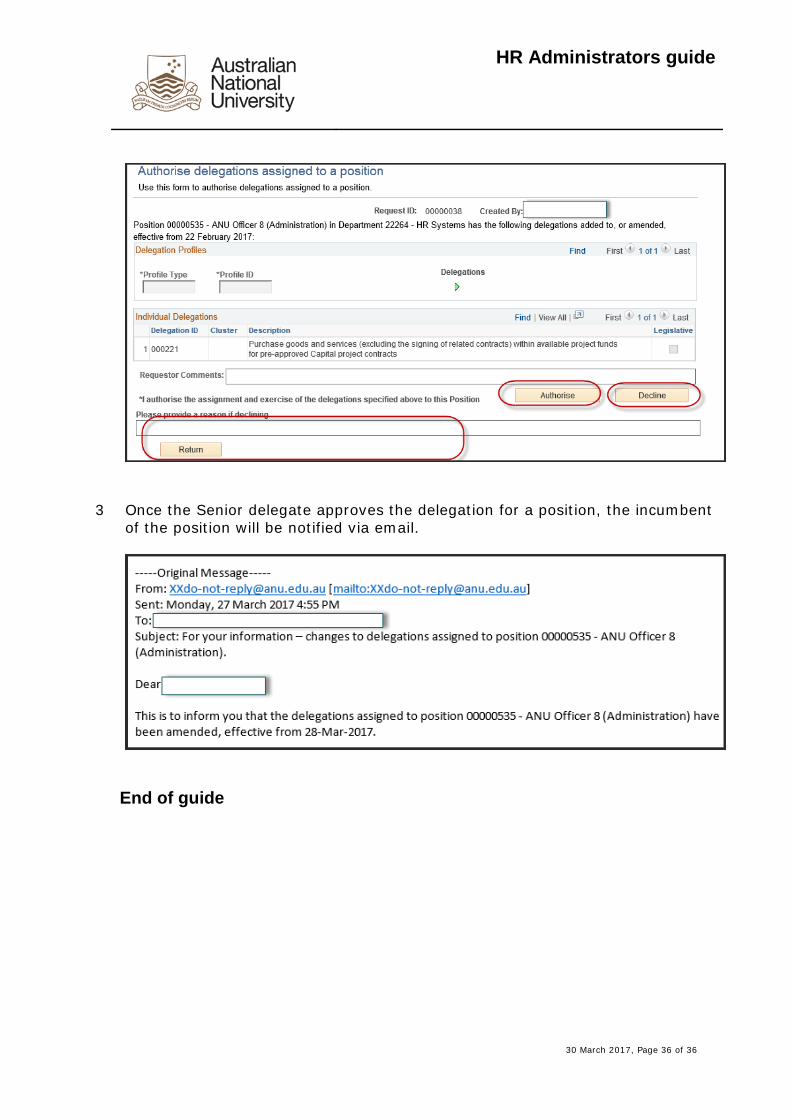
2. The senior delegate will be able to review the delegation request and either
Authorise or Decline the request by selecting the corresponding options. A reason will need to be provided if the request is declined.
30 March 2017, Page 35 of 36
HR Administrators guide
3 Once the Senior delegate approves the delegation for a position, the incumbent of the position will be notified via email.
End of guide
30 March 2017, Page 36 of 36