post-processing digital ship imagesapi.ning.com/.../postprocessingofphotosships20130615.pdf ·...
TRANSCRIPT

_______________________________________________________________________________________
1 | P a g e
Post-Processing Digital Ship Images By Hans Fairhurst
Very rarely does a camera produce the perfect shot straight out of the box…at least mine
doesn’t. What is done to an image after the shot has been taken can be the difference
between an OK photo and a good photo. The location of ships can sometimes give you no choice
when it comes to lighting and such; you just have to take what you can get. Below is the way I
go about cleaning up an image before posting it. I don’t profess to be a particularly good
photographer by any means but I do enjoy looking at good clear and well-presented images of
ships. The following is my approach. It is very basic and is by no means the only way or even
necessarily the right way.
IN GENERAL
a) REMEMBER WHY – The object of the exercise for the most part is to produce a
photograph of a ship that will look presentable when someone opens it in the Shipfinder
app. Always bear that in mind and make it a photo you’ll be proud of.
b) KNOW YOUR CAMERA - Know the limitations of your camera and work within them. It
is futile for instance to attempt a long distance shot of a vessel with the idea of
enlarging later if it is beyond the resolution capability of the camera. No amount of
digital processing will save it. Getting up close and personal whenever possible is always
best.
c) TAKE CONTROL - Even the simplest cameras have a manual settings capability. Learn
what they do because they are the key to better results. Take control..!! Start with the
“Av” (aperture priority) function and vary the aperture in your shots and see what it
does then try the “Tv” (shutter priority) function and see the effect. Use low ISO (say
100) and compare it with a very high setting, note the grainy appearance.
d) EXPERIMENT AND LEARN - If possible don’t take one photo, take lots. Vary the
aperture, vary the speed, try different things and then take note of what works and
what doesn’t. Sharpness, depth of field, lighting, contrast. An uploaded image of mine
can be the product of 20 or more shots.
e) BE CRITICAL - ”Be honest with yourself, be your own harshest critic”.
a. Is the image level? (check..!!)
b. Is the image clear?
c. Is the image sharp?
d. Is the image balanced?
e. Is the subject appropriately positioned?
f. Is the image appropriately cropped?
g. Is the ship the main subject of the image?
h. Can the ship be identified from the image?
i. Is the image level? (check again..!!)
_______________________________________________________________________________________
2 | P a g e
THE SHOT
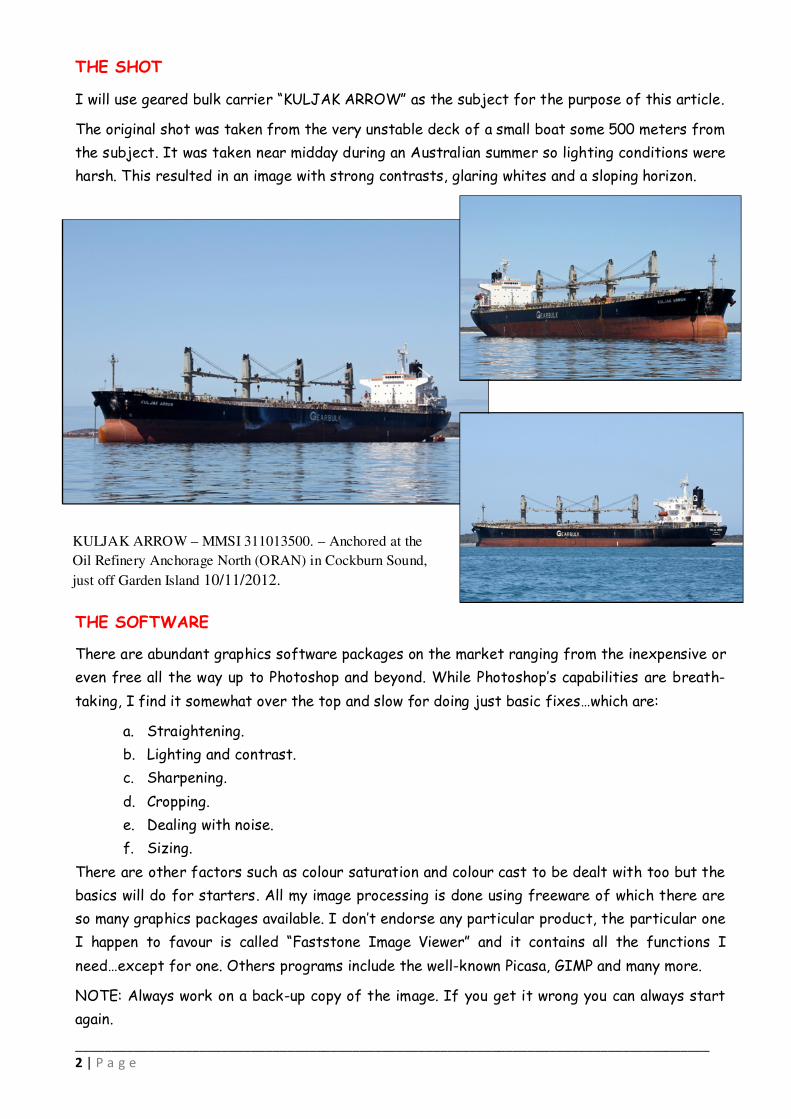
I will use geared bulk carrier “KULJAK ARROW” as the subject for the purpose of this article.
The original shot was taken from the very unstable deck of a small boat some 500 meters from
the subject. It was taken near midday during an Australian summer so lighting conditions were
harsh. This resulted in an image with strong contrasts, glaring whites and a sloping horizon.
THE SOFTWARE
There are abundant graphics software packages on the market ranging from the inexpensive or
even free all the way up to Photoshop and beyond. While Photoshop’s capabilities are breath-
taking, I find it somewhat over the top and slow for doing just basic fixes…which are:
a. Straightening.
b. Lighting and contrast.
c. Sharpening.
d. Cropping.
e. Dealing with noise.
f. Sizing.
There are other factors such as colour saturation and colour cast to be dealt with too but the
basics will do for starters. All my image processing is done using freeware of which there are
so many graphics packages available. I don’t endorse any particular product, the particular one
I happen to favour is called “Faststone Image Viewer” and it contains all the functions I
need…except for one. Others programs include the well-known Picasa, GIMP and many more.
NOTE: Always work on a back-up copy of the image. If you get it wrong you can always start
again.
KULJAK ARROW – MMSI 311013500. – Anchored at the
Oil Refinery Anchorage North (ORAN) in Cockburn Sound,
just off Garden Island 10/11/2012.

_______________________________________________________________________________________
3 | P a g e
1. SLOPING HORIZONS
In reality very few oceans of the world have sloping horizons for ships to gracefully slide down
or struggle up so it is not a good look in a photo either…unless of course there is some artistic
merit in doing so. Scanned photos of old ships are probably the other exception. That aside,
I’ve singled this out as the most unforgiveable mistake of all because it is very obvious and it is
by far the easiest to fix. Just about every editing package available has a “Rotate” option that
takes only seconds to use.
Simply match the natural horizon to a horizontal reference line on the overlay grid and adjust.
The above example required a 2.5 degree clockwise rotation to correct its appearance. In the
above example I used the beach on Garden Island in the background as a reliable horizontal
reference.
In the absence of any visible horizontal reference try using the ships waterline if it is side-on
to you. Note that if the ship is angled sharply towards or away from you, the waterline will not
necessarily be horizontal due to the effect of perspective. If no horizontal references can be
found, try using vertical features such as harbour lighting towers, ships masts or deck-cranes
as references against the vertical grid-lines.
_______________________________________________________________________________________
4 | P a g e
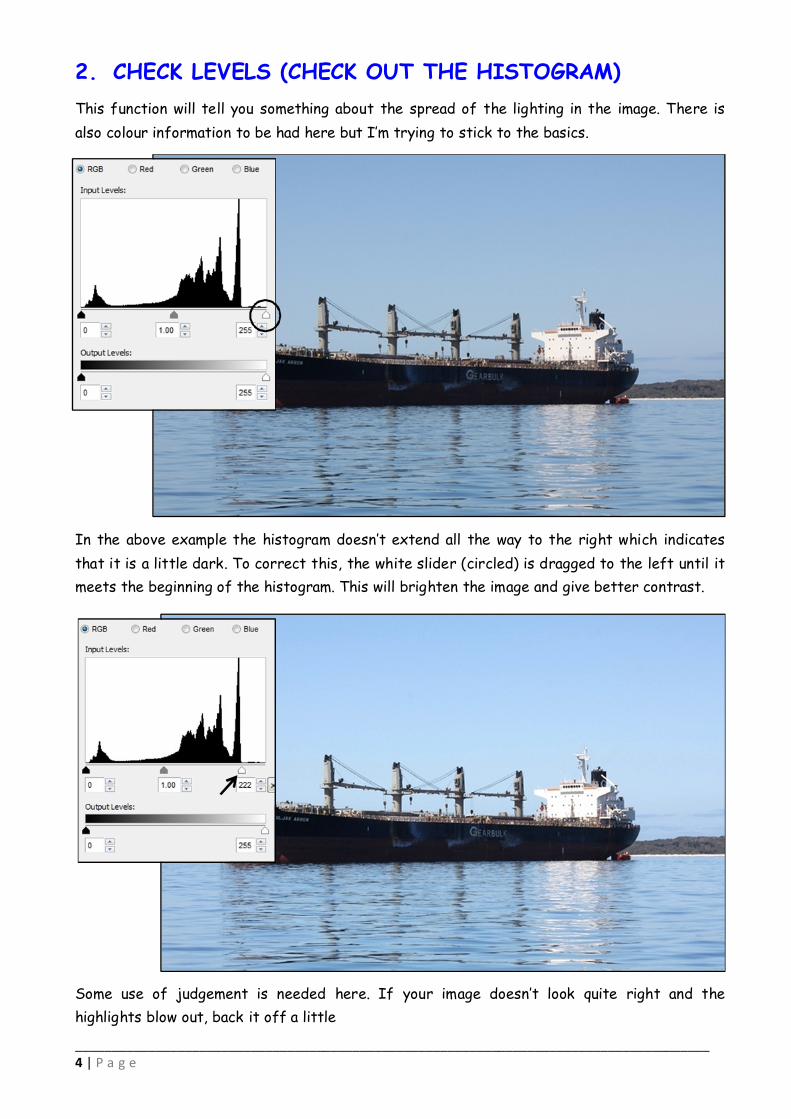
2. CHECK LEVELS (CHECK OUT THE HISTOGRAM)
This function will tell you something about the spread of the lighting in the image. There is
also colour information to be had here but I’m trying to stick to the basics.
In the above example the histogram doesn’t extend all the way to the right which indicates
that it is a little dark. To correct this, the white slider (circled) is dragged to the left until it
meets the beginning of the histogram. This will brighten the image and give better contrast.
Some use of judgement is needed here. If your image doesn’t look quite right and the
highlights blow out, back it off a little

_______________________________________________________________________________________
5 | P a g e
3. FIX THE LIGHTING (HIGHLIGHTS AND SHADOWS)
This is also known as “dodge and burn” in some software. The image above still tends to have a
very bright white citadel contrasting with the dark shadow over the hull. Tweaking the lighting
can fine tune the image by dropping the brightness of the whites (Highlights) and raising the
light in the dark areas (Shadows).
a. Adjusting the shadows up a little lightens the hull.
b. Reducing the highlights takes out some of the harsh whiteness of the citadel and
improves the visibility of the lettering on the hull.
c. Lightening the dark areas can also increase noise sometimes so in this case I’ve also
increased the contrast a little to help offset this.

_______________________________________________________________________________________
6 | P a g e
4. SHARPENING
Just about every photo I take gets some sharpening applied. However this is also the single
best way I know to wreck an otherwise good photo. The golden rule here is “use this function
sparingly”.
Zoom up the image and check if the image focus is sharp or soft. More often than not it will
benefit from a little tweaking…but NOT from a lot of tweaking.
Overdoing the sharpening will result in unsightly white outlines around everything and an
increase in noise. This does nothing to improve the image, in fact it does just the opposite. If
an image really needs that much sharpening, don’t bother because it is already beyond saving.
The left half of the “KULJAK ARROW” photo above has been deliberately over-sharpened to
demonstrate.
It is very seldom that I would go much beyond 20% sharpening and 1 radius unit.
Once the sharpening has been applied, zoom up again to check that it hasn’t been over applied.

_______________________________________________________________________________________
7 | P a g e
5. CROPPING
Once all the fixing up is done, it is time to position your subject where you want it in the shot.
Unless some nearby bridges, harbour cranes tugs etc. provide some additional narrative, just
try to maximise the main subject as much as possible in a balanced way.
RULE OF THIRDS
For a simple image like the above, centre the ship horizontally though preferably not vertically
because now is the time to remember the “rule of thirds”. This is simply a rule of thumb or
guideline that suggests:
“an image is more pleasing to the eye if the subject is placed along one of the imaginary lines that divides the image into a 3 x 3 grid. Key elements of the image are best placed where lines intersect if possible”.
_______________________________________________________________________________________
8 | P a g e
This isn’t a hard and fast rule nor is it the only one but it has been giving guidance for the
positioning of subjects in images since the old masters of the renaissance. After more than
500 years of use it is probably coming to the end of its trial-period and therefore worth
considering as and when appropriate. Google has heaps of information about it. Many cameras
have a 3 x 3 grid built in to the screen or eye-piece and it is there for a very good reason. In
most cases it can be accessed via a menu option.
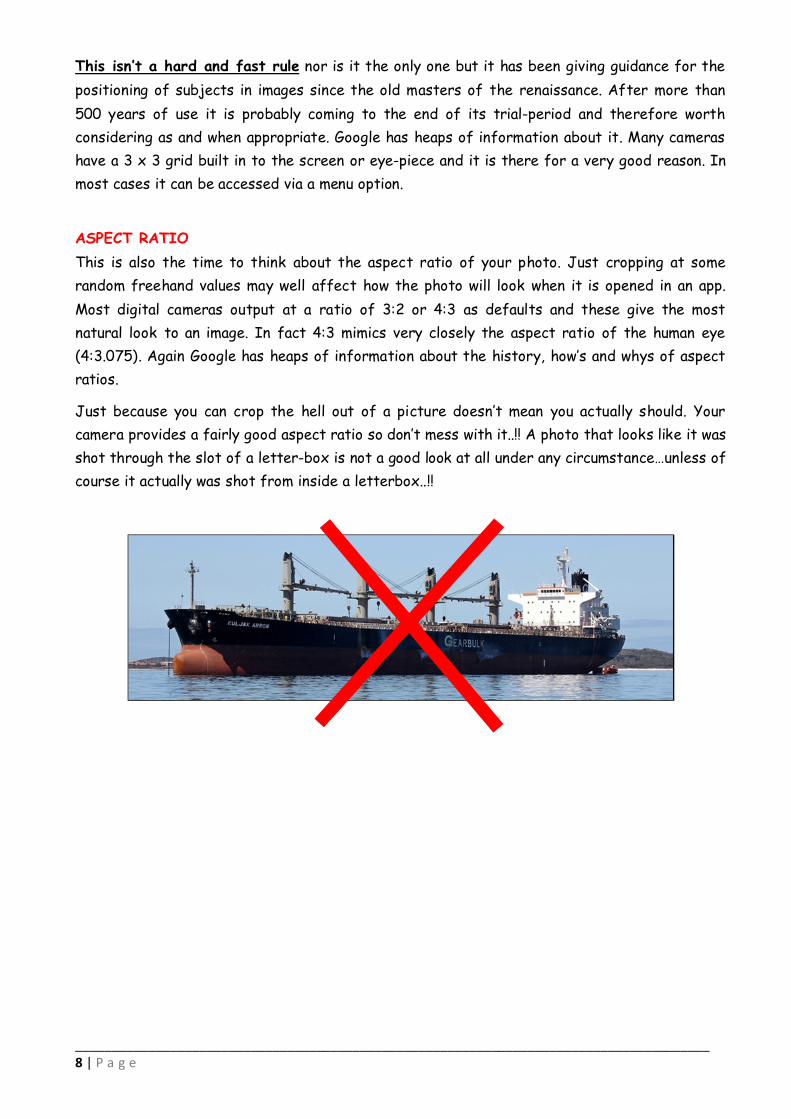
ASPECT RATIO
This is also the time to think about the aspect ratio of your photo. Just cropping at some
random freehand values may well affect how the photo will look when it is opened in an app.
Most digital cameras output at a ratio of 3:2 or 4:3 as defaults and these give the most
natural look to an image. In fact 4:3 mimics very closely the aspect ratio of the human eye
(4:3.075). Again Google has heaps of information about the history, how’s and whys of aspect
ratios.
Just because you can crop the hell out of a picture doesn’t mean you actually should. Your
camera provides a fairly good aspect ratio so don’t mess with it..!! A photo that looks like it was
shot through the slot of a letter-box is not a good look at all under any circumstance…unless of
course it actually was shot from inside a letterbox..!!

_______________________________________________________________________________________
9 | P a g e
6. NOISE
Occasionally if the photo requires a lot of tweaking, especially lightening up shadows and
enlarging, there will be a good deal of grainy texture (noise) in the image. This is also an issue
if it has been necessary to shoot with very high ISO settings due to poor light. Noise filtering
is the one feature that Fastone Image Viewer lacks but it isn’t the end of the world. There are
a number of good stand-alone image noise reduction programs, both commercial and freeware.
For my money, “Neat Image” represents good value as a commercial program. It is a very
powerful and effective program that has a modest price. My favourite feature is the fact that
it can do batches of photos.
On the freeware side there is “DenoiseMyImage_Free” which is also very neat and will do
batches of images. It has a nag-screen on start-up that can be made to go away for a small
price.
As with sharpening, use just enough noise reduction to do the job. If it is overdone you risk
losing image detail. More is NOT always better.
The above image is a close-up of the hull of “KULJAK ARROW” being processed by
“DeNoiseMyImage_Free”. Just using the default settings, the area inside the preview square
already has a much smoother and cleaner appearance.

_______________________________________________________________________________________
10 | P a g e
7. SIZE MATTERS
Once a photo has been tidied up, it is almost ready to be uploaded…but how big is it? Many
cameras these days will pump out images in excess of 5 or 6 Mbytes in .JPG format or even
bigger in .RAW. There is no point in uploading a huge image file when a cut-down version will:
(a) Look just as good.
(b) Be faster to upload.
(c) Be faster to load on screen.
Shrinking an image down is about as simple as repairing those unforgiveable sloping horizons. In
the case of Faststone Image Viewer, simply select “Resize/Resample” and click on the desired
size. I normally go with 2048 x 1536 which gives me a file of about 1Mb to 2Mb in size.
This is quite adequate though I could easily go smaller still without too much degradation of
quality. I do however make a full-sized backup first…just in case something goes wrong or it all
needs re-doing.
As before, overdoing it will eventually cost you image quality so don’t go too small either.
_______________________________________________________________________________________
11 | P a g e
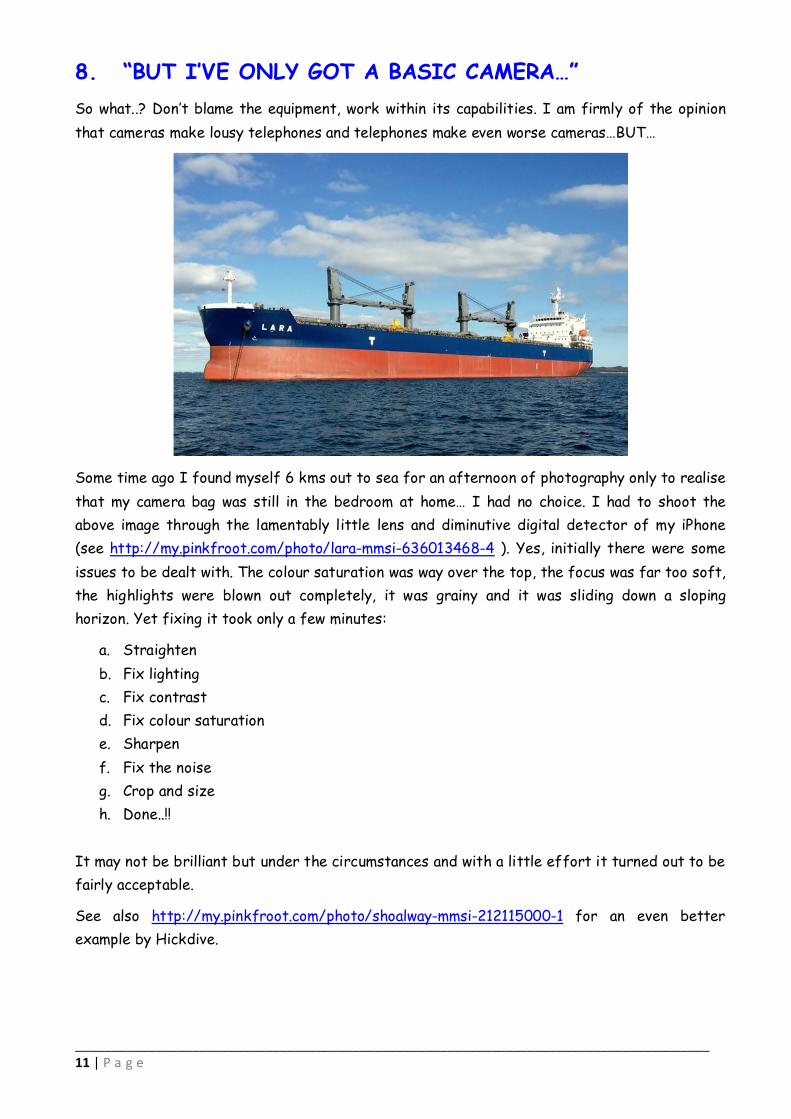
8. “BUT I’VE ONLY GOT A BASIC CAMERA…”
So what..? Don’t blame the equipment, work within its capabilities. I am firmly of the opinion
that cameras make lousy telephones and telephones make even worse cameras…BUT…
Some time ago I found myself 6 kms out to sea for an afternoon of photography only to realise
that my camera bag was still in the bedroom at home… I had no choice. I had to shoot the
above image through the lamentably little lens and diminutive digital detector of my iPhone
(see http://my.pinkfroot.com/photo/lara-mmsi-636013468-4 ). Yes, initially there were some
issues to be dealt with. The colour saturation was way over the top, the focus was far too soft,
the highlights were blown out completely, it was grainy and it was sliding down a sloping
horizon. Yet fixing it took only a few minutes:
a. Straighten
b. Fix lighting
c. Fix contrast
d. Fix colour saturation
e. Sharpen
f. Fix the noise
g. Crop and size
h. Done..!!
It may not be brilliant but under the circumstances and with a little effort it turned out to be
fairly acceptable.
See also http://my.pinkfroot.com/photo/shoalway-mmsi-212115000-1 for an even better
example by Hickdive.

_______________________________________________________________________________________
12 | P a g e
9. FINALLY
The above only represent some of the all too familiar basic and obvious problems that are very
easy to fix…and should be fixed as a matter of course. There is an endless array of other
issues that are far harder to deal with. Often these are driven by the environmental
conditions at the time of shooting and possibly can’t be fixed.
For the main issues however it is not difficult nor is it costly and so a small amount of care and
effort can make a great deal of difference but most of all…
“Be Honest With Yourself…Be Your Own Harshest Critic”