powerpoint presentation · title: powerpoint presentation author: sreejith kulaparambil created...
TRANSCRIPT

Welcome to Smart Enterprise Solutions
USER MANUAL
TELEMARKETER 1

USER MANUAL
CONTENTSUSER FUNCTIONALITY PAGE #
WEBSITE /LANDING PAGE------------------------------------------------------------------------------------------------------------------------------------------------------------------------------------------ 6
REGISTRATION --------------------------------------------------------------------------------------------------------------------------------------------------------------------------------------------------------- 7
REGISTRATION – SELECT TYPE OF REGISTRATION ------------------------------------------------------------------------------------------------------------------------------------------------------------------------ 8
REGISTRATION - ENTITY LOGIN /SINGUP PAGE------------------------------------------------------------------------------------------------------------------------------------------------------------------------------- 9
REGISTRATION - SELECT COMPANY LOCATION------------------------------------------------------------------------------------------------------------------------------------------------------------------------------ 10
NEW TELEMARKETER REGISTRATION------------------------------------------------------------------------------------------------------------------------------------------------------------------------- 11
NEW TELEMARKETER REGISTRATION - FEE DETAILS---------------------------------------------------------------------------------------------------------------------------------------------------------------------- 12
NEW TELEMARKETER REGISTRATION - SIGN UP/ OTP VERIFICATION------------------------------------------------------------------------------------------------------------------------------------------------ 13
NEW TELEMARKETER REGISTRATION - EMAIL CONFIRMATION LINK------------------------------------------------------------------------------------------------------------------------------------------------- 14
NEW TELEMARKETER REGISTRATION - EMAIL VERIFICATION CONFIRMATION---------------------------------------------------------------------------------------------------------------------------------- 15
ENROL TELEMARKTER (ALREADY REGISTERED) -------------------------------------------------------------------------------------------------------------------------------------------------------- 16
TELEMARKETER ENROLMENT – INITIATION ------------------------------------------------------------------------------------------------------------------------------------------------------------------------------------ 17
TELEMARKETER ENROLMENT – SUBMISSION OF TM ID-------------------------------------------------------------------------------------------------------------------------------------------------------------------- 18
TELEMARKETER ENROLMENT – OTP /EMAIL VERIFICATION PROCESS---------------------------------------------------------------------------------------------------------------------------------------------- 19
TELEMARKETER ENROLMENT - SUCCESSFUL REQUEST SUBMISSION--------------------------------------------------------------------------------------------------------------------------------------------- 20
TELEMARKETER ENROLMENT - LOGIN PANEL--------------------------------------------------------------------------------------------------------------------------------------------------------------------- 21
ENTITY REQUEST APPROVAL ------------------------------------------------------------------------------------------------------------------------------------------------------------------------------------- 22
ENTITY REQUEST APPROVAL – PROCESS-------------------------------------------------------------------------------------------------------------------------------------------------------------------------------------- 23
ENTITY REQUEST APPROVAL - REJECTION------------------------------------------------------------------------------------------------------------------------------------------------------------------------------------- 24
2

USER MANUAL
CONTENTSUSER FUNCTIONALITY PAGE #
PENDING ENTITY APPROVAL – STATUS------------------------------------------------------------------------------------------------------------------------------------------------------------------------------------------ 25
TELEMARKETER – ENTITY REVOCATION FUNCTION ---------------------------------------------------------------------------------------------------------------------------------------------------- 26
TELEMARKETER-ENTITY REVOCATION – ENTITY SELECTION -------------------------------------------------------------------------------------------------------------------------------------------------------- 27
TELEMARKETER-ENTITY REVOCATION – PROFILE PAGE ----------------------------------------------------------------------------------------------------------------------------------------------------------------- 28
TELEMARKETER-ENTITY REVOCATION – REMARKS ----------------------------------------------------------------------------------------------------------------------------------------------------------------------- 29
TELEMARKETER-ENTITY REVOCATION – CONFIRMATION ---------------------------------------------------------------------------------------------------------------------------------------------------------------- 30
TELEMARKETER-ENTITY REVOCATION – STATUS --------------------------------------------------------------------------------------------------------------------------------------------------------------------------- 31
`HEADER-------------------------------------------------------------------------------------------------------------------------------------------------------------------------------------------------------------------- 32
HEADER CREATION – HEADER SECTION---------------------------------------------------------------------------------------------------------------------------------------------------------------------------------------- 33
HEADER CREATION – SELECTION OF ENTITY---------------------------------------------------------------------------------------------------------------------------------------------------------------------------------- 34
HEADER CREATION – HEADER TYPE SELECTION---------------------------------------------------------------------------------------------------------------------------------------------------------------------------- 35
HEADER CREATION – CATEGORY SELECTION--------------------------------------------------------------------------------------------------------------------------------------------------------------------------------- 36
HEADER CREATION - VALIDATION TABLE -------------------------------------------------------------------------------------------------------------------------------------------------------------------------------------- 37
HEADER CREATION – REQUEST SUBMISSION--------------------------------------------------------------------------------------------------------------------------------------------------------------------------------- 38
HEADER CREATION – REQUEST STATUS--------------------------------------------------------------------------------------------------------------------------------------------------------------------------------------- 39
HEADER ALLOTMENT APPROVAL------------------------------------------------------------------------------------------------------------------------------------------------------------------------------- 40
HEADER ALLOTMENT - MAIN TABLE----------------------------------------------------------------------------------------------------------------------------------------------------------------------------------------------- 41
HEADER ALLOTMENT – APPROVAL ----------------------------------------------------------------------------------------------------------------------------------------------------------------------------------------------- 42
HEADER ALLOTMENT – ACTIVE STATUS ---------------------------------------------------------------------------------------------------------------------------------------------------------------------------------------- 43
3

USER MANUAL
CONTENTSUSER FUNCTIONALITY PAGE #
HEADER ALLOTMENT - REJECTION----------------------------------------------------------------------------------------------------------------------------------------------------------------------------------------------- 44
HEADER ALLOTMENT – REJECTED STATUS ----------------------------------------------------------------------------------------------------------------------------------------------------------------------------------- 45
HEADER ALLOTMENT - REVOCATION--------------------------------------------------------------------------------------------------------------------------------------------------------------------------------------------- 46
HEADER ALLOTMENT – REVOKED STATUS------------------------------------------------------------------------------------------------------------------------------------------------------------------------------------- 47
TEMPLATE--------------------------------------------------------------------------------------------------------------------------------------------------------------------------------------------------------------- 48
TEMPLATE CREATION – TEMPLATE TABLE------------------------------------------------------------------------------------------------------------------------------------------------------------------------------------- 49
TEMPLATE CREATION – ENTITY SELECTION ------------------------------------------------------------------------------------------------------------------------------------------------------------------------------- 50
TEMPLATE CREATION – TEMPLATE NAME ---------------------------------------------------------------------------------------------------------------------------------------------------------------------------------- 51
TEMPLATE CREATION – CONTENT TYPE ------------------------------------------------------------------------------------------------------------------------------------------------------------------------------------- 52
TEMPLATE CREATION – CONSENT TEMPLATE----------------------------------------------------------------------------------------------------------------------------------------------------------------------------- 53
TEMPLATE CREATION – CONTENT CATEGORY ----------------------------------------------------------------------------------------------------------------------------------------------------------------------------- 54
TEMPLATE CREATION – TEMPLATE & COMMUNICATION TYPE ------------------------------------------------------------------------------------------------------------------------------------------------------- 55
TEMPLATE CREATION – CONTENT CREATION (COPY/PASTE) --------------------------------------------------------------------------------------------------------------------------------------------------------- 56
TEMPLATE CREATION - CONTENT CREATION (TYPE MESSAGE) ---------------------------------------------------------------------------------------------------------------------------------------------------- 57
TEMPLATE CREATION - REQUEST SUBMISSION--------------------------------------------------------------------------------------------------------------------------------------------------------------------------- 58
REPORTS -------------------------------------------------------------------------------------------------------------------------------------------------------------------------------------------------------------- 59
TELEMARKETER REPORTS--------------------------------------------------------------------------------------------------------------------------------------------------------------------------------------------------------- 60
PROFILE---------------------------------------------------------------------------------------------------------------------------------------------------------------------------------------------------------------- 61
PROFILE PAGE -------------------------------------------------------------------------------------------------------------------------------------------------------------------------------------------------------------------------- 62
4

USER MANUAL
CONTENTSUSER FUNCTIONALITY PAGE #
PROFILE UPDATE PAGE ------------------------------------------------------------------------------------------------------------------------------------------------------------------------------------------------------------ 63
PROFILE – CHANGE PASSWORD ------------------------------------------------------------------------------------------------------------------------------------------------------------------------------------------------- 64
SYSTEM REQUIREMENTS---------------------------------------------------------------------------------------------------------------------------------------------------------------------------------------- 65
SYSTEM REQUIREMENT - SPECIFICATIONS------------------------------------------------------------------------------------------------------------------------------------------------------------------------------------ 66
5

USER MANUAL
WEBSITE / LANDING PAGE
1
2
1Visit https://www.smartping.live URL
to Login/Register yourself as
Entity/Telemarketer
Incorrect URL: www.smartping.live
Correct URL: https://www.smartping.live
Note: Use the https://www before the URL to have the
secure user experience.
2 Click on Login/Signup button to Login or register
yourself as Entity/Telemarketer
6

USER MANUAL
REGISTRATION
7

1
2
USER MANUAL
REGISTRATION – SELECT TYPE OF REGISTRATION
To register yourself as a Telemarketer on the
portal, select the “As Telemarketer” option in
the Type of Operation.
Click Next button for further steps towards
registration.
1
2
A legal entity or person, who on behalf of entity or entities is
connected with telecom service provider directly or indirectly
for the purpose of aggregation or deliveryor both for SMS or
voice communication.
8

USER MANUAL
REGISTRATION - TELEMARKETER LOGIN /SINGUP PAGE
Click Sign Up Button to start registration
process.
Put in Email ID &Password and
Click Login Button to access the panel, if you
already registeredas Telemarketer.
Click Forgot password? in case you
forgot thepassword.
(The New Password will be sent to your Registered
Email ID.)
3
4
5
9
3
4
5

USER MANUAL
REGISTRATION - SELECT COMPANY LOCATION
Select the Location of Company. Choose Indian if
your company is Indian Origin.
Choose Overseas if your company is Overseas
origin.
After selecting the company’s location click Next
Button for further steps.
6
8
7
10
6 7
8

USER MANUAL
NEW TELEMARKETER REGISTRATION
11

USER MANUAL
Select the Registration type. Choose New
Registration if you are registering for the first
time.
After Selecting NewRegistration, confirm the
Payment terms by clicking Ok button.
Duly fill the customer acquisition form and
submit.
1
2
NEW TELEMARKETER REGISTRATION – FEE DETAILS
12
2
1

USER MANUAL
You will receive an OTP on your registered
Mobile number and Email ID to verify mobile
number. Enter OTP and click Submit button.
If in case OTP not received, click Resend
button
3
4
NEW TELEMARKETER REGISTRATION - SIGN UP/ OTPVERIFICATION
13
3
4

USER MANUAL
NEW TELEMARKETER REGISTRATION - EMAIL CONFIRMATION LINK
After verifying OTP, a verification link will be
sent to your registered email Id.
Click OK button once you read the message
and validate your mail by clicking the verification
link received on your registered email id.
Please check your email inbox as well as spam
folder for the verification link.
5
14
5

USER MANUAL
NEW TELEMARKETER REGISTRATION - EMAIL VERIFICATION CONFIRMATION
On successful email id verification you will
receive a message confirming the submission of
your application, press OK after reading the
message to close the notification.
Once Operator approves your application, you
will receive login credentials on your registered
email id.
Use the login credentials sent by the operator to
access the Telemarketer portal and Click Login
6
7
15
6
7

USER MANUAL
ENROLL TELEMARKETER (ALREADY REGISTERED)
16

USER MANUAL
2
1
Choose Enrol `Telemarketer if your
company is already registered on different
operator and Fill the form.
Telemarketeralready registeredwith other operator on
DLT can enrol by providing Telemarketer ID (DLT
RegistrationNumber)
1
After Selecting Enrol Telemarketer.
Confirm the Payment terms by Clicking Ok
button.
2
TELEMARKETER ENROLMENT – INITIATION
17

USER MANUAL
1
TELEMARKETER ENROLMENT – SUBMISSION OF TM ID
Type in the already registered Telemarketer Id
and click View details button. Duly Fill the form
and click Submit.
3
183

USER MANUAL
TELEMARKETER ENROLMENT – OTP /EMAIL VERIFICATION PROCESS
You will receive an One Time Password (OTP)
on your registered Mobile number and Email ID
to verify mobile number. Enter OTP and click
Submit button.
If in case OTP not received, click Resend button
After verifying OTP, a verification link will be
sent to your registered email Id.
Click OK button once you read the message and
validate your mail by clicking the verification link
received on your registered email id.
Please check your email inbox as well as spam
folder for the verification link.
4
5
6
19
4
5
6

USER MANUAL
TELEMARKETER ENROLMENT - SUCCESSFUL REQUEST SUBMISSION
On successful email id verification you will
receive a message confirming the submission of
your application, press OK after reading the
message to close the notification.
Once Operator approves your application, you
will receive login credentials on your registered
email id.
7
20
7

USER MANUAL
TELEMARKETER ENROLMENT - LOGINPANEL
If you already registered as Telemarketer, put
you Email ID & Password and
Click Login Button to access the panel.
8
21
8

USER MANUAL
ENTITY REQUEST APPROVAL
22

USER MANUAL
23
ENTITY REQUEST APPROVAL - PROCESS
To associate with Telemarketer for commercial
communication Entities will sent an online request for
approval to the Telemarketer fromtheir respective Entity
portal. To view the Request:
Select Entities Tab from the Sidebar
Select Approve radio button to approve the
request
A pop-up will appear to confirm the action, press
Yes to approve.
If you do not want to approve press Cancel.
Click on Pending Entity Request to view
the pending request sent by Entities for
association.
1
4
2
3
5
1
4
2
3
5

USER MANUAL
24
ENTITY REQUESTAPPROVAL - REJECTION
If the user want to reject the request received
from the Entity then press Reject radio button
A pop-up will appear to confirm therejection
process. Enter the rejection remarks and press
Reject button.
In case the user wants to stop the rejection
process, press Cancel button
6
8
7
78
6

USER MANUAL
25
9
10
ENTITY REQUEST APPROVAL – STATUS
Approved Entities can be viewed in the
Approved Section of Entities with status as
Active.
Rejected Entities can be viewed in the
Rejected/Revoked Section of Entities with
status as Active.
9
10

USER MANUAL
26
TELEMARKETER – ENTITYREVOCATION FUNCTION

USER MANUAL
27
1
3
The Telemarketer can Revoke the business relationship
with any of its associated Entities from the DLT panel. 2
1Choose the Entities from the sidebar.
Select the Approved section to view all the
active Entities associated with the
Telemarketer.
Click on the Status button and profile page will
open.
2
3
TELEMARKETER-ENTITY REVOCATION – ENTITY SELECTION

USER MANUAL
28
4
4
TELEMARKETER-ENTITY REVOCATION – PROFILE PAGE
In the Profile page Revoke button is
provided at the bottom right corner. Click on
the button to proceed the revoke function.

USER MANUAL
29
6
6
TELEMARKETER-ENTITY REVOCATION – REMARKS
5
5
7
Remarks column will appear which is
mandatory before proceeding to the final
revocation process.
2
5Once the Remarks are filled then press the
Revoke button provided.
If the revocation process needs to be
cancelled the same can be done by pressing
the Cancel button.

USER MANUAL
30
10
8
TELEMARKETER-ENTITY REVOCATION – CONFIRMATION
A Pop-up will appear to confirm the
revocation process.
Press Yes to confirm the action.9
Press Cancel to stop the revocation
process. 9
8 10

USER MANUAL
31
11
TELEMARKETER-ENTITY REVOCATION – STATUS
To see the revoked entries select the
Rejected/Revoked section.
12 The revoked Entities will be visible in the table
with Revoked status. 11
12

USER MANUAL
HEADERP – Promotional -
Messages which are purely promotional in nature send to all the prospects in the database by an
Entity basis on there preferences. Ex : All kind of Promotional messages.
O – Others- Includes Transactional, Service Implicit and Service Explicit messages.
(Transactional - Essential messages related to transaction. Ex: OTP.
Service Implicit - Service messages that are ought to be sent basis on the business relation with
the customer. Ex : Service Alert Messages
Service Explicit - Service messages that are send by the Entity which are promotional in nature but send
with prior consent. Ex : New offers for the Entity )
32

USER MANUAL
33
HEADER CREATION – HEADER SECTION
Telemarketers can create Headers on behalf of their
Principle Entities for commercial communication as per the
guidelines by TRAI. The process is as follows:
In the Telemarketer Portal select Header from
the sidebar.. It will open the Header section.
Created Headers tab shows all the headers
which are created by the Telemarketer for their
Entities.
Rejected Headers tab shows all the
headers which were sent for approval but
rejected by Operator.
To create New Header click on the New
Header tab as shown in the panel.
1
4
2
3
14
2 3

USER MANUAL
34
HEADERCREATION – SELECTION OF ENTITY
In the Entity ID section put a valid ID of the
Principle Entity forwhom the user wants to
create a header.
Entity Name will automatic appear in the Table.
NOTE : In case of Government Entitles, there will be Header
Exemption option (If selected you will have to upload verification
document)
5
6
5
6

USER MANUAL
35
HEADERCREATION – HEADER TYPE SELECTION
select the Header Type from the dropdown
available.
• Promotional
• Other
7
7

USER MANUAL
36
Select the Category before creating the Header
from the dropdown list given in the Category
section.
Category is optional for othertype of header and
mandatory for Promotional.
HEADERCREATION – CATEGORY SELECTION
8
8

USER MANUAL
Header type Entity Type Type Length Instructions
Promotional (P) All Numeric 6 Characters Allowed
Alpha Not Allowed
Other (O) Govt. Numeric 3-8 Characters Starts with 1 , length = 6 not allowed
Alpha 3-6 Characters Allowed
Non-Govt Numeric Not Allowed
Alpha 3-6 characters Allowed
Table – 1
HEADER CREATION - VALIDATION TABLE
37
USER MANUAL
38
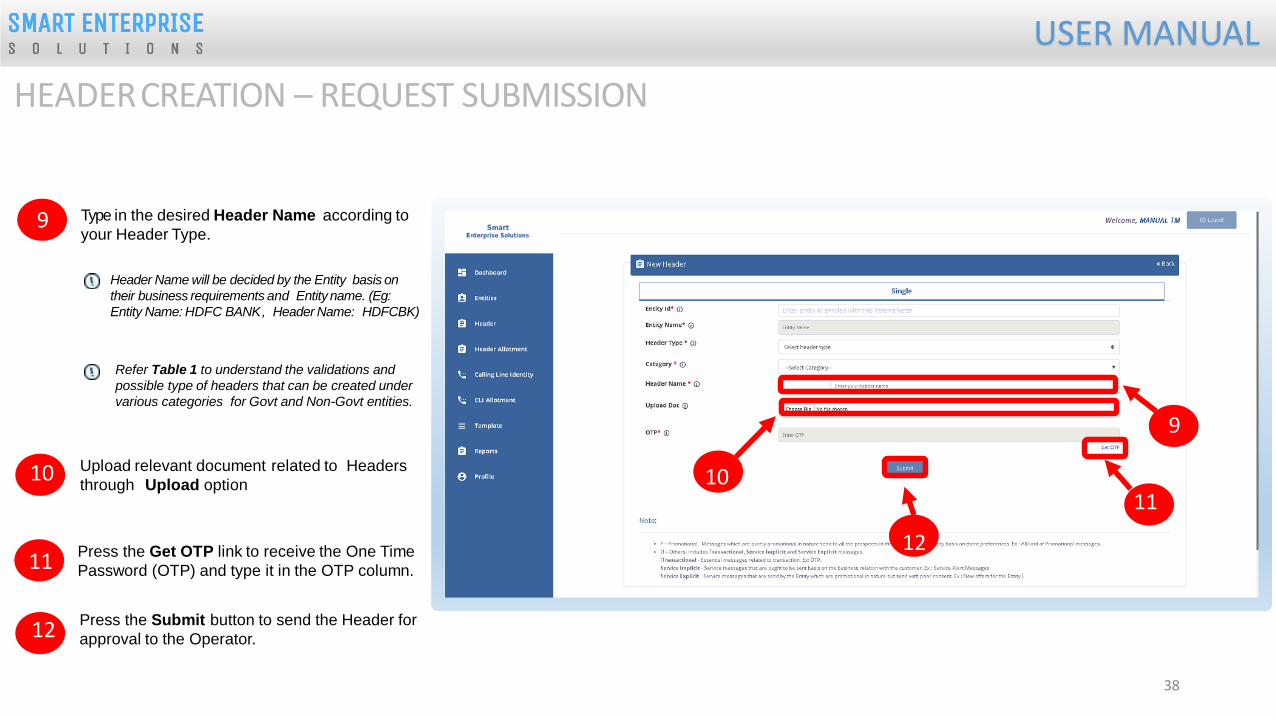
Type in the desired Header Name according to
your Header Type.
Header Name will be decided by the Entity basis on
their business requirements and Entity name. (Eg:
Entity Name: HDFC BANK, Header Name: HDFCBK)
Upload relevant document related to Headers
through Upload option
Press the Get OTP link to receive the One Time
Password (OTP) and type it in the OTP column.
Press the Submit button to send the Header for
approval to the Operator.
Refer Table 1 to understand the validations and
possible type of headers that can be created under
various categories for Govt and Non-Govt entities.
HEADERCREATION – REQUEST SUBMISSION
9
11
10
12
9
1110
12

USER MANUAL
39
The Header send for approval to the Operator
will be visible in the Created Header section with
Pending status.
The Header request created for entity by the
Telemarketer will fall in both Headers and Header allotment
tab with Pending status. Once approved from Operator both
the Header and the header allotment are done
simultaneously.
Once the Operator approves the Header the
status will change to Active and will be visible
in the created headers.
HEADERCREATION – REQUEST STATUS
14
13
13
14

USER MANUAL
HEADER ALLOTMENT APPROVAL
40
USER MANUAL
41
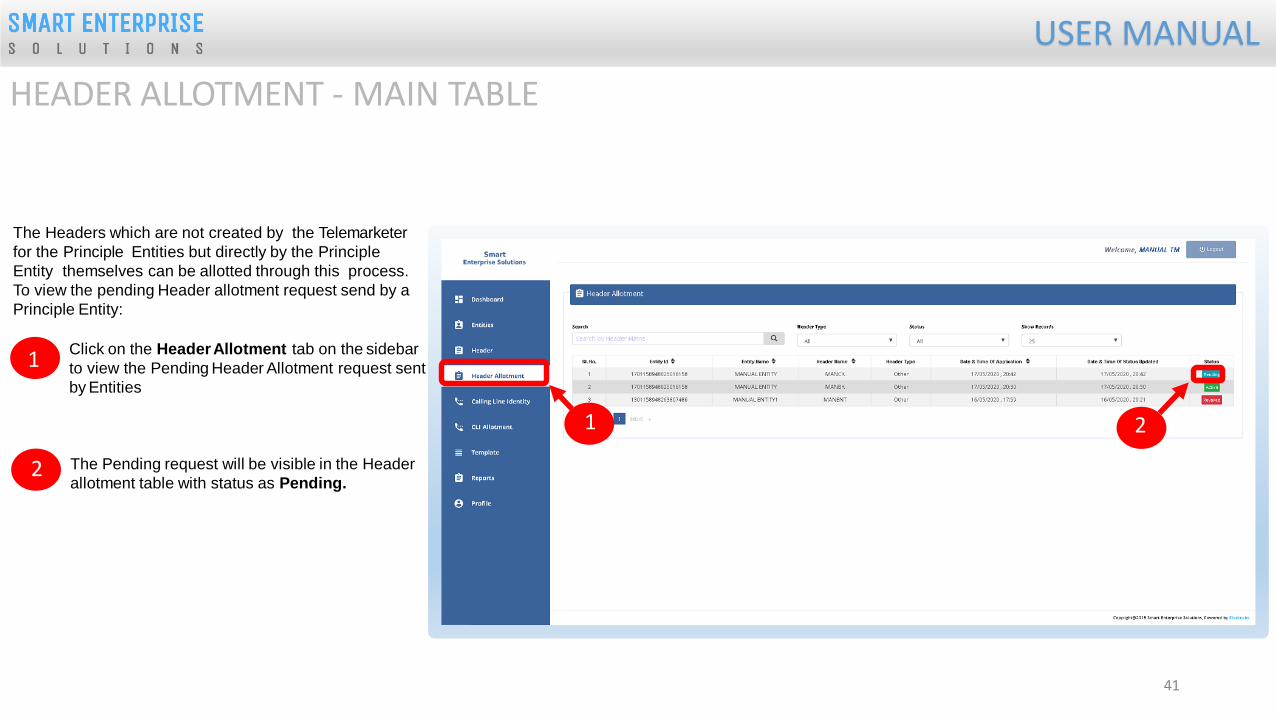
HEADER ALLOTMENT - MAIN TABLE
The Headers which are not created by the Telemarketer
for the Principle Entities but directly by the Principle
Entity themselves can be allotted through this process.
To view the pending Header allotment request send by a
Principle Entity:
Click on the HeaderAllotment tab on the sidebar
to view the Pending Header Allotment request sent
by Entities
The Pending request will be visible in the Header
allotment table with status as Pending.2
1
21

USER MANUAL
42
5
Click on the Pending Status anda pop-up will
appear with header details along approval
/Rejection button.
To approve the Header Allotment request, press
Approve button
Once you click the approve button there willbe
another pop-up for confirmation of the header
allotment.
If the user wants to stop the confirmation then
press Cancel
Press Yes to confirm.
HEADER ALLOTMENT – APPROVAL
5
4
6
3
7
67
3
4

USER MANUAL
43
Once approved the entry will reflect with Active
Status in the Head Allotment Table.
HEADER ALLOTMENT – ACTIVE STATUS
8
8

USER MANUAL
44
HEADER ALLOTMENT -REJECTION
In case the Header allotment request needs to be
rejected due to any reason, then press Reject
button
Upon clicking the reject button another pop-up
box will appear to confirm the action.
Put the valid remarks and press Yes button to
confirm the rejection. (Remarks are mandatory)
If the user wants to cancel the rejection process
then press Cancel button.
9
10
11
12
9
101112

USER MANUAL
45
Once rejected the entry will reflect with
Rejected Status in the Head Allotment Table.
HEADER ALLOTMENT – REJECTED STATUS
13
13

USER MANUAL
46
HEADER ALLOTMENT - REVOCATION
The allotted headers by an Entity can be delinked with
Revoke button from Header Allotment section of a
Telemarketer Panel
Click on the Active Status in the Header allotment
table.
A pop-up box will appear with the Header details
along with the option to Revoke.
Press Revoke to delink the header allotment
process.
Press Yes to confirm the Allotment revocation
process after putting a valid reason/remarks. (Remarks are mandatory)
Another pop-up box will appear to confirm the
action.
Press No to cancel the revocation process.
14
15
16
17
18
19
14
16
16
15
17
1819

USER MANUAL
47
Once revoked the entry will reflect with
Revoked Status in the Head Allotment Table.
HEADER ALLOTMENT – REVOKED STATUS
20
20

USER MANUAL
TEMPLATE
48

USER MANUAL
49
TEMPLATE CREATION – TEMPLATE TABLE
Templates are created for Commercial Communication
and as per TRAI guidelines all the Principle Entities needs
to register their Templates before sending Commercial
Communication.
In the Telemarketer portal on the side bar click
on the Templates option to view the Template
page.
In the Template page user can click on Add
New Template button to create new
Templates.
1
2
1
2

USER MANUAL
50
Select /type the Entity ID of the Principle
Entity for whom the Template to be created.
The Name of the Entity will be displayed
along with the Entity ID.
TEMPLATE CREATION – ENTITY SELECTION
33

USER MANUAL
51
Fill an appropriate Template name basis on
the business requirement in the Template
Name column
TEMPLATE CREATION – TEMPLATE NAME
4
4

USER MANUAL
52
In the Content Type the user can select any of
the following options:
• Transactional
• Promotional
• Service Explicit
• Service Implicit
TEMPLATE CREATION – CONTENT TYPE
5
5

USER MANUAL
53
In the Consent Template ID column select the
appropriate Consent Template registered on DLT
from the dropdown list.
TEMPLATE CREATION – CONSENT TEMPLATE
6
6Consent Template ID is not mandatory for
Transactional and Service Implicit commercial
communications.

USER MANUAL
54
In the Content Category column select any
of the Category from the dropdown list as per
the business requirement of the Entity.
TEMPLATE CREATION – CONTENT CATEGORY
7
7
Content Category is only mandatory in case of
Promotional messages.

USER MANUAL
55
In the Communication Type column the
user will select the type of
communication from the following:
• Call
• SMS
In the Template Type column it willbe:
• Text
• Unicode
(user need not select the option it will be auto selected
basis on the content user is creating.)
TEMPLATE CREATION – TEMPLATE & COMMUNICATION TYPE
9
8
89

USER MANUAL
56
TEMPLATE CREATION – CONTENT CREATION (COPY/PASTE)
In the Content creation section there are two options
available:
• Copy/Paste Message
• Create New Message(Type)
Select any of the option basis on the requirement of
content creation.
In the Copy/Paste Message option copy any
message and create the required content for the
Template.
10
10

USER MANUAL
57
In the Create New Message option type the
required content.
In the Create New Message Box type the
required content and to add variables there are
options available on the panel..
Messages in languages other than English can
be created, such templates type will be treated
as Unicode. Language can be selected from the dropdown list.
TEMPLATE CREATION - CONTENT CREATION (TYPE MESSAGE)
11
12
13 11
13
12

USER MANUAL
58
Press Submit button to confirm and send the
request for approval
Press the Get OTP link to get a One Time
Password on your registered Mobile and email id,
type the OTP in the OTP column to authenticate
the template creation process.
TEMPLATE CREATION - REQUEST SUBMISSION
14
15
15
14

USER MANUAL
REPORTS
59

USER MANUAL
Select the Report Type.
Select the Status or else by default it will be All
Select the relevant date option for Report
Select the date range for which the report
needs to be generated.
Press Submit button to generate the report.
TELEMARKETER REPORTS
Select the Reports from the sidebar of the
panel.
2
4
3
5
1
6
60
2
43
5
1
6

USER MANUAL
PROFILE
61

USER MANUAL
Profile Page contains the details of the Entity and the
Authorized Representative of the Company..
PROFILE PAGE
Click on the Profile available on the sidebar
Click on the Edit button to update or change
the Authorized Person’s details.
Click on the Click Here link to change the
password.
1
2
3
62
1
2
3

USER MANUAL
In the Update Profile page user can update the
following details:
• Name of the Authorized Person
• Designation of the Authorized Person
• Mobile number of the Authorized Person
• Email ID of the Authorized Person
PROFILE UPDATE PAGE
Upload the authorization document
Eg: Board Resolution copy or letter from the
Authority of the Company.
Submit the request to update the details.
Once the Operator approves the details will get
updated.
5
4
6
4
6
5
63

USER MANUAL
In the Password Reset Page user can change the
password
PROFILE – CHANGE PASSWORD
Type the old password here.
Type the new password and then confirm it
again (Check the password strength).
Press the Submit button and the new
password will be activated instantly.
7
8
9
7
8
9
64

USER MANUAL
SYSTEM REQUIREMENTS
65

USER MANUAL
Requirements Recommended
Web Browser
Google Chrome (Latest
Version), Mozilla Firefox
(Version 70.0.1)
Operating System
Windows 7, 8 ,10
Ubuntu 19.10
RAM Minimum 4 GB
Internet Connectivity 1Mbps & Above
SYSTEM REQUIREMENT - SPECIFICATIONS
The website is best viewed on:
66

USER MANUAL
Thank You !
67