powerpoint xp module - western illinois · pdf filethe customize option will allow you to ......
TRANSCRIPT
Office of Teacher Education Partnerships • College of Education and Human Services 113 Horrabin Hall • Western Illinois University • Macomb, IL 61455
1 of 38
TECHNOLOGY COMPETENCY ASSESSMENT MODULE Microsoft® PowerPoint This module was developed to assist students in passing the SkillCheck Incorporated PowerPoint 2003 Technology Competency Assessment. It was last updated 11/3/05. All rights reserved, copies may be made only with permission granted through Western Illinois University College of Education and Human Services.
Office of Teacher Education Partnerships • College of Education and Human Services 113 Horrabin Hall • Western Illinois University • Macomb, IL 61455
2 of 38
Presentation Overview: Microsoft® PowerPoint Microsoft® PowerPoint is a program which allows you to create colorful digital presentations or slide shows. These slide shows can incorporate graphs, charts, clip art, and an array of special effects. You can also create handouts, overhead transparencies (both color and black and white), and 35mm slides from the presentation. Generally, the program is used for creating and sharing presentations. To create presentations, you must create and design slides. In Microsoft® PowerPoint, your entire presentation is in one file, including all the slides, the outline, the speaker's notes, and the handouts. There are pre-set slide layouts for you to choose from; some are designed for typing text, some let you add graphs, charts, and images. You can change the look of your presentation, including format, background, and colors, at any time. Microsoft® PowerPoint also comes with over 100 background templates, each with its own color scheme. Many teachers use Microsoft® PowerPoint in the classroom to enhance direct instruction of content by using it to introduce new topics, add to learning centers, offer interactive quizzes, offer math problems of the day, and much more. Students, too, are using this application for classroom presentations to create yearbooks, daily newscasts, and other project based activities. At the end of this module, users should be able to:
• Understand the Microsoft® PowerPoint Toolbars
• Understand Microsoft® PowerPoint Views
• Create a presentation
• Insert slides, text, and clip art
• Add custom animation
• Add slide transitions
• View the entire slide show
• Add content such as motion clips, movies, charts, and tables
• Print the slide show
• Package presentation for CD
Office of Teacher Education Partnerships • College of Education and Human Services 113 Horrabin Hall • Western Illinois University • Macomb, IL 61455
3 of 38
Lesson 1 – Exploring Terms, Toolbars, and Views of Microsoft PowerPoint • PowerPoint terms • PowerPoint menu items • PowerPoint views
Lesson 2 – Building the Presentation
• Choose title slide • Type and edit text • Apply slide design • Format text • Add new slides • Save presentation
Lesson 3 – Exploring Views of Presentation
• Normal view • Slide view • Slide Sorter view • Re-order slides • Change slide layout • Delete slide
Lesson 4 – Adding Clip Art and Animation
• Insert clip art without placeholder • Add animation
Lesson 5 – Viewing the Presentation
• View entire show • View show from current slide • Add transitions
Lesson 6 – Using Draw Tools
• Add Draw toolbar • Draw shape
Lesson 7 – Exploring PowerPoint Features
• Insert Microsoft Graph Chart • Insert motion clip and movie files • Add table
Lesson 8 – Printing the Presentation
• Print slides • Print handouts • Print speaker notes • Package presentation for CD
Office of Teacher Education Partnerships • College of Education and Human Services 113 Horrabin Hall • Western Illinois University • Macomb, IL 61455
4 of 38
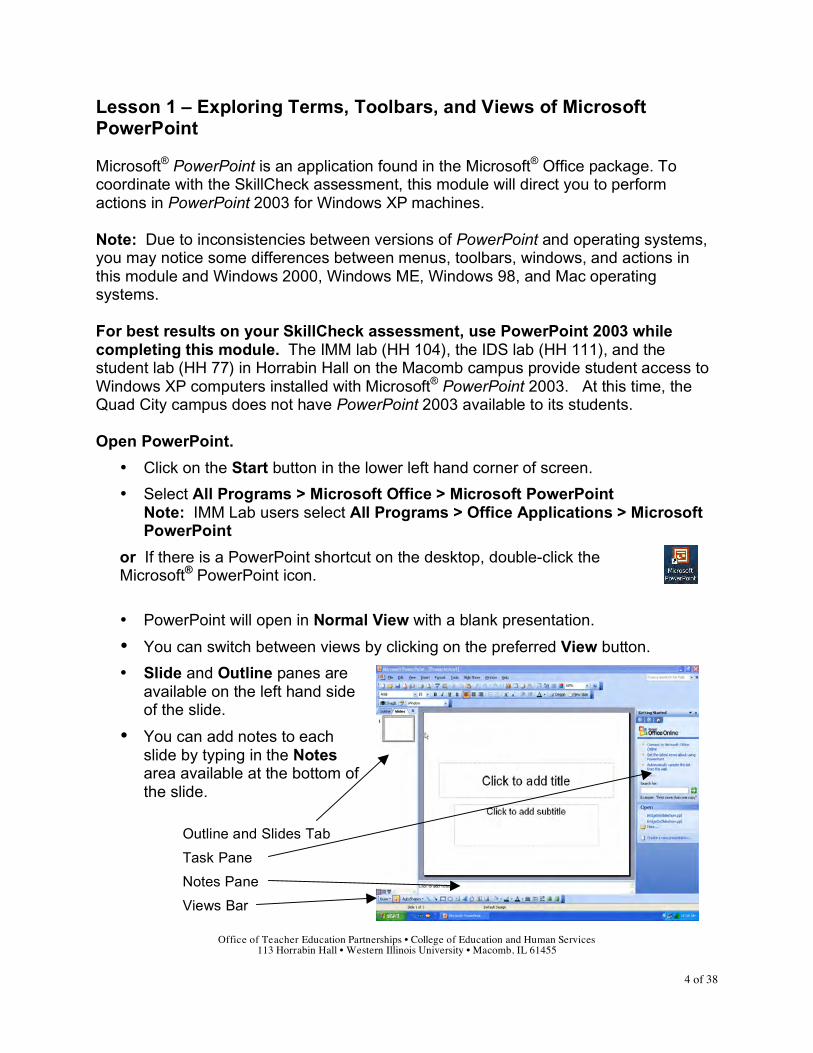
Lesson 1 – Exploring Terms, Toolbars, and Views of Microsoft PowerPoint Microsoft® PowerPoint is an application found in the Microsoft® Office package. To coordinate with the SkillCheck assessment, this module will direct you to perform actions in PowerPoint 2003 for Windows XP machines. Note: Due to inconsistencies between versions of PowerPoint and operating systems, you may notice some differences between menus, toolbars, windows, and actions in this module and Windows 2000, Windows ME, Windows 98, and Mac operating systems. For best results on your SkillCheck assessment, use PowerPoint 2003 while completing this module. The IMM lab (HH 104), the IDS lab (HH 111), and the student lab (HH 77) in Horrabin Hall on the Macomb campus provide student access to Windows XP computers installed with Microsoft® PowerPoint 2003. At this time, the Quad City campus does not have PowerPoint 2003 available to its students. Open PowerPoint.
• Click on the Start button in the lower left hand corner of screen.
• Select All Programs > Microsoft Office > Microsoft PowerPoint Note: IMM Lab users select All Programs > Office Applications > Microsoft PowerPoint
or If there is a PowerPoint shortcut on the desktop, double-click the Microsoft® PowerPoint icon.
• PowerPoint will open in Normal View with a blank presentation.
• You can switch between views by clicking on the preferred View button.
• Slide and Outline panes are available on the left hand side of the slide.
• You can add notes to each slide by typing in the Notes area available at the bottom of the slide.
Outline and Slides Tab
Notes Pane
Views Bar
Task Pane
Office of Teacher Education Partnerships • College of Education and Human Services 113 Horrabin Hall • Western Illinois University • Macomb, IL 61455
5 of 38
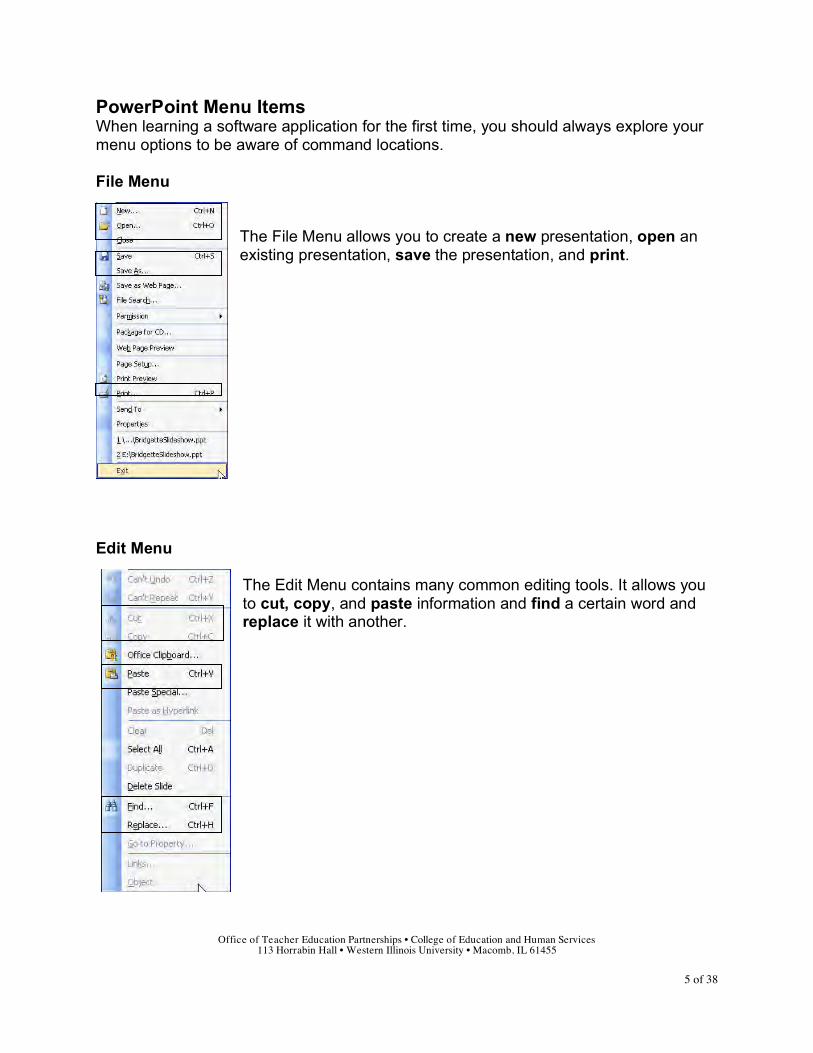
PowerPoint Menu Items When learning a software application for the first time, you should always explore your menu options to be aware of command locations. File Menu
The File Menu allows you to create a new presentation, open an existing presentation, save the presentation, and print.
Edit Menu
The Edit Menu contains many common editing tools. It allows you to cut, copy, and paste information and find a certain word and replace it with another.
Office of Teacher Education Partnerships • College of Education and Human Services 113 Horrabin Hall • Western Illinois University • Macomb, IL 61455
6 of 38
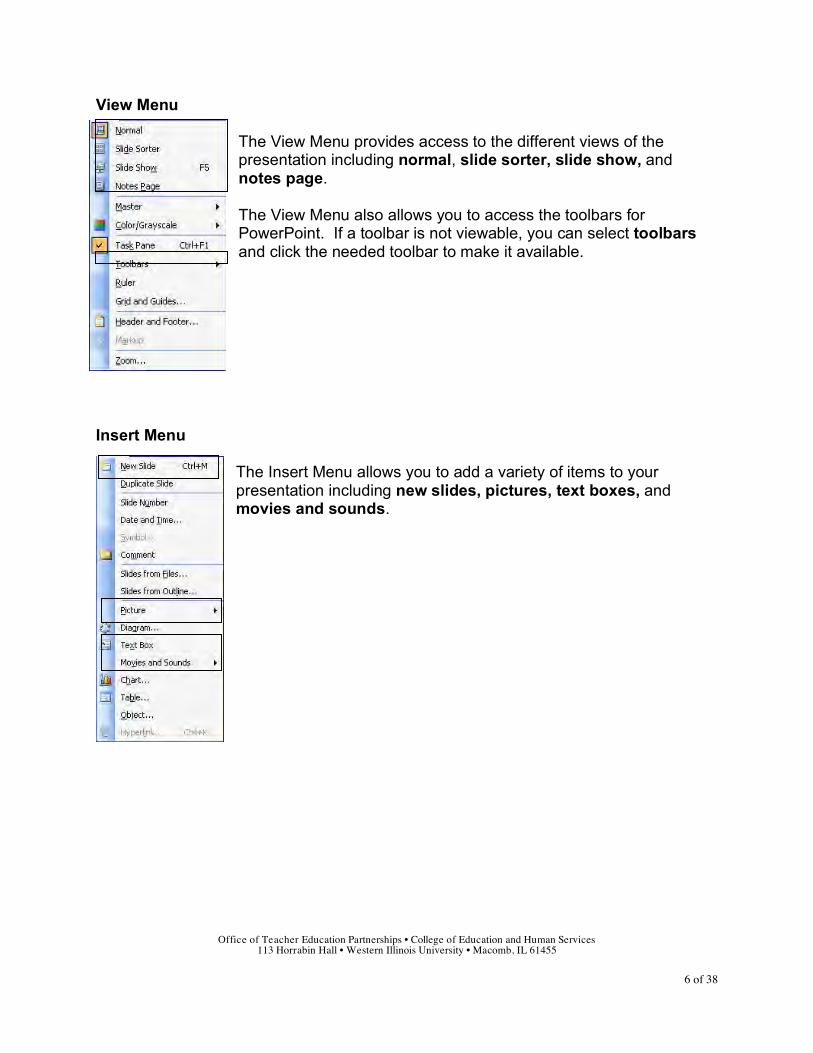
View Menu The View Menu provides access to the different views of the presentation including normal, slide sorter, slide show, and notes page. The View Menu also allows you to access the toolbars for PowerPoint. If a toolbar is not viewable, you can select toolbars and click the needed toolbar to make it available.
Insert Menu
The Insert Menu allows you to add a variety of items to your presentation including new slides, pictures, text boxes, and movies and sounds.
Office of Teacher Education Partnerships • College of Education and Human Services 113 Horrabin Hall • Western Illinois University • Macomb, IL 61455
7 of 38
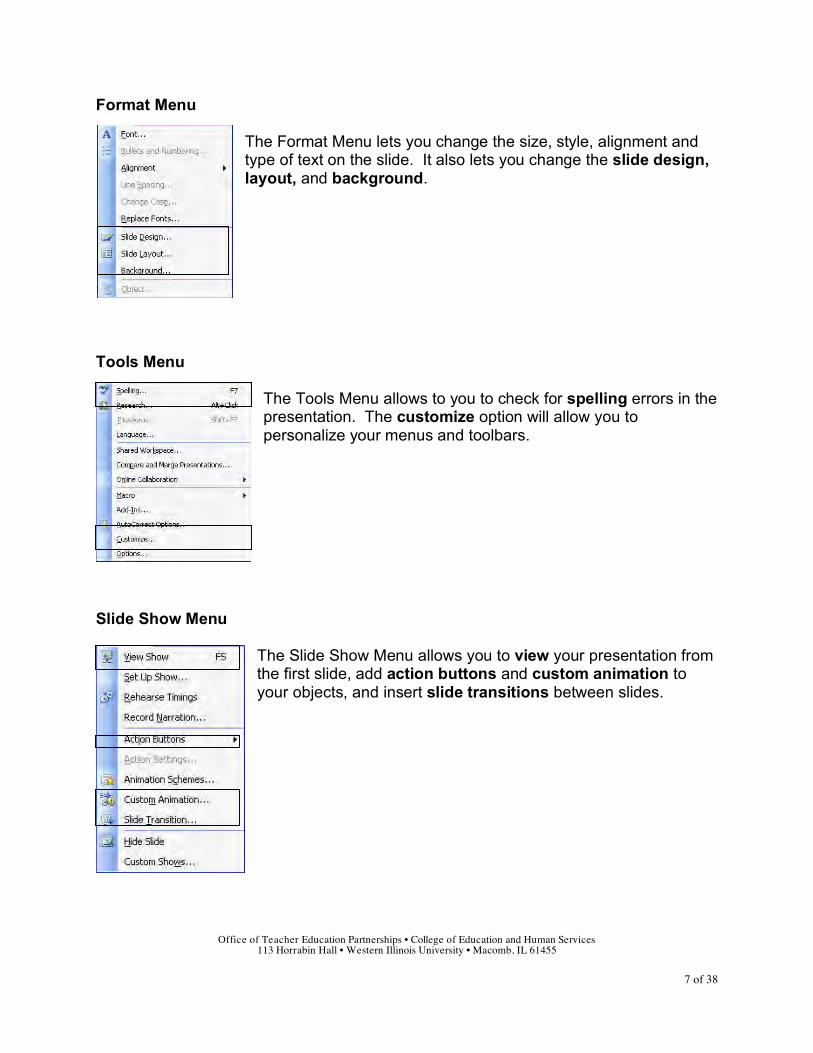
Format Menu The Format Menu lets you change the size, style, alignment and type of text on the slide. It also lets you change the slide design, layout, and background.
Tools Menu
The Tools Menu allows to you to check for spelling errors in the presentation. The customize option will allow you to personalize your menus and toolbars.
Slide Show Menu
The Slide Show Menu allows you to view your presentation from the first slide, add action buttons and custom animation to your objects, and insert slide transitions between slides.
Office of Teacher Education Partnerships • College of Education and Human Services 113 Horrabin Hall • Western Illinois University • Macomb, IL 61455
8 of 38
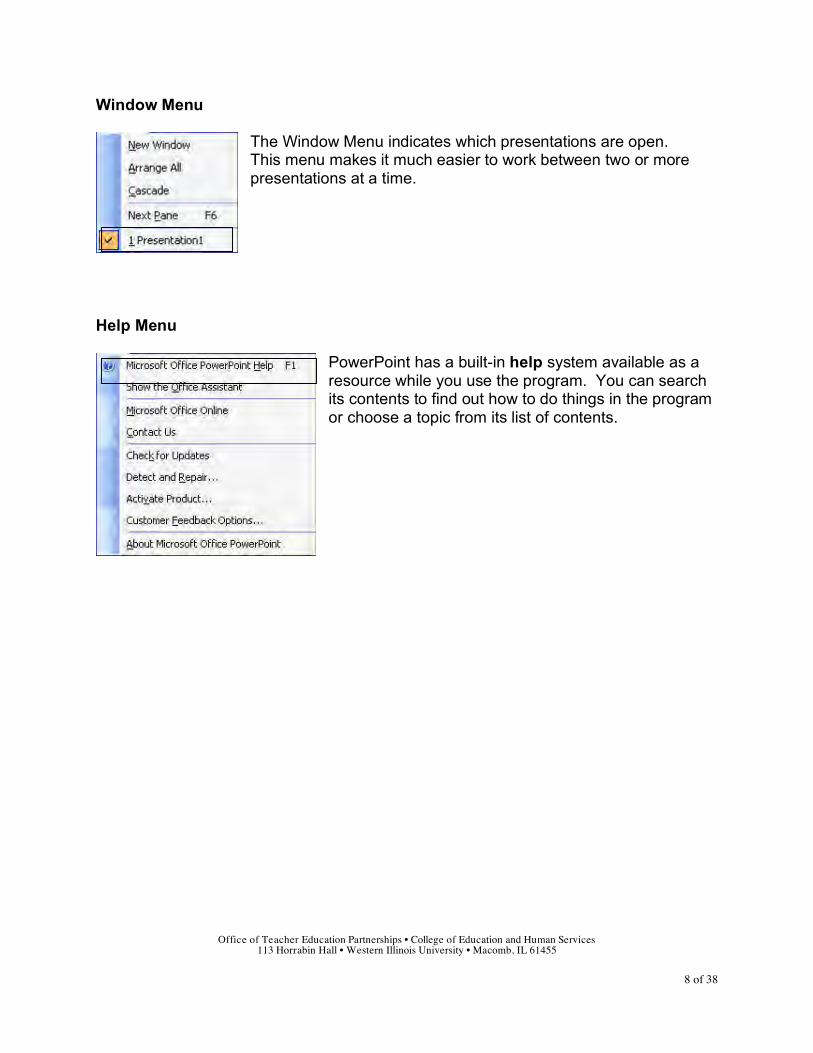
Window Menu The Window Menu indicates which presentations are open. This menu makes it much easier to work between two or more presentations at a time.
Help Menu
PowerPoint has a built-in help system available as a resource while you use the program. You can search its contents to find out how to do things in the program or choose a topic from its list of contents.
Office of Teacher Education Partnerships • College of Education and Human Services 113 Horrabin Hall • Western Illinois University • Macomb, IL 61455
9 of 38
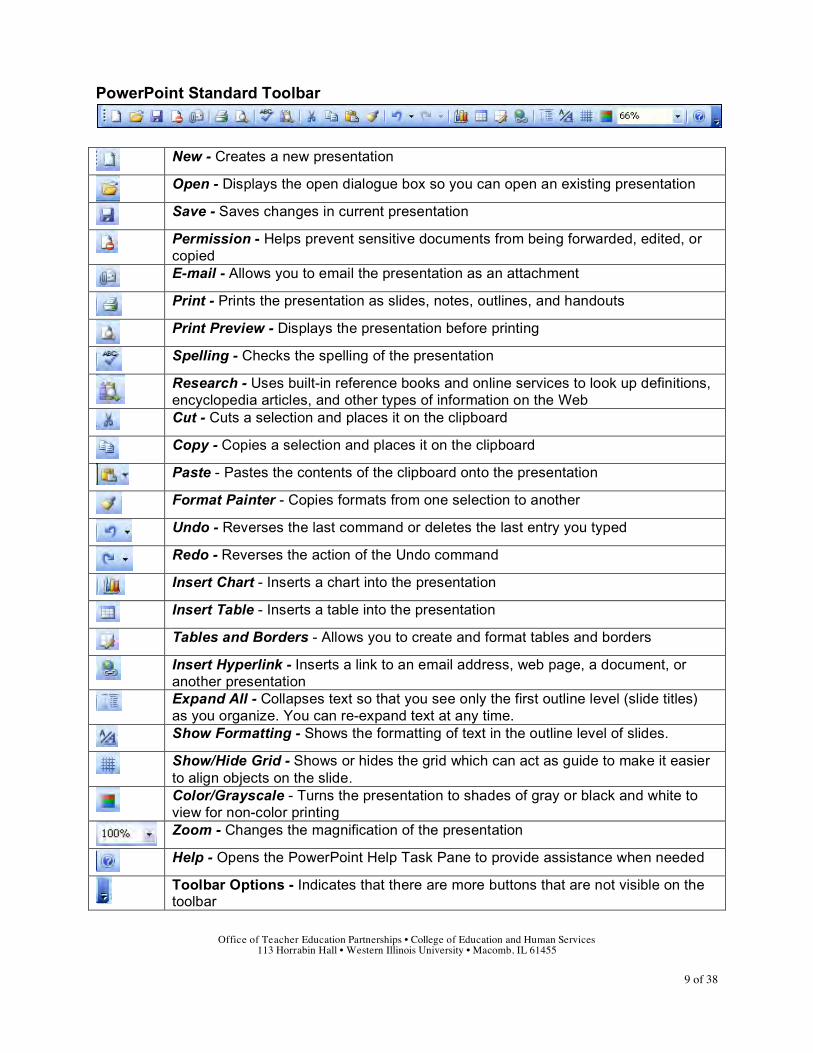
PowerPoint Standard Toolbar
New - Creates a new presentation
Open - Displays the open dialogue box so you can open an existing presentation
Save - Saves changes in current presentation
Permission - Helps prevent sensitive documents from being forwarded, edited, or copied
E-mail - Allows you to email the presentation as an attachment
Print - Prints the presentation as slides, notes, outlines, and handouts
Print Preview - Displays the presentation before printing
Spelling - Checks the spelling of the presentation
Research - Uses built-in reference books and online services to look up definitions, encyclopedia articles, and other types of information on the Web
Cut - Cuts a selection and places it on the clipboard
Copy - Copies a selection and places it on the clipboard
Paste - Pastes the contents of the clipboard onto the presentation
Format Painter - Copies formats from one selection to another
Undo - Reverses the last command or deletes the last entry you typed
Redo - Reverses the action of the Undo command
Insert Chart - Inserts a chart into the presentation
Insert Table - Inserts a table into the presentation
Tables and Borders - Allows you to create and format tables and borders
Insert Hyperlink - Inserts a link to an email address, web page, a document, or another presentation
Expand All - Collapses text so that you see only the first outline level (slide titles) as you organize. You can re-expand text at any time.
Show Formatting - Shows the formatting of text in the outline level of slides.
Show/Hide Grid - Shows or hides the grid which can act as guide to make it easier to align objects on the slide.
Color/Grayscale - Turns the presentation to shades of gray or black and white to view for non-color printing
Zoom - Changes the magnification of the presentation
Help - Opens the PowerPoint Help Task Pane to provide assistance when needed
Toolbar Options - Indicates that there are more buttons that are not visible on the toolbar
Office of Teacher Education Partnerships • College of Education and Human Services 113 Horrabin Hall • Western Illinois University • Macomb, IL 61455
10 of 38
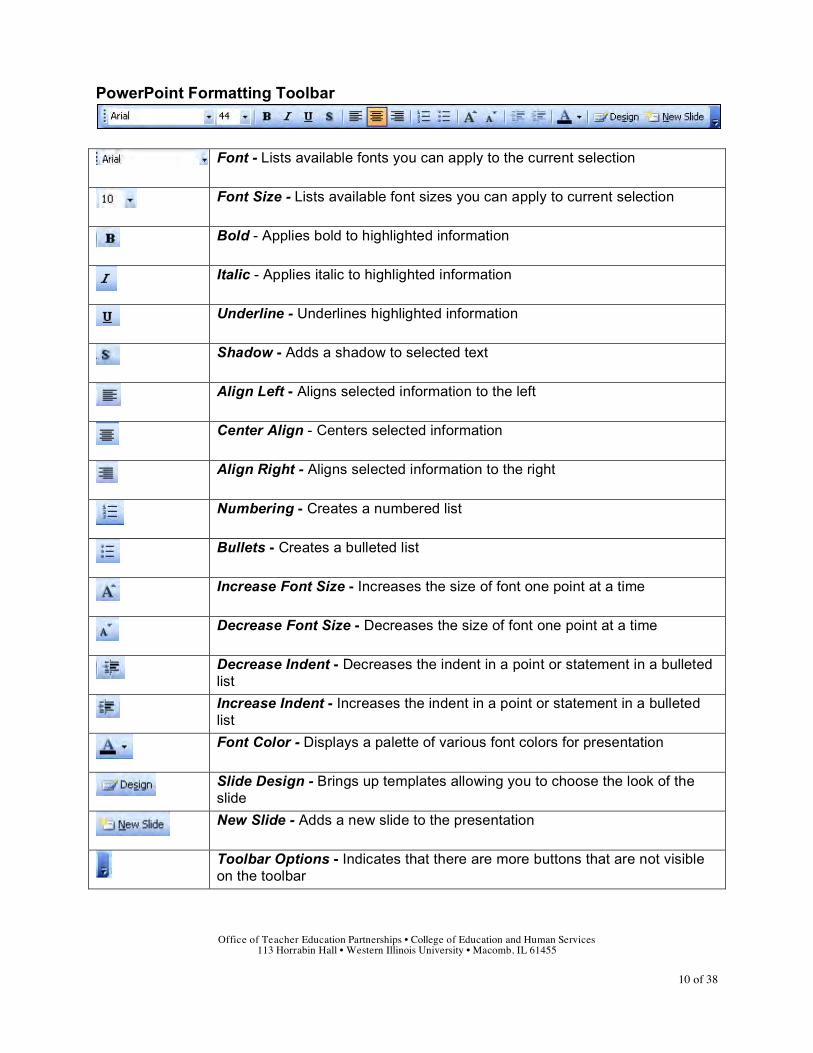
PowerPoint Formatting Toolbar
Font - Lists available fonts you can apply to the current selection
Font Size - Lists available font sizes you can apply to current selection
Bold - Applies bold to highlighted information
Italic - Applies italic to highlighted information
Underline - Underlines highlighted information
Shadow - Adds a shadow to selected text
Align Left - Aligns selected information to the left
Center Align - Centers selected information
Align Right - Aligns selected information to the right
Numbering - Creates a numbered list
Bullets - Creates a bulleted list
Increase Font Size - Increases the size of font one point at a time
Decrease Font Size - Decreases the size of font one point at a time
Decrease Indent - Decreases the indent in a point or statement in a bulleted list
Increase Indent - Increases the indent in a point or statement in a bulleted list
Font Color - Displays a palette of various font colors for presentation
Slide Design - Brings up templates allowing you to choose the look of the slide
New Slide - Adds a new slide to the presentation
Toolbar Options - Indicates that there are more buttons that are not visible on the toolbar
Office of Teacher Education Partnerships • College of Education and Human Services 113 Horrabin Hall • Western Illinois University • Macomb, IL 61455
11 of 38
PowerPoint Terms Presentation: A Microsoft® PowerPoint presentation is a collection of slides, handouts, speaker notes, and outline, all in one file. As you create slides, you are designing and formatting the presentation. Slides: Slides are the individual pages of your presentation. They can have text, titles, graphs, drawn objects, clip art, and more. Handouts: Smaller, printed versions of your slides with 2, 3, or 6 per page. You can also print name, date and page numbers on them. Speaker Notes: A small image of the slide along with any notes you type for yourself. Outlines: An outline form of your presentation, where titles and main text are visible, but not clip art or additional text. You can also print your outline. Placeholders: Placeholders are areas on a slide that have been designated for titles, text, graphics, etc. to assist you on the design of the slide. On new slides, dashed boxes will designate placeholders. Once text or images have been placed, the dashed boxes disappear from view on the slide until you click on the text or object.
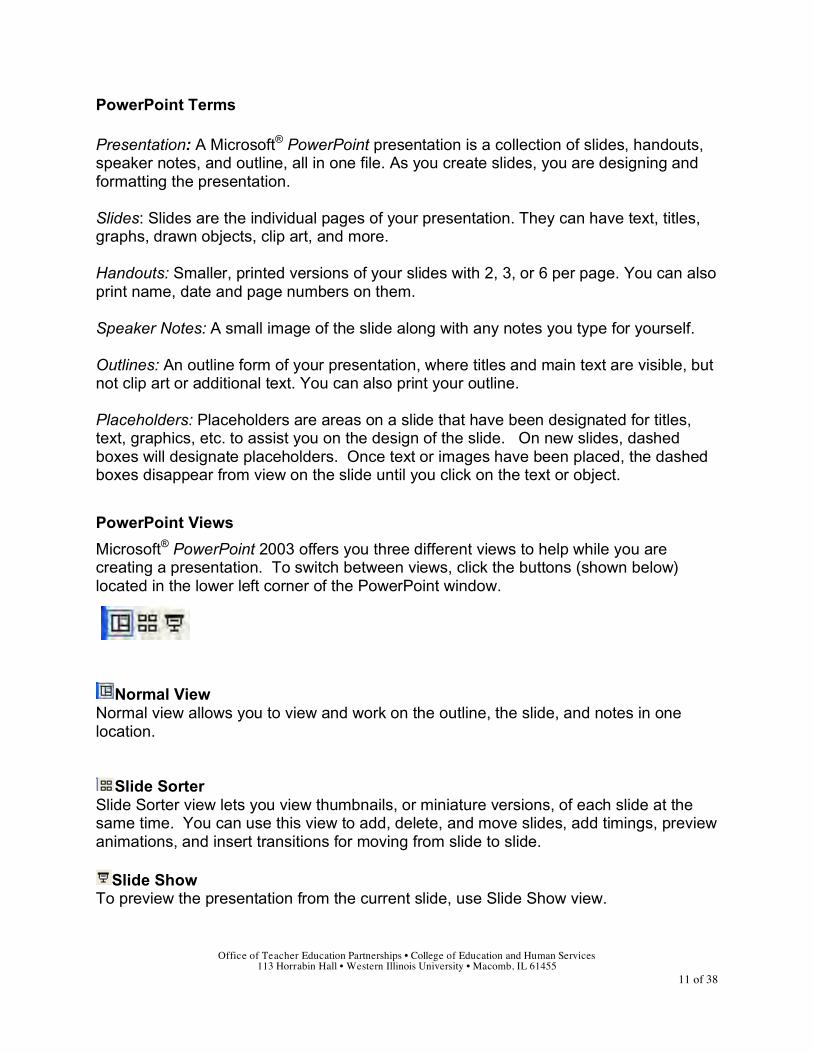
PowerPoint Views
Microsoft® PowerPoint 2003 offers you three different views to help while you are creating a presentation. To switch between views, click the buttons (shown below) located in the lower left corner of the PowerPoint window.
Normal View Normal view allows you to view and work on the outline, the slide, and notes in one location.
Slide Sorter Slide Sorter view lets you view thumbnails, or miniature versions, of each slide at the same time. You can use this view to add, delete, and move slides, add timings, preview animations, and insert transitions for moving from slide to slide.
Slide Show To preview the presentation from the current slide, use Slide Show view.
Office of Teacher Education Partnerships • College of Education and Human Services 113 Horrabin Hall • Western Illinois University • Macomb, IL 61455
12 of 38
Lesson 2 – Building the Presentation
Create new presentation from template.
• Open PowerPoint if you have not already opened the program.
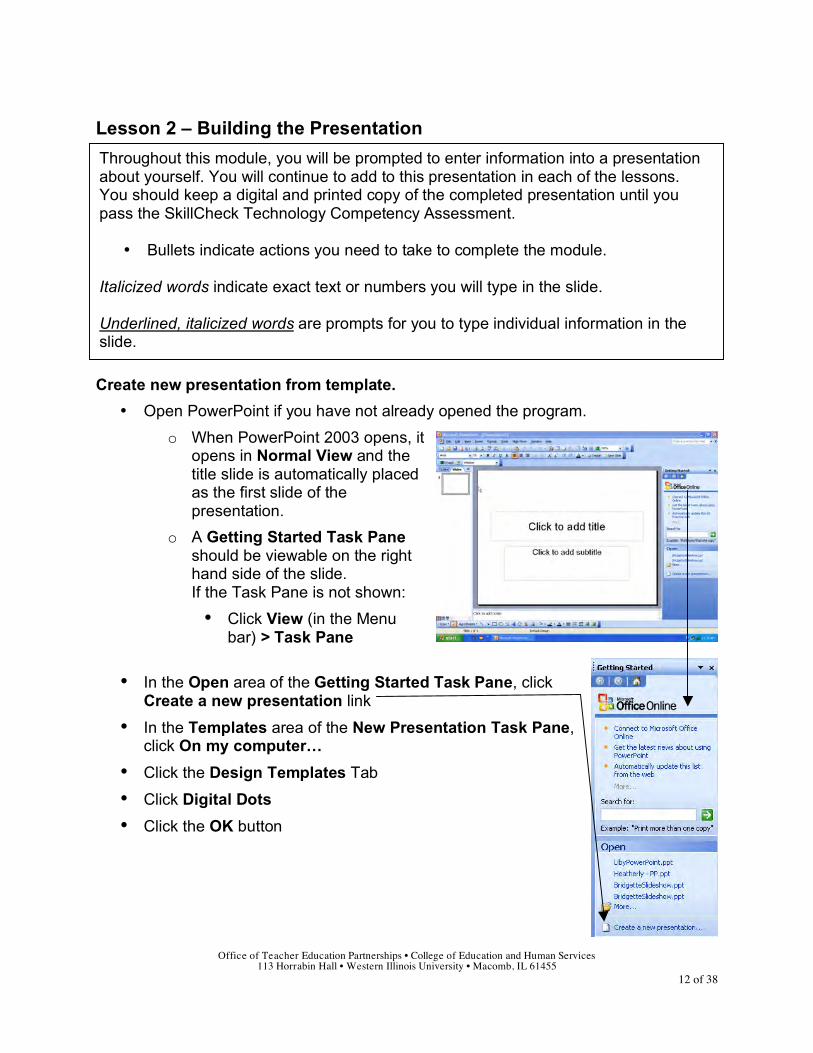
o When PowerPoint 2003 opens, it opens in Normal View and the title slide is automatically placed as the first slide of the presentation.
o A Getting Started Task Pane should be viewable on the right hand side of the slide. If the Task Pane is not shown:
• Click View (in the Menu bar) > Task Pane
• In the Open area of the Getting Started Task Pane, click Create a new presentation link
• In the Templates area of the New Presentation Task Pane, click On my computer…
• Click the Design Templates Tab
• Click Digital Dots
• Click the OK button
Throughout this module, you will be prompted to enter information into a presentation about yourself. You will continue to add to this presentation in each of the lessons. You should keep a digital and printed copy of the completed presentation until you pass the SkillCheck Technology Competency Assessment.
• Bullets indicate actions you need to take to complete the module.
Italicized words indicate exact text or numbers you will type in the slide. Underlined, italicized words are prompts for you to type individual information in the slide.
Office of Teacher Education Partnerships • College of Education and Human Services 113 Horrabin Hall • Western Illinois University • Macomb, IL 61455
13 of 38
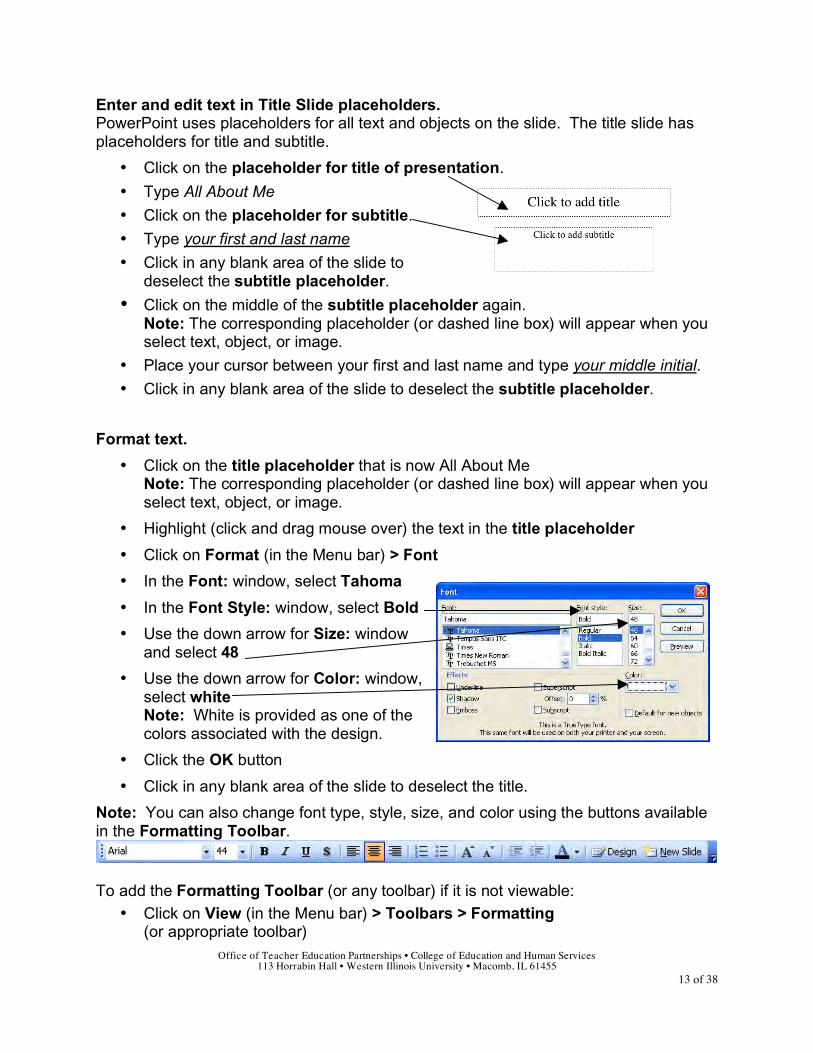
Enter and edit text in Title Slide placeholders. PowerPoint uses placeholders for all text and objects on the slide. The title slide has placeholders for title and subtitle.
• Click on the placeholder for title of presentation.
• Type All About Me
• Click on the placeholder for subtitle.
• Type your first and last name
• Click in any blank area of the slide to deselect the subtitle placeholder.
• Click on the middle of the subtitle placeholder again. Note: The corresponding placeholder (or dashed line box) will appear when you select text, object, or image.
• Place your cursor between your first and last name and type your middle initial. • Click in any blank area of the slide to deselect the subtitle placeholder.
Format text.
• Click on the title placeholder that is now All About Me Note: The corresponding placeholder (or dashed line box) will appear when you select text, object, or image.
• Highlight (click and drag mouse over) the text in the title placeholder
• Click on Format (in the Menu bar) > Font
• In the Font: window, select Tahoma
• In the Font Style: window, select Bold
• Use the down arrow for Size: window and select 48
• Use the down arrow for Color: window, select white Note: White is provided as one of the colors associated with the design.
• Click the OK button
• Click in any blank area of the slide to deselect the title.
Note: You can also change font type, style, size, and color using the buttons available in the Formatting Toolbar.
To add the Formatting Toolbar (or any toolbar) if it is not viewable:
• Click on View (in the Menu bar) > Toolbars > Formatting (or appropriate toolbar)
Office of Teacher Education Partnerships • College of Education and Human Services 113 Horrabin Hall • Western Illinois University • Macomb, IL 61455
14 of 38
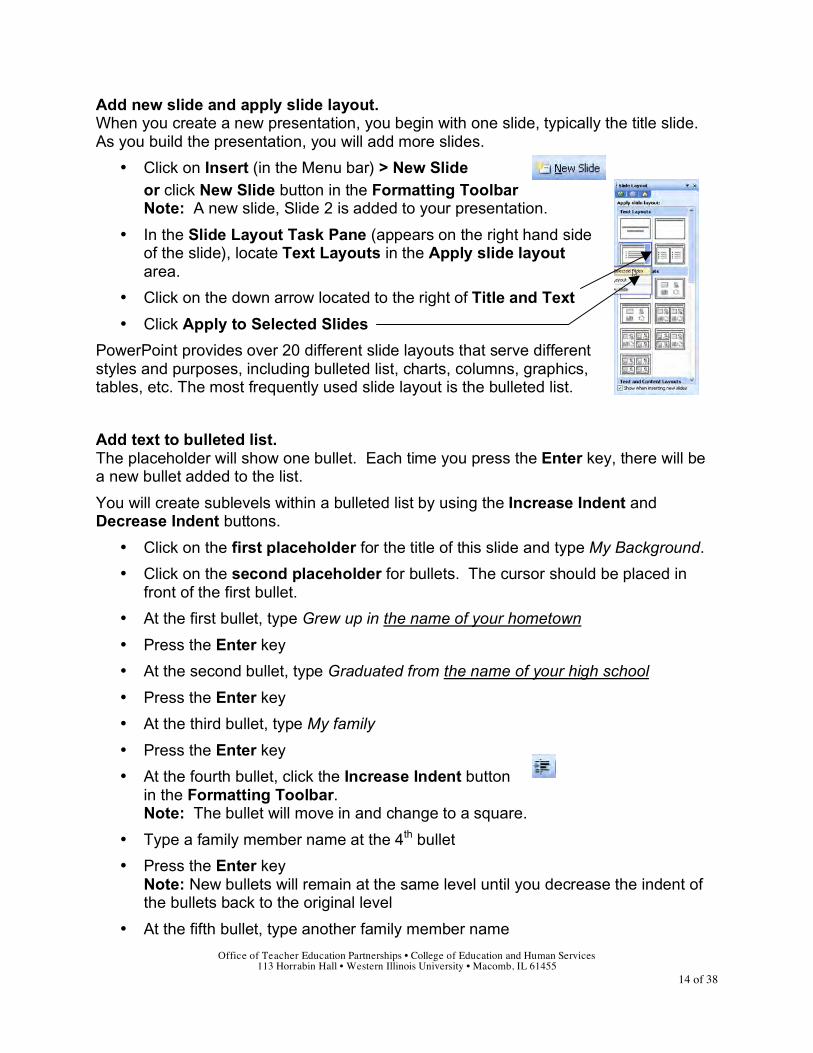
Add new slide and apply slide layout. When you create a new presentation, you begin with one slide, typically the title slide. As you build the presentation, you will add more slides.
• Click on Insert (in the Menu bar) > New Slide or click New Slide button in the Formatting Toolbar Note: A new slide, Slide 2 is added to your presentation.
• In the Slide Layout Task Pane (appears on the right hand side of the slide), locate Text Layouts in the Apply slide layout area.
• Click on the down arrow located to the right of Title and Text
• Click Apply to Selected Slides
PowerPoint provides over 20 different slide layouts that serve different styles and purposes, including bulleted list, charts, columns, graphics, tables, etc. The most frequently used slide layout is the bulleted list.
Add text to bulleted list. The placeholder will show one bullet. Each time you press the Enter key, there will be a new bullet added to the list.
You will create sublevels within a bulleted list by using the Increase Indent and Decrease Indent buttons.
• Click on the first placeholder for the title of this slide and type My Background.
• Click on the second placeholder for bullets. The cursor should be placed in front of the first bullet.
• At the first bullet, type Grew up in the name of your hometown
• Press the Enter key
• At the second bullet, type Graduated from the name of your high school
• Press the Enter key
• At the third bullet, type My family
• Press the Enter key
• At the fourth bullet, click the Increase Indent button in the Formatting Toolbar. Note: The bullet will move in and change to a square.
• Type a family member name at the 4th bullet
• Press the Enter key Note: New bullets will remain at the same level until you decrease the indent of the bullets back to the original level
• At the fifth bullet, type another family member name

Office of Teacher Education Partnerships • College of Education and Human Services 113 Horrabin Hall • Western Illinois University • Macomb, IL 61455
15 of 38
• Press the Enter key
• At the sixth bullet, type another family member name
• Press the Enter key
• At the seventh bullet, type the last family member name
• Press the Enter key
• At the eighth bullet, click the Decrease Indent button in the Formatting Toolbar.
• Remaining at the eighth bullet, type I worked at place of employment.
• Click in any blank area of the slide to deselect the bulleted list
Change bullet size.
• Select all the text in the bulleted list
o Click cursor in front of the G of the first bullet; hold and drag cursor across entire text of the first bullet, then down to the last bullet so all bulleted items are highlighted
• Click Format (in the Menu bar) > Bullets and Numbering
• Click the Bulleted tab
• In the Size: area, click the down arrow until 75 is viewable in the % field
• Click the OK button
• Click in any blank area of the slide to deselect the bulleted list
Add third slide and apply slide layout.
• Click on New Slide button in the Standard Toolbar or click on Insert (in the Menu bar) > New Slide Note: The third slide will be inserted after the second slide.
• In the Slide Layout Task Pane, scroll down to Text and Content Layouts in the Apply slide layout area.
• Click on the down arrow located next to Title, Text, and Content
• Click Apply to Selected Slides
Office of Teacher Education Partnerships • College of Education and Human Services 113 Horrabin Hall • Western Illinois University • Macomb, IL 61455
16 of 38
Review skills: Adding text to third slide.
• Click on the first placeholder (title of the third slide) and type Western Life.
• Click on placeholder for bulleted text. The cursor should be placed in front of the first bullet.
• At the first bullet, type My major is name of major
• Press the Enter key
• At the second bullet, type I will graduate in year plan to graduate
• Press the Enter key
• At the third bullet, type I belong to
• Press the Enter key
• Increase indent the fourth bullet and type name of a club, organization, or fraternity/sorority
• Press the Enter key
• At the fifth and sixth bullets, continue to list a club, organization, or other affiliations.
• Click on any blank area of the slide to deselect the bulleted list.
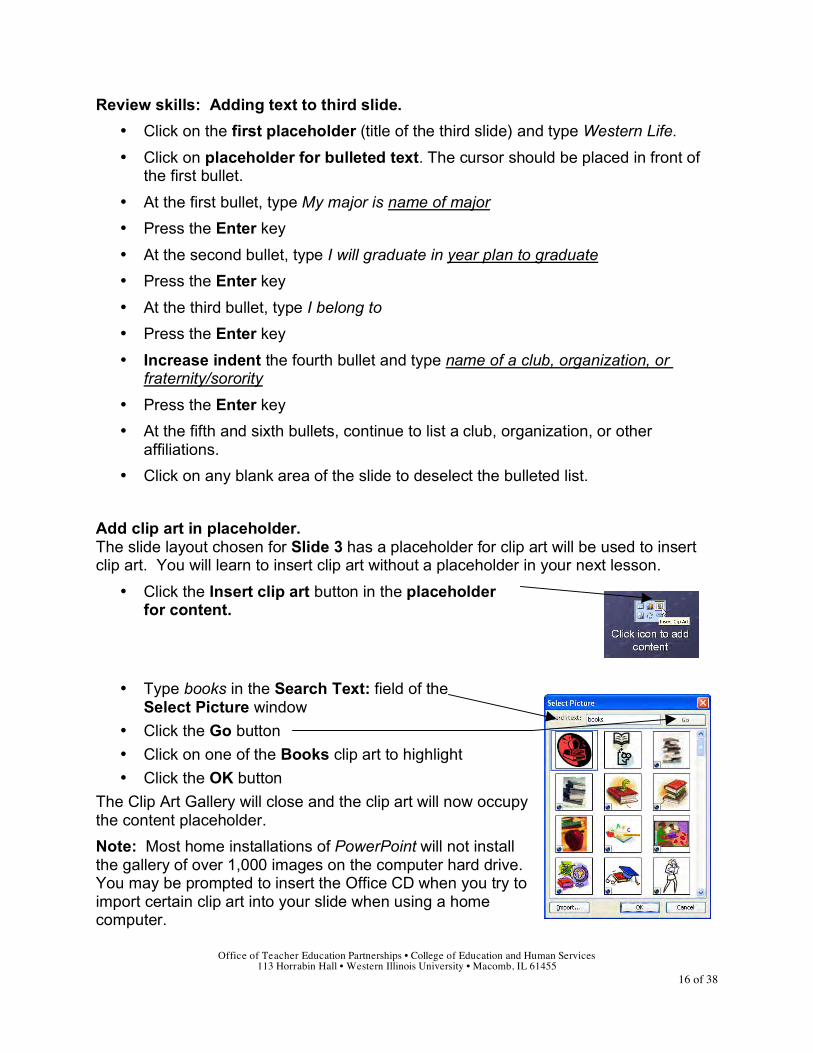
Add clip art in placeholder. The slide layout chosen for Slide 3 has a placeholder for clip art will be used to insert clip art. You will learn to insert clip art without a placeholder in your next lesson.
• Click the Insert clip art button in the placeholder for content.
• Type books in the Search Text: field of the Select Picture window
• Click the Go button
• Click on one of the Books clip art to highlight
• Click the OK button
The Clip Art Gallery will close and the clip art will now occupy the content placeholder.
Note: Most home installations of PowerPoint will not install the gallery of over 1,000 images on the computer hard drive. You may be prompted to insert the Office CD when you try to import certain clip art into your slide when using a home computer.
Office of Teacher Education Partnerships • College of Education and Human Services 113 Horrabin Hall • Western Illinois University • Macomb, IL 61455
17 of 38
Review skills: Insert Slide 4 and add text to slide.
• Insert a new slide after Slide 3
• Select Title and Text slide layout
• In the title placeholder, type Teaching Experiences
• In the bulleted list placeholder, type at least three different experiences you have had with teaching others
Save presentation.
• Click on File (in the Menu bar) > Save
• In the Save in: window, click on the down arrow and select My Documents, your USB Drive, or another Disk
• In the File Name: window, type yourlastname autobiography.ppt
• Click the Save button Note: The Save As command also displays a box to select where you want the document to be saved. Use File > Save As when you want to save a copy of the current document with a different name or in a different folder or on a different disk. The newly saved document becomes the active document.
Exit PowerPoint.
• Click on File (in the Menu bar) > Exit
Continue to Lesson 3.
Office of Teacher Education Partnerships • College of Education and Human Services 113 Horrabin Hall • Western Illinois University • Macomb, IL 61455
18 of 38
Lesson 3 – Exploring Views of Presentation Open PowerPoint.
• Click on the Start button in the lower left hand corner of screen.
• Select All Programs > Microsoft Office > Microsoft PowerPoint Note: IMM Lab users select All Programs > Office Applications > Microsoft PowerPoin
or
If there is a PowerPoint shortcut on the desktop, double-click the Microsoft® PowerPoint icon
Open presentation from Task Pane.
• If the Task Pane is not viewable on the right hand side of the blank slide, click View (in the Menu bar) > Task Pane
• In the Open area of the Getting Started Task Pane, click on your file for yourlastname autobiography saved in Lesson 2
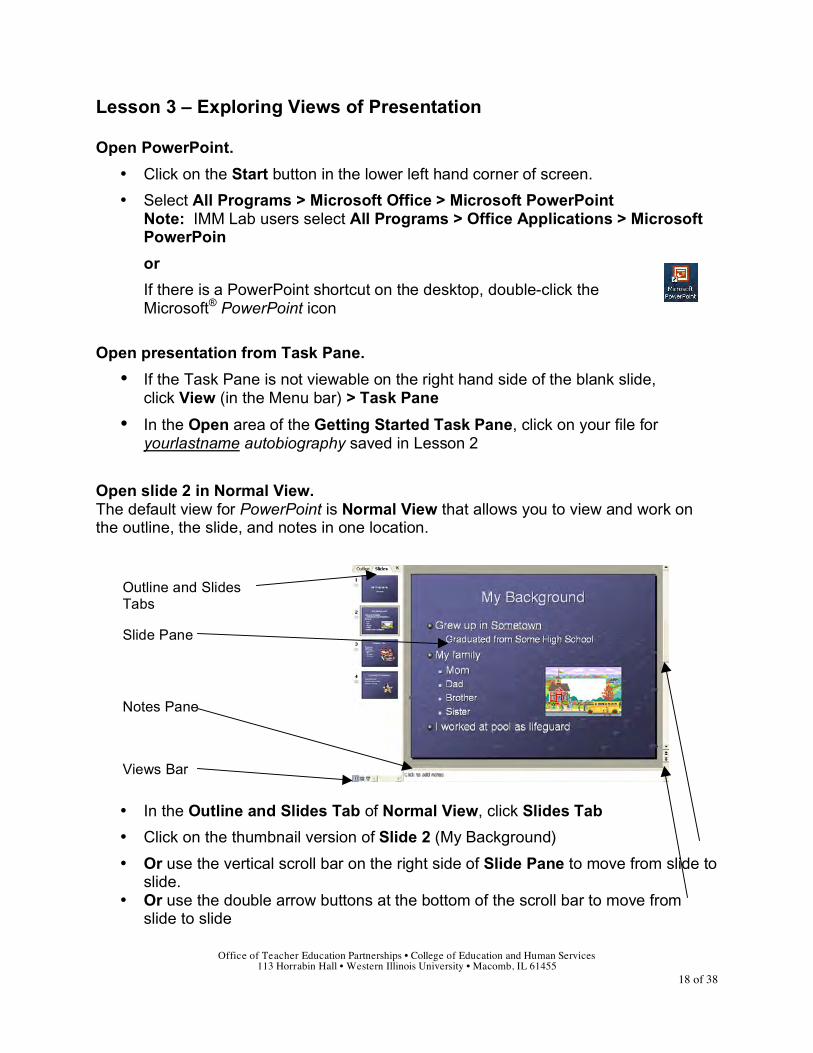
Open slide 2 in Normal View. The default view for PowerPoint is Normal View that allows you to view and work on the outline, the slide, and notes in one location.
• In the Outline and Slides Tab of Normal View, click Slides Tab
• Click on the thumbnail version of Slide 2 (My Background)
• Or use the vertical scroll bar on the right side of Slide Pane to move from slide to slide.
• Or use the double arrow buttons at the bottom of the scroll bar to move from slide to slide
Outline and Slides Tabs
Slide Pane
Notes Pane
Views Bar

Office of Teacher Education Partnerships • College of Education and Human Services 113 Horrabin Hall • Western Illinois University • Macomb, IL 61455
19 of 38
Display slide at 100%.
• Click on full size version of Slide 2 in the Slide Pane • Click on the down arrow to the right of the Zoom button
in the Standard Toolbar • Click on 100%
Display outline view.
• In the Outline and Slides Tab located on the left hand side of the screen, click the Outline tab
Display slide at 66%.
• Click on full size version of Slide 2 in the Slide Pane • Click on the down arrow to the right of the Zoom button in the Standard Toolbar • Click on 66%
Switch to Slide Sorter View. Slide Sorter view lets you view thumbnails, or miniature versions, of each slide at the same time. You can use this view to add, delete, and move slides, add timings, preview animations, and insert transitions for moving from slide to slide.
• With Slide 2 (My Background) open in Normal View, click on the Slide Sorter View button (second button) in the Views Bar.
Insert new slide in Slide Sorter View.
• Click once on Slide 3 (Western Life) to highlight it. Note: Double-clicking a slide in Slide Sorter View will open the slide in Normal View.
• Click Insert (in the Menu bar) > New Slide Note: A new blank slide will be placed between slides 3 and 4
• Click on Slide 4 (blank slide), if needed.
• In the Slide Layout Task Pane (appears on the right hand side of the slide), locate Text Layouts in the Apply slide layout area.
• Click on the down arrow located to the right of Title and Text
• Click Apply to Selected Slides
Slide Sorter View
Office of Teacher Education Partnerships • College of Education and Human Services 113 Horrabin Hall • Western Illinois University • Macomb, IL 61455
20 of 38
Re-order slides.
• Click and hold mouse on Slide 4 (new slide)
• Drag Slide 4 to the right past Slide 5
• Release mouse Note: The blank slide should now be the Slide 5 (or the last slide).
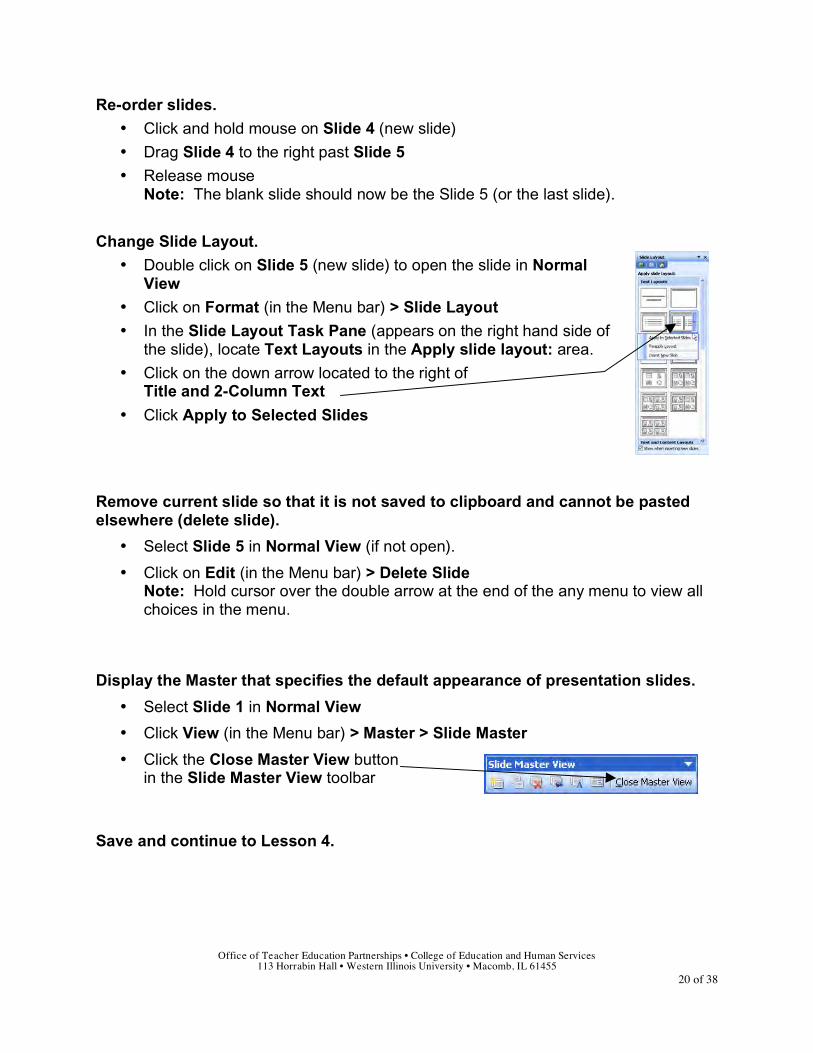
Change Slide Layout.
• Double click on Slide 5 (new slide) to open the slide in Normal View
• Click on Format (in the Menu bar) > Slide Layout
• In the Slide Layout Task Pane (appears on the right hand side of the slide), locate Text Layouts in the Apply slide layout: area.
• Click on the down arrow located to the right of Title and 2-Column Text
• Click Apply to Selected Slides
Remove current slide so that it is not saved to clipboard and cannot be pasted elsewhere (delete slide).
• Select Slide 5 in Normal View (if not open).
• Click on Edit (in the Menu bar) > Delete Slide Note: Hold cursor over the double arrow at the end of the any menu to view all choices in the menu.
Display the Master that specifies the default appearance of presentation slides.
• Select Slide 1 in Normal View
• Click View (in the Menu bar) > Master > Slide Master • Click the Close Master View button
in the Slide Master View toolbar Save and continue to Lesson 4.
Office of Teacher Education Partnerships • College of Education and Human Services 113 Horrabin Hall • Western Illinois University • Macomb, IL 61455
21 of 38
Lesson 4 – Adding Clip Art and Animation Confirm Normal View.
• If you are not in Normal View, click the Normal View button located in the lower left corner of the PowerPoint Window.
Insert Clip Art.
• Select Slide 2 (My Background) in Normal View
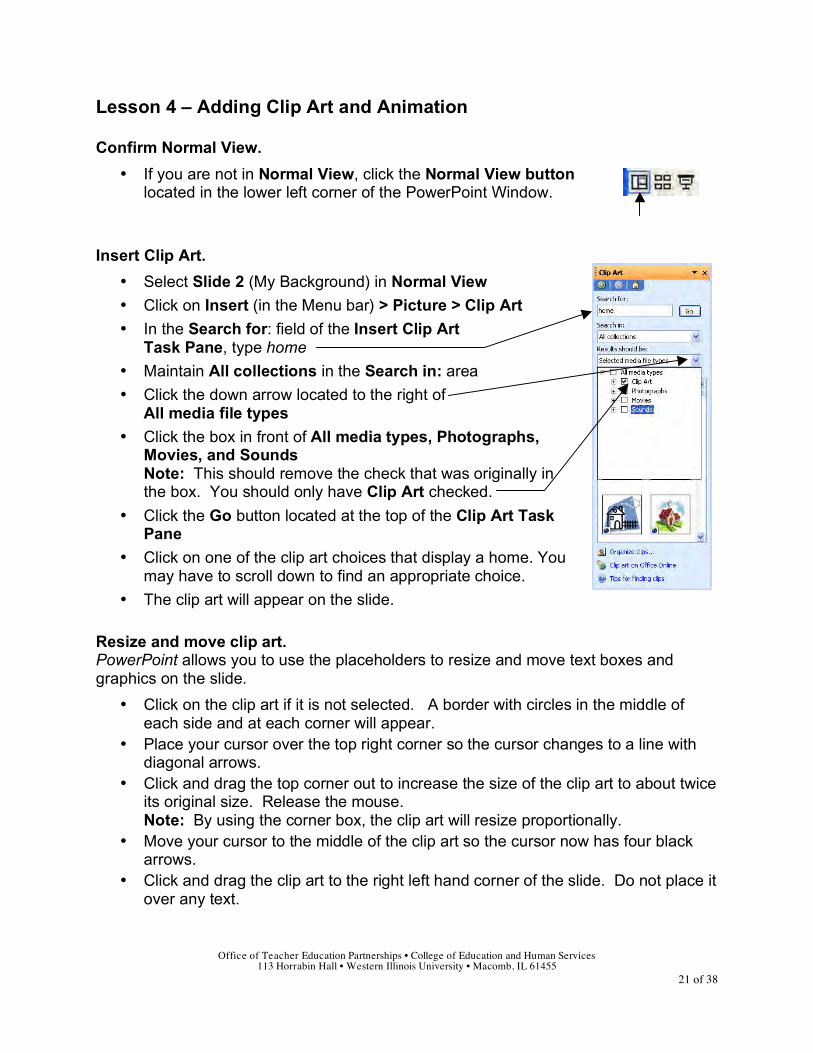
• Click on Insert (in the Menu bar) > Picture > Clip Art • In the Search for: field of the Insert Clip Art
Task Pane, type home • Maintain All collections in the Search in: area • Click the down arrow located to the right of
All media file types • Click the box in front of All media types, Photographs,
Movies, and Sounds Note: This should remove the check that was originally in the box. You should only have Clip Art checked.
• Click the Go button located at the top of the Clip Art Task Pane
• Click on one of the clip art choices that display a home. You may have to scroll down to find an appropriate choice.
• The clip art will appear on the slide.
Resize and move clip art. PowerPoint allows you to use the placeholders to resize and move text boxes and graphics on the slide.
• Click on the clip art if it is not selected. A border with circles in the middle of each side and at each corner will appear.
• Place your cursor over the top right corner so the cursor changes to a line with diagonal arrows.
• Click and drag the top corner out to increase the size of the clip art to about twice its original size. Release the mouse. Note: By using the corner box, the clip art will resize proportionally.
• Move your cursor to the middle of the clip art so the cursor now has four black arrows.
• Click and drag the clip art to the right left hand corner of the slide. Do not place it over any text.
Office of Teacher Education Partnerships • College of Education and Human Services 113 Horrabin Hall • Western Illinois University • Macomb, IL 61455
22 of 38
Place a border around clip art.
• Double click (click twice quickly) on the clip art of the home placed in Slide 2.
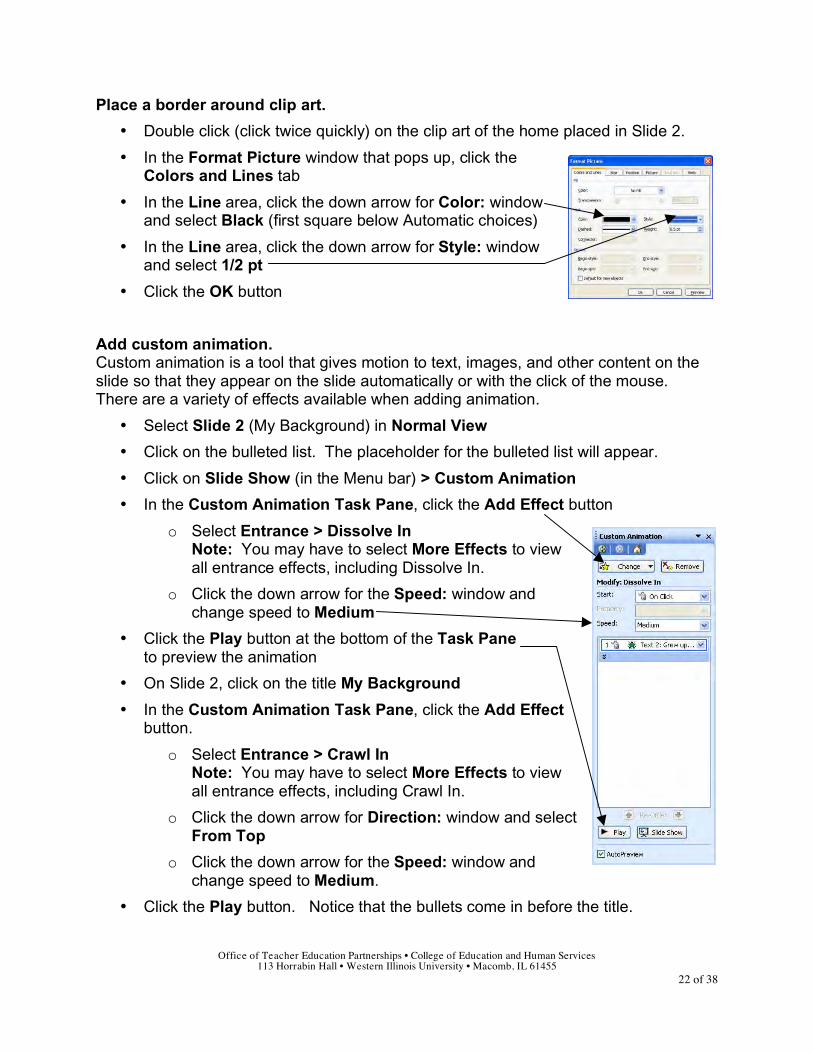
• In the Format Picture window that pops up, click the Colors and Lines tab
• In the Line area, click the down arrow for Color: window and select Black (first square below Automatic choices)
• In the Line area, click the down arrow for Style: window and select 1/2 pt
• Click the OK button
Add custom animation. Custom animation is a tool that gives motion to text, images, and other content on the slide so that they appear on the slide automatically or with the click of the mouse. There are a variety of effects available when adding animation.
• Select Slide 2 (My Background) in Normal View
• Click on the bulleted list. The placeholder for the bulleted list will appear.
• Click on Slide Show (in the Menu bar) > Custom Animation
• In the Custom Animation Task Pane, click the Add Effect button
o Select Entrance > Dissolve In Note: You may have to select More Effects to view all entrance effects, including Dissolve In.
o Click the down arrow for the Speed: window and change speed to Medium
• Click the Play button at the bottom of the Task Pane to preview the animation
• On Slide 2, click on the title My Background
• In the Custom Animation Task Pane, click the Add Effect button.
o Select Entrance > Crawl In Note: You may have to select More Effects to view all entrance effects, including Crawl In.
o Click the down arrow for Direction: window and select From Top
o Click the down arrow for the Speed: window and change speed to Medium.
• Click the Play button. Notice that the bullets come in before the title.
Office of Teacher Education Partnerships • College of Education and Human Services 113 Horrabin Hall • Western Illinois University • Macomb, IL 61455
23 of 38
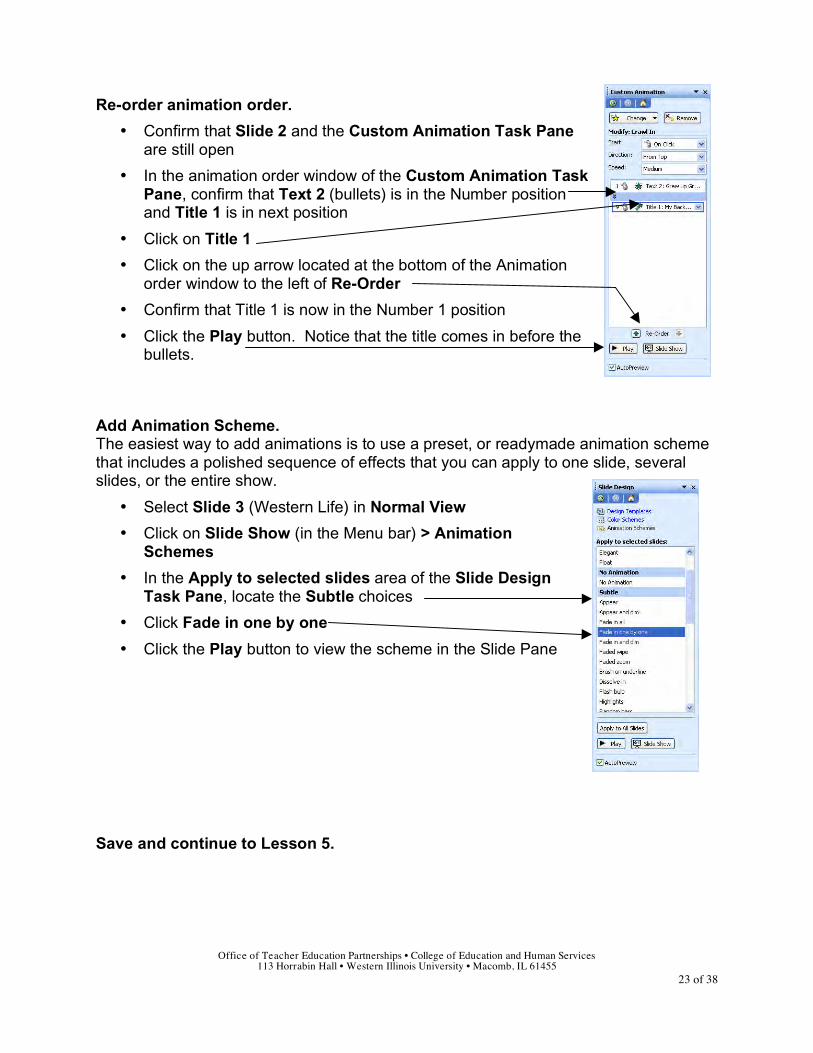
Re-order animation order.
• Confirm that Slide 2 and the Custom Animation Task Pane are still open
• In the animation order window of the Custom Animation Task Pane, confirm that Text 2 (bullets) is in the Number position and Title 1 is in next position
• Click on Title 1
• Click on the up arrow located at the bottom of the Animation order window to the left of Re-Order
• Confirm that Title 1 is now in the Number 1 position
• Click the Play button. Notice that the title comes in before the bullets.
Add Animation Scheme. The easiest way to add animations is to use a preset, or readymade animation scheme that includes a polished sequence of effects that you can apply to one slide, several slides, or the entire show.
• Select Slide 3 (Western Life) in Normal View
• Click on Slide Show (in the Menu bar) > Animation Schemes
• In the Apply to selected slides area of the Slide Design Task Pane, locate the Subtle choices
• Click Fade in one by one
• Click the Play button to view the scheme in the Slide Pane
Save and continue to Lesson 5.

Office of Teacher Education Partnerships • College of Education and Human Services 113 Horrabin Hall • Western Illinois University • Macomb, IL 61455
24 of 38
Lesson 5 - Viewing the Presentation At any time during the creation of your presentation, you can see what your presentation looks like as a slide show. There are two methods to view the presentation. You can view the entire show, from the first slide to the last slide, or you can view the show from the current slide open to the last slide. The last method is preferred when the presentation has a large number of slides. View entire show manually from beginning to end. PowerPoint will run the presentation manually unless changes are made to run it automatically. This presentation will run manually. You will advance through the presentation by left clicking on the mouse.
On Slides 2 and 3, the animated title and bullets will come in one at a time each time you click the mouse.
• Click on Slide Show (in the Menu bar) > View Show
• The computer screen will adjust so the presentation fills the screen
• Click to advance to the second slide
• Click to view the title of second slide
• Click to view the first bullet of second slide
• Continue clicking the mouse to view rest of the bullets on Slide 2 and to advance through the presentation until it is back at Normal View
View show from current slide to end.
• Select Slide 3 in Normal View
• Click the Slide Show button (third button) located in the lower left corner of the PowerPoint Window.
• The computer screen will adjust so the presentation fills the screen
• The presentation will begin on Slide 3
• Continue clicking mouse to advance presentation through rest of show and return to Normal View
Viewing options.
• To leave the slide show at any time, press the Escape button on your keyboard.
• To go back to previous slide, press the Backspace key
Office of Teacher Education Partnerships • College of Education and Human Services 113 Horrabin Hall • Western Illinois University • Macomb, IL 61455
25 of 38
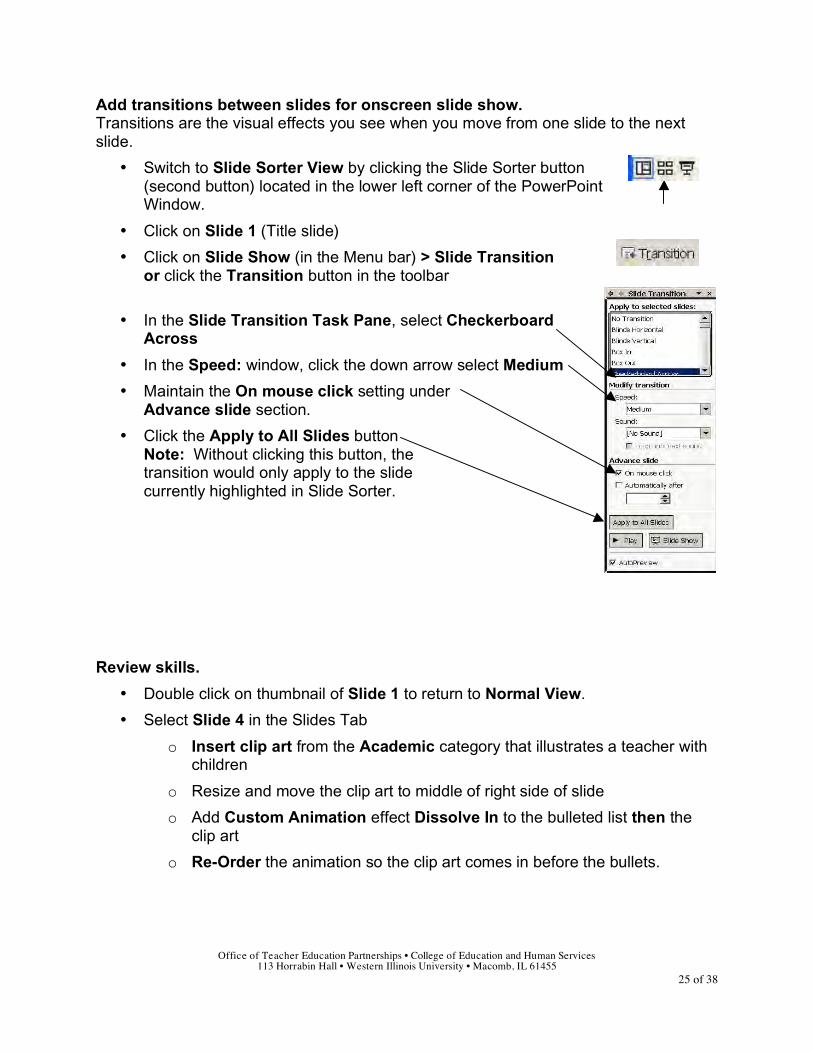
Add transitions between slides for onscreen slide show. Transitions are the visual effects you see when you move from one slide to the next slide.
• Switch to Slide Sorter View by clicking the Slide Sorter button (second button) located in the lower left corner of the PowerPoint Window.
• Click on Slide 1 (Title slide)
• Click on Slide Show (in the Menu bar) > Slide Transition or click the Transition button in the toolbar
• In the Slide Transition Task Pane, select Checkerboard Across
• In the Speed: window, click the down arrow select Medium
• Maintain the On mouse click setting under Advance slide section.
• Click the Apply to All Slides button Note: Without clicking this button, the transition would only apply to the slide currently highlighted in Slide Sorter.
Review skills.
• Double click on thumbnail of Slide 1 to return to Normal View.
• Select Slide 4 in the Slides Tab
o Insert clip art from the Academic category that illustrates a teacher with children
o Resize and move the clip art to middle of right side of slide
o Add Custom Animation effect Dissolve In to the bulleted list then the clip art
o Re-Order the animation so the clip art comes in before the bullets.

Office of Teacher Education Partnerships • College of Education and Human Services 113 Horrabin Hall • Western Illinois University • Macomb, IL 61455
26 of 38
Give an on-screen presentation that displays timer to practice timing.
• Click Slide Show (in the Menu bar) > Rehearse Timings Note: You may have to hold cursor over double arrow located at the bottom of Slide Show menu to expand the menu to view Rehearse Timings
• The presentation will begin on Slide 1 and the Rehearsal window will pop-up to time the presentation
• Continue clicking mouse to advance presentation through the entire show and return to Normal View
• Click No at the prompt to keep slide timings
Specify presentation will appear in portrait rather than landscape.
• Click File (in the Menu bar) > Page Setup
• In the Slides area of Orientation, click the radio button in front of Portrait
• Click the OK button
Format notes, handouts, and outlines in landscape rather than portrait.
• Click File (in the Menu bar) > Page Setup
• In the Notes, handouts, & outline area of Orientation, click the radio button in front of Landscape
• Click the OK button
Change presentation and note formatting back to original settings.
• Click File (in the Menu bar) > Page Setup
• In the Slides area of Orientation, click the radio button in front of Landscape
• In the Notes, handouts, & outline area of Orientation, click the radio button in front of Portrait
• Click the OK button
Save presentation and continue to Lesson 6.
Office of Teacher Education Partnerships • College of Education and Human Services 113 Horrabin Hall • Western Illinois University • Macomb, IL 61455
27 of 38
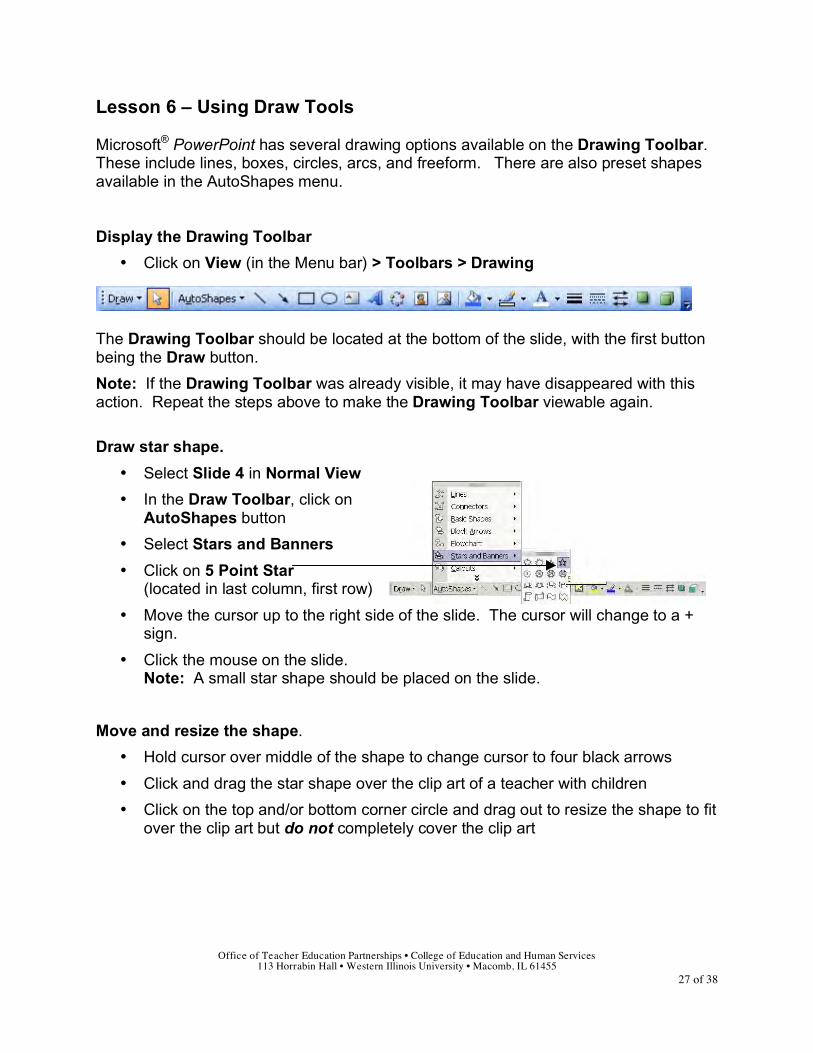
Lesson 6 – Using Draw Tools Microsoft® PowerPoint has several drawing options available on the Drawing Toolbar. These include lines, boxes, circles, arcs, and freeform. There are also preset shapes available in the AutoShapes menu. Display the Drawing Toolbar
• Click on View (in the Menu bar) > Toolbars > Drawing
The Drawing Toolbar should be located at the bottom of the slide, with the first button being the Draw button.
Note: If the Drawing Toolbar was already visible, it may have disappeared with this action. Repeat the steps above to make the Drawing Toolbar viewable again.
Draw star shape.
• Select Slide 4 in Normal View
• In the Draw Toolbar, click on AutoShapes button
• Select Stars and Banners
• Click on 5 Point Star (located in last column, first row)
• Move the cursor up to the right side of the slide. The cursor will change to a + sign.
• Click the mouse on the slide. Note: A small star shape should be placed on the slide.
Move and resize the shape.
• Hold cursor over middle of the shape to change cursor to four black arrows
• Click and drag the star shape over the clip art of a teacher with children
• Click on the top and/or bottom corner circle and drag out to resize the shape to fit over the clip art but do not completely cover the clip art
Office of Teacher Education Partnerships • College of Education and Human Services 113 Horrabin Hall • Western Illinois University • Macomb, IL 61455
28 of 38
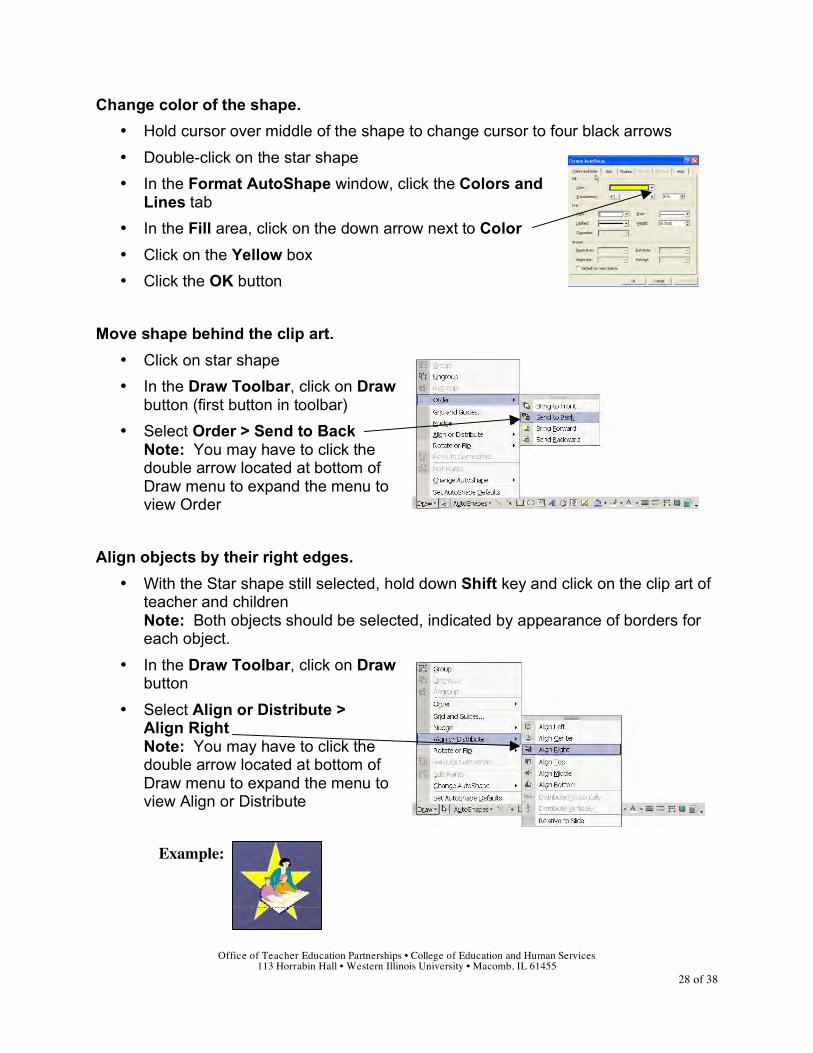
Change color of the shape.
• Hold cursor over middle of the shape to change cursor to four black arrows
• Double-click on the star shape
• In the Format AutoShape window, click the Colors and Lines tab
• In the Fill area, click on the down arrow next to Color
• Click on the Yellow box
• Click the OK button
Move shape behind the clip art.
• Click on star shape
• In the Draw Toolbar, click on Draw button (first button in toolbar)
• Select Order > Send to Back Note: You may have to click the double arrow located at bottom of Draw menu to expand the menu to view Order
Align objects by their right edges.
• With the Star shape still selected, hold down Shift key and click on the clip art of teacher and children Note: Both objects should be selected, indicated by appearance of borders for each object.
• In the Draw Toolbar, click on Draw button
• Select Align or Distribute > Align Right Note: You may have to click the double arrow located at bottom of Draw menu to expand the menu to view Align or Distribute
Example:

Office of Teacher Education Partnerships • College of Education and Human Services 113 Horrabin Hall • Western Illinois University • Macomb, IL 61455
29 of 38
Group selected objects so they are one graphic.
• Select both the star and the clip art of teacher and children (if needed)
• In the Draw Toolbar, click on Draw button
• Select Group Note: You may have to click the double arrow located at bottom of Draw menu to expand the menu to view Group
Use help topics without office assistant.
• Click on Help (in the Menu bar) > Microsoft Office PowerPoint Help
• In the Assistance area of the PowerPoint Help Task Pane, type line in the Search for: field
• Click the Green button with a white arrow to start searching
• In the Search Results field, click on Format a line or connector
• In the new window, click the link Change the style of a line or connector • Following help directions, change the solid line of the Star shape to a dashed
line.
• Close Help window
Specify background objects will not appear on Slide 4 but will appear on other slides.
• Click on Format (in the Menu bar) > Background
• In the Background window, click the box in front of Omit background graphics from master
• Click the Apply button Note: Apply to All will change all the slides in the presentation.
Save and continue to Lesson 7.
Office of Teacher Education Partnerships • College of Education and Human Services 113 Horrabin Hall • Western Illinois University • Macomb, IL 61455
30 of 38
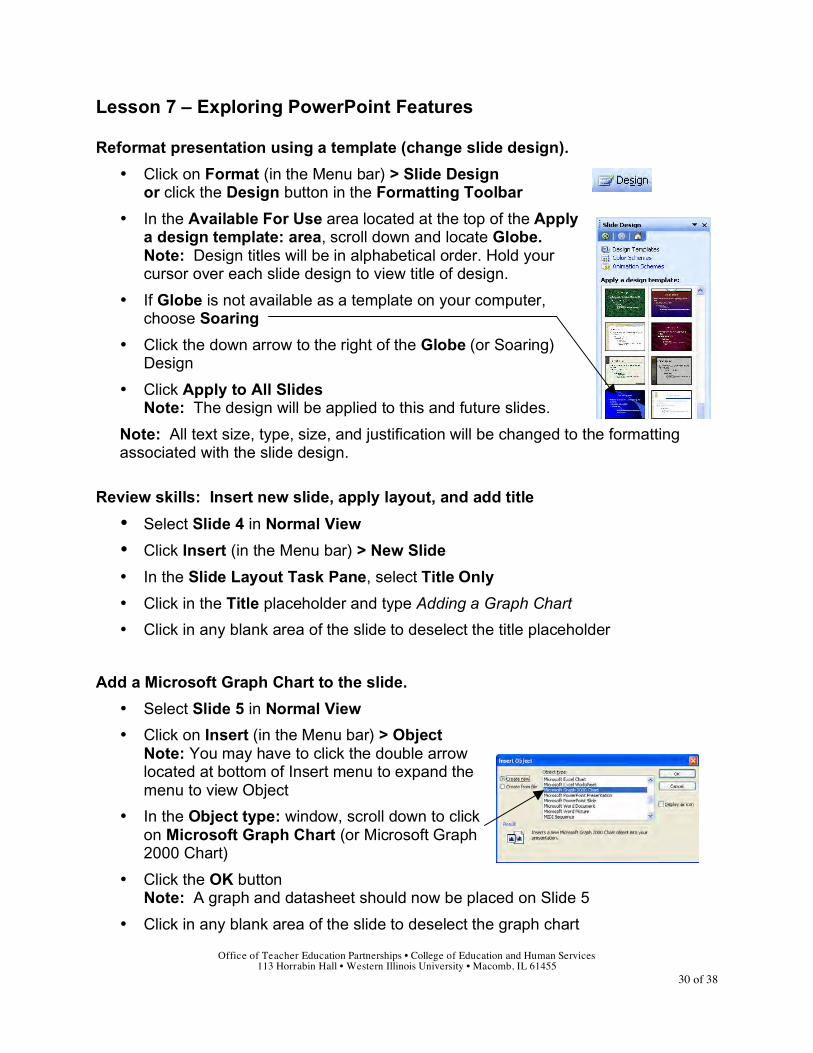
Lesson 7 – Exploring PowerPoint Features Reformat presentation using a template (change slide design).
• Click on Format (in the Menu bar) > Slide Design or click the Design button in the Formatting Toolbar
• In the Available For Use area located at the top of the Apply a design template: area, scroll down and locate Globe. Note: Design titles will be in alphabetical order. Hold your cursor over each slide design to view title of design.
• If Globe is not available as a template on your computer, choose Soaring
• Click the down arrow to the right of the Globe (or Soaring) Design
• Click Apply to All Slides Note: The design will be applied to this and future slides.
Note: All text size, type, size, and justification will be changed to the formatting associated with the slide design.
Review skills: Insert new slide, apply layout, and add title
• Select Slide 4 in Normal View
• Click Insert (in the Menu bar) > New Slide
• In the Slide Layout Task Pane, select Title Only
• Click in the Title placeholder and type Adding a Graph Chart • Click in any blank area of the slide to deselect the title placeholder
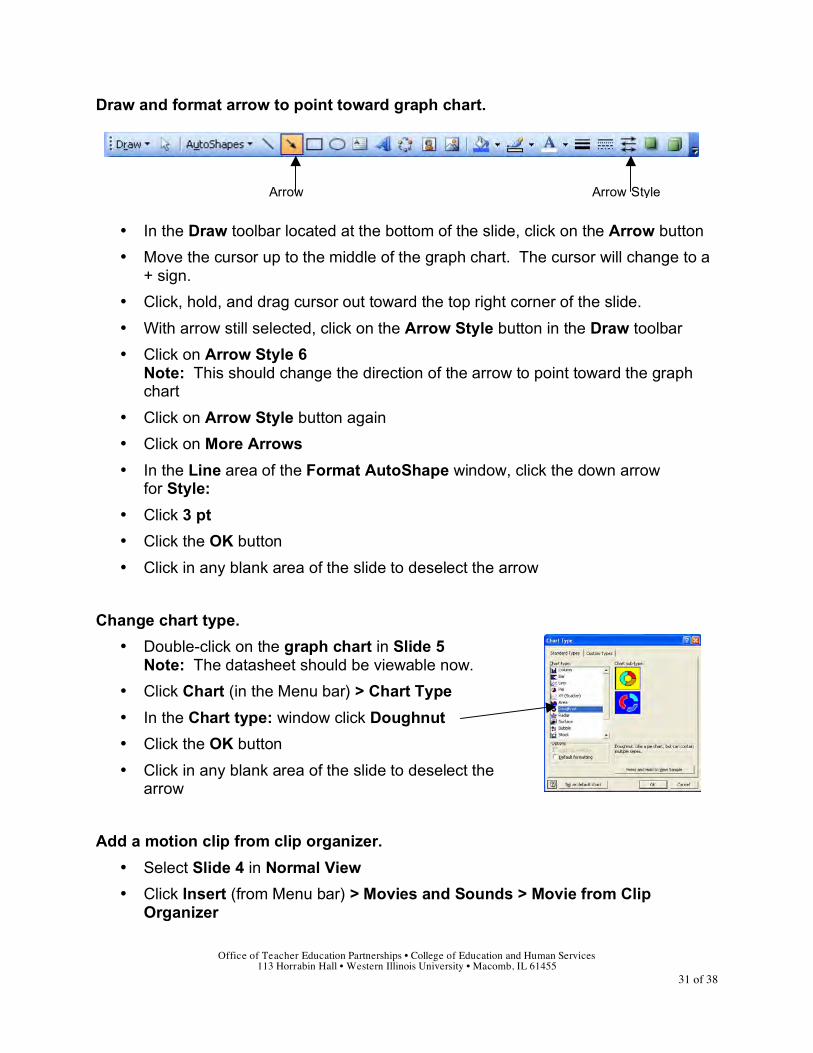
Add a Microsoft Graph Chart to the slide.
• Select Slide 5 in Normal View • Click on Insert (in the Menu bar) > Object
Note: You may have to click the double arrow located at bottom of Insert menu to expand the menu to view Object
• In the Object type: window, scroll down to click on Microsoft Graph Chart (or Microsoft Graph 2000 Chart)
• Click the OK button Note: A graph and datasheet should now be placed on Slide 5
• Click in any blank area of the slide to deselect the graph chart
Office of Teacher Education Partnerships • College of Education and Human Services 113 Horrabin Hall • Western Illinois University • Macomb, IL 61455
31 of 38
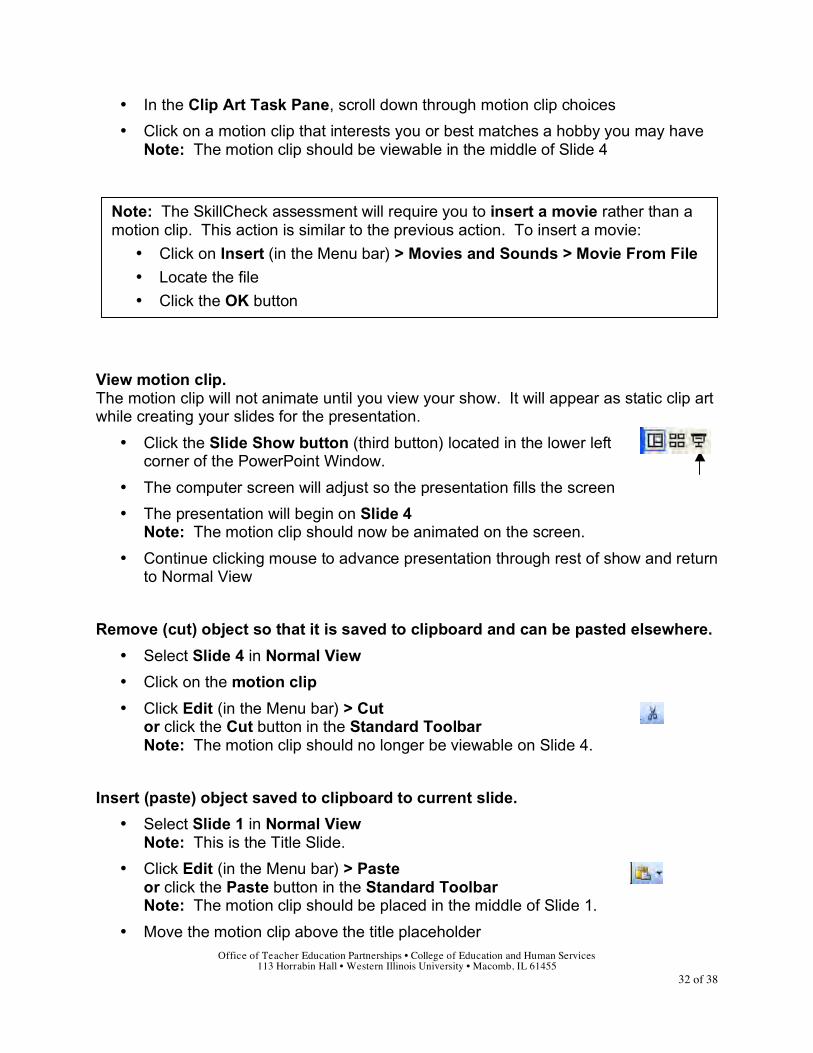
Draw and format arrow to point toward graph chart.
• In the Draw toolbar located at the bottom of the slide, click on the Arrow button
• Move the cursor up to the middle of the graph chart. The cursor will change to a + sign.
• Click, hold, and drag cursor out toward the top right corner of the slide.
• With arrow still selected, click on the Arrow Style button in the Draw toolbar
• Click on Arrow Style 6 Note: This should change the direction of the arrow to point toward the graph chart
• Click on Arrow Style button again
• Click on More Arrows
• In the Line area of the Format AutoShape window, click the down arrow for Style:
• Click 3 pt
• Click the OK button
• Click in any blank area of the slide to deselect the arrow
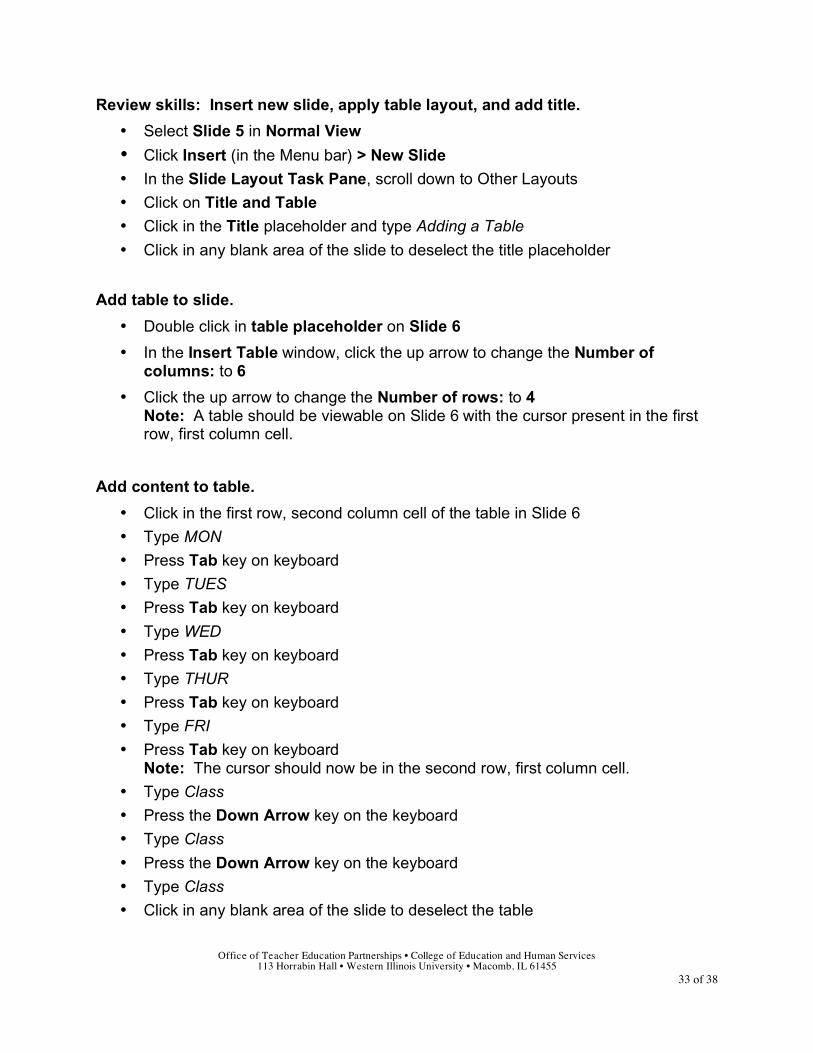
Change chart type.
• Double-click on the graph chart in Slide 5 Note: The datasheet should be viewable now.
• Click Chart (in the Menu bar) > Chart Type
• In the Chart type: window click Doughnut
• Click the OK button
• Click in any blank area of the slide to deselect the arrow
Add a motion clip from clip organizer.
• Select Slide 4 in Normal View • Click Insert (from Menu bar) > Movies and Sounds > Movie from Clip
Organizer
Arrow Arrow Style
Office of Teacher Education Partnerships • College of Education and Human Services 113 Horrabin Hall • Western Illinois University • Macomb, IL 61455
32 of 38
• In the Clip Art Task Pane, scroll down through motion clip choices • Click on a motion clip that interests you or best matches a hobby you may have
Note: The motion clip should be viewable in the middle of Slide 4
View motion clip. The motion clip will not animate until you view your show. It will appear as static clip art while creating your slides for the presentation.
• Click the Slide Show button (third button) located in the lower left corner of the PowerPoint Window.
• The computer screen will adjust so the presentation fills the screen
• The presentation will begin on Slide 4 Note: The motion clip should now be animated on the screen.
• Continue clicking mouse to advance presentation through rest of show and return to Normal View
Remove (cut) object so that it is saved to clipboard and can be pasted elsewhere.
• Select Slide 4 in Normal View
• Click on the motion clip
• Click Edit (in the Menu bar) > Cut or click the Cut button in the Standard Toolbar Note: The motion clip should no longer be viewable on Slide 4.
Insert (paste) object saved to clipboard to current slide.
• Select Slide 1 in Normal View Note: This is the Title Slide.
• Click Edit (in the Menu bar) > Paste or click the Paste button in the Standard Toolbar Note: The motion clip should be placed in the middle of Slide 1.
• Move the motion clip above the title placeholder
Note: The SkillCheck assessment will require you to insert a movie rather than a motion clip. This action is similar to the previous action. To insert a movie:
• Click on Insert (in the Menu bar) > Movies and Sounds > Movie From File • Locate the file • Click the OK button
Office of Teacher Education Partnerships • College of Education and Human Services 113 Horrabin Hall • Western Illinois University • Macomb, IL 61455
33 of 38
Review skills: Insert new slide, apply table layout, and add title.
• Select Slide 5 in Normal View
• Click Insert (in the Menu bar) > New Slide • In the Slide Layout Task Pane, scroll down to Other Layouts
• Click on Title and Table
• Click in the Title placeholder and type Adding a Table • Click in any blank area of the slide to deselect the title placeholder
Add table to slide.
• Double click in table placeholder on Slide 6
• In the Insert Table window, click the up arrow to change the Number of columns: to 6
• Click the up arrow to change the Number of rows: to 4 Note: A table should be viewable on Slide 6 with the cursor present in the first row, first column cell.
Add content to table.
• Click in the first row, second column cell of the table in Slide 6
• Type MON
• Press Tab key on keyboard
• Type TUES
• Press Tab key on keyboard
• Type WED
• Press Tab key on keyboard
• Type THUR
• Press Tab key on keyboard
• Type FRI
• Press Tab key on keyboard Note: The cursor should now be in the second row, first column cell.
• Type Class
• Press the Down Arrow key on the keyboard
• Type Class
• Press the Down Arrow key on the keyboard
• Type Class
• Click in any blank area of the slide to deselect the table
Office of Teacher Education Partnerships • College of Education and Human Services 113 Horrabin Hall • Western Illinois University • Macomb, IL 61455
34 of 38
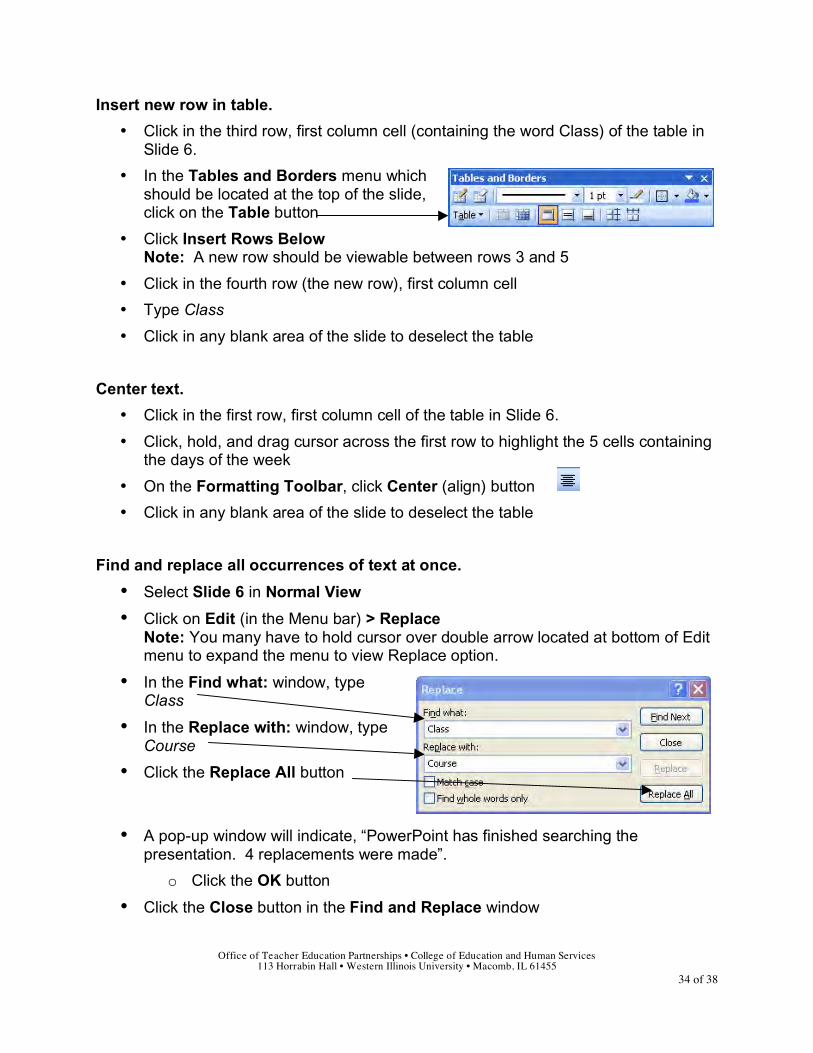
Insert new row in table.
• Click in the third row, first column cell (containing the word Class) of the table in Slide 6.
• In the Tables and Borders menu which should be located at the top of the slide, click on the Table button
• Click Insert Rows Below Note: A new row should be viewable between rows 3 and 5
• Click in the fourth row (the new row), first column cell
• Type Class
• Click in any blank area of the slide to deselect the table
Center text.
• Click in the first row, first column cell of the table in Slide 6.
• Click, hold, and drag cursor across the first row to highlight the 5 cells containing the days of the week
• On the Formatting Toolbar, click Center (align) button
• Click in any blank area of the slide to deselect the table
Find and replace all occurrences of text at once.
• Select Slide 6 in Normal View
• Click on Edit (in the Menu bar) > Replace Note: You many have to hold cursor over double arrow located at bottom of Edit menu to expand the menu to view Replace option.
• In the Find what: window, type Class
• In the Replace with: window, type Course
• Click the Replace All button
• A pop-up window will indicate, “PowerPoint has finished searching the presentation. 4 replacements were made”.
o Click the OK button
• Click the Close button in the Find and Replace window
Office of Teacher Education Partnerships • College of Education and Human Services 113 Horrabin Hall • Western Illinois University • Macomb, IL 61455
35 of 38
Check for spelling for entire presentation.
• Click on Tools (in the Menu bar) > Spelling or click the Spelling button in the Standard Toolbar
• If there are incorrect spellings of words in the document, a window will open highlighting the words, one at a time. Note: Microsoft Word may not recognize proper names or email addresses.
o Click Ignore button if the highlighted word does not need changed
o Click Change if the highlighted word needs changed to the correct spelling.
Note: The F7 key at the top of your keyboard will bring up the same dialog window.
• Click the OK button when spelling check is complete.
Save and continue to Lesson 8.
Office of Teacher Education Partnerships • College of Education and Human Services 113 Horrabin Hall • Western Illinois University • Macomb, IL 61455
36 of 38
Lesson 8 - Printing the Presentation
There are several printing options in Microsoft® PowerPoint. You can print your entire presentation as individual slides, in an outline, with speaker's notes, and audience handouts, two, three, or six slides per page. You can also print copies of slides on paper or overhead transparencies. Save the presentation before printing the slides and handouts.
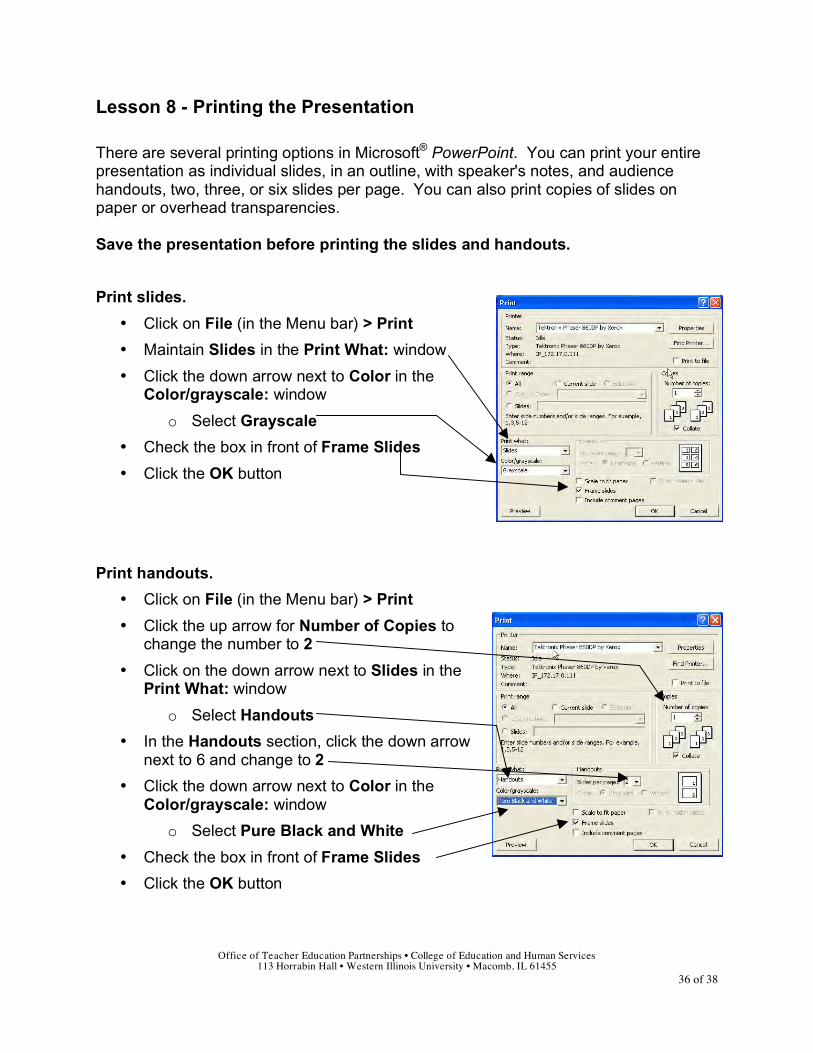
Print slides.
• Click on File (in the Menu bar) > Print
• Maintain Slides in the Print What: window
• Click the down arrow next to Color in the Color/grayscale: window
o Select Grayscale
• Check the box in front of Frame Slides
• Click the OK button
Print handouts.
• Click on File (in the Menu bar) > Print
• Click the up arrow for Number of Copies to change the number to 2
• Click on the down arrow next to Slides in the Print What: window
o Select Handouts
• In the Handouts section, click the down arrow next to 6 and change to 2
• Click the down arrow next to Color in the Color/grayscale: window
o Select Pure Black and White
• Check the box in front of Frame Slides
• Click the OK button
Office of Teacher Education Partnerships • College of Education and Human Services 113 Horrabin Hall • Western Illinois University • Macomb, IL 61455
37 of 38
Print speaker notes.
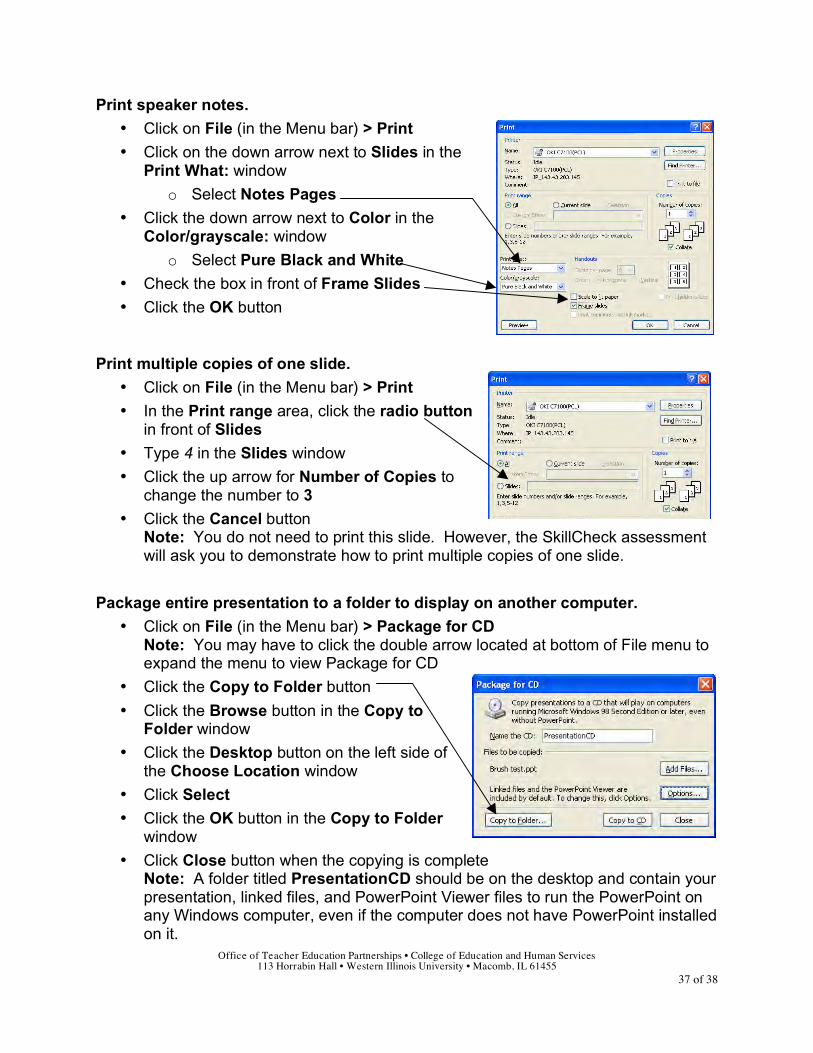
• Click on File (in the Menu bar) > Print
• Click on the down arrow next to Slides in the Print What: window
o Select Notes Pages
• Click the down arrow next to Color in the Color/grayscale: window
o Select Pure Black and White
• Check the box in front of Frame Slides
• Click the OK button
Print multiple copies of one slide.
• Click on File (in the Menu bar) > Print
• In the Print range area, click the radio button in front of Slides
• Type 4 in the Slides window
• Click the up arrow for Number of Copies to change the number to 3
• Click the Cancel button Note: You do not need to print this slide. However, the SkillCheck assessment will ask you to demonstrate how to print multiple copies of one slide.
Package entire presentation to a folder to display on another computer.
• Click on File (in the Menu bar) > Package for CD Note: You may have to click the double arrow located at bottom of File menu to expand the menu to view Package for CD
• Click the Copy to Folder button
• Click the Browse button in the Copy to Folder window
• Click the Desktop button on the left side of the Choose Location window
• Click Select
• Click the OK button in the Copy to Folder window
• Click Close button when the copying is complete Note: A folder titled PresentationCD should be on the desktop and contain your presentation, linked files, and PowerPoint Viewer files to run the PowerPoint on any Windows computer, even if the computer does not have PowerPoint installed on it.

Office of Teacher Education Partnerships • College of Education and Human Services 113 Horrabin Hall • Western Illinois University • Macomb, IL 61455
38 of 38
Completed presentation.
• You are finished with this PowerPoint module.
• Please keep your digital copy and printed copy of this presentation until you have passed the SkillCheck Assessment.