practical in general microbiology 140 mic prepared by
TRANSCRIPT

Practical
In
General Microbiology
140 MIC
Prepared by
Bassam Alnafisi

Syllabus of General Microbiology 140 MIC (Practical)
List of Topics No. of
Weeks
Introduction of general Microbiology and biohazards, biosafety of laboratories. 1
Sterilization, Physical methods, Chemical methods, Mechanical methods. 2
Microbiological culture media, preparation of microbiological media. 3
Isolation of bacteria from different places (skin ,nose, Soil, water ,air). 4
Isolation of bacteria by pouring plate method (Dilution method). 5
Purification of bacteria by streaking methods. 6
Isolation of fungi from different places. 7
Purification of fungi. 8
Microscopy, types of microscope, microbial stains (simple stain). 9
Microbial stain (differential stain, gram stain). 10
Introduction of Microalgae (theory). 12
Introduction of virology and diagnostic technique(theory). 13
Revision of practical general Microbiology 14
Final exam of practical exam 15

Lab#1
Introduction of general Microbiology
Precautions and safety rules
Microbiology: is a study of microorganisms (example: Bacteria, viruses, Fungi
(Molds and Yeast), and study the different activities and this science contains
different branches:
1-Bacteriology
2-Mycology
3- Virology
4-Phycology
5-Protozoa
6-Immuonology
7-Medical Microbiology
8- Industrial Microbiology
9-Food Microbiology
10-Parasitology
Objectives:
Learning the technical safety requirements for work in microbiological
laboratories.
*Microbiology laboratories contain different kinds of microorganisms , some of
these are harmful such as human pathogenic microorganisms , which may cause
blood diseases , allergy and dermatoid as well as toxin producing microorganisms
, the following precaution and safety guidelines should be considered avoiding
microorganisms harmful effects.

Precautions and biohazards:
1-Use your lab coat when working in the laboratory to protect clothing from
contamination or accidental discoloration by staining solutions.
2-Clean your work area (laboratory bench) with a recommended disinfectant such
5% Lysol or 5% phenol before and after each laboratory period to avoid
contamination.
3-Eating, drinking, and smoking is forbidden at all times in the laboratory.
4-Always keep the laboratory work area free from articles not actually in us and
replace all reagents, cultures and glass ware in their appropriate places.
5-Keep your hands away from your mouth and eyes while in the laboratories.
6-Do not place anything such as pencils , food , fingers in your mouth while in the
laboratories.
7-Wah your hands thoroughly before and after each experiment , using
disinfecting soap if possible.
8-Wear your mask and gloves to avoid inhalation of harmful solvents and buffer
solutions as well as effecting your hands.
9-Avoid contamination of benches , floor , and wastebaskets.
10-Place all discarded cultures infectious materials , used glass slides and
contaminated glassware into the provided receptacles. Do not let unneeded
materials accumulate.
11-When infectious material is accidentally spilled , cover it immediately with a
disinfectant such as 5% Lysol or5% phenol and notify your instructor at once.
12-Do not move with a loop or pipette containing infectious material through the
laboratory , flame wire loops and needles before and immediately after transfer
of cultures.
13-Labell all experimental material with your laboratory experiment.

Lab#2
Sterilization
Sterilization: is defined as the complete destruction or elimination of all forms of
viable microorganisms from a material by a chemical or physical or mechanical
methods.
Objective:
Define what is term sterilization mean?
Study the sterilization techniques and learn how and when we use the different
heat based and another sterilization tools.
Types of sterilization technique:
1-Heat:
It is a consider the most common and reliable method of sterilization , this
method can be used for all materials that withstand heat.
Sterilization by heat could be concluded as follow:
A-Dry heat:
1-Direct flaming: it is a simple and common method for effective sterilization of
materials that can be heated to redness in direct flame , flaming could be used in
microbiology labs to sterilize inoculating needles , loops , forceps , tips , searing
spatulas and straight-wires by exposure to Bunsen burner until become red.Loops
, forceps , tips and other metal object could be dipped in 70% ethanol before
briefly passing over Bunsen burner flame to obtained maximum degree of
sterilization.

2-Hot air oven:Dy heat can be used to sterilize glassware or other non-porous
heat conductive materials , in dry oven 1 to 2 hours at 160 to 170 C is standard
setting for complete sterilization.
B-Moist Heat:
Steam under pressure (Autoclaving):
The technique could be used to sterilize microorganisms culture media, aqueous
solutions, and contaminated items such as petri dishes, tips, tubes, gloves and
plastic vessels comprised of polypropylene.
Water boils at 100 C at atmospheric temperature , but within an autoclave ,steam
pressure can reach (15 psi , above atmospheric pressure) with this increased
pressure (the water temperature will be increased to 121 C which will sterilize
media more efficiently . Generally we can use an autoclave or pressure cooker at
121 C, 15 psi for 15 minutes, this is the standard recommended for most
microbiological media , these conditions are adequate to quickly and effectively
kill all microbial forms even the hardiest spore formers.

The following instructions must be considered when use the autoclave:
1-Always read the operating instructions before using autoclave.
2-Always use distilled water if available.
3-All bottles and containers must be heat-proof.
4-Never fill containers completely with the liquids.
5-Never tightly cap the bottles and containers.
6-When ready to open the autoclave and fill it with water to the right level.
7-Set the timer and switch on the heat.
8-Power switch must turn off as soon as the alarm sounds, or light flashers.
9-Never open the autoclave door until the pressure falls to zero.
*Dry heat takes much longer time than moist heat to be transferred to the
organisms , thus both the time and the temperature must usually be increased .
*Moist heat is more effective than dry heat.
3-Radiation: there are two types of radiation could be employed to achieve
microbe-free environment because radiation does not generate heat ,it is term
cold sterilization , Rays are harmful to skin and eyes, it doesn’t penetrate glass
paper or plastic.

1-Ionizing rays: Gamma rays(electromagnetic) such as Gamma rays produced by a
linear accelerator from a heated cathode are high-energy with good penetrative
power, it is used to sterilize disposable petri dishes , gloves , plastic syringes ,
dressing packs , antibiotics , vitamins , hormones and fabrics in few seconds.
2-Non-ionizing rays: UV rays of wavelength longer than the visible light are low
energy with poor penetrative power, wavelengths of UV rays , ranged from 200-
280nm have a destruction effect on microbial cells with 260 nm being most
effective , UV rays use in surface disinfection to disinfect hospitals wards ,
operation theaters , virology lab , corridors, etc.
B-Chemicals methods:
There are many chemicals that have a broad spectrum of antimicrobial activity
and are fast acting (Mercuric chloride, sodium hypochlorite ,formalin ,phenols,
ethanol and isopropanol) are extensively used in microbiological labs for a variety
of purposes such as swabbing a bench before and after use , for the sterilization
of surfaces , and for the disposal of used instruments such as Pasteur pipettes ,
many laboratory disinfectants need to be prepared before they can be used.
C-Mechanical methods(filtration):
Filtration could be done for liquids and gases that may chemically altered by heat
exposure such as antibiotics and certain of cultures media components , these
solutions could be sterilized by passing them through filters of an appropriate
pore size while most solutions used in molecular biology will be adequately
sterilized with a 0.22 u filter those for tissue cultures should be use 0.1u filter to
remove mycoplasma from tissue-culture , there are much kind of filters could be
used for such purpose i.e. asbestos filters , membrane filters and sintered glass.

LAB#3
Microbiology Culture media
Growth media: are a collection of substances it can grow of microorganisms and
contains necessary elements for growth examples (Carbon-Nitrogen) in additional
some of mineral elements.
Nutrition media divide it from structure to:
1-Chemically Defined Media: it contains of multi chemical substances known, add
it at certain rate and dissolve it in water at certain rate.
2- Chemically Nondefined Media: it contains of components non-known
chemical structure, contains of plant or animal extracts examples (Beef extract,
Blood extract, animal or plant tissues).
As we can divide these two into three shapes:
1-Solid media: add it with agar
2-Semi-solid media: contains of quarter amount of agar.
3-Liquid agar: without agar.
Agar: carbohydrate extract from red Algae, autoclave didn’t affect the agar,
dissolve it at 100 C , solidifying at less than 45 C.
There are culture media use for special purpose response for experiment type:
1-Enriched media: additional some specials compounds to be enriched. (Blood
agar-Chocolate agar).
2-Selective media: additional some chemical compounds to help growth of
some and inhibit the others MacConkey agar-Hecktoen enteric agar-Mannitol
Salt agar).
3-Differential media: use to differentiate between two large group of bacteria
MacConkey agar-Hecktoen enteric agar).
4-Enrichement media : simple contains and general med for
microorganisms(Nutrient agar-potatoes dextrose agar-nutrient broth).
*Ph for bacteria: 7-8 for fungi:4.5-7
Yeast:4.5-5.5 Molds: 6-7
Preparation of media:
If you want to prepare 500 ml from nutrient agar and the weight to prepare it in
1L (1000 ml) is 28 g we will use this method:
1000 ml 28g
500ml x
X = 28*500/1000=14gm
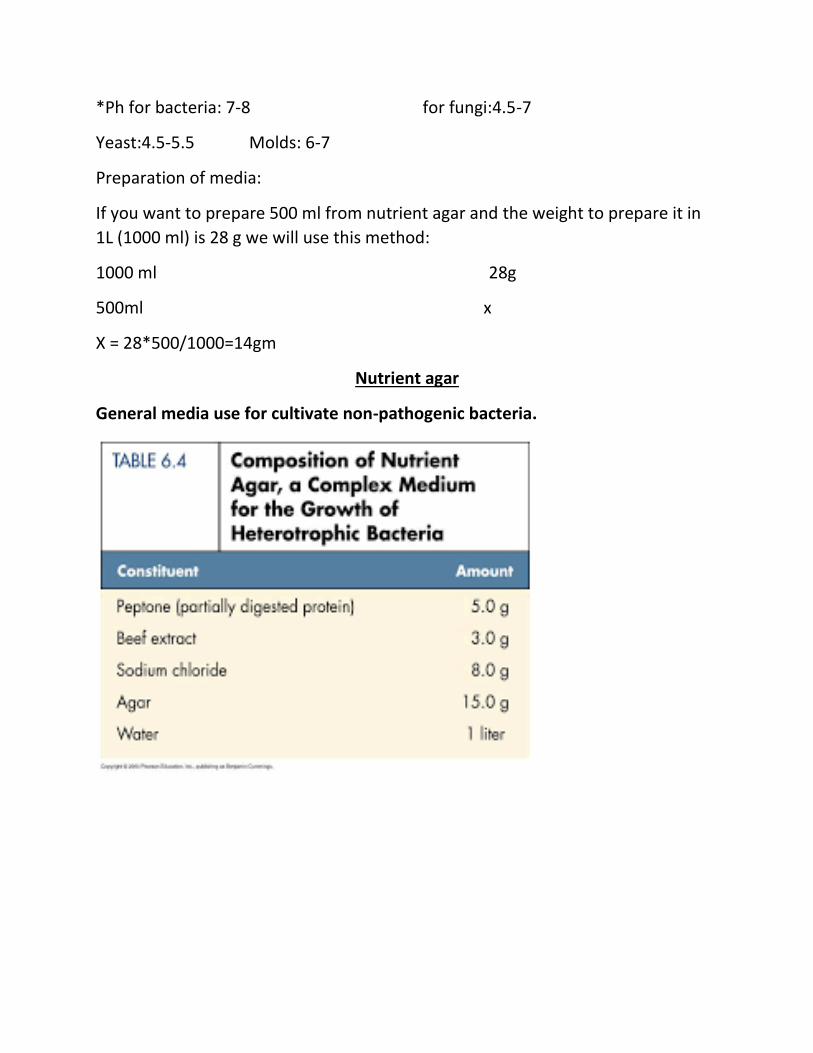
Nutrient agar
General media use for cultivate non-pathogenic bacteria.

Potatoes Dextrose Agar
Blood Agar
Use to isolate pathogenic bacteria and fungi can grow in it

Sabouraud Dextrose Agar
PDA general media use to cultivate fungi.
Sabouraud Dextrose Agar clinical media use to cultivate pathogenic fungi.
Pouring plates technique
Name of experiment: How to Pour Growth Media into Petri Dish.
Purpose of experiment: to learn the methods how to pour plate in aseptic
technique.
Materials: Petri dishes-sterile nutrient agar flask – Benson flame.

Methods:
1-Set Up All Materials: Before pouring the agar, make sure that everything is
properly set up. The Bunsen burner should be hooked up to the gas supply,
matches handy, and the sterile Petri dishes positioned close to the Bunsen
burner. The farther the Petri dishes are from the burner, the more opportunity
there will be for contamination to occur while pouring the plates.
2-Step 2 - Light the Bunsen Burner: Hook the tubing of the Bunsen burner up to the gas valve. Turn on the gas. If using a match, run the lit match up the stem of the burner until it lights (to avoid burning yourself). Adjust the flame so that there is a small, bright blue cone in the center. Extinguish the match and set it on the bench, making sure not to throw the match in the trash until it has cooled.
LAB#4
Isolation of Bacteria from different places
Objective: to Learn how to isolate bacteria from body site and natural places and
see it in the plates and sub-culture.
Materials: Cotton swab – inoculation loop – sterile petri plates nutrient agar-
different sites from body site (nose-ear-teeth-mouth-cheek ( -air-tap water.
Methods:
1-Use cotton swab for (nose-ear-teeth-mouth-cheek) and inoculate it in plates,
streak it and incubate it for 24 hours at incubation for 24 -48 hours.
2-Take one drop of tap water and inoculate with streak and incubate for 24-48
hours.
3-For air isolation open plate for 10-15 minutes and incubate it for 48 hours.
4-After incubations record the result.
Results:
We can see different colonies of different species of bacteria that means the
bacteria lives every place.
LAB#5
Purification of Bacterial cultures
Name of experiment: Purification of bacterial isolation from different places.
Purpose: to obtain single colony.
*To isolate purify cultures from bacteria we should obtain single colonies
separate from each other.
They are two principles methods to purification bacterial culture:
1-Streak plate method.
2-Pour plate method (Dilution method).
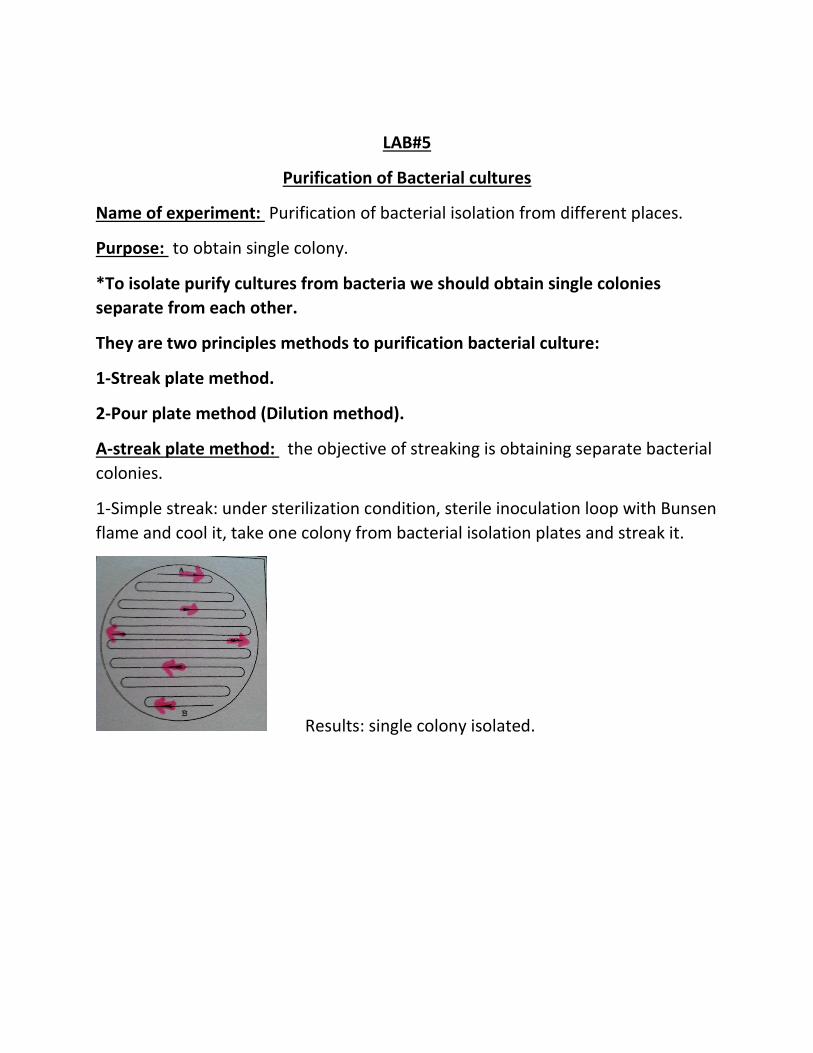
A-streak plate method: the objective of streaking is obtaining separate bacterial
colonies.
1-Simple streak: under sterilization condition, sterile inoculation loop with Bunsen
flame and cool it, take one colony from bacterial isolation plates and streak it.
Results: single colony isolated.

LAB#6
Pouring Plates method
Dilution method
Use for determine the range count number for microorganisms and use to obtain
fresh cultures.
Name of experiment: isolation and purification bacteria from soil.
Objective: to study the count number of bacteria from soil and dilution it.
Materials:
Farm soil (fertilizer soil)-sterilize nutrient agar in flask-sterile petri dishes-sterile
pipet or micro pipet – spoon-balance-six sterile distil water 9ml-10ml distil water
Method:
1-balance 1gm soil and add it in 10ml distil water and mix it for 15-20minutes
(leave it until see the dust in bottom (stock solution).
2-prepare serial dilution (1/10-1/100-1/1000……etc.) transfer 1ml from stock
solution to first dilution and record it 1/10 , transfer 1ml from tube to plate.
3- transfer 1ml from first dilution to second dilution and record it 1/100 , transfer
1ml from tube to plate.
4- transfer 1ml from second dilution to third dilution and record it 1/1000 ,
transfer 1ml from tube to plate.
5- transfer 1ml from third dilution to fourth dilution and record it 1/10000 ,
transfer 1ml from tube to plate.

6- transfer 1ml from fourth dilution to fifth dilution and record it 1/100000 ,
transfer 1ml from tube to plate.
7- transfer 1ml from fifth dilution to sixth dilution and record it 1/1000000,
transfer 1ml from tube to plate.
8-Pour the media in each plate and mix it very well until homogenous and leave it
until cool(solidifying).
9-Incubate in incubation for 24-48 hour and record results.
(Results)Methods to calculate count number of bacteria:
Bacteria count number in 1 ml= colonies number *dilution number= number of
colonies CFU/ml
CFU: Colony Forming Unit
Example: dilution factor= 1/104 = 10000
Bacterial colony number in plate = 53 colony
Bacteria count number in 1 ml= colonies number *dilution number= number of
colonies CFU/ml
Bacteria count number in 1 ml= 53 *10000= 530000 CFU/ml
LAB#7
Isolation of Fungi from different places
Name of experiment: isolation of fungi from different places.
Purpose or objective: to purification and study the shape and morphology of
fungi (Yeast or Molds).
Materials: PDA (Potatoes Dextrose Agar) – Petri plates-inoculation needle-flame-
soil-tape water-air.
Methods:
1-Pour the media under sterile condition and leave it to solid.
2-Inoculate the plates from (drop water in middle) -(air open the plate for 20
minutes)-(soil put a little bit of soil in middle).

3-Incubate it in incubation at 25 C for one week and record the results.
*Potatoes Dextrose Agar (PDA): is a general media use to cultivate non -
pathogenic yeast and molds.
*Sabroud Dextrose Agar: is a general media use to cultivate pathogenic fungi
Yeast or fungi).
Results: we can see different species of molds fungi and yeast therefore we can
purification of fungi.
LAB#8
Purification of Fungi (Yeast and mold)
Name of experiment: Purification of fungi from different places.
Purpose or objective: to study the shape and morphology of fungi (Yeast or
Molds).
Materials: PDA (Potatoes Dextrose Agar) – Petri plates-inoculation needle-flame-
Fresh fungal cultures.
Methods:
1-Pour the media under sterile condition and leave it to solid.
2-Inoculate the plates from fresh culture to take a piece from Mycelium into the
middle of plates.
3-Incubate it in incubation (Room temperature) at 25 C for one week and record
the results.
Results: we can now identify by staining.
LAB#9
Microbial Stains(Dyes) and microscopy
Stains (Dyes) It is a color organic material that has the ability to bond with other materials giving it color. It must have two basic conditions: 1. The availability of the so-called color holder, which gives the dye its distinctive color.

2. The factor that gives the dye has the ability to ionize, which makes it more active, and makes it able to bind to the dyed body. Types of stains:
1-Simple stain: use one type of stain (lactophenol, safranin, crystal violet) to
identify bacteria or fungi.
2-Differintial stain(complex stain): use two or more than one stain to identify of
bacteria(gram stain , Ziel-Nelson stain).
3-Special stain: use to identify the specific inside bacteria or yeast (flagella,
spores, capsule) , example of stain ( green malachite for spores of bacteria, Indian
ink for capsules of bacteria and yeast , Carbol-fuchsin for flagella).
Name of experiment: stain of bacteria and fungi use simple and differential stain.
Purpose: to study the shapes of bacteria and yeast , also study the molds
filamentous shape under microscope .
*To visual under microscope for fungi (yeast and molds) use 40X and 60X eye
lens, for bacteria use 100X with oil (Xylene oil to broken light to see very well
under microscope).
Materials:
Inoculation loop-inoculation needle-crystal violet-safranin-iodine-lactophenol-
alcohol 95%-fresh cultures (bacteria and fungi)- clean slides-benzene flame-xylene
oil-Microscope-cover slides.
A-simple stain for bacteria:
1-Make a smear of bacterial colonies (take one colony and mix it with saline) and
fix it under benzene flame till dry.
2-Flood (cover completely) the entire slide with crystal violet for 1 min and wash
it by water.
3- allow the slide to air dry before viewing under the microscope and add drop of
xylene oil (immersion oil) and examine it under 100x eye lens.
B-Simple stain for yeast:

1-Make a smear of Yeast colonies (take one colony and mix it with saline) and fix
it under benzene flame till dry.
2- Flood (cover completely) the entire slide with Safranin for 1 min and wash it by
water.
3- allow the slide to air dry before viewing under the microscope and examine it
under 40X -60X eye lens.
C-simple stain for Molds:
Take a piece of fungal growth and cut it to small pieces and add it into slide with
drop of lactophenol and cover it by cover slide and visual under microscope on
40X-60X lens.
D-differential stain for bacteria(Gram stain):
Is a differential stain use to divide two large group of bacteria Based on cellular
content, Gram stain divides almost all bacteria into two main groups: gram
positive- bacteria (Purple) and gram-negative bacteria (Red).
1-Make a smear of bacterial colonies (take one colony and mix it with saline) and
fix it under benzene flame till dry.
2-Flood (cover completely) the entire slide with crystal violet for 1 min and wash
it by water.
3-Flood the entire slide with Iodine solution for 1 min and wash it by water.
4-This step is best performed while holding the slide at a slant with forceps, rather
than while sitting on a slide rack, add decolorizer(Acetone-alcohol) dropwise and
allow it run off. Rinse with running tap water. Repeat this step until the blue dye
no longer runs off the slide with the decolorizer. Rinse with running tap water
and shake off the excess is somewhat tricky because using too much decolorizer
could result in a false Gram (-) result. Likewise, not using enough decolorizer may
yield a false Gram (+) result.
5-Flood the entire slide with Safranin for 1 min and wash it by water.

6-allow the slide to air dry before viewing under the microscope and add drop of
xylene oil (immersion oil) and examine it under 100x eye lens.
Results and Discussion:
Simple stain bacteria with crystal violet
Yeast with safranin
mold with lactophenol
gram positive cocci

Gram negative bacilli
Lab#10
Introduction of Microalgae (Cyanobacteria)
*Algae: The term algae are used to describe a diverse collection of aquatic organisms that, in
general, have the ability to produce their own food through the process of photosynthesis
(though there are exceptions). Algae have fairly simple vegetative and reproductive structures
lacking the complex tissues found in higher plants. They are found in a wide variety of habitats
including ponds, lakes, rivers, estuaries, oceans, soils.
*Microalgae or microphytes: are microscopic algae typically found
in freshwater and marine systems living in both the water column and sediment they are
unicellular species which exist individually, or in chains or groups depending on the species,
their sizes can range from a few micrometers (µm) to a few hundred micrometers.
Unlike higher plants, microalgae do not have roots or stems or leaves they are specially adapted
to an environment dominated by viscous forces.
*Cyanobacteria: are sometimes considered algae, but they are actually bacteria (prokaryotic),
where the term "algae" is now reserved for eukaryotic organisms. They also derive their energy
through photosynthesis, but lack a nucleus or membrane bound organelles, like chloroplasts.
Actually, cyanobacteria may have evolved into the first chloroplasts, as evidenced by similar
structural and genetic traits. Cyanobacteria have a unique set of pigments used in
photosynthesis, called the phycobiliproteins (phycobilins), which can give some of them a blue-
green color. Cyanobacteria are also responsible for many of the Harmful Algal Blooms (HABs)
that cause ecological, economical and public health concerns in waterways, many times
through the production of cyanotoxins.
*Lichens: symbiosis relationship between fungi and algae.

*The culture media use for cyanobacteria is BG11(Blue-Green media)
Pictures of some cyanobacteria
Gloecapsa magma Chroococcales sp.

Nostoc sp. Oscillatoria sp.
Lab#11
Introduction of Virology
Virology: study of viruses and study how to cause infection of the host.
Viruses: obligate parasite inside hosts, non-living organism, activate it after
entering the host cells, DNA or RNA contains neither both, protein structure.
*Media use to cultivation for viruses use cell cultures or tissue culture, it should
to cultivation inside the cells to cultivate it (Egg yolk-cell culture media-
continuous cell culture media).
*Diagnosis of viruses:
1-serology: ELISA

2-Moleculer : PCR(Polymerase Chain Reaction).
Serology: is the study of serum and other body fluids. In practice, the term usually refers to
the diagnostic identification of antibodies in the serum. Such antibodies are typically formed in
response to an infection (against a given microorganism), against other foreign proteins (in
response, for example, to a mismatched blood transfusion), or to one's own proteins (in
instances of autoimmune disease).
Serological test use to diagnosis viral or bacterial infection.
*ELISA (The enzyme-linked immunosorbent assay):
ELISA is a test that uses antibodies and color change to identify a substance.
ELISA is a popular format of "wet-lab" type analytic biochemistry assay that uses a solid-phase enzyme immunoassay (EIA) to detect the presence of a substance, usually an antigen, in a liquid sample or wet sample
1-Indirect ELISA: is a two-step ELISA which involves two binding process of primary antibody
(sample antibody) and labeled secondary antibody.
2-Direct ELISA(Sandwich ELISA):the sandwich ELISA quantify antigens between two layers of
antibodies (i.e. capture and detection antibody).
Moleculer diagnosis
PCR (Polymerase reaction) is an in-vitro enzymatic reaction used for amplification of a specific
DNA fragment that lies between two regions of known nucleotide sequence.
Use to diagnosis of viral infection and bacterial infection
Three steps of PCR principles:
1-Denaturation: the two DNA stands are separated by breaking down the hydrogen bonds
between complementary bases at 92-96°C.

2-Annealing: Two specific primers are linked to sequences flanking the target region (37-65°C).
Primers serve as a starting unit for DNA polymerase
3-Extension: Two specific primers are linked to sequences flanking the target region (72°C).
Primers serve as a starting unit for DNA polymerase.