prairiecat cataloging i training manual · 2014-04-30 · sierra cataloging i 2 sierra cataloging...
TRANSCRIPT
Revised November 18th, 2013
PrairieCat Cataloging I Training Manual

Sierra Cataloging I
2
Sierra Cataloging allows staff to do the following: Create Bibliographic, Item, Authority and other records, edit existing records, perform Global Updates and Rapid Updates, delete records, load files of records, and create lists. After this course you will know how to:
Know basic record structure
Create item records
o Single item
o Multiple copies
Edit item records
o Individual
o groups
Setting item records for deletions
Create Volume records
Link and unlink items to volume records
Unlink Volume records from bibliographic record
Delete volume records
Friendly reminders and tips:
Sessions will timeout after 60 minutes of inactivity to free up user licenses but make it
a good practice to log out.
Staff can only work with one module at a time. To work simultaneously on two or
more modules, one must log into another session but keep in mind this will use up a
user license.
Searching standard numbers cannot include hyphens or spaces: item/patron barcodes,
ISBNs, ISSNs LCCNs)
Wildcards in searching: Search expressions can include the '*' character at the end of
a word or phrase as a wildcard. For example, the search expression "symph*" matches
the words "symphony", "symphonic", and so forth. By default, the system uses a
single asterisk to match a maximum of five characters and a double asterisk to match
any number of characters. For example, defens* will match defense, defensible, but
not defensibility. defens** will match all three words.

Sierra Cataloging I
3
TABLE OF CONTENTS
Log In _______________________________________________________________________ 5
Record Structure and data fields _________________________________________________ 5
Record Numbers __________________________________________________________________________ 5
Check Digits _____________________________________________________________________________ 6
Fixed Fields ______________________________________________________________________________ 6
Variable-length fields ______________________________________________________________________ 6
Wildcards in searching _________________________________________________________ 6
Item records __________________________________________________________________ 7
Sort item records in summary display by column ________________________________________________ 7
Item Record Structure ______________________________________________________________________ 8
View __________________________________________________________________________________ 8
Description _____________________________________________________________________________ 9
999 Field ______________________________________________________________________________ 11
New Record Templates ___________________________________________________________________ 12
Setting for Item Entry ____________________________________________________________________ 12
Creating/attaching new Item records to bibliographic record (Brief instructions) ____________________ 15
Creating/attaching new Item records to bibliographic record (Detailed instructions) _________________ 16
Single copy ____________________________________________________________________________ 16
Multiple copies _________________________________________________________________________ 20
Editing Items records _____________________________________________________________________ 22
Modify groups of attached records from the Summary display (***Will lock selected records!) _________ 25
Deleting item records from bibliographic record _______________________________________________ 28
To view just your items on a particular title ___________________________________________________ 30
Volume Records _____________________________________________________________ 31
Attaching/creating volume records to bibliographic records _____________________________________ 31
Attaching (linking) item records to volumes record _____________________________________________ 33
Unlinking item records from volumes record __________________________________________________ 34
Modifying volume records _________________________________________________________________ 34
Deleting volume records ___________________________________________________________________ 35
Volume Record / Volume Field association ___________________________________________________ 35
Bibliographic Record Maintenance ______________________________________________ 36
Display of bibliographic record _____________________________________________________________ 36
Staff View _____________________________________________________________________________ 36
Public view of records ____________________________________________________________________ 36
Bibliographic records with “multi” locations __________________________________________________ 37

Sierra Cataloging I
4
Displaying Record Maintenance Statistics ____________________________________________________ 37
Spine labels _____________________________________________________________________________ 39
Printing Monographic Labels Using Print Templates _____________________________________________ 39
Batch Printing of Item Labels ______________________________________________________________ 39 Queueing Monographic Labels for Batch Printing ____________________________________________ 39 Viewing the Print Queues _______________________________________________________________ 40 Searching for Items Within the Queue _____________________________________________________ 40 Removing Items from the Queue _________________________________________________________ 41 Prepending Blank Labels _______________________________________________________________ 41 Previewing the Print Job ________________________________________________________________ 41 Printing the Queues ___________________________________________________________________ 41
Record Links ________________________________________________________________ 42
Bibliographic Record Links ________________________________________________________________ 42
Order Record Links _______________________________________________________________________ 42
Checkin Record Links _____________________________________________________________________ 42
Item Record Links ________________________________________________________________________ 42
Patron Record Links ______________________________________________________________________ 42
Course Record Links ______________________________________________________________________ 43
Authority Record Links ____________________________________________________________________ 43
Bibliographic Record Links ____________________________________________________ 43
Volume Record Links _________________________________________________________ 44
Search Indexes _______________________________________________________________ 45
To report record corrections and duplicate record: _________________________________ 47
TB 33 OCLC numbers – Sending to PC staff via e-mail _____________________________ 48
For more information _________________________________________________________ 53
Appendices __________________________________________________________________ 54
Appendix A: To add an item to an exisiting bibliographic record: _________________________________ 55
Appendix B: Chief source of information _____________________________________________________ 56
Appendix C: Imprints _____________________________________________________________________ 57
Appendix D: Paperback editions and dates____________________________________________________ 58

Sierra Cataloging I
5
Log In
Double click on the Sierra icon on your computer’s desktop.
When the Login and Password dialog box appears, enter a Sierra Cataloging login name and password.
Click the OK button or press the Enter key
This connects you to the server and loads the Sierra Cataloging software.
Record Structure and data fields
Record Numbers
Each record is assigned an internal control number, known as a record number. Record numbers are prefixed with a period (.) and a one-character tag that identifies the record type. The record types are assigned the following character tags:
b bibliographic o order i item c checkin a authority p patron r course n invoice v vendor e resource l license t contact j volume
Record numbers are seven or eight digits long, including a modulus 11 check digit in the last position. For example, the number .b10243641 is interpreted as follows:
.b10243641 ||| | ||| `--- Check digit (Last digit in #) ||`--- Record number (“1024364”) |`--- Record type (bibliographic) (b)
`--- Record number prefix (. =period)

Sierra Cataloging I
6
Check Digits
When searching for a record number, if you don't know the check digit, you can substitute the character a for the check digit. For example, you could enter the record number above as .b1024364a.
Most Sierra record types (i.e.: Bibliographic, Item, Holdings, Order, Patron, etc.) consist of fixed-length fields and variable-length fields.
Fixed Fields
Each Fixed-length field contains a specific code, numeric or alphabetic or alphanumeric, which is selected from the set of valid codes for that field. Each fixed-length field for a particular record type appears in every record of that type. Fixed-length fields are not repeatable. Valid codes are established in the System Codes section, and modification, addition, or deletion of these code values are performed only by a user with appropriate authorizations to modify codes in the system. Consult the System Administration Training Manual for details on modifying codes in the system.
Variable-length fields
All variable-length fields are repeatable. Some fields have a specific use and are automatically generated by the system (such as PAID and ROUTING fields.) Other fields, (i.e.: NOTE), are available for you to enter free text. Some variable-length fields can be indexed, and may be used to retrieve records. The library may ask Sierra to index certain fields (not all) if they are not already indexed (for example, Publisher).
Wildcards in searching
Search expressions can include the '*' character at the end of a word or phrase as a wildcard. For example, the search expression "symph*" matches the words "symphony", "symphonic", and so forth.
By default, the system uses a single asterisk to match a maximum of five characters and a double asterisk to match any number of characters. For example, defens* will match defense, defensible, but not defensibility. defens** will match all three words.

Sierra Cataloging I
7
Item records
Sort item records in summary display by column
After opening a Bibliographic record, select all (or appropriate) item records from the Summary tab by clicking in the checkbox. Select Edit | Location/call no./volume sort from the dropdown menu.
Can also be sorted by clicking on headings fields, i.e. Location.
This option sorts records alphabetically by location name, by call number, and then by volume (pulled from either the volume field of the Item record or the linked volume record)

Sierra Cataloging I
8
Item Record Structure
View

Sierra Cataloging I
9
Description
Fixed Fields (only certain values can be put into field; cannot be free text)
Copy No. Edit manually. System does not generate or increment. May leave blank.
Item Code 1 Numeric Statistical field. (Sirsi’s Item cats1 & 2 combined). Will need to use cheat sheet. Mandatory field.
Item Code 2 [1] No code “---, [2] “Suppress” code (Equivalent to “shadow item”). [3] “d Discard” (Suppressed code; used to set items for deletion) Suppressed items will not display in OPAC.
Item Type 1st of 3 determiners of loan policy (Determiners: Item type [1st], Location [2nd], and Patron type [3rd]) Mandatory field.
Price Mandatory field. Include processing fee if charged.
Checkout Date System generated; date & time stamp
Checkout Location System generated; statistical gathering field. (i.e. Kids’ checkout vs. checked out @ Reference desk)
Due Date System generated; cannot edit.
Patron No. System generated; cannot edit.
Last Patron System generated; cannot edit.
Last Checkin System generated; cannot edit.
Inventory Date System generated; cannot edit.
Checkin Location System generated; cannot edit.
No. of Renewals System generated; cannot edit. Current user only.
No. of Overdues System generated; cannot edit. Current user only.
Overdue Date System generated; cannot edit. Date overdue notice generated.
Item Use 3 No prescribed use. Create a statistical gathering temporarily, i.e., create bibliography. System staff create review file.
Recall Date We do not use – always blank
Total Checkouts Over life of item – increment up only
Total Renewals Over life of item – increment up only
Last Checkout Date System generated; date & time stamp
Location 2nd of 3 determiners of loan policy (Determiners: Item type [1st], Location [2nd], and Patron type [3rd]) i.e. rsanf (Rails Shorewood Center Adult NonFiction) 5-character code. Autofill as you type or double-click field and select value. Mandatory field.
Loanrule Onshelf (not checked out) = 0 (zero); numeric code. Auto generated; dependent on of 3 determiners of loan policy.
Status Anything on shelf or Checked out (--[dash dash] value); Reference (Lib Use Only) Checked out status will reflect due date.

Sierra Cataloging I
10
Internal Use i.e. “Stats week”; equivalent to “marked item used”
Copy Use Used for photocopying. Can also be used similarly to “marked item used) Increment up only; cannot edit.
Item Message “No message” or “On the Fly” (Not used); 14-character limit. Public does not see. Central system function mapped to variable field message.
OPAC Message Not used.
Year-to-date Circ Year on year stats
Last Year Circ Overwrite / append option
Item Agency Main library, not branches. Parent organization (2-character library code) Mandatory field.
Variable Fields (entered as free text)
b Barcode Indexed; need to enter barcode without spaces if entered manually (vs. scanner)
c Call No. Indexed.
090 Locally Assigned LC-type Call Number (i.e.: QP801.A3 D37 2011)
092 Locally Assigned Dewey Call Number (i.e.: 641.5 COO)
096 Locally Assigned NLM-type Call Number (i.e.: QV 766 P348 2004)
099 Local Free-Text Call Number (i.e.: FIC SMI)
v Volume Do NOT manually add. Follow TSUG policy/procedure manual – If item record is linked to volume record, volume field is added temporarily and will disappear when item record is saved. Volume Record takes precedence over Volume Field. Use internal Note field in place of Volume Field.
m Message Pop up message. Repeatable. 10,000 character length. Multi-piece item: # (To be used in place of “Number of pieces:”
n Public Note Display in online catalog. Sits on record; does not pop up.
x Internal Note Staff note. Used for things like vendor information.
y URL URL for item; generally not used. Most times keep with bibliographic record’s URL.
r Reserve Notes System generated if item placed on course reserves. Reserve circs are separate from regular circs.
a Item Field (999) Migration field only. Information pulled over from former system. |d=last activity date; |e = last discharge date; |u = original creation date.
Messages: pop-up during check-ins and check outs.
Notes (internal & public): just sit on record; no alerts. Not indexed; system report can search notes. Encore community tagging

Sierra Cataloging I
11
999 Field
The 999 field is a variable field in the item record. The 999 field in Sierra contains Information from the Symphony Item Record Example 999 field: F CLEMENT|wDEWEY|c1|i32077001127133|d6/1/2012|e5/23/2012|lAD-FIC LSBB- 3|n7|p$24.99|rY|sY|tBOOK|u1/12/2012|xMYSTERY ADULT|oB&T 1/11/12|z092 Elements explained: Call number | Classification scheme | copy number | item barcode | d=last activity date | e=date last charged | l=home location | n=total checkouts | p=price | r=circulation flag | s=permanent flag | t=item type | u=acquisitions date | x=item category 1 | o=item notes or comments | z=item category 2

Sierra Cataloging I
12
Item Templates
New Record Templates
The Sierra system uses new record templates to create new records. A new record template can be configured by the library/system staff to prompt the user to fill in specific fields. A new record template can also be configured by the library/system staff to contain default data in certain fields which is automatically inserted into the record during the new record creation process. Libraries will have templates created to make sure items are consistently entered and all necessary fields prompted to edit.
The template “wizard” will guide the user through the creation of the new Item record. Templates are used to ensure consistency in item entry and inclusion of all necessary fields.
Setting for Item Entry
To get to settings:
Menu Toolbar Admin-
Settings New Records

Sierra Cataloging I
13
1. Prompt for template: Prompted only once.
2. Always prompt for template: Prompted each
time an item record is created.
3. Specific template selected: will always use
designated template.
Recommendation: Always prompt for template
Prompt for adding Single or Multiple Copies option

Sierra Cataloging I
14
Record Templates tab:
Templates viewed pulled from list in “Preferred Templates” column. If nothing in the preferred list one will see the all-inclusive list under “Other Templates”.
Click “Save Settings” once changes are made.
Sierra Cataloging I
15
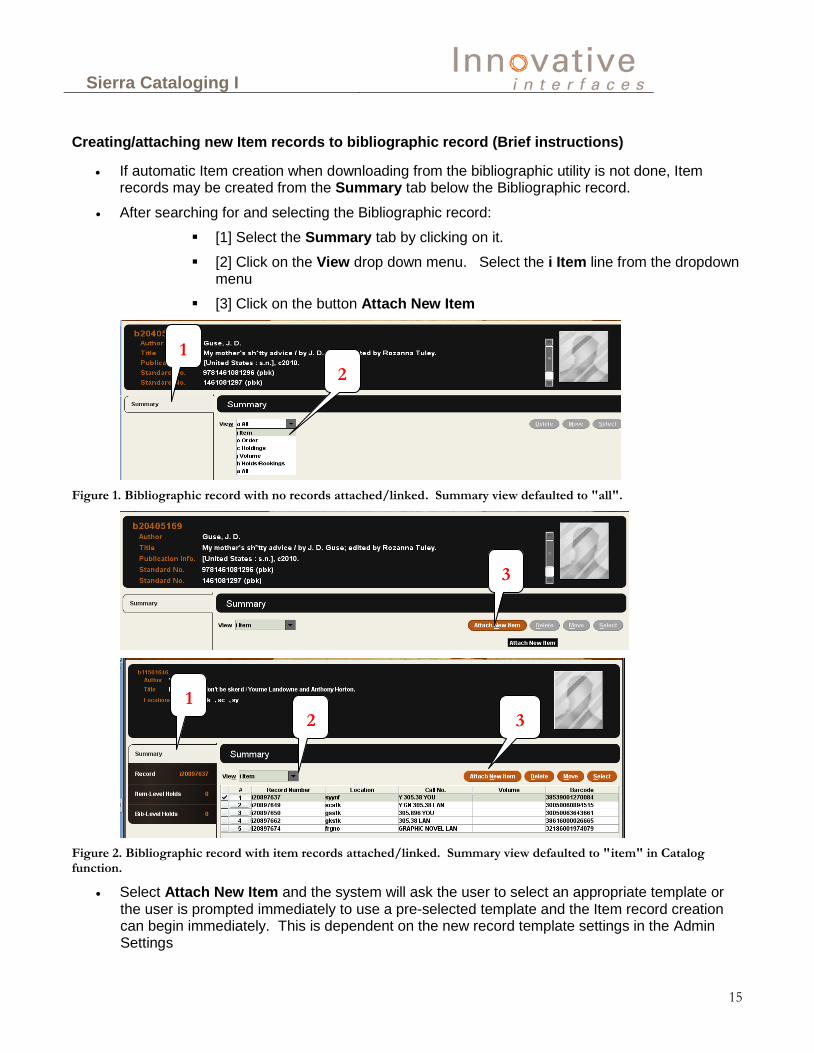
Creating/attaching new Item records to bibliographic record (Brief instructions)
If automatic Item creation when downloading from the bibliographic utility is not done, Item records may be created from the Summary tab below the Bibliographic record.
After searching for and selecting the Bibliographic record:
[1] Select the Summary tab by clicking on it.
[2] Click on the View drop down menu. Select the i Item line from the dropdown menu
[3] Click on the button Attach New Item
Figure 1. Bibliographic record with no records attached/linked. Summary view defaulted to "all".
Figure 2. Bibliographic record with item records attached/linked. Summary view defaulted to "item" in Catalog function.
Select Attach New Item and the system will ask the user to select an appropriate template or the user is prompted immediately to use a pre-selected template and the Item record creation can begin immediately. This is dependent on the new record template settings in the Admin Settings
1
2
3
1
2 3

Sierra Cataloging I
16
Creating/attaching new Item records to bibliographic record (Detailed instructions)
Single copy
1. Search for your bibliographic record
2. If more than one match, list will display. Highlight desired record and left double-click on record
or click “Select”. If only one match, you will be taken directly to the summary window of
desired bibliographic record.
Double-click on desired record or click on “select” to pull up high-lighted record.

Sierra Cataloging I
17
3. Click on icon top of screen to view bibliographic record to verify that bibliographic record
matches your item.
4. Click on icon at top of screen to return to summary.
5. Click “Attach New Item”

Sierra Cataloging I
18
6. Select “Single Item” & click “OK” (This window is optional; can set preference to always do
single or multiple items)
7. Highlight desired template and click “select”
Sierra Cataloging I
19
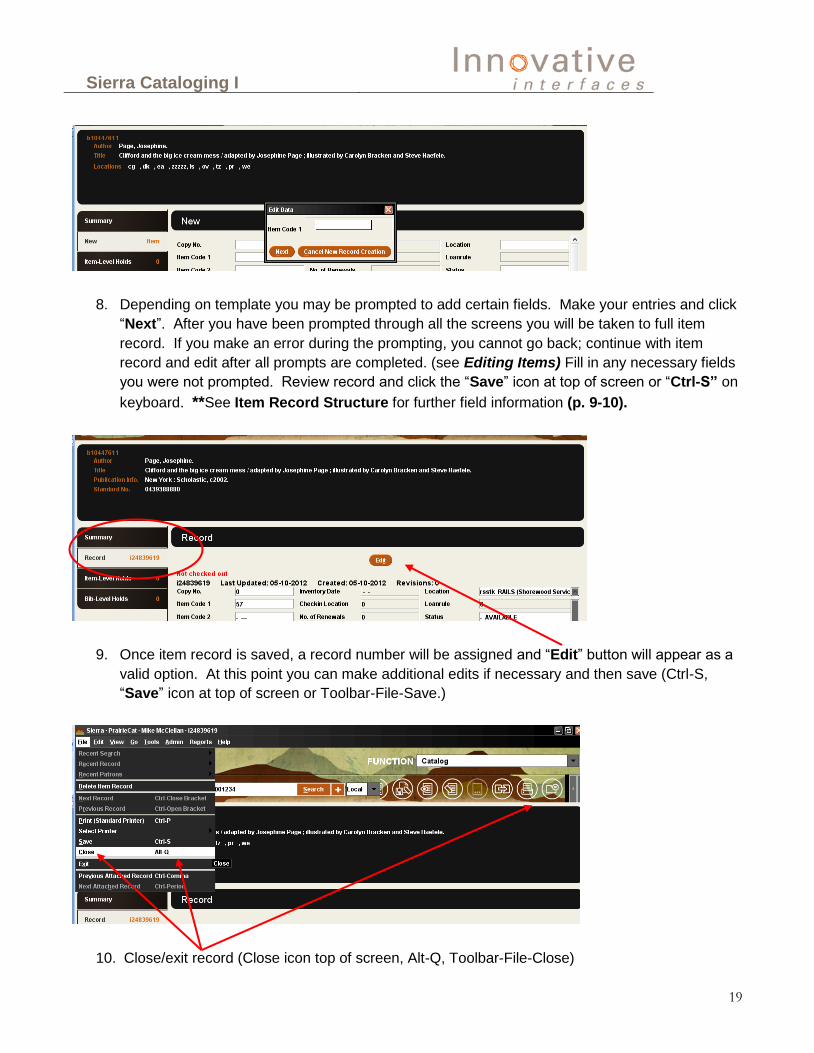
8. Depending on template you may be prompted to add certain fields. Make your entries and click
“Next”. After you have been prompted through all the screens you will be taken to full item
record. If you make an error during the prompting, you cannot go back; continue with item
record and edit after all prompts are completed. (see Editing Items) Fill in any necessary fields
you were not prompted. Review record and click the “Save” icon at top of screen or “Ctrl-S” on
keyboard. **See Item Record Structure for further field information (p. 9-10).
9. Once item record is saved, a record number will be assigned and “Edit” button will appear as a
valid option. At this point you can make additional edits if necessary and then save (Ctrl-S,
“Save” icon at top of screen or Toolbar-File-Save.)
10. Close/exit record (Close icon top of screen, Alt-Q, Toolbar-File-Close)

Sierra Cataloging I
20
Multiple copies
Follow instructions for single copy steps 1-5
6. Select “Multiple Items” [1], Select “Location” [2], “# of Copies” [3] & click “OK” [4] (You can
fill in other fields but if not used be sure they are blank). You can add copies in multiple
locations. You can also have copy # increment within each location (i.e. copies 1-3 in Circ and
copies 1-3 in Ref) or across all locations (i.e. copies 1-3 in Circ and copies 4-6 in Ref). If you do
not want to include copy number, leave “Beginning Copy Number” blank and uncheck
“Increment Copy Number”. (All item records will have “0” [zero] assigned as copy no. You
may leave as-is or you may clear out the field).
7. Click “Yes” to accept; “No” to go back and re-do.
[1]
[2] [3]
[4]
Sierra Cataloging I
21
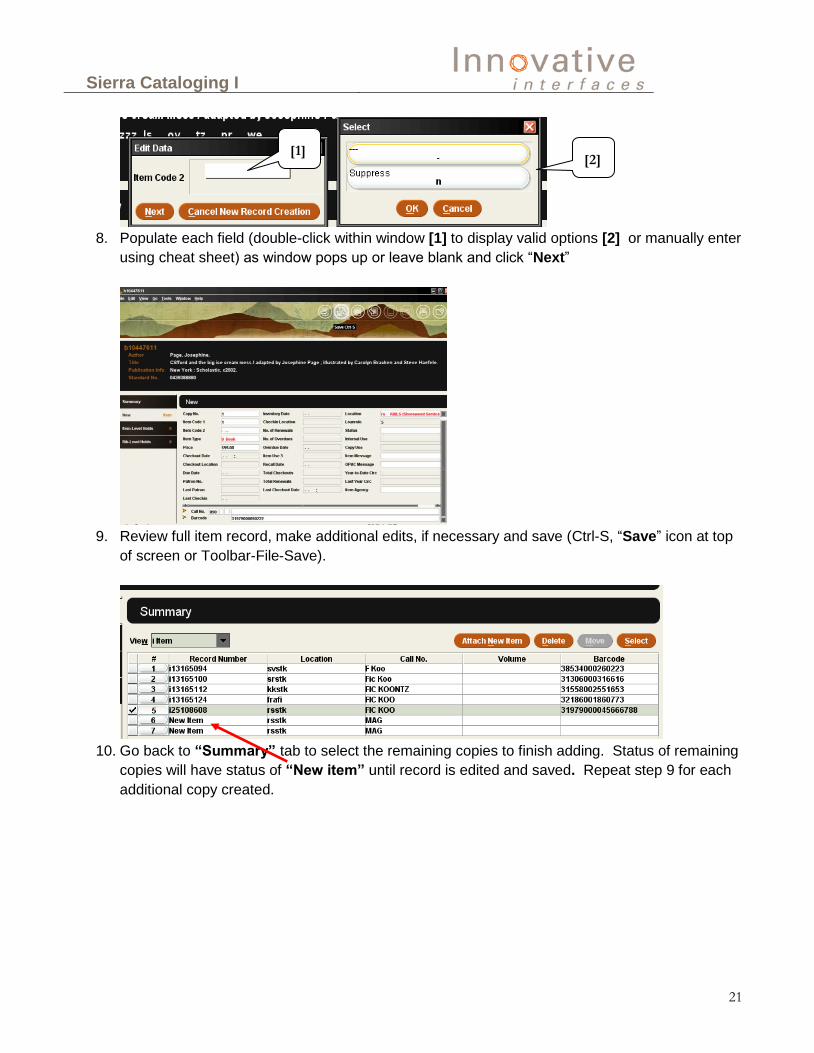
8. Populate each field (double-click within window [1] to display valid options [2] or manually enter
using cheat sheet) as window pops up or leave blank and click “Next”
9. Review full item record, make additional edits, if necessary and save (Ctrl-S, “Save” icon at top
of screen or Toolbar-File-Save).
10. Go back to “Summary” tab to select the remaining copies to finish adding. Status of remaining
copies will have status of “New item” until record is edited and saved. Repeat step 9 for each
additional copy created.
[1] [2]

Sierra Cataloging I
22
Editing Items records
1. Search for your bibliographic record. If you search by barcode** or item record #, there should
be only one match and you will be taken directly to that record (skip to step 4. p. 19) If you
search by title, etc., you may have multiple matches (go to step 2.). **It is possible to use a
barcode multiple times or have one barcode used in multiple records.
2. If more than one record matches, list will display. Highlight desired record and left double-click
on mouse or click “Select”. If only one match, you will be taken directly to the summary
window of desired bibliographic record.
Double-click on desired record or click on “select” to pull up record.

Sierra Cataloging I
23
3. Click on “Summary” to find and select your item record. Double-click on line item or click
“Select”.
4. Editing fields
a. Editing Fixed fields
i. Double-click to in field to display valid options and then double-click on desired
option to pull information back into field. OR-
ii. Highlight entire contents in field and manually enter (use of cheat-sheet may be
required for some numeric statistical fields)
Double-clicking in Item Type field [1] causes the selection of this field to display [2]. Double-click desired selection or Click once and then click “OK”
[1]
[2]

Sierra Cataloging I
24
b. Editing Variable fields
i. Method 1:
1. Place cursor in variable field and right-click [1]. Select “Edit Field” [2].
Field to edit will pop up [3]. Make edits and click “OK” [4].
2. Save. (Ctrl-S, “Save” icon at top of screen or Toolbar-File-Save) OR
ii. Method 2:
1. Place cursor in variable field. From toolbar, click, “Edit [1a]”, “Edit Field”
[2a]. Field to edit will pop up [3a]. Make edits and click “OK” [4a].
2. Save. (Ctrl-S, “Save” icon at top of screen or Toolbar-File-Save. OR
iii. Method 3:
1. Insert cursor in field, manually edit. Save.
5. Inserting variable fields
a. Toolbar—Edit—Insert Field or,
b. Ctrl-i, or
c. Place cursor within field, type Ctrl-i. This will insert same type of variable field that
cursor was placed, (i.e. if cursor is within an existing note field and you type “ctrl-i”,
another note field will be inserted.
[1]
[2]
[3]
[4]
[1a]
[2a]
[3a]
[4a]

Sierra Cataloging I
25
6. Delete/clear fields
a. Fixed fields
i. Double-click to access valid options and then double-click on desired option.
ii. Highlight entire contents in field and hit “Backspace” or “Delete”
b. Variable fields
i. Toolbar—Edit—Delete Field and Save.
ii. Ctrl-D and Save, or
iii. Place cursor with field, Ctrl-D and Save, or
iv. Clear out field and Save.
7. Close/exit record (Close icon top of screen, Alt-Q, Toolbar-File-Close)
Modify groups of attached records from the Summary display (***Will lock selected records!)
Select or highlight from the summary tab the records to be modified by clicking the check boxes to the left of the entry. Got to toolbar and click Edit | Modify Group from the dropdown display.

Sierra Cataloging I
26
Select the field to modify by double-clicking on the field tag or field number in “field” box [1], or
by clicking on the “down arrow” key on the keyboard to display all of the available fields to
modify [2]. Select the appropriate field by using the <Enter> key.
[1] Double-click in “Field” box to pull up “Select” box
[2] Place cursor in “Field” box and click the arrow-down button on keyboard to open drop down box.

Sierra Cataloging I
27
[1] Double click to select a new value to insert, or [2] go to toolbar and click Edit | Find | Find what | Replace with to find and replace a specified value in a group of records.
From toolbar, use Edit | Increment data from the dropdown menu to numerically increment VOLUME, COPY #, and BARCODE fields.
[1] Double-click in individual field to modify
[2] Double-click in individual field to modify

Sierra Cataloging I
28
Deleting item records from bibliographic record
When you want to discard an item, you will change the Item Code 2 in the item record to “d Discard” and change the Status to “w WITHDRAWAL”. Central Site will then run a report after monthly deletion statistics are run, to actually discard the items. Items with Item Code 2 assigned “d Discard are suppressed from the OPAC and will not be viewable to the public.
Central site will provide statistical reports of how many items were deleted to those who want them, and PrairieCat contract staff will actually delete the items.
1. Search for your bibliographic record. If you search by barcode or .i record, there should be only
one match and will go directly to that record (skip to step 4.) If you search by title, etc., you
may have multiple matches (go to step 2.).
2. If more than one match, list will display. Highlight desired record and left double-click on mouse
or click “Select”. If only one match, you will be taken directly to the summary window of
desired bibliographic record.
Double-click on desired record or click on
“select” to pull up record.

Sierra Cataloging I
29
3. Click on “Summary” to find and select your item record. Double-click on line item or click
“Select”.
4. With full item displayed, change item code 2 to “d Discard” to set the item for deletion.
5. Change Status to “w WITHDRAWAL”.
6. Save (Ctrl-S, “Save” icon at top of screen or Toolbar-File-Save.)
7. Close/exit record (“Close” icon top of screen, Alt-Q, Toolbar-File-Close)

Sierra Cataloging I
30
To view just your items on a particular title
FUNCTION: Catalog
With full record displayed, on “Summary” tab, change “View” display to “h Holds/Bookings”.
Select “Current Location”
Only your library’s items will display.

Sierra Cataloging I
31
Volume Records
**|z in our legacy system is being replaced with volume records. Follow policy/procedure manual.
Attaching/creating volume records to bibliographic records
1. With desired bibliographic record selected, go to Summary window and select “j Volume” view.
2. Click “Attach New Volume”.
3. Select desired template if given selection.
4. Follow prompt(s) and enter volume information according to TSUG procedure/policy manual.
5. Save (icon at top right of screen, “Ctrl-S” or File-Save).

Sierra Cataloging I
32
6. Window will appear to give opportunity to attach (link) item(s) to volume just created.
a. Select appropriated items and click “Attach” OR
b. Don’t select any items and click “Don’t attach. You choose to link at a later time. See
Attaching (linking) item records to volumes record (p. 30)
7. Save. (icon at top right of screen, “Ctrl-S” or File-Save).
Sierra Cataloging I
33
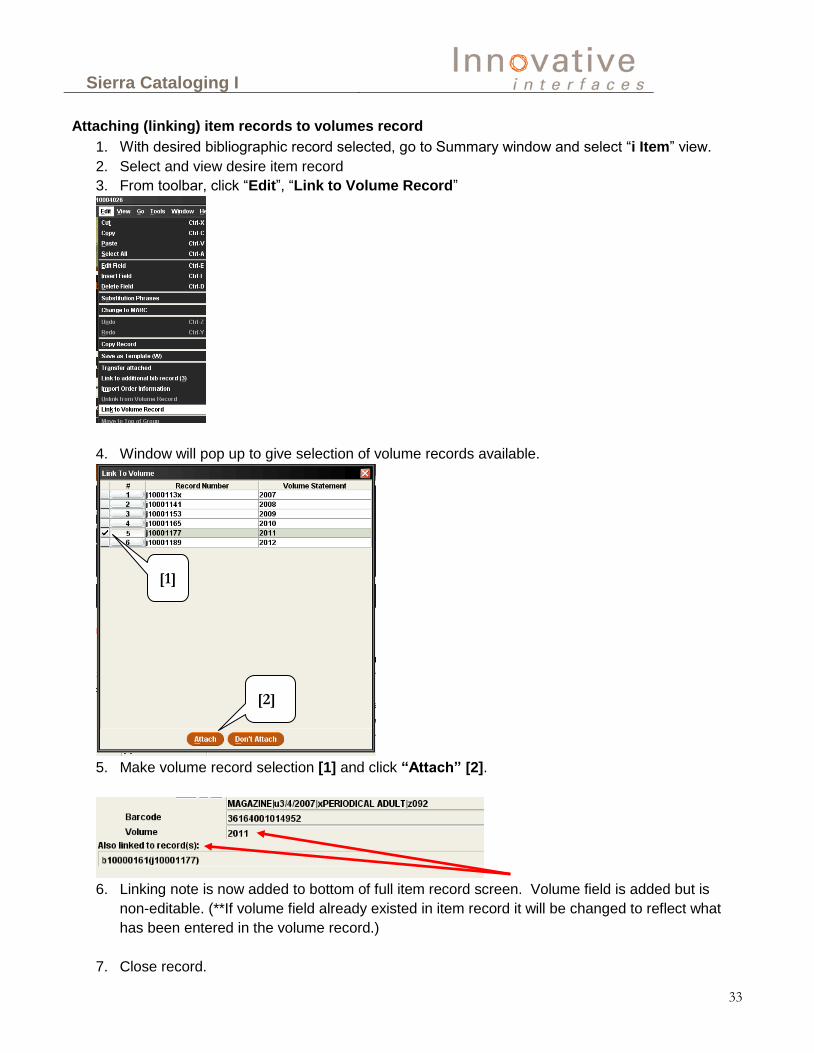
Attaching (linking) item records to volumes record
1. With desired bibliographic record selected, go to Summary window and select “i Item” view.
2. Select and view desire item record
3. From toolbar, click “Edit”, “Link to Volume Record”
4. Window will pop up to give selection of volume records available.
5. Make volume record selection [1] and click “Attach” [2].
6. Linking note is now added to bottom of full item record screen. Volume field is added but is
non-editable. (**If volume field already existed in item record it will be changed to reflect what
has been entered in the volume record.)
7. Close record.
[1]
[2]

Sierra Cataloging I
34
Unlinking item records from volumes record
1. With desired bibliographic record selected, go to Summary window and select “i Item” view.
2. Select and view desire item record
3. With full item record displayed go to toolbar, click “Edit”, “Unlink from Volume Record” Item
record will no longer be associated with any volume information.
4. Close record.
Modifying volume records
1. With desired bibliographic record selected, go to Summary window and select “j Volume” view.
2. Select desired volume record and click “Select”
3. Make edits.
4. Save (icon at top right of screen, “Ctrl-S” or File-Save).

Sierra Cataloging I
35
Deleting volume records
1. With desired bibliographic record selected, go to Summary window and select “j Volume” view.
2. Select desire volume record and click “Delete”.
3. Window will pop up to confirm deletion. Click “Yes”.
4. Close window.
5. **Deleting a volume with item(s) attached/linked will merely unlink the items(s).
Volume Record / Volume Field association
Volume fields are never to be manually added. Due to software issues, holds can only be placed at item-level within OPAC if an item record has a volume field but in not linked to a volume record.
Data displayed in Volume column is the Summary display can be pulled from either the Volume field in the item record or the Volume record that an item record is linked to.
If you link an item with an existing volume field to a volume record the volume field will disappear (Once the item is linked to the volume record, the volume statement (from the volume record) replaces the volume field in the item record. The volume record statement is designed to permanently replace the volume field in the item record when they are linked).
If volume field differs from volume record and you then link them, the field automatically changes to reflect what is in the volume record.
Volume Record needed for OPAC sorting and placing volume holds
Volume field is used in print labels but due to software issues holds can only be placed at item-level within OPAC if an item record has a volume field but in not linked to a volume record. Use Internal Note field in place of Volume Field.

Sierra Cataloging I
36
Bibliographic Record Maintenance
Display of bibliographic record
Staff View
To view full bibliographic record, click on icon at top of screen.
Public view of records
Use the dropdown menu View | Public display to launch a web browser and to view any open record as it will display in the OPAC (Online Public Access Catalog). Must have single bibliographic record displayed; Option is not available in truncated brief title list display.

Sierra Cataloging I
37
Bibliographic records with “multi” locations
Appears if the fixed-length field LOCATION is MULTI. If multiple copies are being sent to multiple branches or locations, and the fixed-length field LOCATION is therefore MULTI, the variable-length LOCATIONS field is created and displays the locations and number of copies (if it is more than one). This field cannot be edited; it can be changed by editing the fixed-length field LOCATION.
Displaying Record Maintenance Statistics
Sierra Cataloging retains statistics on the number of records you create, edit, and delete. You can display these statistics for the current session only, or for a cumulative range of months that you specify. For example, you can choose to display the statistics from June 2000 through August 2000, or from September 2000 through September 2001. The default number of months for which statistics are retained is 13 (one full year plus the current month).
Activities recorded for statistics include:
Updating bibliographic, item, holdings (checkin), order, authority, patron, and course records.
Creating new records.
Deleting attached records from existing bibliographic records.
Transferring attached records from one bibliographic record to another. (Each such transaction results in two counts in the bibliographic record type Modified column and one in the item record type Modified column for each record transferred.)
Rapid Updating.
Global Updating.
Do not edit. Allow for nightly Link Maintenance
Report to update.

Sierra Cataloging I
38
Session statistics track activities performed during a single session. A session begins when an instance of Sierra Cataloging starts, and ends when that instance of Sierra Cataloging closes. Session statistics can encompass the activity of multiple users, as defined by user initials.
Cumulative statistics reflect more than the totals of the session statistics. With cumulative statistics, you can view statistics for users of Sierra Cataloging, Global Update and Rapid Update in any Sierra application, and many standard cataloging activities performed with the same user initials in the character-based system. For example, cumulative statistics include records that are globally updated in the character-based Global Update program.

Sierra Cataloging I
39
Spine labels
Printing Monographic Labels Using Print Templates
You can print monographic labels in the edit display or summary display of item records.
To print a single monographic label using print templates:
1. Retrieve an item record.
2. Choose Tools | Print Spine Label.
3. If prompted, select a template for the print job, and then choose Select.
4. If prompted, select a printer for the print job, and then choose Print.
Batch Printing of Item Labels
When creating new Items, displaying existing Items in the summary display, or displaying existing Items in the edit display, the user can queue monographic labels and print them in a batch at a later time. Before printing the labels, the user can edit them to add, remove, or change the data that will be printed.
Item label queues are based upon login. Each time the user queues an item label, that label will be added to that login's queue and will remain there until it is cleared from the queue through the process of being printed. Each queue is a special review file. After copying the special review file, the user has an option (as above) to edit the labels before printing them. The user also has the option to print only user-selected labels or to print all labels in the selected queue.
You can send monographic label information to a queue for batch printing from the edit display or summary display of item records. Batch printing includes three tasks:
Queueing monographic labels for batch printing
Viewing the print queues
Printing the queues
Queueing Monographic Labels for Batch Printing
To queue labels for batch printing, retrieve an item record and choose Tools | Queue Spine Labels to Print | Queue<#>.
The system provides up to nine separate print queues per login per session. You can choose the destination queue for each item, or for a group of items selected from an item summary list.
Print Queue Persistence
Sierra maintains print queues for the current session only. If you attempt to close your Sierra session while items remain in a queue, the system displays a Warning dialog box. If you choose to close your
session, all print queue contents are lost.

Sierra Cataloging I
40
Viewing the Print Queues
After you send items to the print queues, you can review the queues by choosing Tools | View Spine Label Queues.
Each print queue appears in a tab. The system displays only those queues that contain label information to be printed. Thus, if you send items only to queues 1, 4, and 5, tabs for empty queues 2, 3, and 6 - 9 do not appear.
In the View Spine Label Queues window, you can:
Search for items within the queue. Remove some or all of the items from the queue. Prepend blank labels to accommodate partially-used label sheets. Preview the print job.
Searching for Items Within the Queue
To search for an item in the print queue list:
1. Click the tab of the queue in which you want to search.
2. Enter the item number, title, or location you want to find into the corresponding text box.
3. Choose Find. The system highlights all matching items and places a dark border around the line of the first item in the list that matches your search term.
4. Choose Find again to move the dark border to the next matching item.
Notes on Searching
The following considerations apply to print queue searching:
The item number must be exact and begin with 'i'. The check digit is not required. The title search need not include the full title. Any exact string contained within the title results in
a match. The search is not case-sensitive. The location code must be exact. Choose Find with all search boxes empty to clear an existing search.

Sierra Cataloging I
41
Removing Items from the Queue
To remove items from a print queue:
1. Click the tab of the queue with which you want to work.
2. Select (check) the box in the Remove column that corresponds to the item(s) you want to remove.
3. Choose Remove Checked. The Confirm Removal dialog box appears.
4. Choose Yes to remove the selected item(s) or No to return to the queue without removing items.
Always prompt before removing checked labels The Confirm Removal dialog box includes a checkbox that enables you to skip the confirmation step for further deletions. Deselect (uncheck) the Always prompt before removing checked
labels check box to disable the confirmation dialog box. This is a per-session setting. The confirmation dialog box returns when you start a new Sierra session
5. To clear all items from the queue, choose Remove All.
Prepending Blank Labels
You can print to a partially-used label sheet by prepending blank labels to a print queue. In the Number of blank labels to prepend box, specify the number of labels to skip before printing the first label.
"Blank" Labels The system prints no data to the number of labels you specify to skip. However, any non-data
elements appearing in the template are printed to the "blank" labels.
Previewing the Print Job
To preview the first page of a print queue on your monitor:
1. Click the tab of the queue you want to preview, and then choose the Print Preview button.
2. Select a template for the preview, and then choose Select. The template you select applies to all labels in the queue.
3. When you finish previewing the labels, choose Close to return to the print queue.
Printing the Queues
To print a queue of labels:
1. If you are not in the View Spine Label Queues window, choose Tools | View Spine Label Queues.
2. Click the tab of the queue you want to print, and then choose the Print button.
3. Select a template for the print job, and then choose Select. The template you select applies to all labels in the queue.

Sierra Cataloging I
42
Selecting a Template When batch label printing, you must always select a template regardless of the options chosen
in Print Templates Settings. Default printer settings options are honored.
4. If prompted, select a printer for the print job, and then choose Print.
5. “When the Printed Successfully?” dialog box appears, choose Yes to empty the queue, or No to preserve the queue.
6. Choose Close when you want to close the View Spine Label Queues window. Closing the window does not empty the print queues.
Record Links
The SIERRA system links records to each other in certain situations. For instance, when the library orders a copy of a book (or several copies), the system keeps track of which Bibliographic record the order belongs with. SIERRA does this by linking the Order record with the Bibliographic record. Another example of record linking is when a patron checks out a book, the system links the Item record to the Patron record. The list and diagram below indicate which record types can be linked:
Bibliographic Record Links
Bibliographic records do not necessarily have to be linked to any other kinds of records, but may be linked to a large number of Order, Checkin, and Item records.
Order Record Links
Each Order record must be linked to one and only one Bibliographic record; multiple Order records may be linked to the same Bibliographic record.
Checkin Record Links
Each Checkin record must be linked to one and only one Bibliographic record; multiple Checkin records may be linked to the same Bibliographic record.
Item Record Links
A single Item record may be linked to multiple Bibliographic records, and multiple Item records may be linked to the same Bibliographic record.
Patron Record Links
Patron records do not necessarily have to be linked to any other kinds of records, but may be linked to Item records, (e.g., when items are checked out or on hold).

Sierra Cataloging I
43
Course Record Links
Course records do not necessarily have to be linked to any other kinds of records, but may be linked to Item records.
Authority Record Links
Authority records are not linked to any other kinds of records.
Bibliographic Record Links

Sierra Cataloging I
44
Volume Record Links

Sierra Cataloging I
45
Search Indexes
Browse display if your search does not match any index entries. In this situation, the browse display is referred to as a "no-hit" browse display; it consists of nearby entries in the index.
t Title
W Keyword
a Author
d Subject
j Periodical title
s Series Title
c Call no.
v Dewey Call no.
h Local Call no.
o Control no.
i Standard number
g Gov’t. Doc. no.
z ARN
n Patron Name
b Barcode
u Unique ID
p Prof/TA
r Course
. Record no. (.p=patron, .b =bibliography, .i=item)
x SICI#

Sierra Cataloging I
46
Limits:
Material type
Publisher Year
Language
Publisher
Title
Author
Subject

Sierra Cataloging I
47
To report record corrections and duplicate record:
To report errors and/or merges, please send email to:
or use links below: (all located http://support.prairiecat.info/ under “Forms” tab. Must be logged in using your L2 email address and password).
Duplicate Record Merge Request: http://support.prairiecat.info/forms/duplicate-record-merge-request
Record Correction: http://support.prairiecat.info/forms/record-correction
Title Cancellation: http://support.prairiecat.info/forms/title-cancellation
Please include:
Record number (b =bibliographic, i=item, p=patron, etc.)
Control number (001 tag in bibliographic record)
Title
Author
Any standard numbers (ISBNs, ISSNs, LCCNs, etc.)
These problems/issues will be correctly when time permits and does not require follow up.
For urgent matters, please continue to report issue to the helpdesk ( http://216.125.140.42 ) or call 877.542.7257, press 7.
Use these forms to report: - Filing indicator changes - Typos - Name and subject corrections - Authority file errors - Incorrect title/subtitle information - Incorrect copyright dates - Duplicate matching records

Sierra Cataloging I
48
TB 33 OCLC numbers – Sending to PC staff via e-mail
PrairieCat Technical Bulletin Number: 33
Subject: OCLC numbers – Sending to PC staff via e-mail
Created: February 3, 2004
Revised: October 18, 2012
_______________________________________________________________________
Library staff are to thoroughly search PrairieCat for a matching record before requesting to have a new OCLC record be loaded into the database. Thoroughly searching means not just searching by the ISBN but by searching the author, title or author/title information.
PrairieCat staff will load a submitted file within 48 hours of receipt, unless the file is submitted on the day before a holiday or submitted over the weekend.
Each library is to submit only one file per day. Minimum file size will be 5 records, maximum file size will be 25 records. NOTE: If your library does not accumulate 5 records for submission within a week’s time, a smaller file can be submitted, based on the following schedule.
Code ends in Y – week is Wednesday to Tuesday, submit on Tuesday Code ends in G – week is Thursday to Wednesday, submit on Wednesday Code ends in B – week is Friday to Thursday, submit on Thursday
An output/finished file report will be emailed to the email address that submitted the original file. Local library staff must verify the titles loaded and remove any records that were submitted & loaded in error. When resubmitting OCLC numbers, they are to be sent in the next file submitted.
Vendor order records (a/k/a/ Encoding Level 3 records) will not be loaded into PrairieCat. Encoding 3 records will be removed from a libraries file before the file is loaded. The member library will be notified which records were rejected and why (Enc. Level 3) and the library will be requested to submit the actual resource/item to their PrairieCat cataloger so the record can be enhanced on OCLC before being loaded into PrairieCat. NOTE: Make sure that your item has your property stamp on it before sending it to the Service Center.

Sierra Cataloging I
49
Creating Notepad file
OCLC record numbers are to be submitted: 1) in a single column, 2) proceeded by a pound sign (#), 3) using Notepad (see illustration 1)
OCLC numbers MUST be preceded by a pound sign. If they are not, your records will be rejected and not loaded into PrairieCat. NO other information (i.e. paging, illustrations) is to be submitted in the Notepad [see illustrations 1 & 2]. Notes pertaining to specific OCLC numbers submitted are to be included in the body of the email that you are submitting, with the file attached!
Notepad will save your file with a .txt extension. The OCLC software only accepts files that have this .txt extension format. Word and WordPad save with a .doc extension, and cannot be ready by the OCLC software. DO NOT use WORD or WORDPAD to send in record numbers.
Saving Notepad file
To open Notepad: Click on “Start”. Go to “Programs”, “Accessories”, and “Notepad” to open Notepad.
Save this list of numbers to a file. Click on “File” in the menu bar at the top of the screen. In the dropdown, click on “Save As”. Using “Save As” instead of “Save” gives you more control in choosing where to save the file.
Illustration 1

Sierra Cataloging I
50
In the “Save As” window, should be DESKTOP. If it is not there, click on the drop-down arrow next to the “Save in” box, and select DESKTOP.
File Name
This is an example of
what NOT to do.
Do NOT submit physical description information in the Notepad file, include this in the body of the email that you are ATTACHING this file to – along with the corresponding OCLC number.
Illustration 2
Illustration 3

Sierra Cataloging I
51
Naming Notepad file
When naming your file in the ‘File Name’ window, use your libraries four letter delivery code, in caps (WDLG, BYLY, MNBB, etc.) followed by the year, the month and date in YYMMDD format, leaving no empty spacing between characters.
Submitting Notepad file
You are now ready to submit your Notepad file. Start a new email address, address the to [email protected] .
Attach the Notepad file you just saved to your email message. In the body of the message you include any additional information, for example, if there is a problem with a record (see illustration 4), you must verify the title, subtitle, and description against the resource you have in hand. Include that information in the body of the email, NOT in the Notepad file. You must also send a copy of the chief source of information to your cataloger at either Coal Valley or Shorewood Service Centers.
The Subject Line of your email must include your libraries four letter delivery code, in caps, the text OCMLIST and the month, date and year in YYMMDD format, leaving no empty spacing between characters.
When finished and ready, click on the <SEND> button to send your file in.
When your file is processed you will receive confirmation email containing a copy of the output report.
LELY 120922

Sierra Cataloging I
52
Pre Publication OCM Submissions
Above is an illustration from FirstSearch showing what you should be looking for so that you may know that this record is a pre-publication bibliographic record.
Library staff members must submit written information in the body of the email along with the corresponding OCLC # that must be in the attached file. Notes in the body of the email must be only for those records in the attachment.
Paging: list the last number in Roman numerals, and last numbered page. (Preliminary pages of i, ii, iii, iv, and v, and the book ends on page 400. This is listed as v, 400 p. ) If it’s unpaged, say it’s unpaged.
Illustrations: color or black and white
Size: must be in centimeters! Need outside height measurement (measure along the spine of the book, it’s easier). If the book is wider than it is tall, then need both height and width. If the book is ½ as narrow as it is tall, then need both height and width.
If the record is loaded into PrairieCat with inaccurate information in it, the submitting or loading library has the responsibility to submit photocopies to PrairieCat contract staff for correction of title information.
If a prepub record is submitted with no physical description information in the body of the email to fill in the 300 field, PC staff will remove the record from the file to be loaded and will load the remaining records. The member library will have to resubmit in a different file, the catalog record with the information to fill in the fields. Prompt attention to this by members is crucial!
Illustration 4

Sierra Cataloging I
53
For more information
If you have questions about cataloging, please feel free to contact the PrairieCat staff at Reaching Across Illinois Library System. We will be happy to assist you.
Mary Louise Brown, Senior Cataloger
(309) 799-3155 x3253
Sandy Tedder, Senior Cataloger
(815) 729-3345 x2713

Sierra Cataloging I
54
Appendices

Sierra Cataloging I
55
Appendix A: To add an item to an existing bibliographic record:
1. Locate matching title record using the “Catalog” function. USE THE CHIEF TITLE SOURCE on item to find matching bibliographic record see appendix B
a. Acceptable searches: i. Title ii. Author iii. Title/Author iv. Standard numbers (Back up with a different search. Matching soley on
numbers i.e. ISBNs, ISSNs, EANs, UPCs, etc. is NOT acceptable – REPRINTS do NOT require new record i.e. Paw Prints)
b. If more than one match, a truncated list will display i. The following parts must be the same to be considered a match:
1. Title 2. Author 3. Publisher see appendix C 4. Pagination 5. Sizing (measured in centimeters, rounded up; 2 cm. or less in
difference is considered a match) 6. Publication/copyright year - (Printing date is ignored unless this is the
only date available.) see appendix D 7. Edition statement (with the exception of presence/absence of:
a. 1st ed b. Book club ed c. Paperback ed. see appendix D
ii. When a matching record is found, click on the “Attach New Item” button on Summary tab with view set to “item”.
c. If only one match, full title record will display. See matching criteria in section 1bi.
2. Enter the item information, including barcode/item ID. a. Mandatory fields:
i. Item Code 1 (iCode1) ii. Item Type iii. Price iv. Location v. Item Agency (pre-populated with templates)
b. Do NOT start call number with a space. Use ONLY single spacing in call number, i.e.: 641.5^SMI, NOT 641.5^^SMI (^=space)
c. If using a scanner to enter barcode/item ID, entry of the barcode should be the final step as most scanners are set up to include a carriage return which will result in saving the record.
d. DO NOT add/edit/delete item field 999. 3. Save record.
To help prepare PrairieCat barcoders and catalogers for the Barcode Certification Test, a sample test is available at http://support.prairiecat.info/services/barcode-testing

Sierra Cataloging I
56
Appendix B: Chief source of information
Information taken from sources other than those prescribed for a particular area of the bibliographic record is to be enclosed in square brackets.
Printed monographs (books) /scores: title page. Sound discs (LPs, CDs): disc and label 2 3
Tape cassette: cassette (carrier) and label 2 4
Playaway player: playaway player (carrier) and label 2 4
Video recordings (DVD, VHS): title and credit frames (opening AND closing; be sure to check at the end of the video.) b) If the item is not playable because we lack the playback equipment for the item to be cataloged, the chief source is the physical item itself (the carrier).
2The "label" is defined as permanently affixed paper, plastic, or other material. If there are labels on two or more sides, treat all as a single source. 3For CDs, which have no label per se, consider the information appearing on the disc itself to be the label. Consider any information on the insert that can be seen through a closed cassette case or jewel case to be on the container. 4Physical item itself (the carrier).
To help prepare PrairieCat barcoders and catalogers for the Barcode Certification Test, a sample test is available at http://support.prairiecat.info/services/barcode-testing

Sierra Cataloging I
57
Appendix C: Imprints
Imprints are subsidiary publishing houses. Imprint publishers will often be specialty publishers, whereas their parent companies may publish books with no limitations on subjects or content.
One method to distinguish if the publisher is an imprint is to look at the first 5 digits of the ISBN. If the numbers are the same, but the publisher name is different, it will still be considered the same edition. Do not create a new record. Another method to distinguish if the publishers are the same is to look at the CIP information on the back of the title page or to read the publisher information on the title page. There are instances when the ISBN is different, but the publishers are the same. -- http://catblog.sals.edu/index.php/publisher-imprints/
Everything matches except publisher is imprint; bibliographic record of parent publishing company can be used.
Imprint will be added to 260 tag, i.e.:
260__ New York : |b Random House/ Ballantine Books, an imprint of Random House, |c2009.
Imprint will be qualified to Imprints 020/ISBN, i.e,
020__9781234567890 (Ballatine Books)
Everything matches except publisher is imprint and year; bibliographic record of parent publishing company can be used.
Imprint will be added to 260 tag, i.e.:
260__ New York : |b Random House/ Ballantine Books, an imprint of Random House, |c2009.
Imprint and year will be qualified to Imprints 020/ISBN, i.e,
020__9781234567890 (Ballatine Books, 2013)
**To request this enhancement to parent bibliographic record please provide copy of title page and verso to the cleanup group ([email protected])**

Sierra Cataloging I
58
Appendix D: Paperback editions and dates
Everything matches except edition is paperback edition and year; bibliographic record of hardcover edition can be used.
Paperback and year will be qualified to paperback 020/ISBN, i.e,
020__9781234567890 (pbk, 2013)
020__9781234567890 (1st pbk ed., 2013)