pre-cu t sauna kit - scandia mfg · page 3 scandia pre-cut sauna kit instructions use standard...
TRANSCRIPT

Scandia Manufacturing —PO Box 636 Eagle Idaho USA. 83616 T: 877.467.2862 F: 208.286.0290 [email protected] www.scandiamfg.com
I n s t a l l a t i o n G u i d e
P R E - C U T S A U N A K I T
ELECTRICAL NOTES
For heater, controls and light installation - refer to the heater installation instructions. The Sauna and all of its components must be installed by certified professionals and according to local codes. All national and local safety requirements must be met during handling and installation of the sauna.
Page 1

1. FRAME ROOM TO DESIRED SIZE Get all wiring done at this stage including lighting (See Heater Instructions) 2. INSULATE ROOM 3. APPLY THE ALUMINUM VAPOR BARRIER TO WALLS AND CEILING 4. SORT ALL OF YOUR SAUNA MATERIALS - Scandia saunas kits are typically sup-plied with full length T&G boards to run vertically on walls as standard for rooms larg-er than 7’x6’. Scandia may supply T&G for horizontal applications for smaller rooms and per availability. Please check your packing slip for T&G board direction before installation. 5. APPLYING THE T&G(TONGUE AND GROOVE WOOD PANELING) Start with the Ceiling Continue with walls Assemble benches 6. HANG AND CONNECT HEATER AND LIGHTING For details, refer to the heater installation instructions 7. CONSTRUCT FLOORING 8. INSTALL PRE-HUNG DOOR ⇒ Framing of rough opening ⇒ Installing the door frame ⇒ Installing the hinge side ⇒ Installing the top door jamb ⇒ Installing the door slab 9. SAUNA ROOM VENTING 10. FIRE UP YOUR SAUNA Follow heater instructions for the first heat-up
Read all instructions and packing slip included with your shipment
before starting your sauna project.
Page 2
R o o m P r e p a r a t i o n G u i d e l i n e s
Scandia Pre-cut Sauna Kit Instructions
Page 3
Scandia Pre-cut Sauna Kit Instructions
Use standard building techniques to frame your room to include openings for the sauna door, intake and exhaust vents, and any windows. The sauna ceiling should be set at 7’ for proper heat levels. Place studs at 1 foot on center intervals, or if the room is already framed, toenail extra studs in so that you have them at 12” on center.
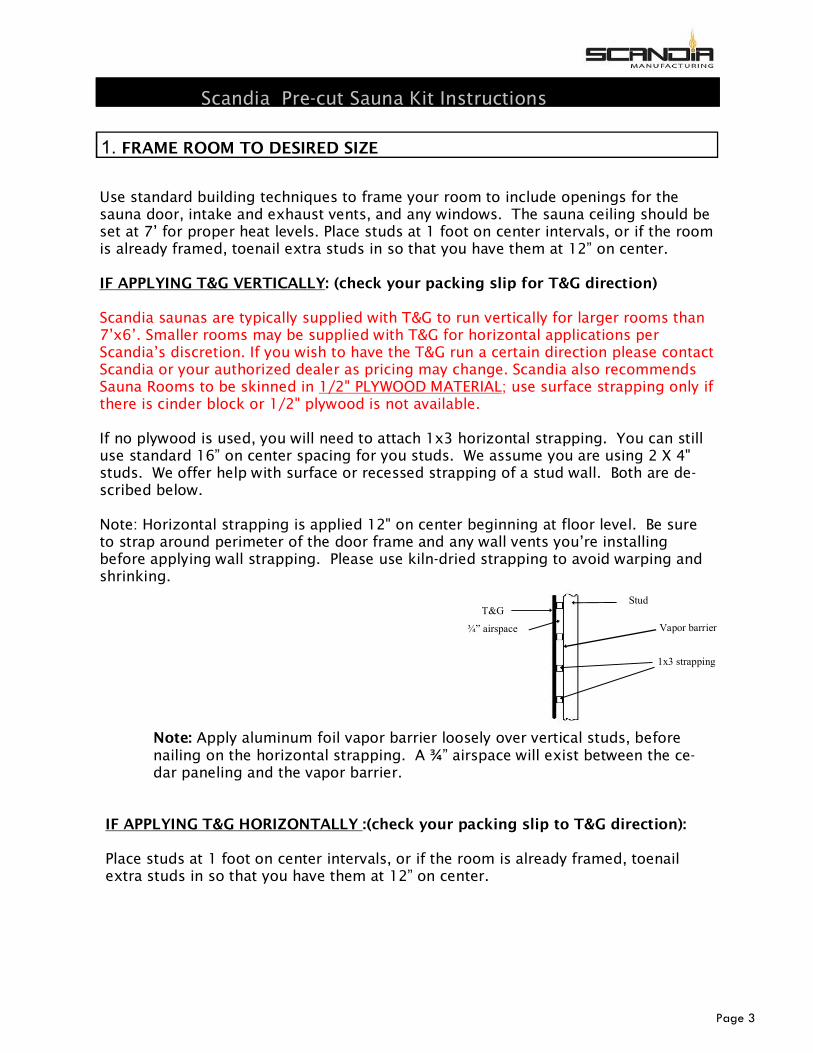
IF APPLYING T&G VERTICALLY: (check your packing slip for T&G direction) Scandia saunas are typically supplied with T&G to run vertically for larger rooms than 7’x6’. Smaller rooms may be supplied with T&G for horizontal applications per Scandia’s discretion. If you wish to have the T&G run a certain direction please contact Scandia or your authorized dealer as pricing may change. Scandia also recommends Sauna Rooms to be skinned in 1/2" PLYWOOD MATERIAL; use surface strapping only if there is cinder block or 1/2" plywood is not available. If no plywood is used, you will need to attach 1x3 horizontal strapping. You can still use standard 16” on center spacing for you studs. We assume you are using 2 X 4" studs. We offer help with surface or recessed strapping of a stud wall. Both are de-scribed below. Note: Horizontal strapping is applied 12" on center beginning at floor level. Be sure to strap around perimeter of the door frame and any wall vents you’re installing before applying wall strapping. Please use kiln-dried strapping to avoid warping and shrinking.
1. FRAME ROOM TO DESIRED SIZE
Stud T&G
1x3 strapping
¾” airspace Vapor barrier
Note: Apply aluminum foil vapor barrier loosely over vertical studs, before nailing on the horizontal strapping. A ¾” airspace will exist between the ce-dar paneling and the vapor barrier.
IF APPLYING T&G HORIZONTALLY :(check your packing slip to T&G direction): Place studs at 1 foot on center intervals, or if the room is already framed, toenail extra studs in so that you have them at 12” on center.

Page 4
Scandia Pre-cut Sauna Assembly Instructions
ATTACH HORIZONTAL NAILING BOARDS: The nailing boards are what you attach the heater and benches to for support. (see heater instructions). Wall blocking for benches:
Place upper bench blocking at approximately 35” from the floor.
Place lower bench blocking at approxi-mately 15” from the floor.
**GET ALL WIRING DONE AT THIS STAGE INCLUDING LIGHTING. ** (SEE HEATER INSTRUCTIONS)
Use R13 in the walls and R19 in the ceiling. Fill gaps between door frame, window frames, etc. Windows should be made of insulated glass.
We supply vapor barrier for walls and ceiling sections. For best results, apply vapor barrier vertically on wall sections, starting from the top to bottom. Contrary to the methods used when applying residential poly vapor barrier.... do NOT stretch alumi-num vapor barrier when installing. Instead, drape it slightly loose and overlap any joints with a 2" overlap. When exposed to the heat of the sauna, the aluminum will shrink over time so allow for this when you're installing it. Start your first section by applying the vapor barrier vertically on the wall sections, starting from top to bot-tom using a hand stapler (not small office size) to tack the barrier to the studs. A suggestion for those customers wanting the very best installation: joints can be sealed using self-adhesive aluminum tape, (not duct tape).
INSULATE ROOM
APPLY THE ALUMINUM VAPOR BARRIER TO WALLS & CEILING

Page 5
Scandia Pre-cut Sauna Kit Instructions
This will help familiarize yourself with the components and allow you to see how much of each size T&G is in your kit. Sort them using the following suggestion: HINT: You can inconspicuously hide any boards with slight blemishes underneath the upper bench and directly behind the sauna heater. TOOLS AND MATERIALS THAT WILL BE HELPFUL FOR KIT INSTALLATION: ⇒ Hammer ⇒ Miter saw (electric is best). Ensure the matching ends of cedar boards are exactly
90 degrees for a good match, if not then trim with the miter saw. ⇒ Carpenter square ⇒ Air powered brad nailer with supply of 1" or 1¼” brad nails, (you will appreciate
this before you finish the sauna....a great timesaver!) Rent or borrow one if you can.
⇒ Stapler to fasten aluminum vapor barrier ⇒ Scissors or utility knife for cutting aluminum vapor barrier ⇒ 4-foot carpenter's level
Tongue-and-groove is supplied in full length boards. We supply enough T&G to cov-er the entire sauna room plus a small allowance for mistakes. Normally, the nailing is done through the "tongue" of the board, at an angle so the next board slips over the tongue without the nail shank impeding it (see below). START WITH THE CEILING: If cedar is going to be applied parallel to the ceiling joists, then strapping will have to be installed to nail to. The ceiling T&G can be ⅛” short for easier fitting. The last board to be installed should be ripped at an angle to allow it to “slip” into place. Sur-face nailing with finish nails will be necessary on the last board; alternatively you can glue it in place to avoid nails showing. Be sure to cut any butt joints accurately. For this purpose an electric miter saw is one of the best tools. Do not trust the angle markings on a miter saw! Unplug the saw and double check the angle markings by locking the blade down into the kerf groove on the miter saw and aligning the saw blade with a carpenter square resting against the back fence of the saw. This will show you the true “0” mark. Use this as your reference point for quality joints. NOW CONTINUE WITH THE WALLS: Start in the corner where the heater will be located and work your way around the room. The corner with the heater is usually not a dominant or noticeable corner (depending on your light) and there is more leeway for an imperfect fit. Finishing with a perfect fit in the last corner requires more finesse than the other corners.
SORT ALL OF THE SAUNA MATERIALS
APPLYING THE T&G, (TONGUE AND GROOVE WOOD PANELING)

Page 6
Scandia Pre-cut Sauna Kit Instructions
HINT: You can inconspicuously hide any boards with slight blemishes underneath the upper bench and directly behind the sauna heater. Please note that a right-handed person will find it easier to nail the T&G boards if they are installed with the tongues pointing to their right. Working clockwise from the heater (or counter-clockwise if you are left-handed) will allow you to easily use up any defective pieces regardless of which end of the board are “blemished”. Every board can be used in either the clockwise or counterclockwise application. When planning the location of each T&G board, utilize the natural beauty of the color variation and grain in the wood. Rip the first board of each wall square to start and the last board with a slight taper for easi-er fitting. The first board on the adjacent wall will cover any gap so you can just keep going. Only the last board of the fourth wall needs to be properly angled and precisely fitted. All wall T&G boards should butt tight to the ceiling. Avoid having butt joints at the same lev-el from one row to the next if using multiple length material. Mix the lengths of boards on every new section so the eye is not attracted to joints unnecessarily. Secure T&G to studs using 1¼” finishing nails or brads in an air gun. When nailing the T&G, avoid nailing too close to the end of the board to prevent splitting the wood. If you have to nail near the end of a board, drilling a 1/16” pilot hole can prevent split boards. The nailing should be done in a way that doesn’t interfere with the placement of the next board. Use a nail set to set the nail heads flush if necessary. Door casings are installed leaving about 3/16" of the front edge of the doorjamb visible, however personal preferences vary. Layout and miter the top corners accordingly. Door cas-ing should be level with the doorjamb. ASSEMBLE BENCHES: Scandia prefabricates all bench tops and bench legs prior to shipping according to the signed layout confirmed by construction manager in charge of the project. You should find an assortment of bench tops and legs. Separate out the 18" H-legs from the 36" H-legs if there is a two tier bench configuration in the sauna. Standard benches get a support at each end of the bench. The remaining H-legs are to be distributed evenly throughout. All benches are made LONG so that they may need be cut to fit to actual rooms size as all rooms very in inches from shop drawings. Refer to the Cut sheets that come with the kit to confirm bench placement.
For details, refer to heater installation instructions.
For details, refer to heater installation instructions.
HANG AND CONNECT HEATER AND INSTALL LIGHT FIXTURE
CONSTRUCT HEATER GUARD

Page 7
Scandia Pre-cut Sauna Kit Instructions
Scandia provides 12" x 12" PVC interlocking Tru-Tile flooring as a standard in all Sauna kits. Wooden duckboard flooring is an option that can be purchased (upon request). Wooden duckboard or “slats” are used to cover the traffic area in front of the benches for both appearance and walking on. Build the duckboards so they can be removed in sections so the floor can be cleaned. Do not install duckboards
under the heater area. The duckboard must be re-movable when the heater guard is in place. When assembling cedar duckboards, lay out the top boards, good side down with an equal airspace be-tween. Then lay out the sleepers on the top boards planning for heater guard cutout. Nail or screw the sleepers to top boards so that fasteners do not pro-trude through. Sleepers are usually placed on 12" centers.
FRAMING OF ROUGH OPENING: The rough door opening size in your stud wall should be constructed to a width and height, which is 2" larger than the nominal door slab size. This 2" al-lows for the thickness of the jamb (door frame) and allows the door frame some adjustment space if your wall framing is not square. The difference in space is taken up using door shims, or wedges available from
a lumber dealer.
The doorjamb comes in 1”x4” standard cedar. The 1”x4” doorstop may need to be sized to the actual wall thickness to fit the interior T&G finish and the exterior wall finish that you choose.
INSTALLING THE DOOR FRAME:
Using "construction terminology", the rough opening for your door in your stud wall should be both "plumb" and "level". By this we mean the horizontal members of your rough opening should be "level", and your vertical side members should be "plumb"....or dead-on for accuracy. If not, don't worry, you will have some adjust-ment room when you put your door frame into the rough opening in the stud wall. Door frame installation is made a whole lot easier if the door opening is true and square. At this stage you should have your door frame assembled, with 1/2 of each hinge pair set screwed loosely in to hold the door in place when the time comes. Remem-ber the hinge door pins drop in from the top !! Don't install the door slab in the frame yet, we will install the door slab after the frame is nailed in place and "trued" for level.
INSTALL FLOORING
INSTALL SAUNA DOOR
1x4 door

Page 8
Scandia Pre-cut Sauna Kit Instructions
HINT: For cosmetic reasons, it's good to hide the screw or nails going through the jamb under the door stop molding you will install after the door slab is in the frame. Pre-drilling screw holes through the jamb will be stronger than just "driving" them through the jamb, and you are less likely to split the cedar jamb. Any holes you pre-drill should be 3-1/4" from the edge of the hinge side of the jamb, this way they will be covered later by the doorstop molding (see diagram below). Drill all 3 pieces of the door frame putting the holes about 12" apart. If the door threshold is not required, it can be left out. INSTALLING THE HINGE SIDE: Only install nails or screws loosely at this point through the jamb. Set the door frame in the opening and lightly fasten the hinge side to the adjoining stud through the holes you have already predrilled. Center the jamb so the edges are flush with both sides of the finished walls. If the 2" x 4" stud is plumb, nail or screw the hinge side of the jamb directly to the 2" x 4". If the stud is not plumb, shim as necessary so the jamb is plumb. Always drive the fastener through a shim, not between a shim or you will pull the jamb crooked. Make sure the door frame is up towards the top of the opening so there is some room for ventilation under the door slab. Remember the door must open outwards from the sauna ―take time to double check !! INSTALLING THE TOP DOOR JAMB: Level the top of the doorjamb, install shims as required directly in the path of screws or nails you will put through the jamb. (See illustration above, left.). In-stall doorjamb flushed to the outside finished wall. You may need to custom-ize/rip the door stop to your space, so that the door stop is flushed with the inside of the sauna. INSTALLING THE DOOR SLAB: Now you can hang the door slab in the frame. Make sure the hinges attached to the door slab are not screwed down tight yet. This will allow some room for fitting. Get another person to help you with holding the door slab and mating. Do not close the door yet!! Next, screw all the hinge screws down tight making sure each hinge fits nicely into the area pre-routed out for it. The screw heads should be level and flush with the hinge surface so they don't bind when the door is closed. Now you can close the door. Scandia sauna doors come with spring hinges already installed on door side.
Page 9
Scandia Pre-cut Sauna Kit Instructions
Standing inside the sauna, survey the fitting of the frame around the door. Now is the time to "fine-tune" the frame installation, keeping a nice even spacing on all fac-es of the door between the frame. Here's where using screws is superior to using nails. Adjust your shims in or out as required to take up any slack between the door frame and the rough-in studding. Install the door catch and make sure the door moves smoothly from the latch position through to the full-open position. If the door swings on it's own.... it’s not level, adjust the hinge side so it's plumb on all sides. Place your level on the jamb and check the jamb face and the edge-on view to see if they are plumb while standing in the doorway. Now you can screw down all screws holding the frame to the rough-in stud. Or, if you used nails, hammer them home remembering you want to always screw/nail through the shim, not between shims or you will distort the jamb. Once you're satisfied with the door installation you are ready to install the doorstop molding. With the door closed you can now nail the doorstops in place. Have someone maintain steady, gentle pressure on the outside of the door. Butt the doorstop molding up to the door slab and nail it into the jamb with small finishing nails.
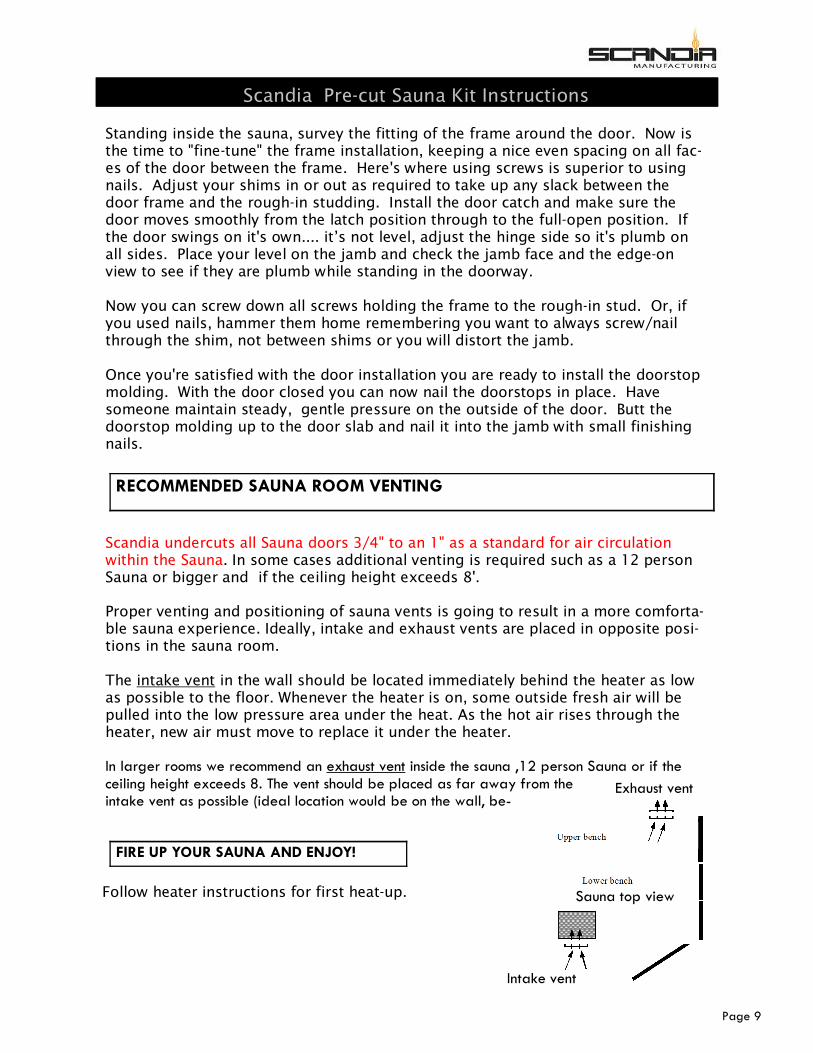
Scandia undercuts all Sauna doors 3/4" to an 1" as a standard for air circulation within the Sauna. In some cases additional venting is required such as a 12 person Sauna or bigger and if the ceiling height exceeds 8'. Proper venting and positioning of sauna vents is going to result in a more comforta-ble sauna experience. Ideally, intake and exhaust vents are placed in opposite posi-tions in the sauna room. The intake vent in the wall should be located immediately behind the heater as low as possible to the floor. Whenever the heater is on, some outside fresh air will be pulled into the low pressure area under the heat. As the hot air rises through the heater, new air must move to replace it under the heater. In larger rooms we recommend an exhaust vent inside the sauna ,12 person Sauna or if the ceiling height exceeds 8. The vent should be placed as far away from the intake vent as possible (ideal location would be on the wall, be-
RECOMMENDED SAUNA ROOM VENTING
Follow heater instructions for first heat-up.
FIRE UP YOUR SAUNA AND ENJOY!
Exhaust vent
Sauna top view
Intake vent