prepared exclusively for robert walsh - lagout programmers/core...3.3 cocoa bindings and core data ....
TRANSCRIPT

Prepared exclusively for Robert Walsh

What Readers Are Saying About
Core Data
I was putting off learning Core Data—and then I saw Marcus’s book.
Bought it, read it, learned Core Data. It even covers the hard things I
really needed to know but weren’t well written elsewhere: things like
Spotlight integration, version migration, syncing, and, most important
for me, multithreading.
Brent Simmons
Developer, NetNewsWire
If your application deals with data, you need Core Data. If you need
Core Data, you need to know Marcus Zarra.
Mike Lee
Engineer, United Lemur
At last we have a book to introduce people to this fantastic devel-
oper technology. Starting with a high-level overview and ending with
advanced techniques, Marcus expertly guides developers on their
journey from Core Data noob to expert.
Steve Scott (Scotty)
The Mac Developer Network
This book does a wonderful job of leading you through Core Data’s
steep learning curve. Even experienced Core Data developers will
learn something new.
Jon Trainer
President, Outer Level
I have been using Core Data since it was introduced, and there were
still new techniques that I uncovered in this book.
Luis de la Rosa
Founder, Happy Apps LLC
Prepared exclusively for Robert Walsh
Download at WoweBook.Com

Core DataApple’s API for Persisting Data on Mac OS X
Marcus S. Zarra
The Pragmatic BookshelfRaleigh, North Carolina Dallas, Texas
Prepared exclusively for Robert Walsh
Download at WoweBook.Com

Many of the designations used by manufacturers and sellers to distinguish their prod-
ucts are claimed as trademarks. Where those designations appear in this book, and The
Pragmatic Programmers, LLC was aware of a trademark claim, the designations have
been printed in initial capital letters or in all capitals. The Pragmatic Starter Kit, The
Pragmatic Programmer, Pragmatic Programming, Pragmatic Bookshelf and the linking g
device are trademarks of The Pragmatic Programmers, LLC.
Every precaution was taken in the preparation of this book. However, the publisher
assumes no responsibility for errors or omissions, or for damages that may result from
the use of information (including program listings) contained herein.
Our Pragmatic courses, workshops, and other products can help you and your team
create better software and have more fun. For more information, as well as the latest
Pragmatic titles, please visit us at
http://www.pragprog.com
Copyright © 2009 Marcus S. Zarra.
All rights reserved.
No part of this publication may be reproduced, stored in a retrieval system, or transmit-
ted, in any form, or by any means, electronic, mechanical, photocopying, recording, or
otherwise, without the prior consent of the publisher.
Printed in the United States of America.
ISBN-10: 1-934356-32-8
ISBN-13: 978-1-934356-32-6
Printed on acid-free paper.
P1.0 printing, September 2009
Version: 2009-10-9
Prepared exclusively for Robert Walsh
Download at WoweBook.Com

Contents1 Introduction 8
1.1 What Is Core Data? . . . . . . . . . . . . . . . . . . . . . 9
1.2 In This Book . . . . . . . . . . . . . . . . . . . . . . . . . 10
1.3 Acknowledgments . . . . . . . . . . . . . . . . . . . . . . 12
2 Getting Started with Core Data 14
2.1 Our Application . . . . . . . . . . . . . . . . . . . . . . . 14
2.2 Our Application Design . . . . . . . . . . . . . . . . . . 15
2.3 Advanced Readers . . . . . . . . . . . . . . . . . . . . . 16
2.4 Creating Our Xcode Project . . . . . . . . . . . . . . . . 16
2.5 Building the Data Model . . . . . . . . . . . . . . . . . . 16
2.6 Building the Controller Layer . . . . . . . . . . . . . . . 22
2.7 Building the User Interface . . . . . . . . . . . . . . . . 25
2.8 Adding a Splash of Code . . . . . . . . . . . . . . . . . . 29
3 Core Data and Bindings 34
3.1 Key Value Coding . . . . . . . . . . . . . . . . . . . . . . 34
3.2 Key Value Observing . . . . . . . . . . . . . . . . . . . . 39
3.3 Cocoa Bindings and Core Data . . . . . . . . . . . . . . 40
3.4 Other Elements That Use KVO, KVC, and Core Data . 44
4 Under the Hood of Core Data 51
4.1 NSManagedObject . . . . . . . . . . . . . . . . . . . . . 52
4.2 NSFetchRequest . . . . . . . . . . . . . . . . . . . . . . . 59
4.3 NSSortDescriptor . . . . . . . . . . . . . . . . . . . . . . 63
4.4 NSManagedObjectContext . . . . . . . . . . . . . . . . . 64
4.5 NSManagedObjectModel . . . . . . . . . . . . . . . . . . 68
4.6 NSPersistentStoreCoordinator . . . . . . . . . . . . . . . 69
4.7 Fetched Properties . . . . . . . . . . . . . . . . . . . . . 71
4.8 Wrapping Up . . . . . . . . . . . . . . . . . . . . . . . . . 72
Prepared exclusively for Robert Walsh
Download at WoweBook.Com

CONTENTS 6
5 Versioning and Migration 73
5.1 Some Maintenance Before We Migrate . . . . . . . . . . 74
5.2 A Simple Migration . . . . . . . . . . . . . . . . . . . . . 76
5.3 Fundamentals of Core Data Versioning . . . . . . . . . 82
5.4 A More Complex Migration . . . . . . . . . . . . . . . . . 85
5.5 Automatic Data Migration . . . . . . . . . . . . . . . . . 88
5.6 Manual Data Migration . . . . . . . . . . . . . . . . . . . 90
5.7 Progressive Data Migration . . . . . . . . . . . . . . . . 90
5.8 Tips and Tricks . . . . . . . . . . . . . . . . . . . . . . . 96
6 Performance Tuning 97
6.1 Persistent Store Types . . . . . . . . . . . . . . . . . . . 97
6.2 Optimizing Your Data Model . . . . . . . . . . . . . . . . 99
6.3 Fetching . . . . . . . . . . . . . . . . . . . . . . . . . . . 104
6.4 Faulting . . . . . . . . . . . . . . . . . . . . . . . . . . . 108
6.5 Access Patterns . . . . . . . . . . . . . . . . . . . . . . . 112
7 Spotlight, Quick Look, and Core Data 114
7.1 Integrating with Spotlight . . . . . . . . . . . . . . . . . 116
7.2 Integrating with Quick Look . . . . . . . . . . . . . . . . 130
7.3 Putting It All Together . . . . . . . . . . . . . . . . . . . 138
7.4 Taking It Further . . . . . . . . . . . . . . . . . . . . . . 139
8 Sync Services and Core Data 140
8.1 Sync Services Fundamentals . . . . . . . . . . . . . . . 141
8.2 Updating Our Data Model . . . . . . . . . . . . . . . . . 143
8.3 Creating the Sync Schema . . . . . . . . . . . . . . . . . 146
8.4 Creating the Client Description File . . . . . . . . . . . 149
8.5 Modifying the NSPersistentStoreCoordinator . . . . . . 151
8.6 Creating the Sync Helper . . . . . . . . . . . . . . . . . 152
8.7 The Syncrospector . . . . . . . . . . . . . . . . . . . . . 158
8.8 Wrapping Up . . . . . . . . . . . . . . . . . . . . . . . . . 160
9 Multithreading and Core Data 162
9.1 Why Isn’t Core Data Thread Safe? . . . . . . . . . . . . 162
9.2 Creating Multiple Contexts . . . . . . . . . . . . . . . . 163
9.3 Exporting Recipes . . . . . . . . . . . . . . . . . . . . . . 165
9.4 Importing Recipes . . . . . . . . . . . . . . . . . . . . . . 173
9.5 The Recursive Copy Reviewed . . . . . . . . . . . . . . . 178
9.6 Wrapping Up . . . . . . . . . . . . . . . . . . . . . . . . . 183
Report erratum
this copy is (P1.0 printing, September 2009)Prepared exclusively for Robert Walsh
Download at WoweBook.Com

CONTENTS 7
10 Core Data and iPhone 184
10.1 Similarities and Differences . . . . . . . . . . . . . . . . 184
10.2 Memory Management . . . . . . . . . . . . . . . . . . . . 190
10.3 Data Change Notifications . . . . . . . . . . . . . . . . . 192
10.4 Recipes for the iPhone . . . . . . . . . . . . . . . . . . . 195
10.5 Going Further . . . . . . . . . . . . . . . . . . . . . . . . 206
11 Recipe: Distributed Core Data 207
11.1 Building the Server . . . . . . . . . . . . . . . . . . . . . 209
11.2 Building the Client . . . . . . . . . . . . . . . . . . . . . 218
11.3 Testing the Networking Code . . . . . . . . . . . . . . . 221
11.4 Wrapping Up . . . . . . . . . . . . . . . . . . . . . . . . . 227
12 Recipe: Dynamic Parameters 228
12.1 Building the Xcode Example Project . . . . . . . . . . . 230
12.2 The DocumentPreferences Object . . . . . . . . . . . . . 230
12.3 Review . . . . . . . . . . . . . . . . . . . . . . . . . . . . 236
Index 238
Report erratum
this copy is (P1.0 printing, September 2009)Prepared exclusively for Robert Walsh
Download at WoweBook.Com

Chapter 1
IntroductionIt is hard to believe that I have been working on this book for nine
months and that it is now complete. I freely admit that I walked into
this project with a lot of trepidation. There was simply no way that I
was going to fill an entire book about Core Data! Now looking back on
it, I realize how wrong I was. If you look at Core Data in a vacuum, then
it can be a fairly small subject, and believe me, that is a good thing. But
when we take it as part of the whole ecology of OS X, then it becomes
so much more, which makes it possible to write several books on the
subject.
Back when Core Data was first introduced, I was in the process of
designing a desktop application later to become known as Simple Ele-
gant Sales. This point-of-sale software was originally written for my wife
and her business as a photographer. I wanted her to be able to easily
handle the accounting of her business from her laptop as she traveled
from location to location. When I originally wrote the software, I had far
more experience with Java than with Objective-C, but I knew that if the
app was going to be taken seriously as an OS X application, the user
interface had to be written in Objective-C and Cocoa. A Java UI simply
would not do. However, I decided to write the back side of the applica-
tion in Java so that I could take advantage of the powerful databases
and relational mapping abilities of Hibernate.
I was about halfway through this project when I met Tom Harrington
of Atomic Bird (http://www.atomicbird.com). He suggested that I take a
look at Core Data for the back end of my software and that it might
suit my needs better than Java. At that time, Tiger had not yet been
released, and Core Data was still available only to developers. After
experimenting with it for just one day, I immediately went back to the
Prepared exclusively for Robert Walsh
Download at WoweBook.Com

WHAT IS CORE DATA? 9
Joe Asks. . .
Is This Book for You?
If you plan on writing an application that saves data to disk,then you should be taking a very long look at Core Data.Whether you are focusing on the desktop or the iPhone, CoreData is the most efficient solution to data persistence.
A good way to confirm that you know enough Cocoa to bene-fit from this book is to take a look at Chapter 2, Getting Startedwith Core Data, on page 14. You should find that chapterdense, but every step should be familiar to you.
drawing board, scratched the entire project, and started over. It was
that much of an improvement over what I was doing.
Since that day, I have been enraptured by Core Data, and I quickly
learned everything about it that I possibly could.
1.1 What Is Core Data?
In the simplest terms, Core Data is an object graph that can be per-
sisted to disk. But just like describing a man as a “bag of mostly water,”
that description hardly does Core Data justice. If you’ve worked with
Interface Builder, you know that it effectively removes a third of the cod-
ing design known as MVC. With Interface Builder, a developer does not
need to spend countless hours writing and rewriting their user inter-
face to make sure that it is pixel perfect. Instead, they simply drag and
drop the elements in the IDE, bind them together, and call it done.
Of course, the problem with Interface Builder is that we still need to
code the other two parts! Both the controller and the model need to be
developed in code and made to work with the interface we just designed.
That is where Core Data comes in. In a nutshell, Core Data removes
another third from that MVC design. Core Data is the model.
It is a common misconception that Core Data is a database API for
Cocoa that allows a Cocoa application to store its data in a database.
Although that is factually accurate, Core Data does a lot more for us. It
serves as the entire model layer for us. It is not just the persistence on
Report erratum
this copy is (P1.0 printing, September 2009)Prepared exclusively for Robert Walsh
Download at WoweBook.Com

IN THIS BOOK 10
disk, but it is also all the objects in memory that we normally consider
to be data objects. If you have experience working with Java, C#, or
some other object-oriented language, the data objects take a lot of time
to write, and they are generally very repetitive in nature. Core Data
eliminates most, if not all, of that boilerplate code for us and lets us
focus on the business logic, or the controller layer, of our application.
It does this with an interface that is as easy to use as Interface Builder.
In addition to ease of use, Core Data is also highly flexible. If we need to
step in and change the functionality of some portion of the data model,
we can. From how a value is handled when it is being accessed to how
data is migrated from one persistent store to another, we can choose
how little or how much we want to code ourselves and how much we
want Core Data to do for us.
The original design and idea of Core Data came from Enterprise Ob-
jects, which is part of Web Objects, another Apple framework. You may
be surprised to learn that Enterprise Objects and Web Objects, the
ancestors of Core Data, still run a large portion of Apple’s public-facing
websites. Both iTunes and http://www.apple.com run on a Web Objects
server. Therefore, although Core Data is a relatively new technology for
the OS X desktop, it has a long lineage.
We are also not at the end of the story with Core Data. Although it
is a stable and mature framework that is being used by thousands of
applications on a daily basis, there are most certainly things coming in
the future that will make it even greater. Just comparing its abilities to
those of Enterprise Objects, we know that the best is yet to come. If you
are starting an application now, you should be using Core Data.
1.2 In This Book
Within this book we’ll build a single application that utilizes Core Data.
We’ll use that application as the foundation through our journey with
Core Data. Once we have the application started, we’ll cover a few of
the technologies that are not strictly speaking part of Core Data, but
they nonetheless make Core Data work. We will then start exploring
Core Data in depth and how it applies to and works with the other
technologies of OS X.
We will start off in Chapter 2, Getting Started with Core Data, on page 14,
with building our demo application. In that chapter, we will go through
all the steps to make our application functional, but we’ll step through
Report erratum
this copy is (P1.0 printing, September 2009)Prepared exclusively for Robert Walsh
Download at WoweBook.Com

IN THIS BOOK 11
them very quickly. The goal of the chapter is to give us a frame upon
which to build as we explore the depths of Core Data. By the end of
the chapter, we will have a basic Core Data application running that we
can then expand upon.
In Chapter 3, Core Data and Bindings, on page 34, we will explore Key
Value Observing (KVO) and Key Value Coding (KVC), which are at the
heart of what makes Core Data such a powerful framework. Without
an understanding of KVO and KVC, the rest of Core Data will seem like
magic. Therefore, we will make sure we have a solid understanding of
how these technologies work and how they apply to Core Data.
Next in Chapter 4, Under the Hood of Core Data, on page 51, we will
explore the big pieces of Core Data. We will take each component and
grasp how it works with our application that we wrote and what it does
in the overall Core Data framework. I strongly recommend bookmarking
this chapter, because we will be utilizing its components through the
rest of the book.
In Chapter 5, Versioning and Migration, on page 73, we will explore
how to change our underlying data model once our application has
been released to the public. Mistakes happen, and more often than not,
improvements to an application cause a need for the data to change. In
this chapter we will explore how to handle the changes to data and how
to migrate it from one version to another. At the end of this chapter,
we will discuss a technique that makes versioning and migration easier
and reduces the amount of maintenance we need to perform.
In Chapter 6, Performance Tuning, on page 97, we take the components
we learned from Chapter 4 and explore how to make them run as fast
as possible. Although Core Data does a lot of work for us and is very
performant, it is still possible to do the wrong thing and slow it down.
In this chapter we will discuss some of the common mistakes made and
how to avoid them. With that knowledge, we will be better armed going
forward to avoid those mistakes so that we don’t have to go back and
fix them later.
In Chapter 7, Spotlight, Quick Look, and Core Data, on page 114, you’ll
learn about integrating our Core Data application with the rest of the
operating system. Nothing screams polish to me like an application that
works well with both Spotlight and Quick Look. In this chapter we will
learn how to make that happen in our application.
Report erratum
this copy is (P1.0 printing, September 2009)Prepared exclusively for Robert Walsh
Download at WoweBook.Com

ACKNOWLEDGMENTS 12
In Chapter 8, Sync Services and Core Data, on page 140, we’ll discuss
ways in which we can sync the data that is in our application across
multiple instances. With more and more users having more than one
computer, it is ever more important to be able to keep data “in the
cloud” and sync it properly across machines. By the end of this chapter,
we will be able to add that functionality to our application.
In Chapter 9, Multithreading and Core Data, on page 162, you’ll see how
to maximize the use of the computing power available to us. Modern
desktops and laptops have more than one CPU available to use, and
if the situation demands it, it is expected that our applications will
take advantage of all that processing power in a parallel manner. In
this chapter, we explore the safe ways to make a Core Data application
multithreaded.
In Chapter 10, Core Data and iPhone, on page 184, we take a side step
to discuss how we can use the power and flexibility of Core Data to
make our iPhone development easier. In this chapter we will also be
introduced to a new controller object that does not currently exist on
the Desktop.
In Chapter 11, Recipe: Distributed Core Data, on page 207, we explore
one solution for using Core Data across a distributed environment. By
combining Core Data, Bonjour, and distributed objects, we can access
a Core Data repository from more than one client spread across a local
network. Although I would not recommend developing the next great
MMORPG with this solution, it certainly has its uses.
In Chapter 12, Recipe: Dynamic Parameters, on page 228, the final
chapter, I share one of my secrets that I used in Simply Elegant Sales
and have used several times since its original design. In this recipe, we
design a document-level properties storage system similar to NSUserDe-
faults.
By the end of this book, we will have a superior grasp of all that Core
Data can do along with many practical applications of this technology.
From here we can take that knowledge to build the next generation of
fantastic desktop applications.
1.3 Acknowledgments
When I first started working with Core Data, I enjoyed it so much that
I wanted to share all the discoveries that I had made with it. I soon
Report erratum
this copy is (P1.0 printing, September 2009)Prepared exclusively for Robert Walsh
Download at WoweBook.Com

ACKNOWLEDGMENTS 13
continued sharing discoveries with other technologies as my enjoyment
of the sharing became addictive. A while back I had the pleasure of
meeting a fellow developer by the name of Matt Long and helped him
become more proficient with Cocoa and its related technologies. During
that time, we continued to share what we were learning and teaching
in the form of the blog “Cocoa Is My Girlfriend.” All of that led to this
book. What started out with a simple altruistic gesture has turned into
the text you are about to enjoy. Along the way I have been helped by a
number of fantastic developers.
First, I would like to thank Matt Long for convincing me to share what
we learned in a broader space than just one on one. I think that dis-
cussion has changed both of our lives forever.
Second, I would like to thank Tom Harrington for turning me on to
Core Data in the first place. Being pointed at this technology at that
particular time had a drastic positive change on my development efforts
at the time.
I would also like to thank one man who tends to remain behind the
scenes: Brent Simmons. A quote comes to mind when I think of Brent:
“Keep away from people who try to belittle your ambitions. Small people
always do that, but the really great make you feel that you, too, can
become great.” —Mark Twain. Thank you, Brent, for making me feel
that I, too, can become great.
Lastly, I would like to thank the reviewers of this book who have caught,
corrected, and pointed out my many mistakes while writing. As every
developer knows, it is nearly impossible to test your own code, and
the same goes for your own writing. Without the people who read this
book and tested the code while it was being written, this would be a
far inferior work than the one you have in front of you. The testers and
reviewers of this book have gone further than I ever expected to help
make sure this work is accurate.
Report erratum
this copy is (P1.0 printing, September 2009)Prepared exclusively for Robert Walsh
Download at WoweBook.Com

Chapter 2
Getting Started with Core DataInstead of starting off discussing theory or reviewing the concepts be-
hind Core Data, we will dive right into writing a Core Data application.
The application we build in this chapter will be used throughout the
rest of the book to explore the intricacies of Core Data.
You will be learning through doing. We will build a basic application
and, in the chapters following, look back through it to understand what
the pieces actually do. In this book we are writing a food recipe appli-
cation that uses Core Data. The concepts within a recipe application
are well known, and we will avoid spending cycles on trying to figure
out the concepts of the application while also trying to grok Core Data
itself.
2.1 Our Application
Before we start building our application, we will do a quick overview of
how the UI will look and work (see Figure 2.1, on the following page).
In section 1, we will allow the user to edit information about individual
recipes. Each recipe can be selected in the list and its details edited
next to it.
In section 2, we will allow the user to enter the ingredients of the
selected recipe. Each recipe will have its own list of ingredients that
can be added, viewed, and edited here.
In section 3, we will allow the user to add a picture of the recipe for
reference. This is a view-only element, and the addition of the image
will be handled through the main menu.
Prepared exclusively for Robert Walsh
Download at WoweBook.Com

OUR APPLICATION DESIGN 15
Figure 2.1: Our recipe application
2.2 Our Application Design
In this chapter, we will start at the very beginning. You will be launching
Xcode and proceeding through all the steps to create the application
and bring it to a usable state. At the end of this chapter, you may be
surprised that the steps to create our application are so few. This is
part of the allure and strength of Cocoa development. Coupled with
Core Data, it is doubly so.
In the first version of our recipe application, we will give our future
users the following abilities:
• The ability to add recipes with a description, type, name, image,
and number of people it serves
• The ability to add ingredients to those recipes that include a name,
quantity, type, and unit of measure
This first version of our application is intentionally simple. This is use-
ful both so that we can add features to it later and thereby explore some
of the abilities of Core Data and so that we can keep the distractions to
a minimum while we explore Core Data.
Report erratum
this copy is (P1.0 printing, September 2009)Prepared exclusively for Robert Walsh
Download at WoweBook.Com

ADVANCED READERS 16
2.3 Advanced Readers
If you are already a bit familiar with Core Data and building a Core
Data application, please feel free to move quickly through the rest of
this chapter. In this chapter, we will walk through the construction of
our project and how to build its data model. The end result will be a
data model like the one shown in Figure 2.4, on page 21.
2.4 Creating Our Xcode Project
The first step is to create our Xcode project. With the recent versions
of Xcode, quite a few project templates are available to us, and more
than one of those is based on Core Data. If you are using Leopard, then
you will want to use the Core Data Application template, and if you
are using Snow Leopard, then you want to select the Cocoa Application
template and ensure that the “Use Core Data for storage” checkbox is
selected.
Once we select which template, we will name the project Grokking
Recipes, which will also be the name of our application.1 In your Groups
& Files listing in Xcode, you will see an additional folder named Models
containing the data model file (see Figure 2.2, on the following page).
The basic Core Data template gives us an application that works some-
what like Address Book. In Address Book, the user has only one data
file and generally accesses that data file via one window. Our recipes
application will be designed around that same pattern. We will have
exactly one data file that all the user’s recipes will be stored in.
Once the project is created in Xcode, it is time to start building the Core
Data aspects of our application.
2.5 Building the Data Model
Core Data applications are like database-driven applications, and in
that light, we will start with building the data structures first and then
move to the user interface. The three components we are going to be
working with at this point are entities, attributes, and relationships.
In our design (see Section 2.2, Our Application Design, on the previous
page), we already described at least two of the data objects that we
1. Although it can be changed later.
Report erratum
this copy is (P1.0 printing, September 2009)Prepared exclusively for Robert Walsh
Download at WoweBook.Com

BUILDING THE DATA MODEL 17
Figure 2.2: The data model in Xcode
want to use and at least some of the attributes. Therefore, we will start
with them. In our Xcode project, there is a group called Models, and
within that group is a file called DataModel.xcdatamodel.2 This file is a
representation of the data structure that Core Data will use. This file
has a lot of similarities to an entity-relationship diagram (ERD) except
that Xcode will compile it directly into our final data file structure.
Adding an Entity to the Model
In Core Data, an entity has a lot of similarities to a table in a normal
database design. Although this similarity is not exact, it is a good place
to start.
To add our first entity to our data model, first open the .xcdatamodel file
in the Models group, and then choose Design > Data Model > Add Entity
from the menu bar (or use the + button in the entry area in the top left).
This will add a blank entity to our data model. Next, double-click the
name of the entity, and rename it to Recipe.
2. It is possible this file will be named ${PROJECT_NAME}_DataModel.xcdatamodel depending
on the version of Xcode you are using.
Report erratum
this copy is (P1.0 printing, September 2009)Prepared exclusively for Robert Walsh
Download at WoweBook.Com

BUILDING THE DATA MODEL 18
Figure 2.3: Attribute details
Adding an Attribute Property
Just as an entity has a lot of similarities to a table, a property has quite
a few similarities to a column in that table. This similarity breaks down
very quickly when we start adding relationships, but it helps in the
beginning to think of it this way. Properties are further broken down
into several subtypes; the two most relevant are attributes and rela-
tionships. Relationship properties describe the relationships between
two entities, and attribute properties are the values of an entity.
To add our first attribute property to our Recipe entity, select the entity,
and choose Design > Data Model > Add Attribute from the menu bar;
you can also use the top + button or the keyboard shortcut. Like the
entity creation, this will create a new attribute property within our
entity. Double-click the name of this property, and rename it to name.
After renaming the attribute, select it to see its details, as shown in
Figure 2.3.
These details allow us to control several aspects of the attribute includ-
ing the default value, what type of attribute it is, and whether it is
transient, indexed, optional, and so on. We will go through all of these
settings in greater detail later, so for now set the type to String, set the
default value to untitled, and make sure it is not optional.
Report erratum
this copy is (P1.0 printing, September 2009)Prepared exclusively for Robert Walsh
Download at WoweBook.Com

BUILDING THE DATA MODEL 19
Once the first attribute is finished, add the following attributes to the
Recipe object:
• Set imagePath to an optional String without a default value.
• Set desc to an optional String without a default value.
• Set serves to an Integer 16 with a minimum value of 1 and a default
value of 1. Be sure to flag it as nonoptional.
• Set type to an optional String with a default value of Meat.
Creating Our Second Entity
With the Recipe entity nearly complete, it is time to create our second
entity. This second entity will store the ingredients that go into a recipe,
and we will call it RecipeIngredient. Following the same steps, we can add
these attributes:
• Set name to a nonoptional String with a default value of untitled.
• Set quantity to a nonoptional Integer 16 with a minimum value of 0
and a default value of 1.
• Set unitOfMeasure to a nonoptional String with a default value of
untitled.
Adding a Relationship Property
Relationship properties are created in the same way as attribute prop-
erties, although the specifics naturally differ. Add a relationship to the
Recipe entity by selecting Design > Data Model > Add Relationship from
the menu bar. For this first relationship, name it ingredients, and flag it
as optional.
Where a relationship is different from an attribute, however, is in the
properties. Instead of defining an object type, default values, and so on,
we are instead defining a destination entity, an inverse relationship,
and whether this relationship is “to-many.” For this relationship, we
will start by naming it ingredients, and then we set the destination entity
to RecipeIngredient, but we are not going to set the inverse relationship
yet. We are also going to flag it as to-many, since a recipe can definitely
have more than one ingredient.
The last option, the delete rule, instructs Core Data on how to handle
the relationship when this, the Recipe entity, is deleted. In this rela-
tionship, we will delete the RecipeIngredient object to avoid any discon-
nected objects. Therefore, we will select the cascade option, which will
remove any associated RecipeIngredient objects when the Recipe entity
is deleted.
Report erratum
this copy is (P1.0 printing, September 2009)Prepared exclusively for Robert Walsh
Download at WoweBook.Com

BUILDING THE DATA MODEL 20
Joe Asks. . .
What Is One-to-Many?
One-to-many is a database term that describes the relation-ship between two tables in the database. Normally, thereare three kinds of relationships: one-to-one, one-to-many, andmany-to-many. A one-to-one relationship means that for eachrecord in the first table there can be no more than one recordin the second table. In a one-to-many relationship, for eachrecord in the first table, there can be more than one recordin the second table. The last relationship type, many-to-many,means that for any record in the first table, there can beany number of records in the second table, and, likewise, foreach record in the second table, there can be any number ofrecords in the first table.
Completing the Relationship
One rule that is often repeated by the developers of Core Data is that
every relationship in your database should have an inverse. Although
this may not make logical sense for the data, it is important for data
integrity within Core Data. What this means from our programming
perspective is that we need to be able to reference each object in the
relationship from either side. Apple recommends this inverse relation-
ship for many reasons, which will be discussed in greater detail
throughout this book.
To set up the inverse relationship, we select the RecipeIngredient entity
and add a Relationship property to it just like we did in the Recipe entity
earlier. This new Relationship property is named recipe with a destina-
tion of the Recipe entity. Next, we set the inverse relationship to be
ingredients, which was the name of the relationship we set in the Recipe
entity. As soon as we set the inverse relationship on the RecipeIngredi-
ent, the graphical view of the relationships will change. Instead of two
lines connecting the objects, they are replaced with one line, making
the graphical view quite useful for debugging relationship settings. In
our current design, an ingredient can have only one recipe; therefore,
we leave the to-many option unselected. Lastly, we set the Delete Rule
setting to Nullify. This setting will not delete the Recipe entity when a
RecipeIngredient object is deleted. Instead, it will just break the connec-
tion between the two.
Report erratum
this copy is (P1.0 printing, September 2009)Prepared exclusively for Robert Walsh
Download at WoweBook.Com

BUILDING THE DATA MODEL 21
Figure 2.4: The managed object model (MOM)
Adding the Last Entity
We have one more entity to add in this release of our recipe applica-
tion. We will be categorizing the recipes that are added. For example,
we will be separating desserts from appetizers, and so on. To keep these
categories consistent, we store the actual category names in their own
object. Therefore, add one more entity to our model called Type. This
entity has only one attribute property, called name, which is a nonop-
tional string with no default value. Lastly, this entity has no relation-
ships because it will be used only as a lookup to populate the type
NSComboBox discussed in Section 2.7, Adding the Recipe Details, on
page 27.
And with that last entity, that concludes the construction of the data
model for our application. The final result should look similar to Fig-
ure 2.4.
Build the Data Objects
In other languages, or even in Cocoa applications that do not use Core
Data, the next step would normally be to build the data objects that
are associated with the “tables” in the “database.” Fortunately, we are
working with Core Data, and there are no data objects to construct.
As part of Core Data, defining the data model also defines the base
data objects for us. If we need custom management of objects, we can
extend from these, but at this point the base data objects (called NSMan-
agedObject) are more than sufficient for our needs.
Report erratum
this copy is (P1.0 printing, September 2009)Prepared exclusively for Robert Walsh
Download at WoweBook.Com

BUILDING THE CONTROLLER LAYER 22
2.6 Building the Controller Layer
As you know from your experience developing Cocoa apps, Interface
Builder is a very large part of any project. Now that we have built our
data model and we have a template ready in Xcode, it is time to put
together the user interface.
I should mention two things before we get into the fun of Interface
Builder:
• This is not going to be Delicious Library. We will be using standard
widgets for our application to help keep the non–Core Data code
to a minimum.
• There are a lot of features that we could add to this application
but we won’t. Those features, although useful, will detract from
our focus.
Adding Objects to the xib
The first part of the user interface we will work on is the objects in
the xib file. As with most applications, we need to add the AppDelegate
to the xib so that it both will be instantiated on startup and will be
properly linked into the application itself.
Add the AppDelegate
Upon opening MainMenu.xib and depending on the whims of the tem-
plates within Xcode, the AppDelegate may already be in the xib file. If it
is, great! Move on to the next section. If it is not, then we need to add
it.3
To add the AppDelegate to the xib file, follow these steps:
1. Find the NSObject in the library palette, and drag it to the xib’s
window.
2. Click the name of the NSObject, and when it is editable, change it
to AppDelegate.
3. Go to the Identity tab on the Inspector palette, and change the
class of the object from NSObject to AppDelegate.
4. Right-drag from the application to the AppDelegate object, and
select Delegate.
3. Please note that depending on the version of Xcode you are running, the applica-
tion delegate could have the application name prepended to it. If it does, then please
substitute that name for any reference to AppDelegate in this context.
Report erratum
this copy is (P1.0 printing, September 2009)Prepared exclusively for Robert Walsh
Download at WoweBook.Com

BUILDING THE CONTROLLER LAYER 23
Figure 2.5: The main menu xib
When this is completed, the AppDelegate class will be instantiated when
our application launches, and the application will send all delegate
messages to it.
Adding the NSArrayController Objects
Our application is going to display all of our recipes in a single win-
dow. To do that, we need to be able to reference the data so that it
can be displayed. Therefore, add three NSArrayController objects into our
xib that reference that data. Our window will then reference those NS-
ArrayController objects. Once the NSArrayController objects are added and
configured, the xib will look like Figure 2.5.
To add an NSArrayController for the recipe entities, follow these steps:
1. Find the NSArrayController object in the library, and drag it to the
xib file.
2. Click the name of the NSArrayController, and when it is editable,
rename it to Recipes. If you have trouble getting the element to go
into edit mode, you can change the name in the Identity inspector
in Interface Builder and change the identity Name field.
3. On the Attributes tab of the inspector, change the mode from Class
to Entity, and change the entity name to Recipe.
4. Make sure that the Prepares Content flag is selected.
Report erratum
this copy is (P1.0 printing, September 2009)Prepared exclusively for Robert Walsh
Download at WoweBook.Com

BUILDING THE CONTROLLER LAYER 24
Figure 2.6: NSArrayController content set properties
5. On the Bindings tab of the inspector, bind ManagedObjectContext
to the AppDelegate with a model key path of managedObjectCon-
text.
Now that we have the recipe’s NSArrayController built, we need to config-
ure the other two, the recipe ingredients and the type. The type NSArray-
Controller follows the same steps as our Recipe entity, but we need to set
the entity name to Type so that it will be populated with Type objects.
Other than that one difference, we can follow the previous steps to com-
plete the type’s NSArrayController.
Report erratum
this copy is (P1.0 printing, September 2009)Prepared exclusively for Robert Walsh
Download at WoweBook.Com

BUILDING THE USER INTERFACE 25
Figure 2.7: The main window
Set the identity of the last NSArrayController, the recipe ingredients’ NS-
ArrayController, to RecipeIngredient. In the Attributes inspector, choose
Entity, and set the entity name to RecipeIngredient. Set the bindings as
before with one additional change. On the Bindings tab of the inspec-
tor, enable the content set in the controller content and point it at the
recipe’s NSArrayController with a controller key of selection and a model
key path of ingredients. See Figure 2.6, on the preceding page.
Now we are ready to build the NSWindow itself.
2.7 Building the User Interface
Now that we have all the data objects referenced properly, it is time to
build the user interface. Although this interface certainly will not be
winning any ADAs4 any time soon, it will allow us to view and edit all
the data objects in our model. The window we are building will look like
Figure 2.7, and we will quickly walk through the steps to set it up with
a more detailed review of what we are doing in Chapter 3, Core Data
and Bindings, on page 34.
4. Apple Design Awards
Report erratum
this copy is (P1.0 printing, September 2009)Prepared exclusively for Robert Walsh
Download at WoweBook.Com

BUILDING THE USER INTERFACE 26
Building the Recipe Source List
The first part of this interface that we are building is in the upper-
left corner just below the search field. This view is an NSTableView that
is configured with one column, no horizontal scroll bar, an automati-
cally displaying vertical scroll bar, and the highlight set to Source List.
The scroll bars are configured in the inspector for the NSScrollView.
The number of columns and the highlight option are configured in
the NSTableView inspector. Each of these inspectors can be accessed
by Control+Shift-clicking (or Shift+right-clicking) the NSTableView and
selecting the appropriate view from the list. If the inspector is not on
the screen, it can be displayed from the Tools > Inspector menu item.
To bind this table to our recipe’s NSArrayController object, though, we
need to dig down a little bit and get ahold of the NSTableColumn so that
we can tell that column what to display. We could click in the table view
until eventually, ideally, we would get the NSTableColumn selected, but
fortunately there is an easier way. If we Shift+right-click the table, we
will be presented with a pop-up listing all of the views, hereby making
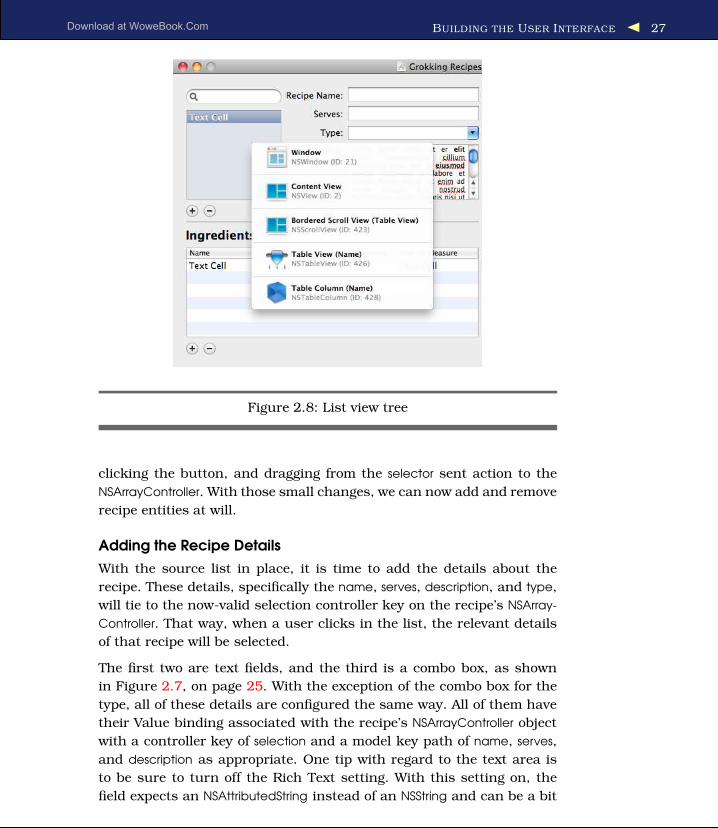
it easy for us to select the NSTableColumn (see Figure 2.8, on the next
page). With the NSTableColumn selected, we can now open its Bindings
tab in the inspector and bind its value to the RecipesNSArrayController
with a controller key of arrangedObjects and a model key path of name.
Once this is set, our Recipe entities will now show up in this table. More
important, when we click a recipe in this list, that recipe will become
the selection that feeds the rest of the UI.
Next we need to add the buttons that will control the creation and
removal of Recipe entities. To do this, we drag an NSButton (it does not
matter which one) from the Library and place it below the Recipe table
view. Then in the button’s Attributes tab, we want to set its image to
NSAddTemplate (a system-level image available for our use), change its
style to Round Rect, and remove its title if it has one. Once that is done,
we need to select the menu item Layout > Size to Fit to get the button
to the perfect size. Once that is done for the add button, select Edit >
Duplicate from the main menu to create a second button and change
the second button’s image to NSRemoveTemplate.
Next, we can “wire up” the buttons under the NSTableView and connect
them directly to the recipe’s NSArrayController. The add button will be
connected to the -add: action, and the remove button will be connected
to the -remove: action on the Recipes NSArrayController. These buttons
can be connected to their actions by holding down the Control key,
Report erratum
this copy is (P1.0 printing, September 2009)Prepared exclusively for Robert Walsh
Download at WoweBook.Com
BUILDING THE USER INTERFACE 27
Figure 2.8: List view tree
clicking the button, and dragging from the selector sent action to the
NSArrayController. With those small changes, we can now add and remove
recipe entities at will.
Adding the Recipe Details
With the source list in place, it is time to add the details about the
recipe. These details, specifically the name, serves, description, and type,
will tie to the now-valid selection controller key on the recipe’s NSArray-
Controller. That way, when a user clicks in the list, the relevant details
of that recipe will be selected.
The first two are text fields, and the third is a combo box, as shown
in Figure 2.7, on page 25. With the exception of the combo box for the
type, all of these details are configured the same way. All of them have
their Value binding associated with the recipe’s NSArrayController object
with a controller key of selection and a model key path of name, serves,
and description as appropriate. One tip with regard to the text area is
to be sure to turn off the Rich Text setting. With this setting on, the
field expects an NSAttributedString instead of an NSString and can be a bit
Report erratum
this copy is (P1.0 printing, September 2009)Prepared exclusively for Robert Walsh
Download at WoweBook.Com

BUILDING THE USER INTERFACE 28
Figure 2.9: Remember to turn off the Rich Text setting.
confusing (see Figure 2.9). In addition, to be proper citizens, we should
drag over an NSNumberFormatter to the Serves text field and configure it
to allow only whole numbers.
The combo box is a little more complex. Although it is also associated
with the selected recipe, we need to populate the entire list with values.
For now, we will enter the possible values for this box manually into
Interface Builder, as shown in Figure 2.10, on the following page. Next
we need to bind its current value to the selected recipe. We do this by
binding the NSComboBox value to the currently selected recipe’s type
value. On the Bindings tab for the NSComboBox, we open the Value sec-
tion, bind it to the recipe NSArrayController, and set the controller key to
selection and model key path to type. Later, in Section 4.4, NSManage-
dObjectContext, on page 64, we will show how to prepopulate this list
directly into the Core Data persistent store.
Adding the Ingredients
Now that we have the recipe section of our UI complete, it is time to
add ingredients. This is the table you see in the lower-left corner of
our window. Fortunately, this part is almost identical to setting up the
Report erratum
this copy is (P1.0 printing, September 2009)Prepared exclusively for Robert Walsh
Download at WoweBook.Com

ADDING A SPLASH OF CODE 29
Figure 2.10: Manual data entry for the combo box
recipe source list. However, unlike the recipe source list, our NSTable-
View will have three columns, display its headers and its vertical scroll
bar, but hide the horizontal scroll bar. Enter the column headings as
Name, Quantity, and Unit of Measure.
Like the recipe source list, bind the values for each column in the NS-
TableView to our recipe ingredients’ NSArrayController using the controller
key arrangedObjects and using the appropriate model key paths: name,
quantity, and unitOfMeasure. The quantity column (or more specifically
the table cell in the quantity column) should also have an NSNumberFor-
matter assigned to it so that the quantity is properly formatted for the
value that it holds. Once those are configured, we can see the recipe
ingredients for the selected recipe. Remember that we configured the
recipe ingredients’ NSArrayController to feed off the selected recipe, so we
do not have to do anything extra at this point.
Like the recipe source list, the add and subtract buttons are config-
ured by binding them to the recipe ingredients’ NSArrayController objects
-add: and -remove: methods, respectively. And with that, we have the
ingredients section complete and are nearly done with our UI.
2.8 Adding a Splash of Code
Wondering where the code is? As it stands right now, our recipe appli-
cation is fully functional. We can run it without any actual code on
Report erratum
this copy is (P1.0 printing, September 2009)Prepared exclusively for Robert Walsh
Download at WoweBook.Com

ADDING A SPLASH OF CODE 30
our part and start inputting recipes. With the combination of Cocoa
and Core Data, we can produce an application like this with no custom
code on our part. However, we are not stopping there.
Displaying a Picture of the Recipe
What recipe application would be complete without a picture? The
users of our application need to know what the dish is going to (or
at least should) look like when they are done. Fortunately, from the UI
point of view, this is an easy addition. Drag an NSImageView (referred to
as an image well in Interface Builder 3.1) onto our window, and con-
nect its value path to the imagePath of the recipe’s NSArrayController with
a controller key of selection.
Importing Images
Once we have the NSImageView added to our user interface, we need to
make our AppDelegate aware of it. In addition, we need to add a way to
set the image path of our Recipe entities. Therefore, we need to update
our AppDelegate.h and add an IBOutlet for the recipe NSArrayController
and an IBAction to be able to set the image path, as shown here:
Download GrokkingRecipes_v1/AppDelegate.h
@interface AppDelegate : NSObject
{
IBOutlet NSWindow *window;
IBOutlet NSArrayController *recipeArrayController;
NSPersistentStoreCoordinator *persistentStoreCoordinator;
NSManagedObjectModel *managedObjectModel;
NSManagedObjectContext *managedObjectContext;
}
- (NSPersistentStoreCoordinator *)persistentStoreCoordinator;
- (NSManagedObjectModel *)managedObjectModel;
- (NSManagedObjectContext *)managedObjectContext;
- (IBAction)saveAction:(id)sender;
- (IBAction)addImage:(id)sender;
@end
The IBAction, specifically -(IBAction)addImage:(id)sender;, will be called
from our main menu and will display an open file dialog box when it is
called. In addition, for us to be able to work with the recipe entities, we
need to be able to get a reference to the selected recipe. To do that, we
will add a reference to the recipe’s NSArrayController that is instantiated
in our nib within the AppDelegate.
Report erratum
this copy is (P1.0 printing, September 2009)Prepared exclusively for Robert Walsh
Download at WoweBook.Com

ADDING A SPLASH OF CODE 31
Figure 2.11: Add Recipe Image menu item
Once the recipe’s NSArrayController has been added to the AppDelegate
header, we need to go back to Interface Builder briefly and Control+drag
from the AppDelegate to the recipe’s NSArrayController to complete the
binding.
While we are here, we need to add a menu item to the File menu. We do
this by making sure the MainMenu element is open in Interface Builder
(it will appear as a floating menu) and clicking its File menu. From
there we can either add a new NSMenuItem or use one that already
exists that is not being used. Since the Save As menu item is not rele-
vant to our application, go ahead and rename it to Add Recipe Image.
Once it is renamed, Control+drag from it to the AppDelegate, and bind
the menu item to the IBAction we defined in the header, as shown in
Figure 2.11. With the bindings in place, it is time to implement the
-addImage: method.
Report erratum
this copy is (P1.0 printing, September 2009)Prepared exclusively for Robert Walsh
Download at WoweBook.Com

ADDING A SPLASH OF CODE 32
Download GrokkingRecipes_v1/AppDelegate.m
- (IBAction)addImage:(id)sender
{
id recipe = [[recipeArrayController selectedObjects] lastObject];
if (!recipe) return;
NSOpenPanel *openPanel = [NSOpenPanel openPanel];
[openPanel setCanChooseDirectories:NO];
[openPanel setCanCreateDirectories:NO];
[openPanel setAllowsMultipleSelection:NO];
SEL select = @selector(addImageSheetDidEnd:returnCode:contextInfo:);
[openPanel beginSheetForDirectory:nil
file:nil
modalForWindow:window
modalDelegate:self
didEndSelector:select
contextInfo:recipe];
}
The implementation of -addImage: will display an NSOpenPanel, which
will attach to the window as a sheet, making it modal to the window.
Next, we tweak the NSOpenPanel a little bit so that it cannot select direc-
tories or multiple files or create directories. You will also notice that we
first check to make sure a recipe has been selected before we open the
panel. A little bit of error checking can go a long way.
Since sheets work asynchronously, we need to hand it a callback to
another method in the AppDelegate. Also, while we are engaging the
sheet, we will pass along the current recipe reference. When the sheet
calls back, we are guaranteed to still be talking about the same recipe
we started with.
Download GrokkingRecipes_v1/AppDelegate.m
- (void)addImageSheetDidEnd:(NSOpenPanel*)openPanel
returnCode:(NSInteger)returnCode
contextInfo:(NSManagedObject*)recipe
{
if (returnCode == NSCancelButton) return;
NSString *path = [openPanel filename];
//Build the path we want the file to be at
NSString *destPath = [self applicationSupportFolder];
NSString *guid = [[NSProcessInfo processInfo] globallyUniqueString];
destPath = [destPath stringByAppendingPathComponent:guid];
NSError *error = nil;
Report erratum
this copy is (P1.0 printing, September 2009)Prepared exclusively for Robert Walsh
Download at WoweBook.Com

ADDING A SPLASH OF CODE 33
[[NSFileManager defaultManager] copyItemAtPath:path
toPath:destPath
error:&error];
if (error) {
[NSApp presentError:error];
}
[recipe setValue:destPath forKey:@"imagePath"];
}
In -addImageSheetDidEnd:returnCode:contextInfo:, we grab the filename
from the NSOpenPanel and stick it into the correct recipe. As part of
this callback, we get passed the recipe so we will get the filename and
set it into the recipe. However, there is a risk there. What happens if the
user moves the image? Perhaps it was a temporary image? To ensure
that we always have the image available, we will copy it to a known
location within our control and then use that file path. To accomplish
this, we grab the filename from the NSOpenPanel and also construct a
unique path within our Application Support directory structure. Next we
use the NSFileManager to copy the image to that location. Last we set the
new file path into our Recipe object.
With the addition of that menu item, we have completed the initial func-
tionality. Our application is now ready to hand off to our trusty users,
and we can eagerly await feedback. While we wait to hear back from
them, we can tear into the depths of Core Data. To test our application,
we can do a Build and Go from Xcode and start entering recipes into
the application.
Report erratum
this copy is (P1.0 printing, September 2009)Prepared exclusively for Robert Walsh
Download at WoweBook.Com

Chapter 3
Core Data and BindingsCocoa Bindings provides a lot of the magic behind Core Data. Cocoa
Bindings consists of a number of APIs and concepts that together allow
us to develop our applications using the Model View Controller para-
digm without requiring a tight coupling of the three aspects.
Cocoa Bindings allows us to design views, controllers, and models that
all expect data in a specific format without requiring that we bind them
to specific classes. This means we can use views in multiple places
and swap out controllers and even models without extensive (if any)
recoding.
In this chapter, we’ll look at some of the key components of Cocoa Bind-
ings and then delve into the specifics of how Core Data works with those
bindings. The two primary APIs that we are looking into are Key Value
Coding and Key Value Observing. Between these two APIs, we are given
a tremendous amount of flexibility in our design. In addition, these
APIs are part of the foundation that allows Interface Builder to function
and allows us to focus on the business logic of our applications. Lastly,
these APIs are used heavily by Core Data to allow us to focus on the
business logic of our applications as opposed to the data layer.
3.1 Key Value Coding
One of the cornerstones of Cocoa Bindings is Key Value Coding (KVC).
Key Value Coding is a way to access the attributes of an object without
calling the accessors of that object directly. Key Value Coding is imple-
mented through an informal protocol on NSObject itself and is used
mainly through the getter/setter pair -valueForKey: and -setValue:forKey:.
Prepared exclusively for Robert Walsh
Download at WoweBook.Com

KEY VALUE CODING 35
-valueForKey:
The method -valueForKey: is a generic accessor to retrieve an attribute
on an object. For example, if we had an object called Recipe and it had
an attribute called name, normally we would access that attribute via
the following:
Recipe *myRecipe = ...
NSString *recipeName = [myRecipe name];
However, this requires specific knowledge about the Recipe object to
exist in the calling method and generally requires that we import the
header file of the Recipe object. However, with Key Value Coding, we can
obtain this same attribute without having any preexisting knowledge
about the Recipe object:
id myRecipe = ...
NSString *recipeName = [myRecipe valueForKey:@"name"];
By itself, this is not all that useful. However, there are huge benefits to
it that are not apparent on the surface. Here’s an example that shows
how you might better take advantage of this:
- (NSString*)description
{
NSMutableString *string = [NSMutableString stringWithFormat:@"[%@] {",
[self class]];
NSEntityDescription *desc = [self entity];
for (NSString *name in [desc attributeKeys]) {
[string appendFormat:@"\n\t%@ = '%@'", name, [self valueForKey:name]];
}
[string appendString:@"\n}"];
return string;
}
In this example, I am utilizing the NSEntityDescription1 class to retrieve
the names all of the attributes of an NSManagedObject subclass and
generating an NSString for display in the logs. With this method, I can
reuse it in every NSManagedObject subclass that I create rather than
having to create a custom -description method for each subclass.
There are a couple of things to note in this example. First, the tar-
get object is not required to have accessor methods for the attribute
being queried. If our target object has only an ivar2 for a name, it will
still be resolved and retrieved properly. In addition, if the target object
1. We will discuss the NSEntityDescription class in greater detail in Chapter 4, Under the
Hood of Core Data, on page 512. ivar stands for instance variable. This is different from a static or local variable.
Report erratum
this copy is (P1.0 printing, September 2009)Prepared exclusively for Robert Walsh
Download at WoweBook.Com

KEY VALUE CODING 36
has neither an accessor nor an ivar, the target object will still have
a chance to respond to the request before an error occurs via the
-valueForUndefinedKey: method. Lastly, all the properties of an NSMan-
agedObject are queryable via the KVC protocol. What this means is that
if we have an NSManagedObject defined in our model, we can retrieve
an instance of that object and access its properties without having to
implement a single line of code in the target object!
-setValue:forKey:
Being able to dynamically access properties on an object is quite useful,
but that is only half of what KVC does. The other half is the ability to
dynamically set attributes on an object in much the same manner that
we can retrieve them. Normally, we would change the name attribute
on an Recipe object by calling the setter method:
Recipe *myRecipe = ...
[myRecipe setName:@"Yummy Cookies"];
Like the earlier getter accessor, this requires preexisting knowledge of
the Recipe object to be able to use that accessor without compiler warn-
ings. However, with KVC, we can access it in a more dynamic manner:
id myRecipe = ...
[myRecipe setValue:@"Yummy Cookies" forKey:@"name"];
This call will attempt to use the setter -setName: if it is available; if it is
not, then it will look for and use the attribute directly if it is available,
and failing that, it will call -setValue:forUndefinedKey: on the target object.
The combination of the dynamic getter coupled with the dynamic setter
allows us to manipulate objects without having to write accessors and
without having to know (or care!) if they exist. This is used to great
effect in one of the Core Data recipes to create a preferences singleton
object that reads its values from a properties table. See Chapter 12,
Recipe: Dynamic Parameters, on page 228.
@property
In addition, as of OS X 10.5 Leopard, we have the new keyword @prop-
erty that allows us to synthesize accessors to attributes on an object.
This new feature plays very nicely with KVC, and the two can be used
together to produce extremely dynamic and flexible code. By utilizing
the new @property keyword, we can instruct the compiler to generate
getter and setter accessors for us that are KVO compliant. In a 32-bit
application, we can define a @property that has the same object type
Report erratum
this copy is (P1.0 printing, September 2009)Prepared exclusively for Robert Walsh
Download at WoweBook.Com

KEY VALUE CODING 37
and name as a defined ivar. This will tell the compiler that getter and
setter accessors exist or will exist for that ivar. In a 64-bit application,
the ivar itself is not required because the property definition handles
that for us as well. For example, if we had an object with the following
header:
@interface MyObject : NSObject
{
NSString *myString;
}
@property (retain) NSString *myString;
@end
Xcode would interpret it the same as the following header:
@interface MyObject : NSObject
{
NSString *myString;
}
- (NSString*)myString;
- (void)setMyString:(NSString*)string;
@end
In combination with the @property keyword, we have the @synthesize
and @dynamic keywords for use in our implementation files. @synthe-
size will generate the actual accessors that the @property alludes to in
the header. Therefore, in our example MyObject.m file, we can declare
the following:
#import "MyObject.h"
@implementation MyObject
@synthesize myString;
@end
and have the same effective code as this:
#import "MyObject.h"
@implementation MyObject
- (NSString*)myString;
{
return myString;
}
Report erratum
this copy is (P1.0 printing, September 2009)Prepared exclusively for Robert Walsh
Download at WoweBook.Com

KEY VALUE CODING 38
- (void)setMyString:(NSString*)string;
{
@synchronized(self) {
if ([string isEqualToString:myString]) return;
[myString release];
myString = [string retain];
}
}
@end
The retain in the setter is added by the compiler because we specified it
in the property. If we had set it to assign instead, then no retain would
have occurred. Likewise, the locking of the ivar is a default option that
we could have turned off by adding the nonatomic option to the property
definition.
When dealing with multiple properties on an object, this can be a great
time-saver. There have also been indications that the accessors gener-
ated by the compiler are faster than the “normal” accessors that devel-
opers write. In addition to generating accessors, the @synthesize keyword
is smart about what it implements. If we need to implement our own
setter for a property, then it will not overwrite that setter.
Alongside the @synthesize property, we have the @dynamic property. Un-
like @synthesize, which generates the accessors for us, @dynamic tells
the compiler that while the accessors for the property are not there at
compile time, they will be there at run time and to not produce a warn-
ing for them. @synthesize and @dynamic are sibling keywords. For each
property, we can use one or the other but not both.3 If the accessor
methods will be implemented at runtime, we would use the @dynamic
property instead of the @synthesize property so that the compiler does
not produce a warning. This is particularly useful for Core Data sub-
classes, which we will discuss in Chapter 4, Under the Hood of Core
Data, on page 51.
It should be noted that it is possible to have a @property definition that
does not match the name of the ivar. For example, it is fairly common
to have ivars that start with an underscore, but the accessors do not
include the underscore. The @property can handle this as well as part
of the @synthesize and @dynamic calls.
3. However, neither is required in a situation where we are implementing the accessors
ourselves.
Report erratum
this copy is (P1.0 printing, September 2009)Prepared exclusively for Robert Walsh
Download at WoweBook.Com

KEY VALUE OBSERVING 39
@interface MyObject : NSObject
{
NSString *_myString;
}
@property (retain) NSString *myString;
@end
@implementation MyObject
@synthesize myString = _myString;
@end
3.2 Key Value Observing
Key Value Observing (KVO) is the sister API to KVC. KVO allows us
to request notifications when an attribute has changed. By observ-
ing attributes on an object, we can react when those attributes are
changed. KVO is also implemented via an informal protocol on the
NSObject, and you register and remove observers using -addObserver:for-
KeyPath:options:context: and -removeObserver:forKeyPath:. Although, like
KVC, there are other methods involved in the protocol, these are the
primary two used.
If we wanted to observe the name value on a recipe, we would add
ourselves (or another object) as an observer for that value like this:
static NSString *kPragProgObserver = @"PragProgObserver"
id myRecipe = ...
[myRecipe addObserver:self
forKeyPath:@"name"
options:(NSKeyValueObservingOptionNew|NSKeyValueObservingOptionOld)
context:kPragProgObserver];
What this snippet of code is doing is adding self as an observer to
the myRecipe object and asking that when the name value changes to
please notify self of that change and include both the old value and
the new value in that notification. We pass along a context so that we
can ensure we are acting on observations meant only for us and that
they are not accidentally intercepted. After this code has been called,
any time the name property is changed on that instance of Recipe, the
-observeValueForKeyPath:ofObject:change:context: is called upon self.
Report erratum
this copy is (P1.0 printing, September 2009)Prepared exclusively for Robert Walsh
Download at WoweBook.Com

COCOA BINDINGS AND CORE DATA 40
We can then handle that change notification as appropriate:
- (void)observeValueForKeyPath:(NSString*)keyPath
ofObject:(id)object
change:(NSDictionary*)change
context:(void*)context
{
if (context != kPragProgObserver) {
[super observeValueForKeyPath:keyPath
ofObject:object
change:change
context:context];
return;
}
NSLog(@"Attribute %@ changed from %@ to %@", keyPath,
[change valueForKey:NSKeyValueChangeOldKey],
[change valueForKey:NSKeyValueChangeNewKey]);
}
When the variable is changed, we will see output similar to the follow-
ing:
Attribute name changed from untitled to Beef Chili
When we are done observing a value, we can stop receiving messages
by passing -removeObserver:forKeyPath: to the observed object:
id myRecipe = ...
[myRecipe removeObserver:self
forKeyPath:@"name"];
KVO is what allows views to automatically refresh themselves from the
model when the data has changed. When a view is initialized, it uses
KVO to connect all its components to the underlying objects and uses
the notifications to refresh itself.
3.3 Cocoa Bindings and Core Data
The combination of KVO/KVC (collectively referred to as Cocoa Bind-
ings) and Core Data reduces the amount of code that we are required
to write by a considerable amount. In the previous chapter, we wrote
almost no code to create and display our recipe objects. Nearly all the
work that we did was in Interface Builder. In this section, we will dis-
cuss each of those interface objects that we used and how they worked
with Core Data.
How does this apply to our application? Let’s review the user interface
that we built in Chapter 2, Getting Started with Core Data, on page 14
and how we used KVO and KVC.
Report erratum
this copy is (P1.0 printing, September 2009)Prepared exclusively for Robert Walsh
Download at WoweBook.Com

COCOA BINDINGS AND CORE DATA 41
Figure 3.1: Select each NSTableColumn individually.
NSTableView
In our recipe application, we make heavy use of the NSTableView. In the
main window of our application, we have two table views, one to list
all of the recipes and another to list the ingredients for those recipes.
Whenever an application needs to display a list of items or a grid of
data, the NSTableView is the element to use.
NSTableView, like NSOutlineView (as discussed in Section 3.4, NSOutline-
View, on page 46), plays very nicely with Core Data. This is especially
true when the NSTableView is backed by an NSArrayController that is feed-
ing the data. However, it is possible to use NSTableView with a cus-
tom data source if that is appropriate for the problem at hand. How-
ever, when bound with an NSArrayController, then the NSTableView can be
manipulated with other objects such as the NSSearchView discussed in a
moment to produce interfaces that integrate smoothly and give a great
user experience.
In an NSTableView, like the NSOutlineView, we do not actually bind the
table itself to the NSArrayController. Instead, we select each column indi-
vidually and bind it to a property of the objects in the NSArrayController
(see Figure 3.1). As we did in Chapter 2, Getting Started with Core Data,
on page 14, we bind the column to the arrangedObjects controller key
and the model key path to the value we want displayed in that column,
as shown in Figure 3.2, on the following page.
Report erratum
this copy is (P1.0 printing, September 2009)Prepared exclusively for Robert Walsh
Download at WoweBook.Com

COCOA BINDINGS AND CORE DATA 42
Figure 3.2: Bind the table column to the Core Data property.
With this configuration, the NSTableView will display the data from the
NSArrayController automatically and, thanks to KVO, will stay in sync
with the data stored in the persistence layer.
NSArrayController
NSArrayController is an extremely useful object when working with Core
Data because it is aware of the Core Data layer and knows how to talk to
it without any additional code on our part. When we configure it within
Interface Builder, all that we really need to give it is the NSManagedOb-
jectContext and a data object type. The rest of the work—retrieving the
Report erratum
this copy is (P1.0 printing, September 2009)Prepared exclusively for Robert Walsh
Download at WoweBook.Com

COCOA BINDINGS AND CORE DATA 43
objects, updating those objects, and creating new ones—is all handled
for us.
NSArrayController also understands relationships between objects when
it is working with Core Data. In our recipe application, we have one
NSArrayController configured to manage RecipeIngredient objects. Based
on our data model, these are child objects that are bound to a specific
recipe. Because NSArrayController understands these relationships, we
can configure it to pull and display only those RecipeIngredient objects
that are connected to a Recipe object that is selected in another NSArray-
Controller. This again is made possible by KVC and KVO. When we con-
figure the RecipeIngredient’s NSArrayController to provide only those ingre-
dients that are related to the specific recipe, what it is doing behind
the scenes is accessing the Recipe object and requesting its ingredients
property via KVC. In the RecipeIngredient’s NSArrayController, we bind the
NSManagedObjectContext so that new ingredients can be added. In addi-
tion to properly being able to create (and remove) objects from the per-
sistence layer, the NSArrayController will also manage the relationship
between the newly created or removed RecipeIngredient and the parent
Recipe object.
All of this works because Core Data is the entire persistence layer and is
accessed in a consistent way no matter what object is being dealt with.
Because Core Data uses KVO and KVC, our controller objects do not
need to know very much about the objects, other than the name of the
objects and where they are stored. The rest is all resolved at runtime
based on the settings that we provide in Interface Builder. In our recipe
application, we have one NSArrayController that is bound to the Recipe
entity in Core Data. Because we also bound that NSArrayController to
our NSManagedObjectContext, it is able to retrieve those Recipe entities
automatically and make them available to the rest of the user interface.
When our interface is loaded, those NSArrayController objects go out to
that NSManagedObjectContext and ask for the entities that currently
exist. Once they are loaded into the NSArrayController objects, any view
element associated with them will be notified, via KVO, that the data
is available for display. All of this happens behind the scenes without
requiring us to write code for any of this.
NSFormatter
Users expect fields in the interface to accept their input and format it
appropriately. This is where NSFormatter objects come into play. When
dealing with any type of number, it is best to add an NSNumberFormatter
Report erratum
this copy is (P1.0 printing, September 2009)Prepared exclusively for Robert Walsh
Download at WoweBook.Com

OTHER ELEMENTS THAT USE KVO, KVC, AND CORE DATA 44
to the text field or table column and define its display. Likewise, when
working with dates, use an NSDateFormatter on the field or column to
ensure that the data will be formatted and validated correctly before it
is stored in the Core Data repository. When working with Core Data, it
is sometimes necessary to manipulate the display of the data both so
that the user’s input can be validated and so that it can be displayed
in a usable form. For instance, it is not a very good user experience to
display currency as 3.99 rather than $3.99 or to display a date in raw
seconds.
In our application, we used an NSNumberFormatter to display the quan-
tity in the ingredients column of our second NSTableView. If we were to
add a shopping list to our application, we would also use NSNumberFor-
matter objects to display currency and NSDateFormatter objects to show
date and time information.
To add an NSFormatter to a field (either a column or a text field), select
it in the library palette, and drag it onto the interface element. Once
it is in place, you can configure its details in the Attributes inspector,
as shown in Figure 3.3, on the next page. The Attributes inspector will
allow you to configure exactly how the data is presented to the user.
In addition to properly displaying number and date data, the NSFormat-
ter classes will also accept input from the user and send it back to the
model in the correct format. For example, by applying NSNumberFormat-
ter to the quantity column of the ingredients table, we are guaranteed
to receive an NSNumber back from the user interface.
Once an NSFormatter has been applied to an object, it can be a little
tricky to reference it again to make changes. To be able to change or
remove an NSFormatter once it has been applied, you can select the user
interface element, and a small double bracket icon will appear below it.
Selecting that icon will reference the NSFormatter again so that it can be
manipulated. See Figure 3.4, on page 46.
3.4 Other Interface Elements That Use KVO, KVC, and Core Data
Although the previous list shows how we are using KVO and KVC to
access our Core Data repository in our recipe application, we should
quickly review the other elements that, if we wanted or needed to, could
be utilized to display the data in our application as well.
Report erratum
this copy is (P1.0 printing, September 2009)Prepared exclusively for Robert Walsh
Download at WoweBook.Com

OTHER ELEMENTS THAT USE KVO, KVC, AND CORE DATA 45
Figure 3.3: NSNumberFormatter Attributes inspector
Report erratum
this copy is (P1.0 printing, September 2009)Prepared exclusively for Robert Walsh
Download at WoweBook.Com

OTHER ELEMENTS THAT USE KVO, KVC, AND CORE DATA 46
Figure 3.4: Accessing an existing NSFormatter on an element
NSObjectController
NSObjectController shares a lot of similarities with the NSArrayController
discussed earlier. However, unlike the NSArrayController, the NSObject-
Controller is designed to represent one instance rather than an array of
instances. One common usage of the NSObjectController is to represent
the selected object of an NSArrayController, thereby making it clearer as to
what data is being displayed in the interface elements that are bound to
the NSObjectController as opposed to an NSArrayController. Another com-
mon usage is to have an entire interface, such as a detail sheet or child
window, be bound to the values within an NSObjectController and then
have the File’s Owner reference and populate that NSObjectController. In
this design, the File’s Owner (usually a subclass of NSWindowController)
simply has to populate the NSObjectController with a call to -setContent:,
and the entire UI will get populated automatically. This again makes
the maintenance of the code very easy and also improves readability.
NSOutlineView
If we wanted to change the look of our application, we could display
a single NSOutlineView instead of the two table views we have currently.
With an NSOutlineView, we could display a list of recipes with a hierarchy
of ingredients listed under them, as depicted in Figure 3.5, on the next
page.
NSOutlineView shares a lot in common with the NSTableView object. In
fact, it is a subclass of NSTableView. The major difference is that the
NSOutlineView displays data in both a column format as well as a hier-
Report erratum
this copy is (P1.0 printing, September 2009)Prepared exclusively for Robert Walsh
Download at WoweBook.Com

OTHER ELEMENTS THAT USE KVO, KVC, AND CORE DATA 47
Figure 3.5: Outline view of recipes
archal format. This changes how the data needs to be represented and
accessed. Instead of a flat array of objects, the NSOutlineView expects the
data to be in a tree structure. Fortunately, there is a controller designed
just for that use: NSTreeController. Some care needs to be taken when
working with Core Data and an NSOutlineView. In general, the NSOutline-
View and the NSTreeController expect the data to be in a fairly organized
state. NSTreeController expects each parent (or branch) to have children
accessible via the same methods. This is a bit counterintuitive to hav-
ing descriptive names for relationships between objects, and I normally
implement accessors instead of making my relationships generic. For
instance, if we had a recipe that has children named RecipeIngredients,
I would add another accessor to that relationship called children, purely
for the NSOutlineView to use. We will discuss custom NSManagedObject
classes in the next chapter.
Unlike its parent object, NSTableView, the NSOutlineView does not work
as cleanly as you might expect. You can combine it with the NSTreeCon-
troller, but you get a lot more functionality and control by implement-
ing the data source protocol for the NSOutlineView instead of using the
NSTreeController object. Since we have seen continual improvement in
the last couple of releases of OS X on the NSTreeController, I suspect this
Report erratum
this copy is (P1.0 printing, September 2009)Prepared exclusively for Robert Walsh
Download at WoweBook.Com

OTHER ELEMENTS THAT USE KVO, KVC, AND CORE DATA 48
situation will change in the future. However, for now, the data source
protocol is the better option when working with the NSOutlineView object.
NSTreeController
As discussed in Section 3.4, NSOutlineView, on page 46, NSTreeCon-
troller objects are primarily used by the NSOutlineView interface element.
Although they can store any data that lends itself to a tree structure,
they are best suited as a controller for NSOutlineView objects. Unfortu-
nately, there is still quite a bit of work to be done with the NSTreeCon-
troller, and the results we get from working with it can be unexpected
and unclear. Therefore, I recommend skipping it at this time and imple-
menting the data source protocol instead when working with tree data.
NSSearchField
The NSSearchField interface element is an extremely useful tool to pro-
vide that extra little bit of polish to an interface. Its primary purpose
is to filter the objects in an NSArrayController. This does not seem like
much until we remember that, thanks to KVO, any tables or interface
elements associated with that NSArrayController will get updated auto-
matically and instantly. This means if we put a search field into our
application and link it to our NSArrayController of Recipe objects, our
source list of recipes will automatically be filtered based on the user
input into that NSSearchField. Even better, we don’t have to write any
code to accomplish this! All that we need to do to implement it is con-
figure the bindings for the NSSearchField.
To accomplish this, first we need to add an NSSearchField to our appli-
cation. In Figure 3.6, on the next page, we have decreased the vertical
size of the Recipe source list and inserted an NSSearchField above it. Next
we need to configure its bindings.
As shown in Figure 3.7, on page 50, the NSSearchField interface ele-
ment works with an NSPredicate. We write the predicate in the Predicate
Format field substituting $value for whatever the user inputs into the
search field and using the controller key, model key path, and value
transformer to bind it to our data. In this example, we want to filter on
the name of recipes; therefore, we bind this NSSearchField to our recipe’s
NSArrayController using the controller key of filterPredicate and a model
key path of name.
Once we add one predicate, another will appear on the Bindings tab
for the NSSearchField. This is intended so that we can use a search field
Report erratum
this copy is (P1.0 printing, September 2009)Prepared exclusively for Robert Walsh
Download at WoweBook.Com

OTHER ELEMENTS THAT USE KVO, KVC, AND CORE DATA 49
Figure 3.6: Adding an NSSearchField to our application
for more than one type of search. Each search will be shown in the
drop-down on the NSSearchField, and the Display Name binding will be
shown to the user. This allows us to create one NSSearchField that can
search for recipe names, ingredients, descriptions, or anything else we
may need.
Once the binding is complete, we are done adding a basic search field.
Running the application will show that text entered into the search field
impacts the list of recipes, as shown in Figure 3.8, on the next page.
Now that we have a better understanding of the user interface we built
in Chapter 2, Getting Started with Core Data, on page 14, we can next
look at the structure of the Core Data code provided for us in the tem-
plate to get a firm understanding both of it and of how to improve it.
Report erratum
this copy is (P1.0 printing, September 2009)Prepared exclusively for Robert Walsh
Download at WoweBook.Com

OTHER ELEMENTS THAT USE KVO, KVC, AND CORE DATA 50
Figure 3.7: NSSearchField bindings
Figure 3.8: Search filter running against the recipe list
Report erratum
this copy is (P1.0 printing, September 2009)Prepared exclusively for Robert Walsh
Download at WoweBook.Com

Chapter 4
Under the Hood of Core DataThe more we understand the details of Core Data, the better equipped
we are to understand when something goes wrong or how to accomplish
a task that is off the beaten path.
In my experience of working with and writing persistence layers for var-
ious languages, I am constantly amazed at how simple and elegant the
Core Data API is. There is very little overlap in functionality between the
individual pieces of Core Data—no wasted space or unnecessary redun-
dancy. Because Core Data is built upon the infrastructure of Objective-
C and Core Foundation, it does not seek to duplicate functionality that
already exists in other parts of the overall API but instead uses it to its
full extent.
In this chapter, we will walk through the various pieces that make up
Core Data and explore how they apply to the ways that we use Core
Data and how they apply to the application we are developing in this
book. By the end of this chapter, we will have a firmer grasp of what
Core Data is, what we can do with it, and how to use it to its full
capabilities.
The Core Data API, or stack as it is commonly called, consists of three
primary pieces: NSPersistentStoreCoordinator, NSManagedObjectModel,
and NSManagedObjectContext. All of these work together to allow a pro-
gram to retrieve and store NSManagedObject objects. In most situations,
the program will access NSManagedObjectContext only once the stack
has been created. It is possible to access the other components of the
stack, but it is rarely necessary.
Prepared exclusively for Robert Walsh
Download at WoweBook.Com

NSMANAGEDOBJECT 52
Joe Asks. . .
What Is a Stack?
The term stack has a few different meanings depending on itscontext. In this context, it refers to a multilayered structure thatpasses data around in a vertical manner. Vertical here meanscoming in through the top layer and reaching down to the last,or bottom, layer. Data is never passed directly to the bottomlayer or any of the middle layers; it always accessed from thetop.
4.1 NSManagedObject
NSManagedObject is the object we work with the most in a Core Data
application. Each instance of NSManagedObject represents one entity in
our Core Data repository. By combining Core Data with KVC and KVO,
this one object can dynamically represent any object that we need and
that can be defined in our data model.
All of the properties and relationships defined in our data model are
available and are easy to access directly from the NSManagedObject.
Without subclassing it, we can access values associated with an NSMan-
agedObject in the following ways.
Accessing Attributes
Attributes are the easiest to access. By utilizing KVC, we can get or set
any attribute on the NSManagedObject directly. You may have noticed
that we did not write a Recipe entity in the previous chapter. At this
point in our application, NSManagedObject provides all the functionality
that we require. For example, we could get the name as follows:
NSManagedObject *recipe = ...;
NSString *name = [recipe valueForKey:@"name"];
Likewise, we can set the name in a similar fashion:
NSManagedObject *recipe = ...;
[recipe setValue:@"New Name" forKey:@"name"];
When we want to subclass NSManagedObject, we can also define prop-
erties for the attributes (and relationships discussed in a moment) so
Report erratum
this copy is (P1.0 printing, September 2009)Prepared exclusively for Robert Walsh
Download at WoweBook.Com

NSMANAGEDOBJECT 53
that we can access them directly. In the header of our subclass, we
would define the properties normally:
Download Spotlight/PPRecipe.h
@interface PPRecipe : NSManagedObject {
}
@property (assign) NSString *desc;
@property (assign) NSString *name;
@property (assign) NSString *type;
@property (assign) NSManagedObject *author;
@property (assign) NSDate *lastUsed;
As you can see, we are defining the property like normal, but there
are no ivars associated with those properties. Since these properties
are created dynamically at runtime, we do not need to declare them in
the header. However, we do need to flag them as dynamic so that the
compiler will not issue a warning. This is done in the implementation
file:
Download Spotlight/PPRecipe.m
@implementation PPRecipe
@dynamic desc;
@dynamic name;
@dynamic type;
@dynamic author;
@dynamic lastUsed;
By declaring them as @dynamic, we are telling the compiler to ignore
any warnings associated with these properties because we “promise” to
generate them at runtime. Naturally, if they turn up missing at runtime,
then our application is going to crash. However, when we are working
with NSManagedObject objects, the attributes will be looked up for us,
and we do not need to implement anything. By adding that code, we
can access the attribute directly, as shown in the following example:
PPRecipe *myRecipe = ...;
NSString *recipeName = [myRecipe name];
//Do something with the name
[myRecipe setName:recipeName];
Primitive Access
It should be noted that accessing the attribute via KVC or properties
will trigger KVO notifications that the attribute has changed. There are
situations where we do not want this to occur or where we prefer it to
Report erratum
this copy is (P1.0 printing, September 2009)Prepared exclusively for Robert Walsh
Download at WoweBook.Com

NSMANAGEDOBJECT 54
occur later. In those situations, we can access the attribute using the
-primitiveValueForKey: and -setPrimitiveValue:forKey: methods. Both of these
methods work the same as the -valueForKey: and -setValue:forKey methods
that we are used to working with, but they do not cause KVO notifica-
tions to fire. This means that the rest of our application will be unaware
of any changes we make until and unless we notify it.
Where is this useful? I find it quite useful when I am loading in data
from an external source and the data is going to impact several attri-
butes at once. Imagine we wrote a recipe importer that accepted a
comma-separated value (CSV) file from another recipe application. In
that situation, we may not want the UI or other parts of our applica-
tion making decisions based on the data in the middle of the import.
Therefore, we would want to update the values without notifications,
and once all of them are done, we let the notifications go out. The code
to handle this situation would look something like this:
- (void)importData:(NSDictionary*)values //CSV translated into a dictionary
{
[self willChangeValueForKey:@"name"];
[self willChangeValueForKey:@"desc"];
[self willChangeValueForKey:@"serves"];
[self willChangeValueForKey:@"type"];
[self setPrimitiveValue:[values valueForKey:@"name"] forKey:@"name"];
[self setPrimitiveValue:[values valueForKey:@"desc"] forKey:@"desc"];
[self setPrimitiveValue:[values valueForKey:@"serves"] forKey:@"serves"];
[self setPrimitiveValue:[values valueForKey:@"type"] forKey:@"type"];
[self didChangeValueForKey:@"type"];
[self didChangeValueForKey:@"serves"];
[self didChangeValueForKey:@"desc"];
[self didChangeValueForKey:@"name"];
}
In this example code, we are handling all the change notifications our-
selves and setting the values into our NSManagedObject directly using
the -setPrimitiveValue:forKey: method. This will cause all the values to be
updated prior to the notifications being fired.
Accessing Relationships
Accessing relationships on an NSManagedObject is nearly as easy as
accessing attributes. There is a bit of a difference between working with
a to-one relationship and a to-many relationship, though.
Report erratum
this copy is (P1.0 printing, September 2009)Prepared exclusively for Robert Walsh
Download at WoweBook.Com

NSMANAGEDOBJECT 55
Accessing a To-One Relationship
When we are accessing a to-one relationship, we can treat it the same as
an attribute. For example, the relationship between Recipe and RecipeIn-
gredient is a to-one relationship from the RecipeIngredient side. There-
fore, if we were accessing this relationship from that point of view, the
code would be as follows:
NSManagedObject *ingredient = ...;
NSManagedObject *recipe = [ingredient valueForKey:@"recipe"];
In this example, we are using the -valueForKey: KVC method to access
the relationship, and the NSManagedObject will return the object on
the other side of the relationship, the Recipe entity. Likewise, to set the
recipe for a RecipeIngredient, we would use the following code:
NSManagedObject *ingredient = ...;
NSManagedObject *recipe = ...;
[ingredient setValue:recipe forKey:@"recipe"];
Accessing a To-Many Relationship
The many side of a relationship is stored orderless. What this means
is that each time we fetch the objects on the many side of a relation-
ship, the order is not guaranteed, and it is probable that the order will
change between fetches. However, we are guaranteed that each object
will be included only once. In other words, when we access a to-many
relationship using KVC, we will get an NSSet back. For example, if we
want to access the ingredients of a recipe, we would use code similar to
the following:
NSManagedObject *recipe = ...;
NSSet *ingredients = [recipe valueForKey:@"ingredients"];
Likewise, setting the ingredients into a recipe is as follows:
NSManagedObject *recipe = ...;
NSSet *someIngredients = ...;
[recipe setValue:someIngredients forKey:@"ingredients"];
Mutable Access of To-Many Relationships
You might note that the NSSet we get back when accessing a to-many
relationship is immutable. Adding an object to a to-many relationship
with a immutable NSSet would require creating a mutable copy of the
NSSet, adding the new object to the NSMutableSet and then setting the
NSMutableSet back onto the parent object. That’s painful and fortunately
unnecessary. When we want to add an object to a to-many relationship,
Report erratum
this copy is (P1.0 printing, September 2009)Prepared exclusively for Robert Walsh
Download at WoweBook.Com

NSMANAGEDOBJECT 56
we can use -mutableSetValueForKey: in the place of -valueForKey:. This will
return an NSMutableSet for us that is already associated with the parent
object and reduces our code to the following:
NSManagedObject *newIngredient = ...;
NSManagedObject *recipe = ...;
NSMutableSet *ingredients = [recipe mutableSetValueForKey:@"ingredients"];
[ingredients addObject:newIngredient];
Note that we did not need to set the NSMutableSet back into the Recipe
entity, and therefore the code to add an object to a to-many relationship
is quite short.
One important thing to notice in these relationship examples is that
when we are updating the relationship, we are updating only one side
of it. Because we defined these relationships as double-sided (that is, it
includes an inverse relationship that we defined in Section 2.5, Building
the Data Model, on page 16), Core Data handles keeping the integrity
of the relationship intact. When we update one side of the relationship,
Core Data automatically goes in and sets the other side for us.
Primitive Access
Like accessing attributes discussed earlier, changes to a relationship
will fire KVO notifications. Since there are situations where we would
not want this to occur or where we would want a finer-grained control
over the notifications, there are primitive accessors for relationships as
well. However, there is no primitive method for retrieving an NSMutable-
Set for a to-many relationship. Therefore, if the code requires changes to
a relationship with either delayed or no observations being fired, then
we would need to use -primitiveValueForKey: to get back an NSSet, call
-mutableCopy on the NSSet, add our new object to the NSMutableSet, and
finally use -setPrimitiveValue:forKey: to apply the changes.
Property Accessors
Relationships can use properties just like attributes discussed earlier.
In the code in Section 4.1, Mutable Access of To-Many Relationships,
on the preceding page, if we wanted to add a property to retrieve the
RecipeIngredient relationship, we would declare the following property:
@property (retain) NSSet *recipeIngredients;
And then flag it as dynamic in the implementation file.
Report erratum
this copy is (P1.0 printing, September 2009)Prepared exclusively for Robert Walsh
Download at WoweBook.Com
NSMANAGEDOBJECT 57
Subclassing NSManagedObject
Although NSManagedObject provides a tremendous amount of flexibil-
ity and handles the majority of the work a data object normally does,
it does not cover every possibility, and there are occasions where we
would want to subclass it. Subclassing to gain @property access to
attributes and relationships is one common situation, but we may also
want to add other convenience methods or additional functionality to
the object. When this arises, there are some general rules to remember.
Methods That Are Not Safe to Override
In Apple’s documentation, the following methods should never be over-
ridden:
-primitiveValueForKey:, -setPrimitiveValue:forKey:, -isEqual:, -hash, -superclass,
-class, -self, -zone, -isProxy:, -isKindOfClass:, -isMemberOfClass:, -conformsToPro-
tocol:, -respondsToSelector:, -retain, -release, -autorelease, -retainCount,
-managedObjectContext, -entity, -objectID, -isInserted, -isUpdated, -isDeleted,
-isFault, -alloc, -allocWithZone:, +new, +instancesRespondToSelector:,
+instanceMethodForSelector:, -methodForSelector:, -methodSignatureForSel-
ector:, and -isSubclassOfClass:.
That’s quite a list! Most, if not all, of these are common sense, and expe-
rience with Objective-C explains why these should not be overridden.
Even though this is a fairly long list, I would add a few more.
-initXXX. There is really no reason or benefit to overriding the -init meth-
ods of an NSManagedObject, and there are situations where doing so
will have unpredictable results. Although it is not specifically against
the documentation to override the -init methods, I recommend strongly
against it. The -awakeFromInsert and -awakeFromFetch methods provide
sufficient access that overriding -init is unnecessary. Both -awakeFromIn-
sert and -awakeFromFetch are discussed in more depth later in this
chapter.
All of the KVO methods. The documentation flags these methods as
“discouraged,” but I would put them in the “do not subclass” list. Again,
there is no reason to override these methods, and any logic that you
would want to put into them can probably be put somewhere else with
fewer issues.
-description. The -description method is used in logging fairly often. It is
a great way to dump the contents of an object out to the logs dur-
ing debugging. However, when we are dealing with faults (discussed in
Report erratum
this copy is (P1.0 printing, September 2009)Prepared exclusively for Robert Walsh
Download at WoweBook.Com

NSMANAGEDOBJECT 58
Chapter 6, Performance Tuning, on page 97), we do not want to fire a
fault in the -description method. Since the default implementation of
-description does the right thing with regard to faults, it is best that we
not try to override its behavior.
-dealloc is normally the place that we release memory before the object
is being freed. However, when we are dealing with NSManagedObject
objects, it is possible that the object will not actually be released from
memory when we think it will. In fact, the -dealloc method may never
get called in the life cycle of our application! Instead of releasing objects
in the -dealloc method, it is recommended that we use -didTurnIntoFault
as our point of releasing transient resources. -didTurnIntoFault will be
called whenever the NSManagedObject is “faulted,” which occurs far
more often than the object actually being removed from memory.
-finalize is on the list for the same reason as -dealloc. When dealing with
NSManagedObject objects, -finalize is not the proper point to be releasing
resources.
Methods to Override
With the long list of methods that we should not override, what methods
should we consider overriding? There are a few where it is common to
override them.
-didTurnIntoFault
This method is called after the NSManagedObject has been turned into
a fault. It is a good place to release transient resources. One important
thing to note is that when this method is called, all the stored val-
ues/relationships in the NSManagedObject are already out of memory.
If you access any of them, it will fire the fault and pull them all back
into memory again.
-willTurnIntoFault
Similar to -didTurnIntoFault, this method is called just before the NSMan-
agedObject is turned into a fault. If your code needs to access attributes
or relationships on the NSManagedObject before it is turned into a fault,
then this is the entry point to use. Transient resources that impact
attributes and relationships should be released here.
Report erratum
this copy is (P1.0 printing, September 2009)Prepared exclusively for Robert Walsh
Download at WoweBook.Com

NSFETCHREQUEST 59
-awakeFromInsert
As mentioned, overriding any of the -init methods is risky and unnec-
essary. However, it is very useful to be able to prepare an NSManage-
dObject before it starts accepting data. Perhaps we want to set up some
logical defaults or assign some relationships before handing the object
to the user. In these situations, we use -awakeFromInsert. As the name
implies, this method is called right after the NSManagedObject is created
from an insert call. This method is called before any values are set and
is a perfect opportunity to set default values, initialize transient prop-
erties, and perform other tasks that we would normally handle in the
-init method. This method is called exactly once in the entire lifetime of
an object. It will not be called on the next execution of the application,
and it will not be called when an object is read in from the persistent
store. Therefore, we do not need to worry about overriding values that
have been set previously. When we override this method, we should be
sure to call [super awakeFromInsert] at the very beginning of our imple-
mentation to allow the NSManagedObject to finish anything it needs to
before we begin our code.
-awakeFromFetch
-awakeFromFetch is the counterpart to -awakeFromInsert. The -awakeFrom-
Fetch method will be called every time the object is retrieved from the
persistent store (that is, loaded from disk). This method is highly useful
for setting up transient objects or connections that the NSManagedOb-
ject will use during its life cycle. Because this method is called before
the data is loaded into the NSManagedObject, care should be taken to
not access or change any relationships that are associated with the
NSManagedObject. Like the -awakeFromInsert method, when we override
this method, we should call [super awakeFromFetch]; before any of our
own code is called.
4.2 NSFetchRequest
NSFetchRequest is the part of Core Data that causes people to think it
is a database API instead of an object hierarchy. Whenever we want to
retrieve objects from Core Data, we will normally use an NSFetchRe-
quest to do the retrieval. There are two parts to the creation of an
NSFetchRequest: setting the entity to be retrieved and optionally defining
an NSPredicate to filter the objects we want retrieved.
Report erratum
this copy is (P1.0 printing, September 2009)Prepared exclusively for Robert Walsh
Download at WoweBook.Com

NSFETCHREQUEST 60
Setting the Entity
The one thing that we must do as part of every NSFetchRequest is define
what entity we want returned from the fetch. We do this by passing
the appropriate NSEntityDescription to the NSFetchRequest. For example, if
we wanted to retrieve recipe entities, we would construct the NSFetchRe-
quest as follows:
NSManagedObjectContext *moc = [self managedObjectContext];
NSFetchRequest *request = [[NSFetchRequest alloc] init];
[request setEntity:[NSEntityDescription entityForName:@"Recipe"
inManagedObjectContext:moc]];
In this example code, we are constructing a new NSFetchRequest and
calling -setEntity: on it. We are using the class method +entityForName:in-
ManagedObjectContext: on the NSEntityDescription class to get the appro-
priate instance of NSEntityDescription back for the setter.
Executing a Fetch Request
Once we have constructed our NSFetchRequest, we need to execute it
against the NSManagedObjectContext to get back the results. Like a
result set when accessing a database, an executed NSFetchRequest will
return an NSArray of entities that match our search criteria. Since it
is possible that a search will fail, the execution of an NSFetchRequest
accepts a pointer to an NSError to describe any problems that resulted
from the execution. For example, if we wanted to execute the fetch from
the previous example, we could use the following code:
NSManagedObjectContext *moc = [self managedObjectContext];
NSFetchRequest *request = [[NSFetchRequest alloc] init];
[request setEntity:[NSEntityDescription entityForName:@"Recipe"
inManagedObjectContext:moc]];
NSError *error = nil;
NSArray *results = [moc executeFetchRequest:request error:&error];
if (error) {
[NSApp presentError:error];
return;
}
In this example, we are calling -executeFetchRequest:error: on the NSMan-
agedObjectContext, passing in the NSFetchRequest and a pointer to a
local NSError. If the fetch failed with an error, then the pointer will be
directed to an instance of NSError that describes the problem, and the
NSArray will be assigned to nil. In that situation, we ask the NSApplication
to present the error for us and return. If there is no error, then we can
Report erratum
this copy is (P1.0 printing, September 2009)Prepared exclusively for Robert Walsh
Download at WoweBook.Com

NSFETCHREQUEST 61
proceed with our code. Note that the NSArray is guaranteed to not be nil
at this point, but it could be empty if no results are returned.
NSPredicate
When we don’t want every instance of an entity returned, we then use
an NSPredicate to narrow the search or filter the results. The NSPredicate
class is quite complex and powerful and can be used for more things
than just Core Data. It is frequently used to filter the results of an
NSArray by acting on the KVC API and doing logic checks on the objects
contained in the NSArray.
One of the most common ways to use an NSPredicate is to construct a
SQL-like query such as the following example:
NSManagedObjectContext *moc = [self managedObjectContext];
NSFetchRequest *request = [[NSFetchRequest alloc] init];
[request setEntity:[NSEntityDescription entityForName:@"Recipe"
inManagedObjectContext:moc]];
NSPredicate *predicate = [NSPredicate predicateWithFormat:@"serves > 10"];
[request setPredicate:predicate];
There are many different ways to build an NSPredicate. The one shown
in the previous example accepts a SQL-like NSString and can accept any
number of parameters after the NSString. For example, if we were going
to pass in the number of servings, we would rewrite the NSPredicate as
follows:
NSUInteger numberOfServings = 10;
NSManagedObjectContext *moc = [self managedObjectContext];
NSFetchRequest *request = [[NSFetchRequest alloc] init];
[request setEntity:[NSEntityDescription entityForName:@"Recipe"
inManagedObjectContext:moc]];
NSPredicate *predicate = nil;
predicate = [NSPredicate predicateWithFormat:@"serves > %i", numberOfServings];
[request setPredicate:predicate];
It is possible to add as many parameters to the NSPredicate as needed.
The NSPredicate class is quite flexible and can be used in a large number
of ways. For further reading on how to use the NSPredicate class to its
full potential, I recommend Apple’s Predicate Programming Guide.1
Stored Fetch Requests
In addition to constructing the NSFetchRequest directly in code, it is pos-
sible to build them within the data model and store them for later
1. http://developer.apple.com/documentation/Cocoa/Conceptual/Predicates/Articles/pUsing.html
Report erratum
this copy is (P1.0 printing, September 2009)Prepared exclusively for Robert Walsh
Download at WoweBook.Com

NSFETCHREQUEST 62
Figure 4.1: Stored fetch request
use. By storing the fetch requests within the model itself, it is possi-
ble for us to change them as needed without having to go through all
the code looking for every place that it is used. Simply changing it in
the model will automatically update wherever it is being used. To store
an NSFetchRequest within the data model, we select the entity that we
want to run the request against and choose Design > Data Model >
Add Fetch Request from the main menu. From there we will be able to
set the name of the fetch request and define its predicate, as shown in
Figure 4.1.
Once we have the fetch request in our data model, we can request a
reference to it by asking the NSManagedObjectModel. Once we have a
reference to the NSFetchRequest, we can execute it in the same manner
as we do with an NSFetchRequest that has been constructed in code.
Download GrokkingRecipes_v1/AppDelegate.m
- (NSArray*)retrieveBigMeals
{
NSManagedObjectContext *moc = [self managedObjectContext];
NSManagedObjectModel *mom = [self managedObjectModel];
NSFetchRequest *request = [mom fetchRequestTemplateForName:@"bigMeals"];
NSError *error = nil;
NSArray *result = [moc executeFetchRequest:request error:&error];
if (error) {
[NSApp presentError:error];
return nil;
}
return result;
}
Report erratum
this copy is (P1.0 printing, September 2009)Prepared exclusively for Robert Walsh
Download at WoweBook.Com

NSSORTDESCRIPTOR 63
As shown, we call the -fetchRequestTemplateForName: method on the
NSManagedObjectModel, which will return a fully formed NSFetchRequest
to us. This NSFetchRequest will already have the NSEntityDescription and
NSPredicate set so that we can execute the NSFetchRequest immediately.
4.3 NSSortDescriptor
NSSortDescriptor has been around longer than Core Data has; however,
it is quite useful for ordering data. As mentioned previously, data that
comes from a to-many relationship is unordered by default, and it is
up to us to order it. For example, if we wanted to retrieve all the recipes
and then sort them by their name property in alphabetical order, this
would require an additional step as part of the fetch.
Download GrokkingRecipes_v1/AppDelegate.m
- (NSArray*)allRecipesSortedByName
{
NSSortDescriptor *nameSort = [[NSSortDescriptor alloc] initWithKey:@"name"
ascending:YES];
NSArray *sorters = [NSArray arrayWithObject:nameSort];
[nameSort release], nameSort = nil;
NSManagedObjectContext *moc = [self managedObjectContext];
NSFetchRequest *request = [[NSFetchRequest alloc] init];
[request setSortDescriptors:sorters];
[request setEntity:[NSEntityDescription entityForName:@"Recipe"
inManagedObjectContext:moc]];
NSError *error = nil;
NSArray *result = [moc executeFetchRequest:request
error:&error];
[request release], request = nil;
if (error) {
[NSApp presentError:error];
return nil;
}
return [result sortedArrayUsingDescriptors:sorters];
}
In this example, we are retrieving all the recipe entities by creating an
NSFetchRequest with the NSEntityDescription set to our Recipe entity and
no predicate. However, in addition to fetching the recipe entities, we
also want them sorted. We can accomplish this by adding an NSArray
of NSSortDescriptor instances directly to the NSFetchRequest, which will
cause the returned NSArray to be properly sorted.
Report erratum
this copy is (P1.0 printing, September 2009)Prepared exclusively for Robert Walsh
Download at WoweBook.Com

NSMANAGEDOBJECTCONTEXT 64
NSManagedObjectContext
NSPersistentStoreCoordinator NSManagedObjectModel
Disk
NSPersistentStore
Figure 4.2: The Core Data stack
The NSSortDescriptor takes two parameters as part of its -init: a key and
a BOOL denoting whether the sort is ascending or descending. We can
have as many NSSortDescriptor objects as we want as part of the sort,
and therefore they are placed within an NSArray prior to the sort being
performed.
Adding an NSSortDescriptor is especially useful on Cocoa Touch because
the NSFetchedResultsController will continue to keep its results sorted
without any intervention on our part. The NSFetchedResultsController is
discussed in more depth in Chapter 10, Core Data and iPhone, on
page 184.
4.4 NSManagedObjectContext
Next to NSManagedObject, NSManagedObjectContext is the one object in
the Core Data stack that we access the most. The NSManagedObjectCon-
text is the object we access when we want to save to disk, when we want
to read data into memory, and when we want to create new objects. As
Report erratum
this copy is (P1.0 printing, September 2009)Prepared exclusively for Robert Walsh
Download at WoweBook.Com
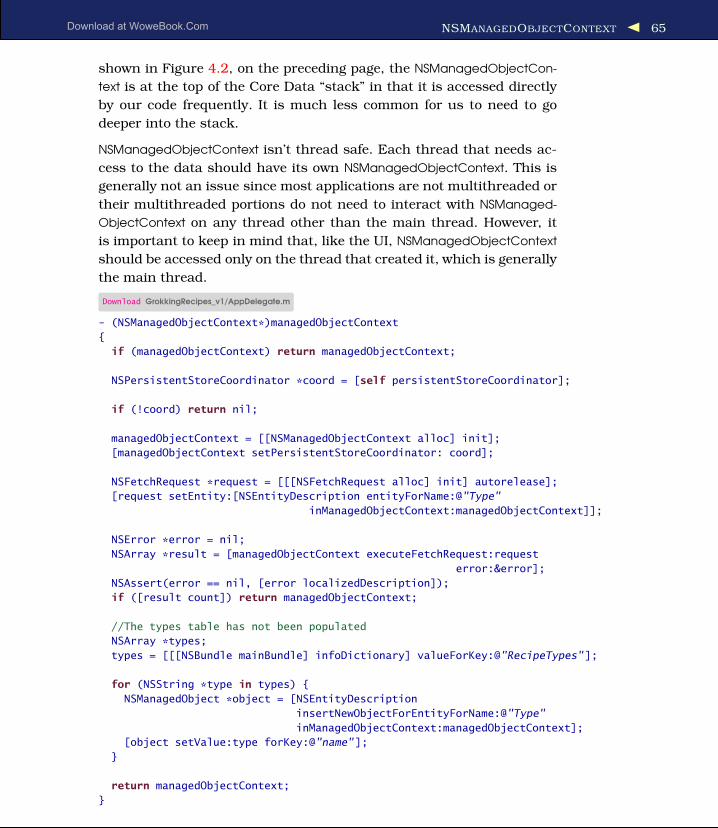
NSMANAGEDOBJECTCONTEXT 65
shown in Figure 4.2, on the preceding page, the NSManagedObjectCon-
text is at the top of the Core Data “stack” in that it is accessed directly
by our code frequently. It is much less common for us to need to go
deeper into the stack.
NSManagedObjectContext isn’t thread safe. Each thread that needs ac-
cess to the data should have its own NSManagedObjectContext. This is
generally not an issue since most applications are not multithreaded or
their multithreaded portions do not need to interact with NSManaged-
ObjectContext on any thread other than the main thread. However, it
is important to keep in mind that, like the UI, NSManagedObjectContext
should be accessed only on the thread that created it, which is generally
the main thread.
Download GrokkingRecipes_v1/AppDelegate.m
- (NSManagedObjectContext*)managedObjectContext
{
if (managedObjectContext) return managedObjectContext;
NSPersistentStoreCoordinator *coord = [self persistentStoreCoordinator];
if (!coord) return nil;
managedObjectContext = [[NSManagedObjectContext alloc] init];
[managedObjectContext setPersistentStoreCoordinator: coord];
NSFetchRequest *request = [[[NSFetchRequest alloc] init] autorelease];
[request setEntity:[NSEntityDescription entityForName:@"Type"
inManagedObjectContext:managedObjectContext]];
NSError *error = nil;
NSArray *result = [managedObjectContext executeFetchRequest:request
error:&error];
NSAssert(error == nil, [error localizedDescription]);
if ([result count]) return managedObjectContext;
//The types table has not been populated
NSArray *types;
types = [[[NSBundle mainBundle] infoDictionary] valueForKey:@"RecipeTypes"];
for (NSString *type in types) {
NSManagedObject *object = [NSEntityDescription
insertNewObjectForEntityForName:@"Type"
inManagedObjectContext:managedObjectContext];
[object setValue:type forKey:@"name"];
}
return managedObjectContext;
}
Report erratum
this copy is (P1.0 printing, September 2009)Prepared exclusively for Robert Walsh
Download at WoweBook.Com

NSMANAGEDOBJECTCONTEXT 66
Linking the Type Entity to the Type NSComboBox
Now that we have our Type entity populated on launch, weshould bind our user interface to it so that changes to the Typetable will be reflected in the user interface. To do this, we needto open the MainMenu.xib file in Interface Builder and selectthe NSComboBox. Then on the Bindings tab, open the ContentValues section, and bind it to the type’s NSArrayController witha controller key of arrangedObjects and a model key path ofname, as shown in Figure 4.3, on the next page.
Now any changes to the Type table will be reflected in the userinterface automatically.
The NSManagedObjectContext itself is fairly straightforward to initialize.
However, I also like to load any objects that need to be prepopulated into
the repository at this point as well. To review, we start off by grabbing
a reference to the NSPersistentStoreCoordinator and initializing the NSMan-
agedObjectContext. Once the NSManagedObjectContext is initialized, we
pass in the NSPersistentStoreCoordinator.
If we did not have any data that we needed to load into the NSManaged-
ObjectContext, this would normally be the completion of the method.
However, in our application, we want to prepopulate the Type entity
before anyone gets a chance to create any recipes. Therefore, once the
NSManagedObjectContext has been initialized, we immediately execute
an NSFetchRequest against the Type table and see whether there are any
results. If there are any, then we complete the method and exit the run
loop.
If there are no entities in the Type table, then we know that it needs to
be populated. The next step is to grab the list of types from the Info.plist
and loop over them. For each entry in the Info.plist, we create a new
NSManagedObject and set its name to the value from the Info.plist. Once
the loop is complete, the store has been prepopulated, and we can exit
this cycle of the run loop.
There are a few other ways to prepopulate the repository. Some are
easier and some are more complicated than this method. One example
I have used in the past is to simply store a prepared repository in the
application bundle. When the user requests a new store, I copy the pre-
Report erratum
this copy is (P1.0 printing, September 2009)Prepared exclusively for Robert Walsh
Download at WoweBook.Com

NSMANAGEDOBJECTCONTEXT 67
Figure 4.3: Binding the NSComboBox to the Type entity
populated store out of the application bundle to the location specified
and then initialize the NSPersistentStoreCoordinator against it. This makes
the prepopulation easy, but we need to maintain that internal database
and update it any time the data model changes.
Another design to prepopulate data is to keep an XML store within the
application bundle instead of the final store type. XML is more pliable
than the other store types and can easily be manipulated during devel-
opment. At runtime, we can stand up a Core Data stack against that
internal XML store and then execute a copy of the objects over to the
final store. This design involves a bit more code than just copying the
file, but it makes the maintenance of the internal store easier.
Each design is viable, and it depends on the final application design
and the preferences of the developer as to which serves best.
Report erratum
this copy is (P1.0 printing, September 2009)Prepared exclusively for Robert Walsh
Download at WoweBook.Com

NSMANAGEDOBJECTMODEL 68
Joe Asks. . .
What Is a Plist?
A plist is an XML file that normally represents an NSDictionary
data structure. The top level of a plist normally starts out with a<dict> tag and a list of <key> tags along with their values. Sincean NSDictionary can hold any object as its value, the value tagscan be any number of types including <string>, <array>, and anumber of other types including other <dict> tags!
4.5 NSManagedObjectModel
The NSManagedObjectModel can be considered a compiled, binary ver-
sion of the data model that we created in Xcode. As part of the build
process for an application, the .xcdatamodel file is compiled into a .mom
file that is stored in the Resources directory of the application bundle.
If we have more than one .xcdatamodel file, then each file is compiled
into a separate .mom file. When we construct our NSManagedObject-
Model, we can use just one of these .mom files, or we can combine them
all into a single NSManagedObjectModel. The design of our application
usually dictates this decision. For our recipes application, however, we
have a single .mom to use as part of our NSManagedObjectModel:
Download GrokkingRecipes_v1/AppDelegate.m
- (NSManagedObjectModel*)managedObjectModel
{
if (managedObjectModel) return managedObjectModel;
NSString *path = [[NSBundle mainBundle] pathForResource:@"DataModel"
ofType:@"mom"];
NSAssert(path != nil, @"Unable to find DataModel in main bundle");
if (!path) return nil;
NSURL *url = [NSURL fileURLWithPath:path];
managedObjectModel = [[NSManagedObjectModel alloc] initWithContentsOfURL:url];
return managedObjectModel;
}
The construction of the NSManagedObjectModel does not involve very
much code when used in one of the standard configurations. We start
by determining the location of the .mom file. Since we have only a sin-
gle data model, we use the NSBundle method -pathForResource:ofType: to
Report erratum
this copy is (P1.0 printing, September 2009)Prepared exclusively for Robert Walsh
Download at WoweBook.Com

NSPERSISTENTSTORECOORDINATOR 69
locate the path for our model and use it to construct an NSURL. With
that NSURL, we can then initialize the NSManagedObjectModel.
Depending on the complexity of the application, it is common to not
need access to the NSManagedObjectModel after the Core Data stack
has been initialized. However, there is a wealth of information within
this object that can be quite useful in edge cases.
For example, since the descriptions of all the entities that exist in the
model are contained in the NSManagedObjectModel, it is possible to use
it to do dynamic discovery of the model for display purposes. By access-
ing the NSManagedObjectModel directory, we can interrogate the Core
Data stack and discover all the relationships, entities, and properties
that exist and display them to the user. Although this might not be
useful in a consumer-facing application, it can be quite useful as a
developer tool.
Another situation when accessing the NSManagedObjectModel directly
is useful is when handling versioning. When we are developing unusual
version shifts or writing the versioning code ourselves, it can be very
useful to interrogate the NSManagedObjectModel, both the source and
the destination, to make logical decisions about the versioning process.
Core Data versioning is discussed more in depth in Chapter 5, Version-
ing and Migration, on page 73.
4.6 NSPersistentStoreCoordinator
The NSPersistentStoreCoordinator is at the bottom of the Core Data stack. It
is responsible for persisting the data to its repository. That repository is
usually, but not always, on disk. The store, in the case of an in-memory
store, could be only in memory with no disk representation. However,
in most cases, the NSPersistentStoreCoordinator handles disk access.
The NSPersistentStoreCoordinator is also not thread safe. However, the
NSManagedObjectContext knows how to properly lock the NSPersistent-
StoreCoordinator, so therefore it is possible to associate multiple NSMan-
agedObjectContext instances to a single NSPersistentStoreCoordinator with-
out concern. However, direct access to the NSPersistentStoreCoordinator
from multiple threads (such as adding persistent store objects) can
cause issues. In fact, when working in a multithreaded environment,
this is how the single-threaded design of the NSManagedObjectContext
is handled. We discuss this aspect of the NSPersistentStoreCoordinator in
detail in Chapter 9, Multithreading and Core Data, on page 162.
Report erratum
this copy is (P1.0 printing, September 2009)Prepared exclusively for Robert Walsh
Download at WoweBook.Com
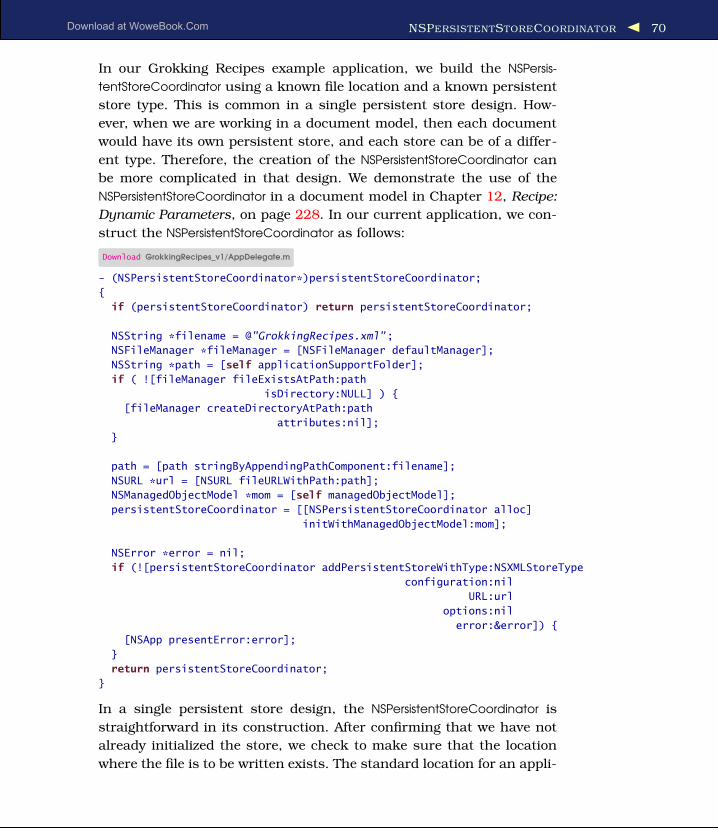
NSPERSISTENTSTORECOORDINATOR 70
In our Grokking Recipes example application, we build the NSPersis-
tentStoreCoordinator using a known file location and a known persistent
store type. This is common in a single persistent store design. How-
ever, when we are working in a document model, then each document
would have its own persistent store, and each store can be of a differ-
ent type. Therefore, the creation of the NSPersistentStoreCoordinator can
be more complicated in that design. We demonstrate the use of the
NSPersistentStoreCoordinator in a document model in Chapter 12, Recipe:
Dynamic Parameters, on page 228. In our current application, we con-
struct the NSPersistentStoreCoordinator as follows:
Download GrokkingRecipes_v1/AppDelegate.m
- (NSPersistentStoreCoordinator*)persistentStoreCoordinator;
{
if (persistentStoreCoordinator) return persistentStoreCoordinator;
NSString *filename = @"GrokkingRecipes.xml";
NSFileManager *fileManager = [NSFileManager defaultManager];
NSString *path = [self applicationSupportFolder];
if ( ![fileManager fileExistsAtPath:path
isDirectory:NULL] ) {
[fileManager createDirectoryAtPath:path
attributes:nil];
}
path = [path stringByAppendingPathComponent:filename];
NSURL *url = [NSURL fileURLWithPath:path];
NSManagedObjectModel *mom = [self managedObjectModel];
persistentStoreCoordinator = [[NSPersistentStoreCoordinator alloc]
initWithManagedObjectModel:mom];
NSError *error = nil;
if (![persistentStoreCoordinator addPersistentStoreWithType:NSXMLStoreType
configuration:nil
URL:url
options:nil
error:&error]) {
[NSApp presentError:error];
}
return persistentStoreCoordinator;
}
In a single persistent store design, the NSPersistentStoreCoordinator is
straightforward in its construction. After confirming that we have not
already initialized the store, we check to make sure that the location
where the file is to be written exists. The standard location for an appli-
Report erratum
this copy is (P1.0 printing, September 2009)Prepared exclusively for Robert Walsh
Download at WoweBook.Com

FETCHED PROPERTIES 71
cation of this design is in the Application Support directory under the
Library directory of the user’s home.
Once we have confirmed the existence or added the appropriate direc-
tories, the next step is to get a reference to the NSManagedObjectModel,
which is discussed in Section 4.5, NSManagedObjectModel, on page 68.
With a reference to the NSManagedObjectModel, we can initialize the
NSPersistentStoreCoordinator with that model.
With the NSPersistentStoreCoordinator initialized, we need to add the act-
ual NSPersistentStore to it. It is possible to add more than one NSPersis-
tentStore to the NSPersistentStoreCoordinator, which can be useful when
dealing with data that is split into multiple files. However, in our exam-
ple, we have a single file. Part of adding the NSPersistentStore to the
NSPersistentStoreCoordinator is to specify what type of store it is. The dif-
ferent types of stores and their benefits are discussed in Chapter 6,
Performance Tuning, on page 97. When we add the NSPersistentStore to
the NSPersistentStoreCoordinator, it is possible that there will be a failure.
Therefore, we check for the error and handle it if it occurs.
Normally once we have initialized the NSPersistentStoreCoordinator and
added it to the NSManagedObjectContext, we rarely touch it again. In
most cases, the only time we would want to access it again is to handle
manual migration.
4.7 Fetched Properties
In addition to NSFetchRequest objects, we have the ability to define a lazy
relationship between objects. Fetched properties are kind of a cross
between relationships and the NSFetchRequest. A fetched property is not
a relationship in the strictest sense and is not realized until the prop-
erty is requested. When the property is accessed, Core Data performs
the underlying NSFetchRequest and returns the result. Unlike a normal
relationship, a fetched property is returned as an NSArray as opposed to
an NSSet.
In practice, I have found fetched properties to be less useful and less
flexible than creating either a stored fetch request or building the fetch
request in code. Usually when a situation calls for a fetched property,
it tends to be easier to subclass the entity in question, perform an
NSFetchRequest in code, and return the results.
Report erratum
this copy is (P1.0 printing, September 2009)Prepared exclusively for Robert Walsh
Download at WoweBook.Com

WRAPPING UP 72
4.8 Wrapping Up
We covered a large number of pieces of Core Data in this chapter. As
we continue to explore Core Data in depth, please use this chapter as
a reference point for pieces of Core Data and how they all fit together.
By the end of the book, each of these elements should be as familiar to
you as NSString and NSArray are today.
Report erratum
this copy is (P1.0 printing, September 2009)Prepared exclusively for Robert Walsh
Download at WoweBook.Com

Chapter 5
Versioning and MigrationJust like a battle plan, no code base ever survives contact with users. As
soon as users start to use an application, they want to change it. Even
if the code is just for ourselves, we, also as users, will want to change
things. For example, we may need to add an attribute, add a new
object, or just restructure things to accommodate those changes. Those
changes can be quite involved and invariably will require a change to
how the data is stored. Although the data migration will work even if
there is no data stored, it is more useful going forward to have some
data to work with. Therefore, if you have not added any recipes yet, I
recommend doing so before we proceed.
Starting with Mac OS X 10.5 Leopard, Apple has made data migration
nearly trivial for users of Core Data. When developing for Leopard, ver-
sioning is included in the Core Data API, and with a relatively small
amount of effort on our part as the developer, we can easily migrate our
data stores from one version to another. Depending on the complexity
of the migration, the effort required of us, the developer, can be trivial
to rather complex.
Taking the project that we started with in Chapter 2, Getting Started
with Core Data, on page 14, we will be adding some additional features
to it in succeeding versions. In version 2, we will add the ability to tag
an author to a recipe as well as tag a “last used” date. That way, we
know who created the delicious dish as well as the last time we made
it. We certainly wouldn’t want to accidentally make the same dish two
days in a row! Lastly, we will remove the Meat and Fish entries from the
Type attribute of the Recipe entity. Any recipe entries that are flagged
with Meat or Fish will be updated to Entrée instead.
Prepared exclusively for Robert Walsh
Download at WoweBook.Com

SOME MAINTENANCE BEFORE WE MIGRATE 74
Figure 5.1: Default model issue dialog box
In version 3, we will normalize the repository a bit by extracting the
ingredients and forming a many-to-many relationship back to the reci-
pes. In addition, we will add the concept of a shopping list to make
it easier to ensure we pick up all the ingredients on our next trip to
the store. Finally, we will extract the unitOfMeasure attribute from the
RecipeIngredient entity into its own entity and allow that new entity to
be linked to the new ingredient entity. This will give us one lookup list
for the various units of measure and reduce the risk of human error.
5.1 Some Maintenance Before We Migrate
Before we actually release a new version of our application that mi-
grates the data, we need to first complete a minor “maintenance” update
for our users. Normally we would add this code to the very first version
of our application, but just in case we wrote that first version before
versioning was a consideration (or in case we wrote the first version
for Tiger), we need to go back to our old version and add a very small
amount of code to help our users.
Some users will download the new version of an application to just “try
it out” and see whether it is worth the upgrade price or worth the hassle.
Normally this is not an issue until we upgrade the data underneath our
users. Then things go sideways. What we do not want to happen is the
error message shown in Figure 5.1.
This is a terrible user experience and something we want to avoid. For-
tunately, the way to avoid it is very easy, and we can add it to a point
Report erratum
this copy is (P1.0 printing, September 2009)Prepared exclusively for Robert Walsh
Download at WoweBook.Com

SOME MAINTENANCE BEFORE WE MIGRATE 75
release of our application before we do any migration. That way, when
the user opens the first version of our application after “testing” the
second version, they get a friendly error message, or you can take it a
step further and restore/access the older version of their data.
Download GrokkingRecipes_v2/AppDelegate.m
if (![persistentStoreCoordinator addPersistentStoreWithType:NSXMLStoreType
configuration:nil
URL:url
options:dict
error:&error]) {
NSDictionary *ui = [error userInfo];
if (ui) {
NSLog(@"%@:%s %@", [self class], _cmd, [error localizedDescription]);
for (NSError *suberror in [ui valueForKey:NSDetailedErrorsKey]) {
NSLog(@"\t%@", [suberror localizedDescription]);
}
} else {
NSLog(@"%@:%s %@", [self class], _cmd, [error localizedDescription]);
}
NSAlert *alert = [[NSAlert alloc] init];
[alert setAlertStyle:NSCriticalAlertStyle];
[alert setMessageText:@"Unable to load the recipes database."];
NSString *msgText = nil;
msgText = [NSString stringWithFormat:@"The recipes database %@%@%@\n%@",
@"is either corrupt or was created by a newer ",
@"version of Grokking Recipes. Please contact ",
@"support to assist with this error.\n\nError: ",
[error localizedDescription]];
[alert setInformativeText:msgText];
[alert addButtonWithTitle:@"Quit"];
[alert runModal];
exit(1);
}
We have added this code to the -persistentStoreCoordinator method in the
application delegate of our first version of the recipes application. In
the first version of our application, if an error occurred with the adding
of an NSPersistentStore to the NSPersistentStoreCoordinator, we would just
present the error to the user via [[NSApplication sharedApplication] pre-
sentError:error]. With this change, we give the user a little more useful
information as well as dumping quite a bit of useful information to
the logs for us to review. We will also keep this code in all future ver-
sions of our application to help “future proof” it. Naturally, this is the
bare minimum that we can do, and I recommend adding other options.
However, the most important point is in place. We do not let the user
proceed without a Core Data stack in place. The original way that we
Report erratum
this copy is (P1.0 printing, September 2009)Prepared exclusively for Robert Walsh
Download at WoweBook.Com

A SIMPLE MIGRATION 76
Figure 5.2: New, improved error dialog box
were handling this error allowed the user to proceed with our applica-
tion and enter new information only to find out they can’t save it. With
this error message, we stop that from occurring by forcing the user to
quit until they deal with the error. The resulting error message is shown
in Figure 5.2.
We do have one other addition to this error check. Before we present
the NSAlert to the user, we also dump the information about the error to
the console. This is primarily useful during the development cycle but
can also be helpful when we have a user with an unusual issue. When
Core Data fails with more than one error, it will load all the errors into
a single NSError instance that it passes back to us. In that situation, the
top-level -localizedDescription will tell the user only that “Multiple Vali-
dation Errors Occurred,” which is not very useful to us as developers.
However, the other errors are available for display, we can get them
from the userInfo of the NSError, and we can then iterate over them, print
out their -localizedDescription to the console, and reveal the exact prob-
lems. We also check to make sure there are suberrors so that we can
print out the top-level error by itself if there is only one.
5.2 A Simple Migration
To demonstrate a simple migration, we will add the ability to attribute
recipes to authors. To kick off the versioning, the first thing that we
Report erratum
this copy is (P1.0 printing, September 2009)Prepared exclusively for Robert Walsh
Download at WoweBook.Com

A SIMPLE MIGRATION 77
Your First Data Model Version
When you first set up versioning, be sure to look inside the tar-get in Xcode and update the Compile Sources section. If youdo not see the .xcdatamodeld file inside the target, then removethe xcdatamodel references from it and drag the entire xcdata-
modeld bundle into the target. Otherwise, your application maycomplain about being unable to merge entities because it willtreat each version of the model as an independent model.
Once this change has been completed, it is best to clean theproject (delete any previously compiled code) by choosingBuild > Clean All Targets from the main menu.
need to do is create a new managed object model (MOM) based on the
first one. To do this, we need to select the existing model in Xcode and
then choose Design > Data Model > Add Model Version.
Creating a Versioned Data Model
This is the first time we have added a model version, Xcode is going to
create a new bundle for us called DataModel.xcdatamodeld and put the
original MOM inside the bundle along with a new copy of the original
MOM. To make things clearer in the example project, I renamed these
MOM objects to v1.xcdatamodel and v2.xcdatamodel. Next, we need to
select the v2.xcdatamodel and choose Design > Data Model > Set Cur-
rent Version. Like the name suggests, this tells Core Data which version
of the MOM is current.
Now that we have a new version of the MOM, it is time to add the new
entities and attributes. This is going to require the addition of a new
entity and some changes to the Recipe entity. Look at the new model
(Figure 5.3, on the following page) and compare it to the original model
(Figure 2.4, on page 21). In this updated MOM, you’ll find the new
Author entity along with its one-to-many relationship with the Recipe
entity. Also, the Recipe entity has a new attribute called lastUsed, which
is defined as an Date.
We’re not quite done yet. If we were to run the application right now,
we would trip the error that we discussed in Section 5.1, Some Mainte-
nance Before We Migrate, on page 74. Clearly something is missing.
Report erratum
this copy is (P1.0 printing, September 2009)Prepared exclusively for Robert Walsh
Download at WoweBook.Com

A SIMPLE MIGRATION 78
Figure 5.3: Version 2 of the MOM
Turning on Automatic Data Migration
The first thing we need to do is to tell Core Data to automatically
migrate data when the persistent store is not using the same model as
the current version. To do this, we need to make a small change to the
persistentStoreCoordinator method in our AppDelegate. Previously we were
passing nil to the addPersistentStoreWithType:configuration:URL:options:error:
method for the options parameter. However, we need to change that to
the following:
Download GrokkingRecipes_v2/AppDelegate.m
NSMutableDictionary *dict = [NSMutableDictionary dictionary];
[dict setObject:[NSNumber numberWithBool:YES]
forKey:NSMigratePersistentStoresAutomaticallyOption];
NSError *error = nil;
if (![persistentStoreCoordinator addPersistentStoreWithType:NSXMLStoreType
configuration:nil
URL:url
options:dict
error:&error]) {
This change tells Core Data to attempt an automatic migration when it
encounters a persistent store that does not match the current version
Report erratum
this copy is (P1.0 printing, September 2009)Prepared exclusively for Robert Walsh
Download at WoweBook.Com

A SIMPLE MIGRATION 79
Figure 5.4: Error when we are missing a mapping model
of the MOM. If we try to run our application after this change, we get
something new, as shown in Figure 5.4.
Creating Our First Mapping Model
We’re definitely getting closer but are not quite there yet. We are miss-
ing one more thing, and that is the mapping model. The mapping model
describes how to transition the data from one object model to another.
A mapping model is created by asking Xcode to create a new file and
choosing Mapping Model from the selection. After naming the new file
(I named it v1_to_v2), Xcode asks you to select the source and desti-
nation models. Selecting v1 and v2 appropriately will complete the file
creation. Xcode does some basic building of the mapping model, and
that is nearly sufficient for this migration.
The initial mapping model generated by Xcode handles almost every-
thing that we want to do. It handles the migration of the existing enti-
ties over to the new object model just fine. However, there are a couple
of things we need to do to tweak it.
First, we can remove the Author entity from the mapping model. Since
there is no Author in the original object model and the relationship is
not required, we do not need to deal with it during the migration. We
can also remove the mapping for the author relationship in the Recipe
entity as well as the lastUsed attribute. Again, since these can be nil and
we are not populating them during the migration, they are not needed
in the mapping model.
Report erratum
this copy is (P1.0 printing, September 2009)Prepared exclusively for Robert Walsh
Download at WoweBook.Com

A SIMPLE MIGRATION 80
Figure 5.5: Mapping model entity list
Second, we can remove the inverse of the relationship between the
Recipe entity and the RecipeIngredient entity. Because this relationship
is two sided (as strongly recommended by Apple), we do not need to
migrate both sides of the relationship. Therefore, we can remove the
RecipeIngredient side of the relationship. This will also remove a poten-
tial issue with the next change. The resulting entity mapping list is
shown in Figure 5.5.
The other change we need to make to the mapping model is a bit more
complicated. To remove the Meat and Fish types from the store during
the migration, we need to employ a filter predicate. Just like the NSFil-
terPredicate object that we are used to working with, a filter predicate
in the model resolves to a boolean expression that determines whether
the source object is included in the mapping. In the recipe mapping, we
will add the following predicate:
type != 'Fish' && type != 'Meat'
This will tell the mapping to migrate all the recipe entities except for
those that have a type of Fish or Meat (see Figure 5.6, on the next
page). Next, we will create a new mapping that is almost identical to the
Report erratum
this copy is (P1.0 printing, September 2009)Prepared exclusively for Robert Walsh
Download at WoweBook.Com

A SIMPLE MIGRATION 81
Figure 5.6: Exclusion filter predicate
RecipeToRecipe mapping. This second mapping of the Recipe entity we
will call Fish & Meat, and its predicate will be as follows:
type == 'Fish' || type == 'Meat'
The other difference between the Fish & Meat mapping and the RecipeTo-
Recipe mapping is the type attribute. In the original RecipeToRecipe
mapping, it was set to $source.type, which tells Core Data to copy over
the value of the source object’s type attribute. In the Fish & Meat map-
ping, we will set it to Entrée directly. This will cause any Recipe entity
with a Fish or Meat type to be changed to Entrée during the migration.
Now when we run the application, nothing spectacular happens. The
application opens, the data is displayed, and everything is happy with-
out any noise. That is all there is to it for version 2!
What Did We Just Do?
We have just completed a very simple data migration from version 1 to
version 2 of our data model. Now, when a user runs our application, no
matter what version data model they have, they will automatically be
upgraded to version 2 without any surprises.
Report erratum
this copy is (P1.0 printing, September 2009)Prepared exclusively for Robert Walsh
Download at WoweBook.Com

FUNDAMENTALS OF CORE DATA VERSIONING 82
Along the way, we learned how to create multiple versions of our data
model and how to create mapping models to describe how to transition
the data between versions.
5.3 Fundamentals of Core Data Versioning
So, what is the magic behind all of this? How does the data migration
actually work? As we already explored in the previous chapters, Core
Data works with MOM objects that describe the data entities, their
attributes, and their relationships. Core Data versioning works with
those same MOM objects but takes the design one step further. Each
entity version in each data model has a unique hash. When Core Data
loads a persistent store from disk, it resolves the matching hashes in
the persistent store against the MOM objects included with the appli-
cation. If the matching MOM is not flagged as the “current” MOM, then
data migration kicks in.
How Data Migration Works
Core Data handles data migration in a very straightforward manner.
Whenever a persistent store needs to be migrated, there are three steps.
Copying of the Entities with Attributes
In the first pass of the migration, Core Data creates new entities in
the new persistent store for every entity in the old store. These entities
have their attributes copied over but not their relationships. During
this phase, Core Data also keeps a reference to the old unique ID for
each entity to be used in phase 2.
Creating Relationships Between the Entities
In the second pass, Core Data builds all the relationships between the
entities based on the previous relationships. This is where the reference
in phase 1 is used.
Validation of the New Store
During the migration, all validation rules are turned off, and Core Data
ignores the child classes defined in the MOM. Therefore, it is possible
that some data validation rules got broken during the migration. In the
final phase of the migration, Core Data goes back through the store and
checks all the validation rules to ensure that the data is in a valid state.
Report erratum
this copy is (P1.0 printing, September 2009)Prepared exclusively for Robert Walsh
Download at WoweBook.Com

FUNDAMENTALS OF CORE DATA VERSIONING 83
Model Versions and Hashes
The word versioning has been used through this chapter as well as
other material to describe data migration in Core Data. Unfortunately,
it is an inaccurate term. Versioning implies that there is an order or
precedence to the models. This is not accurate when it comes to data
model versioning/migration in Core Data.
Entity Hashes
Instead of keeping track of a version number, creation date, or some
other potentially chronological identifier, Core Data generates a hash
for each entity in a model. Those hashes are then stored within the
persistent stores created with that model for later comparison. When
a persistent store is loaded, the first thing that Core Data does is to
retrieve the metadata from that store. Inside that metadata is a list
of every entity type in the store along with the hash for that entity.
Core Data then compares that list of hashes against the hashes of the
“current” MOM. If they match, then everything is fine, and the store
is loaded. If they do not match, then Core Data checks the options on
the load persistent store call to see whether automatic data migration
is requested. If it is not, then the error message from Section 5.1, Some
Maintenance Before We Migrate, on page 74 is presented to the user.
Changing the Hash Values
Surprisingly, not everything that changes inside a MOM causes the
hash of the entities inside to change. There are actually quite a few
things that we can do to a model that does not trigger data migration
at all.
Changes That Alter the Entity Hash
If any of the following are changed on an entity, the entity will report a
different hash:
• Name: The name of the entity
• Inheritance: Changing who the parent entity is
• Persistent properties: Adding or removing a property
In addition, changing the following for properties will also trigger a
change to the entity hash:
• Name: The name of the property
Report erratum
this copy is (P1.0 printing, September 2009)Prepared exclusively for Robert Walsh
Download at WoweBook.Com

FUNDAMENTALS OF CORE DATA VERSIONING 84
• Optionality/read-only: Changing whether the property is optional
or read-only
• Attribute type: Changes to the type of value stored
• Relationship: Changes to the destination, minimum/maximum
count, the delete rule, or the inverse
Changes That Do Not Alter the Entity Hash
The following changes to an entity will not trigger a change to the entity
hash:
• Class name: Changes to the NSManagedObject subclass
• Transient properties: Properties that are not saved in the persis-
tent store
• User info: Adding, removing, or changing the user info keys/values
• Validation predicates: Adding, removing, or changing the valida-
tion rules
• Default values: Adding, removing, or changing the default value of
an attribute
In addition, the following changes to the properties of an entity will also
not change the hash of the entity:
• User info: Adding, removing, or changing the user info key/values
• Validation predicates: Adding, removing, or changing the valida-
tion rules
The general distinction between things that do and do not affect version
hashes is whether the changes impact the store schema. Things such
as the class name impact only the runtime, not the structure of the
persistent data.
Mapping Models
If Core Data detects that an upgrade to the persistent store is needed,
it looks for three files in the application bundle:
• The MOM that matches the hash from the persistent store
• The current MOM
• The mapping model for those two MOM objects
Report erratum
this copy is (P1.0 printing, September 2009)Prepared exclusively for Robert Walsh
Download at WoweBook.Com

A MORE COMPLEX MIGRATION 85
Assuming that all three files are located (and if they aren’t, bad things
happen), Core Data will then migrate the data in the persistent store
from the old MOM to the new MOM. Once the migration is complete,
the stack (MOC, PS, and MOM) is fully initialized, and the applica-
tion continues. This, of course, is the happy path, and there are sev-
eral safeguards in place to allow the application developer to control
failures.
5.4 A More Complex Migration
Now that we have gotten our feet wet with data migration and ver-
sioning, it’s time to test the limits of what we can do. To that end,
we will create another migration that is far more complex. Specifically,
the ingredients really should be in another entity with a many-to-many
relationship to the recipe. In addition, the units of measure should also
be in their own table. And since we have the engine apart as it were,
we can put in the cost of the ingredients as well as the unit size for
ordering. This will allow us to estimate the cost per serving.
With these changes in mind, the data model will look like Figure 5.7,
on the next page. As we learned earlier in this chapter, we will need a
mapping model to go from version 2 to version 3. But what about users
who are still on version 1? For automatic versioning to work, we would
also need a mapping model from version 1 to version 3. Since that will
be a variation on our version 2 to version 3 model, we will skip it for the
moment.
The biggest challenge for this migration is the introduction of the new
entities. Unlike the Author entity from before, during this migration, not
only are we creating new entities, but we are having to extract data
from existing entities to build those new entities, and we have to then
properly link the new entities back to their source. To make it even
more interesting, we do not want these new entities duplicated. This
complexity is far beyond the basic migration that we did for version
2, and it is going to require writing a custom NSEntityMigrationPolicy to
handle it.
NSEntityMigrationPolicy
A NSEntityMigrationPolicy allows us to control exactly how a migration is
handled. Although there are quite a few methods that we can override
Report erratum
this copy is (P1.0 printing, September 2009)Prepared exclusively for Robert Walsh
Download at WoweBook.Com

A MORE COMPLEX MIGRATION 86
Figure 5.7: Version 3 of the MOM
depending on our needs, the two methods that we need for this migra-
tion are as follows:
- (BOOL)createDestinationInstancesForSourceInstance:(NSManagedObject*)source
entityMapping:(NSEntityMapping*)mapping
manager:(NSMigrationManager*)manager
error:(NSError**)error
- (BOOL)createRelationshipsForDestinationInstance:(NSManagedObject*)dInstance
entityMapping:(NSEntityMapping*)mapping
manager:(NSMigrationManager*)manager
error:(NSError**)error
createDestinationInstancesForSourceInstance:
The first method, createDestinationInstancesForSourceInstance:, is called
for each entity in the source store that is associated with this migration
policy. For example, during the migration of the RecipeIngredient entities
and the creation of the Ingredient entities, this method would be called
for each RecipeIngredient, and it would be expected that an ingredient
entity would be created or associated with the incoming RecipeIngredient
as a result.
Report erratum
this copy is (P1.0 printing, September 2009)Prepared exclusively for Robert Walsh
Download at WoweBook.Com

A MORE COMPLEX MIGRATION 87
The code to implement this breaks down as follows:
Download GrokkingRecipes_v3/RecipeIngredientToIngredient.m
NSManagedObjectContext *destMOC = [manager destinationContext];
NSString *destEntityName = [mapping destinationEntityName];
//The name of the ingredient
NSString *name = [source valueForKey:@"name"];
In the first part of the method, we are simply setting up references
that will be needed later. Specifically, we are getting a reference to the
destination NSManagedObjectContext, which we will need to create new
entities, the name of the destination entity, and most important the
name value from the incoming entity. Since the incoming entity is a
RecipeIngredient, the name value will be the name of the ingredient that
we now want to reference.
Download GrokkingRecipes_v3/RecipeIngredientToIngredient.m
NSMutableDictionary *userInfo = (NSMutableDictionary*)[manager userInfo];
if (!userInfo) {
userInfo = [NSMutableDictionary dictionary];
[manager setUserInfo:userInfo];
}
NSMutableDictionary *ingredientLookup = [userInfo valueForKey:@"ingredients"];
if (!ingredientLookup) {
ingredientLookup = [NSMutableDictionary dictionary];
[userInfo setValue:ingredientLookup forKey:@"ingredients"];
}
NSManagedObject *dest = [ingredientLookup valueForKey:name];
if (!dest) {
dest = [NSEntityDescription insertNewObjectForEntityForName:destEntityName
inManagedObjectContext:destMOC];
[dest setValue:name forKey:@"name"];
[ingredientLookup setValue:dest forKey:name];
}
In this next section of code, we deal with the possibility that the Ingre-
dient entity that we need to reference has already been created. Rather
than doing a fetch against the destination context every time, we have
a hash built up and stored within the NSMigrationManger. The NSMigra-
tionManager has an NSDictionary called userInfo that is perfectly suited for
this purpose. We first lazily initialize this dictionary, and then we lazily
initialize another NSDictionary inside it to store references to the Ingredi-
ent entities using the name of the ingredient as the key. With this, we
can make sure that each Ingredient is created only once. If the Ingredi-
ent does not exist yet, then we create it and store it back inside of the
userInfo cache.
Report erratum
this copy is (P1.0 printing, September 2009)Prepared exclusively for Robert Walsh
Download at WoweBook.Com

AUTOMATIC DATA MIGRATION 88
Download GrokkingRecipes_v3/RecipeIngredientToIngredient.m
[manager associateSourceInstance:source
withDestinationInstance:dest
forEntityMapping:mapping];
return YES;
The last thing that we need to do is to tell the manager about the asso-
ciation. Since the manager keeps track of all associations between the
two NSManagedObjectContext objects, we need to inform it of this new
entity that was just created and that it is associated with the source
entity that was passed in. Once that is complete, we return YES, and we
are done.
createRelationshipsForDestinationInstance:
In a properly designed data model, this method will rarely if ever be
needed. The intention of this method (which is called in the second
pass) is to build any relationships for the new destination entity that
was created in the previous method. However, if all the relationships
in the model are double sided, then this is not necessary because we
already set up one side of them. If for some reason there is an entity
in the model that is not double sided, then additional code would be
required in this method to handle the one-sided relationship. Since we
do not need that functionality in our model, we just return YES.
Download GrokkingRecipes_v3/RecipeIngredientToIngredient.m
- (BOOL)createRelationshipsForDestinationInstance:(NSManagedObject*)dInstance
entityMapping:(NSEntityMapping*)mapping
manager:(NSMigrationManager*)manager
error:(NSError**)error
{
return YES;
}
5.5 Automatic Data Migration
If your data migration needs are easy to handle and your application is
not coming from Tiger, then automatic migration is probably all that is
needed. Automatic migration lets Core Data handle all the details and
assumes the following:
• Every persistent store that the application will come up against
has hash metadata.
Report erratum
this copy is (P1.0 printing, September 2009)Prepared exclusively for Robert Walsh
Download at WoweBook.Com

AUTOMATIC DATA MIGRATION 89
• Every persistent store that the application will come up against
has a corresponding model stored inside the application’s bundle.
• Every persistent store that the application will come up against
has a mapping model from its MOM to the current MOM.
If the application can meet these three criteria (and any application that
has begun its life in Leopard should), then automatic migration should
be able to do all of the dirty work for us.
To enable automatic versioning, we need to set a preference on the
NSPersistentStoreCoordinator while adding a persistent store. Previously,
the method that built up the NSPersistentStoreCoordinator in our recipe
application was as follows:
Download GrokkingRecipes_v1/AppDelegate.m
- (NSPersistentStoreCoordinator*)persistentStoreCoordinator;
{
if (persistentStoreCoordinator) return persistentStoreCoordinator;
NSString *filename = @"GrokkingRecipes.xml";
NSFileManager *fileManager = [NSFileManager defaultManager];
NSString *path = [self applicationSupportFolder];
if ( ![fileManager fileExistsAtPath:path
isDirectory:NULL] ) {
[fileManager createDirectoryAtPath:path
attributes:nil];
}
path = [path stringByAppendingPathComponent:filename];
NSURL *url = [NSURL fileURLWithPath:path];
NSManagedObjectModel *mom = [self managedObjectModel];
persistentStoreCoordinator = [[NSPersistentStoreCoordinator alloc]
initWithManagedObjectModel:mom];
NSError *error = nil;
if (![persistentStoreCoordinator addPersistentStoreWithType:NSXMLStoreType
configuration:nil
URL:url
options:nil
error:&error]) {
[NSApp presentError:error];
}
return persistentStoreCoordinator;
}
Report erratum
this copy is (P1.0 printing, September 2009)Prepared exclusively for Robert Walsh
Download at WoweBook.Com

MANUAL DATA MIGRATION 90
With automatic versioning, we need to make one minor change to this
method. Instead of passing nil as the options value in the call to -addPer-
sistentStoreWithType:configuration:URL:options:error:, we build up an NSDic-
tionary with one key and value. By setting the key NSMigratePersistentStore-
sAutomaticallyOption to YES, Core Data will attempt to migrate the persis-
tent store if needed.
Download GrokkingRecipes_v2/AppDelegate.m
NSMutableDictionary *dict = [NSMutableDictionary dictionary];
[dict setObject:[NSNumber numberWithBool:YES]
forKey:NSMigratePersistentStoresAutomaticallyOption];
NSError *error = nil;
if (![persistentStoreCoordinator addPersistentStoreWithType:NSXMLStoreType
configuration:nil
URL:url
options:dict
error:&error]) {
5.6 Manual Data Migration
If the persistent store that is being migrated was originally written in
Tiger, then it will not contain the hash information that Core Data
needs, and automatic migration will fail. Fortunately, these stores can
still be migrated, but it is a manual process.
Another situation where manual migration will be useful is when deal-
ing with very large stores. During the migration process, the entire store
is pulled into memory. With very large stores, this can cause a perfor-
mance issue as well as a usability issue. Therefore, in those situations,
it may be advantageous to migrate the store in chunks so that the mem-
ory is more manageable. Doing that would require a manual migration
process and a custom NSMigrationManager.
5.7 Progressive Data Migration
What happens when your application is at version 5 of its data model
and someone who has been at version 1 decides to upgrade? Normally
you would need to provide a mapping model for every combination of
source and destination object models. For the first couple of versions,
this is not an issue. However, when you are getting further and fur-
ther away from version 1, this becomes increasingly difficult. Fortu-
Report erratum
this copy is (P1.0 printing, September 2009)Prepared exclusively for Robert Walsh
Download at WoweBook.Com

PROGRESSIVE DATA MIGRATION 91
nately, it is possible to figure out a migration path and do a progressive
migration.
To accomplish this, we will need to handle the migration manually. The
workflow is as follows:
1. If the store’s model is the current model, do nothing.
2. Find a mapping model with the current store’s model as its source.
3. Migrate the data to that mapping model’s destination model.
4. Repeat starting at step 1.
Creating the Migration Method
To begin this monumental task, we will be creating a new method in
the AppDelegate. The method requires several pieces of information:
the source path, the source type (XML, SQL, and so on), and the final
model. In addition, we will pass in an error to be able to report any
failures.
Download ProgressiveMigration/AppDelegate.m
- (BOOL)progressivelyMigrateURL:(NSURL*)sourceStoreURL
ofType:(NSString*)type
toModel:(NSManagedObjectModel*)finalModel
error:(NSError**)error
{
It’s a rather unwieldy method name to be sure, but it contains all the
information that we need to figure out our migration path. Since this is
going to be a recursive method, the first thing we need to do is check to
see whether we are at our goal:
Download ProgressiveMigration/AppDelegate.m
NSDictionary *sourceMetadata =
[NSPersistentStoreCoordinator metadataForPersistentStoreOfType:type
URL:sourceStoreURL
error:error];
if (!sourceMetadata) return NO;
if ([finalModel isConfiguration:nil
compatibleWithStoreMetadata:sourceMetadata]) {
*error = nil;
return YES;
}
Report erratum
this copy is (P1.0 printing, September 2009)Prepared exclusively for Robert Walsh
Download at WoweBook.Com

PROGRESSIVE DATA MIGRATION 92
In this code segment, we first retrieve the metadata from the source
URL. If that metadata is not nil, we ask the final model whether the
metadata is compatible with it. If it is, then we are happy and done.
We then set the error pointer to nil and return YES. If not, then we need
to try to figure out the mapping model and potentially the interim data
model to migrate to.
Finding All the Managed Object Models
To find the next step in the migration, we need to find every managed
object model in the bundle and loop through them. The goal at this
point is to get all the models and then figure out which one we can
migrate to. Since these models will probably be in their own bundles,
we have to first look for the bundles and then look inside each of them.
Download ProgressiveMigration/AppDelegate.m
//Find the source model
NSManagedObjectModel *sourceModel = [NSManagedObjectModel
mergedModelFromBundles:nil
forStoreMetadata:sourceMetadata];
NSAssert(sourceModel != nil, ([NSString stringWithFormat:
@"Failed to find source model\n%@",
sourceMetadata]));
//Find all of the mom and momd files in the Resources directory
NSMutableArray *modelPaths = [NSMutableArray array];
NSArray *momdArray = [[NSBundle mainBundle] pathsForResourcesOfType:@"momd"
inDirectory:nil];
for (NSString *momdPath in momdArray) {
NSString *resourceSubpath = [momdPath lastPathComponent];
NSArray *array = [[NSBundle mainBundle]
pathsForResourcesOfType:@"mom"
inDirectory:resourceSubpath];
[modelPaths addObjectsFromArray:array];
}
NSArray* otherModels = [[NSBundle mainBundle] pathsForResourcesOfType:@"mom"
inDirectory:nil];
[modelPaths addObjectsFromArray:otherModels];
if (!modelPaths || ![modelPaths count]) {
//Throw an error if there are no models
NSMutableDictionary *dict = [NSMutableDictionary dictionary];
[dict setValue:@"No models found in bundle"
forKey:NSLocalizedDescriptionKey];
//Populate the error
*error = [NSError errorWithDomain:@"Zarra" code:8001 userInfo:dict];
return NO;
}
Report erratum
this copy is (P1.0 printing, September 2009)Prepared exclusively for Robert Walsh
Download at WoweBook.Com

PROGRESSIVE DATA MIGRATION 93
In this code block, we first grab all the resource paths from the mainBun-
dle that are of type momd. This will give us a list of all the model bun-
dles. We then loop through this list and look for mom resources inside
each and add those to an overall array. Once those are done, we then
look inside the mainBundle again for any freestanding mom resources.
Finally, we do a failure check to make sure we have some models to
look through. If we can’t find any, then we populate the NSError and
return NO.
Finding the Mapping Model
Now the complicated part comes in. Since it is not currently possible to
get an NSMappingModel with just the source model and then determine
the destination model, we have to instead loop through every model we
find, instantiate it, plug it in as a possible destination, and see whether
there is a mapping model in existence. If there isn’t, we continue to the
next one.
Download ProgressiveMigration/AppDelegate.m
NSMappingModel *mappingModel = nil;
NSManagedObjectModel *targetModel = nil;
NSString *modelPath = nil;
for (modelPath in modelPaths) {
targetModel = [[NSManagedObjectModel alloc]
initWithContentsOfURL:[NSURL fileURLWithPath:modelPath]];
mappingModel = [NSMappingModel mappingModelFromBundles:nil
forSourceModel:sourceModel
destinationModel:targetModel];
//If we found a mapping model then proceed
if (mappingModel) break;
//Release the target model and keep looking
[targetModel release], targetModel = nil;
}
//We have tested every model, if nil here we failed
if (!mappingModel) {
NSMutableDictionary *dict = [NSMutableDictionary dictionary];
[dict setValue:@"No models found in bundle"
forKey:NSLocalizedDescriptionKey];
*error = [NSError errorWithDomain:@"Zarra"
code:8001
userInfo:dict];
return NO;
}
This section is probably the most complicated piece of the progressive
migration routine. In this section, we’re looping through all the models
that were previously discovered. For each of those models, we’re instan-
tiating the model and then asking NSMappingModel for an instance that
will map between our known source model and the current model. If
Report erratum
this copy is (P1.0 printing, September 2009)Prepared exclusively for Robert Walsh
Download at WoweBook.Com

PROGRESSIVE DATA MIGRATION 94
we find a mapping model, we break from our loop and continue. Oth-
erwise, we release the instantiated model and continue the loop. After
the loop, if the mapping model is still nil, we generate an error stating
that we cannot discover the progression between the source model and
the target and return NO. At this point, we should have all the compo-
nents we need for one migration. The source model, target model, and
mapping model are all known quantities. Now it’s time to migrate!
Performing the Migration
In this block, we are instantiating an NSMigrationManager (if we needed
something special, we would build our own manager instead) with the
source model and the destination model. We are also building up a
unique path to migrate to. In this example, we are using the destination
model’s filename as the unique change to the source store’s path. Once
the destination path is built, we then tell the migration manager to
perform the migration and check to see whether it was successful. If
it wasn’t, we simply return NO because the NSError will be populated
by the NSMigrationManager. If it’s successful, there are only three things
left to do: move the source out of the way, then replace it with the new
destination store, and finally recurse.
Download ProgressiveMigration/AppDelegate.m
NSMigrationManager *manager = [[NSMigrationManager alloc]
initWithSourceModel:sourceModel
destinationModel:targetModel];
NSString *modelName = [[modelPath lastPathComponent]
stringByDeletingPathExtension];
NSString *storeExtension = [[sourceStoreURL path] pathExtension];
NSString *storePath = [[sourceStoreURL path] stringByDeletingPathExtension];
//Build a path to write the new store
storePath = [NSString stringWithFormat:@"%@.%@.%@", storePath,
modelName, storeExtension];
NSURL *destinationStoreURL = [NSURL fileURLWithPath:storePath];
if (![manager migrateStoreFromURL:sourceStoreURL
type:type
options:nil
withMappingModel:mappingModel
toDestinationURL:destinationStoreURL
destinationType:type
destinationOptions:nil
error:error]) {
return NO;
}
Report erratum
this copy is (P1.0 printing, September 2009)Prepared exclusively for Robert Walsh
Download at WoweBook.Com

PROGRESSIVE DATA MIGRATION 95
In this final code block, we first create a permanent location for the
original store to be moved to. In this case, we will use a globally unique
string generated from the NSProcessInfo class and attach the destination
model’s filename and the store’s extension to it. Once that path is built,
we move the source to it and then replace the source with the desti-
nation. At this point, we are at the same spot we were when we began
except that we are now one version closer to the current model version.
Now we need to loop back to step 1 again in our workflow. Therefore, we
will recursively call ourselves, returning the result of that recurse. As
you can recall from the beginning of this method, if we are now at the
current version, we will simply return YES, which will end the recursion.
Download ProgressiveMigration/AppDelegate.m
NSString *guid = [[NSProcessInfo processInfo] globallyUniqueString];
guid = [guid stringByAppendingPathExtension:modelName];
guid = [guid stringByAppendingPathExtension:storeExtension];
NSString *appSupportPath = [storePath stringByDeletingLastPathComponent];
NSString *backupPath = [appSupportPath stringByAppendingPathComponent:guid];
NSFileManager *fileManager = [NSFileManager defaultManager];
if (![fileManager moveItemAtPath:[sourceStoreURL path]
toPath:backupPath
error:error]) {
//Failed to copy the file
return NO;
}
//Move the destination to the source path
if (![fileManager moveItemAtPath:storePath
toPath:[sourceStoreURL path]
error:error]) {
//Try to back out the source move first, no point in checking it for errors
[fileManager moveItemAtPath:backupPath
toPath:[sourceStoreURL path]
error:nil];
return NO;
}
//We may not be at the "current" model yet, so recurse
return [self progressivelyMigrateURL:sourceStoreURL
ofType:type
toModel:finalModel
error:error];
This progressive migration can be tested by first running version 1 of
our Grokking Recipes application, entering some data, and then run-
ning the ProgressiveMigration version. You will then see the data model
migrate seamlessly from version 1 to version 3 with no intervention
required.
Report erratum
this copy is (P1.0 printing, September 2009)Prepared exclusively for Robert Walsh
Download at WoweBook.Com

TIPS AND TRICKS 96
5.8 Tips and Tricks
Updating a Mapping Model
As always happens during development, you will want to make changes
to the current object model that of course will then break the mapping
model. Fortunately, it is possible to tell the mapping model to refresh
the source and/or destination data models. This can be done via the
Design > Mapping Model menu.
Report erratum
this copy is (P1.0 printing, September 2009)Prepared exclusively for Robert Walsh
Download at WoweBook.Com

Chapter 6
Performance TuningBrent Simmons, creator of NetNewsWire, once shared a story about
a user who filed a bug report about the poor startup performance of
NetNewsWire. Upon discussion with that user, he discovered that they
had more than 900,000 unread RSS feeds! The lesson I took away from
that story is to expect my users to put thousands of times as much
data into my applications as I would ever consider reasonable.
While we are working with Core Data, we need to consider the per-
formance impacts of our design. We might test with a couple of dozen
recipes and expect our users to load a couple hundred recipes into our
application and test with those expectations. However, our users cannot
read our intentions or expectations. As soon as we ship the application,
some user somewhere will load 100,000 recipes into it and then file a
bug report that it performs poorly.
6.1 Persistent Store Types
Four types of repositories are included with the Core Data API: SQLite,
XML, binary, and in-memory. In-memory is technically not a persistent
store because it is never written out to disk. Binary is effectively a seri-
alized version of the object graph written out to disk. The XML store
writes out the object graph to a human-readable text file, and SQLite
stores the object graph in a relational database. Excluding edge cases,
it is common to use XML as our persistent store while we are in devel-
opment and then to switch over to SQLite once the application is ready
for production use.
Prepared exclusively for Robert Walsh
Download at WoweBook.Com

PERSISTENT STORE TYPES 98
Atomic Stores
Atomic stores include XML, binary, and custom data stores. All of these
stores are written to disk atomically; in other words, the entire data
file is rewritten on every save. Although these store types have their
advantages, they do not scale as well as the SQLite store. In addition,
they are loaded fully into memory when they are accessed. This causes
atomic stores to have a larger memory footprint than a SQLite store.
However, because they reside completely in memory while the applica-
tion is running, they can be very fast since the disk is hit only when the
file is read into memory and when it is saved back out. SQLite, although
still considered a fast store, is slower when dealing with smaller data
sets because of its inherent disk access. That said, the differences are
measured in fractions of a second, so we cannot expect a large speed
increase by using an atomic store. But if fractions of a second matter,
it may be something to consider.
When deciding between a binary store and an XML store, the format
on disk should be considered. When working with a binary format, the
only way to review the data is via Core Data. XML, on the other hand,
can be reviewed with any text editor, which makes it a superior choice
during development.
SQLite Persistent Store
The single biggest performance boost that we can make to our applica-
tion is to switch its persistent store type from XML to SQLite. SQLite
is a software library that implements a self-contained, serverless, zero-
configuration, transactional SQL database engine. SQLite is the most
widely deployed SQL database engine in the world. The source code for
SQLite is in the public domain.
Better Scaling
By utilizing a relational database as the persistent store, we no longer
need to load the entire data set into memory to work with it. Because
the data is being stored in a relational database, our application can
scale to a very large size. SQLite itself has been tested with data sets
measured in terabytes and can handle just about anything that we can
realistically develop. Since we are loading only the data we want at a
particular moment, SQLite keeps the memory footprint of our applica-
tion quite low. Likewise, SQLite makes efficient use of its disk space
and therefore has a small footprint on disk as well.
Report erratum
this copy is (P1.0 printing, September 2009)Prepared exclusively for Robert Walsh
Download at WoweBook.Com

OPTIMIZING YOUR DATA MODEL 99
More Performance-Tuning Options
By working with a database instead of a flat file, we have access to
many more performance-tuning options. For example, we can index
the columns within our entities to enable faster predicates. We can also
control exactly what gets loaded into memory. It is possible to get just
a count of the objects, just the unique identifiers for objects, and more.
This flexibility allows us to tune the performance of our application
more than any other store type. Because the SQLite store is the only
format that is not fully loaded into memory, we get to control the data
flow. All of the other formats require that the entire data file be loaded
into memory before they can be used. The details of how to utilize these
features are discussed in Section 6.3, Fetching, on page 104.
6.2 Optimizing Your Data Model
When we are designing our data model, we need to consider several fac-
tors. Where we put our binary data can be extremely important because
its size and storage location will play a key role in the performance of
our application. Likewise, relationships must be carefully balanced and
used appropriately. Also, entity inheritance, a powerful feature of Core
Data, must be used with a delicate hand because the underlying struc-
ture may be surprising.
Although it is easy to think of Core Data as a database API, we must
remember that it is not and that structuring the data with data normal-
ization may not yield the most efficient results. In many cases, denor-
malizing the data can yield greater performance gains.
Where to Put Binary Data
One of the easiest ways to kill performance in a Core Data application
is to stick large amounts of binary data into frequently accessed tables.
For example, if we were to put the pictures of our recipes into the recipe
table, we would start seeing performance degradation after only a cou-
ple hundred recipes had been added. Every time we accessed a Recipe
entity, we would have to load its image data, even if we were not going
to display the image. Since our application displays all the recipes in a
list, this would mean that every image would reside in memory imme-
diately upon launch and would remain there until the application quit.
Imagine this situation with a few thousand recipes!
Report erratum
this copy is (P1.0 printing, September 2009)Prepared exclusively for Robert Walsh
Download at WoweBook.Com

OPTIMIZING YOUR DATA MODEL 100
Joe Asks. . .
What Is a Fault?
Core Data faults are similar to virtual memory page faults.Faulted objects are scoped objects that may or may not actu-ally be in memory, or “realized,” until you actually use them.Although there is no guarantee for when a faulted NSMan-
agedObject will be loaded into memory, it is guaranteed tobe loaded when accessed. However, the object will be aninstance of the appropriate class (either an NSManagedObject
or the designated subclass), but its attributes are not initialized.
But where do we draw the line? What is considered a small enough
piece of binary data to fit into a table, and what should not be put into
the repository at all?
Small Binary Data
Anything smaller than 100 kilobytes is considered to be small binary
data. Icons or small avatars are a couple examples of data of this size.
When working with something this small, it is most efficient to store it
directly as a property value in its corresponding table. The performance
impact of binary data this size is negligible. The transformable attribute
type is ideal for this use.
Medium Binary Data
Medium binary data is anything that is larger than 100 kilobytes and
smaller than 1 megabyte in size. Average-sized images and small audio
clips are a few examples of data in this size range. Data of this size
can also be stored directly in the repository. However, the data should
be stored in its own table on the other end of a relationship with the
primary tables. This allows the binary data to remain a fault until it
is actually needed. In the previous recipe example, even though the
Recipe entity would be loaded into memory for display, the image would
be loaded only when it is needed by the UI.
SQLite has shown itself to be quite efficient at disk access. There are
cases where loading data from the SQLite store can actually be faster
than direct disk access. This is one of the reasons that medium binary
data can be stored directly in the repository.
Report erratum
this copy is (P1.0 printing, September 2009)Prepared exclusively for Robert Walsh
Download at WoweBook.Com

OPTIMIZING YOUR DATA MODEL 101
Figure 6.1: Entity inheritance example
Large Binary Data
Large binary data is anything greater than 1 megabyte in size. Large
images, audio files, and video files are just some examples of data of this
size. Any binary data of this size should be stored on disk as opposed to
in the repository. When working with data of this size, it is best to store
its path information directly in the primary entity (such as the Recipe
entity) and store the binary data in a known location on disk (such as
in the Application Support subdirectory for your application).
Entity Inheritance
Entity inheritance is a very powerful feature within Core Data. It allows
you to build an object-like inheritance tree in your data model. How-
ever, this feature comes at a rather large cost. For example, let’s look
at an example model that makes moderate use of entity inheritance, as
shown in Figure 6.1.
The object model itself looks quite reasonable. We are sharing name,
desc, and a one-to-many relationship to the ImageEntity. However, the
underlying table structure actually looks like Figure 6.2, on the follow-
ing page. The reason for this is how Core Data handles the object model
to relational table mapping. Instead of creating one table for each child
Report erratum
this copy is (P1.0 printing, September 2009)Prepared exclusively for Robert Walsh
Download at WoweBook.Com

OPTIMIZING YOUR DATA MODEL 102
Figure 6.2: SQLite table layout
object, Core Data creates one large table that includes all the proper-
ties for the parent entity as well as its children. The end result is an
extremely wide and tall table in the database with a high percentage of
empty values.
Although the entity inheritance feature of Core Data is extremely use-
ful, we should be aware of what is going on underneath the object model
to avoid a performance penalty. We should not treat entity inheritance
as an equal to object inheritance. There is certainly some overlap, but
they are not equal, and treating them as such will have a negative
impact on the performance of the repository.
Denormalizing Data to Improve Performance
Although the most powerful persistent store available for Core Data is a
database, we must always be conscious of the fact that Core Data is not
just a database. Core Data is an object hierarchy that can be persisted
to a database format. The difference is subtle but important. Core Data
is first a collection of objects that we use to display data in a user
interface of some form and allow the user to access that data. Therefore,
although database normalization might be the first place to look for
performance improvements, we should not take it too far. There are six
levels of database normalization,1 but a Core Data repository should
rarely, if ever, be taken beyond the second level. There are several cases
where we can gain a greater performance benefit by denormalizing the
data.
Search Only Properties
Searching within properties can be quite expensive. For properties that
have a large amount of text or, worse, Unicode text, a single search
field can cause a huge performance hit. One way to improve this sit-
uation is to create a derived attribute based on the text in an entity.
1. See http://en.wikipedia.org/wiki/Database_normalization for details.
Report erratum
this copy is (P1.0 printing, September 2009)Prepared exclusively for Robert Walsh
Download at WoweBook.Com

OPTIMIZING YOUR DATA MODEL 103
For example, searching in our description property of the Recipe entity
can potentially be very expensive if the user has verbose descriptions
and/or uses Unicode characters in the description.
To improve performance of searches in this field, we could create a
second property on the Recipe entity that strips the Unicode characters
from the description and also removes common words such as a, the,
and etc. If we then perform the search on this derived property, we can
drastically improve search performance.
The downside to using search-only properties is that we need to main-
tain them. Every time the description field is edited, we need to update
the derived property as well.
Expensive Calculations
In a normalized database, calculated values are not stored. It is consid-
ered cheaper to recalculate the value as needed than to store it in the
database. However, from a user experience point of view, the opposite
can frequently be true. In cases where the calculation takes a human-
noticeable amount of time, it may very well be better for the user to
store that calculation in the entity and recalculate it only when one of
its dependent values has changed. For example, if we store the first and
last names of a user in our Core Data repository, then it might make
sense to store the full name as well.
Intelligent Relationships
Relationships in a Core Data Model are like salt in a cooking recipe.
Too much and you ruin the recipe; too little and something is missing.
Fortunately, there are some simple rules we can follow when it comes
to relationships in a Core Data repository.
Follow the Object Model
Core Data is first and foremost an object model. The entities in our
model should represent the data as accurately as possible. Just be-
cause a value might be duplicated across several objects (or rows from
the database point of view) does not mean it should be extruded into
its own table. Many times it is more efficient for us to store that string
several times over in the entity itself than to traverse a relationship to
get it.
Report erratum
this copy is (P1.0 printing, September 2009)Prepared exclusively for Robert Walsh
Download at WoweBook.Com

FETCHING 104
Traversing a relationship is generally more expensive than accessing
an attribute on the entity. Therefore, if the value being stored is simple,
then leave it in the entity it is associated with.
Separate Commonly Used from Rarely Used Data
If the object design calls for a one-to-many relationship or a many-
to-many relationship, then definitely create a relationship for it. This
is usually the case where the data is more than a single property or
contains binary data or would be difficult to properly model inside the
parent object. For example, if we have a user entity, it is more effi-
cient to store their address in its own object as opposed to having sev-
eral attributes in the user object for address, city, state, postal code,
and so on.
Balance needs to be carefully maintained between what is stored on
the other end of a relationship and what is stored in the primary entity.
Crossing key paths is more expensive than accessing attributes, but
creating objects that are very wide also slows down data access.
6.3 Fetching
Fetching is the term used to describe the resolving of NSManagedObject
objects from the repository. When we retrieve an NSManagedObject, it is
“fetched” into memory, and we can then access its properties. To help
us utilize memory efficiently, fetching may not always happen all at
once. Specifically, when we are using a SQLite store, it is quite possible
that an object we think is in memory is actually only on disk and has
yet to be read into memory. Likewise, objects that we think we are done
with may actually still sit in a cache.
To demonstrate the differences in the ways that we can load data into
memory from our SQLite Store, I used Apple’s demonstration applica-
tion from WWDC 2007 called GoFetch.2 The entire goal of this appli-
cation is to generate a large amount of random data and let us control
how it is fetched back into memory. Each fetch is then timed to demon-
strate the speed of various options. These tests were performed with
3,417 records in the SQLite repository.
2. The source code for this application is available as part of the ADC Headstart package
for Core Data.
Report erratum
this copy is (P1.0 printing, September 2009)Prepared exclusively for Robert Walsh
Download at WoweBook.Com

FETCHING 105
Loading NSManagedObjectID Objects Only
The smallest amount of data that we can retrieve as part of an NSFetch-
Request is just the NSManagedObjectID. The NSManagedObjectID is the
unique identifier for the record and contains no content. In the test
discussed earlier, it took the test machine 0.004 seconds to retrieve
3,417 records from disk.
How to Retrieve NSManagedObjectID Objects
There is only one change required to retrieve just NSManagedObjectID
objects instead of full NSManagedObject objects:
NSFetchRequest *fetchRequest = [[NSFetchRequest alloc] init];
[fetchRequest setEntity:[NSEntityDescription entityForName:@"Person"
inManagedObjectContext:[self managedObjectContext]]];
[fetchRequest setResultType:NSManagedObjectIDResultType];
By changing the -resultType to NSManagedObjectIDResultType, our call to
-executeFetchRequest:error: will return an NSArray of NSManagedObjectID
objects instead of NSManagedObject objects.
Why would we want only the NSManagedObjectID objects? There are
several uses for this:
• Inclusion comparison. Since NSManagedObjectID objects guaran-
tee uniqueness, we can use them to determine whether an object
is included in a set and avoid having to retrieve the entire set for
this comparison.
• Prefetching. Even though the properties for the associated objects
are not loaded into NSManagedObject objects for us to access, they
are loaded into a cache within Core Data. This means that when
we do access the associated NSManagedObject objects via a call
to objectWithID: on NSManagedObjectContext, we will get the results
much faster than if we had to make a full round-trip to the disk.
You can accomplish this by turning on property loading while
keeping the -resultType as NSManagedObjectIDResultType. This is of-
ten referred to as warming up the cache.
Loaded As a Fault
The next smallest amount of data that we can retrieve is referred to as
a faulted NSManagedObject. What this means is that the NSFetchRequest
returns an NSArray of NSManagedObject objects, but those objects con-
tain only the NSManagedObjectID. All the properties and relationships
Report erratum
this copy is (P1.0 printing, September 2009)Prepared exclusively for Robert Walsh
Download at WoweBook.Com

FETCHING 106
are empty or in a faulted state. As soon as an attribute is accessed, all
of the attributes on that object are loaded in. Likewise, as soon as a rela-
tionship is accessed, all the NSManagedObject objects on the other end
of that relationship are loaded in as faults. Performing the same query
as earlier in this configuration returned the 3,417 records in 0.007 sec-
onds. Faults will be discussed in greater depth in Section 6.4, Faulting,
on page 108.
How to Retrieve Faulted NSManagedObject Objects
To disable the fetching of attributes as part of the NSFetchRequest, we
need to disable it prior to executing the fetch:
NSFetchRequest *fetchRequest = [[NSFetchRequest alloc] init];
[fetchRequest setIncludesPropertyValues:NO];
[fetchRequest setEntity:[NSEntityDescription entityForName:@"Person"
inManagedObjectContext:[self managedObjectContext]]];
Although this seems like a great solution, it can be a bit of a trap.
Because this configuration returns empty skeletons, each object gets
loaded from disk individually. This is significantly slower than loading
all the objects needed at once. However, the time to load the objects is
spread out and can be less noticeable to the user. For raw speed, it is
recommended that we load all the data for the objects in one pass.
Loading Property Values
The next step up from faulted NSManagedObject objects is to prefetch
their property values. This will not retrieve the objects on the other
sides of relationships. Performing this query took 0.021 seconds for
the 3,417 records in the test repository.
How to Retrieve Only Property Values
Retrieving NSManagedObject objects with attributes populated is the
default for NSFetchRequest:
NSFetchRequest *fetchRequest = [[NSFetchRequest alloc] init];
[fetchRequest setEntity:[NSEntityDescription entityForName:@"Person"
inManagedObjectContext:[self managedObjectContext]]];
This option is a very good middle ground between fetching faults and
some of the following choices. In situations where only the object re-
quested needs to be displayed right away and its relationships are not
needed right away, this can be the most efficient solution.
Report erratum
this copy is (P1.0 printing, September 2009)Prepared exclusively for Robert Walsh
Download at WoweBook.Com

FETCHING 107
How to Load Property Values and NSManagedObjectID Objects
We can also combine this option with the NSManagedObjectID retrieval
listed earlier to warm up the cache. The settings to accomplish this are
as follows:
NSFetchRequest *fetchRequest = [[NSFetchRequest alloc] init];
[fetchRequest setResultType:NSManagedObjectIDResultType];
[fetchRequest setEntity:[NSEntityDescription entityForName:@"Person"
inManagedObjectContext:[self managedObjectContext]]];
This can be used to excellent effect on a background thread when the
entire fetch is going to take a significant amount of time. Once the
NSManagedObjectID objects are retrieved, they can be safely passed to
the primary thread and used to display the data to the user. Using Core
Data within a multithreaded application is discussed in greater detail
in Chapter 9, Multithreading and Core Data, on page 162.
Loading Relationships
The next step up in the scale of loading data is to prefetch the relation-
ships while loading the targeted entities. This does not fetch them as
fully formed but as faults. This step up can have a significant impact on
the performance of a Core Data application. In the test, this fetch took
1.166 seconds to retrieve 3,417 objects each with only a single object
on the other side of a one-to-one relationship. With a more complex
data model, this becomes an even larger performance hit.
How to Load Relationships
Fortunately, this option gives us some fine-grained control over which
relationships to load. This would allow us to, for example, load only the
addresses associated with a person and skip over their images, phone
numbers, and so on. Accomplishing this requires passing an NSArray of
NSString objects with the names of the relationships to load:
NSFetchRequest *fetchRequest = [[NSFetchRequest alloc] init];
NSArray *relationshipKeys = [NSArray arrayWithObject:@"addresses"];
[fetchRequest setRelationshipKeyPathsForPrefetching:relationshipKeys];
[fetchRequest setEntity:[NSEntityDescription entityForName:@"Person"
inManagedObjectContext:[self managedObjectContext]]];
In this example code, we create a new NSArray that has one NSString
within it that corresponds to the name of the relationship within the
Person entity. We can get even more clever with this request by using a
keypath in the NSArray and specifying a second level of objects to include
in the fetch. For example, if our Address entities had a relationship to
Report erratum
this copy is (P1.0 printing, September 2009)Prepared exclusively for Robert Walsh
Download at WoweBook.Com

FAULTING 108
a postal code lookup table that contained the city and state, we could
change the NSArray creation line to the following:
NSArray *relationshipKeys = [NSArray arrayWithObject:@"addresses",
@"addresses.postalCode", nil];
That would cause Core Data to retrieve two levels of relationships as
faults. In addition, this call does check for duplication before executing
the requests and thereby can be used safely when mixing keypaths. In
other words, the postalCode relationship, which is probably many-to-
many, will not be retrieved more than once.
NSFetchRequest and Disk Access
Every time an NSFetchRequest is executed, it hits the disk. This is an
important point to keep in mind when we are working with NSManaged-
Object objects. If we are doing joins, adding objects to a relationship,
and so on, it might seem easier and cleaner to perform an NSFetchRe-
quest to check to see whether the object is already in the relationship
or a similar function, but that can hurt performance significantly. Even
if we have all the relevant objects in memory, an NSFetchRequest is still
going to hit the disk. It is far more efficient for us to use that NSPredicate
against a collection that is already in memory.
We have seen in this section that with a SQLite persistent store, we
have a lot of control over how our data is loaded into memory. We can
tailor the load to fit our exacting needs. All of these options can be a
bit overwhelming, but there is one good rule of thumb. Try to load only
the data you need at that moment in one pass. Every fetch request can
take quite a bit of time, and since they are normally performed on the
main thread, they can damage the user experience of your application.
6.4 Faulting
Firing faults individually is one of the most common, if not the most
common, cause for the poor performance of Core Data applications.
Faults are a double-edged sword that can make great improvements to
the speed and performance of our applications or can drag the perfor-
mance down to the depths of the unusable. The single most valuable
performance improvements we can make to a Core Data application is
to make sure we are fetching only the data we need when we need it.
If we fetch too little, then our application will feel unresponsive. If we
Report erratum
this copy is (P1.0 printing, September 2009)Prepared exclusively for Robert Walsh
Download at WoweBook.Com

FAULTING 109
Application Context Disk
10E-9Seconds
10E-3Seconds
Figure 6.3: Access performance
fetch too much, then our application will stall with the famous Spinning
Beach Ball of Death.
Orders of Magnitude
Disk access is significantly slower than accessing memory. The times
measured for each is six orders of magnitude different. This translates
into disk access being roughly 1 million times slower than accessing
data that is stored in memory, as illustrated in Figure 6.3.
Although the actual retrieval times are closer to a few thousand times
slower, the point is still clear. Avoid accessing the disk if possible. How-
ever, when we have no choice but to access the disk, attempt to get
everything we need in one pass. Repeated small requests to the disk
are significantly slower than one larger request.
Prefetching
In Section 6.3, Fetching, on page 104, we reviewed the different ways
that we can retrieve the data from disk. To expand on that, consider
each request you make from the NSManagedObjectContext and try to
retrieve all the data in one request that the user is going to want to
view. For example, if the user is going to be editing a user record, load
that user and all its relationships at once. This will be significantly
faster than grabbing the Person entity and then going back to grab three
Address entities, then two Phone entities, and so on. Use the relation-
ship prefetching option of NSFetchRequest to grab all of them at once.
If we can predict what the user is going to want to see and load it ahead
of their request, the overall user experience will be vastly improved.
As we are developing our applications, we need to look at each win-
dow, view, or sheet and ask, “What information will this part present?"
and make sure that all of that information is either already in mem-
ory or loaded at once. Having said that, we need to balance this with
Report erratum
this copy is (P1.0 printing, September 2009)Prepared exclusively for Robert Walsh
Download at WoweBook.Com

FAULTING 110
information overload, as discussed in Section 6.5, Access Patterns, on
page 112.
Warming Up the Cache
As we discussed in Section 6.3, Fetching, on page 104, it is possible
to preload the data into the cache so that it is in memory when we
need it. The easiest way to perform this is to execute a full fetch on a
background thread. For example, on launch of our recipe application,
we could launch a background thread to retrieve all the Recipe entities.
This would allow us to fill the cache with the Recipe entities that we
know are going to be presented to the user. This would allow the main
thread to grab those recipes from the cache instead of the disk and
give the user a smoother-running application in the process. The magic
behind this is based on how the NSPersistentCoordinator works. Whenever
any request on any thread is performed, the data is held in the NSPersis-
tentStoreCoordinator as part of its cache. When another request is made,
no matter what thread it came from, for that same data it is retrieved
from the cache instead of requiring another hit to the disk.
Saving
The numbers discussed in Section 6.4, Orders of Magnitude, on the
previous page also apply to writing the data back out to the disk. In
fact, writing to the disk is even slower than reading from it. Therefore,
it is more efficient for us to save data back out to disk in batches.
Saving after every record change will cause our entire application to feel
sluggish to the user. Likewise, doing a huge write while the application
is attempting to exit will give the appearance that our application has
stopped responding and risks data loss.
As with most things when it comes to performance tuning, be aware of
your saves and how much data, or how frequently, you are saving data.
Try to do saves during logical pauses in the application flow.
Deleting
It may come as a surprise, but deleting an object can cause a per-
formance issue. Let’s review the data model from Chapter 5, Version-
ing and Migration, on page 73. Imagine that in this later version of
our application we want to delete a recipe from the repository. When
we delete the recipe, we have a cascade rule set up to delete all the
associated RecipeIngredient entities as well. We also need to touch the
Report erratum
this copy is (P1.0 printing, September 2009)Prepared exclusively for Robert Walsh
Download at WoweBook.Com

FAULTING 111
Figure 6.4: Impacts of deleting a recipe
Author entity, Ingredient entity, and UnitOfMeasure entity, as shown in
Figure 6.4.
It is obvious why we need to touch the RecipeIngredient entity, but why
do we need to access all the others? This is because of the relation-
ships between the entities. For each relationship, we need to validate
the relationship after the delete and confirm that there are no dan-
gling references. If these objects are not currently in memory, then the
NSManagedObjectContext must retrieve them from the disk to accom-
plish all of this.
Therefore, when we are doing deletes, especially large deletes, it can be
a performance improvement to fetch all the relationships prior to the
delete.
Faulting and Disk Access
Firing a fault does not always mean that the data is going to be read
from disk. Depending on how we have requested the data in the first
Report erratum
this copy is (P1.0 printing, September 2009)Prepared exclusively for Robert Walsh
Download at WoweBook.Com

ACCESS PATTERNS 112
place or what happened earlier in the NSManagedObject object’s life
span, it is quite possible that the data will be loaded from cache instead.
Likewise, faulting an NSManagedObject does not guarantee that it will
be written back out to disk nor does it guarantee that it will be removed
from the cache. If the object has no changes, then there is nothing to
write to disk, and it is quite possible that it will remain in the cache for
an unknown period of time.
Easily one of the best ways to check to see whether the firing of a fault
is in fact causing disk access is to monitor our application with instru-
ments. By using the Core Data template, we can use the “cache miss”
instrument to check for disk hits. If we are getting far more calls to the
disk than expected, then we need to consider refactoring the code.
6.5 Access Patterns
Improving performance within Core Data is not necessarily only about
the repository and order of loading the data. There are a number of
things that we can do within the user interface to help performance as
well.
Searching
Searching the repository can be absolute murder on performance.
Whether we are searching at the request of the user or we are per-
forming a search in the background, we need to be very careful to avoid
impacting the performance of our application.
Order Is Important
Just like any conditional, the order of the logic is important. Simple
equality is faster than inclusions such as in, contains, and so on. When
building the predicate, try to order the logic from left to right, simple
to complex. This will allow Core Data to fail quickly and improve the
search performance.
Unicode and Regular Expressions
Unicode is very expensive to work with when we are searching. As sug-
gested earlier in Section 6.2, Search Only Properties, on page 102, try to
avoid searching against Unicode directly. It is cheaper to keep a derived
value that strips off the Unicode than it is to do frequent searches
against the Unicode text.
Report erratum
this copy is (P1.0 printing, September 2009)Prepared exclusively for Robert Walsh
Download at WoweBook.Com

ACCESS PATTERNS 113
Likewise, regular expressions are expensive. If a situation calls for one,
try to put it at the far right end of the NSPredicate, as discussed in
Section 6.5, Order Is Important, on the previous page.
Limit Queries Across Relationships
Searching across objects that are joined by a relationship can be very
expensive for searching. Although it is impressive to search against per-
son.address.postalCode.city, it may not be the most efficient way to solve
the problem. Consider reversing the query or breaking it down into sev-
eral smaller queries to reduce the complexity of the underlying SQL.
When we are working with a SQLite back end, all of our NSPredicate
calls turn into SQL before hitting the database. The less complex that
SQL is, the faster it will run. It may very well be faster to get an NSArray
of all the Address objects within a specific city and then perform the
rest of the query against that NSArray than it would be to traverse three
relationships in one call.
Information Overload
A busy user interface is more than just a poor user experience; it also
impacts the performance of the application. When we display a large
amount of data on the screen, we must keep that information in mem-
ory, which in turn means we must load a large amount of data from
disk all in one go. It is far better to break an application user interface
up into consumable chunks of information than it is to try to display
every last bit on the screen at once.
The careful use of tabs, sheets, and panels can improve the feel of
a user interface, and that will in turn improve the performance. By
splitting the user interface into smaller pieces, we have finer-grained
control over what data gets loaded when, and we can reduce our disk
access to manageable chunks.
Keep it simple.
Report erratum
this copy is (P1.0 printing, September 2009)Prepared exclusively for Robert Walsh
Download at WoweBook.Com

Chapter 7
Spotlight, Quick Look,and Core Data
Developing for Mac OS X is about functionality meeting quality. When
our applications have either without the other, we leave our users want-
ing more. They may not be able to define it, but “something” will be
missing. Spotlight and Quick Look integration are two of those things
that users don’t look for when trying a new application but are pleas-
antly surprised by them when they stumble upon them. Surprisingly,
not a lot of developers handle this integration. Perhaps it is because
Spotlight does not get along with Core Data very well. Perhaps the fea-
ture is too new. But one thing is for certain—integrating with Spotlight
is the right move going forward. Spotlight is here to stay, and users will
be using it more often and in more creative ways.
Unfortunately, for technical reasons, Spotlight and Core Data are at
odds with each other. Spotlight works on the metadata of individual
files, and Core Data stores everything in a single file. Because Spotlight
is designed to work with the metadata of a file to discover things about
the file, it will not work very well with a single file design such as Core
Data. When Tiger was first released, there were a number of applica-
tions (such as Entourage) that, because of their single file design, did
not play nicely with Spotlight. In fact, Apple rearchitected Mail for that
reason.
The incompatibility between Spotlight and Core Data is corrected in
Snow Leopard but unfortunately it’s Snow Leopard only and not back-
ward compatible with plain old vanilla Leopard. How? It’s in a manner
that is very similar to the solution described in this chapter.
Prepared exclusively for Robert Walsh
Download at WoweBook.Com

CHAPTER 7. SPOTLIGHT, QUICK LOOK, AND CORE DATA 115
Should I Just Use Separate Files?
Throughout this book, the application we are designing usesa single Core Data file. This is done for the sake of clarity andfocus on Core Data. Depending on the application that isbeing designed, it is highly likely that it will be document based,and therefore it would be appropriate to have one Core Datarepository per document. In that situation, Spotlight and QuickLook can be a lot easier to integrate.
However, for applications that are not document based, thenit is preferable to use a single Core Data repository as opposedto individual files. Although individual files will make Spotlighteasier to work with, it would be the tail wagging the dog. Themain focus of object persistence (in other words, data files) isto quickly and easily access the data in a logical and repro-ducible manner. Core Data solves all those problems quiteneatly with the unfortunately minor side effect of not being fullycompatible with Spotlight.
In this chapter, we will integrate Spotlight into our recipes application.
Once we are done, our users will be able to search for Pot Roast and
find it in our application. In addition, when they select that search
result, our application will not only open but open to Pot Roast. While
we are solving the Spotlight issue, we are also going to take a look at
Quick Look. Although on the surface these two technologies appear to
be completely different, they are handled in a very similar fashion by
Mac OS X and the Finder. And although it is not 100 percent appro-
priate for our sample application (since we have only a single data file
and that data file is hidden away in the Library/Application Support
directory), it is very useful to understand how Quick Look works for
document-based Core Data applications because it makes them easier
to find in Finder, Spotlight, Time Machine, Mail, and many other appli-
cations. Lastly, Quick Look and Spotlight integrate rather well together.
If our users activate Quick Look on a Spotlight result, we want them to
see information about the recipe, not a picture of a generic file.
Report erratum
this copy is (P1.0 printing, September 2009)Prepared exclusively for Robert Walsh
Download at WoweBook.Com

INTEGRATING WITH SPOTLIGHT 116
7.1 Integrating with Spotlight
The issue, as mentioned, is one of multiple files. Ideally, for our recipe
application, we want one Spotlight “record” for each recipe in our Core
Data repository. For Spotlight to work properly, we would need one file
on the disk for each recipe along with its associated metadata. There-
fore, to make Spotlight happy, we will do exactly that. However, since
all our data is being stored in a Core Data repository, there is no rea-
son to store any data in these files. These additional files exist purely
for Spotlight (and Quick Look) to utilize. Since Spotlight does not need
any data in the files to work (it just needs metadata), we will create very
simple files and link them back to our Core Data repository.
The other gotcha with Spotlight is that the importer needs to be as
fast as possible. What might be acceptable for processing one file or
ten files is not going to fly when Spotlight has to chug through thou-
sands of files. Since the same importer that we are writing for use
inside our application could potentially be used in a server situation,
it needs to be as fast as we can make it. Therefore, we will cheat a
bit. Instead of looking up the metadata in our Core Data repository
upon request from Spotlight, we will instead store that metadata in the
files we are creating for Spotlight. That way, our importer has to touch
the metadata files only and does not need to initialize the entire Core
Data “stack” (NSManagedObjectContext, NSPersistentStoreCoordinator, and
NSManagedObjectModel).
Creating the Metadata Files
We first need to produce and update the metadata files on the fly. To
keep them as simple as possible, we will just use plist files as opposed to
a binary representation or some other format. Since NSDictionary under-
stands plist files, it will reduce the amount of overhead we have for
loading and saving the files.
To begin with, we will create our first NSManagedObject subclass. This
subclass will handle producing the NSDictionary that will contain all the
metadata. Since we are creating a subclass, we might as well implement
some of the properties we will be using to reduce the code complexity
and make it easier to maintain.
Report erratum
this copy is (P1.0 printing, September 2009)Prepared exclusively for Robert Walsh
Download at WoweBook.Com

INTEGRATING WITH SPOTLIGHT 117
Figure 7.1: Changing the entity’s class
Therefore, our header file will look as follows:
Download Spotlight/PPRecipe.h
#import <Cocoa/Cocoa.h>
extern NSString *kPPImagePath;
extern NSString *kPPObjectID;
extern NSString *kPPServes;
@interface PPRecipe : NSManagedObject {
}
@property (assign) NSString *desc;
@property (assign) NSString *name;
@property (assign) NSString *type;
@property (assign) NSManagedObject *author;
@property (assign) NSDate *lastUsed;
- (NSDictionary*)metadata;
- (NSString*)metadataFilename;
@end
We need to make sure that we change the class setting in the latest data
model so that Core Data will use our subclass rather than the default
NSManagedObject. See Figure 7.1.
Implementing the Metadata Method
The goal of this metadata file is to contain just enough information to
populate Spotlight and Quick Look but not too much information that
Report erratum
this copy is (P1.0 printing, September 2009)Prepared exclusively for Robert Walsh
Download at WoweBook.Com

INTEGRATING WITH SPOTLIGHT 118
the files become large and cumbersome. We always have to pretend that
there will be thousands of these files (even if in reality that would be
impractical), and we do not want to impact the user’s performance or
their hard drive capacity. For our metadata files, we really need only
the following information:
• The name of the recipe
• The number of people it serves
• The image for the recipe
• The last time it was served
• The description of how to prepare it
Most of that list is very light—just text. However, the image is proba-
bly too large to cram into the plist file, especially since we cannot be
sure how large those files will be. In addition, it would complicate the
file format by including binary data. Therefore, we will put in its path
instead of the actual image. Since the image is stored on disk anyway,
we can just access that copy.
In addition to this list, we need to add one more item that is not user
facing. We want a way to link back to the recipe record in our Core
Data repository so that if the user tries to open the metadata file, it will
instead open our application and select the correct record. To do this,
we will use the NSManagedObjectID of the recipe and store its URIRepre-
sentation (which is actually an NSURL) as a string in the metadata.
Download Spotlight/PPRecipe.m
- (NSDictionary*)metadata;
{
NSMutableDictionary *metadataDict = [NSMutableDictionary dictionary];
[metadataDict setValue:[self name]
forKey:(id)kMDItemTitle];
[metadataDict setValue:[self desc]
forKey:(id)kMDItemTextContent];
[metadataDict setValue:[[self author] valueForKey:@"name"]
forKey:(id)kMDItemAuthors];
[metadataDict setValue:[self valueForKey:@"imagePath"]
forKey:kPPImagePath];
[metadataDict setValue:[self lastUsed] forKey:(id)kMDItemLastUsedDate];
[metadataDict setValue:[self valueForKey:@"serves"] forKey:kPPServes];
[metadataDict setValue:[NSString stringWithFormat:@"Recipe: %@", [self name]]
forKey:(id)kMDItemDisplayName];
[metadataDict setValue:[[[self objectID] URIRepresentation] absoluteString]
forKey:kPPObjectID];
return metadataDict;
}
Report erratum
this copy is (P1.0 printing, September 2009)Prepared exclusively for Robert Walsh
Download at WoweBook.Com

INTEGRATING WITH SPOTLIGHT 119
Implementing the metadataName Method
Because we want users to be able to view the actual metadata files in
the Finder, the filenames should represent the recipe rather than an
abstract name. Therefore, we will use the name attribute of the recipe
itself as the filename:
Download Spotlight/PPRecipe.m
- (NSString*)metadataFilename;
{
return [[self name] stringByAppendingPathExtension:@"grokkingrecipe"];
}
Generating and Updating the Metadata Files
Now that we have an implementation for generating the metadata per
recipe, we need to add the ability to populate these files and keep them
up-to-date. Ideally, we want to refresh the metadata files every time
that the NSManagedObjectContext is saved. To do this, we will add a new
-save: method to our AppDelegate and route all of our saves through it:
Download Spotlight/AppDelegate.m
- (BOOL)save:(NSError**)error;
{
NSManagedObjectContext *moc = [self managedObjectContext];
if (!moc) return YES;
if (![moc hasChanges]) return YES;
//Grab a reference to all of the objects we will need to work with
NSSet *deleted = [moc deletedObjects];
NSMutableSet *deletedPaths = [NSMutableSet set];
for (NSManagedObject *object in deleted) {
if (![object isKindOfClass:[PPRecipe class]]) continue;
[deletedPaths addObject:[object valueForKey:@"metadataFilename"]];
}
NSMutableSet *updated = [NSMutableSet setWithSet:[moc insertedObjects]];
[updated unionSet:[moc updatedObjects]];
//Save the context
if (![moc save:error]) {
return NO;
}
return [self updateMetadataForObjects:updated
andDeletedObjects:deletedPaths
error:error];
}
Report erratum
this copy is (P1.0 printing, September 2009)Prepared exclusively for Robert Walsh
Download at WoweBook.Com

INTEGRATING WITH SPOTLIGHT 120
In this new -save: method, we are doing a couple of things before calling
save on the NSManagedObjectContext. Since the NSManagedObjectCon-
text knows what objects have been deleted, updated, or inserted, we
want to grab a reference to that information before the -save: occurs.
Once the -save: is complete, that information is no longer available.
Therefore, we grab a reference to the NSSet of deleted objects, updated
objects, and inserted objects. Because the deleted objects will be, well,
deleted once the -save: is performed, we want to extract the information
we care about beforehand. Therefore, we loop over the deleted objects
looking for Recipe instances. Whenever we find one, we extract its meta-
dataFilename and store it in a new NSMutableSet. In addition, since we
will be doing the same thing to the inserted and the updated objects, we
merge them into one set. Once we have that information, we go ahead
and save the context. If the save fails, we just abort and let the calling
code handle the error. When the save is successful, it is time to update
the metadata.
Download Spotlight/AppDelegate.m
if ((!updatedObjects || ![updatedObjects count]) &&
(!deletedObjects || ![deletedObjects count])) return YES;
NSString *path = [self metadataFolder:error];
if (!path) return NO;
BOOL directory = NO;
NSFileManager *fileManager = [NSFileManager defaultManager];
if (![fileManager fileExistsAtPath:path isDirectory:&directory]) {
if (![fileManager createDirectoryAtPath:path
withIntermediateDirectories:YES
attributes:nil
error:error]) {
return NO;
}
directory = YES;
}
if (!directory) {
NSMutableDictionary *errorDict = [NSMutableDictionary dictionary];
NSString *msg = NSLocalizedString(@"File in place of metadata directory",
@"metadata directory is a file error description");
[errorDict setValue:msg forKey:NSLocalizedDescriptionKey];
*error = [NSError errorWithDomain:@"pragprog" code:1001 userInfo:errorDict];
return NO;
}
In the habit of assuming nothing, we first check to make sure that
there is something to update or delete. Once we are past that check, we
Report erratum
this copy is (P1.0 printing, September 2009)Prepared exclusively for Robert Walsh
Download at WoweBook.Com

INTEGRATING WITH SPOTLIGHT 121
next need to confirm that the cache directory is in place and either our
metadata directory is in place or we can create it. If any of this fails, we
update the NSError object and return.
Download Spotlight/AppDelegate.m
NSString *filePath = nil;
if (deletedObjects && [deletedObjects count]) {
for (NSString *filename in deletedObjects) {
filePath = [path stringByAppendingPathComponent:filename];
if (![fileManager fileExistsAtPath:filePath]) continue;
if (![fileManager removeItemAtPath:filePath error:error]) return NO;
}
}
The next part of updating the metadata is to remove any files that are no
longer appropriate. Therefore, if the passed-in deletedObjects set con-
tains any objects, we need to loop over it. Since we know that the name
of the metadata file is stored in the deletedObjects variable, we append
it to the metadata directory path and check for the existence of the file.
If it exists, we delete it.1 If we run into an issue deleting the file, then
we abort the update and let the calling method handle the error.
Download Spotlight/AppDelegate.m
if (!updatedObjects || ![updatedObjects count]) return YES;
NSNumber *_YES = [NSNumber numberWithBool:YES];
NSDictionary *attributesDictionary = [NSDictionary
dictionaryWithObject:_YES
forKey:NSFileExtensionHidden];
for (NSString *filename in updatedObjects) {
if (![object isKindOfClass:[PPRecipe class]]) continue;
PPRecipe *recipe = (PPRecipe*)object;
NSDictionary *metadata = [recipe metadata];
filePath = [recipe metadataFilename];
filePath = [path stringByAppendingPathComponent:filePath];
[metadata writeToFile:filePath atomically:YES];
[fileManager changeFileAttributes:attributesDictionary atPath:filePath];
}
return YES;
The last part of updating the metadata files is to process existing or
new recipes. As with the deleted objects earlier, we first check to see
whether there are any objects to update, and if there are not, we are
1. It may be possible that a recipe got created and deleted without ever being saved to
disk. It’s unlikely, but why take chances?
Report erratum
this copy is (P1.0 printing, September 2009)Prepared exclusively for Robert Walsh
Download at WoweBook.Com

INTEGRATING WITH SPOTLIGHT 122
done and successful. If there are new or updated objects, then we again
loop through the NSSet looking for PPRecipe entities. For each recipe that
we find, we request its metadata NSDictionary object from the metadata
method we created earlier. Using that NSDictionary along with the meta-
dataFilename method, we write the NSDictionary to disk. For one last bit
of polish, we update the attributes on the newly created (or updated)
file and tell it to hide its file extension. This will give us the cleanest
appearance when viewed inside the Finder.
Now that the -save: method has been written, we need to route all
the -save: calls that exist to call this method instead of calling -save:
directly on the NSManagedObjectContext. Currently, this requires modi-
fying both the -(NSApplicationTerminateReply)applicationShouldTerminate:
method and the -(IBAction)saveAction: method. In each case, we just need
to change the following:
[[self managedObjectContext] save:&error]
to a message to the -save: method on the AppDelegate itself:
[self save:&error];
There is one last situation we need to handle. If we have existing users
and are adding the Spotlight integration after v1.0, we need some way
to bring our users up to speed. To do this, we need to add a check to
the -(void)applicationDidFinishLaunching: method. If the metadata directory
does not exist, then we need to do a full push of all the metadata in the
persistent store.
Download Spotlight/AppDelegate.m
NSError *error = nil;
NSString *path = [self metadataFolder:&error];
if (!path) {
NSLog(@"%@:%s Error resolving cache path: %@", [self class], _cmd, error);
return;
}
if ([[NSFileManager defaultManager] fileExistsAtPath:path]) return;
NSManagedObjectContext *moc = [self managedObjectContext];
NSFetchRequest *request = [[[NSFetchRequest alloc] init] autorelease];
[request setEntity:[NSEntityDescription entityForName:@"Recipe"
inManagedObjectContext:moc]];
NSSet *recipes = [NSSet setWithArray:[moc executeFetchRequest:request
error:&error]];
if (error) {
NSLog(@"%@:%s Error: %@", [self class], _cmd, error);
return;
}
Report erratum
this copy is (P1.0 printing, September 2009)Prepared exclusively for Robert Walsh
Download at WoweBook.Com

INTEGRATING WITH SPOTLIGHT 123
[self updateMetadataForObjects:recipes andDeletedObjects:nil error:&error];
if (error) {
NSLog(@"%@:%s Error: %@", [self class], _cmd, error);
return;
}
Here we are looking for the metadata cache directory, and if it does
not exist, then we fetch every recipe entity in the persistent store and
pass the NSSet to our metadata building method. This will also protect
us from users who like to periodically delete their cache directory. This
method calls the -metadataFolder method to determine where the meta-
data should be stored.
Download Spotlight/AppDelegate.m
- (NSString*)metadataFolder:(NSError**)error
{
NSString *path = [NSSearchPathForDirectoriesInDomains(NSCachesDirectory,
NSUserDomainMask, YES)
lastObject];
if (!path) {
NSMutableDictionary *errorDict = [NSMutableDictionary dictionary];
[errorDict setValue:NSLocalizedString(@"Failed to locate caches directory",
@"caches directory error description")
forKey:NSLocalizedDescriptionKey];
*error = [NSError errorWithDomain:@"pragprog" code:1000 userInfo:errorDict];
return nil;
}
path = [path stringByAppendingPathComponent:@"Metadata"];
path = [path stringByAppendingPathComponent:@"GrokkingRecipes"];
return path;
}
In the -metadataFolder, we first request a list of the cache directories
from the NSSearchPathForDirectoiesInDomain method and append the path
components Metadata and GrokkingRecipes to it. We do not check to see
whether the path exists at this point but instead let our caller decide
how to handle that.
Creating the Spotlight Importer
Now that we have some metadata to work with, it is time to build the
Spotlight importer. To start off this part of the application, we need to
first address UTIs.
Uniform Type Identifiers (UTIs)
Both Spotlight and Quick Look use UTIs rather than filename exten-
sions to connect files on disk with (Spotlight) importers and (Quick
Look) generators. A UTI is a unique string that identifies the type of
Report erratum
this copy is (P1.0 printing, September 2009)Prepared exclusively for Robert Walsh
Download at WoweBook.Com

INTEGRATING WITH SPOTLIGHT 124
data stored in a given file. It is recommended that UTIs identify the
company and application that created the data file, and like bundle
identifiers, a reverse domain name is ideal for this purpose.2 Since our
application uses com.pragprog.grokkingrecipes as its unique bundle iden-
tifier, we will use the same UTI as the value of the LSItemContentTypes to
identify the files.
Download Spotlight/Info.plist
<key>CFBundleDocumentTypes</key>
<array>
<dict>
<key>CFBundleTypeExtensions</key>
<array>
<string>grokkingrecipe</string>
</array>
<key>CFBundleTypeIconFile</key>
<string>book.icns</string>
<key>CFBundleTypeName</key>
<string>Grokking Recipe</string>
<key>CFBundleTypeRole</key>
<string>Editor</string>
<key>LSItemContentTypes</key>
<array>
<string>com.pragprog.grokkingrecipe</string>
</array>
<key>NSPersistentStoreTypeKey</key>
<string>XML</string>
</dict>
</array>
The UTExportedTypeDeclarations section is probably very familiar. Xcode
generates it to describe any file that is handled by the application being
built. The one difference is that, instead of defining a file extension (like
.txt), we are defining a UTI that is being handled by our application.
Since this UTI is unknown by the system, we need to describe it, again
in our Info.plist file:
Download Spotlight/Info.plist
<key>UTExportedTypeDeclarations</key>
<array>
<dict>
<key>UTTypeConformsTo</key>
<array>
<string>public.data</string>
<string>public.content</string>
</array>
<key>UTTypeDescription</key>
2. It should be noted that bundle identifiers are in fact UTIs themselves.
Report erratum
this copy is (P1.0 printing, September 2009)Prepared exclusively for Robert Walsh
Download at WoweBook.Com

INTEGRATING WITH SPOTLIGHT 125
<string>Grokking Recipe</string>
<key>UTTypeIdentifier</key>
<string>com.pragprog.grokkingrecipe</string>
<key>UTTypeTagSpecification</key>
<dict>
<key>public.filename-extension</key>
<string>grokkingrecipe</string>
</dict>
</dict>
</array>
This key describes exporting our UTI and tells Mac OS X how to link it
to different file extensions. In addition, this section describes the data
to Mac OS X, telling the OS a descriptive name for the data type and
where in the UTI tree it fits.3
Xcode Subproject
Our Spotlight importer is actually its own application. Xcode handles
this by having a separate project for the importer.4 Since we want to
include the importer as part of our primary application and we do not
want to have to remember to rebuild the subproject every time we build
our main project, we will set it up as a dependent or subproject within
our primary project. To do this, we start with creating a project in Xcode
and selecting the Spotlight importer, as shown in Figure 7.2, on the
next page. We want to save this project in a directory inside our primary
recipe project. Don’t be too clever. Give the subproject an obvious name
like SpotlightPlugin, and include it with the Spotlight example project. To
make Xcode build this plug-in every time we build the main project, we
need to link the two together. This is accomplished with the following
steps:
1. Drag the subproject into the main project. See Figure 7.3, on the
following page.
2. Open the target in the main project, and select the General tab.
3. Add the subproject as a dependency.
4. Add a new copy phase to the main project’s target, and set its
destination to wrapper and path to Contents/Library/Spotlight.
3. For more information on UTIs, I suggest reviewing
http://developer.apple.com/documentation/Carbon/Conceptual/understanding_utis/understand_utis_intro/chapter_1_section_1.html#//a
4. It is actually possible to include the plug-in as part of the main application project,
but I have found that to be a complete mess and more hassle than it is worth.
Report erratum
this copy is (P1.0 printing, September 2009)Prepared exclusively for Robert Walsh
Download at WoweBook.Com

INTEGRATING WITH SPOTLIGHT 126
Figure 7.2: Select the Spotlight template.
Figure 7.3: Drag the subproject into the main project.
Figure 7.4: Drag the plug-in into its build phase.
Report erratum
this copy is (P1.0 printing, September 2009)Prepared exclusively for Robert Walsh
Download at WoweBook.Com

INTEGRATING WITH SPOTLIGHT 127
5. Drag the Spotlight plug-in into the new build phase. See Fig-
ure 7.4, on the previous page.
Now, whenever we clean or build the main project, the subproject will
be cleaned/built. This will also allow the subproject to be built with the
same settings as the primary project.
Linking the Spotlight Importer to the UTI
With our Spotlight importer subproject in place, it is time to link the
importer to the UTI for our metadata files. To do this, we need to update
the Info.plist of our Spotlight subproject to let the operating system know
which UTIs this importer handles.
<array>
<dict>
<key>CFBundleTypeRole</key>
<string>MDImporter</string>
<key>LSItemContentTypes</key>
<array>
<string>com.pragprog.grokkingrecipe</string>
</array>
</dict>
</array>
Here, we are defining our plug-in as having an MDImporter role, and the
list of UTIs contains just the one for our metadata file. With this change,
Mac OS X will know to use this importer to retrieve the information for
our metadata files.
Building the Spotlight Importer
Now that everything is connected, it is time to build the importer itself.
Fortunately, this is the easiest and shortest part of the entire process.
The Spotlight template created the main.m file that we will be using,
and it contains all the boilerplate code for us. The only code we need to
write for the importer is in the GetMetadataForFile.m file. The template
generates a GetMetadataForFile.c file, and that file will not accept any
Objective-C code. Since I prefer Objective-C over straight C, the first
thing I did was rename the .c file to an .m file. This tells Xcode to com-
pile it as Objective-C rather than C. Since we will be using Foundation
APIs, we need to include Foundation.framework as well.
Download Spotlight/SpotlightPlugin/GetMetadataForFile.m
#include <CoreFoundation/CoreFoundation.h>
#include <CoreServices/CoreServices.h>
#import <Foundation/Foundation.h>
Report erratum
this copy is (P1.0 printing, September 2009)Prepared exclusively for Robert Walsh
Download at WoweBook.Com

INTEGRATING WITH SPOTLIGHT 128
Boolean GetMetadataForFile(void* thisInterface,
CFMutableDictionaryRef attributes,
CFStringRef contentTypeUTI,
CFStringRef pathToFile)
{
NSAutoreleasePool *pool = [[NSAutoreleasePool alloc] init];
NSDictionary *metadata;
metadata = [NSDictionary dictionaryWithContentsOfFile:(NSString*)pathToFile];
for (NSString *key in [metadata allKeys]) {
[(id)attributes setObject:[metadata objectForKey:key] forKey:key];
}
[pool release], pool = nil;
return TRUE;
}
The actual code for the importer is almost laughable. We are simply
loading the metadata file back into an NSDictionary, looping over the
keys using the allKeys method, and adding each associated value to
the passed-in CFMutableDictionaryRef. Once we are done with the NSDic-
tionary, we return TRUE and are done. Since we are running inside a C
function, we need to wrap the entire procedure in an NSAutoreleasePool
so that we are not leaking any memory.
Testing the Spotlight Importer
There are a couple of ways to test the importer to make sure that every-
thing is working properly. The first thing we need to do is to generate
the metadata files. We can do this by running our application. Once the
metadata files are created, we can test the importer.
We can get a lot of information about our importer directly on the com-
mand line. Included with Mac OS X is a command-line tool called mdim-
port. A quick review of the man page will reveal that there are three
switches for this command that are of immediate use. First, we need to
tell Spotlight to load our importer:
mdimport -r ${path to our project}/build/Debug/GrokkingRecipes.app/
Contents/Library/Spotlight/SpotlightPlugin.mdimporter
Once Spotlight is aware of our importer, we can start querying it, again
from the command line using the mdimport command:
cd ~/Library/Caches/Metadata/GrokkingRecipes
mdimport -d2 Test.grokkingrecipe
We can change the debug level from 1 to 4 to display different quanti-
ties of information about the metadata file. However, level 2 will tell us
that the importer is working and give us a basic summary of the data
contained inside the file.
Report erratum
this copy is (P1.0 printing, September 2009)Prepared exclusively for Robert Walsh
Download at WoweBook.Com
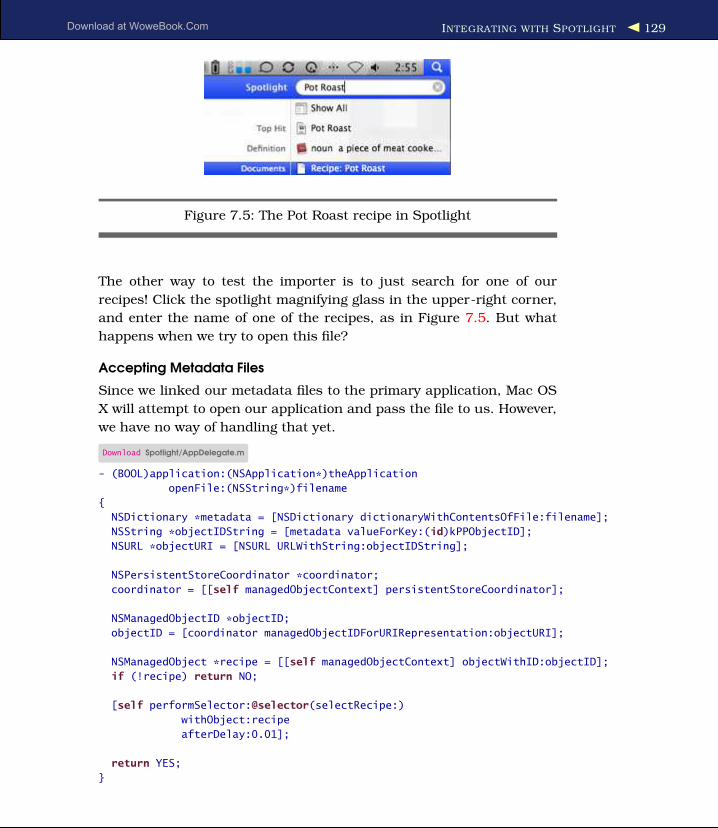
INTEGRATING WITH SPOTLIGHT 129
Figure 7.5: The Pot Roast recipe in Spotlight
The other way to test the importer is to just search for one of our
recipes! Click the spotlight magnifying glass in the upper-right corner,
and enter the name of one of the recipes, as in Figure 7.5. But what
happens when we try to open this file?
Accepting Metadata Files
Since we linked our metadata files to the primary application, Mac OS
X will attempt to open our application and pass the file to us. However,
we have no way of handling that yet.
Download Spotlight/AppDelegate.m
- (BOOL)application:(NSApplication*)theApplication
openFile:(NSString*)filename
{
NSDictionary *metadata = [NSDictionary dictionaryWithContentsOfFile:filename];
NSString *objectIDString = [metadata valueForKey:(id)kPPObjectID];
NSURL *objectURI = [NSURL URLWithString:objectIDString];
NSPersistentStoreCoordinator *coordinator;
coordinator = [[self managedObjectContext] persistentStoreCoordinator];
NSManagedObjectID *objectID;
objectID = [coordinator managedObjectIDForURIRepresentation:objectURI];
NSManagedObject *recipe = [[self managedObjectContext] objectWithID:objectID];
if (!recipe) return NO;
[self performSelector:@selector(selectRecipe:)
withObject:recipe
afterDelay:0.01];
return YES;
}
Report erratum
this copy is (P1.0 printing, September 2009)Prepared exclusively for Robert Walsh
Download at WoweBook.Com

INTEGRATING WITH QUICK LOOK 130
In our application delegate, we need to add the method -(BOOL)appli-
cation:openFile: that will be called when the operating system attempts
to open one of our metadata files. In that method, we will load the
metadata file into an NSDictionary and retrieve the URIRepresentation of
the NSManagedObjectID. With the NSManagedObjectID in hand, we can
load the represented Recipe entity and display it to the user. Since we
want to return from this method as quickly as possible (since the oper-
ating system is waiting on an answer), we will display the recipe after
we return from this method. To do that, we wrap the call to display the
recipe in a -(void)performSelector:withObject:afterDelay, which will pass
the recipe to the -(void)selectRecipe: method almost immediately after
this method returns.
The -(void)selectRecipe: method simply sets the selectedObjects on the
recipe’s NSArrayController to the passed-in Recipe, which will then be
reflected in the UI.
Download Spotlight/AppDelegate.m
- (void)selectRecipe:(NSManagedObject*)recipe;
{
[recipeArrayController setSelectedObjects:[NSArray arrayWithObject:recipe]];
}
With that code in place, we can select a recipe from Spotlight, and our
application will open with the correct recipe selected. The first part of
our OS integration is now in place.
7.2 Integrating with Quick Look
There are two different ways to implement Quick Look. The application
can generate images as part of the data bundle, or a generator can be
written that will generate the images on the fly. Storing images with the
data is viable only if the data is stored in a bundle similar to the way
that Pages or Numbers does. When the data is stored in a flat file, like
our metadata files, then a generator is the only way to integrate with
Quick Look. Fortunately, writing a Quick Look generator is only slightly
more complicated than a Spotlight importer.
Adding the Subproject
Just like the Spotlight importer, the Quick Look generator is created
within its own subproject.
Report erratum
this copy is (P1.0 printing, September 2009)Prepared exclusively for Robert Walsh
Download at WoweBook.Com

INTEGRATING WITH QUICK LOOK 131
Figure 7.6: The Xcode project tree with all plug-ins added
Like the Spotlight importer subproject we added earlier, we need to
perform the following steps:
1. Create a subproject under our recipes project. Again, I named
mine the very clever name of QuickLookPlugin.
2. Drag the project into the main project, and flag it as a dependency.
3. Add a new copy phase to the main project’s target, and set its
destination to wrapper and path to Contents/Library/QuickLook.
4. Drag the Quick Look plug-in into the new build phase.
If any of these steps are confusing, please see Section 7.1, Xcode Sub-
project, on page 125. Once the Quick Look subproject has been added,
the main project’s tree should look similar to Figure 7.6.
Once the subproject has been set up properly, we will go ahead and
rename the two .c files to .m files so that we can use Objective-C inside
them. We need to also add Foundation.framework to the subproject so
that we can utilize the Foundation APIs.
Unlike Spotlight, Quick Look has two components. There is a thumb-
nail generation and a preview generation. The thumbnail is used by the
Report erratum
this copy is (P1.0 printing, September 2009)Prepared exclusively for Robert Walsh
Download at WoweBook.Com

INTEGRATING WITH QUICK LOOK 132
Finder both in place of a standard file icon and in Cover Flow. The pre-
view is used when Quick Look is invoked in Finder, Mail, and so on.
Therefore, the Quick Look template creates two .c (now .m) files, one
for each. We will tackle the thumbnail file first.
Generating the Quick Look Thumbnail
The file GenerateThumbnailForURL.m has one function inside it that is
called by the Quick Look manager (part of the operating system). This
function expects that we will be populating the QLThumbnailRequestRef
and returning the OSStatus of noErr. Based on the documentation for
Quick Look, even if we suffer a complete failure inside of our plug-in,
we should always return noErr.
As you can probably guess, our thumbnail generation code is going to
be very simple. Since we already have an image included with each
recipe, we are simply going to pass that image back whenever it is
requested.
Download Spotlight/QuickLookPlugin/GenerateThumbnailForURL.m
OSStatus GenerateThumbnailForURL(void *thisInterface,
QLThumbnailRequestRef thumbnail,
CFURLRef url,
CFStringRef contentTypeUTI,
CFDictionaryRef options,
CGSize maxSize)
{
NSAutoreleasePool *pool = [[NSAutoreleasePool alloc] init];
@try {
NSDictionary *metadata;
metadata = [NSDictionary dictionaryWithContentsOfURL:(NSURL*)url];
NSString *pathToImage = [metadata valueForKey:@"kPPImagePath"];
if (!pathToImage) {
//No image available
return noErr;
}
NSData *imageData = [NSData dataWithContentsOfFile:pathToImage];
if (!imageData) {
//Unable to load the data for some reason.
return noErr;
}
QLThumbnailRequestSetImageWithData(thumbnail, (CFDataRef)imageData, NULL);
} @finally {
[pool release], pool = nil;
}
return noErr;
}
Report erratum
this copy is (P1.0 printing, September 2009)Prepared exclusively for Robert Walsh
Download at WoweBook.Com

INTEGRATING WITH QUICK LOOK 133
Figure 7.7: Basic Quick Look Preview
In this method, we are again retrieving the metadata file and load-
ing it into an NSDictionary. From that dictionary we are retrieving the
path to the image for the recipe and loading the image into an NSData
object. From there, we then call the QLThumbnailRequestSetImageWith-
Data(QLThumbnailRequestRef, CFDataRect, CFDictionaryRef) method, which
will populate the QLThumbnailRequestRef. After that is done, we pop the
NSAutoreleasePool and return noErr. From there Quick Look will use the
image we have provided whenever it needs a thumbnail for the file.
Generating the Quick Look preview
The Quick Look preview is understandably more complex than gener-
ating a thumbnail image. If we do absolutely nothing for this part of
Quick Look, we would still get a rather satisfying preview, as shown in
Figure 7.7. But why stop there when we can do so much more?
Like the thumbnail generator in Section 7.2, Generating the Quick Look
Thumbnail, on the preceding page, the preview generator is contained
within one function call, and we are expected to populate the QLPre-
viewRequestRef and return noErr. Also, like the thumbnail generator, we
will always return noErr no matter what happens within our function
call.
Report erratum
this copy is (P1.0 printing, September 2009)Prepared exclusively for Robert Walsh
Download at WoweBook.Com

INTEGRATING WITH QUICK LOOK 134
Unlike the thumbnail generator, we are not going to be working with
just the image for the recipe. Instead, we will generate a full HTML
page that contains a large amount of information about the recipe and
use that as our preview. Although it would be possible to generate the
entire HTML page in code, I am rather lazy and would rather avoid
that. Instead, we will be taking advantage of some XPath queries to
locate the correct nodes inside a template HTML file, change the values
to be appropriate for our current recipe, and use that to generate the
QLPreviewRequestRef.
Download Spotlight/QuickLookPlugin/GeneratePreviewForURL.m
NSString *bundleID = @"com.pragprog.quicklook.grokkingrecipe";
OSStatus GeneratePreviewForURL(void *thisInterface,
QLPreviewRequestRef preview,
CFURLRef url,
CFStringRef contentTypeUTI,
CFDictionaryRef options)
{
NSAutoreleasePool *pool = [[NSAutoreleasePool alloc] init];
@try {
NSDictionary *metadata;
metadata = [NSDictionary dictionaryWithContentsOfURL:(NSURL*)url];
if (!metadata) return noErr;
NSLog(@"metadata: %@", metadata);
NSString *imagePath = [metadata valueForKey:@"kPPImagePath"];
NSData *imageData = [[NSData alloc] initWithContentsOfFile:imagePath];
if (!imageData) return noErr;
To start with, we load the metadata dictionary like we have previously.
We are also going to load the image data into an NSData object again.
Assuming there are no issues with either the metadata or the image
loading, the next step is to set up the options for the HTML page.
Download Spotlight/QuickLookPlugin/GeneratePreviewForURL.m
NSMutableDictionary *imageDict = [NSMutableDictionary dictionary];
[imageDict setValue:imageData
forKey:(id)kQLPreviewPropertyAttachmentDataKey];
if (QLPreviewRequestIsCancelled(preview)) return noErr;
NSMutableDictionary *attachments = [NSMutableDictionary dictionary];
[attachments setValue:imageDict forKey:@"preview-image"];
NSMutableDictionary *properties = [NSMutableDictionary dictionary];
[properties setValue:attachments
forKey:(id)kQLPreviewPropertyAttachmentsKey];
Report erratum
this copy is (P1.0 printing, September 2009)Prepared exclusively for Robert Walsh
Download at WoweBook.Com

INTEGRATING WITH QUICK LOOK 135
[properties setValue:@"text/html"
forKey:(id)kQLPreviewPropertyMIMETypeKey];
[properties setValue:@"UTF-8"
forKey:(id)kQLPreviewPropertyTextEncodingNameKey];
[properties setValue:@"Recipe"
forKey:(id)kQLPreviewPropertyDisplayNameKey];
For Quick Look to be able to use the HTML page that we are handing
to it, it requires that we describe the document to it and include any
attachments it has. This helps improve the performance of the HTML
rendering since it does not have to fetch any of the attachments. There-
fore, in this section, we are setting up the properties for the HTML page
including specifying its encoding, MIME type, and the attachments. We
also give it a display name that will be used outside the HTML page.
Download Spotlight/QuickLookPlugin/GeneratePreviewForURL.m
NSBundle *bundle = [NSBundle bundleWithIdentifier:bundleID];
NSString *templatePath = [bundle pathForResource:@"preview" ofType:@"html"];
NSURL *templateURL = [NSURL fileURLWithPath:templatePath];
NSError *error = nil;
NSXMLDocument *template;
template = [[[NSXMLDocument alloc] initWithContentsOfURL:(NSURL*)templateURL
options:NSXMLDocumentTidyHTML
error:&error] autorelease];
if (!template) {
NSLog(@"Failed to build template: %@", error);
return noErr;
}
Once all the preliminaries are complete, we need to retrieve the HTML
template from our bundle. Since this code is not actually being called
from our bundle, we cannot just perform [NSBundle mainBundle] and get
a reference to our NSBundle.5 Instead, we have to request it by its UTI.
With a reference to the bundle, we can then retrieve the path to the pre-
view.html, which we will be using as our template. Once we have loaded
the HTML file into an NSXMLDocument, it is time to substitute the place-
holders in that file with real data.
Download Spotlight/QuickLookPlugin/GeneratePreviewForURL.m
//Updating the Title
error = nil;
NSXMLElement *element = [[template nodesForXPath:
@"/html/body/div/*[@id='title']"
error:&error] lastObject];
5. If we tried, we would actually get a reference to /usr/bin/qlmanage instead!
Report erratum
this copy is (P1.0 printing, September 2009)Prepared exclusively for Robert Walsh
Download at WoweBook.Com

INTEGRATING WITH QUICK LOOK 136
if (!element) {
NSLog(@"Failed to find element: %@", error);
return noErr;
}
[element setStringValue:[metadata valueForKey:(id)kMDItemDisplayName]];
//Updating the description
error = nil;
element = [[template nodesForXPath:@"/html/body/div/*[@id='description']"
error:&error] lastObject];
if (!element) {
NSLog(@"Failed to find element: %@", error);
return noErr;
}
[element setStringValue:[metadata valueForKey:(id)kMDItemTextContent]];
//Updating the serves value
error = nil;
element = [[template nodesForXPath:@"/html/body/div/*[@id='serves']"
error:&error] lastObject];
if (!element) {
NSLog(@"Failed to find element: %@", error);
return noErr;
}
NSNumber *serves = [metadata valueForKey:@"kPPServes"];
[element setStringValue:[NSString stringWithFormat:@"Serves: %i",
[serves integerValue]]];
//Updating the last served value
error = nil;
element = [[template nodesForXPath:@"/html/body/div/*[@id='last_served']"
error:&error] lastObject];
if (!element) {
NSLog(@"Failed to find element: %@", error);
return noErr;
}
NSDate *lastServedDate = [metadata valueForKey:(id)kMDItemLastUsedDate];
if (lastServedDate) {
NSDateFormatter *dateFormatter;
dateFormatter = [[[NSDateFormatter alloc] init] autorelease];
[dateFormatter setDateStyle:NSDateFormatterMediumStyle];
[dateFormatter setTimeStyle:NSDateFormatterNoStyle];
[element setStringValue:[NSString stringWithFormat:@"Last Served: %@",
[dateFormatter stringFromDate:lastServedDate]]];
} else {
[element setStringValue:@"Last Served: Never"];
}
Since we know the shape of the HTML document, we can build simple
XPath queries to retrieve each part of the document and replace its
value component with data from our metadata in NSDictionary.
Report erratum
this copy is (P1.0 printing, September 2009)Prepared exclusively for Robert Walsh
Download at WoweBook.Com

INTEGRATING WITH QUICK LOOK 137
Download Spotlight/QuickLookPlugin/GeneratePreviewForURL.m
QLPreviewRequestSetDataRepresentation(preview,
(CFDataRef)[template XMLData],
kUTTypeHTML,
(CFDictionaryRef)properties);
} @finally {
[pool release], pool = nil;
}
return noErr;
}
Once all the data has been put into the HTML document, it is time to
render it and set the QLPreviewRequestRef. As you can see in this section
of code, we are passing in the reference along with the HTML file as
data and the properties NSDictionary. When this is complete, we pop the
NSAutoreleasePool and return noErr. Quick Look will now generate our
preview and present it to the user.
Testing the Quick Look Plug-In
At the time of this writing, testing the Quick Look plug-in is a bit
more challenging than its Spotlight counterpart. Although there is still
a command-line option to test it, getting the system to recognize the
plug-in is a bit trickier. The issue is that the system tends to ignore
what generator you want it to use and will use the generator defined for
the system.
In writing this chapter, I used the following workflow to test the Quick
Look plug-in:
1. Clean and build the main recipe application.
2. On the command line, execute qlmanage -r to reset the Quick Look
generators.
3. Run the recipe application, which causes our Quick Look genera-
tor to get registered.
4. From the command line (can also be done inside of Xcode), I ran
qlmanage -p ${path to metadata test file}, which generated the pre-
view. Using the -t switch instead would produce the thumbnail.
5. Rinse and repeat.
I hope by the time you read this the workflow will have improved. There
is a -g switch available on the qlmanage command line that should
Report erratum
this copy is (P1.0 printing, September 2009)Prepared exclusively for Robert Walsh
Download at WoweBook.Com

PUTTING IT ALL TOGETHER 138
Figure 7.8: Displaying the metadata files in a smart folder
override the system generator, but unfortunately it does not appear to
work at this time.
7.3 Putting It All Together
With a Spotlight importer and a Quick Look generator, it is possible
to do some very interesting things in Mac OS X. For example, we can
build a smart folder that finds all our recipes. We can then put that
smart folder in the sidebar of Finder and be able to easily access all our
recipes directly from the Finder. Further, we can turn on Cover Flow
for this smart folder and smoothly browse through the pictures of our
recipes. See Figure 7.8.
With the included metadata, this opens up quite a few ideas. For exam-
ple, along with each recipe, we are storing the time it was last served in
the metadata. We can use this information to further refine our smart
folder to display only those recipes that we have not served in the last
thirty days. It is possible to get quite creative with metadata now that
the operating system is aware of it.
Report erratum
this copy is (P1.0 printing, September 2009)Prepared exclusively for Robert Walsh
Download at WoweBook.Com
TAKING IT FURTHER 139
7.4 Taking It Further
Further Use of UTIs
With UTIs it is possible to integrate even further with the operating sys-
tem, Spotlight, and Quick Look. It is possible to publish a full descrip-
tion of the UTI—effectively injecting it into the tree and thus having the
data type appear in Spotlight rules and more. However, this is beyond
the scope of this book.
Decreasing the Size of the Metadata Files
This is probably very
similar to how Core Data
does it internally in
Snow Leopard.
Depending on the application, it is possible to reduce the metadata
files dramatically. Since the importer (and the generator) can stand up
the entire Core Data stack, it is possible to just have the NSManaged-
ObjectID (or even a unique identifier within the Recipe object) stored
in the metadata file and have the importers and generators retrieve
all the metadata information from the Core Data stack instead. This
would also simplify the updating of the metadata since the only action
required at that point would be to delete metadata files for records
that no longer exist. However, care must be taken with this approach
because performance may suffer greatly.
Improving the Quick Look Thumbnail Generator
You may have noticed that we ignored the max size setting of the Quick
Look thumbnail generator. That was done for the sake of clarity, and in
a production system we should be sizing down the image to accommo-
date that setting. By doing so, we would be good citizens as well as be
helping the performance of Quick Look whenever our files are involved.
Document-Based Applications
When writing an application that uses a document model as opposed to
a single repository, then integrating Spotlight and Quick Look is even
easier. Instead of having separate metadata files, we can simply store
the relevant information in the metadata of the actual documents. This
allows the importers to read the metadata without having to initialize
the entire Core Data stack and still allows for very quick access to the
relevant information.
Report erratum
this copy is (P1.0 printing, September 2009)Prepared exclusively for Robert Walsh
Download at WoweBook.Com

Chapter 8
Sync Services and Core DataCloud computing is in our future. Users do not want to have to worry
about which computer they stored their data on. It brings great peace of
mind to me knowing that when I enter a new contact on my laptop while
I am out, it will get synced to my other computers and my phone. For
every application where it makes sense to share data across computers,
it is incumbent upon us as developers to make the option available to
our users.
Fortunately, Apple has made huge advances in Sync Services in Leop-
ard. One of those improvements was to integrate Sync Services with
Core Data. Although it is still nontrivial to utilize Sync Services, it is
significantly simpler than it was in Tiger, and when combined with Core
Data, it is even easier than it would be without that combination.
When our data is stored in Core Data and we are writing an application
that is at least Leopard targeted, Sync Services can use the Core Data
model directly to get information about the data to be synced. In addi-
tion, since the data format of Core Data is known as far as the Sync
Services APIs are concerned, the amount of code required to perform a
sync is one line. For anyone who has written Sync Services code under
a previous version of Mac OS X, this will be a welcome change.
Although the sync operation itself is only one line of code, quite a bit
of work is still required to get syncing working correctly. We will need
to configure our data model properly for Sync Services, create a sync
schema, and add the syncing logic to our application, and we will need
to make a couple of changes to our persistent store coordinator.
Overall, adding syncing to an application can be quite a challenge,
but the end result is definitely worth it. When we are done, our users
Prepared exclusively for Robert Walsh
Download at WoweBook.Com

SYNC SERVICES FUNDAMENTALS 141
will not have to worry about which Mac they added or updated their
recipe on. Simply updating the recipe on their laptop will cause it to get
updated on every other Mac they have.
8.1 Sync Services Fundamentals
Conceptually, Sync Services works on the principle of a single source
of truth. That truth is stored at the operating system level and operates
very much like a database. Each entity for each application is stored in
the truth as a single record, and the truth keeps track of every change
to every entity.
Sync Clients
Every application, device, server, or peer1 is considered a client to Sync
Services and talks to the truth. Even if an application is the source of
that data, like our recipes application is, it is still considered a client of
the truth, and therefore it syncs to that truth.
As a client, it is expected that our application will register with the truth
and give it a description. That description will let the truth know our
name, the image to use when talking about us, and what entities we
care about. The entities part is what makes Sync Services very power-
ful. We can subscribe to more data than we produce. For instance, we
could receive sync notifications for calendars, contacts, or bookmarks
if we were interested. Although we will be paying attention to only our
recipe objects at this time, it is definitely possible to listen for more.
As part of the registration, each client defines a callback method that
Sync Services will use to let the client know that a sync is about to
happen. The client can choose not to participate in the sync at that
time, but generally, it is a good idea to be part of the sync. Sync Services
will not call a client unless data it cares about is being synced.
When a sync is performed, there are three steps to the sync process:
push, mingle, and pull. During the push phase, each client pushes all
changes it has that have occurred since the last sync. Once the truth
has received all the changes from all the clients, a mingle is performed.
The mingle merges all the changes from all the clients into a single data
set. This mingle happens entirely within the truth, and clients simply
wait for this phase to be over. Once the mingle phase is complete, the
1. Currently the only server available is MobileMe, and there are no provisions for peers.
Report erratum
this copy is (P1.0 printing, September 2009)Prepared exclusively for Robert Walsh
Download at WoweBook.Com

SYNC SERVICES FUNDAMENTALS 142
pull phase occurs. In the pull phase, each client pulls down the changes
from the truth and updates their internal data stores to match. When
the pull phase is complete, then the sync is finished.
Sync Schemas
A sync schema has a lot of similarities to a database schema. Each sync
schema describes how data is structured for one or more data classes.
These data classes are not objects but are types of data. For instance,
contacts is one class of data. Calendar data is also one class of data.
Our recipes will also be one class of data. It is possible to have more
than one data class in a schema, but for our application we will have
only one.
In addition to describing the data class, the sync schema will also define
all the entities that are part of that data class. For our application, each
of the entities that is in our data model will also be in our sync schema.
For each entity, all of its attributes and its relationships are described.
For each of those, all of the details are made available. For instance,
an attribute would be described as required, string, and so on. For a
relationship, it would describe what it is a relationship to, whether it is
one-to-one, one-to-many, and so on.
Finally, a sync schema contains the name of the schema and an image
associated with the schema that Sync Services can use when asking
for user input. If we look at the Sync tab of MobileMe in the system
preferences, we can see an example of this interaction, as shown in
Figure 8.1, on the following page.
Don’t Panic!
I am sure, after reading all of this, that the thought of adding Sync
Services to your application is absolutely terrifying. I know that when I
did it the first time, it certainly was. However, there is a light at the end
of the tunnel for those of us who are fortunate enough to be using Core
Data. With Leopard, most of this has already been done for us!
Since Core Data represents a known data structure, the engineers
within Apple were kind enough to do all of the heavy lifting for us to
integrate Sync Services into our applications. All that is required of us
is to link everything together.
Report erratum
this copy is (P1.0 printing, September 2009)Prepared exclusively for Robert Walsh
Download at WoweBook.Com

UPDATING OUR DATA MODEL 143
Figure 8.1: MobileMe system preferences
8.2 Updating Our Data Model
The first step in making our application ready for Sync Services is to
update the data model to reflect what we want synced, what is consid-
ered an identity item (similar in concept to a primary key in database
terms), and what triggers a “data changed” notification. All of this is
configured directly with the data model, and fortunately making these
changes does not trigger a version difference in the data model itself,
so we do not have to create new data and mapping models.
Setting the Data Class
One of the confusing things about Sync Services is some of the ter-
minology that is used. One example of that is the data class. Coming
from Core Data, one would think this refers to an object class that
describes the data. That, unfortunately, is not its meaning with Sync
Services. Instead, it is a unique identifier that defines a logical grouping
of data. For instance, the entire Address Book’s data model is called the
com.apple.contacts data class. For our application, our data class will
be com.pragprog.GrokkingRecipes. This is the value that we will assign
to every entity in the data model. You will note that when we enter
this value, Xcode automatically appends the name of the entity itself to
the end of the data class’s name. This creates a unique name for each
entity.
Report erratum
this copy is (P1.0 printing, September 2009)Prepared exclusively for Robert Walsh
Download at WoweBook.Com

UPDATING OUR DATA MODEL 144
Attribute and Relationship Names
Each attribute and relationship within each entity also hasits own unique name. The format for the attributes andrelationships is DataClass.EntityName/AttributeName. For exam-ple, the name of the recipe entity would be referred to ascom.pragprog.GrokkingRecipes.Recipe/name.
Figure 8.2: Setting the data class
Setting the Identity Properties
Once the data class has been set for each entity in the data model, the
next step is to set which attributes and/or relationships are identity
properties for the sake of Sync Services. The purpose of this setting is
to tell Sync Services which attributes or relationships it should use to
match up records between applications, servers, or peers. When Sync
Services attempts to merge data from two different sources, it looks to
these identity properties to find records that would be considered the
same. For example, if we were merging recipe data from two computers
via MobileMe and we were looking at the Author entities, we would com-
pare the name attribute of each author. If the name is the same, then
we would consider it to be the same record for syncing purposes.
Author Settings
For the author, the settings are very simple since the object itself is very
simple. We set the name attribute to be the identity property, and nei-
ther the name nor the recipes is excluded from the data change alerts.
Report erratum
this copy is (P1.0 printing, September 2009)Prepared exclusively for Robert Walsh
Download at WoweBook.Com

UPDATING OUR DATA MODEL 145
Ingredient Settings
The ingredient entity is configured virtually identically to the Author
entity. The name attribute will still be used as the identity property;
all the rest of the attributes and relationships will be included for sync-
ing, and none of them is excluded from data change alerts.
Recipe Settings
The Recipe entity has a special situation. First, the imagePath is very
specific to the machine that the recipe is being stored on. It is unlikely
(and unnecessary) that this path will be the same on more than one
machine. Therefore, we will not be syncing this attribute. However, we
do want the image itself to be synced across the machines. To accom-
plish this, we will change the entity slightly; we’ll add a new attribute
called image and configure it as optional and transient. By flagging it
as transient, we will not have to worry about a version change for the
data model. As you will recall, setting it as transient will also mean
that it is not stored in our repository, which is exactly what we want.
Although we do not want it stored in the repository, we do want to sync
it across machines. Therefore, we will make sure that the Synchronize
option is set to YES. To complete this attribute, we need to add logic to
our PPRecipe object to handle the image.
Download SyncServices/PPRecipe.m
- (NSData*)image
{
NSLog(@"%@:%s entered", [self class], _cmd);
if (image) return image;
NSString *path = [self primitiveValueForKey:@"imagePath"];
if (!path) return nil;
image = [[NSData alloc] initWithContentsOfFile:path];
return image;
}
- (void)setImage:(NSData*)data
{
NSLog(@"%@:%s entered", [self class], _cmd);
NSString *destPath = [self primitiveValueForKey:@"imagePath"];
if (!destPath) {
//Build the path we want the file to be at
destPath = [[NSApp delegate] applicationSupportFolder];
NSString *guid = [[NSProcessInfo processInfo] globallyUniqueString];
destPath = [destPath stringByAppendingPathComponent:guid];
[self setValue:destPath forKey:@"imagePath"];
}
[data writeToFile:destPath atomically:NO];
Report erratum
this copy is (P1.0 printing, September 2009)Prepared exclusively for Robert Walsh
Download at WoweBook.Com

CREATING THE SYNC SCHEMA 146
[data retain];
[image release];
image = data;
}
In the accessor methods that we added to the PPRecipe object, we are
retrieving the image data that is stored on the disk at imagePath. When
the data is being set and the imagePath is not set, then we will create a
new file in our Application Support directory and save it. These acces-
sors now allow for the image to be passed around for Sync Services
without it being stored in the repository.
As for the rest of the attributes and relationships, they are all flagged
to be synced, and only the name attribute is flagged to be an identity
property.
RecipeIngredient Settings
The RecipeIngredient entity is an unusual one to sync. Since it is basi-
cally a join table (to borrow from database terminology), there is no
attribute that identifies it as unique. Therefore, we will sync its one
attribute, quantity, but we will flag its relationships as the identity prop-
erties. By flagging all three relationships as the identity of the record, we
are guaranteed uniqueness for each combination of Ingredient, Recipe,
and UnitOfMeasure.
Type Settings
For the Type entity, we are syncing this object only to preserve the rela-
tionships across sync clients. Although this data will never change and
therefore does not really need to be synced, we do want to sync the
relationships between Type entities and Recipe entities. Therefore, we
flag the name as the identity property and include its relationships in
the sync.
UnitOfMeasure
Like the Author entity, this entity has the name attribute as its identity
property and has its relationships included in the sync.
8.3 Creating the Sync Schema
Now that our data model is ready for syncing, it is time to build the sync
schema itself. The sync schema is used by Mac OS X to describe our
interaction with and integration into the syncing ecosystem. If we were
Report erratum
this copy is (P1.0 printing, September 2009)Prepared exclusively for Robert Walsh
Download at WoweBook.Com

CREATING THE SYNC SCHEMA 147
not using Core Data, we would be describing every entity, attribute, and
relationship inside of the sync schema. Fortunately, since we are using
Core Data, that part is not necessary. What this leaves to be included
in the schema is to define the data classes, the localization, and the
icon to be used by Sync Services whenever it is talking about our data
class. When we are done, we will have another bundle to be included in
our application that we will reference when dealing with Sync Services.
Setting Up the Sync Schema Subproject
Just like the Spotlight and Quick Look subprojects that we created in
Chapter 7, Spotlight, Quick Look, and Core Data, on page 114, we will
add a third subproject to our recipes application. Just like the previ-
ous two, the sync schema project template is under the Standard Apple
Plugins section in Xcode. Once the subproject is created, we drag the
project into our main project and define it as a dependency in the appli-
cation target. Once the dependency is set up, then add the .syncschema
bundle to the Copy Bundle Resources phase of the target.
Creating the Schema.plist
Although it is possible to add custom code to a sync schema to help dis-
play the data when the sync error dialog box is displayed, for our pur-
poses we really need to set up only the Schema.plist file. The header and
implementation files that are created with the template can be removed
because we will not be needing them.
The Schema.plist file describes everything that Sync Services needs to
know about our data. For our needs, we need to set three keys within
this plist: DataClasses, ManagedObjectModels, and Name.
DataClasses Key
The DataClasses key has two values, a Name and an ImagePath. The
Name value is meant to be localized and therefore does not need to
be user friendly in this file. For our recipes, I named the data class
com.pragprog.GrokkingRecipes. The only requirement is that this name
be unique. Therefore, a reverse dot notation will help to guarantee that.
The other value, ImagePath, needs to point to an image file that Sync
Services will use whenever it is referring to our data. For example, this
image is used in the system preferences and in the data change alert
dialog boxes. For our needs, the application icon is sufficient for this,
so we include a copy of it within the sync schema bundle.
Report erratum
this copy is (P1.0 printing, September 2009)Prepared exclusively for Robert Walsh
Download at WoweBook.Com

CREATING THE SYNC SCHEMA 148
ManagedObjectModels Key
The ManagedObjectModels key is an array of file references pointing to
.mom files. Note that this key will not accept versioned managed object
model bundles, and therefore we need to point to a specific version of
our model. Since we are currently on version 3 of the model, we will
point this to that model. This key can accept more than one model, so
if we had split up our data model into multiple managed object model
files, we would add all of them here.
Name Key
This name attribute refers to the name of the schema as opposed to the
name of the data. This name is used internally in Sync Services and
is not exposed to the user at all. Since we have only one data class in
our application, we can name the schema the same as the data class,
com.pragprog.GrokkingRecipes.
Localizing Schema.strings
Although our application is not localized for any language other than
English, we need to create a strings file for the sync schema. This local-
ization file will translate the unique identifiers into human-readable
names when Sync Services displays information about our data. Just
like other localization files, this file is a list of name-value pairs with the
unique names of our data class, entities, attributes, and relationships
as the name half and the human-readable counterpart as the value.
/* Localized strings for GrokkingRecipes */
"com.pragprog.GrokkingRecipes" = "Grokking Recipes";
"com.pragprog.GrokkingRecipes.Author" = "Author Entity";
"com.pragprog.GrokkingRecipes.Author/name" = "Author Name";
"com.pragprog.GrokkingRecipes.Ingredient" = "Ingredient Entity";
"com.pragprog.GrokkingRecipes.Ingredient/cost" = "Cost";
"com.pragprog.GrokkingRecipes.Ingredient/name" = "Ingredient Name";
"com.pragprog.GrokkingRecipes.Ingredient/quantity" = "Quantity";
"com.pragprog.GrokkingRecipes.Recipe" = "Recipe Entity";
"com.pragprog.GrokkingRecipes.Recipe/type" = "Recipe Type";
"com.pragprog.GrokkingRecipes.Recipe/desc" = "Description";
"com.pragprog.GrokkingRecipes.Recipe/lastUsed" = "Last Used";
"com.pragprog.GrokkingRecipes.Recipe/name" = "Recipe Name";
"com.pragprog.GrokkingRecipes.Recipe/serves" = "Serves";
"com.pragprog.GrokkingRecipes.RecipeIngredient" = "Quantity Entity";
"com.pragprog.GrokkingRecipes.RecipeIngredient/quantity" = "Quantity";
Report erratum
this copy is (P1.0 printing, September 2009)Prepared exclusively for Robert Walsh
Download at WoweBook.Com

CREATING THE CLIENT DESCRIPTION FILE 149
"com.pragprog.GrokkingRecipes.Type" = "Type Entity";
"com.pragprog.GrokkingRecipes.Type/name" = "Name";
"com.pragprog.GrokkingRecipes.UnitOfMeasure" = "Unit of Measure Entity";
"com.pragprog.GrokkingRecipes.UnitOfMeasure/name" = "Name";
8.4 Creating the Client Description File
Now that we have our schema put together, it is time to build the client
description file. This file is different from the sync schema we just built
because it is coming at the sync from the client’s point of view. The sync
schema tells Sync Services what data will be synced, and the client
description tells Sync Services what data this application will be sync-
ing. It is quite possible to have a client that wants only a subset of the
data and does not care about certain parts. For example, if we wanted to
build a dashboard widget that displayed recipes, it may not care about
the author and therefore would not add it to its client description.
Since we are the primary application for this schema, we will sync all
the data available. This file is called ClientDescription.plist, and it is part
of the primary application bundle and will be included in the Resources
subdirectory of the application bundle. Inside of this plist are four keys:
DisplayName, ImagePath, Type, and Entities. DisplayName and ImagePath
are both used when Sync Services needs to display specific informa-
tion about this client as opposed to information about the schema
itself. However, since our application is the primary application for this
schema (as opposed to calendar or contact data), we can use the same
name and image that we used for the schema. The Type key defines
what type of client we are, with options of app, device, server, or peer.
For our application, that answer is app.
This leaves the Entities key. The Entities key tells Sync Services which
entities our client cares about and the attributes/relationships of those
entities. Since we are the primary application, we care about all the
entities, their attributes, and the relationships.
Download SyncServices/ClientDescription.plist
<?xml version="1.0" encoding="UTF-8"?>
<!DOCTYPE plist PUBLIC "-//Apple//DTD PLIST 1.0//EN"
"http://www.apple.com/DTDs/PropertyList-1.0.dtd">
<plist version="1.0">
<dict>
<key>DisplayName</key>
Report erratum
this copy is (P1.0 printing, September 2009)Prepared exclusively for Robert Walsh
Download at WoweBook.Com

CREATING THE CLIENT DESCRIPTION FILE 150
<string>Grokking Recipes</string>
<key>ImagePath</key>
<string>App.icns</string>
<key>Type</key>
<string>app</string>
<key>Entities</key>
<dict>
<key>com.pragprog.GrokkingRecipes.Author</key>
<array>
<string>com.apple.syncservices.RecordEntityName</string>
<string>name</string>
<string>recipes</string>
</array>
<key>com.pragprog.GrokkingRecipes.Ingredient</key>
<array>
<string>com.apple.syncservices.RecordEntityName</string>
<string>cost</string>
<string>name</string>
<string>quantity</string>
<string>recipes</string>
<string>unitOfMeasure</string>
</array>
<key>com.pragprog.GrokkingRecipes.Recipe</key>
<array>
<string>com.apple.syncservices.RecordEntityName</string>
<string>desc</string>
<string>lastUsed</string>
<string>name</string>
<string>serves</string>
<string>type</string>
<string>author</string>
<string>ingredients</string>
<string>image</string>
</array>
<key>com.pragprog.GrokkingRecipes.RecipeIngredient</key>
<array>
<string>com.apple.syncservices.RecordEntityName</string>
<string>quantity</string>
<string>unitOfMeasure</string>
<string>ingredient</string>
<string>recipe</string>
</array>
<key>com.pragprog.GrokkingRecipes.Type</key>
<array>
<string>com.apple.syncservices.RecordEntityName</string>
<string>name</string>
</array>
<key>com.pragprog.GrokkingRecipes.UnitOfMeasure</key>
<array>
<string>com.apple.syncservices.RecordEntityName</string>
<string>name</string>
Report erratum
this copy is (P1.0 printing, September 2009)Prepared exclusively for Robert Walsh
Download at WoweBook.Com
MODIFYING THE NSPERSISTENTSTORECOORDINATOR 151
<string>ingredients</string>
<string>recipeIngredients</string>
</array>
</dict>
</dict>
</plist>
8.5 Modifying the NSPersistentStoreCoordinator
One thing that always has to be remembered about Sync Services is
that we want it to be fast—the faster, the better. If it gets slowed down,
then all kinds of bad things can happen. For instance, the computer
can go to sleep in the middle of the sync, the user can quit the appli-
cation, network connections can go down—the list goes on. Therefore,
we want to make sure that when a sync actually happens, it happens
very quickly. Unfortunately, Core Data, although being a fast process in
its own environment, can be too slow for syncing purposes. To address
this, the NSPersistentStoreCoordinator has an additional method included
in a category as part of the Sync Services framework. This method, set-
StoresFastSyncDetailsAtURL:forPersistentStore:, defines an additional store to
be used by Sync Services to store information in preparation for the
next sync operation. This additional store is not a copy of the data but
has similarities to notes about the various objects in our NSPersistentStore
that can be used during the sync process to speed things up.
It should be noted that without this additional setting, syncing of a Core
Data repository will not work. If you run into an issue with another
application and syncing is not working, be sure to check that the fast
sync store is being set and created.
Adding this store to our application requires a small change to our
-persistentStoreCoordinator method.
Download SyncServices/AppDelegate.m
NSPersistentStore *store;
store = [persistentStoreCoordinator addPersistentStoreWithType:NSXMLStoreType
configuration:nil
URL:url
options:nil
error:&error];
if (!store) {
NSLog(@"%@:%s presenting error no store", [self class], _cmd);
[[NSApplication sharedApplication] presentError:error];
return nil;
}
Report erratum
this copy is (P1.0 printing, September 2009)Prepared exclusively for Robert Walsh
Download at WoweBook.Com

CREATING THE SYNC HELPER 152
NSString *fss = @"GrokkingRecipes.fastsyncstore";
fss = [applicationSupportFolder stringByAppendingPathComponent:fss];
NSURL *fsdURL = [NSURL fileURLWithPath:fss];
[persistentStoreCoordinator setStoresFastSyncDetailsAtURL:fsdURL
forPersistentStore:store];
return persistentStoreCoordinator;
In this code snippet there are two important changes. First, instead
of checking to see whether the call to addPersistentStoreWithType:configu-
ration:URL:options:error: returned a nil or not, we assign its result to a local
variable. We do this so that we can pass it into the setStoresFastSyncDe-
tailsAtURL:forPersistentStore: method further down. Next we build a path
for the fast sync store to be written to. Since we are storing our data in
the Application Support folder, it makes sense to just store it alongside
the primary persistent store. If we were using a document application,
then it might make sense to store it somewhere else or with a unique
filename. Once the path is built, we pass that path along with our ref-
erence to the NSPersistentStore to the category method setStoresFastSyncDe-
tailsAtURL:forPersistentStore: on our NSPersistentStoreCoordinator. That is the
only change we need to make to our Core Data stack to enable Sync
Services support.
8.6 Creating the Sync Helper
Now it is time to put all the pieces together. Although this piece can be
put just about anywhere, I decided to separate all the sync code into its
own class for clarity. When I originally wrote this code, I had put it into
the AppDelegate.m but quickly decided that it was causing that object
to be too complex and hard to follow. Therefore, I decided to separate
the syncing code into a small helper class.
NSPersistentStoreCoordinatorSyncing
As I mentioned in the fundamentals (Section 8.1, Sync Services Funda-
mentals, on page 141), Sync Services needs a callback to let our client
know what is going on. To be completely accurate, we need both a call-
back and a protocol. The callback is used by Sync Services to let our
application know that a sync is about to happen. The protocol allows
us to listen in to that sync and answer questions as things go by. Our
sync helper will implement that protocol named NSPersistentStoreCoordi-
natorSyncing.
Report erratum
this copy is (P1.0 printing, September 2009)Prepared exclusively for Robert Walsh
Download at WoweBook.Com

CREATING THE SYNC HELPER 153
Every method within this protocol is considered optional, but there are
two that I think should be considered required. Although I have imple-
mented all the methods in the example project, it is the following two
methods that are most important:
• -managedObjectContextsToMonitorWhenSyncingPersistentStoreCo-
ordinator:. This method, in our application, returns our single
NSManagedObjectContext. The purpose of this method is to tell
Sync Services which contexts to monitor during the sync just in
case our user gets clever (and quick!) and alters the data during
a sync. Without implementing this method, it is quite possible to
get conflicts between the truth and our internal NSManagedObject-
Context.
• -managedObjectContextsToReloadAfterSyncingPersistentStoreCo-
ordinator:. This is similar to the previous method mentioned; our
implementation of this method simply returns our single NSMan-
agedObjectContext. Also, like the previous method, I consider this
one required because we want our context reloaded after the sync
has completed so that our user can see the updated information.
I can certainly imagine situations where we would not want this,
but for our application, none of those situations applies.
The rest of the methods in the protocol allow us to be notified when a
sync has finished and tell us what is being pushed, pulled, and can-
celed. By using the rest of this protocol, we can provide feedback to the
user, inject special case changes to the sync itself, or just monitor its
progress. Although I have implemented these methods in the example
code, they are optional and can be removed for brevity.
Registering as a Sync Client
When our application starts up and after we have checked our meta-
data per Chapter 7, Spotlight, Quick Look, and Core Data, we want to
register our application as a sync client. Since all the sync-handling
code is contained within SyncHelper, the only thing we need to do here
is initialize an instance of it.
Download SyncServices/AppDelegate.m
NSError *error = nil;
syncHelper = [[SyncHelper alloc] initWithDelegate:self error:&error];
if (!syncHelper) {
NSLog(@"%@:%s presenting error sync helper failed", [self class], _cmd);
NSDictionary *ui = [error userInfo];
Report erratum
this copy is (P1.0 printing, September 2009)Prepared exclusively for Robert Walsh
Download at WoweBook.Com

CREATING THE SYNC HELPER 154
for (NSError *suberror in [ui valueForKey:NSDetailedErrorsKey]) {
NSLog(@"subError: %@", suberror);
}
[NSApp presentError:error];
}
error = nil;
Our SyncHelper takes two parameters on initialization: a reference to
our AppDelegate and a pointer to an NSError. If something goes wrong in
the registration, the NSError will get populated, and the SyncHelper will
return nil. If that occurs, then we will present the error to the user and
continue.
Inside the SyncHelper, we assign the reference to the AppDelegate to an
ivar and attempt to register ourselves as a client to Sync Services and
start a sync.
Download SyncServices/SyncHelper.m
- (id)initWithDelegate:(id)_delegate error:(NSError**)error
{
if (!(self = [super init])) return nil;
delegate = _delegate;
ISyncClient *client = [self syncClient:error];
if (!client) {
[self autorelease];
return nil;
}
[client setSyncAlertHandler:self
selector:@selector(client:mightWantToSyncEntityNames:)];
if (![self performSync:error]) {
[self autorelease];
return nil;
}
return self;
}
In this method, we set this instance of the SyncHelper to be the call-
back for Sync Services to notify when a sync is about to start exter-
nal to our application. When that occurs, we will receive a message to
-client:mightWantToSyncEntityNames:, and we can react accordingly. The
most complex part of this object initialization is getting a reference
to the ISyncClient object. Since getting this reference will occur several
times within the life cycle of our application, it has been put into its
own method.
Report erratum
this copy is (P1.0 printing, September 2009)Prepared exclusively for Robert Walsh
Download at WoweBook.Com

CREATING THE SYNC HELPER 155
Download SyncServices/SyncHelper.m
- (ISyncClient*)syncClient:(NSError**)error
{
NSString *ident = [[NSBundle mainBundle] bundleIdentifier];
ISyncClient *client;
NSDictionary *dict;
ISyncManager *manager = [ISyncManager sharedManager];
NSBundle *mainBundle = [NSBundle mainBundle];
@try {
client = [manager clientWithIdentifier:ident];
if (client) return client;
The first thing that we do when trying to get a reference to our ISyncClient
is to request it from the ISyncManager using our bundle identifier as our
name. If we have previously registered with the ISyncManager, then this
will return our client, and we are done. If this is our first time through
this process, then that call will return a nil, and we will have to register
with the ISyncManager.
Download SyncServices/SyncHelper.m
NSString *path = [mainBundle pathForResource:@"GrokkingRecipes"
ofType:@"syncschema"];
if (![manager registerSchemaWithBundlePath:path]) {
NSString *err = NSLocalizedString(@"Failed to register the schema",
@"Failed to register the schema error message");
dict = [NSDictionary dictionaryWithObject:err
forKey:NSLocalizedDescriptionKey];
*error = [NSError errorWithDomain:@"PragProg"
code:8001
userInfo:dict];
return nil;
}
This is where the sync schema that we built comes into play. Since
our client has not been registered, then we know, since we are the
originator of the data, that our schema has also not been registered.
Therefore, the first step is to find the GrokkingRecipes.syncschema bundle
within our application and register it with the ISyncManager. If this is
not successful, then we populate the NSError and return nil. Assuming
that it is successful, the next step is to register our client.
Download SyncServices/SyncHelper.m
path = [mainBundle pathForResource:@"ClientDescription"
ofType:@"plist"];
client = [manager registerClientWithIdentifier:ident
descriptionFilePath:path];
Report erratum
this copy is (P1.0 printing, September 2009)Prepared exclusively for Robert Walsh
Download at WoweBook.Com

CREATING THE SYNC HELPER 156
With the schema registered, we need to now register our client. Here we
grab a reference to the ClientDescription.plist that we created previously
and pass it to the ISyncManager along with our unique identifier. This
will register our client and return a reference to our ISyncClient object.
Now that our client is registered, we need to turn on syncing with all of
the other client types. This allows us to decide which syncs we want to
be involved in. Again, since we are the originator of the data, we want
to be involved in every sync.
Download SyncServices/SyncHelper.m
[client setShouldSynchronize:YES
withClientsOfType:ISyncClientTypeApplication];
[client setShouldSynchronize:YES
withClientsOfType:ISyncClientTypeDevice];
[client setShouldSynchronize:YES
withClientsOfType:ISyncClientTypeServer];
[client setShouldSynchronize:YES
withClientsOfType:ISyncClientTypePeer];
The last step in this method is to capture and handle any exceptions
that we receive. As of the writing of this book, there are still a few
exceptions that this process can throw, so we want to be sure to capture
those, wrap them up in an NSError,2 and hand the back to our caller.
Assuming nothing has blown up on us, we return the ISyncClient.
Download SyncServices/SyncHelper.m
} @catch (NSException *exception) {
dict = [NSDictionary dictionaryWithObject:[exception reason]
forKey:NSLocalizedDescriptionKey];
*error = [NSError errorWithDomain:@"PragProg"
code:8002
userInfo:dict];
return nil;
}
return client;
}
Performing a Sync
Now that we have registered our schema and our sync client, we need
to be able to handle the two ways a sync can occur. We can either
initiate the sync or receive a notification that a sync is about to occur.
Fortunately, we handle both of these situations in the same manner.
2. Where they belong anyway.
Report erratum
this copy is (P1.0 printing, September 2009)Prepared exclusively for Robert Walsh
Download at WoweBook.Com

CREATING THE SYNC HELPER 157
When a sync is about to start, the first thing we want to do is perform a
save on our NSManagedObjectContext. Once that is completed, then we
can tell Sync Services that we are ready to perform a sync. Therefore,
we need to make a small alteration to our global save method. Since
we already put all our save logic in one method in Chapter 7, Spotlight,
Quick Look, and Core Data, on page 114, it makes perfect sense to kick
off our sync operations from there.
Download SyncServices/AppDelegate.m
NSLog(@"%@:%s Performing sync", [self class], _cmd);
if (![syncHelper performSync:error]) {
return NO;
}
As soon as the save operation returns, we want to call our SyncHelper
and ask it to -performSync:. We pass in an NSError into this method so
that we can be notified if an error occurred during the sync.
Download SyncServices/SyncHelper.m
- (BOOL)performSync:(NSError**)err;
{
ISyncClient *client = [self syncClient:err];
if (!client) return NO;
NSLog(@"Starting sync");
NSPersistentStoreCoordinator *store = [delegate persistentStoreCoordinator];
return [store syncWithClient:client
inBackground:YES
handler:self
error:err];
}
In the -performSync: method, we grab a fresh reference to our ISyncClient
and a reference to our NSPersistentStoreCoordinator. With both of those,
we will use the second method added to the NSPersistentStoreCoordina-
tor in the Sync Services category and request a sync via the syncWith-
Client:inBackground:handler:error: method. If there is a failure in the sync,
then a NO will be returned to the caller, and the NSError will be popu-
lated. Since we are passing the SyncHelper as the handler for this sync, it
will receive all of the notifications discussed earlier because of it imple-
menting the NSPersistentStoreCoordinatorSyncing protocol.
To make sure that our metadata is up-to-date, we want to flesh out one
of the delegate callback methods, specifically, -persistentStoreCoordinator:
didFinishSyncSession:. In this method, we want to check to see whether our
Report erratum
this copy is (P1.0 printing, September 2009)Prepared exclusively for Robert Walsh
Download at WoweBook.Com

THE SYNCROSPECTOR 158
NSManagedObjectContext has any changes in it and, if it does, update
the metadata and save the context.
The last thing we need to do is handle an external sync request. Since
we already defined -client:mightWantToSyncEntityNames: as the method to
be called when an external sync starts, we need to request a save at
that point.
Download SyncServices/SyncHelper.m
- (void)client:(ISyncClient*)client mightWantToSyncEntityNames:(NSArray*)names
{
NSError *error = nil;
if (![delegate save:&error]) {
[NSApp presentError:error];
}
}
Since our call to save the NSManagedObjectContext will also kick off a
sync, there is nothing more that we need to do.
8.7 The Syncrospector
Sync Services has the added complexity of being rather difficult to
debug and test. Since the truth is effectively a black box, normally
all we can do is poke at it and watch the responses. Fortunately, in
the more recent builds of Xcode, Apple has given us a working copy
of a development tool called Syncrospector. You can locate the Syn-
crospector in the Developer directory (wherever you decided to install
it, normally at /Developer), in the Applications folder, and finally in the
Utilities subfolder. This tool allows us to peek inside the truth and even
reset data or force different types of syncs.
Clients Pane
The Clients pane shows all the known clients of Sync Services. Within
this pane we can see whether our client is registered properly, what
data classes it has registered, and the state of each entity. We can also
force a sync of the client from this pane. See Figure 8.3, on the following
page. Of all the panes available inside the Syncrospector, this is one of
the two that I use most often.
Truth Pane
The Truth pane allows us to look at the data that is currently in the
truth. We can see, for each entity, when it was last updated and who
Report erratum
this copy is (P1.0 printing, September 2009)Prepared exclusively for Robert Walsh
Download at WoweBook.Com

THE SYNCROSPECTOR 159
Figure 8.3: Syncrospector Clients pane
changed it. I find this pane to be useful when trying to figure out what
went wrong with my data and to see who mucked it up.
History Pane
The History pane allows us to see every transaction that has ever oc-
curred inside the truth. With this pane, it is possible to track down
where data got mangled and by whom, no matter how long ago it
occurred.
Schema Pane
The Schema pane is the other that I use very frequently. It shows all the
schemas that are registered within the truth and allows us to inspect
all their details. In addition, it is possible to delete a schema from the
truth via this pane. Finally, this pane is useful for clearing data from
the truth and clients. This is very helpful during testing.
Report erratum
this copy is (P1.0 printing, September 2009)Prepared exclusively for Robert Walsh
Download at WoweBook.Com

WRAPPING UP 160
Figure 8.4: Syncrospector Schema pane
8.8 Wrapping Up
Since this book is focused on Core Data, we haven’t covered quite a
few areas of Sync Services. For a true breadth of knowledge on this
framework, you should research the following subjects in more depth.
Schema Versioning
This subject is currently in flux and may change by the time you read
this book. As it stands today, if your schema needs to change, then
ideally all your clients of that data should get updated to the latest
schema. If they don’t, then your users may get inconsistent results.
In addition, schemas are tied to a particular version of the NSManaged-
ObjectModel. Therefore, if the data model changes, then chances are a
new schema will be needed, or at least it will need to reference the latest
data model.
Report erratum
this copy is (P1.0 printing, September 2009)Prepared exclusively for Robert Walsh
Download at WoweBook.Com

WRAPPING UP 161
Syncing with Devices, Servers, and Peers
This chapter covers syncing with the truth. The truth can also sync
with MobileMe (currently one of the most useful features of Sync Ser-
vices), devices, and peers. Although there are no peers defined at this
time, it does not mean there never will be. In addition, it is quite com-
mon to sync with devices, and I suspect that Sync Services will become
available for the iPhone at some time in the near future.
Report erratum
this copy is (P1.0 printing, September 2009)Prepared exclusively for Robert Walsh
Download at WoweBook.Com

Chapter 9
Multithreading and Core DataChances are your primary machine has at least two cores in it. I also
would not be surprised if every machine you develop on has at least
two cores or even more. Multithreading is soon going to be necessary
for every moderately complex application that runs on Mac OS X. This
is something that we as developers need to accept and plan for while
developing our applications. Fortunately, there are new features in Mac
OS X that make multithreading easier for us and less error prone.
The problem, however, is that Core Data is not inherently thread safe.
It still wants and expects to be run in a single thread. Therefore, when
we start multithreading our applications, we must take care to work
with Core Data properly to avoid threading issues.
9.1 Why Isn’t Core Data Thread Safe?
You may be surprised to learn that there are a lot of things in Cocoa
and Objective-C that are not thread safe and that Core Data is only one
of many. For instance, whenever you make a change to a GUI widget, it
is recommended that you be on the main thread because the UI is not
thread safe.
The biggest issue with dealing with Core Data in multiple threads is
keeping the NSManagedObjectContext in sync. When a change is made
to an NSManagedObject on a thread that is different from the one that
created the NSManagedObjectContext, the context is not aware of it and
can have potentially stale data. This is the part of Core Data that is not
thread safe. The NSPersistentStore, NSPersistentStoreCoordinator, and NSMan-
agedObjectModel are all perfectly thread safe, but the NSManagedOb-
jectContext is not.
Prepared exclusively for Robert Walsh
Download at WoweBook.Com

CREATING MULTIPLE CONTEXTS 163
NSOperation and NSOperationQueue
Throughout this chapter we will be using NSOperation and NSOp-
erationQueue quite heavily. These are classes that were addedto Cocoa as part of Mac OS X 10.5 Leopard specifically tomake threading easier. Although we will not be going intodetail on how to use these classes, it is of extreme value to fullylearn these classes so that you can use them properly in yourown projects.
Often one naming issue causes some confusion while usingNSOperation. The NSOperation uses a method named -main asthe entry point for the work that the NSOperation is to completewhile running on a background thread. The NSOperationQueue
calls this method directly.
Another issue is one of concurrency. If an NSManagedObject is updated
on more than one thread, then the results of one or more of those
updates is undetermined and unpredictable. Therefore, it is recom-
mended that NSManagedObject instances do not cross thread
“boundaries.”
9.2 Creating Multiple Contexts
Currently, there is one approved method for using Core Data across
multiple threads. This method involves creating a separate NSManaged-
ObjectContext for each thread that will be interacting with Core Data.
The creation of the separate context on a background thread is quite
straightforward and is nearly identical to the creation of the NSManage-
dObjectContext on the main thread.
Download MultiThreading/PPImportOperation.m
- (NSManagedObjectContext*)newContextToMainStore
{
NSPersistentStoreCoordinator *coord = nil;
coord = [appDelegate persistentStoreCoordinator];
NSManagedObjectContext *moc = [[NSManagedObjectContext alloc] init];
[moc setPersistentStoreCoordinator:coord];
return [moc autorelease];
}
Report erratum
this copy is (P1.0 printing, September 2009)Prepared exclusively for Robert Walsh
Download at WoweBook.Com

CREATING MULTIPLE CONTEXTS 164
Joe Asks. . .
When Do I Need to Worry About Threading?
The point at which threading is appropriate is a hard one todecide upon. As a rule, I will put an operation into anotherthread any time that it blocks the UI thread from drawing orcauses the operating system to think that the application isnonresponsive. When an application starts “beach-balling,” itis time to optimize the application and look at threading.
As shown in the method -newContextToMainStore, we grab a reference to
the existing NSPersistentStoreCoordinator and use that in the initialization
of a new NSManagedObjectContext.
Although the NSPersistentStoreCoordinator is not thread safe either, the
NSManagedObjectContext knows how to lock it properly when in use.
Therefore, we can attach as many NSManagedObjectContext objects to a
single NSPersistentStoreCoordinator as we want without fear of collision.
Cross-Thread Communication
There is one major catch when standing up multiple NSManagedOb-
jectContext instances. Each instance is unaware of the existence and
activity of the other instances. This means that when an NSManage-
dObject is created, edited, or deleted by one NSManagedObjectContext,
the other instances aren’t aware of the change.
Fortunately, Apple has given us a relatively easy way to keep all the
NSManagedObjectContext instances in sync. Every time that an NSMan-
agedObjectContext completes a save operation, it will broadcast an
NSNotification with the key NSManagedObjectContextDidSaveNotification.
In addition, the NSNotification instance will contain all the information
about what is occurring in that save.
To complement this NSNotification broadcast, the NSManagedObjectCon-
text has a method that is designed to consume this NSNotification and
update itself based on its contents. This method, -mergeChangesFrom-
ContextDidSaveNotification:, will update the NSManagedObjectContext
with the changes and will also notify any observers of those changes.
This means that our main NSManagedObjectContext can be updated
Report erratum
this copy is (P1.0 printing, September 2009)Prepared exclusively for Robert Walsh
Download at WoweBook.Com

EXPORTING RECIPES 165
with a single call whenever the background NSManagedObjectContext
instances perform a save, and our user interface will be updated auto-
matically.
9.3 Exporting Recipes
In this first demonstration of multithreading, we will be adding the abil-
ity to export recipes from our database so that they can be shared. In
this new section of the application, we will be creating an NSOperation,
which will create its own NSManagedObjectContext, and use it to copy
the selected recipes into a new NSManagedObjectContext, which is then
saved to a location specified by the user.
To implement this addition to our application, we need to make a few
changes to the user interface. We want to add a menu item for the user
to select when they want to export a recipe, and we want to display a
sheet for the user to select which recipe(s) they want to extract.
Before we can add the menu item, we want to add a method to the
AppDelegate header for the menu item to be bound to.
Download MultiThreading/AppDelegate.h
- (IBAction)exportRecipes:(id)sender;
- (IBAction)exportApproved:(id)sender;
- (IBAction)exportCancelled:(id)sender;
We have added three new methods to our AppDelegate. The first,
-exportRecipes:, will be called by the new menu item and will display our
sheet allowing the user to select which recipe(s) to export. The second,
-exportApproved:, will be called from the export button on that sheet,
and the third, -exportCancelled:, will be called from the cancel button of
that same sheet.
Updating the User Interface
To kick off the export, the user will select a menu item under the File
menu.
We will bind this menu item to the -exportRecipes: method that we added
to our AppDelegate header (shown in Figure 9.5, on page 174). When
this menu item is selected, we want a sheet to drop down with a list
that the user can select from. To do this, we will need to add a new
NSArrayController to our xib file, naming it export list, and bind it to our
AppDelegate. We will also need to create a new NSPanel, named Export
Report erratum
this copy is (P1.0 printing, September 2009)Prepared exclusively for Robert Walsh
Download at WoweBook.Com

EXPORTING RECIPES 166
Figure 9.1: Linking the Import menu item
Sheet, that will be used as our sheet. On this sheet, we will add an
NSTableView and two buttons, one named Cancel and the other named
Export, as demonstrated in Figure 9.2, on the following page.
Note that we have two columns in the table with a checkbox in the first
column. The second column is going to display the name of the recipe.
We want to bind each of these columns to the export list’s NSArrayCon-
troller that we added earlier. The checkbox column should be bound to
the model key path of selected, and the name column should be bound
to the model key path of name. Both columns should have their con-
troller key set to arrangedObjects.
The Export button needs to be bound to the -exportApproved: method
we added to our AppDelegate. Likewise, the Cancel button needs to be
bound to the -exportCancelled: method. The one last change we need to
make is to turn off Visible At Launch and Release When Closed. We
want to reuse this NSPanel and therefore do not want to release it, and
we also do not want it displayed when our application first launches.
Implementing the Export Methods
Now that we have updated our UI, we need to implement the new meth-
ods in our AppDelegate.
Report erratum
this copy is (P1.0 printing, September 2009)Prepared exclusively for Robert Walsh
Download at WoweBook.Com

EXPORTING RECIPES 167
Figure 9.2: New NSPanel for the export list
Download MultiThreading/AppDelegate.m
#pragma mark Export methods
#pragma mark -
- (IBAction)exportRecipes:(id)sender;
{
NSFetchRequest *request = [[NSFetchRequest alloc] init];
NSManagedObjectContext *moc = [self managedObjectContext];
[request setEntity:[NSEntityDescription entityForName:@"Recipe"
inManagedObjectContext:moc]];
NSError *error = nil;
NSArray *recipes = [moc executeFetchRequest:request
error:&error];
if (error) {
[NSApp presentError:error];
return;
}
The first step in our export is to grab all the recipes. We accomplish
this by doing an NSFetchRequest with the Recipe entity and without a
predicate. This will give us an NSArray of all the recipes in our NSMan-
agedObjectContext.
Download MultiThreading/AppDelegate.m
NSMutableArray *exportList = [NSMutableArray array];
for (NSManagedObject *recipe in recipes) {
NSMutableDictionary *entry = [NSMutableDictionary dictionary];
Report erratum
this copy is (P1.0 printing, September 2009)Prepared exclusively for Robert Walsh
Download at WoweBook.Com

EXPORTING RECIPES 168
[entry setValue:[NSNumber numberWithBool:NO]
forKey:@"selected"];
[entry setValue:[recipe valueForKey:@"name"]
forKey:@"name"];
[entry setValue:[recipe objectID]
forKey:@"objectID"];
[exportList addObject:entry];
}
[exportArrayController setContent:exportList];
Now that we have an NSArray of the recipes, we need to store the recipes
in our NSArrayController. However, the Recipe entity does not have any
way to specify whether it has been selected, so we will load NSDictionary
objects into the NSArrayController instead. Therefore, we will create a new
NSMutableArray and start looping over the results of our fetch. For each
result, we grab the name and the NSManagedObjectID and store both in
a new NSMutableDictionary. We also need to add an NSNumber into the
NSMutableDictionary set to NO with the key selected. This NSNumber will
be used to determine whether the user has selected that recipe.
Once we have added all the recipes to the NSMutableArray, we can then
set it as the content of the NSArrayController that is being used to display
the export list in our UI. Calling the -setContent: of the NSArrayController
will trigger the KVO and cause the NSTableView to be updated for us.
Download MultiThreading/AppDelegate.m
[NSApp beginSheet:exportSheet
modalForWindow:window
modalDelegate:nil
didEndSelector:NULL
contextInfo:nil];
Once the NSArrayController has been loaded, we need to display the sheet.
This is performed by a call to the shared NSApplication. Now when our
user selects Export Recipe(s) from the File menu, they will be presented
with a sheet to select from, as shown in Figure 9.3, on the next page.
The -exportCancelled: method involves only closing the sheet and return-
ing control to the user. Doing this requires two calls in the resulting
method.
Download MultiThreading/AppDelegate.m
- (IBAction)exportCancelled:(id)sender;
{
[exportSheet orderOut:sender];
[NSApp endSheet:exportSheet];
[exportArrayController setContent:nil];
}
Report erratum
this copy is (P1.0 printing, September 2009)Prepared exclusively for Robert Walsh
Download at WoweBook.Com

EXPORTING RECIPES 169
Figure 9.3: Displaying the export sheet
The -exportApproved: method is also quite brief. In this method we want
to also close the sheet, but we want to then present an NSSavePanel as
a sheet to the user so that they can tell us where to save the exported
recipes. Since the NSSavePanel will be asynchronous as a sheet, we need
to pass along the selected recipe’s NSManagedObjectID objects so that
the callback can use them to do the actual export.
Download MultiThreading/AppDelegate.m
- (IBAction)exportApproved:(id)sender;
{
[exportSheet orderOut:sender];
[NSApp endSheet:exportSheet];
NSArray *content = [exportArrayController content];
NSPredicate *pred = [NSPredicate predicateWithFormat:@"selected == YES"];
NSArray *filtered = [content filteredArrayUsingPredicate:pred];
NSArray *exportIDs = [filtered valueForKeyPath:@"objectID"];
NSSavePanel *savePanel = [NSSavePanel savePanel];
[savePanel setExtensionHidden:YES];
[savePanel setRequiredFileType:@"grx"];
[savePanel setCanSelectHiddenExtension:NO];
Report erratum
this copy is (P1.0 printing, September 2009)Prepared exclusively for Robert Walsh
Download at WoweBook.Com

EXPORTING RECIPES 170
SEL select = @selector(exportSaveDidEnd:returnCode:contextInfo:);
[savePanel beginSheetForDirectory:nil
file:nil
modalForWindow:window
modalDelegate:self
didEndSelector:select
contextInfo:[exportIDs retain]];
[exportArrayController setContent:nil];
}
Kicking Off the NSOperation
The last change we need to make to the AppDelegate is the callback for
our NSSavePanel. In this last method, we are grabbing both the filename
and the context from the NSSavePanel and constructing an instance of
a new class: PPExportOperation. During the initialization, we are passing
in a reference to the AppDelegate, the save path, and the NSManaged-
ObjectID objects for the recipes that need to be exported. After the PPEx-
portOperation has been constructed, we can hand it off to an NSOpera-
tionQueue. This will cause the PPExportOperation to be run on another
thread, allowing the UI to proceed.
Download MultiThreading/AppDelegate.m
- (void)exportSaveDidEnd:(NSSavePanel*)savePanel
returnCode:(NSInteger)returnCode
contextInfo:(NSArray*)exportIDs
{
if (returnCode == NSCancelButton) {
[exportIDs release];
return;
}
PPExportOperation *op = nil;
op = [[PPExportOperation alloc] initWithDelegate:self
objectIDs:exportIDs
saveFilePath:[savePanel filename]];
if (!genericOperationQueue) {
genericOperationQueue = [[NSOperationQueue alloc] init];
}
[genericOperationQueue addOperation:op];
[exportIDs release];
[op release];
}
Report erratum
this copy is (P1.0 printing, September 2009)Prepared exclusively for Robert Walsh
Download at WoweBook.Com

EXPORTING RECIPES 171
Making the Copy One-Way
When we are performing this copy, it would be very easy tocopy the entire Core Data repository. Because all our objectsare linked via two-way relationships, if we built a recursivemethod to copy the objects and follow their relationships, wewould end up with a complete duplicate of all the recipes.
To prevent that, we added a check into each object copy.Whenever it follows a relationship, it first checks to make surethat the destination entity of that relationship is not the sameentity as the parent entity that called it. By doing this, we guar-antee that the entity tree is copied in only one direction, asshown in Figure 9.4, on the following page
Although quite a bit of code is involved in the export operation, we will
touch on only a couple parts of it that are relevant to the manipulation
of the Core Data elements.
Download MultiThreading/PPExportOperation.m
- (void)main
{
NSManagedObjectContext *exportMOC = [self managedObjectContext];
if (!exportMOC) return;
NSPersistentStoreCoordinator *sourceStore = nil;
sourceStore = [appDelegate persistentStoreCoordinator];
NSManagedObjectContext *sourceMOC = [[NSManagedObjectContext alloc] init];
[sourceMOC setPersistentStoreCoordinator:sourceStore];
Before we can start the export, we can build the NSManagedObjectCon-
text for the export file. Once we have constructed the new Core Data
stack for the export file, the next step is to construct a new NSManage-
dObjectContext that is associated with the primary NSPersistentStoreCo-
ordinator for the application. To this end, we obtain a reference to the
primary NSPersistentStoreCoordinator from the AppDelegate reference that
was passed in when we initialized the NSOperation. With that reference
obtained, we next instantiate a new NSManagedObjectContext and set
the NSPersistentStoreCoordinator. We now have two NSManagedObjectCon-
text instances talking to the same NSPersistentStoreCoordinator.
Report erratum
this copy is (P1.0 printing, September 2009)Prepared exclusively for Robert Walsh
Download at WoweBook.Com

EXPORTING RECIPES 172
Recipe
RecipeIngredient
Ingredient
Author
UnitOfMeasure
Figure 9.4: The flow of the copy
Download MultiThreading/PPExportOperation.m
for (NSManagedObjectID *objectID in [self objectIDs]) {
NSManagedObject *object = [sourceMOC objectWithID:objectID];
[self copyObject:object
toContext:exportMOC
parent:nil];
}
[sourceMOC release], sourceMOC = nil;
Although this part of the -main performs all the work for the export, it
is actually very quick. Since we are not writing anything to disk yet and
the Recipe objects are already in memory, we are performing this sec-
tion of code very quickly. This copy operation will duplicate not only the
Recipe entity that we are exporting but all the other entities associated
with that recipe. Once all the selected Recipe objects have been copied
into the new NSManagedObjectContext, it is time to unlock the primary
NSManagedObjectContext.
Download MultiThreading/PPExportOperation.m
NSError *error = nil;
if (![exportMOC save:&error]) {
[NSApp presentError:error];
}
}
Report erratum
this copy is (P1.0 printing, September 2009)Prepared exclusively for Robert Walsh
Download at WoweBook.Com

IMPORTING RECIPES 173
Once the copy is complete, we can write the new context to disk. If
there is an error during the save, we notify the user and finish the
operation. Once the -main method exits, the instance will be released
by the NSOperationQueue, and all the temporary objects we used will be
freed in our -dealloc method.
9.4 Importing Recipes
Being able to export recipes is a great addition to our application. It not
only makes it easier for our users to share recipes, but it also promotes
the application itself. Existing users can share their recipes with new
users, and those new users will have to use our application to view the
recipes. It’s a great little micro market of its own. However, users also
need the ability to import these recipes to complete the circuit.
While implementing the import feature, we will also build a second
NSManagedObjectContext. This will allow us to add records as needed,
and when we are done with our manipulations, we can notify the main
thread of those changes. By putting the import on a separate thread,
the user can continue to operate the UI while the import is occurring.
When we are done with the import, the user will just see the recipes
added.
As with the earlier export operation, quite a bit of code is involved in
the import. I recommend reviewing the full process because we will be
touching only lightly on the mechanics here. The full implementation
of this process is included with the example code.
Updating the User Interface
Adding the import functionality requires a minor change to the user
interface. Like the export feature, we want to add another NSMenuItem
to the File menu called Import Recipe(s). We also want to bind that
NSMenuItem to a new method in our AppDelegate called -importRecipes:
(see Figure 9.5, on the next page). In that method, we want to display
an NSOpenPanel to the user as a sheet and force it to allow only selection
of our export records.
Download MultiThreading/AppDelegate.m
#pragma mark Import methods
#pragma mark -
Report erratum
this copy is (P1.0 printing, September 2009)Prepared exclusively for Robert Walsh
Download at WoweBook.Com

IMPORTING RECIPES 174
Figure 9.5: Linking the Import menu item
- (IBAction)importRecipes:(id)sender;
{
NSOpenPanel *openPanel = [NSOpenPanel openPanel];
[openPanel setCanChooseDirectories:NO];
[openPanel setCanCreateDirectories:NO];
[openPanel setRequiredFileType:@"grx"];
SEL selector = @selector(importSheetDidEnd:returnCode:context:);
[openPanel beginSheetForDirectory:nil
file:nil
modalForWindow:window
modalDelegate:self
didEndSelector:selector
contextInfo:nil];
}
Report erratum
this copy is (P1.0 printing, September 2009)Prepared exclusively for Robert Walsh
Download at WoweBook.Com

IMPORTING RECIPES 175
For the import, there is nothing we need to do before showing the
NSOpenPanel to the user. All of the work is done after our user has
selected a file to import.
Download MultiThreading/AppDelegate.m
- (void)importSheetDidEnd:(NSOpenPanel*)openPanel
returnCode:(NSInteger)returnCode
context:(void*)context
{
if (returnCode == NSCancelButton) return;
PPImportOperation *op = nil;
op = [[PPImportOperation alloc] initWithDelegate:self
filePath:[openPanel filename]];
if (!genericOperationQueue) {
genericOperationQueue = [[NSOperationQueue alloc] init];
}
[genericOperationQueue addOperation:op];
[op release], op = nil;
}
When the NSOpenPanel calls back to our AppDelegate, we first check
to see whether the user canceled the sheet. If they did not, then we
grab the filename from the NSOpenPanel and pass it into a new instance
of PPImportOperation along with a reference to the AppDelegate. After
the PPImportOperation has been initialized, we hand it off to the NSOp-
erationQueue and return control to the user. The rest of the import is
performed within the PPImportOperation.
Performing the Import Operation
The import is a fair bit more complicated than the export. Although
the concept is the same, we are copying NSManagedObject objects from
one NSManagedObjectContext to another. In this case, we need to worry
about certain objects being duplicated. We do not care if the Recipe
and RecipeIngredient objects are duplicated, but we don’t want to dupli-
cate UnitOfMeasure, Author, or Ingredient entities. Therefore, as part of the
import, whenever one of these objects is run across, it is searched for
in the primary NSManagedObjectContext before being created.
To help keep the -main as clean as possible, a lot of the initialization is
going to be done in the -initWithDelegate:filePath: instead.
Report erratum
this copy is (P1.0 printing, September 2009)Prepared exclusively for Robert Walsh
Download at WoweBook.Com

IMPORTING RECIPES 176
Download MultiThreading/PPImportOperation.m
- (id)initWithDelegate:(AppDelegate*)delegate
filePath:(NSString*)filePath
{
if (!(self = [super init])) return nil;
appDelegate = delegate;
[self setFilePath:filePath];
[self setImportContext:[self managedObjectContext]];
NSManagedObjectContext *mainMOC = [self newContextToMainStore];
NSNotificationCenter *center = [NSNotificationCenter defaultCenter];
[center addObserver:self
selector:@selector(contextDidSave:)
name:NSManagedObjectContextDidSaveNotification
object:mainMOC];
[self setMainContext:mainMOC];
[self setLookup:[NSMutableDictionary dictionary]];
return self;
}
Once the [super init] has returned, we set the filePath to an ivar, con-
struct an NSManagedObjectContext for it, and set that to another ivar.
Once we have the NSManagedObjectContext instantiated for the file to
be imported, we also want to start listening for NSNotification broadcasts
from that NSManagedObjectContext.
Download MultiThreading/PPImportOperation.m
- (void)main
{
NSFetchRequest *request = [[NSFetchRequest alloc] init];
[request setEntity:[NSEntityDescription entityForName:@"Recipe"
inManagedObjectContext:[self importContext]]];
NSError *error = nil;
NSArray *incomingRecipes = [[self importContext] executeFetchRequest:request
error:&error];
[request release], request = nil;
if (error) {
[NSApp presentError:error];
return;
}
At the start of our -main, we need to grab a reference to all the Recipe
entities that are in the import file. Since we have an NSManagedOb-
jectContext attached to the file, we need to perform an NSFetchRequest
against that NSManagedObjectContext and retrieve an array of NSMan-
agedObject references for the Recipe objects.
Report erratum
this copy is (P1.0 printing, September 2009)Prepared exclusively for Robert Walsh
Download at WoweBook.Com

IMPORTING RECIPES 177
Download MultiThreading/PPImportOperation.m
NSAutoreleasePool *pool = [[NSAutoreleasePool alloc] init];
for (NSManagedObject *recipe in incomingRecipes) {
[self copyRecipe:recipe];
[pool drain], pool = nil;
pool = [[NSAutoreleasePool alloc] init];
}
[pool drain], pool = nil;
Once we have all the recipes, we need to loop over them and copy each
one to the main NSManagedObjectContext. This copy operation is fairly
complicated, but the basic flow is this:
1. Copy the Recipe entity and its property attributes.
2. Copy each relationship, searching for existing objects by name
if they are not RecipeIngredients. If they are RecipeIngrdients, copy
them without searching.
3. For each object in the relationship, copy its relationships, taking
care to never copy parent objects.
This copy is one-way, as discussed in the sidebar on page 171. Once
the copy is complete, we need to save the main NSManagedObjectContext
and get ready to update the main thread and its NSManagedObjectCon-
text.
Download MultiThreading/PPImportOperation.m
error = nil;
if (![[self mainContext] save:&error]) {
[NSApp presentError:error];
return;
}
Once we have completed the import, it is time to save the context and
confirm that it was successful. Once the save is complete, we can exit
the -main method and complete the NSOperation. The only question that
remains is, how do we update the main NSManagedObjectContext and
thereby the UI?
When we wrote the -initWithDelegate:filePath:, we added the NSOperation
as an observer to its own NSManagedObjectContextDidSaveNotification
broadcasts. When we performed the -save: in the -main method, the
notification was automatically fired. To update the main NSManagedOb-
jectContext, we need to forward that notification along.
Report erratum
this copy is (P1.0 printing, September 2009)Prepared exclusively for Robert Walsh
Download at WoweBook.Com

THE RECURSIVE COPY REVIEWED 178
Download MultiThreading/PPImportOperation.m
- (void)contextDidSave:(NSNotification*)notification
{
SEL selector = @selector(mergeChangesFromContextDidSaveNotification:);
[[appDelegate managedObjectContext] performSelectorOnMainThread:selector
withObject:notification
waitUntilDone:YES];
}
In the implementation of the -contextDidSave: method, we only need to
pass along the notification to the main NSManagedObjectContext and
make sure that the -mergeChangesFromContextDidSaveNotification: is
called on the main thread. Once that call is complete, the main NSMan-
agedObjectContext will be up-to-date as will any observers it has, in-
cluding the user interface.
9.5 The Recursive Copy Reviewed
Although not strictly relevant to the subject of multithreading, it is valu-
able to review how the recursive copy that is used in these operations
works. Of the two, the recursive copy in the PPImportOperation is more
complex, so we will review that one.
-copyRecipe:
Download MultiThreading/PPImportOperation.m
- (void)copyRecipe:(NSManagedObject*)recipe
{
NSString *entityName = [[recipe entity] name];
NSManagedObject *newObject = [NSEntityDescription
insertNewObjectForEntityForName:entityName
inManagedObjectContext:[self mainContext]];
[[self lookup] setObject:newObject forKey:[recipe objectID]];
//Catch 22 Need to copy properties before changing the name but that
//loads it into the context causing an infinite loop
[self copyPropertiesFromObject:recipe toObject:newObject parent:entityName];
[newObject setValue:@"untitled recipe" forKey:@"name"];
NSUInteger index = 1;
NSString *newName = [recipe valueForKey:@"name"];
while ([self objectOfType:entityName withName:newName]) {
NSString *origName = [recipe valueForKey:@"name"];
newName = [NSString stringWithFormat:@"%@-%u", origName, index];
++index;
}
[newObject setValue:newName forKey:@"name"];
}
Report erratum
this copy is (P1.0 printing, September 2009)Prepared exclusively for Robert Walsh
Download at WoweBook.Com

THE RECURSIVE COPY REVIEWED 179
The recursive copy starts out by copying the Recipe object. Since we
know that we will always be copying the Recipe object, there is no
check, in the beginning, to see whether it already exists. Therefore, a
new NSManagedObject is created on the correct NSManagedObjectCon-
text, and then its properties and relationships are copied, which we will
review in a moment.
One thing to note is that as soon as we create the new NSManagedOb-
ject, we insert it into the lookup dictionary using the object’s NSManage-
dObjectID as the key. This NSDictionary will be used as a lookup later for
relationships.
After the copy is complete, the name of the new Recipe entity is changed
to “untitled recipe,” and a search is done on the NSManagedObjectCon-
text to see whether another recipe exists with the same name. The name
is changed first to ensure that we do not find this recipe in that search.
If a recipe is found, then we loop over the name, incrementing an index
and adding that index to the name in each pass until we find a variant
of the name that does not exist. Once that is found, or if the name is
not a duplicate, we reset the name onto the NSManagedObject.
-copyPropertiesFromObject:toObject:parent:
This method is at the heart of the recursive copy. There are two parts
to the copy operation.
Download MultiThreading/PPImportOperation.m
- (void)copyPropertiesFromObject:(NSManagedObject*)oldObject
toObject:(NSManagedObject*)newObject
parent:(NSString*)parentEntity
{
NSString *entityName = [[oldObject entity] name];
NSArray *attKeys = [[[oldObject entity] attributesByName] allKeys];
NSDictionary *attributes = [oldObject dictionaryWithValuesForKeys:attKeys];
[newObject setValuesForKeysWithDictionary:attributes];
In the first part of the copy operation, we will retrieve all the names of
the attributes in the object. This information is stored in the NSEntity-
Description, which can be referenced from the NSManagedObject via the
-entity method. Once we have an NSArray of all the attribute names, we
can get their values stored in an NSDictionary. We can then pass this
dictionary to the new NSManagedObject and thereby update all of its
attributes.
Report erratum
this copy is (P1.0 printing, September 2009)Prepared exclusively for Robert Walsh
Download at WoweBook.Com

THE RECURSIVE COPY REVIEWED 180
Download MultiThreading/PPImportOperation.m
id oldDestObject = nil;
id temp = nil;
NSDictionary *relationships = [[oldObject entity] relationshipsByName];
for (NSString *key in [relationships allKeys]) {
NSRelationshipDescription *desc = [relationships valueForKey:key];
NSString *destEntityName = [[desc destinationEntity] name];
if ([destEntityName isEqualToString:parentEntity]) continue;
if ([desc isToMany]) {
NSMutableSet *newDestSet = [NSMutableSet set];
for (oldDestObject in [oldObject valueForKey:key]) {
temp = [[self lookup] objectForKey:[oldDestObject objectID]];
if (!temp) {
temp = [self associateObject:oldDestObject
parent:entityName];
}
[newDestSet addObject:temp];
}
[newObject setValue:newDestSet forKey:key];
} else {
oldDestObject = [oldObject valueForKey:key];
if (!oldDestObject) continue;
temp = [[self lookup] objectForKey:[oldDestObject objectID]];
if (!temp) {
temp = [self associateObject:oldDestObject
parent:entityName];
}
[newObject setValue:temp forKey:key];
}
}
}
The second half of the copy is quite a bit more complicated. The first
issue is that a relationship can be pointing to one object or multiple
objects, and each of those possibilities needs to be handled differently.
Second, the object on the other end of that relationship may or may
not exist. If the destination object exists, then we can just set the rela-
tionship. If it does not exist, then we need to create it, which is done
in the -associateObject:parent: method discussed in a moment. It is here
that we use the lookup dictionary. By using the NSManagedObjectID as
the key, we can ensure that different relationships pointing to the same
object remain intact.
One important thing to note here is the parentEntity variable that is being
passed in. This variable is checked at the start of each relationship
copy. If the destination object for that relationship matches this vari-
able, then the relationship is skipped. This guarantees that the copy is
performed only down the tree and never back up.
Report erratum
this copy is (P1.0 printing, September 2009)Prepared exclusively for Robert Walsh
Download at WoweBook.Com

THE RECURSIVE COPY REVIEWED 181
-associateObject:parent:
This method is called from the -copyPropertiesFromObject:toObject:parent:
method whenever it fails to find a destination object in the lookup dic-
tionary.
Download MultiThreading/PPImportOperation.m
- (id)associateObject:(NSManagedObject*)object parent:(NSString*)name
{
NSManagedObjectContext *moc = [self mainContext];
NSString *entityName = [[object entity] name];
id temp = nil;
if ([entityName isEqualToString:@"RecipeIngredient"]) {
temp = [NSEntityDescription insertNewObjectForEntityForName:entityName
inManagedObjectContext:moc];
[[self lookup] setObject:temp forKey:[object objectID]];
[self copyPropertiesFromObject:object toObject:temp parent:name];
return temp;
}
if (temp = [self objectOfType:entityName
withName:[object valueForKey:@"name"]]) {
[[self lookup] setObject:temp forKey:[object objectID]];
return temp;
}
temp = [NSEntityDescription insertNewObjectForEntityForName:entityName
inManagedObjectContext:moc];
[[self lookup] setObject:temp forKey:[object objectID]];
[self copyPropertiesFromObject:object toObject:temp parent:name];
return temp;
}
In this method, unlike the previous method discussed, we care what
kind of entity we are working with. If we are working with a RecipeIn-
gredient, then we know to just blindly create a new object. However, for
any other object, we need to first check to see whether it already exists
in the NSManagedObjectContext. We do this by calling -objectOfType:with-
Name:, and if it returns a nil, then we need to create a new object. If
it returns an NSManagedObject, then we associate that returned object
with the original object passed in so that future calls against it will be
found in the lookup dictionary.
There are a couple of things to note. First, no matter whether we are
creating a new object or associating an existing object, we always store
Report erratum
this copy is (P1.0 printing, September 2009)Prepared exclusively for Robert Walsh
Download at WoweBook.Com

THE RECURSIVE COPY REVIEWED 182
the reference in our lookup dictionary. This makes sure we do not dupli-
cate the work and that we can refresh the object later as needed.
The other important thing to note here is the recursion. If we create
a new object, we call copyPropertiesFromObject:toObject:parent: on that
object even though that is the method that we just came from. However,
because of the parent reference, we guarantee that the copy loop never
goes back up the chain.
-objectOfType:withName:
The final method in this copy routine is called from the -associateObject:
parent: method. This method determines whether an object already
exists in the NSManagedObjectContext to avoid duplication.
Download MultiThreading/PPImportOperation.m
- (id)objectOfType:(NSString*)entityName withName:(NSString*)name
{
NSFetchRequest *request = [[NSFetchRequest alloc] init];
[request setEntity:[NSEntityDescription entityForName:entityName
inManagedObjectContext:[self mainContext]]];
[request setPredicate:[NSPredicate predicateWithFormat:@"name = %@", name]];
NSError *error = nil;
id result = [[[self mainContext] executeFetchRequest:request
error:&error] lastObject];
return result;
}
In our data model, almost every object has a name property. Fortu-
nately, in the one case that this is not true, we don’t care whether there
are duplicate objects. Therefore, this method gets rather heavily used
during the import operation to help guarantee that we are not creating
more than one object with the same name.
We accomplish this check by creating an NSFetchRequest using the name
as the test in the predicate and using the passed-in entityName to con-
struct the NSEntityDescription. We then return the -lastObject of the NS-
Array returned from the fetch. By using -lastObject, we can avoid hav-
ing to check the length of the returned array. -lastObject will check the
length for us automatically and return a nil if the NSArray has no objects.
Report erratum
this copy is (P1.0 printing, September 2009)Prepared exclusively for Robert Walsh
Download at WoweBook.Com

WRAPPING UP 183
9.6 Wrapping Up
In this chapter, we reviewed how to use Core Data in a multithreaded
application and added some very useful features to our recipes appli-
cation. We have learned that each thread needs to have its own NS-
ManagedObjectContext and that NSManagedObject instances should
never cross threads. We also learned how to send notifications across
threads so that changes in one NSManagedObjectContext can be up-
dated in other NSManagedObjectContext instances.
Report erratum
this copy is (P1.0 printing, September 2009)Prepared exclusively for Robert Walsh
Download at WoweBook.Com

Chapter 10
Core Data and iPhoneCore Data is now available on the iPhone. Introduced as part of the
iPhone 3.0 SDK, the API is nearly identical to the desktop version. There
are, however, some very important differences that we will review in this
chapter.
This chapter assumes that you have at least a basic understanding of
how code is written for the Cocoa Touch devices and are comfortable
with the UIViewController design. If you are not, then I highly recom-
mend reading Bill Dudney and Chris Adamson’s iPhone SDK Develop-
ment (also from the Pragmatic Bookshelf) before proceeding with this
chapter.
10.1 Similarities and Differences
The Core Data API is nearly identical on both the desktop and Cocoa
Touch devices. Of course, “nearly identical” and “identical” are not the
same thing. We need to be conscious of a few very important differences
between the desktop and Cocoa Touch before designing an application
to run on Cocoa Touch.
Creating a New Core Data Cocoa Touch Project
When starting a new Cocoa Touch project, it is possible to add Core
Data to many of the existing templates. To do this, select the template
that you want to start with, and then select the “Use Core Data for
storage” checkbox before progressing in the creation of the template.
To demonstrate using Core Data on the iPhone, we will be using the
Navigation-based Application template with the “Use Core Data for stor-
age” box selected, as shown in Figure 10.1, on the next page. We’ll start
this project in Section 10.4, Recipes for the iPhone, on page 195.
Prepared exclusively for Robert Walsh
Download at WoweBook.Com

SIMILARITIES AND DIFFERENCES 185
Figure 10.1: iPhone OS New Project dialog box
Upgrading an Existing Application to Core Data
Many of us have been developing iPhone applications since the SDK’s
original release, so it is quite likely that you have an existing application
that you want to integrate with Core Data. Fortunately, it does not take
very much code to build up the Core Data stack in an existing project.
Adding a Data Model to the Project
Just like on the desktop, Core Data on Cocoa Touch requires a data
model to define the structure of the data entities. Therefore, the first
step is to add a data model to the project by selecting File > New File.
Within the dialog box that appears, if we select the Resources section,
we can then create a new data model, as shown in Figure 10.2, on the
next page.
In addition to creating a new data model, we can also use an existing
data model from an existing application. Later in this chapter, in Sec-
tion 10.4, Recipes for the iPhone, on page 195, we use the data model
from our desktop recipes application in our new iPhone application.
The data models are compatible between the desktop and Cocoa Touch,
Report erratum
this copy is (P1.0 printing, September 2009)Prepared exclusively for Robert Walsh
Download at WoweBook.Com

SIMILARITIES AND DIFFERENCES 186
Figure 10.2: Adding a data model to the project
which allows us to share not only models but the underling persistent
stores as well.
Adding the Core Data Code
Once we have a data model to work with, we next need to add the code
to load the Core Data stack. The exact placement of this code depends
on the design of your application. Since there are no document-style
applications on the iPhone, it is most common to have a single data
model and a single persistent store per Cocoa Touch application. Al-
though I still like to put the Core Data code in the application delegate,
it might make sense to put it somewhere else. No matter where the code
is placed, it is very similar to the desktop. First we need to initialize the
data model.
Download RecipeCT/Classes/AppDelegate.m
- (NSManagedObjectModel*)managedObjectModel
{
if (managedObjectModel) return managedObjectModel;
NSString *path = [[NSBundle mainBundle] pathForResource:@"DataModel"
ofType:@"momd"];
Report erratum
this copy is (P1.0 printing, September 2009)Prepared exclusively for Robert Walsh
Download at WoweBook.Com

SIMILARITIES AND DIFFERENCES 187
if (!path) {
path = [[NSBundle mainBundle] pathForResource:@"DataModel"
ofType:@"mom"];
}
NSAssert(path != nil, @"Unable to find DataModel in main bundle");
NSURL *url = [NSURL fileURLWithPath:path];
managedObjectModel = [[NSManagedObjectModel alloc] initWithContentsOfURL:url];
return managedObjectModel;
}
This should look quite familiar because it is identical to the way you
would build the NSManagedObjectModel on the desktop. We get the path
for the .mom file (or the .momd if there are multiple versions of the data
model) and use it to initialize the NSManagedObjectModel.
Download RecipeCT/Classes/AppDelegate.m
- (NSString*)documentsFolder
{
NSArray *paths = NSSearchPathForDirectoriesInDomains(NSDocumentDirectory,
NSUserDomainMask, YES);
NSString *filePath = [paths objectAtIndex:0];
return filePath;
}
Before we construct the NSPersistentStoreCoordinator, we need to decide
where to store the persistent store file. On the desktop in an applica-
tion with a single persistent store, we would save the file to the Applica-
tion Support folder. However, on Cocoa Touch devices, there is no such
location. Instead, each application has its own sandboxed Documents
directory designed for the storage of files. This is where we will write our
persistent store. Using code similar to what we used on the desktop to
find the Application Support folder, we will find the Documents folder
specific to our application.
Download RecipeCT/Classes/AppDelegate.m
- (NSPersistentStoreCoordinator*)persistentStoreCoordinator;
{
if (persistentStoreCoordinator) return persistentStoreCoordinator;
NSFileManager *fileManager = [NSFileManager defaultManager];
NSString *docFolder = [self documentsFolder];
if (![fileManager fileExistsAtPath:docFolder]) {
[fileManager createDirectoryAtPath:docFolder attributes:nil];
}
NSString *filePath = nil;
filePath = [docFolder stringByAppendingPathComponent:@"recipes.sqlite"];
Report erratum
this copy is (P1.0 printing, September 2009)Prepared exclusively for Robert Walsh
Download at WoweBook.Com

SIMILARITIES AND DIFFERENCES 188
if (![fileManager fileExistsAtPath:filePath]) {
NSString *defaultDB = [[NSBundle mainBundle] pathForResource:@"recipes"
ofType:@"sqlite"];
NSError *error = nil;
if (![[NSFileManager defaultManager] copyItemAtPath:defaultDB
toPath:filePath
error:&error]) {
NSLog(@"%@:%s Error copying file %@", [self class], _cmd, error);
}
}
NSURL *url = [NSURL fileURLWithPath:filePath];
NSManagedObjectModel *mom = [self managedObjectModel];
persistentStoreCoordinator = [[NSPersistentStoreCoordinator alloc]
initWithManagedObjectModel:mom];
NSError *error = nil;
if ([persistentStoreCoordinator addPersistentStoreWithType:NSSQLiteStoreType
configuration:nil
URL:url
options:nil
error:&error]) {
return persistentStoreCoordinator;
}
[persistentStoreCoordinator release], persistentStoreCoordinator = nil;
NSDictionary *ui = [error userInfo];
if (![ui valueForKey:NSDetailedErrorsKey]) {
NSLog(@"%@:%s Error adding store %@", [self class], _cmd,
[error localizedDescription]);
} else {
for (NSError *suberror in [ui valueForKey:NSDetailedErrorsKey]) {
NSLog(@"%@:%s Error: %@", [self class], _cmd,
[suberror localizedDescription]);
}
}
NSAssert(NO, @"Failed to initialize the persistent store");
return nil;
}
Once we have the NSManagedObjectModel constructed, the next step
is to build the persistent store coordinator. Again, this code is nearly
identical to the desktop version but with a few differences. First, for the
moment, I have turned off the versioning check because we have only
one version on the iPhone. When we release version 2 in the future, we
will need to turn that back on.
The second major difference has to do with default settings. We initially
check for the existence of a database file in the application’s Docu-
ments directory, but if it does not exist, then we copy one from within
Report erratum
this copy is (P1.0 printing, September 2009)Prepared exclusively for Robert Walsh
Download at WoweBook.Com

SIMILARITIES AND DIFFERENCES 189
the bundle of the application itself. This gives us a set of “defaults” or
“samples” for the user who is accessing the iPhone application for the
very first time. By doing this, we can present the user with an inviting
list of recipes when they launch our application instead of an empty
table view.
Download RecipeCT/Classes/AppDelegate.m
- (NSManagedObjectContext*)managedObjectContext
{
if (managedObjectContext) return managedObjectContext;
NSPersistentStoreCoordinator *coord = [self persistentStoreCoordinator];
if (!coord) return nil;
managedObjectContext = [[NSManagedObjectContext alloc] init];
[managedObjectContext setPersistentStoreCoordinator:coord];
return managedObjectContext;
}
The last method we need to implement is the -managedObjectContext
method. Since we did all the hard work either in the -managedObject-
Model method or in the -persistentStoreCoordinator method, this method
is even simpler than its desktop cousin. We request a reference to the
NSPersistentStoreCoordinator, and assuming that it is not nil, we initialize
an NSManagedObjectContext, add the NSPersistentStoreCoordinator to it,
and return the resulting NSManagedObjectContext. Since we will either
have an existing persistent store from the last time the user ran the
application or have a default store copied over, there is no need to check
the Type table as we have previously. It is guaranteed either to be there
or to be intentionally cleared out by the user.
Persistent Store Formats
Similar to Core Data on the desktop, several persistent formats are
available on Cocoa Touch devices. However, one format is missing that
I have grown to love. The XML format is not available currently on the
iPhone. I suspect this is to force us to use something that is far more
memory efficient such as the SQLite store. It is also possible that it was
skipped because of dependencies on other APIs that are also not avail-
able at this time. Whatever the reason, the XML store is not available to
us, and we should be using the SQLite store in every situation possible.
Besides the SQLite persistent store format, we also have access to the
binary and in-memory formats. However, both of these formats require
Report erratum
this copy is (P1.0 printing, September 2009)Prepared exclusively for Robert Walsh
Download at WoweBook.Com

MEMORY MANAGEMENT 190
that the entire object hierarchy be loaded into memory, and that is
something we generally cannot afford on a Cocoa Touch device. There-
fore, unless there is a very solid design reason to use another store
format, SQLite should be used.
10.2 Memory Management
One of the most important differences we need to keep in mind while
working with Core Data on the iPhone is the management of memory.
Depending on which Cocoa Touch device is targeted, we could have
as little as 20MB of memory to work with. This is drastically different
from the modern desktop that measures memory in gigabytes! There-
fore, Core Data, to be a good citizen on this much smaller device, must
handle memory differently.
The best way to handle memory management is to let someone else do
it. Fortunately, Apple has stepped up to the plate and done most of the
heavy lifting for us. As we will discuss in depth in Section 10.3, Using
the NSFetchedResultsController, on page 194, the new class, NSFetched-
ResultsController, does a lot of the memory management work for us as
long as we play by its rules. These rules break down into two separate
sections.
Grab Only What You Need
Because we have such a small amount of memory to work with, it is
very important that we keep only the entities in memory that we abso-
lutely need for that view. What this means is that if we are working in a
view (or a page, as some refer to a single screen of information), then we
should be retaining only the entities that are needed for that view. In the
case of a view that is a table, then that becomes a bit trickier. But fortu-
nately, the NSFetchedResultsController helps us solve that problem as well.
Handling Data Changes
The second rule of working with Core Data on the iPhone has to do
with the notification of changes to the data entities. On the desktop
our view elements are bound directly to the data entities, and when
an entity changes, all the view elements associated with that entity
are automatically updated through KVO, as discussed in Chapter 3,
Core Data and Bindings, on page 34. However, on a CocoaTouch device,
those bindings do not currently exist, and updates to visual elements
need to be coded.
Report erratum
this copy is (P1.0 printing, September 2009)Prepared exclusively for Robert Walsh
Download at WoweBook.Com

MEMORY MANAGEMENT 191
Figure 10.3: Contacts table view
When we’re working within one view, this isn’t too much of an issue.
We have a direct relationship between the view elements being manipu-
lated by the user and the elements displayed by the view. However, what
about any other view that exists in the hierarchy that is not currently
being displayed but still has elements that are being manipulated?
A good example of this is the Contacts application that exists on every
Cocoa Touch device. The primary view for this application is a table
listing all the contacts in the database, as shown in Figure 10.3.
In addition to this table view, we also have a detail view that displays
a single contact, as shown in Figure 10.4, on the following page. It is
this detail view that handles all the editing of a contact. However, when
a detail of that contact gets edited that is also displayed in the parent
table view, how does that table view get notified to update its display
values?
Report erratum
this copy is (P1.0 printing, September 2009)Prepared exclusively for Robert Walsh
Download at WoweBook.Com
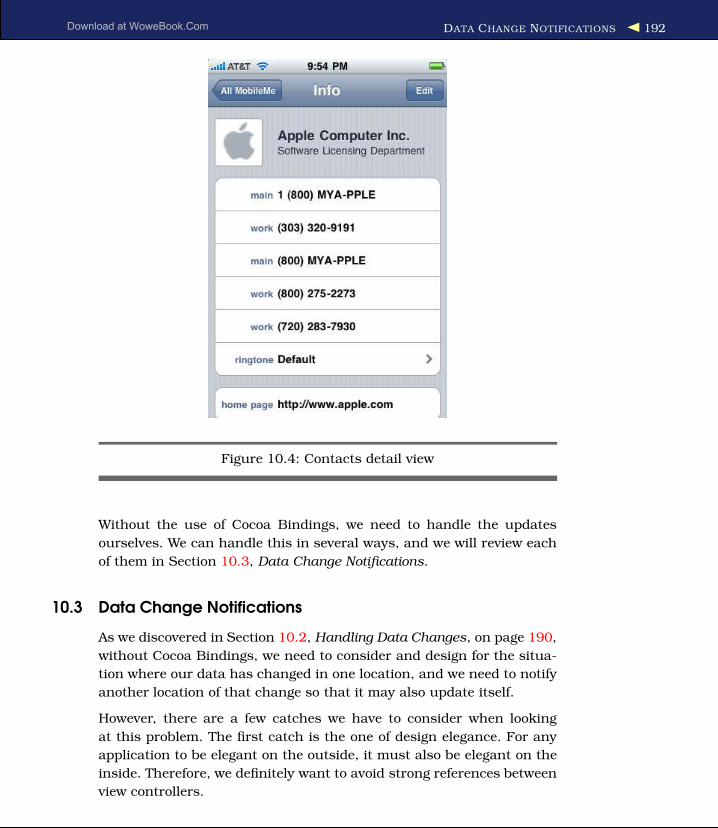
DATA CHANGE NOTIFICATIONS 192
Figure 10.4: Contacts detail view
Without the use of Cocoa Bindings, we need to handle the updates
ourselves. We can handle this in several ways, and we will review each
of them in Section 10.3, Data Change Notifications.
10.3 Data Change Notifications
As we discovered in Section 10.2, Handling Data Changes, on page 190,
without Cocoa Bindings, we need to consider and design for the situa-
tion where our data has changed in one location, and we need to notify
another location of that change so that it may also update itself.
However, there are a few catches we have to consider when looking
at this problem. The first catch is the one of design elegance. For any
application to be elegant on the outside, it must also be elegant on the
inside. Therefore, we definitely want to avoid strong references between
view controllers.
Report erratum
this copy is (P1.0 printing, September 2009)Prepared exclusively for Robert Walsh
Download at WoweBook.Com

DATA CHANGE NOTIFICATIONS 193
The second catch has to again do with memory. The Cocoa Touch sys-
tem has some great memory management features built right into it,
and we need to be conscious of them. For example, if we have a UIView-
Controller stack that is very deep and we start to hit the memory limits,
it is quite possible that the operating system will decide to drop some of
our views from memory. If each view is a self-contained island of data,
this is generally not a problem. However, if we want to start broadcast-
ing data change notifications back up the stack, this is something we
need to be aware of and check for; otherwise, a data notification could
cause the entire application to crash.
Using the Delegate Design Pattern
One of the most common solutions to this problem is to use a delegate.
In fact, Apple uses this pattern very frequently. Ideally, when using
a delegate design, we want to keep a separation between the delegate
and the calling object. This will avoid having a strong link between view
controllers and allows for the flow of the view controllers to be changed
if needed in some future release. With Cocoa Touch, Apple has started
using protocols to define delegate methods. Prior to Cocoa Touch (and
Objective-C 2.0), it was far more common to add a category to NSObject
to define the methods that are called upon the delegate.
With the addition of Objective-C 2.0, we can now have optional meth-
ods in a protocol, which makes it easier to use protocols instead of
categories. We can now define which methods are required, testing at
compile time, and which methods are optional. Previously with cate-
gories we had to define which were required and which were optional
through runtime checks and documentation.
Unfortunately, using a delegate design does have one fairly major issue.
We can have just one delegate being notified when the data changes. If
we have a deep stack of view controllers, then we would need to build
up a cascade of change notifications up the stack. It’s certainly possible
but not the most elegant solution in that situation.
Using the NSNotificationCenter
When a delegate won’t do, then a notification usually will. The NSNotifi-
cation API has the advantage of being able to handle multiple observers
and notify each of them in turn. In an NSNotification design, each view
would add itself as an observer to a specific key. When a notification
Report erratum
this copy is (P1.0 printing, September 2009)Prepared exclusively for Robert Walsh
Download at WoweBook.Com
DATA CHANGE NOTIFICATIONS 194
with that key is broadcast, then the view would receive a callback and
be allowed to handle the notification as needed.
The NSNotification API is quite elegant for a number of reasons. Each
observer can decide on its own how to handle the notification that it
receives. In addition, the object that posts the notification does not need
to know anything about the consumers of that notification. It does not
even need to know what method is being called on the consumer. The
producer simply sends out the notification and carries on. This provides
excellent separation of the view controllers.
Using the NSFetchedResultsController
With the release of 3.0 for Cocoa Touch, Apple has provided us with a
third solution to this problem. This third solution is provided via the
NSFetchedResultsController and is recommended for most standard Cocoa
Touch application designs.
The NSFetchedResultsController is specifically designed to manage a result
set of entities from an NSManagedObjectContext and provides methods
to query the result set for the number of entities and to keep them
in order.
In addition, the NSFetchedResultsController also provides means for a UI-
ViewController to be notified when any of the entities in the result set are
modified including the addition or deletion of entities. The best way to
look at the NSFetchedResultsController is as a layer between the NSMan-
agedObjectContext and the UIViewController, as depicted in Figure 10.5,
on the next page.
To construct an NSFetchedResultsController, we need to first construct an
NSFetchRequest and pass that request into the NSFetchedResultsController.
Once that is accomplished, we can query the NSFetchedResultsController
for the number of entities in the results and retrieve individual entities.
In our example application, RecipesCT, we will be using the NSFetched-
ResultsController to manage the main table view as well as to receive
events when the detail view changes one of the entities. This project
is discussed in greater detail in Section 10.4, Recipes for the iPhone, on
the following page.
Report erratum
this copy is (P1.0 printing, September 2009)Prepared exclusively for Robert Walsh
Download at WoweBook.Com
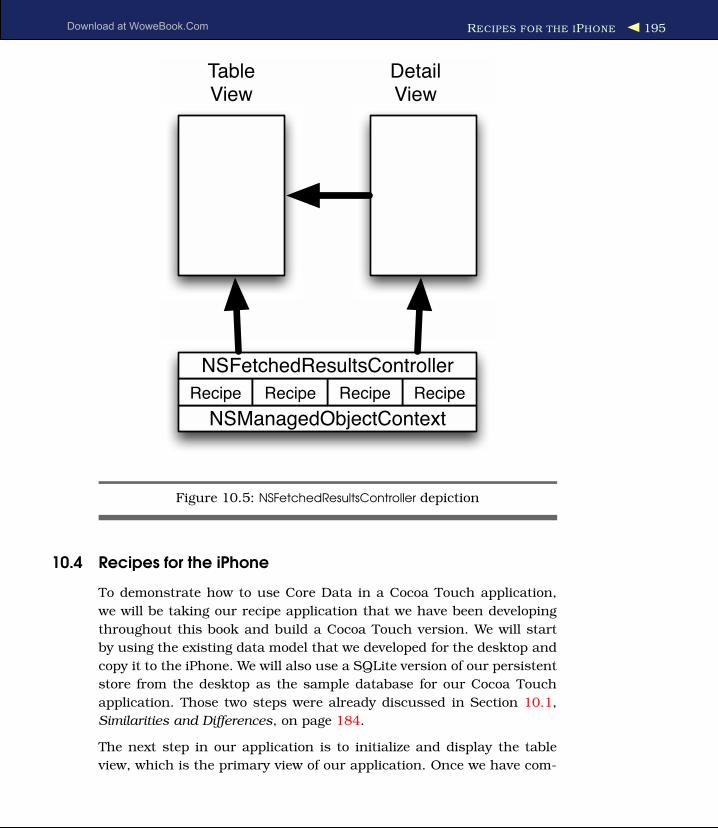
RECIPES FOR THE IPHONE 195
TableView
DetailView
NSManagedObjectContext
Recipe RecipeRecipeRecipe
NSFetchedResultsController
Figure 10.5: NSFetchedResultsController depiction
10.4 Recipes for the iPhone
To demonstrate how to use Core Data in a Cocoa Touch application,
we will be taking our recipe application that we have been developing
throughout this book and build a Cocoa Touch version. We will start
by using the existing data model that we developed for the desktop and
copy it to the iPhone. We will also use a SQLite version of our persistent
store from the desktop as the sample database for our Cocoa Touch
application. Those two steps were already discussed in Section 10.1,
Similarities and Differences, on page 184.
The next step in our application is to initialize and display the table
view, which is the primary view of our application. Once we have com-
Report erratum
this copy is (P1.0 printing, September 2009)Prepared exclusively for Robert Walsh
Download at WoweBook.Com
RECIPES FOR THE IPHONE 196
pleted building the table view, we will then construct a detail view,
which will display a single recipe. Although we will not be developing
every aspect of this application, we will touch on the key points that
involve working with the Core Data portion of the application.
Preparing the NSFetchedResultsController
As soon as the application launches, we want to display a table view of
all the available recipes. To do this, we need to construct an NSFetched-
ResultsController that manages all the Recipe entities and that the UITable-
ViewController will query to display the recipes.
Download RecipeCT/Classes/AppDelegate.m
- (void)applicationDidFinishLaunching:(UIApplication*)application
{
window = [[UIWindow alloc] initWithFrame:[[UIScreen mainScreen] bounds]];
NSFetchedResultsController *results = [self fetchedResultsController];
MainViewController *controller = nil;
controller = [[MainViewController alloc] initWithFetchController:results];
nav = [[UINavigationController alloc] initWithRootViewController:controller];
[controller release], controller = nil;
// Override point for customization after app launch
[window addSubview:[nav view]];
[window makeKeyAndVisible];
}
Most of this is familiar to you if you’ve developed a Cocoa Touch appli-
cation. Once the application has finished launching, we need to build
the user interface. To do that, we initialize the window to be the size of
the screen, and we then construct our MainViewController, which is the
controller managing the main table view. Then we place that MainView-
Controller into a UINavigationController so that we can easily transition to
the detail view. Once the UINavigationController has been initialized, we
add its -view to the window and request that the window become visible.
The one interesting or different part of this method is the initialization
of the MainViewController. In this example, it accepts an NSFetchedResults-
Controller as part of its initialization. It is expected that the MainView-
Controller will retain this NSFetchedResultsController and use it to populate
the table view.
Report erratum
this copy is (P1.0 printing, September 2009)Prepared exclusively for Robert Walsh
Download at WoweBook.Com

RECIPES FOR THE IPHONE 197
The code to construct this NSFetchedResultsController is most interesting.
Download RecipeCT/Classes/AppDelegate.m
- (NSFetchedResultsController*)fetchedResultsController
{
NSManagedObjectContext *context = [self managedObjectContext];
NSFetchRequest *fetchRequest = [[NSFetchRequest alloc] init];
[fetchRequest setEntity:[NSEntityDescription entityForName:@"Recipe"
inManagedObjectContext:context]];
// Configure the request's entity, and optionally its predicate.
NSSortDescriptor *sortDescriptor = nil;
sortDescriptor = [[NSSortDescriptor alloc] initWithKey:@"name" ascending:YES];
NSArray *sortDescriptors = nil;
sortDescriptors = [[NSArray alloc] initWithObjects:sortDescriptor, nil];
[sortDescriptor release], sortDescriptor = nil;
[fetchRequest setSortDescriptors:sortDescriptors];
[sortDescriptors release], sortDescriptors = nil;
NSFetchedResultsController *controller = [[NSFetchedResultsController alloc]
initWithFetchRequest:fetchRequest
managedObjectContext:context
sectionNameKeyPath:nil
cacheName:@"Recipe"];
[fetchRequest release];
NSError *error = nil;
BOOL success = [controller performFetch:&error];
if (!success) {
NSLog(@"Error fetching request %@", [error localizedDescription]);
}
return [controller autorelease];
}
As discussed, an NSFetchedResultsController takes an NSFetchRequest as
part of its initialization. This NSFetchRequest is used to determine what
entities are to be included in the NSFetchedResultsController. In this exam-
ple, we configure the NSFetchRequest to request all the Recipe entities
and to sort them based on the name attribute in ascending order.
Once the NSFetchRequest is constructed, we then pass it along to the
NSFetchedResultsController along with a reference to the NSManagedOb-
jectContext. We also give it a name for the cache. This cache can be
shared across NSFetchedResultsController objects if appropriate, although
we will not be doing that in this example.
Once the NSFetchedResultsController has been initialized, we then request
that it perform the fetch that will load the entities into memory. It
should be noted that the NSFetchedResultsController is very conscious of
the available memory on the device, and it will keep only the entities
in memory that are currently needed. Therefore, we can expect at this
Report erratum
this copy is (P1.0 printing, September 2009)Prepared exclusively for Robert Walsh
Download at WoweBook.Com

RECIPES FOR THE IPHONE 198
point that it has loaded only the faulted objects into memory and that
they are not fully realized yet.
Building the Main Table View
Now that we have the NSFetchedResultsController being passed into the
MainViewController, we need to build the main table view. The header for
this UITableViewController is very simple. Because we are displaying only
a UITableView and nothing else, we can use a UITableViewController instead
of its parent, UIViewController. The UITableViewController will handle the
reference to the UITableView for us, and it is already declared as both
a UITableViewDelegate and a UITableViewDatasource. The resulting header
file is as follows:
Download RecipeCT/Classes/MainViewController.h
@interface MainViewController : UITableViewController
{
NSFetchedResultsController *resultsController;
}
@property (retain) NSFetchedResultsController *resultsController;
- (id)initWithFetchController:(NSFetchedResultsController*)controller;
@end
In this class, the only thing we are retaining is the NSFetchedResultsCon-
troller, which will be driving the model for our application. From the
header, we can then construct the -initWithFetchController: method, which
takes a single parameter, the NSFetchedResultsController constructed in
the AppDelegate. Once we have initialized the UITableViewController sub-
class by calling -initWithStyle: on the superclass, we then set the results-
Controller property with the passed-in parameter. We also set our Main-
ViewController instance as the delegate to the NSFetchedResultsController
so that we receive callbacks when any of the entities managed by the
NSFetchedResultsController change.
Download RecipeCT/Classes/MainViewController.m
- (id)initWithFetchController:(NSFetchedResultsController*)controller
{
if (!(self = [super initWithStyle:UITableViewStylePlain])) return nil;
[self setResultsController:controller];
[controller setDelegate:self];
return self;
}
Report erratum
this copy is (P1.0 printing, September 2009)Prepared exclusively for Robert Walsh
Download at WoweBook.Com

RECIPES FOR THE IPHONE 199
The next interesting parts of the MainViewController that we need to
implement are the UITableViewDelegate and UITableViewDataSource
methods.
Implementing the -numberOfSectionsInTableView: Method
Download RecipeCT/Classes/MainViewController.m
- (NSInteger)numberOfSectionsInTableView:(UITableView*)tableView
{
return [[[self resultsController] sections] count];
}
To be able to ask for the number of rows in a section, the UITableView
must first know the number of sections. In this method, we request
the sections property of the NSFetchedResultsController, which returns an
NSArray of NSFetchedResultsSectionInfo implementations. Since we need to
know only the number of sections, we return a call to -count on the
resulting NSArray.
Implementing the -tableView:numberOfRowsInSection: Method
One of the first methods that gets called as the table view is being
realized is the -tableView:numberOfRowsInSection: method, which tells the
UITableView how many rows are going to be displayed.
Download RecipeCT/Classes/MainViewController.m
- (NSInteger)tableView:(UITableView*)table
numberOfRowsInSection:(NSInteger)section
{
id <NSFetchedResultsSectionInfo> sectionInfo = nil;
sectionInfo = [[[self resultsController] sections] objectAtIndex:section];
return [sectionInfo numberOfObjects];
}
In this method, we request a reference to the NSFetchedResultsSectionInfo
instance for the specified section. The result is an implementation of the
protocol that contains a count of the number of objects in the section as
well as a reference to the objects and the name of the section. For this
method, we return the result of a call to the numberOfObjects property.
Implementing the -tableView:cellForRowAtIndexPath: Method
The one method that tends to be the most complex in a UITableView-
Controller is the -tableView:cellForRowAtIndexPath: method. This method is
responsible for initializing (or dequeuing) the UITableViewCell object that
will be displaying a particular row in the table.
Report erratum
this copy is (P1.0 printing, September 2009)Prepared exclusively for Robert Walsh
Download at WoweBook.Com

RECIPES FOR THE IPHONE 200
Download RecipeCT/Classes/MainViewController.m
- (UITableViewCell*)tableView:(UITableView*)tableView
cellForRowAtIndexPath:(NSIndexPath*)indexPath
{
static NSString *cellIdentifier = @"cellIdentifier";
UITableViewCell *cell = nil;
cell = [tableView dequeueReusableCellWithIdentifier:cellIdentifier];
if (!cell) {
cell = [[[UITableViewCell alloc] initWithStyle:UITableViewCellStyleSubtitle
reuseIdentifier:cellIdentifier] autorelease];
[cell setAccessoryType:UITableViewCellAccessoryDisclosureIndicator];
}
[self updateCell:cell fromRecipe:[[self resultsController]
objectAtIndexPath:indexPath]];
return cell;
}
Because our table has only one style of row, it makes this class simpler
than it tends to be in tables that have multiple row types. We start off
by attempting to dequeue a UITableViewCell so that we can reuse it. If
there is not one available to dequeue, we construct a new one. Since
every cell will display a disclosure indicator, we configure that as part
of the initialization of the new cell.
Once the cell is obtained, we need to populate it. Since we will be popu-
lating and/or updating cells in more than one location in our controller,
the populating of the cell has been abstracted into its own method.
Therefore, our -tableView:cellForRowAtIndexPath: needs to obtain a refer-
ence to the entity for the row and pass it to the -updateCell:fromRecipe:
method.
Because the NSFetchedResultsController class is UITableView aware, we do
not need to do any complicated code to obtain the specified object. A
single call to -objectAtIndexPath: passing in the referenced NSIndexPath
object will yield the relevant recipe.
Implementing the -updateCell:fromRecipe: Method
Whenever a cell is created or updated, its contents need to be config-
ured. Fortunately, we are using one of the new table view cell styles
included in 3.0 so that we do not need to do any complicated view con-
struction and layout. However, since the update of a cell can occur in
more than one point in our MainViewController, we have move the imple-
mentation to its own method.
Report erratum
this copy is (P1.0 printing, September 2009)Prepared exclusively for Robert Walsh
Download at WoweBook.Com

RECIPES FOR THE IPHONE 201
Download RecipeCT/Classes/MainViewController.m
- (void)updateCell:(UITableViewCell*)cell fromRecipe:(RecipeEntity*)recipe
{
[[cell textLabel] setText:[recipe name]];
NSString *text = nil;
text = [NSString stringWithFormat:@"Serves: %@", [recipe serves]];
[[cell detailTextLabel] setText:text];
}
Because we are using one of the standard cell layouts, the population
of the cell merely requires setting the textLabel property and the detail-
TextLabel property.
Implementing the -controllerWillChangeContent: Method
With the more interesting UITableViewDatasource methods reviewed, the
only thing left is to implement the NSFetchedResultsControllerDelegate
methods. There are four methods that we need to implement. The first
is the -controllerWillChangeContent: method. This method is called once
per notification cycle (which can include multiple changes), and it gives
us the opportunity to set up our view for the changes that are about to
be performed. Because we have only a UITableView displayed, our setup
for these changes is very simple.
Download RecipeCT/Classes/MainViewController.m
- (void)controllerWillChangeContent:(NSFetchedResultsController*)controller
{
[[self tableView] beginUpdates];
}
Implementing the -controller:didChangeObject:atIndexPath:for-
ChangeType:newIndexPath: Method
This method is where the meat of the NSFetchedResultsController lies.
Whenever an entity is inserted, deleted, changed, or moved, this method
will be called. The exact firing of this method occurs after the changes
have been saved via the -save: method of the NSManagedObjectContext.
Once that occurs, each change is then passed through this method.
Download RecipeCT/Classes/MainViewController.m
- (void)controller:(NSFetchedResultsController*)controller
didChangeObject:(id)anObject
atIndexPath:(NSIndexPath*)indexPath
forChangeType:(NSFetchedResultsChangeType)type
newIndexPath:(NSIndexPath*)newIndexPath
{
NSArray *paths = [NSArray arrayWithObject:newIndexPath];
Report erratum
this copy is (P1.0 printing, September 2009)Prepared exclusively for Robert Walsh
Download at WoweBook.Com

RECIPES FOR THE IPHONE 202
NSIndexSet *section = [NSIndexSet indexSetWithIndex:[newIndexPath section]];
switch (type) {
case NSFetchedResultsChangeInsert:
[[self tableView] insertRowsAtIndexPaths:paths
withRowAnimation:UITableViewRowAnimationFade];
break;
case NSFetchedResultsChangeDelete:
[[self tableView] deleteRowsAtIndexPaths:paths
withRowAnimation:UITableViewRowAnimationFade];
break;
case NSFetchedResultsChangeMove:
[[self tableView] deleteRowsAtIndexPaths:paths
withRowAnimation:UITableViewRowAnimationFade];
[[self tableView] reloadSections:section
withRowAnimation:UITableViewRowAnimationFade];
break;
case NSFetchedResultsChangeUpdate:
[self updateCell:[[self tableView] cellForRowAtIndexPath:indexPath]
fromRecipe:[[self resultsController] objectAtIndexPath:indexPath]];
break;
}
}
For each change, we first determine what type of change has occurred.
If an insert or deletion has occurred, then we pass that information onto
the UITableView so that the UITableView can then handle the change. In
the case of an insertion, the table view would then query the
-tableView:numberOfRowsInSection: and -tableView:cellForRowAtIndexPath:
methods, respectively. In each of those cases, the UITableView will ani-
mate the row change if it is visible on the screen.
In the case of a row being moved (as would occur if the sort property
changed sufficiently to warrant a reorder), the UITableView would handle
the animation of the rows changing position (again, if they are currently
visible on the screen).
In the last possible situation, a change to the properties of the entity, we
call our -updateCell:fromRecipe: method and pass it the relevant Recipe
entity and UITableViewCell.
Implementing the -controller:didChangeSection:atIndex:forChange-
Type: Method
In addition to changing entities, it is also possible that a change in the
NSFetchedResultsController could result in a change to the number of sec-
tions. For example, if each section represented a letter in the alphabet
and we add a new recipe that is the first for that letter, it could cause a
Report erratum
this copy is (P1.0 printing, September 2009)Prepared exclusively for Robert Walsh
Download at WoweBook.Com

RECIPES FOR THE IPHONE 203
new section to be created. Likewise, if we removed the last recipe for a
letter, that would cause a section to be deleted.
When a situation occurs that causes a section to be added or removed, a
call to the -controller:didChangeSection:atIndex:forChangeType: method will
occur. Like the -controller:didChangeObject:atIndexPath:forChange-
Type:indexPath: method, we handle calls to this method by determining
what type of change is occurring. In both cases, regardless of whether
it is a deletion or insertion, we are passing only that information to the
UITableView so that it can update the display.
Download RecipeCT/Classes/MainViewController.m
- (void)controller:(NSFetchedResultsController*)controller
didChangeSection:(id <NSFetchedResultsSectionInfo>)sectionInfo
atIndex:(NSUInteger)sectionIndex
forChangeType:(NSFetchedResultsChangeType)type
{
NSIndexSet *sections = [NSIndexSet indexSetWithIndex:sectionIndex];
switch (type) {
case NSFetchedResultsChangeInsert:
[[self tableView] insertSections:sections
withRowAnimation:UITableViewRowAnimationFade];
break;
case NSFetchedResultsChangeDelete:
[[self tableView] deleteSections:sections
withRowAnimation:UITableViewRowAnimationFade];
break;
}
}
Implementing the -controllerDidChangeContent: Method
The final method that we need to implement is the -controllerDidChange-
Content method. Like its partner method, -controllerWillChangeContent:,
this method is called once all the changes for the current cycle are com-
pleted. For our MainViewController, we need to notify the UITableView that
all the changes are complete and it can begin displaying the changes.
Note that since all changes to this table view can occur only while the
table view is off-screen (only the detail view is editable), there will not be
any animation occurring. The UITableView will update its state, but the
actual drawing will occur once the UITableView reappears on the screen.
Once the MainViewController is finished, the resulting view should look
similar to Figure 10.6, on the following page. Although we did not review
every method needed to complete this view, we did touch on each view
Report erratum
this copy is (P1.0 printing, September 2009)Prepared exclusively for Robert Walsh
Download at WoweBook.Com

RECIPES FOR THE IPHONE 204
Figure 10.6: Cocoa Touch recipes application table view
that is impacted by Core Data. The rest of the methods are implemented
in the included example code.
Building the Detail View Controller
The good news is that nearly all the interaction with Core Data is com-
plete. The bad news is that the detail view has the most complex user
interface code in the application. Although we are not implementing
the entire user interface in this example, there is still quite a bit of code
dealing with the editing of fields.
The basic design of the detail view is shown in Figure 10.7, on the
next page. The primary section of the view is a table view along with
a custom header view. Within the header view is a UIImageView, a UI-
Label, and a UITextField. The name of the recipe is contained within the
UITextField, which is disabled by default. When the edit button is clicked,
Report erratum
this copy is (P1.0 printing, September 2009)Prepared exclusively for Robert Walsh
Download at WoweBook.Com

RECIPES FOR THE IPHONE 205
Figure 10.7: Cocoa Touch recipes application detail view
the UITextField in the header is enabled so that the user can change the
name of the recipe.
If we were to complete this application, there would be a lot more editing
capabilities. However, the code is kept to a minimum to help keep the
focus on the Core Data changes.
Implementing the -setEditing:animated: Method
All the interaction with the Core Data underpinnings occurs in the
-setEditing:animated: method. In this method, in addition to flipping the
UITextField between enabled and nonenabled, we also have a check at
the very end of the method. If we are going from an edited state to a
nonedited state, then the method will perform a save on the NSMan-
agedObjectContext. It is this save that triggers the notifications to the
parent table view and causes the updates.
Report erratum
this copy is (P1.0 printing, September 2009)Prepared exclusively for Robert Walsh
Download at WoweBook.Com

GOING FURTHER 206
Download RecipeCT/Classes/RecipeDetailViewController.m
- (void)setEditing:(BOOL)editing animated:(BOOL)animated
{
[super setEditing:editing animated:animated];
[self.navigationItem setHidesBackButton:editing animated:YES];
[[self titleLabel] setEnabled:editing];
if (editing) return;
NSManagedObjectContext *context = recipe.managedObjectContext;
NSError *error = nil;
if ([context save:&error]) return;
NSLog(@"save error %@, %@", error, [error userInfo]);
exit(-1); // Fail
}
Because we are using an NSFetchedResultsController, it automatically
monitors the NSManagedObjectContext for changes and broadcasts
them to its delegate. Therefore, a simple save of the NSManagedObject-
Context automatically takes care of any change notifications in the other
view controllers.
Overview
In this section, we looked into the impacts that adding Core Data to a
Cocoa Touch application has. Similar to the desktop, Core Data helps to
eliminate a large portion of the code dealing with the object hierarchy
and persisting data to disk. By adding Core Data to a Cocoa Touch
project, we can further reduce the amount of code required to develop
an application and reduce the time to market even further.
10.5 Going Further
Because of our focus purely on Core Data in this chapter, we did not
cover all aspects of this application. We also did not complete the appli-
cation and make it consumer ready.
Interestingly enough, with the release of v3.0 for Cocoa Touch, Apple
also released a sample recipes application for the iPhone that uses Core
Data. This application is available to everyone who has an iPhone devel-
oper account, and I highly recommend reviewing the solutions provided
in that project.
Report erratum
this copy is (P1.0 printing, September 2009)Prepared exclusively for Robert Walsh
Download at WoweBook.Com

Chapter 11
Recipe: Distributed Core DataImagine if all the users in a family had our recipe application and
wanted to be able to see everyone else’s recipes. You can probably come
up with many such scenarios for sharing data across a local area net-
work. If your application sits on a user’s desktop and laptop, then there
is a fair chance that the user wants to keep that data in sync. Of course,
this can be done with a form of cloud syncing, but imagine a small office
environment or family of computers. Not every user has the same cloud
account (whether it be MobileMe, Dropbox, or some other cloud stor-
age), and you may not want to share the entire data set to every user.
Being able to set up a local area sharing can solve the need to share
partial or complete data in a local environment.
Core Data is generally considered to be a single-user/single-application
persistent store. However, as we explored in Chapter 10, Core Data
and iPhone, on page 184, Core Data can be used beyond the single-
user/single-application design. In this chapter, we are going to explore
using Core Data with distributed objects. Distributed objects enable a
Cocoa application to call an object in a different Cocoa application (or a
different thread in the same application). The applications can even be
running on different computers on a network.
To take this idea one step further, we are going to add Bonjour into the
design. Bonjour, also known as zero-configuration networking, enables
automatic discovery of computers, devices, and services on IP networks.
With this combination, we can provide access to a Core Data repository
to any client on the network “automatically” without user interaction.
Prepared exclusively for Robert Walsh
Download at WoweBook.Com

CHAPTER 11. RECIPE: DISTRIBUTED CORE DATA 208
Figure 11.1: Distributed server UI
Before we go into the details, I want to mention the cons for this design.
• Scalability: This design does not scale very well at all. When we are
working with a couple of clients on a network, then it will perform
just fine. When we start scaling it to half a dozen or more clients, it
starts to slow down very quickly. There are optimizations that we
can do, but if you have more than a couple of clients, you should
use a full database solution instead of Core Data.
• Threading: Although all the calls to the server are performed on
the main thread, calls within objects passed by reference are not
by their very nature. Therefore, if we pass an NSManagedObject
by reference to a client and that client makes a change to the
NSManagedObject, we are in a worst-case situation with regard to
threading.
Report erratum
this copy is (P1.0 printing, September 2009)Prepared exclusively for Robert Walsh
Download at WoweBook.Com

BUILDING THE SERVER 209
Figure 11.2: Distributed server data model
11.1 Building the Server
In a normal client-server application, the server would be a background
or GUI-less application. In this demonstration, we are going to start
with a normal single persistent store Cocoa application instead. There
is no benefit to having a UI for a server in a production environment,
but for testing, it is useful to see the activity on the server. Therefore,
we start with creating a Core Data Cocoa application called Distributed-
CDServer. The user interface for the server is a single window with a
table view displaying the list of items in the Core Data persistent store,
as shown in Figure 11.1, on the previous page.
The data model for this example is composed of two entities. The top-
level entity is named Test and has two properties: name and children.
The second entity is called Child and also has two properties: name
and parent. The two objects share a many-to-one relationship between
the properties children and parent. The resulting model is shown in Fig-
ure 11.2.
Distributed Objects Protocol
When I am working with distributed objects, I prefer to contain the
contract between the client and the server within a protocol. For this
application, we are going to have a few methods that the clients can use
to query the server, but we are not going to have any server to client
queries.
Report erratum
this copy is (P1.0 printing, September 2009)Prepared exclusively for Robert Walsh
Download at WoweBook.Com

BUILDING THE SERVER 210
The resulting protocol is as follows:
Download DistributedCDServer/PPDistributedProtocol.h
#define kDomainName @"local."
#define kServiceName @"_pragProgExample._tcp"
@protocol PPDistributedProtocol
- (oneway void)ping;
- (byref NSManagedObject*)createObject;
- (byref NSManagedObject*)createChildForObject:(byref NSManagedObject*)parent;
- (oneway void)deleteObject:(byref NSManagedObject*)object;
- (byref NSArray*)allObjects;
- (byref NSArray*)objectsOfName:(bycopy NSString*)name
withPredicate:(bycopy NSPredicate*)predicate;
@end
When we are working with distributed objects, we need to define how
nonscalar attributes are handled.1 In our protocol, we are passing most
of the objects byref, which means that an NSDistantObject is created on
the receiver as a proxy to the object that is residing on the server. This
is different from bycopy, which will make a copy of the object on the
receiving end. One of the interesting differences between these is that
KVO works across a distributed object when it is passed byref. This will
be demonstrated as we build the application.
Broadcasting the Service
Distributed objects work by using good old Unix sockets. Fortunately,
these are wrapped with NSSocketPort for us so that we do not need to
use the raw C functions and all the complexity that entails. To use
sockets, we need to know the address and port of the socket to talk to.
This can be entered by the user, which is a suboptimal experience, or
we can discover it using Bonjour. To use Bonjour, we need to set up a
broadcast on the server for the client to discover.
Download DistributedCDServer/AppDelegate.m
- (void)startBroadcasting
{
receiveSocket = [[NSSocketPort alloc] init];
int receivePort = [self portFromSocket:receiveSocket];
myConnection = [[NSConnection alloc] initWithReceivePort:receiveSocket
sendPort:nil];
1. These are discussed in depth in Apple’s documentation.
Report erratum
this copy is (P1.0 printing, September 2009)Prepared exclusively for Robert Walsh
Download at WoweBook.Com

BUILDING THE SERVER 211
[myConnection setRootObject:self];
myService = [[NSNetService alloc] initWithDomain:kDomainName
type:kServiceName
name:kServerName
port:receivePort];
[myService setDelegate:self];
[myService publish];
}
In the -startBroadcasting method, we first initialize a new NSSocketPort.
When we use the default -init method, the NSSocketPort will choose a
random open port for us to use. However, we need to broadcast this
port information as part of the Bonjour service. Therefore, we need to
extract the port information from the NSSocketPort object. In a produc-
tion environment, we probably want to define a port to use instead of
selecting one at random.
Download DistributedCDServer/AppDelegate.m
- (int)portFromSocket:(NSSocketPort*)socket
{
struct sockaddr *address = (struct sockaddr*)[[receiveSocket address] bytes];
uint16_t port;
if (address->sa_family == AF_INET) {
port = ntohs(((struct sockaddr_in*)address)->sin_port);
} else if (address->sa_family == AF_INET6) {
port = ntohs(((struct sockaddr_in6*)address)->sin6_port);
} else {
@throw [NSException exceptionWithName:@"Socket Error"
reason:@"Unknown network type"
userInfo:nil];
}
return port;
}
This bit of C code determines whether the address received from the
NSSocketPort is IPv4 or IPv6 and based on that decision extracts the port
information from the address and returns it to the caller.
With the port number in hand, we next construct an NSConnection and
assign the AppDelegate as the root object. The root object is what will
be “proxied” to any clients, and any methods they call on that proxy
object will be transferred to the root object on the receiver. In a more
complex example, it would make sense to have a separate object used
as the proxy instead of the AppDelegate. With the NSConnection cre-
ated, we can initialize the NSNetService. The NSNetService is what han-
dles the broadcasting using Bonjour. Bonjour requires four pieces of
Report erratum
this copy is (P1.0 printing, September 2009)Prepared exclusively for Robert Walsh
Download at WoweBook.Com

BUILDING THE SERVER 212
information: the domain, type, name, and port. The port we discovered
previously, and the domain and type we defined within the PPDistributed-
Protcol. The last value is the name of server and should be unique per
machine. With this information, we can instantiate the NSNetService, set
its delegate, and publish it. Once we call -publish, other machines can
see the service.
Starting the Server
The -startBroadcasting method is invoked from -applicationDidFinishLanching:
Download DistributedCDServer/AppDelegate.m
- (void)applicationDidFinishLaunching:(NSNotification*)notification
{
[self startBroadcasting];
saveTimer = [NSTimer scheduledTimerWithTimeInterval:5.0
target:self
selector:@selector(saveAction:)
userInfo:nil
repeats:YES];
}
In addition to broadcasting the service on startup, we also schedule an
autosave of the NSManagedObjectContext. In this example, we automat-
ically save every five minutes:
Download DistributedCDServer/AppDelegate.m
- (IBAction)saveAction:(id)sender
{
NSError *error = nil;
NSManagedObjectContext *context = [self managedObjectContext];
if (![context hasChanges]) return;
if (![context save:&error]) {
[self logError:error];
}
}
The -saveAction: is similar to a save we would see in any Core Data appli-
cation. There are a couple of changes that we made just for protection.
Before we attempt a save call, we first check to see whether there are
any changes to save. In addition, instead of handing off the error (if
there is one) to the NSApplication to present via the UI, we instead log
the error to the console via a call to -logError:. By logging the error, we
can see all the issues in a more programmer-friendly setup.
Report erratum
this copy is (P1.0 printing, September 2009)Prepared exclusively for Robert Walsh
Download at WoweBook.Com

BUILDING THE SERVER 213
Download DistributedCDServer/AppDelegate.m
- (void)logError:(NSError*)error
{
id sub = [[error userInfo] valueForKey:@"NSUnderlyingException"];
if (!sub) {
sub = [[error userInfo] valueForKey:NSUnderlyingErrorKey];
}
if (!sub) {
NSLog(@"%@:%s Error Received: %@", [self class], _cmd,
[error localizedDescription]);
return;
}
if ([sub isKindOfClass:[NSArray class]] ||
[sub isKindOfClass:[NSSet class]]) {
for (NSError *subError in sub) {
NSLog(@"%@:%s SubError: %@", [self class], _cmd,
[subError localizedDescription]);
}
} else {
NSLog(@"%@:%s exception %@", [self class], _cmd, [sub description]);
}
}
The -logError: attempts to extract the NSUnderlyingException from the user-
Info of the passed-in NSError. If something goes wrong within Core Data
that is not part of the normal failure path, it is possible to get infor-
mation about the failure via the NSUnderlyingException stored. If there is
no NSUnderlyingException, then we look for a value stored under the key
NSUnderlyingErrorKey. If we get something back from that key, we check
to see whether it is a collection, which would indicate multiple valida-
tion errors and print the -localizedDescription to the console. If we cannot
locate either an NSUnderlyingException or an NSUnderlyingErrorKey, then we
dump the -localizedDescription for the NSError that is passed in.
Once the Bonjour service has started and the save thread has started,
the server waits for requests from clients. In a distributed object appli-
cation, the server does not get notified when a client connects; it simply
starts getting calls to the exposed methods.
Receiving Requests from Clients
Working with distributed objects is deceptively easy. Other than the
minor changes to the method signatures, there are no other changes
to the methods and how they are handled. However, whenever we write
Report erratum
this copy is (P1.0 printing, September 2009)Prepared exclusively for Robert Walsh
Download at WoweBook.Com

BUILDING THE SERVER 214
a method that is going to be accessed via distributed objects, we need
to remember that it is not being called locally and keep a few things in
mind:
• The server configuration we have built in this example has one
incoming socket. That means that it can process only one request
at a time. If a request takes too long (which we demonstrate in a
moment), all the other clients wait in line; this includes calls from
the same client.
• Although we can pass objects by reference to the client, if those
objects get passed back to the server by reference, it can cause
confusion. This is especially true when dealing with NSManage-
dObject objects. Therefore, whenever we receive an NSManagedOb-
ject back from the client, we resolve a local reference and perform
any actions on the local reference instead of trying to use the client
reference a second time on the server.
-ping Implementation
The first method I always implement when building a distributed object
application is -ping. I use this method to test the connectivity between
the client and the server. Since this method does nothing other than
print out a console message, I am guaranteed that no other program-
ming errors will be introduced while I test the connectivity.
Download DistributedCDServer/AppDelegate.m
- (oneway void)ping
{
NSLog(@"%@:%s received", [self class], _cmd);
}
-allObjects Implementation
This is one of those methods that is at risk of taking too long:
Download DistributedCDServer/AppDelegate.m
- (byref NSArray*)allObjects
{
NSManagedObjectContext *context = [self managedObjectContext];
NSFetchRequest *request = [[NSFetchRequest alloc] init];
NSEntityDescription *entity = [NSEntityDescription entityForName:@"Test"
inManagedObjectContext:context];
[request setEntity:entity];
NSError *error = nil;
Report erratum
this copy is (P1.0 printing, September 2009)Prepared exclusively for Robert Walsh
Download at WoweBook.Com

BUILDING THE SERVER 215
Joe Asks. . .
Can We Pass the NSManagedObjectContext by Refer-ence?
Although this is feasible, it is not recommended. When we passobjects by reference, a proxy object is created on the receiverthat sends all messages back to the server to be performed. Thisis fine for objects with low complexity, but when dealing withhighly complex objects, such as the NSManagedObjectContext,it will perform rather poorly. During experimentation, I receivedsome very unusual errors deep within the Core Data API whenthe NSManagedObjectContext was passed by reference. There-fore, I do not recommend this approach.
NSArray *objects = [context executeFetchRequest:request error:&error];
[request release], request = nil;
if (error) {
NSLog(@"%@:%s error: %@", [self class], _cmd, error);
return nil;
}
return objects;
}
In this method, we retrieve a reference to the NSManagedObjectContext
and build an NSFetchRequest to retrieve all the Test entities from the
persistent store. If there are any errors, we log them and return nil.
Otherwise, we return the resulting NSArray.
This method, although useful for demonstrating distributed objects and
Core Data, is a very poor performer. When we start working with tens
of thousands of entities in the persistent store, they take a long time
to pass over the network. This will hamper the performance of not just
the client making the request but of every client waiting in line to make
a request on the server. If our requirements involve data of this size,
then we should consider other options. One that has met great success
is to keep a local copy of the entire repository on each machine and
when they sync to merely pass deltas back and forth instead of a true
client-server environment.
Report erratum
this copy is (P1.0 printing, September 2009)Prepared exclusively for Robert Walsh
Download at WoweBook.Com

BUILDING THE SERVER 216
-createObject Implementation
Download DistributedCDServer/AppDelegate.m
- (byref NSManagedObject*)createObject;
{
NSManagedObjectContext *context = [self managedObjectContext];
NSManagedObject *object = nil;
object = [NSEntityDescription insertNewObjectForEntityForName:@"Test"
inManagedObjectContext:context];
return object;
}
The -createObject method demonstrates a more performant distributed
object method. In this method, we again retrieve a reference the NSMan-
agedObjectContext and then use that reference to create a new Test
object. We create and delete all objects on the server as opposed to
pulling the NSManagedObjectContext over to the client and trying to
delete it remotely. This helps prevent any threading issues while work-
ing with the NSManagedObjectContext.
-deleteObject Implementation
Download DistributedCDServer/AppDelegate.m
- (oneway void)deleteObject:(byref NSManagedObject*)object;
{
NSManagedObjectContext *context = [self managedObjectContext];
NSManagedObject *local = [context objectWithID:[object objectID]];
if ([local isDeleted]) {
return;
}
if (![local isInserted]) {
[self saveAction:self];
}
[context deleteObject:local];
}
The -deleteObject is similar to the -createObject discussed earlier. How-
ever, in this method, we need to retrieve a local reference to a passed-
in NSManagedObject. If we attempted to delete the referenced NSMan-
agedObject directly, the NSManagedObjectContext implodes deep within
the API. No doubt this is caused by the double proxy of looping to
the remote and then back again to the server. To solve this issue, we
retrieve the NSManagedObjetID from the referenced NSManagedObject
and use it to retrieve a local reference to the NSManagedObject via the
-objectWithID: of the NSManagedObjectContext. Once we have a local ref-
erence to the NSManagedObjet, we check to see whether it is freshly
inserted or already deleted. If it is freshly inserted, we need to persist
Report erratum
this copy is (P1.0 printing, September 2009)Prepared exclusively for Robert Walsh
Download at WoweBook.Com

BUILDING THE SERVER 217
it before we can delete it. Therefore, we save the NSManagedObjectCon-
text and then delete the NSManagedObject. If the NSManagedObject has
already been deleted, then we return to the caller.
-createChildForObject: Implementation
Download DistributedCDServer/AppDelegate.m
- (byref NSManagedObject*)createChildForObject:(byref NSManagedObject*)parent;
{
NSManagedObjectContext *context = [self managedObjectContext];
NSManagedObject *localParent = [context objectWithID:[parent objectID]];
NSManagedObject *object = nil;
object = [NSEntityDescription insertNewObjectForEntityForName:@"Child"
inManagedObjectContext:context];
[object setValue:localParent forKey:@"parent"];
return object;
}
The -createChildForObject: implementation is similar to the -createObject
implementation discussed earlier. There is one important difference,
though. Since we defined the Child entity to have a nonoptional parent
property, we set it immediately while we are still on the main thread of
the server. This again is a protection against the uncontrollably mul-
tithreaded nature of distributed objects. We could just create the Child
entity and return it to the caller, but there is a fair chance that a save
will occur before the relationship is updated on the client and an error
would result.
In addition to setting the parent property on the Child object, we also
grab a local reference to the passed-in NSManagedObject. Although I
did not receive any errors during testing of this method by using the
remote proxy, there is no reason to risk it.
-objectsOfName:withPredicate: Implementation
Download DistributedCDServer/AppDelegate.m
- (byref NSArray*)objectsOfName:(bycopy NSString*)name
withPredicate:(bycopy NSPredicate*)predicate;
{
NSManagedObjectContext *context = [self managedObjectContext];
NSError *error = nil;
NSFetchRequest *request = [[NSFetchRequest alloc] init];
[request setEntity:[NSEntityDescription entityForName:name
inManagedObjectContext:context]];
[request setPredicate:predicate];
NSArray *results = [context executeFetchRequest:request error:&error];
[request release], request = nil;
Report erratum
this copy is (P1.0 printing, September 2009)Prepared exclusively for Robert Walsh
Download at WoweBook.Com

BUILDING THE CLIENT 218
if (error) {
NSLog(@"%@:%s Error on fetch %@", [self class], _cmd, error);
return nil;
}
return results;
}
In this last example method, we deal with a more complicated situa-
tion. During the development of this method, I started with passing an
NSFetchRequest around between the server and clients. This resulted in
some terminal errors within the Core Data stack and led me to this
solution instead. Based on these experiments, it is clear to me that
passing around the NSManagedObjectContext itself results in some risky
situations and should be avoided. However, NSPredicate objects can be
passed around without any issue. Therefore, in this method, we accept
the name of the entity and the NSPredicate to use in the NSFetchRequest.
From this we build the NSFetchRequest and execute it against the local
NSManagedObjetContext. If there is an error, we print it to the console
and return nil. Otherwise, we return the resulting array.
11.2 Building the Client
The client side of this application is both easier and more complicated
than the server. Configuring Bonjour and setting up the distributed
objects is a bit more complicated than it is on the server. However, once
the distributed object is configured, the rest is significantly easier.
In this example, we are going to build a client that is designed to stress
test the server as opposed to being truly functional in a user perspec-
tive. Our client is going to connect to the first server that it finds,
and once the connection is complete, it will run NSTimer objects to fire
against each of the methods on the server in quick succession. With
this type of client, we can stress test the server with multiple clients
and look for race conditions and threading/locking issues.
Configuring the Xcode Project
Unlike the server, the client is going to start with a Cocoa non–Core
Data application. Because the server is maintaining the Core Data
repository, the client does not need to be configured as a Core Data
application. However, like the server, our user interface is a single win-
dow with a single table displaying the results of one of the method calls
to the server. See Figure 11.3, on the next page.
Report erratum
this copy is (P1.0 printing, September 2009)Prepared exclusively for Robert Walsh
Download at WoweBook.Com

BUILDING THE CLIENT 219
Figure 11.3: The Distributed Client user interface
Once the DistributedCDClient project has been created, we need copy the
PPDistributedProtocol.h file from the server into the project. Normally I
would just reference the file directly from the server project so that both
are using the same file, but the example has a copy in each project to
prevent any errors in the referencing. Next we need create a new class
called AppDelegate and add it to the project. Once the AppDelegate has
been added to the project, we will need to configure the user interface.
Opening the MainMenu.xib file in Interface Builder, we will want to add a
new NSObject to the xib and set its class to AppDelegate. We then need
to bind the NSApplication delegate outlet to the AppDelegate. Next we
need to add an NSArrayController to the xib and bind its content array to
the AppDelegate with a model key of filteredObjects. Lastly, we need to
add an NSTableView to the window, expanding it to take up the entire
window and assigning the first column to the NSArrayController with a
controller key of arrangedObjects and the model key path set to child-
Count. The second column’s value should also be set to the NSArrayCon-
troller with a controller key of arrangedObjects and the model key path
set to name. Once that is complete, we can close Interface Builder and
open the AppDelegate.
Report erratum
this copy is (P1.0 printing, September 2009)Prepared exclusively for Robert Walsh
Download at WoweBook.Com

BUILDING THE CLIENT 220
-applicationDidFinishLaunching: Implementation
Like most application delegate objects, our custom code will start in
the -applicationDidFinishLaunching:. The first thing that our client needs
to do is find a server to connect to. To accomplish this, we initialize
an NSNetServiceBrowser and set our AppDelegate as its delegate. We then
configure it to search for our server using the #define settings in the pro-
tocol that we imported. That browser will then run in the background
and start searching for servers on the local network. If it finds a server,
it will call -netServiceBrowser:didFindService:moreComing:.
Download DistributedCDClient/AppDelegate.m
- (void)applicationDidFinishLaunching:(NSNotification*)notification
{
NSNetServiceBrowser *myBrowser = [[NSNetServiceBrowser alloc] init];
[myBrowser setDelegate:self];
[myBrowser searchForServicesOfType:kServiceName inDomain:kDomainName];
}
-netServiceBrowser:didFindService: Implementation
Every time that the NSNetServiceBrowser finds a service, it will call this
method. If it finds more than one server in a single sweep of the net-
work, then it will call this method once per service, and the didFindSer-
vice: will be set to YES.
Download DistributedCDClient/AppDelegate.m
- (void)netServiceBrowser:(NSNetServiceBrowser*)browser
didFindService:(NSNetService*)service
moreComing:(BOOL)more
{
[service retain];
[service setDelegate:self];
[service resolveWithTimeout:5.0];
[service startMonitoring];
[browser stop];
[browser release], browser = nil;
}
In our implementation, as soon as we find a server, we want to connect
to it. We are not worried about multiple servers on the network, so the
first one that comes in will do. Once we receive notice that a service
matching our search criteria is available, we start monitoring it. This
will cause the NSNetServiceBrowser to attempt to resolve the service. Once
the service is resolved, the service’s delegate will receive notification.
Therefore, we set the AppDelegate as the delegate to the service. Since
Report erratum
this copy is (P1.0 printing, September 2009)Prepared exclusively for Robert Walsh
Download at WoweBook.Com

TESTING THE NETWORKING CODE 221
we care about only a single service, we shut down the browser and
release it.
-netServiceDidResolveAddress: Implementation
Once the service has been resolved, the NSNetService will call -netService-
DidResolveAddress: on its delegate. When this method is called, we can
retrieve the address and port information about the service, which will
let us connect to it and begin using distributed objects.
Download DistributedCDClient/AppDelegate.m
- (void)netServiceDidResolveAddress:(NSNetService*)service
{
NSConnection *clientConnection = nil;
NSSocketPort *socket = nil;
NSData *address = [[service addresses] lastObject];
u_char family = ((struct sockaddr*)[address bytes])->sa_family;
socket = [[NSSocketPort alloc] initRemoteWithProtocolFamily:family
socketType:SOCK_STREAM
protocol:IPPROTO_TCP
address:address];
clientConnection = [NSConnection connectionWithReceivePort:nil
sendPort:socket];
[clientConnection enableMultipleThreads];
server = [clientConnection rootProxy];
[socket release], socket = nil;
[service stop];
[service release];
[self startTestTimers];
}
Once the NSNetService has been resolved, we can retrieve its addresses
and connect to it. With access to the address from the NSNetService, we
can initialize an NSSocketPort to connect to the server hosting the service.
With the NSSocketPort initialized, we can then initialize an NSConnection
and finally get a reference to the -rootProxy of the NSConnection, which is
actually an NSDistantObject proxy for the AppDelegate of the server. Once
we have the server referenced properly, we can shut down the Bonjour
NSNetService and start our tests.
11.3 Testing the Networking Code
Whenever I build an application that needs to communicate to a server
or another device, I always start off with simple tests to confirm that
Report erratum
this copy is (P1.0 printing, September 2009)Prepared exclusively for Robert Walsh
Download at WoweBook.Com

TESTING THE NETWORKING CODE 222
the connection is working. I generally leave these tests in place until
the code goes to production. This both provides me with a simple way
to test the connectivity and gives me a base to fall back upon if some of
the higher-level functions start to fail. For this application, we will start
with setting up a group of timers that will fire off our test methods.
-startTestTimers Implementation
To simulate a large amount of client-server traffic, this application runs
several timers at a fairly high pace. This will help us catch any race con-
ditions or other issues with the distributed nature of this application.
Download DistributedCDClient/AppDelegate.m
- (void)startTestTimers
{
SEL selector = @selector(testPing);
pingTimer = [NSTimer scheduledTimerWithTimeInterval:0.5
target:self
selector:selector
userInfo:nil
repeats:YES];
selector = @selector(testObjectInsertion);
insertTimer = [NSTimer scheduledTimerWithTimeInterval:0.5
target:self
selector:selector
userInfo:nil
repeats:YES];
selector = @selector(testObjectDeletion);
deleteTimer = [NSTimer scheduledTimerWithTimeInterval:1.0
target:self
selector:selector
userInfo:nil
repeats:YES];
selector = @selector(testChildInsertion);
childInsertTimer = [NSTimer scheduledTimerWithTimeInterval:1.0
target:self
selector:selector
userInfo:nil
repeats:YES];
selector = @selector(testChildDeletion);
childDeleteTimer = [NSTimer scheduledTimerWithTimeInterval:1.0
target:self
selector:selector
userInfo:nil
repeats:YES];
Report erratum
this copy is (P1.0 printing, September 2009)Prepared exclusively for Robert Walsh
Download at WoweBook.Com

TESTING THE NETWORKING CODE 223
selector = @selector(testObjectFetch);
fetchTimer = [NSTimer scheduledTimerWithTimeInterval:15.0
target:self
selector:selector
userInfo:nil
repeats:YES];
}
The -startTestTimers fires up a number of timers that will continuously
call our test methods. We retain a reference to each of these timers so
that we can later shut them down gracefully.
-disconnect Implementation
Whenever we shut down the client application, we want to shut down
the timers, and we want to close the connection to the server. The -
disconnect walks through each of the NSTimer references and invalidates
them. Once all the timers are shut down, it then retrieves the NSCon-
nection from the server proxy and invalidates it.
Download DistributedCDClient/AppDelegate.m
- (void)disconnect
{
[pingTimer invalidate], pingTimer = nil;
[fetchTimer invalidate], fetchTimer = nil;
[insertTimer invalidate], insertTimer = nil;
[deleteTimer invalidate], deleteTimer = nil;
[childDeleteTimer invalidate], childDeleteTimer = nil;
[childInsertTimer invalidate], childInsertTimer = nil;
NSConnection *connection = [(NSDistantObject*)server connectionForProxy];
[connection invalidate];
server = nil;
}
-testPing Implementation
The first of our test methods is also the simplest. We call the -ping
method on the server and nothing else. We do not expect a return from
the server at all. What this method will do is cause a log statement to
be generated on the server. This allows us to watch the server and see
that connections are in fact coming in. The other benefit is that it keeps
the testing simple. With this method, we can confirm that the Bonjour
service and the distributed objects are working properly without having
to wonder whether some other logic in some other part of our applica-
tion is the real source of a failure. If the ping is not getting through,
Report erratum
this copy is (P1.0 printing, September 2009)Prepared exclusively for Robert Walsh
Download at WoweBook.Com

TESTING THE NETWORKING CODE 224
we know that either the Bonjour service or the distributed objects are
failing.
Download DistributedCDClient/AppDelegate.m
- (void)testPing
{
[server ping];
}
-testObjectFetch Implementation
The -testObjectFetch is the first complicated method that we are test-
ing across the distributed objects link. In this test, we construct an
NSPredicate that we pass to the server to be executed against the NSMan-
agedObjectContext. As I mentioned, passing the NSManagedObjectCon-
text itself across distributed objects produced some terminal exceptions
within the Core Data stack itself, so we are avoiding this by perform-
ing as much of the Core Data work as possible on the server. Here we
are passing in the name of the entity we want to search against and
the NSPredicate. The server will return an NSArray of the entities that fit
the NSPredicate. One interesting thing to note in this method is that we
are not using the new for loop to access the returned NSArray. Since the
NSArray is actually an NSDistant proxy for the NSArray on the server, the
new for loop does not handle it properly. Therefore, we need to use the
older NSEnumerator instead.
Download DistributedCDClient/AppDelegate.m
- (void)testObjectFetch
{
NSString *test = [GUID substringToIndex:3];
NSPredicate *predicate = nil;
predicate = [NSPredicate predicateWithFormat:@"name contains[c] %@", test];
NSArray *results = [server objectsOfName:@"Test" withPredicate:predicate];
NSEnumerator *enumerator = [results objectEnumerator];
NSManagedObject *object;
while (object = [enumerator nextObject]) {
[object setValue:GUID forKey:@"name"];
}
[self setFilteredObjects:results];
}
To show and test KVO across the distributed objects, we loop over the
NSManagedObject objects within the NSArray and update their name to a
Report erratum
this copy is (P1.0 printing, September 2009)Prepared exclusively for Robert Walsh
Download at WoweBook.Com

TESTING THE NETWORKING CODE 225
globally unique string that we retrieve from NSProcessInfo using a #define
to make it a little easier to read. The #define is as follows:
#define GUID [[NSProcessInfo processInfo] globallyUniqueString]
-testObjectInsertion Implementation
Testing object creation is only a single call to the server. However, to
test that we can start using the object immediately, we also set its name
using a globally unique string received from the NSProcessInfo. In addi-
tion, we also added a random into this method so that approximately
50 percent of the time it would not do an insertion. This adds a bit of
randomness into the data testing and helps keep the number of Test
entities on the server low.
Download DistributedCDClient/AppDelegate.m
- (void)testObjectInsertion
{
if ((rand() % 2) == NO) return;
NSManagedObject *object = [server createObject];
[object setValue:GUID forKey:@"name"];
}
-testObjectDeletion Implementation
-testObjectDeletion is a fair bit more complicated than -testObjectInsertion
because we need to have a reference to an object first before we can
delete it. Therefore, this method starts off by calling -allObjects on the
server to get an NSArray of Test entities. From that NSArray, we randomly
select an entity to delete and call -deleteObject: on the server.
Download DistributedCDClient/AppDelegate.m
- (void)testObjectDeletion
{
NSArray *objects = [server allObjects];
if (![objects count]) return;
int index = (rand() % [objects count]);
NSManagedObject *toBeDeleted = [objects objectAtIndex:index];
[server deleteObject:toBeDeleted];
}
-testChildInsertion Implementation
To test relationships, we have two methods: child creation and child
deletion. In the first one, -testChildInsertion, we start off by getting an
Report erratum
this copy is (P1.0 printing, September 2009)Prepared exclusively for Robert Walsh
Download at WoweBook.Com

TESTING THE NETWORKING CODE 226
NSArray of all the Test entities. From there, we call -createChildForObject:
on the server, randomly using one of the Test entities from the retrieved
NSArray. We let the server handle the actual creation of the relation-
ship between these objects to ensure that there are no issues with
the distributed objects themselves. During testing, Core Data got con-
fused when the relationship was created on the client as opposed to
the server. Therefore, to avoid any risks in this area, we pass the par-
ent back to the server to let the server both create the child and set the
relationship between the two objects.
Download DistributedCDClient/AppDelegate.m
- (void)testChildInsertion
{
NSArray *objects = [server allObjects];
id object = [objects objectAtIndex:(rand() % [objects count])];
id child = [server createChildForObject:object];
[child setValue:GUID forKey:@"name"];
}
-testChildDeletion Implementation
The last test method is the deletion of a child object. In this test, we
again retrieve all the Test entities from the server and randomly select
one. We then check to see whether the Test entity has a child, and if
it does, then we grab one of them and call -deleteObject: on the server
with that child as the parameter.
Download DistributedCDClient/AppDelegate.m
- (void)testChildDeletion
{
NSArray *objects = [server allObjects];
int index = (rand() % [objects count]);
id object = [objects objectAtIndex:index];
NSSet *children = [object valueForKey:@"children"];
if (![children count]) return;
id child = [children anyObject];
[server deleteObject:child];
}
Report erratum
this copy is (P1.0 printing, September 2009)Prepared exclusively for Robert Walsh
Download at WoweBook.Com

WRAPPING UP 227
11.4 Wrapping Up
Whenever we start working with multiple computers on a network or
interapplication communication, the code starts to get extremely com-
plex. However, at least with this design, we can keep the Core Data/
persistence separated from the distributed objects/networking as much
as possible. By doing so, we avoid the need for a large number of locks
and synchronization that would otherwise be required.
As we discussed at the beginning of this chapter, it is not a very scal-
able design, but in situations where a formal stand-alone database is
overkill, this design actually works quite well. There is no user con-
figuration, and there is no need to set up an external application; we
just start one application on one machine and another application on
another and let them talk. The biggest gotcha is with the NSManagedOb-
jectContext. As long as we do not try to share it across the distributed
objects, we can use Core Data fairly transparently.
The design that we built here can also be used in a peer environment as
opposed to the client-server design. Multiple peers could use Bonjour
to discover each other and use distributed objects to sync their data
stores so that each device has a complete and up-to-date copy of the
data set. In a situation like that, a user could have our application on
each of their machines, and whenever they are near each other (that
is, on the same local network), they would automatically update each
other. Talk about a pleasant user experience!
Report erratum
this copy is (P1.0 printing, September 2009)Prepared exclusively for Robert Walsh
Download at WoweBook.Com

Chapter 12
Recipe: Dynamic ParametersIf you have a document-style application, you will need to work with
document-specific parameters or settings. For example, in a word pro-
cessor, some settings are specific to one document, and some settings
apply to the entire application. When it comes to storing application-
level parameters, we have a great implementation: NSUserDefaults. How-
ever, when it comes to document-level parameters, there is no reusable
storage system for them provided by the APIs. In this chapter, we’ll
build that reusable storage system within Core Data.
System-level and user-level preferences are extremely useful and easy
to access on OS X. One call to standardDefaults on NSUserDefaults from
anywhere in the application instantly gives you access to the defaults
for the currently logged in user. However, sometimes we don’t want to
store preferences at the user level but would prefer to store them at the
file level.
When we are working with a Core Data application, the first thought is
to just create a table for these parameters and access them from within
the Core Data API. However, the problem comes when we are accessing
those parameters. No longer is it a single call to standardDefaults on
NSUserDefaults; now it looks more like this:
Download CDPreferences/MyDocument.m
- (void)clunkyParameterAccess
{
NSManagedObjectContext *moc = [self managedObjectContext];
NSFetchRequest *request = [[NSFetchRequest alloc] init];
[request setEntity:[NSEntityDescription entityForName:@"parameter"
inManagedObjectContext:moc]];
Prepared exclusively for Robert Walsh
Download at WoweBook.Com

CHAPTER 12. RECIPE: DYNAMIC PARAMETERS 229
[request setPredicate:[NSPredicate predicateWithFormat:@"name == %@",
@"default1"]];
NSError *error = nil;
NSManagedObject *param = [[moc executeFetchRequest:request
error:&error] lastObject];
if (error) {
NSLog(@"%@:%s Error fetching param: %@", [self class], _cmd, error);
return;
}
NSLog(@"%@:%s Parameter value %@", [self class], _cmd,
[param valueForKey:@"value"]);
}
Worse is when we need to set a parameter:
Download CDPreferences/MyDocument.m
- (void)clunkyParameterWrite
{
NSManagedObjectContext *moc = [self managedObjectContext];
NSFetchRequest *request = [[NSFetchRequest alloc] init];
[request setEntity:[NSEntityDescription entityForName:@"parameter"
inManagedObjectContext:moc]];
[request setPredicate:[NSPredicate predicateWithFormat:@"name == %@",
@"default1"]];
NSError *error = nil;
NSManagedObject *param = [[moc executeFetchRequest:request
error:&error] lastObject];
if (error) {
NSLog(@"%@:%s Error fetching param: %@", [self class], _cmd, error);
return;
}
if (!param) {
param = [NSEntityDescription insertNewObjectForEntityForName:@"Parameter"
inManagedObjectContext:moc];
[param setValue:@"default1" forKey:@"name"];
}
[param setValue:@"SomeValue" forKey:@"value"];
}
The most obvious solution to this is to abstract away this code some-
where so that we can hit it with only one line of code. Wouldn’t it be
Report erratum
this copy is (P1.0 printing, September 2009)Prepared exclusively for Robert Walsh
Download at WoweBook.Com

BUILDING THE XCODE EXAMPLE PROJECT 230
nice if we could access our document-level parameters with code like
this:
Download CDPreferences/MyDocument.m
if ([[[self defaults] valueForKey:@"default1"] boolValue]) {
//Do something clever
}
and be able to set them with something like this:
Download CDPreferences/MyDocument.m
[[self defaults] setValue:@"New Value" forKey:@"newKey"];
In this example, that is exactly what we are going to do. As we discussed
briefly in Chapter 3, Core Data and Bindings, on page 34, every object
responds to the -valueForUndefinedKey: and -setValue:forUndefinedKey:
methods. We can use (or abuse) these methods and make them do all
of the heavy lifting for us.
12.1 Building the Xcode Example Project
To start this project, we’ll use the Core Data Document-based Appli-
cation template from within Xcode. In a document-based application,
each document object has its own Core Data stack as opposed to having
a single Core Data stack for the entire application.
Once we have created the project, named CDPreferences, we need to
create the data model. For this example, we are going to focus only on
the parameters and build the parameters table shown in Figure 12.1,
on the next page. Each parameter has two properties: a name that is a
nonoptional string and a value that is an optional string. By making the
value optional, we can have parameters that are nullable.
With no additional code changes, our application will correctly start up
and display an empty document. Since each document has its own per-
sistent store, the persistent store becomes the document that is being
saved to disk. The next step is to build the object that will manage the
parameters.
12.2 The DocumentPreferences Object
To build a system that imitates the NSUserDefaults, we need to have a
single object that manages the parameters table for us. By doing so, we
can treat the entire parameters table as if it were a single object with
Report erratum
this copy is (P1.0 printing, September 2009)Prepared exclusively for Robert Walsh
Download at WoweBook.Com

THE DOCUMENTPREFERENCES OBJECT 231
Figure 12.1: Parameter table model
a dynamic number of accessors. However, we do not want to have to
write an accessor every time that we add a parameter; ideally, we want
to just call -valueForKey: and -setValue:forKey: and not worry about the
persistence of these values. Lastly, we want to be able to set up some
default values.
An important point about the defaults is that they are not persisted to
disk. If they get persisted, then later versions that change the default
would require additional code to check for persisted defaults and reset
them. If, however, we do not persist them, then users of newer versions
of the application automatically get the newer defaults for free and,
more important, do not get their preferences destroyed if they have
changed the value from its default.
The DocumentPreferences object will accomplish all of these goals:
Download CDPreferences/DocumentPreferences.h
@interface DocumentPreferences : NSObject
{
NSDictionary *_defaults;
NSPersistentDocument *_associatedDocument;
}
@property (assign) NSPersistentDocument *associatedDocument;
@property (assign) NSDictionary *defaults;
- (id)initWithDocument:(NSPersistentDocument*)associatedDocument;
- (NSArray*)allParameterNames;
- (NSDictionary*)allParameters;
@end
Report erratum
this copy is (P1.0 printing, September 2009)Prepared exclusively for Robert Walsh
Download at WoweBook.Com

THE DOCUMENTPREFERENCES OBJECT 232
Our DocumentPreferences object expects to receive a reference to its
NSPersistentDocument upon initialization. From the passed-in reference,
our DocumentPreferences will be able to access the underlying NSMan-
agedObjectContext. We could also just incorporate this design directly
into a subclass of NSPersistentDocument; however, that can cause the
document object to become quite large and difficult to maintain. There-
fore, even though there is a one-to-one relationship between NSPersis-
tentDocument objects and DocumentPreferences objects, we keep them
separate to reduce code complexity.
The one thing that’s missing from this header file is any way to access
the parameters themselves. There are no methods for this access be-
cause we are going to take advantage of KVC. Whenever another piece
of code requests a parameter from our DocumentPreferences object, the
-valueForUndefinedKey: method will get called, and that is where we han-
dle access to the parameters table.
-valueForUndefinedKey:
Download CDPreferences/DocumentPreferences.m
- (id)valueForUndefinedKey:(NSString*)key
{
id parameter = [self findParameter:key];
if (!parameter && [[self defaults] objectForKey:key]) {
return [[self defaults] objectForKey:key];
}
return [parameter valueForKey:@"value"];
}
In this method, we receive the name of the value that the caller is
attempting to retrieve. We use this name to retrieve the NSManage-
dObject via the -findParameter: method and return the NSManagedOb-
ject object’s value property. If there is no parameter with the passed-in
name, then we check the defaults NSDictionary to see whether there is a
default for it. If there is no default set, we let the -valueForKey: method
return nil to the caller.
-findParameter:
Download CDPreferences/DocumentPreferences.m
- (NSManagedObject*)findParameter:(NSString*)name;
{
NSManagedObjectContext *moc;
NSManagedObject *param;
NSError *error = nil;
moc = [[self associatedDocument] managedObjectContext];
Report erratum
this copy is (P1.0 printing, September 2009)Prepared exclusively for Robert Walsh
Download at WoweBook.Com

THE DOCUMENTPREFERENCES OBJECT 233
NSFetchRequest *request = [[NSFetchRequest alloc] init];
[request setEntity:[NSEntityDescription entityForName:@"Parameter"
inManagedObjectContext:moc]];
[request setPredicate:[NSPredicate predicateWithFormat:@"name == %@", name]];
param = [[moc executeFetchRequest:request error:&error] lastObject];
if (error) {
NSLog(@"%@:%s Error fetching parameter: %@", [self class], _cmd, error);
return nil;
}
[request release], request = nil;
return param;
}
In the -findParameter: method, we construct an NSFetchRequest against
the parameters table using a compare on the name property to filter it
down to a single result. Assuming there is no error on the fetch, we
return the NSManagedObject that is returned. In this method, we are
using the -lastObject method on the resulting array as a convenience.
-lastObject automatically checks for an empty array and will return nil if
the array is empty. This reduces the code complexity and gives us the
result we want in a single call. If there is an error accessing the Core
Data stack, we report the error and return nil. Note that we do not create
a parameter if there is not one in this method. We intentionally separate
this out so that we are not creating potentially empty parameters. This
allows us to request a parameter and check whether it is nil without
concern of parameters being generated unnecessarily.
-setValue:forUndefinedKey:
Download CDPreferences/DocumentPreferences.m
- (void)setValue:(id)value forUndefinedKey:(NSString*)key
{
[self willChangeValueForKey:key];
NSManagedObject *parameter = [self findParameter:key];
if (!parameter) {
if ([[self defaults] valueForKey:key] &&
[value isEqualTo:[[self defaults] valueForKey:key]]) {
[self didChangeValueForKey:key];
return;
}
parameter = [self createParameter:key];
} else {
if ([[self defaults] valueForKey:key] &&
[value isEqualTo:[[self defaults] valueForKey:key]]) {
[self didChangeValueForKey:key];
[[[self associatedDocument] managedObjectContext] deleteObject:parameter];
Report erratum
this copy is (P1.0 printing, September 2009)Prepared exclusively for Robert Walsh
Download at WoweBook.Com

THE DOCUMENTPREFERENCES OBJECT 234
[self didChangeValueForKey:key];
return;
}
}
if ([value isKindOfClass:[NSNumber class]]) {
[parameter setValue:[value stringValue] forKey:@"value"];
} else if ([value isKindOfClass:[NSDate class]]) {
[parameter setValue:[value description] forKey:@"value"];
} else {
[parameter setValue:value forKey:@"value"];
}
[self didChangeValueForKey:key];
}
In addition to being able to access a parameter, we also need to set
parameters. This is done in the counterpart method of -valueForUn-
definedKey: called -setValue:forUndefinedKey:. In this method, we first
notify the system that we are going to be changing the value associ-
ated with the passed-in key. This is part of KVO and is required so
that notifications work correctly. After starting the KVO notification, we
attempt to retrieve the NSManagedObject from the parameters table. If
there is no NSManagedObject for the passed-in key, we then check the
defaults NSDictionary to see whether there is a default. If there is a default
set and the passed-in value matches the default, we complete the KVO
notification and return. If the default value does not match the passed-
in value, we create a new NSManagedObject for the passed-in key.
If there is an NSManagedObject and a default set for the key, we com-
pare the default value to the passed-in value. If they match, we then
delete the NSManagedObject, which effectively resets the parameter to
the default. Once we pass the checks against default and/or create the
NSManagedObject, we test the value to see whether it is an NSNumber or
NSDate. If it is, then we pass in its -stringValue or -description as the value
for the NSManagedObject. Otherwise, we pass in the value directly to the
NSManagedObject. Once the value is set, we call -didChangeValueForKey:
to complete the KVO notification.
-createParameter:
Download CDPreferences/DocumentPreferences.m
- (NSManagedObject*)createParameter:(NSString*)name
{
NSManagedObject *param;
NSManagedObjectContext *moc;
Report erratum
this copy is (P1.0 printing, September 2009)Prepared exclusively for Robert Walsh
Download at WoweBook.Com

THE DOCUMENTPREFERENCES OBJECT 235
moc = [[self associatedDocument] managedObjectContext];
param = [NSEntityDescription insertNewObjectForEntityForName:@"Parameter"
inManagedObjectContext:moc];
[param setValue:name forKey:@"name"];
return param;
}
The -createParameter: method creates a new NSManagedObject and sets
the name property with the passed-in value. It does not set the value
property, leaving that up to the caller. This allows us to set a nil param-
eter if we really need one.
-allParameters
Download CDPreferences/DocumentPreferences.m
- (NSDictionary*)allParameters;
{
NSManagedObjectContext *moc;
NSError *error = nil;
moc = [[self associatedDocument] managedObjectContext];
NSFetchRequest *request = [[NSFetchRequest alloc] init];
[request setEntity:[NSEntityDescription entityForName:@"Parameter"
inManagedObjectContext:moc]];
NSArray *params = [moc executeFetchRequest:request error:&error];
if (error) {
NSLog(@"%@:%s Error fetching parameter: %@", [self class], _cmd, error);
return nil;
}
NSMutableDictionary *dict = [[self defaults] mutableCopy];
for (NSManagedObject *param in params) {
NSString *name = [param valueForKey:@"name"];
NSString *value = [param valueForKey:@"value"];
[dict setValue: value forKey:name];
}
return dict;
}
In addition to the primary function of this class, we have a couple of
convenience methods that have proven useful. The first one, -allPara-
meters, returns an NSDictionary of all the parameters, including the de-
faults. In this method, we create an NSFetchRequest for the Parameter
entity without an NSPredicate. We take the resulting NSArray from the
fetch and loop over it. Within that loop, we add each NSManagedOb-
ject to an NSMutableDictionary derived from the default NSDictionary. This
ensures that we have both the default values and the Parameter entries
included in the final NSDictionary.
Report erratum
this copy is (P1.0 printing, September 2009)Prepared exclusively for Robert Walsh
Download at WoweBook.Com

REVIEW 236
-allParameterNames
Download CDPreferences/DocumentPreferences.m
- (NSArray*)allParameterNames;
{
NSManagedObjectContext *moc;
NSError *error = nil;
moc = [[self associatedDocument] managedObjectContext];
NSFetchRequest *request = [[NSFetchRequest alloc] init];
[request setEntity:[NSEntityDescription entityForName:@"Parameter"
inManagedObjectContext:moc]];
NSArray *params = [moc executeFetchRequest:request error:&error];
if (error) {
NSLog(@"%@:%s Error fetching parameter: %@", [self class], _cmd, error);
return nil;
}
NSMutableArray *keys = [[[self defaults] allKeys] mutableCopy];
for (NSManagedObject *param in params) {
NSString *name = [param valueForKey:@"name"];
[keys addObject:name];
}
return keys;
}
Like -allParameters, -allParameterNames is a convenience method that re-
turns an NSArray of the keys currently set or defaulted. Just like the
-allParameters method, it retrieves all the parameter NSManagedObject
objects and loops over them. Within that loop, it adds the name property
to an NSMutableArray derived from the defaultsNSDictionary.
12.3 Review
With this design, we can access our parameters within each document
without having to worry about the underlying structure. We also don’t
need to stop coding just to hop over and add a parameter to the object.
We can work with DocumentPreferences in the same manner that we
work with NSUserDefaults.
This same design can be used in a nondocument application by chang-
ing the DocumentPreferences object into a singleton or by adding the
-valueForUndefinedKey: and -setValue:forUndefinedKey: methods directly to
the NSApplication delegate along with the NSManagedObjectContext.
Report erratum
this copy is (P1.0 printing, September 2009)Prepared exclusively for Robert Walsh
Download at WoweBook.Com

REVIEW 237
Whether we are working in a document model or not, we can now access
persistent store–specific parameters with a single call similar to the
following:
NSString *value = [[self preferences] valueForKey:@"exampleKey1"];
We can also set them with a call similar to the following:
[[self preferences] setValue:@"someValue" forKey:@"someKey"];
In both of these examples, we are calling -valueForKey: and -setValue:for-
Key: directly on the DocumentPreferences object and not worrying about
whether the value exists. If it does not exist, we will receive a nil. If it
has been set as a default, we will get the default back, and if we have
overridden the default or previously set the property, it will be returned.
Lastly, like the NSUserDefaults, the default values are not persisted to
disk. Therefore, we need to set them every time we initialize the Docu-
mentPreferences:
Download CDPreferences/MyDocument.m
NSMutableDictionary *defaults = [NSMutableDictionary dictionary];
[defaults setValue:[NSNumber numberWithBool:YES] forKey:@"default1"];
[defaults setValue:@"DefaultValue2" forKey:@"default2"];
[defaults setValue:@"DefaultValue3" forKey:@"default3"];
[_preferences setDefaults:defaults];
However, we do not need to worry about changing the defaults at a
later date. If we change the defaults in a subsequent version, they will
automatically be updated if the user has not overridden them.
Report erratum
this copy is (P1.0 printing, September 2009)Prepared exclusively for Robert Walsh
Download at WoweBook.Com

IndexAaccess patterns, 112–113
add: method (NSArrayController), 26, 29
addImage: method, 31
addObserver:forKeyPath: method, 39
addPersistentStoreWithType: method, 90,
152
Address Book application, 16
allObjects implementation
(DistributedCDServer), 214
allParameterNames implementation
(CDPreferences), 236
allParameters implementation
(CDPreferences), 235
AppDelegate objects
adding to xib file, 22
image path, in header, 30
applicationDidFinishLaunching: method,
212, 220
applicationDidFinishLaunching: method,
122
applicationShouldTerminate: method, 122
associateObject:parent: method, 181
atomic stores, 98
attribute properties (data models), 18
Attributes inspector, 44
attributes of data class entities, 144
attributes of NSManagedObject objects,
52–54
primitive access, 53
automatic data migration, 88–90
turning on, 78
awakeFromFetch: method, overriding, 59
awakeFromInsert: method, overriding, 59
Bbinary data, where to store, 99
binary stores, 97, 98, 189
Bonjour, 207, 210
broadcasting service (distributed Core
Data), 210–212
buttons, 26
Ccaching data, 110
calculated values, storing, 103
cascade option (delete rules), 19
CDPreferences application
building, 230–237
DocumentPreferences objects, 230–236
allParameterNames, 236
allParameters, 235
createParameter:, 235
findParameter:, 233
setValue:forUndefinedKey:, 234, 236
valueForUndefinedKey:, 232, 236
client, distributed Core Data, 218–221
allObjects, 214
applicationDidFinishLaunching:, 220
createChildForObject:, 217
createObject, 216
deleteObject:, 216
netServiceBrowser:didFindService:, 220
netServiceDidResolveAddress:, 221
objectsOfName:withPredicate:, 218
ping, 214
ping implementation
testing, 223
receiving requests from, 213
client description files (Sync Services),
149
ClientDescription.plist file, 149
clients, sync, 141
registering as, 153–156
Clients pane (Syncrospector), 158
Cocoa Application template, 16
Cocoa Bindings, 34–49
Key Value Coding (KVC), 34–38
Prepared exclusively for Robert Walsh
Download at WoweBook.Com

COCOA TOUCH PROJECTS DISCONNECT METHOD
Key Value Observing (KVO), 39–40
with NSArrayController objects, 42
with NSFormatter objects, 43
with NSObjectController objects, 46
with NSOutlineView objects, 46
with NSSearchField objects, 48
with NSTableView objects, 41
with NSTreeController objects, 48
primitive access to NSManagedObject
attributes, 53
primitive access to NSManagedObject
relationships, 56
for recipe application, 40–49
Cocoa Touch projects, creating, 184
combo boxes (user interface), 28
binding to Type entity, 66
commonly used data, storing, 104
Compile Sources section, 77
contextDidSave: method, 178
controller layer, building, 22–25
adding objects to xib file, 22
controllerDidChangeContent: method, 203
controllerWillChangeContent: method, 201
copyPropertiesFromObject:toObject:parent:
method, 179–180
copyRecipe: method, 178
Core Data, defined, 9–10
Core Data API (stack), 51
adding to Cocoa Touch projects,
186–189
NSManagedObjectContext, about,
64–67
NSManagedObjectModel, about, 68–69
NSPersistentStoreCoordinator, about,
69–71
requiring, 75
Core Data Application template, 16
createChildForObject: implementation
(DistributedCDServer), 217
createDestinationInstancesForSourceInstance:
method, 86–88
createObject implementation
(DistributedCDServer), 216
createParameter: implementation
(CDPreferences), 235
createRelationshipsForDestinationInstance:
method, 88
cross-thread communication, 164, 177
custom data stores, 98
Ddata change notifications, iPhone,
192–194
delegate design pattern, 193
NSFetchedResultsController objects, 194
NSNotificationCenter objects, 193
data classes (sync schemas), 142, 143
data denormalization, 102
data migration, 73
automatic, 88–90
turning on, 78
complex migration, example, 85–88
manual, 90
process of, 82
progressive, 90–95
creating migration method, 91
finding managed object models, 92
finding mapping model, 93
simple migration, example, 76–82
creating first mapping model,
79–81
creating versioned data models,
77
turning on automatic migration,
78
data model
adding to Cocoa Touch projects, 185
building, 16–21
adding entities to models, 17–21
for DistributedCDServer application
(example), 209
updating for syncing, 143–146
data model optimization, 99–104
denormalizing data, 102
entity inheritance, 101
intelligence relationships, 103
storing binary data, 99
data objects, 21
DataClasses key (Schema.plist), 147
DataModel.xcdatamodel file, 17
dealloc: method, not overriding, 58
delegate design (iPhone), 193
delete rules, 19
deleteObject: implementation
(DistributedCDServer), 216
deleting objects, 110
denormalizing data, 102
description: method, not overriding, 57
destination entities, 19
didTurnInfoFault: method, overriding, 58
disconnect method, 223
239Prepared exclusively for Robert Walsh
Download at WoweBook.Com

DISK ACCESS FETCHED PROPERTIES
disk access, 109
faults and, 111
fetch requests and, 108
SQLite stores, 100
writing to disk, 110
DisplayName key (ClientDescription.plist),
149
distributed objects, Core Data with,
207–227
building the client, 218–221
applicationDidFinishLaunching:, 220
netServiceBrowser:didFindService:, 220
netServiceDidResolveAddress:, 221
building the server, 209–218
allObjects, 214
broadcasting the service, 210–212
createChildForObject, 217
createObject, 216
deleteObject:, 216
distributed objects protocol, 209
objectsOfName:withPredicate:, 218
ping, 214, 223
receiving requests from clients,
213
starting the server, 212–213
disadvantages with, 208
testing networking code, 222–226
disconnect method, 223
startTestTimers method, 222
testChildDeletion method, 226
testChildInsertion method, 225
testObjectDeletion method, 225
testObjectFetch method, 224
testObjectInsertion method, 225
testPing method, 223
distributed objects protocol, 209
DistributedCDClient project, 218–221
applicationDidFinishLaunching:, 220
netServiceBrowser:didFindService:, 220
netServiceDidResolveAddress:, 221
DistributedCDServer application,
209–218
DistributedCDServer application
allObjects, 214
broadcasting the service, 210–213
createChildForObject:, 217
createObject, 216
deleteObject:, 216
distributed objects protocol, 209
objectsOfName:withPredicate:, 218
ping, 214
ping implementation
testing, 223
receiving requests for clients, 213
document-based applications, 139, 228
@dynamic keyword, 38, 53
dynamic parameters, 228–237
building project for, 230
DocumentPreferences objects, 230–236
allParameterNames, 236
allParameters, 235
createParameter:, 235
findParameter:, 233
setValue:forUndefinedKey:, 234, 236
valueForUndefinedKey:, 232, 236
EEnterprise Objects, 10
entities, adding to data models, 17–21
entities in data classes, 142
Entities key (ClientDescription.plist), 149
entity hashes, 83
entity inheritance, 101
entityForName:inManagedObjectContext:
method, 60
errors, presenting, 76
executeFetchRequest:error: method, 60
exporting recipes (multithreading
example), 165–173
Ffaulted NSManagedObject objects, 105
faults, 108–112
disk access and, 111
fetch performance, 104–108
disk access and, 108
of faulted NSManagedObject objects,
105
loading NSManagedObjectID objects,
105
property values, prefetching, 106
relationships, prefetching, 107, 109
fetch requests, 59–63
disk access and, 108
executing, 60
for exporting recipes (example), 167
for importing recipes (example), 176
narrowing search or filtering results,
61
setting entity to fetch, 60
storing, 62
fetched properties, 71
240Prepared exclusively for Robert Walsh
Download at WoweBook.Com

FETCHREQUESTTEMPLATEFORNAME: METHOD MENU ITEMS (USER INTERFACE)
fetchRequestTemplateForName: method,
63
File menu, adding item to, 31
filenames for Spotlight metadata, 119
files, creating for Spotlight, 116
filtering
NSFetchRequest searches, 61
objects in an NSArrayController, 48
finalize: method, not overriding, 58
findParameter: implementation
(CDPreferences), 233
formats for persistent stores, 97–99,
189
GGenerateThumbnailForURL.m file, 132
generating Spotlight metadata files, 119
GetMetadataForFile.m file, 127
HHarrington, Tom, 8
hashes (versioning), 83
History pane (Syncrospector), 159
HTML pages for recipes, 134
IIBAction objects, 30
IBOutlet objects, 30
identity properties, for Sync Services,
144
ImagePath key (ClientDescription.plist), 149
images, adding to user interface, 30
importer, Spotlight
building, 123–130
performance requirements, 116
importing images, 30
importing recipes (multithreading
example), 173–178
in-memory stores, 97, 189
Info.plist, populating Type table from, 66
information overload, 113
Ingredients property, 19
inheritance, entity, 101
initWithFetchController: method, 198
initXXX: methods, not overriding, 57
inspectors, 26
intelligent relationships, 103
Interface Builder, 9, 22
inverse relationships, 19, 20
iPhone, 184–206
data change notifications, 192–194
delegate design pattern, 193
NSFetchedResultsController objects,
194
NSNotificationCenter objects, 193
memory management, 190–192
recipe application on, 195–206
building detail view controller,
204–206
building main table view, 198–204
preparing NSFetchedResultsController,
196–198
upgrading applications to Core Data,
185–189
KKey Value Coding (KVC), 34–38
primitive access to NSManagedObject
attributes, 53
primitive access to NSManagedObject
relationships, 56
Key Value Observing (KVO), 39–40
primitive access to NSManagedObject
attributes, 53
primitive access to NSManagedObject
relationships, 56
Llarge binary data, storing, 101
localization file (syncing), 148
localizedDescription method, 76, 213
logError: method, 212
Mmain method (NSOperation), 163
MainMenu element, 31
managedObjectContext: method, 189
managedObjectContextsToMonitorWhen-
SyncingPersistentStoreCoordinator:
method, 153
managedObjectContextsToReloadAfter-
SyncingPersistentStoreCoordinator:
method, 153
ManagedObjectModels key (Schema.plist),
148
manual data migration, 90
mapping models, 84
first, creating, 79–81
updating, 96
medium binary data, storing, 100
memory management, iPhone, 190–192
menu items (user interface), 31
241Prepared exclusively for Robert Walsh
Download at WoweBook.Com

MENU ITEMS (USER INTERFACE) NSMANAGEDOBJECT OBJECTS
menu items (user interface), 165, 173
mergeChangesFromContextDidSaveNotification:
method, 164, 178
metadata files for Spotlight integration,
116–123, 129, 139
metadataFolder: method, 123
methods, overriding
methods good for, 58
methods not safe for, 57
mingle phase (sync process), 141
.mom files, 68
entity hashes, 83
multithreading, 162–183
creating multiple contexts, 163–165
distributed objects and, 208
exporting recipes (example), 165–173
importing recipes (example),
173–178
NSManagedObjectContext objects and,
65, 162
NSPersistentStoreCoordinator objects
and, 69
recursive copy, 178–182
why Core Data is thread unsafe,
162–163
mutable access, to-many relationships,
55
mutableSetValueForKey: method, 56
Nname attribute (Schema.plist), 148
name attribute, Type entity, 21
names for Spotlight metadata files, 119
netServiceBrowser:didFindService:
implementation
(DistributedCDClient), 220
netServiceDidResolveAddress:
implementation
(DistributedCDClient), 221
networking code for distributed Core
Data, testing, 222–226
disconnect method, 223
startTestTimers method, 222
testChildDeletion method, 226
testChildInsertion method, 225
testObjectDeletion method, 225
testObjectFetch method, 224
testObjectInsertion method, 225
testPing method, 223
new projects, creating, 16
newContextToMainStore method, 164
nonatomic option (property definitions),
38
notifications with KVO, avoiding, 53, 56
NSAddTemplate image, 26
NSAlert objects, 76
NSArray objects
for exporting recipes (example), 167
for importing recipes (example), 176
sorting, 63
NSArrayController objects, 23
for exporting recipes (example), 168
using Cocoa Bindings with, 42
NSAttributedString objects, 27
NSButton objects, 26
NSComboBox objects, 28
binding to Type entity, 66
NSConnection objects, 221
NSDateFormatter objects, Cocoa Bindings
with, 44
NSDictionary objects, for Spotlight
integration, 116
NSEntityDescription objects, for fetch
requests, 60
NSEntityMigrationPolicy objects, 85–88
NSFetchedResultsController objects, 64,
190, 194, 196–198
NSFetchRequest objects, 59–63
disk access and, 108
executing fetch requests, 60
for exporting recipes (example), 167
of faulted NSManagedObject objects,
105
for importing recipes (example), 176
setting entity to fetch, 60
storing fetch requests, 62
using NSPredictate objects with, 61
NSFileManager objects, 33
NSFormatter objects, Cocoa Bindings
with, 43
NSImageView objects, 30
NSManagedObjects objects, 52–59
accessing attributes, 52–54
primitive access, 53
accessing relationships, 54–56
primitive access, 56
property accessors, 56
to-many relationships, 55
to-one relationships, 55
subclassing, 57–59
NSManagedObject objects
faulted, 105
242Prepared exclusively for Robert Walsh
Download at WoweBook.Com

NSMANAGEDOBJECTCONTEXT OBJECTS OVERRIDING METHODS
Key Value Coding with, 35
prefetching property values, 106
NSManagedObjectContext objects, 64–67
creating multiple, 163–165
for export files, 171
passing by reference, 215
updating Spotlight metadata files,
119
NSManagedObjectContextDidSaveNotification
key, 164, 177
NSManagedObjectID objects, 105
prefetching, 107
NSManagedObjectModel objects, 68–69
finding, for progressive migration, 92
iPhone projects, 187
as thread safe, 162
NSMappingModel objects
finding, for progressive migration, 93
updating, 96
NSMenuItem objects, 165, 173
NSMigratePersistentStoresAutomaticallyOption
key, 90
NSMigrationManager objects, 94
NSMutableSet objects, 55
NSNetService objects, 211, 221
NSNetServiceBrowser objects, 220
NSNotification API, 193
NSNotification objects, multithreading
and, 164, 177
NSNotificationCenter objects, 193
NSNumberFormatter objects, 28, 29
using Cocoa Bindings with, 43
NSObject objects
Key Value Coding implementation,
34
Key Value Observing
implementation, 39
NSObjectController objects, Cocoa
Bindings with, 46
NSOpenPanel objects, 32
NSOperation objects, 163, 170
NSOperationQueue objects, 163
NSOutlineView objects, Cocoa Bindings
with, 46
NSPersistentCoordinator objects, 110
NSPersistentDocument objects, 232
NSPersistentStore objects
adding to NSPersistentStoreCoordinator,
71, 75
as thread safe, 162
NSPersistentStoreCoordinator objects,
69–71
enabling automatic versioning, 89
iPhone projects, 187
modifying for syncing, 151–152
as thread safe, 162
NSPersistentStoreCoordinatorSyncing
protocol, 152
NSPredicate objects, 48
focusing fetch requests with, 61
NSRemoveTemplate image, 26
NSSavePanel objects, 169
NSScrollView objects, 26
NSSearchField objects, Cocoa Bindings
with, 48
NSSet objects, 55
NSSocketPort objects, 210, 211
NSSortDescriptor objects, 63–64
NSTableColumn objects, 26
NSTableView objects, 26
using Cocoa Bindings with, 41
NSTreeController objects, 47
using Cocoa Bindings with, 48
NSUnderlyingErrorKey key, 213
NSUnderlyingException objects, 213
NSURL objects, for
NSManagedObjectModel, 69
NSUserDefaults objects, 228
numberOfSectionsInTableView: method,
199
Oobject deletion, 110
objectOfType:withName: method, 182
objectsOfName:withPredicate:
implementation
(DistributedCDServer), 218
one-to-many relationships, 20
one-way copies of repository, 171
optimizing data model, 99–104
denormalizing data, 102
entity inheritance, 101
intelligent relationships, 103
storing binary data, 99
order of magnitude (performance), 109
ordering data
with NSSortDescriptor, 63–64
performance and, 112
outline views (user interface), 46
overriding methods
methods good for, 58
243Prepared exclusively for Robert Walsh
Download at WoweBook.Com
PATH RECIPE APPLICATION
methods not safe for, 57
Ppath, image, 30
:pathForResource:ofType: method, 68
patterns of access, 112–113
peers, syncing with, 141n, 161
performance tuning, 97–113
access patterns, 112–113
faults, 108–112
fetching, 104–108
loading NSManagedObjectID
objects, 105
optimizing data model, 99–104
persistent store types, 97–99, 189
Spotlight integration, 116
performing sync, 156–158
persisted defaults, 231
persistent store types, 97–99, 189
persistentStoreCoordinator: method, 75
turning on automatic migration, 78
persisting data to repository, 69
pictures, adding to user interface, 30
ping implementation
(DistributedCDServer), 214
testing, 223
plist files
defined, 68
as Spotlight metadata files, 116
PPDistributedProtocol.h file, 219
PPDistributedProtocol protocol, 209
PPExportOperation objects, 170
PPImportOperation objects, 175
predicates, 48
focusing fetch requests with, 61
preferences, system- and user-level,
228
prefetching, 105, 109
NSManagedObjectID objects, 107
property values, 106
relationships, 107, 109
preloading data into cache, 110
prepopulating repository, 66
preview, Quick Look, 133–137
primitive access
to NSManagedObject attributes, 53
to NSManagedObject relationships, 56
primitiveValueForKey: method, 54
progressive data migration, 90–95
creating migration method, 91
finding managed object models, 92
finding mapping model, 93
projects, creating, 16
properties (data models), 18
properties optimized for search, 102
@property keyword, 36–38, 57
property values, prefetching, 106
pull phase (sync process), 142
push phase (sync process), 141
QQuick Look, 115, 130–138
generating preview, 133–137
generating thumbnail, 132
with Spotlight importer, 138–139
testing plug-in, 137
Rrarely used data, storing, 104
recipe application
automatic migration, 88–90
turning on, 78
building controller layer for, 22–25
building data model for, 16–21
adding entities to models, 17–21
building NSPersistentStoreCoordinator,
70
Cocoa Bindings with, 40–44
NSArrayController objects, 42
NSFormatter objects, 43
NSTableView objects, 41
Cocoa Touch version, 195–206
building detail view controller,
204–206
building main table view, 198–204
preparing NSFetchedResultsController,
196–198
complex migration, with
NSEntityMigrationPolicy, 85–88
controller layer, building
adding objects to xib file, 22
with document-level parameters,
228–237
building project for, 230
DocumentPreferences objects,
230–236
exporting recipes (multithreading),
165–173
generating HTML pages for recipes,
134
importing recipes (multithreading),
173–178
244Prepared exclusively for Robert Walsh
Download at WoweBook.Com

RECIPE ENTRY STACK (CORE DATA API)
maintenance update, 74–76
manual migration, 90
pictures of recipes, 30–33
progressive migration, 90–95
creating migration method, 91
finding managed object models, 92
finding mapping model, 93
simple migration, 76–82
creating first mapping model,
79–81
creating versioned data models,
77
turning on automatic migration,
78
updating data model for syncing,
144–146
user interface, 14, 25–29
ingredients lists, 28–29
recipe details, 27–28
recipe source list, 26–27
Recipe entry, creating, 17
RecipeIngredient entity, 19
recursive copy, 178–182
registering as sync clients, 153–156
registering with truth (syncing), 141
regular expressions, performance and,
112
relational database as persistent store,
98
relationship properties, 19–20
need for inverse relationships, 20
Relationship property, 20
relationships
in data class entities, 144
limiting queries across, 113
prefetching, 107, 109
relationships of NSManagedObject
objects, 54–56
primitive access, 56
primitive access to, 56
property accessors, 56
to-many relationships, 55
to-one relationships, 55
remove: method (NSArrayController), 26,
29
removeObserver:forKeyPath: method, 39
repository
one-way copies, 171
persisting data to, 69
prepopulating objects into, 66
using multiple files instead of, 115
rootProxy method (NSConnection), 221
Ssave dialogs (user interface), 169
saveAction: method, 122, 212
scalability, distributed objects and, 208
schema, sync, 146–148
Schema pane (Syncrospector), 159
Schema.strings file, 148
Schema.plist file, 147
search fields (user interface), 48
search-only properties, 102
search performance, 112
server, distributed Core Data, 209–218
allObjects, 214
broadcasting the service, 210–212
createChildForObject:, 217
createObject, 216
deleteObject:, 216
distributed objects protocol, 209
objectsOfName:withPredicate:, 218
ping, 214
ping implementation
testing, 223
receiving requests for clients, 213
starting, 212–213
setEditing:animated: method, 205
setPrimitiveValue:forKey: method, 54
setStoresFastSyncDetailsAtURL:forPersistentStore:
method, 151, 152
setValue:forKey: method, 36
imitating NSUserDefaults, 231
setValue:forUndefinedKey: implementation
(CDPreferences), 234, 236
setValue:forUndefinedKey: method, 36
single persistent store, 70, 187
small binary data, storing, 100
sorting data
with NSSortDescriptor, 63–64
performance and, 112
Spotlight, 114–130
building importer, 123–130
creating metadata files, 116–123
with Quick Look generator, 138–139
testing importer, 128
SQLite stores, 97, 98, 189
stack (Core Data API), 51
adding to Cocoa Touch projects,
186–189
NSManagedObjectContext objects,
64–67
245Prepared exclusively for Robert Walsh
Download at WoweBook.Com

STANDARDDEFAULTS METHOD (NSUSERDEFAULTS) USER INTERFACE
NSManagedObjectModel objects,
68–69
NSPersistentStoreCoordinator objects,
69–71
requiring, 75
standardDefaults method (NSUserDefaults),
228
startBroadcasting method, 211
startTestTimers method, 222
store types, persistent, 97–99, 189
storing binary data, 99
storing calculated values, 103
storing fetch requests, 62
strings, localizing (syncing), 148
sync clients, 141
registering as, 153, 156
sync helper, creating, 152–158
performing sync, 156–158
registering as sync client, 153–156
sync schemas, 142
creating, 146–148
versioning, 160
viewing in Syncrospector, 159
Sync Services, 140–161
creating client description files, 149
creating sync helper, 152–158
performing sync, 156–158
registering as sync client, 153–156
creating sync schema, 146–148
fundamentals, 141–142
modifying NSPersistentStoreCoordinator,
151–152
updating data model for syncing,
143–146
using Syncrospector, 158–159
Syncrospector tool, 158–159
@synthesize keyword, 37
system-level preferences, 228
TtableView:cellForRowAtIndexPath: method,
199
tableView:numberOfRowsInSection:
method, 199
testChildDeletion method, 226
testChildInsertion method, 225
testing networking code (distributed
Core Data), 222–226
disconnect method, 223
startTestTimers method, 222
testChildDeletion method, 226
testChildInsertion method, 225
testObjectDeletion method, 225
testObjectFetch method, 224
testObjectInsertion method, 225
testPing method, 223
testing Quick Look plug-in, 137
testing Spotlight importer, 128
testObjectDeletion method, 225
testObjectFetch method, 224
testObjectInsertion method, 225
testPing method, 223
text fields (user interface), 27
thread unsafe, Core Data as
distributed objects and, 208
thread unsafe, Core Data as, 162–163
NSManagedObjectContext objects, 65,
162
NSPersistentStoreCoordinator objects, 69
thumbnail, Quick Look, 132, 139
to-many relationships, 19, 55
to-one relationships, 55
truth (syncing with), 141, 161
Truth pane (Syncrospector), 158
Type entity, 21
Type key (ClientDescription.plist), 149
Type table, 66
UUIViewController objects, 194
Unicode, performance and, 112
updateCell:fromRecipe: method, 200
updating mapping models, 96
updating Spotlight metadata files, 119
upgrading iPhone applications,
185–189
URIRepresentation objects, 118
user interface
for exporting and importing recipes,
165, 173
building, 25–29
ingredients lists, 28–29
recipe details, 27–28
recipe source list, 26–27
information overload, 113
presenting error data, 76
showing pictures in, 30
using Cocoa Bindings with, 40–49
NSArrayController objects, 42
NSFormatter objects, 43
NSObjectController objects, 46
NSOutlineView objects, 46
246Prepared exclusively for Robert Walsh
Download at WoweBook.Com

USER-LEVEL PREFERENCES ZERO-CONFIGURATION NETWORKING
NSSearchField objects, 48
NSTableView objects, 41
NSTreeController objects, 48
user-level preferences, 228
UTIs (uniform type identifiers), 123,
139
linking Spotlight importer to, 127
VvalueForKey: method, 35, 55
imitating NSUserDefaults, 231
valueForUndefinedKey: implementation
(CDPreferences), 232, 236
valueForUndefinedKey: method, 36
versioning
automatic migration, 88–90
turning on, 78
complex migration, example, 85–88
fundamentals of, 82–85
model versions and hashes, 83
process of data migration, 82
manual migration, 90
NSManagedObjectModel and, 69
progressive migration, 90–95
creating migration method, 91
finding managed object models, 92
finding mapping model, 93
simple migration, example, 76–82
creating first mapping model,
79–81
creating versioned data models,
77
turning on automatic migration,
78
of sync schema, 160
WWeb Objects, 10
willTurnIntoFault: method, overriding, 58
writing to disk, 110
X.xcdatamodel files, 17, 68
.xcdatamodeld file, 77
Xcode projects, creating, 16
xib files, adding objects to, 22
XML stores, 97, 98, 189
XPath for recipe pages, 134
Zzero-configuration networking, 207
247Prepared exclusively for Robert Walsh
Download at WoweBook.Com

More Mac OS X Titles...For more books and screencasts on XCode, Cocoa, the iPhone, TextMate and other Mac
topics, please visit www.pragprog.com.
Cocoa ProgrammingCocoa Programming shows you how to get
productive with Cocoa–fast! You’ll learn to use the
Apple developer tools to design your user interface,
write the code, and create the data model. We’ll
show you Objective-C concepts when you are ready
to apply them throughout the book. By the end of
the book, you’ll be a Cocoa programmer.
Cocoa Programming: A Quick-Start Guide for
Developers
Daniel H Steinberg
(280 pages) ISBN: 978-19343563-0-2. $32.95
http://pragprog.com/titles/dscpq
Core Animation for OS X/iPhoneHave you seen Apple’s Front Row application and
Cover Flow effects? Then you’ve seen Core
Animation at work. It’s about making applications
that give strong visual feedback through movement
and morphing, rather than repainting panels. This
comprehensive guide will get you up to speed
quickly and take you into the depths of this new
technology.
Core Animation for Mac OS X and the iPhone:
Creating Compelling Dynamic User Interfaces
Bill Dudney
(220 pages) ISBN: 978-1-9343561-0-4. $34.95
http://pragprog.com/titles/bdcora
Prepared exclusively for Robert Walsh
Download at WoweBook.Com

The Pragmatic BookshelfThe Pragmatic Bookshelf features books written by developers for developers. The titles
continue the well-known Pragmatic Programmer style and continue to garner awards and
rave reviews. As development gets more and more difficult, the Pragmatic Programmers
will be there with more titles and products to help you stay on top of your game.
Visit Us OnlineCore Data’s Home Page
http://pragprog.com/titles/mzcd
Source code from this book, errata, and other resources. Come give us feedback, too!
Register for Updates
http://pragprog.com/updates
Be notified when updates and new books become available.
Join the Community
http://pragprog.com/community
Read our weblogs, join our online discussions, participate in our mailing list, interact
with our wiki, and benefit from the experience of other Pragmatic Programmers.
New and Noteworthy
http://pragprog.com/news
Check out the latest pragmatic developments, new titles and other offerings.
Buy the BookIf you liked this eBook, perhaps you’d like to have a paper copy of the book. It’s available
for purchase at our store: pragprog.com/titles/mzcd.
Contact UsOnline Orders: www.pragprog.com/catalog
Customer Service: [email protected]
Non-English Versions: [email protected]
Pragmatic Teaching: [email protected]
Author Proposals: [email protected]
Contact us: 1-800-699-PROG (+1 919 847 3884)
Prepared exclusively for Robert Walsh
Download at WoweBook.Com