preparing for carpenter training · 2015-10-30 · preparing for carpenter training. the...
TRANSCRIPT

Preparing for Carpenter Training
NAME:
DATE:
CoursE:
Funded by the Office of Literacy and Essential Skills, Government of Canada

Preparing for Carpenter Training
The Construction Sector Council is a national organization committed to the development of a highly skilled workforce – one that will support the future needs of the construction industry in Canada. Created in April 2001, and financed by both government and industry, the CSC is a partnership between labour and business.
This material was developed by the Construction Sector Council to further the use of Essential Skills concepts by the industry in its training activities. This part of the Essential Skills Workplace Services Initiative involves industry partners who deliver technical training. This publication is one of a series that is intended to support instructors and apprentices in improving performance and success rates in technical training.
The Construction Sector Council accepts no responsibility or liability connected with the use or reproduction of the information contained in this material. It is provided “as is” and is intended for informational use only, without warranty, express or implied.
For more information contact:The Construction Sector Council 220 Laurier Ave. West, Suite 1150Ottawa, Ontario, K1P 5Z9Phone: 613 569-5552 Fax: 613 [email protected]
This publication may be reproduced provided that each page used is reproduced in its entirety without modification, and with all legal notices maintained. No part of this material may be reproduced or used for any commercial purpose or sold by any person.
Funded by the Office of Literacy and Essential Skills, Government of Canada
Content for this publication was developed by SkillPlan, BC Construction Industry Skills Improvement Council.
For more information about SkillPlan, visit www.skillplan.ca.
Sincere appreciation is extended to Melissa Young, Executive Director, Gerry Gray, Training Coordinator, and the other instructors at the
Carpentry Training Centre of New Brunswick. www.ctcnd.com

What is the purpose of this assessment?The purpose of the Carpenter Training Assessment is to assess your readiness for entering the Carpentry trade. This assessment gives you an opportunity to practice your skills in Reading Text, Document Use and Numeracy. It gives you a review of the math foundation skills you will need during technical training.
Who should use this assessment?The questions in this assessment are typical of those you will solve in technical training and on the job as a Carpenter. The Carpenter Training Assessment is intended for individuals:
• considering a Carpentry career • applying to pre-apprenticeship training• attending Carpenter training courses
If you want to achieve your career goal in Carpentry, completing this assessment will help you decide what skills you need to improve.
What skills does this assessment cover?Essential Skills are the skills that people need for work, learning and life. There are nine Essential Skills: Reading Text, Document Use, Writing, Numeracy, Oral Communication, Thinking Skills, Working with Others, Computer Use and Continuous Learning. You use these skills at different complexity levels at work and during technical training. This assessment assesses three Essential Skills: Reading Text, Document Use and Numeracy.
This assessment is a preview of the skills you need to do well in technical training. Although some of the problems in this workbook may not be familiar to you, it is not necessary for you to know about carpentry. The focus is on Essential Skills, such as Numeracy. All of the information needed to answer the questions is included. There is a list of formulas and conversions at the beginning of the assessment to help you.
Preparing for Carpenter Training

How is the assessment organized?The assessment is organized into three sections.
Section 1: Math FoundationsThe first section tests basic math skills: whole numbers, decimals, fractions, imperial measurement and metric measurement.
Section 2: Word ProblemsThe second section requires you to set up and solve numeracy problems. You may need to do more than one calculation to solve a problem. Some problems require you to use information from drawings or photographs. Although you are given some formulas and conversions at the beginning of the assessment, you are required to decide which formula or formulas to use.
Section 3: Problem SetsThe third section has four problem sets. Each problem set asks questions about an authentic workplace document. Two of the problem sets use drawings from a residential building project. Two of the problem sets use labels from building materials. All of the information you need to answer the questions is in the workplace document. You do not need a background in carpentry.
What happens to the results?This assessment is a general indicator of how prepared you are for technical training and what your skill levels are in Reading Text, Document Use and Numeracy. Your instructor will mark the assessment and make recommendations based on your results. For example, your instructor may recommend tutoring or going to a local learning centre for extra help.
Your instructor will give you a detailed diagnostic sheet that shows what you were able to do and what you had difficulty with. If you are going to a tutor or to a learning centre, you should take this diagnostic with you. The diagnostic sheet will tell the tutor or learning centre which topics you need to review.
Preparing for Carpenter Training

Preparing for Carpenter Training Introduction
�
Introduction• Use a pen or pencil.• Take a couple of minutes to look through the entire assessment.• Do not rush through the assessment, work carefully.• Do all rough work in the space provided.• Print all answers clearly. If the answer cannot be read, it will be marked incorrect.• You can use a calculator during the entire assessment. • Try every question. The questions are not ordered according to difficulty and you
will not lose marks for wrong answers.• If you find a question difficult, move on to the next question and come back later.• If you decide to change an answer, make sure you cross out your old answer.
The following formulas and conversions have been provided to help you.Formulas
Geometric Shapes Area Volume
L
W A = L × W V = L × W × H
diameter
radius
� = 3.�4
diameter = radius × 2
radius = diameter2
A = �r2 V = �r2 H
Pythagorean Theorem a2 + b2 = c2 a2 = c2 – b2
b2 = c2 – a2 a
b
c
Conversions Imperial �2" = �' 3' = � yd �44 in2 = � ft2
9 ft2 = � yd2
�,728 in3 = � ft3
27 ft3 = � yd3
Converting Inches to Feet Feet to Inches
inches ÷ �2 =�0" = �0 ÷ �2 = .83'
feet × �2 =.5' = .5 × �2 = 6"

Preparing for Carpenter Training Section �
2
Section 1: Math Foundations
Whole Numbers1. 2 983 + 551 + 1 865 + 49 =
2. 4 647 rounded off to the nearest hundred is:
3. 264 × 38 =
4. 1 589 ÷ 14 =
Decimals5. 6.23 + 149.756 + 0.41 + 8.5 =
6. 39.404 − 12.647 =
7. List the following decimals in order from largest to smallest. 0.043, 0.251, 0.054, 0.19, 0.250
8. Round off to the nearest hundredth. 3.5349
9. Convert 0.75 to a fraction.
Fractions10. 31
8 + 1 3
8 =
11. 612
+ 2 14
=
Preparing for Carpenter Training Section �
3
12. 578
− 2 38
=
13. 78
− 34
=
14. 34
× 12
=
15. 2 12
× 1 34
=
16. Convert the following fractions to decimals.
a) 14
= b) 12
= c) 34
=
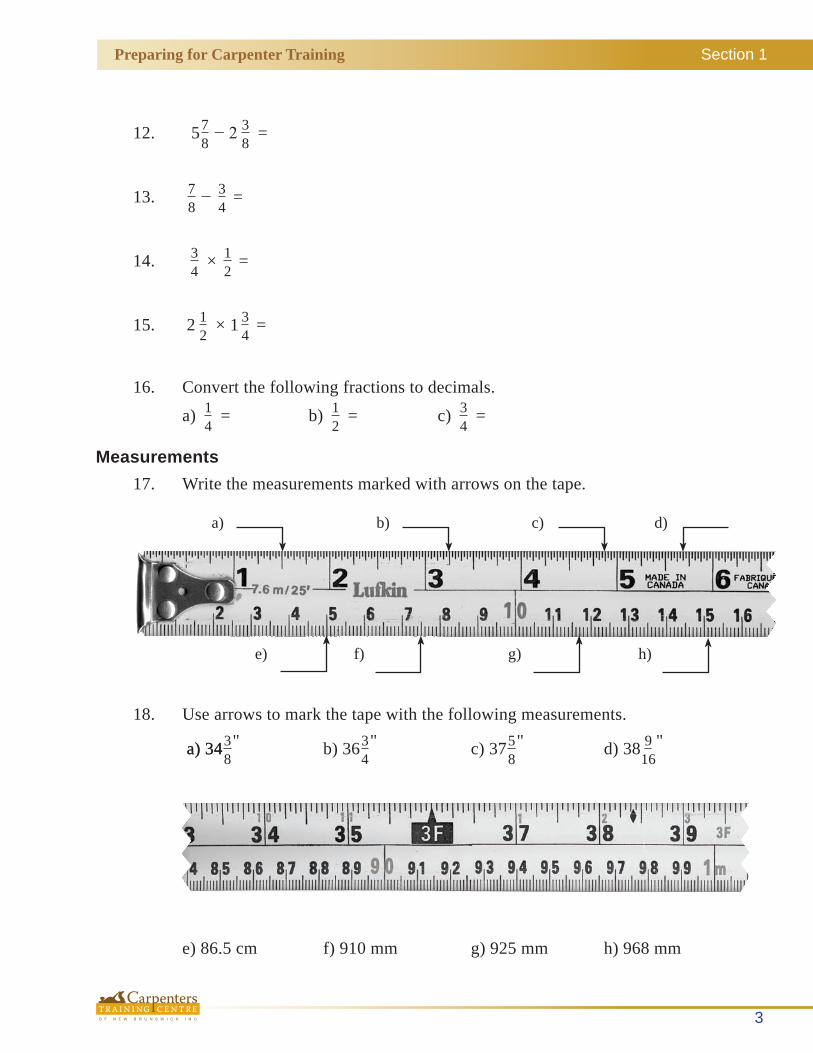
Measurements17. Write the measurements marked with arrows on the tape.
a) b) c) d)
e) f) g) h)
18. Use arrows to mark the tape with the following measurements.
a) 34a) 3438
" b) 3634
" c) 3758
" d) 38 916
"
e) 86.5 cm f) 910 mm g) 925 mm h) 968 mm

Preparing for Carpenter Training Section 2
4
Section 2: Math Problems
Answer each of the questions below. Show your work. Some formulas have been provided at the front of this booklet.
1. It takes about 5 pounds of nails to fasten each 1,000 square feet of drywall. About how many pounds of nails will be needed for 9,545 square feet? Round up to the nearest whole number.
2. A contractor purchases lumber at $2.29 per board foot. Calculate the cost of 365 board feet.
3. Twenty-five sheets of drywall cost $748.75. a) Calculate the cost of one piece of drywall.
b) Calculate the cost of 12 pieces of drywall.
4. A carpenter is building a fence along an 86 foot property line. A fence panel measures 8 feet × 6 feet.
a) Calculate the number of fence panels required to build the fence.
b) Calculate the number of fence posts. Hint: there is a fence post at each end.

Preparing for Carpenter Training Section 2
5
5. A carpenter is installing a door. Calculate the centre to centre ( CL ) distance between hinges.
6. Calculate the thickness of the floor.
5/8" 13"
5/8" 1/2"
7. There are 9 risers in a staircase that has a total rise of 67 ½ inches. What is the height of 1 riser?
Run
Rise
Total Run
Tota
l Ris
e
8. The total run of a staircase that has 7 risers and 6 treads measures 55 ½ inches. Calculate the length of one tread.
tread
Rise
Total Run
Tota
l Ris
e
CL of Hinge
CL of Hinge
CL of Hinge
80”
13”
9”
Eq
ual
Eq
ual

Preparing for Carpenter Training Section 2
6
9. Use the drawing to answer a) and b).
a) Calculate the length of the kitchen cupboard in the drawing.
b) Calculate the total length of countertop needed for the kitchen cupboards in the drawing.
10. Use the drawing below to answer a) and b).
a) Calculate the missing dimension.
b) Calculate the length of the wall highlighted in the drawing.

Preparing for Carpenter Training Section 2
7
11. a) Calculate the linear feet of baseboard required for the room shown in the drawing.
b) Estimate the number of studs needed for framing. Use the formula:
Number of studs = Perimeter
2
12. Carpenters apply wooden siding to outside walls. The siding is overlapped so it will shed water and provide a windproof and dustproof covering. The overall height of the wall is 130 1/2". The siding exposure is 7 1/4". Calculate the number of rows of siding needed for the wall.
13. a) Calculate the area of the gable roof in the drawing below. Hint: There are two sides to the roof.
b) One bundle of shingles covers 32.5 ft2. Calculate the number of bundles of shingles required for the roof.
�0.4'
�2.75'
28.5'
22'
130 12
" total
exposure
7 14
" siding
exposure
27.7'
18.25'
Preparing for Carpenter Training Section 2
8
14. a) Calculate the volume of concrete in cubic feet required for six footings that measure 2' × 2' × 0.75'.2' × 2' × 0.75'..
b) Concrete is ordered in cubic yards. Convert cubic feet to cubic yards.
15. a) Calculate the volume of concrete required for four footings with a diameter of 1.5 feet and a height of 0.5 feet.
b) Concrete is ordered in cubic yards. Convert cubic feet to cubic yards.
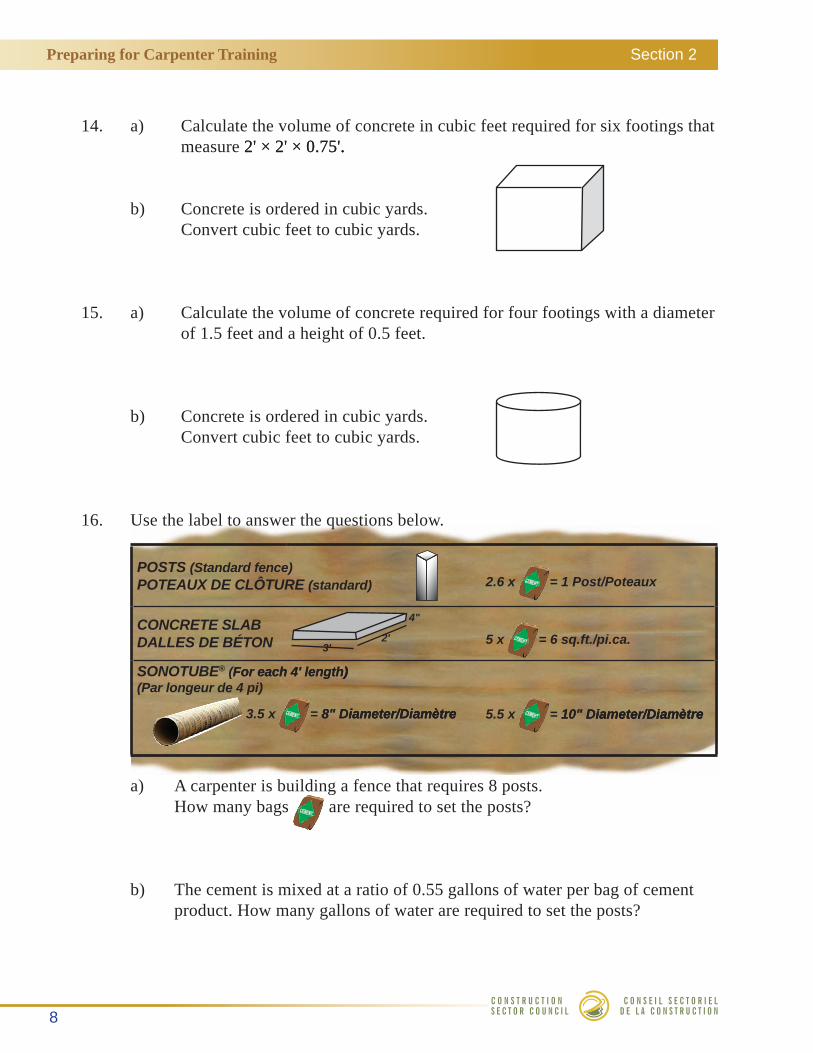
16. Use the label to answer the questions below.
POSTS (Standard fence)POTeaux de clôTure (standard) 2.6 x = 1 Post/Poteaux
cOncreTe SlabdalleS de béTOn
4"
2'3'
5 x = 6 sq.ft./pi.ca.
SOnOTube® (�or eac�� 4' �en�t��)�or eac�� 4' �en�t��)) (Par �on�eur de 4 pi)
3.5 x = �" dia�eter/dia��tre�" dia�eter/dia��treia�eter/dia��tre 5.5 x = 1�" dia�eter/dia��tre1�" dia�eter/dia��treia�eter/dia��tre
a) A carpenter is building a fence that requires 8 posts.
How many bags are required to set the posts?
b) The cement is mixed at a ratio of 0.55 gallons of water per bag of cement product. How many gallons of water are required to set the posts?

Preparing for Carpenter Training Section 2
9
17. A carpenter is framing walls and needs to make sure the corners are square (90°). The carpenter measures 3' from the corner along one wall and 4' from the corner3' from the corner along one wall and 4' from the corner from the corner along one wall and 4' from the corner4' from the corner from the corner along the other wall. Then he measures the length of the diagonal connecting these two points. Calculate the length of the diagonal line.
4'
3'
18. Carpenters calculate, lay out and construct stairs. The stringer is the inclined side of a staircase. It supports the treads and risers. One way to calculate the length of the stringer is to calculate the unit of bridge. Then, multiply the length of bridge by the number of risers.
a) Calculate the unit of bridge.
b) Calculate the length of the stringer.
7 "
unit of bridge
?
10 "
?
stringer
unit of bridge
treadriser

Preparing for Carpenter Training Section 3
�0
Section 3: Problem Sets
2 GROUNDFLOORPLANAl SCALE, 3 "16 =1'-0"
4 WINDOW/DOORSCHEDULEA2 SCALE, 3 "16 =1'-0"
A ground floor plan is a view from above. It shows the room layout, types and positions of doors and windows and the location of stairways.Look at the Ground Floor Plan and Window/Door Schedule.
1. This plan shows the ground floor of a four-unit residential building. The two floors have the same layout. How many bedrooms are there per unit? DocumentUse,Numeracy
2. How many Type 1 Windows are there in Unit 1?DocumentUse,Numeracy
3. The floor plans for each unit on a floor are mirror images of each other. What type of window is installed in the Dining Room of Unit 2?DocumentUse
4. Calculate the area of one bathroom in square feet. Numeracy
5. What is the length of each wall on either side of the dining room window? DocumentUse,Numeracy
6. Carpenters check that plan drawings conform to the National Building Code.a) Calculate the distance of the bedroom window from the finished floor in
millimeters. 1 inch = 25.4 millimetersDocumentUse,Numeracy
Continue to 6.b)

Preparing for Carpenter Training Section 3
11
INTERIOR DOORS: HOLLOW-CORE MASONITE EMBOSED DOORS AS SHOWN
DOOR HARDWARE: - 10’STRIPKITPERDOOR& FRAMEPRE-HUNGKIT
-PASSAGESET- DEAD-BOLT

Preparing for Carpenter Training Section 3Preparing for Carpenter Training Section 3
12
5 SECTION:STAIR@UNIT1&3A2 SCALE, 1 "4 =1'-0"
Sectionviewsshowacross-sectionoftheinteriordetails.Sectionviewsareoftendrawntoalargerscalethanotherdrawings.Thismakesiteasiertoshowmoredetailoftheinterior.LookattheSection:Stair@Unit1&3drawing.
1. WhatisthegroundfloorelevationatUnit1?Document Use
2. Whatistheo/cspacingoftherooftrusses?Document Use
3. Calculatethedistancefromthefrontoutsideoftheconcretewalltothefaceofthefloorjoist.Document Use, Numeracy
4. ListthecommonmaterialsusedinW1andW2walls.Document Use
5. Whatisthethicknessofthecommonfloor?Document Use, Numeracy
6. Imperialroofframingusesthetermcut of rooftodescribetheratiobetweentherise(vertical)andtherun(horizontal)oftheroof.Inimperialroofframingtherunisalways12.Theriseisalwayswrittenfirst.Whatisthecutofroofforthisbuilding?Document Use
6. b) LookatthepartialsectionoftheNationalBuildingCodeforHeight of Window Sills above Floors or Groundbelow.WhatdoestheCarpenter decideregardingwhethertheplansconformtocode?Document Use, Numeracy
9.7.1.5. HeightofWindowSillsaboveFloorsorGround (See Appendix A.)
1) ExceptasprovidedinSentence(2),openablewindowsinbuildings ofresidential occupancyshallbeprotectedby
a) aguard,inaccordancewithSection9.8.,orb) amechanismcapableofcontrollingthefreeswingingorslidingofthe
openablepartofthewindowsoastolimitanyclearunobstructedopeningtonotmorethan100mmmeasuredeitherverticallyorhorizontallywheretheotherdimensionisgreaterthan380mm.
2) WindowsneednotbeprotectedaccordingtoSentence(I)wherea) thewindowservesadwelling unitthatisnotlocatedaboveanothersuite,b) theonlyopeninggreaterthan100mmby380mmisahorizontalopening
atthetopofthewindow,c) thewindowsillislocatedmorethan450mmabovethefinishedflooron
onesideofthewindow,ord) thewindowislocatedinaroomorspacewiththefinishedfloordescribed
inClause(c)locatedlessthan1800mmabovethefloororgroundontheothersideofthewindow.
From the National Building Code

Preparing for Carpenter Training Section 3
13

Preparing for Carpenter Training Section 3Preparing for Carpenter Training Section 3
Hardiplank®Lap Siding
Carpentersreadmateriallabelstofollowmanufacturers’installationprocedures.ThisdocumenttellsCarpentershowtoinstallHardiplank®lapsiding.LookattheHardiplank®LapSidingpage.
1. Whatcouldhappenifthesidingisinstalledwhenitiswet?Reading Text
2. WhyisitimportanttouseeitherHEPAvacuumsorwetcleanupmethodsduringcleanup?Document Use, Reading Text
3. Whatisthepurposeofinstallinga1¼"starterstripshowninFigure2?Document Use, Reading Text
4. Whatpersonalprotectiveequipmentisrecommendedwheninstallingorhandlingthisproduct?Reading Text
5. Highlight,circleorunderlinethesectionthatliststheplaceswhereaclearancebetweentheproductandotherbuildingfeaturesareneeded.Document Use, Reading Text
6. Whatadditionalinformationisprovidedaboutfacenailingcorrosionresistantsidingnailsthatare0.091"shankx0.221"HDx1-1/2"long?Document Use
7. Whyiskickoutflashingneeded?
Reading Text
14

ProductSafetyInformation-HARDIPLANK®LapSiding
RiskPhrases: Product contains respirable crystalline silica, which is known to the State of California to cause cancer and is considered by lARC and NIOSH to be a cause of cancer from occupational sources. Breathing excessive amounts of respirable silica can cause a disabling disease and potentially fatal lung disease called silicosis, and has been inked with other diseases.
PrecautionaryStatements: During installation or handling: (1) work in outdoor areas with ample ventilation; (2) use fiber cement shears for cutting or, where not feasible, use a Hardiblade® saw blade and dust-reducing circular saw attached to a HEPA vacuum; (3) warn others in the immediate
area; (4) wear a properly-fitted, NIOSH-approved dust mask or respirator (e.g. N-95) In accordance with applicable government regulations and manufacturer instructions to further limit respirable silica exposure.
FirstAidMeasures: Inhalation: Remove yourself to fresh air. EyeContact: Flush eyes out with running water for at least 20 minutes. SkinContact: Wash thoroughly with mild soap and water if skin is irritated. If any of the above measures are taken and still have irritation seek medical attention.SeeMaterialSafetyDataSheetJames Hardie Building Products Technical Services 26300 La Alameda Suite 250 MissionViejo, CA92691 USACall 1-800-9HARDIE. From U.S. or Canada
Because of the volume of water that can pour down a sloped roof, one of the most critical flashing details occurs where a roof intersects a sidewall. The roof must be flashed with step flashing. Where the roof terminates, install a kickout to deflect water away from the siding (figure 7). It is best to install a full rubberized asphalt flashing on the wall before the subfascia and trim boards are nailed in place, and then come back to install the kickout.Figure7,KickoutFlashing‡ To prevent water from dumping behind the siding and the end of the roof intersection, bend a small “kickout” from metal flashing to divert water running down the roof away from the siding.
15

Preparing for Carpenter Training Section 3Preparing for Carpenter Training Section 3
Carpentersreadmateriallabelstofollowmanufacturers’installationprocedures.ThisdocumenttellsCarpentershowtoinstallshinglesonaroof.LookattheApplicationInstruction.
1. Highlight,underlineorcirclethesectionthatshowsthenailingpatterns.Document Use
2. Whyisthroughventilationimportant?Reading Text
3. Thefirststepforinstallingtheseshingles,eitherstep1orstep1a,dependsontheslope(orcut)oftheroof.DecidewhichstepshouldbefollowedfirstaccordingtotheroofinformationfoundintheSection: 3 page 12drawing.Document Use
4. Thecarpenterisnotusingapre-cutstarterstripinthestartercourse.Whatshouldthecarpenterdotoallstartercourseshingles?Document Use, Reading Text
5. Timberlineshinglesaretough,heavyweightshingles.Nametwotoolsthataremoreeffectivethanstraightbladeutilityknivesatcuttingtheseshingles.Reading Text
•
•
6. Whyisitimportanttostoreshinglesproperly?Reading Text
7. Whatcausesshingleblisters?Reading Text
16

36'914mm
17'432mm
17'432mm
17'432mm
36'914mm
19'483mm
Application Instruction
GENERAL INSTRUCTIONS• ROOF DECKS: Wood decks must be well-seasoned, supported, and tightly-constructed with maximum 6” (152mm) wide lumber, having adequate nail-holding capacity and a smooth surface. Plywood or OSB decking as recommended by APA-The Engineered Wood Assn. is acceptable. Do not fasten shingles directly to insulation or insulated deck unless authorized in writing by GAF-Elk. Roof decks and existing surfacing material must be dry prior to application of shingles.• UNDERLAYMENT: Underlayment beneath shingles has many benefits, including preventing wind-driven rain from reaching the interior of the building and preventing sap in some wood decking from reacting with asphalt shingles.Underlayment is also required by many code bodies and is required to maintain the UL Class A fire rating. Where an underlayment is to be installed, use a breather-type underlayment such as GAF-Elk Shingle-Mate1, Leatherback or Deck-Armor” underlayment.• FASTENERS: Use only zinc-coated steel or aluminum, 10-12 gauge, barbed, deformed or smooth shank roofing nails with heads 3/8” (10mm) to 7/16” (12mm) in diameter. Fasteners should be long enough to penetrate at least 3/4” (19mm) into wood decks or just through the plywood decks. Fasteners must be driven flush with the surface of the shingle. Overdriving will damage the shingle. Raised fasteners will interfere with the sealing of the shingles and can back out.• WIND RESISTANCE/HAND SEALING: These shingles have a special thermal sealant that firmly bonds the shingles together after application when exposed to sun and warm temperatures. Shingles installed in Fall or Winter may not seal until the following Spring. If shingles are damaged by winds before sealing or are not exposed to adequate surface temperatures, or if the self-sealant gets dirty, the shingles may never seal. Failure to seal under these circumstances results from the nature of self-sealing shingles and is not a manufacturing defect. To insure immediate sealing, apply 4 quarter-sized dabs of shingle tab adhesive on the back of the shingle 1” (25mm) and 13” (330mm) in from each side and 1” (25mm) up from bottom of the shingle. Press shingle
firmly into the adhesive. For maximum wind resistance along rakes, install GAF-Elk Starter Strip Shingles with GAF-Elk Dura-Grip” sealant or cement shingles to underlayment and each other in a 4” (102mm) width of asphalt plastic cement. Caution: Apply ONLY a thin uniform layer of asphalt plastic cement less than 1/8” (3mm) thick. Excess amounts can cause blistering of the shingles and may soften the asphalt in certain underlayments, including StormGuard’, Weather Watch” and other GAF-Elk Leak Barriers, resulting in the asphalt flowing, dripping and staining.• RELEASE FILM: The film strips on the back of each shingle are to prevent sticking together of the shingles while in the bundle. Their removal is NOT required during application.• MANSARD AND STEEP SLOPE APPLICATIONS: Forroof slopes greater than 21” per foot (1750mm/m), shingle must be hand sealed (DO NOT use on vertical side walls). See “Wind Resistance/Hand Sealing” for the application of adhesive.• SHINGLE TAB ADHESIVE: Use asphalt plastic cementconforming to ASTM D4586 Type I or II.• THROUGH VENTILATION: All roof structures must beprovided with through ventilation to prevent entrapment of moisture-laden air behind roof sheathing. Proper ventilation is also necessary to prevent mold growth. Ventilation provisions must at least meet or exceed current F.H.A., H.U.D. or local code minimum requirements. Note: Minimum net free ventilation area of 1 sq. foot per 150 sq. feet (1 sq. meter per 150 sq. meters) of ceiling area is required. When vents are located at the eaves and near the roof’s peak (balanced) for maximum air flow, ventilation may be reduced to 1 sq. foot per 300 sq. feet (1 sq. meter per 300 sq. meters).• NON-CORRODING METAL DRIP EDGES: Recommended along rake and eave edges on all decks, especially plywood decks.• EXPOSED METAL: All exposed metal surfaces (flashing, vents, etc.) should be painted with matching GAF-Elk roofaccessory paint.
Note: These shingles MUST be nailed a nominal 5 5/8�� (143mm) from bottom of shingles, not in or above self seal, as shown. NailsThese shingles MUST be nailed a nominal 5 5/8�� (143mm) from bottom of shingles, not in or above self seal, as shown. Nails should reamin unexposed.
GAF Materials Corporation. Reprinted with permission.
17
Underlayment: Standard Slope–4/12 (333mm/m) or moreApplication of underlayment: ������ ����� ����� ��� ������ ��� ���������m��� ��������� �������������� ����� ����� ��� ������ ��� ���������m��� ��������� �������� ����������. U�� ���� ����g�� ����� �� ����� ���������m��� �� p���� ����� �������� b� �����g���. Application of eave flashing: I������ ���� ���������g ����� �� GAF-E��� W�������� W�����®, S����mG�����®, ��� ������� GAF-E��� L���� B��������� �� ���������� ������� ������ m�� b� ������ b� ������ b������g �p b������ ��� ��� ��b���� ��m�. E��� ���������g m��� ��� ���������g ���� ���� ��g� b� m���� ����� 1/4” (6mm) ��� �x���� 24” (610mm) b����� ���� ������ ���� ����.
1
Underlayment: Low Slope 2/12-4/12 (167mm-333mm/m)Application of underlayment and eave flashing: ��mp������ ������ ���� ����� ����� �����mp������ ������ ���� ����� ����� ��� ������� ��� ���������m��� �� ������. U�� ���� ����g�� ����� �� ����� ���������m��� �� p���� ����� �������� b� �����g���. U�� b���� ������g ����� ���� ���������g�. A� ����� ��� ������� ��� ��m� ��� b� �xp�����, ��� ��� ������ ��� GAF W�������� W�����®, S����mG�����® ��� ������� GAF-E��� L���� B���������. E��� ���������g m��� ��� ���������g ���� ������ ���� ��g� b� m���� ����� 1/4” (6mm) ��� �x���� 24”(610mm) b����� ���� ������ ���� ����. W������ ��� ��m� ��� ��b���� ��m� ���� ��� �xp�����, ������� 2 p���� ��� S����g��-M���® ���������m���.
1a
Second CourseS����� ��� �������� ������ ������� �� ������. T���m 6” (152mm) �����m ���� ��� ��� ���� �����g��. P������� ���� �����g��� �� ���� ������ ��� ��b��q���� �������� ������� ����� ���� ��p� ��� ���� ���� ���-����. T���� �������� �� � 5” (127mm) �xp������. �������� ����� ����� ������ �����g��� ������� ���� ������.
4 Third CourseT���m 11” (279mm) �����m ���� ������� �����g�� �� ���� �������; ����� �������� ����� ����� �����g��� ������� ���� ������. S������� � ������� ���� �b��� ������ 6 �������� �� ������� p�������� ���g�m��� ����� �����. Note: S����g��� m�� b� ���� �����m �������� ����� ��� ���g���-����� ����.
5
Starter CourseApp�� �� ������ Note: GAF-E��� ��������� �����p� ����� ������� ���� �����mm����� �� ���� ����� ��� ������� ����� b��� p��������m���� ��� ���q������ ����� ���� b��� ��m���� ���� ������������ �� �������� p�������� (��� ��m���� ���������� ����� �������).
2 First CourseS����� ��� �������� ����� ����� �����g��� ���� ������� ����� ���� ��������� �������. S����g��� m�� b� ���� �����m ����� �� ���g��� ��� ���g��� �� �����. DO NOT ��� �����g��� ������g��� �p ���� ������ (��������g) ����� ����� p���������� ��� ����� �� ����������� ������ b���� �� ���� ������ ��� m�� ��m�g� ���� �����g���.
3

18
Precautionary NotesThese shingles are fiberglass, self-sealing asphalt shingles. Because of the natural characteristics of the high quality waterproofing material used, these shingles will be stiff in cold weather and flexible in hot weather.1. These shingles are particularly tough, heavyweight shingles with a definitely rugged-looking appearance. They require additional
effort to trim to fit on the roof. Curved blade utility knives are more effective than straight blade utility knives in cutting these shingles. Using a circular saw equipped with carbide-tipped blades is also effective.
2. Regardless of the tool used, always wear proper protective wear, i.e. gloves, eye protection, etc; follow all protection procedures and use tools carefully to prevent personal injury when working with these heavier products.
3. Do not drop bundles on edge or on other bundles to separate shingles. Do not load bundles across a hip or ridge. Do not bend bundles over shoulder for carrying. Premium weight may cause cracks at sharp bend points.
4. Handle carefully. Shingles can easily be broken in cold weather or their edges damaged in hot weather.5. Store on flat surface, in a covered, ventilated area-maximum temperature 110°F (43°C). Do not store near steam pipes, radiators,
etc., or in sunlight.6. GAF-Elk does not recommend long-term storage of double stacked pallets. If double stacking is required for short periods, slip
sheets of 1/2” {13mm} plywood cut to the pallet size are required between pallets to minimize damage. Long-term double stacked storage, especially in hot weather, can result in possible sticking, staining and distortion of the shingles in the lower layers of shingle bundles.
7. If shingles are to be applied during PROLONGED COLD periods or in areas where airborne dust or sand can be expected before sealing occurs, the shingles MUST be hand sealed. See “Wind Resistance/Hand Sealing” instructions.
IMPORTANT: Repair leaks promptly to avoid adverse effects, including mold growth.Re-RoofingIf old asphalt shingles are to remain in place, nail down or cut away all loose, curled or lifted shingles; replace with new; and just before applying the new roofing, sweep the surface clean of all loose debris. Since any irregularities may show through the new shingles, be sure the underlying shingles provide a smooth surface. Fasteners must be long enough to penetrate the wood deck at least 3/4” (19mm) or just through plywood. Follow above instructions for application.Note: Shingles can be applied over wood shingles if the surface can be made smooth enough. This may include cutting back old shingles at eaves and rakes, installing new wood edging strips as needed, and the use of beveled wood strips. Install #30 underlayment to maintainClass A rating.For more information, visit our website at www.gaf.com or call Technical Services at 1-800-ROOF-411.This product is sold with an express LIMITED WARRANTY only. A copy of the LIMITED WARRANTY stating its terms and restrictions is printed on the product wrapper or may be obtained from the distributor of this product or directly from GAF-Elk Corporation. Any deviation from printed instructions shall be the responsibility of applicator and/or specifier.© 2007 GAF-Elk Corporation
HipandRidgeInstall GAF-Elk Timbertex® ,Z®Ridge, Seal-A-Ridge®, or ridglass® hip and ridge shingles (check regional availability). Follow the application instructions shown on the hip and ridge wrapper.
107
Wall Flashing8 Chimney Flashing9
Valley Construction - Closed or Woven Valley������� � ����� 36” (914mm) ������ ��� W�������� W�����®, S����mG�����® ��� ������� GAF-E��� L���� B��������� ����� ������� ������ ���g��� �� ���� ���� ������. L�� S����g��-M���® ��� ������� GAF-E��� ���������m��� ���� ���� ������ ��� �������pp��g ���� L���� B��������� � m���m�m ��� 6” (152mm). D���g� ���� ������ ����� ������ ����� ����� ���� ����mm�� �����g�� b� ���������g ���� ������ b�g�����g ����� ���� ������ p���� ����� ���� ���� ������ ���p� ��� ������� ����g���. Ex���� ���� b����m �����g��� 12” (305mm) p��� ���� ������ ������� ����. U�� ����m�� �����g�� ���������g m������� (������������� ������� 6” (152mm) ��� ������ ������� ����, ��� ����� �� ���� �����g��’� ���). �������� �� ���� ��p ��� ���� ������ �� ���� ��m� m������. T���m�����g��� 2” (51mm) b���� �����m ������ ������� ���� �� ��p ������ p����. ���p �����g�� ��������� ������� ���� ��� �� ����p ������ ����� �� ���� ������ �������. S��� ���� ������ ����g p������ ������ ��m���; ���� ���� ������ �����g��� �� ����� ������� ����� ���� b��� p����������. (N���: Ex���� ��m��� ��� ����� �����g�� b��������).
11 Valley Construction - Open Cut������� � ����� 36” ������ ��� W�������� W�����®, S����mG�����® ��� ������� GAF-E��� L���� B��������� ����� ������� ������ ���g��� �� ���� ���� ������. L�� S����g��-M���® ��� ������� GAF-E��� ���������m��� ���� ���� ������ ��� �������pp��g ���� ����� b��������� � m���m�m ��� 6”. ������� ������ m���� ����g 20” (508mm) ���� ���m���m, g������z�� �����, ��pp���, ��� ������� ���-����������g, ���-�������g m����� (24 g��g� m���m�m). Emb�� ���� m���� ��p� �� ��p����� p������ ��m��� � m���m�m ��� 12” (305mm).*N��� ���� m���� �� ���� ��g�� �� ���� ���� ������ ����� �� �� p����. D� ��� p�������� ���� m����. N�����g �������g�� ���� m���� m�� ����� �������g ��� b�������g ��� �� m���m���. I������ �����g��� �� ���� ������, ��������g ���� m���� 4” (102mm) m���m�m �� ����� ���� �� ����. ���p ���� ��p ��������� �� ����p ������ ����� ������� ���� ������ �������. T�p��� ���� ������ �����g��� �� ������� ����������g ������ ����m�. S����� �� 6” (152mm) ���� �� ���� ������ ��p, ����� 1/8” (3mm/m) p��� ����� ������� ���� ���� (���p ������� ����� �� ������� �����g��� ������g� p���p����� �� ������). Emb�� ���� �����g�� ���� �� p������ ��m��� �� ���� ���� �����g��� �� ���� m���� ��� ����p ������ �����m �������g ������ ����m.* *N���: Ex���� ��m��� ��� ����� �����g�� b��������.
Fourth Course and Remaining CoursesT���m 17” (432mm) �����m ������� �����g�� �� ���� �������, ����� �������� ����� ����� �����g��� ������� ���� ������. F������ ��� ��b��q���� ��������; ���p��� S��p� 3 �������g�� 6.
6

Preparing for Carpenter Training
