preparing to install php - o'reilly...
TRANSCRIPT

Linux/Unix 3: Unix Services
Lesson 1: How Email WorksIntroduct ionHow email worksDetermining the Dest inat ionWho is my MX?SMTP
Handing in a Quiz or Object iveLesson 2: Sendmail
SendmailSendmail at StartupTest ing Sendmail
Lesson 3: More on Sending and Receiving MailPineMail HeadersRelayingRemote Mail
Lesson 4: ProcmailProcmailFilters and RecipesMore Recipe Examples
Lesson 5: AliasesForwarding EmailAliases
Lesson 6: How Webservers WorksHow Webservers WorkBehind the ScenesCGI RequestsDif ferent Webservers
Lesson 7: ApacheInstalling ApacheInit ial Conf igurat ionTest ing Apache
Lesson 8: Configuring Apachehttpd.confSect ion 2 of ht tpd.conf
Lesson 9: Apache Access ControlIntroduct ion to Apache Access Controlht tpd.conf Cont inuedAccess Control.htaccessAdding Password Authent icat ion
Lesson 10: Apache LogsWebserver LogsAccess and Error Logs
Lesson 11: Even More Apache Configurat ionCGI with ApacheTest ing CGIAllowing CGI for UsersChanging the Missing File Page
Lesson 12: Installing PHP

What is PHP?Preparing to Install PHPInstalling PHPTest ing PHP
Copyright © 1998-2014 O'Reilly Media, Inc.
This work is licensed under a Creat ive Commons Attribut ion-ShareAlike 3.0 Unported License.See ht tp://creat ivecommons.org/licenses/by-sa/3.0/legalcode for more informat ion.

How Email Works
IntroductionIn order to take this course successfully, you should be able to FTP files, install and run programs on a server, andunderstand DNS. You should also be able to keep track o f users and the processes they are running on a server.
In this course, you'll learn all about mail! Not only will you learn how a server sends and receives email, but you willalso learn how to install and configure a mail server. We will begin by discussing how email works.
NoteAll o f the examples, quizzes, and objectives for this course should be completed in the Unix Sandbo x. Ifyou have never taken an O'Reilly School o f Technology (OST) System Administration course, pleaseclick here to learn about the different features o f this too l.
How email worksLet's imagine for a moment that you wish to write a letter to your cousin living in Alaska. You sit down with your penand paper and write your message. Then you neatly place the letter in an envelope, write your cousin's address on it,and put it in the mailbox. As far as you're concerned, the process is over and your cousin will get the letter in a fewdays.
We know better than that though. The postal worker must come pick up your letter and take it to the post o ffice where itwill be processed, organized for distribution, shipped to a post o ffice in Alaska, sorted again, and finally delivered toyour cousin's mailbox. Later that day your cousin will check her mailbox to find a letter from you, which she will openand read with delight. The relatively long duration o f this process has caused some people to start calling it "snailmail."
Email works in a very similar manner (only faster, o f course). Imagine that you wish to send your cousin an emailinstead o f a regular postal letter. To write this message, you must use an email edito r, like Eudora, Pine, NetscapeMail, o r Outlook Express. The email edito r is referred to as the MUA o r mail user agent. After typing your cousin'semail address and message, you send it.
Now what? Will the email magically appear on your cousin's computer? Unfortunately, it will no t. Just like regular mail,we need something that will determine where the message should go and then deliver it. This is accomplished by themail t ransport agent or MT A. Once sent to the correct "post o ffice," an LDA (local delivery agent) is responsible forputting the message in your cousin's mailbox. She can then read the email message with her own MUA. Unlike postaldelivery, an email message is typically delivered within a matter o f seconds.
In this lesson, we will discuss the MTA and LDA in more detail.
Determining the DestinationThe first thing an MTA does, is determine the destination for the email message. This is done by looking at the emailaddress. Let's say the email address is co [email protected] m . The destination for this message would bealaska.co m . In this case, the destination is a domain. That's not really good enough though, we need to know thename of a server on which this domain resides. To determine this, we can use DNS zone files.
Many DNS zone files contain an entry fo r an MX record.
Take a look at this DNS zone file:
@ IN SOA ns1.private.oreillyschool.com. root.private.oreillyschool.com. ( 5 ;serial 21600 ;refresh 3600 ;retry 1209600 ;expire 172800 ;ttl ) IN NS ns1.private.oreillyschool.com. IN MX 5 mail.private.oreillyschool.com.
In this case, any email with a destination o f private.oreillyschoo l.com will be sent to mail.private.oreillyschoo l.com.
The alaska.com domain from our example will have at least one MX record as well. The MTA will determine the mailexchanger with the lowest preference number and attempt to transfer the message to it. The exchanger will normally besomething like mail.alaska.com.
What if your cousin's email address was [email protected] instead o f [email protected]? Thedestination is now a specific host within a domain. It's possible for hosts within a domain to have a specified mailexchanger. If an MX isn't listed, the MTA will attempt to deliver the email directly to host123. Let's look at an examplefrom our zone file.
Observe the fo llowing:
; The bubblesbubble2 IN A 10.0.0.2bubble3 IN A 10.0.0.3
Here we have just a couple o f simple address records from the private.oreillyschoo l.com zone file. Neither one o fthese have MX records, so any mail directed to bubble2 or bubble3 will be sent directly to these machines. However,we could have done this:
Observe the fo llowing:
; The bubblesbubble2 IN A 10.0.0.2 IN MX 5 mail.private.oreillyschool.com. IN MX 10 mail2.private.oreillyschool.com.bubble3 IN A 10.0.0.3
In this case, mail sent to bubble2 will be delivered to mail.private.oreillyschoo l.com, while mail can still be sent directlyto bubble3.
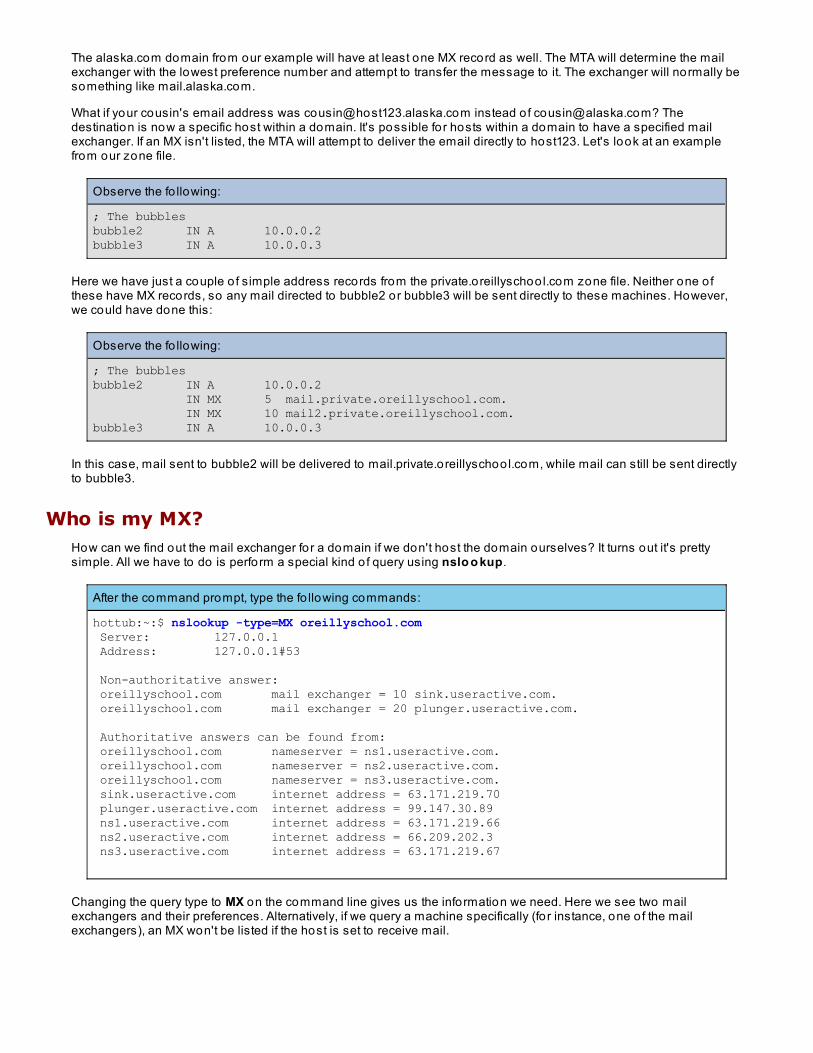
Who is my MX?How can we find out the mail exchanger for a domain if we don't host the domain ourselves? It turns out it's prettysimple. All we have to do is perform a special kind o f query using nslo o kup.
After the command prompt, type the fo llowing commands:
hottub:~:$ nslookup -type=MX oreillyschool.com Server: 127.0.0.1 Address: 127.0.0.1#53 Non-authoritative answer: oreillyschool.com mail exchanger = 10 sink.useractive.com. oreillyschool.com mail exchanger = 20 plunger.useractive.com. Authoritative answers can be found from: oreillyschool.com nameserver = ns1.useractive.com. oreillyschool.com nameserver = ns2.useractive.com. oreillyschool.com nameserver = ns3.useractive.com. sink.useractive.com internet address = 63.171.219.70 plunger.useractive.com internet address = 99.147.30.89 ns1.useractive.com internet address = 63.171.219.66 ns2.useractive.com internet address = 66.209.202.3 ns3.useractive.com internet address = 63.171.219.67
Changing the query type to MX on the command line gives us the information we need. Here we see two mailexchangers and their preferences. Alternatively, if we query a machine specifically (fo r instance, one o f the mailexchangers), an MX won't be listed if the host is set to receive mail.

After the command prompt, type the fo llowing commands:
hottub:~$ nslookup -type=MX sink.useractive.com Server: 127.0.0.1 Address: 127.0.0.1#53 Non-authoritative answer: *** Can't find sink.useractive.com: No answer Authoritative answers can be found from: useractive.com origin = ns1.useractive.com mail addr = nic.useractive.com serial = 2006112301 refresh = 21600 retry = 10800 expire = 2592000 minimum = 60
SMTPOnce the MTA figures out the email's destination, it attempts to contact the MTA of the remote machine. The standardport o f communication between MTA's is port 25. The two MTA's establish communication and talk to each o ther viathe simple mail t ransfer pro toco l or SMT P . This can be verified by looking at the port assignments in /e t c/services.
SMTP, just as the name implies, is fairly simple. We can get an idea o f how it works by talking to port 25 directly. Usetelnet to connect to port 25 o f the hottub. By do ing this, you can pretend you are an MTA with a message to deliver.
After the command prompt, type the fo llowing commands:
hottub:~$ telnet localhost 25Trying 127.0.0.1...Connected to localhost.Escape character is '^]'.220 hottub.useractive.com ESMTP Sendmail 8.12.11.20060308/8.12.11; Fri, 4 May2001 15:15:17 -0500
SMTP doesn't give you a prompt since it's not really meant to be used as a user interface. Let's type the firstinstruction.
Type the fo llowing commands:
MAIL FROM: [email protected] 2.1.0 [email protected]... Sender ok
This tells the MTA that there is an email message from yo [email protected] m . Be sure to replace this with yourown email address.
Type the fo llowing commands:
RCPT TO: [email protected] 2.1.5 [email protected]... Recipient ok
This specifies the recipient o f the message. The last thing you need to do is send the text o f the message itself.

Type the fo llowing commands:
DATA354 Enter mail, end with "." on a line by itselfthis is my test message.250 2.0.0 g48GSu013680 Message accepted for deliveryquit221 2.0.0 hottub.useractive.com closing connectionConnection closed by foreign host.
We initiate the transfer o f the body o f the message by typing DAT A. Then we can type as much as we want. In order toend the data section o f the message, we have to type a period on a line by itself. If done correctly, the email should bedelivered to your inbox.
Check out your email inbox and see if the message is there!
Handing in a Quiz or Objective
After you have read the lesson you have quizzes and objectives to complete that allow you to demonstratethe concepts you have learned. Under the lesson heading there is an objective and/or quiz item. Click on thisto reveal the instructions. When you are finished, scro ll down the top half o f the Coderunner screen and selectthe button that reads Hand in at the right side o f the window. You will use the same procedure to hand inobjectives. Please do not use the Drop In box but simply click on the Hand In button to hand in any filescreated. This button will alert your mentor that you are ready to be evaluated.
Copyright © 1998-2014 O'Reilly Media, Inc.
This work is licensed under a Creative Commons Attribution-ShareAlike 3.0 Unported License.See http://creativecommons.org/licenses/by-sa/3.0/legalcode for more information.

Sendmail
SendmailWhen creating a Linux mail server, there are several different MTA's from which to choose. The most popular MTA issendmail (the runner up is qmail). Sendmail is known for being difficult to set up and configure. In most cases wewon't need to use any o f its many specialized configuration options. sendmail is usually installed on the server aspart o f the base system when you install Linux.
Let's begin our investigation into sendmail. First we need to connect to a bubble.
After the command prompt, type the fo llowing commands:
hottub:~$ bubble
Let's look at the main sendmail configuration file. Configuration options for sendmail are called rules. Things maylook pretty confusing in sendmail.cf , but luckily we don't need to change anything. Open /e t c/sendmail.cf using aneditor or pager such as less. Scro ll down a few lines until you see this:
Observe the fo llowing:
################### local info ###################
Cwlocalhost# file containing names of hosts for which we receive emailFw/etc/mail/local-host-names
These two rules specify machines that are in charge o f receiving mail. This means that if sendmail receives a messagebound for one o f the machines listed, it will accept the message for delivery as long as that user exists on the server.The first Cw line specifies that we receive mail fo r the localhost. The Fw line gives a file where o ther hostnames arecontained. Older versions o f sendmail had these listed in a file called sendmail.cw.
Continue scro lling down through sendmail.cf to get familiar with the number and complexity o f some of sendmail'soptions.
We need to add our bubble's hostname to /etc/mail/local-host-names so that we can receive mail. We're go ing to needroot access so let's go ahead and su.
After the command prompt, type the fo llowing commands:
bubble12:~$ su suusernamePassword:bubble12:~#
You need to figure out the hostname of your bubble before you can add it to the local-host-names file. Recall from thelast course that you do that by looking at the /etc/sysconfig/network file:
After the command prompt, type the fo llowing commands:
bubble12:~# cat /etc/sysconfig/networkNETWORKING=yesFORWARD_IPV4=falseHOSTNAME=bubble12.private.useractive.com
Your hostname is at the bottom. It will be o f the form bubble12.privat e .useract ive.co m . The number may bedifferent than the one showed here. Edit /etc/mail/local-host-names and add the line below:

Add this line to /etc/mail/local-host-names:
bubble12.private.useractive.com
Remember, your bubble's hostname is probably different.
NoteYou'll need to change this file whenever you login to a new bubble. If you fail to do so, any email sent tothe server will be bounced back to the sender. This is only necessary when you're using or testingsendmail.
Sendmail at StartupSendmail is typically started when the system boots up, either with a script in /etc/rc.d/init.d o r within an rc script in/etc/rc.d. Looking at the man page for sendmail will reveal a ton o f different options, but the most common commandline options for sendmail are as fo llows:
sendmail -bd -q 15m
Email messages that fo r one reason or another haven't been delivered are kept in a queue. The -q 15m option tellssendmail to try and send those messages every 15 minutes. Find out fo r yourself what the -bd option means.
Testing SendmailSendmail is probably already running. We'll need to restart it so it will reread its config files.
After the command prompt, type the fo llowing commands:
bubble12:~# ps auxw |grep sendmailroot 415 0.0 6.1 5052 1968 ? S 12:22 0:00 sendmail: accepting connectionsroot 551 0.0 1.4 1432 472 pts/0 S 13:01 0.00 grep sendmailbubble12:~# kill -HUP 415
We can use kill -HUP on the process ID to cause sendmail to restart. Now we'll check to make sure it restarted okay.Your PID will be different.
After the command prompt, type the fo llowing commands:
bubble12:~# tail -n 2 /var/log/maillogMay 8 10:08:59 bubble12 sendmail[415]: restarting on signal /usr/sbin/sendmailMay 8 10:08:59 bubble12 sendmail[554]: starting daemon (8.11.2): SMTP+queueing@01:00:00
In the next lesson, you will learn how to send yourself a test message using the pine mail reader. See you there!
Copyright © 1998-2014 O'Reilly Media, Inc.
This work is licensed under a Creative Commons Attribution-ShareAlike 3.0 Unported License.See http://creativecommons.org/licenses/by-sa/3.0/legalcode for more information.
More on Sending and Receiving Mail
PineBefore starting this lesson, make sure you update /etc/mail/local-host-names on your bubble.
By now you should be at least slightly familiar with a text edito r called pico . This is actually a derivative o f a Unix mailclient called pine . We're go ing to use pine to send and receive test messages.
After the command prompt, type the fo llowing commands:
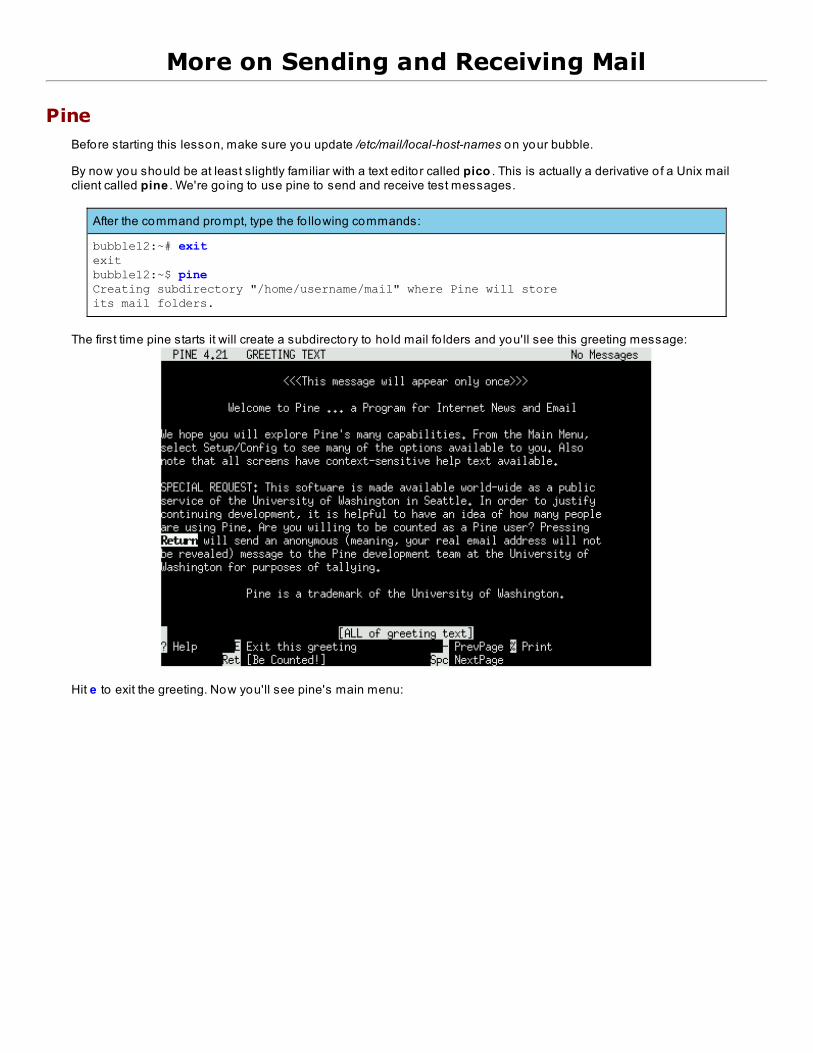
bubble12:~# exitexitbubble12:~$ pineCreating subdirectory "/home/username/mail" where Pine will storeits mail folders.
The first time pine starts it will create a subdirectory to ho ld mail fo lders and you'll see this greeting message:
Hit e to exit the greeting. Now you'll see pine's main menu:

We want to send a test message, so we'll type c to compose a message. While writing an email message, pine usesthe pico editor. Type in a message like the one below, being sure to replace username with your actual username andthe bubble hostname with the one you're logged into :
To send the message, type C-x (Ctrl plus x).You will be asked whether you really want to send the message. You do,so you should type y. After sending the message we'll be back at the main menu. Let's quit out o f pine for a moment bytyping q. It'll ask us if we really want to quit, then hit y.
Let's take a look at /var/log/maillog to see if our message was sent successfully.

After the command prompt, type the fo llowing commands:
bubble12:~$ su suusernamePassword:bubble12:~# tail /var/log/maillog......May 10 10:25:47 bubble12 sendmail[561]: g49JxY900561: from=<[email protected]>, size=335, class=0, nrcpts=1, msgid=<Pine.LNX.4.33.0105101025320.559-100000@bubble12.private.useractive.com>,proto=ESMTP, relay=username@localhostMay 10 10:25:47 bubble12 sendmail[562]: f4AFPlR02001: to=<[email protected]>,ctladdr=<[email protected]> (505/100), delay=00:00:00, xdelay=00:00:00,mailer=local, pri=30037, dsn=2.0.0, stat=Sent
bubble12:~# exitexitbubble12:~$
If it worked alright, you should see two lines like the ones above. We can go back into pine and read our message.
After the command prompt, type the fo llowing commands:
bubble12:~$ pine
Pine will take us right to the main menu this time. We want to check our mail fo lders and, as we can see from the menu,we do this by typing l (L).
Note Pine also lets us move around the menu with the arrow keys and choose things by hitting enter.
This is our fo lder list. We want to take a look at our INBOX, which should already be highlighted, so all we have to do ishit ent er. This brings us to the message list fo r our INBOX.

Awesome, there's the message we sent ourselves a few moments ago. Hit ent er again to view it. Now we can goahead and quit pine again.
Mail HeadersInstead o f using a mail client such as pine, we can view our mailbox directly. Every user has a mail spoo l file that istypically kept in /var/spool/mail. Each user's file is the same as their username and they have ownership o f it (this is sothe mail client has permission to modify the file). The /var/spool/mail/username file contains all o f the messages in auser's inbox, all in a row. The mail client usually separates them for us. Let's take a look at our mail spoo l file.
After the command prompt, type the fo llowing commands:
bubble12:~$ tail -n 20 /var/spool/mail/usernameReturn-Path: <[email protected]>
Received: from localhost (username@localhost) by bubble12.private.useractive.com (8.11.2/8.11.2) with ESMTP id g49JxY900561 for <[email protected]>; Thu, 10 May 2001 10:25:47 -0500
Date: Thu, 10 May 2001 10:25:47 -0500 (CDT)From: <[email protected]>To: <[email protected]>Subject: test messageMessage-ID:<Pine.LNX.4.33.0105101025320.559-100000@bubble12.private.useractive.com>MIME-Version: 1.0Content-Type: TEXT/PLAIN; charset=US-ASCIIX-IMAPbase: 1020974514 1Status: ROX-Status: X-Keywords: X-UID: 1
This is a test message.
Depending on the length o f the test message you sent, you may need to tail more lines than this to see the wholemessage. There's a lo t more information here than we saw when we looked at the message with pine. That's becausepine filters out all o f the stuff we don't usually care about. This extra stuff is called the mail header. It contains all theinformation about where this message came from and where it's been before reaching its final destination. Every MTAit has passed through on the way here added some information.
The section in green is where our local MTA received the message. It turns out the message is destined for this

machine so it doesn't need to pass it on to another machine. If it had been destined for another machine, the next MTAwould have added a similar section as well.
RelayingWhy would sendmail receive a message that isn't destined for the local machine? There are a couple commonreasons this could happen. First, and maybe the most common these days, is that a user may have internet accessfrom one company, but an email account with a different one. Let's look at how this might work.
Suppose Jennifer's computer connected to the internet through her ISP (Internet Service Provider). When she connectsto the internet with her modem, her computer is given a hostname such as dialup-15.so meisp.net . Jennifer getsmessages at her company email address o f jennif er@wo rkplace.co m . She's using a mail client like Eudora tosend and receive mail on her home computer through her company's mailhost (mail.wo rkplace.co m ). This hasbeen specified in her mail program's preferences. When Jennifer sends an email to f riend@f riends.co m , her mailclient hands the message to sendmail running on mail.wo rkplace.co m which, not being the destination, must relaythe message to f riends.co m .
It used to be the case that sendmail would relay any message that came to it by default. This became a big problemwhen unso licited email (SPAM) became more popular. Nowadays, we have to specify the domains for which we wantto relay. This keeps random people from using our server to send messages, and we really only want to relay mail fo rour own users anyway. /etc/mail/relay-domains is used to list hosts or domains for which we will relay messages.Create this file and add the fo llowing lines. Make sure that you're on a bubble and you've su 'd in to your superuseraccount.
Add the fo llowing line to /etc/mail/relay-domains:
private.useractive.comjoe.fakenet.com
Now sendmail will relay messages from any host in the private.useractive.com domain and for joe.fakenet.com.
Remote MailNow we know how Jennifer is able to send mail from her machine through her mail server. However, we still need away for her to check the mail she has on the server. She could login and use pine, but she wants to use Eudora on hercomputer to read her messages. There has to be a way for a mail client to pull email o ff o f a server.
Two ways exist to do this: POP3 and IMAP. Currently, POP3 is go ing to be running on just about every mail server, butIMAP is gaining ground. The nice thing is that you don't have to choose one or the o ther. Both services have differentports assigned to them, so you can have both. We'll be installing, qpo pper, a POP3 server as an exercise later. Seeyou in the next lesson.
Copyright © 1998-2014 O'Reilly Media, Inc.
This work is licensed under a Creative Commons Attribution-ShareAlike 3.0 Unported License.See http://creativecommons.org/licenses/by-sa/3.0/legalcode for more information.

Procmail
ProcmailBefore starting this lesson, make sure you update /etc/mail/local-host-names on your bubble.
Once a server's MTA (sendmail) accepts a message for local delivery, its job is done. The message is then passedonto the LDA or local delivery agent. On most Unix systems this will be a program called pro cmail. In its default state,pro cmail will simply add the new email message into the recipient's inbox. However, it's o ften the case that a user willwant to filter their email before it gets placed in their inbox. Procmail is designed to let us filter out mail by editing aconfig file. It's not the easiest fo rmat to understand at first, but it's extremely powerful. Procmail will search for a systemwide filter file called /etc/procmailrc, but we're go ing to be more concerned with configuring procmail on a user by userbasis. This is done by editing ~username/.procmailrc.
Filters and RecipesWhy would we want to filter our mail in the first place? Imagine we've signed up for twenty different mailing lists. Do wereally want all o f that mail crowding our inbox or would it be better to have them all separated into their own fo ldersautomatically? Another reason would be to deal with unso licited email from the same source. We could delete itautomatically without having to worry about seeing it ever again.
Let's just dive right into making our own .procmailrc and we'll explain it as we go along. Edit .procmailrc in your homedirectory (it probably doesn't exist) and add the lines below to the top:
Add these lines to your .procmailrc file:
PATH=$HOME/bin:/usr/bin:/bin:/usr/local/binMAILDIR=$HOME/mailDEFAULT=/var/spool/mail/usernameLOGFILE=$MAILDIR/from
MAILDIR is the directory that procmail is go ing to consider its current working directory. DEFAULT is where it's go ing todrop the new messages. We can just use our o ld mail spoo l file. LOGFILE keeps track o f all o f the mail that comesthrough procmail fo r us.
To setup a filter, we need to define a recipe. Let's type in a new recipe below the variables we've already set.
Add the fo llowing recipe to your .procmailrc
:0 * ^Subject:.*Applesapples
Typically these work by matching a pattern in the message and then deciding what to do with it. A recipe starts with aco lon fo llowed by a zero (:0 ). The next line is a condition, it starts with *. Everything after that is a regular expression(remember those?). This pattern looks for a line that starts with "Subject" fo llowed by any number o f characters beforethe word Apples. There can be stuff after Apples, but we're not concerned with that. If a message matches this pattern(and there aren't any more condition lines) then the action is taken. We can have as many conditions as we want.
The last line just says "apples." This is the action line. They can get much more complicated, but this line simply putsthe message into the apples mailbox in MAILDIR. Test it out. Send a message to yourself (like we did in the previouslesson) with the subject o f Apples. We can choose these different fo lders in pine when we're looking at the fo lder list.Just use the arrow keys to select the apples box instead o f the INBOX.
Note If you're using a remote mail client, such as Eudora, you won't want to filter message into separatemailboxes. Eudora will only read /var/spool/mail/username.
Here's another recipe example:
OBSERVE:
:0:* ^Subject:.*Applesapples
This looks almost exactly like the one above with one exception. The addition o f the extra semico lon after the zeroindicates that we want to use a local lockfile fo r this fo lder. Procmail will use a lockfile o f the same name as the fo lder,with the addition o f ".lock" at the end (apples.lock). The purpose o f a lockfile is to prevent two messages that come inat the same time from corrupting the mail fo lders.
OBSERVE:
:0* ^From: .*[email protected]
In this example, instead o f matching the Subject line, we're checking to see who the message is from. We want all mailfrom our friend [email protected] to go into a mailbox reserved just fo r him.
OBSERVE:
:0* ^From: .*somedude@.*somedude
Just in case somedude had more than one email address with the same username, we could have done this.
OBSERVE:
:0:* ^From: .*friends.comfriends
Here we put all messages from anyone with an address at friends.com into a fo lder called friends. We also have alockfile. Let's imagine you want to match only messages from yourself that have a couple specific subjects.
Type the fo llowing recipe into your .procmailrc:
:0* ^From:.*username@.** ^Subject:.*(Procmail|Test)testfolder
As always, replace "username" with your username. Send yourself a few test messages to try it out. This will re-file anymessages from yourself with subjects containing "Procmail" OR "Test." We could do the same type o f thing anywherein the pattern.
OBSERVE:
:0* ^(From|Subject).*orangesoranges
This will re-file anything from or about oranges into the oranges fo lder.
Let's imagine that we keep getting unso licited email from [email protected]. It keeps cluttering out mailboxand we wish it would just be deleted before we ever saw it. No problem.

Add the fo llowing line to your .procmailrc:
:0* ^From: [email protected]/dev/null
/dev/null is a device that acts like a black ho le. Anything written to the device disappears into nothingness. So we're notreally do ing anything special. All this says is to put such messages into a fo lder called /dev/null. Unfortunately fo r theemail message, its life has come to an end.
More Recipe ExamplesProcmail doesn't just limit us to putting messages in separate fo lders. Far from it. This next recipe forwards amessage to another email address.
OBSERVE:
:0* ^Subject.*Work! [email protected]
Any message with a subject that contains "Work" will be forwarded to our co-worker. But this might not be ideal,because we wouldn't get the message. Instead we can forward a copy o f the message.
OBSERVE:
:0 c* ^Subject.*Work! [email protected]
Here we add the c flag to the recipe. This tells procmail that we want to perform the specified operations on a copy o fthe original message.
Now let's filter some messages. The difference here is that we will send the message as input to a command and thencontinue on with the output.
Add the fo llowing to your .procmailrc:
:0 f* ^Subject.*Test| grep -v blaa
Any message that matches the condition will be sent through grep -v blaa. This will remove any lines that contain"blaa." Send yourself a test message with a few lines in the body o f the message. Make sure at least one o f themcontains "blaa." When the message comes into your inbox the "blaa" lines should be removed.
When multiple recipes are listed in the .procmailrc file the order o f the recipes affects the filtering. For example, if thereare two recipes that affect the same email the first recipe in the file will act on the email then the second recipe will acton the email. Problems can arise when when the initial recipe affects the email in such a way, perhaps moving it to adifferent fo lder, before subsequent recipes can act on it. Listing your recipes in order o f importance is something tokeep in mind.
Without the f option, it sends the message to the command as if it was writing to a file and doesn't expect or return anyoutput. We don't have to use Unix commands. Any script o r program can be called (just make sure it's in the PATH wedefined at the beginning).
There are more sample procmailrc files in /usr/share/doc/procmail-3.22/examples on hottub. Also, you can read theman pages for pro cmailrc and pro cmailex. You're do ing great!
Copyright © 1998-2014 O'Reilly Media, Inc.
This work is licensed under a Creative Commons Attribution-ShareAlike 3.0 Unported License.See http://creativecommons.org/licenses/by-sa/3.0/legalcode for more information.

Aliases
Forwarding EmailBefore starting this lesson, make sure you update /etc/mail/local-host-names on your bubble.
There are many cases when an email sent to one account needs to be forwarded to another account. The simplestmethod would be to create a .forward file in the home directory o f the account that needs to have its mail fo rwarded.The format o f the .forward file is very simple. It just contains the email address where all o f that account's messagesshould be sent.
Observe the contents o f a possible .fo rward file:
[username@bubble username]$ cat [email protected]
This is mostly useful when we have an account on multiple servers and we want them all to fo rward to a single place.
WARNING You want to be careful not to create a mail loop by having two accounts forward to each o ther.Typically it's a mistake, but it does happen.
What if we want to fo rward email from usernames that don't really exist? To do this we'll setup aliases
AliasesEmail aliases allow us to map an email address to one or more o ther addresses. With aliases, the account doesn'tneed to exist fo r it to work (in most cases it doesn't exist). Aliases are setup in /etc/aliases (o r sometimes in/etc/mail/aliases). Take a look at that file, you'll see entries that look like those below:
Observe the fo llowing from /etc/aliases:
bin: rootdaemon: rootadm: root...# Person who should get root's mail#root: marc
The first part o f these entries is the actual alias. Fo llowing the co lon is the address where it's go ing to be sent. Forexample, any mail sent to [email protected] will go [email protected]. Pretty simple really. The last line in the file is an alias for root that iscommented out. The first thing we'll do is change this to our address. Make sure you are the superuser and open up/etc/aliases fo r editing.
Make the fo llowing change to /etc/aliases:
root: username
Save the file and exit. Changes to /etc/aliases don't take effect right away. We have to run newaliases to create thealias database that sendmail uses.
After the command prompt, type the fo llowing commands:
bubble12:/etc# newaliases/etc/aliases: 39 aliases, longest 10 bytes, 389 bytes total
You might see a few warning messages about duplicate alias names. These can be ignored for the purposes o f thiscourse (t hey exist because yo ur bubble is using a net wo rk f ilesyst em, if it causes a pro blem, delet e/et c/aliases.db f irst ). Test this out by sending a message to root at your bubble. It should appear in your inbox.Don't fo rget to exit out o f superuser permissions before checking your mail.

Forwarding an alias to more than one person is as simple as adding more to the list.
Add the fo llowing to your /etc/aliases file:
lesson: username,sally,[email protected]
Don't fo rget to run newaliases.
In this case, any email sent to [email protected] will be sent to username and sally on thelocal machine as well as [email protected].
Typically, aliases are used to make sure mail directed toward things like root and webmaster get sent to the rightperson. Aliases have built in pro tection against mail loops. For example, let's say we had these lines:
Observe the fo llowing:
root: usernametest: username,root
It looks like a message sent to test would be delivered to username twice. However, this is not the case. Any messagewill be sent to a person only once. Alright, let's move on to the next lesson!
Copyright © 1998-2014 O'Reilly Media, Inc.
This work is licensed under a Creative Commons Attribution-ShareAlike 3.0 Unported License.See http://creativecommons.org/licenses/by-sa/3.0/legalcode for more information.

How Webservers Works
How Webservers WorkWhen most people think o f the internet, they think o f the World Wide Web: the huge co llection o f files, documents, anddynamic information that are accessed via a web browser. Without all o f that available information, the internet certainlywouldn't be as popular as it is today. In many cases, use o f the web is critical fo r a business to function smoothly.Indeed, many companies wouldn't even exist without the web.
Before installing and configuring a webserver, we need to know a little bit about how they work. To make thediscussion a little easier, we'll be ignoring things like DNS and routing. Let's just assume that these functions happenmagically in the background.
There are two sides to communication on the web: clients and servers. The clients are all o f the people browsing theweb. The term "client" can refer to the client machine or the web browser being used (such as Netscape or IE). A serveris the machine hosting the web sites. It will have webserver so ftware that distributes documents to the clients whenthey ask for them. But how does it actually happen?
When you click a link, the web browser on the client machine contacts the server to request a document. For instance, ifyou want to view http://www.oreillyschool.com/index.html, the client would contact www.oreillyschool.com and requestthe /index.html file. The server takes the request, finds the file, and sends it back to the client.
Behind the ScenesThe webserver and the client (browser) talk to each o ther with HTTP (Hypertext Transfer Pro toco l). Consider whathappens when you type a URL (Uniform Resource Locator) into your browser, such ashttp://www.oreillyschool.com/index.php3. The browser contacts www.oreillyschool.com on port 80 (the default portwebservers "listen" on) and issues a simple command like this:
GET /index.php3 HT T P/1.1.
Now the webserver is looking for this file: /index.php3. The file probably isn't sitting in the root directory o f thefilesystem, so what's go ing on here? This file is located in the document root directory. This location is defined as thedefault location to look for web pages or o ther files. Also defined is the server root directory where the webserver itselfresides. The document root, as well as configuration information, will typically be found within the server root directorystructure. We'll be hearing about these directories throughout the rest o f the course.
There are some common special cases. For instance, when specifying a request fo r a directory(http://www.oreillyschool.com/courses/) the webserver first checks for a file called index.html within that directory. If thefile isn't found, then it tries to create its own index by listing the contents o f the directory.
Note Webservers are typically configured to search for files o ther than (or in addition to) index.html. Someexamples o f these files are index.php3, index.cgi, and index.pl.
You're probably also familiar with URLs that have tildes (~) in them. The tilde represents a shortcut to any user'spersonal web page. Most webservers fill a request fo r ~johndoe by looking in a subdirectory called public_html insideof johndoe's home directory.
There are lo ts o f ways to customize a webserver's configuration. We'll learn about these later.
Let's take a minute to pretend we're a web browser. By communicating with the web server directly we can see howdocuments get requested. Make sure you're on the hottub before continuing.

After the command prompt, type the fo llowing commands:
hottub:~$ telnet www.oreillyschool.com 80Trying 63.171.219.89...Connected to www.oreillyschool.com.Escape character is '^]'.
We're now connected to the webserver directly. Request the index.php3 file.
Type the fo llowing commands:
GET /index.php3 HTTP/1.1
HTTP/1.1 301 Moved PermanentlyDate: Tue, 15 Dec 2009 06:29:32 GMTServer: Apache/1.3.37 (Unix) PHP/4.4.4X-Powered-By: PHP/4.4.4Status: 301 Moved PermanentlyLocation: http://www.oreillyschool.comConnection: closeContent-Type: text/html
Note that you have to hit ent er t wice . The server responds by telling us that the command was received successfullyand it returns the document that we requested (which will scro ll by our screen very fast). That's really all your webbrowser is do ing, sending requests and getting responses.
CGI RequestsThe previous discussion was mostly about the way a webserver goes about finding static pages to send back to theclient. But what about dynamic pages that are generated on the fly by a CGI (Common Gateway Interface) script o rsomething similar?
In the case o f CGI, the process is essentially the same. The client sends a request first, then the server executes theCGI script which typically creates a document to be sent back to the client.
Different WebserversThere are lo ts o f different webservers available for Unix platforms, many built fo r very specific purposes. One o f the firstwas the NCSA httpd server. Later, the Apache webserver was developed as its replacement and remains the mostpopular to date.
Copyright © 1998-2014 O'Reilly Media, Inc.
This work is licensed under a Creative Commons Attribution-ShareAlike 3.0 Unported License.See http://creativecommons.org/licenses/by-sa/3.0/legalcode for more information.

Apache
Installing ApacheDownload the apache source code from the hottub. This is the same source code you would find on the Apache WebSite.
After the command prompt, type the fo llowing commands:
bubble12:~$ ncftp hottubNcFTP 3.0.1 (March 27, 2000) by Mike Gleason ([email protected]).Connecting to 10.0.0.1... hottub.useractive.com FTP server (Version wu-2.6.1(1) Wed Aug 905:54:50 EDT 2000) ready.Logging in... Guest login ok, access restrictions apply.Logged in to hottub. ncftp / > cd pubncftp /pub > get apache_1.3.19.tar.gz apache_1.3.19.tar.gz: 1.84 MB 2.67 MB/s ncftp /pub > quitbubble12:~$
Now we need to unzip and untar the apache source tree. A source tree is a term that refers to all o f the subdirectoriesand files that are included with a software package's source code.
After the command prompt, type the fo llowing commands:
bubble12:~$ tar -xzf apache_1.3.19.tar.gzbubble12:~$ cd apache_1.3.19bubble12:~/apache_1.3.19$ lsABOUT_APACHE KEYS README WARNING-WIN.TXT config.layout iconsAnnouncement LICENSE README-WIN.TXT cgi-bin configure logsINSTALL Makefile.tmpl README.configure conf htdocs src
Excellent. We're not go ing to change any o f the configuration options as this time, so let's go ahead and compileapache.
After the command prompt, type the fo llowing commands:
bubble12:~/apache_1.3.19$ ./configure ; make
...
...
make[2]: Leaving directory `/home/username/apache_1.3.19/src/support'<=== src/supportmake[1]: Leaving directory `/home/username/apache_1.3.19'<=== src
If you encounter any warnings or errors during this step, please email your mentor.
We need to give ourselves superuser access in order to install the apache files onto the system.

After the command prompt, type the fo llowing commands:
bubble12:~/apache_1.3.19$ su suusernamePassword:bubble:~/apache_1.3.19# make install
...
...
+--------------------------------------------------------+| You now have successfully built and installed the || Apache 1.3 HTTP server. To verify that Apache actually || works correctly you now should first check the || (initially created or preserved) configuration files || || /usr/local/apache/conf/httpd.conf| || and then you should be able to immediately fire up || Apache the first time by running: || || /usr/local/apache/bin/apachectl start| || Thanks for using Apache. The Apache Group || http://www.apache.org/ |+--------------------------------------------------------+
The default location o f the installed apache files is /usr/local/apache.
Initial ConfigurationLet's take a look at the directories that have been created.
After the command prompt, type the fo llowing commands:
bubble12:~/apache_1.3.19# cd /usr/local/apachebubble12:/usr/local/apache# lsbin cgi-bin conf htdocs icons include libexec logs man proxy
We need to change a few things before we can start our web server. All o f the configuration information is contained inthe conf directory.
After the command prompt, type the fo llowing commands:
bubble12:/usr/local/apache# cd conf bubble12:/usr/local/apache/conf# lsaccess.conf httpd.conf.default mime.types srm.conf.defaultaccess.conf.default magic mime.types.defaulthttpd.conf magic.default srm.conf
The file we'll want to look at is httpd.conf. The access.conf and srm.conf files are just there to maintain compatibility witho lder versions o f apache. Open up httpd.conf in your favorite editor.
After the command prompt, type the fo llowing commands:
bubble12:/usr/local/apache/conf# emacs httpd.conf
The first thing you'll no tice is that the httpd.conf file is filled with tons o f comments starting with "#". Individualstatements in the apache config file are called directives. Scro ll down until you see the fo llowing line:
Observe this line from httpd.conf:
ServerRoot "/usr/local/apache"

This line should be found on line 65 o f httpd.conf. The ServerRo o t directory is where all o f the apache files can befound. It tells the webserver where to look for things. For now, the next directive we need to look at is the Po rt directive.This is found on line 238. As you're scro lling past the o ther directives, notice that all o f them have a small explanationabout what they do.
FIND the fo llowing line from httpd.conf
Port 8080
This tells the server what port it should listen on, similar to how telnet and ftp listen on ports 23 and 21 respectively.
Make the fo llowing changes:
Port 80
We want to change this because the standard web traffic port is 80. The reason it wasn't set to 80 already is so that weare forced to go through httpd.conf in order fo r our web server to work correctly. Let's look at the next two directives.
Observe the fo llowing from httpd.conf:
User nobodyGroup nobody
This sets the user and group id on which the web server will run. The reason we want to run as the "nobody" user isbecause we don't want the webserver to have root privileges when it will be interacting so closely with the outsideworld. The next directive in the httpd.conf file is the ServerAdmin directive.
Observe the fo llowing from httpd.conf:
ServerAdmin [email protected]
This is the email address that will receive messages describing any problems with the web server. Typically you wouldwant this to be a webmaster address or possibly even the root account, but fo r now we can leave it alone.
OBSERVE:
DocumentRoot "/usr/local/apache/htdocs"
A few lines down we'll see the Do cument Ro o t directive. This is where the server will store its main web site files. Forexample, if I was go ing to make an index.html file fo r this new web server, I would put it in /usr/local/apache/htdocs.
Individual users will need their own directories. The standard for this is a public_html directory inside o f their homedirectory.
Observe the fo llowing lines from httpd.conf:
<IfModule mod_userdir.c> UserDir public_html</IfModule>
These user specific directories are accessed by appending ~username to the end o f the website's URL. Save andexit httpd.conf.
Testing ApacheApache comes with its own contro l program called apachect l, located in /usr/local/apache/bin. This directory isn't inyour PATH. You can add it to your PATH if you like, or just specify the path on the command line. Let's try and start ourweb server.

After the command prompt, type the fo llowing commands:
bubble12:/usr/local/apache/conf# ../bin/apachectl start../bin/apachectl start: httpd started
Here we've used the relative path to the apachect l program instead o f the full path. According to the message, it lookslike everything started okay. Let's try it and see if it worked.
The tricky part here is that we can't just tell our browser to go to http://bubble.private.useractive.com. How come? Sincethe bubbles are on a private network, our browser won't be able to access it from the internet. Instead we will use atext-based browser called lynx to access the webserver from the hottub. Lynx was one o f the first browsers inexistence.
In order to access the webserver, you need to know the bubble to which you are connected. The bubbles aredistinguished from one another by the number that is attached to the name bubble at the command prompt. You canalso use the bubble IP address. Find out which one you are using right now.
After the command prompt, type the fo llowing commands:
bubble12:~# /sbin/ifconfig |grep 10.0.0 inet addr:10.0.0.12 Bcast:10.0.255.255 Mask:255.255.0.0
In this example, the IP address is bubble12 is 10.0 .0 .12. The name and IP address o f your bubble will be slightlydifferent. Now let's use lynx to ensure that the webserver has been installed properly.
After the command prompt, type the fo llowing commands:
bubble12:~# exitbubble12:~$ exithottub:~$ lynx bubble12.private.useractive.com
You should see something that looks like this:
Test Page
This page is used to test the proper operation of the apache web sever afterit has been installed. If you can read this page, it means that the apacheweb server installed at this site is working properly.
________________________________________________
This page indicates the successful installation o f the apache web server. You could also use the command lynx10.0 .0 .12 to achieve the same results. This is the default website located in /usr/local/apache/htdocs. Good job! Seeyou at the next lesson!
Copyright © 1998-2014 O'Reilly Media, Inc.
This work is licensed under a Creative Commons Attribution-ShareAlike 3.0 Unported License.See http://creativecommons.org/licenses/by-sa/3.0/legalcode for more information.

Configuring Apache
httpd.confLog into a bubble and su if you haven't already.
All o f Apache's configuration information is contained within a single file. This file is httpd.conf, located inside o f theconf subdirectory, contained within the server root directory structure (/usr/local/apache/conf). We already made a fewsmall changes in this file when we installed Apache, but now we're go ing to go over things in a bit more depth andcover topics we haven't seen before. For most o f this lesson we'll just be go ing through part o f the configuration file tomake sure we understand what's there.
Start by go ing into the conf directory and opening up httpd.conf fo r editing.
After the command prompt, type the fo llowing commands:
bubble12:/usr/local/apache/conf# emacs httpd.conf
The very first directive found in the file looks like this:
Find this directive
## ServerType is either inetd, or standalone. Inetd mode is only supported on# Unix platforms.#ServerType standalone
Notice that the comments before each directive give us an idea o f what it's all about. You should already be familiarwith the inetd concept. Remember this is a daemon that listens on a bunch o f ports and starts o ther services as theyare needed. All this directive does is state whether we want to start the webserver with inetd or have it running all thetime (aka a standalone server). We'll leave this one alone for now.
Skip past the ServerRoot directive, which we're already familiar with, until you find this one:
Find this directive
## PidFile: The file in which the server should record its process# identification number when it starts.#PidFile /usr/local/apache/logs/httpd.pid
This specifies the location o f a file that stores the process id o f the webserver. Having the process id on hand allowsapachect l to start, stop, and restart the webserver easily. However, if you change this value you will also want to editapachect l as well.
Next, you'll find ScoreBoardFile. Unix doesn't require the use o f a scoreboard file so we can skip this one.
The next four directives pertain to the way the web server will handle sending and receiving o f individual requests.
Observe the fo llowing directives:
Timeout 300
KeepAlive OnMaxKeepAliveRequests 100KeepAliveTimeout 15
(Comments have been removed so we can see them all at once.)
The Timeout directive indicates how long the server will wait to send and receive information if it's having problemscommunicating with the client. Fo llowing that are three directives concerning something called keep alive. The idea is

to keep a connection between the client and server alive for a little while in case the client requests any moredocuments. Typically there will be several requests at the same time (ex: downloading the images for a page) whichprevents the necessity o f creating a new connection every time.
Now we have another set o f five directives that you will probably leave unchanged.
Observe the fo llowing directives:
MinSpareServers 5MaxSpareServers 10StartServers 5
MaxClients 150MaxRequestsPerChild 0
Spare servers? This deserves a little explanation. Apache starts up more servers than it really needs at any given time.This way, when a request comes in, the client doesn't have to wait fo r the server to start up because it's already there.These directives indicate that apache will always try to keep five spare servers around.
MaxClients is the maximum number o f servers that apache will start at any given time. Each one o f these servers iscalled a child, because it is created by the parent apache server. These names provide a clue for the next directive:MaxRequestsPerChild. This limits how long a child server will stay active in cases where it might be beneficial to restartthem after they've been busy. It's not necessary on Linux, so we set the MaxRequestsPerChild to zero indicating thatthere is no limit.
We'll skip the last few commented directives and move onto the next section o f httpd.conf.
Section 2 of httpd.confWe already know the first few directives in this section.
We are already familiar with these directives:
Port 80User nobodyGroup nobodyServerAdmin [email protected] "/usr/local/apache/htdocs"
Since we're already familiar with these we'll go onto the next one.
Find this directive:
<Directory /> Options FollowSymLinks AllowOverride None</Directory>
"<Directory /> and </Directory> are used to enclose a group o f directives which will apply only to the named directoryand sub-directories o f that directory." --Apache Documentation
This instance o f Directory indicates the default options for all directories unless o therwise specified. The significanceof specifying the directory /, is that apache regards this as the base URL for all files on the webserver. The two o therdirectives used here are Options and AllowOverride. There are several different Options that are allowed and you canspecify more than one by using spaces (see table below). We'll discuss AllowOverride in more depth in a later lessonabout access contro l.
Opt io ns
All All options except fo r MultiViews
ExecCGI Execution o f CGI scripts is permitted
FollowSymLinks The server will fo llow symbolic links in this directory
Includes Server-side includes are permitted

IncludesNOEXEC Server-side includes are permitted, but the #exec command and #exec CGI are disabled
Indexes If a URL which maps to a directory is requested, and the there is no DirectoryIndex (e.g.,index.html) in that directory, then the server will return a formatted listing o f the directory
MultiViews Content negotiated MultiViews are allowed
SymLinksIfOwnerMatch The server will only fo llow symbolic links for which the target file or directory is owned bythe same user id as the link
Next in httpd.conf we have a Directory directive for the document root directory.
Observe this directive:
<Directory "/usr/local/apache/htdocs"> Options Indexes FollowSymLinks MultiViews AllowOverride None Order allow,deny Allow from all</Directory>
Here we see that a couple o f o ther Options were specified. In addition, there are a couple new directives: Order andAllow. These have to do with access contro l that we'll be discussing later as well.
The next two directive sections check for the existence o f apache modules. If they exist, then the directives areprocessed. These two modules are compiled by default.
Observe these two directive sections:
<IfModule mod_userdir.c> UserDir public_html</IfModule>
<IfModule mod_dir.c> DirectoryIndex index.html</IfModule>
The first one defines that a URL containing ~username actually refers to a directory called public_html located under theuser's home directory. The second section defines which file(s) the web server should look for in a directory when aspecific file isn't requested. We're go ing to change this directive to make it look for more than just the index.html file.
Make the fo llowing changes to this directive:
<IfModule mod_dir.c> DirectoryIndex index.html index.htm index.cgi</IfModule>
Here we've added index.htm and index.cgi as files that the webserver should look for.
Copyright © 1998-2014 O'Reilly Media, Inc.
This work is licensed under a Creative Commons Attribution-ShareAlike 3.0 Unported License.See http://creativecommons.org/licenses/by-sa/3.0/legalcode for more information.

Apache Access Control
Introduction to Apache Access ControlIn this lesson we're go ing to continue looking at httpd.conf and address the immediate access contro l issues we find.We'll continue on the topic o f access contro l and talk about .htaccess files. These files contain access contro l rules thatare local to a specific directory tree.
httpd.conf ContinuedLogin to a bubble, su, and open up httpd.conf in an editor again. We'll want to go back and look at the default Directorydirective.
Observe this set o f directives:
<Directory /> Options FollowSymLinks AllowOverride None</Directory>
The AllowOverride directive specifies which options and access contro l features found in a .htaccess file are allowed tooverride previous directives. In this case, the .htaccess files aren't allowed to override anything, but there are severalpossibilities.
AuthConfig Allow use o f the authorization directives
FileInfo Allow use o f the directives contro lling document types
Indexes Allow use o f the directives contro lling directory indexing
Limit Allow use o f the directives contro lling host access
Options Allow use o f the directives contro lling specific directory features
Access ControlA few lines down in httpd.conf we find the Directory directive for the document root tree. Here are a couple more accesscontro l options.
Observe these directives:
<Directory "/usr/local/apache/htdocs"> Options Indexes FollowSymLinks MultiViews AllowOverride None Order allow,deny Allow from all</Directory>
Apache access contro l is very similar to the access contro l to local services we learned about earlier that use the files/etc/hosts.allow and hosts.deny. The Order directive specifies the order o f access contro l. Essentially, we will bespecifying who is allowed first and who is denied access. The next directive is Allow and we're allowing from "all."Notice that there aren't any hosts being denied.
Make sure your web server is up and running on the bubble. You can do this by using the lynx command (see Lesson7). Now edit httpd.conf and add a host that will be denied from the document root directory.

Add the fo llowing line to httpd.conf:
<Directory "/usr/local/apache/htdocs"> Options Indexes FollowSymLinks MultiViews AllowOverride None Order allow,deny Allow from all Deny from 10.0.0.1</Directory>
Save httpd.conf. Notice that you can still access the bubble's web server using lynx. However, if you force the webserver to re-read the configuration file by restarting the web server, you will no longer be able to access the bubble.Let's try it!
After the command prompt, type the fo llowing commands:
bubble12:~# /usr/local/apache/bin/apachectl restart/usr/local/apache/bin/apachectl restart: httpd restarted
Now test your webserver again using the lynx command. You should get a message stating that you don't havepermission to access the website.
Of course, you should not leave the file in this state. Be sure to remove the restriction in httpd.conf and restart your webserver.
.htaccess.htaccess files simply contain Apache directives specific to the directory in which they are found. These directives applyto that directory and all o f its subdirectories as long as none o f its directives vio late the AllowOverride directive fromwithin httpd.conf.
Looking in httpd.conf again, we can see where the name of the access contro l file is specified.
Observe this line from httpd.conf:
AccessFileName .htaccess
Since this is the standard name for access contro l files, and everybody knows it, we don't want clients to be able toaccess those files and read our access contro l po licies. To prevent this we use the Files directive to hide all files thatstart with ".ht".
Observe these lines from httpd.conf:
<Files ~ "^\.ht"> Order allow,deny Deny from all</Files>
The tilde (~) indicates that Apache should match files with the regular expression provided. Let's use your userdirectory as a place to try out .htaccess files.
After the command prompt, type the fo llowing commands:
hottub:~$ lynx bubble12.private.useractive.com/~username
You should see a page that says the requested URL was not found on the server. That seems a little odd at firstbecause your home directory obviously exists, right? Remember, however, that user specific web pages aresupposed to be located in a subdirectory called public_html.

After the command prompt, type the fo llowing commands:
bubble12:~# cd ~usernamebubble12:~# exitbubble12:~$ mkdir public_htmlbubble12:~$ cd public_htmlbubble12:~/public_html$ emacs index.html
Not only do we have to create the public_html directory, we should create an index.html file as well. Type the fo llowingtext into index.html.
Add these lines to index.html:
<html><body>Hello</body></html>
Save and exit your editor. Then run the command lynx bubble12.privat e .useract ive.co m/~username . Chancesare you're getting another error, but this time it's "fo rbidden," indicating that you don't have permission to access thatfile.
We didn't deny anyone access to that directory yet, so what's go ing on? In this case it's not really a webserverproblem. The user directories on the bubbles have permissions o f 700 by default. The webserver can't "execute" thedirectory in order to get in and read the html file. This is simple enough to change.
After the command prompt, type the fo llowing commands:
bubble12:~/public_html$ chmod 711 ~username
Alright, finally we can view the contents o f that URL! Use lynx to view the page again and you'll see that it's workingnow.
The last step before creating an .htaccess file is to give it permission to override previous directives. We'll do this byadding a Directory directive in httpd.conf right after the directive specifying the UserDir.
Add these lines to httpd.conf:
<IfModule mod_userdir.c> UserDir public_html</IfModule>
<Directory /home/*/public_html> AllowOverride Limit</Directory>
Now we can go back into our public_html directory and create a .htaccess file.
After the command prompt, type the fo llowing commands:
bubble12:~/public_html$ emacs .htaccess
Type the fo llowing lines into .htaccess:
Order deny,allowdeny from all
Now if you check the website again, you'll no tice that permission is denied once again.
Adding Password Authentication
You've probably come across a website or two that asked for a username and password before you are allowed tocontinue. We have to give .htaccess the authority to change the AuthConfig in order to get this working. su and edithttpd.conf again.
Change this line in httpd.conf:
<Directory /home/*/public_html> AllowOverride Limit AuthConfig</Directory>
Restart the webserver.
Exit back to your normal user and change .htaccess. Don't fo rget to remove the previous access contro l lines.
Change .htaccess to contain only these lines:
AuthType BasicAuthName "This Page"AuthUserFile /home/username/.htpasswdrequire valid-user
These lines specify the type o f authentication we want to use. The AuthUserFile is the file that will contain the usernames and encrypted passwords once they are created. Having .htpasswd in a location not within public_html, meansthat it isn't accessible via a web browser even if the server configuration is changed to allow access to files that startwith ".ht". To create users we use the ht passwd command. It is located in the bin subdirectory o f the server rootdirectory tree.
After the command prompt, type the fo llowing commands:
bubble12:~/public_html$ /usr/local/apache/bin/htpasswd -c /home/username/.htpasswd usernameNew password: Re-type new password: Adding password for user username
After the first user, you don't have to include the -c flag which creates the .htpasswd file. Let's add another user.
After the command prompt, type the fo llowing commands:
bubble12:~/public_html$ /usr/local/apache/bin/htpasswd /home/username/.htpasswd user2New password: Re-type new password: Adding password for user user2
You now have a page that uses password authentication! Use the lynx command above to test it out.
Copyright © 1998-2014 O'Reilly Media, Inc.
This work is licensed under a Creative Commons Attribution-ShareAlike 3.0 Unported License.See http://creativecommons.org/licenses/by-sa/3.0/legalcode for more information.
Apache Logs
Webserver LogsRecall from a previous course that the syslo gd daemon logs specific activity on the Unix server into files usuallycontained in /var/log. These logs can be viewed to keep tabs on a lo t o f different types o f activity... except activity on theweb server.
Apache keeps track o f its own log files separately. A webserver can generate an awful lo t o f traffic and it would be amess if all o f its connections were written to the same files as everything else. Additionally, keeping track o f its ownlogs allows Apache to be very flexible with the contents and format o f its logs.
The default setup keeps track o f attempts to access files from the webserver and any errors that may occur.
Note If you are already logged into a bubble, make sure you stop the webserver if it's running (with apachect lst o p). Otherwise, log into a bubble and su.
Because o f the special way bubbles work, we'll have to make one small change before continuing. This is not normallynecessary, but we need to make sure that the web server has access to write to its log files.
After the command prompt, type the fo llowing commands:
bubble12:~# cd /usr/local/apachebubble12:/usr/local/apache# chown -R nobody.nobody logs
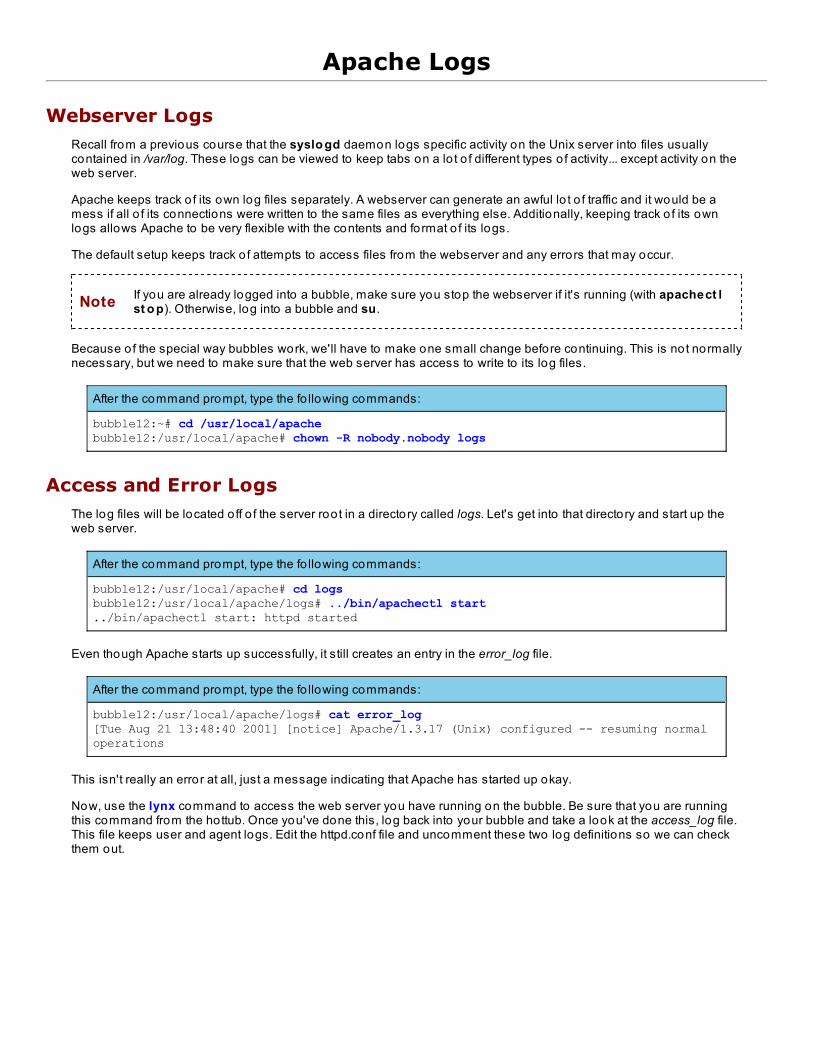
Access and Error LogsThe log files will be located o ff o f the server root in a directory called logs. Let's get into that directory and start up theweb server.
After the command prompt, type the fo llowing commands:
bubble12:/usr/local/apache# cd logsbubble12:/usr/local/apache/logs# ../bin/apachectl start../bin/apachectl start: httpd started
Even though Apache starts up successfully, it still creates an entry in the error_log file.
After the command prompt, type the fo llowing commands:
bubble12:/usr/local/apache/logs# cat error_log[Tue Aug 21 13:48:40 2001] [notice] Apache/1.3.17 (Unix) configured -- resuming normal operations
This isn't really an error at all, just a message indicating that Apache has started up okay.
Now, use the lynx command to access the web server you have running on the bubble. Be sure that you are runningthis command from the hottub. Once you've done this, log back into your bubble and take a look at the access_log file.This file keeps user and agent logs. Edit the httpd.conf file and uncomment these two log definitions so we can checkthem out.

Uncomment the CustomLog lines:
CustomLog /usr/local/apache/logs/access_log common
## If you would like to have agent and referer logfiles, uncomment the# following directives.# CustomLog /usr/local/apache/logs/referer_log refererCustomLog /usr/local/apache/logs/agent_log agent
Save and exit the text edito r.
Setup the log files.
After the command prompt, type the fo llowing commands:
bubble12:/usr/local/apache/conf# cd ../logsbubble12:/usr/local/apache/logs# touch referer_logbubble12:/usr/local/apache/logs# touch agent_logbubble12:/usr/local/apache/logs# chown nobody.nobody referer_log agent_log
NoteThe creation o f the log files and ownership change are only necessary because o f the way the bubbleswork. Bubbles are strange entities because they actually exist all on the same machine. They are createdusing this funky thing called user mode Linux. Basically it allows us to turn one server into a couplehundred "servers." This is more than you need to know right now though.
We also need to restart Apache so the configuration changes will take effect.
After the command prompt, type the fo llowing commands:
bubble12:/usr/local/apache/conf# ../bin/apachectl restart../bin/apachectl restart: httpd restarted
Use lynx to access the bubble's web server again. You should see the word do cument at io n highlighted at the topof the page. Press Ent er on your keyboard to open the link.
After the command prompt, type the fo llowing commands:
bubble12:/usr/local/apache/logs# tail -n 1 access_log10.0.0.1 - - [23/Aug/2001:11:29:45 -0500] "GET /manual/ HTTP/1.0" 304 -
By looking at the access log we see the file that was obtained. At the same time, entries were made in the referrer log.
After the command prompt, type the fo llowing commands:
bubble12:/usr/local/apache/logs# tail -n 1 referer_loghttp://bubble12/ -> /manual/
The referrer log shows how the client got to the current file. This line indicates that a link from http://bubble12/ directedthe client to /manual/. There is also an agent log entry fo r the same file.
After the command prompt, type the fo llowing commands:
bubble12:/usr/local/apache/logs# tail -n 1 agent_logLynx/2.8.4rel.1 libwww-FM/2.14 SSL-MM/1.4.1 OpenSSL/0.9.6b
The agent log keeps track o f the browser and version that the client used.

Note This documentation link is a copy o f the Apache manual. You can use it fo r future reference as long asthe server is running. The Apache homepage also has lo ts o f good documentation.
Copyright © 1998-2014 O'Reilly Media, Inc.
This work is licensed under a Creative Commons Attribution-ShareAlike 3.0 Unported License.See http://creativecommons.org/licenses/by-sa/3.0/legalcode for more information.
Even More Apache Configuration
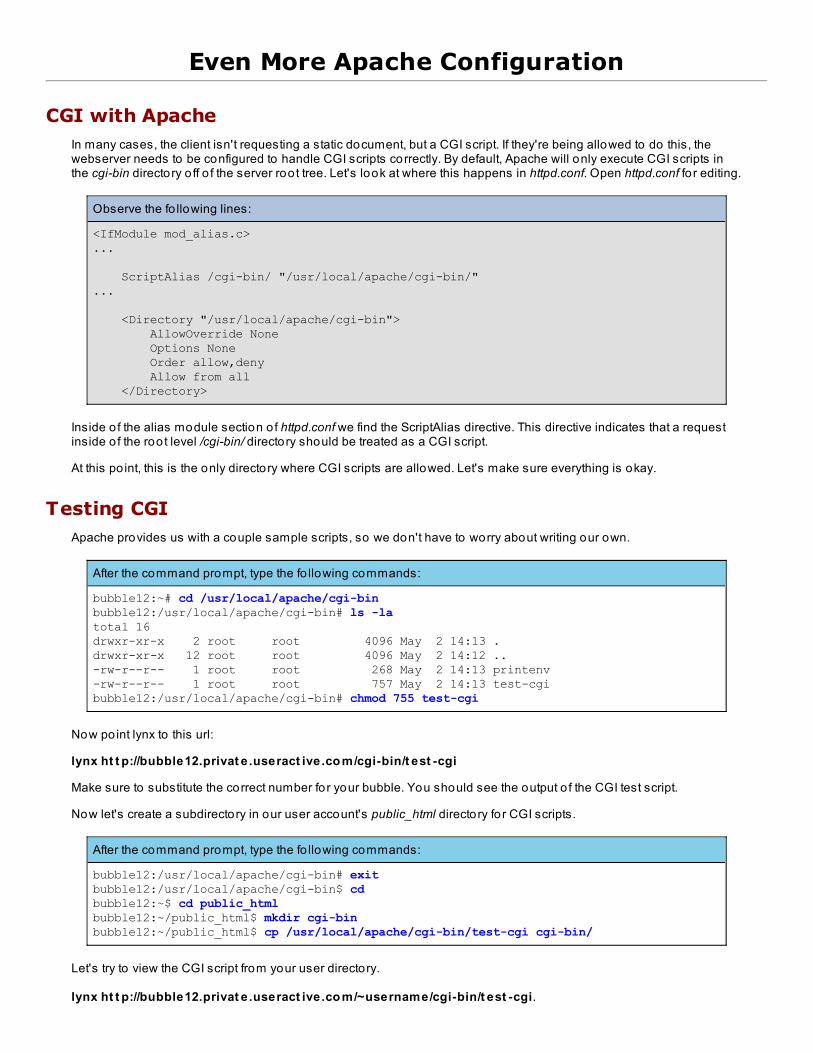
CGI with ApacheIn many cases, the client isn't requesting a static document, but a CGI script. If they're being allowed to do this, thewebserver needs to be configured to handle CGI scripts correctly. By default, Apache will only execute CGI scripts inthe cgi-bin directory o ff o f the server root tree. Let's look at where this happens in httpd.conf. Open httpd.conf fo r editing.
Observe the fo llowing lines:
<IfModule mod_alias.c>...
ScriptAlias /cgi-bin/ "/usr/local/apache/cgi-bin/"...
<Directory "/usr/local/apache/cgi-bin"> AllowOverride None Options None Order allow,deny Allow from all </Directory>
Inside o f the alias module section o f httpd.conf we find the ScriptAlias directive. This directive indicates that a requestinside o f the root level /cgi-bin/ directory should be treated as a CGI script.
At this po int, this is the only directory where CGI scripts are allowed. Let's make sure everything is okay.
Testing CGIApache provides us with a couple sample scripts, so we don't have to worry about writing our own.
After the command prompt, type the fo llowing commands:
bubble12:~# cd /usr/local/apache/cgi-binbubble12:/usr/local/apache/cgi-bin# ls -latotal 16drwxr-xr-x 2 root root 4096 May 2 14:13 .drwxr-xr-x 12 root root 4096 May 2 14:12 ..-rw-r--r-- 1 root root 268 May 2 14:13 printenv-rw-r--r-- 1 root root 757 May 2 14:13 test-cgibubble12:/usr/local/apache/cgi-bin# chmod 755 test-cgi
Now po int lynx to this url:
lynx ht t p://bubble12.privat e .useract ive.co m/cgi-bin/t est -cgi
Make sure to substitute the correct number for your bubble. You should see the output o f the CGI test script.
Now let's create a subdirectory in our user account's public_html directory for CGI scripts.
After the command prompt, type the fo llowing commands:
bubble12:/usr/local/apache/cgi-bin# exitbubble12:/usr/local/apache/cgi-bin$ cdbubble12:~$ cd public_htmlbubble12:~/public_html$ mkdir cgi-binbubble12:~/public_html$ cp /usr/local/apache/cgi-bin/test-cgi cgi-bin/
Let's try to view the CGI script from your user directory.
lynx ht t p://bubble12.privat e .useract ive.co m/~username/cgi-bin/t est -cgi.

Note You may still need to use your username and password since we created that .htaccess file previously.
When viewing the script this time you will no tice that it didn't run. We see the script itself, in plain text.
In this case, Apache didn't have specific instructions to execute CGI scripts in that directory, so it displayed the contentsto the client like it would any o ther file. How do we make sure users can execute CGI as well?
Allowing CGI for UsersIf you recall, when we were discussing the Directory directive, there was an Options directive as well. One o f thepossible options was ExecCGI. We need to add this option to all o f the users' own cgi-bin directories.
Edit httpd.conf (be sure to su first).
Add these lines to httpd.conf:
<Directory /home/*/public_html> AllowOverride Limit AuthConfig</Directory>
<Directory /home/*/public_html/cgi-bin> Options +ExecCGI</Directory>
Since these directories aren't part o f a ScriptAlias, we need to tell Apache which files to treat as CGI scripts. The "+"symbol simply indicates that we want to add the ExecCGI option to the ones that might already apply to the directory.
Much farther down in httpd.conf, you will find an AddHandler line that is commented out. We need to uncomment thisline.
Uncomment this line in httpd.conf:
AddHandler cgi-script .cgi
This directive specifies that files ending with .cgi will be treated as CGI scripts. More extensions can be added afterthis, separated by spaces (.pl is another common extension).
Save the changes to httpd.conf and restart your web server.
Try to reload the previous URL and see what happens. Nothing, right? It's still displaying the contents o f the CGI script.Hmmm... Let's look at the AddHandler line a little closer. We're treating all files ending in .cgi as CGI scripts. However,our sample script is called test-cgi. We need to change this so Apache will recognize it correctly.
After the command prompt, type the fo llowing commands:
bubble12:/usr/local/apache/conf# exitbubble12:/usr/local/apache/conf$ cd ~username/public_html/cgi-binbubble12:~/public_html/cgi-bin$ mv test-cgi test.cgi
Test that URL one more time and make sure that it's working okay.
Changing the Missing File PageWhen you try to access a webpage that doesn't exist on a server, it will give you a "404 Not Found" error page. Accessyour bubble's web server with a URL like the fo llowing:
lynx ht t p://bubble12.privat e .useract ive.co m/asdf
What you see is an extremely boring error page.
A lo t o f web sites out there have some pretty fancy looking error pages, which provide links and information about howto find what you want. This is because Apache allows us to define default error pages that we can create to lookhowever we want.
Su again and open httpd.conf one more time.
Far down in the file, even below the AddHandler directive we previously uncommented, are three commentedErrorDocument directives. Below is one that we're go ing to be changing.
Observe the fo llowing in httpd.conf:
# 2) local redirects#ErrorDocument 404 /missing.html# to redirect to local URL /missing.html
The ErrorDocument directive specifies a file to be displayed to the client when a specific error code comes up. A "404"error means that the client requested a page that cannot be found on the server. Without an error document specified,Apache will just generate the very basic one. Let's uncomment this line and create our own error page.
Uncomment this line in httpd.conf:
# 2) local redirectsErrorDocument 404 /missing.html# to redirect to local URL /missing.html
Save httpd.conf and restart your web server. Reload the fake URL we attempted previously.
Notice the additional line telling us the error document wasn't found either. This is because we to ld Apache that wewanted to use our own missing.html file, but we never created the file.
Go into the document root directory and create a file called missing.html.
Type these lines in missing.html:
<html><body>
This is our new missing file page:
</body></html>
Reload the fake URL again and make sure that you see our new error document page. Excellent! See you at the nextlesson.
Copyright © 1998-2014 O'Reilly Media, Inc.
This work is licensed under a Creative Commons Attribution-ShareAlike 3.0 Unported License.See http://creativecommons.org/licenses/by-sa/3.0/legalcode for more information.

Installing PHP
What is PHP?Even if you're not a web developer yourself, it's likely that as a systems administrator, you'll find web developersasking for your help with PHP (among o ther things). PHP is a widely used general-purpose scripting language that isespecially suited for web development and can be embedded into HTML.
In this lesson you will learn how to install PHP on your bubble.
NoteSome of the different flavors o f Unix/Linux provide pre-compiled packages that can be downloaded andinstalled. We could download and install the RPM packages for PHP, but compiling it by hand from thesource code provides a little deeper understanding.
Preparing to Install PHPBefore installing PHP we must recompile Apache with another module so that PHP can be used dynamically. Login toyour bubble as a superuser.
After the command prompt, type the fo llowing commands:
bubble12:~# cd apache_1.3.19bubble12:~/apache_1.3.19# ./configure --enable-module=so
...
...
bubble12:~/apache_1.3.19# make clean ; make
...
...
bubble12:~/apache_1.3.19# make install
...
...
Note that the --enable-mo dule configuration option is in addition to any o ther options you may have previouslyused.
Installing PHPYou are now ready to install PHP! When you installed programs in the past, you downloaded programs from thehottub. This time you will download PHP from the internet.
First, use lynx on the website http://www.php.net/downloads.php and download the file to the hottub.
After the command prompt, type the fo llowing commands:
hottub:~$ lynx www.php.net/releases

You should see something that looks like this:
PHP: Downloads (p1 of 9)
PHP downloads | documentation | faq | getting help | mailing lists | licenses | wiki | reporting bugs | php.net sites | links |conferences | my php.net search for ______________________________ in the [function list_____________] search
Look for the section labeled 4.4 .9 Note: Please download PHP version 4. Because o f the way the bubbles areconfigured PHP version 5 will no t work properly. If you are having trouble locating this section, use a f o rward slash /to search for a specific query string. When you find this section, look for the underlined words PHP 4.4 .9(t ar.gz) . Usethe up and down arrows to highlight these words, then press Ent er.
You will see another webpage that lists the available locations from which you can download the file. Choose thelocation closest to your physical home, highlight it, and then press Ent er.
You should see the words applicat io n/x-gzip D)o wnlo ad, o r C)ancel at the bottom of the screen. Press the d keyto download the file.
When you are finished downloading, you should see something that looks like this:
Download Options
Download Options (Lynx Version 2.8.4rel.1)
Downloaded link: http://www.php.net/distributions/php-4.4.9.tar.gzSuggested file name: php-4.4.9.tar.gz
Standard download options: Save to disk
Local additions: View with less
Highlight the words Save t o disk and press Ent er. You will be prompted to Ent er a f ilename , but there should be adefault filename of php-4.4 .9 .t ar.gz . Press Ent er. Exit the webpage by pressing the q. You will be asked Are yo usure yo u want t o quit ? (y) . Simply press Ent er.
Let's check to be sure you have downloaded this file to the hottub.
After the command prompt, type the fo llowing commands:
hottub:~$ ls
You should see php-4.4 .9 .t ar.gz listed as one o f the files.
Now that you have downloaded PHP to your hottub, you need to copy it to your bubble using the secure copycommand. Login to your bubble.
After the command prompt, type the fo llowing commands:
bubble12:~$ scp hottub:php-4.4.9.tar.gz .username@hottub's password:php-4.4.9.tar.gz | 3297 KB | 824.3 kB/s | ETA: 00.00.00 | 100%
You are ready to install PHP on your bubble! Login to your bubble as a superuser.
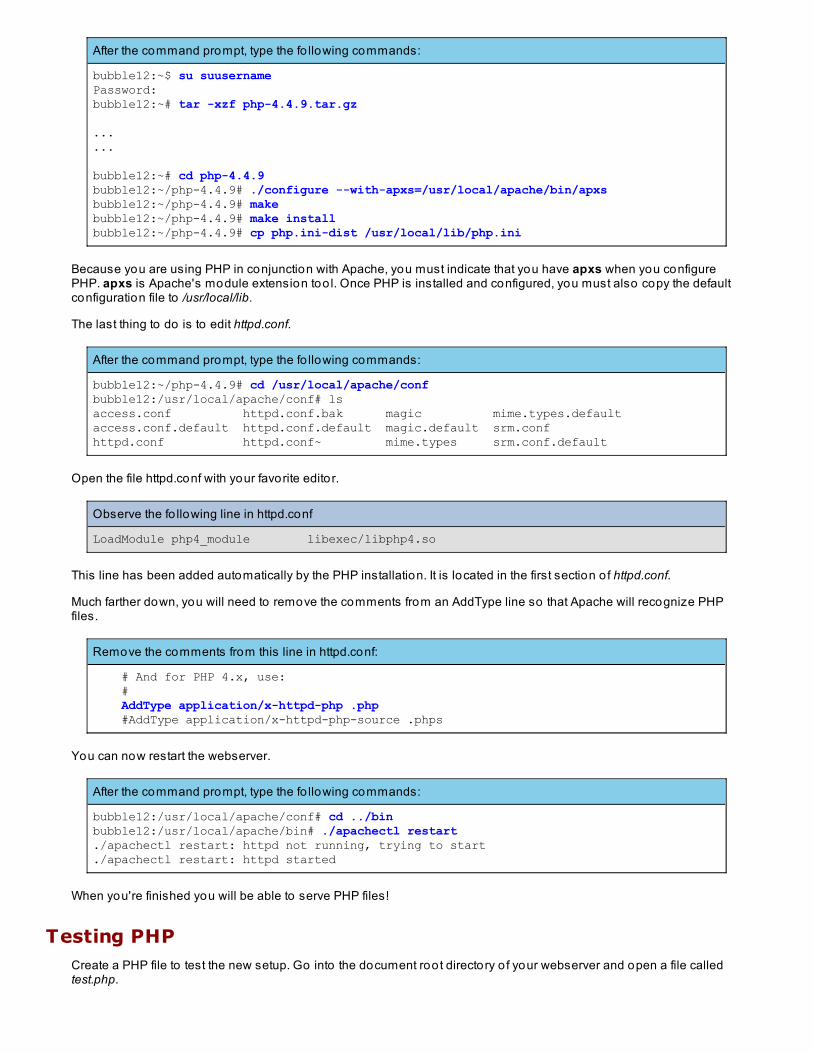
After the command prompt, type the fo llowing commands:
bubble12:~$ su suusernamePassword: bubble12:~# tar -xzf php-4.4.9.tar.gz
...
...
bubble12:~# cd php-4.4.9bubble12:~/php-4.4.9# ./configure --with-apxs=/usr/local/apache/bin/apxsbubble12:~/php-4.4.9# makebubble12:~/php-4.4.9# make installbubble12:~/php-4.4.9# cp php.ini-dist /usr/local/lib/php.ini
Because you are using PHP in conjunction with Apache, you must indicate that you have apxs when you configurePHP. apxs is Apache's module extension too l. Once PHP is installed and configured, you must also copy the defaultconfiguration file to /usr/local/lib.
The last thing to do is to edit httpd.conf.
After the command prompt, type the fo llowing commands:
bubble12:~/php-4.4.9# cd /usr/local/apache/confbubble12:/usr/local/apache/conf# lsaccess.conf httpd.conf.bak magic mime.types.defaultaccess.conf.default httpd.conf.default magic.default srm.confhttpd.conf httpd.conf~ mime.types srm.conf.default
Open the file httpd.conf with your favorite editor.
Observe the fo llowing line in httpd.conf
LoadModule php4_module libexec/libphp4.so
This line has been added automatically by the PHP installation. It is located in the first section o f httpd.conf.
Much farther down, you will need to remove the comments from an AddType line so that Apache will recognize PHPfiles.
Remove the comments from this line in httpd.conf:
# And for PHP 4.x, use: # AddType application/x-httpd-php .php #AddType application/x-httpd-php-source .phps
You can now restart the webserver.
After the command prompt, type the fo llowing commands:
bubble12:/usr/local/apache/conf# cd ../binbubble12:/usr/local/apache/bin# ./apachectl restart./apachectl restart: httpd not running, trying to start./apachectl restart: httpd started
When you're finished you will be able to serve PHP files!
Testing PHPCreate a PHP file to test the new setup. Go into the document root directory o f your webserver and open a file calledtest.php.

After the command prompt, type the fo llowing commands:
bubble12:/usr/local/apache/bin# cd ../htdocsbubble12:/usr/local/apache/htdocs# emacs test.php
Add the fo llowing line to test.php:
Add this line to test.php:
<?phpinfo()?>
Save this file and exit the editor.
Use lynx to view this file and see what happens!
After the command prompt, type the fo llowing commands:
bubble12:/usr/local/apache/htdocs# exitexitbubble12:~$ exitlogoutConnection to 10.0.0.12 closed.hottub:~$ lynx bubble12.private.useractive.com/test.php
You should see the PHP Logo page. If no t, o r if you a see a D)ownload or C)ancel prompt, Please email your mentorat learn@oreillyschoo l.com. Congratulations! You are finished the last lesson!
Copyright © 1998-2014 O'Reilly Media, Inc.
This work is licensed under a Creative Commons Attribution-ShareAlike 3.0 Unported License.See http://creativecommons.org/licenses/by-sa/3.0/legalcode for more information.