preservation of fish and meat
TRANSCRIPT
Agrodok 12
Preservation of fish and meat
Brigitte Maas-van Berkel Brigiet van den Boogaard
Corlien Heijnen
© Agromisa Foundation, Wageningen, 2004. All rights reserved. No part of this book may be reproduced in any form, by print, photocopy, microfilm or any other means, without written permission from the publisher. First English edition: 1994 Second edition: 2002 Third revised edition: 2004 Authors: Brigitte Maas-van Berkel, Brigiet van den Boogaard, Corlien Heijnen Editor: Marja de Goffau-Markusse Translation: Joost Guijt, Catharina de Kat-Reynen (editing) Printed by: Digigrafi, Wageningen, the Netherlands ISBN: 90-72746-01-9
NUGI: 835

Foreword 3
Foreword
This Agrodok is intended as a practical manual that reviews the simple techniques used to preserve fish and meat. The booklet gives guide-lines for several preservation techniques. The methods described and the results achieved can, of course, differ locally.
The general introduction deals with the principles of preventing spoil-age. Next, the various methods of preserving foods are explained and the main aspects of spoilage relevant to each method are covered. Special attention is given to the question of which method to choose given the local conditions.
The following topics are discussed: salting, drying and smoking of fish and meat; fermentation of fish; canning of fish and meat; and cooling and freezing fish and meat.
The authors have endeavoured to describe each method as practically as possible, including descriptions of the required materials and tech-niques.
In this revised edition some descriptions of techniques were modified, illustrations were added and lists of sources for further information were updated. I would like to thank Jacques Houben and Ife Fitz James for their valuable observations after critically reading this docu-ment and Barbera Oranje for making some new illustrations.
Marja de Goffau-Markusse
Wageningen, 2004

Preservation of fish and meat 4
Contents
1 Introduction 6
2 Storage life and spoilage of fish and meat 8 2.1 How long can fish or meat be kept? 8 2.2 When has fish or meat gone bad? 8 2.3 Which micro-organisms spoil fish and meat? 10 2.4 Spoilage and/or fish and meat poisoning 10 2.5 How does contamination take place? 12 2.6 How does one prevent contamination? Hygiene! 12 2.7 Prevention of spoilage 13 2.8 Which method should be chosen? 15
3 Preparation of fish and meat 16 3.1 Catching and cleaning fish 16 3.2 Butchering 21 3.3 Cutting meat into pieces for drying 22
4 Salting fish and meat 25 4.1 General information 25 4.2 Salting fish 26 4.3 Salting meat 32 4.4 Preparing salted fish and meat for consumption 36
5 Drying fish and meat 37 5.1 General information on natural drying 37 5.2 Preparation 38 5.3 Hanging fish and meat up to dry 38 5.4 The drying process 40 5.5 Dried fish and meat: storage and use 41 5.6 Solar drying 43
6 Smoking fish and meat 46 6.1 General information 46
Contents 5
6.2 Preparation 47 6.3 Wood 48 6.4 Smoking ovens 48 6.5 Smoke-drying process 52 6.6 Remarks 53
7 Fermenting fish 54 7.1 General information 54 7.2 Fermentation 54 7.3 Traditional fermentation methods 55 7.4 Fermented fish sauce with 20-25% salt 57 7.5 Fish pastes and whole fish 59 7.6 Remarks 63
8 Canning fish and meat 64 8.1 General information 64 8.2 Advantages and disadvantages of the canning process 65 8.3 Packaging materials 66 8.4 Processing equipment 68 8.5 Preparation 69 8.6 Processing techniques 71 8.7 Storage 76 8.8 Setting up a small-scale canning factory: prerequisites 76
9 Cooling and freezing fish and meat 78 9.1 General information 78 9.2 Cooling and freezing fish 79 9.3 Cooling and freezing meat 80
Further reading 82
Useful addresses 84
Glossary 86
Preservation of fish and meat 6
1 Introduction
Preservation is the processing of foods so that they can be stored longer. Man is dependent on products of plant and animal origin for food. Because most of these products are readily available only during certain seasons of the year and because fresh food spoils quickly, methods have been developed to preserve foods. Preserved foods can be eaten long after the fresh products would normally have spoiled. With the growth of towns, the need to preserve foods longer increased as some people could no longer grow their own vegetables nor keep animals.
Preservation must be seen as a way of storing excess foods that are abundantly available at certain times of the year, so that they can be consumed in times when food is scarce. Consumption of fresh foods is always preferable, however, as preservation usually decreases the nu-tritional value. In other words, preserved foods are not as healthy as fresh foods.
A number of simple preservation techniques suitable for small-scale preservation, such as at the household or village level, will be de-scribed in this booklet. The emphasis is on �small-scale�, to inform individuals how to process and store their surplus economically.
In times of scarcity, preserved foods can be a welcome addition to the diet. Through preservation, sales of out of season products are possi-ble and prices asked are independent of the usually lower market prices during the harvest season.
This booklet starts with a discussion of spoilage and its prevention. Knowledge of the causes of spoilage is necessary in order to be able to preserve foods correctly. After that, the principles and the methods of preservation are explained and the advantages and disadvantages of each method are described.

Introduction 7
The following preservation methods are discussed: salting, drying and smoking of fish and meat, fermenting of fish, canning of fish and meat, and cooling and freezing of fish and meat.
Preservation of fish and meat 8
2 Storage life and spoilage
2.1 How long can fish or meat be kept? Fresh fish will spoil very quickly. Once the fish has been caught, spoilage progresses rapidly. In the high ambient temperatures of the tropics, fish will spoil within 12 hours. Using good fishing techniques (to ensure the fish is barely damaged) and cooling the fish, with the help on ice on board, can increase the storage life of fresh fish.
The speed with which meat spoils not only depends on hygiene condi-tions and storage temperature, but also on the acidity of the meat and the structure of the muscular tissue. The firm muscular tissue of beef, for example, spoils less quickly than liver. Hygienic slaughtering and clean handling of the carcass have a positive effect on storage life. Af-ter slaughtering, one should preserve the meat as quickly as possible.
2.2 When has fish or meat gone bad? Spoilage is the deterioration of food which makes it taste and smell bad (e.g. when it is sour, rotten or mouldy) and/or makes it a carrier of disease germs.
Properties of spoiled fish compared to fresh fish are: ? strong odour ? dark-red gills with slime on them instead of bright red ones ? soft flesh with brown traces of blood instead of firm flesh with red
blood ? red, milky pupils without slime instead of clear ones
The onset of spoilage in meat is seen by changes in colour, among other things. Typical spoilage smells also develop (such as a rotten egg smell).
Storage life and spoilage 9
Spoiled food, when consumed, can cause symptoms such as diarrhoea, stomach pains, nausea and vomiting, and stomach infections or cramps. In very serious cases it can cause death.
In fish and meat the most important kinds of spoilage are: 1 microbiological spoilage caused by bacteria 2 autolytic spoilage caused by enzymes 3 fat oxidation 1 Bacteria are single-celled micro-organisms that are invisible to the
naked eye. They break down the wastes and bodies of dead organ-isms. Some cause severe illness. Under favourable conditions microbiological spoilage starts quickly in fresh and non-acidic products such as fish and meat. Bacteria from the animal�s skin or intestines can rapidly reproduce. This form of spoilage will be ex-plained in greater detail below (see section 2.3).
2 Enzymes are proteins which assist biological reactions, e.g. the con-version of certain organic substances into different ones. When fish or animals are killed, the enzymes inside them are still intact. Those enzymes start breaking down components into smaller parts. This affects smell, taste and texture. Several hours after death �rigor mortis� occurs (a stiffening of the flesh). After that the flesh gets softer again due to enzymatic reactions (autolysis). Heat treatment (e.g. pasteurization) can inactivate enzymes.
3 With fatty fish or meat, chemical reactions can take place between the fat and oxygen in the air (oxidation reactions). By exposing these products for a long time to air, e.g. during drying and smok-ing, the product acquires a rancid smell and taste. It is therefore bet-ter to use less fatty kinds or pieces of fish or meat for smoking and drying.
Preservation of fish and meat 10
2.3 Which micro-organisms cause spoilage? Not all micro-organisms cause spoilage. Some cause desirable changes in fish and meat. An example of this is the fermentation of fish, for example resulting in fish pastes or sauces. These changes are caused by useful micro-organisms, of which there are thousands of kinds. Micro-organisms are usually not visible to the naked eye, which means that serious infections and food poisoning can be caused with-out the food being visibly changed.
Bacteria can grow in fresh foods (meat, fish, milk, vegetables) which are not acidic. Some bacteria can cause infections and poisoning as well as spoilage. A number of bacteria can form spores which are less easily destroyed by preservation techniques; they can start to grow again after insufficient heat treatment.
2.4 Spoilage and/or fish and meat poisoning Bacteria can only cause rotting if, after contamination of the fish and meat, the bacteria are also able to grow in the fish and meat. The fol-lowing factors influence the growth of bacteria and the speed with which rotting takes place.
Damage The skin of fish and meat, for example, is a protection against bacte-rial growth in the flesh. By damaging the skin, which functions as a barrier, nutrients are released. Bacteria can enter the flesh and start to grow.
Water content (internal water content and humidity) Fish consists of on average 70% water; in fatty fish this percentage is about 65% and in lean fish about 80%. Beef consists of 65% and pork of 60% water on average. With such high levels of internal moisture, bacteria can grow rapidly. Meat forms a protective layer on the flesh as a result of drying out at low humidity. A film of condensation is formed on cold meat lying in warm surroundings, which is a good medium for bacteria and moulds.
Storage life and spoilage 11
Oxygen content Strictly aerobic micro-organisms need oxygen for their growth, while strictly anaerobic micro-organisms can only grow in the absence of oxygen. Minced meat, for example, spoils very quickly because a lot of air has been mixed into it.
Acidity The acidity of a product is indicated by its pH. Fish and meat have a neutral pH, i.e. 7. Bacteria only grow between a minimum pH of 4.5 and a maximum of 8-9 with an optimum of 6.5-7.5. As a result, fish and meat are very susceptible to spoilage. When fermenting fish and meat, the pH is deliberately kept low so that only the desired micro-organisms affect the product and not those bacteria which cause spoil-age.
Specific chemical composition Bacteria need sources of energy and nitrogen. Minerals and vitamins are also important for growth. In meat, the first source of energy used by bacteria is sugar, then lactate, free amino acids and only then pro-tein. Sources of nitrogen are nitrate, ammonia, peptides, amino acids or products of decomposition.
Temperature The ideal temperature for the growth of micro-organisms is between 7 °C and 55 °C (45-131 0F). The range within which bacteria grow is between �10 °C and 70 °C (14-158 0F), but the range within which they will survive is much greater. With freezing, micro-organisms are inactivated, and with long-term heating all micro-organisms will eventually die. At temperatures above 80 °C (176 0F) they usually die. Spores are often resistant to temperatures above 100 °C (212 0F). Apart from all these preconditions for growth, the time between con-tamination and processing or consumption is also of importance. Some micro-organisms grow faster than others. This means that the number of micro-organisms and the amount of toxins they produce can vary.
Preservation of fish and meat 12
At 37 °C (99 0F) certain bacteria can multiply from 1,000 to 10,000,000 individual organisms in seven hours. The actual rate at which bacteria grow depends on a combination of the factors men-tioned above. A watery product at 25 °C (77 0F) will spoil much quicker than a dry, acidic product at 5 °C (41 0F).
2.5 How does contamination take place? Contamination can come from people (germs on skin, intestines, cuts, throat or hands), soil, dust, sewage, surface water, manure and other spoiled foods. Contamination can also be caused by poorly cleaned apparatus, domestic animals, pets, vermin or unhygienic ally slaugh-tered animals.
Contamination after a preservation treatment has been carried out is especially dangerous. An example of this is the contamination of cooked meat by placing it on the same plate on which raw meat was kept.
2.6 Hygiene! ? Ensure good personal hygiene. Wash hands thoroughly with hot
water and soap after using the toilet, handling cuts, cleaning infec-tions and doing dirty work, and before touching fish and meat. ? Change towels and wash clothes regularly. ? Keep fish and meat on smooth surfaces which can be and are
washed well (e.g. stainless steel kitchen block, tiles, stone). ? Keep the places where fish and meat are stored clean by regularly
washing with a kitchen soda solution. ? Wash all tools used for fish and meat regularly. ? Cover all foods well. ? Try to keep all pests away from the places where foods are kept. ? Never store leftovers at room temperature. ? Ensure proper hygiene when animals are slaughtered. ? Use clean water. If necessary, boil the water before use.
Storage life and spoilage 13
2.7 Prevention of spoilage This booklet deals with preservation, to extend the storage life of products which would otherwise decay quickly. Preservation can have two effects: 1 retention of the original qualities and properties of the foods 2 radical changes which result in new products with completely new
qualities and properties.
Preservation is based on slowing down or preventing spoilage by mi-cro-organisms. The dangers of micro-organisms can be avoided in three ways:
The micro-organisms are removed. This is a very costly method which can only be used with liquids (e.g. filtering of drinking water). This method will not be discussed in this booklet.
The micro-organisms are killed. This is usually done with heat. When all the micro-organisms present are killed by a heat treatment, the process is called sterilization and the product can be stored for a long time, if kept at the right temperature. When a short heat treatment at 80 °C (176 0F) is applied, so that not all micro-organisms are killed, the process is called pasteurization and the product can be stored for only a limited time. Cured meat products contain salt and sometimes also nitrite. They therefore need less in-tense heat than is needed in the preservation of vegetables, for exam-ple.
Micro-organism activity is suppressed. An environment in which micro-organisms can no longer grow, or can grow only very slowly, is created. There are various ways of doing this:
Lowering the temperature Products remain fresh in the refrigerator (2-4 °C / 35.5-41 0F) for 4-7 days; they can be stored much longer in the deep-freeze (�20 °C / �4
Preservation of fish and meat 14
0F). Low temperatures must be maintained accurately and continu-ously and high demands are made on the freezer, energy supply and food quality. As this method requires a lot of energy and materials and a large investment, it will be only briefly described here. For further information, please see other literature.
Reducing the water content Drying is the oldest way of preserving foods. When sufficient water is removed from a product, micro-organisms can no longer grow. The amount of water to be removed varies with the product. The simplest and cheapest method is to dry the product in the open air (with or without sun). Somewhat more expensive and difficult methods make use of driers in which the products are artificially dried using heated air. Sun-dried products are of slightly less quality due to the break-down of certain vitamins in sunlight. Lengthy smoking is also based on the principle of reducing the internal water content. Smoke parti-cles give an added taste to the product.
Increasing the osmotic pressure In this technique, salt is added to stop the growth of micro-organisms. Examples are the salting of meat and fish. These preserved products keep well. The nutritional value of the final product is reasonable.
Adding preservatives Addition of certain substances can partly prevent spoilage. In practice, this method is only used as an aid for other preservation methods and will therefore not be covered here. Because of the nature of the sub-stances, the accompanying directions must be followed exactly.
Changing the foods By preserving in liquids, by adding acid or through special microbial processes, �new� foods can be made. These often have a very special odour and taste, such as smoked fish and many local fermented prod-ucts.
Storage life and spoilage 15
2.8 Which method should be chosen? The choice of a preservation method depends on the product, the de-sired properties of the product to be stored, the availability of energy sources (wood, gasoline, oil, electricity, sun), the storage facilities, possible packaging materials and the costs involved for each method. It is sometimes necessary to combine methods, such as salting and drying meat or adding acid and then sterilizing. It is also desirable to conform to local customs if the products are to be acceptable to the local population.
A number of advantages and disadvantages of several methods are summarized below:
? Salting fish and meat: inexpensive when salt is cheap; no energy required; storage at room temperature; reasonable quality; long storage life; nutritional value reasonable. ? Drying fish and meat: inexpensive; no energy required; little
equipment needed; dry and/or airtight storage required; quality and nutritional value reasonable with good storage. ? Smoking fish and meat: inexpensive; little energy required; fuel
must be present; little equipment needed; quality and nutritional value reasonable. ? Fermentation of fish and meat: often cheap (local techniques); no
energy needed; taste and odour often radically changed; storage life varies from short to long depending on the fermented product; nu-tritional value often high. ? Canning fish and meat: fairly expensive; labour intensive; requires
much energy and water; tins or jars with lids are needed; sterilizers or pressure cookers and canning machines are needed; packaging is expensive; storage is easy (below 25 °C / 77 0F) and possible for long periods; the quality of the product and its nutritional value is good. ? Cooling and freezing fish and meat: very expensive technique;
uses much energy; large investments are needed; quality, nutritional value and storage life of the product are good.
Preservation of fish and meat 16
3 Preparation
3.1 Catching and cleaning fish
Catching and preparing fresh fish As fish spoils very quickly, measures must already be taken on board the fishing boat to limit spoilage. First of all, the fish must immedi-ately be kept out of the salt water so that the fish does not get con-taminated by bacteria in the salt water.
Apart from preventing contamination, one should also prevent out-growth of bacteria which are already present. The best way is to re-move the intestines and gills of the fish on board the fishing boat. Af-ter that the fish must be washed with clean water to rinse off any blood or other remains. It is recommended to transport the fish on ice to shore. However, cleaning and transporting the fish on ice is often difficult and expensive to realize. All that can be done then is to trans-port the fish as quickly and carefully as possible to the shore. To pre-vent the bacteria in the intestines, liver, gills and on the skin of the fish from increasing, the fish must be kept in a clean boat and in the shade.
Cleaning fish To clean fish, first of all one needs good and clean tools. Personal hy-giene is also important (see Chapter 2). It is important that the fish is not cleaned on the ground but on a clean table or bench. The table should be at working height and can be made of wood, metal or con-crete. The surface of the table must be smooth and easy to clean. It is also handy to clean the fish on a cutting board so that the table is not damaged.
Knives are the most important tools for cleaning fish. Short knives are used for small kinds of fish, long flexible knives to fillet larger kinds of fish and a thick, strong knife to cut open large fish. The knives must be sharp.
Preparation 17
To salt, dry and smoke fish, it is important that the surface area of the fish be increased. Then the salt and smoke particles can penetrate eas-ily into the fish and moisture can work its way out. The method used to clean fish depends primarily on the size and kind of fish.
1 With very small kinds of fish, such as anchovies, sardines and oth-ers smaller than 10 cm, usually only the intestines are removed. Whether or not this is done depends on local customs and the pur-pose for which the fish is to be used. For some fermentation proc-esses the intestines are not removed.
2 Fish larger than 15 cm are, apart from being cleaned, also cut crosswise so that the surface area of the fish is increased and the flesh becomes less thick. Preservation methods work faster with a larger surface area of the flesh.
3 In addition to cleaning and splitting fish that are larger than 25 cm, one also makes extra cuts in the flesh. Sometimes the fish are cut into chunks or completely filleted.
The way in which the fish are cleaned depends not only on the size of the fish but also on the wishes of the consumer. Some consumers, for example, want the fish with its head intact while others especially want it cut off.
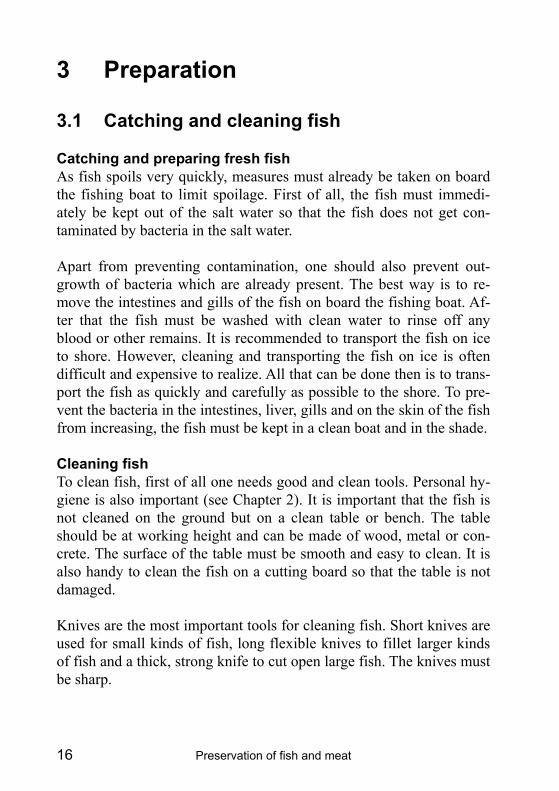
The last thing to be discussed is a brief description of how to gut, split and fillet fish.
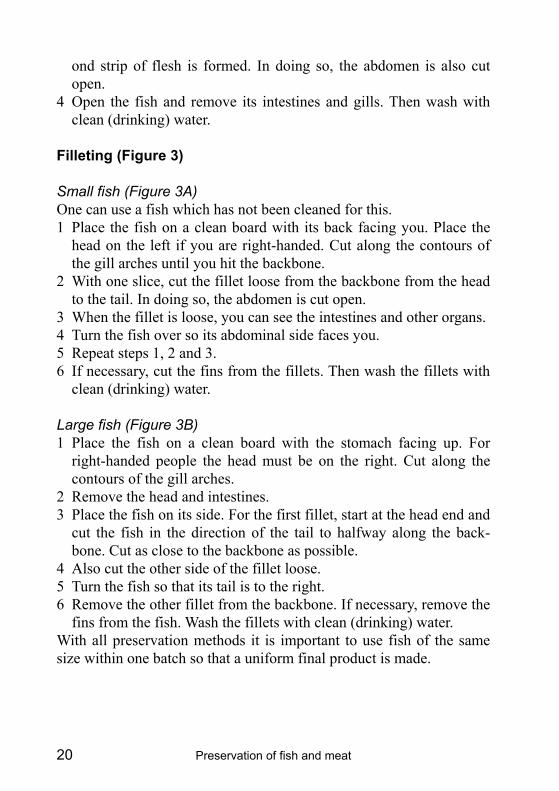
Gutting and scaling (Figure 1) 1 Place the fish on a clean board and hold it by its head. Scrape the
scales off starting at the tail and working towards the head. Try not to damage the skin of the fish while doing so.
2 Wash the fish in clean (drinking) water and remove all loose scales. 3 Lay the fish on its side on a clean board and cut into the fish along
its gills with a sharp knife. Do the same on the other side but do not cut the head off.
Preservation of fish and meat 18
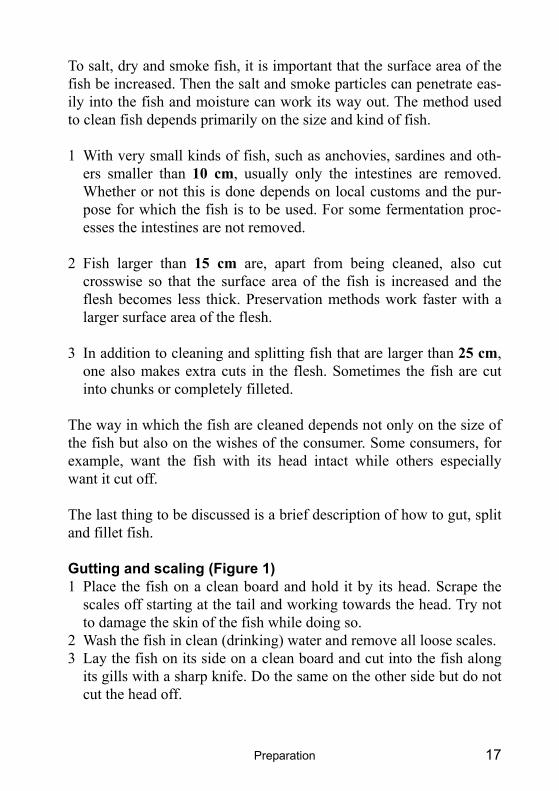
4 Cut the gills free by cutting the ends free from the head and body with the point of the knife.
5 Slit the abdominal wall open from the anal opening towards the head of the fish. Cut deep enough but try not to damage the intes-tines of the fish.
6 When the fish has been opened up, the gills and intestines can be removed by placing one's fingers under the gills and pulling every-thing out.
7 Scrape any remaining blood out with the knife. 8 Clean the abdominal wall with clean (drinking) water.
Figure 1: Gutting and scaling of fish
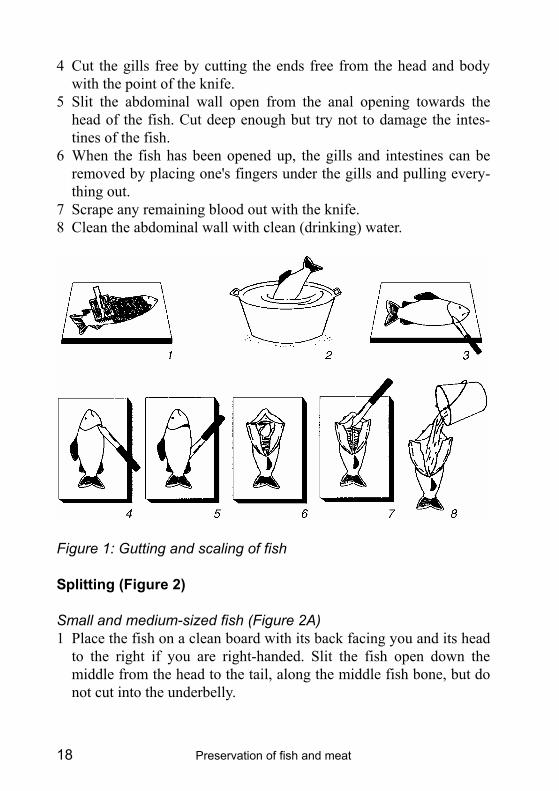
Splitting (Figure 2) Small and medium-sized fish (Figure 2A) 1 Place the fish on a clean board with its back facing you and its head
to the right if you are right-handed. Slit the fish open down the middle from the head to the tail, along the middle fish bone, but do not cut into the underbelly.
Preparation 19
2 Open the fish and remove the intestines and gills. Wash the fish thoroughly with clean (drinking) water.
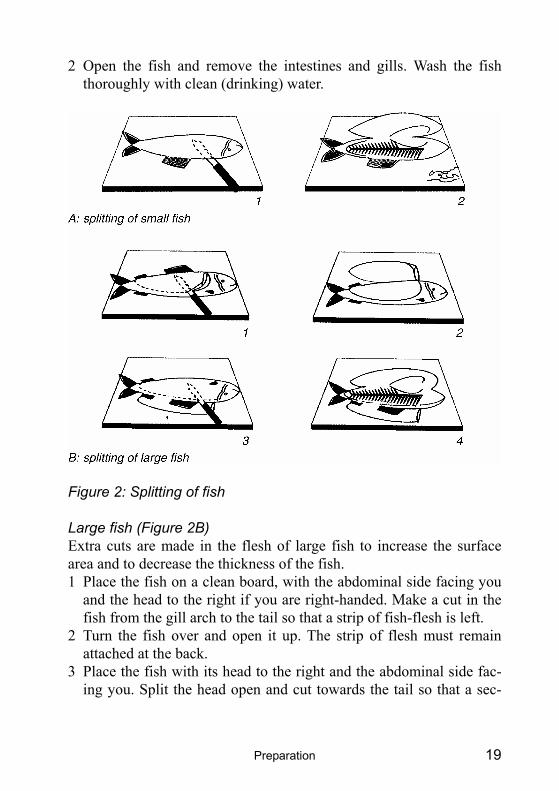
Figure 2: Splitting of fish
Large fish (Figure 2B) Extra cuts are made in the flesh of large fish to increase the surface area and to decrease the thickness of the fish. 1 Place the fish on a clean board, with the abdominal side facing you
and the head to the right if you are right-handed. Make a cut in the fish from the gill arch to the tail so that a strip of fish-flesh is left.
2 Turn the fish over and open it up. The strip of flesh must remain attached at the back.
3 Place the fish with its head to the right and the abdominal side fac-ing you. Split the head open and cut towards the tail so that a sec-
Preservation of fish and meat 20
ond strip of flesh is formed. In doing so, the abdomen is also cut open.
4 Open the fish and remove its intestines and gills. Then wash with clean (drinking) water.
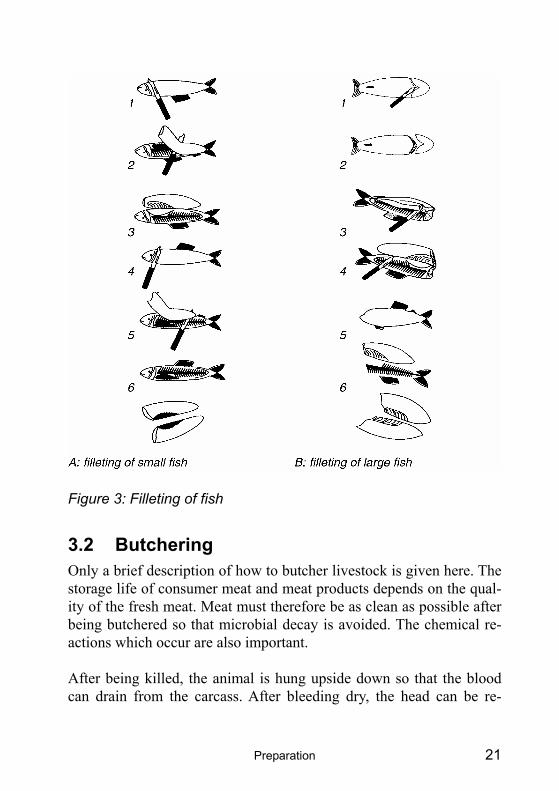
Filleting (Figure 3) Small fish (Figure 3A) One can use a fish which has not been cleaned for this. 1 Place the fish on a clean board with its back facing you. Place the
head on the left if you are right-handed. Cut along the contours of the gill arches until you hit the backbone.
2 With one slice, cut the fillet loose from the backbone from the head to the tail. In doing so, the abdomen is cut open.
3 When the fillet is loose, you can see the intestines and other organs. 4 Turn the fish over so its abdominal side faces you. 5 Repeat steps 1, 2 and 3. 6 If necessary, cut the fins from the fillets. Then wash the fillets with
clean (drinking) water.
Large fish (Figure 3B) 1 Place the fish on a clean board with the stomach facing up. For
right-handed people the head must be on the right. Cut along the contours of the gill arches.
2 Remove the head and intestines. 3 Place the fish on its side. For the first fillet, start at the head end and
cut the fish in the direction of the tail to halfway along the back-bone. Cut as close to the backbone as possible.
4 Also cut the other side of the fillet loose. 5 Turn the fish so that its tail is to the right. 6 Remove the other fillet from the backbone. If necessary, remove the
fins from the fish. Wash the fillets with clean (drinking) water. With all preservation methods it is important to use fish of the same size within one batch so that a uniform final product is made.
Preparation 21
Figure 3: Filleting of fish
3.2 Butchering Only a brief description of how to butcher livestock is given here. The storage life of consumer meat and meat products depends on the qual-ity of the fresh meat. Meat must therefore be as clean as possible after being butchered so that microbial decay is avoided. The chemical re-actions which occur are also important.
After being killed, the animal is hung upside down so that the blood can drain from the carcass. After bleeding dry, the head can be re-
Preservation of fish and meat 22
moved. Subsequently the hooves and the hide are removed from most kinds of animals. After a thorough inspection for visible abnormali-ties, the carcass can be divided into four parts and each part can be hung up.
Pigs, after being killed, hung up and bled, are heated so that the hide with the hairs can be scraped off. The butchering of sheep and goats is comparable to that of pigs.
It is best after butchering to store the parts of the carcass in cooling cells. However, as cooling facilities are often absent, the meat must be consumed or processed as quickly as possible (within several hours).
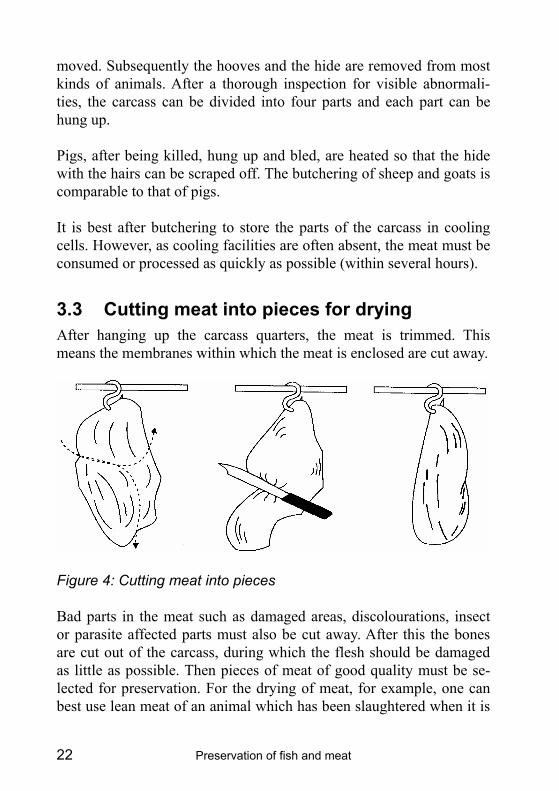
3.3 Cutting meat into pieces for drying After hanging up the carcass quarters, the meat is trimmed. This means the membranes within which the meat is enclosed are cut away.
Figure 4: Cutting meat into pieces
Bad parts in the meat such as damaged areas, discolourations, insect or parasite affected parts must also be cut away. After this the bones are cut out of the carcass, during which the flesh should be damaged as little as possible. Then pieces of meat of good quality must be se-lected for preservation. For the drying of meat, for example, one can best use lean meat of an animal which has been slaughtered when it is

Preparation 23
middle-aged. The larger pieces of meat are cut into smaller ones fol-lowing the anatomical lines (Figure 4).
The larger muscles are left in one piece but one piece of meat may contain a number of smaller muscles. Subsequently the pieces of meat are cut into strips. There are two ways to cut the pieces into strips: 1 Place the meat on a board and cut it into strips. 2 Hang the meat up and cut strips off it. In both cases the meat must be cut in the direction of the muscular tissue (Figure 5).
Figure 5: Cutting meat into strips
The length of the strip can vary from 20 to 70 cm. Short strips of meat take more time to be hung up, but longer strips can break under their own weight when drying. The thickness of the meat is important in determining the necessary drying time of the meat. In one batch it is important that all the meat strips are equally thick so that after drying you are not left with too dry or not dry enough pieces of meat.
Examples of different thicknesses which are used are: ? strips of 1 × 1 cm ? flat strips of 0.5 × (3, 4 or 5 cm)
Preservation of fish and meat 24
The exact shape of the strips depends on the preservation method to be used.
It is very important that a clean working surface and knife are used so that the starting material for preservation is good. Personal hygiene is also very important. Further preparatory work such as salting is de-scribed under the appropriate preservation method in the following chapters.
Salting 25
4 Salting
4.1 General information By salting food, storage life is prolonged. Salt absorbs much of the water in the food and makes it difficult for micro-organisms to sur-vive. For salting, it is important that the fish or meat has been pre-pared in such a way that the salt added can quickly draw into the flesh and the moisture can leave the fish or meat. Large pieces of flesh must be cut into thin slices to allow this.
Fish are divided in half or even in quarters depending on their size. Fish smaller than 10 cm (anchovies, sardines) usually only have their intestines removed. Fish of ± 15 cm are split open so that the surface area of the fish is increased, salt can penetrate better, and the flesh of the fish therefore becomes thinner. Large cuts can be made in fish 25 cm or longer, or these can be split a number of times (see Chapter 3).
To learn how to salt fish, for example the amount of salt needed and the effect of those quantities on the firmness and the taste of the fish, it is recommended at first to use small amounts of different kinds of fish that are easily available. It is easier to start with non-fatty kinds of fish. Lean fish is recognizable by its white or very pale flesh. More fatty fish usually have a darker colour.
The quality of the starting material to be used must be good. Old, rot-ten fish or fish of poor quality is not improved by salting it and is cer-tainly not storable for longer. The same is true for meat.
Salt intended for salting fish should be as clean as possible. The salt may not contain any dust, sand, etc. Salt can contain bacteria which can survive despite a very high salt concentration. These bacteria can therefore also cause salted fish or meat to spoil. Strongly contaminated salt can be recognized by a slightly pink colour. It can be heated on a
Preservation of fish and meat 26
metal plate over a fire to kill the bacteria. Salt can be very fine or have large chunks; a mixture of fine and coarse salt is best.
During the salting of fish and meat in the tropics, attention must be paid to the following:
1 Use the cleanest salt available. 2 Use enough salt. Note that salting products is not the same as using
a lot of salt. Large amounts of salt give fish and meat a very salty taste. At the same time many of the nutrients are lost if too much salt is used.
3 The water which is to be used must not be contaminated; it must be clean and clear (drinking water quality).
4 The most effective way of preserving fish and meat is to combine salting with smoking or drying.
4.2 Salting fish Three ways of salting fish are described here: dry and wet salting (in technical jargon: kench salting and pickle curing) and brining. The first two methods result in fish with a relatively high salt content, the third method is usually used if one wants fish with a relatively low salt content.
For kench salting and pickle curing, 30-40 kg of salt is used per 100 kg of cleaned fish. Using more salt does not improve the process and only leads to unnecessarily high costs: salt is expensive.
Dry salting fish: kench salting Coarse salt is more suitable for dry (kench) salting. Fine salt will draw water too quickly from the outside of the fish, making the outside hard. As a result the water inside the fish cannot escape and the salt cannot penetrate deep into the fish. Therefore the fish spoils despite being salted. This is known as �salt burn�. Coarse salt does not have this effect. Kench salting is very suitable for mainly lean kinds of fish.
Salting 27
You will need: ? Split fish or fish fillets (see Chapter 3). If the flesh is thick, make
cuts in it so the salt can penetrate well. ? Salt. Use 30-35 kg of salt for 100 kg of cleaned fish. Use more salt
where deep cuts have been made or where the flesh is thicker. ? Baskets or other perforated containers from which moisture can
drain.
Figure 6: Kench salting
Preservation of fish and meat 28
Method of working (see Figure 6): 1 Split fish or fish fillets. 2 Rub the fish well with salt, especially in the deep cuts. 3 Put a thick layer of salt in the bottom of the basket or container. 4 Place one layer of fish with the skin facing up on the salt. The fish
are not allowed to overlap. 5 Follow with one layer of salt, one layer of fish, etc. until the basket
is full. 6 Cover the basket with a layer of plastic but do not put any weights
on it.
By adding salt to fish, moisture is drawn out of the fish. This moisture, with the salt dissolved in it, is called brine. Place the basket on some stones so the brine can drain. Take care with this method that the fish is piled in such a way that the brine can drain easily and will not collect in spots. If it does, it causes an uneven preservation. After a day the fish must be stacked anew so that the fish which was originally on the bottom now lies on top of the pile. The salt is thus distributed more evenly (replenish it if necessary) and you will not get the effect that the fish on the bottom of the pile has a different amount of salt than the fish on top.
After being salted, the fish must look clear and see-through. The fish must feel firm and have a whitish salt layer all over it. A fishy smell and the smell of brine must dominate.
Strongly salted fish, if it is properly covered, can be stored for a long time. A disadvantage of this method is that the brine drains away, leav-ing the fish standing dry. Fatty kinds of fish can then turn rancid as they are exposed to air. Scavengers can easily get to the fish and bac-teria and moulds cause decay there where insufficient salt has been used.
Salting 29
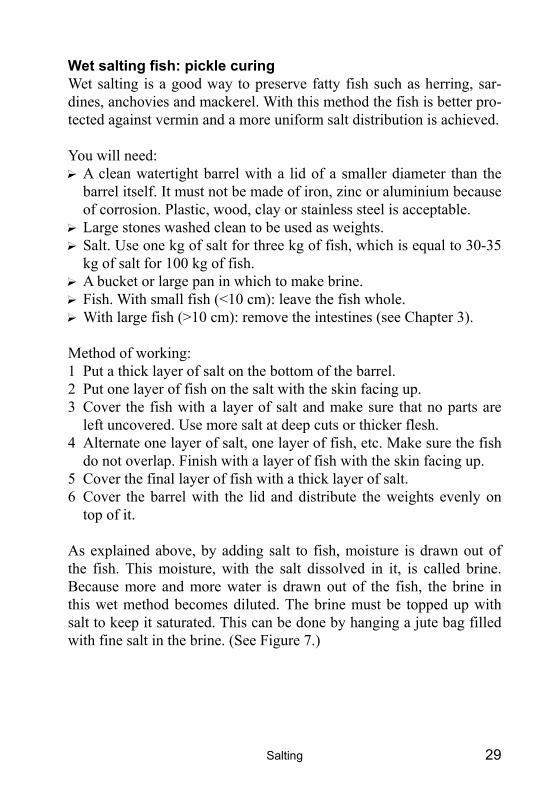
Wet salting fish: pickle curing Wet salting is a good way to preserve fatty fish such as herring, sar-dines, anchovies and mackerel. With this method the fish is better pro-tected against vermin and a more uniform salt distribution is achieved.
You will need: ? A clean watertight barrel with a lid of a smaller diameter than the
barrel itself. It must not be made of iron, zinc or aluminium because of corrosion. Plastic, wood, clay or stainless steel is acceptable. ? Large stones washed clean to be used as weights. ? Salt. Use one kg of salt for three kg of fish, which is equal to 30-35
kg of salt for 100 kg of fish. ? A bucket or large pan in which to make brine. ? Fish. With small fish (<10 cm): leave the fish whole. ? With large fish (>10 cm): remove the intestines (see Chapter 3).
Method of working: 1 Put a thick layer of salt on the bottom of the barrel. 2 Put one layer of fish on the salt with the skin facing up. 3 Cover the fish with a layer of salt and make sure that no parts are
left uncovered. Use more salt at deep cuts or thicker flesh. 4 Alternate one layer of salt, one layer of fish, etc. Make sure the fish
do not overlap. Finish with a layer of fish with the skin facing up. 5 Cover the final layer of fish with a thick layer of salt. 6 Cover the barrel with the lid and distribute the weights evenly on
top of it.
As explained above, by adding salt to fish, moisture is drawn out of the fish. This moisture, with the salt dissolved in it, is called brine. Because more and more water is drawn out of the fish, the brine in this wet method becomes diluted. The brine must be topped up with salt to keep it saturated. This can be done by hanging a jute bag filled with fine salt in the brine. (See Figure 7.)

Preservation of fish and meat 30
7 Keep the brine saturated. This can be done by hanging a jute bag filled with fine salt in the brine. (Figure 7) Using unsaturated brine will lead to spoilage.
8 If, after several hours, the level of the created brine does not reach the lid, a saturated salt solution must be added.
9 The salt solution is made of at least 360 grams of salt dissolved in each litre of water. Heat the solution in a pan and let it boil for 10 minutes. Let the brine cool down until it is warm to the touch. Then add the brine to the barrel with fish until it reaches the lid.
10 Keep the barrel in as cool a place as possible
Figure 7: Pickle curing
After being salted, the fish must look clear and see-through. The fish must feel firm and have a whitish salt layer all over them. A fishy smell and the smell of brine must dominate. Check the container regularly. If foam appears on top of the brine (a result of fermentation), replace the old brine with a fresh brine solu-tion.
Salting 31
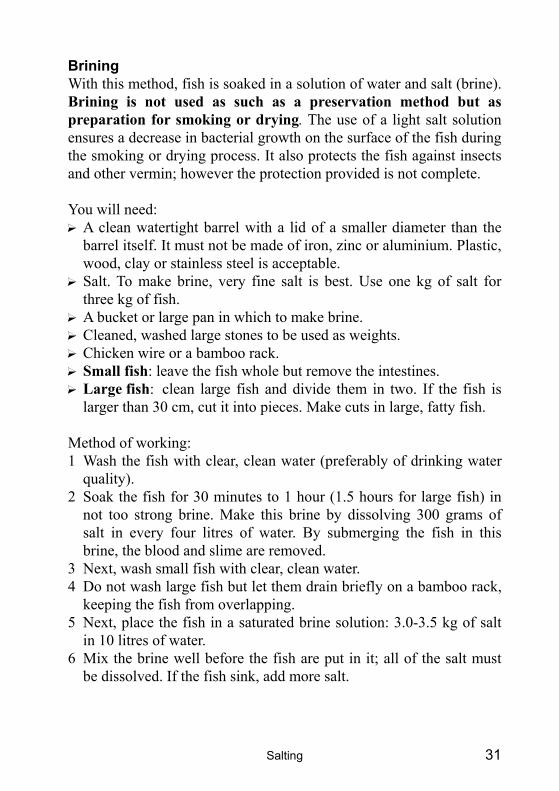
Brining With this method, fish is soaked in a solution of water and salt (brine). Brining is not used as such as a preservation method but as preparation for smoking or drying. The use of a light salt solution ensures a decrease in bacterial growth on the surface of the fish during the smoking or drying process. It also protects the fish against insects and other vermin; however the protection provided is not complete.
You will need: ? A clean watertight barrel with a lid of a smaller diameter than the
barrel itself. It must not be made of iron, zinc or aluminium. Plastic, wood, clay or stainless steel is acceptable. ? Salt. To make brine, very fine salt is best. Use one kg of salt for
three kg of fish. ? A bucket or large pan in which to make brine. ? Cleaned, washed large stones to be used as weights. ? Chicken wire or a bamboo rack. ? Small fish: leave the fish whole but remove the intestines. ? Large fish: clean large fish and divide them in two. If the fish is
larger than 30 cm, cut it into pieces. Make cuts in large, fatty fish.
Method of working: 1 Wash the fish with clear, clean water (preferably of drinking water
quality). 2 Soak the fish for 30 minutes to 1 hour (1.5 hours for large fish) in
not too strong brine. Make this brine by dissolving 300 grams of salt in every four litres of water. By submerging the fish in this brine, the blood and slime are removed.
3 Next, wash small fish with clear, clean water. 4 Do not wash large fish but let them drain briefly on a bamboo rack,
keeping the fish from overlapping. 5 Next, place the fish in a saturated brine solution: 3.0-3.5 kg of salt
in 10 litres of water. 6 Mix the brine well before the fish are put in it; all of the salt must
be dissolved. If the fish sink, add more salt.
Preservation of fish and meat 32
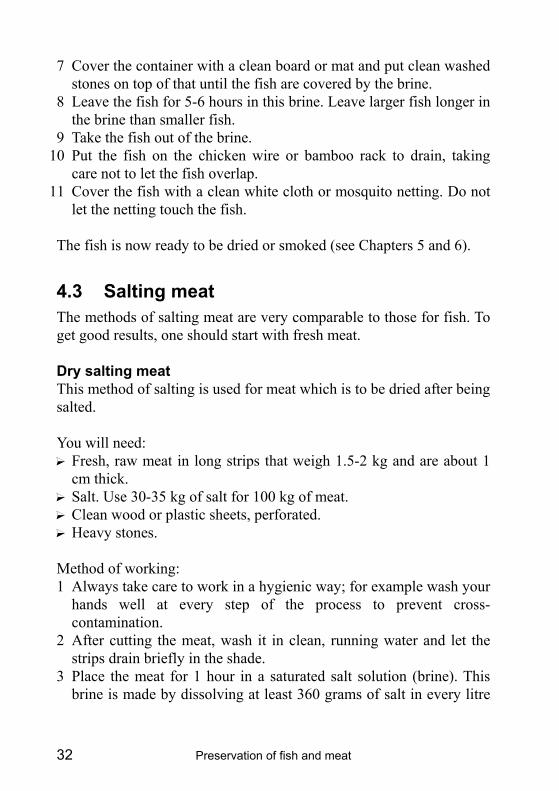
7 Cover the container with a clean board or mat and put clean washed stones on top of that until the fish are covered by the brine.
8 Leave the fish for 5-6 hours in this brine. Leave larger fish longer in the brine than smaller fish.
9 Take the fish out of the brine. 10 Put the fish on the chicken wire or bamboo rack to drain, taking
care not to let the fish overlap. 11 Cover the fish with a clean white cloth or mosquito netting. Do not
let the netting touch the fish.
The fish is now ready to be dried or smoked (see Chapters 5 and 6).
4.3 Salting meat The methods of salting meat are very comparable to those for fish. To get good results, one should start with fresh meat.
Dry salting meat This method of salting is used for meat which is to be dried after being salted.
You will need: ? Fresh, raw meat in long strips that weigh 1.5-2 kg and are about 1
cm thick. ? Salt. Use 30-35 kg of salt for 100 kg of meat. ? Clean wood or plastic sheets, perforated. ? Heavy stones.
Method of working: 1 Always take care to work in a hygienic way; for example wash your
hands well at every step of the process to prevent cross-contamination.
2 After cutting the meat, wash it in clean, running water and let the strips drain briefly in the shade.
3 Place the meat for 1 hour in a saturated salt solution (brine). This brine is made by dissolving at least 360 grams of salt in every litre
Salting 33
of water. Dissolve the salt completely before placing the meat in the brine.
4 Next, hang the meat up above the brine to let it drip dry. 5 Rub the meat thoroughly with salt; use a total of 30-35 kg of salt for
100 kg of meat. 6 Put a 1-2 cm thick layer of salt on a (perforated) wooden or plastic
board, or if possible, a concrete or stone slab with diagonal grooves. 7 Put the meat on top of this layer of salt. Put another 1-2 cm layer of
salt on top of the layer of meat. Alternate one layer of meat, one layer of salt, etc., until the pile is about 1-1.5 metres high.
8 Cover the pile with a wood or plastic board on which there are sev-eral heavy, clean stones to weigh it down. The liquid which comes out of the meat must be able to drain away.
9 The next day, rotate the layers by putting the top layers on the bot-tom and the bottom layers of meat on top. Again, use salt. If after two days the liquid starts to come out of the pile, and no more liquid drips out of the meat, the process can be stopped. If this is not the case, keep on rotating the layers of meat until no more moisture comes out of the meat. Only then can the drying process start.
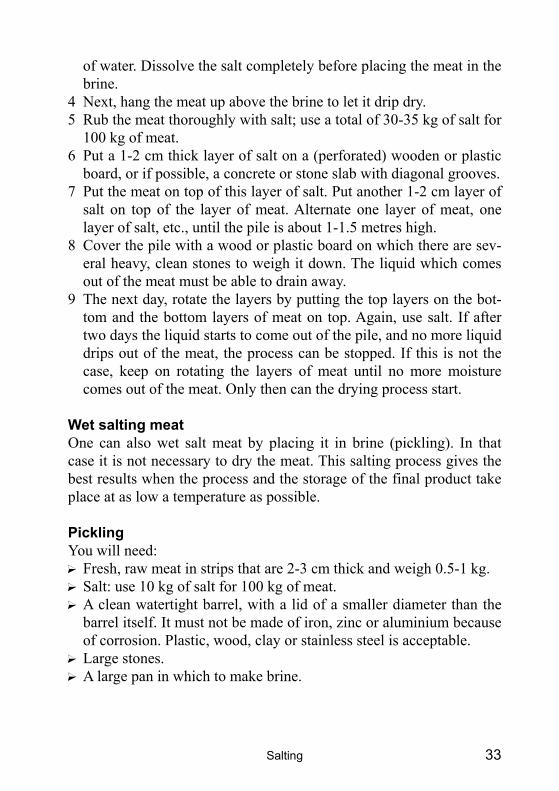
Wet salting meat One can also wet salt meat by placing it in brine (pickling). In that case it is not necessary to dry the meat. This salting process gives the best results when the process and the storage of the final product take place at as low a temperature as possible.
Pickling You will need: ? Fresh, raw meat in strips that are 2-3 cm thick and weigh 0.5-1 kg. ? Salt: use 10 kg of salt for 100 kg of meat. ? A clean watertight barrel, with a lid of a smaller diameter than the
barrel itself. It must not be made of iron, zinc or aluminium because of corrosion. Plastic, wood, clay or stainless steel is acceptable. ? Large stones. ? A large pan in which to make brine.
Preservation of fish and meat 34
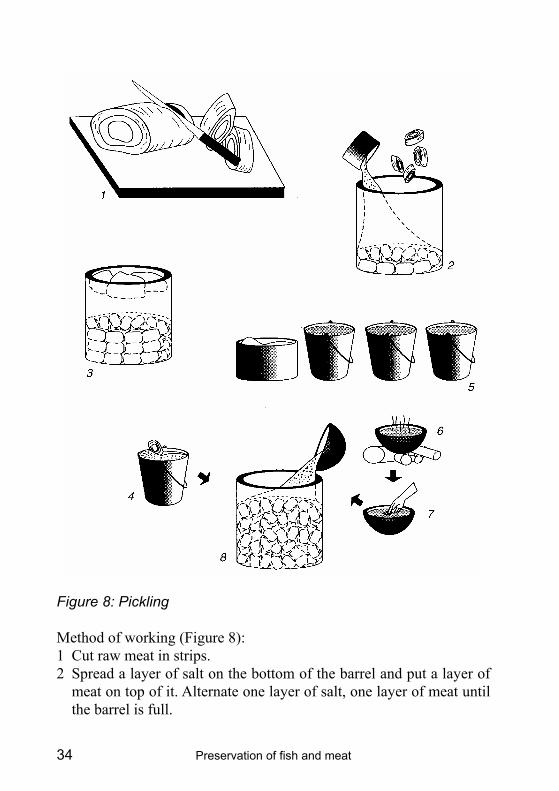
Figure 8: Pickling
Method of working (Figure 8): 1 Cut raw meat in strips. 2 Spread a layer of salt on the bottom of the barrel and put a layer of
meat on top of it. Alternate one layer of salt, one layer of meat until the barrel is full.

Salting 35
3 Place the lid on top of the meat and push it down using the stones. Let the meat stand for two weeks, during which time brine is formed from the salt and the moisture leaving the meat.
4 Take the meat out of the brine and rinse it with cold (drinking) wa-ter.
5 Make a brine solution of at least 360 grams of salt per litre of water. 6 Boil the brine for several minutes. 7 Let it cool until it is warm to the touch. Put the rinsed meat in a clean, empty barrel. Fill the barrel with the boiled, saturated brine. In this way the meat is preserved for later con-sumption.
Alternative method of pickle brining Below an alternative pickling method is described which can be used as an initial preparation for drying meat.
For what you need (materials) see: pickling.
Method of working: 1 Follow the method described above; let the meat cure for two weeks
during which time a brine is formed from the salt and the moisture leaving the meat.
2 Soak the meat in boiled water for 2-3 hours to remove any excess salt. Refresh the water 2-3 times with clean, fresh water.
3 The meat is now ready to be sun-dried.
Brine salting With this method, meat is soaked in a solution of water and salt (brine). Brining is not used as such as a preservation technique but as preparation for the smoking or drying of meat. The use of a light brine solution slows bacterial growth at the surface of the meat during the smoking or drying process. It also protects the meat against insects and other vermin; however, it does not provide complete pro-tection.
Preservation of fish and meat 36
You will need: ? Fresh, raw meat in long strips of about 1 cm thick.. ? Salt. Use a 15% salt solution (150 grams of salt per litre of water).
Very fine salt is best for making brine. ? A strainer.
Method of working: 1 Submerge the strips of meat in the brine as soon as the salt has dis-
solved in the water. Leave the meat in the brine for 5-10 minutes. 2 Let the meat drain in a strainer. Catch the brine for re-use. The meat
can now be dried and/or smoked.
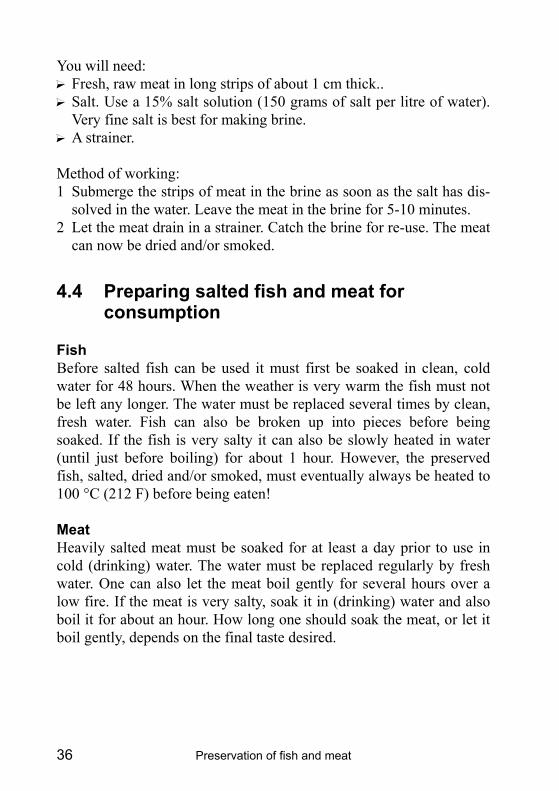
4.4 Preparing salted fish and meat for consumption
Fish Before salted fish can be used it must first be soaked in clean, cold water for 48 hours. When the weather is very warm the fish must not be left any longer. The water must be replaced several times by clean, fresh water. Fish can also be broken up into pieces before being soaked. If the fish is very salty it can also be slowly heated in water (until just before boiling) for about 1 hour. However, the preserved fish, salted, dried and/or smoked, must eventually always be heated to 100 °C (212 F) before being eaten!
Meat Heavily salted meat must be soaked for at least a day prior to use in cold (drinking) water. The water must be replaced regularly by fresh water. One can also let the meat boil gently for several hours over a low fire. If the meat is very salty, soak it in (drinking) water and also boil it for about an hour. How long one should soak the meat, or let it boil gently, depends on the final taste desired.

Drying 37
5 Drying
5.1 General information on natural drying Spoilage of fish and meat is slowed when water is drawn from the fish or meat. This can be achieved by salting as described in Chapter 4 but also by naturally drying fish or meat. The best results are achieved by combining salting with drying. Salting the fish or meat is not essential but has great advantages and is therefore strongly recommended be-fore drying. The salting ensures, among other things, that during dry-ing the micro-organisms at the surface are inhibited and insects and other vermin are kept away. Thus the spoilage of material is slowed. After drying, salt gives a more stable product with a longer storage life. The use of salt before drying and the manner of salting (see Chap-ter 4) depend on the availability of salt and local customs. Generally very small fish are dried unsalted. Large fish will spoil before the dry-ing process is completed and therefore salting is necessary.
It is important that fish and meat be prepared in such a way that salt can be quickly drawn into the flesh and moisture can quickly leave. To achieve this, try to keep the flesh of the products thin and the surface area of the product as large as possible (see Chapter 3). Be sure to work as hygienically as possible.
Make sure that a batch of meat or fish to be dried is made up of pieces of roughly the same size. This ensures that the whole batch dries evenly and that after drying part of the product is not too dry or actu-ally not dry enough.
Very fatty fish or meat is difficult to convert into a good salted and/or dried product. The problem is that the fat forms a barrier to salt pene-tration and/or loss of moisture.

Preservation of fish and meat 38
5.2 Preparation Salting (see Chapter 4) is part of the preparation for drying, and de-pends among other things on the availability of salt and on local cus-toms.
After salting, the excess water formed must be removed from the fish or meat. With meat, it can be done by passing the larger pieces of meat through a wringer (two wooden rolls 1.5-2.0 cm apart). In doing so, the surface area is also increased which reduces the time needed for drying. A somewhat simpler method for removing moisture is to press meat and (mainly whole) fish. Put the fish on a clean, level surface and, using sheets of e.g. wood with weights on them, press the fish or meat as flat as possible. Subsequently the fish and meat is hung up before drying to speed up the drying process.
5.3 Hanging fish and meat up to dry Fish can be hung up in several ways on horizontal sticks to dry. It is advisable to hang fish on hooks or with string tied around the tails (Figure 9).
Figure 9: Drying fish
Drying 39
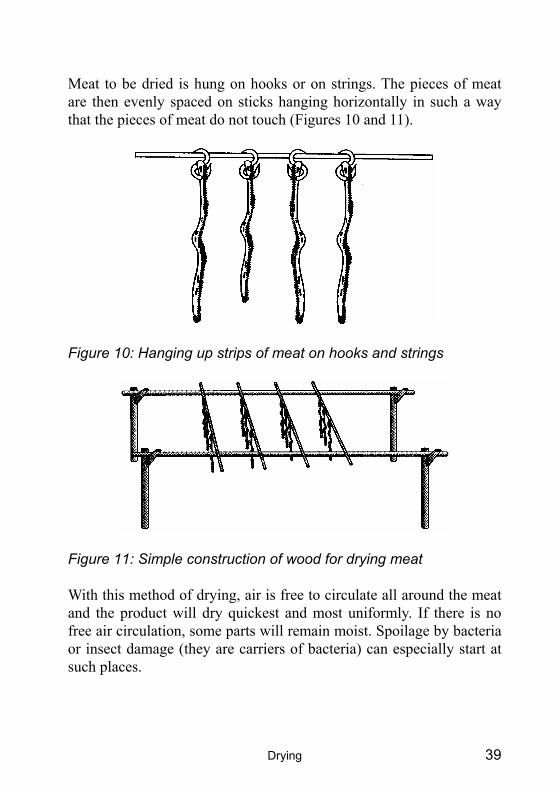
Meat to be dried is hung on hooks or on strings. The pieces of meat are then evenly spaced on sticks hanging horizontally in such a way that the pieces of meat do not touch (Figures 10 and 11).
Figure 10: Hanging up strips of meat on hooks and strings
Figure 11: Simple construction of wood for drying meat
With this method of drying, air is free to circulate all around the meat and the product will dry quickest and most uniformly. If there is no free air circulation, some parts will remain moist. Spoilage by bacteria or insect damage (they are carriers of bacteria) can especially start at such places.
Preservation of fish and meat 40
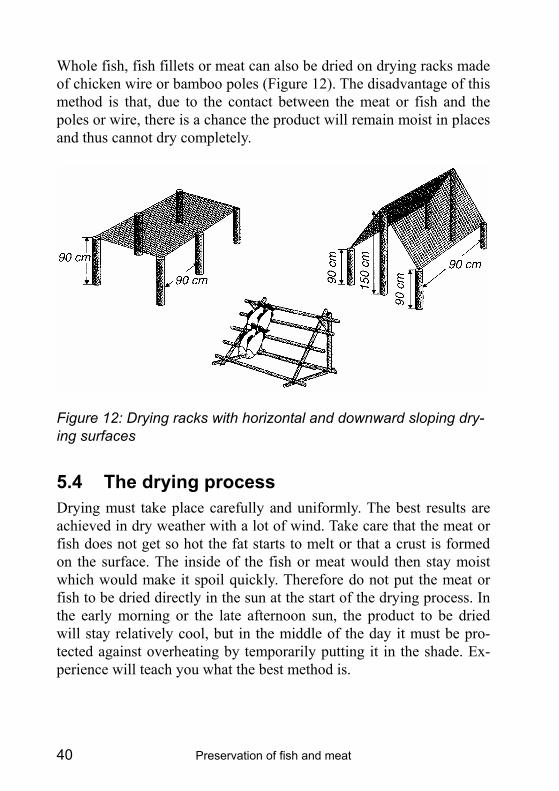
Whole fish, fish fillets or meat can also be dried on drying racks made of chicken wire or bamboo poles (Figure 12). The disadvantage of this method is that, due to the contact between the meat or fish and the poles or wire, there is a chance the product will remain moist in places and thus cannot dry completely.
Figure 12: Drying racks with horizontal and downward sloping dry-ing surfaces
5.4 The drying process Drying must take place carefully and uniformly. The best results are achieved in dry weather with a lot of wind. Take care that the meat or fish does not get so hot the fat starts to melt or that a crust is formed on the surface. The inside of the fish or meat would then stay moist which would make it spoil quickly. Therefore do not put the meat or fish to be dried directly in the sun at the start of the drying process. In the early morning or the late afternoon sun, the product to be dried will stay relatively cool, but in the middle of the day it must be pro-tected against overheating by temporarily putting it in the shade. Ex-perience will teach you what the best method is.
Drying 41
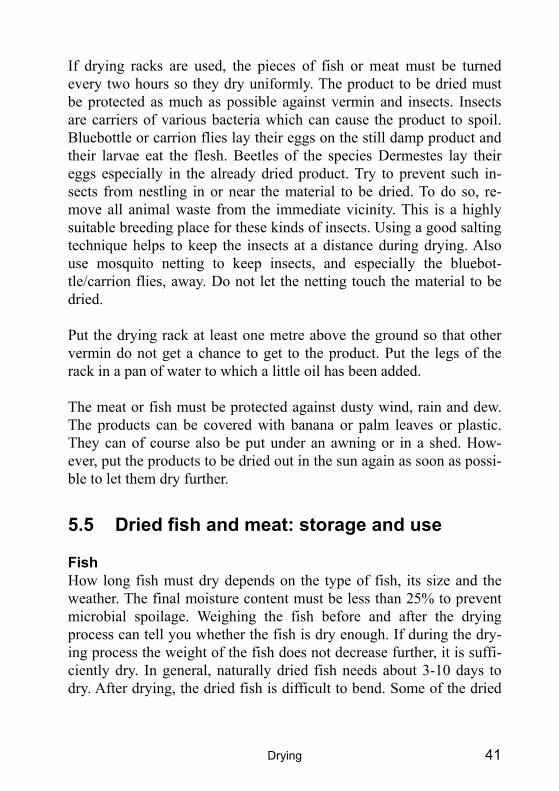
If drying racks are used, the pieces of fish or meat must be turned every two hours so they dry uniformly. The product to be dried must be protected as much as possible against vermin and insects. Insects are carriers of various bacteria which can cause the product to spoil. Bluebottle or carrion flies lay their eggs on the still damp product and their larvae eat the flesh. Beetles of the species Dermestes lay their eggs especially in the already dried product. Try to prevent such in-sects from nestling in or near the material to be dried. To do so, re-move all animal waste from the immediate vicinity. This is a highly suitable breeding place for these kinds of insects. Using a good salting technique helps to keep the insects at a distance during drying. Also use mosquito netting to keep insects, and especially the bluebot-tle/carrion flies, away. Do not let the netting touch the material to be dried.
Put the drying rack at least one metre above the ground so that other vermin do not get a chance to get to the product. Put the legs of the rack in a pan of water to which a little oil has been added.
The meat or fish must be protected against dusty wind, rain and dew. The products can be covered with banana or palm leaves or plastic. They can of course also be put under an awning or in a shed. How-ever, put the products to be dried out in the sun again as soon as possi-ble to let them dry further.
5.5 Dried fish and meat: storage and use
Fish How long fish must dry depends on the type of fish, its size and the weather. The final moisture content must be less than 25% to prevent microbial spoilage. Weighing the fish before and after the drying process can tell you whether the fish is dry enough. If during the dry-ing process the weight of the fish does not decrease further, it is suffi-ciently dry. In general, naturally dried fish needs about 3-10 days to dry. After drying, the dried fish is difficult to bend. Some of the dried
Preservation of fish and meat 42
fish products are very crumbly and breakable and must be handled with care after being dried.
In dry climates it is possible to store dried fish in sealable, sturdy boxes or wooden crates in which ventilation holes have been made. The holes must be covered with mosquito netting to keep out insects and vermin.
In humid conditions dried fish can take up moisture from the air and must be packed airtight. An additional advantage of airtight packaging is a delay in the onset of rancidity in fatty fish. Strong plastic bags can be used which are then closed properly. These provide protection against insects and moisture. However, the bags should not be placed in the direct sun or in warm places. The product can then start sweat-ing; there is, after all, some moisture left. This moisture can cause mould to grow on the fish. When such moisture is seen, the fish should be re-dried in the sun for several hours and re-packed.
Store the packed, dried fish in a cool, dry, well-ventilated and dark place.
Before unsalted or salted dried fish can be eaten, it must first be soaked in clean, cold water for 48 hours. In very warm weather, the fish should not be left standing longer than that. The water must be replaced several times by clean, fresh water. Fish can also be broken into smaller pieces before being soaked. If the fish is very salty, it can be slowly heated in water (until just before boiling) for about 1 hour. However, preserved fish, whether salted, dried and/or smoked, must eventually always be heated to 100 °C (212 0F) before being eaten!
Meat Experience will help you determine when meat is dry enough. Often this is after 5 days, depending on the weather. Well-dried meat has a uniform appearance after being broken. The colour is the same throughout the product and is often dark red. The consistency is hard and when it is pushed with a finger, it does not give. The smell and
Drying 43
taste of dried meat is different to that of fresh meat. Light oxidation of the meat fats gives a typical dried meat taste. Meat which has any signs of spoilage should not be stored any longer nor eaten.
After drying, the meat can be packed and stored. In dry climates it is possible to store dried meat in sealable, sturdy boxes or wooden crates in which ventilation holes have been made. These holes must be cov-ered with mosquito netting to keep out insects and vermin. One can also store-dried meat in closed (jute) bags hung from the ceiling to keep out any vermin. In humid conditions dried meat can take up moisture from the air and must be packed airtight. Strong plastic bags can be used which are then closed properly. Keep the packed meat in a cool, dry, well-ventilated and dark place. In such conditions, well-dried meat can be kept for months.
Before using salted or unsalted dried meat, it must first be soaked in boiling water or be boiled gently. How long the meat is soaked or heated depends on the desired taste and consistency.
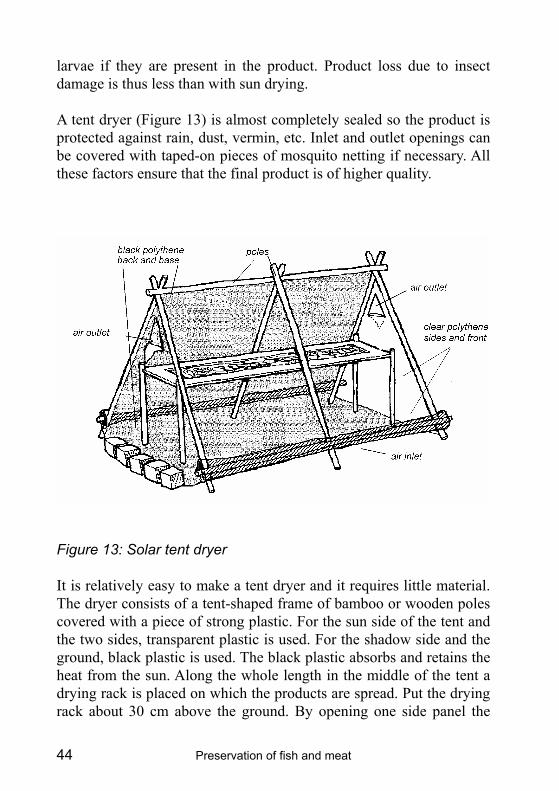
5.6 Solar drying Natural drying of fish and meat sometimes has disadvantages. Long periods of sunshine are required, the drying speed is slow and in areas with a relatively high humidity it is often difficult to dry the fish and meat adequately. An alternative for conventional sun drying is solar drying.
Improved sun drying for fish A solar tent dryer can be used for solar drying. This is the simplest and cheapest way of solar drying. Solar dryers work by retaining the heat of the sun's rays. A higher drying temperature and thus greater drying speed can then be achieved. The moisture content of the final product is lower than that achieved with conventional sun drying. All this means that the chance of spoilage occurring during the drying process and storage is smaller. The higher temperatures in a tent dryer slow down bacterial growth on and in the product and kill insects and their
Preservation of fish and meat 44
larvae if they are present in the product. Product loss due to insect damage is thus less than with sun drying.
A tent dryer (Figure 13) is almost completely sealed so the product is protected against rain, dust, vermin, etc. Inlet and outlet openings can be covered with taped-on pieces of mosquito netting if necessary. All these factors ensure that the final product is of higher quality.
Figure 13: Solar tent dryer
It is relatively easy to make a tent dryer and it requires little material. The dryer consists of a tent-shaped frame of bamboo or wooden poles covered with a piece of strong plastic. For the sun side of the tent and the two sides, transparent plastic is used. For the shadow side and the ground, black plastic is used. The black plastic absorbs and retains the heat from the sun. Along the whole length in the middle of the tent a drying rack is placed on which the products are spread. Put the drying rack about 30 cm above the ground. By opening one side panel the
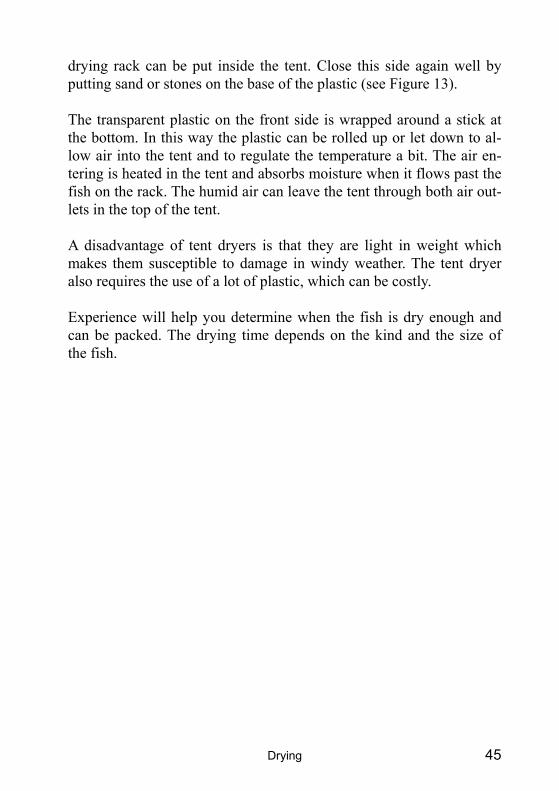
Drying 45
drying rack can be put inside the tent. Close this side again well by putting sand or stones on the base of the plastic (see Figure 13). The transparent plastic on the front side is wrapped around a stick at the bottom. In this way the plastic can be rolled up or let down to al-low air into the tent and to regulate the temperature a bit. The air en-tering is heated in the tent and absorbs moisture when it flows past the fish on the rack. The humid air can leave the tent through both air out-lets in the top of the tent.
A disadvantage of tent dryers is that they are light in weight which makes them susceptible to damage in windy weather. The tent dryer also requires the use of a lot of plastic, which can be costly.
Experience will help you determine when the fish is dry enough and can be packed. The drying time depends on the kind and the size of the fish.
Preservation of fish and meat 46
6 Smoking
6.1 General information Raw fish and meat can also be preserved by smoking. The preserving effect of the smoke is a result of drying (withdrawal of moisture) of the product during the smoking. The smoke particles, absorbed by the flesh, also have a preserving effect which, however, is less than the drying effect. The smoke particles, after being absorbed by the prod-uct, inhibit bacterial growth on the surface of the product. The smoke particles also have a positive effect on the taste and colour of the product.
The heat of the fire dries the fish or meat during the smoking process and if the temperature gets high enough, the flesh is cooked. This means that bacterial spoilage and spoilage due to enzyme activity (see Chapter 2) is prevented. Drying and cooking of the flesh when being smoked play an important role in the preservation. If a product is well dried during smoking then it can be stored for a long time.
There are three ways of smoking:
Cold smoke method: the temperature during the smoking is at most 30 °C (86 F) which means the product does not get cooked. Hot smoke method: during this process the product does get cooked but not dried (temperature varies between 65 and ±100 °C [149-212 °F]) Smoke drying: during this process, the product is first hot smoked, so that it gets cooked, and then, with continued smoking the product is dried (temperatures vary between 45-85 °C [113-185 °F]). Cold smoking gives a product which is not cooked. It is therefore sus-ceptible to spoilage and must be kept cool. The storage life of a cold-smoked product is not greater than that of fresh fish or meat. Further-more, it is difficult to control the process in high ambient tempera-tures; the temperature may not rise above 30 °C (86 °F). The process
Smoking 47
demands strict hygiene and the danger of spoilage occurring during the smoking process itself is present. Because of these disadvantages, this process will not be described further in this chapter.
Hot smoking, during which the fish or meat is heated without being dried, extends the storage life of raw products by at most two days. Hot smoking will also therefore not be described further. Most traditional smoked products in the tropics belong to the third category. They are hot smoked and subsequently dried under contin-ued smoking (smoke drying). The process takes about 12-18 hours or even days, depending on the product. Sometimes the product is salted and/or pre-dried (see Chapters 4 and 5) before being smoke dried. The smoke drying method will be described further below. Because smok-ing is virtually the same for meat and fish, no further distinction will be made between the two.
6.2 Preparation Fish can be smoked whole, cleaned, split or filleted, depending on lo-cal preferences and the desired final product. Meat must be cut into strips 5 cm wide and 1 cm thick before being smoked. An important fact is that the greater the surface area of the meat or fish, the greater the amount of smoke particles which can be absorbed during smoking and the better the product can dry.
It is advisable to kench salt or brine the product in a saturated salt so-lution (see Chapter 4) before smoking. This extends the storage quali-ties of the final product. Remove excess salt after salting by rinsing the raw material in clean (drinking) water, since salt can form a hard, impenetrable crust during smoking.
It is also advisable to dry the raw product for an hour in the sun (see Chapter 5) before smoking it. This prevents the outer layer of the fish or meat from sealing shut (case hardening) during smoking. That would mean the outer layer (which in the case of fish is their skin)
Preservation of fish and meat 48
would no longer allow moisture to pass through and therefore the in-side of the fish would not be able to dry properly. Insufficiently dried fish or meat cannot be stored long. Furthermore, pre-drying fish gives it a nice shiny surface layer. Whether or not a product is salted and/or dried before smoking depends on local customs and preferences.
The fish are threaded on stakes or tied to them using string or hooks. Meat is attached to sticks using string or hooks. Products which are hung up may not touch each other during smoking. The smoke would then not be able to reach everywhere and the product would not dry uniformly.
6.3 Wood The best smoke production is obtained from a smouldering fire of wood shavings and hard wood blocks. One can best begin the smoking process by burning damp wood. After that, smoke with dry wood. Some kinds of wood (such as oleander) are not suitable for smoking as they contain poisonous substances. All wood from deciduous trees and pines is reported to be safe. A dis-advantage of smoking is that a lot of wood is needed. If wood is scarce, one can also use papyrus, palm kernels, peeled maize-cobs and coconut husks as fuel.
6.4 Smoking ovens The smoking process has the best results in a dry environment. It is therefore often better to work in a smoke house rather than in the open air.
A few types of smoking ovens which can be made at a reasonable price are described below.
Smoking 49
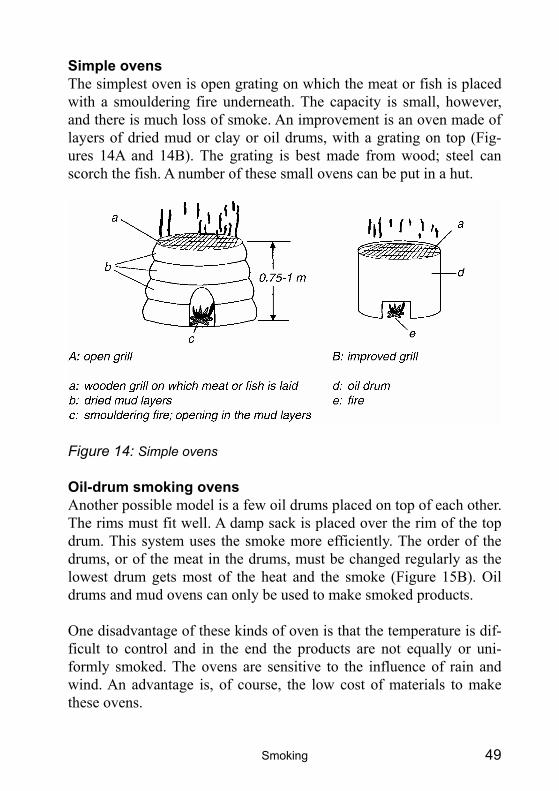
Simple ovens The simplest oven is open grating on which the meat or fish is placed with a smouldering fire underneath. The capacity is small, however, and there is much loss of smoke. An improvement is an oven made of layers of dried mud or clay or oil drums, with a grating on top (Fig-ures 14A and 14B). The grating is best made from wood; steel can scorch the fish. A number of these small ovens can be put in a hut.
Figure 14: Simple ovens
Oil-drum smoking ovens Another possible model is a few oil drums placed on top of each other. The rims must fit well. A damp sack is placed over the rim of the top drum. This system uses the smoke more efficiently. The order of the drums, or of the meat in the drums, must be changed regularly as the lowest drum gets most of the heat and the smoke (Figure 15B). Oil drums and mud ovens can only be used to make smoked products. One disadvantage of these kinds of oven is that the temperature is dif-ficult to control and in the end the products are not equally or uni-formly smoked. The ovens are sensitive to the influence of rain and wind. An advantage is, of course, the low cost of materials to make these ovens.

Preservation of fish and meat 50
Figure 15: Oil-drum smoking ovens
The Chorkor oven (see Figure 16) This large, rectangular smoking oven is especially suited for smoking smaller fish. It consists of a rectangular fire box onto which a number of shallow wooden framed wire mesh trays are stacked. Fish are placed on the trays and firewood is burnt in the fire box. The fire box can be constructed in different ways: ? clay and mud shaped by hand ? packed mud faced with cement ? clay mud blocks and mortar ? cement blocks with mortar.
Smoking 51
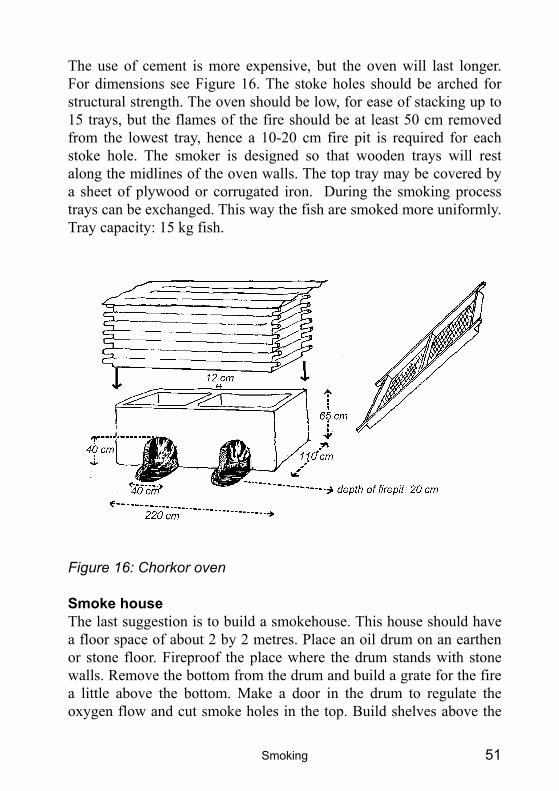
The use of cement is more expensive, but the oven will last longer. For dimensions see Figure 16. The stoke holes should be arched for structural strength. The oven should be low, for ease of stacking up to 15 trays, but the flames of the fire should be at least 50 cm removed from the lowest tray, hence a 10-20 cm fire pit is required for each stoke hole. The smoker is designed so that wooden trays will rest along the midlines of the oven walls. The top tray may be covered by a sheet of plywood or corrugated iron. During the smoking process trays can be exchanged. This way the fish are smoked more uniformly. Tray capacity: 15 kg fish.
Figure 16: Chorkor oven
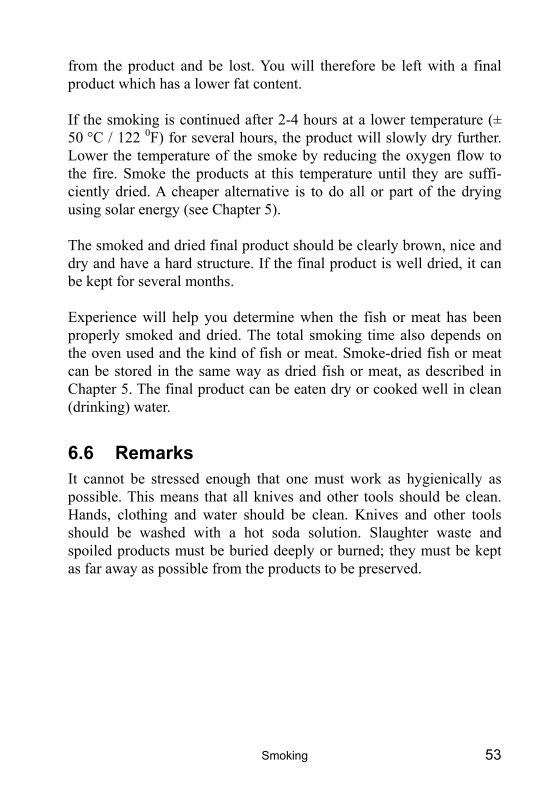
Smoke house The last suggestion is to build a smokehouse. This house should have a floor space of about 2 by 2 metres. Place an oil drum on an earthen or stone floor. Fireproof the place where the drum stands with stone walls. Remove the bottom from the drum and build a grate for the fire a little above the bottom. Make a door in the drum to regulate the oxygen flow and cut smoke holes in the top. Build shelves above the
Preservation of fish and meat 52
drum on which to put the meat. Leave enough room to let the smoke permeate the house. Instead of shelves, the walls can have supports to rest removable beams on. The meat and fish can be hung from these beams. The walls and the roof must be closed so that the smoke can-not escape. Build a ventilation valve or flap into the roof. This can be used to control the smoke circulation (Figure 17). When one builds a completely closed smokehouse, the fire can be made directly on the floor. Hang the meat on ropes or hooks above the oven.
Figure 17: Smoke house
6.5 Smoke-drying process Start the smoking process with a smouldering fire using some damp wood so that a lot of smoke (at ± 45 °C / 113 0F) is produced. This damp smoke forms a layer of moisture on the surface of the product which allows smoke particles to be absorbed quicker. Next, slowly raise the temperature (to ± 85 °C / 185 0F) by allowing more oxygen to enter. With fish do not allow the temperature to rise too quickly as the skin may split and case hardening can occur. Case hardening can also occur during the smoking of meat.
The product is then cooked for a short time (2-4 hours) at ± 85 °C (185 0F). It must be remembered that at such temperatures fat will leak
Smoking 53
from the product and be lost. You will therefore be left with a final product which has a lower fat content.
If the smoking is continued after 2-4 hours at a lower temperature (± 50 °C / 122 0F) for several hours, the product will slowly dry further. Lower the temperature of the smoke by reducing the oxygen flow to the fire. Smoke the products at this temperature until they are suffi-ciently dried. A cheaper alternative is to do all or part of the drying using solar energy (see Chapter 5).
The smoked and dried final product should be clearly brown, nice and dry and have a hard structure. If the final product is well dried, it can be kept for several months.
Experience will help you determine when the fish or meat has been properly smoked and dried. The total smoking time also depends on the oven used and the kind of fish or meat. Smoke-dried fish or meat can be stored in the same way as dried fish or meat, as described in Chapter 5. The final product can be eaten dry or cooked well in clean (drinking) water.
6.6 Remarks It cannot be stressed enough that one must work as hygienically as possible. This means that all knives and other tools should be clean. Hands, clothing and water should be clean. Knives and other tools should be washed with a hot soda solution. Slaughter waste and spoiled products must be buried deeply or burned; they must be kept as far away as possible from the products to be preserved.
Preservation of fish and meat 54
7 Fermenting fish
7.1 General information Fish is an important source of protein in the daily diet. However, fish also has the disadvantage that it spoils quickly. If fish is not boiled, salted, dried, smoked or preserved in some other way, it will quickly spoil. In South-East Asia, fermentation is the most important way of preserving fish. Fermented fish pastes and sauces have a much more important place in the daily diet than salted or dried fish. Fish sauces and pastes provide a welcome variation in the monotonous South-East Asian diet which often consists mainly of rice. Although fermented fish products are a good source of protein, they can be consumed only in limited quantities because of the high salt content of these products. Fermentation of fish is especially used in situations where drying of fish is not possible because the climate is too wet and where cooling and sterilization of the product is too expensive.
7.2 Fermentation During the fermentation of fish, protein is broken down in the pres-ence of a high salt concentration. The fish protein is mainly broken down by enzymes which come from the fish itself. These enzymes are mainly present in the gut. In the traditional fermentation methods in which the intestines are removed from the fish, fermentation will often be slower as there are fewer enzymes present in the flesh.
Role of micro-organisms Micro-organisms probably play no role in the breaking down of pro-tein during fermentation. However, micro-organisms which can toler-ate salt (because of the high concentrations of salt which are used dur-ing fermentation of fish) do seem to contribute to the specific taste and smell of the fermented product.
In some traditional fermentation techniques, such as in the production of sushi, a fermentable source of carbohydrates such as boiled rice is
Fermenting fish 55
added to the fermented fish product. This combination stimulates the growth of lactic acid bacteria. The rice is a source of sugars for the lactic acid bacteria. Due to the formation of lactic acid, which is desir-able in these products, the pH of the fish mixture is lowered making the product safer and easier to keep.
Salt Salt is used to draw liquid out of the fish and to control the fermenta-tion. Thus the high salt content (20-30%) ensures that spoilage due to bacteria is prevented and that the number of bacteria present drops as quickly as possible during fermentation. From a nutritional point of view, however, it would be best to use as little salt as possible. The high salt concentration also slows down the fermentation speed.
7.3 Traditional fermentation methods The fermentation methods described in this chapter are traditional methods. That is to say that the fermentation is allowed to take place by chance and is guided by experience. No control is exerted over the fermentation. If enough salt is added, some 30% by weight of fish, and there is no influx of air during the fermentation process (anaerobic environment), the fermentation will proceed by itself. The fermenta-tion methods are more or less standard for a given region. Local adap-tations or changes in the procedure can, of course, be found.
Experience will help determine whether or not the fermentation has gone well. If the product is different than normal, for example if it has a different colour or smell, the product should not be eaten.
Traditional products are divided into two groups: 1 products which, in the presence of salt, are fermented by the en-
zymes present in the fish flesh and intestines; 2 products which are fermented in the presence of boiled or roasted
rice. Usually in South-East Asia boiled rice is added to the fish-salt mix-ture.
Preservation of fish and meat 56
There are three kinds of fermented fish products: 1 the fish flesh is converted into a liquid fish sauce; 2 the fish is converted into a paste; 3 the fish, whole or in pieces, retains as much as possible of its own
structure.
Fermented fish products are eaten mainly in South-East Asia. Protein consumption is relatively low in those countries and the most impor-tant sources of protein are fish and fish products. Fermented fish products are an important protein supplement. They contain a number of essential amino acids which can form an important addition to the daily diet. For example, fish sauce contains a lot of the amino acid lysine. This amino acid is found only in small quantities in rice.
The quality of the resulting product depends on the fat content of the fish, the enzyme activity in the fish flesh, contaminations in the salt used and the temperature. Contaminated salt can be recognized by its slightly pink colour and can be purified by heating the salt on a metal sheet over a fire. If the same fermentation process takes place at a higher temperature, a completely different product results.
Fish used Often the surplus or the side catch of the main catch are fermented. These fish would otherwise be lost to spoilage. Mainly small kinds of fish are used. Table 1 lists the different kinds of fish used in South-East Asia for fermentation.
Table 1: Saltwater and freshwater fish and crustaceans which are mainly used in the fermentation methods of South-East Asia
Product group
Species
Saltwater fish Anchovies, herring, deep-bodied herring, Fimbriated herring, mackerel, round scad, slipmouth
Freshwater fish Carp, catfish, climbing perch, gourami, mudfish Shellfish and crusta-ceans
Shrimp, mussels, oysters, ctopus
Fermenting fish 57
7.4 Fermented fish sauce with 20-25% salt Fish are washed and left intact. The fish are then packed with large quantities of salt in earthenware or wooden containers. Usually 1 kg of salt is used for 3 to 4 kg of fish. The containers are filled to the rim so that no air is present and sealed so as to create an anaerobic environ-ment. The fish protein is broken down as a result of the activity of the enzymes present in the fish. After several months a clear, amber col-oured liquid will have been formed which is separated from the resi-due by squeezing it out. Sometimes a fish sauce can also be made dur-ing the preparation of fish paste. Fermentation of fish sauce takes longer than that of fish paste because all of the flesh must be broken down to create a clear liquid. A number of methods are given below for making the most common fish sauces.
South-East Asia:
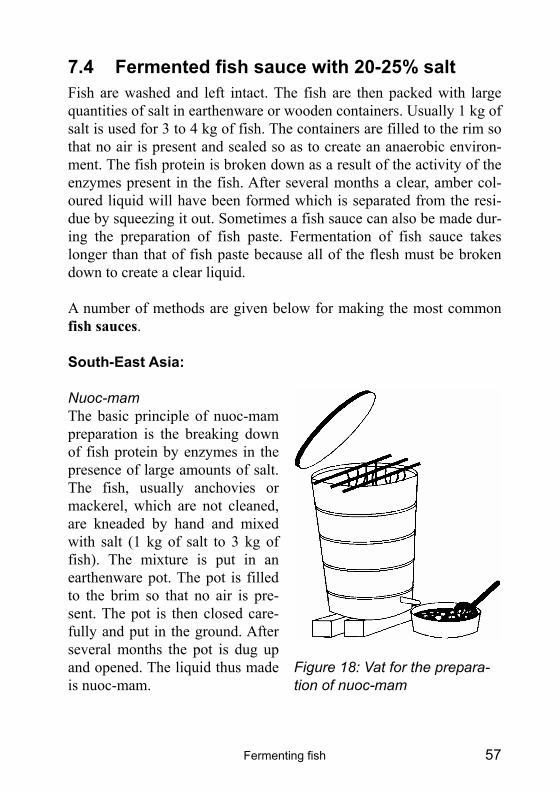
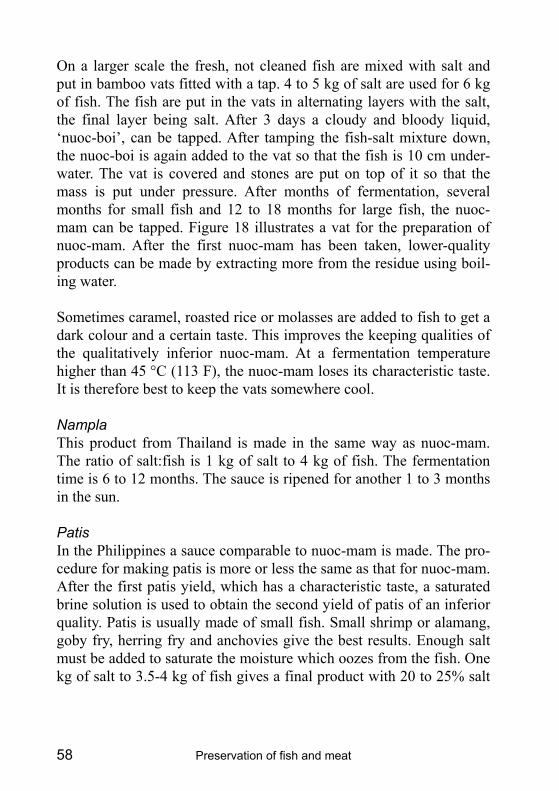
Nuoc-mam The basic principle of nuoc-mam preparation is the breaking down of fish protein by enzymes in the presence of large amounts of salt. The fish, usually anchovies or mackerel, which are not cleaned, are kneaded by hand and mixed with salt (1 kg of salt to 3 kg of fish). The mixture is put in an earthenware pot. The pot is filled to the brim so that no air is pre-sent. The pot is then closed care-fully and put in the ground. After several months the pot is dug up and opened. The liquid thus made is nuoc-mam.
Figure 18: Vat for the prepara-tion of nuoc-mam
Preservation of fish and meat 58
On a larger scale the fresh, not cleaned fish are mixed with salt and put in bamboo vats fitted with a tap. 4 to 5 kg of salt are used for 6 kg of fish. The fish are put in the vats in alternating layers with the salt, the final layer being salt. After 3 days a cloudy and bloody liquid, �nuoc-boi�, can be tapped. After tamping the fish-salt mixture down, the nuoc-boi is again added to the vat so that the fish is 10 cm under-water. The vat is covered and stones are put on top of it so that the mass is put under pressure. After months of fermentation, several months for small fish and 12 to 18 months for large fish, the nuoc-mam can be tapped. Figure 18 illustrates a vat for the preparation of nuoc-mam. After the first nuoc-mam has been taken, lower-quality products can be made by extracting more from the residue using boil-ing water.
Sometimes caramel, roasted rice or molasses are added to fish to get a dark colour and a certain taste. This improves the keeping qualities of the qualitatively inferior nuoc-mam. At a fermentation temperature higher than 45 °C (113 F), the nuoc-mam loses its characteristic taste. It is therefore best to keep the vats somewhere cool.
Nampla This product from Thailand is made in the same way as nuoc-mam. The ratio of salt:fish is 1 kg of salt to 4 kg of fish. The fermentation time is 6 to 12 months. The sauce is ripened for another 1 to 3 months in the sun.
Patis In the Philippines a sauce comparable to nuoc-mam is made. The pro-cedure for making patis is more or less the same as that for nuoc-mam. After the first patis yield, which has a characteristic taste, a saturated brine solution is used to obtain the second yield of patis of an inferior quality. Patis is usually made of small fish. Small shrimp or alamang, goby fry, herring fry and anchovies give the best results. Enough salt must be added to saturate the moisture which oozes from the fish. One kg of salt to 3.5-4 kg of fish gives a final product with 20 to 25% salt
Fermenting fish 59
content. Patis is also a by-product of the preparation of the fish paste bagoong (described further on).
Japan:
Shottsuru A Japanese variation of the nuoc-nam of South-East Asia is soy-sauce, made from soya beans. However, another sauce, shottsuru, is also made in Japan from sandfish. Sardines, anchovies and molluscs can also be used as starting material. The fluid is filtered and boiled and can be kept for years. Soya bean sediment or �koji�, which is fer-mented with wheat, can be added to shottsuru.
7.5 Fish pastes and whole fish A considerable part of the protein consumption in a number of Asian countries comes from the consumption of fish pastes, which are of greater importance from a nutritional point of view than fish sauces. There are two kinds of fish pastes in South-East Asia: 1 fish-salt mixtures 2 products which are fermented in the presence of cooked or roasted
rice on which yeasts and moulds are present.
The general method of preparation of fish pastes is the same as that described for fish sauces. Only the fermentation time is shorter, as not all of the fish flesh needs to be broken down. Fish paste must be mixed regularly to keep the salt evenly distributed.
South-East Asia:
Bagoong Bagoong, a fish paste from the Philippines, is made by fermenting well-cleaned whole or minced fish, shrimp, fish or shrimp eggs in the presence of salt (1 kg of salt to 3 kg of fish). The salt-fish mixture is put into earthenware pots and covered with cheesecloth for 5 days. The covered pots are then put in the sun for 7 days. After that, the
Preservation of fish and meat 60
product is fermented for a further 3 to 12 months. As a by-product, the fish sauce patis can be harvested by separating the liquid above from the paste. The paste is sometimes coloured by adding �angkak�, rice which has been treated with the red yeast-like organism Monascus purpureus. Bagoong can be stored for several years.
Balao-balao Balao-balao, which comes from the Philippines, is a fermented rice-shrimp product. Balao-balao is made by mixing boiled rice, whole raw shrimp and salt (20% of the weight of the shrimp). The product is stored in jars and is fermented for 7 to 10 days. The mixture becomes less sour the longer the fermentation takes place. The shells of the shrimp become red and soft and the mixture, including the rice, be-comes liquid. In the general preparation it is fried with garlic and on-ion after fermentation. It is eaten as a sauce or as a complete meal in itself.
Belachan Belachan is a paste made of small shrimp to which a relatively small amount of salt has been added (4 to 5 kg per 100 kg of shrimp). The mixture is dried on mats on the ground in the sun. After 4 to 8 hours of drying, during which 50% of the moisture is lost, any contaminants in the shrimp are removed. The shrimp are then chopped up and squeezed into wooden vats so that no more air is present. The paste which results is fermented for 7 days. After 7 days the substance is taken out of the barrel and is dried for 3 to 5 hours in the sun. The paste is again ground up after which it is put back in the wooden vats. The paste should now be fermented for one month.
Ngapi Small anchovies are washed with salt water and dried in the sun for 2 days. One kg of salt is added to 6 kg of dried fish in bamboo baskets. The mixture is pounded until it is fine and is then packed into wooden crates, after which fermentation takes place for a period of 7 days. Next, the mixture is again ground up and the same amount of salt is
Fermenting fish 61
added. The mixture is dried in the sun for 3 to 5 hours. Further fer-mentation takes place for 1 month in wooden crates.
Prahoc In Kampuchea, prahoc is prepared as follows: after the fish (cyprinids) are beheaded they are kneaded by hand so that the scales and intes-tines come loose. The fish are then washed in drinking water, during which care is taken to remove all scales. The fish are placed in a bas-ket and covered with banana leaves and stones for 24 hours in order to drain. The fish are salted and, after leaving them for half an hour, they are dried on mats for 1 day in the sun. The fish are then pounded into a paste. The paste is put into open jars and placed in the sun. At night, the jars are closed so that insects cannot get at the fish. Fermentation now takes place. The liquid which appears on top is removed. The paste can be eaten when no more liquid comes out.
Trassi Trassi is a fish paste made in Indonesia. Trassi udang is made of shrimp and trassi ikan of fish. The fresh shrimp or fish are mixed with 15% salt. The mixture is spread out on mats and is dried for 1 to 3 days in the sun. The moisture content of the fish or shrimp drops from 80 to 50%. The substance is kneaded and pounded until it is a paste. The paste is dried in thin layers in the sun. It is then packed in cylin-ders made of bamboo or nipa leaves after which it is allowed to ripen as long as is needed to get a typical trassi smell. Three kg of shrimp give 2 to 2.5 kg of trassi. Rice and potato peelings are sometimes added. Trassi must never be eaten raw but must always be heated in some way, such as boiling or frying, before consumption. Trassi is used as a seasoning.
As a supplement to fish sauces and fish pastes, entire fish are also fermented in South-East Asia.
Colombo cure The intestines and gills are removed from mackerel or non-fatty sar-dines after which the fish are washed in drinking water. The fish are

Preservation of fish and meat 62
mixed with salt (1 kg of salt to 3 kg of fish) and put into jars. Dried fruit pulp or tamarind (a tropical fruit) is added to the salt and fish to lower the pH (8 kg of tamarind to 100 kg of fish). The fish are kept covered with brine with the help of weighted mats and are fermented for 2 to 4 months. They are transferred to wooden barrels and care is taken to keep them covered with brine. The fermented fish can be kept for one year.
Pedah-siam This product is made of salted mackerel. During the preparation, the intestines are removed through the mouth. The fish are then salted, 3 kg of fish to 1 kg of salt, and stored for 24 hours. Ripening takes place under anaerobic conditions. The brine formed is removed regularly. A red colour appears after ripening.
Japan:
Sushi Sushi is a group of preserved fish products which are formed through the addition of boiled rice to fermented fish and salt. The low pH which results from the growth of lactic acid bacteria contributes to the preserving effect. The general preparation is as follows. The intestines of the fish are removed and the fish is mixed with 20 to 30% salt. Af-ter being stored for 1 to 2 months the fish are de-salted and the liquid is removed. Boiled rice and �koji� (fermented wheat) are placed on the bottom of a basket and the de-salted fish are alternated in layers with boiled rice or �koji�. The amount of boiled rice added is equal to 40 or 50% of the weight of the fish, the amount of �koji� is half the amount of boiled rice (rice: fish:koji = 2:4:1). The fermentation continues for another 10 days.
South America:
Anchoa Anchoa is a product found in a few South American countries, includ-ing Peru, Chili and Argentina. Whole anchovies are mixed with 35%
Fermenting fish 63
salt and placed in barrels. The fermentation, a result of enzyme activ-ity, takes place for a period of 3 to 4 months.
Africa:
Momone Momone is product from Ghana. In its general preparation, the intes-tines and gills of the fish are removed and the fish are washed in wa-ter. They are then rubbed with salt and packed in layers in barrels, al-ternating with layers of salt. The salt:fish ratio is 1:9. Fermentation takes place for 7 days. After that the fish are dried for 1 to 3 days on mats in the sun.
7.6 Remarks For all the above methods it is true that the fermentation procedures are more or less standardized in a particular region but local adjust-ments or changes in the procedure can always be found, of course. The fermentation methods described are left to chance and experience. No control is exerted over the fermentation. If enough salt is added, some 30% of the weight of the fish, and if air is excluded from the fermentation so that an anaerobic environment is created, then the fermentation will work by itself.
Experience will help determine whether the fermentation has gone well or not. If the product looks different from normal, for example if it has a different colour or smell, the product should not be eaten.
Always use as clean salt as possible. Also ensure good personal hy-giene.
Preservation of fish and meat 64
8 Canning
8.1 General information First, some general information about canning of fish and meat will be given. This covers the advantages and disadvantages of the process, packaging materials and materials needed. After this general introduc-tion, the following will be described: preparation of fish and meat, processing techniques and storage of the product.
A lot of canning equipment is manufactured in the U.S. Therefore pressures and temperatures will be given both in metric and American measuring units (e.g. pounds/inch2 and degrees Fahrenheit).
Principle and limitations The canning process involves placing foods in cans or jars and heating them to a temperature that destroys micro-organisms that could be a health hazard or cause the food to spoil. Canning also inactivates en-zymes that could cause the food to spoil. As the cans or jars are sealed hermetically, re-contamination from outside is prevented. In general, canned products can be stored for a long time without refrigeration. Chemical quality loss (in taste, colour and amount of certain essential nutrients) will slowly continue though.
Not all products can be heated in the same way. The amount of time and the temperature needed depends on: ? the number and kinds of micro-organisms and the form (active cells
or spores) in which they are present ? water content of the product ? acidity of the product ? presence of salt and/or other inhibitors of bacterial growth ? fat content of the product ? shape and size of the tin can or glass jar ? storage temperature
Canning 65
In fish and meat the number of micro-organisms initially present may be large, the internal water content is high and the pH is close to neu-tral. It is therefore difficult to kill all micro-organisms present and to get a safe product. The only safe way to sterilize low acid products such as fish and meat is by prolonged heating in a pressure canner or sterilizer in which temperatures higher than 100 °C (212 0F) can be reached.
The main reason pressure canning is necessary is the hazard of the Clostridium botulinum bacterium. Though the bacterial cells are killed at boiling temperatures, they can form spores that can withstand these temperatures. The spores grow well in low acid foods, in the absence of air, such as in canned low acid foods (vegetables and meats). When the spores germinate and grow to high numbers, they produce the deadly botulinum toxins (poisons). The spores can be destroyed by canning the food at a temperature of 115-121 0C (240-250 °F) for the correct length of time. This temperature can only be reached in a pres-sure canner.
As the canning of fish and meat requires a lot of energy, clean water and a large investment in equipment, usually it can only be done at a small-scale industrial level. It is less suited for household-level preservation.
8.2 Advantages and disadvantages of the canning process
Advantages of canning: ? The product can be stored longer and more safely. ? A good-quality product is ensured with fish and meat; it is better
than that of foods preserved by other methods like drying in the sun. The best quality is achieved by using fresh, healthy products and by exactly following the heating specifications for that product.

Preservation of fish and meat 66
Disadvantages of canning: ? The high price of the preserved foods due to the following:
-Glass or tinned steel packaging materials must be used, and may be expensive and difficult to obtain. Glass can be reused. -The processing equipment is, when compared with sun drying or smoking, very expensive. The costs for canning in glass jars are less. -The process requires a lot of fuel. ? The process requires more clean water than other methods do. ? The extended heating at high temperatures causes both a decrease in
taste and vitamin losses. The nutritional value of the food, com-pared to the fresh product, is therefore somewhat lower. Nutrients dissolving in the brine are lost if these juices are not consumed.
In this chapter, the methods for canning and sterilizing a variety of fish and meats are given. Because the packaging materials are very important in the procedures, these will be discussed first.
8.3 Packaging materials
General Cans made of tinned steel plate are especially used to store fish and meat products. Sometimes it is better to use glass; acid products, for example, corrode cans and are therefore better packed in glass. The shape and volume of the vessels must be chosen according to the quantity to be processed. Big bulky products such as pieces of meat must be sterilized in small or flat tin cans or jars which allow the heat to penetrate quickly to the centre of the product. Small products and products in brine, etc., can be packed in all shapes and types of tin cans or jars. The contents of an opened tin can or jar must be consumed as quickly as possible (in any case within 24 hours), which implies that the amount of food put in one can or jar should be adjusted to the amount of food consumed during one meal or in one day. Of course, it is true that the larger the tin cans or jars, the cheaper the packaging material
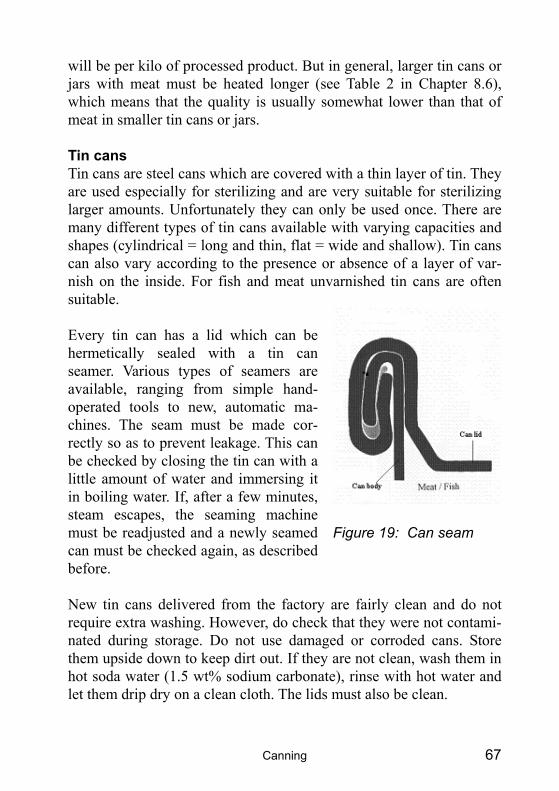
Canning 67
will be per kilo of processed product. But in general, larger tin cans or jars with meat must be heated longer (see Table 2 in Chapter 8.6), which means that the quality is usually somewhat lower than that of meat in smaller tin cans or jars.
Tin cans Tin cans are steel cans which are covered with a thin layer of tin. They are used especially for sterilizing and are very suitable for sterilizing larger amounts. Unfortunately they can only be used once. There are many different types of tin cans available with varying capacities and shapes (cylindrical = long and thin, flat = wide and shallow). Tin cans can also vary according to the presence or absence of a layer of var-nish on the inside. For fish and meat unvarnished tin cans are often suitable. Every tin can has a lid which can be hermetically sealed with a tin can seamer. Various types of seamers are available, ranging from simple hand-operated tools to new, automatic ma-chines. The seam must be made cor-rectly so as to prevent leakage. This can be checked by closing the tin can with a little amount of water and immersing it in boiling water. If, after a few minutes, steam escapes, the seaming machine must be readjusted and a newly seamed can must be checked again, as described before.
New tin cans delivered from the factory are fairly clean and do not require extra washing. However, do check that they were not contami-nated during storage. Do not use damaged or corroded cans. Store them upside down to keep dirt out. If they are not clean, wash them in hot soda water (1.5 wt% sodium carbonate), rinse with hot water and let them drip dry on a clean cloth. The lids must also be clean.
Figure 19: Can seam
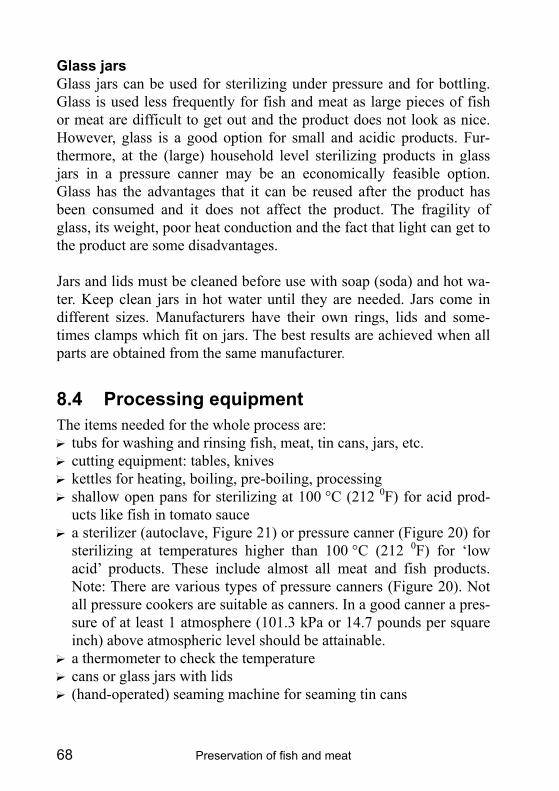
Preservation of fish and meat 68
Glass jars Glass jars can be used for sterilizing under pressure and for bottling. Glass is used less frequently for fish and meat as large pieces of fish or meat are difficult to get out and the product does not look as nice. However, glass is a good option for small and acidic products. Fur-thermore, at the (large) household level sterilizing products in glass jars in a pressure canner may be an economically feasible option. Glass has the advantages that it can be reused after the product has been consumed and it does not affect the product. The fragility of glass, its weight, poor heat conduction and the fact that light can get to the product are some disadvantages.
Jars and lids must be cleaned before use with soap (soda) and hot wa-ter. Keep clean jars in hot water until they are needed. Jars come in different sizes. Manufacturers have their own rings, lids and some-times clamps which fit on jars. The best results are achieved when all parts are obtained from the same manufacturer.
8.4 Processing equipment The items needed for the whole process are: ? tubs for washing and rinsing fish, meat, tin cans, jars, etc. ? cutting equipment: tables, knives ? kettles for heating, boiling, pre-boiling, processing ? shallow open pans for sterilizing at 100 °C (212 0F) for acid prod-
ucts like fish in tomato sauce ? a sterilizer (autoclave, Figure 21) or pressure canner (Figure 20) for
sterilizing at temperatures higher than 100 °C (212 0F) for �low acid� products. These include almost all meat and fish products. Note: There are various types of pressure canners (Figure 20). Not all pressure cookers are suitable as canners. In a good canner a pres-sure of at least 1 atmosphere (101.3 kPa or 14.7 pounds per square inch) above atmospheric level should be attainable. ? a thermometer to check the temperature ? cans or glass jars with lids ? (hand-operated) seaming machine for seaming tin cans
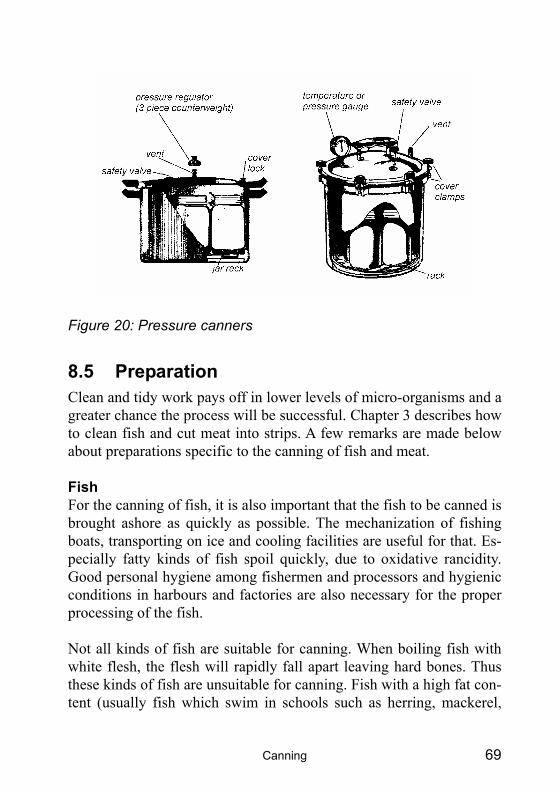
Canning 69
Figure 20: Pressure canners
8.5 Preparation Clean and tidy work pays off in lower levels of micro-organisms and a greater chance the process will be successful. Chapter 3 describes how to clean fish and cut meat into strips. A few remarks are made below about preparations specific to the canning of fish and meat.
Fish For the canning of fish, it is also important that the fish to be canned is brought ashore as quickly as possible. The mechanization of fishing boats, transporting on ice and cooling facilities are useful for that. Es-pecially fatty kinds of fish spoil quickly, due to oxidative rancidity. Good personal hygiene among fishermen and processors and hygienic conditions in harbours and factories are also necessary for the proper processing of the fish.
Not all kinds of fish are suitable for canning. When boiling fish with white flesh, the flesh will rapidly fall apart leaving hard bones. Thus these kinds of fish are unsuitable for canning. Fish with a high fat con-tent (usually fish which swim in schools such as herring, mackerel,
Preservation of fish and meat 70
tuna and sardines) have much firmer flesh and softer bones. When cooking such fish, the bones get soft before the flesh starts to fall apart. The fish thus retain their original shape and are very suitable for canning. Another advantage of canning fatty kinds of fish is that the oxygen entrapped in the can will be consumed during sterilization and this will prevent fat oxidation and rancidness, which is not achieved with simpler preservation methods such as drying, etc.
Start with fresh, healthy fish. Wash them and gut them in such a way that the intestines do not touch the flesh while being removed. Re-move the head and tail, and the bones of large fish, then wash the fish thoroughly in cold water. The fish can be tinned raw, but preferably fried or cooked. Fish is often also salted, pickled, smoked, etc. after being cleaned and before canning. The protein thus denatures which makes the flesh stay firm and not shrink after canning.
Use as little herbs and spices as possible. These are often a source of contamination with bacterial spores. Put small fish straight up in flat oval cans (herring). Big fish have to be cut into smaller pieces to get them into small tin cans.
Meat Bottling meat at 100 °C (212 0F) is not advisable but sterilizing it at 115-121 0C (240-250 0F) is possible. Use only clean, fresh pieces of meat. Remove the bones, cut the meat into smaller pieces (a few cm thick) and season as desired. Brown the meat by roasting or frying; big pieces should be partially cooked before frying. For small pieces in sauce, stock or brine, various sizes of tins and jars can be used. For bigger pieces, use flat tin cans.
In general, almost all meat products are suitable for canning. Only products which are eaten raw such as raw dry-cured ham or dry sau-sage are not suitable.
Canning 71
8.6 Processing techniques A simple description of the process of canning fish or meat is given below: ? Prepare fish or meat (Chapter 3) ? Precook (or roast/smoke) meat and fish; this reduces volume and
makes the flesh firmer. ? Fill tin can with fish or meat and filling liquid. ? Remove excess air from can, but keep the required headspace. ? Seal can shut with seamer.. ? Apply heat treatment (115-121 0C/240-250 0F for most fish and
meat products or 100 °C / 212 0F for sour products) ? Cool can, wash it and affix label.
Filling and closing containers After initial preparation, the products, which are still warm or heated to the filling temperature, are put into tin cans or glass jars as quickly as possible. These are then filled with hot water, hot broth, hot salt solution or hot oil to about half a centimetre under the rim. This is called the headspace; it is needed to give the food inside the jar room to expand during heating and to create a vacuum in the jar after cool-ing. Take care that no air pockets are sealed in with the product.
Glass jars can be closed at this point. The lid should fit well, but (for example in the case of a screw cap) it should not be twisted tightly closed, because some air should be allowed to escape while the jar is being heated. Immediately after the heating process the lid should be closed tightly. This way a vacuum will develop in the jar as the prod-uct cools and the food inside has no more chance of coming in contact with outside air and becoming contaminated.
Tin cans can be sealed after adding the liquid, as long as the middle of the product has reached the sealing temperature. Always measure the temperature in the middle of the tin can. The sealing temperature must not be lower than 60-80 °C (140-176 °F), depending on the product and the size of the can. If it is lower, the cans must be quickly reheated in a shallow water bath until the temperature in the middle of the tin
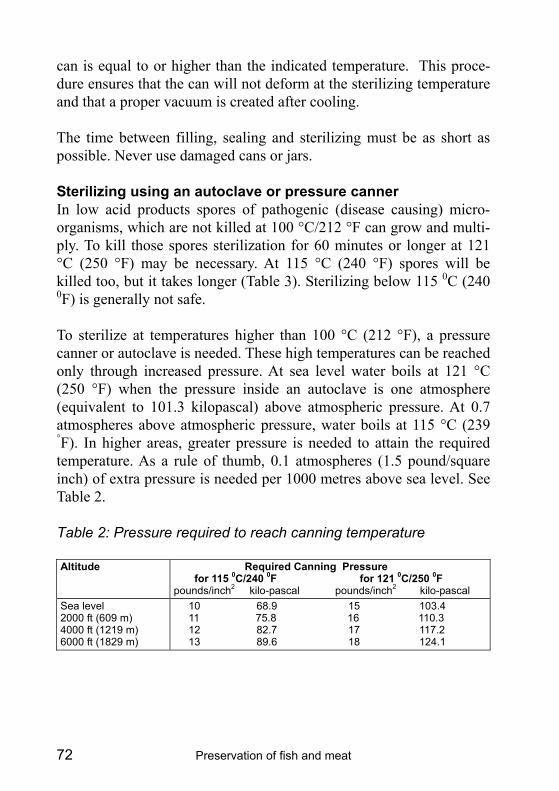
Preservation of fish and meat 72
can is equal to or higher than the indicated temperature. This proce-dure ensures that the can will not deform at the sterilizing temperature and that a proper vacuum is created after cooling.
The time between filling, sealing and sterilizing must be as short as possible. Never use damaged cans or jars.
Sterilizing using an autoclave or pressure canner In low acid products spores of pathogenic (disease causing) micro-organisms, which are not killed at 100 °C/212 °F can grow and multi-ply. To kill those spores sterilization for 60 minutes or longer at 121 °C (250 °F) may be necessary. At 115 °C (240 °F) spores will be killed too, but it takes longer (Table 3). Sterilizing below 115 0C (240 0F) is generally not safe.
To sterilize at temperatures higher than 100 °C (212 °F), a pressure canner or autoclave is needed. These high temperatures can be reached only through increased pressure. At sea level water boils at 121 °C (250 °F) when the pressure inside an autoclave is one atmosphere (equivalent to 101.3 kilopascal) above atmospheric pressure. At 0.7 atmospheres above atmospheric pressure, water boils at 115 °C (239 °F). In higher areas, greater pressure is needed to attain the required temperature. As a rule of thumb, 0.1 atmospheres (1.5 pound/square inch) of extra pressure is needed per 1000 metres above sea level. See Table 2.
Table 2: Pressure required to reach canning temperature
Altitude Required Canning Pressure for 115 0C/240 0F for 121 0C/250 0F pounds/inch2 kilo-pascal pounds/inch2 kilo-pascal
Sea level 2000 ft (609 m) 4000 ft (1219 m) 6000 ft (1829 m)
10 68.9 15 103.4 11 75.8 16 110.3 12 82.7 17 117.2 13 89.6 18 124.1
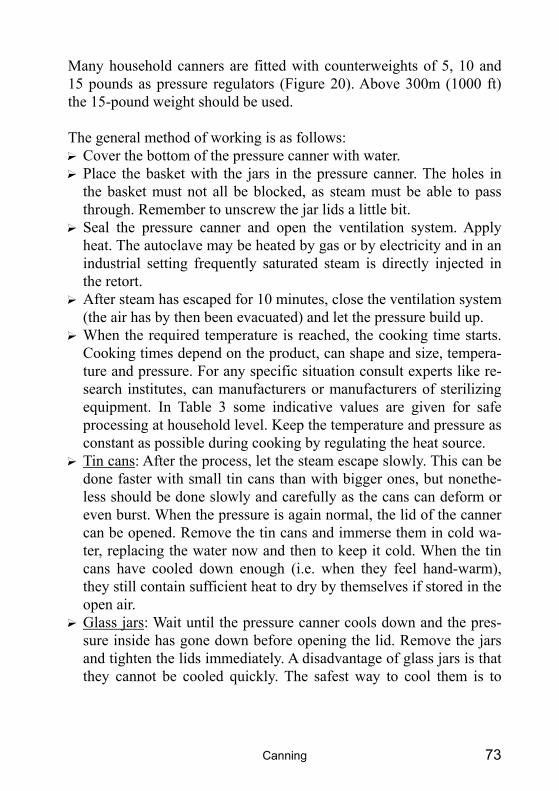
Canning 73
Many household canners are fitted with counterweights of 5, 10 and 15 pounds as pressure regulators (Figure 20). Above 300m (1000 ft) the 15-pound weight should be used.
The general method of working is as follows: ? Cover the bottom of the pressure canner with water. ? Place the basket with the jars in the pressure canner. The holes in
the basket must not all be blocked, as steam must be able to pass through. Remember to unscrew the jar lids a little bit. ? Seal the pressure canner and open the ventilation system. Apply
heat. The autoclave may be heated by gas or by electricity and in an industrial setting frequently saturated steam is directly injected in the retort. ? After steam has escaped for 10 minutes, close the ventilation system
(the air has by then been evacuated) and let the pressure build up. ? When the required temperature is reached, the cooking time starts.
Cooking times depend on the product, can shape and size, tempera-ture and pressure. For any specific situation consult experts like re-search institutes, can manufacturers or manufacturers of sterilizing equipment. In Table 3 some indicative values are given for safe processing at household level. Keep the temperature and pressure as constant as possible during cooking by regulating the heat source. ? Tin cans: After the process, let the steam escape slowly. This can be
done faster with small tin cans than with bigger ones, but nonethe-less should be done slowly and carefully as the cans can deform or even burst. When the pressure is again normal, the lid of the canner can be opened. Remove the tin cans and immerse them in cold wa-ter, replacing the water now and then to keep it cold. When the tin cans have cooled down enough (i.e. when they feel hand-warm), they still contain sufficient heat to dry by themselves if stored in the open air. ? Glass jars: Wait until the pressure canner cools down and the pres-
sure inside has gone down before opening the lid. Remove the jars and tighten the lids immediately. A disadvantage of glass jars is that they cannot be cooled quickly. The safest way to cool them is to
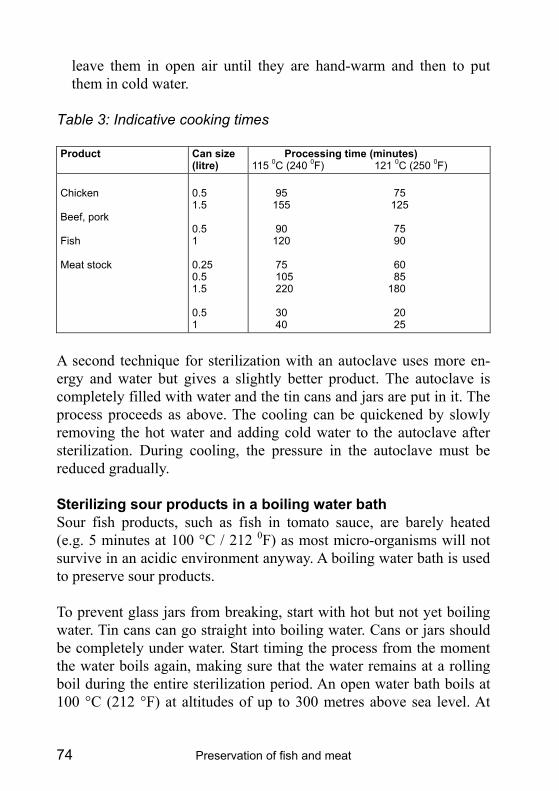
Preservation of fish and meat 74
leave them in open air until they are hand-warm and then to put them in cold water.
Table 3: Indicative cooking times
Product Can size (litre)
Processing time (minutes) 115 0C (240 0F) 121 0C (250 0F)
Chicken
Beef, pork
Fish
Meat stock
0.5 1.5
0.5 1
0.25 0.5 1.5
0.5 1
95 75 155 125
90 75 120 90
75 60 105 85 220 180
30 20 40 25
A second technique for sterilization with an autoclave uses more en-ergy and water but gives a slightly better product. The autoclave is completely filled with water and the tin cans and jars are put in it. The process proceeds as above. The cooling can be quickened by slowly removing the hot water and adding cold water to the autoclave after sterilization. During cooling, the pressure in the autoclave must be reduced gradually.
Sterilizing sour products in a boiling water bath Sour fish products, such as fish in tomato sauce, are barely heated (e.g. 5 minutes at 100 °C / 212 0F) as most micro-organisms will not survive in an acidic environment anyway. A boiling water bath is used to preserve sour products.
To prevent glass jars from breaking, start with hot but not yet boiling water. Tin cans can go straight into boiling water. Cans or jars should be completely under water. Start timing the process from the moment the water boils again, making sure that the water remains at a rolling boil during the entire sterilization period. An open water bath boils at 100 °C (212 °F) at altitudes of up to 300 metres above sea level. At
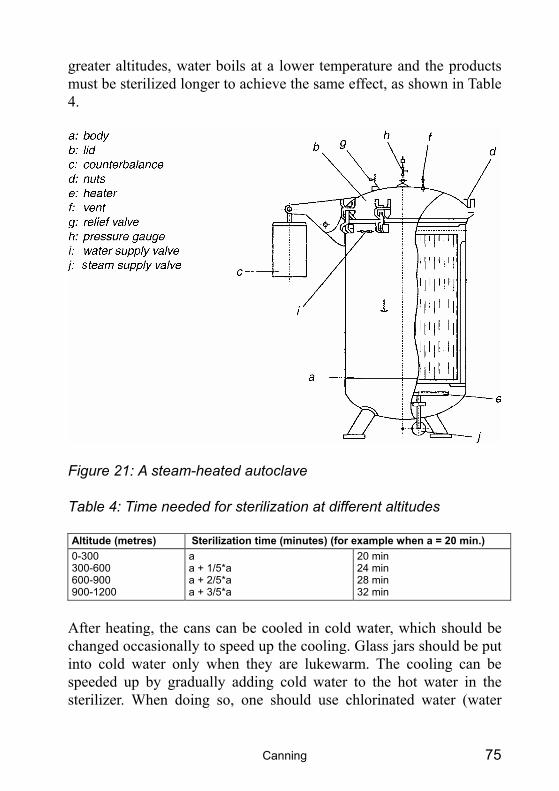
Canning 75
greater altitudes, water boils at a lower temperature and the products must be sterilized longer to achieve the same effect, as shown in Table 4.
Figure 21: A steam-heated autoclave
Table 4: Time needed for sterilization at different altitudes
Altitude (metres) Sterilization time (minutes) (for example when a = 20 min.) 0-300 300-600 600-900 900-1200
a a + 1/5*a a + 2/5*a a + 3/5*a
20 min 24 min 28 min 32 min
After heating, the cans can be cooled in cold water, which should be changed occasionally to speed up the cooling. Glass jars should be put into cold water only when they are lukewarm. The cooling can be speeded up by gradually adding cold water to the hot water in the sterilizer. When doing so, one should use chlorinated water (water
Preservation of fish and meat 76
containing 0.01 wt% chloride of lime = bleaching powder, available worldwide) so that the cans with possible micro leaks are not con-taminated.
8.7 Storage Store the canned foods in a cool place. Label them so that you know the contents. The storage temperature should preferably stay below 20 °C (68 °F); the cooler the better, as chemical quality degradation still continues after canning. With conventional canning techniques as described in this chapter not all bacterial spores may be killed. Fortu-nately, these heat resistant survivors do not grow at temperatures be-low 35 °C. If you want to store the product for a long time (up to 2 years) in tropical conditions with higher temperatures (of 35 °C or more), than a much more intensive heat treatment at 121 °C (250 °F) is necessary so that all micro-organism spores are inactivated. This is expensive in terms of fuel and will lower the quality of the canned product. Do not pile the preserved foods too close to each other; air should be able to circulate. The storeroom should also be dry and kept at a constant temperature. Only ventilate with dry air; avoid ventila-tion in warm, humid weather, as condensation could rust the tin cans. Always consume the oldest preserved foods first. Check each product for spoilage.
Pasteurized meat products (heat treatment at 80 °C / 176 °F) can be kept in cooling cells (2-4 °C / 35.5-39 °F) for up to 6 months.
8.8 Setting up a small-scale canning factory: prerequisites
Apart from the materials that are needed, there are also a number of other prerequisites to be met to ensure the success of a small-scale fish or meat canning factory.
Canning 77
Some important prerequisites are: ? sufficient clean water and energy ? good infrastructure (roads, cooling facilities, harbours, slaughter-
houses, etc.) ? financial feasibility: Is there a sound business plan? ? sufficient trained personnel to operate machines and the right level
of skills for bookkeeping and management ? technical support: machine maintenance and supply of spare parts ? regular supply of fish or meat at a reasonable price (Certain kinds of
fish are not available at certain times of the year.) ? good temperature control during the process ? testing of chemical and micro-biological quality after the process
(Laboratory facilities are needed for this.) ? a good market for canned fish or meat. If export is also possible,
apart from local trading, the cost of a can of fish or meat can be lowered.
Some publications in this Agrodok series provide valuable information related to some of the above issues: marketing for small-scale produc-ers is discussed in No. 26 and includes chapters on product selection, management, finance, cooperation and organization and cost price calculation; storage techniques for tropical agricultural products are explained in No. 31; preservation and processing techniques are dis-cussed in No. 3 (fruit and vegetables), No. 12 (fish and meat), Nro 36 (dairy products) and No. 22 (weaning foods). Strongly recommended is the CTA Publication �Setting up and running a small food business� (see page 84).
Unless all of the above prerequisites for canning are satisfied, it is bet-ter not to set up a fish or meat canning factory. Canning of meat under primitive conditions is not to be recommended. However, if one can meet all the necessary requirements and canning fish or meat proves to be economically feasible, then the local canning of fish or meat will certainly make a positive contribution to the diet of the local popula-tion.
Preservation of fish and meat 78
9 Cooling and freezing
9.1 General information The storage life of fish or meat, or of a fish or meat product, depends on the acidity and water content of the product. External influences such as oxygen (from the air), micro-organisms, storage temperature, light and water secretion are all also important determining factors.
Fresh fish and meat spoil very quickly in the high ambient tempera-tures of the tropics. If you want to keep fish or meat more than one day, you will have to preserve it. Another preservation method is to cool or freeze the products.
There are two possibilities for storing fresh fish or meat at low tem-peratures: ? cooling at -1° � +4 °C / 30-39 °F, which inhibits the growth of mi-
cro-organisms ? freezing at -18° � -30 °C / -0.5 � -22 °F, which completely stops
bacteria from growing.
Because of the low temperatures, all (bio)chemical, physical and mi-cro-biological processes are slowed down so decaying does not occur. To increase the storage life of the product, it is important to lower the temperature very quickly so as to preserve its quality. If the freezing goes too slowly, large ice crystals are formed which affect the struc-ture of the product.
To cool meat, one needs a large cooling cell. Cooling of fish is often done by keeping it on ice. This requires ice-making machines. Very expensive and advanced freezing equipment is needed for the freezing of fresh fish or meat. Furthermore, these preservation methods require a lot of energy and a large investment in the necessary materials. The supply of fish or meat must be large to cover these costs and there must also be a good market for cooled or frozen fish or meat. There-fore cooling and freezing can only be done at an industrial level. As
Cooling and freezing 79
we are mainly focusing on preservation methods which are feasible at household level, these methods will be described only very briefly. For further information, please read other relevant literature. In the following, an indication will be given of the relationship be-tween storage temperature and storage time for fish and meat so as to give an impression of the effectiveness of these methods. The installa-tion of an ice factory and/or cooling or freezing facility will not be discussed.
9.2 Cooling and freezing fish Whole fish, with the intestines and gills removed, and fish fillets are often cooled (at 0°C / 32°0F) by putting ice on them. Alternating lay-ers of fish and ice are put in a box. Be sure to use at least as much ice as fish. One should always end with a layer of ice. When the ice has melted, new ice must be added to keep the fish at 0 °C (32 °F). Espe-cially with fatty fish it is important to cool quickly so that oxidation of the fat is slowed down.
Fish can also be stored in cooling cells. The temperature there is just above freezing point, so ice lying on the fish melts and the fish stay fresh. This way fish will not freeze. The boxes in which the product are kept must not be kept on the ground, against a wall or against each other, but in clusters on pallets and slightly away from walls so that air can circulate freely.
If one wishes to store fish for more than 2 or 3 weeks, it must be fro-zen. For the freezing of fish in freezing cells, a temperature of -30°C / -22°F is recommended. If good quality fish is frozen at -30 °C / -22°F quickly after being caught, then it can be stored for a very long time.
Table 5 gives examples of the storage life of different kinds of fish using the cooling/freezing method. The storage life which one achieves depends on the quality of the fish and the storage conditions (e.g. how constant the temperature is).

Preservation of fish and meat 80
9.3 Cooling and freezing meat Cooling and freezing is also used for the storage of meat as well. With meat it is important to quickly lower the temperature of the carcass (± 40 °C/104 °F) down to 0-5 °C (32-41 °F) to prevent micro-biological spoilage at the surface of the meat. After this initial rapid cooling, the meat is kept cool or frozen.
Table 5: Storage life of fish at different temperatures
Product Temperature ( °C/F) Storage life Cooling Cod fillets 0/32 11 days 3/37 5 days 10/50 25 hours Bred trout (cleaned and vacuum packed)
0/32 18 days
5/41 10 days South American hake (cleaned)
0/32 11 days
5/41 5 days Freezing: Cod �30/�22 8 months-4 years Herring �30/�22 6 months-1 year
Preparations for cooling consist of slaughtering and quartering the carcass. Under optimal cooling of a quarter carcass, the meat loses 1-3% of its moisture in the first 24 hours. Cooling at �1 °C (30 °F) to +3 °C (37 0F) may be necessary during the period between slaughter and sale or during long transport (e.g. from Argentina to Europe). Cooling of meat is also used to ripen the meat: it makes it softer. This is frequently done, especially with beef. The air circulation in meat cooling cells is also very important.
Sometimes quarter carcasses are frozen but sometimes their volume is decreased by boning the quarters and cutting the meat into large chunks. At �10 °C (14 °F) to �18 °C (�0.5 °F), freezing a quarter car-cass of beef takes 4 to 6 days. Storage of frozen meat usually takes place at �12 °C (10 °F) to �20 °C (�4 °F). At such temperatures beef
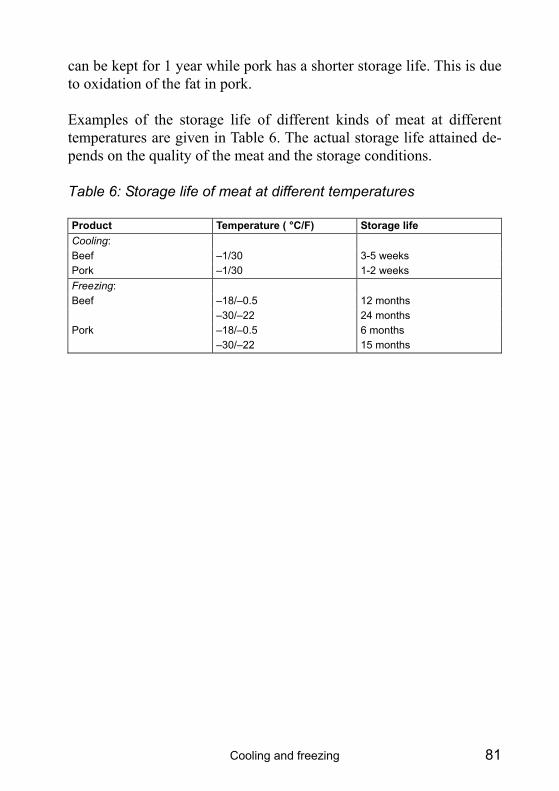
Cooling and freezing 81
can be kept for 1 year while pork has a shorter storage life. This is due to oxidation of the fat in pork.
Examples of the storage life of different kinds of meat at different temperatures are given in Table 6. The actual storage life attained de-pends on the quality of the meat and the storage conditions.
Table 6: Storage life of meat at different temperatures
Product Temperature ( °C/F) Storage life Cooling: Beef �1/30 3-5 weeks Pork �1/30 1-2 weeks Freezing: Beef �18/�0.5 12 months �30/�22 24 months Pork �18/�0.5 6 months �30/�22 15 months
Preservation of fish and meat 82
Further reading
A number of Agromisa publications are available which complement this booklet. These are: � Agrodok 3: Preservation of fruit and vegetables � Agrodok 26: Marketing for small-scale producers � Agrodok 31: The storage of Tropical Agricultural Products � Agrodok 36: Preparation of Dairy Products
Small-scale food processing: A directory of equipment and meth-ods (revised edition). Azam-Ali, S., Judge, E., Fellows, P., Battcock, M. 2003, Northern Foods, ITDG, CTA, ISBN 1 85339 504 8
An introduction to fish handling and processing: I.J. Clucas and P.J. Sutcliffe., G 143, 1981, Tropical Products Institute. ISBN: 0-85954-124-X
Fish handling; preservation and processing in the tropics: parts 1 and 2, G144-145, 1981, Tropical Products Institute. ISBN:0-85954-125-8 and ISBN 0-85954-126-6
Ice in fisheries. 1992, FAO Fisheries Technical Paper. No. 331. FAO, Rome. ISBN 92-5-103280-7 Available at internet on: http://www.fao.org/DOCREP/T0713E/T0713E00.HTM
Guidelines for slaughtering, meat cutting and further processing. 1991, FAO, Rome, ISBN 92-5-102921-0. FAO Animal production and health paper 91, Available at internet at http://www.fao.org/DOCREP/004/T0279E/T0279E00.htm
Fish processing UNIFEM ISBN 1853391379, 1993, Published by: ITDG Publishing
Drying UNIFEM ISBN 1853393088, 1995, Published by: ITDG Pub-lishing.
Further reading 83
Manual on fish canning, 1988, FAO, Rome ISBN 92-5-102726-9 FAO fisheries technical paper - 285. Available on internet at: http://www.fao.org/DOCREP/003/T0007E/T0007E00.htm
Manual on simple methods of meat preservation, FAO animal pro-duction and health paper 79, 1990, FAO, Rome ISBN 92-5-102744-7. Internet: http://www.fao.org/docrep/003/x6932e/X6932E00.htm
Economic aspects of small-scale fish freezing, P.R. Street, I.J. Clu-cas, A. Jones and R.C. Cole. G 146, 1980, Tropical Products Institute.
Conserver et transformer le poisson : guide technique et méthod-ologique GRET/CTA, 1993. ISBN: 2-86844-053, CTA n° 514,
Setting up and running a small food business, Opportunities in food processing series: Fellows, P.J. and Axtell, B. (2001). CTA. ISBN 92-9081-246X.
Appropriate food packaging: Fellows, P.J. and Axtell, B (2002). ITDG. ISBN: 1853395625.
Preservation of fish and meat 84
Useful addresses
There are a number of institutes you can contact for further informa-tion on food technology or appropriate technology:
The Netherlands. University of Utrecht, Dept. of Public Health and Food Safety, PO Box 80175, 3508 TD Utrecht, E-mail: [email protected] The Netherlands. TNO Nutrition and Food Research, PO Box 360, 3700 AJ Zeist, Internet: http://www.voeding.tno.nl The Netherlands. The Netherlands Institute for Fisheries Research, PO Box 68, 1970 AB IJmuiden, Internet: http://www.rivo.dlo.nl
Italy: FAO Headquarters, Viale delle Terme di Caracalla, 00100 Rome. Internet: http://www.fao.org E-mail: [email protected]
India. Action for Food (AFPRO), 25/1A, Institutional Area, D-Block Pankha Road, Janakpuri New Delhi 110058. Internet: http://www.afpro.org
Ghana. Technology Consultancy Centre, University of Science and Technology, University Post Office, Kumasi, Ghana. E-mail [email protected] ITDG-Eastern Africa AAYMCA Building (Second Floor) Along State House Crescent P.O. Box 39493, Nairobi, Kenya ITDG Latin America , Av Jorge Chávez 275 � Miraflores, Apartado Postal 18-0620, Lima 18, PERU. Internet: www.itdg.org.pe Email: [email protected] ITDG Nepal, Pandol Marga, Lazimpat, PO Box 15135, Kathmandu, Nepal ITDG Bangladesh, GPO Box 3881, Dhaka 1000, Bangladesh House 32, Road 13/A, Dhanmondi R/A, Dhaka -1209 Internet: www.itdgbangladesh.org
Useful addresses 85
ITDG South Asia, 5, Lionel Edirisinghe Mawatha, Kirulapone, Co-lombo 05, Sri Lanka. email: [email protected] ITDG Group Southern Africa (Harare), Number 4 Ludlow Road (off Enterprise Road), Newlands, Harare. E-mail: [email protected] or [email protected] ITDG Sudan. PO Box 4172, Khartoum Central, Sudan. E-mail: [email protected]
There may be institutes in your own country that can help you with your problems or questions. One can often get assistance from the Ministry of Agriculture or from industry (e.g. to find addresses for equipment, specific product information, etc.).
Preservation of fish and meat 86
Glossary
Amino acids Building blocks of protein Aerobic In the presence of oxygen Anaerobic In the absence of oxygen Autolysis Destruction of substances by their own enzymes Bacteria One-celled micro-organisms present throughout
the environment. Some of them cause severe ill-ness.
Curing Preserving by smoking, salting, drying, ferment-ing, acid curing or various combinations of these.
Enzymes Proteins specialized to catalyze biological reac-tions, e.g. the conversion of certain organic sub-stances into different ones
Fat oxidation Reaction of fat with oxygen, which leads to a ran-cid taste in fish and meat
Fermentation Process by which enzymes, usually from micro-organisms, cause desired changes (in taste, smell, texture)
Oxidation reaction The reaction of a substance with oxygen from the air
Pasteurization Partial sterilization of foods at a temperature that destroys harmful micro-organisms without major changes in the chemistry of the food. Not recom-mended as a preservation method for fish and meat.
pH Level of acidity Spores Bacteria in a dormant state Sterilization Destruction of all micro-organisms, including
most vegetative forms and spores, by chemicals or heat treatment (prolonged heating at 100-121 0C).
Structure Firmness