principles level of exercise, fitness & health · pdf fileunit 4 principles of exercise,...
TRANSCRIPT

2LEVELGYM INSTRUCTOR WORKBOOK / MANUAL 3
UNIT 4
PRINCIPLES OF EXERCISE, FITNESS & HEALTH
www.thetrainingroom.com
Gym Instructor Workbook Manual 3
2

1UNIT
4
3
Unit 4 Principles of Exercise, Fitness & Health
Unit 4.1 Components of Fitness
Unit 4.2 Effects & Health Benefits of Exercise
Unit 4.3 Applying the Principles & Variables of Fitness to an Exercise Programme
Unit 4.4 Monitoring Exercise Intensity
Unit 4.5 Exercise Contraindications & Safety Guidelines for Special Populations
Unit 4.6 Importance of Health Eating
Page
5
13
25
39
47
61
UNIT CONTENTS

www.thetrainingroom.com
4
Gym Instructor Workbook Manual 3
5
1UNIT
4
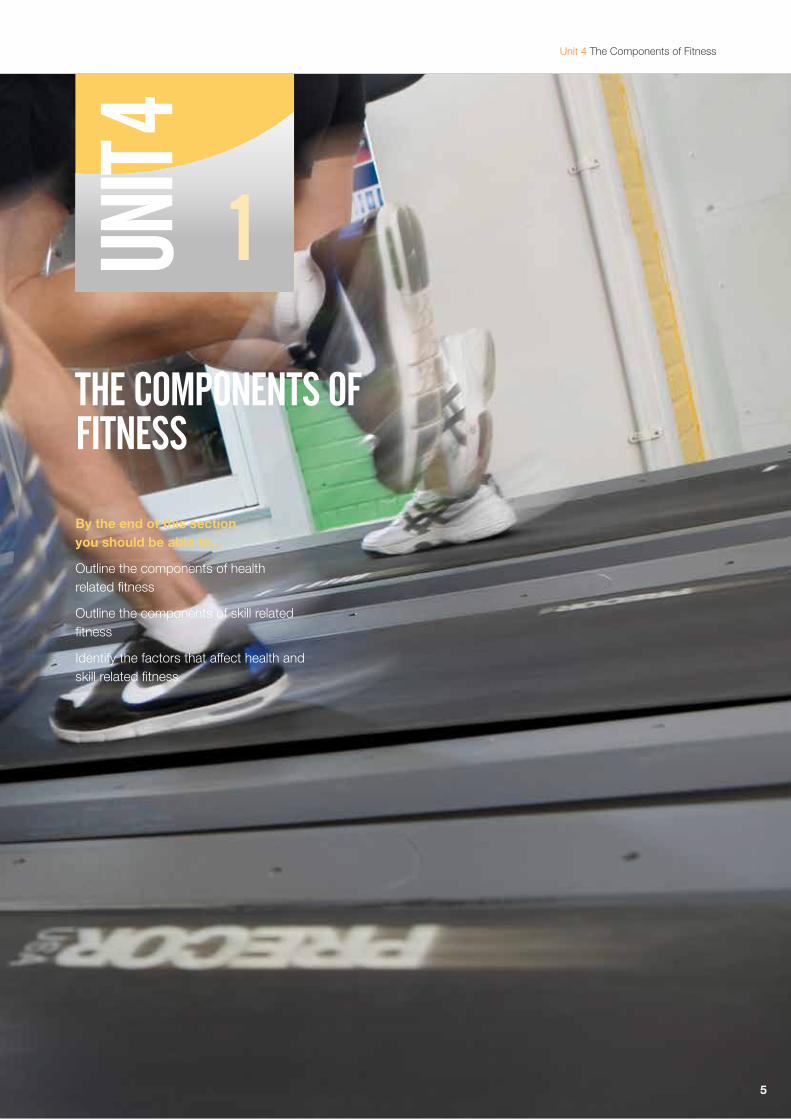
THE COMPONENTS OF FITNESS
By the end of this section you should be able to...
Outline the components of health related fitness
Outline the components of skill related fitness
Identify the factors that affect health and skill related fitness
Unit 4 The Components of Fitness
Gym Instructor Workbook Manual 3
6
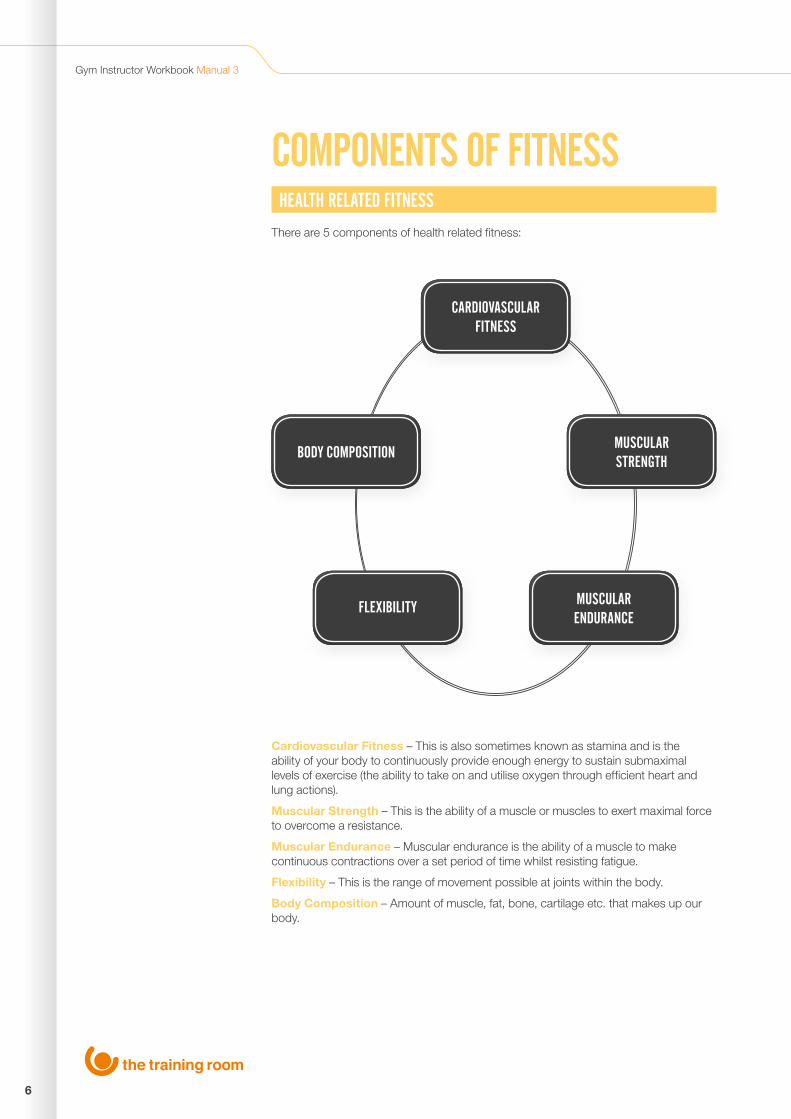
COMPONENTS OF FITNESSHEALTH RELATED FITNESS
There are 5 components of health related fitness:
Cardiovascular Fitness – This is also sometimes known as stamina and is the ability of your body to continuously provide enough energy to sustain submaximal levels of exercise (the ability to take on and utilise oxygen through efficient heart and lung actions).
Muscular Strength – This is the ability of a muscle or muscles to exert maximal force to overcome a resistance.
Muscular Endurance – Muscular endurance is the ability of a muscle to make continuous contractions over a set period of time whilst resisting fatigue.
Flexibility – This is the range of movement possible at joints within the body.
Body Composition – Amount of muscle, fat, bone, cartilage etc. that makes up our body.
CARDIOVASCULAR FITNESS
BODY COMPOSITION
FLEXIBILITY
MUSCULAR STRENGTH
MUSCULARENDURANCE
Unit 4 The Components of Fitness 1
7
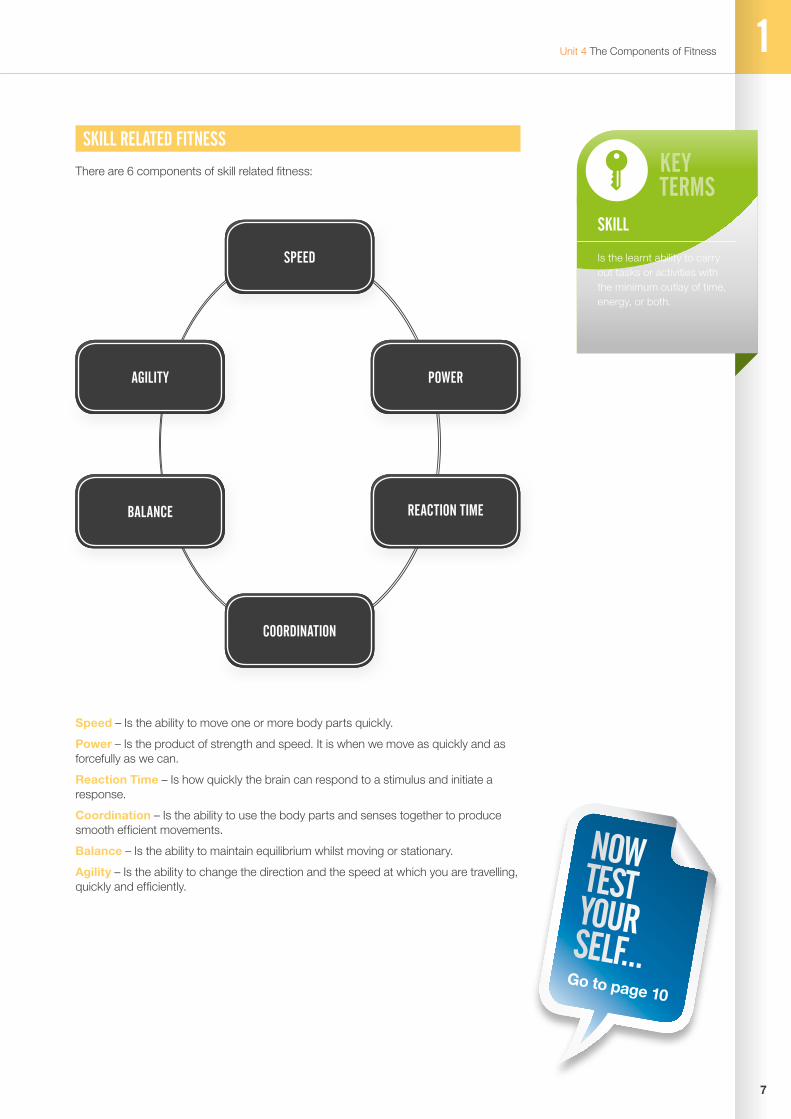
Speed – Is the ability to move one or more body parts quickly.
Power – Is the product of strength and speed. It is when we move as quickly and as forcefully as we can.
Reaction Time – Is how quickly the brain can respond to a stimulus and initiate a response.
Coordination – Is the ability to use the body parts and senses together to produce smooth efficient movements.
Balance – Is the ability to maintain equilibrium whilst moving or stationary.
Agility – Is the ability to change the direction and the speed at which you are travelling, quickly and efficiently.
KEYTERMS
SKILL
Is the learnt ability to carry out tasks or activities with the minimum outlay of time, energy, or both.
NOWTESTYOURSELF...
Go to page 10
SKILL RELATED FITNESS
There are 6 components of skill related fitness:
SPEED
COORDINATION
AGILITY
BALANCE
POWER
REACTION TIME
Gym Instructor Workbook Manual 3
8
HELPFULHINT
FACTORS THAT AFFECT HEALTH AND SKILL RELATED FITNESS
Age – Physical fitness generally declines with the ageing process. However, the speed at which the effects of ageing occur can be offset by regular physical activity.
Gender – Due to hormonal deviations (testosterone/oestrogen) males tend to have a larger muscle mass, larger lungs and a larger aerobic ability than females, who often have better flexibility and a higher body fat percentage.
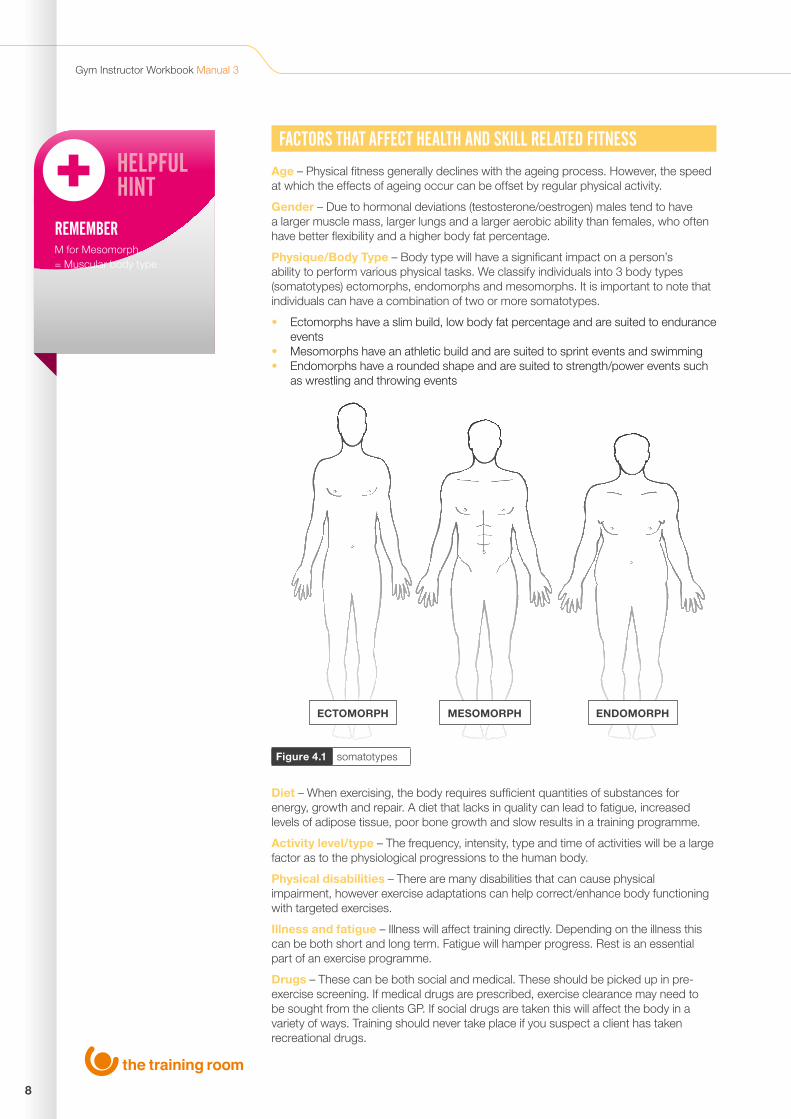
Physique/Body Type – Body type will have a significant impact on a person’s ability to perform various physical tasks. We classify individuals into 3 body types (somatotypes) ectomorphs, endomorphs and mesomorphs. It is important to note that individuals can have a combination of two or more somatotypes.
• Ectomorphs have a slim build, low body fat percentage and are suited to endurance events
• Mesomorphs have an athletic build and are suited to sprint events and swimming• Endomorphs have a rounded shape and are suited to strength/power events such
as wrestling and throwing events
Diet – When exercising, the body requires sufficient quantities of substances for energy, growth and repair. A diet that lacks in quality can lead to fatigue, increased levels of adipose tissue, poor bone growth and slow results in a training programme.
Activity level/type – The frequency, intensity, type and time of activities will be a large factor as to the physiological progressions to the human body.
Physical disabilities – There are many disabilities that can cause physical impairment, however exercise adaptations can help correct/enhance body functioning with targeted exercises.
Illness and fatigue – Illness will affect training directly. Depending on the illness this can be both short and long term. Fatigue will hamper progress. Rest is an essential part of an exercise programme.
Drugs – These can be both social and medical. These should be picked up in pre-exercise screening. If medical drugs are prescribed, exercise clearance may need to be sought from the clients GP. If social drugs are taken this will affect the body in a variety of ways. Training should never take place if you suspect a client has taken recreational drugs.
Figure 4.1 somatotypes
ECTOMORPH MESOMORPH ENDOMORPH
REMEMBERM for Mesomorph = Muscular body type

Unit 4 The Components of Fitness 1
9
THE COMPONENTS OF FITNESS SUMMARY OUTCOMESCAN YOU NOW...
Outline the components of health related fitness
Outline the components of skill related fitness
Identify the factors that affect health and skill related fitness

10
Gym Instructor Workbook Manual 3
www.thetrainingroom.com
NOWTESTYOURSELF...
TASK 1.1
Fill in the blank components of fitness:
TASK 1.2
The 6 components of skill related fitness are:
FLEXIBILITY
MUSCULARSTRENGTH
11
Unit 4 The Components of Fitness 1
TASK 1.3
List 8 factors that can affect health and skill related fitness:
TASK 1.4
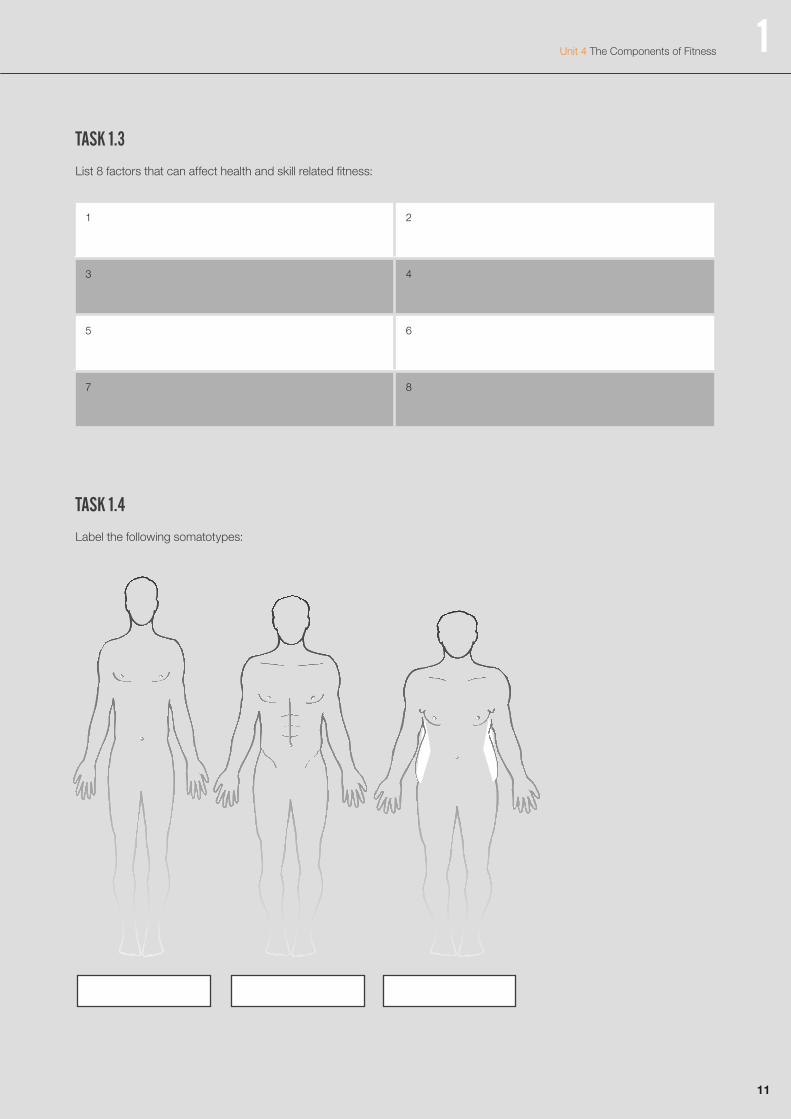
Label the following somatotypes:
1 2
3 4
5 6
7 8
www.thetrainingroom.com
12
Gym Instructor Workbook Manual 3
2UNIT
4
13
Unit 4 The Effects and Health Benefits of Exercise
THE EFFECTS AND HEALTH BENEFITS OF EXERCISE By the end of this section you should be able to…
Describe cardiovascular and respiratory adaptations to endurance/aerobic training
Identify the short and long term effects of exercise on blood pressure
Explain the “blood pooling” effect following exercise
Identify the affects of exercise on bones and joints including the significance of weight bearing exercise
Describe delayed onset of muscle soreness (DOMS) and identify exercises or techniques likely to increase its risk
Explain the short and long term effects of different types of exercise on muscle
Identify different exercises that can improve posture

14
Gym Instructor Workbook Manual 3
WHY EXERCISE?The term hypokinetic describes many of the diseases and conditions associated with inactivity and poor fitness and first originated in the book Hypokinetic Disease (Kraus & Raab,1961).
Hypokinetic Diseases include:
Obesity
High blood pressure
High cholesterol
Osteoporosis
Osteoarthritis
Lower back pain
Type 2 diabetes mellitus
THE HEALTH BENEFITS OF EXERCISE
• Physically active people have a 33-50% lower risk of developing type 2 diabetes compared with inactive people. The preventative effect is particularly strong for those at high risk of developing type 2 diabetes, as it can reduce their risk of developing the disease by up to 64%
• Physical activity programmes can help reduce the risk of falling, and therefore fractures, among older people
• Physical activity is effective in the treatment of clinical depression and can be as successful as psychotherapy or medication, particularly in the longer term.
• Physical activity is associated with a reduction in overall risk of cancer. In colon cancer the most active individuals have, on average, a 40-50% lower risk than the least active. Women with higher levels of physical activity have about a 30% lower risk of breast cancer than the least active
• Physical activity is a major independent protective factor against coronary heart disease in men and women. Inactive and unfit people have almost double the risk of dying from coronary heart disease compared with more active and fit people. People at high risk of coronary heart disease may benefit even more from physical activity compared with people at lower risk. Physical activity also significantly reduces the risk of a stroke and provides effective treatment of peripheral vascular disease
(The Department of Health, 2004)
Exercises can be categorised into 2 areas:
1. Aerobic/Cardiovascular
2. Anaerobic
The key differences between these two types of exercises are the duration and the exercise intensity.
VITALFACTS
HYPOKINETIC
Hypo - lack of
Kinetic - movement
Hypokinetic diseases are conditions related to inactivity or low levels of movement.
15
Unit 4 The Effects and Health Benefits of Exercise 2
CARDIOVASCULAR EXERCISE
These types of exercises are low to moderate in intensity using slow twitch muscle fibres, these primarily utilise energy created from the aerobic energy system and typically use large muscle groups in a rhythmical movement for extended periods of time. For example cycling, swimming and running
Cardiovascular exercise improves the efficiency of oxygen transfer between the heart and lungs, this can be measured using VO2 max. VO2 max is the maximum capacity of an individual’s body to transport and use oxygen during exercise.
“Maximal oxygen uptake (VO2 max) is widely accepted as the single best measure of cardiovascular fitness and maximal aerobic power. Absolute values of VO2 max are typically 40-60% higher in men than in women.” (Hyde & Gengenbach 2007)
Standard VO2 max tests include:
• Cooper VO2 max test (12 minute maximum run)• The multi stage fitness test (bleep test)• Queens college step test• Rockport Fitness walking test
RESISTANCE EXERCISE
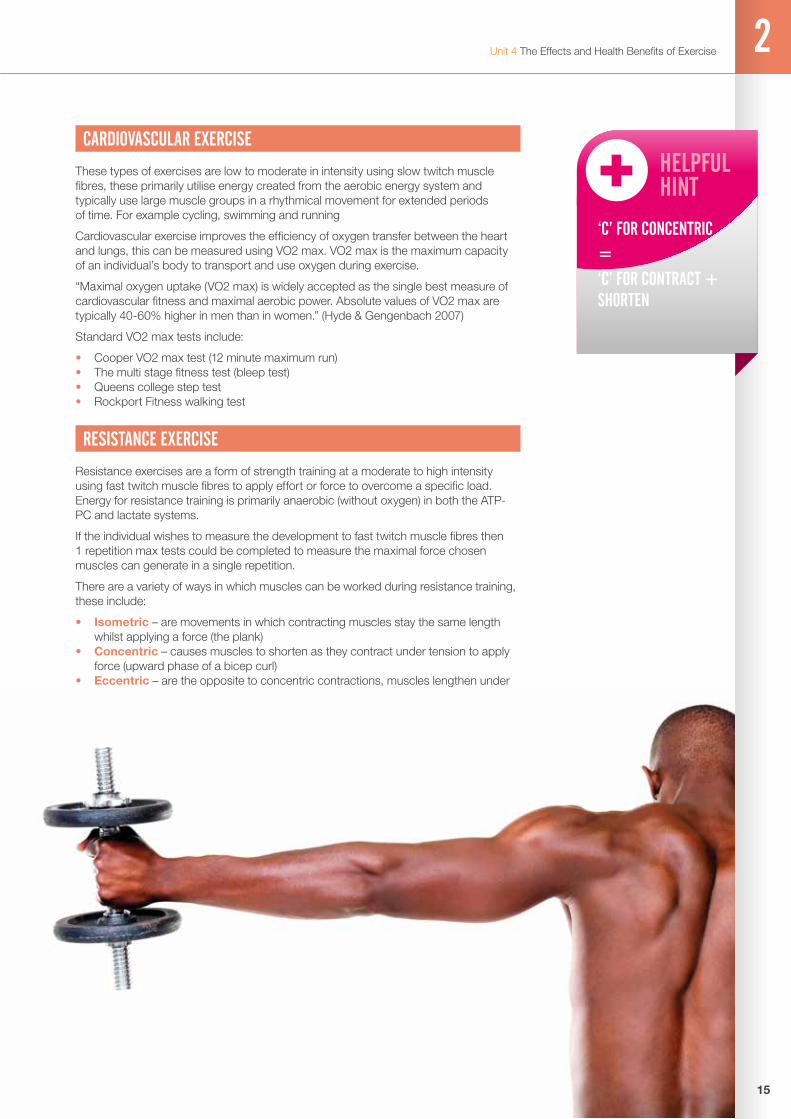
Resistance exercises are a form of strength training at a moderate to high intensity using fast twitch muscle fibres to apply effort or force to overcome a specific load. Energy for resistance training is primarily anaerobic (without oxygen) in both the ATP-PC and lactate systems.
If the individual wishes to measure the development to fast twitch muscle fibres then 1 repetition max tests could be completed to measure the maximal force chosen muscles can generate in a single repetition.
There are a variety of ways in which muscles can be worked during resistance training, these include:
• Isometric – are movements in which contracting muscles stay the same length whilst applying a force (the plank)
• Concentric – causes muscles to shorten as they contract under tension to apply force (upward phase of a bicep curl)
• Eccentric – are the opposite to concentric contractions, muscles lengthen under tension to apply a force (controlled lowering phase of a bicep curl)
HELPFULHINT
‘C’ FOR CONCENTRIC=‘C’ FOR CONTRACT + SHORTEN

16
Gym Instructor Workbook Manual 3
EFFECTS OF EXERCISE ON THE BODYThe body will adapt to the pressures put upon it if the overload principle is used. When this is applied, the body will develop so that it is better suited to these pressures. The type of training undertaken will promote different adaptations.
THE LONG TERM PHYSIOLOGICAL BENEFITS OF RESISTANCE TRAINING
• Increased bone density• Increased resting metabolic rate• Decreased body fat percentage• Increased creatine phosphate and adenosine triphosphate stores• Decreased blood pressure• Decreased blood cholesterol markers• Muscular hypertrophy• Improved posture• Improved core stability• Decreased risk of injury• Increased range of movement• Improved power• Improved strength• Increase in number and size of mitochondria• Improved motor unit firing and ability to recruit motor units
THE LONG TERM PHYSIOLOGICAL BENEFITS OF CARDIOVASCULAR TRAINING
• Increased lung capacity/increase in VO2 max• Hypertrophy of cardiac tissue• Increased blood volume and red blood cell count• Increased cardiac output and stroke volume• Increased number of capillaries (capillarisation)• Reduction in blood pressure • Increased number of mitochondria • Increase in bone density • Lower blood cholesterol markers (reduction in HDL count)• Reduction in body fat

17
Unit 4 The Effects and Health Benefits of Exercise 2
HELPFULHINT
MMHG- Millimetres of mercury
EFFECTS OF EXERCISE ON BLOOD PRESSURESHORT TERM
Heavy weight training and isometric exercise will significantly increase both systolic and diastolic blood pressure. As a fitness instructor you should always get your client to complete a pre exercise questionnaire which will highlight any known hypertension, you may also complete static health tests including blood pressure. If the client is hypertensive, explosive movements such as plyometric training and static movements such as the plank or bridge should be avoided, to ensure the condition is not exacerbated. A gradual warm up/pulse raiser should always be completed to increase blood pressure steadily at the start of every exercise programme.
However during light/moderate aerobic activity, blood pressure can drop and remain lower than usual for up to 22 hours, according to the American College of Sports Medicine (ACSM). This is due to blood vessels responding to exercise (vasodilation) which increases blood vessel size and reduces the pressure exerted on the artery walls.
LONG TERM
Aerobic exercise is very effective in reducing both systolic and diastolic blood pressure over a long term exercise programme.
About 30% of patients were estimated to achieve a reduction in systolic blood pressure of 10 mmHg or more in the short term, up to 1 year.
(NICE (June 2006). Management of hypertension in adults in primary care)
BLOOD POOLING
Whilst exercising there is an increased demand for blood flow to the working muscles to provide oxygen and nutrients. The action of skeletal muscle contraction helps return deoxygenated blood back to the heart as part of the venous return process. However, when the exercise stops so does this muscular contraction, this leads to blood and other waste products staying within the muscle. This process is known as blood pooling. Blood located in muscles below the heart, especially the legs, is also subject to gravity, which increases the likelihood of blood pooling.
During exercise the requirements of venous return is increased due to a higher build-up of blood and waste products within muscle tissue. Increased muscular pump of skeletal muscle, peristalsis of smooth muscle and non-return valves found in veins help return blood, if the exercise stops suddenly then waste products will not be removed effectively which can cause fainting, dizziness and nausea.
Blood pooling can be reduced by gradually lowering the exercise intensity. This will slowly reduce heart rate, help in lactic acid removal and aid in venous return. A cool down should be completed at the end of a workout to help in reducing blood pooling.
18
Gym Instructor Workbook Manual 3
VITALFACTS
REMEMBERDilation - is to open up, get bigger, increase in size.
Constriction - is to close up, get smaller, decrease in size.
EFFECTS OF EXERCISE ON BONES AND JOINTSSHORT TERM
• An increased production and secretion of synovial fluid. This will lubricate the joints and reduce friction between the articular cartilages of each bone
LONG TERM
• Stronger ligaments and tendons increase the number of collagen fibres creating better joint stability
• Increase in bone density due to the increased activity of osteoblasts (bone building cells). Physical activity can increase bone mineral density in adolescents, maintain it in young adults, and slow its decline in old age
EFFECTS OF EXERCISE ON SKELETAL MUSCLESSHORT TERM
• Vasodilation of blood vessels diverts blood to working muscles
LONG TERM
Muscular endurance/aerobic training will cause an increase in number and size of mitochondria (sometimes referred to as the battery cells, as this is where energy is produced in the form of ATP) as well as capillarisation (increase in capillaries surrounding muscles).
Muscular hypertrophy and strength training will cause an Increase in muscle size (hypertrophy) and can cause a reduction in reciprocal inhibition (muscles on one side of a joint relaxing to allow the contraction of muscles on the opposite side of that joint). This in turn can maximise the force generated by that agonist.
19
Unit 4 The Effects and Health Benefits of Exercise 2
EFFECTS OF EXERCISE ON THE RESPIRATORY SYSTEMSHORT TERM
• Increased breathing rate and amount of oxygen breathed in and out of the lungs (Tidal Volume)
LONG TERM
• Increased strength of respiratory muscles, these include the diaphragm and intercostals
• Increased alveolar surface area• An increase in vital capacity, the amount of air that can be expired from the lungs
once they are filled
EFFECTS OF DIFFERENT TYPES OF RESISTANCE EXERCISE ON MUSCLESAEROBIC EXERCISE AND MUSCULAR ENDURANCE RESISTANCE TRAINING
Endurance training programs use low resistance, high repetition exercises such as running or cycling to increase VO2 max.
Low intensity, long duration exercise can bring about the following changes on Type I fibres:
• An increase in the number and size of mitochondria in the muscle fibres• An increase in the number of capillaries surrounding these fibres• An increase in the number of aerobic enzymes, stored glycogen and triglycerides
in the muscle fibres
HYPERTROPHY AND STRENGTH RESISTANCE TRAINING
Typically, strength training programs involve large muscle group activation of high-resistance low repetition exercises to increase the force output ability of skeletal muscle (Sale et al 1990).
Short duration, high intensity exercise affects mainly Type II fibres:
• A decrease in reciprocal inhibition• An increase in the diameter of the recruited fibres (hypertrophy) due to an increase
in the myofilaments within the fibres• An increase in the glycolytic activity (the process in which carbohydrates and
sugars, especially glucose, are broken down, producing ATP) of the muscle allowing more work to be performed under anaerobic conditions or high stress conditions
Delayed onset of muscle soreness – The delayed onset muscle soreness (DOMS) is the pain and stiffness felt in muscles 24 to 72 hours after the exercise. DOMS often occurs when an individual changes/increases the workload/workout intensity. The eccentric phases of training are the main reason for muscle soreness.
20
Gym Instructor Workbook Manual 3
EFFECTS OF EXERCISE ON POSTUREPoor posture is common in both children and adults, which is usually caused by muscular imbalance. There are many causes of poor posture within a modern lifestyle. These include work such as desk jobs (which can cause a shortening of the pectorals) and driving (which can lead to a shortening of the hip flexors), these in turn can affect spinal posture.
Through a combination of stretching and strengthening specific muscle groups postural abnormalities can be improved. Below are a few exercises that can be completed to improve some spinal abnormalities, for more detail on these abnormalities refer to the anatomy and physiology section.
LORDOSIS EXERCISE REQUIREMENTS
• Strengthen Abdominals• Strengthen Gluteals• Strengthen Hamstrings• Stretch Hip Flexors• Stretch Quadriceps • Stretch Erector Spinae
KYPHOSIS EXERCISE REQUIREMENTS
• Strengthen Posterior Deltoid • Strengthen Trapezius• Strengthen Rhomboid• Strengthen Infraspinatus and Teres Minor• Stretch Latissimus Dorsi• Stretch Pectorals• Stretch Anterior Deltoid
POSTERIOR PELVIC TILT (FLAT BACK) EXERCISE REQUIREMENTS
• Strengthen Posterior Deltoids • Strengthen Trapezius• Strengthen Rhomboids• Strengthen Infraspinatus and Teres Minor• Strengthen Hip Flexors• Strengthen Quadriceps • Stretch Gluteals• Stretch Hamstrings• Stretch Pectorals• Stretch Abdominals
NOWTESTYOURSELF...
Go to page 22
VITALFACTS
POSTURE
Is the position in which you hold your body in relation to gravity.
21
Unit 4 The Effects and Health Benefits of Exercise 2
THE EFFECTS AND HEALTH BENEFITS OF EXERCISE SUMMARY OUTCOMESCAN YOU NOW…
Describe cardiovascular and respiratory adaptations to endurance/aerobic training
Identify the short and long term effects of exercise on blood pressure
Explain the “blood pooling” effect following exercise
Identify the effects of exercise on bones and joints including the significance of weight bearing exercise
Describe delayed onset of muscle soreness (DOMS) and identify exercises or techniques likely to increase its risk
Explain the short and long term effects of different types of exercise on muscle
Identify different exercises that can improve posture

22
Gym Instructor Workbook Manual 3
www.thetrainingroom.com
NOWTESTYOURSELF...
TASK 2.1
List 6 Hypokinetic Diseases:
TASK 2.2
List 7 physiological benefits of the following types of training on the body:
1 2
3 4
5 6
Cardiovascular Resistance
1 1
2 2
3 3
4 4
5 5
6 6
7 7

23
Unit 4 The Effects and Health Benefits of Exercise 2
TASK 2.3
Match the correct statements, each system has a short and long term adaption to exercise:
Bones and Joints
Long Term Adaption
Long Term Adaption
Long Term Adaption
Short Term Adaption
Short Term Adaption
Short Term Adaption
An increase in vital capacity, the amount of air that can be expired from the lungs once they are filled.
Increase in bone density due to the increased activity of Osteoblasts (bone building cells). Physical activity can increase bone mineral density in adolescents, maintain it in young adults, and slow its decline in old age.
Muscular Endurance/Aerobic Training will cause an increase in number and size of mitochondria (sometimes referred to as the battery cells, as this is where energy is produced in the form of ATP) as well as capillarisation (increase in capillaries surrounding muscles).
Vasodilation of blood vessels diverts blood to working muscles.
Increased breathing rate and amount of oxygen breathed into and out of the lungs (Tidal Volume)
An increased production and secretion of synovial fluid. This will lubricate the joints and reduce friction between the articular cartilages of each bone.
Respiratory System
Skeletal Muscles
www.thetrainingroom.com
24
Gym Instructor Workbook Manual 3

25
Unit 4 Applying the Principles and Variables of Fitness to an Exercise Programme
APPLYING THE PRINCIPLES AND VARIABLES OF FITNESS TO AN EXERCISE PROGRAMME
By the end of this section you should be able to…
Describe the importance of and reasons for a warm up and cool down
Identify the implications of specificity, overload, reversibility, adaptability, individuality and recovery
Explain the principles of FITT, with modifications and progressions for each component
Explain how to recognise when and how to regress a training programme
Describe the effect speed and intensity has on posture
Describe the effect of levers, gravity and resistance on exercise
Describe the differences between programming exercise for physical fitness and for health benefits
3UNIT
4
26
Gym Instructor Workbook Manual 3
VITALFACTS
WARM UP - Pulse Raiser (CV) Stretches prior to exercise
COOL DOWN -Pulse Lower (CV) Post stretches (flexibility) after exercise
THE PURPOSE OF A WARM UP AND COOL DOWNWhen designing an exercise programme it is essential that a specific warm up and cool down are included. These are often neglected by gym users but have an important role in preparing and returning the body to a pre exercise state to reduce the risk of injury.
WARM UPA warm up is an exercise that gradually builds in intensity at the beginning of a workout. This prepares muscles, heart rate, blood pressure and body temperature for the forthcoming exercises.
A typical warm up may include cardiovascular exercise with a gradual increase in intensity. This is often referred to as a pulse raiser. Mobilisation exercises to promote joint movement and pre exercise stretching (static, dynamic or ballistic) may also be included.
A warm up is prescribed to raise the body temperature to 39/40 degrees. This small increase in temperature has many benefits to exercise performance.
1. This heating effect will allow the muscles and tendons to become more extensible. This in turn will create more supple muscle fibres and enhance stretching.
2. An increase in oxygen and essential nutrients to muscle tissue, which occurs due to an increase in blood flow through vasodilation.
3. Specific warm ups that mirror the activity about to take place will enhance neural pathways, which speeds up reaction time.
4. Secretion of synovial fluid helps lubricate joints.
5. Psychological preparation for physical activity/exercise.
The risk of injury can be reduced by about one third and the risk of severe injuries by as much as a half. (Soligard T, Myklebust G, Steffen K, et al. 2008).
TYPES OF WARM UP
There are 3 main categories of warm up:
Passive Warm Up – increases body temperature by some external means, for example a bath or massage, this however is not the most appropriate method to prepare muscles for exercise.
General Warm Up – increases body temperature by using general rhythmical body movements which use large muscle groups, examples of movements include jogging, cycling and rowing.
Exercise Specific Warm Up – increases body temperature whilst using specific muscle groups that are going to be used within the exercise following the warm up. For example in football a warm up would include drills and exercises (turns, jumps and lunges) which replicate the players movement patterns within a game.
Although there are no general rules to the best warm up type, an exercise specific warm-up is seen to be the most appropriate as this method provides a rehearsal of the activity or event.
Depending on the client, warms ups should consist of a pulse raiser lasting between 5 and 20 minutes, gradually increasing intensity until the participant is working to around 40-60% of maximal heart rate (4-6 RPE), as explained by the ASCM 2010.
27
Unit 4 Applying the Principles and Variables of Fitness to an Exercise Programme 3
KEYTERMS
WARM UP
COOL DOWN
Preparing muscles, increasing heart rate and body temperature for exercise.
Returning the body gradually to a pre exercise state.
Pre exercise stretching should then be completed on muscle groups that are going to be worked during the session.
COOL DOWNThe purpose of a cool down is to return the body to a pre exercise state. This may involve a cardiovascular cool down lasting 5-10 minutes in which the working intensity is gradually reduced by reducing the speed and resistance allowing a gradual decrease in temperature, heart rate and blood pressure, back to resting levels. By gently working the major muscle groups blood pooling is reduced and the removal of waste products such as lactic acid. A good indication of when the cool down is complete would be when the participant’s heart rate is reduced to just above the individuals resting heart rate figure.
Stretching after the cardiovascular cool down could also reduce the effects of DOMS following exercise. It can help improve flexibility, which will have a positive effect on performance in physical activities, or decrease risk of injuries by helping joints move through their full range of motion more effectively.
TYPES OF STRETCHINGThere are a variety of ways to stretch before and after exercise.
Active – Active stretching is accomplished using antagonist muscles without assistance from an external force or object (Alter, 1998) For example contracting the hamstrings to stretch the quadriceps.
Passive – Passive stretching is a form of stretching in which an external object or person is used to help enhance the stretch. For example using a wall to stretch the pectorals.
WARM UP
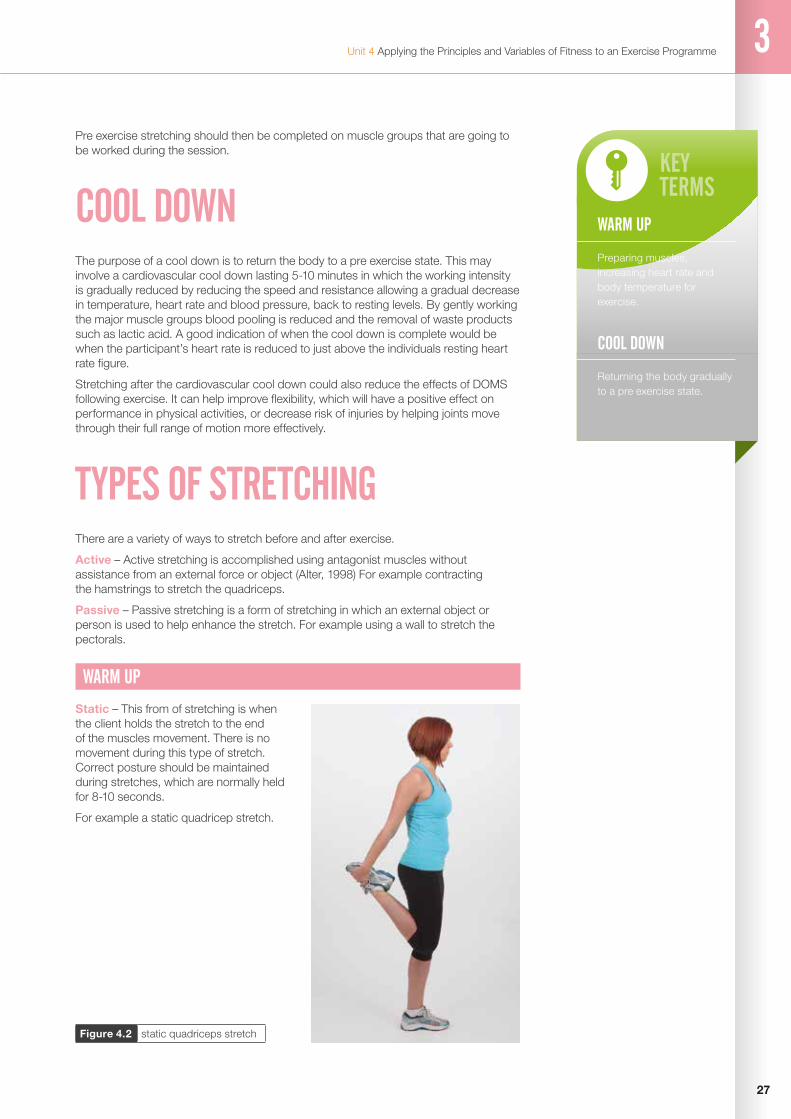
Static – This from of stretching is when the client holds the stretch to the end of the muscles movement. There is no movement during this type of stretch. Correct posture should be maintained during stretches, which are normally held for 8-10 seconds.
For example a static quadricep stretch.
Figure 4.2 static quadriceps stretch

28
Gym Instructor Workbook Manual 3
Dynamic – These types of stretches are seen to be the best way of preparing for exercise. They are controlled movements that reflect the exercise about to be performed. 8-10 repetitions of each movement are normally completed.
For example a lunge rotation movement helps stretch the quadriceps and obliques.
Figure 4.3 examples of dynamic stretches
Ballistic – These types of stretches involve rapid bouncing movements, which lengthen the muscle to beyond its normal range with the use of momentum. These are not suitable for exercise beginners as they can cause muscle damage and muscle soreness. An example of this would be bouncing to touch your toes in a standing hamstring stretch.
For tasks requiring power and agility, results suggest that a dynamic warm up might offer performance benefits not found with static stretching.
For tasks demanding a high degree of flexibility, power, and agility, warm up activities should be sequenced so that static-stretching (if it is deemed necessary) is followed by dynamic, progressive movements that mimic the goal activity without inducing fatigue.
(Samson et al 2012)
COOL DOWN
Static (Maintenance) – cool down stretches are generally static and are held for 15-30 seconds.
Static (Developmental) – these stretches are held for 15 second intervals and are repeated as required, these are used to develop the range of movement at a joint. Firstly the stretch would be held for 15 seconds maintaining correct posture, once the tension has reduced within the muscle the stretch will be passively increased and held for a further 15 seconds, repeat as necessary.
HELPFULHINT
There are 2 types of cool down stretches:
Maintenance & Developmental
29
Unit 4 Applying the Principles and Variables of Fitness to an Exercise Programme 3
TRAINING PRINCIPLESWhen designing an exercise programme a fitness professional has six main training principles to apply as applicable to the clients’ goals. These principles can be applied to both health and fitness related goals. However, fitness goals are usually more specific and focus on improving or maintaining one or more of the five components of physical fitness.
THE 6 TRAINING PRINCIPLES ARE:
Individuality
Each training programme that is written will differ slightly and be very specific to the client it is intended for. The reason for this is because no two clients will be the same. Final goals of clients may be similar but other factors such as previous exercise history, exercise likes and dislikes, current exercise participation and underlying medical problems will need to be adapted for.
Specificity
This principle outlines the need for the programme to be tailored to the client’s goals. The training will need to be specific to the final outcomes desired, for example if a client wishes to improve on their 10km run time then training should include exercises that meet the physical requirements. Cycling for example will help improve Vo2 max but ideally the client should train to run that specific distance.
Progressive Overload
Progressive overload is essential when designing a programme, this is the gradual increase of stress placed upon the body during exercise training. This is important as the body will adapt to the stresses placed upon it, and continual progression will lead to better results. For example if a client feels the intensity level has dropped during the bench press set, there are a number of variables a fitness professional can use to increase the working intensity. These could be:
1. Increasing the weight used whilst decreasing repetitions
2. Slowing repetitions down during the set
3. Adding another set to the end of the section
4. Decrease the rest periods used
Adaptability
The adaptability principle suggests that the body will react to the training stimuli endured whilst training, by increasing its ability to cope with those loads. Physiological adaptations occur during the recovery period after the training session is completed.
Recovery
As outlined in the adaptability principle, rest is a vital part of an exercise programme and is not always adhered to by the client. Rest periods both during and after training allow the body to adapt to the pressures being placed upon it.
Reversibility
Once the client has reached the intended goal they will enter the maintenance phase of training. This is when exercise is undertaken to maintain current fitness levels. It will ensure that a training stimulus is still present, therefore reducing the risk of a decline in fitness levels.
When training ceases the training effect will also stop. It gradually reduces at approximately one third of the rate of acquisition (Jenson and Fisher, 1972)
VITALFACTS
There are 6 principles of training:
• Individuality • Specificity • Progressive Overload • Adaptability • Recovery • Reversibility

30
Gym Instructor Workbook Manual 3
NOWTESTYOURSELF...
Go to page 36
THE FITT PRINCIPLEThis principle can be used to evaluate previous and current exercise sessions, as well as give guidance to future sessions within an exercise programme.
KEY GUIDELINES FOR ADULTS
The general exercise recommendations for healthy adults, as prescribed by the ACSM 2010 are:
F I T TFrequency – The number of exercise sessions in a set period i.e. 3 sessions per week
Intensity – The level of work performed during an activity session i.e. moderate intensity
Time – The duration of a given session i.e. 45 minutes
Type – The choice of activity i.e. cardiovascular, resistance training, or activity specific (football, rugby etc)
Table 4.1 ACSM 2010 prescribing exercise guidelines for healthy adults
Frequency Advised Exercise Type
At least 5 days per week
Moderate Intensity 40-60% Max Heart Rate (4-6 RPE) aerobic (CV endurance) activities, weight-bearing exercise, flexibility exercise
At least 3 days per week
Vigorous Intensity > 60% Max Heart Rate (>6 RPE) cardiovascular activities, weight-bearing exercise, flexibility exercise
3-5 days per week A combination of moderate and vigorous intensity aerobic activities, weight-bearing exercise, flexibility exercise
2-3 days per week Muscular strength and endurance resistance exercise, motor skills (balance and agility)
(NHS Statistics on obesity, physical activity and diet: England, 2011)
• In 2009, almost a quarter of adults (22% of men and 24% of women aged 16 or over) in England were classified as obese

31
Unit 4 Applying the Principles and Variables of Fitness to an Exercise Programme 3
Table 4.2 programming guidelines and principles (Adapted from Earle and Baechle 2000)
Table 4.3 exercise programme progression – frequency (Baechle and Earle, 2000)
• In 2009, 16% of boys aged 2 to 15, and 15% of girls were classed as obese, an increase from 11% and 12% respectively in 1995
• In 2009, the number of prescription items dispensed for the treatment of obesity was 1.45 million; this is more than eleven times the number in 1999
When looking at prescribing exercise and programme design it is important to work on the correct training stimulus. Shown below are the ACSM 2010 exercise guidelines adapted for healthy adults when prescribing exercise, specifying FITT principles and guidelines for resistance and cardiovascular exercise.
Training Goal Strength Hypertrophy Endurance Health Cardiovascular
Intensity High Moderate Low Low (aerobic) 60-90 % MHR Moderate - High
Load as % of 1RM > 85% 67%-85% < 67% N/A N/A
Reps/Duration 1-5 6-12 12+ 30 mins + 20-60 mins
Recover between Sets
3-5 mins 1-2 mins 30-60 seconds N/A N/A
Sets per Exercise 2-6 3-6 2-3 1 1
Frequency per Muscle Group
1-2 x per week 1-2 x per week 2-3 x per week 5-7 sessions per week
3-5 sessions per week
Training Status Frequency guidelines (sessions / week)
Beginner 2-3
Intermediate 3-4
Advanced 4-5
METHODS OF EXERCISE PROGRAMME PROGRESSIONFrequency – The frequency of training can be adjusted according to the fitness of the client. The starting point for the number of sessions in a programme can be judged from the completion. The number of sessions should increase as the client becomes more advanced, however barriers may limit training session availability.

32
Gym Instructor Workbook Manual 3
Figure 4.4 exercise progressions through reduction in exercise stability
Intensity – Increasing the exercise intensity is essential to a progressive exercise programme. There are a number of ways in which to increase working intensity in chosen exercises. For example:
Speed of repetitions – The tempo at which an exercise is completed will affect the intensity and can help specify the exercise for a set goal. An example of this would be increasing the speeds during a cardiovascular workout (RPM on a bike, SPM on a rowing machine and speed on a treadmill). Explosive movements such as the clean and press or plyometric squats are completed at high speed and are more intense than a normal tempo of 2 seconds concentric, pause, 2 seconds eccentric.
Slowing resistance exercises from the normal tempo will also increase the exercise as the muscles are under tension for a longer period of time. This method of training can be referred to a super slows and will emphasise the eccentric phase (lowering against gravity) which is often neglected during exercise. A side effect of this training is an increase in DOMS.
Exercise Stability – Exercise stability has been a large area of development within the last decade, latest gadgets include Swiss balls, air discs, wobble boards and suspension trainers.
Unstable exercises require large amounts of work by muscles other than the prime mover to control the movement (synergists and fixators). This leads to an increase in muscles used but can reduce the workload on prime movers.
An example of making an exercise unstable would be a development with a client from a chest press machine to a barbell bench press, to a dumb bell bench press as the client becomes more familiar with movement patterns. This can then be progressed by using a Swiss ball as the platform to create an unstable bench to lay on.
It may be more suitable for a beginner to used fixed path resistance machines at the start of an exercise programme to reduce the risk of injury and to increase proprioception on new exercise movements.
Reduction in stability

33
Unit 4 Applying the Principles and Variables of Fitness to an Exercise Programme 3
HELPFULHINT
HELPFULHINT
In a press up the lever length can be increased by lengthening the distance between the fulcrum and the main force. As a beginner a box press up would be the easiest regression followed by a ¾ press up and finally a full press up.
It is important for the instructor to understand that by increasing the speed of movement, lengthening the lever and increasing the resistance, any postural abnormalities will be exaggerated. For some clients progression will be a slow process but is essential to reduce the risk of injury!
Figure 4.5 exercise progressions through increased lever length
Lever Length – A lever is a rigid rod or bar to which a force may be applied to overcome a resistance. The lever is free to turn about a fixed support called the fulcrum.
Below is an example of a second class lever:
Range of movement – Training through a full range of movement allows the client to work muscles to their full length. This promotes flexibility and as discussed in the speed of repetition section, increases muscle time under tension. Training through a partial range of movement cuts time under tension and will allow the client to use more weight in a specific section of an exercise. This can lead to a client using a weight that can create poor form. The only time training through a full range of motion may be detrimental is if you are training around an injury.
Gravity – Is a force applied to us at all times. This can be increased by adding weight to a movement, which could be through a resistance machine, free weight or by changing the body angle.
Time – To progress an exercise programme using time, cardiovascular elements and isometric contractions could be completed for a longer duration. Resistance training would involve completing more repetitions or sets to increase the muscles time under tension.
Type – Types of exercises can be used to increase muscle stimulation and to add a variety of training for the participant. For example you may use body weight dips rather than tricep extensions or use a cross trainer rather than a treadmill.
P = Pivot (fulcrum)
R = Resisting force
F = Force/load
Box press up Full press up3/4 press up
Progression of a press up
P
R F

34
Gym Instructor Workbook Manual 3
PROGRESSION AND PERIODISATIONProgression will occur when the overload principle is applied to an exercise programme. This will ensure that the body continues to adapt to the stress placed upon it.
Periodisation allows us to make informed decisions regarding our successes and how to make direct improvements for future development.
From evaluations made on training progress (fitness testing) it will be clear to see whether a new cycle of training or stimulus is needed to progress with the bodies adaptations. If the client remains within a stage or cycle of training then they are likely to plateau. This can lead to a reduction of results and a client that is unmotivated. Once a new training stimulus is introduced, adaptations will continue.
Table 4.4 symptoms of overtraining
Symptoms of Over Training
Training Physiological Psychological
Decreased speed Continual DOMS Increase irritability
Decreased strength Increased resting heart rate Anger
Reduced co-ordination Increased weight loss Loss of concentration
Increased fatigue Feeling fatigue Lack of enthusiasm
Elevated heart rates Increased injury rate Increase in stress
Delayed recovery Frequent illness i.e. colds Can lead to depression
Figure 4.6 exercise plateau continuum
Plateau/New Training Stimulus Chart
Time
Clie
nts
Res
ults Plateau
New Training Stimulus
OVERTRAINING
An exercise programme requires a balance between overload and recovery. Too much overload and/or too little recovery may result in symptoms of overtraining syndrome. It is important that rest and recovery are planned within an exercise programme.
If the fitness professional recognises these symptoms with the client, the programme should be immediately regressed to allow the client to recover fully.

35
Unit 4 Applying the Principles and Variables of Fitness to an Exercise Programme 3
APPLYING THE PRINCIPLES AND VARIABLES OF FITNESS TO AN EXERCISE PROGRAMME SUMMARY OUTCOMESCAN YOU NOW…
Describe the importance and reasons for a warm up and cool down
Identify the implications of specificity, overload, reversibility, adaptability, individuality and recovery
Explain the principles of FITT, modification and progression for each component
Explain how to recognise when and how to regress a training programme
Describe the effect speed and intensity has on posture
Describe the effect of levers, gravity and resistance on exercise
Describe the differences between programming exercise for physical fitness and for health benefits

36
Gym Instructor Workbook Manual 3
www.thetrainingroom.com
NOWTESTYOURSELF...
TASK 3.1
List the principles of training:
TASK 3.2
Match the FITT principles to the correct statements:
1 4
2 5
3 6
Frequency The duration of a given session
Type The choice of activity
Time The level of work performed during an activity session
Intensity The number of exercise sessions in a set period

37
Unit 4 Applying the Principles and Variables of Fitness to an Exercise Programme 3
TASK 3.4
List 8 methods of exercise programme progressions:
TASK 3.3
Complete the following table with the cardiovascular training guidelines for a healthy adult:
1 5
2 6
3 7
4 8
Training Goal Cardiovascular
Intensity
Load as % of 1 RM N/A
Reps / Duration
Recover between Sets N/A
Sets per Exercise 1
Frequency per Muscle Group
www.thetrainingroom.com
38
Gym Instructor Workbook Manual 3

4UNIT
4
39
Unit 4 Monitoring Exercise Intensity
MONITORING EXERCISE INTENSITY
By the end of this section you should be able to…
Describe the benefits of monitoring exercise intensity
Identify the limitations of the methods of monitoring intensity

40
Gym Instructor Workbook Manual 3
VITALFACTS
METHODS TO MONITOR EXERCISE INTENSITYAs an exercise professional it is key that you have the ability to monitor your clients working intensity and make adaptations as necessary. Having the ability to judge working intensities will ensure that you as an instructor are working in the correct way with your client to reach targets and goals. Working intensities apply to both cardiovascular and resistance training methods. There are a variety of methods in which an instructor can monitor intensity.
RPE – Stands for the rate of perceived exertion and is measured on a scale of 6 (No exertion at all) to 20 (Maximal exertion) with the client indicating a figure according to exercise intensity.
Although this is a subjective measure, a high correlation exists between a person’s perceived exertion rating and the actual heart rate during physical activity; so a person’s exertion rating may provide a fairly good estimate of the actual heart rate during activity (Borg, 1998).
RPE = Rate of Perceived Exertion
NOWTESTYOURSELF...
Go to page 44
Table 4.5 Borg 6-20 RPE Scale
Number on Borg Scale HR Estimation Intensity Suggestion
6 60 BPM No exertion
7 70 BPM Extremely light
8 80 BPM Very Light
9 90 BPM
10 100 BPM
11 110 BPM Light
12 120 BPM
13 130 BPM Somewhat hard
14 140 BPM
15 150 BPM Hard (Heavy)
16 160 BPM
17 170 BPM Very hard
18 180 BPM
19 190 BPM Extremely hard
20 200 BPM Maximal exertion

41
Unit 4 Monitoring Exercise Intensity 4
A more commonly used version of the this scale has been developed, and is called the Borg CR10 Scale, which runs from 1-10, and relates to a ‘how do you feel’ scale. This scale can be seen below: HELPFUL
HINTThere are 2 main methods we used to moniter exercise intensity:
Borg Scale - 6-20
Borg CR10 Scale - 1-10
Table 4.6 Borg CR10 RPE Scale
Borg CR10 Scale
Intensity Suggestion
1 Very Light Activity – Anything other than sleeping. Watching TV, riding in a car etc.
2 Light Activity – Feels like you can maintain for hours. Easy to breathe and hold a conversation
3
4 Moderate Activity – Feels like you can exercise for prolonged periods. Increased breathing rate and can hold a short conversation
5
6
7 Vigorous Activity – On the verge of becoming uncomfortable. Short of breath, can speak a sentence
8
9 Very Hard Activity – very difficult to maintain exercise intensity. Heavy breathing and can speak a single word
10 Max Effort Activity – feels almost impossible to keep going. Completely out of breathe, unable to talk
HEART RATE/KARVONEN METHOD
The Target Heart Rate or Training Heart Rate (THR) is a desired range of heart rate reached during aerobic exercise which enables the heart and lungs to receive the most benefit from a workout. The THR can be calculated as a range of 65%-85% intensity.
Heart rate (HR) – Is the number of heart beats per minute, resting heart rate (RHR) is the amount of beats at rest. Maximum HR is calculated by taking your age from 220 (HRmax = 220 - age). Although this is not completely accurate, it can be used as a basic guideline by fitness professionals to find the percentage of maximal heart rate and enable training in the clients THR.
However the Karvonen method of calculating target heart rates (THR) is one of the most effective methods as long as the maximum heart rate is accurate as it takes into account resting heart rate. The formula is:
THR = (HRmax − HRrest) × % intensity (0.65 to 0.85) + HRrest

42
Gym Instructor Workbook Manual 3
VITALFACTS
Pro-active instructors use a combination of 3 ways to monitor their clients:
- RPE check
- Talk test
- Observation
Figure 4.7 heart rate training zones
HEART RATE TRAINING ZONES
TALK TEST
This is a simple test that does not require any equipment or client knowledge, this simply involves the client responding/communicating to the trainer. As the activity increases, the clients breathing will become deeper and there will be larger pauses between words/sentences. The talk test can be used along with observations on both technique and colour to the face, but should not be used as a sole method of checking exercise intensity due to its subjective nature.
1. Light breathing and able to talk easily – light activity
2. Deeper breathing with small pauses within sentences – moderate activity
3. Deep breathing with large pauses within sentences – vigorous activity
OBSERVATION
This is another simple method in which the trainer uses basic observation on the client. Technique will be a key indicator on the exercise intensity. If the clients form becomes poor this can indicate the working intensity is too hard or becoming difficult. The second observation can be on the client’s appearance, have they changed colour, are they sweaty? However this does vary from client to client and is not always an accurate measure on working intensity.
Exercise Zones
Age
20 25 30 35 40 45 50 55 65 70
Bea
ts p
er m
inu
te
100%
90%
200 195 190 185 180 175 170 165 155 150
VO2 Max (Maximum effort)
180 176 171 167 162 158 153 149 140 135
80% Anaerobic (Hardcore training)
160 156 152 148 144 140 136 132 124 120
70% Aerobic (Cardio training/endurance)
140 137 133 130 126 123 119 116 109 105
60% Weight control (fitness/fat burn)
120 117 114 111 108 105 102 99 93 90
50% Moderate activity (maintenance/warm up)
100 98 95 93 90 88 85 83 78 75

43
Unit 4 Monitoring Exercise Intensity 4
MONITORING EXERCISE INTENSITY SUMMARY OUTCOMESCAN YOU NOW…
Describe the benefits of monitoring exercise intensity
Identify the limitations of the methods of monitoring intensity
44
Gym Instructor Workbook Manual 3
www.thetrainingroom.com
NOWTESTYOURSELF...
TASK 4.1
List 4 methods of monitoring clients:
TASK 4.2
Complete the following Borg Table, by filling in the blanks:
1 3
2 4
Number on Borg Scale HR Estimation Intensity Suggestion
6 60 BPM No exertion
7 70 BPM Extremely light
80 BPM Very Light
9 90 BPM
100 BPM
11 110 BPM
12 120 BPM
130 BPM Somewhat hard
14 140 BPM
15 150 BPM Hard (Heavy)
16 160 BPM
170 BPM
18 180 BPM
19 190 BPM Extremely hard
20 200 BPM

45
Unit 4 Monitoring Exercise Intensity 4

www.thetrainingroom.com
46
Gym Instructor Workbook Manual 3
5UNIT
4
47
Unit 4 Exercise Contraindications and Safety Guidelines for Special Populations
EXERCISE CONTRAINDICATIONS AND SAFETY GUIDELINES FOR SPECIAL POPULATIONS
By the end of this section you should be able to…
Describe the exercise contraindications and key safety guidelines for working with:
a. Older people (50 plus)
b. Pre/Post natal
c. Clients with disabilities
d. Young people (14-16 yrs old)

48
Gym Instructor Workbook Manual 3
EXERCISE CONTRAINDICATIONS FOR SPECIAL POPULATIONSSpecial populations is a term used to describe participants that require expertise and supervision to overcome their situation and allow safe/effective exercise. There are 4 main population groups:
1. Older people (50 plus)
2. Pre/Post natal
3. Clients with disabilities
4. Young people (14-16 yrs old)
Contraindications are in place wherever there is an increased risk of harm or injury in any given exercise or activity, regardless of age, skill level or ability. They should be identified at the consultation phase through either interview or questionnaire (via the PAR-Q). Contraindications will exclude participants from exercise or activity until they have clearance to commence or continue, which usually requires GP referral.
Adaptations and special considerations may need to be applied to programmes when working with special population groups within the exercise environment.
OLDER ADULTSThis relates to clients aged 50 or above. 50 is the recognised age when there is a reduction in the safety margins relating to exercise and a thorough pre-exercise screen is essential prior to activity. Regarding clients over 50 it has been noted that 4 out of 10 older adults have a chronic disorder that results in a functional limitation (Blocker, 1992).
40 is the approximate age that the ageing process begins and at 50 is when it starts to progressively affect the musculoskeletal, cardiovascular and neuromuscular systems, meaning that adaptation of exercise needs to be considered. Relaxation of these guidelines for highly trained or active individuals needs to be taken at the clients own risk, as regardless of appearance and fitness levels the life course and ageing process is already underway.
PHYSICAL ADAPTIONS
From the age of 40 there is a reduction in physical capacity, around 1-2% loss per year, which effects:
• Muscular Strength – fewer, smaller and weaker muscle fibres• Power – fewer fast twitch muscle fibres, smaller, weaker and slower• Bone Density – thinner, more brittle bones, with less ability to withstand high
impact/fracture• Aerobic Capacity – fewer capillaries, less elastic vessels and reduced intake,
uptake and utilisation of oxygen, increased heart rate and blood pressure• Balance and Co-ordination – less sensory input, less postural stability, resulting
in less co-ordination• Flexibility & Motor Skills – stiffer joints, reduced range of movement and a
reduction in daily activities i.e. getting up and down from the floor and seated positions
VITALFACTS
From the age of 40 there is reduction in physical capacity, around 1-2% loss per year.
This can be offset by remaining physically active.

49
Unit 4 Exercise Contraindications and Safety Guidelines for Special Populations 5
SENSORY & COGNITIVE DECLINES
There are declines in performance of sensory function including:
• Sight and Hearing – reduced visual and aural ability• Motor Learning – reduced ability to learn new skills• Reduction in Short Term Memory
EXERCISE GUIDELINES
As an instructor working with older adults there are some key guidelines to ensure the safe participation in exercise and physical activity.
• Clients should complete a detailed pre-screen, medical questionnaire and lifestyle analysis (and if over the age of 69 should have clearance to exercise). Completing this process will establish whether they are ready to participate or whether they should seek further medical assessment and referral prior to commencing an exercise programme
• It is important to complete a longer and more gradual warm up (approximately 15 minutes) and carry out more joint mobility exercises, especially if they have joint issues i.e. osteoarthritis
• When planning the main components of the programme the instructor should keep the intensity challenging but work within the guidelines for health related fitness. Regularly using and checking intensity, via the RPE scale and talk tests
• At the end of the session build in a longer and gradually tapered cool down, in order to assist in reducing heart rate and to avoid adverse cardiovascular events
In addition to these adaptions and changes, instructors should also be aware of, and encourage older adult clients to:
• Take more time during change of positions and exercises, especially floor to standing or vice versa
• Use correct technique and maintain good form to prevent injury or risk to themselves
• Adapt exercises to simplify, especially if they are new to the client, so that they can learn them from the easy position, lightest resistance and slowly progress from there
• Avoid motor skill exercises to avoid falls and injury risk as well as those exercises where there is a quick transfer of weight, high impact or long periods spent on one leg
• Avoid exercises that directly load the spine and exercises that require rotation/flexion of the spine
HELPFULHINT
Warm up time should be increased.
Main components should be focused on health/endrance benefits
Cool down time should be longer and taper off slowly

50
Gym Instructor Workbook Manual 3
PRE AND POST NATALThe following guidance relates to normal, adult women who are, or have experienced a normal and healthy pregnancy or birth. In the majority of cases exercise is safe for both the mother and baby, and at the correct intensity is not associated with complications or an adverse pregnancy outcome.
A BRIEF OVERVIEW OF PREGNANCY
Pregnancy is divided into three periods (called Trimesters):
1st Trimester (first 3 months) 1 - 12 weeks – this is the phase with the highest risk of miscarriage, and often the time when women suffer from morning sickness, but experience of this varies greatly.
2nd Trimester (second 3 months) 13 - 25 weeks – this is the phase when most women feel pretty good. Morning sickness has normally stopped but the ’bump’ isn’t large or heavy enough to cause postural problems and back pain yet.
3rd Trimester (third 3 months) 26 - 40/42 weeks – the final phase of pregnancy when the foetus does the majority of its growing and a woman’s energy requirements can increase by as much as 200-300 Kcal per day. Exercise intensity will need to decrease at this time and may not be possible due to sciatica or low back pain caused by postural changes.
The postnatal period is divided into two phases:
The immediate post natal period is 0 - 6 weeks. After 6 weeks women will have a post natal check with their GP, to ensure they have recovered from the birth and are able to return to exercise after this period with the GP clearance.
The extended post natal period is 7 weeks to 1 year.
PRE AND POST NATAL EXERCISE CONSIDERATIONS
Women who have not previously exercised before pregnancy should be cautious, and begin exercise with only 15 minutes continuous low to moderate aerobic exercise, gradually building up to 30 minutes continuous low to moderate aerobic exercise, which should be monitored closely.
It is important for pregnant women to remain hydrated and avoid exercising in hot or humid conditions. They must ensure they have consumed sufficient calories, and not to exercise for longer than 45 minutes.
Women should be advised to monitor exercise according to ‘how they feel’ and using the talk test, rather than heart rate. Women during pregnancy and exercise should also avoid:
• Exercising in the supine position after 16 weeks of pregnancy The inclined position is likely to be a successful alternative to flat supine
• Exercising prone• Prolonged, motionless standing• Heavy, uncontrolled, isometric or prolonged resistance work above the head• Leg adduction and abduction against a resistance• Isometric exercises• Loaded forward flexion• Rapid changes of direction or position• Uncontrolled twisting• Exercise with a risk of falling or abdominal trauma• Excessive and uncontrolled de-stabilisation techniques
VITALFACTS
Women should be cautious when exercising when pregnant and especially if new to exercise, but can exercise with correct supervision
51
Unit 4 Exercise Contraindications and Safety Guidelines for Special Populations 5
Pregnant women should immediately stop exercising if they experience:
• Dizziness, faintness or nausea• Bleeding or leakage of amniotic fluid• Abdominal or contraction type pain• Unexplained pain in the back, pelvis, groin, buttocks or legs• Excessive shortness of breath, chest pain or palpitations
Hormonal and postural changes make pregnant women vulnerable to injury, joint misalignment, muscle imbalance and motor skills decline, especially if they are genetically hypermobile. These changes may start from very early on in pregnancy and gradually become more significant as pregnancy progresses.
A woman should be referred to a health professional if she is experiencing any of the following symptoms post-birth:
• Stress incontinence or pelvic floor muscle weakness• “Dragging” pain or a feeling of heaviness in the lower abdominal or pelvic floor area• Groin, low back pain or difficulty walking, even if mild and intermittent• Abdominal muscle weakness, excessive abdominal doming, abdominal muscle
separation or softness/sinking at the umbilical mid-line, umbilical hernia
As an instructor it is also important to understand that there are benefits to exercising safely and regularly during pregnancy:
• Helps to promote healthy lifestyle habits • Can alleviate many symptoms of pregnancy• Can increase self-esteem & feelings of well-being• Increases endurance levels, which may help during labour• May decrease the time spent in active phase of labour • Can help reduce stress and pain in labour• Is associated with an improved recovery from labour• Can help with maintaining good posture and therefore reduce back pain• May improve sleeping patterns• Can prevent stress incontinence• Facilitates a quicker return to pre-pregnancy weight, strength & flexibility levels
CLIENTS WITH DISABILITIESAN INTRODUCTION TO DISABILITIES
The World Health Organisation – WHO (2012) explains that ‘disabilities’ is an umbrella term covering impairments, activity limitations, and participation restrictions.
“An impairment is a problem in body function or structure; an activity limitation is a difficulty encountered by an individual in executing a task or action; while a participation restriction is a problem experienced by an individual in involvement in life situations. Thus disability is a complex phenomenon, reflecting an interaction between features of a person’s body and features of the society in which he or she lives.” (WHO, 2012)
It is important as an instructor to understand that many disabled people find they experience barriers to accessing sufficient physical exercise for psychological, physical or social reasons.
It is widely recognised that regular and planned physical activity in a safe and supportive environment may not only help disabled clients in the same range of ways as for non-disabled clients, but it may also reduce the risk of gaining additional disabling conditions, improve the ability to perform activities of daily living that might previously have been difficult, and maintain or even improve independence.
MYTHBUSTER
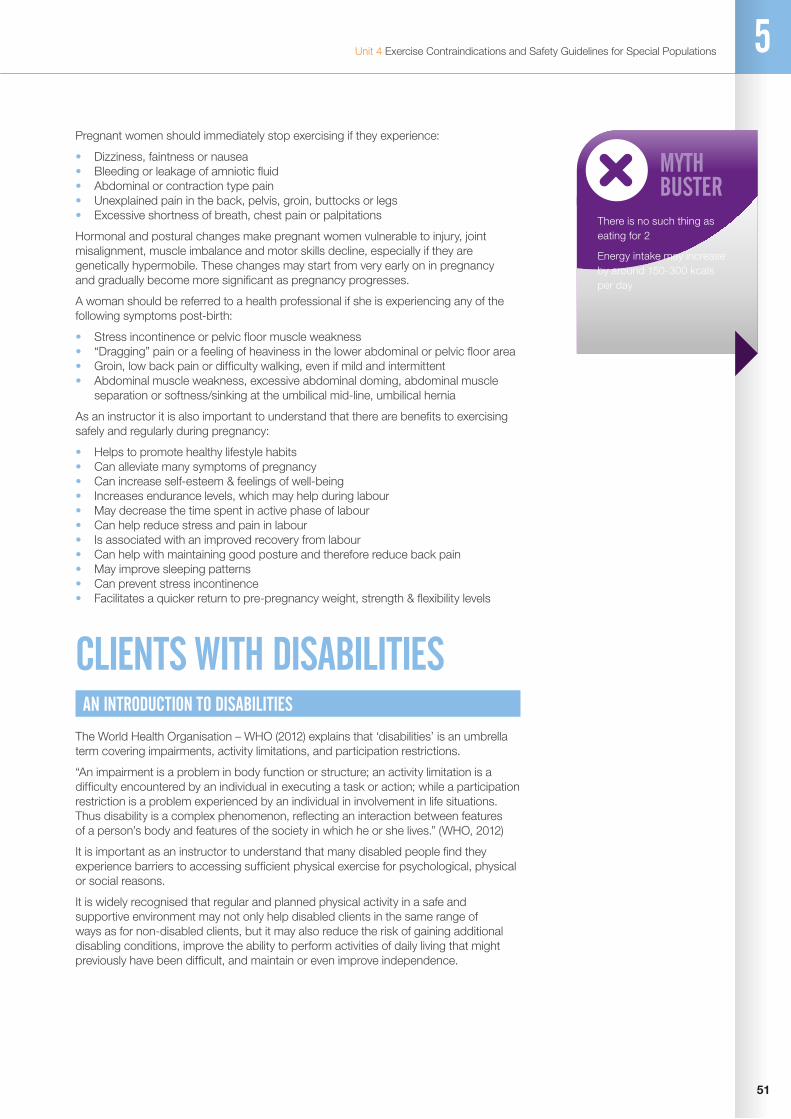
There is no such thing as eating for 2
Energy intake may increase by around 150-300 kcals per day
52
Gym Instructor Workbook Manual 3
VITALFACTS
Exercise may help with disabilities to improve daily activities, maintain/improve independence, reduce the risk of further disabling conditions
LEGISLATION
The Disability Discrimination Act (DDA) 1995
It is unlawful to refuse to serve a disabled person, provide a lower standard of service, or offer a less favourable service to a disabled person. Service providers must make “reasonable adjustments” to their facilities and services so that they are accessible to disabled people. Adjustments to buildings and services must be made in anticipation of attendance of disabled people, it is not reasonable for disabled people to be asked to wait until adjustments have been made. This may include providing extra help when required, but does not include automatically providing an additional service that is not required.
Exemption from the DDA is justified for the following reasons:
• If by meeting the needs of the disabled person the health and safety of any person, including the disabled person, is endangered
• If by serving the disabled person the service provider is unable to serve others (not including a delay or inconvenience to others)
• If the disabled person is unable to enter into a legally enforceable agreement, or give informed consent
• If providing a service to disabled people on the same terms as to other people means that it would not be possible to offer the service at all, or if a higher charge would have to be made to others
DISABILITY CONSIDERATIONS
The benefits of exercise for people with disabilities generally outweigh the concerns, and with the correct guidance and advice these concerns can be overcome. It is important you focus on what clients can do rather than what they cannot do. To programme a safe and effective session it is important to recognise the following issues:
Physical Disabilities
There are a wide range of physical disabilities that can effect the safety and effectiveness of the session. It is therefore important when prescribing exercise programmes that the instructor adapts and selects exercises specific to the clients’ needs and capability.
Some physical disabilities are classified as progressive, this means that the condition develops and worsens over time. An example of this is multiple sclerosis. Progressive disorders require careful monitoring, to ensure that the exercise and activities prescribed are not causing the condition to worsen or develop more quickly.
There are other physical disabilities which present asymmetrical weakness, which means that there is a difference in strength or control between the left and right sides of the body. An example of this includes a stroke or cerebral palsy. The instructor should aim to improve the affected side of the body as much as possible whilst working the unaffected side. Be aware that improvement in the affected muscles is greatly reduced if the nerves controlling the affected side have been partially or completely damaged.
Spasticity
The majority of individuals with physical disabilities will have some degree of spasticity, spastic muscles being very tight or rigid, which means that flexibility training is essential in their programmes. It is important though for the instructor, before including any flexibility training, to gain authorisation and further advice from a suitable trained medical authority on the best practice to stretch a spastic muscle without causing further trauma or injury.

53
Unit 4 Exercise Contraindications and Safety Guidelines for Special Populations 5
KEYTERMS
WHO (2012) explains that the term ‘disability’ is an umbrella term covering impairments, activity limitations and participation restrictions
Table 4.7 outlines of a variety of disability conditions
Neurological Conditions
Neurological disorders are diseases of the central and peripheral nervous system. They can affect the brain, spinal cord, cranial nerves, peripheral nerves, nerve roots, autonomic nervous system, neuromuscular junction and muscles.
Condition How It Affects the Client
Arthritis A degenerative joint disease characterised by the progressive loss of joint cartilage
Symptoms can include pain and stiffness, restricted movement, joint swelling, tenderness, crepitus (crackling noise on movement) or swelling of structures surrounding the joint
Asthma Chronic inflammatory disorder of the airways
Symptoms can include chest tightness, shortness of breath and wheezing
Diabetes Can be present in both type 1 and type 2 forms, and occurs when there is an increased resistance or deficiency in insulin
Symptoms can include, increased requirement for hydration, increased sweating from the upper body and hyperglycaemia
Depression ‘Depression is a psychiatric disorder that ranges from episodes of unhappiness that affect most people from time to time, to persistent low mood and inability to find enjoyment’ (Biddle and Mutrie, 2001)
Symptoms can include low energy levels, weight loss and a loss of interest in activity
Multiple Sclerosis A chronic and unpredictable progressive disease that affects the nerves in the brain and spinal cord
Symptoms can include fatigue, muscle weakness/stiffness, altered sensation/sensory difficulties e.g. tingling, numbness, burning, balance and co-ordination difficulties
Osteoporosis A loss in bone mass resulting in porous bone
Symptoms include a higher chance of bone fractures. If present in the spine abnormalities to posture and breathing may result
Parkinson Disease Parkinson’s Disease (PD) is a long term, progressive neurological disorder affecting motor control
Symptoms can include a slowing of movements, balance problems, tremors or muscle stiffness
Strokes A stroke occurs when the blood supply to part of the brain is suddenly stopped, which can cause motor/sensory impairments, speech, language and visual problems
Obesity The fundamental cause of obesity is consuming more calories than are expended in everyday life (National Audit Office, 2001)
Symptoms can include high blood pressure, increased joint pain and breathlessness
54
Gym Instructor Workbook Manual 3
VITALFACTS
Children are not small adults!!
Their anatomy and physiology is different from mature adults.
A result of this is that muscles become progressively weaker as a result of the decline in the central nervous system functioning. Examples of neurological conditions are muscular dystrophy, Parkinson’s disease, epilepsy and Alzheimer’s disease. Exercise can help to offset this and programmes should focus to work on general fitness levels, but if there is any rapid decline in function the client should be referred to their GP for guidance.
Damage to Sensory Nerves
This occurs with many types of physical disabilities. Since this may result in an inability to detect pressure against the skin, left untreated, it can result in a pressure sore. It is generally recognised that the use of a wheelchair increases the risk of developing pressure sores, and so the client will already be aware of the importance of frequent checks. However, the instructor should make the client aware that the use of gym equipment may bring similar associated risks and so extra checks should be made.
Depression
Depression is a common secondary condition resulting from an individual’s physical and psychological challenges of living with a disability. Occasionally, depression can cause a person to drop out of the programme.
These are some of the common conditions that the fitness instructor may come across. Table 4.7 (previous page) details some more conditions, but if they are in doubt of their ability to work safely and effectively with anyone they should refer to a medical professional for advice and further guidance.
YOUNG PEOPLEWhen training young people it is important to consider physiological and psychological maturity levels, which include:
CARDIO-RESPIRATORY SYSTEM IN RELATION TO CHILDREN
During childhood the cardio respiratory system is developing, and therefore instructors need to be aware of the risk factors of training children at high intensities.
Lung volume and peak flow rates will steadily increase until fully grown. Children have an inferior pulmonary function. This means there is reduced ventilation rate (air in and out of the lungs) compared to adults, resulting in a higher breathing rate around 60 breaths per min compared to 40 breaths per min in adults for the equivalent level of exercise.
Children have a reduced cardiovascular function due to having a reduced size in the chambers of the heart. This in turn reduces stroke volume and to compensate they have an increased heart rate. This means their heart has to work harder to sustain cardiac output compared to an adult.
These two factors combined have a direct effect on children’s ability to sustain long periods of vigorous activity, due to their reduced aerobic capacity. As an instructor, long periods of vigorous aerobic activity should be avoided or regular rest periods should be factored in.
Anaerobic exercise capacity is reduced due to lack of muscle mass and liver capacity to store and produce glycogen and creatine phosphate. Therefore they are unable to generate as much anaerobic work.
BODY TEMPERATURE AND DEHYDRATION
Children have inferior cooling mechanisms due to lower blood volume and a higher skin temperature. They are sensitive to heat stress because they expend more energy per kilogram of bodyweight than an adult during exercises.

55
Unit 4 Exercise Contraindications and Safety Guidelines for Special Populations 5
Adolescents are at risk of dehydration when exercising due to overheating. In the cold, they lose heat more quickly due to their relatively large surface area compared to their mass.
The implications for the instructor are:
• give regular water breaks• the warm up component may need to be less intense and shorter than an adults• the cool down component may need to be shorter than an adults• active rests may have to be given in between bouts of vigorous activity
MUSCULOSKELETAL SYSTEM
A major concern with the development of a child’s musculoskeletal system, is damage and trauma to the growth cartilage and epiphyseal growth plate fractures. These fractures are more common in boys than girls, and occur around the age of 14-16. These types of fractures and damage occur between the shaft and head of the bone around the growth area.
The instructor should understand that when prescribing exercise to young people:
• it is extremely important to avoid excessive training. This includes playing too much of one sport, playing the wrong sport for their body type or using too heavy a weight in weight training
• it is important to remember the gender differences and the differing stages of development within the same sex
• inappropriate size matching in pairs should be avoided• avoid too many high impact moves on the spot• always teach an appropriate warm up and cool down• always provide appropriate equipment for the activity e.g. correct size, weight
Children’s muscles do not grow at the same rate as bones, so caution should be taken when planning and prescribing flexibility and resistance training with younger people. In relation to flexibility, children have not gained enough motor skills to develop their flexibility with good technique. Therefore, there is an increased risk of injury due to lack of understanding of stretching tension. Resistance training should focus on endurance, with a consistent tempo ensuring good technique and full range of movement. Any maximal or near maximal lifting or training should be avoided until full musculoskeletal maturity. It is therefore important as an instructor not to build unrealistic expectations of hypertrophy.

56
Gym Instructor Workbook Manual 3
TRAINING YOUNG PEOPLE OVERVIEW
Although infrequent, it is important to be aware of the risk of injury for younger people when taking part in physical activity. Potential injuries during activity fall into one of two categories, impact and non-impact.
Impact injuries (most common as a result of contact sports or falls)
• There is little we can do to prevent impact injuries as they are usually accidental. However, if safety equipment is available this should be used at all times along with careful planning of activities
Non-impact injuries (often affect young adults who participate in large amounts of physical activity)
• These could include sprains, strains, or traction injuries like Osgood Schlatters or Sever’s disease
• A well structured training programme that avoids excessive, long duration or repetitive loading of the same body part will help to reduce the risk of these types of injuries
The moderate risks of injury are normally outweighed by the enormous health, fitness, psychological and social benefits younger adults gain by taking part in physical activity.
Please note that the Level 2 Certificate in Fitness Instructing qualification does not qualify you to work on a regular basis with individuals or groups of special population clients. This unit is intended to equip you with a basic understanding of the needs of these population groups in the event that you are confronted by them as part of your role as a fitness instructor.
VITALFACTS
Growth plate fractures are most common between the ages of 14-16.
NOWTESTYOURSELF...
Go to page 58

57
Unit 4 Exercise Contraindications and Safety Guidelines for Special Populations 5
EXERCISE CONTRAINDICATIONS AND SAFETY GUIDELINES FOR SPECIAL POPULATIONS SUMMARY OUTCOMESCAN YOU NOW...
Describe the exercise contraindications and key safety guidelines for working with: a. Older people (50 plus) b. Pre/Post natal c. Clients with disabilities d. Young people (14-16 yrs old)
58
Gym Instructor Workbook Manual 3
www.thetrainingroom.com
NOWTESTYOURSELF...
TASK 5.1
Using the information in this section; identify suitable adaptions for each of the following special population groups. For each exercise category select an exercise of your choice to adapt:
Think about the factors that affect safe participation and how you could adapt the exercise to maintain an effective workout?
Cardiovascular Machine
14-16 Year Olds
Older Adults
Pre/Post Natal Client
Disability Group
Resistance Machine
14-16 Year Olds
Older Adults
Pre/Post Natal Client
Disability Group

59
Unit 4 Exercise Contraindications and Safety Guidelines for Special Populations 5
Free Weight Exercise
14-16 Year Olds
Older Adults
Pre/Post Natal Client
Disability Group
Body Weight Exercise
14-16 Year Olds
Older Adults
Pre/Post Natal Client
Disability Group

www.thetrainingroom.com
60
Gym Instructor Workbook Manual 3

6UNIT
4
61
Unit 4 The Importance of Healthy Eating
THE IMPORTANCE OF HEALTHY EATING
By the end of this section you should be able to…
Identify the common dietary sources of the key nutrients
Explain the dietary role of the key nutrients
Explain the importance of adequate hydration
Describe the national food model/guide
Describe key healthy eating advice that underpins a healthy diet
Describe the energy balance equation
Explain the health risks of poor nutrition
Explain professional role boundaries in relation to offering nutritional advice
62
Gym Instructor Workbook Manual 3
HEALTHY EATINGAs a fitness professional it is important that the benefits of healthy eating are understood. Healthy eating not only supplements an exercise programme to achieve results, but also benefits in general health. Eating a well-balanced diet can aid in weight loss, increase energy levels and help repair muscle tissue following exercise.
Poor diet can progress and develop diseases such as obesity, osteoarthritis, coronary heart disease (CHD), strokes, type 2 diabetes and some forms of cancer such as colorectal cancer and post-menopausal breast cancer. It can also contribute to a variety of other risk factors such as high blood pressure and high cholesterol.
Poor diet and nutrition are recognised as major contributory risk factors for ill health and premature death (NHS Statistics on obesity, physical activity and diet: England, 2011)
PROFESSIONAL ROLE BOUNDARIES IN OFFERING NUTRITIONAL ADVICE
As part of a fitness instructor role, the instructor should not recommend diets but will be able to give generalised advice on healthy eating for a ‘normal healthy individual’ to improve their current nutritional intake. However for clients with more serious diseases and nutritional deficiencies, an instructor must refer the client to registered dieticians or nutritional therapists as appropriate, as they have the ability to further analyse the client and offer supplements if required.
Registered Dieticians (RDs) – Dieticians are the only qualified health professionals that assess, diagnose and treat diet/nutrition problems. The job role of a dietician is protected by law, the regulator is the Health Professions Council (HPC).
Nutritionists – A Nutritionist is not a protected term and can be used by anyone, however by registering with the UK Voluntary Register of Nutritionists (UKVRN) the term ‘Registered Nutritionist’ can be used. To be able to work with high risk patients they are supervised by a dietician.
Nutritional Therapists – Nutritional therapy is again not a protected term, they do however, have a voluntary register which is the Complementary and Natural Healthcare Council (CNHC). Nutritional therapists tend to work privately with clients on alternative/complementary medicine.
NUTRIENT GROUPS
The body requires a variety of fuels to provide energy to all cells, to allow organs to function and to help repair body tissues. We eat to provide this fuel and food contents can be classified into 2 main categories: Macronutrients which we need a higher quantity of and micronutrients which we require a smaller quantity of.
KEYTERMS
HEALTHY EATING
Is the intake of food that promotes optimal function of the structures and systems of the human body.
MACRONUTRIENTSCarbohydrates Fats Protein
MICRONUTRIENTSVitamins Minerals

63
Unit 4 The Importance of Healthy Eating 6
MACRO-NUTRIENTS
Carbohydrates
There are 3 types of carbohydrate within the food we eat:
Table 4.8 classification of carbohydrates
Table 4.9 classification of fats
Table 4.10 classification of proteins
Classification of Carbohydrate
Structure Example of foods Purpose in the body
Sugars Simple structure easily broken down to provide energy quickly (glucose)
Fruit, sweets, jam and sugar To provide quick release energy to the body, the brain is dependent on glucose to function
Starches Complex build up releasing energy slowly
Vegetables, rice, pasta and potatoes
To provide a slow release of energy to fuel the body
Fibre Indigestible and does not provide energy
Whole grains, beans and the skin of fruit and vegetables
Provides bulk in the digestive system pushing waste products through the digestive tract
Fats
There are 2 main classifications of fats within food:
Classification of Fat
Types Example of foods Purpose in the body
Saturated Generally solid at room temperature except palm and coconut oil, includes butter, lard, fat from meat, eggs and dairy products
Helps cell and nervous system function, insulation under the skin, protection of vital organs and provide energy, as well as storage of vitamins A, D, E and K
Un-saturated Poly-unsaturated
Mono-unsaturated
Nuts, seeds, fish and oils Helps protect from heart disease (CHD) and aid in cell and brain function
Proteins
Amino acids are small structural units that make up proteins, there are 20 standard amino acids, 9 are called essential as the human body cannot synthesize them (create from other compounds) so they must be obtained from food we eat. The II non essential can not be created within the body
We ingest protein from 2 sources:
Classification of protein
Example of foods Purpose in the body
Animal sources Meat, poultry, fish, eggs and dairy products The other 11 amino acids are non-essential which means that they can be synthesized by the body, providing sufficient amounts of the 9 essential amino acids are consumedPlant sources Nuts, seeds, beans and grains
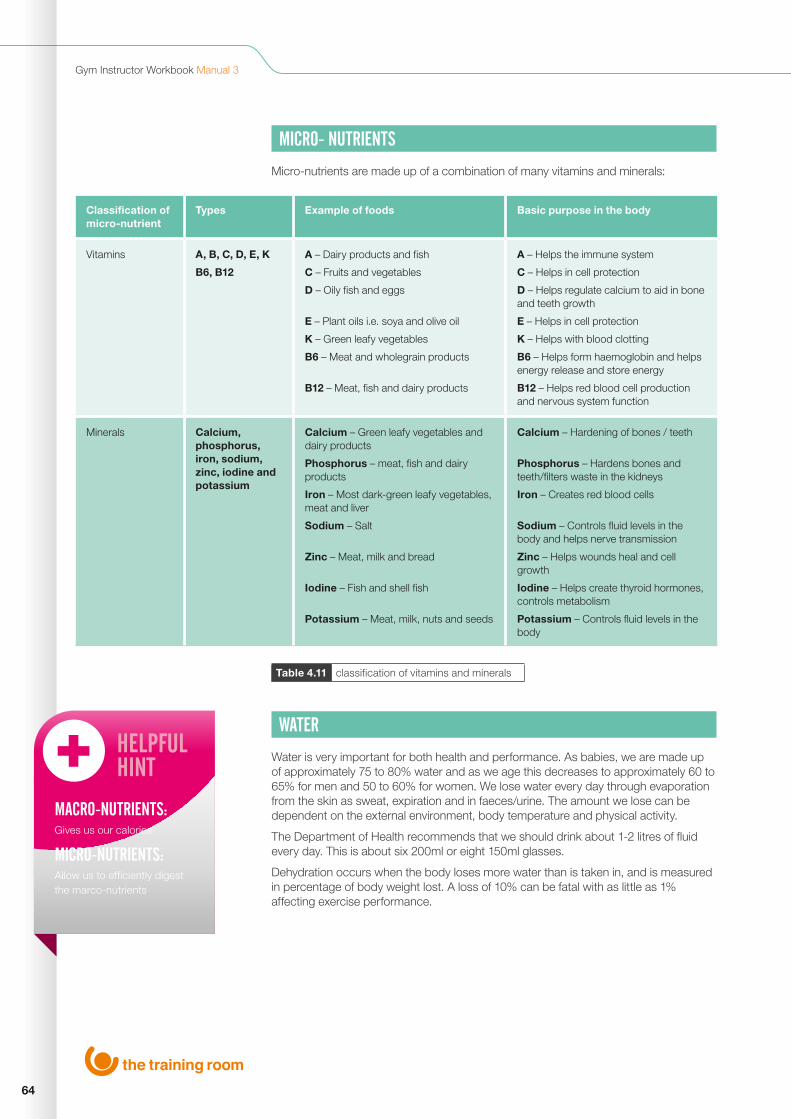
64
Gym Instructor Workbook Manual 3
Table 4.11 classification of vitamins and minerals
MICRO- NUTRIENTS
Micro-nutrients are made up of a combination of many vitamins and minerals:
Classification of micro-nutrient
Types Example of foods Basic purpose in the body
Vitamins A, B, C, D, E, K
B6, B12
A – Dairy products and fish
C – Fruits and vegetables
D – Oily fish and eggs
E – Plant oils i.e. soya and olive oil
K – Green leafy vegetables
B6 – Meat and wholegrain products
B12 – Meat, fish and dairy products
A – Helps the immune system
C – Helps in cell protection
D – Helps regulate calcium to aid in bone and teeth growth
E – Helps in cell protection
K – Helps with blood clotting
B6 – Helps form haemoglobin and helps energy release and store energy
B12 – Helps red blood cell production and nervous system function
Minerals Calcium, phosphorus, iron, sodium, zinc, iodine and potassium
Calcium – Green leafy vegetables and dairy products
Phosphorus – meat, fish and dairy products
Iron – Most dark-green leafy vegetables, meat and liver
Sodium – Salt
Zinc – Meat, milk and bread
Iodine – Fish and shell fish
Potassium – Meat, milk, nuts and seeds
Calcium – Hardening of bones / teeth
Phosphorus – Hardens bones and teeth/filters waste in the kidneys
Iron – Creates red blood cells
Sodium – Controls fluid levels in the body and helps nerve transmission
Zinc – Helps wounds heal and cell growth
Iodine – Helps create thyroid hormones, controls metabolism
Potassium – Controls fluid levels in the body
WATER
Water is very important for both health and performance. As babies, we are made up of approximately 75 to 80% water and as we age this decreases to approximately 60 to 65% for men and 50 to 60% for women. We lose water every day through evaporation from the skin as sweat, expiration and in faeces/urine. The amount we lose can be dependent on the external environment, body temperature and physical activity.
The Department of Health recommends that we should drink about 1-2 litres of fluid every day. This is about six 200ml or eight 150ml glasses.
Dehydration occurs when the body loses more water than is taken in, and is measured in percentage of body weight lost. A loss of 10% can be fatal with as little as 1% affecting exercise performance.
HELPFULHINT
MACRO-NUTRIENTS:Gives us our calories
MICRO-NUTRIENTS:Allow us to efficiently digest the marco-nutrients
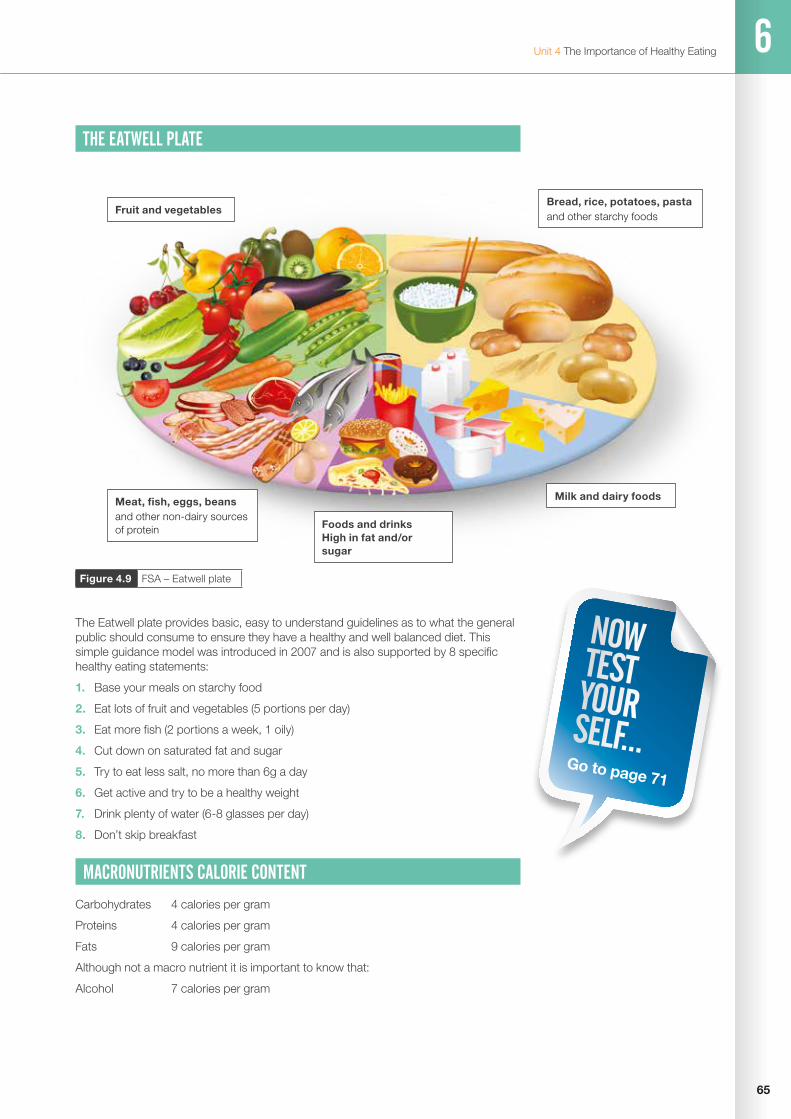
65
Unit 4 The Importance of Healthy Eating 6
Figure 4.9 FSA – Eatwell plate
THE EATWELL PLATE
The Eatwell plate provides basic, easy to understand guidelines as to what the general public should consume to ensure they have a healthy and well balanced diet. This simple guidance model was introduced in 2007 and is also supported by 8 specific healthy eating statements:
1. Base your meals on starchy food
2. Eat lots of fruit and vegetables (5 portions per day)
3. Eat more fish (2 portions a week, 1 oily)
4. Cut down on saturated fat and sugar
5. Try to eat less salt, no more than 6g a day
6. Get active and try to be a healthy weight
7. Drink plenty of water (6-8 glasses per day)
8. Don’t skip breakfast
MACRONUTRIENTS CALORIE CONTENT
Carbohydrates 4 calories per gram
Proteins 4 calories per gram
Fats 9 calories per gram
Although not a macro nutrient it is important to know that:
Alcohol 7 calories per gram
NOWTESTYOURSELF...
Go to page 71
Milk and dairy foods
Fruit and vegetables
Foods and drinks High in fat and/or sugar
Bread, rice, potatoes, pastaand other starchy foods
Meat, fish, eggs, beansand other non-dairy sources of protein

66
Gym Instructor Workbook Manual 3
GUIDELINES ON PORTION SIZES
As a fitness professional you may ask your client to fill out a food diary. It is important to explain how much food is equivalent to a portion size, as this will help both gauging current diet and advising what could be added. Generally a portion size is 80g for an adult or fist size if that’s easier to measure for your client.
• Fruit – adult portion size is 80g• Dried fruit – adult portion size is 30g• Fruit/vegetable juice – adult portion size 150ml• Vegetables – adult portion size is 80g
Below are some examples of fruit and vegetable portion sizes:
Fruit Portions Vegetable Portions
Apple 1 medium apple Beans 3 heaped tablespoons
Apricot 3 apricots Cabbage 3 heaped tablespoons
Avocado Half an avocado Carrots 3 heaped tablespoons
Banana 1 medium banana Cucumber 2 inch slice
Blackberries 1 handful (9 to 10 blackberries)
Mushrooms 13 button mushrooms
Blackcurrants 4 heaped tablespoons
Onion 1 medium onion
Cherries 14 cherries Parsnips 1 large parsnip
Grapes 1 handful Peas 3 heaped table spoons
Kiwi fruit 2 kiwi fruit Pepper Half a pepper
Pineapple 1 large slice Radish 10 radishes
Plum 2 medium plums Sweetcorn 1 cob
Strawberry 7 strawberries Tomato 1 medium or 7 plum tomatoes
Table 4.12 examples of fruit and vegetable portion sizes

67
Unit 4 The Importance of Healthy Eating 6
THE ENERGY BALANCE EQUATION
In its simplest form, the energy balance equation is meant to represent what does (or at least should) happen to the body, by looking at the difference between energy intake (from food) and energy output (physical activity). This highlights the importance of both diet and physical activity in the role of weight gain/loss.
Energy Input is greater than Energy Output = Weight gain
Energy Input is less than Energy Output = Weight loss
Energy Input is the same as Energy Output = Weight maintenance
Estimated Calorie Requirements (in kilocalories) for each gender and age group at three levels of physical activity.
Table 4.13 HHS/USDA dietary guidelines for Americans: 2010
Gender Age (years)
Activity Level
Sedentary Moderately Active
Active
Child 2-3 1,000 1,000 - 1,400 1,000 - 1,400
Female 4 - 8 1,200 1,400 - 1,600 1,400 - 1,800
Female 9-13 1,600 1,600 - 2,000 1,800 - 2,000
Female 14-18 1,800 2,000 2,400
Female 19-30 2,000 2,000 - 2,200 2,400
Female 31-50 1,800 2,000 2,200
Female 51+ 1,600 1,800 2,000 - 2,200
Male 4-8 1,400 1,400 - 1,600 1,600 - 2,000
Male 9-13 1,800 1,800 - 2,200 2,000 - 2,600
Male 14-18 2,200 2,400 - 2,800 2,800 - 3,200
Male 19-30 2,400 2,600 - 2,800 3,000
Male 31-50 2,200 2,400 - 2,600 2,800 - 3,000
Male 51+ 2,000 2,200 - 2,400 2,400 - 2,800
VITALFACTS
WEIGHT GAIN:Energy in Energy out
WEIGHT LOSS:Energy in Energy out
WEIGHT MAINTENANCE:Energy in = Energy out

68
Gym Instructor Workbook Manual 3
THE IMPORTANCE OF HEALTHY EATINGCAN YOU NOW...
Identify the common dietary sources of the key nutrients
Explain the dietary role of the key nutrients
Explain the importance of adequate hydration
Describe the national food model/guide
Describe key healthy eating advice that underpins a healthy diet
Describe the energy balance equation
Explain the health risks of poor nutrition
Explain professional role boundaries in relation to offering nutritional advice

69
Unit 4 The Importance of Healthy Eating 6
70
Gym Instructor Workbook Manual 3
www.thetrainingroom.com
NOWTESTYOURSELF...
TASK 6.1
Match the macronutrients to their role in the body:
TASK 6.2
Identify good food sources for the following macronutrients:
Protein Provide us with Glucose for energy production in the body
Carbohydrates Cell and nervous function, provide insulation, protection of vital organs, storage of vitamins A,D,E and K, energy production
Fats Made up of amino acids, major role is to aid with growth and repair of body tissue
Carbohydrates Fats Proteins

71
Unit 4 The Importance of Healthy Eating 6
TASK 6.2
Label the sections on the Eatwell Plate:
TASK 6.4
The energy balance equation states (match the equations):
Weight Gain Energy input is greater than energy output
Weight Maintenance Energy input is less than energy output
Weight Loss Energy input is the same as energy output

Gym Instructor Workbook Manual 3
72
REFERENCES AND FURTHER READING
Alter, M.J. (2004) Science Of Flexibility. Human Kinetics
American College of Sports Medicine (2010) ACSM’s Guidleines for Exercise Testing and Prescription. 8th Ed. Lippincott Williams and Wilkins
Blocker, W.P. (1992) Maintaining Function Independence by Mobilizing the Aged cited in American Council for Exercise (1998) Exercise for Older Adults. Human Kinetics
Borg, G. (1998) Borg’s Perceived Exertion and Pain Scales. Human Kinetics
Department of Health (2004) The Benefits of Activity and Health. http://www.dh.gov.uk/en/Publicationsandstatistics/Publications/PublicationsPolicyAndGuidance/DH_128209
Earle, R.W. and Baechle, T.R. (2000) Resistance Training and Spotting Techniques. Essentials of Strength and Conditioning. Human Kinetics
Fox and Haskell Formula – Heart Rate Training Zones cited in Singh, A. (2009) Stress Management: Mission to Fight Pressure, Mental & Emotional Strain. Global India
FSA – Food Standards Agency (2007) The Eatwell Plate. http://www.food.gov.uk/multimedia/pdfs/publication/eatwellplate0210.pdf
Hyde, T.E. and Gengenbach, M.S. (2007) Conservative Management of Sports Injuries. 2nd Ed. Jones and Bartlett Publishers
Kraus, H. and Raab, W. (1961) Hypokinetic disease; diseases produced by lack of exercise. llMay6l
Legistation.gov.uk (2012) Disability Discrimination Act 1995. http://www.legislation.gov.uk/ukpga/1995/50/contents
NHS (2006) Management of hypertension in adults in primary care. http://www.nice.org.uk/nicemedia/pdf/CG034NICEguideline.pdf
NHS (2011) Statistics on obesity, physical activity and diet: England, 2011. www.ic.nhs.uk/statistics-and-data-collections/health-and-lifestyles/obesity/statistics-on-obesity-physical-activity-and-diet-england-2011
NHS (2011) Why Body Shape Matters. www.nhs.uk/livewell/loseweight/Pages/Appleorpear.aspx
Sale et al (1990) Interaction between Concurrent Strength and Endurance Training. Journal of Applied Physiology cited on Burne, A. (2000) Concurrent Strength and Endurance Training. www.physiotherapy.curtin.edu.au
Samson, M. et al (2012) Effects of Dynamic and Static Stretching within General and Activity Specific Warm-up Protocols. Journal of Sports Science and Medicine. www.jssm.org
Soligard, T. et al (2008) Comprehensive warm-up programme to prevent injuries in young female footballers: cluster randomized controlled trial. British Medical Journal. http://www.ncbi.nlm.nih.gov/pmc/articles/PMC2600961/

Unit 4 References and Further Reading
73
U.S. Department of Health and Human Services (2010) Dietary Guidelines for Americans 2010. http://health.gov/dietaryguidelines/dga2010/DietaryGuidelines2010.pdf
World Health Organisation (WHO) (2011) Disability and Health. http://www.who.int/mediacentre/factsheets/fs352/en/index.html


The Training Room
Waterloo House
Fleets Corner
Waterloo Road
Poole
Dorset
BH17 0HL
Tel: 0800 021 6050
www.thetrainingroom.com

2LEVELGYM INSTRUCTOR WORKBOOK / MANUAL 4
UNIT 5
PLANNING GYM BASED EXERCISE
UNIT 6
INSTRUCTING GYM BASED EXERCISE

www.thetrainingroom.com
2
Gym Instructor Workbook Manual 4

3
MANUAL CONTENTS
Unit 5 Planning Gym Based Exercise
Unit 6 Instructing Gym Based Exercise
Exercise Library
Exercise Technique
Dynamic Flexibility
Static Warm Up Stretches
Cardiovascular Machines
Free Weight Exercise
Resistance Machines
Bodyweight Exercise
Static Cool Down Stretches
Page
5
33
43
47
50
54
58
73
88
92

www.thetrainingroom.com
4
Gym Instructor Workbook Manual 4
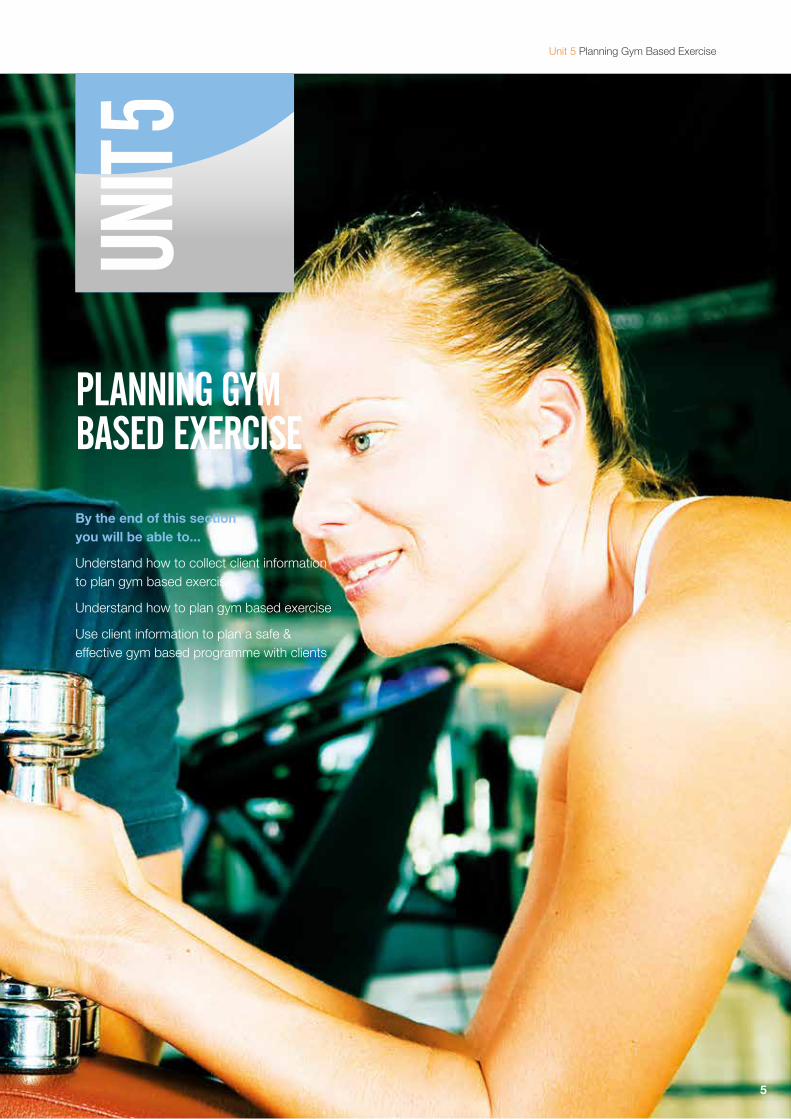
5
Unit 5 Planning Gym Based Exercise
UNIT
5
PLANNING GYM BASED EXERCISE
By the end of this section you will be able to...
Understand how to collect client information to plan gym based exercise
Understand how to plan gym based exercise
Use client information to plan a safe & effective gym based programme with clients

6
Gym Instructor Workbook Manual 4
GATHERING INFORMATION TO PLAN GYM BASED EXERCISEPlanning prior to delivery of a gym-based session is essential to ensure a safe and effective session is carried out. Planning will enable the gym instructor to obtain the client’s goals and will, therefore provide a reference for the development of programmes suitable to their needs and levels of fitness.
This plan may include young people in the 14-16 age range, provided they are part of a larger adult group, as well as working with individual older adults, ante/post-natal and disabled clients, provided the relevant contraindications and key safety guidelines are observed (as discussed in Unit 4).
The ACSM guidelines (2010) explain that most newcomers to exercise are apparently healthy individuals seeking to become fitter and lose weight. Furthermore, individuals who remain physically active are less likely to develop major chronic diseases such as heart disease, obesity and diabetes.
However, for some individuals exercise can actually have the opposite effect. Clients with chronic conditions, such as hypertension or CHD, will be at a higher risk during physical activity. The aim of gathering client’s information and screening is to check the level of risk and know when to refer clients to other health care professionals.
For every client an instructor works with, a health and fitness profile should be obtained using techniques such as questionnaires, diaries and oral questioning. Decisions can then be made of the client’s readiness for exercise, so that the most appropriate action can be taken. If a client is deemed unsuitable to undertake an exercise programme they can then be referred to the appropriate health care professional, such as a GP, to give medical clearance prior to starting.
It is stressed that instructors are not qualified to diagnose any medical conditions or rehabilitate clients from injury (unless they have a relevant professional qualification). This is beyond the gym instructor’s scope of practice.
When planning exercise with clients there are four main stages to follow:
1234Pre-Screen Information
GatheringFitness Tests Programme
Design
STAGE STAGE STAGE STAGE

7
Unit 5 Planning Gym Based Exercise 5
STAGE 1PRE-SCREENING
Once the client has decided to embark on a fitness programme it is the fitness professional’s duty to pre-screen the client and gather any information required, i.e:
• To check the client does not have an obvious health risk
• To fully brief the client as to what is required in the programme and clarify that they are fully aware of what they are participating in and that they understand it is voluntary
• To gain further information on the clients exercise likes/dislikes, current fitness levels, previous fitness levels and goals
When collecting and pre-screening clients, the instructor should be aware of some important factors:
• All of the information gained should be relevant and up to date, and any changes to this information would be updated throughout the programme
• All client information and data collected should be stored safely and securely in line with the Data Protection Act 1998, and not be available or passed on to any third parties
PAR-Q FORM
A physical activity readiness questionnaire or PAR-Q form is a common pre-exercise screening tool. There are many varieties of this form and they can vary from establishment to establishment. The main purpose of a PAR-Q form is to highlight any associated medical risks that could affect the client while taking part in an exercise programme. If any areas are highlighted, then the client should be referred to their GP.
PAR-Q FORM (PHYSICAL ACTIVITY READINESS QUESTIONNAIRE)
The physical activity readiness questionnaire (PAR-Q) was created by the the Canadian Society for Exercise Physiology and is a self-screening tool that can be used by anyone who is planning to start an exercise programme. It should highlight any potential risks for the client when exercising and highlight when exercise is appropriate or those who should seek medical advice before commencing an exercise programme.
A PAR-Q form is a yes and no questionnaire. This physical activity clearance is valid for a maximum of 12 months from the date it is completed and becomes invalid if the clients’ condition changes so that they would answer YES to any of the seven questions.
A written PAR-Q form should be completed by everyone that enrols onto an exercise programme, a verbal PAR-Q should be completed prior to every session even if a written form has already been completed.

8
Gym Instructor Workbook Manual 4
NOTE: If the PAR-Q is being given to a person before he or she participates in a physical activity
programme or a fitness appraisal, this section may be used for legal or administrative purposes.
I have read, understood and completed this questionnaire. Any questions I had were answered to my full satisfaction.Name .............................................................................................................................................................Signature .......................................................................... Date .........................................................Signature of Parent/Guardian ..................................... Witness .....................................................If you answered YES to one or more questions:Talk with your doctor by phone or in person BEFORE you start becoming much more physically
active or BEFORE you have a fitness appraisal. Tell your doctor about the PAR-Q and which
questions you answered YES to.• You may be able to do any activity you want – as long as you start slowly and build up
gradually• You may need to restrict your activities to those which are safe for you. Talk with your doctor
about the kinds of activities you wish to participate in and follow his/her advice
If you answered NO to all questions:If you answered NO honestly to all PAR-Q questions, you can be reasonably sure that you can:
• Start becoming more physically active – begin slowly and build up gradually
• Take part in a fitness appraisal – this is an excellent way to determine your basic fitness so
that you can plan the best way for you to live actively
1. Has your doctor ever said that you have a heart condition and that you should only do physical activity recommended by a doctor?
Yes No2. Do you feel pain in your chest when you do physical activity? Yes No3. In the past month, have you had chest pain when you were not doing physical activity?
Yes No4. Do you lose your balance because of dizziness or do you ever lose
consciousness?Yes No5. Do you have a bone or joint problem (for example, back, knee or hip)
that could be made worse by a change in your physical activity?Yes No6. Is your doctor currently prescribing drugs (for example, water pills)
for your blood pressure or heart conditions? Yes No7. Do you know of any other reason why you should not do physical activity?
Yes No
An example PAR-Q is outlined below:

9
Unit 5 Planning Gym Based Exercise 5
INFORMED CONSENT FORM
An informed consent form is a tool used to ensure the client is fully briefed by the fitness professional as to what their exercise programme entails. The informed consent should contain:
• Clients name, signature and date undertaken
• Purpose and explanation of procedures
• Risks associated with participation
• Benefits to be expected, along with alternatives to exercise
• Confidentiality and use of information
Informed consent should be discussed verbally with the client and recorded In a written format, stored in line with the data protection act.
EVALUATING RESULTS FROM PRE-SCREENINGINCLUSION TO AN EXERCISE PROGRAMME
On completion of the pre-screen it is the responsibility of the instructor to evaluate the client’s responses and information gathered. They can then identify the suitability of inclusion to an exercise programme. Inclusion would be suitable for clients who have responded ‘no’ to all PAR-Q questions, have completed health screening tests, and fall within accepted limits (such as heart rate, blood pressure and BMI), and have agreed and completed informed consent.
TEMPORARY DEFERRAL OF EXERCISE
There may be times when the pre-screen highlights factors which could defer clients from starting an exercise programme. These include:
• ‘Yes’ responses to PAR-Q questions
• Medical Referral - any diagnosed metabolic, pulmonary or cardiovascular disease, any signs and symptoms of pulmonary or cardiovascular disease
• Any doubt or uncertainty regarding the client’s health, including prescribed medication, recent operations and current injury or illness
• Health testing results which fall above or below recommended ‘safe’ levels, such as heart rate, blood pressure and BMI

10
Gym Instructor Workbook Manual 4
Once the referral route has been decided the fitness professional will need to decide the appropriate person depending on the issue. Referrals could be to:
A GP – If there are any medical issues that may affect exercise
Physiotherapist – If the client has recently had a serious injury or operation
Dietician – If there are specific nutritional/supplementation requirements
Psychologist – If the client has suffered eating disorders or depression
When referring clients to any of the above professionals it is best practice to pass on the relevant information, such as: the reason for exercise deferral i.e. previous medical history (CHD, dizzy spells etc.), health screening results (heart rate, blood pressure, BMI) or injury and illness. The whole process of client screening is to reduce risk and provide safe participation for all clientele.
STAGE 2INFORMATION GATHERING
Questionnaires
Questionnaires are a useful tool when gathering data. They come in many forms, they are cheap and simple to produce, and can be given to a large audience easily. The fitness professional can use this method on a face to face basis, or the questions can be given to the client to complete away from the fitness environment. The downsides to questionnaires include the necessity for the client to be literate to complete these, they can seem impersonal and can lend themselves to less detailed data.
One to One interviews
Interviews are very personal as they collect detailed information on a wide range of topics. Face to face meetings can build rapport and trust with the client, which can lead to more honest answers. The downside to interviews include having a suitable environment to complete them in, they can be time consuming and clients may feel nervous or embarrassed.
Direct/Live Observations
Use of direct observation by the fitness professional can be used for a variety of reasons specific to the client, which in turn will enable more effective planning of an exercise programme. For example, it may be necessary to look at the client’s posture, how they have adapted an exercise due to a disability or to check their technique during exercise. This is a very accurate form of information gathering as the data is live. However, the client may feel intimidated or embarrassed of making mistakes especially if they are new to exercise.
Knowledge Required During Pre-Questioning
During the information gathering process, the fitness professional will need to obtain a number of key pieces of information, these include:
Lifestyle Information
Questioning the client on their lifestyle may highlight potential barriers to exercise adherence and goal achievement. For example:
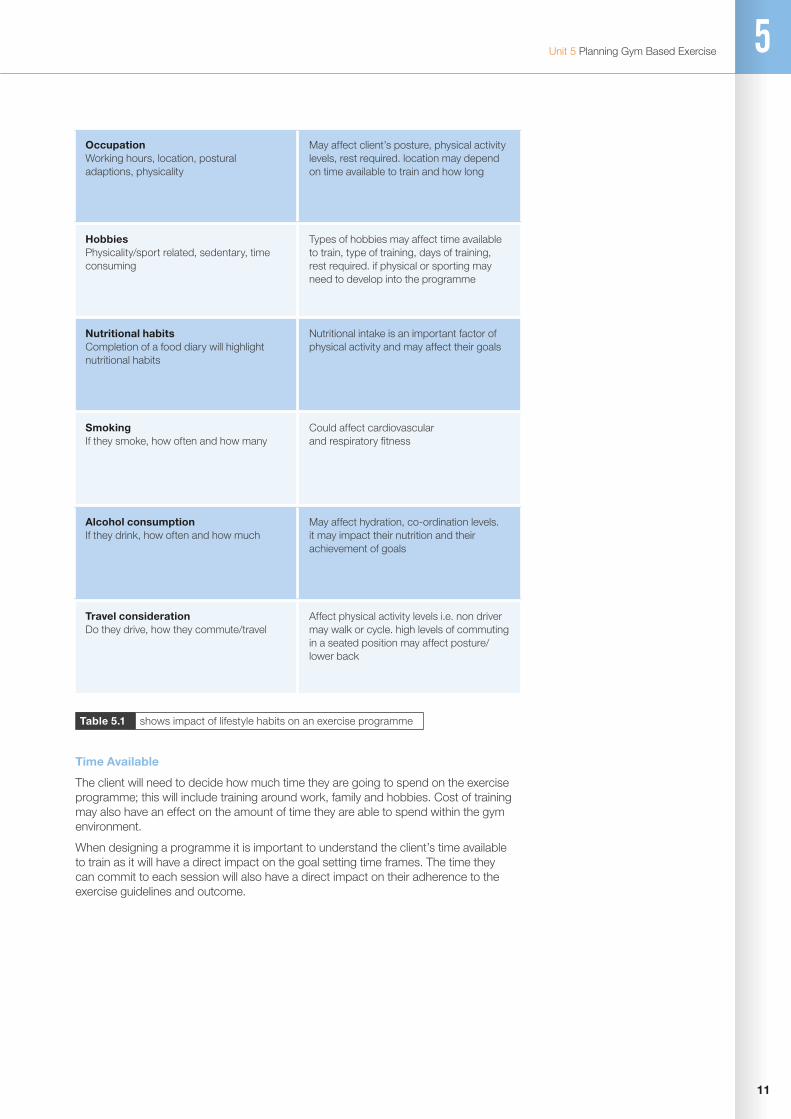
11
Unit 5 Planning Gym Based Exercise 5
Time Available
The client will need to decide how much time they are going to spend on the exercise programme; this will include training around work, family and hobbies. Cost of training may also have an effect on the amount of time they are able to spend within the gym environment.
When designing a programme it is important to understand the client’s time available to train as it will have a direct impact on the goal setting time frames. The time they can commit to each session will also have a direct impact on their adherence to the exercise guidelines and outcome.
Occupation Working hours, location, postural adaptions, physicality
May affect client’s posture, physical activity levels, rest required. location may depend on time available to train and how long
Hobbies Physicality/sport related, sedentary, time consuming
Types of hobbies may affect time available to train, type of training, days of training, rest required. if physical or sporting may need to develop into the programme
Nutritional habits Completion of a food diary will highlight nutritional habits
Nutritional intake is an important factor of physical activity and may affect their goals
Smoking If they smoke, how often and how many
Could affect cardiovascular and respiratory fitness
Alcohol consumption If they drink, how often and how much
May affect hydration, co-ordination levels. it may impact their nutrition and their achievement of goals
Travel consideration Do they drive, how they commute/travel
Affect physical activity levels i.e. non driver may walk or cycle. high levels of commuting in a seated position may affect posture/lower back
Table 5.1 shows impact of lifestyle habits on an exercise programme
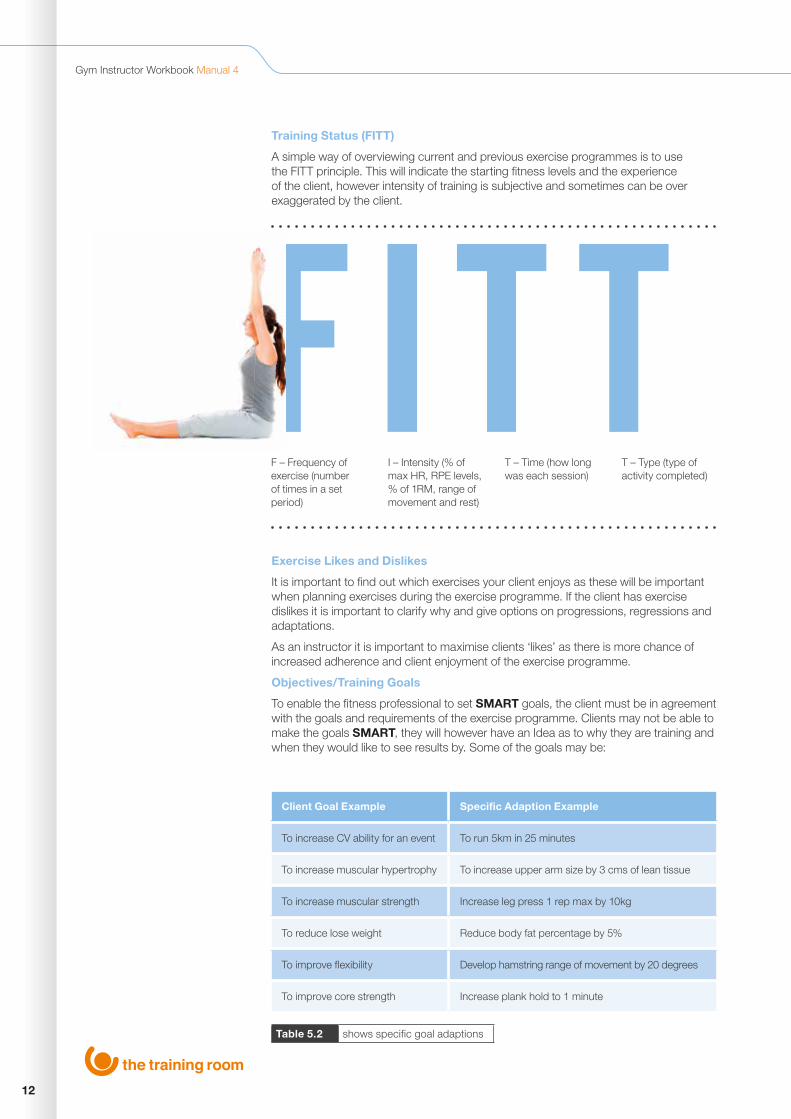
12
Gym Instructor Workbook Manual 4
Training Status (FITT)
A simple way of overviewing current and previous exercise programmes is to use the FITT principle. This will indicate the starting fitness levels and the experience of the client, however intensity of training is subjective and sometimes can be over exaggerated by the client.
Exercise Likes and Dislikes
It is important to find out which exercises your client enjoys as these will be important when planning exercises during the exercise programme. If the client has exercise dislikes it is important to clarify why and give options on progressions, regressions and adaptations.
As an instructor it is important to maximise clients ‘likes’ as there is more chance of increased adherence and client enjoyment of the exercise programme.
Objectives/Training Goals
To enable the fitness professional to set SMART goals, the client must be in agreement with the goals and requirements of the exercise programme. Clients may not be able to make the goals SMART, they will however have an Idea as to why they are training and when they would like to see results by. Some of the goals may be:
Client Goal Example Specific Adaption Example
To increase CV ability for an event To run 5km in 25 minutes
To increase muscular hypertrophy To increase upper arm size by 3 cms of lean tissue
To increase muscular strength Increase leg press 1 rep max by 10kg
To reduce lose weight Reduce body fat percentage by 5%
To improve flexibility Develop hamstring range of movement by 20 degrees
To improve core strength Increase plank hold to 1 minute
Table 5.2 shows specific goal adaptions
F I T TF – Frequency of exercise (number of times in a set period)
I – Intensity (% of max HR, RPE levels, % of 1RM, range of movement and rest)
T – Time (how long was each session)
T – Type (type of activity completed)

13
Unit 5 Planning Gym Based Exercise 5
When setting goals with a client it is important that you target their reasons for exercising. Involving them in the goal setting process will help with motivation, adherence and ensure that both the instructor and client are working towards the same ‘end product’. As an instructor it is important that you are able to develop client’s goals into the SMART format, making them specific, so they are tangible and can be measured and reviewed throughout the programme.
STAGE 3FITNESS TESTING
Physical Measurements
After the client has completed pre-exercise questions it is important that physical measurements are taken. This will give a better insight into the current fitness levels of the client, as well as providing a platform that can referenced against with future fitness testing results. The results of the tests may indicate additional goals that the client had previously overseen, for example reducing BMI to recommended guidelines.
Physical measurements can make some clients feel uncomfortable. It is important to stress that if the client is not comfortable with any tests then they do not have to participate in them, for example, skin fold tests can be intrusive, so an alternative can be used. Where the tests are carried out is important, they should be completed in a private area in which other gym users will be unable to disturb the process, this could be a specific fitness testing room or a gym office.
PHYSICAL TEST CHOICE
Specificity
When choosing a physical test with a client it is important that they are specific to the goals or outcome of the exercise programme.
Validity
Once SMART goals have been decided, the way in which results are going to be measured is very important. For example, if the client wanted to reduce body fat, the instructor could complete skin fold tests or bio electrical impedance tests. However if the client wanted to lose a specific amount from their waist, circumference tests of waist may be more applicable.
Objectivity
Fitness tests should be made objective. This will enable that test to be completed by another fitness professional if the original tester is unavailable whilst producing the same results for the same individual. For example, the multistage fitness test, BMI tests or bio electrical impedance.
Reliability
A reliable fitness test should produce the same results if repeated. To ensure this the instructor should make a list of specific requirements for that test. For example, when measuring skin fold it is important that specific areas are targeted to ensure the consistency of the test results.
14
Gym Instructor Workbook Manual 4
Fitness tests are affected by a number of factors which may affect the outcome. When completing a subsequent fitness test after the initial test, it is important to try to limit as many variables as possible. The instructor must try to replicate the first test as closely as possible. Factors to consider include:
• The time of day the test is completed
• Weather conditions if outdoor tests are completed
• Is the assessor the same, if not, are they using the same test protocol
• Time since the athletes last meal, are they suitably hydrated
• Is the client suffering from illness, and are they taking medication
• Has the testing equipment changed
WHEN TO STOP TESTING
Some physical/dynamic tests can place the client under high intensity. The instructor must therefore ensure the safety of the client and tests should stop immediately if the client experiences any of the following symptoms:
• Onset of angina-like symptoms
• Significant drop (20mmHg) in systolic blood pressure or a failure of the systolic blood pressure to rise with an increase in activity
• Excessive rise in blood pressure: systolic pressure >260 mmHg or diastolic pressure >115 mmHg
• Signs of poor perfusion: light-headedness, confusion, ataxia, pallor, cyanosis, nausea, or cold, clammy skin
• Failure of the heart rate to increase with increased exercise intensity
• Noticeable change in heart rhythm
• Client requests to stop
• Physical or verbal manifestations of severe fatigue
• Failure of the testing equipment
(General indications for stopping exercise testing low-risk adults (ACSM, 2001)

15
Unit 5 Planning Gym Based Exercise 5
STATIC FITNESS TESTS (ANTHROPOMETRICS)ANTHROPOMETRIC TESTS
Before starting the programme, static or anthropometric testing should be completed to assess the client’s current fitness levels. There are a number of tests that can be performed according to the client’s goals:
Height
To measure the client’s height correctly, they must firstly remove any footwear, stand against a flat surface or stand tall then measure to the highest point on the head.
Weight
To weigh the client the scales will firstly need to be calibrated, place the scales on a hard surface and ensure the client has removed any heavy clothing. Weight can be taken in pounds, stones or kilograms depending on the instructor preference.
BMI (Body Mass Index)
BMI is used to judge whether the client is overweight. It is a unit of measure in which body weight is related to height. However, this method does not necessarily identify a healthy individual, neither does it identify the cause of the weight. Many athletes and body builders will find themselves in the overweight or obese categories due to high levels of muscle mass.
Category BMI Range
Very Obese from 35 and above
Obese from 30 to 34.9
Overweight from 25 to 29.9
Normal from 18.5 to 24.9
Underweight from 16 to 18.4
Very Underweight from 15 and below
Table 5.3 classification of BMI from the National Institute of Health 1998
English BMI Formula
BMI= Weight in Pounds
Height in inches x Height in inches x 703
Metric BMI Formula
BMI= Weight in Kilograms
Height in metres x Height in metres

16
Gym Instructor Workbook Manual 4
Circumference Measurements
In many goals set it is essential to measure the circumferences of the body, these sites will vary depending on the goal. One of the main sites of measurement is the waist, however there are 5 sites for circumferential measurement.
Figure 5.1 sites of circumference measurements
ChestUpper Arm
Waist
Thigh
Hips
Calf
When taking measurements it is essential that the client is relaxed (unless specifically measuring tensed size) and breathing normally otherwise the results will be inaccurate.
1. The instructor should measure these areas at their widest point
2. Take an average reading
3. Measure under clothing where possible
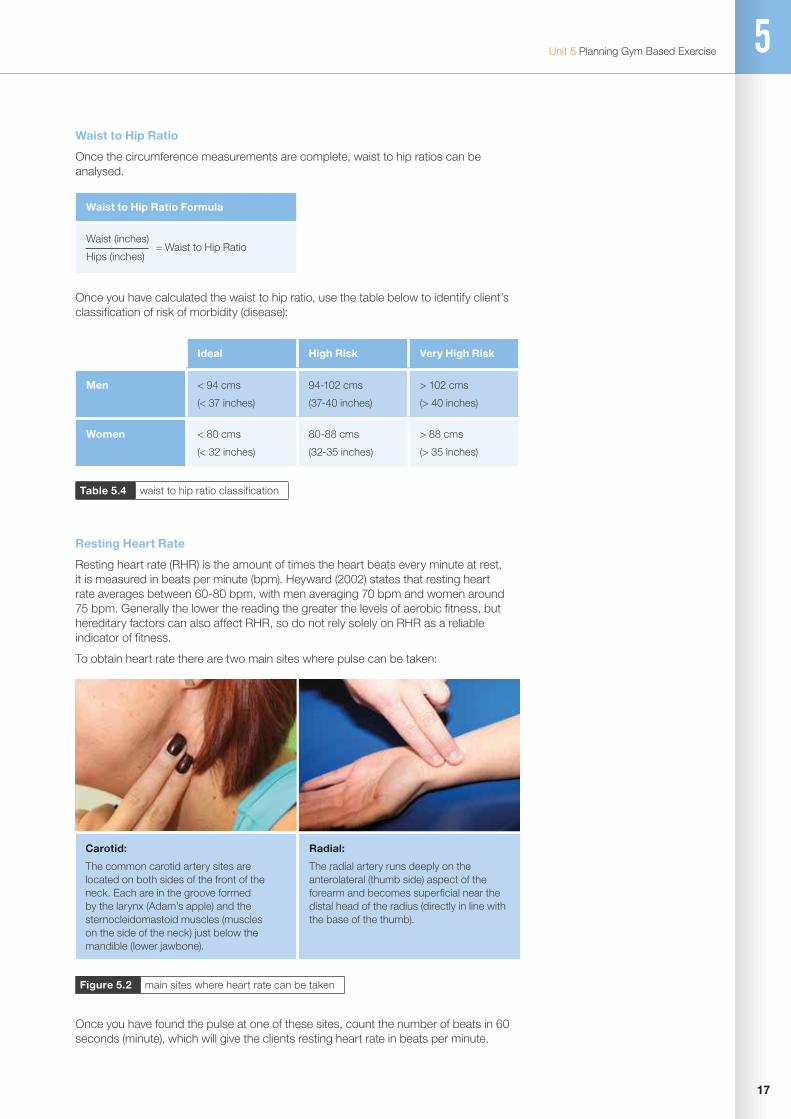
17
Unit 5 Planning Gym Based Exercise 5
Carotid:
The common carotid artery sites are located on both sides of the front of the neck. Each are in the groove formed by the larynx (Adam’s apple) and the sternocleidomastoid muscles (muscles on the side of the neck) just below the mandible (lower jawbone).
Radial:
The radial artery runs deeply on the anterolateral (thumb side) aspect of the forearm and becomes superficial near the distal head of the radius (directly in line with the base of the thumb).
Waist to Hip Ratio Formula
Waist (inches)
Hips (inches) = Waist to Hip Ratio
Waist to Hip Ratio
Once the circumference measurements are complete, waist to hip ratios can be analysed.
Once you have calculated the waist to hip ratio, use the table below to identify client’s classification of risk of morbidity (disease):
Resting Heart Rate
Resting heart rate (RHR) is the amount of times the heart beats every minute at rest, it is measured in beats per minute (bpm). Heyward (2002) states that resting heart rate averages between 60-80 bpm, with men averaging 70 bpm and women around 75 bpm. Generally the lower the reading the greater the levels of aerobic fitness, but hereditary factors can also affect RHR, so do not rely solely on RHR as a reliable indicator of fitness.
To obtain heart rate there are two main sites where pulse can be taken:
Ideal High Risk Very High Risk
Men < 94 cms
(< 37 inches)
94-102 cms
(37-40 inches)
> 102 cms
(> 40 inches)
Women < 80 cms
(< 32 inches)
80-88 cms
(32-35 inches)
> 88 cms
(> 35 inches)
Table 5.4 waist to hip ratio classification
Figure 5.2 main sites where heart rate can be taken
Once you have found the pulse at one of these sites, count the number of beats in 60 seconds (minute), which will give the clients resting heart rate in beats per minute.
18
Gym Instructor Workbook Manual 4
Client Information Storage
On completion of the initial consultation (pre-screen, PAR-Q and fitness testing) it is the responsibility of instructor to store and handle all client information confidentially and securely following the data protection act 1998. This means using the information for reasons collected i.e. in the safe programming and instructing of the client and not disclosing any of the information to other parties, unless required and consented to by the client i.e. medical referral, physio or sports therapists.
STAGE 4PROGRAMME DESIGN
Once the pre-screening questions, medical questionnaire and physical tests are complete, the exercise professional will need to decide how to approach programme design. There are many variables that will affect an exercise programme, for example:
1. Current fitness levels
2. Exercise likes and dislikes
3. Client injuries
4. Time available per week/session to train
5. Clients total programme time
6. Client’s goals - It is important to revisit the clients original objective and agree SMART goals based on the needs and potential of the client.
Once the SMART goals have been agreed by both parties, the instructor should now be armed with the necessary information to plan a safe and effective training programme following industry good practice and level of competency.
PROGRAMME GUIDELINES
When looking at the programme design it is important to work on the correct training stimulus. Shown below are the suggested repetitions and sets for strength, hypertrophy and muscular endurance. During an exercise programme the client could solely stay within one set of guidelines or combine approaches as the fitness professional sees as appropriate.
Training Goal Strength Hypertrophy Endurance Health Cardiovascular
Intensity High Moderate Low Low (aerobic) 60-90% MHR
Load as % of 1RM > 85% 67%-85% < 67% N/A N/A
Reps/duration 1-5 6-12 12+ 30 mins + 20 mins +
Recover between sets 3-5 mins 1-2 mins 30-60 seconds N/A N/A
Sets per exercise 2-6 3-6 2-3 1 1
Frequency per muscle group
1-2 x per week 1-2 x per week 2-3 x per week 5+ sessions weekly 3+ sessions weekly
Table 5.5 programming guidelines and principles (Adapted from Earle and Baechle 2000)
19
Unit 5 Planning Gym Based Exercise 5
PROGRAMMING AEROBIC TRAINING
There is no definitive guide to designing aerobic training programmes; but targeted training should be applied to ensure the adaptations to the training type are specific to the client’s goals. The frequency, intensity and duration of the exercise will affect the work rate in all types of aerobic training.
When prescribing aerobic exercise, the ACSM have outlined guidelines for both maintaining health and improving fitness:
There are 3 main cardiovascular training systems which target a variety of muscle fibre types and energy sources within the body.
Long Slow Duration (LSD) Training
Long slow duration training was first introduced in the 1920’s by Dr Ernst Van Auken and involves prolonged training with no rest periods. LSD training is typically completed at low to moderate intensity (60-80% MHR) for periods longer than 30 minutes. It is therefore good for clients that are new to aerobic exercise or those who wish to maintain a base level of cardiovascular fitness. Another type of duration training is continuous training. The difference from LSD training is that it is often performed as high intensity continuous training and typically works the client to 85-95% MHR.
Interval or Tempo Training
Interval training was formalised in the 1930’s by German coach Woldemar Gerschler and involves 2 phases, one of high intensity and one of lower intensity or active recovery. Active recovery interval training is more commonly used within the fitness environment. There are a number of ways to vary the intensity of interval training:
• Intensity of the exercise interval
• Distance of the exercise interval
• Exercises used in both the exercise and rest intervals
• The duration of rest or active recovery
• The time of training/number of sets of intervals
These variables can be changed according to the client’s goals and fitness levels; interval training is often used to train sports athletes.
Fartlek
Fartlek is Swedish for speed play and was developed in Sweden in the 1930s, this form of training is a combination of continuous and intervals. Fartlek training is often associated with running but can also be applied to other continuous sports such as cycling and swimming. It involves working at a variety of working intensities and is good for cross training as it can work all muscle fibre types and energy sources. It is also good for those clients who get bored easily.
Maintaining Health Improving Fitness
Frequency 5 x per week 3 x per week
Intensity Low to Moderate Vigorous
Time > 30 minutes > 20 minutes
Type Rhythmical Exercise Using Large Muscles Groups
Table 5.6 cardiovascular programming guidelines (Adapted from ACSM 2010)
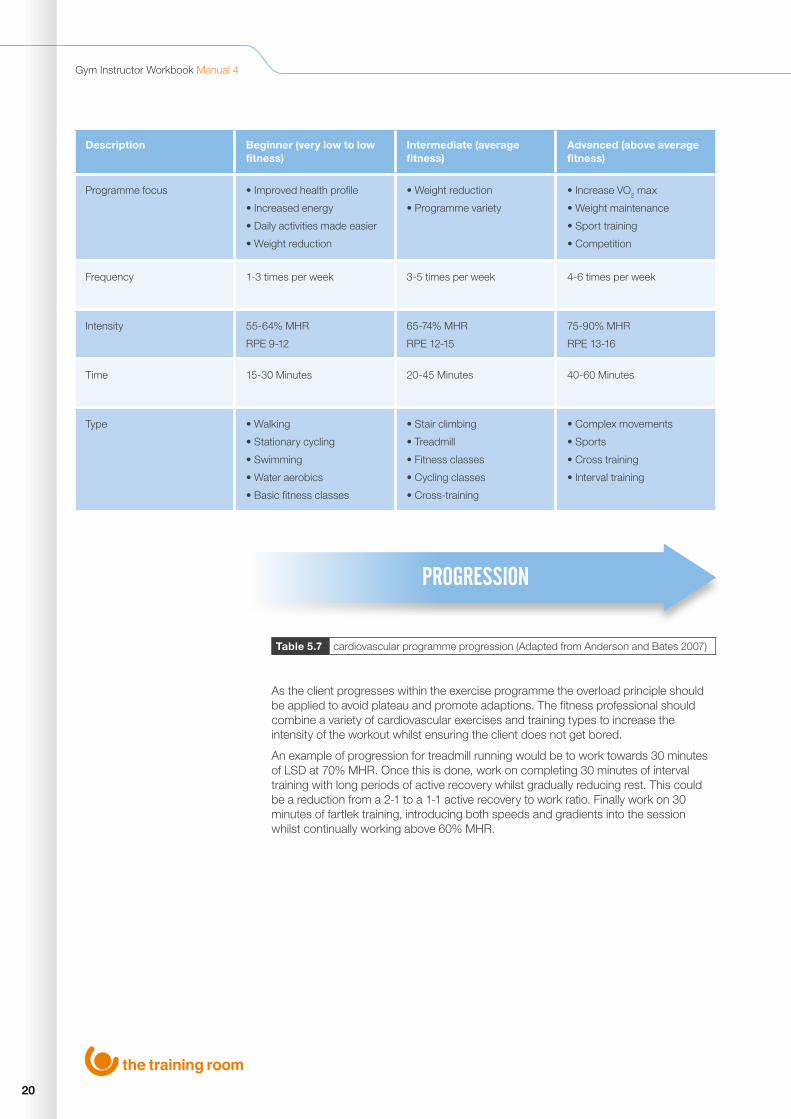
20
Gym Instructor Workbook Manual 4
As the client progresses within the exercise programme the overload principle should be applied to avoid plateau and promote adaptions. The fitness professional should combine a variety of cardiovascular exercises and training types to increase the intensity of the workout whilst ensuring the client does not get bored.
An example of progression for treadmill running would be to work towards 30 minutes of LSD at 70% MHR. Once this is done, work on completing 30 minutes of interval training with long periods of active recovery whilst gradually reducing rest. This could be a reduction from a 2-1 to a 1-1 active recovery to work ratio. Finally work on 30 minutes of fartlek training, introducing both speeds and gradients into the session whilst continually working above 60% MHR.
Description Beginner (very low to low fitness)
Intermediate (average fitness)
Advanced (above average fitness)
Programme focus • Improved health profile
• Increased energy
• Daily activities made easier
• Weight reduction
• Weight reduction
• Programme variety
• Increase VO2 max
• Weight maintenance
• Sport training
• Competition
Frequency 1-3 times per week 3-5 times per week 4-6 times per week
Intensity 55-64% MHR
RPE 9-12
65-74% MHR
RPE 12-15
75-90% MHR
RPE 13-16
Time 15-30 Minutes 20-45 Minutes 40-60 Minutes
Type • Walking
• Stationary cycling
• Swimming
• Water aerobics
• Basic fitness classes
• Stair climbing
• Treadmill
• Fitness classes
• Cycling classes
• Cross-training
• Complex movements
• Sports
• Cross training
• Interval training
PROGRESSION
Table 5.7 cardiovascular programme progression (Adapted from Anderson and Bates 2007)

21
Unit 5 Planning Gym Based Exercise 5
PROGRAMMING FOR BEGINNERS AND MUSCULAR ENDURANCE FITNESSWhen planning resistance exercise for beginners it requires a logical and structured introduction into resistance training. They need to develop a solid foundation that they can build upon as they progress.
The ACSM 2008, state that the guidelines for endurance are as follows:
As an instructor you need to be aware of some of the common issues a beginner to resistance training may display:
Poor Technique
Practicing new exercise moves with teaching points will improve new techniques.
Poor Proprioception
This is normally apparent when a client carries out less stable exercises, for example free weights.
Postural Abnormalities
Depending on work, hobbies and injuries, it may be necessary to strengthen and stretch areas to help reduce injury risks from poor posture.
Weak Muscular Strength
Dynamic fitness tests should indicate current muscular strength. It is important not to overestimate resistance required as it can increase injury risk. Instead use the intensity variables to gradually increase the clients strength.
When a beginner embarks on a resistance programme it is important to incorporate the following:
• Start within the muscular endurance section of the pyramid as the weights/resistance used are less intense, and will enable the client to increase proprioception
• Use a mixture of basic compound and bodyweight exercises
• Ensure correct technique through verbal and visual teaching points
• Train with a whole body approach
Training Goal Endurance
Intensity Low
Load as % of 1RM < 67%
Reps/duration 12+
Recover between sets 30-60 seconds
Sets per exercise 2-3
Frequency per muscle group 2-3 x per week
Table 5.8 programming muscular endurance guidelines (Adapted in Earle and Baechle 2000)

22
Gym Instructor Workbook Manual 4
Figure 5.3 resistance training progression pyramid
When planning to progress a client over a prolonged period of time, from a novice to more advanced and intensive forms of resistance training, It is important that the instructor develops a long term training plan, following the basic progression pyramid:
When planning and programming resistance sessions, there are some basic rules to follow as an instructor:
1. Promote Muscular Balance – ensure that the programme works all major muscle groups equally. This should ensure that individual muscles don’t get overworked resulting in postural deviations. For example over working chest and biceps and neglecting upper back muscle can induce a kyphotic posture.
2. Train Large Muscle Groups First – ensure the programme works large muscle groups first, as this is when they have the most energy to train effectively, maximising correct technique and posture.
3. Complete Compound/High Skill Exercises First – exercises should be planned from compound to isolation. Compound exercises use two or more joint movements and work the larger muscle groups, as they require more energy and motor skills. For example, completing squats and lunges before isolating the quadriceps with a leg extension.
4. Train Synergist and Fixators Last – assisting muscles in compound movements should be trained last, as this provides exercise stability and assistance in the compound movements. If these muscles are fatigued first, then risk of injury from the compound exercise could be increased due to lack of co-ordination, strength and ultimately technique. For example, fatiguing the triceps brachii prior to a chest press.
STRENGTH
HYPERTROPHY
ENDURANCE

23
Unit 5 Planning Gym Based Exercise 5
PROGRAMME VARIABLES
When the time comes to progress or adapt a resistance training programme, the instructor has a variety of factors or variables they can adjust:
1. Number/variation of exercises
2. Stability of exercises
3. Number of repetitions
4. Number of sets
5. Rest time
6. Repetition tempo
7. Split routines
8. Weight increase
By manipulating one, or a combination of these variables, the instructor is able to progress the programme and start the overload principle of training again.
TRAINING WITH INTERMEDIATE/ADVANCED CLIENTSAs the client progresses, the training stimulus will need to be advanced specifically towards their goals. This may mean that the client progresses through the training pyramid from endurance to hypertrophy to strength; this would involve reducing repetitions and increasing the weight and therefore working intensity.
Training Goal Strength Hypertrophy
Intensity High Moderate
Load as % of 1RM > 85% 67% - 85%
Reps/duration 1-5 6-12
Recover between sets 3-5 mins 1-2 mins
Sets per exercise 2-6 3-6
Frequency per muscle group 2-3 x per week 1-2 x per week
Table 5.9programming muscular hypertrophy and strength guidelines (Adapted in Earle and Baechle 2000

24
Gym Instructor Workbook Manual 4
KEY TRAINING ITEMS WHEN WORKING WITH INTERMEDIATE/ADVANCED CLIENTS
• Progress to the hypertrophy/strength stage of the training pyramid as applicable, and start to incorporate more free weight and less stable exercises into the programme as proprioception should have improved
• Use compound exercises as well as isolation to target specific muscle groups
• Continue giving teaching points, start to give tempo and exercise progressions to increase the workout intensity
• Start to look at split routines
TRAINING ROUTINES
Whole body
These are a single workout in which all major muscle groups are worked, i.e. chest, back, shoulders, trapezius, biceps, triceps, abdominals, quadriceps, hamstrings and calves. This type of training can be frequent as the total stress on each muscle group in each training section is limited due to time. Typically 1-2 exercises per muscle group are completed.
Upper/lower
This type of training splits the sessions of the week into upper body muscles (chest, back, shoulders, trapezius, biceps and triceps) and lower body muscles, (quadriceps, hamstrings, calves and core) in a single session. This allows more time to train each muscle group and therefore increases the workload. Typically there is a total of 4 sessions a week.
3 way split
A 3 way split is a progression to upper and lower body splits as it focuses more time on muscle groups during the session, which in turn increases the muscle workload. Typically a leg day (quadriceps, hamstrings, calves and abdominals) a push day (chest, triceps and shoulders) and a pull day (back and biceps) are completed. Muscle groups are usually targeted 1-2 times a week, with longer rest periods between training.
Split Routine - Upper/Lower
Monday Tuesday Wednesday Thursday Friday Saturday Sunday
Lower Body Upper Body Lower Body Upper Body
Split Routine - 3 Way
Monday Tuesday Wednesday Thursday Friday Saturday Sunday
Push Day Legs & Abs Pull Day Upper Body

25
Unit 5 Planning Gym Based Exercise 5
4 way split
A 4 way split is a further progression from the 3 way split adding more volume and work load to each muscle group. Muscle groups are paired, for example chest/triceps, back/biceps, quadriceps/hamstrings and shoulders/abdominal work can be incorporated on any day.
PROGRAMME DESIGN FOR FLEXIBILITY
These are the ACSM 2010 guidelines for the general population to increase range of motion of muscles and joints:
The principles of flexibility as part of a warm up and cool down have already been discussed in Unit 4. As a brief recap, dynamic stretches tend to mimic movements that are likely to be performed in the following exercise session. Typically 3-5 whole body dynamic stretches are sufficient as part of a warm up. 10-15 repetitions of each stretch under control should be performed, gradually increasing the range of movement.
At the end of the session, the number of stretches should be sufficient to have covered the major muscles of the body worked during the main session or to maintain/develop the range of movement around a joint, which has been identified previously. For example, the client may have tight hamstrings, so time should be spent working on development all stretches for this muscle group. The stretches typically used are:
STATIC MAINTENANCE
Static maintenance stretches are adopted to maintain the normal length of the muscles and are typically performed at the end of an exercise session. Following repeated contractions during exercise, the muscle becomes shorter and thicker and a maintenance stretch is used to return the muscle to its normal length. This is done by holding the muscle at the point of tension for up to 15 seconds.
Split Routine - 4 Way
Monday Tuesday Wednesday Thursday Friday Saturday Sunday
Chest/Triceps Legs Back/Biceps Shoulders/Abbs
Flexibility
Frequency 2-3 x per week
Intensity Slowly stretching to a point of mild discomfort
Time Hold stretch for at least 10 secs up to 30 secs
Type Static (maintenance or developmental)
Table 5.10 flexibility programming guidelines (Adapted from ACSM 2010)

26
Gym Instructor Workbook Manual 4
STATIC DEVELOPMENTAL
These stretches are used in flexibility training to develop the length of the fibres themselves, therefore increasing the range of movement at a joint. These stretches are performed by holding the muscle at the point of tension for 15 seconds (as static maintenance), the client then takes a breath in and increases the range of movement, holding at the next point of tension for a further 15 seconds (30 seconds in total).
GOOD PRACTICE WHEN APPLYING PRINCIPLES TO A PROGRAMME
When bringing these components together: warm up, cool down, aerobic, resistance and flexibility training, there are some basic rules and general good practice to follow.
The layout of a basic session should follow this logical order:
Welcome • Welcome client • Outline health, safety and housekeeping • Overview of the session • PAR-Q and readiness check
Warm up • Cardiovascular pulse raiser • Pre workout stretches – dynamic preferable
for large muscle groups to be worked (mimicking movements to be included in the programme)
Main cardiovascular training • Health or improving fitness CV section using one of the recognised methods LSD, intervals, fartlek
Main resistance training • Main resistance section should follow the ACSM guidelines for endurance, hypertrophy or strength dependent on client’s experience level and goals. Combining a mixture of free weight, resistance machine and body weight exercises
Cool down • Cardiovascular pulse-lowering • Post workout stretches - all static, either
maintenance or developmental. Ideally these should be completed on the floor to assist with reducing heart rate
Session conclusion • Client feedback • Instructor feedback • Summary of session • Action points for next session
Table 5.11 basic structure of a gym programme

27
Unit 5 Planning Gym Based Exercise 5
Please see an example of a working session below following these principles and guidelines:
Programme Card (session 1)
Name: A. Client Date: 1/2/34
Warm up
Equipment Duration Level Speed RPE/HR
Cross Trainer 5 Minutes 1-2 80RPM 120BPM
Pre-stretching
Lunge with rotation
Squat to overhead arm swing
Glute and hamstring kick through
Standing pectoral and trapezius
Cardiovascular Training
Equipment Duration Level Speed RPE/HR
Treadmill 15 Minutes (LSD) Incline 1 8.0Km/h 160BPM
Resistance Training
Exercise Resistance/weight Reps Sets Rest
Squats (BB) 50Kg 15 2 60sec
Shoulder Press (DB) 20Kg 15 2 60sec
Single Arm Row (DB) 25Kg 15 2 60sec
Chest Press 40Kg 15 2 60sec
Lat Pulldown 30Kg 15 2 60sec
Hamstring Curl 30Kg 15 2 60sec
Bicep Curl (DB) 12Kg 15 2 60sec
Tricep Pushdown 18Kg 15 2 60sec
Bodyweight Resistance/weight Reps Sets Rest
Pull Up Under hand/close grip 15 2 60sec
Press Up Full 15 2 60sec
Abdominal Crunch Hands on temples 15 2 60sec
Back Extensions Hands on temples 15 2 60sec
Cool Down
Equipment Duration Level Speed RPE/HR
Upright Bike 5 Minutes 6-4 100-60 RPM 100-80BPM
Post Stretches (Static)
Seated Chest
Seated Deltoid
Kneeling Gastrocnemius
Box Erector Spinae
Lying Quadriceps
Lying Hamstrings (Developmental) Hold stretch for 15 seconds, relax, increase stretch for 15 Seconds (x2)
Dynamic pre stretches (8-10 repetitions)
(Maintenance) Hold stretch for 15 seconds

28
Gym Instructor Workbook Manual 4
EXERCISES/EQUIPMENT AND THEIR USES
Cardio Vascular Muscular Fitness Freeweight
Muscular Fitness Resistance Machine
Flexibility Motor Skills Body Weight
Treadmill Deadlift Chest Press Pectoral Stretch Bosu Ball Chin Up/Pull Up
Upright Bike Squat Pec Dec Trapezius Stretch Swiss Ball Press Up
Recumbent Bike Lunge Seated Low Pulley Cable Row
Deltoid Stretch Ladders Lunge
Rowing Machine Bench Press Shoulder Press Lattimius Dorsi Stretch
Medicine Balls Squat
Cross Trainer Shoulder Press Seated Row Tricep Stretch Cable Machines Abdominal Curl
Single Arm Row Lat Pull Down Quadriceps Stretch
Back Raises
Upright Row Leg Press Hamstring Stretch
Chest Flyes Leg Curl Adductor Stretch
Lateral Raise Leg Extension Calf Stretch
Frontal Raise Seated Adductor Gluteal Stretch
Bent Arm Pullover Seated Abductor Hip Flexor Stretch
Prone Flyes Assisted Pull Up Rectus Abdominis Stretch
Bicep curl Low Pulley Cable Bicep Curl
Erector Spinae Stretch
Single Arm Triceps Press
High Pulley Cable Tricep Pushdown
Abdominal Crunch
Back Extension
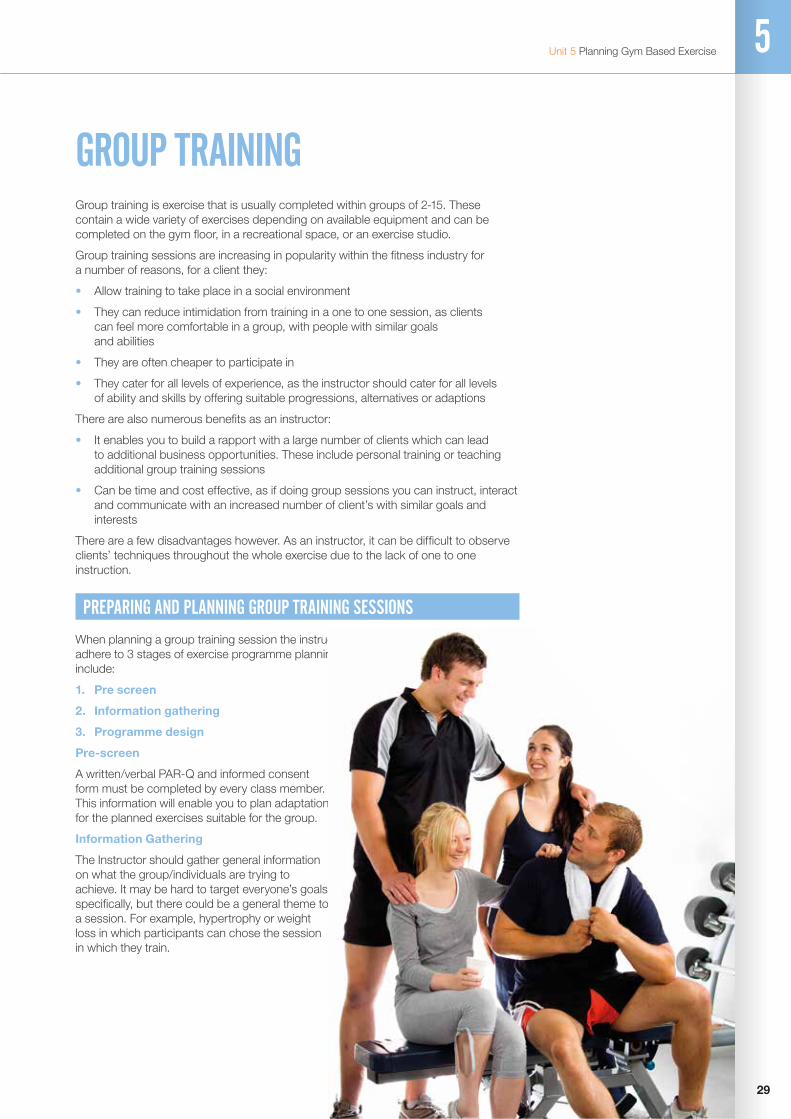
29
Unit 5 Planning Gym Based Exercise 5
GROUP TRAINING Group training is exercise that is usually completed within groups of 2-15. These contain a wide variety of exercises depending on available equipment and can be completed on the gym floor, in a recreational space, or an exercise studio.
Group training sessions are increasing in popularity within the fitness industry for a number of reasons, for a client they:
• Allow training to take place in a social environment
• They can reduce intimidation from training in a one to one session, as clients can feel more comfortable in a group, with people with similar goals and abilities
• They are often cheaper to participate in
• They cater for all levels of experience, as the instructor should cater for all levels of ability and skills by offering suitable progressions, alternatives or adaptions
There are also numerous benefits as an instructor:
• It enables you to build a rapport with a large number of clients which can lead to additional business opportunities. These include personal training or teaching additional group training sessions
• Can be time and cost effective, as if doing group sessions you can instruct, interact and communicate with an increased number of client’s with similar goals and interests
There are a few disadvantages however. As an instructor, it can be difficult to observe clients’ techniques throughout the whole exercise due to the lack of one to one instruction.
PREPARING AND PLANNING GROUP TRAINING SESSIONS
When planning a group training session the instructor should adhere to 3 stages of exercise programme planning, these include:
1. Pre screen
2. Information gathering
3. Programme design
Pre-screen
A written/verbal PAR-Q and informed consent form must be completed by every class member. This information will enable you to plan adaptations for the planned exercises suitable for the group.
Information Gathering
The Instructor should gather general information on what the group/individuals are trying to achieve. It may be hard to target everyone’s goals specifically, but there could be a general theme to a session. For example, hypertrophy or weight loss in which participants can chose the session in which they train.

30
Gym Instructor Workbook Manual 4
Programme Design
There are a number of things to consider when designing a group session:
1. Equipment Availability
Body weight and free weight exercises may be suitable, as having a large number of resistance/cardiovascular machines may not be possible.
2. Progressions/Regressions
Exercises should be suited to the participants experience level. Some will need to have regressions if new participants are taking part in the class.
3. Space Available
The instructor will need to ensure that when planning various exercises there is enough space to minimise risk of collisions. This is especially important when incorporating cardiovascular and resistance training in a small environment.
4. Monitoring Exercise Intensity/Teaching Positions
When instructing a group session the instructor will need to vary their teaching position regularly due to the number of participants. Moving around exercise stations will also enable the instructor to check RPE, talk test and communicate with participants on an individual basis.
GROUP INDUCTIONS
A thorough gym induction is an important starting point for a beginner in learning the safe, effective and correct use of gym equipment. It is recognised as best practice in the industry for a new gym member to go through an induction process with a qualified level 2 instructor and more commonly in health clubs and gyms this is happening in a group setting.
When instructing group inductions, the purpose and structure of the induction should be made clear to the group from the outset and the instructor should inform the group to be mindful of their surroundings to ensure that their safety takes priority. Emphasis should be placed on the importance of being aware of exercisers around them and the equipment they are using. They should also be encouraged to stay close to the group, pay attention to the instructor and to refrain from performing exercises or using machines when they have not be inducted on them or been given permission by the instructor.
The NAMSET acronym also works well within a group environment. It is sometimes helpful for the instructor to use an individual from the group to reinforce teaching points and technique. It is important that the instructor is happy that every member of the group knows how to use the equipment and exercises demonstrated.
Due to time constraints and depending on the size of the group, it may not be possible for every member to practice every exercise or machine demonstrated, but the instructor should try to make sure that all clients have participated at some stage during the induction. It is imperative that the instructor manages the group effectively and maintains their attention by manoeuvring them into appropriate viewing positions so that all members are able to view demonstrations and listen to the various teaching points.

31
Unit 5 Planning Gym Based Exercise 5
PLANNING GYM BASED EXERCISECAN YOU NOW…
Understand how to collect client information to plan gym based exercise
Understand how to plan gym based exercise
Use client information to plan a safe & effective gym based programme with clients

www.thetrainingroom.com
32
Gym Instructor Workbook Manual 4

UNIT
6
33
Unit 6 Instructing Gym Based Exercise
INSTRUCTING GYM BASED EXERCISE
By the end of this section you should be able to...
Understand how to Provide Gym Based Exercise
Prepare Self & Equipment for Gym Based Exercise
Prepare Clients for Gym Based Exercise
Instruct Gym Based Exercise
Supervise Clients within the Gym Environment
Bring a Gym Based Session to an End
Reflect on the Provision of Gym Based Exercise
Support Clients Participating in Gym Based Exercise

34
Gym Instructor Workbook Manual 4
PREPARING YOURSELF, CLIENTS AND EQUIPMENT FOR GYM BASED EXERCISEOnce the instructor has completed the four stages of consultation, from pre-screening to detailed planning, the final step before delivery is thorough session preparation.
INSTRUCTOR PREPARATION FOR GYM BASED EXERCISE
It is the responsibility of the instructor prior to the session to prepare and organise the environment in which activity will take place. This includes:
• Equipment safety checks (i.e. treadmill belts, cables on resistance machines, free weights are secure)
• Environment safety checks (i.e. water available, know your fire exits and that they are clear, duty first aider, first aid kit location, nearest telephone)
• Special arrangements (i.e. access if special populations client)• Identifying suitable alternatives (if applicable and dependant on the client on the day)• Personal Image (i.e. suitably attired – uniform)• Pre-prepared session documents (i.e. consultation notes, session card)
CLIENT PREPARATION FOR GYM BASED EXERCISE
It is the responsibility of the instructor to make the client feel at ease at the beginning of the session. This time should be used to welcome the client, to go through ‘housekeeping’ and start to develop a general rapport. This should include:
• Health and safety update (i.e. nearest emergency exits, first aider, location of nearest telephone and first aid equipment)
• Facilities emergency procedures (i.e. Fire evacuation procedure)• Verbal checks of Par-Q, to ensure no changes have occurred since consultation,
such as injury• Outline the physical and technical demands of the session prepared for the client
(i.e. warm up, main session and cool down)• Reinforce how the session relates to the clients goals – this helps to increase
motivation and adherence as well as keeping the client involved in programming towards their goals
• Answering or addressing any issues or problems the client may have prior to the session starting
After completing instructor preparation and the welcome, a warm up should be undertaken to finalise client preparation for the exercise session. A typical warm up may include a cardiovascular exercise with a gradual increase in intensity; this is often referred to as a pulse raiser. Mobilisation exercises to promote joint movement and pre-exercise stretching (static, dynamic or ballistic) may also be included.
A warm up is prescribed to raise the body temperature to 39/40 degrees, this small increase in temperature has many benefits to exercise performance.
1. This heating effect will allow the muscles and tendons to become more extensible. This in turn will create more supple muscle fibres and enhance stretching.
2. An increase in oxygen and essential nutrients to muscle tissue, this occurs due to an increase in blood flow through vasodilation.
3. Specific warm ups that mirror the activity about to take place will enhance neural pathways, which speeds up reaction time.
4. Secretion of synovial fluid helps lubricate joints.
5. Psychological preparation for physical activity/exercise.

35
Unit 6 Instructing Gym Based Exercise 6
INSTRUCTIONAL SKILLSEffective gym instruction is all about ‘giving information on how to perform something’, which ensures the safety and effectiveness of an exercise and ultimately the workout. This is achieved through the effectiveness of the instructors communication skills, combining both verbal and non-verbal instruction skills. The table below shows examples of verbal and non-verbal communication tools the instructor needs to develop:
Table 6.1 variety of verbal and non-verbal instruction skills
VERBAL INSTRUCTIONS
Terminology
Words are the most useful tool the instructor has if used in the correct way. Instructors should try and use simple terminology when working with clients, keep instructions user friendly and engage the clients. For example when using resistance machines ‘keep wrists fixed and knuckles facing forward’ rather than take a ‘strong pronated grip’.
Motivation
Effective motivation is essential for clients to achieve their goals and targets. It not only comes from self-motivation but also from external sources, and as an instructor you can influence this by:
• Being motivated yourself and being passionate about what you are doing• Using motivation terminology and language appropriate to your client• Portraying confidence• Achieving realistic goals and targets• Using appropriate praise and rewards
Teaching Points
Should be used to support your visual demonstrations, as it allows instructors to explain, correct and reinforce exercise technique. By adding verbal teaching points to demonstrations, and whilst clients are performing, it promotes learning and understanding through the 3 main learning styles (seeing, listening and doing). This promotes and reinforces correct technique, along with safe and effective execution of exercises for all clients. The language used should target your client, be relevant and in a simple and logical format.
Verbal Non-Verbal
Instructions Demonstration
Teaching Points Observation
Motivation/Praise Body Language
Voice Intonation Teaching Position
Correction Facial Expression
Cueing Eye Contact

36
Gym Instructor Workbook Manual 4
Voice Intonation
The way the instructor says something can emphasis the information that they are trying to get across. Words and language should reflect what is being undertaken. For example, during a final set of a demanding resistance exercise the instructor may use words such as ‘2 more reps to go, drive them out’ or ‘dig deep’ compared to a cool down stretch where this may change to ‘relax’ or ‘chill out’. This ensures that the instructor communicates in a way that is appropriate to the client, what they are doing and the surrounding environment. This also avoids monotone instructing. Methods to develop voice intonation include:
• Varying tone• Varying speed• Varying volume• Develop a variety of instructions and phrases
VISUAL INSTRUCTION
Demonstration
Instructors must be competent in the exercise technique before demonstrating or instructing. Clients should be suitably positioned to observe all set up points, joint movements and exercise actions. The demonstration should be given accurately and correctly, supported by teaching points as discussed previously. The instructor should perform between 5-8 reps slowly and controlled focusing on correct technique and posture.
Teaching Positioning and Instructor Observation
It is important that the instructor positions themself to enable effective communication and to observe the clients performance. This may mean moving around the client and at times to be in their eye line. For example when a client is on a treadmill giving instructions or communicating with them from behind may not be suitable, as they may try to look over their shoulder causing them to trip or lose their footing resulting in an accident. Likewise when the client is performing floor based exercises the instructor should get down to their level as not to be intimidating, by towering over them and talking down to the client.
Body Language
This combines both non-verbal and visual communication and gives clues to someone’s current emotional or mental state. For example if someone was depressed then they may have slumped or rounded shoulders. An instructor should adopt open body language at all times for example unfolded arms and using hand gestures creates an open environment, a feeling of energy and enthusiasm rather than closed body language with folded arms, which can be seen as defensive. The body language of an instructor can alter the client’s mood and mind set, influencing the effectiveness of the training session. Eye contact and facial expressions are also important tools in praising and motivating clients. No matter how an instructor is feeling, they should always have open body language, which is positive and motivating to their client.
Instructing New Exercise
The majority of a gym instructor’s time is spent introducing new gym members to the equipment and exercises available on the gym floor. Educating them how to safely and effectively use the equipment and perform the exercises.

37
Unit 6 Instructing Gym Based Exercise 6
When doing this a clear and logical instructing format should be used, to teach new exercises and equipment to clients:
For the new instructor this may seem like a lot to remember but with practice and regular use this process should become second nature. Combined with good communication skills discussed previously, such as simple terminology, voice intonation and body language, this process is an effective way to introduce new exercises to clients, and more importantly for them to remember them.
AME THE EXERCISEgive the name of the exercise or piece of equipmentN
A REA OF THE BODYname the area of the body the exercise/machine works
MUSCLES WORKEDname the muscle group/s being worked
S ILENT DEMONSTRATIONinstructor should complete set up and 5-8 reps of the exercise, allowing the client to observe and concentrate on the technique and movement motions
E XPLANATIONcomplete a few more reps, but this time talk through the set-up, movement and teaching points with the client
T EACHthe instructor should now get the client to have a go and perform the exercise, observing them closely, reinforcing the teaching points and correcting technique

38
Gym Instructor Workbook Manual 4
VITALFACTS
IMPORTANT SPOTTING FACTORS TO CONSIDER: 1. Spotters should be strong
enough to assist the client if required
2. Spotters should know the correct exercise technique & be able to adapt the exercise they are spotting
3. Spotters should know the number of repetitions the client is attempting to lift
4. Spotters should be concentrating on the client & their technique at all times
5. Be aware that some exercises may need 2 spotters e.g. heavy back squats, for client safety
Figure 6.1 barbell spotting
SPOTTING Spotting is a term used to describe the act of supporting a client in an exercise, to assist in the completion of an exercise and to avoid injury in the process. Correct spotting is important to ensure the safety of a client during a resistance training session. As an instructor you may be required to be a spotter for your clients. There are four main functions of a spotter:
1. To safely lift and pass weights to the client (i.e. passing a bar over head when prone on a bench)
2. To assist the client if in difficultly (i.e. if they reach failure during a resistance set)
3. To ensure correct lifting technique
4. To apply high intensity training techniques
There are a variety of exercises that may require a spotter. Free weight exercises are the most common, for example:
• Overhead (shoulder press)• Exercises with the bar on the back e.g. back squat and lunges• Exercises where the bar passes over the head/face e.g. bench press, chest flyes
or lying tricep extension• Exercises with the bar rested on the clavicles e.g. front squat (more advanced
lifting exercises)
SPOTTING TECHNIQUE
There are two spotting techniques - barbell & dumbbell
For both spotting techniques the instructor should ensure that they have a solid base of support, and maintain a neutral spine especially when lifting (following deadlift procedures). There should be constant communication between the instructor and client, especially when passing and receiving the load.
Overhead Barbell Spot:
- Be at the head of the bench with the bar, deadlifted to waist height
- Using either an alternated grip or same grip
- 4 hands on bar as it passes over the face
- To get bar into start position: upright row and step into the head of the bench at the same time, so the bar passes over the clients head and face to start position
- Once in position, client can start exercise, remain at head of bench to spot and give teaching points and motivation from that position

39
Unit 6 Instructing Gym Based Exercise 6
Figure 6.2 dumbbell spotting
MONITORING SAFETY & PROGRESS OF EXERCISESAFETY
An important part of instructing is to monitor and ensure the safety of exercise. The instructor should ensure clients are following and maintaining good practice in terms of postural alignment and exercise technique. If a client is unable to maintain good technique and posture, then the instructor should stop the exercise and offer a suitable alternative or regression of the exercise. It is good practice to have alternatives, progressions or adaptations planned for your clients, which can be recorded on a session plan.
PROGRESS
It is the job of the instructor to be able to identify whether or not a client is ready to move forward, stay where they are or need to regress. The instructor has a variety of ways to monitor the progress of their clients in a gym environment, which can be used to identify the client’s readiness to develop, for example:
• Rating of perceived exertion (RPE scale) or Heart Rate When using RPE (Borg 6-20 scale or 1-10 scale) or heart rate measures (% of Heart Rate Max) to identify client exercise intensity, it is possible to adjust the exercise variables to raise or lower the rating to the required levels
Dumbbell Spot:
- Each dumbbell needs to be spotted into position separately
- Deadlift weight from the side of the bench and get client to take an underhand grip
- Get the client to rest the weight on body, and repeat the process on the other hand
- Get the client to extend arms with DB’s, in to start position, whilst the spotter comes to the head of the bench
- From here the spotter can support the elbows of client if required, as well as give teaching points and motivation

40
Gym Instructor Workbook Manual 4
• Observations Observing the clients performance in terms of technique, strain or effort, along with sweating and redness can all provide a visual gauge of performance levels. With time the instructor will come to recognise their client’s expressions and be able to use them as a guide to intensity and make us of exercise variables to adjust the levels
• Percentage of 1 Rep Max Can be used to monitor the intensity of resistance training and can be increased or decreased to progress or regress clients. It can be used to ensure the client is working within the correct training zone, for example working between 67-85% of 1 rep max for hypertrophy training
SESSION CONCLUSIONCOOL DOWN
At the end of the session it is important that the instructor carries out a cool down. It is beneficial for both the instructor and the client for many reasons:
• Control the clients return to a resting state• Allow time to develop or maintain client’s flexibility• Enhance mental and physical relaxation• To provide the client with feedback on the session • Discuss lifestyle factors • Reinforce session content and relation to adherence to goals
The cool down should be tailored to the session completed. For example, if the session focused predominately on legs then the flexibility and stretching should focus on the legs or areas that lack range of movement.
It should also reflect the intensity of the session. If it has been a high intensity workout finishing on high intensity intervals, then the cool down may need to start at a higher intensity to bring the client’s levels back down.
The cool down may also need to be adapted to the client’s health condition. For example, if the client is pregnant, then minimal static maintenance stretches should be applied. This is due to the effects of relaxin on the joints, which can cause over stretching, especially when if undertaking development stretches.
CLOSING THE SESSION
The cool down is a good time to provide feedback to the client based on their session performance. It should be positive but honest, ensuring to highlight what and where they put the effort in. It should also highlight areas in which the client needs to work on and develop. The instructor’s communication skills will affect how the feedback is received i.e. tone of voice, context and body language. By praising and highlighting areas of success and good performance will untimely assist with motivation and adherence to their client’s exercise programme.
Feedback should be two way, as it is important to get feedback on the session from the client’s perspective. The instructor should offer their client the opportunity to:
• Reflect on the session overall – enjoyment, difficulty, what they liked/disliked• Ask questions – to clarify components/exercises of the session and relevance to
goals• Provide feedback – how they felt the instruction was in terms of motivation,
communication and teaching style• Identify further needs – modification of goals, intensity and future sessions/
assistance
41
Unit 6 Instructing Gym Based Exercise 6
The instructor should be satisfied that the client leaves the session with the knowledge and skills to be able to use the gym without direct supervision. If the client is still unsure then an appropriate follow up session should be arranged.
At the very end of the session it is the responsibility of the instructor to leave the gym environment in a suitable condition for future use. They should encourage ‘good housekeeping’ which will also assist with health, safety and cleanliness, by:
• Wiping clean equipment, benches and mats after use• Tidying away equipment and returning to correct place• Reporting any equipment which has been damaged to the appropriate individual
REVIEW & REFLECT – REFLECTIVE PRACTICEAs Bright 2012 explains reflective practice is a way of studying your own experiences to improve the way you work. The act of reflection is a great way to increase confidence, become a more proactive and qualified professional. Engaging in reflective practice should help to improve the quality of the sessions you give and close the gap between theory and practice.
Following any gym session, at a suitable time after the client has left, the instructor should reflect on a session. The instructor should use both the feedback they gave the client along with the feedback received from the client. This is known as reflective practice and it is good to do this to identify areas of development and improvement, not only for the clients programme but also for the development of an instructor. It will highlight:
• How well exercises met the client’s goals and objectives• How effective and motivational the relationship with the client was• How well the instructing style matched the clients’ needs
From the process of reflective practice and evaluation instructors may use this information to improve their instructing style, the content and effectiveness of their sessions and their personal practice overall.

www.thetrainingroom.com
Gym Instructor Workbook Manual 4
42
43
Unit 6 Instructing Gym Based Exercise
EXERCISE LIBRARY
Exercise Technique
Dynamic Flexibility
Static Warm Up Stretches
Cardiovascular Machines
Free Weight Exercise
Resistance Machines
Bodyweight Exercise
Static Cool Down Stretches

44
Gym Instructor Workbook Manual 4
EXERCISE TECHNIQUESHAND GRIPS
STANCE
There are three main grips you take when handling or completing resistance and free weight exercises, below are images of these grips and examples of when you may use them.
There are two main stances you take when completing free weight exercises, below are images of these stances and example of when you may use them
PRONATED GRIP
NEUTRAL STANCE SPLIT STANCE
SUPINATED GRIP REVERSE GRIPFront Raise
Lateral Raise
Seated Row
Shouder Press
Triceps Pushdown
Upright Row
Biceps Curl
Deadlift
Frontal Raise
Lateral Raise
Lunge
Prone Flyes
Shoulder Press
Squat
Triceps Extension (single arm)
Biceps Curl
Frontal Raises
Lateral Raises
Shoulder Press
Triceps Extension (single arm)
Biceps Curl
Chest Flyes
Chin Up
Deadlift
Spotting

6
45
Unit 6 Exercise Technique
SAFE LIFTING
When moving and handling any weights it is important to use a safe lifting technique to minimise the risk of injury (manual handling) for both barbells and dumbbells
• Both techniques start with the deadlift
• Bending at the knees and hips
• Ensuring the back is neutral
• Keeping the chin the off chest
• Select grip dependant on exercise
• Lift up through the legs, weight into the heels
• Keeping the bar or dumbbells close to the body

46
Gym Instructor Workbook Manual 4
CLEAN AND PRESS
• With barbell resting on the floor, place feet under the bar so shins are lightly touching
• Bend at hips and flex the knees, grasp bar with a pronated grip slightly wider than shoulders. Chest out, head neutral, and maintain a neutral spine
• Lift bar from floor by raising the hips and shoulders
• As bar passes the knees drive the hips forward to stand up straight, keep the shoulders back throughout
• When the is at the top of the thighs, keeping the bar close to the body, complete a wide upright row, to bring the bar to the top of the sternum
• As the bar reaches the top of the sternum, roll the wrists on the bar so knuckles now face the ceiling (palms facing forward)
• Bend knees slightly and drive the bar up and over the head, not locking out the elbows
• Bring the bar down to rest on the ‘fleshy’ part of the upper back (not on the neck), ensuring soft knees to receive the bar
The clean and press is the safe way of lifting and returning the bar bell onto the ‘fleshy’ part of the upper back to perform exercises such as squats and lunges
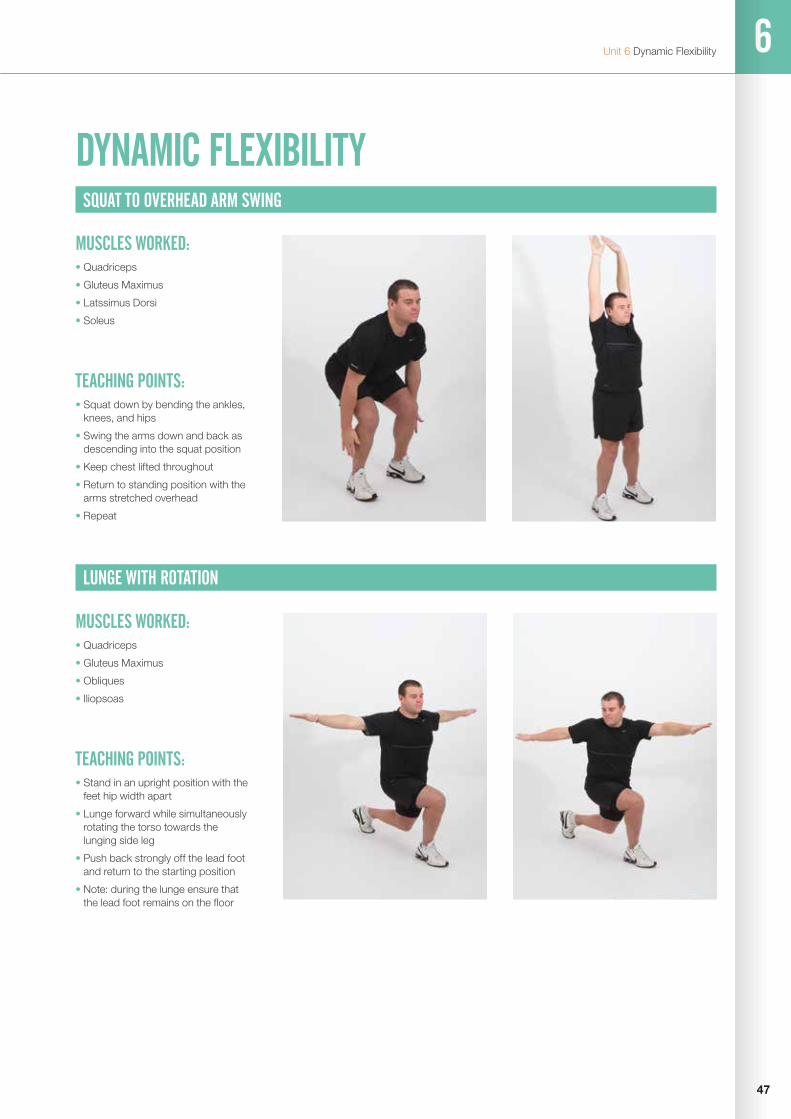
6
47
Unit 6 Dynamic Flexibility
LUNGE WITH ROTATION
TEACHING POINTS:• Stand in an upright position with the
feet hip width apart
• Lunge forward while simultaneously rotating the torso towards the lunging side leg
• Push back strongly off the lead foot and return to the starting position
• Note: during the lunge ensure that the lead foot remains on the floor
MUSCLES WORKED: • Quadriceps
• Gluteus Maximus
• Obliques
• Iliopsoas
DYNAMIC FLEXIBILITYSQUAT TO OVERHEAD ARM SWING
TEACHING POINTS:• Squat down by bending the ankles,
knees, and hips
• Swing the arms down and back as descending into the squat position
• Keep chest lifted throughout
• Return to standing position with the arms stretched overhead
• Repeat
MUSCLES WORKED: • Quadriceps
• Gluteus Maximus
• Latssimus Dorsi
• Soleus

48
Gym Instructor Workbook Manual 4
STANDING PECTORAL AND TRAPEZIUS
TEACHING POINTS:• Stand upright with the feet hip width
apart
• Pull the arms back into a press up position
• Push the arms forward while allowing the thoracic spine to round slightly
• Repeat the above varying the angle of re-traction
MUSCLES WORKED: • Pectoralis Major
• Rhomboids
• Mid Trapezius
GLUTE AND HAMSTRING KICK THROUGH
TEACHING POINTS:• Stand upright with the feet hip
width apart, use a wall to balance if required
• Flex at the knee to bring the heal of the foot to the Glutes
• Kick through as high as comfortable extending the knee
• Repeat
MUSCLES WORKED: • Quadriceps
• Gluteus Maximus
• Hamstrings

6
49
Unit 6 Dynamic Flexibility
GUIDELINES FOR DYNAMIC STRETCHES
Dynamic stretches should only be used during the warm up
• Stretches selected should cover the whole of the body, or in the case of split routines, the stretches should target the specific areas that will be worked during the workout
• The stretches that are selected should replicate the movement patterns that will be used during the workout
• No more than 8-10 repetitions of each dynamic stretch are required, any more than this may prematurely fatigue the client
• The movement speed should be consistent, controlled and appear fluid movements
• For clients with poor co-ordination and balance, dynamic stretches may need to be broken down into component parts or regressed to use static warm up stretches
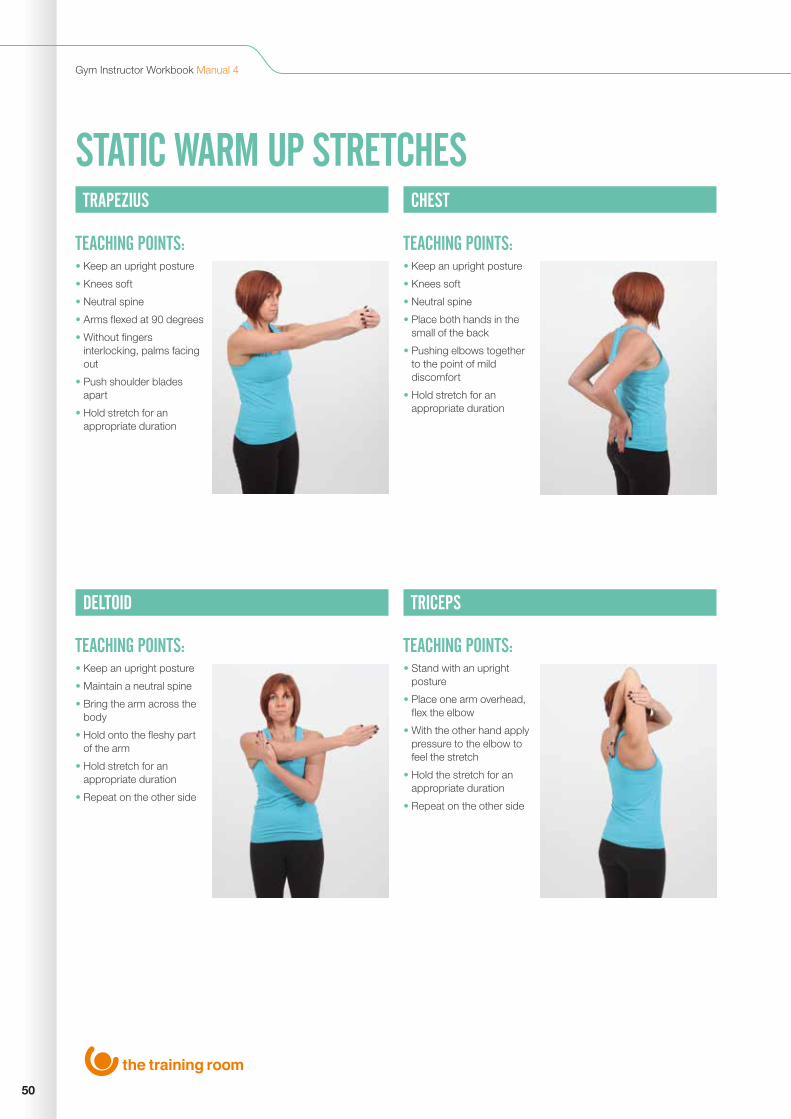
50
Gym Instructor Workbook Manual 4
STATIC WARM UP STRETCHES
TRAPEZIUS
DELTOID
CHEST
TRICEPS
TEACHING POINTS:
TEACHING POINTS:
TEACHING POINTS:
TEACHING POINTS:
• Keep an upright posture
• Knees soft
• Neutral spine
• Arms flexed at 90 degrees
• Without fingers interlocking, palms facing out
• Push shoulder blades apart
• Hold stretch for an appropriate duration
• Keep an upright posture
• Maintain a neutral spine
• Bring the arm across the body
• Hold onto the fleshy part of the arm
• Hold stretch for an appropriate duration
• Repeat on the other side
• Keep an upright posture
• Knees soft
• Neutral spine
• Place both hands in the small of the back
• Pushing elbows together to the point of mild discomfort
• Hold stretch for an appropriate duration
• Stand with an upright posture
• Place one arm overhead, flex the elbow
• With the other hand apply pressure to the elbow to feel the stretch
• Hold the stretch for an appropriate duration
• Repeat on the other side
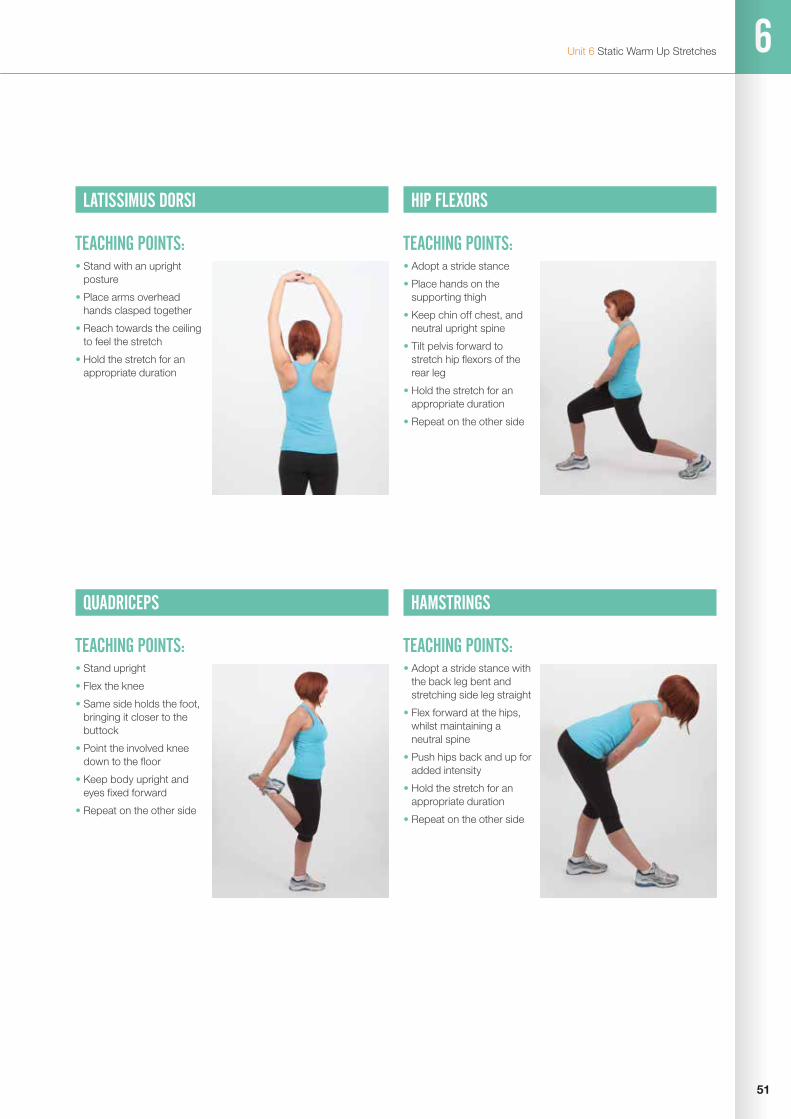
6
51
Unit 6 Static Warm Up Stretches
LATISSIMUS DORSI HIP FLEXORS
QUADRICEPS
TEACHING POINTS: TEACHING POINTS:
TEACHING POINTS:
• Stand with an upright posture
• Place arms overhead hands clasped together
• Reach towards the ceiling to feel the stretch
• Hold the stretch for an appropriate duration
• Adopt a stride stance
• Place hands on the supporting thigh
• Keep chin off chest, and neutral upright spine
• Tilt pelvis forward to stretch hip flexors of the rear leg
• Hold the stretch for an appropriate duration
• Repeat on the other side
• Stand upright
• Flex the knee
• Same side holds the foot, bringing it closer to the buttock
• Point the involved knee down to the floor
• Keep body upright and eyes fixed forward
• Repeat on the other side
HAMSTRINGS
TEACHING POINTS:• Adopt a stride stance with
the back leg bent and stretching side leg straight
• Flex forward at the hips, whilst maintaining a neutral spine
• Push hips back and up for added intensity
• Hold the stretch for an appropriate duration
• Repeat on the other side

52
Gym Instructor Workbook Manual 4
ADDUCTOR GLUTES
TEACHING POINTS: TEACHING POINTS:• Stand tall facing forward
• Neutral spine
• Leg to be stretched should be abducted to the side with feet inline with the knee
• Hold the stretch for an appropriate duration
• Repeat on the other side
• Pick up the right leg and cross it over the left leg (above the knee)
• Sink the weight through the buttocks by pressing the hips back
• Rest the arms on the lower back, keep the chest lifted and eyes looking forwards
• Hold the stretch for an appropriate duration
• Repeat on the other side
GASTROCNEMIUS
TEACHING POINTS:• Adopt a stride stance in
front of a wall
• Hands contact the wall at shoulder height
• Keep head upright and look forward
• Ensure toes are facing forward
• Keep feet flat on the floor, pushing weight down trough the rear heal
• Repeat on the other side
• Hold the stretch for an appropriate duration

6
53
Unit 6 Static Warm Up Stretches
• Stretches selected should cover the whole of the body, or in the case of split routines, the stretches should target the specific areas that will be worked during the workout
• Hold each static warm up stretch for no more than 8-10 seconds
• The stretch should be held at the point of mild discomfort, and do not apply excess pressure to joints when stretching
GUIDELINES FOR STATIC STRETCHES

54
Gym Instructor Workbook Manual 4
CARDIOVASCULAR MACHINE TREADMILL
PRIMARY MUSCLES WORKED:Quadriceps, Hamstrings, Glutes and Gastrocnemius
SPECIAL POPULATION ADAPTIONS 14-16 Year Olds:
Able to do exercise, but need to monitor/reduce intensity, increase rest period. Could use cross trainer to reduce impact on bones/joints – reducing risk of growth plate factures.
Older Adults:
Cross trainer – less impact to bones and joints, but still weight bearing and working heart/lungs (CV system).
Pre/Post Natal Clients:
Upright bike – seated so more stable, requiring less balance/coordination. Also, recumbent bike, supporting lower spine. Both options still giving CV workout.
Disability Client – Wheelchair User
Hand bike/ergo – working arms rather than legs and still giving CV workout to the client.
ALTERNATIVE Cross trainer.
TEACHING POINTS:• Maintain a position in the centre of the belt
• Take a good stride
• Look forward, standing tall
• Strike the belt with a heel-to-toe action
• Swing the arms
• Keep the knees soft throughout
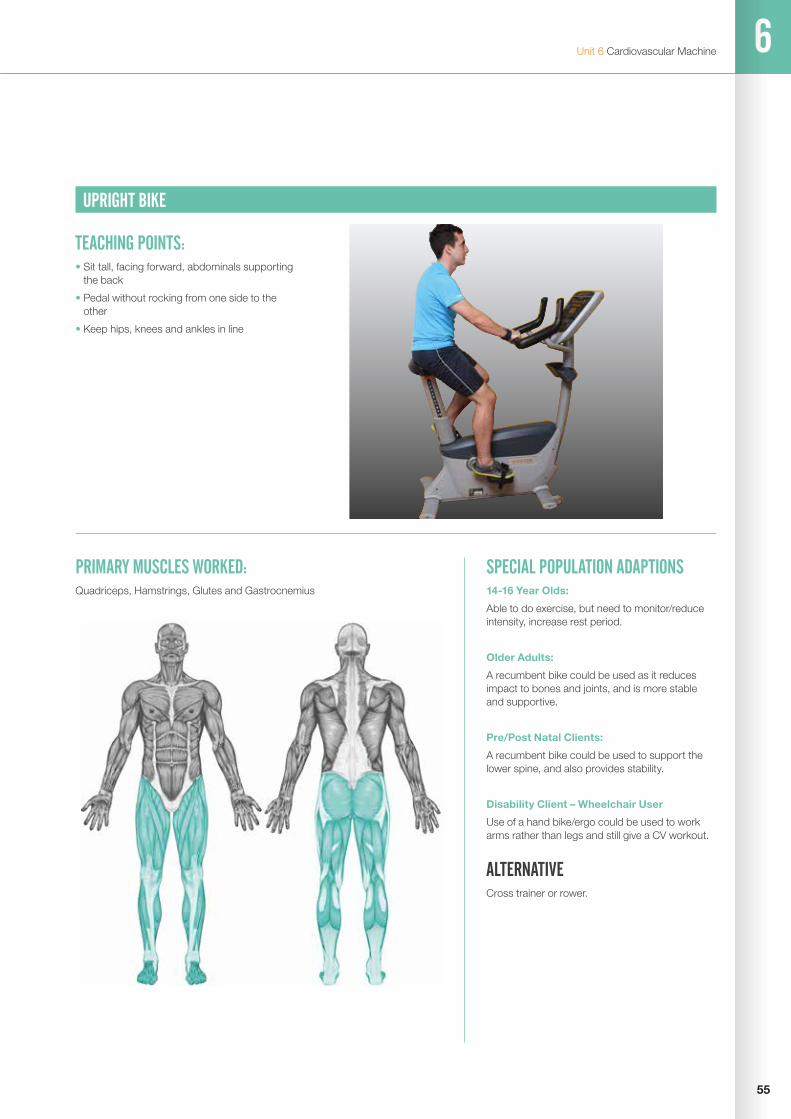
6
55
Unit 6 Cardiovascular Machine
UPRIGHT BIKE
PRIMARY MUSCLES WORKED:Quadriceps, Hamstrings, Glutes and Gastrocnemius
SPECIAL POPULATION ADAPTIONS 14-16 Year Olds:
Able to do exercise, but need to monitor/reduce intensity, increase rest period.
Older Adults:
A recumbent bike could be used as it reduces impact to bones and joints, and is more stable and supportive.
Pre/Post Natal Clients:
A recumbent bike could be used to support the lower spine, and also provides stability.
Disability Client – Wheelchair User
Use of a hand bike/ergo could be used to work arms rather than legs and still give a CV workout.
ALTERNATIVE Cross trainer or rower.
TEACHING POINTS:• Sit tall, facing forward, abdominals supporting
the back
• Pedal without rocking from one side to the other
• Keep hips, knees and ankles in line

56
Gym Instructor Workbook Manual 4
CROSS TRAINER
PRIMARY MUSCLES WORKED:Quadriceps, Hamstrings, Glutes, Gastrocnemius, Pectorals, Biceps, Triceps and Trapezius
SPECIAL POPULATION ADAPTIONS 14-16 Year Olds:
Able to do exercise, but need to monitor/reduce intensity, increase rest period.
Older Adults:
An upright bike could be used as it reduces impact to bones and joints, and is stable and supportive.
Pre/Post Natal Clients:
An upright bike could be used as its more stable, requiring less balance and co-ordination. Also, a recumbent bike if more lumbar support is required.
Disability Client – Multiple Sclerosis
Use of a recumbent bike to increase stability and support, therefore less weight bearing. Also important to keep intensity to health related levels.
ALTERNATIVE Treadmill or upright bike.
TEACHING POINTS:• Stand tall, keep looking forward
• Feet flat on the plates
• Hips, knees and ankles in line
• Keep the knees and elbow soft
• Let legs start/drive the movement rather than arms pulling and pushing

6
57
Unit 6 Cardiovascular Machine
ROWING MACHINE
PRIMARY MUSCLES WORKED:Quadriceps, Biceps, Triceps, Erector Spinae, Deltoids, Trapezius and Rhomboids
SPECIAL POPULATION ADAPTIONS 14-16 Year Olds:
Able to do exercise, but need to monitor reduce intensity and increase rest periods.
Older Adults:
Cross-trainer, as still gives whole body CV workout, but is easier to get on and off.
Pre/Post Natal Clients:
Can do the exercise, but in later stages of pregnancy may need alternative, due to low unsupported seated position on rower.
Disability Client – Neuromuscular disease
Upright bike could be used as the rower requires lots of co-ordination and balance compared to the supported upright bike.
ALTERNATIVE Cross trainer or treadmill.
TEACHING POINTS:• Abdominals tight, back straight
• Wrists in line with forearms
• Follow this sequence of movement - legs, arms, arms, legs
• Try not to lean too far back
• Keep the chain level with the midline of the body

58
Gym Instructor Workbook Manual 4
FREE WEIGHTS DEAD LIFTS
PRIMARY MUSCLES WORKED:Quadriceps, Hamstrings, Glutes, Erector Spinae, Trapezius and Rhomboids
SPECIAL POPULATION ADAPTIONS 14-16 Year Olds:
A combination of bodyweight exercises, squats and back extensions.
Older Adults:
Complete the exercise with resistance in endurance levels, increase rest periods and reduce the range of movement as suitable.
Pre/Post Natal Clients:
Due to the nature of the exercise a combination of exercises such as a seated leg press and low row could be completed.
Disability Client - Stroke
Complete the exercise using dumbbells so the weight can be adjusted according to strength of each side of the body, spotting is essential to guide and correct the movement.
ALTERNATIVE Straight leg deadlift.
TEACHING POINTS:• With barbell resting on the floor, place feet
under the bar so shins are lightly touching
• Bend at hips and flex the knees, grasp bar with a pronated grip slightly wider than shoulders. Chest out, head up, and maintain a neutral spine
• Lift bar from floor by raising the hips and shoulders
• As bar passes the knees drive the hips forward to stand up straight, keep the shoulders back throughout
• On return to the start position tilt forwards from the hip, thus driving the hips backwards.
• As the bar descends past the knees allow them to flex until reaching the starting position
• Keep chest lifted and maintain a neutral spine throughout

6
59
Unit 6 Free Weights
BENCH PRESS (BB)
PRIMARY MUSCLES WORKED:Pectorals, Deltoids and Triceps
SPECIAL POPULATION ADAPTIONS 14-16 Year Olds:
Use a body weight alternative to reduce workload, press ups.
Older Adults:
Seated chest press could be used to increase exercise stability.
Pre/Post Natal Clients:
To avoid lying supine and to increase exercise stability use the seated chest press or pec dec machine.
Disability Client – Wheelchair user
Use a cable crossover machine to complete a chest press, this will enable the exercise to be completed in the wheel-chair.
ALTERNATIVE Dumbbell bench press, seated chest press machine, pec dec machine, dumbbell flyes or press ups.
TEACHING POINTS:• Lie on the bench with upper body and head
supported on the bench
• Grip the bar firmly with hands outside shoulder width and keep the wrists straight
• Barbell should be level with the chest
• Extend the arms without locking out and return the bar to mid-chest level without resting on the chest

60
Gym Instructor Workbook Manual 4
SUPINE TRICEP PRESS (BB)
PRIMARY MUSCLES WORKED:Triceps and Anterior Deltoid
SPECIAL POPULATION ADAPTIONS 14-16 Year Olds:
Use a body weight alternative to reduce workload, press ups.
Older Adults:
Seated tricep press could be used to increase exercise stability.
Pre/Post Natal Clients:
To avoid lying supine and to increase exercise stability use the seated tricep press or tricep pushdown (high pulley).
Disability Client – Wheelchair user
Use tricep pushdown (high pulley), this will enable to exercise to be completed in the wheelchair.
ALTERNATIVE Tricep push down (high pulley), single arm tricep extension, body-weight tricep dip or tricep extension machine.
TEACHING POINTS:• Lie on the bench with upper body and head
supported on the bench
• Grip the bar firmly with hands shoulder width and keep the wrists straight
• Barbell should start level with the bottom of the sternum
• Extend the arms without locking out and return the bar to the starting position keeping the elbows close to the torso

6
61
Unit 6 Free Weights
PECTORAL FLYES (DB)
PRIMARY MUSCLES WORKED:Pectorals and Biceps
SPECIAL POPULATION ADAPTIONS 14-16 Year Olds:
Use a body weight alternative to reduce workload, press ups.
Older Adults:
Seated chest press could be used to increase exercise stability.
Pre/Post Natal Clients:
To avoid lying supine and to increase exercise stability use the seated chest press or pec dec machine.
Disability Client - Multiple sclerosis
A pec dec machine could be used to increase the exercise stability and to help coordinate correct movement.
ALTERNATIVE Bench press, seated chest press machine, pec dec machine or press ups.
TEACHING POINTS:• Hold two dumbbells
• Lie with upper body and head fully supported by the bench, support dumbbells above the chest with the elbows and wrists slightly flexed
• Lower the weights directly to the side to about bench level
• Bring dumbbells back together above the chest

62
Gym Instructor Workbook Manual 4
SHOULDER PRESS (DB)
PRIMARY MUSCLES WORKED:Deltoid and Triceps
SPECIAL POPULATION ADAPTIONS 14-16 Year Olds:
Use resistance bands to complete a shoulder press, use endurance repetition ranges.
Older Adults:
Seated shoulder press machine could be used to increase exercise stability.
Pre/Post Natal Clients:
Seated lateral or frontal raises could be used to increase exercise stability and limit blood pressure increase.
Disability Client – Hypertension
Use frontal or lateral raises to ensure arms do not go over head height to limit blood pressure increase.
ALTERNATIVE Shoulder press machine, front raise or lateral raise.
TEACHING POINTS:• Stand with feet a comfortable distance apart,
knees soft and a neutral spine
• Position dumbbells to each side of shoulders with elbows below wrists
• Press dumbbells up until arms are extended overhead but not locked out
• Lower and repeat

6
63
Unit 6 Free Weights
LATERAL RAISE (DB)
PRIMARY MUSCLES WORKED:Deltoid
SPECIAL POPULATION ADAPTIONS 14-16 Year Olds:
Complete a lateral raise exercise using resistance bands to reduce the workload.
Older Adults:
Seated shoulder press machine could be used to increase exercise stability.
Pre/Post Natal Clients:
Seated lateral or frontal raises could be used to increase exercise stability and limit blood pressure increase.
Disability Client - Cerebral palsy
Perform the exercise one side at a time and adjust the weight to the clients strength or weakness for each side of the body.
ALTERNATIVE Front raise, dumbbell shoulder press or seated shoulder press machine.
TEACHING POINTS:• Stand with feet shoulder width apart or
slightly wider
• Place the dumbbells on the front or side of the thighs
• Maintain neutral spine and slightly flexed elbows
• Raise the dumbbells to shoulder height
• The dumbbells should be parallel to the floor
• Return to that start position

64
Gym Instructor Workbook Manual 4
UPRIGHT ROW (BB)
PRIMARY MUSCLES WORKED:Deltoids, Biceps and Trapezius
SPECIAL POPULATION ADAPTIONS 14-16 Year Olds:
Complete an upright row using resistance bands to reduce the workload.
Older Adults:
Use a combination of exercise such as frontal or lateral raises and shoulder shrugs.
Pre/Post Natal Clients:
As the client could be unable to keep the bar close to the body use a combination of seated lateral and frontal raises with shoulder shrugs.
Disability Client – Muscular dystrophy
Use dumbbells to work muscles on each side of the body independently and adjust the weights accordingly.
ALTERNATIVE Front raise, lateral raise, dumbbell shoulder press, seated shoulder press machine or shoulder shrugs.
TEACHING POINTS:• Standing with feet just outside hip width apart
• Lift the barbell with a close overhand grip (maintain two thumb widths apart)
• Keeping the barbell close to the body, lift up towards chest height
• Keep the elbows higher than the barbell
• Lower the barbell to the original position without locking out the elbows
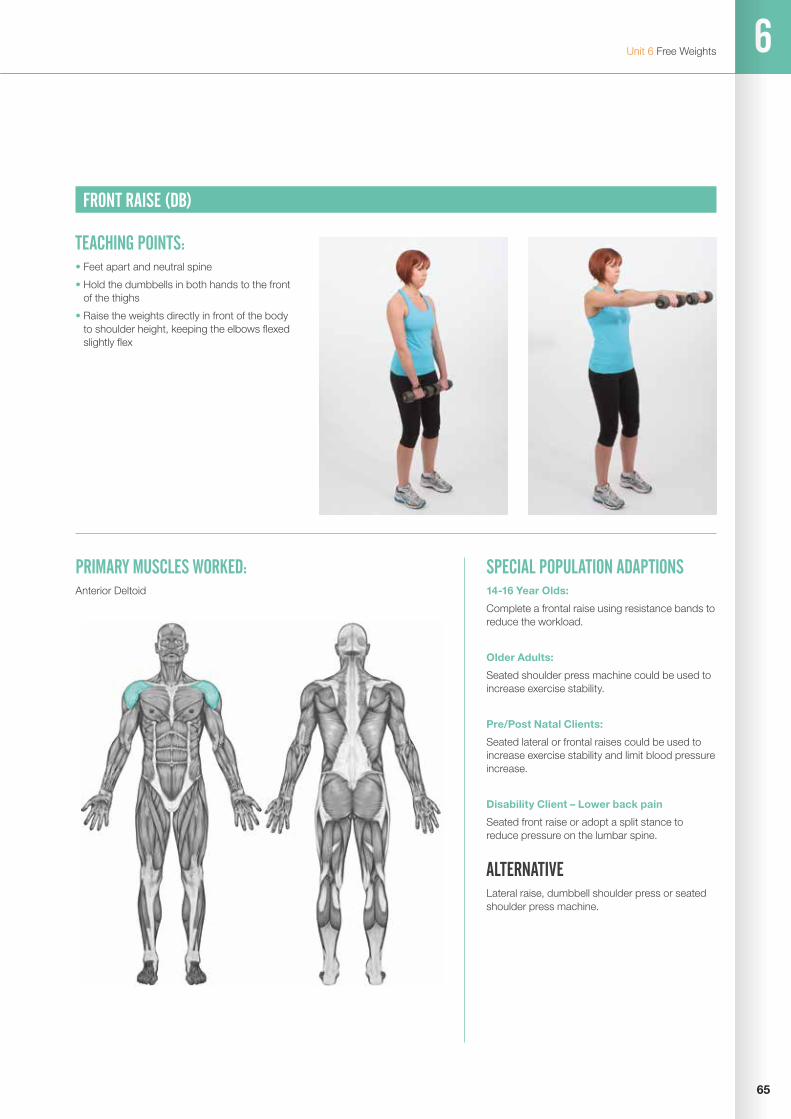
6
65
Unit 6 Free Weights
FRONT RAISE (DB)
PRIMARY MUSCLES WORKED:Anterior Deltoid
SPECIAL POPULATION ADAPTIONS 14-16 Year Olds:
Complete a frontal raise using resistance bands to reduce the workload.
Older Adults:
Seated shoulder press machine could be used to increase exercise stability.
Pre/Post Natal Clients:
Seated lateral or frontal raises could be used to increase exercise stability and limit blood pressure increase.
Disability Client – Lower back pain
Seated front raise or adopt a split stance to reduce pressure on the lumbar spine.
ALTERNATIVE Lateral raise, dumbbell shoulder press or seated shoulder press machine.
TEACHING POINTS:• Feet apart and neutral spine
• Hold the dumbbells in both hands to the front of the thighs
• Raise the weights directly in front of the body to shoulder height, keeping the elbows flexed slightly flex

66
Gym Instructor Workbook Manual 4
SINGLE ARM ROW (DB)
PRIMARY MUSCLES WORKED:Latissimus Dorsi, Posterior Deltoid, Trapezius and Biceps
SPECIAL POPULATION ADAPTIONS 14-16 Year Olds:
Resistance band be bent over row could be completed to reduce the workload.
Older Adults:
Seated row machine could be used to increase exercise stability.
Pre/Post Natal Clients:
Widen foot stance and increase the angle of the bench to reduce pressure on the lumbar spine.
Disability Client - Wheel chair user
Cable rows could be completed so the client does not need to leave the wheel chair.
ALTERNATIVE Seated cable row, seated row machine or prone flyes.
TEACHING POINTS:• Place the knee and the same side hand
on top of a bench, with the hand under the shoulder and the knee beneath the hip
• Maintain a neutral spine and ensure that the hips and shoulders are level
• Place the other leg out to the side to stabilise
• Raise the dumbbell directly up towards the armpit keeping the elbow close to the body
• Lower back down under control ensuring elbows don’t lock out
• NB all movement comes from the arm, there should be no twisting of the body

6
67
Unit 6 Free Weights
BENT ARM PULLOVER (DB)
PRIMARY MUSCLES WORKED:Latissimus Dorsi
SPECIAL POPULATION ADAPTIONS 14-16 Year Olds:
Assisted pull up machine could be used with suitable endurance repetition range and resistance.
Older Adults:
Use a vertical traction machine to increase the exercise stability.
Pre/Post Natal Clients:
To avoid lying supine change the exercise for a single arm row.
Disability Client - Stroke
Use a single arm row so the weight can be changed to suit weakness on either side of the body.
ALTERNATIVE Lat pull down, seated row or single arm row.
TEACHING POINTS:• Lie with the upper body and head fully
supported by the bench
• Grasp one dumbbell with both hands from behind and position over chest with elbows bent approximately 90° and into the side of the body
• With elbows bent, lower dumbbell over and just behind head until upper arm is approximately parallel to the torso
• Return and repeat
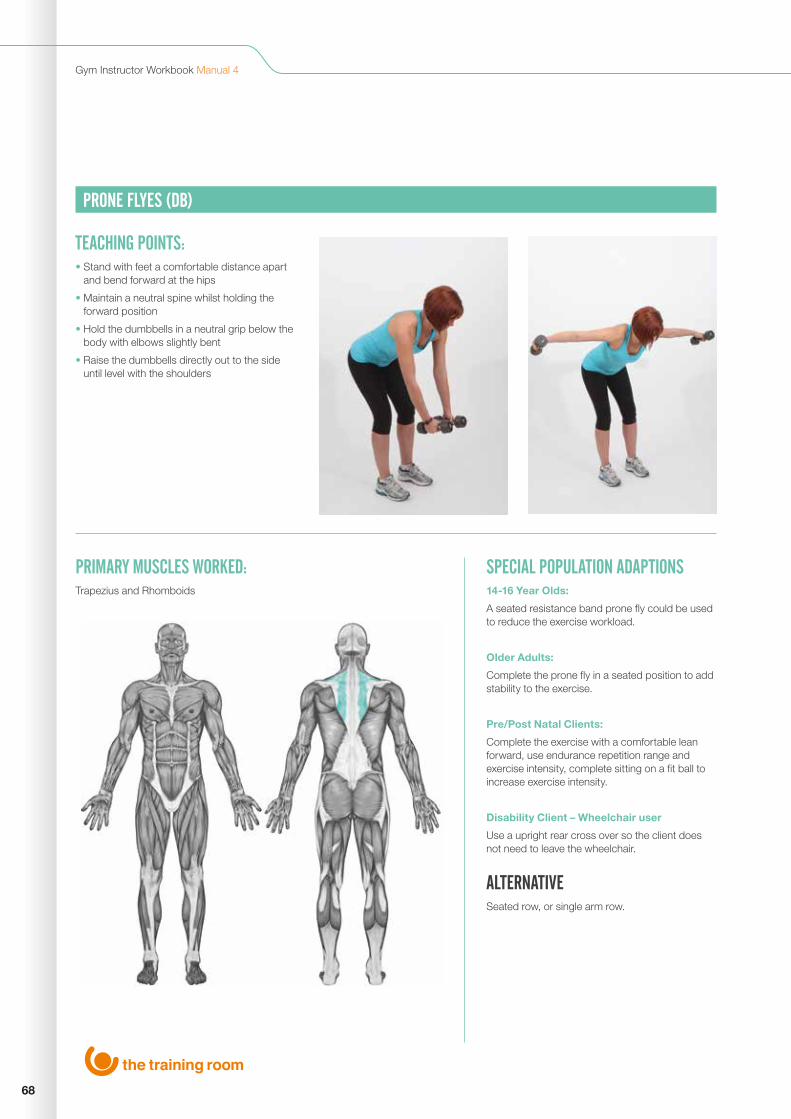
68
Gym Instructor Workbook Manual 4
PRONE FLYES (DB)
PRIMARY MUSCLES WORKED:Trapezius and Rhomboids
SPECIAL POPULATION ADAPTIONS 14-16 Year Olds:
A seated resistance band prone fly could be used to reduce the exercise workload.
Older Adults:
Complete the prone fly in a seated position to add stability to the exercise.
Pre/Post Natal Clients:
Complete the exercise with a comfortable lean forward, use endurance repetition range and exercise intensity, complete sitting on a fit ball to increase exercise intensity.
Disability Client – Wheelchair user
Use a upright rear cross over so the client does not need to leave the wheelchair.
ALTERNATIVE Seated row, or single arm row.
TEACHING POINTS:• Stand with feet a comfortable distance apart
and bend forward at the hips
• Maintain a neutral spine whilst holding the forward position
• Hold the dumbbells in a neutral grip below the body with elbows slightly bent
• Raise the dumbbells directly out to the side until level with the shoulders
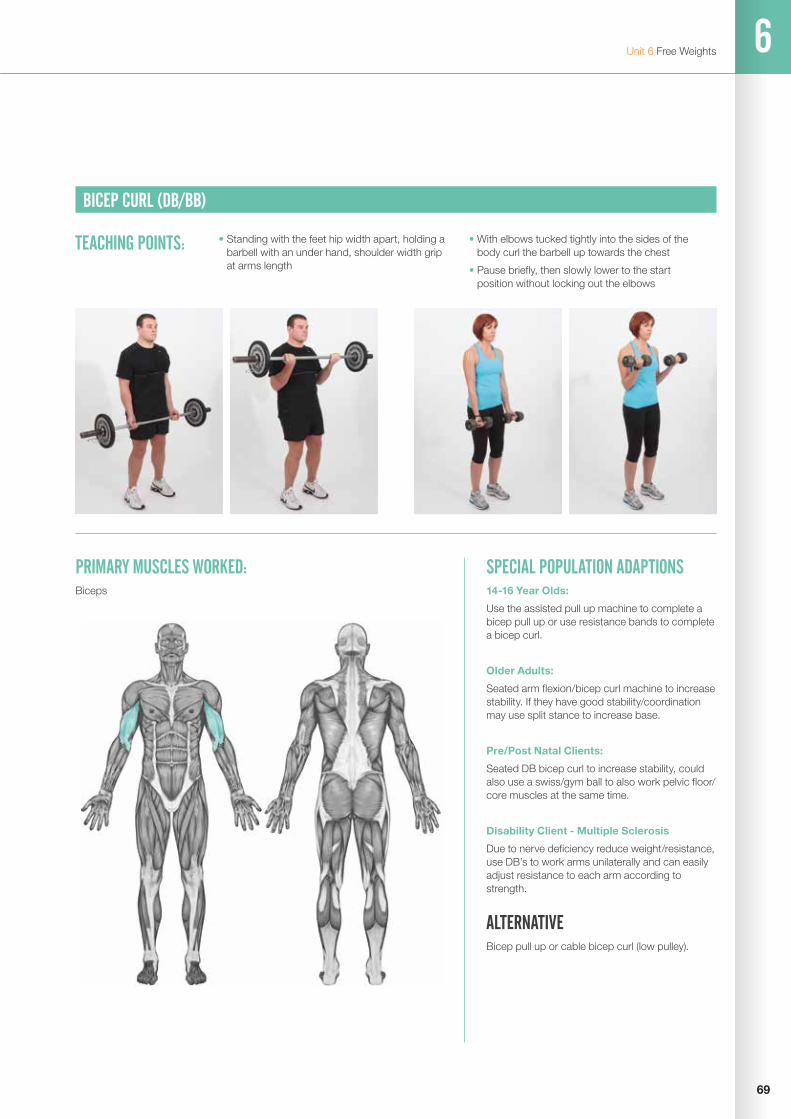
6
69
Unit 6 Free Weights
BICEP CURL (DB/BB)
PRIMARY MUSCLES WORKED:Biceps
SPECIAL POPULATION ADAPTIONS 14-16 Year Olds:
Use the assisted pull up machine to complete a bicep pull up or use resistance bands to complete a bicep curl.
Older Adults:
Seated arm flexion/bicep curl machine to increase stability. If they have good stability/coordination may use split stance to increase base.
Pre/Post Natal Clients:
Seated DB bicep curl to increase stability, could also use a swiss/gym ball to also work pelvic floor/ core muscles at the same time.
Disability Client - Multiple Sclerosis
Due to nerve deficiency reduce weight/resistance, use DB’s to work arms unilaterally and can easily adjust resistance to each arm according to strength.
ALTERNATIVE Bicep pull up or cable bicep curl (low pulley).
TEACHING POINTS: • Standing with the feet hip width apart, holding a barbell with an under hand, shoulder width grip at arms length
• With elbows tucked tightly into the sides of the body curl the barbell up towards the chest
• Pause briefly, then slowly lower to the start position without locking out the elbows
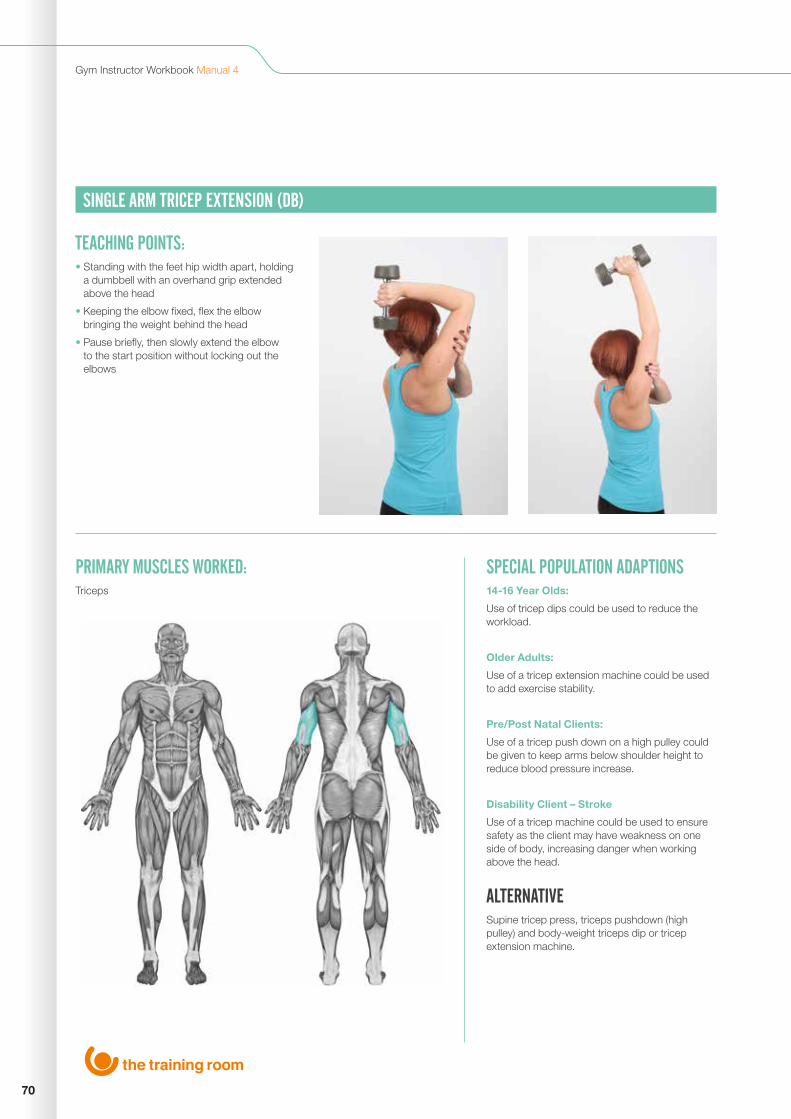
70
Gym Instructor Workbook Manual 4
SINGLE ARM TRICEP EXTENSION (DB)
PRIMARY MUSCLES WORKED:Triceps
SPECIAL POPULATION ADAPTIONS 14-16 Year Olds:
Use of tricep dips could be used to reduce the workload.
Older Adults:
Use of a tricep extension machine could be used to add exercise stability.
Pre/Post Natal Clients:
Use of a tricep push down on a high pulley could be given to keep arms below shoulder height to reduce blood pressure increase.
Disability Client – Stroke
Use of a tricep machine could be used to ensure safety as the client may have weakness on one side of body, increasing danger when working above the head.
ALTERNATIVE Supine tricep press, triceps pushdown (high pulley) and body-weight triceps dip or tricep extension machine.
TEACHING POINTS:• Standing with the feet hip width apart, holding
a dumbbell with an overhand grip extended above the head
• Keeping the elbow fixed, flex the elbow bringing the weight behind the head
• Pause briefly, then slowly extend the elbow to the start position without locking out the elbows

6
71
Unit 6 Free Weights
SQUAT (BB OR DB)
PRIMARY MUSCLES WORKED:Quadriceps, Hamstrings, Gastrocnemius and Glutes
SPECIAL POPULATION ADAPTIONS 14-16 Year Olds:
Body weight squats or lunges could be given to reduce the exercise workload.
Older Adults:
Leg press machine could be given to increase the stability of the exercise.
Pre/Post Natal Clients:
Leg extension and hamstring curls could be completed ensure the client is not supine or endangering the abdomen area.
Disability Client - Stroke
Complete a body weight squat using endurance repetition ranges, reduce the range of movement if required.
ALTERNATIVE Leg press, or a combination of leg extension and hamstring curl and lunge.
TEACHING POINTS:• Hold dumbbells by the side of the body
• Feet shoulder width apart
• Brace abdominal and back muscles
• Initiate squat by flexing from the knees and hips
• Lower slowly to a comfortable position
• From the bottom position push the ground away keeping the chest lifted throughout to maintain a neutral spine
• Breathe out through the sticking point
• Keep knees in line with toes and heels down throughout exercise

72
Gym Instructor Workbook Manual 4
FORWARD LUNGE (BB)
PRIMARY MUSCLES WORKED:Quadriceps, Hamstrings, Gastrocnemius and Glutes
SPECIAL POPULATION ADAPTIONS 14-16 Year Olds:
Body weight lunges could be given to reduce the exercise workload.
Older Adults:
A seated hamstring curl and leg press machine could be given to increase the stability of the exercise.
Pre/Post Natal Clients:
Body weight lunges or hamstring curls could be completed to reduce the exercise intensity.
Disability Client – Obesity
Used a seated hamstring curl and leg press machine to reduce pressure on the knee joint.
ALTERNATIVE Squats, dead lift, leg press or a combination of squats and lunges.
TEACHING POINTS:• Stand tall with a pole/bar placed across the
upper trapezius
• Place the feet greater than a normal stride apart with feet hip width apart and toes facing forward
• Keep chest lifted and brace the abdominals and back muscles
• Lunge forward using alternate legs, flexing the knees until leading leg knee is roughly at a right angle, while the trailing leg knee should avoid contact with the floor
• At the bottom push the ground away keeping the chest lifted to maintain a neutral spine and return to starting position
• Keep knees in line with toes and front heel down throughout exercise

6
73
Unit 6 Resistant Machines
RESISTANCE MACHINESSEATED CHEST PRESS
PRIMARY MUSCLES WORKED:Pectorals, Deltoids and Triceps
SPECIAL POPULATION ADAPTIONS 14-16 Year Olds:
Use bodyweight press up variations to reduce the workload on muscle groups.
Older Adults:
Keep the repetitions and exercise intensity within the endurance range, increase the rest periods as required.
Pre/Post Natal Clients:
Keep the repetitions and exercise intensity within the endurance range, increase the rest periods as required.
Disability Client – Muscular dystrophy
Due to nerve deficiency reduce weight/resistance, use dumbbell bench press to work arms unilaterally and can easily adjust resistance to each arm according to strength.
ALTERNATIVE Bench press, pec flyes, pec dec machine or press ups.
TEACHING POINTS:• Set the seat height so that the handle is at
armpit level
• Maintain neutral spine
• Grip handles firmly and keep the wrists straight
• Push out to extend the arms without locking out the elbows
• Slowly lower the weight, keeping the elbows level with hands
• Return to start position and repeat

74
Gym Instructor Workbook Manual 4
SEATED PEC DEC
PRIMARY MUSCLES WORKED:Pectorals and Anterior Deltoids
SPECIAL POPULATION ADAPTIONS 14-16 Year Olds:
Use bodyweight press up variations to reduce the workload on muscle groups.
Older Adults:
Keep the repetitions and exercise intensity within the endurance range, increase the rest periods as required.
Pre/Post Natal Clients:
Keep the repetitions and exercise intensity within the endurance range, increase the rest periods as required.
Disability Client – Wheelchair user
Use the cable machine to complete chest flyes so the client does not need to leave the wheel chair.
ALTERNATIVE Seated chest press machine, bench press or pec flyes.
TEACHING POINTS:• Sit in the machine with back on pad
• Place forearms on padded lever with elbows in line with the chest
• Squeeze elbows together then return to start position
• Maintain a neutral spine throughout

6
75
Unit 6 Resistant Machines
SEATED ROW (PULLEY)
PRIMARY MUSCLES WORKED:Latissimus Dorsi, Deltoids and Trapezius
SPECIAL POPULATION ADAPTIONS 14-16 Year Olds:
Use resistance bands to complete a bent over row or seated row to reduce the workload.
Older Adults:
Keep the repetitions and exercise intensity within the endurance range, increase the rest periods as required.
Pre/Post Natal Clients:
A single arm row could be used to reduced risk of abdominal injury.
Disability Client – Wheelchair user
If the seat cannot be moved a cable machine could be used to complete a seated row.
ALTERNATIVE Prone flyes, single arm row or bent over row.
TEACHING POINTS:• Adjust the seat height so that it allows the
chest to rest against the support pad
• Maintain a neutral spine
• Keeping the elbows close to the body and the wrists straight
• Pull the weight towards the abdomen pause briefly, then slowly return the weight to the start position
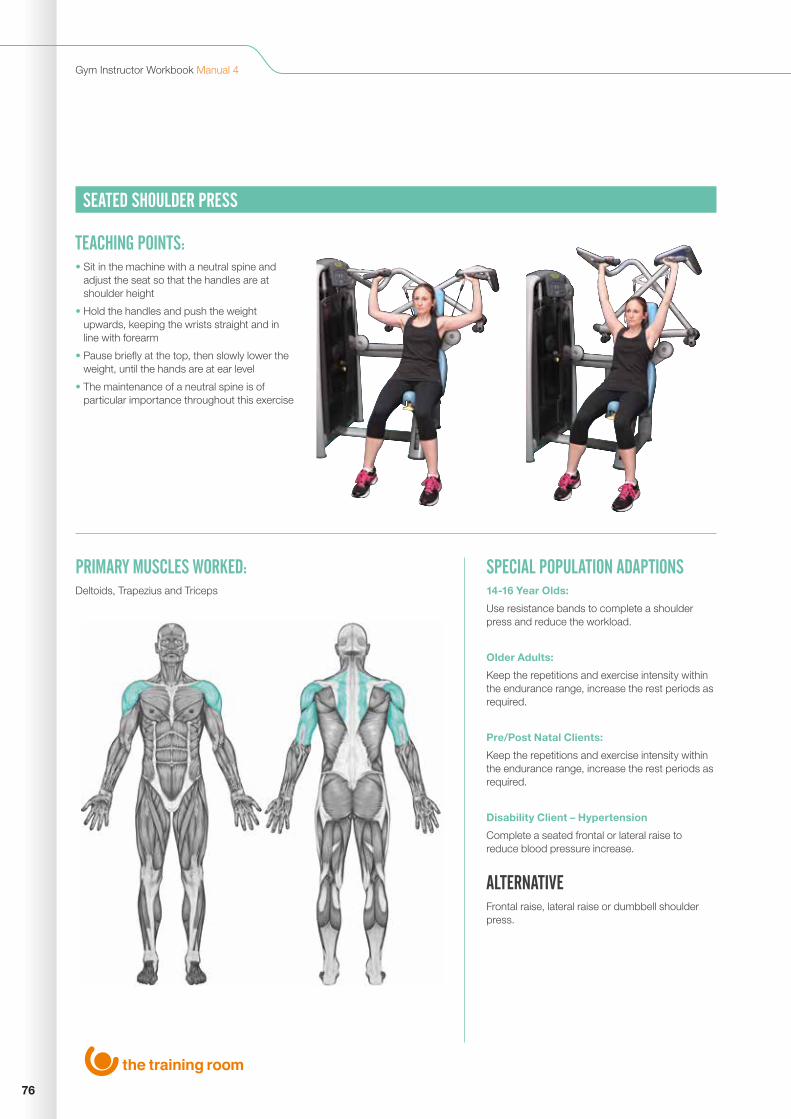
76
Gym Instructor Workbook Manual 4
SEATED SHOULDER PRESS
PRIMARY MUSCLES WORKED:Deltoids, Trapezius and Triceps
SPECIAL POPULATION ADAPTIONS 14-16 Year Olds:
Use resistance bands to complete a shoulder press and reduce the workload.
Older Adults:
Keep the repetitions and exercise intensity within the endurance range, increase the rest periods as required.
Pre/Post Natal Clients:
Keep the repetitions and exercise intensity within the endurance range, increase the rest periods as required.
Disability Client – Hypertension
Complete a seated frontal or lateral raise to reduce blood pressure increase.
ALTERNATIVE Frontal raise, lateral raise or dumbbell shoulder press.
TEACHING POINTS:• Sit in the machine with a neutral spine and
adjust the seat so that the handles are at shoulder height
• Hold the handles and push the weight upwards, keeping the wrists straight and in line with forearm
• Pause briefly at the top, then slowly lower the weight, until the hands are at ear level
• The maintenance of a neutral spine is of particular importance throughout this exercise

6
77
Unit 6 Resistant Machines
LAT PULL DOWN
PRIMARY MUSCLES WORKED:Latissimus Dorsi, Trapezius and Biceps
SPECIAL POPULATION ADAPTIONS 14-16 Year Olds:
Use assisted pull up machine to complete wide arm pull up to reduce the workload.
Older Adults:
Keep the repetitions and exercise intensity within the endurance range, increase the rest periods as required.
Pre/Post Natal Clients:
Keep the repetitions and exercise intensity within the endurance range, increase the rest periods as required.
Disability Client – Stroke
Use dumbbell single arm row so that the weight can be adjusted for the weaker side of the body.
ALTERNATIVE Single arm row, bent arm pull over, assisted wide arm pull up or vertical traction machine.
TEACHING POINTS:• Adopt a natural overhand grip (just wider than
shoulder width)
• Sit into the machine directly under the cable pulley and lock the thighs under the pad (if necessary)
• With the arms above the head, lean back slightly, so that the sternum is now directly under the pulley
• Whilst maintaining a neutral spine, pull the bar down towards the sternum keeping the forearms completely vertical
• Pause briefly then return to the start
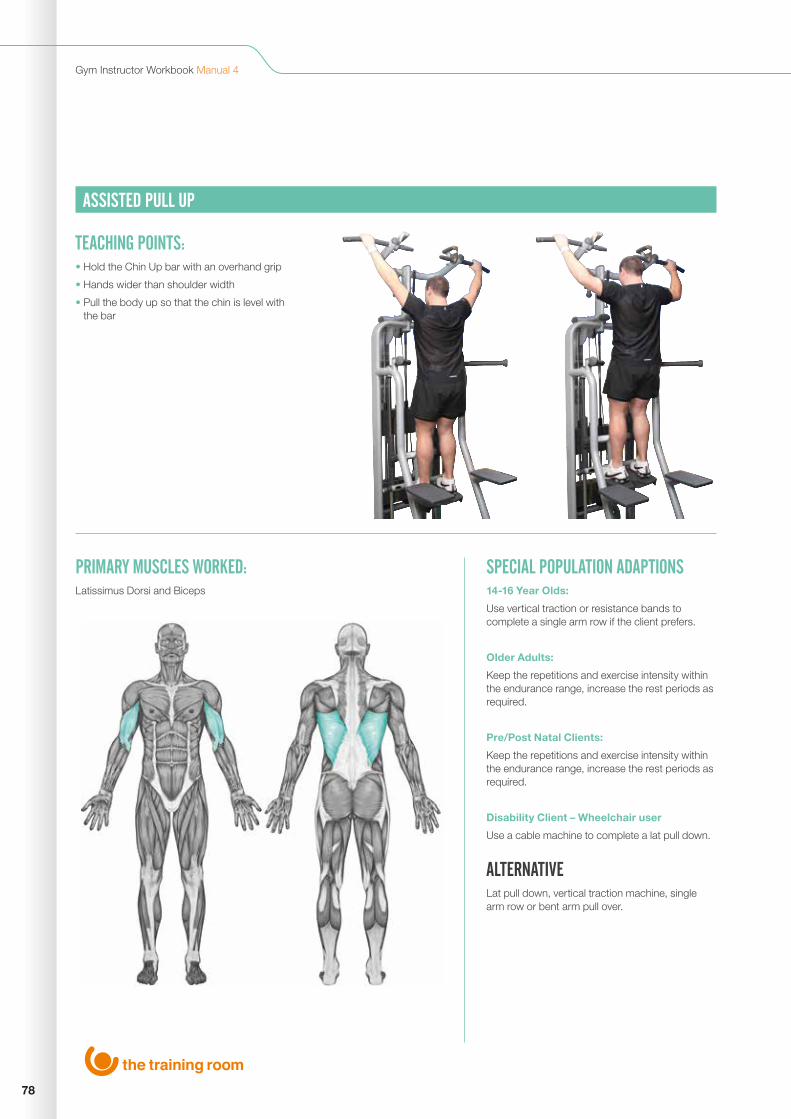
78
Gym Instructor Workbook Manual 4
ASSISTED PULL UP
PRIMARY MUSCLES WORKED:Latissimus Dorsi and Biceps
SPECIAL POPULATION ADAPTIONS 14-16 Year Olds:
Use vertical traction or resistance bands to complete a single arm row if the client prefers.
Older Adults:
Keep the repetitions and exercise intensity within the endurance range, increase the rest periods as required.
Pre/Post Natal Clients:
Keep the repetitions and exercise intensity within the endurance range, increase the rest periods as required.
Disability Client – Wheelchair user
Use a cable machine to complete a lat pull down.
ALTERNATIVE Lat pull down, vertical traction machine, single arm row or bent arm pull over.
TEACHING POINTS:• Hold the Chin Up bar with an overhand grip
• Hands wider than shoulder width
• Pull the body up so that the chin is level with the bar

6
79
Unit 6 Resistant Machines
TRICEP PUSHDOWN (HIGH PULLEY)
PRIMARY MUSCLES WORKED:Triceps
SPECIAL POPULATION ADAPTIONS 14-16 Year Olds:
Complete body weight tricep dips to reduce the work load on the muscles.
Older Adults:
Keep the repetitions and exercise intensity within the endurance range, increase the rest periods as required.
Pre/Post Natal Clients:
Keep the repetitions and exercise intensity within the en-durance range, increase the rest periods as required.
Disability Client – Lower back pain
Use a seated tricep extension to reduce the pressure on the lower back.
ALTERNATIVE Tricep pushdown machine, dumbell tricep extension or tricep dips.
TEACHING POINTS:• Stand facing a cable column with a hip width
stance
• Attach a short bar onto the cable and adopt an over-hand grip
• Keeping a neutral spine
• With the elbows at the side, and arm parallel to the floor, straighten the arms so that the bar rests on the upper thigh
• Moving the elbows, return the bar to the start position

80
Gym Instructor Workbook Manual 4
BICEP CURL (LOW PULLEY)
PRIMARY MUSCLES WORKED:Biceps
SPECIAL POPULATION ADAPTIONS 14-16 Year Olds:
Use resistance bands to complete a bicep curl or assisted pull up machine to complete a bicep pull up.
Older Adults:
Keep the repetitions and exercise intensity within the endurance range, increase the rest periods as required.
Pre/Post Natal Clients:
Keep the repetitions and exercise intensity within the endurance range, increase the rest periods as required.
Disability Client – Oseto arthritis
If the client is unable to grip fully, use the cuff attachment on the fore arm.
ALTERNATIVE Arm curl machine, assisted bicep pull up or dumbbell/barbell bicep curl.
TEACHING POINTS:• Hold the low pulley cable bar with a shoulder
width under hand grip
• Stand close to pulley with elbows to side, raise bar until forearms are vertical
• Lower until the arms are fully extended but not locked out

6
81
Unit 6 Resistant Machines
LEG PRESS
PRIMARY MUSCLES WORKED:Quadriceps, Hamstrings, Gastrocnemius, Soleus and Glutes
SPECIAL POPULATION ADAPTIONS 14-16 Year Olds:
Use body weight alternatives such as squats and lunges to reduce the workload on muscles.
Older Adults:
Keep the repetitions and exercise intensity within the endurance range, increase the rest periods as required.
Pre/Post Natal Clients:
Keep the repetitions and exercise intensity within the endurance range, increase the rest periods as required.
Disability Client - Lower back pain
Leg/knee extension machine seated working one leg at a time, this way the weight can be adapted for the stronger and weaker sides of the body still working the quadriceps.
ALTERNATIVE Leg extension combined with hamstring curl machine, squats or lunges.
TEACHING POINTS: • Sit on machine with back on padded support
• Place feet on platform hip width apart, set seat so that knees are at a 90° angle
• Hold the handles at the side
• Push platform away by extending knees and hips without locking out
• Return to start position

82
Gym Instructor Workbook Manual 4
SEATED KNEE EXTENSION
PRIMARY MUSCLES WORKED:Quadriceps
SPECIAL POPULATION ADAPTIONS 14-16 Year Olds:
Use body weight alternatives such as squats and lunges to reduce the workload on muscles.
Older Adults:
Keep the repetitions and exercise intensity within the endurance range, increase the rest periods as required.
Pre/Post Natal Clients:
Keep the repetitions and exercise intensity within the endurance range, increase the rest periods as required.
Disability Client - Wheelchair user
Use resistance bands or ankle weights to add resistance, the client can also complete this in the wheelchair.
ALTERNATIVE Lunges, squats or seated leg press.
TEACHING POINTS:• Set the back rest so that the back is
supported and the knee is at the pivot point
• Adjust the shin pad so that it is just above the shoe laces
• Sit in the machine, with the back against the rest, lightly gripping the handles
• Lift your toes towards the knees
• Extend the knees under control to full extension keeping the toes to the ceiling
• Pause briefly, then slowly lower to the start position
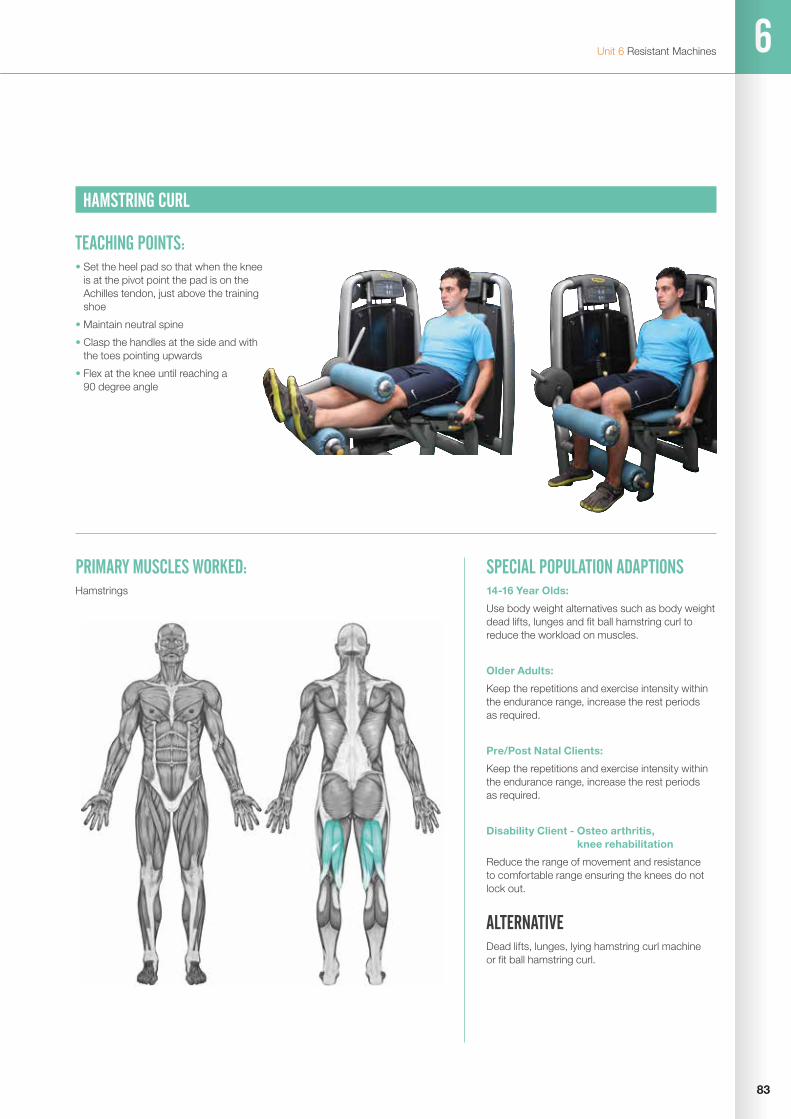
6
83
Unit 6 Resistant Machines
HAMSTRING CURL
PRIMARY MUSCLES WORKED:Hamstrings
SPECIAL POPULATION ADAPTIONS 14-16 Year Olds:
Use body weight alternatives such as body weight dead lifts, lunges and fit ball hamstring curl to reduce the workload on muscles.
Older Adults:
Keep the repetitions and exercise intensity within the endurance range, increase the rest periods as required.
Pre/Post Natal Clients:
Keep the repetitions and exercise intensity within the endurance range, increase the rest periods as required.
Disability Client - Osteo arthritis, knee rehabilitation
Reduce the range of movement and resistance to comfortable range ensuring the knees do not lock out.
ALTERNATIVE Dead lifts, lunges, lying hamstring curl machine or fit ball hamstring curl.
TEACHING POINTS:• Set the heel pad so that when the knee
is at the pivot point the pad is on the Achilles tendon, just above the training shoe
• Maintain neutral spine
• Clasp the handles at the side and with the toes pointing upwards
• Flex at the knee until reaching a 90 degree angle

84
Gym Instructor Workbook Manual 4
SEATED ADDUCTOR
PRIMARY MUSCLES WORKED:Adductors
SPECIAL POPULATION ADAPTIONS 14-16 Year Olds:
Use body weight leg raises or resistance bands to increase the intensity.
Older Adults:
Keep the repetitions and exercise intensity within the endurance range, increase the rest periods as required, reduce the range of movement as required.
Pre/Post Natal Clients:
Avoid this exercise and complete pelvic floor exercises.
Disability Client – Stroke
Work one leg at a time, this way the weight can be adapted for the stronger and weaker sides of the body, resistance bands can be used if required.
ALTERNATIVE Side lying leg raises.
TEACHING POINTS:• Sit in machine with heels on bars and pads on
insides of the knees
• Maintain neutral spine
• Pull on lever to position legs apart
• Release lever into position and grasp bars to sides
• Squeeze knees together by adducting the hips
• Return and repeat

6
85
Unit 6 Resistant Machines
SEATED ABDUCTOR
PRIMARY MUSCLES WORKED:Abductors
SPECIAL POPULATION ADAPTIONS 14-16 Year Olds:
Use a resistance band for inside leg swings.
Older Adults:
Keep the repetitions and exercise intensity within the endurance range, increase the rest periods as required.
Pre/Post Natal Clients:
Avoid this exercise and complete pelvic floor exercises.
Disability Client – Wheelchair user
Use resistance and squeeze between the knees, for example a dyno disc, the client can perform this in the wheel chair.
ALTERNATIVE Inside leg swings with a resistance band.
TEACHING POINTS:• Sit in machine with heels on bars and pads on
outsides of the knees
• Maintain neutral spine
• Pull on lever to position legs together
• Release lever into position and grasp bars to sides
• Move legs away from one another by abducting the hips
• Return and repeat

86
Gym Instructor Workbook Manual 4
SEATED ABDOMINAL CRUNCH
PRIMARY MUSCLES WORKED:Rectus Abdominals
SPECIAL POPULATION ADAPTIONS 14-16 Year Olds:
Use body weight exercises such as a sit up or if needed use a resistance band for added resistance.
Older Adults:
Use body weight exercises, or reduce the range of movement if required.
Pre/Post Natal Clients:
Avoid this exercise and complete pelvic floor exercises.
Disability Client – Wheelchair user
Use a cable high pulley to replicate the movement so the client does not need to leave the wheel chair.
ALTERNATIVE Abdominal crunch or sit ups.
TEACHING POINTS:• Seated with your back against the back rest
• Fix the feet under the rollers/pads at the bottom
• Pull the top roller back until it is against your chest
• Either hang your arms over the top of the roller or cross them in front of it
• Use your chest (not the arms) to push the roller towards your knees
• Slowly return towards the starting position. Stop just before you get there and repeat the exercise
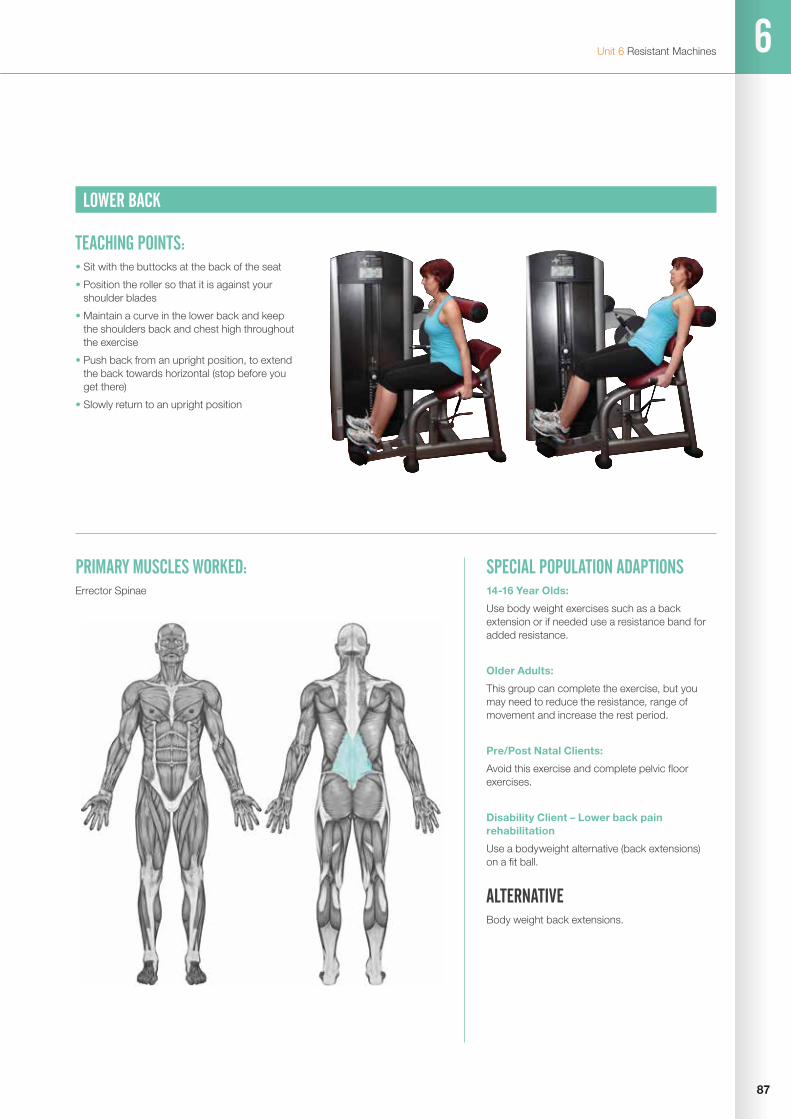
6
87
Unit 6 Resistant Machines
LOWER BACK
PRIMARY MUSCLES WORKED:Errector Spinae
SPECIAL POPULATION ADAPTIONS 14-16 Year Olds:
Use body weight exercises such as a back extension or if needed use a resistance band for added resistance.
Older Adults:
This group can complete the exercise, but you may need to reduce the resistance, range of movement and increase the rest period.
Pre/Post Natal Clients:
Avoid this exercise and complete pelvic floor exercises.
Disability Client – Lower back pain rehabilitation
Use a bodyweight alternative (back extensions) on a fit ball.
ALTERNATIVE Body weight back extensions.
TEACHING POINTS:• Sit with the buttocks at the back of the seat
• Position the roller so that it is against your shoulder blades
• Maintain a curve in the lower back and keep the shoulders back and chest high throughout the exercise
• Push back from an upright position, to extend the back towards horizontal (stop before you get there)
• Slowly return to an upright position
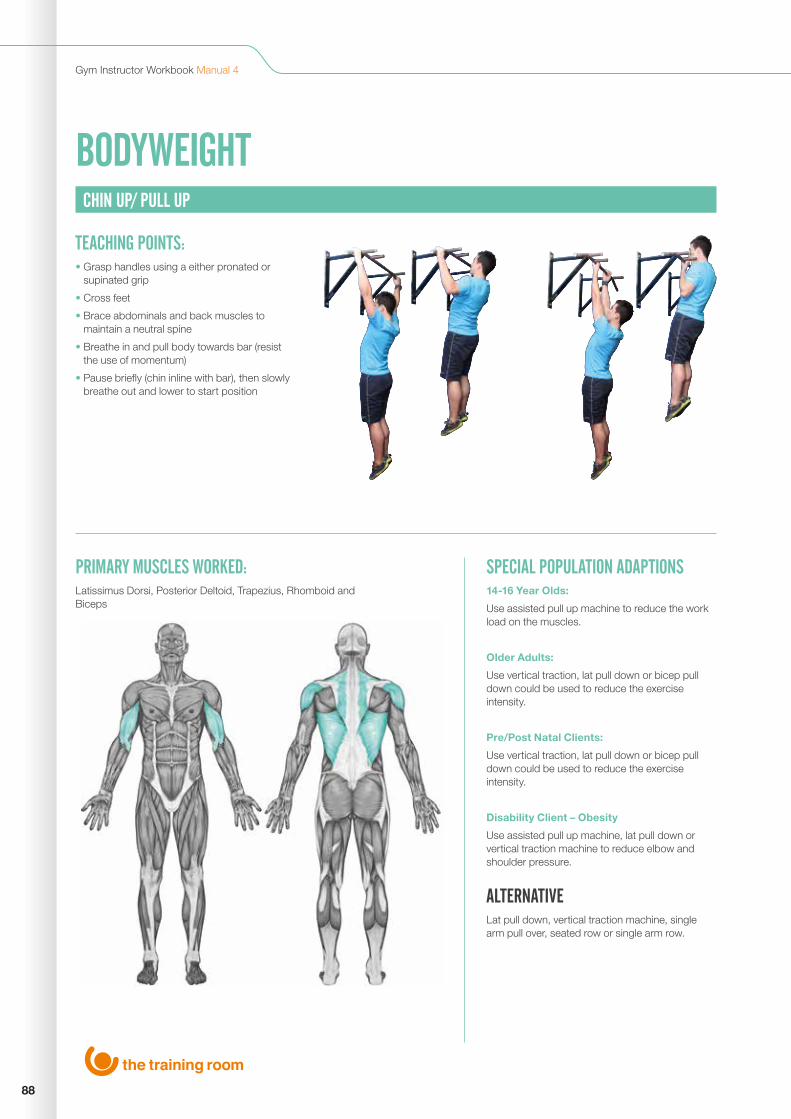
88
Gym Instructor Workbook Manual 4
BODYWEIGHT Free Weight Exercises
CHIN UP/ PULL UP
PRIMARY MUSCLES WORKED:Latissimus Dorsi, Posterior Deltoid, Trapezius, Rhomboid and Biceps
SPECIAL POPULATION ADAPTIONS 14-16 Year Olds:
Use assisted pull up machine to reduce the work load on the muscles.
Older Adults:
Use vertical traction, lat pull down or bicep pull down could be used to reduce the exercise intensity.
Pre/Post Natal Clients:
Use vertical traction, lat pull down or bicep pull down could be used to reduce the exercise intensity.
Disability Client – Obesity
Use assisted pull up machine, lat pull down or vertical traction machine to reduce elbow and shoulder pressure.
ALTERNATIVE Lat pull down, vertical traction machine, single arm pull over, seated row or single arm row.
TEACHING POINTS:• Grasp handles using a either pronated or
supinated grip
• Cross feet
• Brace abdominals and back muscles to maintain a neutral spine
• Breathe in and pull body towards bar (resist the use of momentum)
• Pause briefly (chin inline with bar), then slowly breathe out and lower to start position
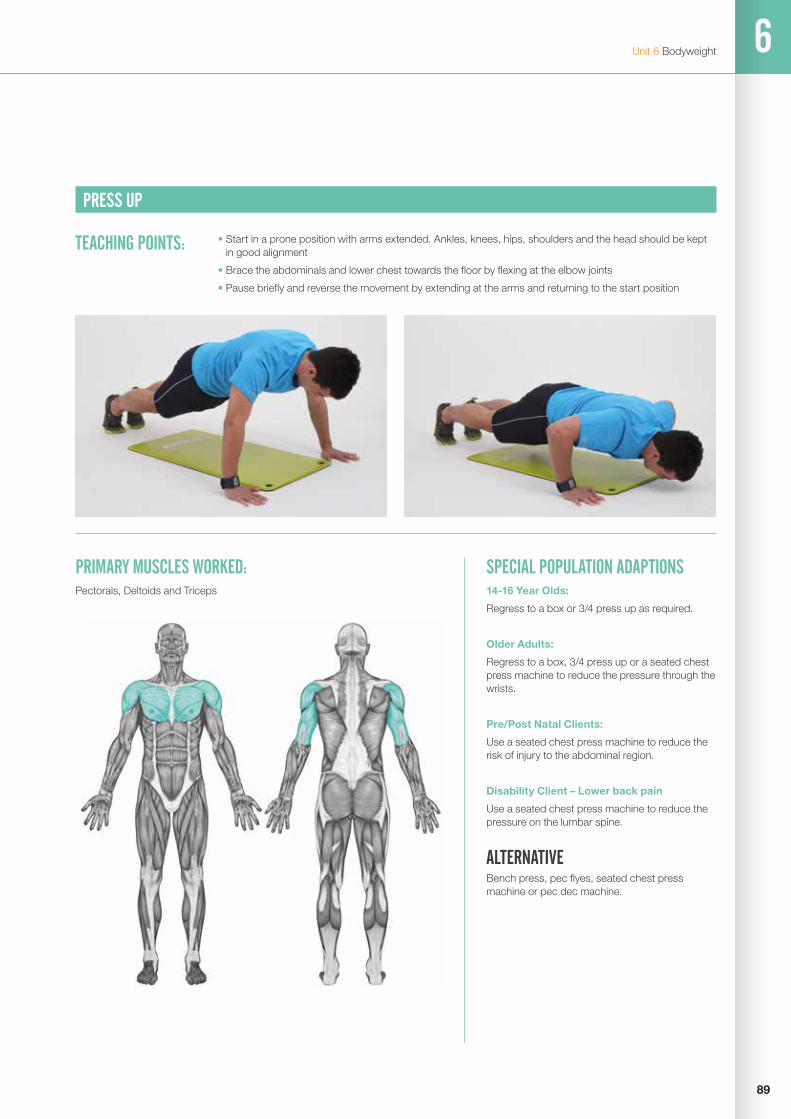
6
89
Unit 6 Bodyweight
PRESS UP
PRIMARY MUSCLES WORKED:Pectorals, Deltoids and Triceps
SPECIAL POPULATION ADAPTIONS 14-16 Year Olds:
Regress to a box or 3/4 press up as required.
Older Adults:
Regress to a box, 3/4 press up or a seated chest press machine to reduce the pressure through the wrists.
Pre/Post Natal Clients:
Use a seated chest press machine to reduce the risk of injury to the abdominal region.
Disability Client – Lower back pain
Use a seated chest press machine to reduce the pressure on the lumbar spine.
ALTERNATIVE Bench press, pec flyes, seated chest press machine or pec dec machine.
TEACHING POINTS: • Start in a prone position with arms extended. Ankles, knees, hips, shoulders and the head should be kept in good alignment
• Brace the abdominals and lower chest towards the floor by flexing at the elbow joints
• Pause briefly and reverse the movement by extending at the arms and returning to the start position

90
Gym Instructor Workbook Manual 4
BACK EXTENSIONS
PRIMARY MUSCLES WORKED:Erector Spinae
SPECIAL POPULATION ADAPTIONS 14-16 Year Olds:
Exercise can be completed, but ensure a safe range of movement.
Older Adults:
Use a back extension machine to avoid getting your client up and down from the floor.
Pre/Post Natal Clients:
Avoid as this can risk abdominal injury, complete pelvic floor exercises.
Disability Client -lower back pain
Back extension on a fit ball for increased support, limit range of movement to a comfortable range.
ALTERNATIVE Back extension machine or deadlift.
TEACHING POINTS: • Start in a prone position on the floor with feet in contact with the ground and fingers on the temples
• Keeping feet in contact with the floor, raise the chest off of the floor keeping head in neutral alignment
• Return to start position
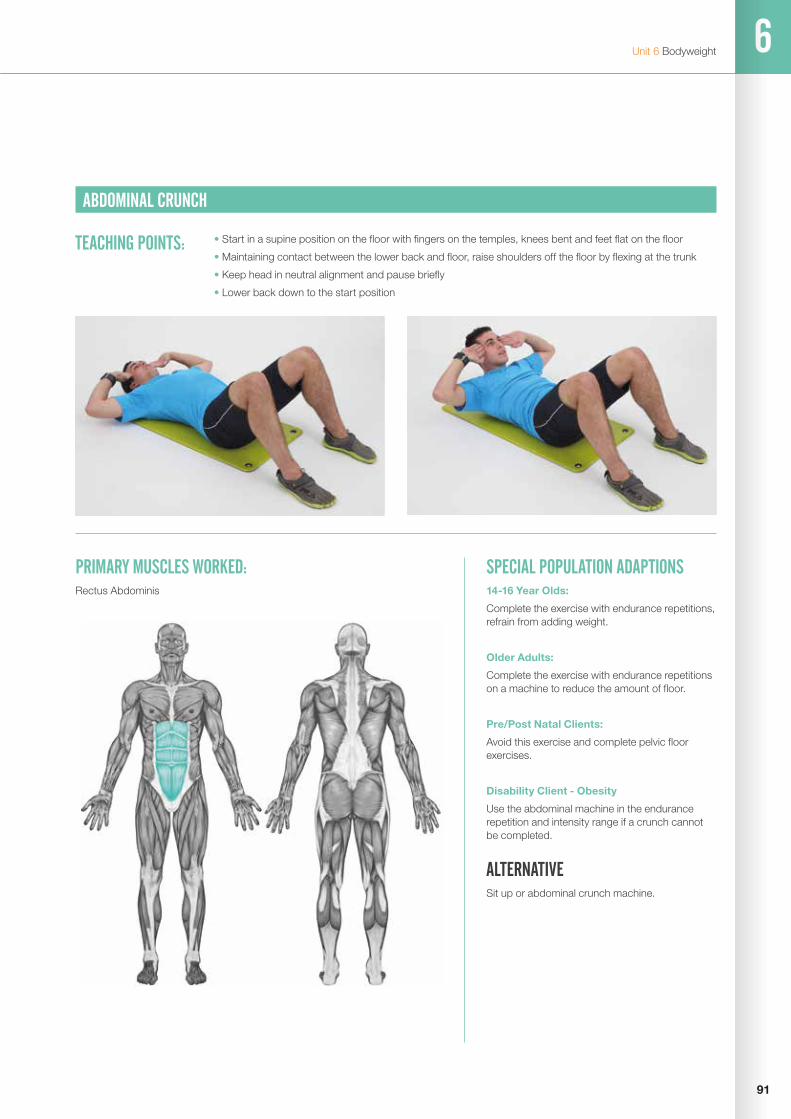
6
91
Unit 6 Bodyweight
ABDOMINAL CRUNCH
PRIMARY MUSCLES WORKED:Rectus Abdominis
SPECIAL POPULATION ADAPTIONS 14-16 Year Olds:
Complete the exercise with endurance repetitions, refrain from adding weight.
Older Adults:
Complete the exercise with endurance repetitions on a machine to reduce the amount of floor.
Pre/Post Natal Clients:
Avoid this exercise and complete pelvic floor exercises.
Disability Client - Obesity
Use the abdominal machine in the endurance repetition and intensity range if a crunch cannot be completed.
ALTERNATIVE Sit up or abdominal crunch machine.
TEACHING POINTS: • Start in a supine position on the floor with fingers on the temples, knees bent and feet flat on the floor
• Maintaining contact between the lower back and floor, raise shoulders off the floor by flexing at the trunk
• Keep head in neutral alignment and pause briefly
• Lower back down to the start position
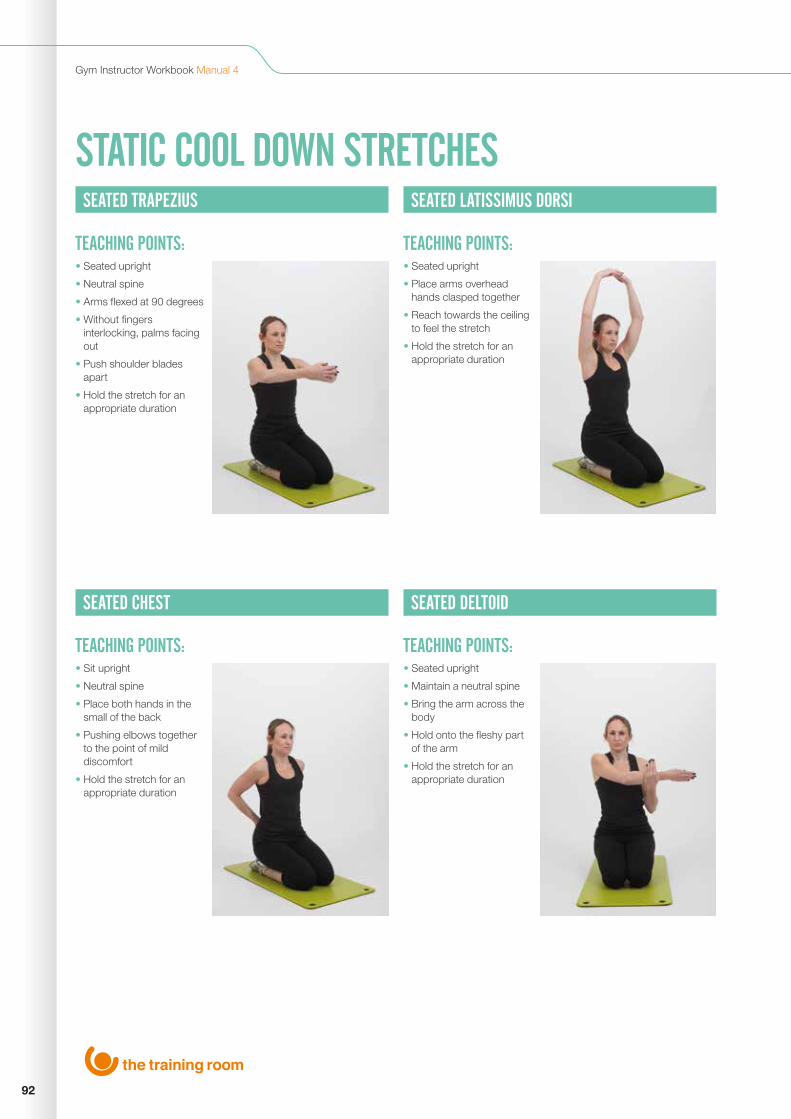
92
Gym Instructor Workbook Manual 4
STATIC COOL DOWN STRETCHESSEATED TRAPEZIUS
SEATED CHEST
SEATED LATISSIMUS DORSI
SEATED DELTOID
TEACHING POINTS:
TEACHING POINTS:
TEACHING POINTS:
TEACHING POINTS:
• Seated upright
• Neutral spine
• Arms flexed at 90 degrees
• Without fingers interlocking, palms facing out
• Push shoulder blades apart
• Hold the stretch for an appropriate duration
• Sit upright
• Neutral spine
• Place both hands in the small of the back
• Pushing elbows together to the point of mild discomfort
• Hold the stretch for an appropriate duration
• Seated upright
• Place arms overhead hands clasped together
• Reach towards the ceiling to feel the stretch
• Hold the stretch for an appropriate duration
• Seated upright
• Maintain a neutral spine
• Bring the arm across the body
• Hold onto the fleshy part of the arm
• Hold the stretch for an appropriate duration
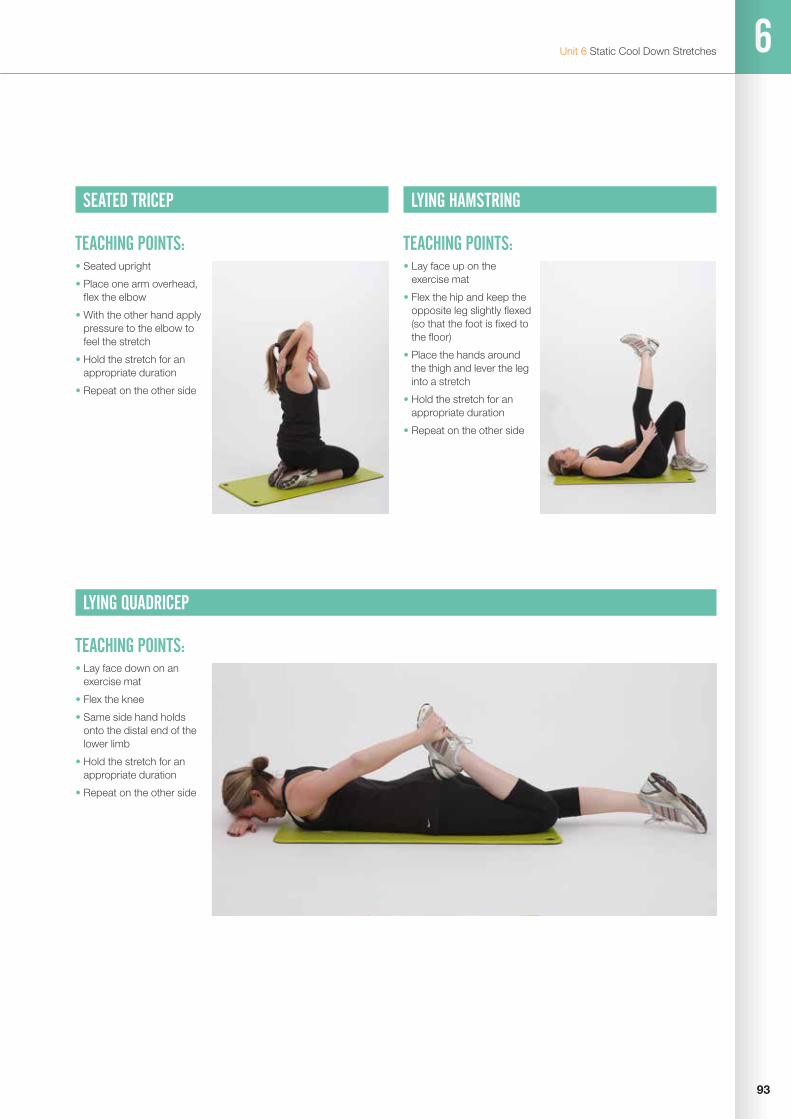
6
93
Unit 6 Static Cool Down Stretches
SEATED TRICEP
LYING QUADRICEP
TEACHING POINTS:
TEACHING POINTS:
• Seated upright
• Place one arm overhead, flex the elbow
• With the other hand apply pressure to the elbow to feel the stretch
• Hold the stretch for an appropriate duration
• Repeat on the other side
• Lay face down on an exercise mat
• Flex the knee
• Same side hand holds onto the distal end of the lower limb
• Hold the stretch for an appropriate duration
• Repeat on the other side
LYING HAMSTRING
TEACHING POINTS:• Lay face up on the
exercise mat
• Flex the hip and keep the opposite leg slightly flexed (so that the foot is fixed to the floor)
• Place the hands around the thigh and lever the leg into a stretch
• Hold the stretch for an appropriate duration
• Repeat on the other side

94
Gym Instructor Workbook Manual 4
SEATED ADDUCTOR
SEATED GLUTES
TEACHING POINTS:
TEACHING POINTS:
• Seated upright
• Draw the soles of the feet together
• Gently apply pressure to the inside of the knees using the hands or elbows
• Hold the stretch for an appropriate duration
• Lay face up on an excercise mat, cross the right leg over the left leg (above the knee)
• Lift the bottom leg off the floor, supporting it with both hands (on the thigh)
• Ease the legs towards the body
• Hold the stretch for an appropriate duration
• Repeat on the other side

6
95
Unit 6 Static Cool Down Stretches
KNEELING GASTROCNEMIUS
KNEELING HIP FLEXOR
TEACHING POINTS:
TEACHING POINTS:
• Adopt a press up position
• Bend one knee up so that it rests on the mat with the opposite leg straight
• Maintain neutral spine, head facing down
• Try and push rear heel into the floor
• Hold the stretch for an appropriate duration
• Repeat on the other side
• Kneel with one knee on the floor and the other in front with the knee bent
• Place hands on the supporting thigh
• Keep chin off chest, and neutral upright spine
• Tilt pelvis forward to stretch hip flexors of the rear leg
• Hold the stretch for an appropriate duration
• Repeat on the other side

96
Gym Instructor Workbook Manual 4
LYING ABDOMINALS (SPHINX)
TEACHING POINTS:• Lay face down on an
exercise mat
• Raise the trunk up off the floor
• Keep palms prone on the floor with the elbows underneath the shoulders
• Hold the stretch for an appropriate duration

6
97
Unit 6 Static Cool Down Stretches
GUIDELINES FOR STATIC COOL DOWN STRETCHES
• Cool Down stretches should ideally be completed on the floor, either seated, kneeling or lying
• There are 2 static cool down stretch options in maintenance or developmental: - stretches should be held at a point of mild discomfort for 15 seconds - development stretches should be held at a point of mild discomfort for 15 seconds, then the client takes a deep breath in, increases the stretch and hold this for a further 15 seconds
• Stretches selected should cover the whole of the body, or in the case of split routines, the stretches should target muscles worked. It is also a good time to focus on muscles which have been identified as tight or need flexibility development
• They should be the final component of your programme before ending the session
Gym Instructor Workbook Manual 4
98
REFERENCES AND FURTHER READING
American College of Sports Medicine (2010) ACSM’s Guidleines for Exercise Testing and Prescription. 8th Ed. Lippincott Williams and Wilkins
Anderson, G. and Bates, M. (2007) Foundations of Professional Personal Trainin. Human Kinetics
BOSU® (2012) Official Bosu Website. www.bosu.com
Bright Knowledge (2012) What Is Reflective Practice. www.brightknowledge.org
CSEP - Canadian Society for Exercise Physiology (2012) Par-Q and You. http://www.csep.ca/English/view.asp?x=698
Earle, R.W. and Baechle, T.R. (2000) Resistance Training and Spotting Techniques. Essentials of Strength and Conditioning. Human Kinetics
Fleck, S.J. and Kraemer, W.J. (2004) Designing Personal Training Programs. 3rd Ed. Human Kinetics
Heyward, V.H. (2002) Advanced Fitness Assessment and Exercise Prescription. 4th Ed. Human Kinetics
Jensen, R.J. and Fisher, A.G (1972) Scientific Basis of Athletic Conditioning. Lea and Fabiger
National Institutes of Health (1998) CLINICAL GUIDELINES ON THE IDENTIFICATION, EVALUATION, AND TREATMENT OFOVERWEIGHT AND OBESITY IN ADULTS The Evidence Report. http://www.nhlbi.nih.gov/guidelines/obesity/ob_gdlns.pdf

Unit 5 & 6 References and Further Reading
99

The Training Room
Waterloo House
Fleets Corner
Waterloo Road
Poole
Dorset
BH17 0HL
Tel: 0800 021 6050
www.thetrainingroom.com