print server application guide - static.tp-link.com · application for mac os how to launch/exit...
TRANSCRIPT

Print Server Application Guide
Rev: 2.0.0 1910011065

Contents Overview ...................................................................................................................................................... 1
How to launch/exit the TP-LINK USB Printer Controller ....................................................................................... 6
How to Print .......................................................................................................................................................... 7
How to scan ........................................................................................................................................................ 10
Other functions/ settings ..................................................................................................................................... 16
Installation for Mac OS ............................................................................................................................. 18
Application for Mac OS ............................................................................................................................. 20
How to Launch/Exit the TP-LINK USB Printer Controller .................................................................................... 20
How to Print ........................................................................................................................................................ 21
How to Scan ....................................................................................................................................................... 24
Other functions/ settings ..................................................................................................................................... 30

-1-
Overview Print server is a function embedded in your router. It allows you to share your printer with computers that are connected to the router.
Typical Topology
Note: (1) Before connection, please check the Printer Compatibility List to verify whether your printer is supported by
the router. You can refer to Troubleshooting for downloading the Printer Compatibility List. (2) Make sure you have already installed the printer’s driver on your computer. Otherwise, please install it first. (3) Any computer in your LAN must first install the software if it wants to share the print server via the modem
router. (4) Here in this guide, we take the configuration procedures of Archer C8 for example.

-2-
Installation for Windows OS
2. Select your router model and click USB Printer Setup.
1. Insert the router’s Resource CD into the CD-ROM drive.
3. Click START.
4. Connect your computer and printer to the router step by step as instructed. Click NEXT.

-3-
5. Check the LED lights and click NEXT.
6. Click NEXT to start installing the printer share software.
7. Please wait a moment for the installation preparation.
8. Click Next and go on to install the TP-LINK USB Printer Controller.

-4-
9. Click Change… to select another destination folder, or leave it default and click Next.
11. Click Finish to complete and exit the InstallShield Wizard.
10. Please wait a while for the installation process.

-5-
When the installation is completed, the TP-LINK USB Printer Controller will pop up, with whose help you can print documents via the router now.
Note: In your LAN, each computer that wants to share the print server should also install the TP-LINK USB Printer Controller. Please follow the previous steps to configure other computers in your LAN.

-6-
Application for Windows OS TP-LINK USB Printer Controller is used to operate the USB Printer on your own computer. After successful
installation, the icon will appear on the desktop of your computer.
How to launch/exit the TP-LINK USB Printer Controller
To launch the USB Printer Controller, double-click the icon on your desktop.
To exit the USB Printer Controller, click System->Exit on the TP-Link USB Printer Controller.

-7-
How to Print
To print, first of all, you need to set your Auto-Connect Printer. After successful setting, you can execute your printing tasks automatically. Please follow the steps below to set your auto-connect printer.
Step 2: Click the inverse triangle mark on the Auto-Connect for printing tab to pull down the list, where you can select Set Auto-Connect Printer.
Step 1: Highlight the printer you want to set as auto-connect printer.

-8-
After successful setting, you will see the printer marked as Auto-Connected Printer. Then you can execute your printing task freely.
Step 3: Tick the name of the printer you would like to set as auto-connect printer, and then click Apply.
-9-
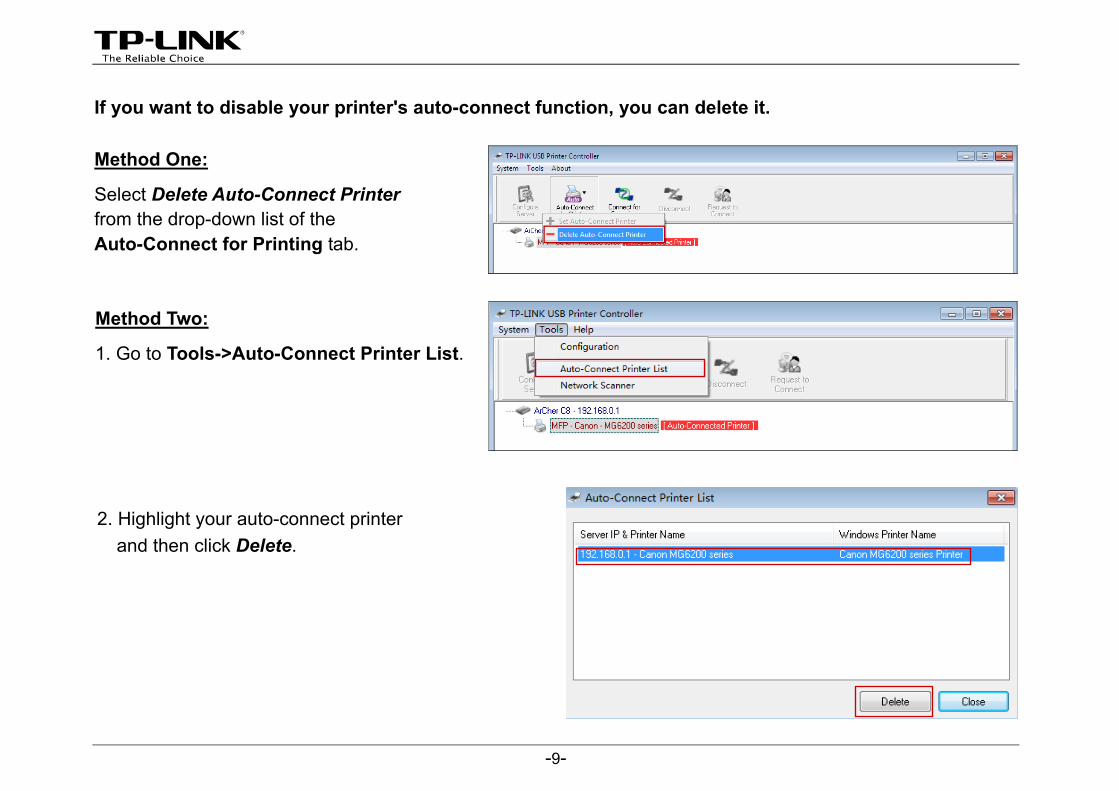
If you want to disable your printer's auto-connect function, you can delete it.
Method One:
Select Delete Auto-Connect Printer from the drop-down list of the Auto-Connect for Printing tab.
Method Two:
1. Go to Tools->Auto-Connect Printer List.
2. Highlight your auto-connect printer and then click Delete.

-10-
How to scan
There are two methods available to realize the scanning function.
Method One: Network Scanner
Step 1: Highlight your scanner or MFP.
Step 2: Click Tools and then select Network Scanner.
-11-
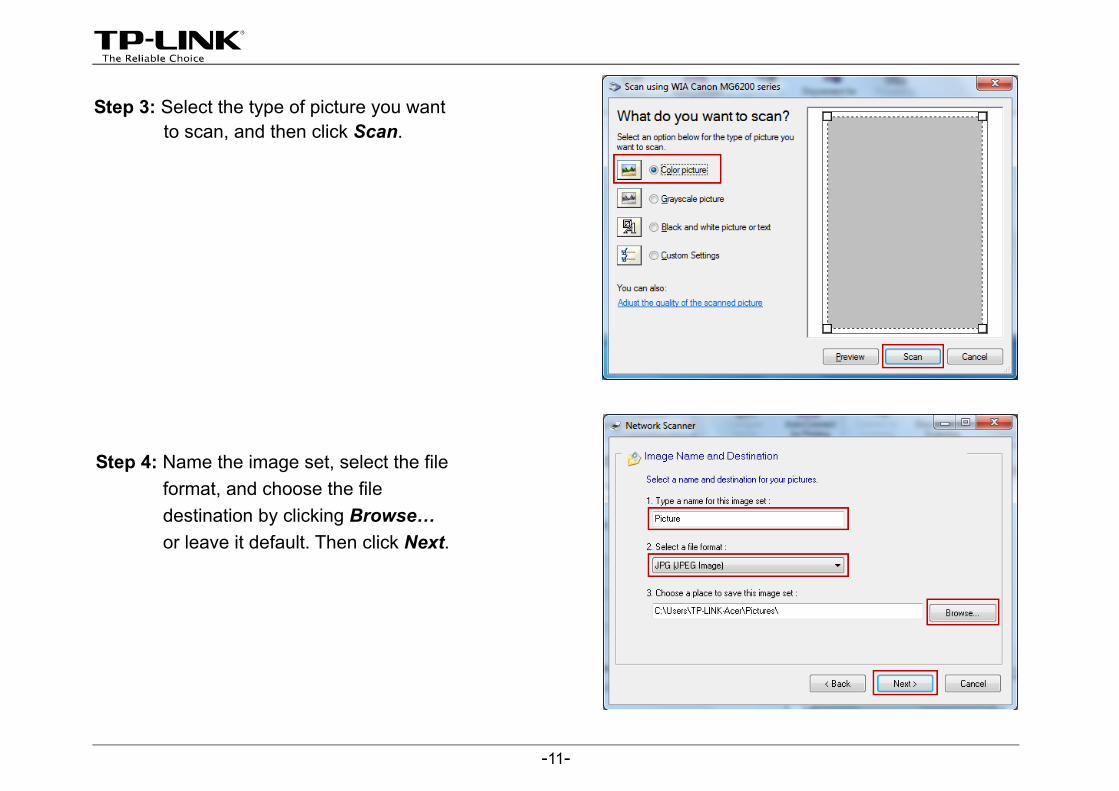
Step 4: Name the image set, select the file format, and choose the file destination by clicking Browse… or leave it default. Then click Next.
Step 3: Select the type of picture you want to scan, and then click Scan.

-12-
Step 5: Wait a while for the scan process.
Step 6: When it is 100% processed and saved, please click Close to complete it.
Then go to the location you’ve chosen in the previous Step 4 and find your picture scanned.

-13-
Method Two: Connect for Scanning
Note: If you choose this method for scanning, no one else in your LAN can share the scanner or MFP to either print or scan, until you click the tab Disconnect for Scanning to release it or accept their Request to Connect.
Step 1: Highlight your scanner or MFP.
Step 2: Click the tab Connect for Scanning.
If it is successfully set and ready for scanning, it will display Manually Connected by…, when you can start your scanning task.

-14-
Request to Connect When one computer in you LAN Connects for Scanning, it is occupying the scanner or MFP; then if you would like to use the printer as well, you will have to Request for Connect.
Step 3: After finishing your scanning task, please do remember to click the tab Disconnect to release the scanner or MFP.
Step 1: Highlight the scanner or MFP you want to share for printing or scanning.
Step 2: Click the tab Request to Connect.

-15-
Step 3: You will be prompted a window that transmits your request. Please wait patiently for the reply.
Step 4: If the other user Accepts your request to connect, please click Exit to start your printing or scanning task.
-16-
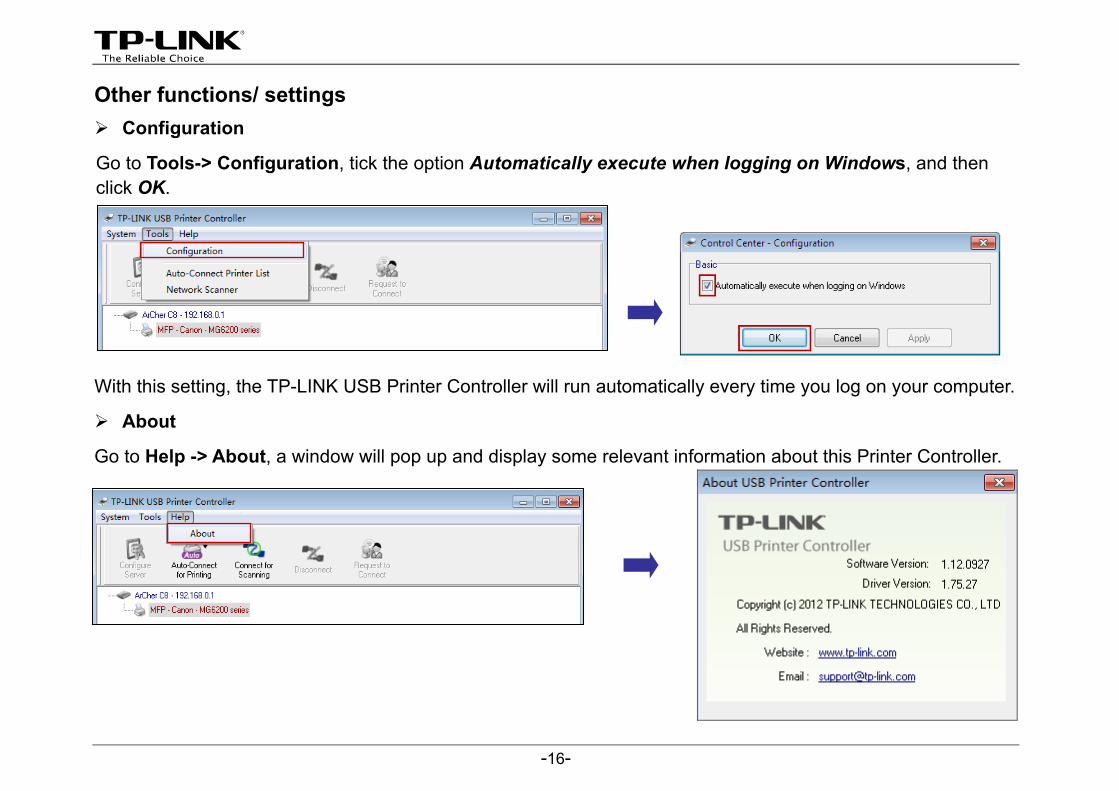
Other functions/ settings Configuration
Go to Tools-> Configuration, tick the option Automatically execute when logging on Windows, and then click OK.
With this setting, the TP-LINK USB Printer Controller will run automatically every time you log on your computer.
About
Go to Help -> About, a window will pop up and display some relevant information about this Printer Controller.

-17-
Configure Server
Highlight the router and click the tab Configure Server; the login window of the router will pop up. You need to enter the user name and password (both are admin by default.) to log in the web-based management page of the router.

-18-
Installation for Mac OS
1. Download the setup software TP-Link UDS Printer Controller Installer.dmg from our website: www.tp-link.com.
2. Double-click the software you’ve downloaded.
3. Double-click the TP-Link UDS Printer Controller Installer.app in the window that pops up.

-19-
4. Click Install to start the installation process.
5. Click Restart to finish the software installation.

-20-
Application for Mac OS How to Launch/Exit the TP-LINK USB Printer Controller
To launch the USB Printer Controller, double-click the icon on your desktop.
To exit the USB Printer Controller, you have two ways:
Click TP-Link USB Printer Controller -> Quit, when the printer controller is on the process. Or you can press the keyboard command + Q to quickly exit the controller.
Left-click and hold the icon in the dock for a while, then you can click Quit to exit the controller.

-21-
How to Print
To print, first of all, you need to set your Auto-Connect Printer. After successful setting, you can execute your printing tasks automatically.
Please follow the steps below to set your auto-connect printer.
Step 2: Click the tab Auto-Connect for printing to pull down a list, where you can select Set Auto-Connect Printer.
Step 1: Highlight your printer.

-22-
Step 3: Select the printer you would like to set as auto-connect printer, and then click the Apply button.
After successful setting, you will see the printer marked as Auto-Connect Printer. Then you can execute your printing task freely.

-23-
If you want to disable your printer's auto-connect function, you can delete it.
Method One:
Select Delete Auto-Connect Printer from the drop-down list of the tab Auto-Connect for Printing.
Method Two:
1. Go to Tools->Auto-Connect Printer List.
2. Highlight your auto-connect printer and
then click Delete.

-24-
How to Scan
There are two methods available to realize the scanning function.
Method One: Network Scanner Step 1: Highlight your scanner or MFP.
Step 2: Click Tools and then select Network Scanner.

-25-
Step 3: Select the kind of picture you want to scan and the destination you want to save it; name your picture and select the format of it. Then click Scan.
Step 4: Wait a while for the scan process.

-26-
Method Two: Connect for Scanning
Note: If you choose this method for scanning, no one else in your LAN can share the scanner or MFP to either print or scan, until you click the tab Disconnect for Scanning to release it or accept their Request to Connect.
Step 5: When it is completed, you will see the scan result shown in the middle.
Then go to the location you’ve chosen in the previous Step 3 and find your picture scanned.
Step 1: Highlight your scanner or MFP.

-27-
Step 2: Click the tab Connect for Scanning.
Successfully set and ready for scanning, it will display Manually Connected by…, when you can start your scan task.
Step 3: After finishing your scan task, please do remember to click the tab Disconnect for Scanning to release the scanner or MFP.

-28-
Request to Connect When one computer in you LAN Connects for Scanning, it is occupying the scanner or MFP; then if you would like to use it as well, you will have to Request for Connect.
Step 1: Highlight the scanner or MFP you want to share for printing or scanning.
Step 2: Click the tab Request to Connect.

-29-
Step 3: You will be prompted a window that transmits your request. Please wait patiently for the reply.
Step 4: If the other user Accepts your request to connect, please click Close to start your printing or scanning task.

-30-
Other functions/ settings About
Go to TP-Link USB Printer Controller -> About; a window will pop up and display some relevant information about this printer controller.
Configure Server
Highlight the Router and click the tab Configure Server, the login window of the Router will pop up. You need to enter the user name and password (both are admin by default.) to log in the web-based management page of the Router.

-31-
Open at Login
Left-click and hold the icon in the dock for a while, until you can select Option > Open at Login.
With this setting, the TP-LINK USB Printer Controller will run automatically every time you log on your Mac.

-32-
Troubleshooting 1. Where can I find the printer compatibility list?
Go to our website www.tp-link.com, then go to Products ->ADSL, find your product model and go to
Download -> Document -> Printer Compatibility List.

-33-
2. Where can I find the relevant software for installation?
Go to our website www.tp-link.com, then go to Products ->ADSL, find your product model and go to
Download ->Software -> Utility. Then next web page will be loaded, where you can select the USB Printer Controller_Utility and download it.

-34-
3. How to manage the print server on the web-based management page?
The router’s Print Server function is enabled by default. To disable the function, you need to log onto the Web-based management page. See the following instructions (Here takes that in Windows 7 for example):
1) Make sure you have a PC or notebook connected to the router, either via wireless or wired connection.
3) After a moment, a login window will appear. Enter admin (in lower case letters) for both the User Name and Password. Then click the OK button or press the Enter key.
2) Launch the TP-LINK USB Printer Controller, highlight the router and click the tab Configure Server.

-35-
4) Go to Basic→USB Settings→Print Server. Click Stop to disable the function. Click Start to enable the
function.