pro e
DESCRIPTION
VIEW MANAGERTRANSCRIPT

5/16/13 www.sharptechdesign.com/Tutorials/ProE_Fundamentals_WF2/WF2_Lesson36.htm
www.sharptechdesign.com/Tutorials/ProE_Fundamentals_WF2/WF2_Lesson36.htm 1/17
Lesson Objective: In this lesson, we will learn about the View Manager.
2001 EQUIVALENTS
Lesson
36

5/16/13 www.sharptechdesign.com/Tutorials/ProE_Fundamentals_WF2/WF2_Lesson36.htm
www.sharptechdesign.com/Tutorials/ProE_Fundamentals_WF2/WF2_Lesson36.htm 2/17
The View Manager is a single interface used to access the following functionality:· Simplified Reps· Cross-Sections· Exploded States· Component Display
ACCESSING THE VIEW MANAGER
The view manager is accessed through the Menu Bar, using View, View Manager. To demonstratethis functionality, we will use the Assembly1 model that we worked with earlier. Open up this assembly,and then go to the View Manager. It will look like the following.
There are six tabs when you are in assembly mode (only three in part mode). The six tabs are for thefollowing:· Simp Rep – Access simplified representations· Style – Access component displays· Xsec – Access cross-sections· Explode – Access Exploded States· Orient – View the different saved views· All – Create a combination of multiple view states (exploded with cross-section with simplified reps,
etc.) Each of these will be shown in a different section below.
SIMP REP
The first one we will show is the Simplified Representation. A Simplified Representation is used tomanage large assemblies. It allows you to create different “views” of an assembly by adding/removingcomponents. A great example might be in the design of a car. A top-level assembly model of a carwould have tens of thousands of components, and would require a supercomputer to open the entiremodel. In most cases, individual designers and engineers are only tasked to work on specific regions of the car– electrical wiring harness, for example. With Simplified Reps, you can create a representation thatwould only include the wiring harness and any other components necessary to define/redefine theharness.

5/16/13 www.sharptechdesign.com/Tutorials/ProE_Fundamentals_WF2/WF2_Lesson36.htm
www.sharptechdesign.com/Tutorials/ProE_Fundamentals_WF2/WF2_Lesson36.htm 3/17
The user only needs to open the rep to work on the model, and therefore doesn’t need the entire carassembly in session. The really nice thing about simplified reps is that you can eliminate a component that may be a parent orchild of one that you need to keep in your rep, and it will not cause a regeneration failure. If a changeneeds to happen to the child in your rep, then it brings in the necessary parent components just for thatchange.
To demonstrate Simplified Reps, we are going to create two different simplified representations. The firstwill be the fasteners only. The second will be the model with no fasteners. Therefore, click on the Simp Rep tab in the view manager, and you will see the following.
As you can see, there are several built-in representations. Currently, we are looking at the Master Rep,because it has the red arrow next to it. If we wanted to change over to the Graphics Rep, we wouldsimply double-click on it. To create a new rep, click on the New button. The window will look like the following.
Type in NO_FASTENERS in the field provided, as shown in the next figure.

5/16/13 www.sharptechdesign.com/Tutorials/ProE_Fundamentals_WF2/WF2_Lesson36.htm
www.sharptechdesign.com/Tutorials/ProE_Fundamentals_WF2/WF2_Lesson36.htm 4/17
When done, it will become the active rep. Now, we will right-click on this rep and select Redefine. When we do this, it brings up the following window.
Our model tree will also update to look like the following.
If you notice, the default rep state for the assembly is shown as Graphics Rep. This is because we

5/16/13 www.sharptechdesign.com/Tutorials/ProE_Fundamentals_WF2/WF2_Lesson36.htm
www.sharptechdesign.com/Tutorials/ProE_Fundamentals_WF2/WF2_Lesson36.htm 5/17
started this new simplified rep with the graphics rep active. We will make sure the Master Rep option isselected on the Include tab, and then pick on the assembly in the model tree. It will now look like thefollowing.
Now, we want to exclude all of the COMPONENT3 models from our assembly. Therefore, we will clickon the Exclude tab, and then pick on the COMPONENT3 files in the model tree. In the second column,we should see the word “Exclude” next to each one, as shown below.
Now, we will click on the green check mark button to accept this, and our model will now update, asshown in the next figure.
In the working window, we can see which rep is currently active by the following text:
Now we are going to create a second one called FASTENERS_ONLY, and exclude COMPONENT 1 andCOMPONENT 2 from the assembly. All you should see when this one is done is the following.

5/16/13 www.sharptechdesign.com/Tutorials/ProE_Fundamentals_WF2/WF2_Lesson36.htm
www.sharptechdesign.com/Tutorials/ProE_Fundamentals_WF2/WF2_Lesson36.htm 6/17
Double-click on the Master Rep once again, and then close out of the view manager. Save theassembly, but don’t close it yet.
STYLE
The next tab is entitled Style, and is used to create different graphical displays for your assembly. Agood example is the car again. You might want to keep the outer body of the car to show how the wiringgoes through the model. If you were in shaded mode, you wouldn’t be able to see the wiring harnessthrough the body of the car. Therefore, you can create a style where the body of the car is in a no-hidden display, while your harness is shaded. Therefore, in the assembly, we will go to View, View Manager, and when this opens, click on the Styletab, which looks like the following.
We will click on the New button to create a new style, and enter Fasteners_Visible in the name field,as shown in the following figure.

5/16/13 www.sharptechdesign.com/Tutorials/ProE_Fundamentals_WF2/WF2_Lesson36.htm
www.sharptechdesign.com/Tutorials/ProE_Fundamentals_WF2/WF2_Lesson36.htm 7/17
Next, we will right-click on this style and select Redefine. This will bring up the next window.
We want to change the display of Component 1 and 2 to be in No Hidden mode, and put all of thefasteners in shaded mode. Therefore, we will click on the Show tab, and then select the No Hiddenoption, as shown below.

5/16/13 www.sharptechdesign.com/Tutorials/ProE_Fundamentals_WF2/WF2_Lesson36.htm
www.sharptechdesign.com/Tutorials/ProE_Fundamentals_WF2/WF2_Lesson36.htm 8/17
In the model tree, click on Component1 and Component2. The second column should now indicate thisstatus change, as shown in the next figure.
Now, select the Shading option, and pick the four Component3 models in the tree. They now indicatetheir status, as shown in the figure below.
When we click on the green arrow to accept this change, our assembly will update (as long as we arenot in shaded mode).

5/16/13 www.sharptechdesign.com/Tutorials/ProE_Fundamentals_WF2/WF2_Lesson36.htm
www.sharptechdesign.com/Tutorials/ProE_Fundamentals_WF2/WF2_Lesson36.htm 9/17
Double-click on the Master Style and then close out of the view manager. Save the assembly but donot close it.
XSEC
The next tab we will talk about is creating cross-sections. Therefore, go to View, View Manager, andclick on the Xsec tab, which will look like the following figure.
Click on the New button, and enter A for the name, as shown in the next figure.

5/16/13 www.sharptechdesign.com/Tutorials/ProE_Fundamentals_WF2/WF2_Lesson36.htm
www.sharptechdesign.com/Tutorials/ProE_Fundamentals_WF2/WF2_Lesson36.htm 10/17
When you click on the ENTER key, it replaces this interface with the menu manager, as shown in thenext figure.
This is the old interface for selecting options for the cross-section. You can see we have the planar andoffset types, just like we did in 2001. We will click on Done to accept the default options, and then thenext menu shows up.
As we know from 2001, we now have the ability to pick an existing plane or create one on-the-fly. Wewill pick on the XSEC_A_PLANE plane in the model. A brief flash will appear on the model, and thendisappear. In the view manager, highlight the “A” xsec and go to Display, Show X-Hatching, as shown in the nextfigure.

5/16/13 www.sharptechdesign.com/Tutorials/ProE_Fundamentals_WF2/WF2_Lesson36.htm
www.sharptechdesign.com/Tutorials/ProE_Fundamentals_WF2/WF2_Lesson36.htm 11/17
The cross-section will now appear on the model, as shown in the next figure.
If we double-click on the cross-section in the main window to make it active, it will remove the geometryon one side of the cross-section plane, as shown in the next figure.

5/16/13 www.sharptechdesign.com/Tutorials/ProE_Fundamentals_WF2/WF2_Lesson36.htm
www.sharptechdesign.com/Tutorials/ProE_Fundamentals_WF2/WF2_Lesson36.htm 12/17
To flip the side removed, go to Display, Flip. To return back to the full assembly, double-click on the NoCross Section item to make it active. Close out of this section and save the model but do not close it.
EXPLODE
Next, we will talk about Exploded states. Therefore, go to View, View Manager and click on theExplode tab, which will look like the following.
Click on New and enter a name of Main_Explode, as shown in the next figure.
When you redefine this explode state, it will bring up the following menu.
This is the same functionality as 2001, so to edit the explode position, you would click on Position,which brings up the following window.

5/16/13 www.sharptechdesign.com/Tutorials/ProE_Fundamentals_WF2/WF2_Lesson36.htm
www.sharptechdesign.com/Tutorials/ProE_Fundamentals_WF2/WF2_Lesson36.htm 13/17
The most common thing to do in an example like this is to pick on a vertical edge or vertical axis todefine the translation direction, and then move the components until they are in a position you want themin, like the one shown in the next figure.
Click on OK to finish the position definition. Next click on Offset Lines to create any dashed offset linesbetween components to show placement. When you click on this option, another menu appears, andwe will click on Create, as shown in the next figure.

5/16/13 www.sharptechdesign.com/Tutorials/ProE_Fundamentals_WF2/WF2_Lesson36.htm
www.sharptechdesign.com/Tutorials/ProE_Fundamentals_WF2/WF2_Lesson36.htm 14/17
When you are lining up holes and shafts, like we are in this case, the easiest thing to do is use the Axisoption, and then pick on the cylindrical surface of one component and the corresponding surface on theother. Repeat for each screw to the green part, and then from the green part to the brown part, to get thefollowing result.
When done, click on Done/Return from the menus until you get back to the View Manager. Click onClose and then save your model.
ORIENT
When you go to View, View Manager and then click on the Orient tab, you get the following.
5/16/13 www.sharptechdesign.com/Tutorials/ProE_Fundamentals_WF2/WF2_Lesson36.htm
www.sharptechdesign.com/Tutorials/ProE_Fundamentals_WF2/WF2_Lesson36.htm 15/17
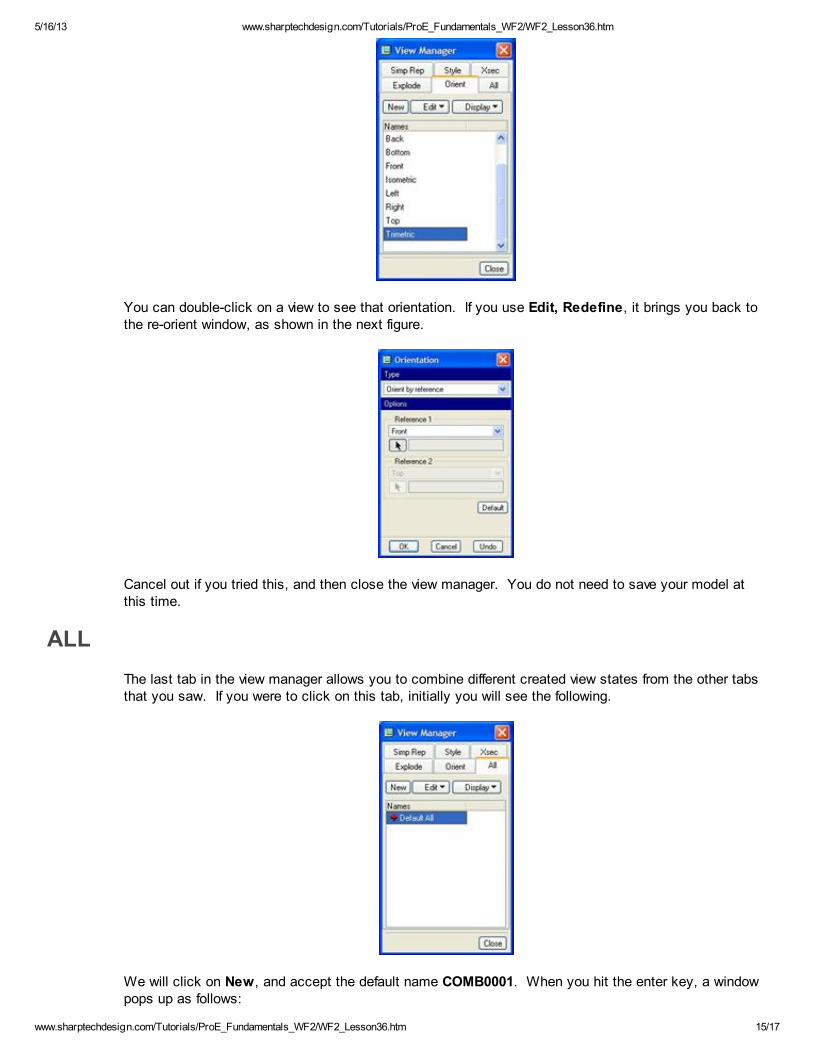
You can double-click on a view to see that orientation. If you use Edit, Redefine, it brings you back tothe re-orient window, as shown in the next figure.
Cancel out if you tried this, and then close the view manager. You do not need to save your model atthis time.
ALL
The last tab in the view manager allows you to combine different created view states from the other tabsthat you saw. If you were to click on this tab, initially you will see the following.
We will click on New, and accept the default name COMB0001. When you hit the enter key, a windowpops up as follows:

5/16/13 www.sharptechdesign.com/Tutorials/ProE_Fundamentals_WF2/WF2_Lesson36.htm
www.sharptechdesign.com/Tutorials/ProE_Fundamentals_WF2/WF2_Lesson36.htm 16/17
You can either reference the existing states so that a change to them will update your combinationstate, or create copies so that your combo state becomes independent. We will pick on the ReferenceOriginals option. Back in the View Manager, redefine this new state, and you will see the following window.
In this window, we will select the different states that we created for each tab. Use the figure above tocreate your COMB0001 state, and when you click on the green check mark, this is what you will see (inNo-Hidden line mode):

5/16/13 www.sharptechdesign.com/Tutorials/ProE_Fundamentals_WF2/WF2_Lesson36.htm
www.sharptechdesign.com/Tutorials/ProE_Fundamentals_WF2/WF2_Lesson36.htm 17/17
LESSON SUMMARY
The view manager combines several functions into a single, consistent interface. You can createexploded views, simplified reps, component displays, cross-sections, saved views, and/or a combinationof these.
EXERCISES
None