procurement services training manual manual.pdfeprocurement (epro) is a module in peoplesoft...
TRANSCRIPT

1
Procurement Services
Training Manual
An Introduction to
eProcurement and GeorgiaFIRST
Marketplace

2
TABLE OF CONTENT
Chapter 1: eProcurement and GeorgiaFIRST Marketplace Overview ....................................... 3
Benefits of ePro and the GeorgiaFIRST Marketplace................................................................................ 3
Types of Roles Involved............................................................................................................................. 4
Process Flow ............................................................................................................................................. 5
How Do Approvals Work? ......................................................................................................................... 6
Chapter 2: Approving and Denying Requisitions ..................................................................... 8
Retrieving Your Worklist ........................................................................................................................... 8
Reviewing Your Worklist ........................................................................................................................... 9
How To: Access your Worklist ............................................................................................................. 16
How To: Approve a Requisition .......................................................................................................... 16
How To: Deny a Requisition ................................................................................................................ 16
Requisition Push Back ……………………………………………………………………………………………………………………… 17
How To: Push Back a Requisition…………………………………………………………………………………………………..20
Chapter 3: Worklist Maintenance......................................................................................... 21
Assigning an Alternate Approver………………………………………………………………………………………………………21
How To: Assign an Alternate Approver……………………………………………………………………………………….22
Ad Hoc Approver……..……………………………………………………………………………………………………………………….. 22
How To: Insert Ad Hoc Approver …………………………………………………………………………………………………..25
3
Chapter 1: eProcurement and GeorgiaFIRST Marketplace
Overview
What are eProcurement and the GeorgiaFIRST Marketplace?
eProcurement (ePro) is a module in PeopleSoft Financials that has a primary function of creating
electronic requisitions and routing them for approval. In this PSFIN module, ePro is used to create
requisitions for goods and services. A requisition is simply an official request to purchase goods and
services.
Currently, we use paper requisitions to request an item to be purchased. The hardcopy requisition is
routed for approval signatures, and then sent to the Purchasing Office. The Purchasing Office keys the
information into the system to create a Purchase Order to send to the supplier.
With ePro, much of this is completely automated. A requisition is created within ePro and then
electronically routed for approval. The approval chain is dependent on the Chartstring charged and item
type, among other things. Finally, after the last electronic approval is made, the requisition can be
copied into, or sourced into an official Purchase Order that is dispatched to a supplier.
The GeorgiaFIRST Marketplace takes the use of ePro to another level. The GeorgiaFIRST Marketplace is
an online shopping site that is accessed from PeopleSoft Financials. Through this online shopping site,
users can shop online for contract items from a variety of state and institution approved suppliers. Users
can select items by placing them in an online shopping cart. They assign these shopping carts to a
designated requester when ready, and the requester then turns their shopping cart into an ePro
requisition.
Benefits of ePro and the GeorgiaFIRST Marketplace
With this new system of online shopping and electronic requisitioning, you will see some immediate
benefits, including:
Reduction in paper forms routing through different offices
Online browsing and shopping for items
Comparison shopping
You only need one login to shop from multiple suppliers
You can request goods from multiple suppliers through one shopping cart
All items in the GeorgiaFIRST Marketplace are contractually approved items
Faster routing for approvals
Ability to save items as ‘favorites’ in the GeorgiaFIRST Marketplace
4
Types of Roles Involved
In order for the ePro and GeorgiaFIRST Marketplace functionality to work properly, users are set up with
specific roles and responsibilities. They include:
Shoppers: These users are the ones who select items in the GeorgiaFIRST Marketplace and place
them into shopping carts to be assigned to their Requester.
Requesters: These users take the shopping carts created by Shoppers and turn them into ePro
Requisitions. Requesters can also build their own shopping carts, just like Shoppers.
Approvers: These users are set up to approve ePro Requisitions.
Buyers: These users are responsible for ensuring approved requisitions are sourced into a
Purchase Order and dispatched to the supplier.
AP Personnel: The AP office processes the resulting invoice from the supplier.
ePro Administrator: This user monitors the approval workflow, to make sure requisitions are
worked in a timely fashion
Local Security Administrator: This user is responsible for setting up all users in their appropriate
roles.
As a Requester, you are primarily responsible for creating ePro requisitions from shopping carts created
in the GeorgiaFIRST Marketplace either created by you or by Shoppers to whom you are assigned. In
addition, you are responsible for creating Special Requisitions, which are requisitions containing non-
contract/non-catalog items and therefore, not initiated from a GeorgiaFIRST Marketplace shopping cart.
Finally, you may be responsible for receiving items in the ePro system so that supplier invoices resulting
from ePro requisitions can be paid.

5
Process Flow
Now that you know all of the roles involved, below is the process flow beginning with Shoppers and
ending with the Accounts Payable office.
How does PSFIN pass along user information to GeorgiaFIRST Marketplace?
In order for you to begin using the GeorgiaFIRST Marketplace, your local security administrator first sets
you up in the PeopleSoft Financials system, with the correct roles and authorizations. By using your
PeopleSoft User ID and Password, you can access the PeopleSoft system. Once in PeopleSoft, you simply
proceed to the GeorgiaFIRST Marketplace through a hyperlink.
Shoppers use the
GeorgiaFIRST Marketplace
to select goods they
request to have purchased
Shoppers assign their
completed shopping carts
to their assigned
Requester
The Requester is notified
by email of this newly
assigned cart
The Requester logs into
the system and pulls the
Shopper’s cart into a
Requisition
The Requester finishes the
requisition and submits it
for approval
The Approvers either
approve or deny the
requisition lines
Once fully approved, the
PeopleSoft Financials system
automatically budget checks
the requisition
Once the requisition has a valid budget check
status, the PeopleSoft Financials system
automatically sources the requisition into a
purchase order and dispatches it to the supplier
The supplier fulfills the
order and sends the item
and invoice to the
Institution
The institution receives
the item
The AP Office pays the
invoice
6
By logging in through PeopleSoft, the system sends specific user information to the GeorgiaFIRST
Marketplace, allowing you to log in only once and shop from multiple suppliers. In addition, your
PeopleSoft User ID is used to store a set of default Chartfields that will be charged for your requested
goods, unless otherwise specified.
How Do Approvals Work?
As mentioned earlier, once the Requester builds the requisition in ePro from a GeorgiaFIRST
Marketplace shopping cart, the Requester submits it for approval. In ePro, approvals are completed
through Workflow. The ePro module looks at certain values in the requisition and automatically routes it
to all necessary approvers.
Once your requested items have been placed on a requisition and are routed for approvals, there are
time limits in place in which each approver act on the requisition. This ensures that your requisition does
not sit around waiting for a required approver for an indefinite amount of time.
When a requisition is submitted for approval, the system routes it to the appropriate approvers’
Worklists accordingly, within PeopleSoft Financials. The Worklist is a queue which holds items waiting
for approval. Once an approver works a transaction, it is removed from their Worklist.
Once the requisition hits an Approver’s Worklist, that approver has 5 days to either approve or deny it,
before they get a reminder notification from the system. If the requisition sits in an Approver’s Worklist
for 7 days without being approved or denied, the system removes the requisition from that Approver’s
Worklist, the transaction is escalated, and the ePro Administrator reassigns the transaction to another
approver. After the Approver has approved the requisition, the system automatically moves it onto the
next required Approver’s Worklist. If an Approver denies a requisition, the system returns it to the
Requester. Denied requisition lines can be edited and resubmitted for approval, or canceled if
necessary.
Approval routings are based on the individual lines in a requisition. Below is a quick summary of how
approvals flow for requisitions originating from the GeorgiaFIRST Marketplace:
First, all requisitions are routed to a Department Manager for approval. The correct Department
Manager is determined by the Department Chartfield used on the requisition line.
If a Project or Grant is indicated on the requisition line also, then the line is routed to the
assigned Project Manager for approval as well.
7
The following approval steps are customizable by institution. Therefore, not all of these steps
will apply to your requisition line.
o Agency Fund Approval: If an agency fund is entered on a requisition line, the line will be
routed to the approver responsible for approving agency fund transactions.
o Amount Approval: If a requisition line is over a certain amount (i.e., $10,000 or greater),
it will be routed to a special approver responsible for approving these high-amount
lines. This is specified by each institution.
o Item Type Approvals: These approvals are determined by the type of item being
requested through the requisition line account number, NIGP code, or both. The special
item types include:
Assets
Audio Visual Equipment
IT Hardware and Software
For Special Requisitions (created for non-catalog/non-contract items not in the GeorgiaFIRST
Marketplace), the approval chain can be slightly different. All requisitions are still routed to a
Department Manager and Project Manager (if a project is indicated on the requisition line).
If an approver will be out of the office for an extended period of time and will be unable to work the
requisitions in their Worklist, they have the ability to assign an alternate to serve in their place. This way,
their Worklist does not build up while they are out of the office, and requisition approval is not delayed.
8
Chapter 2: Approving and Denying Requisitions
In this lesson, we will walk you through the details of how to approve or deny a requisition line assigned
to you.
Let’s log into PeopleSoft FPlay :
https://fplay.gafirst.usg.edu/psp/fplay/?&cmd=login&errorCode=105&languageCd=ENG
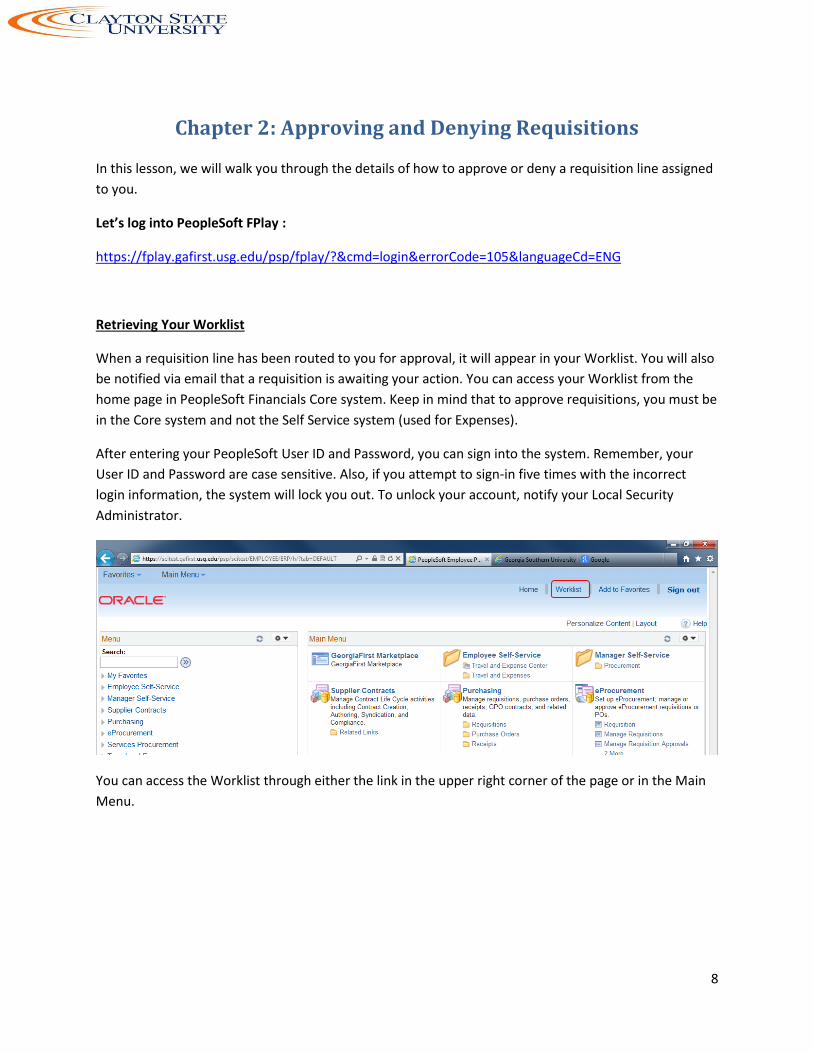
Retrieving Your Worklist
When a requisition line has been routed to you for approval, it will appear in your Worklist. You will also
be notified via email that a requisition is awaiting your action. You can access your Worklist from the
home page in PeopleSoft Financials Core system. Keep in mind that to approve requisitions, you must be
in the Core system and not the Self Service system (used for Expenses).
After entering your PeopleSoft User ID and Password, you can sign into the system. Remember, your
User ID and Password are case sensitive. Also, if you attempt to sign-in five times with the incorrect
login information, the system will lock you out. To unlock your account, notify your Local Security
Administrator.
You can access the Worklist through either the link in the upper right corner of the page or in the Main
Menu.
9
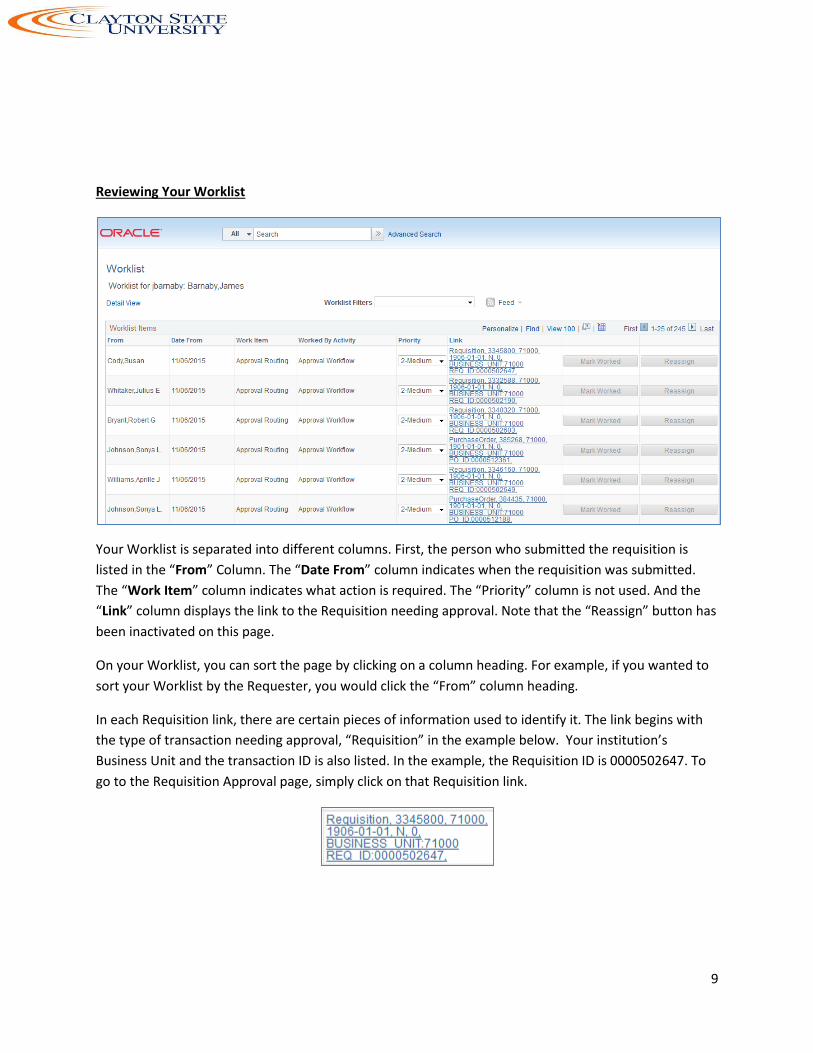
Reviewing Your Worklist
Your Worklist is separated into different columns. First, the person who submitted the requisition is
listed in the “From” Column. The “Date From” column indicates when the requisition was submitted.
The “Work Item” column indicates what action is required. The “Priority” column is not used. And the
“Link” column displays the link to the Requisition needing approval. Note that the “Reassign” button has
been inactivated on this page.
On your Worklist, you can sort the page by clicking on a column heading. For example, if you wanted to
sort your Worklist by the Requester, you would click the “From” column heading.
In each Requisition link, there are certain pieces of information used to identify it. The link begins with
the type of transaction needing approval, “Requisition” in the example below. Your institution’s
Business Unit and the transaction ID is also listed. In the example, the Requisition ID is 0000502647. To
go to the Requisition Approval page, simply click on that Requisition link.
10
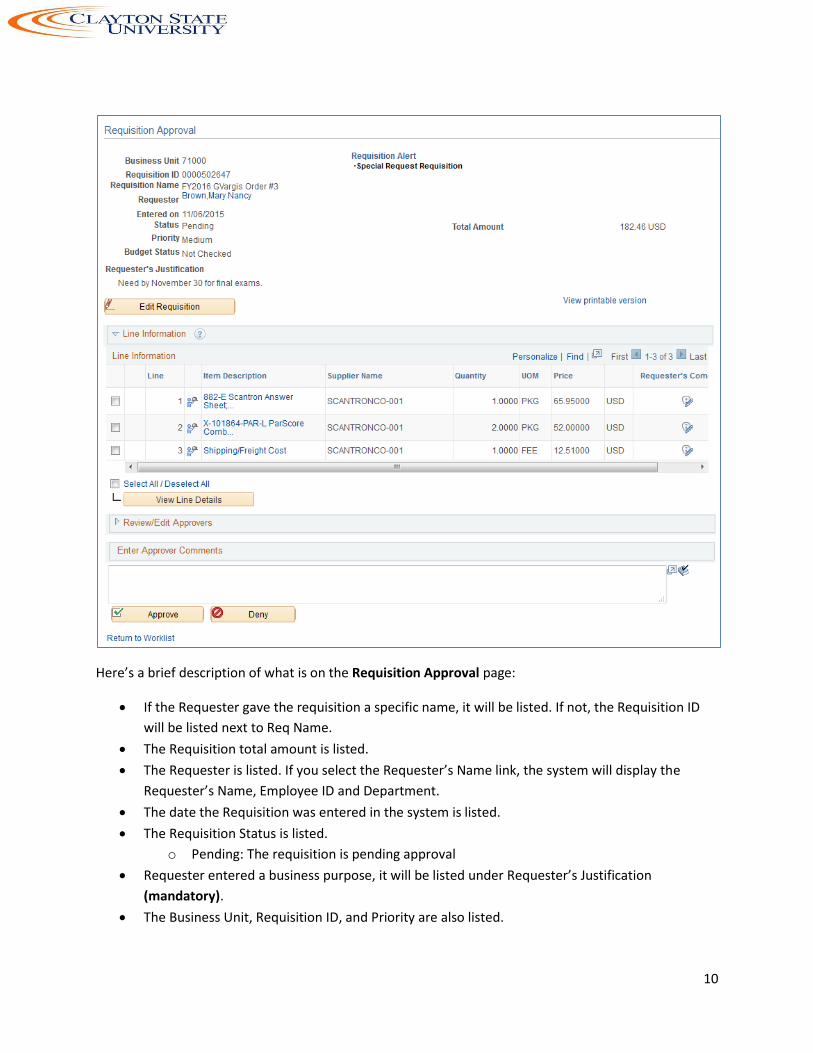
Here’s a brief description of what is on the Requisition Approval page:
If the Requester gave the requisition a specific name, it will be listed. If not, the Requisition ID
will be listed next to Req Name.
The Requisition total amount is listed.
The Requester is listed. If you select the Requester’s Name link, the system will display the
Requester’s Name, Employee ID and Department.
The date the Requisition was entered in the system is listed.
The Requisition Status is listed.
o Pending: The requisition is pending approval
Requester entered a business purpose, it will be listed under Requester’s Justification
(mandatory).
The Business Unit, Requisition ID, and Priority are also listed.
11
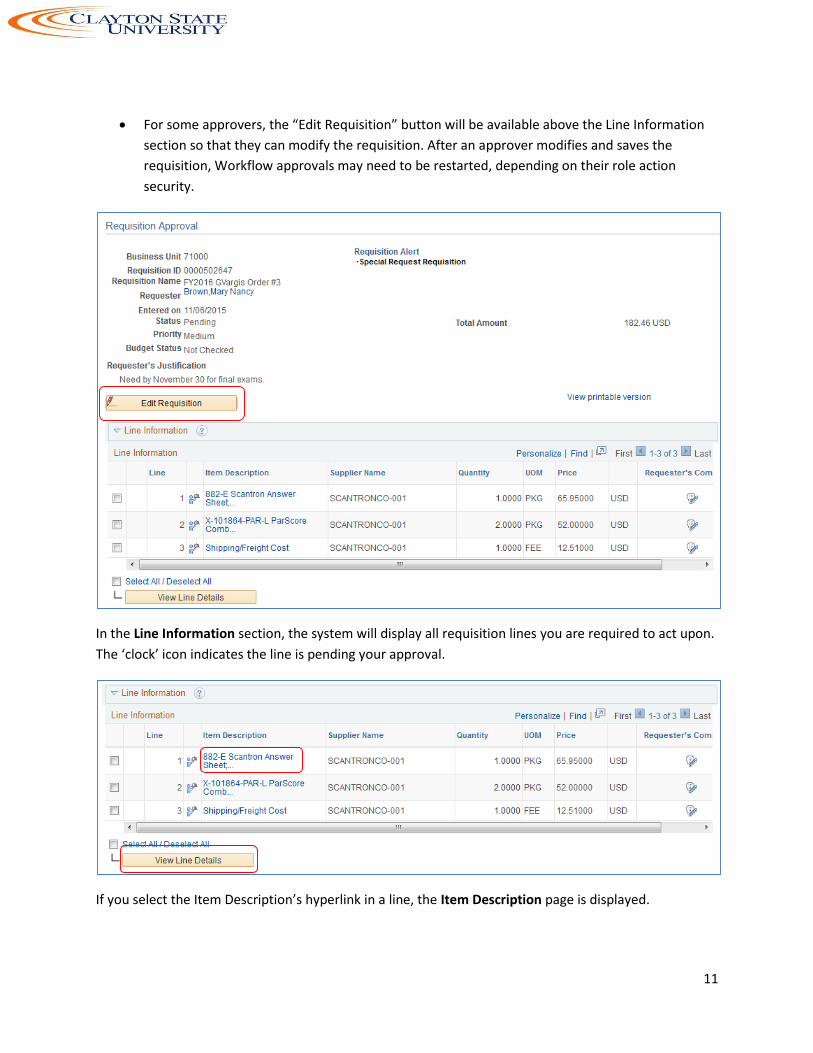
For some approvers, the “Edit Requisition” button will be available above the Line Information
section so that they can modify the requisition. After an approver modifies and saves the
requisition, Workflow approvals may need to be restarted, depending on their role action
security.
In the Line Information section, the system will display all requisition lines you are required to act upon.
The ‘clock’ icon indicates the line is pending your approval.
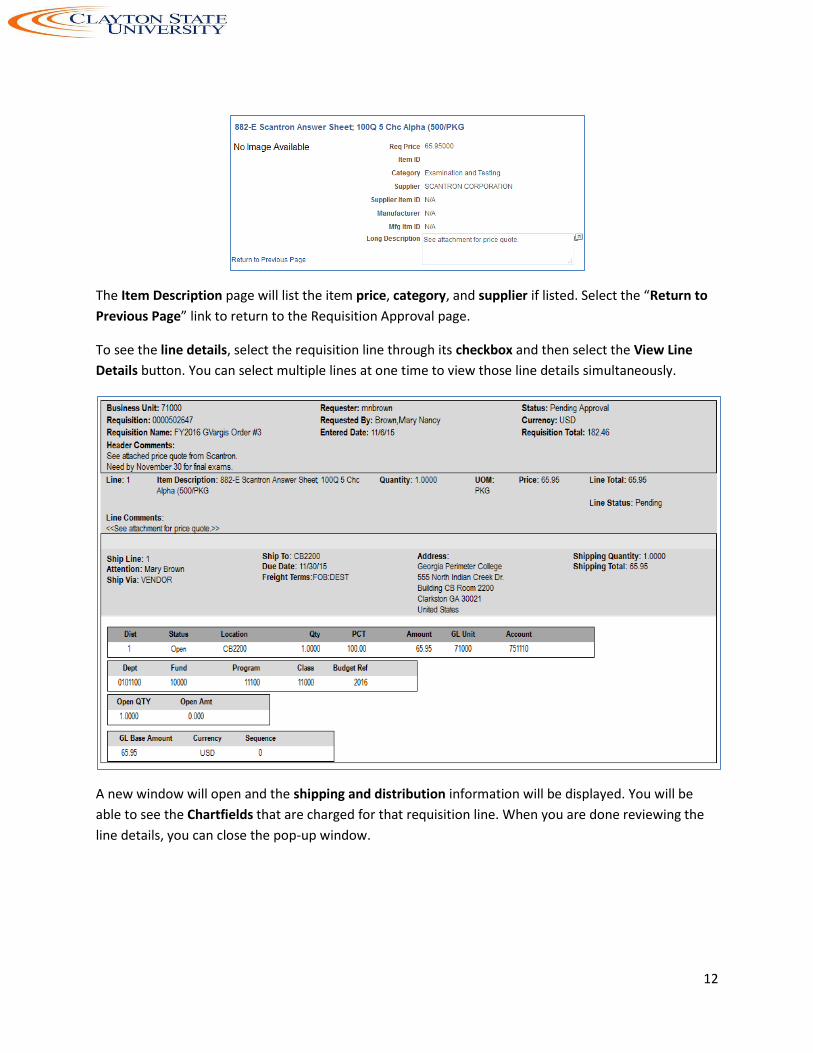
If you select the Item Description’s hyperlink in a line, the Item Description page is displayed.
12
The Item Description page will list the item price, category, and supplier if listed. Select the “Return to
Previous Page” link to return to the Requisition Approval page.
To see the line details, select the requisition line through its checkbox and then select the View Line
Details button. You can select multiple lines at one time to view those line details simultaneously.
A new window will open and the shipping and distribution information will be displayed. You will be
able to see the Chartfields that are charged for that requisition line. When you are done reviewing the
line details, you can close the pop-up window.

13
The “Requester’s Comments” call-out icon appears for those lines that have line comments or
attachments. To review these comments, you can select the call-out icon.
Here, you can review the line comments and attachments. To return to the line information, select the
“Return to Previous Page” link.
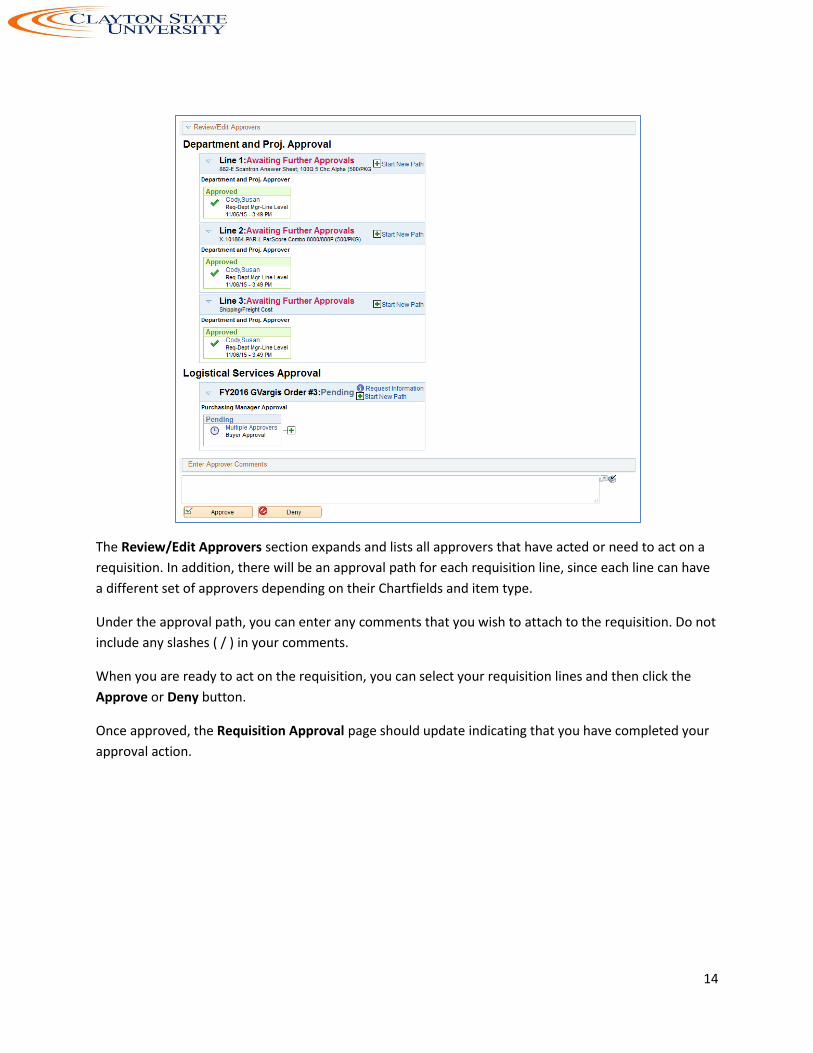
To see the approval path for a requisition, select the “expand” icon next to Review/Edit Approvers.
14
The Review/Edit Approvers section expands and lists all approvers that have acted or need to act on a
requisition. In addition, there will be an approval path for each requisition line, since each line can have
a different set of approvers depending on their Chartfields and item type.
Under the approval path, you can enter any comments that you wish to attach to the requisition. Do not
include any slashes ( / ) in your comments.
When you are ready to act on the requisition, you can select your requisition lines and then click the
Approve or Deny button.
Once approved, the Requisition Approval page should update indicating that you have completed your
approval action.
15
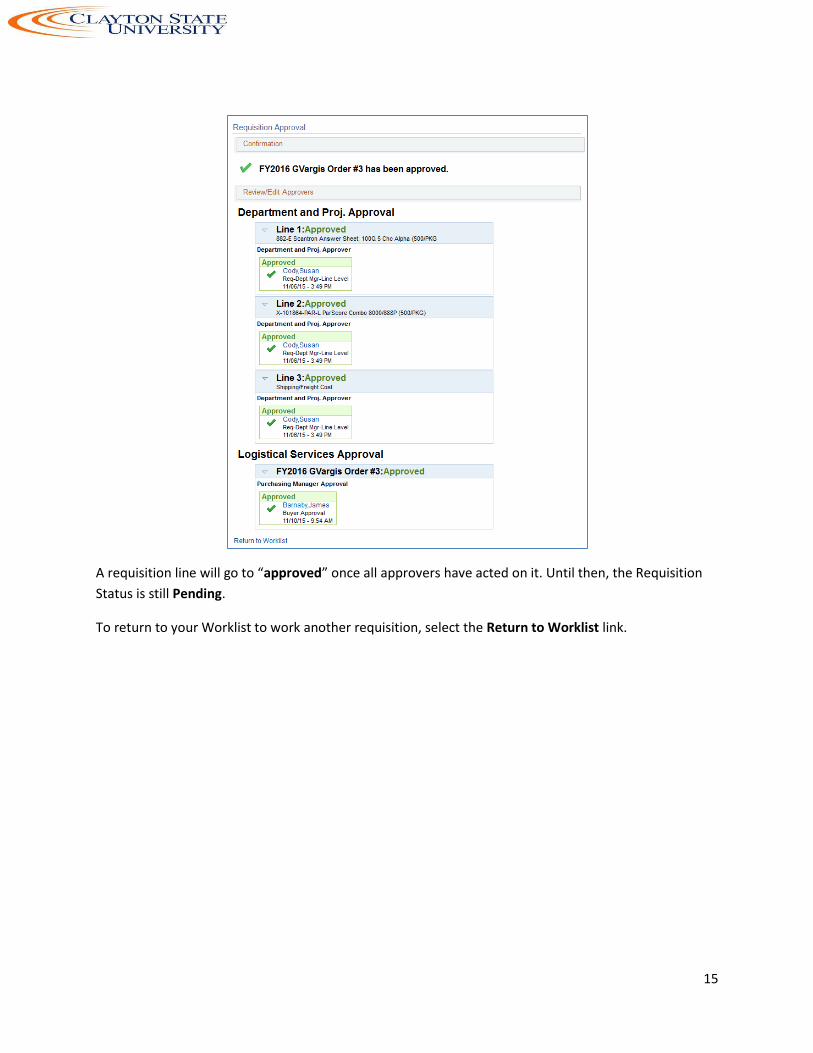
A requisition line will go to “approved” once all approvers have acted on it. Until then, the Requisition
Status is still Pending.
To return to your Worklist to work another requisition, select the Return to Worklist link.
16
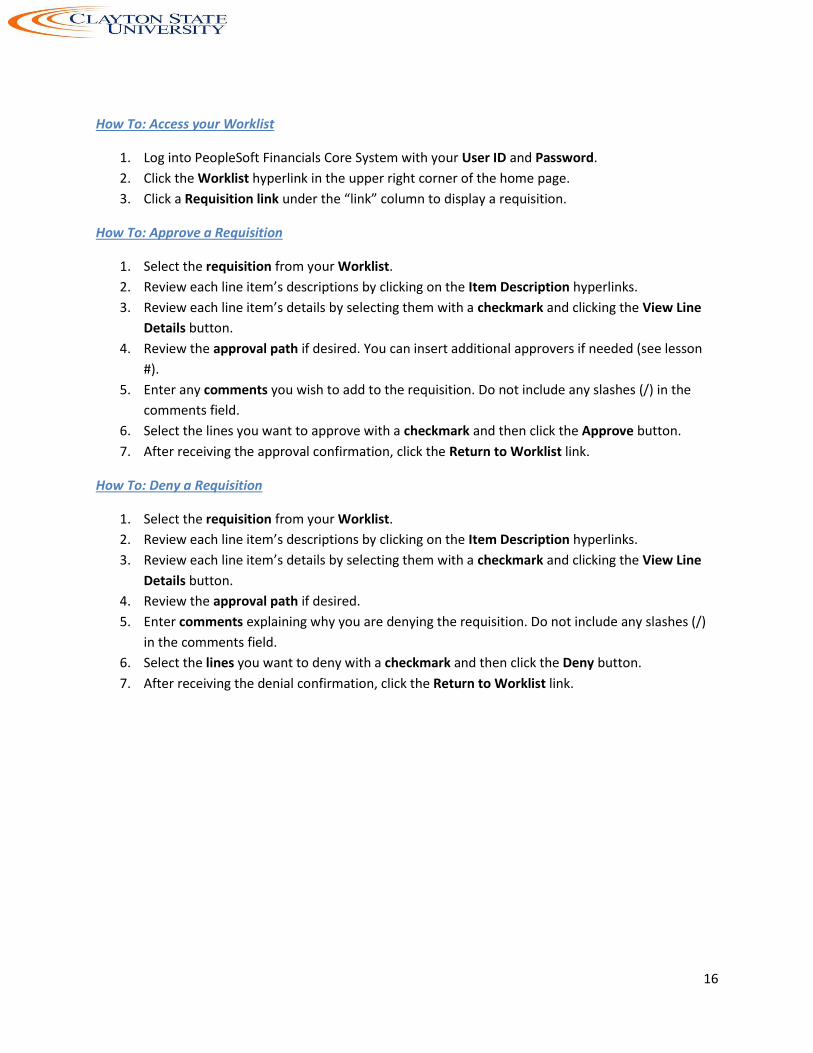
How To: Access your Worklist
1. Log into PeopleSoft Financials Core System with your User ID and Password.
2. Click the Worklist hyperlink in the upper right corner of the home page.
3. Click a Requisition link under the “link” column to display a requisition.
How To: Approve a Requisition
1. Select the requisition from your Worklist.
2. Review each line item’s descriptions by clicking on the Item Description hyperlinks.
3. Review each line item’s details by selecting them with a checkmark and clicking the View Line
Details button.
4. Review the approval path if desired. You can insert additional approvers if needed (see lesson
#).
5. Enter any comments you wish to add to the requisition. Do not include any slashes (/) in the
comments field.
6. Select the lines you want to approve with a checkmark and then click the Approve button.
7. After receiving the approval confirmation, click the Return to Worklist link.
How To: Deny a Requisition
1. Select the requisition from your Worklist.
2. Review each line item’s descriptions by clicking on the Item Description hyperlinks.
3. Review each line item’s details by selecting them with a checkmark and clicking the View Line
Details button.
4. Review the approval path if desired.
5. Enter comments explaining why you are denying the requisition. Do not include any slashes (/)
in the comments field.
6. Select the lines you want to deny with a checkmark and then click the Deny button.
7. After receiving the denial confirmation, click the Return to Worklist link.
17
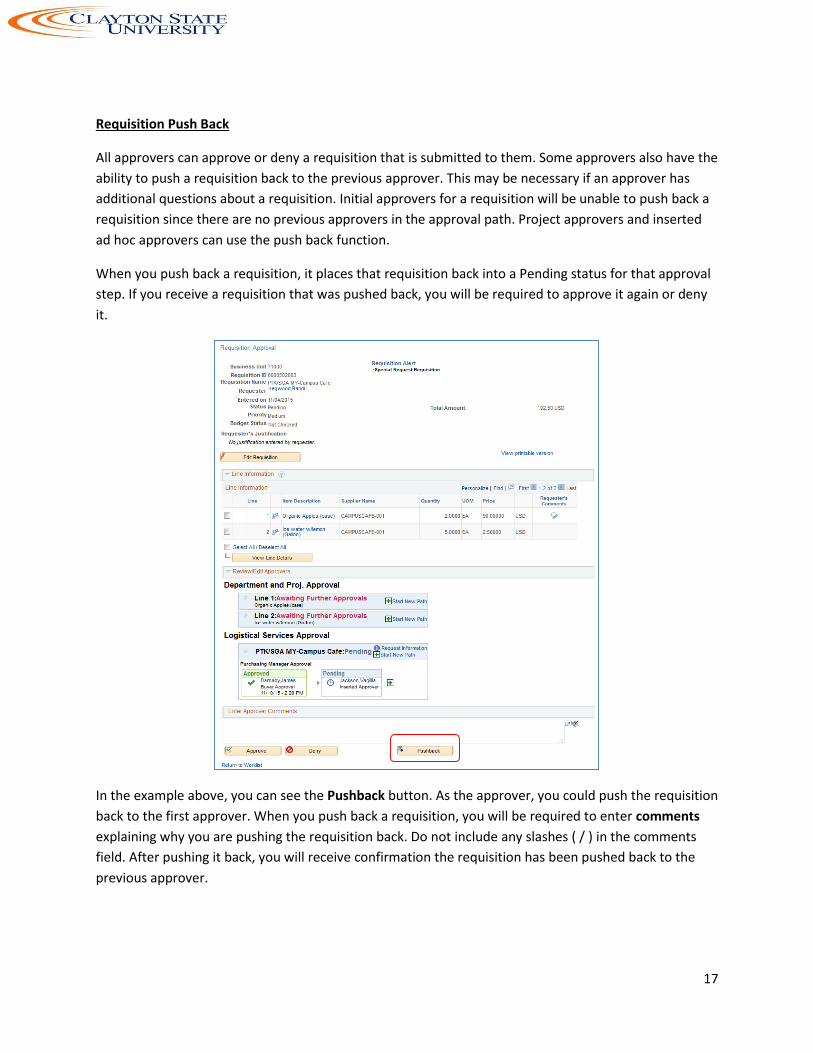
Requisition Push Back
All approvers can approve or deny a requisition that is submitted to them. Some approvers also have the
ability to push a requisition back to the previous approver. This may be necessary if an approver has
additional questions about a requisition. Initial approvers for a requisition will be unable to push back a
requisition since there are no previous approvers in the approval path. Project approvers and inserted
ad hoc approvers can use the push back function.
When you push back a requisition, it places that requisition back into a Pending status for that approval
step. If you receive a requisition that was pushed back, you will be required to approve it again or deny
it.
In the example above, you can see the Pushback button. As the approver, you could push the requisition
back to the first approver. When you push back a requisition, you will be required to enter comments
explaining why you are pushing the requisition back. Do not include any slashes ( / ) in the comments
field. After pushing it back, you will receive confirmation the requisition has been pushed back to the
previous approver.
18
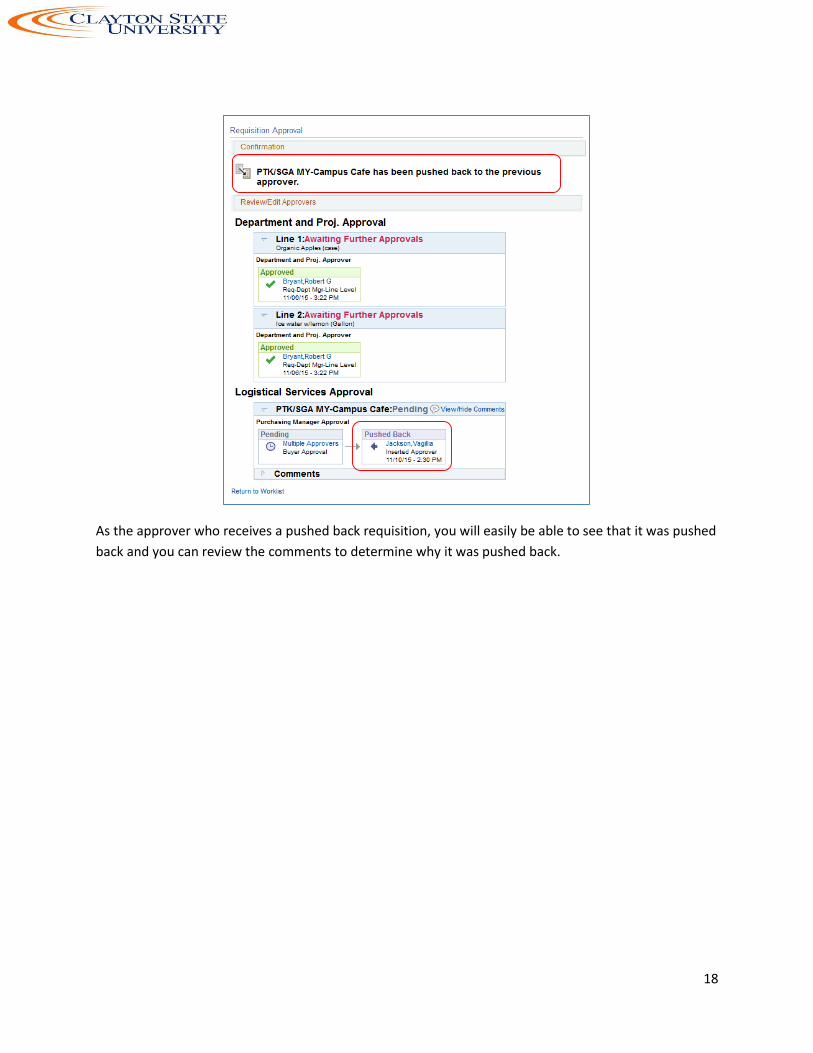
As the approver who receives a pushed back requisition, you will easily be able to see that it was pushed
back and you can review the comments to determine why it was pushed back.
19
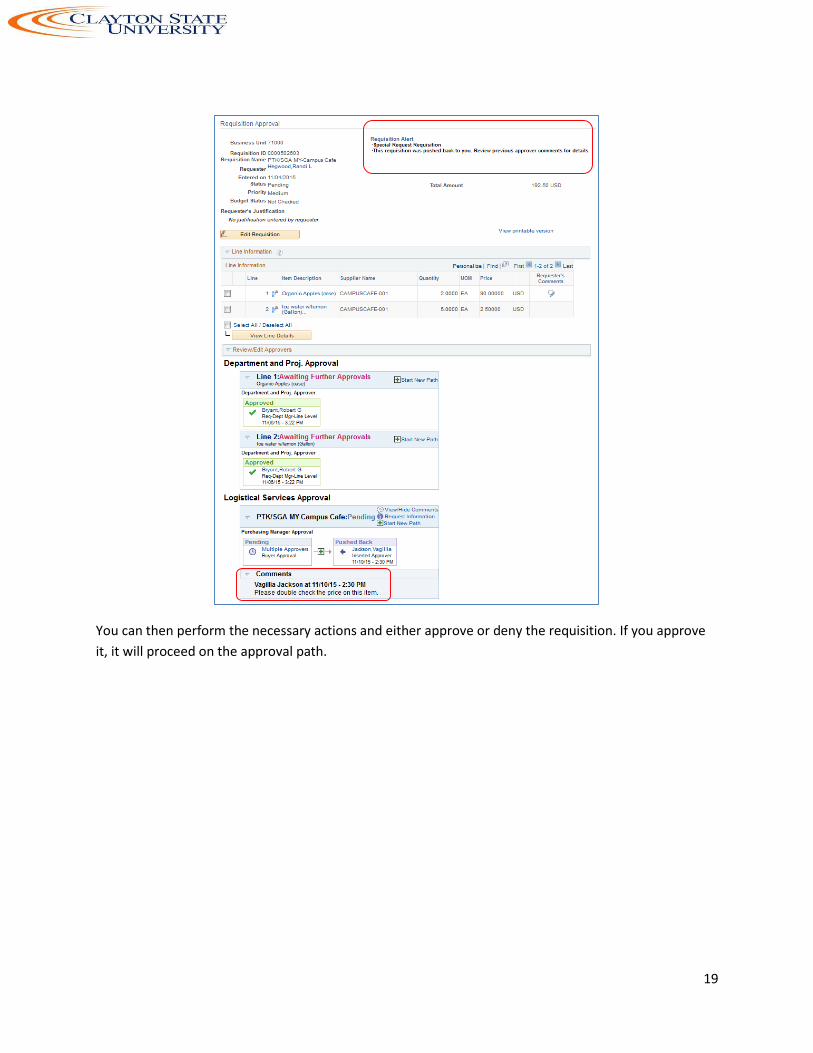
You can then perform the necessary actions and either approve or deny the requisition. If you approve
it, it will proceed on the approval path.
20
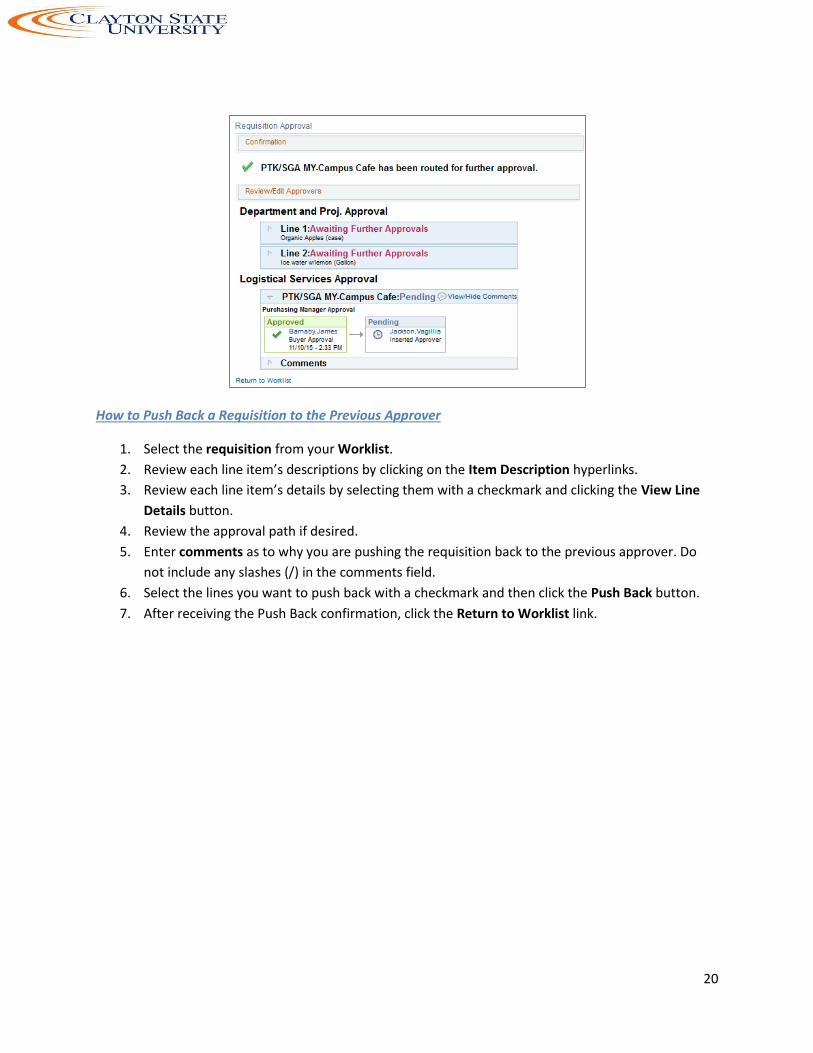
How to Push Back a Requisition to the Previous Approver
1. Select the requisition from your Worklist.
2. Review each line item’s descriptions by clicking on the Item Description hyperlinks.
3. Review each line item’s details by selecting them with a checkmark and clicking the View Line
Details button.
4. Review the approval path if desired.
5. Enter comments as to why you are pushing the requisition back to the previous approver. Do
not include any slashes (/) in the comments field.
6. Select the lines you want to push back with a checkmark and then click the Push Back button.
7. After receiving the Push Back confirmation, click the Return to Worklist link.
21
Chapter 4: Worklist Maintenance
As a requisition approver, you are responsible for approving the purchase of items. If you are unable to
perform this task due to the fact you may be out of the office on leave or out of town, you can assign an
alternate approver while you are away.
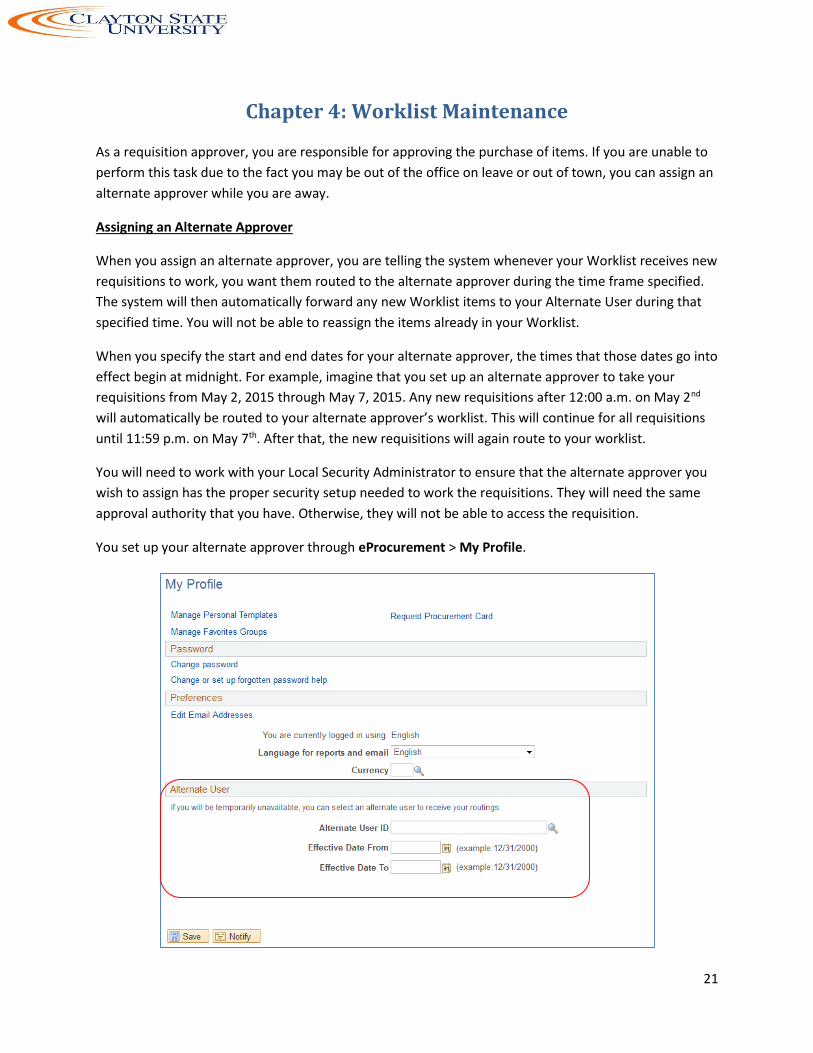
Assigning an Alternate Approver
When you assign an alternate approver, you are telling the system whenever your Worklist receives new
requisitions to work, you want them routed to the alternate approver during the time frame specified.
The system will then automatically forward any new Worklist items to your Alternate User during that
specified time. You will not be able to reassign the items already in your Worklist.
When you specify the start and end dates for your alternate approver, the times that those dates go into
effect begin at midnight. For example, imagine that you set up an alternate approver to take your
requisitions from May 2, 2015 through May 7, 2015. Any new requisitions after 12:00 a.m. on May 2nd
will automatically be routed to your alternate approver’s worklist. This will continue for all requisitions
until 11:59 p.m. on May 7th. After that, the new requisitions will again route to your worklist.
You will need to work with your Local Security Administrator to ensure that the alternate approver you
wish to assign has the proper security setup needed to work the requisitions. They will need the same
approval authority that you have. Otherwise, they will not be able to access the requisition.
You set up your alternate approver through eProcurement > My Profile.
22
How To: Assign an Alternate Approver
1. In PeopleSoft Financials Core System, select eProcurement in the menu.
2. Select My Profile.
3. Select the Alternate User ID look up icon.
4. Search for your alternate user by either User ID or name (Description).
5. Select your alternate user by clicking on their User ID.
6. Enter the Effective Date From.
7. Enter the Effective Date To.
8. Click the Save button.
Ad Hoc Approvers
eProcurement gives you the ability to insert additional approvers if you feel it is necessary. After
reviewing a requisition’s approval path, you can insert additional approvers if you have the
BOR_AD_HOC_APPROVE security role.
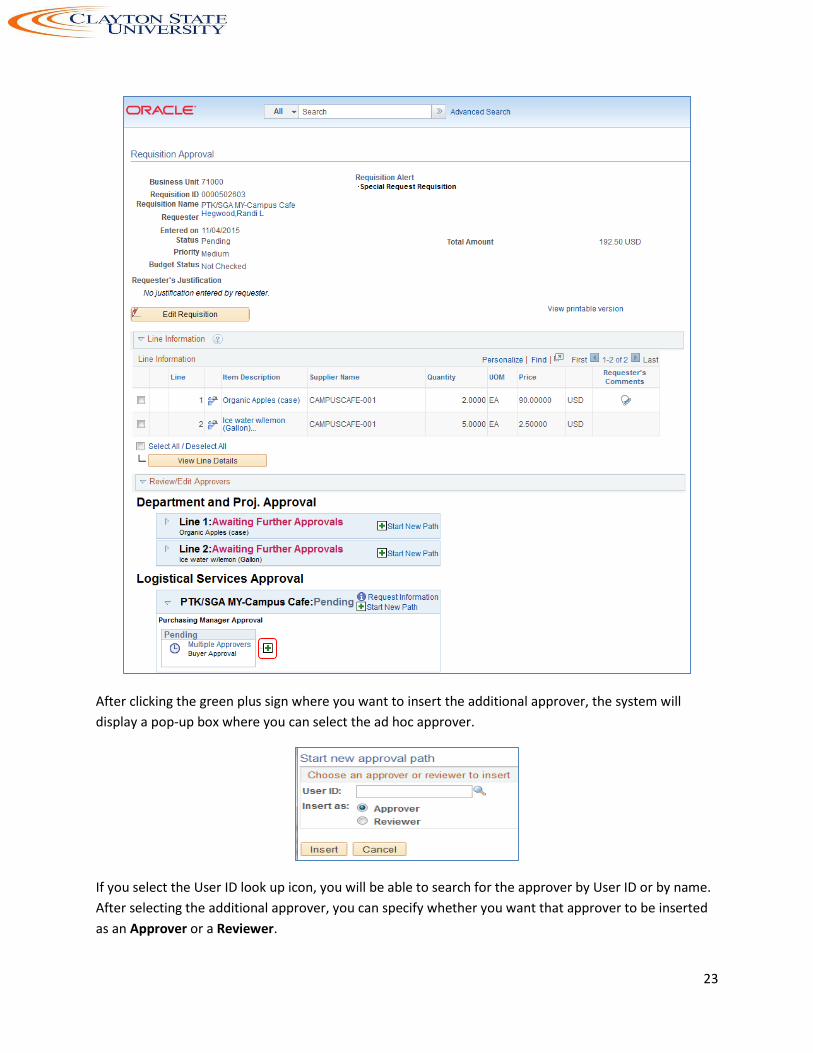
While you are reviewing the approval path for a requisition, you can insert the ad hoc approver
wherever you see a green plus sign (+).
23
After clicking the green plus sign where you want to insert the additional approver, the system will
display a pop-up box where you can select the ad hoc approver.
If you select the User ID look up icon, you will be able to search for the approver by User ID or by name.
After selecting the additional approver, you can specify whether you want that approver to be inserted
as an Approver or a Reviewer.
24
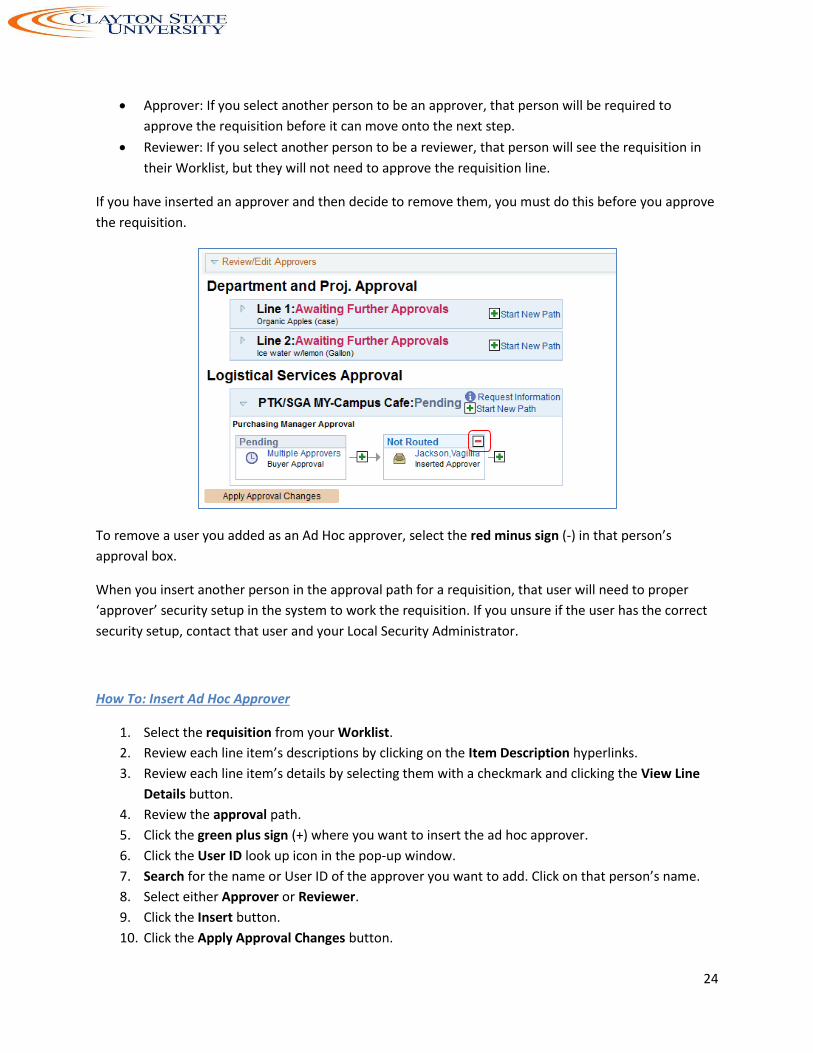
Approver: If you select another person to be an approver, that person will be required to
approve the requisition before it can move onto the next step.
Reviewer: If you select another person to be a reviewer, that person will see the requisition in
their Worklist, but they will not need to approve the requisition line.
If you have inserted an approver and then decide to remove them, you must do this before you approve
the requisition.
To remove a user you added as an Ad Hoc approver, select the red minus sign (-) in that person’s
approval box.
When you insert another person in the approval path for a requisition, that user will need to proper
‘approver’ security setup in the system to work the requisition. If you unsure if the user has the correct
security setup, contact that user and your Local Security Administrator.
How To: Insert Ad Hoc Approver
1. Select the requisition from your Worklist.
2. Review each line item’s descriptions by clicking on the Item Description hyperlinks.
3. Review each line item’s details by selecting them with a checkmark and clicking the View Line
Details button.
4. Review the approval path.
5. Click the green plus sign (+) where you want to insert the ad hoc approver.
6. Click the User ID look up icon in the pop-up window.
7. Search for the name or User ID of the approver you want to add. Click on that person’s name.
8. Select either Approver or Reviewer.
9. Click the Insert button.
10. Click the Apply Approval Changes button.

25
11. Enter any comments you wish to add to the requisition. Do not include any slashes (/) in the
comments field.
12. Select the lines you want to approve with a checkmark and then click the Approve button.
13. After receiving the approval confirmation, click the Return to Worklist link.

26