proda step by step guide - clean
TRANSCRIPT

ndis.gov.au | April 2020 | PRODA Step-by-Step Guide 1
PRODA Step-by-Step Guide
for Registered Providers
April 2020

ndis.gov.au | April 2020 | PRODA Step-by-Step Guide 2
Table of Contents Changes from the last version .................................................................................... 3
Introduction ................................................................................................................ 4
How to access PRODA .............................................................................................. 5
Create PRODA Account ............................................................................................. 6
1. Create Account ................................................................................................... 7
1.1 Enter your personal details:........................................................................... 7
1.2 Create your login details ............................................................................... 9
1.3 Set your security details .............................................................................. 10
1.4 Set your email address ............................................................................... 11
1.5 Verify your email address ............................................................................ 12
2. Verify your documents ...................................................................................... 15
3. Matching existing services ................................................................................ 28
Other PRODA portal functions ................................................................................. 30

ndis.gov.au | April 2020 | PRODA Step-by-Step Guide 3
Changes from the last version The following updates have been made to the last published version of this guide:
The introduction has been revised to reflect current registration processes
Department of Human Services has been changed to Services Australia.

ndis.gov.au | April 2020 | PRODA Step-by-Step Guide 4
Introduction Provider Digital Access (PRODA) provides secure access to online government services, including the NDIS myplace provider portal. To gain access to the myplace provider portal, you first have to login using a PRODA account.
This step by step guide provides instruction in how to complete the three - step PRODA registration online verification process:
1. Create your account - Provide basic personal information, create a username and password, and provide contact information for the secure management of your account.
2. Verify your identity – Verify your identity by providing key information from Government issued identity documents. Your identity will be verified online and in real-time using the Government’s Document Verification Service (DVS).
3. Match Existing Services - Select the PRODA service and link it to your PRODA account. Once you have created your account and verified your identity you will be able to select your service. You need to select a service, which is relevant to the online service you are wanting to access through PRODA. In this case, it is NDIS for providers.
If you have any questions or if you need help with PRODA:
Call the NDIA Contact Centre on 1800 800 110
Send an email to [email protected] or
Go to website Services Australia - PRODA
Create an accountVerify identity
documents - User Authentication
Match existing Services -
(Access to myplaceProvider Portal)
ndis.gov.au | April 2020 | PRODA Step-by-Step Guide 5
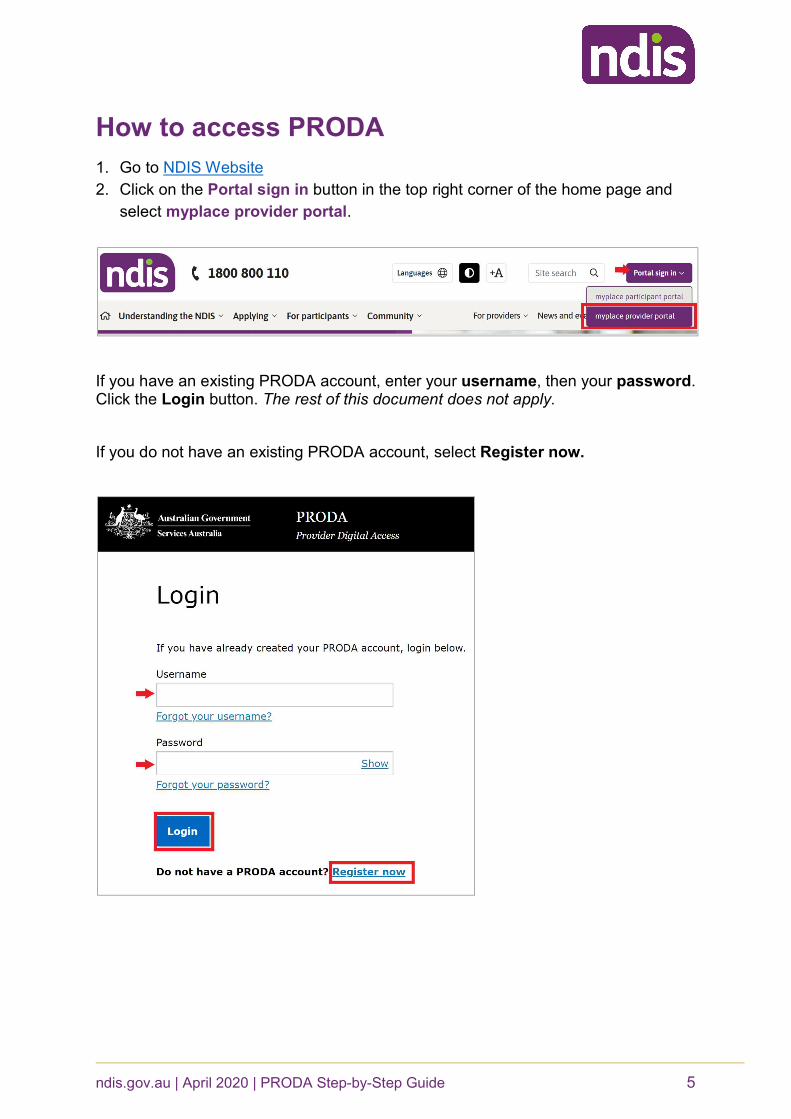
How to access PRODA 1. Go to NDIS Website 2. Click on the Portal sign in button in the top right corner of the home page and
select myplace provider portal.
If you have an existing PRODA account, enter your username, then your password. Click the Login button. The rest of this document does not apply.
If you do not have an existing PRODA account, select Register now.

ndis.gov.au | April 2020 | PRODA Step-by-Step Guide 6
Create PRODA Account The PRODA registration process involves the following three steps.
1. Create Account 2. Verify Documents 3. Match Existing Services
Before you start, you can review the list of verification documents and terms and conditions by clicking on the relevant hyperlinks. You may also want to check your right to privacy on this page before proceeding.
Once you are ready you can click Register now button at the bottom of the page to begin the registration process.

ndis.gov.au | April 2020 | PRODA Step-by-Step Guide 7
1. Create Account
1.1 Enter your personal details:
1. Select your title from the dropdown list (optional) 2. Enter your first name. 3. Enter any additional names. This is required if that name appears on any of your
identity documents. 4. Enter your surname. 5. Select your gender from the dropdown list 6. Enter your date of birth in dd/mm/yyyy format
Please Note: Enter your legal name(s) as they appear on your identity documents. For example, your friends call you Chris and your birth certificate names you as Christopher. The correct name to enter in this section is Christopher.
The personal details you provide at this step need to match with the contact details you will need to provide later when you link your PRODA account to the NDIS myplace provider portal.
Complete your details and click the Next.

ndis.gov.au | April 2020 | PRODA Step-by-Step Guide 8
If you leave the ‘Additional names’ field empty you are prompted to confirm the same as in the below screen. 1. If you select Yes, you will be left on the same page to enter the additional name
details. 2. If you select No, you will be taken to the next page to create your log in details.

ndis.gov.au | April 2020 | PRODA Step-by-Step Guide 9
1.2 Create your login details
1. Enter a Username
2. Enter a Password which must have:
At least 10 characters in length At least 1 uppercase letter At least 1 lowercase letter At least 1 number or special character.
3. Re-enter the password to confirm it.
4. Click Next

ndis.gov.au | April 2020 | PRODA Step-by-Step Guide 10
1.3 Set your security details
1. Select security question 1 from the dropdown list. 2. Enter the answer to security question 3. Select security question 2 from the dropdown list. 4. Enter the answer to security question 5. Select security question 3 from the dropdown list. 6. Enter the answer to security question 7. Click Next.

ndis.gov.au | April 2020 | PRODA Step-by-Step Guide 11
1.4 Set your email address
1. Add your email address 2. Confirm your email address 3. Click Next.

ndis.gov.au | April 2020 | PRODA Step-by-Step Guide 12
1.5 Verify your email address
A code will be sent to the email address you entered above to verify your email address as shown below.
Enter the verification code included in that email.
Click on the Next.
Please Note: If you do not receive your code, click on the “Didn’t receive your code?” link then, click on Resend Code.

ndis.gov.au | April 2020 | PRODA Step-by-Step Guide 13
Once your email has been successfully verified, the PRODA account creation is complete and you will receive a confirmation email, it will look like the one below.
From: [email protected] Date: 5 October 2018 at 10:56:40 am AEST To: [email protected] Subject: PRODA Account Created [SEC=UNCLASSIFIED]
This is an automated email. Please do not reply to this email address. Dear Mr/Mrs. User, You have successfully created a Provider Digital Access (PRODA) account. Your username is brisbane01. Your RA number is 4615912822. Please retain this number as you may need it for future reference. To manage your account you can login at any time. If you have any issues with your account, NDIS providers please call 1800 800 110, other services please call 1800 700 199 (option 1). For more information about PRODA, visit the PRODA information page on the Services Australia website.

ndis.gov.au | April 2020 | PRODA Step-by-Step Guide 14
If you have received this email in error, you can contact us by visiting the PRODA information page on the Services Australia website.
You have now completed Step 1 and created your PRODA account.
The next step is to verify your documents.

ndis.gov.au | April 2020 | PRODA Step-by-Step Guide 15
2. Verify your documents At this stage, you can continue your current session or log out to get your identity documents organised then log back to complete the process.
If you decide to log out of the session, you will be seeing the following warning message. If you click on the Yes button, you will be logged out of PRODA.
The next time and each subsequent time you log back in to PRODA after entering your user name and password you will be prompted to enter the new verification code sent to your email. Please enter the email verification code and click Next.

ndis.gov.au | April 2020 | PRODA Step-by-Step Guide 16
As you have not completed your account creation process in one single session, you will now be asked to accept PRODA terms and conditions. Click on I agree button at the bottom of the page to proceed.
The Continue confirming your identity page will open to continue with the identity verification process. Select Continue.

ndis.gov.au | April 2020 | PRODA Step-by-Step Guide 17
2.1 Verify your documents
If you have all your identity documents ready and decide to continue the session,
1. You can view the list of accepted documents by clicking on the Identity documents hyperlink.
2. When you have your documents and ready to verify your identity, select Next.

ndis.gov.au | April 2020 | PRODA Step-by-Step Guide 18
Please Note: Ensure to select and use the identity documents that match with the current personal details you have provided.
3. Select the first document you wish to verify and provide the required information. Click Next.

ndis.gov.au | April 2020 | PRODA Step-by-Step Guide 19
For example, if you have selected Australian passport, you will see a screen like this. Fill in the details from your document and click Next button at the bottom of the page.
You will see a confirmation of the first document verified online.
4. Select the second document you want to verify and click Next.

ndis.gov.au | April 2020 | PRODA Step-by-Step Guide 20
For example, if you have selected Medicare Card, you will see a screen like this. Fill in the details from your document and select Next at the bottom of the page.
You will see a confirmation of the first document verified online.

ndis.gov.au | April 2020 | PRODA Step-by-Step Guide 21
5. Select the third document you want to verify and click Next.

ndis.gov.au | April 2020 | PRODA Step-by-Step Guide 22
For example, if you have selected Australian driver’s license, you will see the following screen where you need to select the State of issue.
Select the state of issue for the Australian driver’s license and click Next.
Add the required information for the Australian driver’s license and click Next.
You will now see a confirmation of the verification for the Australian driver’s license.
ndis.gov.au | April 2020 | PRODA Step-by-Step Guide 23
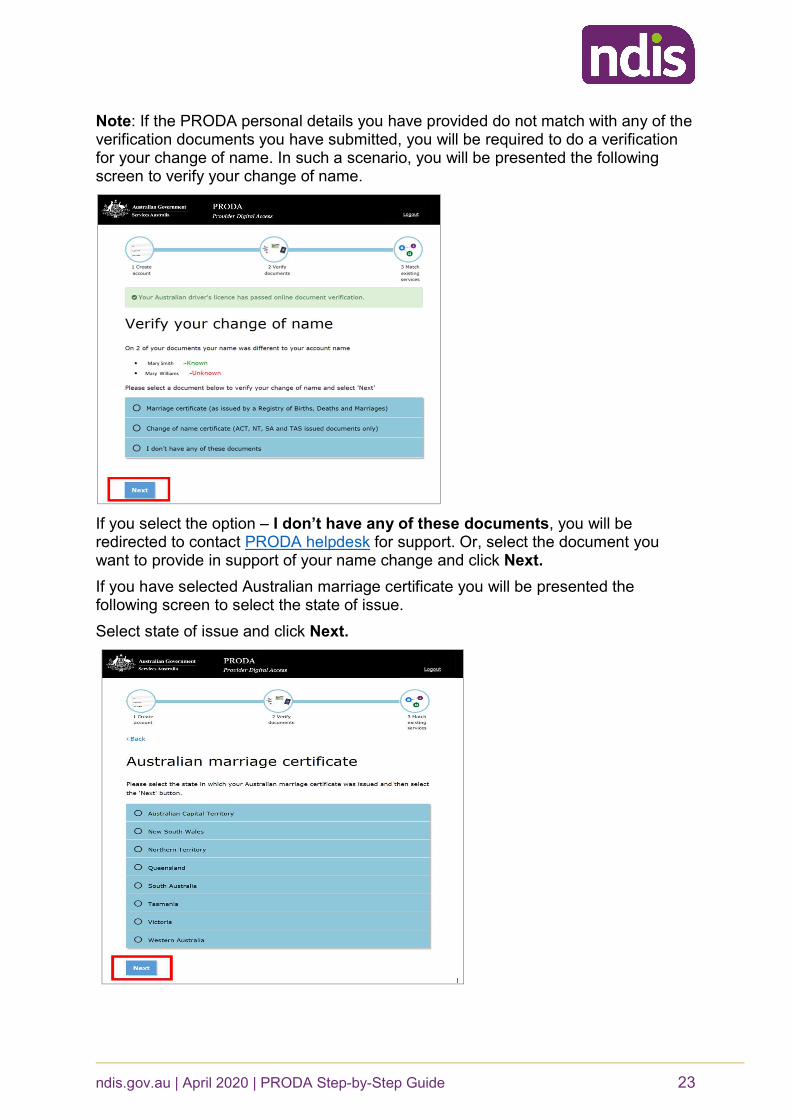
Note: If the PRODA personal details you have provided do not match with any of the verification documents you have submitted, you will be required to do a verification for your change of name. In such a scenario, you will be presented the following screen to verify your change of name.
If you select the option – I don’t have any of these documents, you will be redirected to contact PRODA helpdesk for support. Or, select the document you want to provide in support of your name change and click Next.
If you have selected Australian marriage certificate you will be presented the following screen to select the state of issue.
Select state of issue and click Next.

ndis.gov.au | April 2020 | PRODA Step-by-Step Guide 24
Provide the details of marriage certificate and click Next.
Depending on your circumstances, if you have selected a change of name certificate you will be required to provide the relevant information.
6. At the end of successful verification of the three documents and the name change documents if applicable, you will see the following screen. Select Next to continue.

ndis.gov.au | April 2020 | PRODA Step-by-Step Guide 25
7. The next step after the successful online verification of your identity is to select the verification code preference.
Each time you log in to your PRODA account, you will need to enter a single use verification code to verify your identity.
This verification code will be sent to your email address by default. However, you can change the verification code preference to mobile phone (SMS) or mobile app (PRODA Code Generator app) in the PRODA portal account settings.
If you have selected Email and Next, you will be directed to the PRODA services screen.
If you have selected Mobile phone (SMS) and Next, you will see the following screen. Enter the verification code sent to your mobile number and click Next.

ndis.gov.au | April 2020 | PRODA Step-by-Step Guide 26
If you have selected Mobile App, and Next, the following screen will appear. You are required to download the PRODA code generator app and follow the set-up process.

ndis.gov.au | April 2020 | PRODA Step-by-Step Guide 27
Once you have successfully completed your verification code preference and entered the code you will be taken to the PRODA services page below.
You have now completed Step 2 of the PRODA account creation and verify documents process.
The next and final step is to match existing services.

ndis.gov.au | April 2020 | PRODA Step-by-Step Guide 28
3. Matching existing services
1. Select the NDIS myplace provider portal tile highlighted with red border to link your PRODA account to the myplace provider portal.
2. Enter your personal details to link your PRODA account to myplace provider portal. Please ensure you enter the mobile number in the correct format and your personal details match with the personal details provided in your PRODA registration.
3. Click Submit button at the bottom right hand corner of the page.

ndis.gov.au | April 2020 | PRODA Step-by-Step Guide 29
If your details match your PRODA details, you will see the following screen.
You have now successfully completed your authentication with PRODA and linked to the NDIS myplace provider portal.
Further information and step-by-step guides for linking to your NDIS provider organisations and using the myplace provider portal are available in the NDIS website.

ndis.gov.au | April 2020 | PRODA Step-by-Step Guide 30
Other PRODA portal functions
To logout of the PRODA portal, click on your name in the top right corner of the screen. A drop-down menu will appear. Click on Logout button that drops down when you click on your user name highlighted in the red box on top right hand corner to end your session.
To edit your PRODA account settings, click on your name on the top right hand corner. It will present you the following screen to make the necessary changes to your account settings.
To access help information during the PRODA account creation process, click the Help button on each page.
Please Note:
All the information published in this step-by-step guide is current as at the time of publishing and care has been taken to ensure its accuracy.
If you find any of the steps in this guide out of sync with your real time user experience, please contact us at [email protected].