product install guide - argus softwaredownloads.argussoftware.com/symphony/1.5/symphon… · ·...
TRANSCRIPT

Installation Guide Release Version 1.5 Publication Date: 2/7/2014 Document Version: R1.0

ARGUS Symphony Installation Guide
ARGUS Software: ARGUS Symphony Install Guide
The contents of this document are considered proprietary by ARGUS Software, the information enclosed and any portion thereof may not be utilized for any purpose other than the consideration of ARGUS Software. Information in this document is subject to change without notice and represents no commitment on the part of ARGUS Software.
Copyright © 2013 ARGUS Software, Inc. All rights reserved.
Trademarks
ARGUS Software™ is a trademark of ARGUS Software. All other trademarks and registered trademarks are property of their respective companies and should be treated as such.
Microsoft WindowsXP is a registered trademark of Microsoft Corporation. Microsoft Windows Vista is a registered trademark of Microsoft Corporation. Microsoft Windows 2003 Server is a registered trademark of Microsoft Corporation. Microsoft Office is a registered trademark of Microsoft Corporation. Microsoft Word is a registered trademark of Microsoft Corporation. Microsoft Excel is a registered trademark of Microsoft Corporation. Microsoft SQL Server 2005 is a registered trademark of Microsoft Corporation. Microsoft Framework is a registered trademark of Microsoft Corporation. Microsoft Windows Installer is a registered trademark of Microsoft Corporation.
Disclaimer
This manual has been prepared for use by ARGUS Software personnel, licensees and customers.
ARGUS Software reserves the right to make changes without notice at any time to this document, and shall not be held legally responsible for any typographical, arithmetic and listing errors.
ARGUS Symphony Installation Guide
Table of Contents Chapter 1 ...........................................................................................................................................4
ARGUS Symphony ..................................................................................................................................... 4
Getting Support ..................................................................................................................................... 4
Chapter 2 ...........................................................................................................................................5
Introduction .............................................................................................................................................. 5
Prerequisite Software Installation ............................................................................................................ 5
SQL Server 2008 or SQL Server 2008 R2 ............................................................................................... 5
Microsoft .NET Framework 4.0 ............................................................................................................. 5
Internet Information Services (IIS 7.5 or later) ..................................................................................... 5
Web Service Installation ........................................................................................................................... 8
License Configuration ............................................................................................................................. 15
Web Application Installation ............................................................................................................... 2019
QlikView Installation ........................................................................................................................... 2524
QlikView Ticketing Service Installation ............................................................................................... 3635
QlikView Reports Configuration.......................................................................................................... 3836
Miscellaneous ..................................................................................................................................... 4139
Generating an X.509 Certificate for Message-Level Security ......................................................... 4139
Web Service Certificate ................................................................................................................... 4240
Additional User Rights ..................................................................................................................... 4240
Google Maps API ............................................................................................................................. 4341
Using SSL ......................................................................................................................................... 4341
Creating a QlikView report .............................................................................................................. 4341
Install QLikView SDK and Microsoft IIS Support Manually ............................................................. 4846
Chapter 3 ..................................................................................................................................... 5048
Office Locations................................................................................................................................... 5048
ARGUS Symphony Installation Guide
Chapter 1
ARGUS Symphony The purpose of this document is to provide detailed instructions for installing the components of the ARGUS Symphony application.
Getting Support
Getting support for ARGUS Symphony is easy. Support issues may be reported online at www.argussoftware.com/getsupport. Listed below are the contact details and hours of operation:
Support Contact Information:
US/Canada: 1 888-MyARGUS(692-7487) Asia Pacific/Singapore: +65 6411 2288 Japan: 00531650404 Australia: +612 9262 1332 North China: 10800 6500 477 South China: 10800 2652 492 Europe: +44 (0) 20 8238 8345 All other please call: +1 713 621 4343
Email: [email protected]
Hours of Operation: Americas:7:30am to 6:30pm GMT-6 Monday to Friday, excluding USA public holidays Europe: 9:00am to 5:30pm GMT Monday to Friday, excluding UK public holidays
Asia/Pacific:7:00am to 7:00pm GMT+8 Monday to Friday, excluding Singapore public holidays
Product Information: [email protected]
[email protected] (Europe)
ARGUS Symphony Installation Guide
Chapter 2
Introduction This document contains installation instructions for setting up ARGUS Symphony. Use the detailed instructions to install the required software and components needed to deploy ARGUS Symphony within your company.
Prerequisite Software Installation This section will highlight the steps needed to setup all the required software before installing the main ARGUS Symphony components.
SQL Server 2008 or SQL Server 2008 R2
It is assumed that an instance of SQL Server is already installed and running. See Hardware and Software Requirement document for more information. Microsoft SQL Server Express Edition
http://www.microsoft.com/sqlserver/en/us/editions/express.aspx
Microsoft .NET Framework 4.0
The Microsoft .NET Framework 4 - Standalone Installer can be downloaded from the following link below: http://www.microsoft.com/download/en/details.aspx?id=17718 The installer (dotNetFx40_Full_x86_x64.exe) can also be run directly from the Symphony Tools folder.
Internet Information Services (IIS 7.5 or later)
Verify that IIS 7.5 is installed on the server.
a. Follow the following steps to verify that IIS is installed: Click Start, point to Administrative Tools, and then click Server Manager.
b. In Roles Summary, click Add Roles. c. In the Select Server Roles window, look for the Web Server (IIS) entry in the list of
components. d. If IIS is already installed, the check box next to it is selected. Otherwise IIS is not
installed. To check the version of IIS once IIS has been verified that it’s already installed, simply open your browser and enter one of these addresses. IIS version should be displayed on the page (top right) that is loaded:
ARGUS Symphony Installation Guide
a. http://localhost/localstart.asp
b. http://localhost/iishelp/iis/misc/default.asp

ARGUS Symphony Installation Guide
ARGUS Symphony Installation Guide
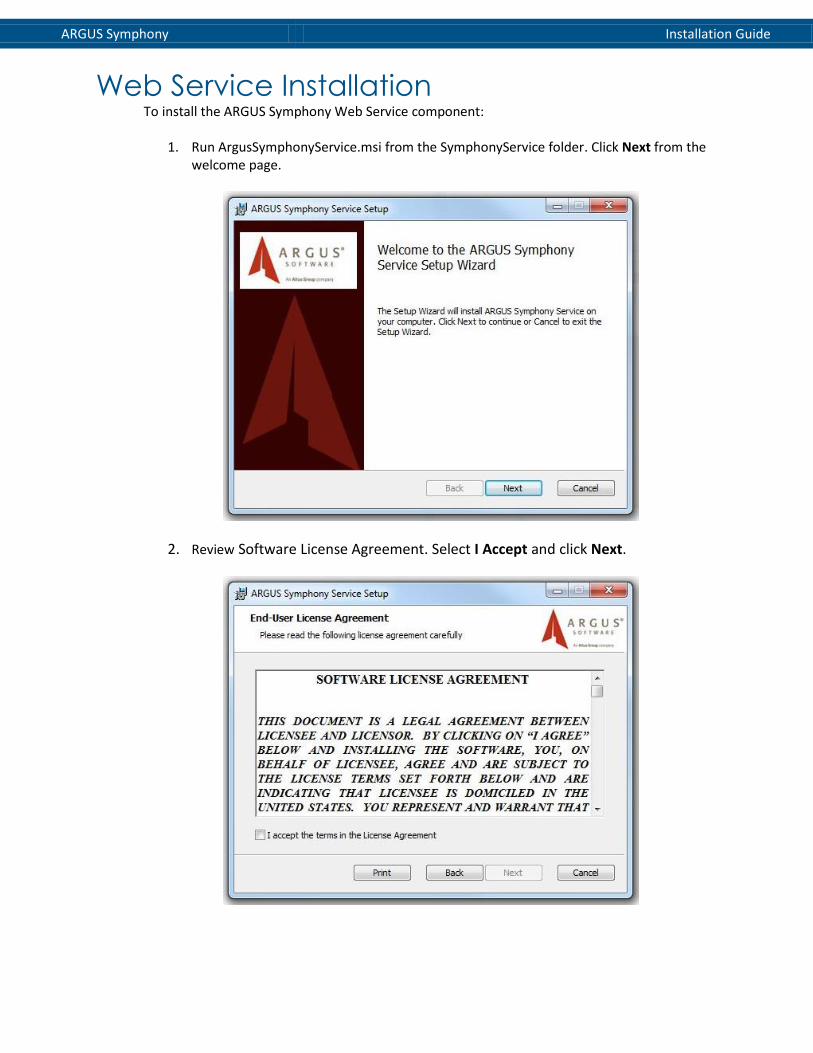
Web Service Installation To install the ARGUS Symphony Web Service component:
1. Run ArgusSymphonyService.msi from the SymphonyService folder. Click Next from the
welcome page.
2. Review Software License Agreement. Select I Accept and click Next.

ARGUS Symphony Installation Guide
3. Specify the following options for Installation Address:
a. Site – default is Default Web Site. If you have multiple sites within the target server, please specify the site you want to use for the ARGUS Symphony Web Service.
b. Application Pool – select ARGUSSymAppPool. This application pool was created
during the start of this installation. Setting this to a different value could create unexpected behaviors.
c. Virtual Directory – default value is “SymService”. Please enter another virtual
directory if you want to use a different path for the ARGUS Symphony Web Service.
Note: This will determine where the actual web application files will be installed on the server. This information is necessary later on when modifying the configuration files.
Important Tip: The actual Symphony Service URL will be determined by the selection to the Site and Virtual Directory entries. You will need this information throughout the configuration of the application. The standard format is:
http://<Site>/<Virtual Directory>/TheArgusService.svc Use localhost if Site is set to “Default Website”. For example, if the user has the
same settings above, the Symphony service will be under this URL: http://localhost/service/TheArgusService.svc Once all the settings above are set, click Next.

ARGUS Symphony Installation Guide
4. Enter all the required settings for the SQL Server Information and click Next.
a. DB Settings: select whether or not to create a new database to be used for Symphony or upgrade an existing one. If upgrading, make sure that all the database information provided will specify an existing database previously setup for use with Symphony.
You will need to select the “Upgrade” option if:
1. You have an existing Symphony 1.1 database; OR 2. You have created a blank SQL database using an external tool like SQL
Management Studio.
NOTE: If you chose to manually create a blank SQL database using an external tool, you will need to run the following SQL scripts prior to proceeding with the next steps.
ALTER DATABASE [$(DatabaseName)]
SET ANSI_NULLS ON,
ANSI_PADDING ON,
ANSI_WARNINGS ON,
ARITHABORT ON,
CONCAT_NULL_YIELDS_NULL ON,
NUMERIC_ROUNDABORT OFF,
QUOTED_IDENTIFIER ON,
ANSI_NULL_DEFAULT ON,
CURSOR_DEFAULT LOCAL,
RECOVERY SIMPLE,
CURSOR_CLOSE_ON_COMMIT OFF,
AUTO_CREATE_STATISTICS ON,
AUTO_SHRINK OFF,
AUTO_UPDATE_STATISTICS ON,

ARGUS Symphony Installation Guide
RECURSIVE_TRIGGERS OFF
WITH ROLLBACK IMMEDIATE;
ALTER DATABASE [$(DatabaseName)]
SET AUTO_CLOSE OFF
WITH ROLLBACK IMMEDIATE;
GO
ALTER DATABASE [$(DatabaseName)]
SET ALLOW_SNAPSHOT_ISOLATION ON;
GO
ALTER DATABASE [$(DatabaseName)]
SET READ_COMMITTED_SNAPSHOT ON;
GO
ALTER DATABASE [$(DatabaseName)]
SET AUTO_UPDATE_STATISTICS_ASYNC OFF,
PAGE_VERIFY NONE,
DATE_CORRELATION_OPTIMIZATION OFF,
DISABLE_BROKER,
PARAMETERIZATION SIMPLE,
SUPPLEMENTAL_LOGGING OFF
WITH ROLLBACK IMMEDIATE;
GO
Note: Replace (DatabaseName) in the script with actual database name being used.
b. Live AE – select whether to activate or de-activate the Live AE mode in
Symphony. Live AE mode turned ON is for using the same database for your AE application and Symphony. If it’s turned OFF, it means the database used for Symphony is only used for Symphony. This will enable users to import ARGUS files. WARNING: The Live AE mode setting cannot be changed once it is set during installation. It is only available at the time of creating a database. If upgrading an existing database, Live AE mode setting will be based on what was previously set in the selected database. If user chooses to turn this ON, the AE tables have to exist in the target database otherwise the install will not proceed. Also for Symphony 1.5, only AE version 9.5 is supported. NEXT Steps: Specify where the SQL server and how the installer will connect to it.
c. Server Host Name/IP – SQL Server name or IP Address to use. If the specified SQL server is using a different instance name rather than the default instance
ARGUS Symphony Installation Guide
name, you will need to specify it here as well using the following format – < SQL Server name or IP Address>\<instance name>
I.e.: 10.10.1.1\SQL2008R2
d. Use Integrated Windows Authentication checkbox – select this option if you want to connect to the database using windows authentication. Unselect if you want to use a local user.
NOTE: if you select this option, the next two fields are not needed and will be disabled.
e. DBA User Name – SQL server local user with enough rights to create/upgrade
the Symphony database and create a local user if specified in step (iv). This is only available if Use Integrated Windows Authentication is unselected.
f. DBA Password – password for user specified in step (v). This is only available if Use Integrated Windows Authentication is unselected. NEXT Steps: Specify Symphony Database Connection and System User.
g. Symphony Database Name – database name to create or upgrade depending on option selected in step (i).
h. Create User for Symphony Database – select this option if user specified in step (v) does not exist yet.
i. Symphony DB User Name – Local SQL Server user that will be used to connect to the Symphony database.
j. Symphony DB Password – password for user specified in step (ix).
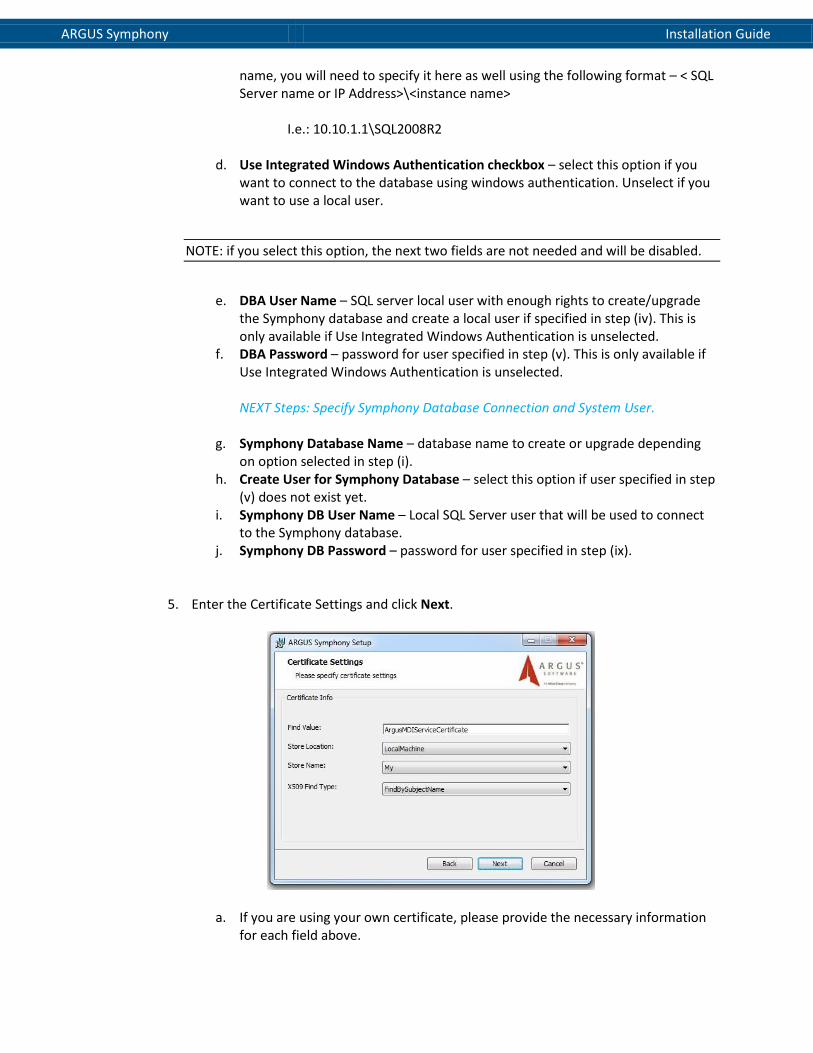
5. Enter the Certificate Settings and click Next.
a. If you are using your own certificate, please provide the necessary information for each field above.

ARGUS Symphony Installation Guide
b. Please see the addendum at the end of this document titled: Generating an
X.509 Certificate for Message-Level Security i. This section will take you through the steps to generate an X.509
certificate that will be used to authenticate the service to clients using Message security mode.
ii. For more information, see http://msdn.microsoft.com/en-us/library/ms731340.aspx.
6. Specify a default Symphony Administrator user and click Next.
a. The user specified above will be created during the installation process and will be given administrative rights.
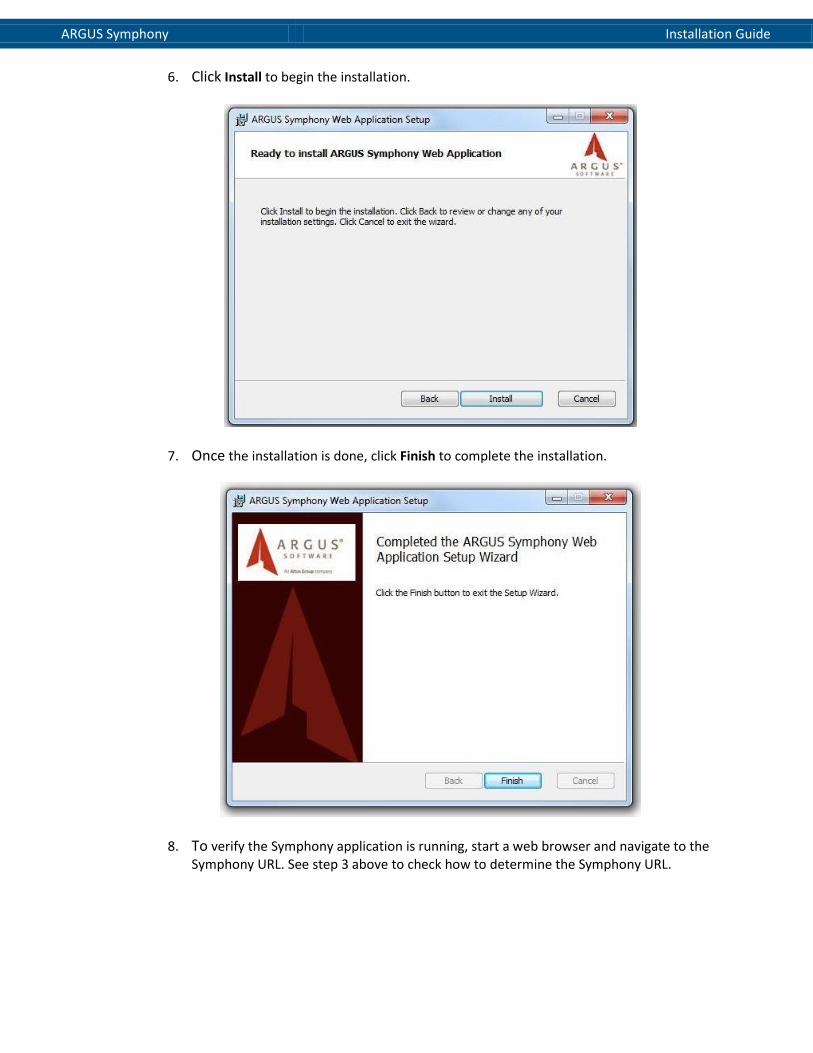
7. Click Install to begin the installation.

ARGUS Symphony Installation Guide
8. Once the installation is done, click Finish to complete the installation.
9. To verify the Symphony service is running, start a web browser and navigate to the Symphony service URL. See step 2 tips above to check how to determine the Symphony Service URL.
ARGUS Symphony Installation Guide
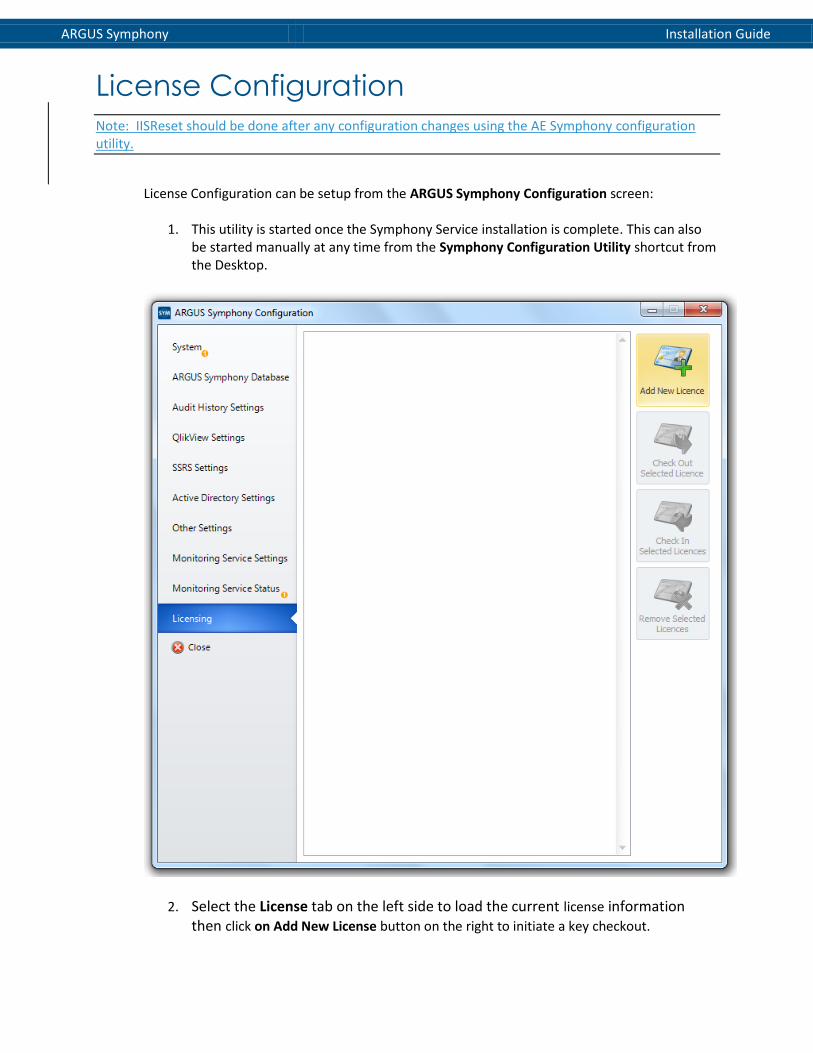
License Configuration Note: IISReset should be done after any configuration changes using the AE Symphony configuration utility.
License Configuration can be setup from the ARGUS Symphony Configuration screen:
1. This utility is started once the Symphony Service installation is complete. This can also
be started manually at any time from the Symphony Configuration Utility shortcut from the Desktop.
2. Select the License tab on the left side to load the current license information then click on Add New License button on the right to initiate a key checkout.

ARGUS Symphony Installation Guide

ARGUS Symphony Installation Guide
3. Enter all required fields in the License Details screen then click Next.
a. If the copy of Symphony came with more than one license key, enter all keys in the License Keys field one row at a time.
4. Review Software License Agreement. Select I Accept and click Next.
ARGUS Symphony Installation Guide
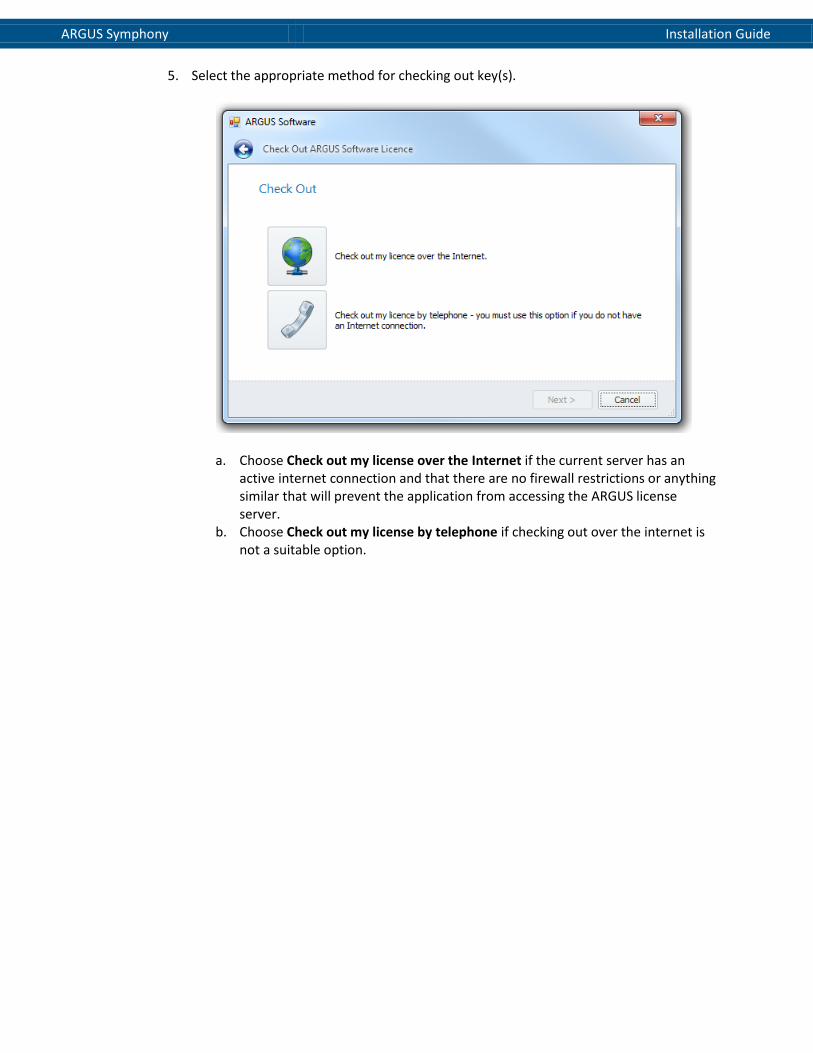
5. Select the appropriate method for checking out key(s).
a. Choose Check out my license over the Internet if the current server has an active internet connection and that there are no firewall restrictions or anything similar that will prevent the application from accessing the ARGUS license server.
b. Choose Check out my license by telephone if checking out over the internet is not a suitable option.
ARGUS Symphony Installation Guide
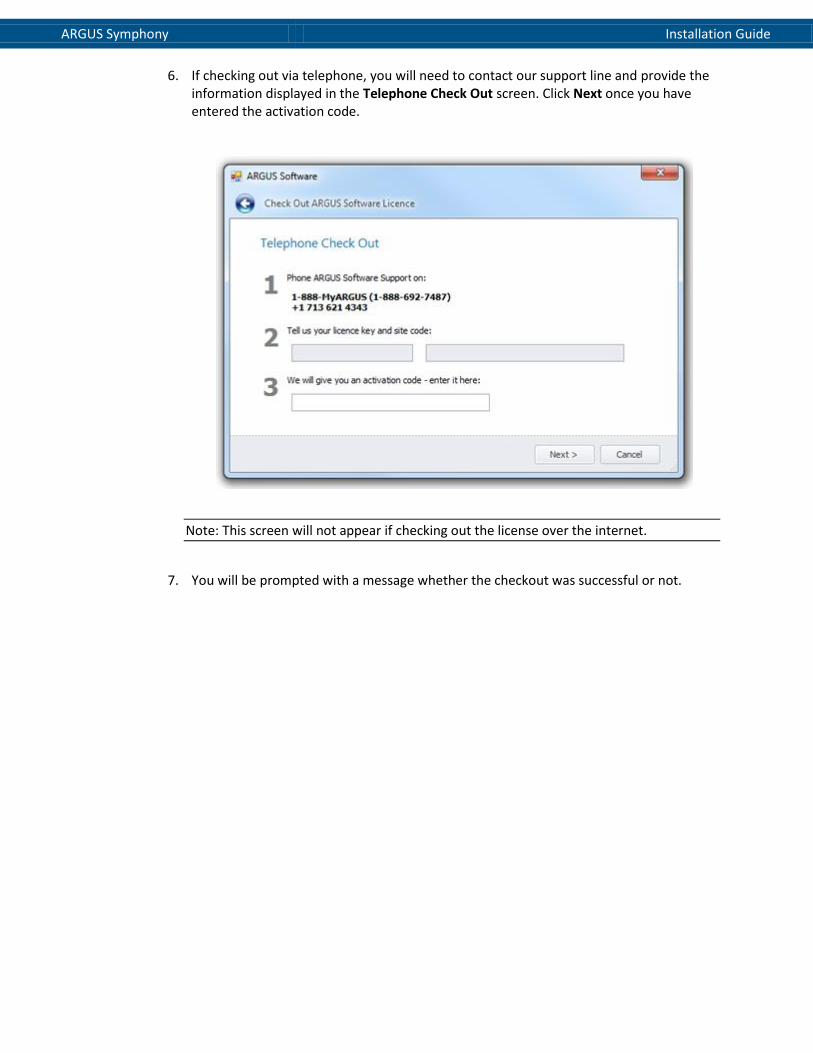
6. If checking out via telephone, you will need to contact our support line and provide the
information displayed in the Telephone Check Out screen. Click Next once you have entered the activation code.
Note: This screen will not appear if checking out the license over the internet.
7. You will be prompted with a message whether the checkout was successful or not.
ARGUS Symphony Installation Guide
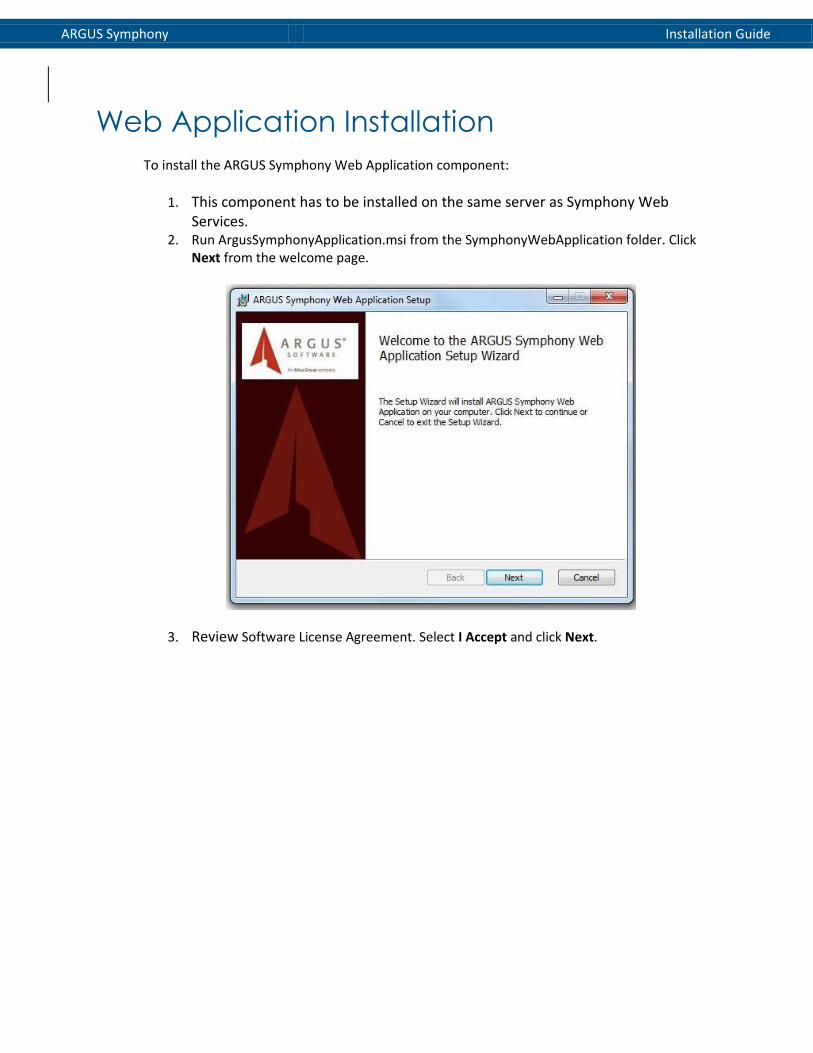
Web Application Installation To install the ARGUS Symphony Web Application component:
1. This component has to be installed on the same server as Symphony Web Services.
2. Run ArgusSymphonyApplication.msi from the SymphonyWebApplication folder. Click Next from the welcome page.
3. Review Software License Agreement. Select I Accept and click Next.
ARGUS Symphony Installation Guide
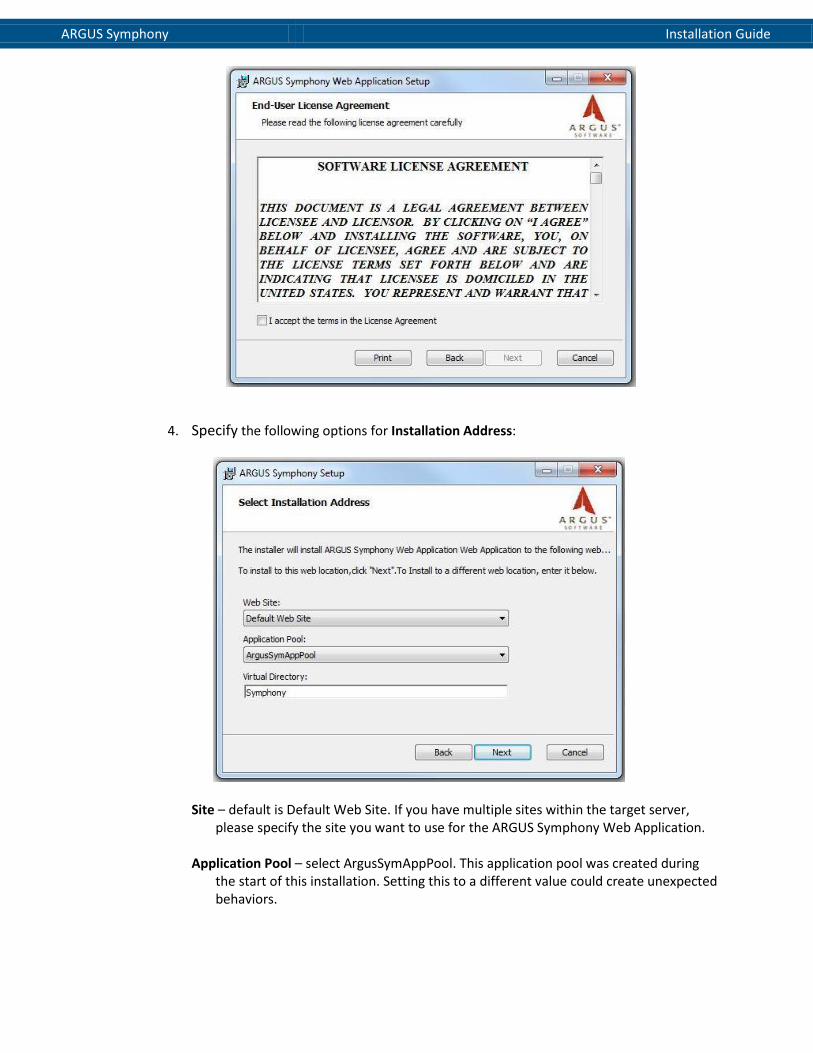
4. Specify the following options for Installation Address:
Site – default is Default Web Site. If you have multiple sites within the target server,
please specify the site you want to use for the ARGUS Symphony Web Application. Application Pool – select ArgusSymAppPool. This application pool was created during
the start of this installation. Setting this to a different value could create unexpected behaviors.

ARGUS Symphony Installation Guide
Virtual Directory – default value is “Symphony”. Please enter another virtual directory if
you want to use a different path for ARGUS Symphony Web Application.
Note: This will determine where the actual web application files will be installed on the server. This information is necessary later on when modifying the configuration files.
Important Tip: The actual Symphony application URL will be determined by the selection to the Site and Virtual Directory entries. You will need this information throughout the configuration of the application. The standard format is:
http://<Site>/<Virtual Directory>/default.aspx Use localhost if Site is set to “Default Website”. For example, if the user has the
same settings above, the Symphony service will be under this URL: http://localhost/symphony/default.aspx Once all the settings above are set, click Next.
ARGUS Symphony Installation Guide
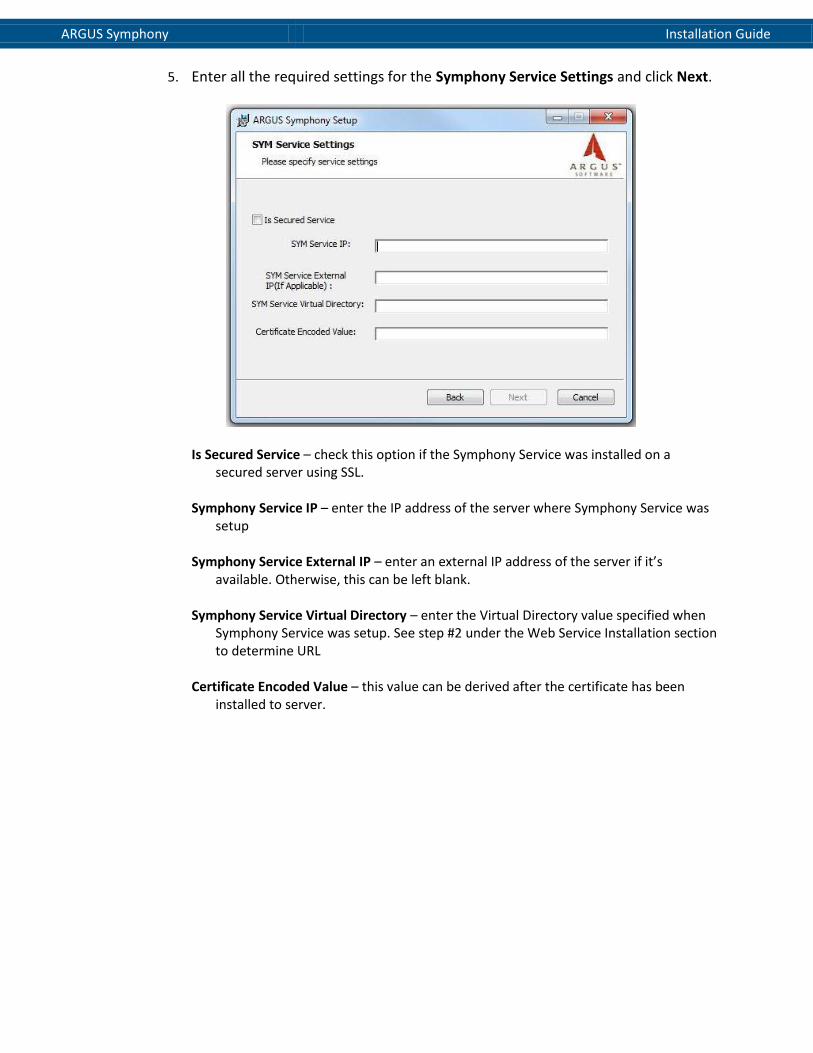
5. Enter all the required settings for the Symphony Service Settings and click Next.
Is Secured Service – check this option if the Symphony Service was installed on a secured server using SSL.
Symphony Service IP – enter the IP address of the server where Symphony Service was
setup Symphony Service External IP – enter an external IP address of the server if it’s
available. Otherwise, this can be left blank. Symphony Service Virtual Directory – enter the Virtual Directory value specified when
Symphony Service was setup. See step #2 under the Web Service Installation section to determine URL
Certificate Encoded Value – this value can be derived after the certificate has been
installed to server.
ARGUS Symphony Installation Guide
6. Click Install to begin the installation.
7. Once the installation is done, click Finish to complete the installation.
8. To verify the Symphony application is running, start a web browser and navigate to the Symphony URL. See step 3 above to check how to determine the Symphony URL.
ARGUS Symphony Installation Guide
QlikView Installation
Note: A new user and a new application pool have to be created prior to installing QlikView.
Create Local User
Add a user named QVIIS on the target server/machine. The option for Password Never Expire should be checked.
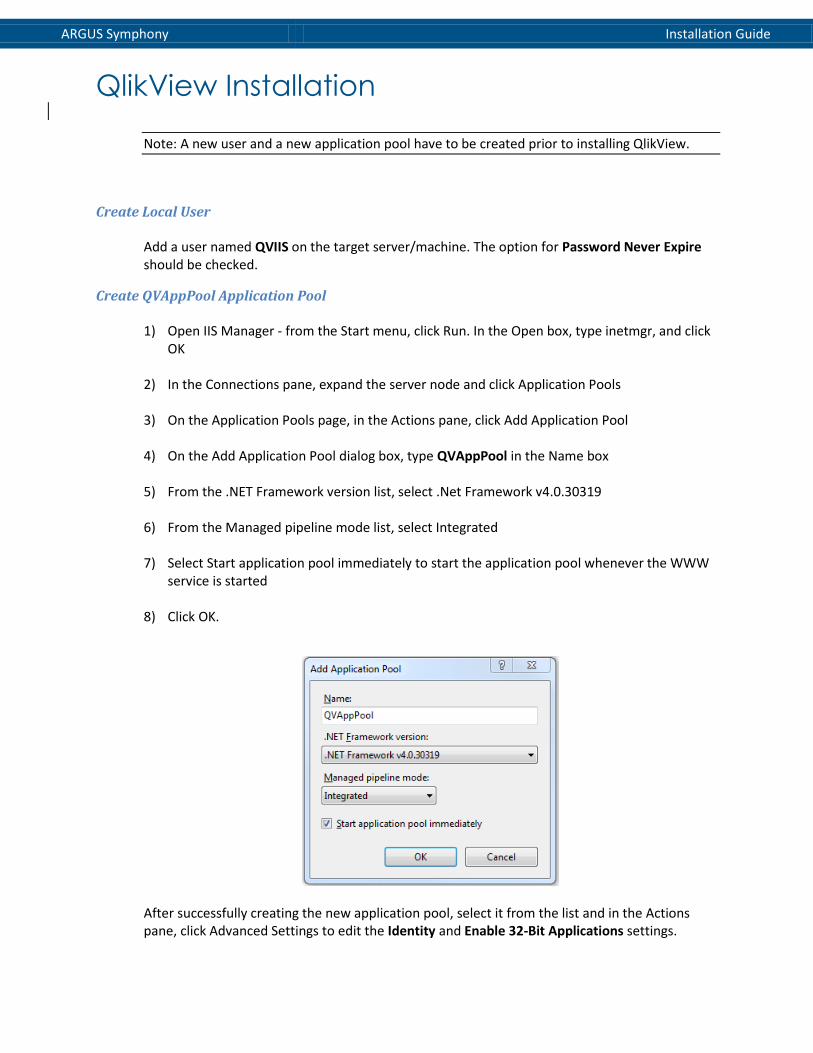
Create QVAppPool Application Pool 1) Open IIS Manager - from the Start menu, click Run. In the Open box, type inetmgr, and click
OK
2) In the Connections pane, expand the server node and click Application Pools
3) On the Application Pools page, in the Actions pane, click Add Application Pool
4) On the Add Application Pool dialog box, type QVAppPool in the Name box
5) From the .NET Framework version list, select .Net Framework v4.0.30319
6) From the Managed pipeline mode list, select Integrated
7) Select Start application pool immediately to start the application pool whenever the WWW service is started
8) Click OK.
After successfully creating the new application pool, select it from the list and in the Actions pane, click Advanced Settings to edit the Identity and Enable 32-Bit Applications settings.
ARGUS Symphony Installation Guide
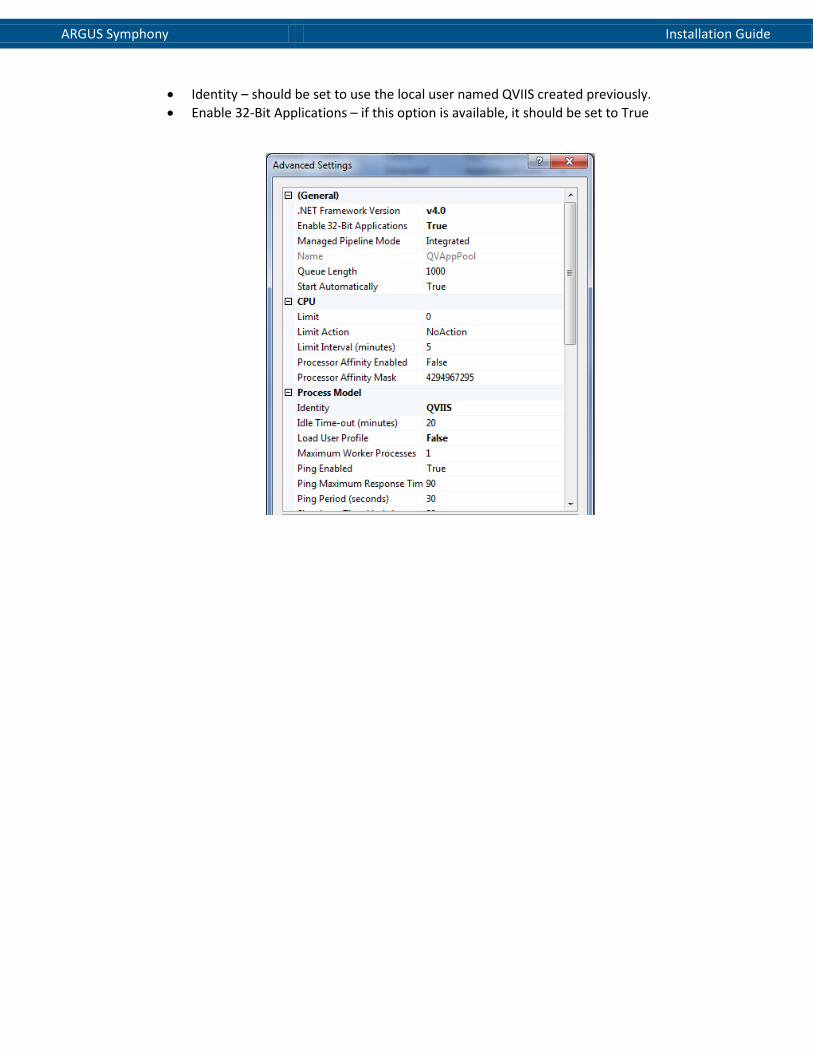
Identity – should be set to use the local user named QVIIS created previously.
Enable 32-Bit Applications – if this option is available, it should be set to True

ARGUS Symphony Installation Guide
Install and set up QlikView for Symphony Application.
1. The version of QlikView we are currently using is Version 11.2 SR3.
2. Execute QlikViewServer_x86.exe or QlikViewServer_x64.exe based on your operating
system. Follow the installation wizard and provide the necessary information.
3. Select the appropriate Region.

ARGUS Symphony Installation Guide
4. Review and accept the License Agreement and click Next.
5. Provide the necessary Customer Information.
ARGUS Symphony Installation Guide
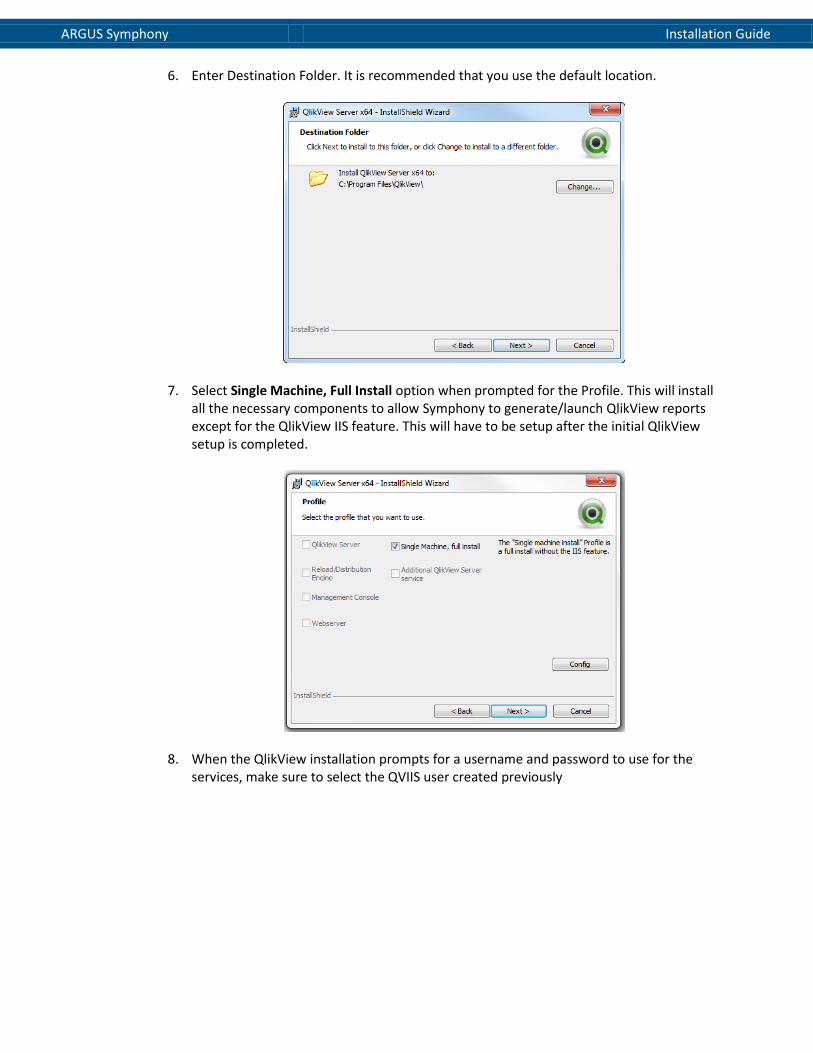
6. Enter Destination Folder. It is recommended that you use the default location.
7. Select Single Machine, Full Install option when prompted for the Profile. This will install all the necessary components to allow Symphony to generate/launch QlikView reports except for the QlikView IIS feature. This will have to be setup after the initial QlikView setup is completed.
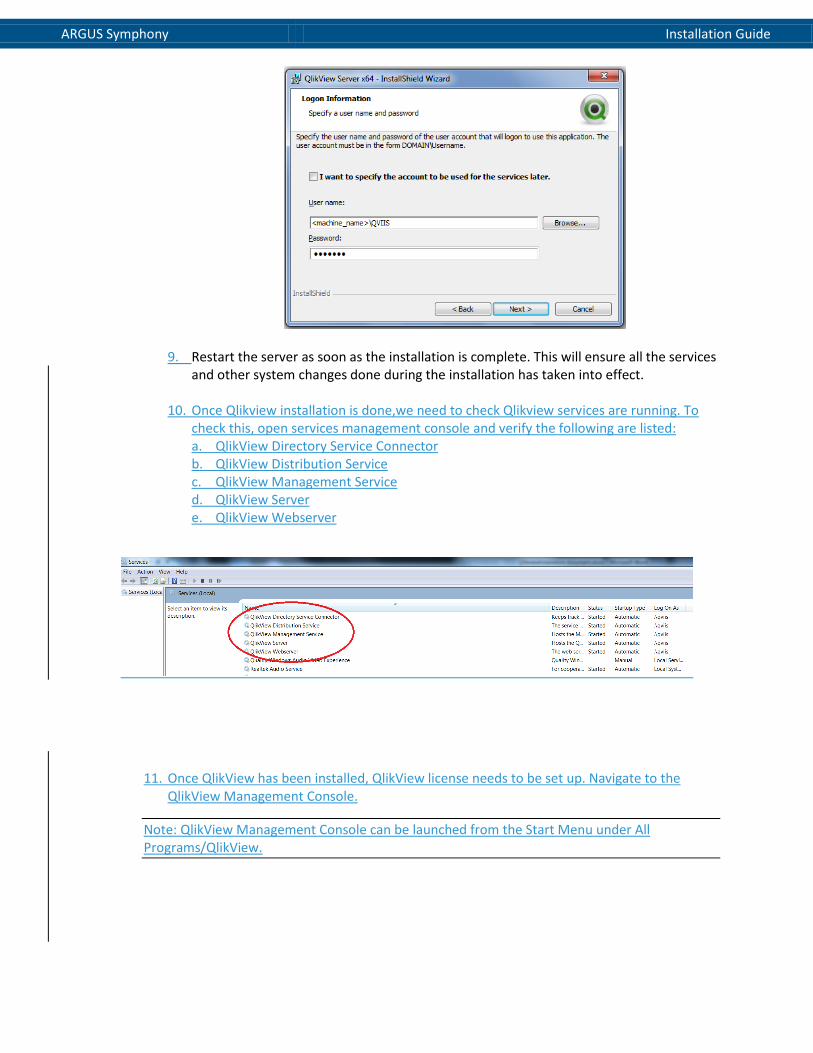
8. When the QlikView installation prompts for a username and password to use for the services, make sure to select the QVIIS user created previously
ARGUS Symphony Installation Guide
9. Restart the server as soon as the installation is complete. This will ensure all the services and other system changes done during the installation has taken into effect.
10. Once Qlikview installation is done,we need to check Qlikview services are running. To check this, open services management console and verify the following are listed: a. QlikView Directory Service Connector b. QlikView Distribution Service c. QlikView Management Service d. QlikView Server e. QlikView Webserver
11. Once QlikView has been installed, QlikView license needs to be set up. Navigate to the
QlikView Management Console.
Note: QlikView Management Console can be launched from the Start Menu under All Programs/QlikView.

ARGUS Symphony Installation Guide
12. Go to System tab, Licenses subtab and enter your licenesing information.
9.13. Go to System page > Setup tab > Folders subtab and make sure that your report root path is included as one of the Source Documents Folders in the QlikView Management Console. [C:\ProgramData\QlikTech\Documents] is the designated location to store all the QlikView reports/files.
Note: You will need to add the designated path to the Path list if it is not included as a Source Document Folder. To add the path, click on the green plus icon on the right.
If Organization Id will be used, create folder with the same name as the Organization Id to be used under the default report path (C:\ProgramData\QlikTech\Documents).
C:\ProgramData\QlikTech\Documents\<organization id>
For example, if organization id is “argus”, then folder must be “C:\ProgramData\QlikTech\Documents \argus”. Use this at the default report path instead.

ARGUS Symphony Installation Guide
10.14. Open Windows Explorer and navigate to the report root folder [C:\ProgramData\QlikTech\Documents]. Delete any default/sample reports that were installed to this folder during the installation. These reports are not needed for Symphony.
a. OPTIONAL: If Organization Id will be used, then create a folder the same name as
the Organization Id to be used under the default report path (C:\ProgramData\QlikTech\Documents). The new report path should be : C:\ProgramData\QlikTech\Documents\<organization_id>
11.15. Create a folder under the report path
(C:\ProgramData\QlikTech\Documents\<organization_id>) called SYMQV Template. Create a new template file called SYMQV Template.qvw and save it to the SYMQV Template folder. See Miscellaneous section below on how to create a blank QlikView file. This template file will have to be setup to use the same database being used by the Symphony application. This is the template file that Symphony will use when creating new reports under the Manage Reports screen in Symphony.
12.16. Setup QlikView server authorization in the QlikView Management Console . a. Click on the System tab and Setup subtab b. Expand the Management Service node to display QlikView Servers node. c. Expand QlikView Servers node and select the first child node d. Once the main server setup information is displayed, click on the Security tab e. From the Security page, select DMS authorization for Authorization type and hit Apply
to save the change.
ARGUS Symphony Installation Guide
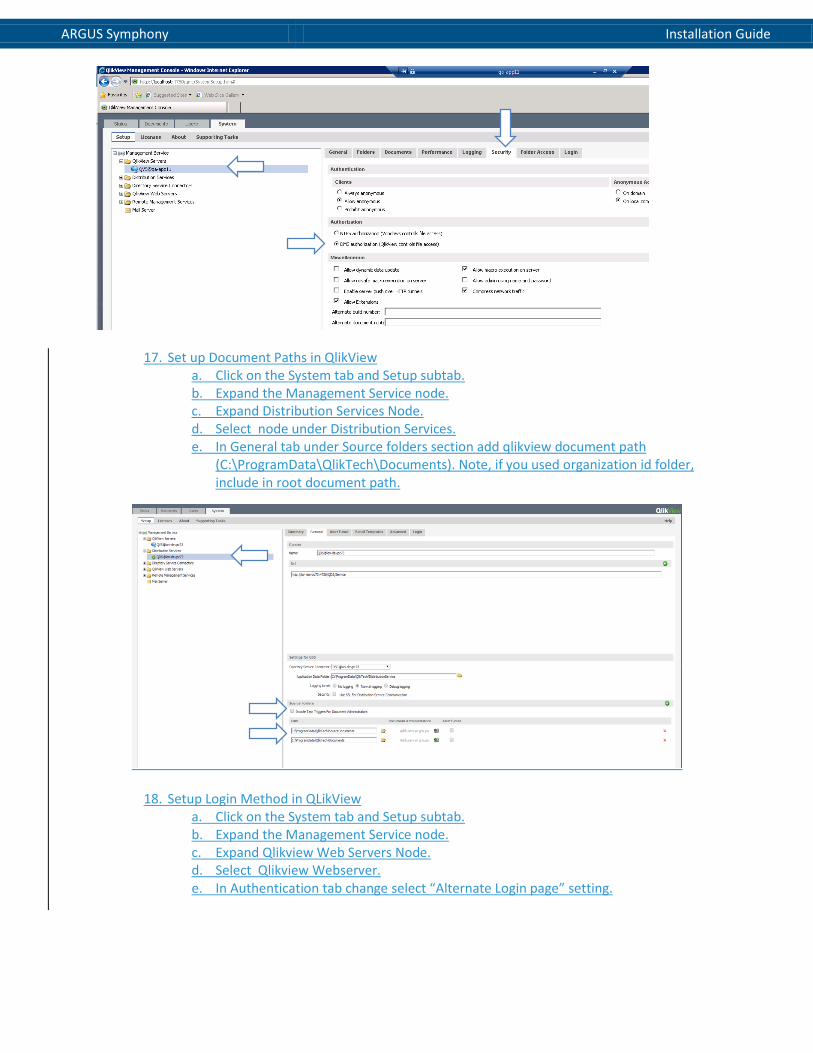
17. Set up Document Paths in QlikView
a. Click on the System tab and Setup subtab. b. Expand the Management Service node. c. Expand Distribution Services Node. d. Select node under Distribution Services. e. In General tab under Source folders section add qlikview document path
(C:\ProgramData\QlikTech\Documents). Note, if you used organization id folder, include in root document path.
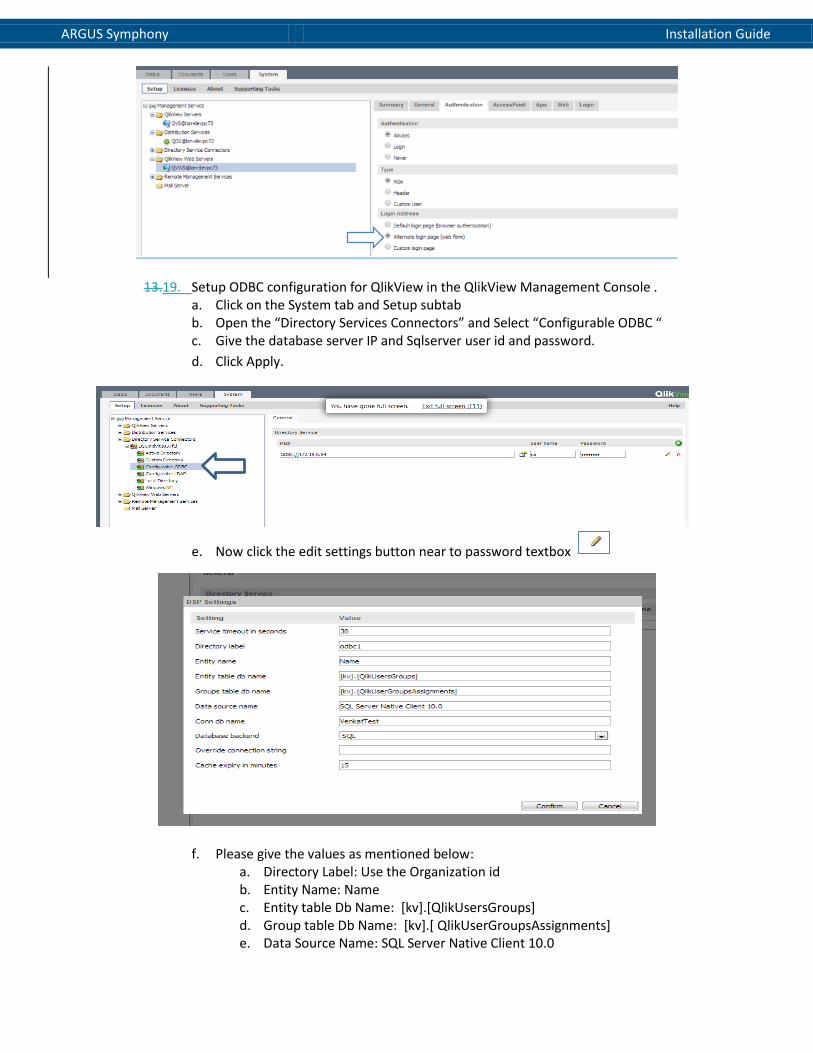
18. Setup Login Method in QLikView a. Click on the System tab and Setup subtab. b. Expand the Management Service node. c. Expand Qlikview Web Servers Node. d. Select Qlikview Webserver. e. In Authentication tab change select “Alternate Login page” setting.
ARGUS Symphony Installation Guide
13.19. Setup ODBC configuration for QlikView in the QlikView Management Console . a. Click on the System tab and Setup subtab b. Open the “Directory Services Connectors” and Select “Configurable ODBC “ c. Give the database server IP and Sqlserver user id and password.
d. Click Apply.
e. Now click the edit settings button near to password textbox
f. Please give the values as mentioned below: a. Directory Label: Use the Organization id b. Entity Name: Name c. Entity table Db Name: [kv].[QlikUsersGroups] d. Group table Db Name: [kv].[ QlikUserGroupsAssignments] e. Data Source Name: SQL Server Native Client 10.0

ARGUS Symphony Installation Guide
f. Conn Db Name: Name of the database that it is setup with. g. Database backend: SQL
g. Click Confirm h. Click Apply
14.20. Disable License Lease option in the QlikView Management Console .
a. Launch QlikView Management Console and click the System Tab, then the Licenses subtab
b. From the Licenses page, select Client Access Licenses (Cals) tab c. Uncheck the Allow license lease checkbox under the Named User CALs section. This
option is only used to temporarily allow users to connect to the QlikView servers if the client does not have a registered license yet.
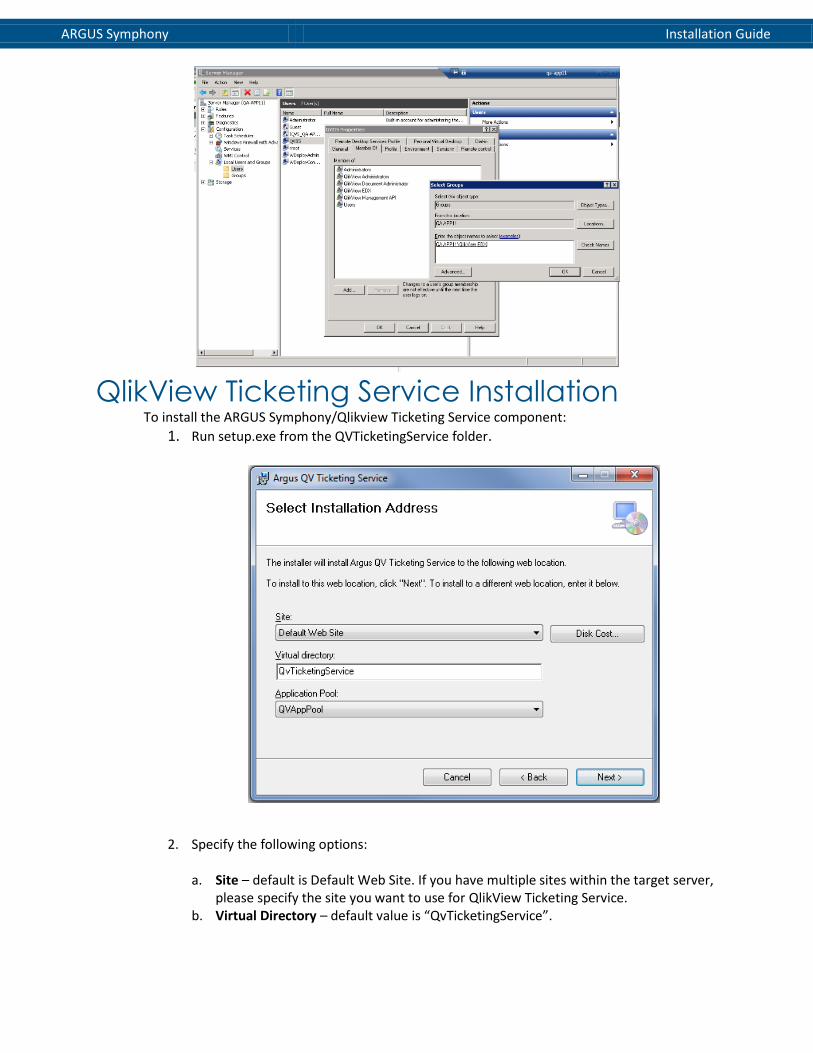
15.21. Make sure the QVIIS user is a member of the following groups. Add the groups if necessary: a. Administrator b. QlikView Administrators c. QlikView Document Administrator d. QlikView EDX e. QlikView Management API
ARGUS Symphony Installation Guide
QlikView Ticketing Service Installation
To install the ARGUS Symphony/Qlikview Ticketing Service component:
1. Run setup.exe from the QVTicketingService folder.
2. Specify the following options: a. Site – default is Default Web Site. If you have multiple sites within the target server,
please specify the site you want to use for QlikView Ticketing Service. b. Virtual Directory – default value is “QvTicketingService”.
ARGUS Symphony Installation Guide
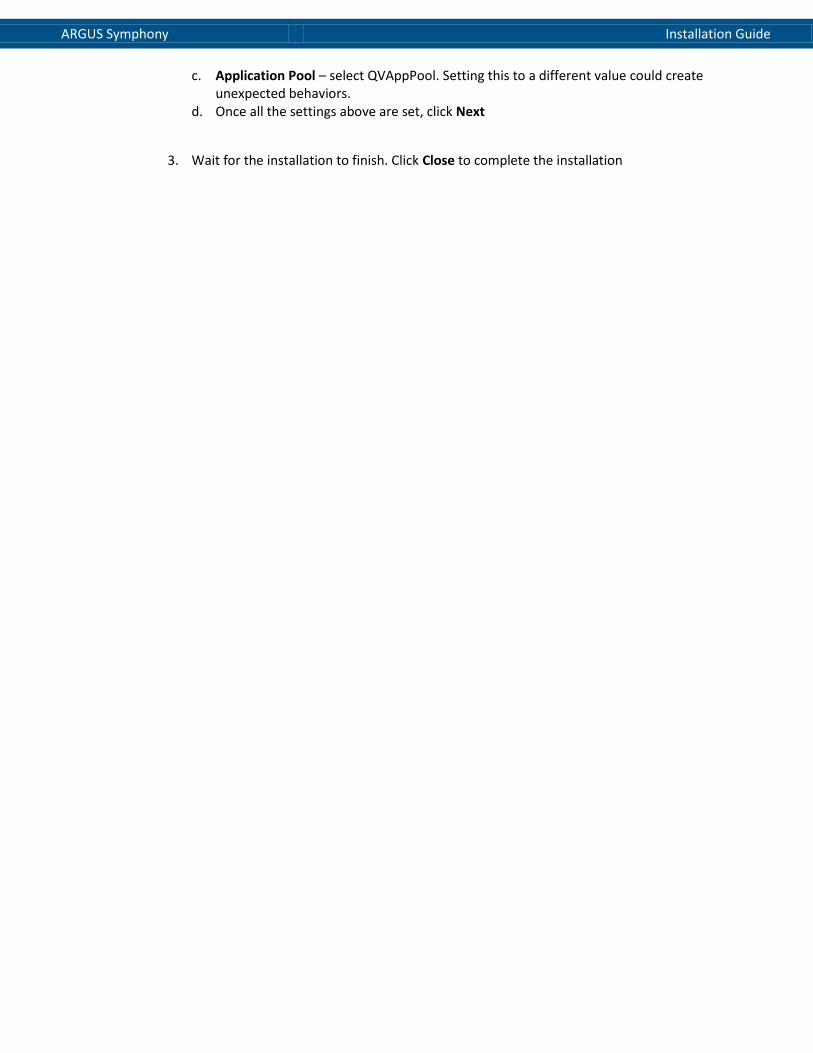
c. Application Pool – select QVAppPool. Setting this to a different value could create
unexpected behaviors. d. Once all the settings above are set, click Next
3. Wait for the installation to finish. Click Close to complete the installation
ARGUS Symphony Installation Guide
QlikView Reports Configuration
Note: IISReset should to be done after any configuration changes using the AE Symphony configuration utility.
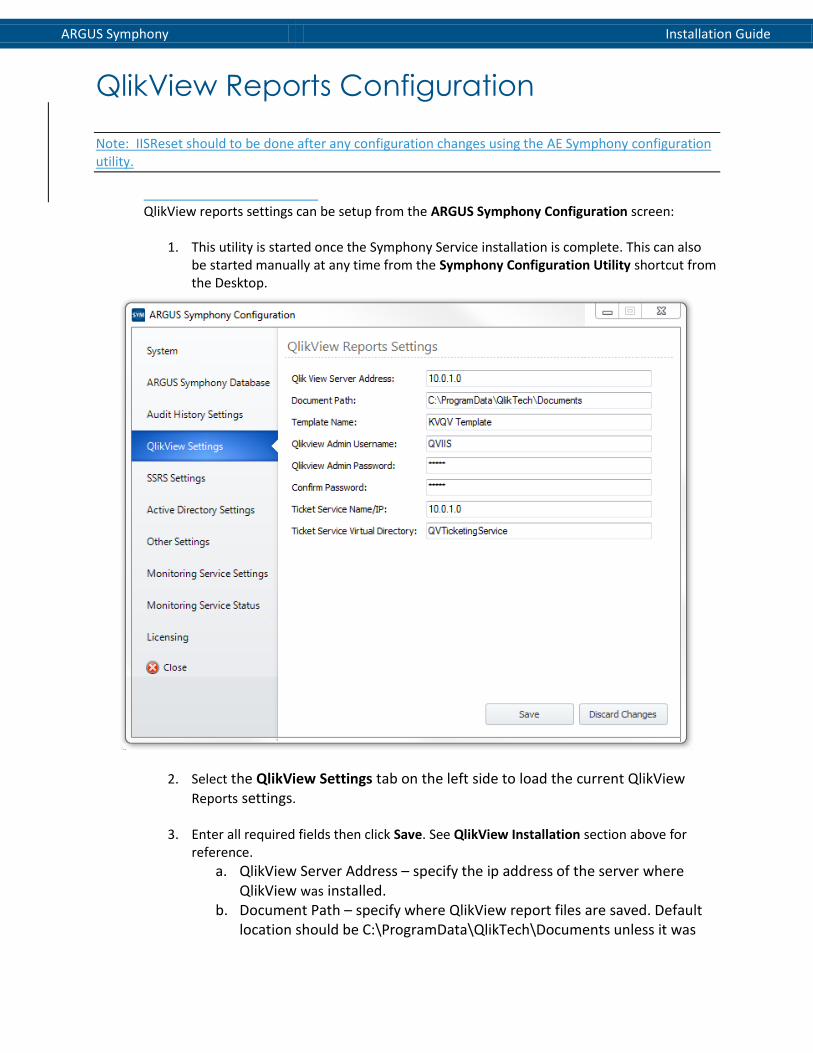
QlikView reports settings can be setup from the ARGUS Symphony Configuration screen:
1. This utility is started once the Symphony Service installation is complete. This can also
be started manually at any time from the Symphony Configuration Utility shortcut from the Desktop.
2. Select the QlikView Settings tab on the left side to load the current QlikView Reports settings.
3. Enter all required fields then click Save. See QlikView Installation section above for reference.
a. QlikView Server Address – specify the ip address of the server where QlikView was installed.
b. Document Path – specify where QlikView report files are saved. Default location should be C:\ProgramData\QlikTech\Documents unless it was

ARGUS Symphony Installation Guide
changed during QlikView setup. See Install and set up QlikView for Symphony Application section above.
c. Template Name – QlikView filename (without the *.qvw extension) to be used as the template report. Default name should be “SYMQV Template” unless it was changed during QlikView setup. See Install and set up QlikView for Symphony Application section above.
d. QlikView Admin Username – specify a local admin user. Use QVIIS user that was created previously.
e. QlikView Admin Password – specify the password to use for the user specified as the QV admin user.
f. Confirm Password – re-enter the password set in the previous field. g. Ticket Service Name/IP - specify the server name or ip address of the
server where QlikView Ticketing service was installed above. h. Ticket Service Virtual Directory - specify the path where QlikView
Ticketing service was installed above.
4. Select the Other Settings tab on the left side.
a. Enter Organization ID.
Note: Organization ID must be the same name as the name of the folder created within QlikTech/Documents, within which SYMQV Template folder is located.

ARGUS Symphony Installation Guide

ARGUS Symphony Installation Guide
Miscellaneous Here are the additional steps to complete Symphony initial installation and troubleshooting items to assist with some common issues with deploying the application.
Generating an X.509 Certificate for Message-Level Security
Symphony incorporates message-level security which requires the use of an encrypted value, also known as a security certificate. This is a feature of Symphony which provides increased security. Users may be particularly pleased to have message-level security if Symphony Service and Web Applications are running on separate machines. Each customer must choose whether to purchase a security certificate, use an existing security certificate, or to use a developer security certificate. This section outlines how to create a developer security certificate. If you wish to purchase or provide your own generated certificate, please simply enter the encrypted value into Symphony installation utility. If you are generating a developer security certificate then you will need to install the application and quickly reinstall to add the certificate. Your install information will be saved to quickly complete the reinstall process. The steps outlined below walk through the process to generate an X.509 certificate. Generating this certificate will produce an encrypted value that needs to be used during Symphony installation process for message-level security. If this certificate is not generated and given to Symphony, the application will not work correctly. 1. Complete Symphony Service and Web Service installations. Then reinstall and follow
Symphony Web Service install Instructions (starting page 19 of the PDF) up to the end of step 10.
2. Open the Symphony Tools Folder provided to you with Symphony installation files.
3. Open the SelfCert folder, run the SelfCert.exe in Administrator mode .
Note: if you do not run in administrator mode it will not work.
4. Provide the following settings: a. X.500 distinguished name: cn=argusmdiservicecertificate b. Key size (bits) 4096 c. Valid to: 10 years into the future d. Save to cert store:
i. Location: LocalMachine ii. Store: My
1. Hit the Save button! 2. After the Key has been generated, close the application. You do not
need to copy your keys
5. Open an elevated MS Dos Prompt. To do this, right click on Command Prompt, and click Run as Administrator.
ARGUS Symphony Installation Guide
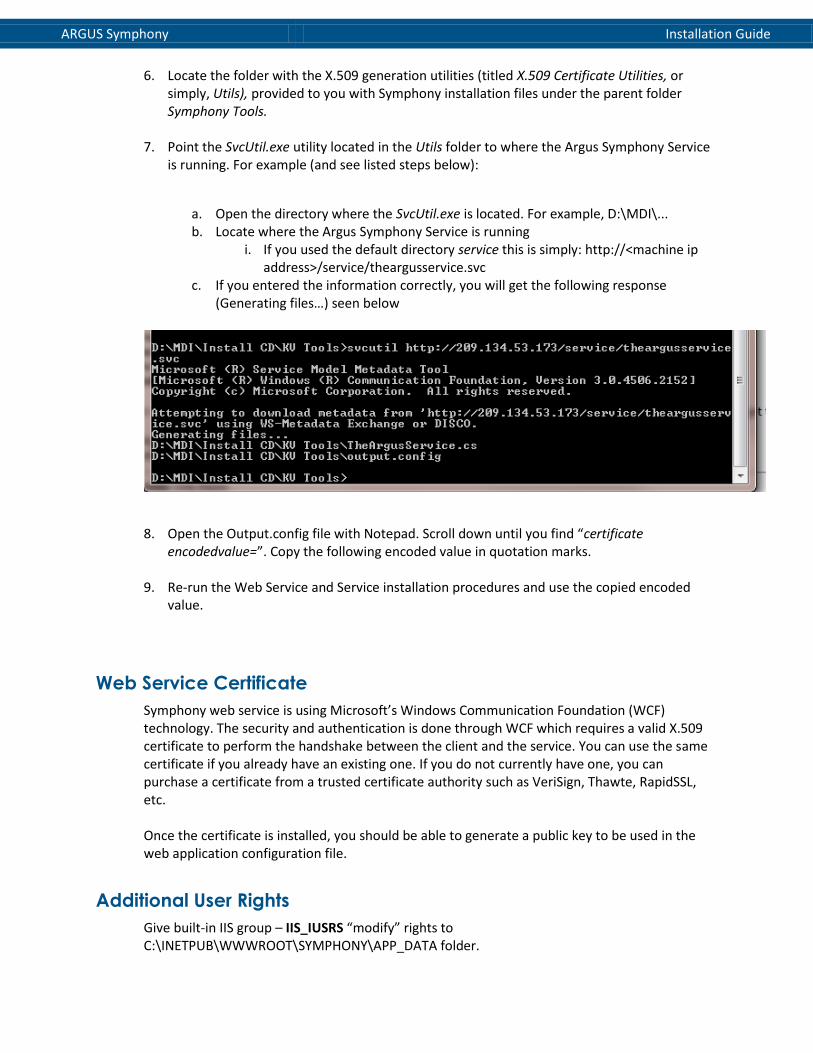
6. Locate the folder with the X.509 generation utilities (titled X.509 Certificate Utilities, or
simply, Utils), provided to you with Symphony installation files under the parent folder Symphony Tools.
7. Point the SvcUtil.exe utility located in the Utils folder to where the Argus Symphony Service is running. For example (and see listed steps below):
a. Open the directory where the SvcUtil.exe is located. For example, D:\MDI\... b. Locate where the Argus Symphony Service is running
i. If you used the default directory service this is simply: http://<machine ip address>/service/theargusservice.svc
c. If you entered the information correctly, you will get the following response (Generating files…) seen below
8. Open the Output.config file with Notepad. Scroll down until you find “certificate encodedvalue=”. Copy the following encoded value in quotation marks.
9. Re-run the Web Service and Service installation procedures and use the copied encoded value.
Web Service Certificate
Symphony web service is using Microsoft’s Windows Communication Foundation (WCF) technology. The security and authentication is done through WCF which requires a valid X.509 certificate to perform the handshake between the client and the service. You can use the same certificate if you already have an existing one. If you do not currently have one, you can purchase a certificate from a trusted certificate authority such as VeriSign, Thawte, RapidSSL, etc. Once the certificate is installed, you should be able to generate a public key to be used in the web application configuration file.
Additional User Rights
Give built-in IIS group – IIS_IUSRS “modify” rights to C:\INETPUB\WWWROOT\SYMPHONY\APP_DATA folder.

ARGUS Symphony Installation Guide
(Note: replace “Symphony” with actual web application virtual folder if the default path was not used during the web application installation.)
Google Maps API
Symphony uses Google Maps API to implement the mapping features within the application. Google Maps requires each environment to have its own API license before it is used in a production environment. Please review the links below for more information about how to acquire a license and Google Maps licensing terms: https://developers.google.com/maps/terms https://developers.google.com/maps/licensing
Using SSL
Each user will have to add the Symphony URL to his/her browser’s trusted site if Symphony website is using SSL. This will ensure that the mapping functionality included in Symphony will function properly.
Creating a QlikView report
Follow the steps below to create a blank QlikView report that can be used as the Symphony Template report or a starting point for creating a new QlikView report that can be uploaded to Symphony later. 10. Launch QlikView Desktop application and click the File/New menu to create a new report.
11. Next step is to set up the blank report to use the Symphony database as the data source.
Click the File/Edit Script menu to load the Edit Script screen
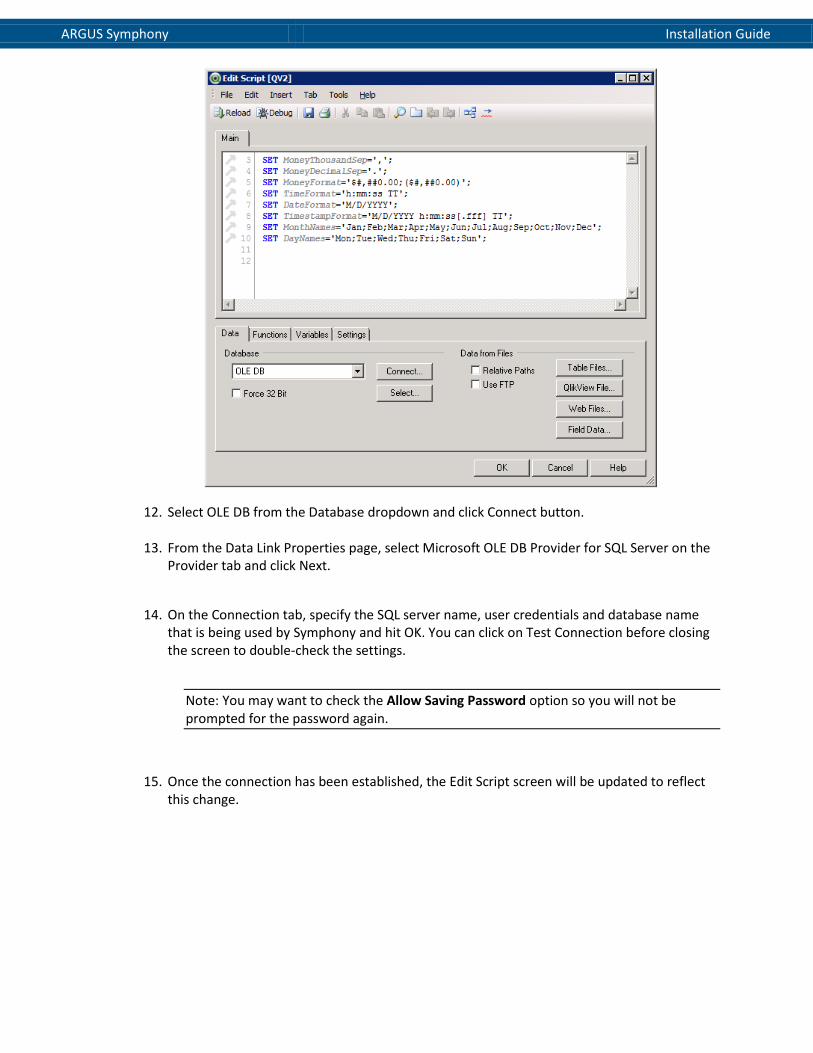
ARGUS Symphony Installation Guide
12. Select OLE DB from the Database dropdown and click Connect button.
13. From the Data Link Properties page, select Microsoft OLE DB Provider for SQL Server on the Provider tab and click Next.
14. On the Connection tab, specify the SQL server name, user credentials and database name that is being used by Symphony and hit OK. You can click on Test Connection before closing the screen to double-check the settings.
Note: You may want to check the Allow Saving Password option so you will not be prompted for the password again.
15. Once the connection has been established, the Edit Script screen will be updated to reflect this change.
ARGUS Symphony Installation Guide
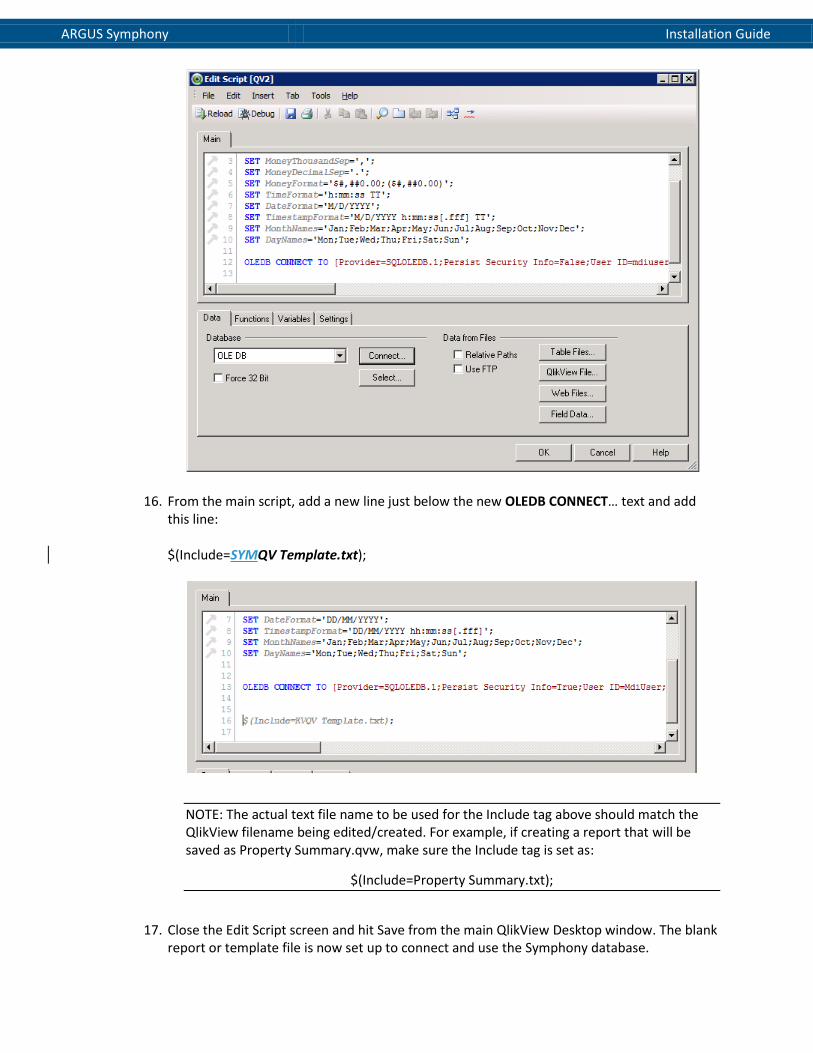
16. From the main script, add a new line just below the new OLEDB CONNECT… text and add this line: $(Include=SYMQV Template.txt);
NOTE: The actual text file name to be used for the Include tag above should match the QlikView filename being edited/created. For example, if creating a report that will be saved as Property Summary.qvw, make sure the Include tag is set as:
$(Include=Property Summary.txt);
17. Close the Edit Script screen and hit Save from the main QlikView Desktop window. The blank
report or template file is now set up to connect and use the Symphony database.
ARGUS Symphony Installation Guide
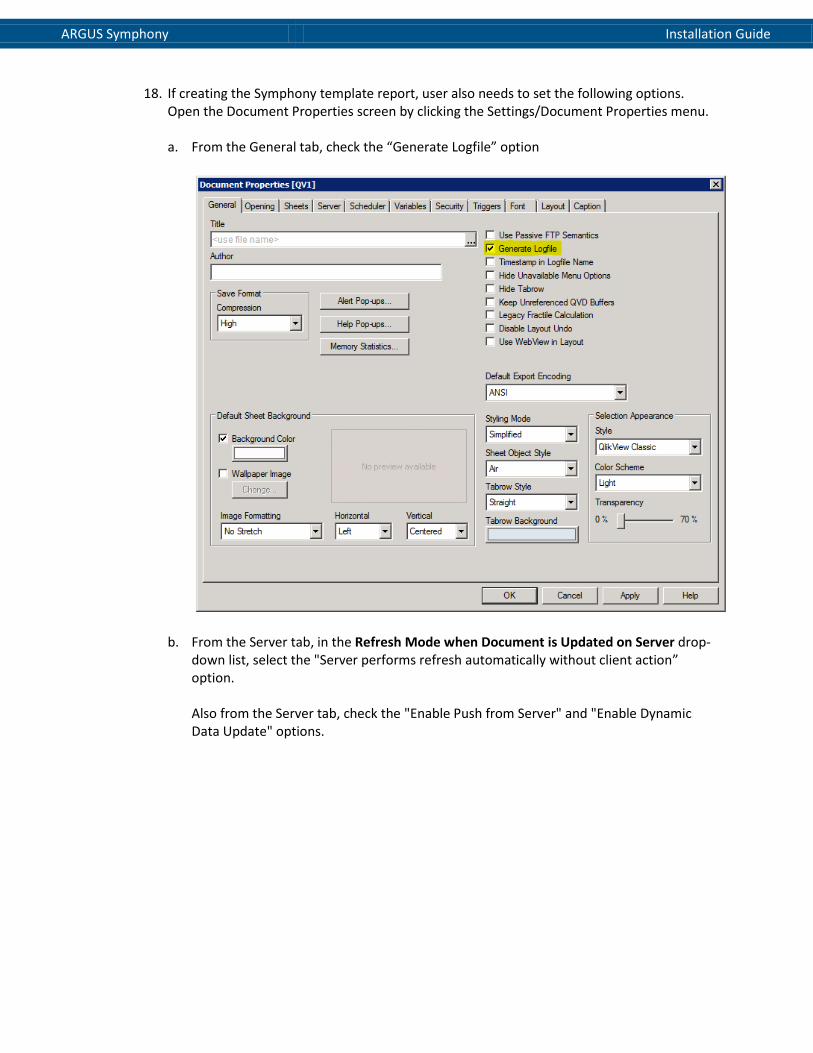
18. If creating the Symphony template report, user also needs to set the following options. Open the Document Properties screen by clicking the Settings/Document Properties menu. a. From the General tab, check the “Generate Logfile” option
b. From the Server tab, in the Refresh Mode when Document is Updated on Server drop-down list, select the "Server performs refresh automatically without client action” option. Also from the Server tab, check the "Enable Push from Server" and "Enable Dynamic Data Update" options.

ARGUS Symphony Installation Guide

ARGUS Symphony Installation Guide
Install QLikView SDK and Microsoft IIS Support Manually
Note: This will usually occur automatically during install. These steps can be taken after QlikView Install described previously in the document and server restart has been performedsteps described previously in the document.
1. Once the server has restarted, re-launch the installation program to setup the other
required components. Select Modify on the Program Maintenance screen and click Next.
2. Check if the initial installation didn’t install the IIS Support and SDK options.

ARGUS Symphony Installation Guide
3. Expand the Microsoft IIS Support node and make sure that the Microsoft IIS Support and
QlikView Tunnel ISAPI dll nodes will be installed. Click on each node and select “This feature will be installed on the local hard drive.” option from the drop-down menu. Perform the same steps on the QlikView SDK option.
4. Select Default Web Site when prompted for the IIS Website and continue with the rest of the installation wizard. Restart the server once the second installation is complete.
ARGUS Symphony Installation Guide
Chapter 3
Office Locations
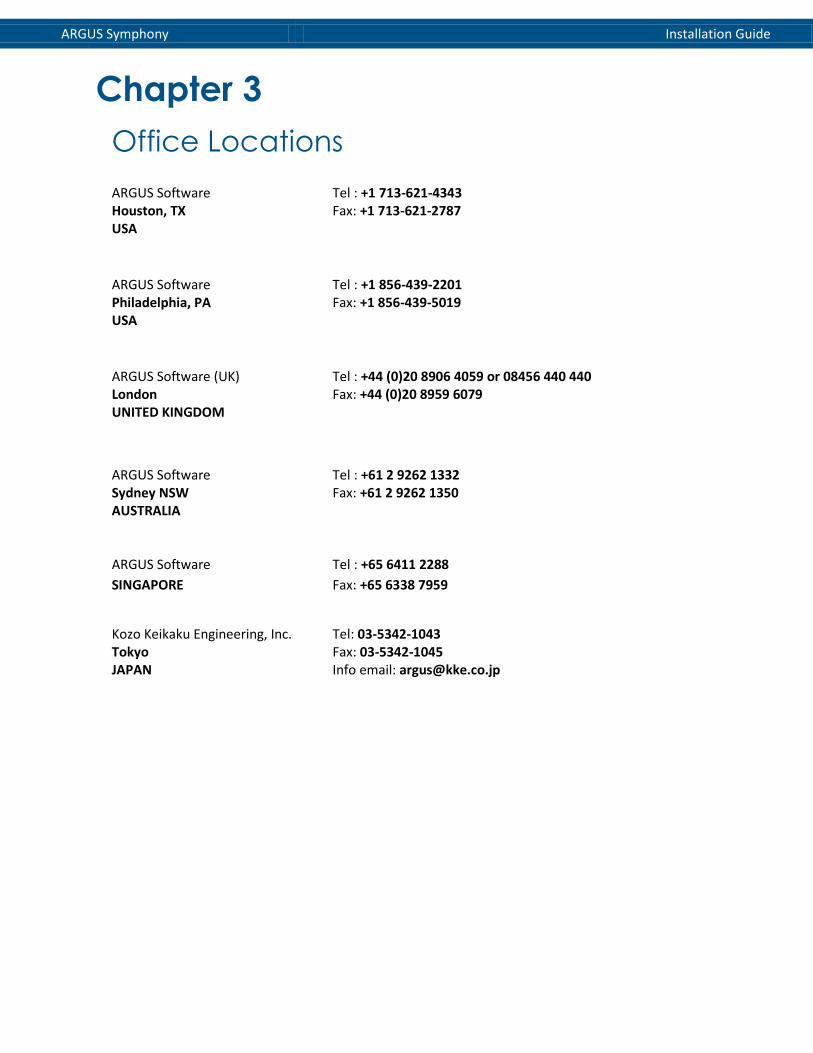
ARGUS Software Houston, TX USA
Tel : +1 713-621-4343 Fax: +1 713-621-2787
ARGUS Software Philadelphia, PA USA
Tel : +1 856-439-2201 Fax: +1 856-439-5019
ARGUS Software (UK) London UNITED KINGDOM
Tel : +44 (0)20 8906 4059 or 08456 440 440 Fax: +44 (0)20 8959 6079
ARGUS Software Sydney NSW AUSTRALIA
Tel : +61 2 9262 1332 Fax: +61 2 9262 1350
ARGUS Software
SINGAPORE
Tel : +65 6411 2288
Fax: +65 6338 7959
Kozo Keikaku Engineering, Inc. Tokyo JAPAN
Tel: 03-5342-1043 Fax: 03-5342-1045
Info email: [email protected]