product update circular codes: q1/q2/q3/ q4/q5/q6€¦ · · 2014-06-14procedures are not...
TRANSCRIPT

IMPORTANT INFORMATION Please inform and provide a copy of this document to every person in your dealership with campaign-related responsibilities, including Service, Parts and Accounting personnel. By law, dealers must correct, prior to delivery for sale or lease, any vehicle that fails to comply with an applicable Federal Motor Vehicle Safety Standard or that contains a defect relating to motor vehicle safety. If you have questions regarding this or any other campaign, please call (800) 741-2919.
The information in this document is intended for use only by skilled technicians who have the proper tools, equipment and training to correctly and safely maintain your vehicle. These procedures are not intended to be attempted by “do-it-yourselfers,” and you should not assume this document applies to your vehicle, or that your vehicle has the condition described. To determine whether this information applies, contact an authorized Volkswagen dealer. ©2006 Volkswagen of America, Inc. and Volkswagen Canada Inc. All Rights Reserved.
Q1/Q2/Q3/Q4/Q5/Q6 (90D7) Page 1 of 51
Product Update Circular Codes: Q1/Q2/Q3/
Q4/Q5/Q6 Subject: 2004-2006 MY Touareg Update Programming for Touareg December 2006 Product Update Description Depending on vehicle configuration, perform update programming. VIN Ranges of Affected Vehicles
2004- 2006 Touareg (U.S.A.) WVG_ _ _7L_4_000001 - WVG_ _ _7L_6_050817
2004-2006 Touareg (Canada) WVG_ _ _7L_4_000029 - WVG_ _ _7L_6_051184
NOTE: Check ELSAWeb on the day of repair to verify v ehicle
eligibility and attach the screen print to the repair order. This is the only valid campaign inquiry and verification source. Some vehicles may be involved in an additional action(s); any additional work can be done while the vehicle is in for this action.
Allocation Report of Affected Vehicles In the Service Manager’s Package, dealers with affected vehicles will receive a report containing the complete VIN with customer name and address data. Dealers will not receive a report if they have no affected vehicles. NOTE: The allocation report contains owner names and
addresses obtained from Motor Vehicle Registration Records. By law, this data may only be used for recall purposes. Use for any other reason may be a violation of law in many states/provinces. Accordingly, you must limit the use of this report.
Parts Allocation There will not be a parts allocation for this action. Product Update Expiration Date This action is effective until December 31, 2007. Dealers should keep this expiration date in mind and schedule vehicle repairs accordingly. Claims with a repair date after December 31, 2007 will not be eligible for payment under this action.
Claim Entry Procedure Immediately upon completion of the repair work, enter the correct code listed in one of the following
reimbursement charts. Claims will only be paid for vehicles that show one or more of the above campaign codes open in ELSAWeb on the day of the repair. To help ensure prompt and proper payment, attach the screen print to the repair order.
SEE FOLLOWING PAGES

The information in this document is intended for use only by skilled technicians who have the proper tools, equipment and training to correctly and safely maintain your vehicle. These procedures are not intended to be attempted by “do-it-yourselfers,” and you should not assume this document applies to your vehicle, or that your vehicle has the condition described. To determine whether this information applies, contact an authorized Volkswagen dealer. ©2006 Volkswagen of America, Inc. and Volkswagen Canada Inc. All Rights Reserved.
Q1/Q2/Q3/Q4/Q5/Q6 (90D7) Page 2 of 51
Q1 REIMBURSEMENT
Loaner Eligibility
SUB LABOR One-day Loaner @ $30/day (USA) One-day Loaner @ $35/day (CAD)
Vehicle is eligible for loaner only if: • customer requests loaner and • repair exceeds two (2) hours
If campaigns M9, N5, and /or N6 are performed simultaneously with the Q1, Q2, Q3, Q4, Q5 or Q6 campaigns, a loaner vehicle can only be claimed on ONE campaign. Multiple claims for a loaner vehicle will be debited.
Damage Time Code Units CRITERIA 16, 21 Work Scope
Q1 12 50 T.U. Check/Update: • Comfort Control Module, • Differential Control Module
(NOTE: If the differential motor required replacement, contact the Campaign Helpline at (800) 741-2919) to obtain claim entry instructions.
Q1 20 0 T.U. - Customer refused repairs
See Loaner Eligibility on chart below There is NO reimbursement for Vehicle Wash
The system will enter labor & parts applicable to the codes above

The information in this document is intended for use only by skilled technicians who have the proper tools, equipment and training to correctly and safely maintain your vehicle. These procedures are not intended to be attempted by “do-it-yourselfers,” and you should not assume this document applies to your vehicle, or that your vehicle has the condition described. To determine whether this information applies, contact an authorized Volkswagen dealer. ©2006 Volkswagen of America, Inc. and Volkswagen Canada Inc. All Rights Reserved.
Q1/Q2/Q3/Q4/Q5/Q6 (90D7) Page 3 of 51
Q2 REIMBURSEMENT
Loaner Eligibility
SUB LABOR One-day Loaner @ $30/day (USA) One-day Loaner @ $35/day (CAD)
Vehicle is eligible for loaner only if: • customer requests loaner and • repair exceeds two (2) hours
If campaigns M9, N5, and /or N6 are performed simultaneously with the Q1, Q2, Q3, Q4, Q5 or Q6 campaigns, a loaner vehicle can only be claimed on ONE campaign. Multiple claims for a loaner vehicle will be debited.
Damage Time Code Units CRITERIA 16, 20, 21 Work Scope
Q2 12 60 T.U. Check/Update: • Comfort Control Module • Transmission Control Module, • Differential Control Module
(NOTE: If the differential motor required replacement, contact the Campaign Helpline at (800) 741-2919) to obtain claim entry instructions.
Q2 20 0 T.U. - Customer refused repairs
See Loaner Eligibility on chart below There is NO reimbursement for Vehicle Wash
The system will enter labor & parts applicable to the codes above
The information in this document is intended for use only by skilled technicians who have the proper tools, equipment and training to correctly and safely maintain your vehicle. These procedures are not intended to be attempted by “do-it-yourselfers,” and you should not assume this document applies to your vehicle, or that your vehicle has the condition described. To determine whether this information applies, contact an authorized Volkswagen dealer. ©2006 Volkswagen of America, Inc. and Volkswagen Canada Inc. All Rights Reserved.
Q1/Q2/Q3/Q4/Q5/Q6 (90D7) Page 4 of 51
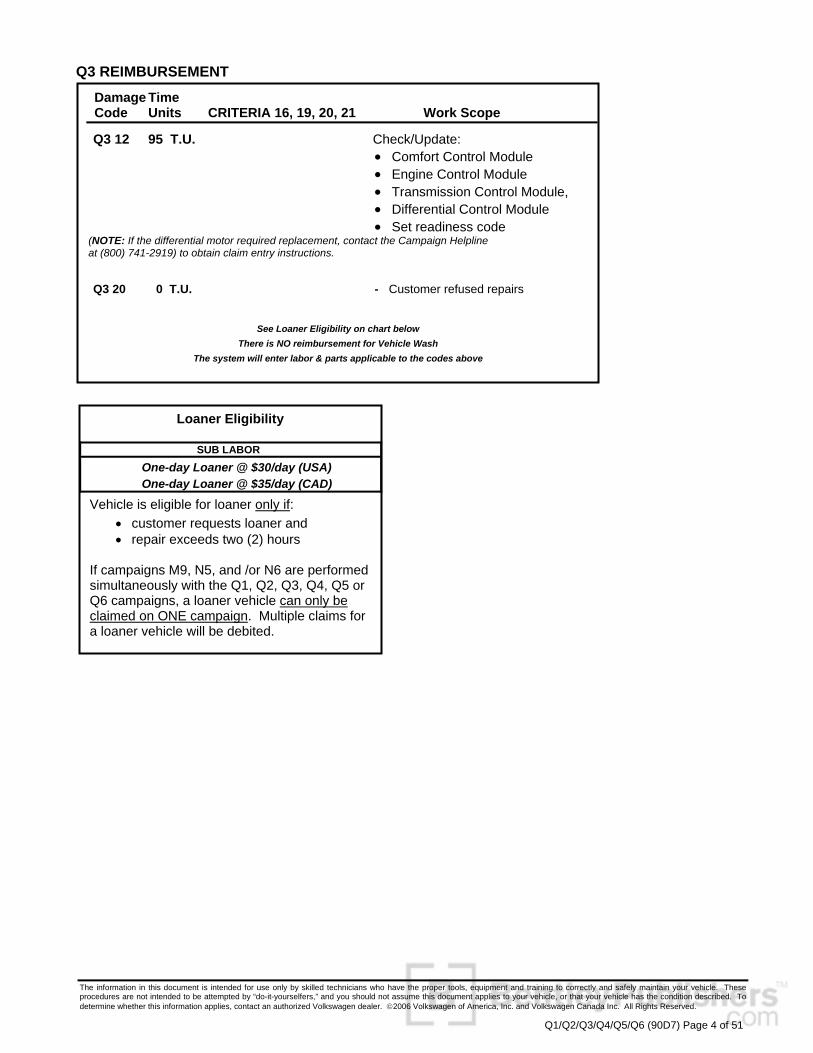
Q3 REIMBURSEMENT
Loaner Eligibility
SUB LABOR One-day Loaner @ $30/day (USA) One-day Loaner @ $35/day (CAD)
Vehicle is eligible for loaner only if: • customer requests loaner and • repair exceeds two (2) hours
If campaigns M9, N5, and /or N6 are performed simultaneously with the Q1, Q2, Q3, Q4, Q5 or Q6 campaigns, a loaner vehicle can only be claimed on ONE campaign. Multiple claims for a loaner vehicle will be debited.
Damage Time Code Units CRITERIA 16, 19, 20, 21 Work Scope
Q3 12 95 T.U. Check/Update: • Comfort Control Module • Engine Control Module • Transmission Control Module, • Differential Control Module • Set readiness code
(NOTE: If the differential motor required replacement, contact the Campaign Helpline at (800) 741-2919) to obtain claim entry instructions.
Q3 20 0 T.U. - Customer refused repairs
See Loaner Eligibility on chart below There is NO reimbursement for Vehicle Wash
The system will enter labor & parts applicable to the codes above

The information in this document is intended for use only by skilled technicians who have the proper tools, equipment and training to correctly and safely maintain your vehicle. These procedures are not intended to be attempted by “do-it-yourselfers,” and you should not assume this document applies to your vehicle, or that your vehicle has the condition described. To determine whether this information applies, contact an authorized Volkswagen dealer. ©2006 Volkswagen of America, Inc. and Volkswagen Canada Inc. All Rights Reserved.
Q1/Q2/Q3/Q4/Q5/Q6 (90D7) Page 5 of 51
Q4 REIMBURSEMENT
Loaner Eligibility
SUB LABOR One-day Loaner @ $30/day (USA) One-day Loaner @ $35/day (CAD)
Vehicle is eligible for loaner only if: • customer requests loaner and • repair exceeds two (2) hours
If campaigns M9, N5, and /or N6 are performed simultaneously with the Q1, Q2, Q3, Q4, Q5 or Q6 campaigns, a loaner vehicle can only be claimed on ONE campaign. Multiple claims for a loaner vehicle will be debited.
Damage Time Code Units CRITERION 21 Work Scope
Q4 12 40 T.U. Check/Update: • Differential Control Module
(NOTE: If the differential motor required replacement, contact the Campaign Helpline at (800) 741-2919) to obtain claim entry instructions.
Q4 20 0 T.U. - Customer refused repairs
See Loaner Eligibility on chart below There is NO reimbursement for Vehicle Wash
The system will enter labor & parts applicable to the codes above

The information in this document is intended for use only by skilled technicians who have the proper tools, equipment and training to correctly and safely maintain your vehicle. These procedures are not intended to be attempted by “do-it-yourselfers,” and you should not assume this document applies to your vehicle, or that your vehicle has the condition described. To determine whether this information applies, contact an authorized Volkswagen dealer. ©2006 Volkswagen of America, Inc. and Volkswagen Canada Inc. All Rights Reserved.
Q1/Q2/Q3/Q4/Q5/Q6 (90D7) Page 6 of 51
Q5 REIMBURSEMENT (United States) Q5 REIMBURSEMENT (CANADA)
Loaner Eligibility
SUB LABOR One-day Loaner @ $30/day (USA) One-day Loaner @ $35/day (CAD)
Vehicle is eligible for loaner only if: • customer requests loaner and • repair exceeds two (2) hours
If campaigns M9, N5, and /or N6 are performed simultaneously with the Q1, Q2, Q3, Q4, Q5 or Q6 campaigns, a loaner vehicle can only be claimed on ONE campaign. Multiple claims for a loaner vehicle will be debited.
Damage Time Code Units CRITERION 22 Work Scope
Q5 11 30 T.U. Check/Flash Instrument Cluster level
Q5 12 90 T.U. Check/Replace Instrument Cluster 1 7L6 920 980MX Instrument Cluster (USA)
Q5 13 90 T.U. Check/Replace Instrument Cluster 1 7L6 920 980PX Instrument Cluster (USA)
Q5 14 90 T.U. Check/Replace Instrument Cluster 1 7L6 920 981X Instrument Cluster (USA)
Q5 14 90 T.U. Check/Replace Instrument Cluster 1 7L6 920 981BX Instrument Cluster (USA) Q5 20 0 T.U. Customer refused repairs
See Loaner Eligibility on chart below
There is NO reimbursement for Vehicle Wash The system will enter labor & parts applicable to the codes above
Damage Time Code Units CRITERION 22 Work Scope
Q5 11 30 T.U. Check/Flash Instrument Cluster level
Q5 1A 90 T.U. Check/Replace Instrument Cluster 1 7L6 920 880QX Instrument Cluster (CAN)
Q5 1B 90 T.U. Check/Replace Instrument Cluster 1 7L6 920 881CX Instrument Cluster (CAN)
Q5 1C 90 T.U. Check/Replace Instrument Cluster 1 7L6 920 881DX Instrument Cluster (CAN)
Q5 1H 90 T.U. Check/Replace Instrument Cluster 1 7L6 920 881FX Instrument Cluster (CAN) Q5 20 0 T.U. Customer refused repairs
See Loaner Eligibility on chart below
There is NO reimbursement for Vehicle Wash The system will enter labor & parts applicable to the codes above

The information in this document is intended for use only by skilled technicians who have the proper tools, equipment and training to correctly and safely maintain your vehicle. These procedures are not intended to be attempted by “do-it-yourselfers,” and you should not assume this document applies to your vehicle, or that your vehicle has the condition described. To determine whether this information applies, contact an authorized Volkswagen dealer. ©2006 Volkswagen of America, Inc. and Volkswagen Canada Inc. All Rights Reserved.
Q1/Q2/Q3/Q4/Q5/Q6 (90D7) Page 7 of 51
Q6 REIMBURSEMENT
Loaner Eligibility
SUB LABOR One-day Loaner @ $30/day (USA) One-day Loaner @ $35/day (CAD)
Vehicle is eligible for loaner only if: • customer requests loaner and • repair exceeds two (2) hours
If campaigns M9, N5, and /or N6 are performed simultaneously with the Q1, Q2, Q3, Q4, Q5 or Q6 campaigns, a loaner vehicle can only be claimed on ONE campaign. Multiple claims for a loaner vehicle will be debited.
Damage Time Code Units CRITERIA 3 Work Scope
Q6 11 10 T.U. Check/Update DVD Navigation Q6 20 0 T.U. Customer refused repairs
See Loaner Eligibility on chart below There is NO reimbursement for Vehicle Wash
The system will enter labor & parts applicable to the codes above

The information in this document is intended for use only by skilled technicians who have the proper tools, equipment and training to correctly and safely maintain your vehicle. These procedures are not intended to be attempted by “do-it-yourselfers,” and you should not assume this document applies to your vehicle, or that your vehicle has the condition described. To determine whether this information applies, contact an authorized Volkswagen dealer. ©2006 Volkswagen of America, Inc. and Volkswagen Canada Inc. All Rights Reserved.
Q1/Q2/Q3/Q4/Q5/Q6 (90D7) Page 8 of 51
Campaign Work Procedure Q1/Q2/Q3/Q4/Q5/Q6 Product Updates Control Module Adaptation / Updating
Note: Navigation flash is only applicable to mid-2005–2006 MY Touareg vehicles with DVD Navigation and not CD Rom Navigation
Possible Required Parts
Criteria Description Part Number 21 Differential Motor Reference ETKA 22 Instrument Cluster Reference ETKA
Special Tools:
⇐ VAS 5051B Diagnostic tester with minimum basic CD 10.07.01 and VW brand CD V 10.72.01 ⇐ Software updates for control units -
part number 90D7 (Supplied in December 2006 dealer package)
• W42TOURSWU47 DVD Navigation Update CD
- previously provided to dealers • Battery charger or equivalent
This procedure descibes the following :
Criteria Description 03 Update DVD Navigation unit 16 Adapting Comfort system control module software 19 Adapting Engine Control Module (ECM) software (V6 Engine – USA only) 20 Adapting Transmission Control Module (TCM) software (USA only) 21 Differential Control Module, adapting software 22 Adapt Instrument cluster software

The information in this document is intended for use only by skilled technicians who have the proper tools, equipment and training to correctly and safely maintain your vehicle. These procedures are not intended to be attempted by “do-it-yourselfers,” and you should not assume this document applies to your vehicle, or that your vehicle has the condition described. To determine whether this information applies, contact an authorized Volkswagen dealer. ©2006 Volkswagen of America, Inc. and Volkswagen Canada Inc. All Rights Reserved.
Q1/Q2/Q3/Q4/Q5/Q6 (90D7) Page 9 of 51
Work Sequence Criterion 03
Navigation Level Checking and Updating
Note: Be aware that checking the vehicle for DVD Navigation update eligibility takes only a couple of minutes, and the update, if necessary, takes 50 minutes. Once the update has started, the ignition cannot be switched on and the vehicle cannot be started. The vehicle can be left unattended for the updating process, and software will complete the process by itself
We recommend that this DVD update
be done prior to, or directly after, any other work on the vehicle
• Battery MUST have a minimum no load
charge of 12.5 V (failure to maintain voltage during update process can lead to instrument cluster failure). Use an approved battery charger to maintain battery voltage
• Any appliances with high electromagnetic
radiation, i.e. mobile phone, should be switched OFF
• Record radio presets before starting
procedure
Tip: If the unit is left on for more than one hour, it will switch off to conserve battery power. Switch the unit back “ON” and continue from previous step

The information in this document is intended for use only by skilled technicians who have the proper tools, equipment and training to correctly and safely maintain your vehicle. These procedures are not intended to be attempted by “do-it-yourselfers,” and you should not assume this document applies to your vehicle, or that your vehicle has the condition described. To determine whether this information applies, contact an authorized Volkswagen dealer. ©2006 Volkswagen of America, Inc. and Volkswagen Canada Inc. All Rights Reserved.
Q1/Q2/Q3/Q4/Q5/Q6 (90D7) Page 10 of 51
• Remove key from ignition ⇐ Press Power knob -arrow-
⇐ Eject any disc in Navigation unit DVD drive
using the Eject button -arrow-
⇐ Press “Accept” soft key -arrow-

The information in this document is intended for use only by skilled technicians who have the proper tools, equipment and training to correctly and safely maintain your vehicle. These procedures are not intended to be attempted by “do-it-yourselfers,” and you should not assume this document applies to your vehicle, or that your vehicle has the condition described. To determine whether this information applies, contact an authorized Volkswagen dealer. ©2006 Volkswagen of America, Inc. and Volkswagen Canada Inc. All Rights Reserved.
Q1/Q2/Q3/Q4/Q5/Q6 (90D7) Page 11 of 51
⇐ Press “BAND” button -white arrow- ⇐ Press “Settings” soft key -black arrow-
Tip: On some units, the button is labeled “RADIO” instead of “BAND”
⇐ Press “Syst. settings” soft key -arrow
⇐ Press and hold “Factory Set.” soft key -arrow-
for at least 6 seconds until next screen appears

The information in this document is intended for use only by skilled technicians who have the proper tools, equipment and training to correctly and safely maintain your vehicle. These procedures are not intended to be attempted by “do-it-yourselfers,” and you should not assume this document applies to your vehicle, or that your vehicle has the condition described. To determine whether this information applies, contact an authorized Volkswagen dealer. ©2006 Volkswagen of America, Inc. and Volkswagen Canada Inc. All Rights Reserved.
Q1/Q2/Q3/Q4/Q5/Q6 (90D7) Page 12 of 51
⇐ Press “System Info” soft key -arrow-
⇐ Press soft key -arrow- next to downward
double arrow on the right side of the screen
⇐ Check 4-digit number -arrow-
- If the last two digits read 47 or higher, no further work required; press “BACK” twice to discontinue procedure
- If the last two digits read 46 or lower, continue to update flashing

The information in this document is intended for use only by skilled technicians who have the proper tools, equipment and training to correctly and safely maintain your vehicle. These procedures are not intended to be attempted by “do-it-yourselfers,” and you should not assume this document applies to your vehicle, or that your vehicle has the condition described. To determine whether this information applies, contact an authorized Volkswagen dealer. ©2006 Volkswagen of America, Inc. and Volkswagen Canada Inc. All Rights Reserved.
Q1/Q2/Q3/Q4/Q5/Q6 (90D7) Page 13 of 51
Tip: The next step is not the software download
If CD does not load or NO DVD installed, eject programming CD, install Navigational DVD, select MAP, wait until a map displays, remove Navigational DVD and install programming CD to continue update
If programming CD will not eject, refer to subject matter: Radio/Navigation System “Sound II” will not accept CD during PDI, will not play audio CD (T.B. V000502 or later)
⇐ Press NAV button -arrow, wait until Software
version screen appears (during this time the screen display may change rapidly, this is normal operation, wait for the load screen in the next step)
Tip: If this screen does not appear after 10 minutes, eject CD and reinstall Data shown in screen shot is for illustration ONLY. Actual dates may differ depending upon the production date of the unit
⇐ Similar screen appears ⇐ Select “Load” soft key -arrow-
The information in this document is intended for use only by skilled technicians who have the proper tools, equipment and training to correctly and safely maintain your vehicle. These procedures are not intended to be attempted by “do-it-yourselfers,” and you should not assume this document applies to your vehicle, or that your vehicle has the condition described. To determine whether this information applies, contact an authorized Volkswagen dealer. ©2006 Volkswagen of America, Inc. and Volkswagen Canada Inc. All Rights Reserved.
Q1/Q2/Q3/Q4/Q5/Q6 (90D7) Page 14 of 51
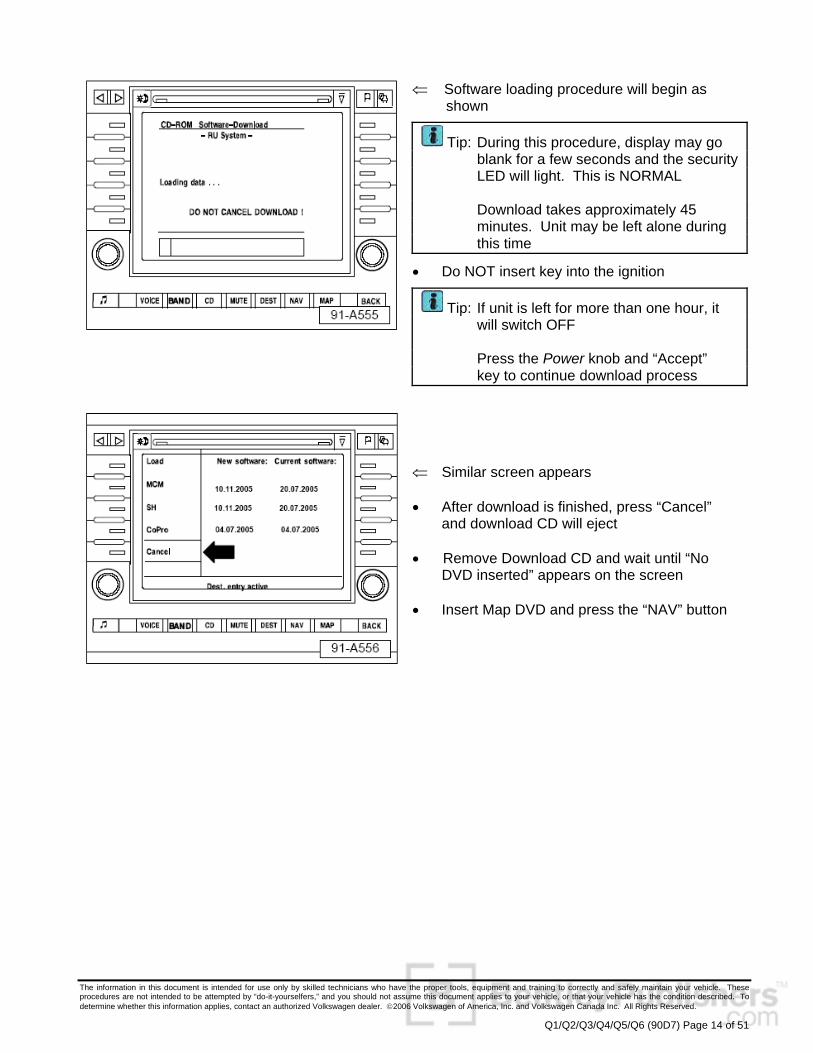
⇐ Software loading procedure will begin as
shown
Tip: During this procedure, display may go blank for a few seconds and the security LED will light. This is NORMAL Download takes approximately 45 minutes. Unit may be left alone during this time
• Do NOT insert key into the ignition
Tip: If unit is left for more than one hour, it will switch OFF Press the Power knob and “Accept” key to continue download process
⇐ Similar screen appears • After download is finished, press “Cancel”
and download CD will eject • Remove Download CD and wait until “No
DVD inserted” appears on the screen • Insert Map DVD and press the “NAV” button

The information in this document is intended for use only by skilled technicians who have the proper tools, equipment and training to correctly and safely maintain your vehicle. These procedures are not intended to be attempted by “do-it-yourselfers,” and you should not assume this document applies to your vehicle, or that your vehicle has the condition described. To determine whether this information applies, contact an authorized Volkswagen dealer. ©2006 Volkswagen of America, Inc. and Volkswagen Canada Inc. All Rights Reserved.
Q1/Q2/Q3/Q4/Q5/Q6 (90D7) Page 15 of 51
Tip: New software will take approximately four minutes to load
⇐ Wait until Navigation main menu appears • Flashing procedure is complete – eject Map
DVD and return it to it’s original storage place • Reset all preset radio stations • Press Power knob to switch Navigation unit
OFF
Tip: If no presets were saved, switch on Navigation unit, press “BAND” button (On some units, the button is labeled “RADIO” instead of “BAND”) Press and hold “Autostore” soft key for at least 10 seconds until an audible beep indicates that “Initial Autostore” is started Wait until “Initial Autostore” completes and radio begins to play a station

The information in this document is intended for use only by skilled technicians who have the proper tools, equipment and training to correctly and safely maintain your vehicle. These procedures are not intended to be attempted by “do-it-yourselfers,” and you should not assume this document applies to your vehicle, or that your vehicle has the condition described. To determine whether this information applies, contact an authorized Volkswagen dealer. ©2006 Volkswagen of America, Inc. and Volkswagen Canada Inc. All Rights Reserved.
Q1/Q2/Q3/Q4/Q5/Q6 (90D7) Page 16 of 51
Section A – Update Preparation
Tip: When performing the reflash procedure, ALL DTCs for all systems are erased. DTCs linked to Guided Fault Finding function tests will be lost. Therefore, always address stored DTCs for Customer concerns unrelated to the reflash procedure first
The following “Update – Programming” (flashing) process may overwrite any “TUNED” ECM/TCM programming. A “TUNED” ECM/TCM is described as any ECM/TCM altered so as to perform outside the normal parameters and specifications approved by Volkswagen of America, Inc.
If you encounter a vehicle with a “Tuned” ECM or TCM, prior to performing the “Update – Programming” (flashing) procedure:
Your Dealership should place the vehicle owner on notice in writing, that their ECM or TCM was found to have been tuned, and that any damage caused by the tuning of the ECM or TCM (including any adverse emissions consequences) will not be covered by Volkswagen of America, Inc. warranties
For any repair requested by the owner under warranty or outside warranty that requires flashing, which will automatically wipe out the “Tuning” program, your Dealership should advise the owner of the above and get his written consent to the flashing procedure (-click here- for ECM / TCM Tuning form)
• Battery MUST have a minimum no load
charge of 12.5 V (failure to maintain voltage during update process can lead to instrument cluster failure). Use an approved battery charger to maintain battery voltage

The information in this document is intended for use only by skilled technicians who have the proper tools, equipment and training to correctly and safely maintain your vehicle. These procedures are not intended to be attempted by “do-it-yourselfers,” and you should not assume this document applies to your vehicle, or that your vehicle has the condition described. To determine whether this information applies, contact an authorized Volkswagen dealer. ©2006 Volkswagen of America, Inc. and Volkswagen Canada Inc. All Rights Reserved.
Q1/Q2/Q3/Q4/Q5/Q6 (90D7) Page 17 of 51
Tip: All mechanical updates (M9, N5 & N6) must be performed prior to adapting control modules
• Open hood and remove left side plenum cover
over fuse relay box • Remove front triangular cover portion from
fuse box ⇐ Remove 60A fuse from position 1 and 30A
fuse from position 2
Tip: Fuses 1 and 2 need to be removed ONLY for adapting instrument cluster software
• Open both front doors and remove instrument
panel end covers ⇐ Remove 15A fuse from position 35 in fuse box
on left side of instrument panel and 15A fuse from position 17 in fuse box on right side of instrument panel
Tip: Fuses 17 and 35 are removed to turn off headlights
• Battery MUST have a minimum no load charge of 12.5 V (failure to maintain voltage during update process can lead to instrument cluster failure). Use an approved battery charger to maintain battery voltage
• Any appliances with high electromagnetic
radiation, i.e. mobile phone, should be switched OFF
• Attach battery charger to vehicle

The information in this document is intended for use only by skilled technicians who have the proper tools, equipment and training to correctly and safely maintain your vehicle. These procedures are not intended to be attempted by “do-it-yourselfers,” and you should not assume this document applies to your vehicle, or that your vehicle has the condition described. To determine whether this information applies, contact an authorized Volkswagen dealer. ©2006 Volkswagen of America, Inc. and Volkswagen Canada Inc. All Rights Reserved.
Q1/Q2/Q3/Q4/Q5/Q6 (90D7) Page 18 of 51
• Connect VAS 5051B diagnostic tester to the
vehicle • Apply the parking brake and switch ignition to
“ON” position ⇐ On the diagnostic tool start up screen select
“Guided Fault Finding”
⇐ Select Volkswagen
Note: VAS 5051B Diagonistic Tester must have base CD 10.01.00 or higher and brand CD 10.72.01 or higher
⇐ Select 7L – Touareg 2003 > only
USA/Canada -arrow-

The information in this document is intended for use only by skilled technicians who have the proper tools, equipment and training to correctly and safely maintain your vehicle. These procedures are not intended to be attempted by “do-it-yourselfers,” and you should not assume this document applies to your vehicle, or that your vehicle has the condition described. To determine whether this information applies, contact an authorized Volkswagen dealer. ©2006 Volkswagen of America, Inc. and Volkswagen Canada Inc. All Rights Reserved.
Q1/Q2/Q3/Q4/Q5/Q6 (90D7) Page 19 of 51
⇐ Select applicable vehicle model year
⇐ Select sedan
⇐ Select engine applicable to vehicle
Tip: Engine code can be found on label under carpet in trunk

The information in this document is intended for use only by skilled technicians who have the proper tools, equipment and training to correctly and safely maintain your vehicle. These procedures are not intended to be attempted by “do-it-yourselfers,” and you should not assume this document applies to your vehicle, or that your vehicle has the condition described. To determine whether this information applies, contact an authorized Volkswagen dealer. ©2006 Volkswagen of America, Inc. and Volkswagen Canada Inc. All Rights Reserved.
Q1/Q2/Q3/Q4/Q5/Q6 (90D7) Page 20 of 51
⇐ Confirm vehicle identification is correct and
press the forward arrow button to check all control units for DTCs
⇐ Diagnostic tester checks all control units for
DTCs
⇐ After checking control units, a note is
displayed that checked control units are highlighted
⇐ Press the “OK” button, then press forward
arrow

The information in this document is intended for use only by skilled technicians who have the proper tools, equipment and training to correctly and safely maintain your vehicle. These procedures are not intended to be attempted by “do-it-yourselfers,” and you should not assume this document applies to your vehicle, or that your vehicle has the condition described. To determine whether this information applies, contact an authorized Volkswagen dealer. ©2006 Volkswagen of America, Inc. and Volkswagen Canada Inc. All Rights Reserved.
Q1/Q2/Q3/Q4/Q5/Q6 (90D7) Page 21 of 51
⇐ Read information on screen, then press “Done”
⇐ This screen indicating comfort control module
has an incorrect software version may be displayed, press the Done button, otherwise continue to next step
Note: Make copy of DTCs for later reference
⇐ Press the “Go To” button and select
Functions/Component Selections

The information in this document is intended for use only by skilled technicians who have the proper tools, equipment and training to correctly and safely maintain your vehicle. These procedures are not intended to be attempted by “do-it-yourselfers,” and you should not assume this document applies to your vehicle, or that your vehicle has the condition described. To determine whether this information applies, contact an authorized Volkswagen dealer. ©2006 Volkswagen of America, Inc. and Volkswagen Canada Inc. All Rights Reserved.
Q1/Q2/Q3/Q4/Q5/Q6 (90D7) Page 22 of 51
⇐ Select Field actions -arrow-
⇐ Select Service action 90D7 and press forward
arrow button
⇐ Service action 90D7 is highlighted, press the
forward arrow button

The information in this document is intended for use only by skilled technicians who have the proper tools, equipment and training to correctly and safely maintain your vehicle. These procedures are not intended to be attempted by “do-it-yourselfers,” and you should not assume this document applies to your vehicle, or that your vehicle has the condition described. To determine whether this information applies, contact an authorized Volkswagen dealer. ©2006 Volkswagen of America, Inc. and Volkswagen Canada Inc. All Rights Reserved.
Q1/Q2/Q3/Q4/Q5/Q6 (90D7) Page 23 of 51
⇐ Press button -1- for doing software adaptation
using CD Rom and continue to next step
Tip: Online updating currently NOT available
⇐ Software adaptation is being done from CD
ROM, insert CD (90D7) into diagnostic tester and press the “Done” button
⇐ Read information screen and press “Done”
button

The information in this document is intended for use only by skilled technicians who have the proper tools, equipment and training to correctly and safely maintain your vehicle. These procedures are not intended to be attempted by “do-it-yourselfers,” and you should not assume this document applies to your vehicle, or that your vehicle has the condition described. To determine whether this information applies, contact an authorized Volkswagen dealer. ©2006 Volkswagen of America, Inc. and Volkswagen Canada Inc. All Rights Reserved.
Q1/Q2/Q3/Q4/Q5/Q6 (90D7) Page 24 of 51
⇐ Reminder screen for connecting battery
charger, fuse removal, etc. is displayed (This work should have been previously done) ⇐ Press “Done” button
⇐ Select control unit to be adapted, press forward arrow button and go to:
- Section B for Criterion 16 - Adapting Comfort System Control Module Software
- Section C for Criterion 19 - Adapting Engine Control Module (ECM) Software (V6 Engine – USA only)
- Section D for Criterion 20 - Adapting Transmission Control Module (TCM) Software (USA only)
- Section E for Criterion 21 - Adapting Differential Control Module, Adapting Software
- Section F for Criterion 22 - Adapt Instrument Cluster Software
Tip: Adapting door control module software is not applicable to any vehicle in this update program

The information in this document is intended for use only by skilled technicians who have the proper tools, equipment and training to correctly and safely maintain your vehicle. These procedures are not intended to be attempted by “do-it-yourselfers,” and you should not assume this document applies to your vehicle, or that your vehicle has the condition described. To determine whether this information applies, contact an authorized Volkswagen dealer. ©2006 Volkswagen of America, Inc. and Volkswagen Canada Inc. All Rights Reserved.
Q1/Q2/Q3/Q4/Q5/Q6 (90D7) Page 25 of 51
Criterion 16 Section B – Adapting Comfort System Control Module Software
⇐ Read Note and Caution information on
screen and press the “Done” button • Wait until part number is checked
⇐ If this screen is displayed, control module
does not need an update; press “Done” button to return to user test plan screen for control module selection (shown at end of this Section B), otherwise; continue
⇐ This screen is displayed while control module
is being updated, wait approx. 2 min. for completion

The information in this document is intended for use only by skilled technicians who have the proper tools, equipment and training to correctly and safely maintain your vehicle. These procedures are not intended to be attempted by “do-it-yourselfers,” and you should not assume this document applies to your vehicle, or that your vehicle has the condition described. To determine whether this information applies, contact an authorized Volkswagen dealer. ©2006 Volkswagen of America, Inc. and Volkswagen Canada Inc. All Rights Reserved.
Q1/Q2/Q3/Q4/Q5/Q6 (90D7) Page 26 of 51
⇐ Screen is displayed indicating comfort system
central control module has been adapted, press “Done” button
• “OK” is displayed on screen in front of control
module that has been checked or adapted
⇐ Select control module to be adapted, press the forward arrow button and go to:
- Section C for Criterion 19 - Adapting Engine Control Module (ECM) Software (V6 Engine – USA only)
- Section D for Criterion 20 - Adapting Transmission Control Module (TCM) Software (USA only)
- Section E for Criterion 21 - Adapting Differential Control Module, Adapting Software
- Section F for Criterion 22 - Adapt Instrument Cluster Software
- If there are no other control modules to be adapted, go to Section G

The information in this document is intended for use only by skilled technicians who have the proper tools, equipment and training to correctly and safely maintain your vehicle. These procedures are not intended to be attempted by “do-it-yourselfers,” and you should not assume this document applies to your vehicle, or that your vehicle has the condition described. To determine whether this information applies, contact an authorized Volkswagen dealer. ©2006 Volkswagen of America, Inc. and Volkswagen Canada Inc. All Rights Reserved.
Q1/Q2/Q3/Q4/Q5/Q6 (90D7) Page 27 of 51
Criterion 19
Section C – Adapting Engine Control Module (ECM) Software (V6 Engines only) USA Vehicles only
⇐ Make certain VAS 5051B network cable is
disconnected and press “Done” button
⇐ Control unit part number and software
version is displayed, press “Done” button to check for updating
⇐ If this screen is displayed, control module does not require adapting, press “Done” button
- Switch Ignition to “OFF” position, press “Done” button and wait approximately 10 seconds
- When prompted, switch ignition to “ON” position and press “Done” button
- Press “Done” button when end of test screen is displayed to return to user test plan screen for control module selection (shown at end of this Section C)
⇐ If this screen is not displayed, continue to next step

The information in this document is intended for use only by skilled technicians who have the proper tools, equipment and training to correctly and safely maintain your vehicle. These procedures are not intended to be attempted by “do-it-yourselfers,” and you should not assume this document applies to your vehicle, or that your vehicle has the condition described. To determine whether this information applies, contact an authorized Volkswagen dealer. ©2006 Volkswagen of America, Inc. and Volkswagen Canada Inc. All Rights Reserved.
Q1/Q2/Q3/Q4/Q5/Q6 (90D7) Page 28 of 51
• Information about data record is displayed ⇐ Press “Done” button
⇐ Press “Yes” button to start software
adaptation
⇐ Current and new software versions are
displayed ⇐ Press “Done” button

The information in this document is intended for use only by skilled technicians who have the proper tools, equipment and training to correctly and safely maintain your vehicle. These procedures are not intended to be attempted by “do-it-yourselfers,” and you should not assume this document applies to your vehicle, or that your vehicle has the condition described. To determine whether this information applies, contact an authorized Volkswagen dealer. ©2006 Volkswagen of America, Inc. and Volkswagen Canada Inc. All Rights Reserved.
Q1/Q2/Q3/Q4/Q5/Q6 (90D7) Page 29 of 51
⇐ “Checking pre-conditions, Software
adaptation” screen appears; press “Continue” button
⇐ Adaptation progress screen is displayed • Wait for adaptation to finish
⇐ Control module part number and software
version are displayed, press “Done” button to check for updating
• Switch Ignition to “OFF” position
Note: Although screen may say adaptation could not be performed successfully, it was performed successfully

The information in this document is intended for use only by skilled technicians who have the proper tools, equipment and training to correctly and safely maintain your vehicle. These procedures are not intended to be attempted by “do-it-yourselfers,” and you should not assume this document applies to your vehicle, or that your vehicle has the condition described. To determine whether this information applies, contact an authorized Volkswagen dealer. ©2006 Volkswagen of America, Inc. and Volkswagen Canada Inc. All Rights Reserved.
Q1/Q2/Q3/Q4/Q5/Q6 (90D7) Page 30 of 51
⇐ Control unit part number and software
version level are displayed ⇐ Press “Done” button • Switch ignition to “OFF” position, press
“Done” button and wait approximately 10 seconds
⇐ When prompted, switch ignition to “ON”
position and press “Done” button
⇐ “OK” is displayed on screen in front of control
module that has been checked or adapted ⇐ Select control module to be adapted, press
forward arrow button and go to:
- Section D for Criterion 20 - Adapting Transmission Control Module (TCM) Software (USA only)
- Section E for Criterion 21 - Adapting Differential Control Module, Adapting Software
- Section F for Criterion 22 - Adapt Instrument Cluster Software
- If there are no other control modules to be
adapted, go to Section G

The information in this document is intended for use only by skilled technicians who have the proper tools, equipment and training to correctly and safely maintain your vehicle. These procedures are not intended to be attempted by “do-it-yourselfers,” and you should not assume this document applies to your vehicle, or that your vehicle has the condition described. To determine whether this information applies, contact an authorized Volkswagen dealer. ©2006 Volkswagen of America, Inc. and Volkswagen Canada Inc. All Rights Reserved.
Q1/Q2/Q3/Q4/Q5/Q6 (90D7) Page 31 of 51
Criterion 20
Section D – Adapting Transmission Control Module (TCM) Software (V6 Engines - USA Vehicles only)
⇐ Make certain VAS 5051B network cable is
disconnected and press “Done” button
⇐ Control module part number and software
version are displayed, press “Done” button to check for updating
⇐ If this screen is displayed, control module does not require adapting, press “Done” button
- Switch ignition to “OFF” position, press “Done” button and wait approximately 10 seconds
- When prompted, switch ignition to “ON” position and press “Done” button
- Press “Done” button when end of test screen is displayed to return to user test plan screen for control module selection (shown at end of this Section D)
⇐ If this screen is not displayed, continue to next step

The information in this document is intended for use only by skilled technicians who have the proper tools, equipment and training to correctly and safely maintain your vehicle. These procedures are not intended to be attempted by “do-it-yourselfers,” and you should not assume this document applies to your vehicle, or that your vehicle has the condition described. To determine whether this information applies, contact an authorized Volkswagen dealer. ©2006 Volkswagen of America, Inc. and Volkswagen Canada Inc. All Rights Reserved.
Q1/Q2/Q3/Q4/Q5/Q6 (90D7) Page 32 of 51
⇐ Information about data record is displayed ⇐ Press “Done” button
⇐ Press “Yes” button to start software
adaptation
⇐ Current and new software versions are
displayed ⇐ Press “Done” button

The information in this document is intended for use only by skilled technicians who have the proper tools, equipment and training to correctly and safely maintain your vehicle. These procedures are not intended to be attempted by “do-it-yourselfers,” and you should not assume this document applies to your vehicle, or that your vehicle has the condition described. To determine whether this information applies, contact an authorized Volkswagen dealer. ©2006 Volkswagen of America, Inc. and Volkswagen Canada Inc. All Rights Reserved.
Q1/Q2/Q3/Q4/Q5/Q6 (90D7) Page 33 of 51
⇐ “Checking pre-conditions, Software
adaptation” screen appears; press “Continue” button
⇐ Adaptation progress screen is displayed • Wait for adaptation to finish
⇐ Successful adaptation screen, press “Done”
button
Note: Although screen may say adaptation could not be performed successfully, it was performed successfully.

The information in this document is intended for use only by skilled technicians who have the proper tools, equipment and training to correctly and safely maintain your vehicle. These procedures are not intended to be attempted by “do-it-yourselfers,” and you should not assume this document applies to your vehicle, or that your vehicle has the condition described. To determine whether this information applies, contact an authorized Volkswagen dealer. ©2006 Volkswagen of America, Inc. and Volkswagen Canada Inc. All Rights Reserved.
Q1/Q2/Q3/Q4/Q5/Q6 (90D7) Page 34 of 51
⇐ Control unit part number and software
version level are displayed ⇐ Press “Done” button • Switch ignition to “OFF” position, press “Done”
button and wait approximately 10 seconds • When prompted, switch ignition to “ON”
position and press “Done” button
⇐ “OK” is displayed on screen in front of control
module that has been checked or adapted ⇐ Select control module to be adapted, press
the forward arrow button and go to:
- Section E for Criterion 21 - Adapting Differential Control Module, Adapting Software
- Section F for Criterion 22 - Adapt Instrument Cluster Software
- If there are no other control modules to
be adapted, go to Section G

The information in this document is intended for use only by skilled technicians who have the proper tools, equipment and training to correctly and safely maintain your vehicle. These procedures are not intended to be attempted by “do-it-yourselfers,” and you should not assume this document applies to your vehicle, or that your vehicle has the condition described. To determine whether this information applies, contact an authorized Volkswagen dealer. ©2006 Volkswagen of America, Inc. and Volkswagen Canada Inc. All Rights Reserved.
Q1/Q2/Q3/Q4/Q5/Q6 (90D7) Page 35 of 51
Criterion 21
Section E – Differential Control Module, Adapting Software
Note: Prior to adapting differential control module software, differential motor on some vehicles may need to be replaced
• Raise vehicle on hoist to check differential
motor part number
⇐ If part number on differential motor is OAD 341 601A/B/C, no new differential motor
is needed; continue with software updating
⇐ If part number on differential motor is OAD 341 601, install new differential motor
prior to performing software update
Tip: If differential motor requires replacement, be sure to reference ETKA for applicable part
⇐ Make certain VAS 5051B network cable is
disconnected and press “Done” button

The information in this document is intended for use only by skilled technicians who have the proper tools, equipment and training to correctly and safely maintain your vehicle. These procedures are not intended to be attempted by “do-it-yourselfers,” and you should not assume this document applies to your vehicle, or that your vehicle has the condition described. To determine whether this information applies, contact an authorized Volkswagen dealer. ©2006 Volkswagen of America, Inc. and Volkswagen Canada Inc. All Rights Reserved.
Q1/Q2/Q3/Q4/Q5/Q6 (90D7) Page 36 of 51
⇐ Screen displays current control unit part
number and software version ⇐ Press “Done” button to check for updates
⇐ If this screen is displayed, control module does not require adapting, press “Done” button
- Switch ignition to “OFF” position, press “Done” button and wait approximately 10 seconds
- When prompted, switch ignition to “ON” position and press “Done” button
- Press “Done” button when end of test screen is displayed to return to user test plan screen for control module selection (shown at end of this Section E)
⇐ If this screen is not displayed, continue to next step
⇐ Screen displays data records ⇐ Press “Done” button

The information in this document is intended for use only by skilled technicians who have the proper tools, equipment and training to correctly and safely maintain your vehicle. These procedures are not intended to be attempted by “do-it-yourselfers,” and you should not assume this document applies to your vehicle, or that your vehicle has the condition described. To determine whether this information applies, contact an authorized Volkswagen dealer. ©2006 Volkswagen of America, Inc. and Volkswagen Canada Inc. All Rights Reserved.
Q1/Q2/Q3/Q4/Q5/Q6 (90D7) Page 37 of 51
⇐ Press “Yes” button to start control module
adaptation
⇐ Screen displays old and new software
versions ⇐ Press “Done” button
⇐ Control module adapting will take approx. 3 minutes, do not disconnect VAS 5051B diagnostic tester from vehicle during updating ⇐ Press “Continue” button

The information in this document is intended for use only by skilled technicians who have the proper tools, equipment and training to correctly and safely maintain your vehicle. These procedures are not intended to be attempted by “do-it-yourselfers,” and you should not assume this document applies to your vehicle, or that your vehicle has the condition described. To determine whether this information applies, contact an authorized Volkswagen dealer. ©2006 Volkswagen of America, Inc. and Volkswagen Canada Inc. All Rights Reserved.
Q1/Q2/Q3/Q4/Q5/Q6 (90D7) Page 38 of 51
⇐ Adaptation progress screen is displayed • Wait for adaptation to finish
⇐ Control module has been adapted ⇐ Press “Done” button
Note: Although screen may say adaptation could not be performed successfully,
it was performed successfully. • Switch ignition to “OFF” position, press “Done”
button and wait approximately 10 seconds • When prompted, switch ignition to “ON”
position and press “Done” button
⇐ Control module part number and software
version are displayed ⇐ Press “Done” button

The information in this document is intended for use only by skilled technicians who have the proper tools, equipment and training to correctly and safely maintain your vehicle. These procedures are not intended to be attempted by “do-it-yourselfers,” and you should not assume this document applies to your vehicle, or that your vehicle has the condition described. To determine whether this information applies, contact an authorized Volkswagen dealer. ©2006 Volkswagen of America, Inc. and Volkswagen Canada Inc. All Rights Reserved.
Q1/Q2/Q3/Q4/Q5/Q6 (90D7) Page 39 of 51
⇐ “OK” is displayed on screen in front of control
module that has been checked or adapted ⇐ Select control module to be updated, press
forward arrow button and go to:
- Section F for Criterion 22 - Adapt Instrument Cluster Software
- If there are no other control modules to be
adapted, go to Section G
Criterion 22
Section F – Adapt Instrument Cluster Software
⇐ Switch ignition switch to “ON” position and
press “Done” button
⇐ Tester will check control module for need for
replacement ⇐ Press “Done” button Note: If a screen is displayed that indicates the
instrument cluster must be replaced, go to Section H; otherwise, continue

The information in this document is intended for use only by skilled technicians who have the proper tools, equipment and training to correctly and safely maintain your vehicle. These procedures are not intended to be attempted by “do-it-yourselfers,” and you should not assume this document applies to your vehicle, or that your vehicle has the condition described. To determine whether this information applies, contact an authorized Volkswagen dealer. ©2006 Volkswagen of America, Inc. and Volkswagen Canada Inc. All Rights Reserved.
Q1/Q2/Q3/Q4/Q5/Q6 (90D7) Page 40 of 51
⇐ Software needs to be adapted and it will be
done in two steps ⇐ Press “Done” button
⇐ Part number and software version are
displayed ⇐ Press “Done” button
⇐ If this screen is displayed, control module does not require adapting, press “Done” button
- Switch ignition to “OFF” position, press “Done” button and wait approximately 10 seconds
- When prompted, switch ignition to “ON” position and press “Done” button
- Press “Done” button when end of test screen is displayed to return to user test plan screen for control module selection (shown at end of this Section F)
⇐ If this screen is not displayed, continue to next step

The information in this document is intended for use only by skilled technicians who have the proper tools, equipment and training to correctly and safely maintain your vehicle. These procedures are not intended to be attempted by “do-it-yourselfers,” and you should not assume this document applies to your vehicle, or that your vehicle has the condition described. To determine whether this information applies, contact an authorized Volkswagen dealer. ©2006 Volkswagen of America, Inc. and Volkswagen Canada Inc. All Rights Reserved.
Q1/Q2/Q3/Q4/Q5/Q6 (90D7) Page 41 of 51
⇐ Data record for control module ⇐ Press “Done” button
⇐ Press “Yes” button to adapt control module
software
⇐ Current and new software versions are
displayed ⇐ Press “Done” button

The information in this document is intended for use only by skilled technicians who have the proper tools, equipment and training to correctly and safely maintain your vehicle. These procedures are not intended to be attempted by “do-it-yourselfers,” and you should not assume this document applies to your vehicle, or that your vehicle has the condition described. To determine whether this information applies, contact an authorized Volkswagen dealer. ©2006 Volkswagen of America, Inc. and Volkswagen Canada Inc. All Rights Reserved.
Q1/Q2/Q3/Q4/Q5/Q6 (90D7) Page 42 of 51
⇐ Software update will take approximately 3
minutes
WARNING! Switching ignition off or disconnecting
diagnostic connector during adaptation may require replacement of control module
⇐ Press “Continue” button
• Pre-check screen appears for a short period
of time ⇐ Screen shows adaptation progress
⇐ Control module has been adapted ⇐ Press “Done” button
Note: Although screen may say adaptation could not be performed successfully, it was performed successfully

The information in this document is intended for use only by skilled technicians who have the proper tools, equipment and training to correctly and safely maintain your vehicle. These procedures are not intended to be attempted by “do-it-yourselfers,” and you should not assume this document applies to your vehicle, or that your vehicle has the condition described. To determine whether this information applies, contact an authorized Volkswagen dealer. ©2006 Volkswagen of America, Inc. and Volkswagen Canada Inc. All Rights Reserved.
Q1/Q2/Q3/Q4/Q5/Q6 (90D7) Page 43 of 51
⇐ Switch ignition to “OFF” position, press
“Done” button and wait approximately 10 seconds
⇐ When prompted, switch ignition to “ON”
position and press “Done” button
⇐ Control module part number and software
version are displayed ⇐ Press “Done” button to start second phase of
control module adapting

The information in this document is intended for use only by skilled technicians who have the proper tools, equipment and training to correctly and safely maintain your vehicle. These procedures are not intended to be attempted by “do-it-yourselfers,” and you should not assume this document applies to your vehicle, or that your vehicle has the condition described. To determine whether this information applies, contact an authorized Volkswagen dealer. ©2006 Volkswagen of America, Inc. and Volkswagen Canada Inc. All Rights Reserved.
Q1/Q2/Q3/Q4/Q5/Q6 (90D7) Page 44 of 51
⇐ Update for control module is displayed ⇐ Press “Done” button
⇐ Press “Yes” button to start software adapting
⇐ Control module software version and new
software version are displayed ⇐ Press “Done” button

The information in this document is intended for use only by skilled technicians who have the proper tools, equipment and training to correctly and safely maintain your vehicle. These procedures are not intended to be attempted by “do-it-yourselfers,” and you should not assume this document applies to your vehicle, or that your vehicle has the condition described. To determine whether this information applies, contact an authorized Volkswagen dealer. ©2006 Volkswagen of America, Inc. and Volkswagen Canada Inc. All Rights Reserved.
Q1/Q2/Q3/Q4/Q5/Q6 (90D7) Page 45 of 51
⇐ Software update will take approximately 3 minutes
WARNING! Switching ignition off or disconnecting
diagnostic connector during adaptation may require replacement of control module!
⇐ Press “Continue” button
⇐ Screen shows adaptation progress
⇐ Control module adaptation is completed ⇐ Press “Done” button
Note: Although screen may say adaptation could not be performed successfully, it was performed successfully

The information in this document is intended for use only by skilled technicians who have the proper tools, equipment and training to correctly and safely maintain your vehicle. These procedures are not intended to be attempted by “do-it-yourselfers,” and you should not assume this document applies to your vehicle, or that your vehicle has the condition described. To determine whether this information applies, contact an authorized Volkswagen dealer. ©2006 Volkswagen of America, Inc. and Volkswagen Canada Inc. All Rights Reserved.
Q1/Q2/Q3/Q4/Q5/Q6 (90D7) Page 46 of 51
⇐ Switch ignition to “OFF” position, press
“Done” button and wait approximately 10 seconds
⇐ When prompted, switch ignition to “ON”
position and press “Done” button
⇐ Control module part number, software level
and coding are displayed ⇐ Press “Done” button

The information in this document is intended for use only by skilled technicians who have the proper tools, equipment and training to correctly and safely maintain your vehicle. These procedures are not intended to be attempted by “do-it-yourselfers,” and you should not assume this document applies to your vehicle, or that your vehicle has the condition described. To determine whether this information applies, contact an authorized Volkswagen dealer. ©2006 Volkswagen of America, Inc. and Volkswagen Canada Inc. All Rights Reserved.
Q1/Q2/Q3/Q4/Q5/Q6 (90D7) Page 47 of 51
⇐ “OK” displayed on screen in front of control
module that has been updated
Tip: Adapting door control module software is not applicable to any vehicle in this update program
• If there are no other control modules to be
updated, go to Section G
Section G – Erase DTCs
• If applicable, reinstall 15A fuse into position
35 in fuse box on left side of instrument panel and 15A fuse into position 17 in fuse box on right side of instrument panel
• If applicable, reinstall 60A fuse into position 1
and 30A fuse into position 2 located in fuse panel under hood
• Press “Go To” button and select “Exit” ⇐ Press “Exit” button and erasing DTCs
memories will start • Remove update CD ROM from VAS 5051B
diagnostic tester • After DTCs have been erased, generate
readiness code ONLY IF ECM HAS BEEN ADAPTED
• Connect VAS 5051B diagnostic tester to on
line connection and send vehicle diagnostic report
• If necessary, reset clock to correct time • Set window pinch protection • No further work is required

The information in this document is intended for use only by skilled technicians who have the proper tools, equipment and training to correctly and safely maintain your vehicle. These procedures are not intended to be attempted by “do-it-yourselfers,” and you should not assume this document applies to your vehicle, or that your vehicle has the condition described. To determine whether this information applies, contact an authorized Volkswagen dealer. ©2006 Volkswagen of America, Inc. and Volkswagen Canada Inc. All Rights Reserved.
Q1/Q2/Q3/Q4/Q5/Q6 (90D7) Page 48 of 51
Section H - Instrument Cluster Replacement
• Press “Go To” button and select “Functions/Component Selection” and follow menu options in sequence: - Body - Electrical equipment - 01-Onboard Diagnostic (OBD) capable
system - Instrument cluster - Functions of instrument panel insert - Instrument panel insert,
adapting/replacing
• Follow instruction in User Test Plan – Instrument Cluster Adapting/replacing
Removal and Installations Steps • Using power or manual adjustment
mechanism, pull steering wheel out completely and lock in lowest position
• Remove instrument panel side cover ⇐ Pry trim strips -1- and -2- out of attaching
clips

The information in this document is intended for use only by skilled technicians who have the proper tools, equipment and training to correctly and safely maintain your vehicle. These procedures are not intended to be attempted by “do-it-yourselfers,” and you should not assume this document applies to your vehicle, or that your vehicle has the condition described. To determine whether this information applies, contact an authorized Volkswagen dealer. ©2006 Volkswagen of America, Inc. and Volkswagen Canada Inc. All Rights Reserved.
Q1/Q2/Q3/Q4/Q5/Q6 (90D7) Page 49 of 51
⇐ Remove screws 1- from upper cover piece of
steering column -2- and remove it
⇐ Pull instrument panel trim -1- out of
instrument panel hood near locking tabs -2- ⇐ Remove screws -3- and -4- ⇐ Remove instrument panel hood -5-
⇐ Remove screws -1- from upper cover piece
of steering column -2- and remove it

The information in this document is intended for use only by skilled technicians who have the proper tools, equipment and training to correctly and safely maintain your vehicle. These procedures are not intended to be attempted by “do-it-yourselfers,” and you should not assume this document applies to your vehicle, or that your vehicle has the condition described. To determine whether this information applies, contact an authorized Volkswagen dealer. ©2006 Volkswagen of America, Inc. and Volkswagen Canada Inc. All Rights Reserved.
Q1/Q2/Q3/Q4/Q5/Q6 (90D7) Page 50 of 51
⇐ Remove screws -1- from instrument cluster
hood bracket -2-
⇐ Remove screws -1-
⇐ Remove instrument cluster hood bracket -1-
in direction of arrow • Remove instrument cluster and disconnect
electrical connectors at rear of instrument cluster
• Return removed instrument cluster to your
facing depot

The information in this document is intended for use only by skilled technicians who have the proper tools, equipment and training to correctly and safely maintain your vehicle. These procedures are not intended to be attempted by “do-it-yourselfers,” and you should not assume this document applies to your vehicle, or that your vehicle has the condition described. To determine whether this information applies, contact an authorized Volkswagen dealer. ©2006 Volkswagen of America, Inc. and Volkswagen Canada Inc. All Rights Reserved.
Q1/Q2/Q3/Q4/Q5/Q6 (90D7) Page 51 of 51
• Install new instrument cluster (part number
per ETKA) and reinstall hood bracket • Secure hood bracket and instrument cluster
with screws • Reinstall upper cover piece over steering
column • Reinstall hood and instrument panel trim • Reinstall trim pieces below instrument cluster
an instrument panel end cover • Adapt keys and immobilizer • Reinstall15A fuse into position 35 in fuse box
on left side of instrument panel and 15A fuse into position 17 in fuse box on right side of instrument panel
• Reinstall 60A fuse into position 1 and 30A
fuse into position 2 located in fuse panel under hood
• Remove update CD ROM from VAS 5051B
diagnostic tester
• Clear DTCs • Connect VAS 5051B diagnostic tester to on
line connection and send vehicle diagnostic report
• If necessary, reset clock to correct time • Set window pinch protection
WORK IS COMPLETE

� 2005 Volkswagen of America, Inc. All rights reserved. Information contained in this document is based on the latest information available at the time of printing and is subject to the copyright and other intellectual property
rights of Volkswagen of America, Inc., its affiliated companies and its licensors. All rights are reserved to make changes at any time without notice. No part of this document may be reproduced, stored in a retrieval system, or transmitted in any form or by any
means, electronic, mechanical, photocopying, recording, or otherwise, nor may these materials be modified or reposted to other sites, without the prior expressed written permission of the publisher.
������������������ ������������ ���� ���������������������� ��������������
������������������������������������ �����
*) “TUNING” is described as the addition of or modification of any component which causes aVolkswagen vehicle to perform outside the normal parameters and specifications approved byVolkswagen of America, Inc..
Date:
Dealer Number:
Vehicle Identification Number:
Repair Order Number:
Dealer stamp
I , owner or driver of the above identified Volkswagen, confirm:
� “Tuning” as described above (especially power increasing modifications) has NOT beenperformed on my vehicle.
� “Tuning” as described above has been performed on my vehicle and the following componentswere modified or installed:
TUNING was performed by (Please provide Company name and telephone number, if you wish usto contact them):
I understand that if my Control Module is determined to have been tuned, any damage caused bythe tuning of the Control Module (including adverse emissions consequences) will not be coveredby Volkswagen of America, Inc. warranties.
I am permitting an authorized Volkswagen Dealer to reflash (update) my Control Module, and bydoing so, I understand that this process will automatically overwrite (destroy) and permanentlydelete any tuning program that was previously installed on the Control Module of my Volkswagenvehicle.
By signing below, I fully acknowledge and understand that the tuning program will not be restoredand Volkswagen of America, Inc., will not be liable in any way for the loss of tuning data.
Signature of Customer