programming in alice: program design and …coweb.cc.gatech.edu/ice-gt/uploads/702/alice...
TRANSCRIPT

Programming in AliceIntroduction
`Then you should say what you mean,' the March Hare went on. `I do,' Alice hastily replied; `at least--atleast I mean what I say--that's the samething, you know.'
We all love to play computer games, and most of you have grown up using computers. Moving beyond Microsoft Office is the world where you get to create the programs you and other s can enjoy. Programming is simply writing a set of instructions that tell the computer what to do. There are lots of different ways to write programs. Each different type of program is written in a programming language. Just like English, French, and German are all verbal languages people use to communicate-there are lots of different programming languages are well Each instruction in a program is an action to be performed. “Writing a program to animate 3D objects in a virtual world is naturally all about objects and the actions objects can

perform. From a practical viewpoint, writing a program is somewhat like working with word problems in math. In word problems, we first read the word problem (a description of the situation) and decide how to go about solving the problem (what steps need to be done). Then, we solve the problem (write a solution) and finally test our answer to make sure it is correct.”( Alice Programming Web Site www.alice.org)
We are going to use a program called Alice. The Alice language will allow you to create virtual worlds with characters and objects you can make move and interact with each other. In Alice you begin by selected really neat 3 D objects and placing them in a background world. Using instructions and code that it already written you can make the object so almost anything you can think of. For example a snowman could fall in love with a snowlady. By dragging and clicking blocks of code representing programming concepts you can enter directions/values/parameters to tweak the block’s behavior. When you are finished you will have created your own 3D movie. Alice is created by Carnegie Melon University and it a great programming language to ge staryed with.-The best part of Alice is that it is free and available at www.Alice.org

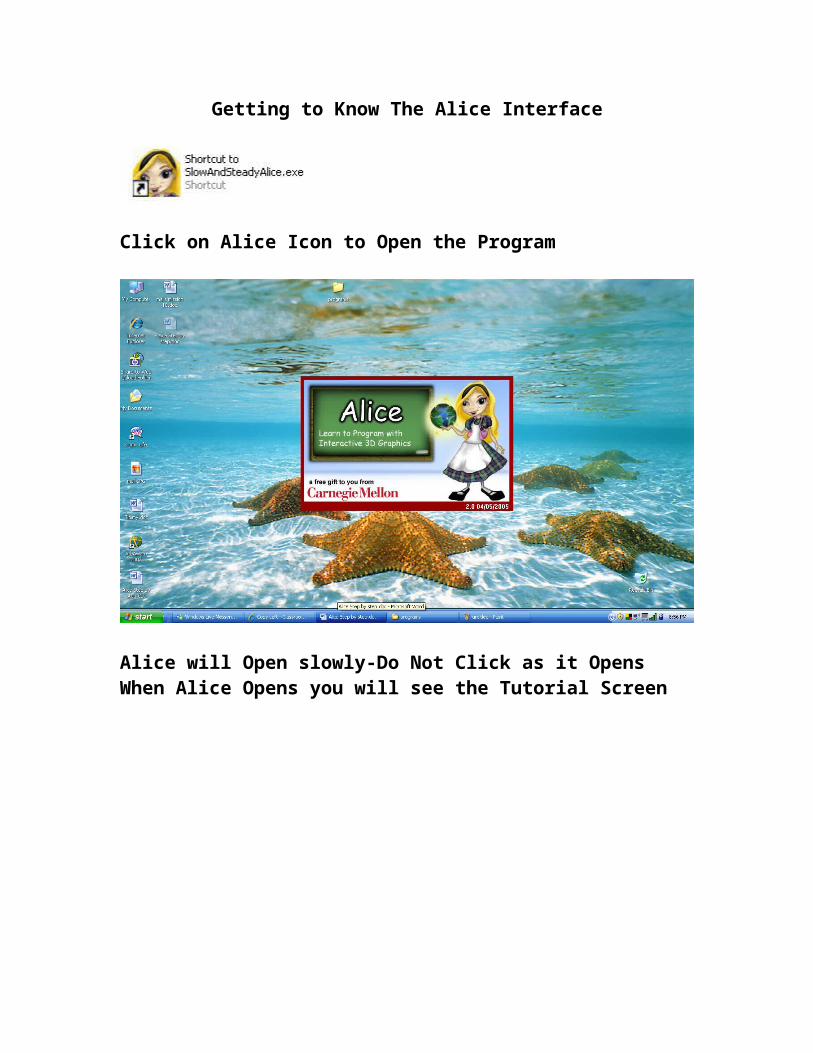
Getting to Know The Alice Interface
Click on Alice Icon to Open the Program
Alice will Open slowly-Do Not Click as it OpensWhen Alice Opens you will see the Tutorial Screen
Run the First Tutorial that will explain the different sections of the interface. You can follow the directions along with the tutorial step by step.
After you have finished the Tutorial Go into Alice pick one character object to experiment with:
a. How to add the objectb. Look at the object treec. Drag and drop methods to make your character
move.
Over the next few days we will practice using the tutorial, experiment in the interface and watch a video Developed by Alice.org to explain the interface.
NOW YOU ARE READY TO BEGIN YOUR OWN PROGRAM
Every Program Starts with an Idea
1. First write a brief description or scenario of the story you are going to tell. This should be a 1-2 paragraph essay.The scenario gives all necessary details for setting up the initial scene and then planning a sequence of instructions for theanimation.
Think about … 1. What story is to be told?____________________2. What objects/avatars are needed?_______________________________________________________ Which objects will play leading roles in the

Story_________________________________ while other objects will be used to provide background scenery.3. What actions are to take place? _______________________________________________________________________________________________________________________________________________________________________________________________________________________Remember the actions in the story will eventuallybecome the instructions in the program.
This is how detailed a scenario should be…
Scenario exampleSetting:You have recently been sitting at home, having missed another day of classes because a wintersnowstorm dropped 2 feet of snow on the ground. You see some children outdoors creatingsnow people. You are daydreaming about a dance you recently attended. Being a very creativeperson, your imagination gets carried away and the two scenes blend together: Severalsnow people are outdoors, on a snow-covered landscape.Action: A snow song is playing. A snowman istrying to meet a snowwoman who is talking with a friend (another snowwoman.) The snowmantries and tries to get her attention. He calls out "Ahem" and blinks his eyes at her. She turns tolook at the snowman and blushes. But, alas, she is not interested in meeting him. She gives him acold shoulder and turns back to talk with her friend. He gives up and turns away.From this scenario, we have answers to questions:What story is to be told? This scenario tells a sad story about a snowman’s unsuccessfulattempt to get the attention of a snowwoman in a winter scene.

What objects are to be used? The objects are snowpeople and the background scenery shoulddepict a winter scene.What actions are to take place? The actions include the snowman trying to attract theattention of the snowwoman, the snowwoman blushing but not being interested, and thesnowman turning away.
2. Next we Create a Storyboard we plan the story out step by step. DesignA storyboard is the design approach we will use to create a solution to a problem, or plan a list ofactions to perform a task, as specified in the scenario. At Pixar, Disney, and other major animation studios, animators use Storyboard. This gives Life and direction to the planning process.
1. Break down a long scenario into sequences of many short scenarios.2. For each scenario, a storyboard is created to depict the sequence of scenes. The storyboard mayconsist of dozens of scene sketches, drawn by animation artists or generated by computeranimation special lists using computer software. Visual storyboards11.A visual storyboard breaks down a scenario into a sequence of major scenes – sort of a snapshot Each snapshot is associated with objects in certain positions, colors, sizes, and poses.2.The snapshots are numbered in sequence and labeled with necessary information. For shortanimations, the breakdown might be presented on one large sheet of paper. For more complexdesigns, a separate sheet of drawing paper might used for each scene to allow the animation artistto easily rearrange or discard scenes without starting over.

1 “Storyboard” is an animation term. In other areas of computer science, the term “state-transition-diagram” is used torefer to what we will describe here as a storyboard.
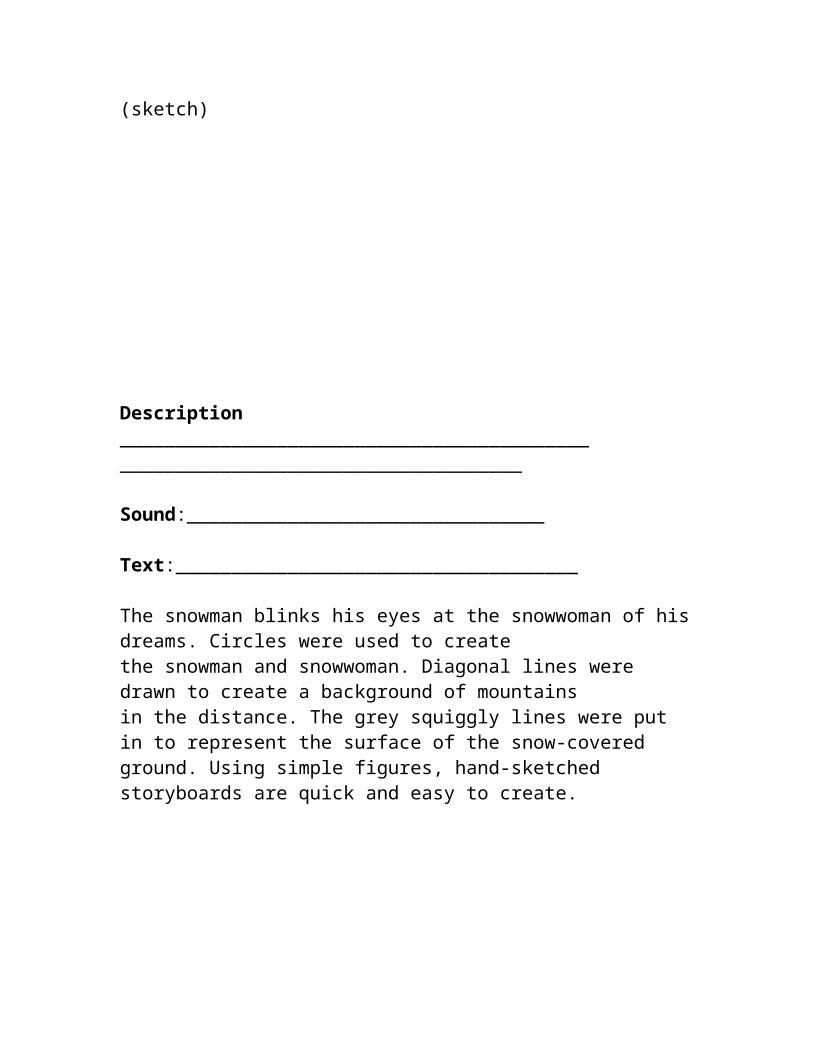
Scene Number: _________________________(sketch)
Description______________________________________________________________________________
Sound:________________________________
Text:____________________________________
The snowman blinks his eyes at the snowwoman of his dreams. Circles were used to createthe snowman and snowwoman. Diagonal lines were drawn to create a background of mountainsin the distance. The grey squiggly lines were put in to represent the surface of the snow-coveredground. Using simple figures, hand-sketched storyboards are quick and easy to create.

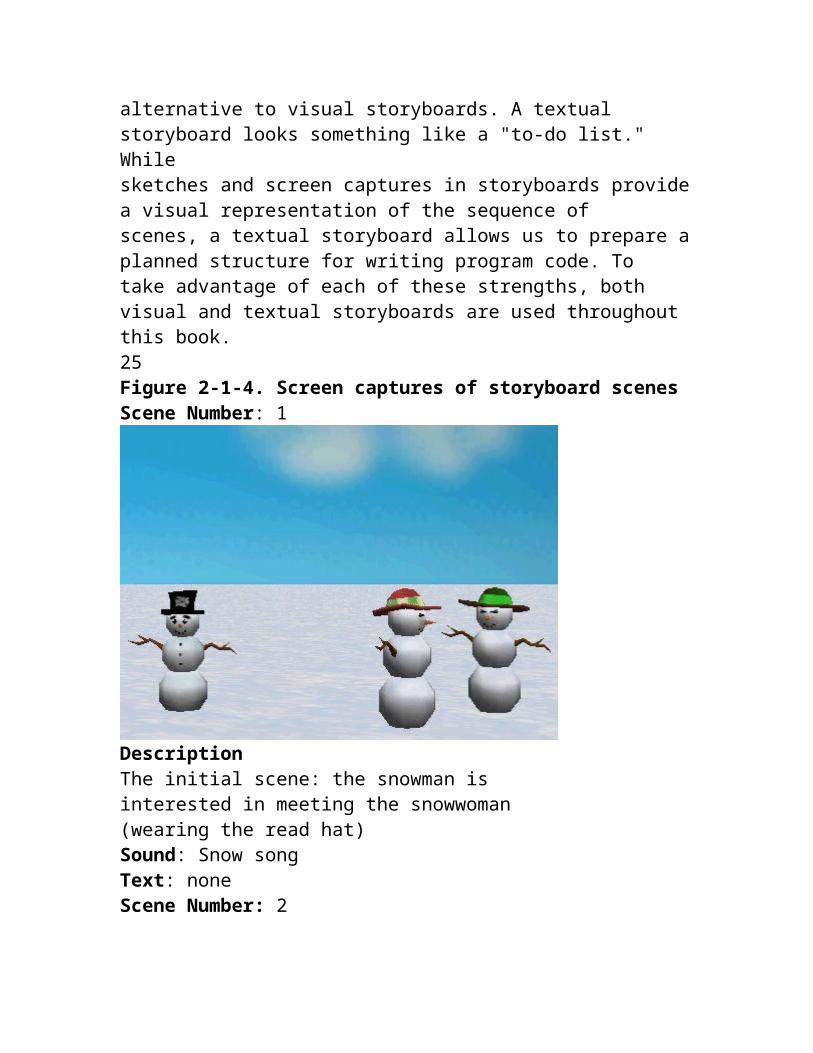
Figure 2-1-3. Hand-sketched visual storyboardFor illustrations in this book, we borrow a technique from professional animators to create visualstoryboards. We use Alice’s scene editor to add objects to a world and then patiently arrange theobjects in various poses. As each successive scene is created, a screen capture is made and copiedto a document. The screen captures shown in Figure 2-1-4 illustrate screen captures in astoryboard for the beginning of the snowpeople animation. Naturally, screen captures for astoryboard are fancier than hand-drawn sketches. But, hand-sketched drawings are much fasterand easier to put together.Textual storyboardsWhile professional animation artists use visual storyboards as part of their project developmentprocess, not everyone has the patience to make dozens of sketches. A textual storyboard is a goodalternative to visual storyboards. A textual storyboard looks something like a "to-do list." Whilesketches and screen captures in storyboards provide a visual representation of the sequence of
scenes, a textual storyboard allows us to prepare a planned structure for writing program code. Totake advantage of each of these strengths, both visual and textual storyboards are used throughoutthis book.25Figure 2-1-4. Screen captures of storyboard scenesScene Number: 1
DescriptionThe initial scene: the snowman isinterested in meeting the snowwoman(wearing the read hat)Sound: Snow songText: noneScene Number: 2

Description:The snowman tries to get thesnowwoman’s attentionSound: Snow songText: Ahem….Scene Number: 3
Description:The snowman blinks his eyes.The snow woman notices the snowman.Sound: Snow songText: none26
Textual storyboard example
A textual storyboard for the snowpeople animation is shown below. An important point thatshould be mentioned about textual storyboards is that a textual storyboard may summarize severalscenes from a visual storyboard. For instance, the textual storyboard shown here summarizesscene number 1, scene number 2, and scene number 3 from the visual storyboard in Figure 2-1-4.(This storyboard represents only the first few actions. The storyboard will be completed in thenext section.)The lines of text in a textual storyboard provide an ordered list of actions.
Do the following steps in ordersnowman turns to face the snowwomansnowman calls out to the snowwomanDo the following steps together
snowman blinks his eyes at the snowwomansnowwoman
The lines are written inan outline format and indentation makes the storyboard easy to read. Notice that two lines in thetextual storyboard are in italics. These lines organize the actions – some actions are to be done inorder (one at a time), others are to be done together (at the same time). The first two actions areperformed in order (the snowman turns to face the snowwoman and then says “Ahem”). The thirdstep is actually two actions performed simultaneously (the snowman blinks his eyes at the sametime as the snowwoman turns around to see who has called out).In computing terminology, a textual storyboard is called an algorithm – a list of actions toperform a task or solve a problem. The actions in a textual storyboard are very close to (but not

quite) actual program code and so are often known as pseudocode.Evaluate and reviseOnce a storyboard has been designed, it is a good idea to take an objective look at the design todecide what might be changed. Evaluate the storyboard by answering these questions:Does the action flow from scene to scene, as the story unfolds?Do any transitions need to be added between scenes to blend one scene to the next?Did you overlook some essential part of the story?Is there something about the story that should be changed?The important idea is that the storyboard is not final. We should be willing to review our plansand modify themDo the following steps in ordersnowman turns to face the snowwomansnowman calls out to the snowwomanDo the following steps togethersnowman blinks his eyes at the snowwomansnowwoman turns to see who is calling her.2-2 A First ProgramIn the previous section, you learned how to carefully read a scenario and design an animation tocarry out a task, play a game, or create a simulation. Now, you are ready to look at how ananimation program can be written. This step in building an animation is called implementation.We recommend that you read this section while sitting at a computer: start up Alice and repeatthe steps shown in the example in this section.What is a program?As you know, a program is a list of instructions (actions) to accomplish a task. You can think ofan Alice program as being somewhat like a script for a theatrical play. A theatrical script tells a

story by describing the actions to be taken and the words to be delivered by actors on stage. In asimilar manner, an Alice program prescribes the actions to be taken and the sound and text to beused by objects in a virtua l world.Create an initial scene
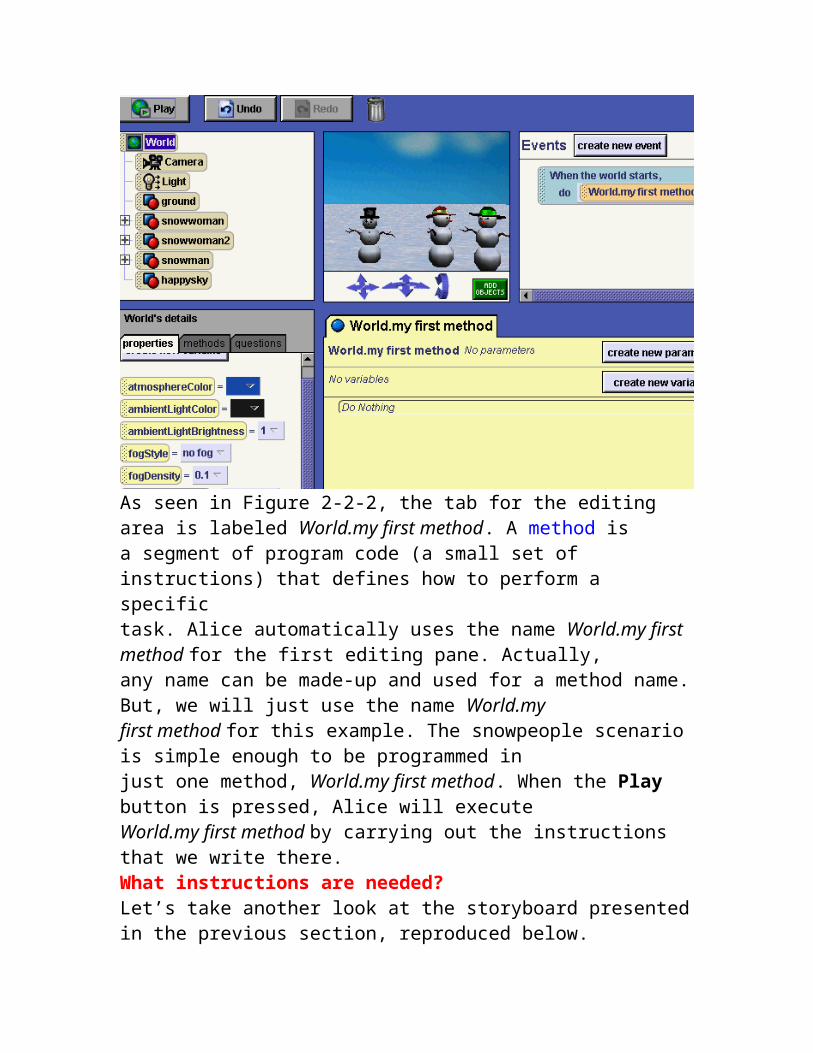
An ancient Chinese proverb is "The longest journey begins with a single step." Let’s begin ourjourney by implementing the snow people animation described in the section 2-1. Recall that asnowman is interested in meeting a snowwoman. He tries to get her attention, but she isn’tinterested in meeting him, so she turns away. Then, he gives up. The first step of the solution is tocreate the initial scene. For a new world, a snow scene template is selected and then a snowmanand two snowwomen (found in the People collection in the local gallery) are added. The initialscene is shown in Figure 2-2-1.Figure 2-2-1. Snowpeople initial sceneProgram code editorOnce the initial scene has been set up, the instructions that make up the program code must bewritten. Alice provides a program code editor -- the large yellow pane at the lower right of themain Alice window, as shown in Figure 2-2-2. The instructions for a program are entered in theeditor. (From now on, we are just going to refer to the program code editor as “the editor”.)28

Figure 2-2-2. Program code editor (the large yellow pane)World.my first method
As seen in Figure 2-2-2, the tab for the editing area is labeled World.my first method. A method isa segment of program code (a small set of instructions) that defines how to perform a specifictask. Alice automatically uses the name World.my first method for the first editing pane. Actually,any name can be made-up and used for a method name. But, we will just use the name World.myfirst method for this example. The snowpeople scenario is simple enough to be programmed injust one method, World.my first method. When the Play button is pressed, Alice will executeWorld.my first method by carrying out the instructions that we write there.What instructions are needed?Let’s take another look at the storyboard presented in the previous section, reproduced below.Do the following steps in order

snowman turns to face the snowwomansnowman calls out to the snowwomanDo the following steps togethersnowman blinks eyes at the snowwomansnowwoman turns to see who is calling her.etc.29Actually, this storyboard is incomplete. The scenario (in the previous section) described asequence of actions: (a) the snowman tries and tries to get the snowwoman’s attention by callingout to her, (b) the snowman blinks his eyes at the snowwoman as she looks to see who is callingher; (c) the snowwoman blushes but isn’t interested, so she turns away from the snowman, and(d) the snowman gives up. Only actions (a) and (b) were outlined. Let's complete the textualstoryboard by adding the remaining actions, as shown below.Figure 2-2-4. The snowpeople storyboard
Translating a storyboard to program codeTo translate a storyboard to program code, begin with the first step of the storyboard and translate

it to an instruction. Then, translate the second step to an instruction, then the third, and so forthand so on until the entire storyboard has been translated to instructions. The instructions used inprogram code use the same built-in methods you learned in the Getting Started exercises inAppendix A. To display the snowman's available methods, click the snowman object in theObject tree and then the methods tab in the details area, as seen in Figure 2-2-3.Do in ordersnowman looks at the snowwomansnowman calls out to the snowwomanDo togethersnowman blinks his eyes at the snowwomansnowwoman turns to see who is calling her.Do togethersnowwoman blushes (her head turns red)snowwoman turns back to her friendssnowwoman’s face turns back to whitesnowman turns away (gives up)30Figure 2-2-3. Built-in methods for writing program codeIn our example, we want to translate the storyboard to program code. We begin with the first stepin the storyboard, making the snowman turn to look at the snowwoman. One of the snowman'smethods is turn to face – we can use this method to make the snowman turn to look towards thesnowwoman. The next step is to have the snowman call out to the snowwoman. The snowman’ssay method can be used to make the snowman call out "Ahem" to the snowwoman.Sequential versus simultaneous actionsFrom our storyboard, it is clear that the first two actions must occur in a specific sequence – the
snowman turns to look at the snowwoman and then the snowman calls out “Ahem” to thesnowwoman. We can tell Alice to Do these instructions in order. But, other actions occursimultaneously (at the same time). For example , the snowman blinks his eyes at the snowwomanat the same time as the snowwoman turns to face the snowman. To have these actions occur at thesame time, Alice must be told to Do these actions together. Do in order and Do together are partof the Alice language. We call them control statements because we use these statements to tellAlice how to carry out the instructions in a program.Do in orderTo tell Alice to do instructions in sequential order, a Do in order block is dragged into the editor,as seen in Figure 2-2-4.31Figure 2-2-4. Dragging a Do in order tile into the editor
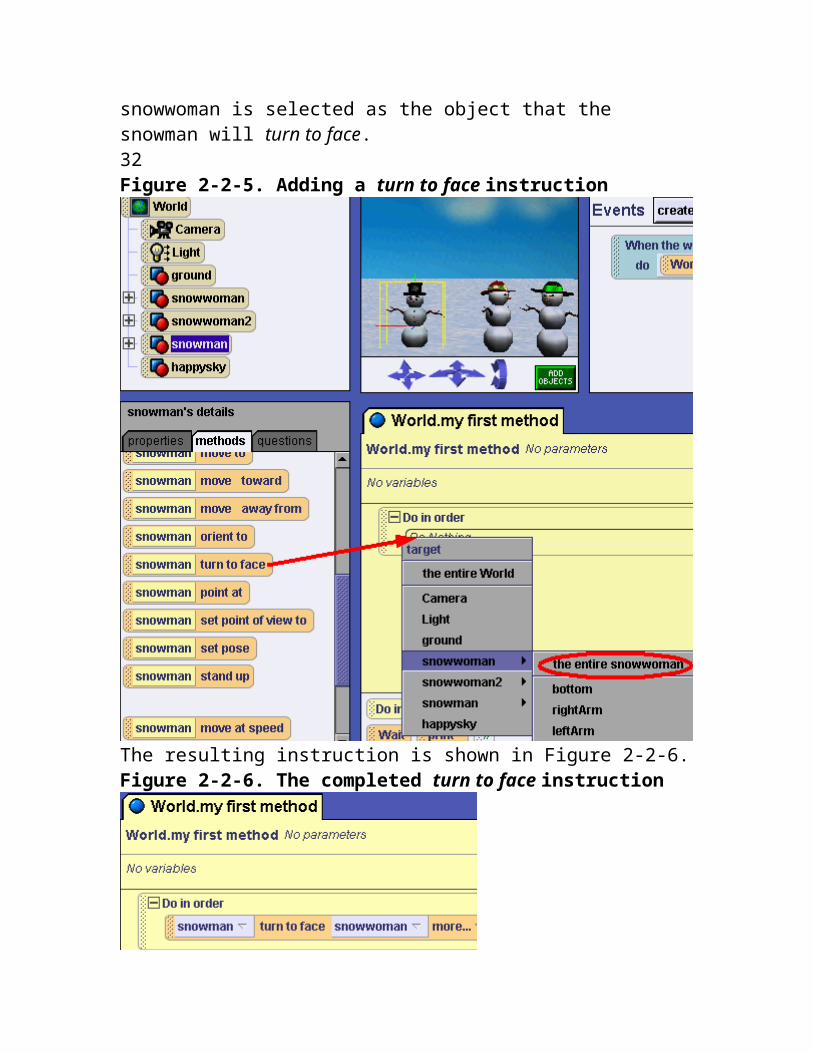
The first two instructions can now be placed within the Do in order block. The snowman isselected in the Object tree. Then, in the snowman’s methods, the turn to face instruction is

selected and dragged into the Do in order, as shown in Figure 2-2-5. The turn to face instructionrequires an argument, namely which object the snowman should turn to face. (An argument is anitem of information that must be supplied so Alice can execute the action.) In this example, thesnowwoman is selected as the object that the snowman will turn to face.32Figure 2-2-5. Adding a turn to face instruction
The resulting instruction is shown in Figure 2-2-6.Figure 2-2-6. The completed turn to face instruction

In the second instruction, the snowman will say “Ahem” to the snowwoman. A snowman saymethod tile is dragged into the editor and "Ahem" is entered as the string of text to be displayed,as illustrated in Figure 2-2-7.
The resulting code is shown in Figure 2-2-8.
When this program isrun (it is perfectly fine to try out the effect of just one or two Alice instructions by clicking on the

Play button), the snowman will turn to face the snowwoman and then he will say “Ahem.”33Figure 2-2-7. Adding a say instructionFigure 2-2-8. Resulting program codeDo togetherThe third step in the storyboard requires two things to occur at once: the snowman blinking hiseyes at the snowwoman as the snowwoman turns her head to see who called out to her. A Dotogether tile is dragged into the Do in order, as shown in Figure 2-2-9. Notice the horizontalgreen line in Figure 2-2-9. The green line indicates where the Do together instruction will bedropped.34Figure 2-2-9. Adding a Do together (inside the Do in order)
The result of this modification, illustrated in Figure 2-2-10, is that the Do together block is nestedwithin the Do in order block. Nesting means that one program statement is written inside another.Note that nesting the Do together inside the Do in order just happens to be the best way to

animate this example. A Do together does not have to be inside a Do in order. These two codingblocks can work together or can work separately in many different combinations.Figure 2-2-10. Do together nested within a Do in
orderNow, instructions can be dragged into the Do together block to simultaneously turn thesnowwoman’s head and blink the snowman’s eyes. How can we have the snowwoman turn herhead to face the snowman? Clicking on the + to the left of the snowwoman in the object treecauses the snowwoman’s parts to be displayed in the object tree. Then clicking on thesnowwoman’s head in the object tree allows access to instructions for moving her head, asillustrated in Figure 2-2-11.35
Figure 2-2-11. Accessing the methods for the snowwoman’s head
A turn to face instruction for the snowwoman’s head is added to the Do together block, as seen inFigure 2-2-12.Figure 2-2-12. Code to turn the snowwoman's head
Creating instructions to make the snowman’s eyes blink is more complicated. A click on the + tothe left of the snowman in the Object tree allows access to the subparts of the snowman. Then, aclick on the + to the left of the snowman’s head allows access to the snowman’s eyes, as shownin Figure 2-2-13.Figure 2-2-13. Accessing the snowman’s eyes

36It is now possible to drag instructions into the editor to move the snowman’s eyes up and thendown, as shown in Figure 2-2-14. Note that popup menus allow you to select arguments for thedirection and the amount of movement. When other is selected as the amount, a number pad(looks like a calculator) pops up on the screen. We chose 0.04 meters, clicking the buttons on thenumber pad to make our selection. How did we know to use 0.04 meters as the distance? Well,we didn’t. We just tried several different distance values until we finally found one that worked togive the best effect. This is an example of a trial and error strategy. While we always recommendgood planning strategies, sometimes trial and error is useful.Figure 2-2-14. Dragging the leftEye move tile into the editor

Instructions are added to the editor for moving the leftEye up, leftEye down, rightEye up, andrightEye down , as seen in Figure 2-2-15.37Figure 2-2-15. Program code has been added to make the snowman blink his eyes
BugsYou will recall that the four steps in creating an animation program are: read, design, implement,

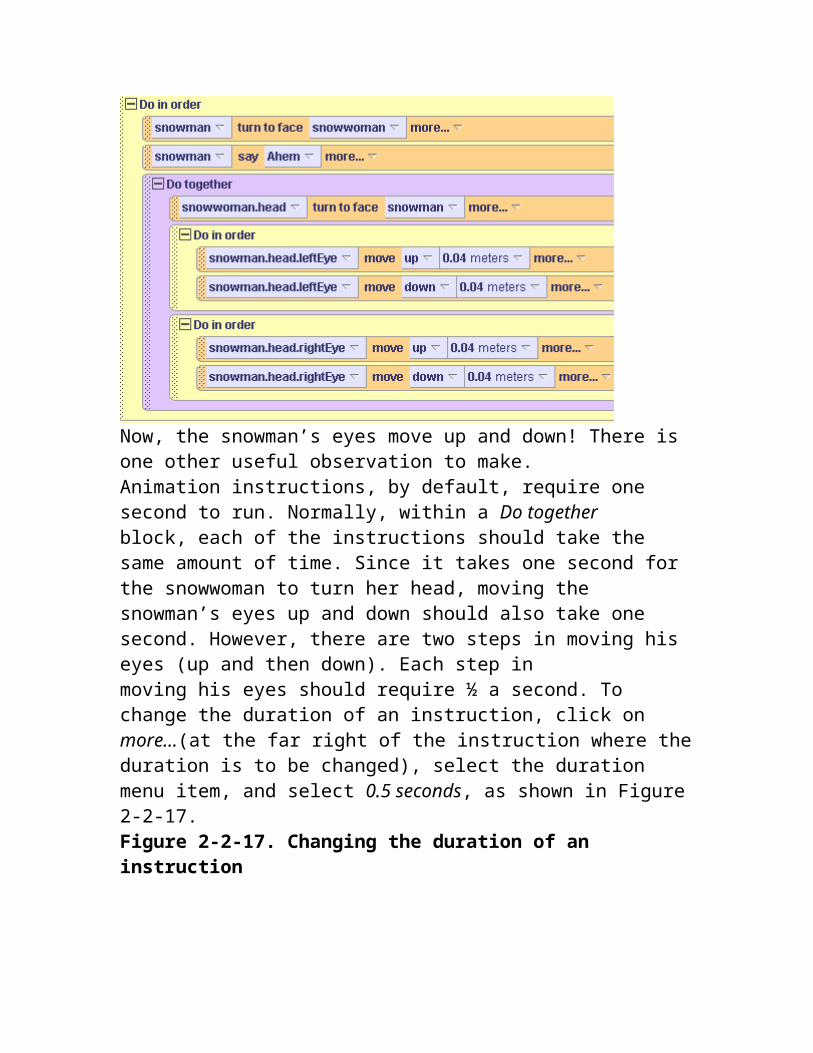
and test. Now that several lines of code have been written (implemented), it is a good idea to testit to see if what you have written thus far works the way you thought it would. You do not have towait until the entire program is completed. To test the instructions written thus far, the Playbutton is clicked. The snowman turns to face the snowwoman, the snowman says “Ahem,” thesnowwoman turns her head to face the snowman, but the snowman’s eyes don’t move up anddown. In fact, they do not appear to move at all!The reason the eyes do not move is the program has a bug. (Errors in computer programs aregenerally referred to as bugs. When we remove bugs from a program, we debug the program.)The problem is, in the code shown above, the snowman eye movement instructions are writteninside a Do together. Of course, if the eyes are moving both up and down at the same time, theyeffectively cancel each other out, and the snowman’s eyes do not move at all! To fix thisproblem, it is necessary to place the snowman’s left eye movement instructions within a Do inorder block and also the snowman’s right eye movement instructions within a Do in order block,as illustrated in Figure 2-2-16.38Figure 2-2-16. Revised instructions for blinking the snowman's eyes

Now, the snowman’s eyes move up and down! There is one other useful observation to make.Animation instructions, by default, require one second to run. Normally, within a Do togetherblock, each of the instructions should take the same amount of time. Since it takes one second forthe snowwoman to turn her head, moving the snowman’s eyes up and down should also take onesecond. However, there are two steps in moving his eyes (up and then down). Each step inmoving his eyes should require ½ a second. To change the duration of an instruction, click onmore…(at the far right of the instruction where the duration is to be changed), select the durationmenu item, and select 0.5 seconds, as shown in Figure 2-2-17.Figure 2-2-17. Changing the duration of an instruction

Using a propertyWe still need to complete the final two steps described in the storyboard. The fourth step requiresthe snowwoman to blush (her head turns red) as she turns her head back to her snow friends.Making the snowwoman’s head change color is slightly different from other instructions we haveused so far. To change the color of the snowwoman’s head, we use the color property of thesnowwoman's head. To view the list of properties of the snowwoman, select the snowwoman inthe Object tree and select the properties tab in the details area (lower left of the Alice window), asshown in Figure 2-2-18.Figure 2-2-18. The properties of the snowwoman

What we want to do is change the color of the snowwoman's head when she turns to look at thesnowman while the animation is running. (The technical term for “while the animation isrunning” is “at runtime.”) Figure 2-2-19 demonstrates the steps. First, a Do together block isdragged into the editor (beneath all the instructions written thus far). Then, in the Object tree, the+ beside the snowwoman is clicked to expand the tree, showing the subparts of the snowwoman.The subpart named head is selected. Then, the color tile in the properties list for thesnowwoman's head is dragged into the Do together block. Finally, the color Red is selected fromthe popup menu of available colors.40Figure 2-2-19. Changing the color of the snowwoman's head

As the snowwoman blushes, she should turn her head to look again at her friend. So, a turn toface instruction is added to the Do together block to make the snowwoman's head return to lookback at snowwoman2. Finally, the last instructions are written to return snowwoman’s head to awhite color and then the snowman gives up (hangs his head in disappointment and turns away).The resulting code for the entire animation is listed in Figure 2-2-20.41Figure 2-2-20. The program code for the entire snowpeople animation
CommentsNow that we have written our first program, it is time to look at a useful component in programs– comments. Comments are NOT instructions that cause some action to take place. This meansthat Alice can ignore comments when running a program. However, comments are consideredgood programming “style” and are extremely useful for humans who are reading a program.Comments help the human reader understand what a program does. This is particularly helpfulwhen someone else wants to read your program code to see what you wrote and how you wrote it.Comments in Alice are created by dragging the green // tile into a program and then writing adescription of what a sequence of code is intended to do. Figure 2-2-22 illustrates World.my first

method with a comment added. Where it is not obvious, a comment should be included at thebeginning of a method to explain what the method does. This kind of comment is like writing atopic sentence in a paragraph – it summarizes what is going on. Also, small sections of severallines of code that collectively perform some action can be documented using a comment. Anadditional comment has been added in Figure 2-2-23. This comment explains that this smallsection of the code is to have the snowwoman blush and turn away.42Figure 2-2-22. An overview comment for World.my first methodFigure 2-2-23. A comment for a small section of code
Sources:
Laugesen, Richard ( [email protected]) Stage 5 Information Technology Introduction to Computer Programming Complete 3 , Australian High School (April 2007)
Pausch, Randy “Learning to Program with Alice” Pearson Pentice Hall N.J. 2007