project 1: toy concept - carnegie mellon school of …rapidproto/students.03/jsl1/portfolio.doc ·...
TRANSCRIPT
Lim, Juliana 39245 Rapid Protyping
Portfolio Pg 1Project 1: Toy Concept
Basically, when I started thinking about what I wanted to do for my toy concepts, I knew that the toy had to have the ability of motion because I am a big fan of toys that can move. I think it captivates a child’s attention a lot more.
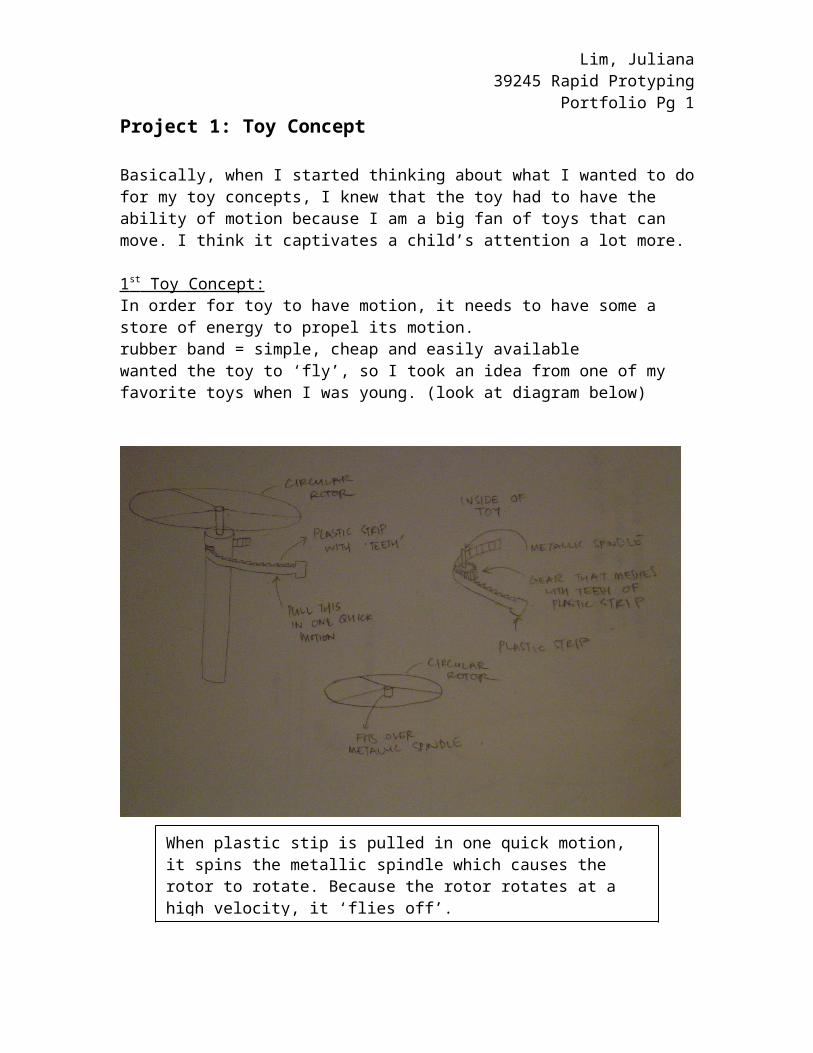
1 st Toy Concept: In order for toy to have motion, it needs to have some a store of energy to propel its motion.rubber band = simple, cheap and easily availablewanted the toy to ‘fly’, so I took an idea from one of my favorite toys when I was young. (look at diagram below)
When plastic stip is pulled in one quick motion, it spins the metallic spindle which causes the rotor to rotate. Because the rotor rotates at a high velocity, it ‘flies off’.

Lim, Juliana 39245 Rapid Protyping
Portfolio Pg 2idea: rocket shaped toy that was propelled by rotor blades. energy needed would be generated by a twisted rubber band.
conclusion:I think getting this toy to work would be a lot harder that expected because the rubber band had to be of the right tension and the shape, length and weight of the rotor blades would be crucial too. However, I’m sure it would definitely be a fun toy that could be used to teach children the concept of stored elastic potential energy, and how energy can be converted to various forms.
2 nd Toy Concept: I remember that when I first learnt about heat convection, I was thoroughly amazed by this physical concept. It was just amazing to see how something that was stationary at first could move because of heat being applied. It seemed almost unbelievable that something could move without any mechanical work done on it.This is one of the experiments that really struck me:
When the spiral is hung and placed over heat, it starts spinning.

Lim, Juliana 39245 Rapid Protyping
Portfolio Pg 3So using the same concept, I decided to come up with a mini hot air balloon.idea: hot air balloon, which has a working principal based on convection currents. children will learn that hot air rises when heated. rising hot air will give the lift that the toy needs to become airborne.
conclusion: because fire is involved, could be dangerous. the ‘canopy’ of the toy must be symmetrical when it is fitted on if not it may cause the toy to tilt in mid air3 rd Toy Concept: When a balloon is blown and air is allowed to escape from it, it whizzes all over the place. so I thought of harnessing the motion provided by this escaping air
idea: hovercraft-like toy
conclusion: I think that this toy has the highest probability of succeeding
Overall thoughts on Project 1:I am officially ‘web savvy’ now that I have created my very own web pages. I think it would have been fun if we got to make the toys. However, this may take a group effort. Initially, I thought brainstorming ideas for the toys would be simple but trying to come up with something original that could teach children

Lim, Juliana 39245 Rapid Protyping
Portfolio Pg 4Project 2: Manufactured AssemblyProblem: In a groups of 4(Lars, Mark, Tuan and I), we had to manufacture a part that was, together with the parts manufactured by the other groups, assembled together to form a working assembly, which was in this case a bell.
Design Process: We did not have to design anything, as we were given the drawings of the part we had to manufacture. Dimensions were included.
Choosing a manufacturing method:- we were limited to a few processes- each person had to research on one process- present the pros and cons to each other- decide as a group which process seemed the most feasible to us
Communication:- constant emails so that everyone knew of each other’s progress- group minutes were taken- tasks assigned to each person was reported in our group reports to make
sure that they weren’t any discrepancies over whose task something was, and so that no one could shrug off their responsibility
Manufacturing:- decided to use injection molding to produce the part- decided on CNC milling for the mold
Team Work:- we all made a good team- no team conflict- everyone was responsible
Evaluation:- Kudos to Tuan for taking it upon himself to make the mold in the machine
shop- everyone played their part to make this project a success
Overall Thoughts on Project 2:I’m glad I got really good team members who were a complete joy to work with. Usually in group projects, there tends to be some sort of clash in the group dynamics, but not in this case. We didn’t have the usual case of a ‘bossy dictator’, or a slacker. We manufactured our part using injection molding I’m curious to know which group/s made their parts of the wrong dimension. It could have been my group for all I know.. Also I thought that the room for error for this project would be very small since the parts would be made by machines, and the dimensions were specified. However this was proven wrong when the final assembly was put together, because it was nowhere near being able to function.
Lim, Juliana 39245 Rapid Protyping
Portfolio Pg 5Project 3: Engineering Activity KitsProblem: In groups of 3(Mark, Ruchi, I), we had to come up with an activity that would teach kids an engineering principal. The materials needed for this kit had to be able to fit into a container of specified dimensions.
Design Process: We first thought about what engineering principle we wanted to teach the kids. We thought about principles of heat, light and sound. From here, we thought about what activities we could use to teach these principles to the children.
Heat – teach the 3 methods of heat transfer(conduction, convection and radiation) through various experiments
Ball and ring Spiral Magnifying class Dye in heated water
Light – light travels in straight lines Pinhole camera Camera obscura
Sound – sound is produced by vibrations. Can travel through solids, liquids, gases but not vacuums.
Tuning fork Pluck nylon strings of different length and thickness Test tubes with water
We had a hard time deciding on the activities. We finally settled on the light experiments, because we decided that the camera obscura could be the teacher demo while the students could make their own pinhole camera, making it more interactive. For the other experiments that we were deciding on, the kids only had to carry out the activities; there was nothing for them to make. Also, we thought that this experiment was simple enough for children to carry out and understand.
Communication:As with the previous group project, emails were our main form of communication. Constant emails were sent remind one another of tasks that had to be done or to update each other on our own progress. We met whenever there were things to be discussed, or when things had to be done as a group, eg the website or the poster board.
Problem Solving:The camera obscura posed problems to us even before we started
With our given budget, we couldn’t get all the materials we needed. However, we managed to solve this problem by a stroke of luck and a little of our ingenuity
o PVC tubes: we recycled PVC tubes from a previous experiment.
Lim, Juliana 39245 Rapid Protyping
Portfolio Pg 6o Light proof material: this was way out of our budget so we decided
to use 2 layers of black cloth instead, though this would mean that the sewing and assembling of the camera obscura would require more work.
Teamwork:Our team worked well together. Because this project was due at the end of the semester, it was a little harder to coordinate, because all of us had more time constraints. We tried our best to accommodate each of our conflicting schedules, especially since Meeting of the Minds took place in the midst of finals. We tried to ensure an equal workload for each of us.
Evaluation:Everything worked out fine in the end. Though the camera obscura wasn’t ready for the first few presentations we had for the children who came to class, it turned out to be a success in the end. The kids had a lot of fun making their own pinhole cameras. The only problem we had was the weather, which was something that we couldn’t control. In order for the image in the pinhole camera to be bright and sharp, there has to be enough light. Thus, our activity would have worked the best outdoors. Many children had trouble understanding the principle behind our activity. This led us to come up with the worksheet that would guide the children in their thinking and hopefully, lead them to the principle behind our project.However, there were some children who just couldn’t understand the working principle behind our project, thus we decided put a ‘8 years old or older’ age limit on our activity in order to be able to understand the concept behind the activity. But, to participate in the activity, there would be no age limit.Many people were always intrigued by the pinhole camera and how it worked. The kids and adults were excited to make their own pinhole camera.It was a great pity that people couldn’t try our camera obscura out for our Meeting of the Minds presentation. Though we did set our camera obscura up in the room, the lighting conditions in the room was too poor, and it would have been almost impossible to see any image being formed. It would have been optimal if we got to set it up outdoors.
Overall thoughts: I enjoyed working with my group on this project. I liked having the kids come test out our ideas in class. It really gave us a better idea on what worked, and what could capture the kids’ attention. We were also given a clearer perspective on what the age limit for our activity should have been. Overall, this was a definite learning experience for me.

Lim, Juliana 39245 Rapid Protyping
Portfolio Pg 7Exercise 1: Pencil Transporter Gizmo
Coming to class and seeing everyone else’s gizmo, I was embarrassed by my own gizmo. It seemed uglier and less sturdy. My mistake was that I didn’t conceptualize my gizmo before I began work on it. I just started building with the materials I had. My ‘strategy’ was to try building a workable structure, making changes to the design whenever something couldn’t work, and making improvements to the design when I saw fit. I think it is important to have a rough working plan before starting work on anything. It would have easier visualizing how I wanted things to be.
Exercise 2: Pencil Transporter GizmoHaving to transport more pencils over a greater height over the river, many changes had to be made to my initial design. I thought of creating a whole new gizmo but because of time constraints, I didn’t think I had sufficient time to do this since it would mean brainstorming for a brand new idea, and rebuilding the whole structure again. Also, I had the impression that we had to stick to our original design for this second exercise. Thus, I basically made many changes to my original design. Seeing everyone’s design in class, I saw that there were a few basic designs that worked well. I also noticed that some people changed their original design totally and ‘borrowed’ their ideas from projects that worked during the first exercise. Instead of working on my old design I should have worked on rebuilding a totally new design. I should have built a few prototypes to test if my design was able to work. I think when constructing something, there should be an ongoing design and build process. You first design the object, and then you build it. If it fails design it better or come up with something entirely different, and then build it. These 2 steps have to keep repeating.