project lesson: darling drawstring - rnk distributing · project lesson: darling drawstring ......
TRANSCRIPT
Floriani...The Name That Means Beautiful Quilting and Embroidery!
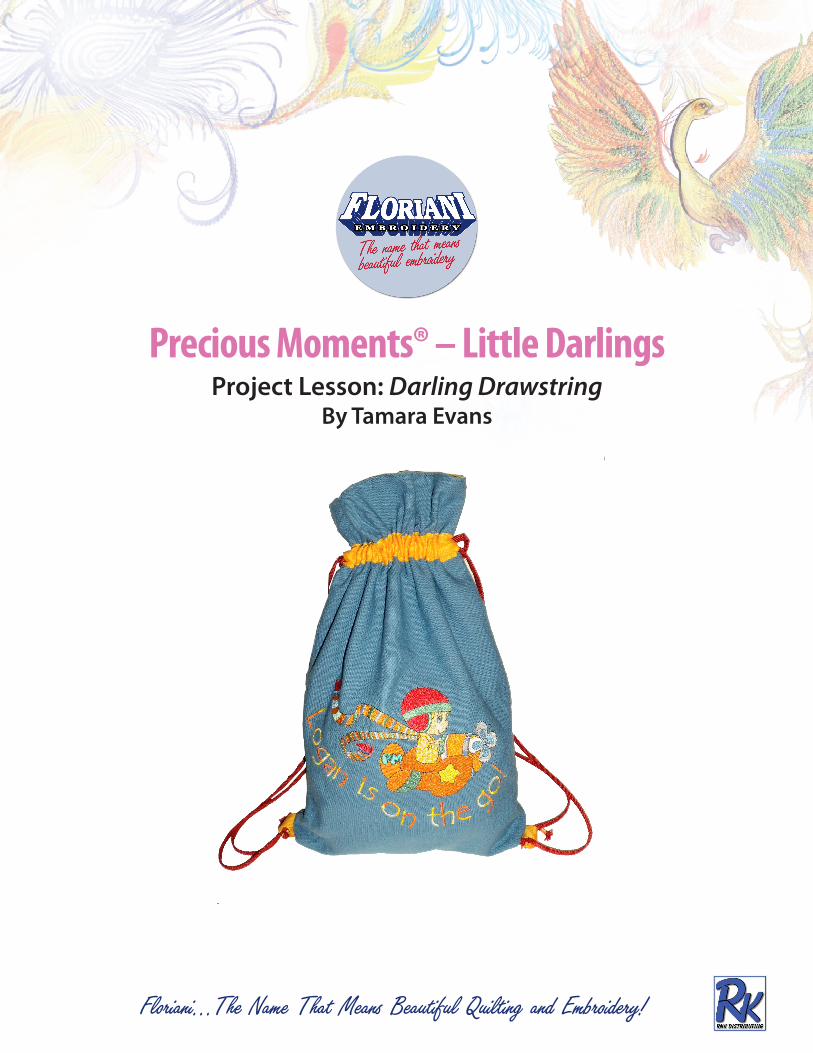
Project Lesson: Darling DrawstringBy Tamara Evans
Precious Moments® – Little Darlings
2 Floriani...The Name That Means Beautiful Quilting and Embroidery!
Project Lesson: Darling DrawstringBy Tamara Evans
Precious Moments® – Little Darlings
This Darling Drawstring bag is just the right size for extra toys, treats and those little necessities to keep a busy toddler happy on the go! And won’t that wee one feel important carrying his personalized backpack. There are many adorable designs to choose from in this collection to delight the “little darling” in your life!
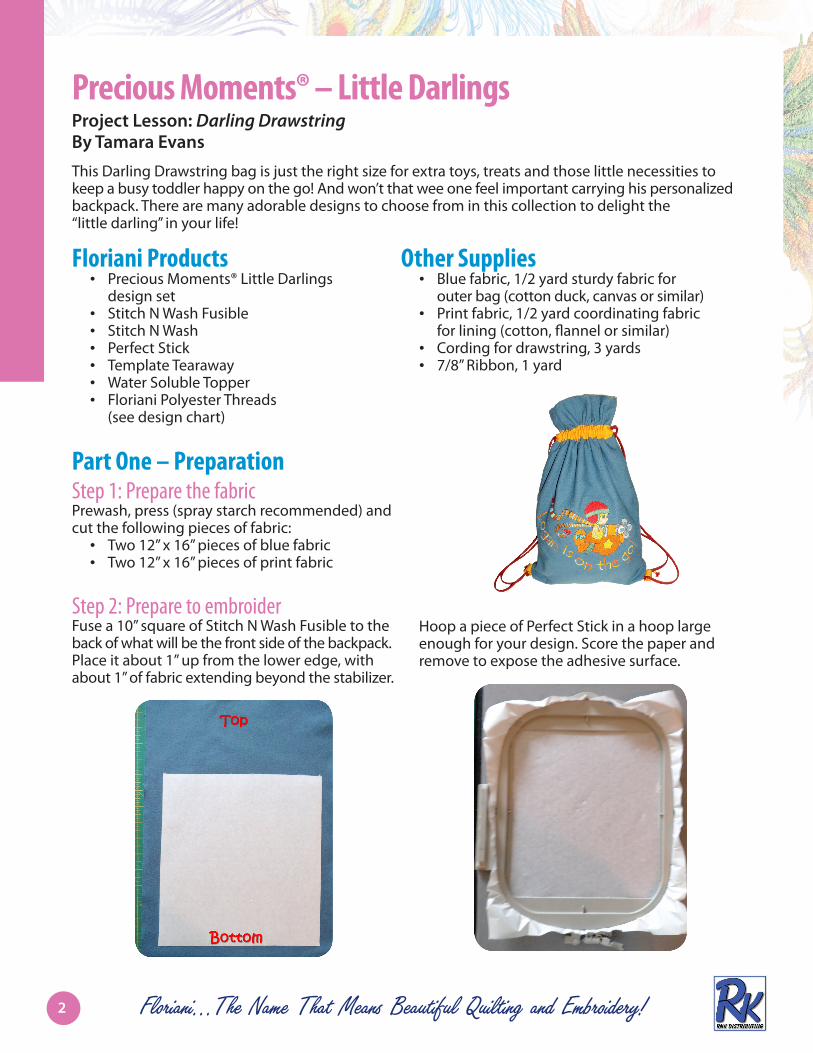
Part One – PreparationStep 1: Prepare the fabricPrewash, press (spray starch recommended) and cut the following pieces of fabric:• Two 12” x 16” pieces of blue fabric• Two 12” x 16” pieces of print fabric
Step 2: Prepare to embroiderFuse a 10” square of Stitch N Wash Fusible to the back of what will be the front side of the backpack. Place it about 1” up from the lower edge, with about 1” of fabric extending beyond the stabilizer.
Floriani Products• Precious Moments® Little Darlings
design set• Stitch N Wash Fusible• Stitch N Wash• Perfect Stick• Template Tearaway• Water Soluble Topper• Floriani Polyester Threads
(see design chart)
Other Supplies• Blue fabric, 1/2 yard sturdy fabric for
outer bag (cotton duck, canvas or similar)• Print fabric, 1/2 yard coordinating fabric
for lining (cotton, flannel or similar)• Cording for drawstring, 3 yards• 7/8” Ribbon, 1 yard
Hoop a piece of Perfect Stick in a hoop large enough for your design. Score the paper and remove to expose the adhesive surface.
3 Floriani...The Name That Means Beautiful Quilting and Embroidery!
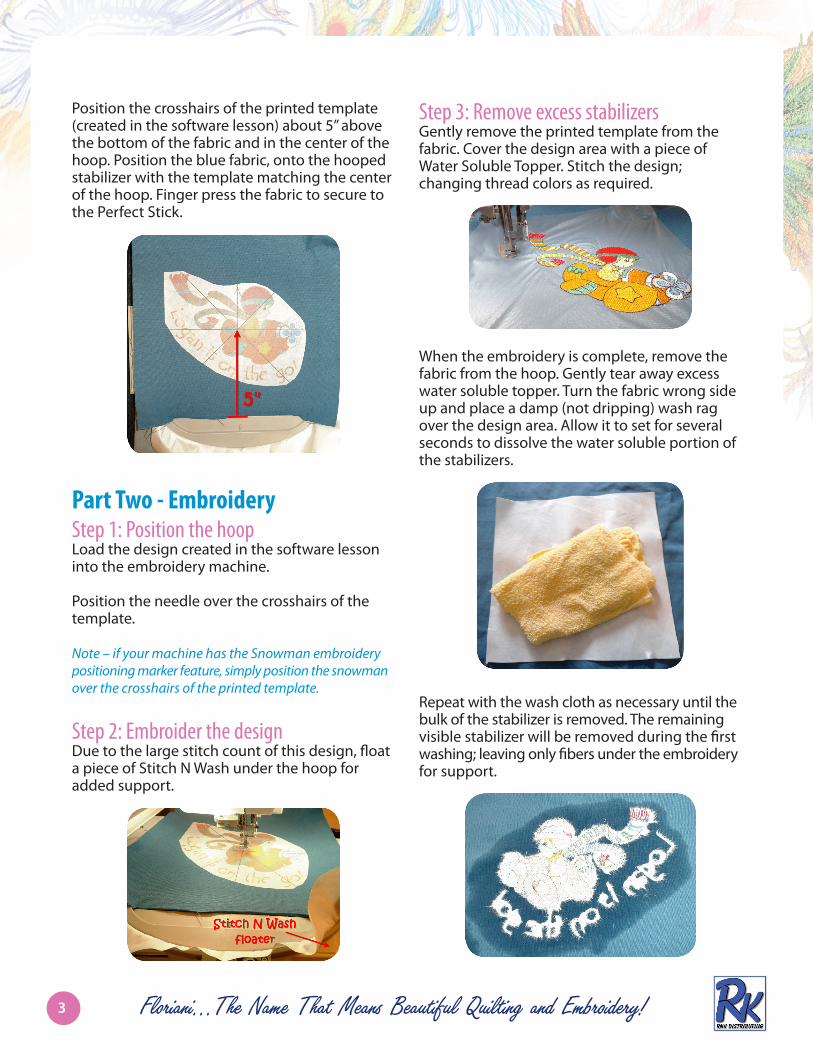
Position the crosshairs of the printed template (created in the software lesson) about 5” above the bottom of the fabric and in the center of the hoop. Position the blue fabric, onto the hooped stabilizer with the template matching the center of the hoop. Finger press the fabric to secure to the Perfect Stick.
Part Two - EmbroideryStep 1: Position the hoopLoad the design created in the software lesson into the embroidery machine.
Position the needle over the crosshairs of the template.
Note – if your machine has the Snowman embroidery positioning marker feature, simply position the snowman over the crosshairs of the printed template.
Step 2: Embroider the designDue to the large stitch count of this design, float a piece of Stitch N Wash under the hoop for added support.
Step 3: Remove excess stabilizersGently remove the printed template from the fabric. Cover the design area with a piece of Water Soluble Topper. Stitch the design; changing thread colors as required.
When the embroidery is complete, remove the fabric from the hoop. Gently tear away excess water soluble topper. Turn the fabric wrong side up and place a damp (not dripping) wash rag over the design area. Allow it to set for several seconds to dissolve the water soluble portion of the stabilizers.
Repeat with the wash cloth as necessary until the bulk of the stabilizer is removed. The remaining visible stabilizer will be removed during the first washing; leaving only fibers under the embroidery for support.
4 Floriani...The Name That Means Beautiful Quilting and Embroidery!
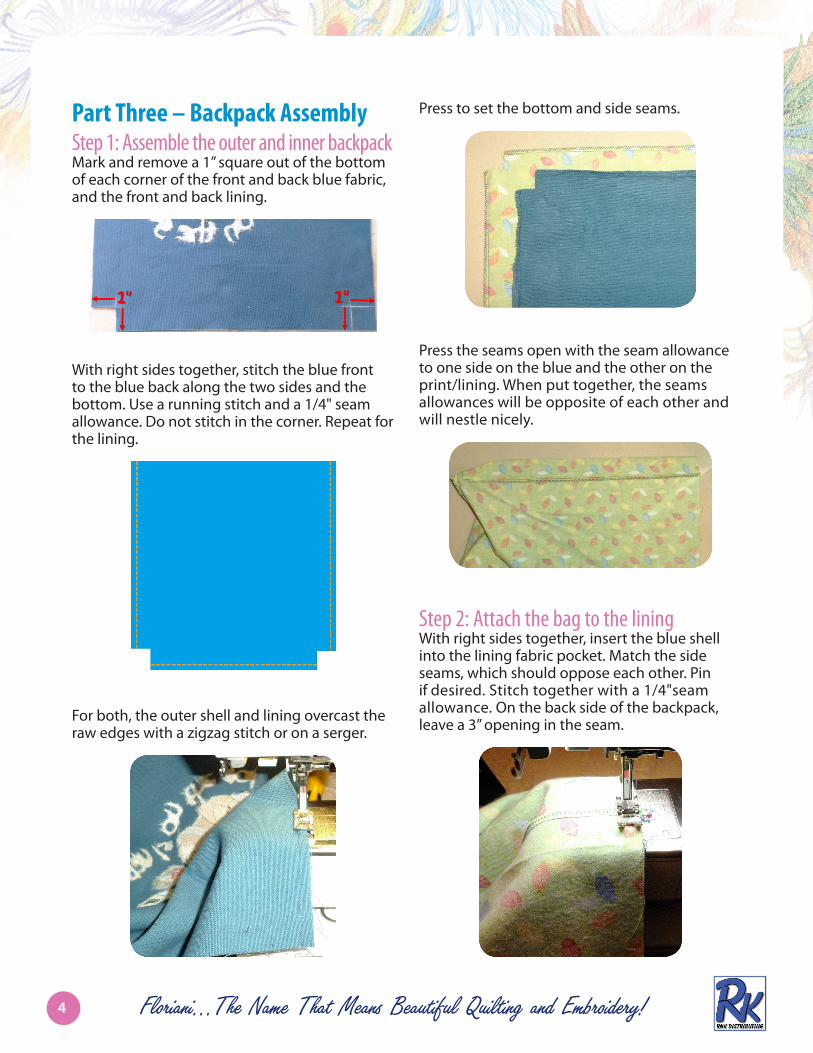
Part Three – Backpack AssemblyStep 1: Assemble the outer and inner backpackMark and remove a 1” square out of the bottom of each corner of the front and back blue fabric, and the front and back lining.
With right sides together, stitch the blue front to the blue back along the two sides and the bottom. Use a running stitch and a 1/4" seam allowance. Do not stitch in the corner. Repeat for the lining.
For both, the outer shell and lining overcast the raw edges with a zigzag stitch or on a serger.
Press to set the bottom and side seams.
Press the seams open with the seam allowance to one side on the blue and the other on the print/lining. When put together, the seams allowances will be opposite of each other and will nestle nicely.
Step 2: Attach the bag to the liningWith right sides together, insert the blue shell into the lining fabric pocket. Match the side seams, which should oppose each other. Pin if desired. Stitch together with a 1/4"seam allowance. On the back side of the backpack, leave a 3” opening in the seam.
5 Floriani...The Name That Means Beautiful Quilting and Embroidery!
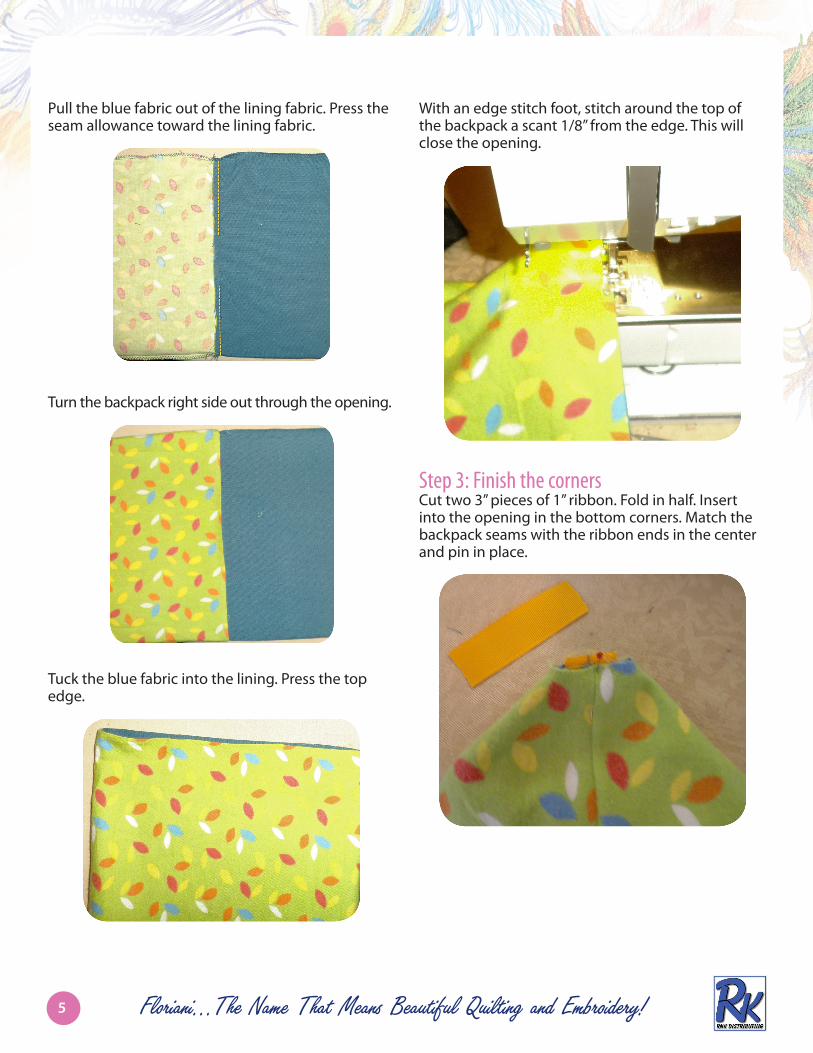
Pull the blue fabric out of the lining fabric. Press the seam allowance toward the lining fabric.
Turn the backpack right side out through the opening.
Tuck the blue fabric into the lining. Press the top edge.
With an edge stitch foot, stitch around the top of the backpack a scant 1/8” from the edge. This will close the opening.
Step 3: Finish the cornersCut two 3” pieces of 1” ribbon. Fold in half. Insert into the opening in the bottom corners. Match the backpack seams with the ribbon ends in the center and pin in place.
6 Floriani...The Name That Means Beautiful Quilting and Embroidery!
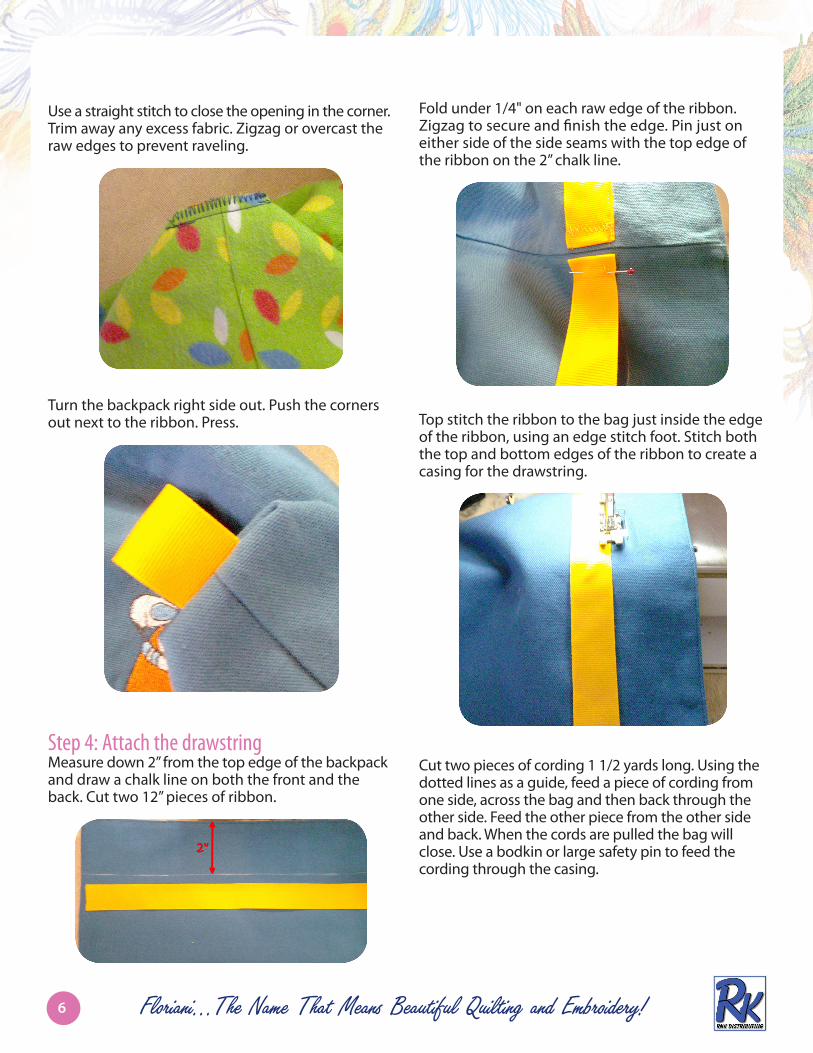
Use a straight stitch to close the opening in the corner. Trim away any excess fabric. Zigzag or overcast the raw edges to prevent raveling.
Turn the backpack right side out. Push the corners out next to the ribbon. Press.
Step 4: Attach the drawstringMeasure down 2” from the top edge of the backpack and draw a chalk line on both the front and the back. Cut two 12” pieces of ribbon.
Fold under 1/4" on each raw edge of the ribbon. Zigzag to secure and finish the edge. Pin just on either side of the side seams with the top edge of the ribbon on the 2” chalk line.
Top stitch the ribbon to the bag just inside the edge of the ribbon, using an edge stitch foot. Stitch both the top and bottom edges of the ribbon to create a casing for the drawstring.
Cut two pieces of cording 1 1/2 yards long. Using the dotted lines as a guide, feed a piece of cording from one side, across the bag and then back through the other side. Feed the other piece from the other side and back. When the cords are pulled the bag will close. Use a bodkin or large safety pin to feed the cording through the casing.
7 Floriani...The Name That Means Beautiful Quilting and Embroidery!
Project and step-by-step instructions created by Tamara Evans
for RNK Distributing.
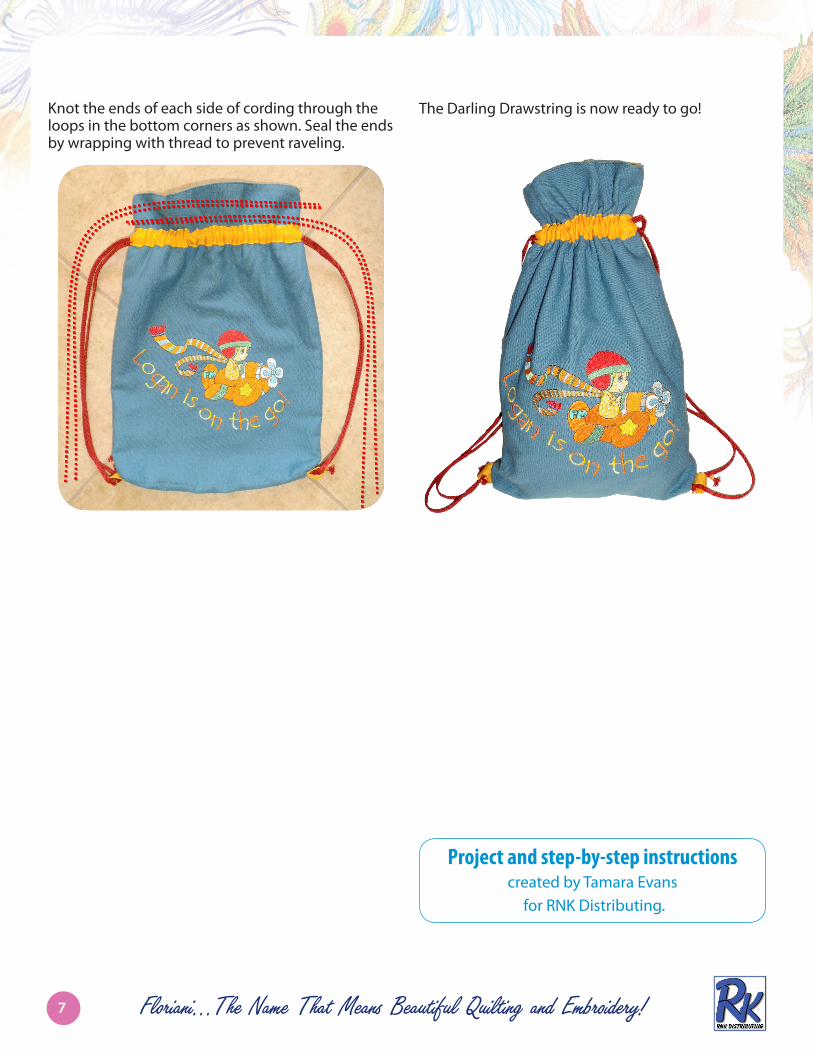
Knot the ends of each side of cording through the loops in the bottom corners as shown. Seal the ends by wrapping with thread to prevent raveling.
The Darling Drawstring is now ready to go!