proofpoint essentials administrator guide - windstream · about this guide this guide introduces...
TRANSCRIPT


2
April 2016
Preface .................................................................................................................................................................................... 5
About this Guide .................................................................................................................................................................................. 5
Intended Audience and Prerequisite Knowledge ................................................................................................................................... 5
Other Sources of Information ............................................................................................................................................................... 5
Introduction to Proofpoint Essentials ……................................................................................................................................. 6
Proofpoint Essentials: Part of the Proofpoint Family ............................................................................................................................. 6
Proofpoint Essentials Overview …............................................................................................................................................................ 6
Email Filtering Overview ............................................................................................................................................................................. 6
Features and Capabilities ............................................................................................................................................................................ 6
Service Architecture .................................................................................................................................................................................... 8
Real-Time / Reliable Spam Detection .......................................................................................................................................................... 8
Message Processing Order .......................................................................................................................................................................... 8
Best Practices .................................................................................................................................................................................... 10
Using Proofpoint Essentials ……............................................................................................................................................... 11
Accessing the User Interface …................................................................................................................................................................. 11
Logging In .................................................................................................................................................................................................. 11
Resetting or changing the administrative password ................................................................................................................................. 11
Using the Homepage ................................................................................................................................................................................. 12
Searching for a Company or Domain ......................................................................................................................................................... 12
Interacting with Lists ................................................................................................................................................................................. 12
Navigating the Interface ..................................................................................................................................................................... 12
Navigation ................................................................................................................................................................................................. 12
Company Settings ..................................................................................................................................................................................... 13
Logs ........................................................................................................................................................................................................... 14
Archive ...................................................................................................................................................................................................... 14
Users & Groups ......................................................................................................................................................................................... 14
Reports ...................................................................................................................................................................................................... 15

Managing Features and Options ............................................................................................................................................. 16
Loading Users ............................................................................................................................................................................................ 16
Configuration Options ……………………….................................................................................................................................................. 18
Features ...................................................................................................................................................................................................... 18
Filters and Sender Lists ............................................................................................................................................................................. 17
Domains .................................................................................................................................................................................................... 24
URL Defense .............................................................................................................................................................................................. 27
Spam ......................................................................................................................................................................................................... 28
Digests ....................................................................................................................................................................................................... 30
Notifications .............................................................................................................................................................................................. 31
Disclaimer ................................................................................................................................................................................................. 33
Social ......................................................................................................................................................................................................... 33
Access Control ........................................................................................................................................................................................... 34
Using Templates ................................................................................................................................................................................. 34
Managing Users & Groups ………............................................................................................................................................. 36
Understanding Roles .......................................................................................................................................................................... 36
Managing Users ................................................................................................................................................................................. 36
Managing Groups ............................................................................................................................................................................... 38
Export Users ............................................................................................................................................................................................. 39
Configuration Options for Users and Groups ....................................................................................................................................... 39
Users ......................................................................................................................................................................................................... 39
Groups ...................................................................................................................................................................................................... 41
Accessing Additional Features ……........................................................................................................................................... 42
Using Email Logs ................................................................................................................................................................................. 42
Searching Logs .......................................................................................................................................................................................... 42
Viewing Search Results ............................................................................................................................................................................. 43
Actions ...................................................................................................................................................................................................... 44
System Alerts ..................................................................................................................................................................................... 45

4
Accessing the Emergency Inbox .......................................................................................................................................................... 45
Reports .............................................................................................................................................................................................. 46
Archive………........................................................................................................................................................................... 48
Configuring Proofpoint Essentials Archive ........................................................................................................................................... 48
Using the Proofpoint Essentials Archive .............................................................................................................................................. 49
Who can search the archive? .................................................................................................................................................................... 49
Viewing Search Results ............................................................................................................................................................................. 50
Appendix I – Configuring Office 365 ……................................................................................................................................... 51
Before you Start ................................................................................................................................................................................. 51
Information needed for configuring Proofpoint Essentials ............................................................................................................................ 51
Information needed for configuring Office 365 ........................................................................................................................................ 51
Setup Inbound Mail Flow .................................................................................................................................................................... 51
Configure Proofpoint Essentials ................................................................................................................................................................ 51
Configure Office 365 ................................................................................................................................................................................. 52
Setup Outbound Mail Flow ................................................................................................................................................................. 52
Configure Proofpoint Essentials ................................................................................................................................................................ 53
Configure Office 365 ................................................................................................................................................................................. 53

Preface About this Guide
This guide introduces Proofpoint Essentials, provides useful background information about it, and explains how to set it up and use
it.
Intended Audience and Prerequisite Knowledge
This guide is intended for use by personnel who manage the messaging environment and are responsible for configuring and
maintaining Proofpoint Essentials.
Other Sources of Information
This guide covers procedural information for Proofpoint Essentials configuration. For other information, see:
Getting Started Guides: Provides basic information on how to add and configure a new company on Proofpoint Essentials service.

6
Introduction to Proofpoint Essentials
In this chapter, you’ll find the following topics:
• Proofpoint Essentials: Part of the Proofpoint Family
• Proofpoint Essentials Overview
• Message Processing Order
• Best Practices
NOTE: This guide does not include information about using other Proofpoint products and services. For this information, refer to the
documentation for those products and services. For details visit: www.proofpoint.com
Proofpoint Essentials: Part of the Proofpoint Family
Proofpoint offers a comprehensive solution for data protection and governance through an integrated, security-as-a-service
platform. Complementing the Proofpoint data protection and security solutions, Proofpoint Essentials is designed specifically for
SMEs and backed by Proofpoint’s enterprise security technology and infrastructure. Proofpoint Essentials offers the ultimate email
security protection for the smaller enterprise.
Proofpoint Essentials Overview
Email Filtering Overview
The message filtering layer lets a company, service provider or other organization easily provide real-time spam and virus filtering,
attack blocking, and email-traffic monitoring and email archiving across a user deployment of any size. Users receive comprehensive
protection against unwanted and malicious email, while administrators can easily tailor service for users’ needs and policies.
The service blocks a wide range of email attacks at the connection level, filters spam and viruses, and can approve or block messages
based on sender address or domain, origin IP address, attachment size or file type, text content, and more. It does this without
requiring you to install additional software or hardware. Instead, users’ incoming email is processed at our highly secure and reliable
data centers before reaching your server. Within seconds, spam and viruses are separated from legitimate messages.
Legitimate messages are delivered to recipients with minimal delay, while suspicious messages are blocked or sent to the
quarantine. Users can review quarantined messages and choose to release them if necessary.
Administrators can arrange users into groups to easily tailor their service while still maintaining control across an entire deployment.
They can also give users control over managing their own service. The service includes a number of tools for administrators to
monitor, secure, and regulate server connections and email delivery.
Features and Capabilities
Your service provides a wide range of protection and administrative capabilities. The following topics provide an overview of these
components, and are a good introduction to understanding the full power of Proofpoint Essentials.
Attack Blocking and Connection Protection
Protection against email attacks, where an outbreak of harmful traffic originates from a single server, is provided at our Connection
layer. This blocks a wide range of attacks, including Directory Harvest Attacks (DHA) and denial-of-service (DoS) attacks, and it
protects against significant spikes in spam or virus activity. Attacks are detected and blocked in real time, at the time the offending IP
address attempts to connect with your email server. When an attack or unwanted probe is detected, the source IP address is
temporarily blocked, during which time all messages received from that address are bounced back to the sender.

Spam, Virus, and Content Filtering
A message passing through the filtering layer is evaluated by several filters, which include:
Virus Blocking - Detected viruses are blocked (not delivered to intended users) and logged in the system.
Spam Filtering - Not only can you set a level for how aggressively to filter spam overall, but users can personally adjust
their threshold if needed without the requirement to alter the entire organization.
Content Filtering - Customized filters allow you to block or allow email based on properties such as size, content, sender,
recipient, etc.
Message Quarantine and Release
Messages caught by a particular filter are processed in a number of ways based on preference. You can take different actions based
on the message received. For example, you might opt for a message to be blocked with no quarantine log, or placed in a quarantine
where you can later review it and optionally release it to the end-user.
Scalable / Custom User Management
With the message filtering service, you can easily maintain common services, filter settings, and email policies across your entire
user base, while also tailoring service for groups of users or individuals. For example, you may apply a standard organization filter
against anyone being able to receive .Avi movie files, set everyone’s spam filtering to moderately aggressive, and provide a master
list of approved senders. Users in Sales, however, might want more lenient filtering, and Marketing might need to receive .Avi files
after all. These users can be placed in a separate group with different permissions to other users in other groups, thus retaining
desired common settings. Each user / group / org can then be tailored as necessary for its users and imported directly from Active
Directory.
The platform can also be tailored, as appropriate, for individual users. For example, some users might want to add their own
personal allowed and blocked senders or manage received content.
User Access
It is currently accepted by the vast majority of administrators and email users that optimal service is experienced when users have
delegated access to manage their own spam and filter messages, by enabling access to the user interface. Users can log in via any
web browser to see what messages are being filtered and why. They can also look for falsely quarantined messages and release any
legitimate messages to their own Inbox.
Email Spooling & Emergency Inbox
Protection against email loss if your email server goes down is provided by all Proofpoint Essentials packages by default. Should your
server become unavailable due to a crash or network connectivity problem, Proofpoint Essentials automatically spools incoming
traffic to a backup server, where it is stored until communication with your service is established. Emergency Inbox is available at all
times. When your server becomes available again, Emergency Inbox unspools the traffic back to your server so it can be delivered.
Instant Replay
Allow both administrators and users to resend any email filtered by Proofpoint Essentials up to 30 days old.
Logs and Reports
The Administration Console provides tools that help service administrators monitor email activity and filter effectiveness:
• Reports - The reports page displays a variety of graphs reporting at-a-glance statistics on the number of messages
recently delivered, blocked, quarantined, or deferred for delivery.
• Logs - View detailed email activity by searching log files.
Email Encryption and Data Loss Prevention
Reduce the risk inherent in individuals making security and disclosure policy decisions by creating custom filters to automate
enforcement of data security policies for sensitive data. Emails are identified based on industry relevant smart identifiers and
dictionaries and the appropriate action is automatically taken – e.g., allowing the information to be sent, blocked or encrypted if
appropriate.

8
Service Architecture
As the message filtering layer is hosted, actual detection and filtering of suspicious mail occurs not in your email environment, but at
our external data center. This is a robust and secure cloud security platform that sits between your users and the Internet, and is
managed by our highly specialized personnel.
To set up the service for an organization, you need to register the mail servers, domains, and users with the service by completing a
simple setup wizard. Then you configure their filtering and services. You can do this all from a standard web browser, without having
to install or maintain any separate hardware or software.
Once the service is set up, all incoming traffic to users is filtered at the data center according to your configuration—before it
reaches your server. Within seconds, heuristics-based anti-spam and virus engines separate spam and viruses from legitimate
messages. Legitimate messages are delivered to users without delay, while suspicious mail is diverted to a quarantine area where
you or your users can review it.
Real-Time / Reliable Spam Detection
Messages are filtered before they reach your email server, without being written to an intermediate disk or delayed in a queue.
Instead, a pass-through spam detection engine works in-line with SMTP traffic to scan, score, and perform any resulting disposition
as messages travel the public Internet.
As a result, the sender receives acknowledgement of successful delivery only after the message is indeed delivered and
acknowledged by your email server. If your server becomes unavailable, the message filtering layer returns the message “451 unable
to reach the domain name”. This 400 class error message indicates a temporary failure to the sending server, which then re-sends
the message repeatedly, until either your email server comes back up and the message is delivered, or until the delivery times out
(up to fourteen days). In the latter case, the sender receives notice that the delivery failed and can resend the message.
Message Processing Order
Each message that is processed by Proofpoint Essentials is blocked, delivered or sent to a quarantine based on as specific sequence
of steps. The order that these steps are applied to messages ensures that no potentially harmful traffic can reach your servers, while
allowing desired traffic to get through in all other cases. For example emails are scanned for viruses before being evaluated by
organization filters. This ensures that a message that contained a virus is blocked regardless if the sender appears on an approved
sender filter. The message processing order is:
Connection Layer
Connection Layer provides protection based on the sender’s behavior at the IP level:
• When a message first reaches the message filtering service’s data center, the service checks to see whether the sender’s IP
address or domain has already been identified as either malicious or trusted. If so, the service might take action against the
message right away.
• Connection Layer monitors incoming traffic for patterns of behavior associated with SMTP attacks, including Email Bombs,
Directory Harvest Attacks, Spam Attacks, and Virus Outbreaks. If it detects an attack, it temporarily closes all connections
between the offending IP address and your email server. If the message comes from such an IP address, it’s bounced, and an
SMTP error message is returned to the sender.
User Validation
The system checks to see if the address is associated with a registered user or aliased to a registered user. If the recipient is a
registered user, the message continues to be processed, according to that user’s filters and other settings. If the recipient is not
registered, the message is either rejected or processed and user created based on SMTP Discovery settings. For more information
about SMTP Discovery settings, please refer to Managing Customers / Provisioning a New Customer / Loading Users / SMTP
Discovery.

Virus Blocking
Virus blocking scans the message and message attachments for viruses. If a virus is detected, the message is blocked and logged.
Attachment Defense (If licensed)
Attachment defense scans supported inbound attachments against Proofpoint’s attachment reputation service. Messages that
contain attachments known to be malicious are blocked and logged.
Message Size
By default, the maximum message size is 100MB; messages exceeding the maximum message size are bounced.
Sending Message Limit
In order to protect the reputation of the sender, the organization and the Proofpoint Essentials platform a sending limit of 100
emails per 10 minutes and 500 per day has been implemented. If the limit has been reached, the message is bounced. Proofpoint
Essentials recommends using a mail delivery service for higher volume mail delivery such as newsletters or marketing related
communications. However, if your organization requires higher outbound volumes for specific senders you can request an exception
to be made.
Custom Filters
Messages are scanned against active custom filters to apply delivery instructions. Filters can be applied to a user, a group of users or
the entire organization.
NOTE: The most specific filter is applied first. For example, a filter that applies to a specified user will be applied before a generic
organization wide filter.
Sender Lists
A sender list is a list of approved or blocked senders. Entries in the list allow or quarantine specific email addresses and/or domains.
NOTE: User safe sender entries have precedence over the organization blocked sender entries. For example, if the sender is on an
individual user’s approved sender list and also on the organization blocked sender list, the message is delivered.
Spam Filters
Next, the message reaches the spam filters. These include a general bulk email filter that sets a baseline threshold for filtering all
types of junk mail, and filter offsets that can provide more aggressive filtering of junk mail. The messages are evaluated against the
threshold set by each user. If the final threshold exceeds the spam trigger score, the message is considered to be spam and then
quarantined.
URL Defense (If Licensed)
All URLs found within inbound messages are re-written (based on configuration options).
Delivery
After passing through the filtering, the message is delivered to the recipient on your email server.

10
Best Practices
Once you have completed the initial company setup we recommend you follow these steps to ensure your organization achieves the
most effective protection & filtering from Proofpoint Essentials:
Add Additional Domains
Ensures that all domains are registered with Proofpoint Essentials.
Lockdown your Firewall
Some virus and spam senders specifically target mail servers using low-priority DNS MX records or by looking up a server directly
using a common naming convention like mail.mydomain.com. To prevent malicious senders bypassing the message filtering service,
we highly recommend that you add all of your domains to the service, and then configure your email servers to accept mail only
from Proofpoint Essentials data centers.
Determine Service Requirements
Review the requirements for the organization’s users and email policy, and design your organizational deployment strategy. For
example, decide which users should have access to the interface, and what additional rules should be created (e.g. Allow and Block
lists).
Enable Features
Review the features available with the package selected and enable important features.
Configure Default User Settings
Spam thresholds and the quarantine digest can be customized for each organization. In addition, settings can be changed for specific
users.
Load Users
There are multiple ways to load users into the Proofpoint Essentials system. It is important to choose the right method that suits the
organization.
Add Additional Administrators
You can create additional accounts for administrators and support staff.
Create an Emergency Plan
You should have a plan in place to follow in the event that you experience a mail flow issue.
• Be sure that you have set up an active and named technical contact with your Proofpoint Essentials reseller for an
emergency service.
• If you have access to the support portal, set up a support portal account and also ensure that the correct person is
nominated as the technical contact for your organization in the Proofpoint Essentials Account profile page.
• Ensure at least one contact at your supplier has not “Opted Out” of service updates & notifications.
• Set up an internal process for the unlikely event of a service outage.

Using Proofpoint Essentials
In this chapter, you’ll find the following topics:
• Accessing the User Interface
• Navigating the Interface
Accessing the User Interface
The Proofpoint Essentials user interface is the secure web-based user and administrator portal used to manage and configure the
Proofpoint Essentials Platform, and administer organizations, users, email archive and email server configurations. The interface
provides a secure web interface during the entire session. The console uses SSL to encrypt the email ID and password information.
All pages on the interface are HTTPS secured. Cookies are only used to identify and validate users. The system does not track history
in cookies. All cookies expire when the browser is exited.
Logging In
To access the Administration Console, you must have your organization provisioned on Proofpoint Essentials.
1. Open a web browser and navigate to the appropriate URL (Please see your Getting Started Guide for the URL).
2. Enter your login email address and password.
• You will receive your login information from your administrator or Proofpoint Essentials reseller once provisioned on
the Interface.
The next page you should see is your own organizations Home Profile Page unless you have used incorrect user credentials – in
which case you should follow the link to “Forget your Password”.
Resetting or changing the administrative password
1. Click on the Users & Groups tab.
2. Click on your name (alternatively, type your name in the Search panel to locate it).
3. Update both password fields in the profile tab.
4. Click Save.
If you forgot your password, you can click on “Forgot your Password” button on the login page. The next page is a request new
password form. Complete this form and a new password will be emailed to you.
Proofpoint Essentials requires that passwords meet the following strength requirements:
Administrators
• Passwords must be at least 12 characters in length
• Passwords must start with a letter.
• Passwords must end with a letter.
• Passwords must contain at least one uppercase and lowercase letter.
• Passwords must contain at least one number.
• Passwords must contain at least one special character.
End-Users
• Passwords must be at least 8 characters in length.
12
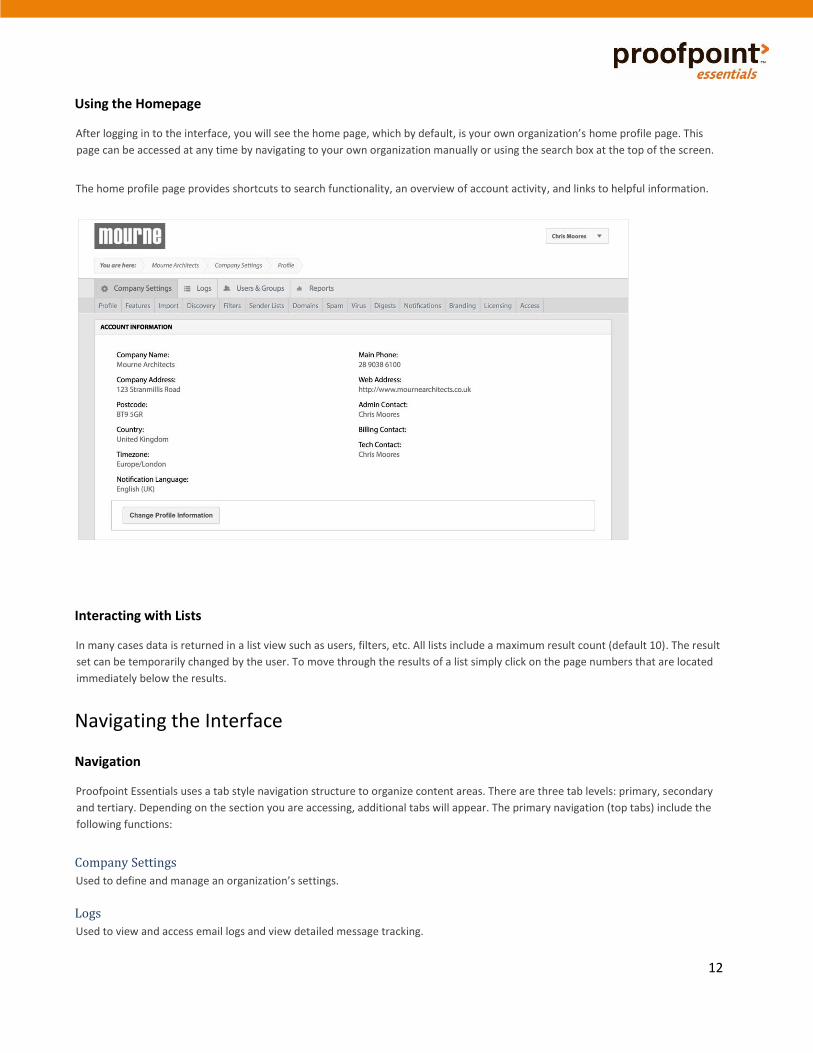
Using the Homepage
After logging in to the interface, you will see the home page, which by default, is your own organization’s home profile page. This
page can be accessed at any time by navigating to your own organization manually or using the search box at the top of the screen.
The home profile page provides shortcuts to search functionality, an overview of account activity, and links to helpful information.
Interacting with Lists
In many cases data is returned in a list view such as users, filters, etc. All lists include a maximum result count (default 10). The result
set can be temporarily changed by the user. To move through the results of a list simply click on the page numbers that are located
immediately below the results.
Navigating the Interface
Navigation
Proofpoint Essentials uses a tab style navigation structure to organize content areas. There are three tab levels: primary, secondary
and tertiary. Depending on the section you are accessing, additional tabs will appear. The primary navigation (top tabs) include the
following functions:
Company Settings
Used to define and manage an organization’s settings.
Logs
Used to view and access email logs and view detailed message tracking.

Archive
Used to configure the archive and search archived mail based on user permissions.
Users & Groups
Used to view and manually manage users and user settings.
Reports
Used to access reports for mail filtering activity.
Company Settings
The Company settings tab is used to manage customer configuration options (such as features, domains, digest settings, etc.).
Profile
Manage the organization’s profile and view details about the features enabled by the organization.
Features
Manage and configure licensed service features.
Import
Import users into the organization through AD Sync or CSV import.
Discovery
Manage organization SMTP Discovery settings.
Filters
Manage custom filters that apply to the organization, groups or end-users.
Sender Lists
Manage safe and blocked sender entries.
Domains
Add, update and delete organization domains under management.
URL Defense
Manage organization URL defense configuration settings.
Spam
Adjust the Proofpoint Essentials Spam engines’ sensitivity and enable additional spam related settings.
Digests
Manage quarantine digest reports, including content and retention period.
Notifications
Customize the content of default system notifications such as the welcome email, quarantine digest and password reset request
email.
Disclaimer
Manage organization-wide outbound disclaimers.

14
Branding
Configure and manage branding of the user interface, welcome emails and quarantine digest. Branding is applied to all organizations
under your management.
Social (Advanced and Professional packages only)
Access Social Media Account Protection, powered by Proofpoint’s Nexgate division.
Licensing
Manage organization licenses; change versions and complete trials.
Access
Manage the privileges of system role accounts.
Logs
The logs tab displays a second level of navigation to organize the following functions:
Users
View logs for a specific user.
Groups
View logs that belong to a specific group.
Functional Accounts
View logs that belong to a specific functional account (Mail enabled Security Groups, Public Folders, etc.).
Licensed
View logs for all licensed users.
Non-Licensed
View logs for all non-licensed users.
Archive
The Archive tab displays a search interface where a user can search for archived email. In addition, administrators can access a
configuration tab to configure the archive service.
Users & Groups
The Users & Groups tab displays a second level of navigation to organize the following functions:
Users
View list of provisioned users; Add, delete or modify a user.
Groups
View list of groups; Add, delete, modify a group; Displays all mail-enabled Security Groups if organization is provisioning users via
Active Directory (LDAP) discovery.
Functional Accounts
View list of mail-enabled objects provisioned via Active Directory (LDAP) Discovery.

Active Directory Sync
Search Active Directory for list of mail-enable objects to be synced with Proofpoint Essentials.
SMTP Discovery
View accounts that have been discovered through the SMTP discovery process.
Reports
The Reports tab displays a second level of navigation to organize the following functions:
Report Builder
View, print and export a series of mail-flow related reports.
Schedule List
Schedule selected reports to be delivered regularly by email.

16
Managing Features and Options
In this chapter, you’ll find the following topics:
• Configuration Options
• Using Templates
• Viewing Customers
Loading Users
Loading Users allows companies to specify a method for provisioning users on the system. The choices are:
Active Directory (LDAP Discovery)
The preferred method of user synchronization is via LDAP Discovery using Proofpoint Essentials’ Active Directory connector module.
This allows the Proofpoint Essentials Platform to import:
• Active users (including both primary email address and user aliases)
• Distribution lists
• Security groups (both standard and mail enabled)
• Public folders
To configure Active Directory connection settings:
1. Click on the Company Settings tab.
2. Click on the Import tab.
3. Click on the Active Directory tab.
4. Choose the default privileges type for new users.
End User: Receive the quarantined digest and can login to the Proofpoint Essentials user interface. Silent User: Receive the
quarantine digest and are not granted access to login to the Proofpoint Essentials user interface.
5. Enter Active Directory URL.
6. Enter Username.
7. Enter Password.
8. Choose Port.
Default port is 389 (LDAP). You can also choose port 636 (LDAP over SSL).
9. Enter BaseDN.
For example, DC=mycompany,DC=local
The Active Directory configuration is stored in the customer creation process and is executed by the administrator once the
customer has been created. Active Directory sync requires the customer to allow Proofpoint Essentials to access the
environment over Port 389. Connections are over TLS. Please refer to the Proofpoint Support Knowledge Base for the
current list of Proofpoint Essentials IP addresses.
http://support.proofpointessentials.com/index.php?/default_import/Knowledgebase/Article/View/75/11/cu rrent-
proofpoint-essentials-data-centre-ip-addresses
10. Choose What to Sync.
a. Active Users (Users with mailboxes).
b. Disabled User Accounts.
c. Functional Accounts (Mail-enabled objects such as Public Folders).
d. Security Groups.
e. Include items hidden from the GAL (Global Address List).
11. Choose How to Sync.
a. Add (Add new user objects found to Proofpoint Essentials).
b. Sync Updated Accounts (update details for previously synched accounts).
c. Delete Removed Accounts (remove accounts from Proofpoint Essentials if no longer present in Active Directory).

d. Sync Every 24hrs (Perform sync automatically every 24 hours).
12. Click Save.
At the end of this process you will have saved your Active Directory Connection details. If you have selected to sync data every 24
hours the system will perform the sync automatically. If not you will need to force the sync process.
To sync Active Directory:
1. Click on the Users & Groups tab.
2. Click on the Active Directory sync tab.
3. Click Search.
Review the returned results.
4. Click Execute.
CSV Upload
This import option allows companies to provision users by loading a Comma-Separated Values (CSV) file. The file can contain a first
name, last name, primary STMP address and aliases for all users.
To load a CSV file:
1. Click on the Company Settings tab.
2. Click on the Import tab.
3. Click on the CSV tab.
4. Choose the type of CSV file you will be loading.
Standard CSV: A basic file format that includes first name, last name, primary email addresses and aliases. Postini User CSV:
A Postini user export file that contains user details first name, last name, primary STMP address) as well as user allow and
block lists.
Postini Alias CSV: A Postini alias export file that contains the alias address, domain, user id and user address. This file can be
imported after you have loaded a Postini User CSV
5. Choose the default privileges type for new users.
End User: Receive the quarantined digest and can login to the Proofpoint Essentials user interface. Silent User: Receive the
quarantine digest and are not granted access to login to the Proofpoint Essentials user interface.
6. Click Choose File.
Locate file you wish to import.
7. Click Upload.
You can view an example of the file format you selected to import by clicking on the CSV File Format Instructions.
Once you upload the file the system will report the number of successful or failed entries imported. If there are errors reported,
review the message and repair the file as instructed. Successful addresses will be imported and visible under the Users & Groups tab.
SMTP Discovery
Another way to provision users to the service is with SMTP Discovery. When enabled, SMTP Discovery allows email to be relayed to
non-licensed users. Users become licensed-users when, within a span of 30 days, a specified number of valid messages are received
for that unique address OR one valid message has been sent outbound from your email server via the Proofpoint Essentials platform.
An administrator can change the SMTP discovery settings.
To enable or disable SMTP Discovery:
1. Click on the Company Settings tab.
2. Click on the Features tab.
3. Disable (uncheck) or Enable (check) the SMTP Discovery checkbox.
4. Click Save.
To update SMTP Discovery settings:
1. Click on the Company Settings tab.
2. Click on the Discovery tab.
3. Choose the default privileges type for new users.

18
End User: Receive the quarantined digest and can login to the Proofpoint Essentials user interface. Silent User: Receive the
quarantine digest and are not granted access to login to the Proofpoint Essentials user interface.
4. Select Inbound Detection Threshold.
The number of clean emails in a 1-month period before the address appears on the SMTP Discovery list.
5. Choose how many times you would like to be notified about an address before it expires.
The named technical contact will receive a weekly notification of discovered addresses. This selection determines the
number of notifications, which will be delivered before an address expires. Proofpoint Essentials will not deliver email to an
expired address.
6. Disable (uncheck) or Enable (check) if expired addresses default to new users.
This setting may create new users. As a result this option can only be controlled by the Organization Administrator.
7. Disable (uncheck) or Enable (check) if aliases should be automatically associated with accounts.
8. Disable (uncheck) or Enable (check) if users detected via outbound should become licensed. This setting may create new
users. As a result this option can only be controlled by the Organization Administrator.
9. Disable (uncheck) or Enable (check) to send out a report on new users.
10. Disable (uncheck) or Enable (check) to send out a report on new aliases.
11. Disable (uncheck) or Enable (check) to include the administrator contact in report.
12. Click Save.
Configuration Options
Features
Features allow administrators to specify which service features should be enabled. By default all features included with the package
selected for the company are enabled.
Instant Replay
The number of days that filtered mail is accessible to users for retrieval (the default is 30 days).
Proofpoint Essentials Archive (Professional package only) Enables access the Proofpoint
Essentials archive service.
Outbound Relaying
Allows registered users to relay all outbound email via the Proofpoint Essentials platform.
Disclaimers
Allows outbound emails to have an email disclaimer appended to outbound emails.
URL Defense (Business, Advanced and Professional packages only)
Enables URLs found within the message body of an inbound email to be re-written to in order to protect users from accessing known
compromised sites.
Attachment Defense (Business, Advanced and Professional packages only)
Scans supported attachments against Proofpoint attachment reputation service. Emails that contain a known malicious attachment
are blocked from delivery.
Data Loss Prevention (Business, Advanced and Professional packages only)
Allows users to access additional filter objects, such as smart identifiers (credit card numbers, drug codes, etc.) and pre-defined
dictionaries, when creating a filter.

SMTP Discovery
Allows emails to be received by and sent from non-registered email addresses for a configurable amount of time before requiring
registration.
Social Media Account Protection (Advanced and Professional packages only)
Social Media Account Protection, powered by Proofpoint’s Nexgate division, enables you to prevent account hacks, automatically
remove malicious or inappropriate content, prevent unauthorized publishing applications, enforce compliance policy in real-time,
and enable intelligent message archival.
Email Encryption (Advanced and Professional packages only)
Create custom filters that will encrypt an email when specific conditions are met such as an embedded trigger term (e.g.,
Confidential, Sensitive, Encrypt, etc.) or sensitive data is found.
To enable or disable features:
1. Click on the Company Settings tab.
2. Click on the Features tab.
3. Enable (check) or Disable (uncheck) features as necessary.
4. Click Save.
Filters and Sender Lists
Organizations can create custom filters that apply to inbound or outbound email based on senders and recipients as well as content,
attachments, email size, etc. Filters can be applied to the organization, a group, or a user. Sender lists are simplified filters that are
designed to accept or block emails from known senders. Sender lists are available for organizations, groups or end-users.
By default, the most specific filters are applied first. For example, a filter that applies to a specific user is applied before a filter that
applies to a group of users. Within each filter group (i.e., organization, group, users) processing order can be customized.
Filters and sender lists are applied to messages in the following order:
1. End-user filters; newest first – oldest last (default, can be changed by user)
2. Group filters; newest first – oldest last (default, can be changed by user)
3. Organization filters; newest first – oldest last (default, can be changed by user)
4. End-user allowed sender list; newest first – oldest last (default, can be changed by user)
5. End-user blocked sender list; newest first – oldest last (default, can be changed by user)
6. Group allowed sender list; newest first – oldest last(default, can be changed by user)
7. Group blocked sender list; newest first – oldest last (default, can be changed by user)
8. Organization allowed sender list; newest first – oldest last (default, can be changed by user) 9. Organization blocked
sender list; newest first – oldest last (default, can be changed by user)
10. Organization allowed sender list; domain; newest first – oldest last. 11. Organization blocked
sender list; domain; newest first – oldest last.
Filters
Administrator Controls
Additional controls are available for administrators to alter standard filter processing behavior as well as control end-user access.
Override Previous Destination
Emails are assigned a destination (i.e., allow, quarantine, etc.) by the first filter that is applied to it. For example, if a user has created
a filter to allow email from anyone at @domain.com then emails sent from @domain.com will inherit the destination “allow”.
However, emails continue to be processed by other matching filters where the destination can be overridden. An administrator can

20
force a new destination by using the “Override Previous Destination” option. For example, if a separate filter is quarantining emails
that contain certain attachments types identifies the same email described previously, and it has this setting checked, the email
destination would be overridden from “Allow” to “Quarantine”.
Stop Processing Additional Filters
When selected, this option will stop processing any other filters that may otherwise have been applied. This option can be used in
conjunction with other level options, such as Override Previous Destination, in order to alter standard filter processing behavior.
Require Admin Privileges to Release
When selected, this option will ensure users will be unable to release the email either from their quarantine digest email or through
their email logs access.
Note: Administrators are treated as end-users when they receive their quarantine digest. As a result, an administrator will be unable
to release an email that has had this restriction applied. The administrator must use the web-based logs to view and release an email.
Hide Log
When selected, this option will hide the email from the quarantine digest and email logs for ALL users, including administrators.
Hide Log from Non‐Admin Users
When selected, this option will hide the email from the quarantine digest and email logs for all end-users. Administrators will see
these emails.
Filter Management
Filters can be managed on a page underneath the Company Settings tab. From this location administrators can manage filters that
apply to the organization, a group of a user or an individual users. In addition, you can access filters when managing a specific group
or a specific user.
To view current inbound filters:
1. Click on the Company Settings tab.
2. Click on the Filters tab.
To view current outbound filters:
1. Click on the Outbound tab
To change the filter view:
1. Click the drop-down and select the appropriate view:
All (Default view): A list of all organization, group and user filters.
Organization: A list of all organization filters.
Group: A list of all group filters, grouped by group. Users: A list of all user
filters, grouped by user.
To adjust the priority of a filter
You can adjust the priority of a filter only if it applies to the same entity. For example, you can adjust the priority of any
organization inbound filters but you cannot prioritize a group filter ahead of an end-user filter.

1. Click on the down arrow next to the filter you wish to lower in priority.
2. Click on the up arrow next to the filter you wish to increase the priority.
To add a new filter:
1. Click on the Company Settings tab.
2. Click on the Filters tab.
3. Click New Filter.
A new window will open.
5. Choose the direction the filter should be applied. Inbound: Email sent to your
licensed users.
Outbound: Email sent from your licensed users.
7. Choose the scope the filter should be applied.
Company: All licensed users that are associated with the company.
Group: A specific group of users. User: A specific user.
8. Add condition:
Sender Address: Matches the email address that the message in question originated from.
Recipient Address: Matches the email address that the message in question is sent to as a final destination, in other words
the To address used by the originating sender.
Email Size (kb):Is greater than can be used to detect an email larger a specified size in order to trigger this rule set. This can
be used to block large email or to define which address within an organization can receive email over a specified size.
Client IP Country: Type in the country name and the select the matching selection once it appears. Select more than 1
country by adding multiple values and separating by a comma.
6. nue

22
Email Subject: Used to trigger a rule set defined by any word(s) contained within the emails subject line defined in the
pattern field.
Email Headers: Used to trigger a rule set defined by any word(s) contained within the emails header defined in the pattern
field.
Email Message Content: Used to trigger a rule set defined by any word(s) contained within the email message content
defined in the pattern field.
Raw Email: Used to trigger a rule set defined by a block of words contained within the email body defined in the pattern
field.
Attachment Type: Used to trigger a rule set when an email contains a specified attachment type, including: Windows
executable components, installers and other vulnerabilities, other executable components and installers, Office documents
and archives, Audio/Visual, Other including PGP encrypted files. Attachment Name: Used to trigger a rule set defined by
any word(s) contained within the attachment name defined in the pattern field.
Smart Identifier Scan (Available only to Business and Professional package subscribers): Used to identify emails that contain
content patterns such as credit card numbers, bank account numbers, etc.
Dictionary Scan (Available only to Business and Professional package subscribers): Used to identify emails that contain
common terms such as protected health information (i.e., NDC terms), personal information (i.e., SSN), and financial
information (i.e., ABA terms).
9. Choose operator.
The operator options will depend on the filter condition selected.
10. Enter value.
The relationship between each condition specified is AND. For example, if sender address is *@domain.com AND
attachment is financial report.
12. Choose action.
13. Quarantine: Used for filters where you want to ensure email is not delivered to the intended recipient. Allow: Used for
filters where you want to ensure email to be delivered (i.e. allow list).
Nothing: Used for filters where you do not want to influence destination (allow, quarantine) but you want to perform a
secondary action (i.e., Alert)
Encrypt: Used to filters where you want to encrypt the email that is caught by the conditions. Encrypt is only available
where direction is outbound and scope is the company. Available with Advanced and Professional packages only.
14. If you wish to add another condition, click Add Another Action.
This will add a new action control.
15. Choose action.
Alert Tech Contact: Will send an alert to the tech contact associated with the site.
Alert Specified Users: Will send an alert to the SMTP addresses specified.
Hide Logs: Will hide the log from the all users including administrators.
Hide Logs from Non-Admin Users: Will hide the log from the users view. The email will still be visible to the administrator.
Stop Processing Additional Filters: Will stop processing any additional filters that normally would have been applied.
Require Admin Privileges to Release: Requires an administrator to release.

Enforce Completely Secure SMTP Delivery: Will force delivery over TLS without an unencrypted fallback. Will check for a
valid certificate for the recipient domain.
Enforce only TLS on SMTP Delivery: Will force delivery over TLS without an unencrypted fallback. Strip Subject Line
Encryption Terms: Will strip terms from the email when identified in a Subject Line condition.
16. Enter a description (Optional).
17. Click Save.
To edit a filter:
1. Click on the Company Settings tab.
2. Click on the Filters tab.
3. Click the Edit icon next to the filter you with to edit.
4. Make appropriate changes.
5. Click Save.
To duplicate an existing filter:
1. Click on the Company Settings tab.
2. Click on the Filters tab.
3. Click the Duplicate icon next to the filter you with to edit.
4. Make appropriate changes.
5. Click Save.
To delete a filter:
1. Click on the Company Settings tab.
2. Click on the Filters tab.
3. Click the Delete icon next to the filter you with to delete.
To disable / enable a filter:
1. Click on the Company Settings tab.
2. Click on the Filters tab.
3. If enabled, click the slider next the filter you wish to disable. If disabled, click the slider next to the filter you wish to enable.
To search for a filter:
1. Click on the Company Settings tab.
2. Click on the Filters tab.
3. Type in a domain, email address or a portion of the name/description of the filter in the search field. Results are
dynamically returned as you type.
Sender Lists
Sender lists are simple filters that are used for specifying addresses or domains that should be allowed or blocked. Sender lists
support the following entries:
• Domains o *@domain.com
• Email Addresses o [email protected]
• IP Addresses o 10.20.0.4 o 10.20.*.4 o
10.*.*.* o *.20.*.4 o 10.0.62.0/24

24
In instances where a single message contains competing actions the following priority logic is used to determine the appropriate
action:
• IP Address > Email > Wildcard Domain >
Wildcard IP > IP (CIDR)
Add entry to Organization Safe Sender List
1. Click on the Company Settings tab.
2. Click on the Sender Lists tab.
3. Enter the address or domain into the Safe Sender List text area.
You can add multiple entries by using a comma, semi-colon or one per line.
4. Click Save.
1. Click the Company Settings tab.
2. Click the Sender Lists tab.
3. Enter the address or domain into the Blocked Sender List text area.
You can add multiple entries by using a comma, semi-colon or one per line.
4. Click Save.
Note: Sender Lists are available at the organization, group and user level. To add an entry to a group or user, navigate to the user
profile and you can follow the same steps as outlined above.
Domains
Every Internet email address includes a domain, which specifies where mail should be sent. For instance, the address
[email protected] directs a message to the user Joe in the domain mycompany.com. In order for a domain to receive filtering
from the message filtering service, that domain must be added to one of the organizations in your service. At least one domain was
added as part of customer creation process.
Adding a domain to an organization facilitates the following:
Add entry to Organization Blocked Sender List

• Allows the message-filtering layer to accept mail traffic for the domain.
• Associates the domain with a destination configuration, which holds delivery information for your mail server and any
failover sites that are enabled.
• Associates the domain with a destination.
• Sets a default domain for new users.
• Associates the domain with an organization’s default settings for functionality such as SMTP Discovery, Active Directory
Discovery and filtering.
When you associate a domain with an organization, keep the following in mind as you decide in which organization you want to
locate a domain:
a) All domains must deliver email to the same destination servers in order to qualify as alias domains.
b) Domains should only have failover destination sites defined if the failover site is available at all times.
c) The system will prevent you adding users without having previously added the domain associated with the user address.
d) An administrator must have authorization over the organization containing the domain to manage the users and domain.
e) A domain and its users must be in the same organization.
f) You cannot add a domain that has already been previously added to the platform.
Domain Purpose
Domain purpose is used to differentiate between domains that are used for email relay and domains that are used for management
purpose only. Domain purpose is a required when creating a new domain.
For Organizations, the default domain purpose will be Relay. The purpose can be changed when creating or editing a domain.
Searching for a Domain If you manage a large number of domains, you can find them by using the Search field on the top of the page or by using the search
field in the customer list. The returned results will present the organization name in which the searched domain match is located.
When you run a search, you see all the organizations that contain domains matching your search criteria. Search results show up to
1,000 results. If necessary, the results are displayed on multiple pages.
To view the domains for a specific organization:
1. Click the Company Settings tab.
2. Click the Customers tab.
3. Click on the customer name.
By clicking on the customer name you will be directed to the customer site and see the customer Profile page.
4. Click on the Domains tab.
Follow these steps to add a domain before you change your MX records for that domain. If you change your MX records before these
steps are completed, you may lose mail.
To add a domain:
1. Click New Domain.
2. Enter the domain name.
3. Change the domain purpose (Optional).
If domain purpose is management than proceed to step 6.
4. Enter the destination IP address or hostname for the domain.
5. (Optional) Enter the failover IP address or hostname for the domain.
6. Click Save.
Domain changes are reflected system wide every half hour.
To test a domain:
1. Click the test icon next to the domain you wish to test.

26
2. Review test results.
MX Records: Will check the MX records for the domain and indicate whether they are correct (pointing to the Proofpoint
Essentials service)
SMTP Destination: Will check to ensure Proofpoint Essentials can connect to destination over port 25.
3. Click Close.
To edit a domain:
1. Click the edit icon next to the domain you wish to edit.
2. Make appropriate changes.
3. Click Save.
Domain changes are reflected system wide every half hour.
To delete a domain:
1. Click the delete icon next to the domain you wish to delete.
Domain changes are reflected system wide every half hour.
Outbound Filtering The Proofpoint Essentials platform will accept email for outbound relay when the following conditions are met:
1. Email sent from a preregistered static IP address.
2. Email is sent from a registered domain corresponding to the preregistered static IP address.
3. The Email is sent from a registered users email address (unless SMTP Discovery is enabled).
Before you can add an outbound IP address, make sure the Outbound filtering option is enabled.
To enable outbound filtering feature:
1. Click the Company Settings tab.
2. Click on the Features tab.
3. If the Enable Outbound Relaying checkbox is unchecked, check it.
4. Click Save.
To add an outbound IP address:
1. Click the Company Settings tab.
2. Click the Domains tab.
3. Click Add New Sending Server.
4. Type in the IP address.
5. Click Save.
6. Repeat for additional addresses.
In addition to adding a standard IP address Proofpoint Essentials also supports CIDR notation (A.B.C.D/n). Simply type in the CIDR
value in the text field provided.
Domain changes are reflected system wide every half hour.
To edit an outbound IP address:
1. Click the Company Settings tab.
2. Click the Domains tab.
3. Click Edit next to the IP you wish to edit.
4. Update the IP address.
5. Click Save.
Domain changes are reflected system wide every half hour.
To delete an outbound IP address:
1. Click the Company Settings tab.
2. Click the Domains tab.
3. Click Delete next to the IP you wish to edit.
Domain changes are reflected system wide every half hour.
Managed Hosted Services
If the organization uses a managed hosted service, such as Office365 or Google Apps, than Proofpoint Essentials can automatically
manage the service IP addresses.
To enable a hosted service:
1. Click the Company Settings tab.
2. Click the Domains tab.
3. Click the Manage Hosted Services button.
4. Click the enable control.
5. Click Save.
Once enabled the service will appear in the Sending Servers table.
To view the current list of IPs for the Managed Service:
1. Click the Company Settings tab.
2. Click the Domains tab.
3. Click the View button.
4. Click the Close button to close the window.
To remove a previously enabled managed service:
1. Click the Company Settings tab.
2. Click the Domains tab.
3. Click the delete button next to the managed service you wish to remove.
To disable a previously enabled managed service:
4. Click the Company Settings tab.
5. Click the Domains tab.
6. Click the Manage Hosted Services button.
7. Click the disable control.
8. Click Save.
Once disabled the service will be removed from the Sending Servers table.
URL Defense
URL Defense protects organizations from accessing known malicious sites by locating and replacing URLs found within the message
body with a separate URL. If users click on a known malicious URL instead of being directed to the original URL they are instead
directed to a page informing that the site is not safe and been blocked. Organizations can manage their URL Defense configuration
as needed.
28
To configure DKIM settings:
DKIM is an email validation system designed to detect email spoofing. It provides a mechanism to allow mail systems to
check that incoming mail from a domain has not been modified during transport. Many hosted mail systems today employ
this technique in their email delivery process. If this setting is enabled URLS found in DKIM signed messages will be re-
written.
1. Click on Company Settings.
2. Click on URL Defense.
URL Defense must be enabled in order to see this tab.
3. Check the checkbox to re-write DKIM signed messages.
To re-write URLs that are not located in an anchor tag:
Anchor tags <a> are used in HTML to tell a browser or email client where to direct the user when a piece of content, such
as a website URL, is clicked. If this setting is enabled, these links will be rewritten.
1. Click on Company Settings.
2. Click on URL Defense.
3. Check the checkbox to re-write URLS that are located in an anchor tag.
To exclude domains from being re‐written:
Organizations can specify one or more domains and/or IP addresses that, when found in a message URL, will not be re-
written.
1. Click on Company Settings.
2. Click on URL Defense.
3. Type in the domain or IP into the text area field provided.
Separate entries by including a comma, semi-colon or putting entries on each line.
To exclude all organization active domains:
1. Click on Company Settings.
2. Click on URL Defense.
3. Check the checkbox to exclude all active domains associated with the organization.
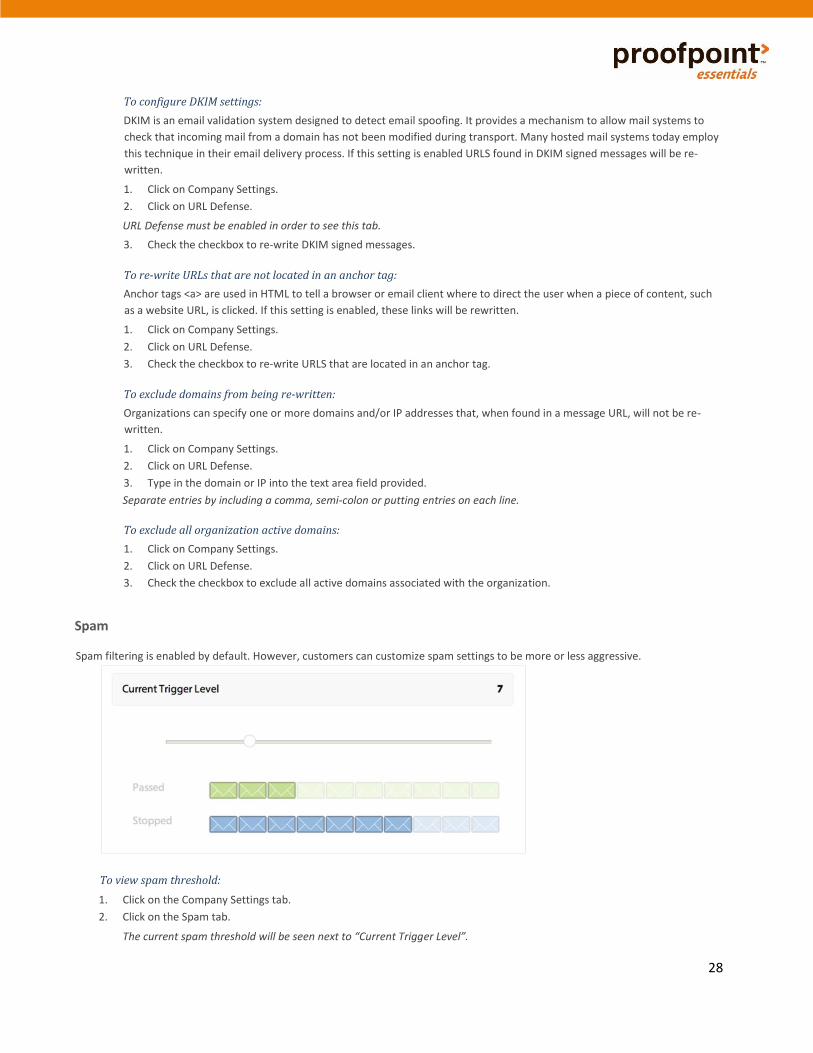
Spam
Spam filtering is enabled by default. However, customers can customize spam settings to be more or less aggressive.
1. Click on the Company Settings tab.
2. Click on the Spam tab.
The current spam threshold will be seen next to “Current Trigger Level”.
To view spam threshold:

You can adjust the sensitivity of the spam-filtering engine by lowering or increasing the current trigger level. The lower the number
the more aggressive the filter, the higher number the less aggressive.
To adjust spam threshold:
1. Click on slide control button.
2. Move left to increase sensitivity or right to decrease sensitivity.
Quarantine Bulk Email
If this option is enabled, Proofpoint Essentials will quarantine emails that are detected as being “bulk” email.
Quarantine email suspected of being phish
If this option is enabled, Proofpoint Essentials will penalize emails to a degree that they will likely be quarantined.
Require administrator privileges to release suspected phishing email
If this option is enabled, end-users will be unable to release emails that have been quarantined as a result of a high phish score.
Stamp & Forward
If this option is enabled, Proofpoint Essentials will still filter messages for spam. However, instead of moving suspected spam to the
quarantine, a configurable text value (default: “***Spam***”) is appended to the subject line and the email is delivered to intended
recipient. This setting can be enabled at the company or user level. The options available for this setting are:
• No: The option is disabled.
• Partial: This option is enabled for emails whose spam score is between 9 and 19.
• All: The option is enabled and applies to all mail.
Easy Spam Reporting
If this option is enabled, a single line disclaimer will be appended to each inbound email processed by Proofpoint Essentials The
disclaimer will be added to the bottom of each HTML and text email with a link to the Proofpoint Essentials quarantine area. This
allows the recipient of an unwanted email to report it directly to Proofpoint Essentials from within the email itself, causing
Proofpoint Essentials’ spam engines to learn that the reported email was unwanted by this user and to update it’s learning to
accommodate this for this user in future.
The disclaimer reads:
“This email has been scanned for spam and viruses by Proofpoint Essentials cloud email security - click here to report this email as
spam.”
By clicking on the embedded link the user will be directed to the Proofpoint Essentials login screen. Once they login, the email will be
reported as misclassified. In addition, the user can also create a filter to block email from the sender or sender domain.
Quarantine inbound email sent by active domains associated with this organization
If this option is enabled suspected imposter emails that are identified as inbound messages from the Internet where the “from”
domain is one of the company’s internal domains, will be quarantined.
You can add IP addresses to the organizations safe sender list or create a custom filter in order by-pass this setting for emails from
approved senders, such as an externally delivered marketing communication.
Update Spam Detection Settings
If the “Update spam detection settings above for all existing user accounts” checkbox is checked, the organization’s spam settings
will replace any end-user settings that have been defined. If this setting is not selected than there will be no changes applied to the
Spam settings your existing users.

30
Inbound Sender DNS
The “Inbound sender DNS sanity checks” provides an additional layer of protection against spam and helps ensure that inbound
messages that might not have a destination to bounce to are not allowed in. This setting forces two additional DNS checks:
1. Whether the sender domain has MX records.
• A check whether the email is bounceable and able to be returned to a sender should it be necessary later.
• The request will get rejected if the MAIL FROM domain has:
a. no DNS A or MX record, or
b. a malformed MX record such as a record with a zero-length MX hostname
2. Whether the sender domain contains MX records pointing to private or reserved IP ranges (e.g.
10.0.0.0/8, 127.0.0.0/8 etc.)
• The request will be rejected if the sender domain MX points to an IP address of an internal network.
While Proofpoint Essentials recommends this option remain enabled, disabling this option does not pose a significant risk.
Proofpoint Essentials allows you to manage these settings at the user level. Please go to Managing Users & Groups / Configuration
Options for Users and Groups to learn more how to make changes.
Digests
Digests are used to allow end users to easily view a list of emails that have been quarantined. Users can review the digest and
choose to take additional actions for each quarantined email. The digest allows users to take the following actions when viewing a
quarantined email:
• Release Once: Allows user to release a specific email from a sender one time. This may be an email newsletter that
they do not want to receive regularly or an email from a source that you feel may be a legitimate source. The release
function does not update the Proofpoint Essentials spam-learning engine and does not create any rules in relation to
the sender.
• Release Always: Allows the user to have the desired message released immediately and inform Proofpoint Essentials
to create an Allow filter between the sender and recipient so that mail will not be qualified as Spam from this sender
in future.
To view current digest settings:
1. Click on the Company Settings tab.
2. Click on the Digests tab.
The digest options can be adjusted to suit each customer. These options can be applied to users directly. To manage a users spam
threshold, go to Managing Users & Groups / Configuration Options for Users and Groups.
Receive Quarantine Digests
Specifies if a summary report is generated or not.
Only include messages quarantined since the last Quarantine Digest was sent
Specifies that the Quarantine digest will only be delivered when new messages have been quarantined since the last report was run.
Quarantine Digest delivery start time
Specifies when the digest delivery schedule starts. For example, if you choose 08:00, the delivery time will be at 8:00 AM and the
interval (see below) will be based off the start time. The time represented is based on the time-zone of the account.
Interval between Quarantine Digest checks
Specifies the frequency of the quarantine digest delivery. The default value is set to 24 hours but there are options for 12 hours, 8
hours, 6 hours and 4 hours. The quarantine digest is sent out at 3:00 AM local time (depending on the time zone configuration of the
company) and at other times throughout the day depending on the interval selected.

Retention period
Defines the period of time messages are retained in the Quarantine.
Include messages that have been quarantined by
If selected will include messages that have been quarantined as a result of a company, group or end user filter or sender list block
entry.
Exclude messages from the Quarantine Digest that are most likely to be spam
If selected any message that scores the highest possible spam score will not be included in the quarantine digest. Effected messages
will still be visible in the user’s web-based quarantine view.
Update Quarantine Digest Settings
If the “Update Quarantine Digest settings for all existing user accounts” checkbox is checked, the company quarantine digest settings
will replace any end-user settings that have been defined.
Proofpoint Essentials allows you to manage these settings at the user level. Please go to Managing Users & Groups / Configuration
Options for Users and Groups to learn more about how to make changes.
Notifications
Proofpoint Essentials allows organizations to localize and customize the content of end-user system emails including the welcome
email, password reset email and the quarantine digest. Content can be localized for the following languages:
• English (US)
• English (UK)
• Spanish • French
• German
To view default notification templates:
1. Click on the Company Settings tab.
2. Click on the Notifications tab.
Templates for all supported notification languages are displayed by default. You can limit the view to a specific language by
selecting a value from the language drop-down.
To edit a notification template:
1. Click on the Company Settings tab.
2. Click on the Notifications tab.
3. Click on the “pencil” icon next to the template you wish to edit.
You will be directed to the Edit page of the template you selected.
4. Edit the subject line of the template (Optional). 5. Click on the section of content you wish to edit.
Use the “pencil” icon to determine what portion of the content you can edit. Click on the area to enter edit mode.

32
7. Modify the content as needed.
8. Click Save or Cancel.
By clicking Save you are updating the system default template for the notification you have updated. You can restore any
custom template in order to change it back to an earlier version.
To restore a template to the system default content:
1. Click on the Company Settings tab.
2. Click on the Notifications tab.
3. Templates that have been edited will have a “restore to default” icon next to the “preview” icon.
4. Click the “Restore to Default” icon.
5. Click OK.
Content Tags
A content tag is used to populate an email with system content such as first name, surname, primary SMTP address, etc. This can be
very useful to ensure the email is personalized for the end user.
To add a content tag to a notification template:
1. Click on the Company Settings tab.
2. Click on the Notifications tab.
3. Edit a template and content section.
4. Select a tag from the –tags—drop-down menu.
The tag will be added where the cursor is located.
5. Move the tag (i.e., copy & paste) to where you would like it to be replaced by system-inserted content.
6. Click Save or Cancel.
Notifications for Groups
Users can receive notifications in a different language than the organization that they belong to. For example, an organization can be
set with English as the notification language. But users in the Paris office can be setup to receive notifications in French. This is
6.

managed through the use of Groups. For more information about Groups, please go to Managing Users & Groups / Configuration
Options for Users and Groups to learn more.
To enable a group of users to receive notifications in another language (than the organization):
1. Click on the Users & Groups tab.
2. Click on the Groups tab.
3. Click the Add a Group button.
4. Add users to the group.
5. Select the language from the language drop-down.
6. Click Save or Cancel.
The users in the group will now receive notifications based on the language selected.
Disclaimer
Proofpoint Essentials has made it even more convenient for customers to append an outbound disclaimer to all emails coming from
an organization. We also offer the ability to have multiple outbound disclaimers depending on your department or your position
within the company. You can even use different disclaimers for different groups of users (i.e. sales, support, marketing).
The order of disclaimer preference is as follows:
• The organization disclaimer is applied to all registered users
• The organization disclaimer is replaced by a user or group disclaimer (if present)
• The group disclaimer is replaced by a user disclaimer (if present)
Disclaimers can be created in both HTML and plain text using a standard WYSIWYG editor to compose email disclaimers with the
ability to include externally hosted images.
Before you can add a disclaimer you will need to enable the disclaimer option in the Features section.
To enable Disclaimers:
1. Click on the Company Settings tab.
2. Click on the Features tab.
3. Check the Disclaimer checkbox.
4. Click Save.
To add a Disclaimer:
1. Click on Company Settings tab.
2. Click on the Disclaimer tab.
3. Copy/Paste/Edit your content using the WYSIWYG editor.
4. Click Save.
Disclaimer related changes are reflected system wide at the top of each hour.
Proofpoint Essentials allows you to create user and group specific disclaimers. Please go to Managing Users & Groups / Configuration
Options for Users and Groups to learn more.
Social
Social Media Account Protection, powered by Proofpoint’s Nexgate division, enables organizations to prevent account hacks,
automatically remove malicious or inappropriate content, prevent unauthorized publishing applications, enforce compliance policy
in real-time, and enable intelligent message archival.

34
Social Media Account Protection is available to Advanced and Professional package subscribers only.
To enable Social Media Account Protection:
1. Click on the Company Settings tab.
2. Click on the Features tab.
3. Check the checkbox next to Enable Social Media Account Protection.
Once enabled, the organization administrator will receive an email from Nexgate with login and setup instructions.
Access Control
The Access Control page is used to limit the permissions of a system role that is assigned to a user who has rights to access
Proofpoint Essentials. There are 5 roles available to Proofpoint Essentials users and they operate with the following permission
model:
Organization Administrator - End-User
To modify the access control for a role:
1. Navigate to the login screen.
2. Login using your account.
3. Click on the Company Settings tab.
4. Click on the Access Control tab.
5. Select the role you wish to edit.
6. Click the Show/Hide button that is next to each module you wish to alter the permission setting for that role.
7. Click Save.
Once the change has been made all users who are assigned the role that has been edited will be subject to the new permissions.
Using Templates
Templates can be used to create common settings that are applied to a new account. When creating a new customer, you can select
a template and all template settings will be applied.
Templates settings are applied during the customer creation. If a change is made to a template, it will be applied to all new
customers created using the template. It will not apply to existing customers that were built using the template.
Each template has a template name and a template id. The template id can be used when provisioning a customer through
Proofpoint Essentials Rest APIs. Information about Rest APIs is not included in this document.
All templates are initially disabled and will not appear in the customer creation wizard. They must be enabled before they will be
visible in the customer creation workflow.
To create a template:
1. Navigate to the login screen.
2. Login using your account.
3. Click on the Customers tab.
4. Select the Templates tab.
5. Click on New Template button.
6. Enter the name of the template.
7. Choose the package.
8. Click on the Create Package button.

To edit a template:
1. Click on the edit icon next to the template you wish you edit.
This will launch the Edit Template screen. You can now move through each tab to configure the settings you want to
associate with your template.
2. Click on each tab you wish to make changes to.
Profile: Adjust default customer profile information.
Features: Enable or disable features.
Discovery: Configure SMTP Discovery settings.
Filters: Create organization wide filters.
Sender Lists: Add safe and/or blocked sender list entries.
Domains: Specify sending servers including managed hosted services.
Notifications: Customize notification content. Access: Customize access
controls.
3. Once you have made all the necessary changes to the template, click Done Editing or you can switch to
another template by selecting the template name within the drop-down list.
To disable / enable a template:
1. Click the slider next to the template you wish to enable or disable.
To delete a template:
1. Click the delete icon next to the template you wish to delete.
To search for a template:
1. Enter the name of the template in the search field.
Search results are returned as the template name is typed.
To view templates by package type:
1. Select the package type you wish to view using the drop-down list control on the Templates page. Beginner: If selected will
display templates that are associated with the beginner package.
Business: If selected will display templates that are associated with the business package.
Advanced: If selected will display templates that are associated with the advanced package.
Professional: If selected will display templates that are associated with the professional package.

36
Managing Users & Groups
In this chapter, you’ll find the following topics:
• Understanding Roles
• Managing Users
• Managing Groups
• Export Users
• Configuration Options for Users and Groups
Understanding Roles
There are several roles that users can be assigned. They include:
Organization Administrator
A user with the Organization Admin role is able to:
• Manage organization site
End User
A user with the end-user role:
• Can login to the Proofpoint Essentials user interface
• Can access their Emergency Inbox
• Receives daily quarantine digest
Silent User
A user with the silent user role:
• Cannot login to Proofpoint Essentials
• Cannot access an Emergency Inbox
• Receives daily quarantine digest
Managing Users
Users and groups are accessed under the Users & Groups tab. Users and groups can be added manually or through LDAP Discovery
or CSV upload.
An administrator can add a user and group by providing basic details through a web form. Users can only be added if their SMTP
address domain has already been registered.

1. Click on the Users & Groups tab.
2. Click on the Users tab.
3. Click on Add a User button.
4. Fill in the required information (*Required Fields). First Name: The first name of the user.
Surname: The last name (surname) of the user.
*Email Address: The primary email address of the user.
*User Privileges: The role of the user.
Mobile number: A mobile number for the user.
5. Click Save.
When you create an End-User a welcome email is sent by default. Users will be directed to click on an encoded URL in order to set
their own password.
To reset a user’s password:
1. Click on the Users & Groups tab.
2. Click on the Users tab.
3. Locate the user you wish to update.
4. Click the users name or the edit button.
5. Click on Reset Password.
This will automatically send user an email with a link to create a new password.
To update a user:
1. Click on the Users & Groups tab.
2. Click on the Users tab.
3. Locate the user you wish to update.
4. Click the users name or the edit button.
5. Update information as needed.
6. Click Save.
To
dd
u ser :

38
To delete a user:
1. Click on the Users & Groups tab.
2. Click on the Users tab.
3. Locate the user you wish to delete.
4. Check the checkbox next to the user.
5. Click the Select list and select Delete.
6. Click Apply.
To add an alias to a user:
1. Click on the Users & Groups tab.
2. Click on the Users tab.
3. Click on the name of the user you wish to add the alias to.
4. Click on the Aliases tab.
5. Click Add Alias.
6. Type the alias into the text box.
7. Click Save.
8. Repeat as necessary.
Managing Groups
Groups can be used to apply specific filters or append disclaimers. If you are using LDAP Discovery to sync with Active Directory,
mail-enabled groups will automatically be created. You can also create and manage groups manually if needed.
To create a group:
1. Click on the Users & Groups tab.
2. Click on the Groups tab.
3. Click on Add a Group button.
4. Enter a group name and description.
5. Select a group language (or leave it as default)
6. Click Save.
To add users to a group:
1. Click on Users & groups tab.
2. Click on the Groups tab.
3. Click on the Group name.
4. Click the Add Members tab.
5. Check the checkbox next to the user you wish to add to the group.
6. Click Add.
To remove users from a group:
1. Click on Users & groups tab.
2. Click on the Groups tab.
3. Click on the Group name.
4. Click the Remove Members tab.
5. Check the checkbox next to the user you wish to remove from the group.
6. Click Remove.

To delete a group:
1. Click on Users & groups tab.
2. Click on the Groups tab.
3. Check the checkbox next to the group you wish to delete.
4. Click the Select list and select Delete.
5. Click Apply.
Export Users
You can export users from Proofpoint Essentials to a CSV file. The export includes basic user information (email address, first name,
last name) and all associated aliases.
To export a list of users:
1. Click on the Users & Groups tab.
2. Click on the Users tab.
3. Click on CSV Export button.
Note: If the export contains entries that contain non-ascii characters, than you may experience issues when importing data into
some spreadsheet applications. A UTF-8 capable text editor will be able to display the data properly.
Configuration Options for Users and Groups
You may need to treat certain users and/or groups of users differently than the rest of the organization. Proofpoint Essentials allows
you to apply user-specific configurations to spam settings and quarantine digest as well as create custom filters and disclaimers.
Users
To adjust a user’s spam settings:
1. Click on the Users & Groups tab.
2. Click on the Users tab.
3. Click on the name of the user you wish to manage.
4. Click on the Spam Settings tab.
5. Make necessary adjustments.
6. Click Save.
For more information about spam settings, please refer to: Managing Customers / Configuration Options for Customers / Spam.
To adjust a user’s disclaimer preferences:
1. Click on the Users & Groups tab.
2. Click on the Users tab.
3. Click on the name of the user you wish to manage.
4. Click on the Digests tab.
5. Make necessary adjustments.
6. Click Save.
For more information about digests, please refer to: Managing Customers / Configuration Options for Customers / Digests.
To force the delivery of the digest for a user:
1. Click on the Users & Groups tab.
2. Click on the Users tab.
3. Click on the name of the user you wish to manage.
4. Click on the Digests tab.
40
5. Click Send Digest.
To create a disclaimer for a user:
1. Click on the Users & Groups tab.
2. Click on the Users tab.
3. Click on the name of the user you wish to manage.
4. Click on the Disclaimer tab.
5. Copy/Paste/Edit your content using the WYSIWYG editor.
6. Click Save.
For more information about disclaimers, please refer to: Managing Customers / Configuration Options for Customers / Disclaimer.
To create a filter for a user:
1. Click on the Users & Groups tab.
2. Click on the Users tab.
3. Click on the name of the user you wish to manage.
4. Click on the Filters tab.
5. Click on Add a Filter (or Add the First Filter)
6. Enter the filter information
Note: The filter scope is set to the user.
7. Click Save.
For more information about filters, please go refer to: Managing Customers / Configuration Options for Customers / Filters.
To add an entry to Safe and/or Blocked sender lists:
1. Click on the Users & groups tab.
2. Click on the Users tab.
3. Add an SMTP Address ([email protected]) or Domain (*@domain.com) to the proper table Note: Safe Sender List will
mean emails from specified senders will not be scanned for Spam. Blocked Sender List will mean all emails from specified
senders will be quarantined.
4. Click Save.
To create a custom Access Control for a user:
1. Click on the Users & groups tab.
2. Click on the Users tab.
3. Click on the name of the user you wish to manage.
4. Click on the Access Control tab.
5. If you have not created an access control for the User, click on the Add Access Control button. If an Access Control has
already been created, skip to Step 7.
6. Click the Add Access Control button.
7. Click the Show / Hide button next to each control that you wish to edit.
Note: User Access Controls take priority over Role Access Controls. For example: If End-Users have Hide set for the Spam tab
but a specific user has Show set for the Spam tab, user will see the Spam tab and all other users will not see the Spam tab.
8. Click Add.
Groups
To create a disclaimer for a group:
1. Click on the Users & Groups tab.
2. Click on the Groups tab.
3. Click on the name of the group you wish to manage.
4. Click on the Group Disclaimer tab.
5. Copy/Paste/Edit your content using the WYSIWYG editor.
6. Click Save.
For more information about disclaimers, please refer to: Managing Customers / Configuration Options for Customers / Disclaimer.
To create a filter for a group:
1. Click on the Users & Groups tab.
2. Click on the Groups tab.
3. Click on the name of the group you wish to manage.
4. Click on the Group Filters tab.
5. Click on Add a Filter (or Add the First Filter)
6. Enter the filter information
Note: The filter scope is set to the group.
7. Click Save.
For more information about filters, please refer to: Managing Customers / Configuration Options for Customers / Filters.

42
Accessing Additional Features
In this chapter, you’ll find the following topics:
• Using Email Logs
• Instant Replay
• System Alerts
• Accessing Emergency Inbox
• Reports
Using Email Logs
As the Proofpoint Essentials platform processes a message, data about the message is captured and stored in a log. The log search
feature enables you to run searches on this data using different criteria. You can then view the search results and drill down to
details about specific messages.
Use the log search to track messages for inbound and outbound traffic, and to track all messages for a specific sender, recipient,
domain, or sub domain. You can also use log search to confirm whether a specific filter was triggered by a message and confirm the
status of processing. If necessary, you can later analyze filter settings that may be affecting traffic.
Searching Logs
Access to an organizations email logs depends on your account privilege level. Access to log search is granted initially to all accounts
for their own email addresses only; Organization & Channel administrators have the ability to search logs for all licensed users and
their respective email addresses.
Please note: Logs contain information about email messages processed and not the actual message itself.
To search logs for a specific user:
1. Click on the Logs tab.
2. Click the user whose logs you wish to search.
3. Choose type.
Inbound: Will search against all inbound email.
Outbound: Will search against all outbound email.
4. Choose date range. Today
Today and Yesterday
The Last week
The Last 2 weeks
The Last 30 days

5. Choose status
Any: Will display any email associated with the user.
Quarantined: Will display email that belongs to the user and was quarantined.
Reported (misclassified): Will display email that was reported by the user as spam.
Blocked: Will display email that was blocked by Proofpoint Essentials.
Cleared: Will display email that was cleared by Proofpoint Essentials.
Cleared (But Queued for delivery): Will display email that was cleared by Proofpoint Essentials but has not yet been
delivered.
Cleared (but Bounced by destination): Will display email that was cleared but was bounced by destination. Cleared
(Released from quarantine): Will display email that was cleared based on the action of a user or administrator
6. Enter sender, recipient and/or subject content.
Wildcard Domains are supported (format: domain.com)
7. Click Search.
Advanced search options are available. This will add the ability to search based on additional categories such as:
• Filtered: Block - Display emails that have been blocked by a filter
• Spam - Display emails that have been classified as spam
• Virus - Display emails that have been identified as containing a virus
• Clean - Display emails that have been classified as clean
• Filtered: Allow - Display emails that have been cleared by a filter
To search logs for all licensed users:
1. Click on the Logs tab.
2. Click on the Licensed Users tab.
3. Choose Search Options.
4. Click Search.
Viewing Search Results
Once you perform a search the system will execute the criteria against the log data and return search results to the screen. You can
adjust the criteria if necessary and perform a new search.
Please note: There is a 1,000 record limit for search results.
The search results are displayed in a table and detailed information about each message is displayed including: • From (Includes
both ‘From’ Header and Envelope Sender when available.)
• To
• Subject
• Date/Time
• Category
• Size
• Status
To view details about a specific message:
1. Locate the message you wish to view.
2. Click on the Detail button next to the message in question.
A pop-up window will appear and include a variety of information about the email. In addition, you can create filters to block
content directly from this screen.

44
To create a filter from the message detail screen:
1. Click on the filter drop box.
2. Select the appropriate action block this address: Will create a filter and block all emails from this
address for the user.
block this domain: Will create a filter and block all emails from this domain for the user.
In addition to viewing details about a specific message, a user or the organization administrator can view a message that has been
quarantined. This allows the user to view the content to determine if this message should be released from the Quarantine or
confirmed as Spam.
To view a specific message:
1. Locate the message you with to view.
2. Click on the View button next to the message in question.
A pop-up window will appear with the message and message header.
To view the header of a specific message:
While the message is opened, click the arrow icon and it will expand the screen to show you the message header.
To download a specific message:
While the message is opened, click the download button and the original email message will be downloaded locally.
Actions
There are a number of actions you can take on one or more messages in the email logs.
Release from Quarantine
Will release the selected email(s) from the quarantine and deliver it to its intended recipient.
Release from Quarantine
Will release the selected email(s) from the quarantine and deliver it to its intended recipient. In addition the sender will be added to
the safe sender list.
Resend (Instant Replay)
This will re-send the selected email(s) to the user.
Not Spam
This will inform the spam engine that the selected email is not spam.
This is Spam
This will inform the spam engine that the selected email is spam.
Delete
This will delete the email from the logs.
To perform an action against one or more messages:
1. Click on the Logs tab.
2. Click on the Licensed Users tab.
3. Click the user whose logs you wish to search.
4. Choose Search Options.
5. Click Search.
6. Check the checkbox next to the message you wish to apply an action to.

7. Click the Actions drop-down list.
8. Select the appropriate action.
9. Click Apply
System Alerts
System alerts refer to email alerts that are generated and delivered automatically by Proofpoint. These alerts are sent to internal
users who send email that is filtered by Proofpoint. System alerts are sent in the following conditions:
• An email is blocked from delivery because it contains a Virus
• An email is blocked from delivery because it contains an attachment that has been identified as malicious (Requires
Attachment Defense to be enabled)
• An email is blocked from delivery because it is suspected as being spam
System alerts are sent to the internal sender. If the sender is a silent user, the alert will be sent to the administrator associated with
the account. System alerts contain links to the original email, which users can use in order to view the email and release it if
necessary. Emails that contain viruses or malicious attachments cannot be released.
To temporarily disable system alerts:
1. Locate a system alert email that you have received.
2. Click on the link that aligns to the time you wish to suspend delivery:
• 1 hour
• 3 hours
• 24 hours
3. The system will disable the delivery of an alert for the time period specified.
Accessing the Emergency Inbox
Emergency Inbox is used to provide users access to email in the event that their mail environment is unavailable. Once this occurs
Proofpoint will automatically begin to spool mail for the effected domain and the emergency inbox will immediately begin to show
the spooled mail. Users are able to send new messages as well as reply to received messages. Users are unable to see messages that
were successfully delivered prior to mail delivery being impacted.

46
Once email delivery has been restored any emails that a user sent (both new and replies) will be automatically delivered to the users
inbox.
To access Emergency Inbox (User)
1. Open a web browser and navigate to the appropriate URL.
2. Enter your login email address and password.
3. Click on the Emergency Inbox tab.
A new window will launch. If email is being spooled than any spooled messages will be seen.
To send an email using Emergency Inbox:
1. Click on the Emergency Inbox tab.
2. Click on the Create a new message icon.
3. Enter the recipient.
4. Enter the subject and message body.
5. Click the Send now icon.
To reply to an email using Emergency Inbox:
1. Click on the Emergency Inbox tab.
2. Click on the Reply to sender icon.
3. Enter the message body.
4. Click the Send now icon.
Note: Only a user or their organization administrator can access their Emergency Inbox.
Reports Proofpoint Essentials provides a number of reports for both administrators and users. Reports cover areas such as:
• Email Flow
• Bandwidth
• My Domains
• External Domains
Reports can be viewed in the user interface as well as printed and exported.
To create a favorite report:
1. Open a web browser and navigate to the appropriate URL.
2. Click on the Reports tab.
3. Select the report you wish to view.
4. Click the cog icon.
The cog icon is located on the right hand side of the screen.
5. Select Save as Favorite.
6. Enter a name for your report.
Your favorite report is now listed on the report page and can be accessed by clicking on the report name.
To export a report:
1. Click on the Reports tab.
2. Select the report you wish to view.
3. Click the cog icon.
4. Choose Export Option.
Export to PDF
Export to CSV

To schedule a report for weekly delivery:
1. Click on the Reports tab.
2. Select the report you wish to view.
3. Click the cog icon.
The cog icon is located on the right hand side of the screen.
4. Select Save as Favorite.
5. Enter a name for your report.
6. Click on the Schedule List tab.
7. Click Add a Report Schedule.
8. Enter a description.
9. Choose frequency.
10. Enter SMTP address for delivery.
11. Select your report from the Choose a Report (based on favorites) drop-down list.
12. Click Save.

48
Archive
In this chapter, you’ll find the following topics:
• Configuring Proofpoint Essentials Archive
• Using the Archive
Configuring Proofpoint Essentials Archive
The Proofpoint Essentials Archive leverages the journaling capability included in Microsoft Exchange. When enabled, journaling
records a copy of all internal and external email communications in your organization and sends them to a dedicated mailbox on an
Exchange Server. Proofpoint Essentials supports Envelope Journaling only on Microsoft Exchange Server 2007 and 2010.
Journaling copies the body of an email message and its transport envelope information (P2 header). The envelope information
includes the sender and all recipients, including BCC recipients and recipients in distribution lists. Envelope journaling presents the
information in a usable format so that the Proofpoint Essentials Archive can retrieve the enveloped message and place it in the
archive whereby it can then be subjected to the search and discovery functionality required.
This guide assumes you have Journaling configured for the Exchange Server in question. For more information on
Journaling configurations see: http://technet.microsoft.com/en-us/library/aa997525(EXCHG.65).aspx
To confirm archive is enabled:
1. Click on the Company Settings tab.
2. Click on the Features tab.
3. Ensure Enable Proofpoint Essentials Archive checkbox is enabled.
4. Click Save.
Once the Proofpoint Essentials Archive has been enabled you now need to add a Microsoft Exchange Server to start archiving email.
To add MS Exchange Server
1. Click on the Archive tab.
2. Click on the Cog button in the top right hand side of the screen.
3. Navigate to the MS Exchange Servers section.
4. Click on Add New Connection.
5. Enter details about your environment.
Server Name: The IMAP host name that Proofpoint Essentials should connect to. Port: The value should
be 143 (IMAP).
SSL Port: The value should be 993 (IMAP over SSL).
Username: This account that should have permissions to access the journal account.
Password: The password that belongs to the account. Connection Mode: Select SSL.
6. Click Save.
To test MS Exchange Server instance:
1. Click on the Archive tab.
2. Click on the Cog in the top right hand side of the screen.
3. Navigate to the MS Exchange Servers section.
4. Click Test.
To edit an MS Exchange Server instance:
1. Click on the Archive tab.

2. Click on the Cog in the top right hand side of the screen.
3. Navigate to the MS Exchange Servers section.
4. Click Edit.
To stop MS Exchange Server instance:
1. Click on the Archive tab.
2. Click on the Cog in the top right hand side of the screen.
3. Navigate to the MS Exchange Servers section.
4. Click Stop.
To delete MS Exchange Server instance:
1. Click on the Archive tab.
2. Click on the Cog in the top right hand side of the screen.
3. Navigate to the MS Exchange Servers section.
4. Click Delete.
To verify connectivity to MS Exchange Server:
1. Click on the Archive tab.
2. Click on the Cog in the top right hand side of the screen.
3. Navigate to the MS Exchange Servers section.
4. Locate the Active icon (checkmark).
A “checkmark” identifies proper connectivity with the MS Exchange Server. An “X” identifies a
connectivity issue with the MS Exchange Server.
Using the Proofpoint Essentials Archive
Once the Proofpoint Essentials Archive has been enabled and an MS Exchange Server has been added successfully the archive will
automatically start to collect emails from the remote server.
Who can search the archive?
Organization administrators have permission to search the archive for all users across the organization.
End users have permission to search their own archive. This means they can only search emails where they are the sender or a
recipient (either directly or as a member of a group).
To search the archive:
1. Click on the Archive tab.
2. Enter the appropriate criteria for your search.
Date / From: Select the FROM date of the range you are interested in.
Date / To: Select the TO date of the range you are interested in.
Date Type: Choose either send date, received date or archived date.
Search By: Choose the location of the message area you wish to search; includes: Subject, Body, To, From, CC, BCC, attachment
body, and attachment name.
Matches: Choose the relationship between the terms defined; includes: Any of these words (OR), All of these words (AND), and
None of these words (NOT).
3. Click Search.

50
Viewing Search Results
Once you perform a search the system will execute the criteria against your archived data and return search results to the screen.
You can further refine search criteria if necessary. There is a 1,000 record limit for search results.
Search results are displayed in a table and detailed information about each message is displayed including:
• Size (Kb)
• Sent date
• Received date
• Archive date
• From
• To
• Subject
To view a message:
1. Click on the View link next to the message in question.
To download a message:
1. Click on the Download link next to the message in question. Downloaded emails are in EML
format.
When viewing a message you can perform multiple actions for the message in question.
To view the list actions:
1. Click on the Actions drop down.
2. Select desired Option.
Redeliver
Provides users with the ability to have an archived email submitted to the Proofpoint Essentials email relay service for redelivery to
each of the messages original recipients. The email will show up in the inbox of the original recipients in a matter of moments.
Forward to
Provides users with the ability to have an archived email forwarded to a desired email address. The email will show up in the inbox
as an attachment from the Proofpoint Essentials Archive system.
Export
Provides users with the ability to have an archived email exported in an email format, which can then be managed by a Microsoft
Outlook client as desired.

Appendix I – Configuring Office 365
Before you Start
Before continuing with the provisioning and configuration of the Proofpoint Essentials service, it is recommended that you have the
information listed below.
Information needed for configuring Proofpoint Essentials
• MX record(s) for domain(s) you are configuring
Information needed for configuring Office 365
• Proofpoint Essentials IPs
• Smart Host for Proofpoint Essentials
Please refer to the following knowledge base article for this information:
http://support.proofpointessentials.com/index.php?/default_import/Knowledgebase/Article/View/75/2/proofpointessentials-data-
centre-and-spf-information
Setup Inbound Mail Flow
Proofpoint Essentials is deployed between the customer’s Office 365 environment and the Internet. Inbound mail is routed to
Proofpoint Essentials by changing the customer’s MX records. After email is processed by Proofpoint Essentials it is routed to Office
365.
Configure Proofpoint Essentials
Locate your MX record for the domain in Office 365
1. Login to the Office 365 Admin portal.
2. Click on Domains from the left side navigation panel.
3. Select the domain you wish to manage.
4. Click Domain Settings.
5. Under Exchange Online, locate the MX row in the table from the Points to address column.
6. Keep this information readily accessible.
Register domain with Proofpoint Essentials
WARNING: Follow these steps to add a domain before you change your MX records for that domain. If you change your MX records
before these steps are completed, you may lose mail.
1. Open a new browser tab and login to Proofpoint Essentials.
2. Click on the Domains tab.
3. Click on Add New Domain.
4. Enter your domain name (e.g., seroom.com).
5. Select purpose (Relay).

52
6. Copy the MX row value from the Points to address column in the Office 365 Admin portal located previously in a separate
tab.
7. Click Save.
Configure Office 365
You may want adjust your spam filtering policy in Office 365 to by-pass filtering for clean mail that is being sent from Proofpoint
Essentials.
By-pass Spam Filtering in Office 365
1. Login to the Office 365 Admin portal.
2. Click on Admin on the left side navigation panel.
3. Click on Exchange.
4. Click the protection link on the left side navigation panel.
5. Click on connection filter.
6. Click the pencil icon to edit the default connection filter.
7. Click connection filtering.
8. Click the + icon to add Proofpoint IP addresses to the exception list.
9. Repeat this step for each Proofpoint IP address entry.
10. Click Save.
You will need to create a rule to allow email to be sent from Proofpoint Essentials.
Add a mail flow rule to only allow email from Proofpoint Essentials
1. Login to the Office 365 Admin portal.
2. Click on Admin on the left side navigation panel.
3. Click on Exchange.
4. Click the mail flow link on the left side navigation panel.
5. Click + to access the pull down menu.
6. Select “Restrict messages by sender or recipient…” from the pull down menu.
7. In the new rule window, complete the required fields:
a. For “Name”, provide a name that is descriptive such as “Enter Only accept mail from Proofpoint”.
b. For “Apply this rule if…” select “The Sender is located…” and “Outside the organization”.
c. For “Do the following…” select “Delete the message without notifying anyone”.
d. Deselect the “Audit this rule with severity level” option.
e. For “Choose a mode for this rule” select “Enforce”.
f. Click More options.
g. Click add exception.
h. Select “the sender IP address is in any of these ranges or exactly matches”.
i. Add Proofpoint IP addresses to the IP address list.
j. Click OK.
k. Click Save.
Setup Outbound Mail Flow
Proofpoint Essentials is deployed between the customer’s Office 365 environment and the Internet. Outbound mail is routed to
Proofpoint Essentials by setting up a connector. This will route all outbound email to Proofpoint Essentials.

Configure Proofpoint Essentials
Enable Outbound Relaying
1. Login to your Proofpoint Essentials interface.
2. Click on the Features tab.
3. Check Enable Outbound Relaying.
4. Click Save.
Add a Sending Server
1. While logged into your Proofpoint Essentials interface, click on the Domains tab.
2. Click on Managed Hosted Services.
3. Choose Office 365.
4. Click Save.
Proofpoint Essentials uses the latest IP ranges for Office 365 published by Microsoft.
Configure Office 365
In order to configure this scenario, you must create an outbound connector that routes mail to your specified server.
1. Login to the Office 365 Admin portal.
2. Click on Admin on the left side navigation panel.
3. Click on Exchange.
4. Click the mail flow link on the left side navigation panel.
5. Click connectors.
6. Click + to access the pull down menu.
a. For “From” select “Office 365”.
b. For “To” select “Partner Organization”.
c. Click Next.
d. For “Name”, provide a name. For “Description”, provide a description.
e. Leave the “turn it on” checked (enabled).
f. Click Next.
g. For “When do you want to use this connector?” select “Only when email messages are sent to these domains”
h. Click +.
i. Enter * to specify all domains.
j. Click OK.
k. Click Next.
l. For “How do you want to route email messages? “ Select “Route email through these smart hosts”.
m. Click +.
n. Enter Proofpoint smart host value (i.e., outbound-us1.ppe-hosted.com)
o. Click Save.
p. Click Next.
q. For “How should Office 365 connect to your partner organization's email server?” choose your preferred approach.
If you choose “Always use Transport Layer Security (TLS) to secure the connection”, please choose “Any digital certificate, including self-signed certificates“.
r. Click Next.
s. Click Next. t. In order to validate the connector you will need to add an email address to send the results to. u. Click + v. Enter an email address.
w. Click OK.
x. Click Validate.
Use validation results to troubleshoot any configuration problems that are identified.
Click Save.