proprietary notice and liability disclaimer · proprietary notice and liability disclaimer ......
TRANSCRIPT

Proprietary Notice and Liability Disclaimer
The information disclosed in this document, including all designs and relatedmaterials, is the valuable property of NEC Computers Inc. (hereinafter “NECC”) and/or its licensors.NECC and/or its licensors, as appropriate, reserve all patent, copyright and other proprietary rights tothis document, including all design, manufacturing, reproduction, use, and sales rights thereto, exceptto the extent said rights are expressly granted to others.
The NECC product(s) discussed in this document are warranted in accordance with the terms of theWarranty Statement accompanying each product. However, actual performance of each such productis dependent upon factors such as system configuration, customer data, and operator control. Sinceimplementation by customers of each product may vary, the suitability of specific productconfigurations and applications must be determined by the customer and is not warranted by NECC.
To allow for design and specification improvements, the information in this document is subject tochange at any time, without notice. Reproduction of this document or portions thereof without priorwritten approval of NECC is prohibited.
NEC and Versa are registered trademarks, VersaBay, and VersaGlide are trademarks of NEC Corporation,and/or one or more of its subsidiaries. All are used under license.
All other product, brand, or trade names used in this publication are the trademarks or registered trademarks oftheir respective trademark owners.
First Printing — May 2000Copyright 2000
NEC Computers Inc.15 Business Park Way
Sacramento, CA 95828All Rights Reserved

Contents iii
Contents
Using This GuideText Setup..............................................................................................................................xRelated Documents................................................................................................................x
1 Introducing Your NEC VersaBefore you Begin................................................................................................................1-2About Your NEC Versa SXi Notebook..............................................................................1-3Around the Front of the System..........................................................................................1-4
LCD Panel ...................................................................................................................1-4Base Unit .....................................................................................................................1-5Operating Status LEDs and Microphone.....................................................................1-6
Power Button........................................................................................................1-7Keyboard .....................................................................................................................1-8
Around the Back of the System ........................................................................................1-10Around the Left Side of the System..................................................................................1-11Around the Right Side of the System ...............................................................................1-13Around the Bottom of the System ....................................................................................1-14About the Port Replicator .................................................................................................1-15
2 Getting StartedNEC VersaGlide .................................................................................................................2-2
Making VersaGlide Adjustments ................................................................................2-2VersaGlide Tips...........................................................................................................2-2
Power Sources for Your NEC Versa ..................................................................................2-3AC Adapter.........................................................................................................................2-3
Connecting the AC Adapter ........................................................................................2-3Powering On Your System..........................................................................................2-4
Powering On with Windows 2000 .......................................................................2-4Main Battery Pack ..............................................................................................................2-5
Determining Battery Status .........................................................................................2-5Low Battery Status ......................................................................................................2-6Returning the Battery to its Normal State....................................................................2-6Extending Battery Life ................................................................................................2-6Conserving Battery Power...........................................................................................2-6Battery Handling .........................................................................................................2-7Replacing the Battery ..................................................................................................2-7Battery Precautions....................................................................................................2-10Precautions for Recharging the Battery.....................................................................2-10
System Batteries ...............................................................................................................2-11Main Battery..............................................................................................................2-11CMOS Battery...........................................................................................................2-11Bridge Battery ...........................................................................................................2-11

iv Contents
System Care......................................................................................................................2-12Precautions for System Use.......................................................................................2-12Storage Requirements................................................................................................2-13Routine Cleaning.......................................................................................................2-13
3 Using the BIOS Setup UtilityIntroducing BIOS Setup .....................................................................................................3-2Entering BIOS Setup ..........................................................................................................3-2
Pausing the Screen.......................................................................................................3-2BIOS Setup Main Menu ..............................................................................................3-3Looking at Screens ......................................................................................................3-3Using Keys ..................................................................................................................3-4
Checking/Setting System Parameters .................................................................................3-4Resetting System Parameters.......................................................................................3-5Standard CMOS Setup ................................................................................................3-5Advanced CMOS Setup ..............................................................................................3-6System Security Setup.................................................................................................3-7Establishing System Passwords...................................................................................3-7Hard Disk Drive Passwords.........................................................................................3-8
Establishing Hard Disk Drive Passwords.............................................................3-8Changing Hard Disk Drive Passwords .................................................................3-9Using Hard Disk Drive Password Protection .......................................................3-9Moving the Hard Disk Drive..............................................................................3-10
Power Management Setup.........................................................................................3-10Boot Device Setup.....................................................................................................3-13Peripheral Setup ........................................................................................................3-14Other BIOS Setup Options ........................................................................................3-15
Managing System Power ..................................................................................................3-16Windows 98 Power Management Properties.............................................................3-16Windows 98 Power Schemes ....................................................................................3-17Windows 98 Alarms..................................................................................................3-18Windows 98 Power Meter .........................................................................................3-18Windows 98 Advanced..............................................................................................3-19Windows 98 Hibernate ..............................................................................................3-19Windows 2000 Power Options Properties.................................................................3-20Windows 2000 Power Schemes ................................................................................3-20Windows 2000 Alarms ..............................................................................................3-21Windows 2000 Power Meter .....................................................................................3-22Windows 2000 Advanced..........................................................................................3-22Windows 2000 Hibernate ..........................................................................................3-23Windows 98/2000 Power Management States ..........................................................3-23Recognizing the Windows 98/2000 Power Management States ...............................3-23Windows NT Power Management States ..................................................................3-24Recognizing the Windows NT Power Management States .......................................3-25
Updating the BIOS ...........................................................................................................3-26Obtaining the BIOS Update.......................................................................................3-26
Contents v
Preparing the BIOS Update Diskette.........................................................................3-26Performing the BIOS Update ....................................................................................3-27
Identifying the Switch Settings.........................................................................................3-28
4 Using the Operating System and UtilitiesWindows Introduction ........................................................................................................4-2
Windows 2000.............................................................................................................4-2Desktop Icons.......................................................................................................4-2Taskbar Icons .......................................................................................................4-3
Windows 98 Second Edition .......................................................................................4-3Desktop Icons.......................................................................................................4-3Taskbar Icons .......................................................................................................4-5
Windows NT ...............................................................................................................4-6NEC Utilities ......................................................................................................................4-6
NEC Customize Utility................................................................................................4-6NEC Customize Utility Screen.............................................................................4-7Using the NEC Customize Utility ........................................................................4-7
HDPREPEZ Utility .....................................................................................................4-7Using HDPREPEZ with Windows 98..................................................................4-8Using HDPREPEZ with Windows NT.................................................................4-8
SpeedStep Applet ...............................................................................................................4-8Application and Driver CD.................................................................................................4-8
Launching the CD with Windows 98 ..........................................................................4-9Launching the CD with Windows NT/2000................................................................4-9Application and Driver CD Dialog Box ......................................................................4-9Installing the Application and Driver CD Software ..................................................4-10
NEC Info Center...............................................................................................................4-10Installing the NEC Info Center..................................................................................4-10Uninstalling the NEC Info Center .............................................................................4-10
Partition Magic .................................................................................................................4-11Product Recovery CD.......................................................................................................4-11
Guidelines for Using the Product Recovery CD........................................................4-12Product Recovery CD Options ..................................................................................4-12Full Disk Drive Restore.............................................................................................4-13Partition Only Restore ...............................................................................................4-14
5 Using the System Drives and BaysSuperDisk Drive .................................................................................................................5-2
Formatting Diskettes in the SuperDisk Drive..............................................................5-2NEC VersaBay III ..............................................................................................................5-2NEC VersaBay III Swap Utility .........................................................................................5-3
Installing the NEC VersaBay III Swap Utility ............................................................5-3Using the NEC VersaBay III Swap Utility..................................................................5-3Removing a Device from the NEC VersaBay III ........................................................5-4Installing a Device in the NEC VersaBay III ..............................................................5-5Other NEC VersaBay III Devices ...............................................................................5-6

vi Contents
24X CD-ROM Drive ..........................................................................................................5-7CD Loading .................................................................................................................5-7CD Care.......................................................................................................................5-8Changing the Auto Play Setting ..................................................................................5-8
CD Read/Write Drive .........................................................................................................5-98X DVD-ROM Drive .........................................................................................................5-9Hard Disk Drive................................................................................................................5-10Memory Modules .............................................................................................................5-14
6 Communicating with Your NEC VersaPC Cards.............................................................................................................................6-2
Type II Cards...............................................................................................................6-2Type II Extended Cards...............................................................................................6-2Type III Cards .............................................................................................................6-2Communication Cards .................................................................................................6-2Storage Cards ..............................................................................................................6-3Other Cards..................................................................................................................6-3PC Card Slots ..............................................................................................................6-3Using the PC Card Slots ..............................................................................................6-4Inserting a PC Card .....................................................................................................6-4Removing a Card.........................................................................................................6-5PC Card Modems ........................................................................................................6-5
Mini-PCI Modem ...............................................................................................................6-6Mini-PCI LAN/Modem ......................................................................................................6-6
Installing the Online LAN/Modem Guides .................................................................6-6Internet Connections...........................................................................................................6-6
Internet Connection Wizard in Windows 98/2000 ......................................................6-7Connecting to the Internet in Windows NT.................................................................6-7
IR Port ................................................................................................................................6-8Infrared Communications............................................................................................6-8Using the IR Port.........................................................................................................6-8Enabling the IR Port in Windows 98...........................................................................6-8Enabling the IR Port in Windows 2000.......................................................................6-9
7 Traveling TipsPreparing for Travel............................................................................................................7-2Packing for Travel ..............................................................................................................7-2Using Power Sources..........................................................................................................7-3Getting Through Customs...................................................................................................7-3Using Your Modem............................................................................................................7-4
8 Using Peripheral DevicesExternal Monitor ................................................................................................................8-2Printer .................................................................................................................................8-2
Parallel Devices...........................................................................................................8-2

Contents vii
Serial Devices..............................................................................................................8-3External Keyboard/Mouse ..................................................................................................8-4External Audio Options ......................................................................................................8-4USB Devices ......................................................................................................................8-5Port Replicator....................................................................................................................8-5
9 Using MultimediaAudio ..................................................................................................................................9-2
Recording ....................................................................................................................9-2Playing Back................................................................................................................9-3Optimizing the Sound Quality.....................................................................................9-3CD-ROM Input............................................................................................................9-4Microphone .................................................................................................................9-4Mixing .........................................................................................................................9-4Using Headphones.......................................................................................................9-4Using External Stereo Speakers ..................................................................................9-5Using the Built-In Speakers.........................................................................................9-5Digital Audio Output...................................................................................................9-5MIDI Files ...................................................................................................................9-5
Video ..................................................................................................................................9-5Using Digital Video Files............................................................................................9-5Using Animation Files.................................................................................................9-6
Multimedia Applications ....................................................................................................9-6
10 Solving System ProblemsProblem Checklist.............................................................................................................10-2Start-Up Problems ............................................................................................................10-3
Post Error Messages ..................................................................................................10-4Beep Codes................................................................................................................10-6
If You Need Assistance ....................................................................................................10-7
11 Getting Service and SupportService and Support Contact Information ........................................................................11-2NECC Web Site................................................................................................................11-3NECC FTP Site ................................................................................................................11-3NECC Support Services ...................................................................................................11-4Email/Fax to Support Services .........................................................................................11-4
A Setting Up a Healthy Work EnvironmentMaking Your Computer Work for You .............................................................................A-2Arrange Your Equipment ..................................................................................................A-3Adjust Your Chair .............................................................................................................A-3Adjust Your Input Devices ................................................................................................A-3Adjust Your Screen or Monitor .........................................................................................A-4Vary Your Workday ..........................................................................................................A-5

viii Contents
Pre-Existing Conditions and Psychosocial Factors............................................................A-5
B SpecificationsSystem Components ..........................................................................................................B-2Memory Map .....................................................................................................................B-9Interrupt Controllers ........................................................................................................B-10
C Frequently Asked QuestionsExternal Mouse..................................................................................................................C-2Display...............................................................................................................................C-2PC Cards............................................................................................................................C-3Diskette Drive....................................................................................................................C-5Booting ..............................................................................................................................C-6Power Management ...........................................................................................................C-7Miscellaneous ..................................................................................................................C-10
Glossary
Index
Regulatory Statements

Using This Guide ix
Using This Guide
The NEC Versa® SXi User's Guide gives you the information you need to maximize theuse of your NEC Versa notebook computer. Read this guide to familiarize yourselfwith the NEC Versa and its features. For specific information see
! Chapter 1, “Introducing Your NEC Versa,” to acquaint yourself with systemhardware.
! Chapter 2, “Getting Started,” for instructions on how to connect, power on, and carefor your system.
! Chapter 3, “Using the BIOS Setup Utility,” for details about modifying systemparameters and power management.
! Chapter 4, “Using the Operating System and Utilities,” for an understanding of yourWindows® operating system. You’ll also learn how to use the system utilities andCDs for loading applications, drivers, and the NEC Info Center.
! Chapter 5, “Using the System Drives and Bays,” to master procedures for swappingVersaBay III devices, upgrading the hard disk drive and installing memorymodules.
! Chapter 6, “Communicating with Your NEC Versa,” for essential information aboutusing PC cards, optional mini-PCI modems or LANs, and other communicationfeatures of the system.
! Chapter 7, “Traveling Tips,” for a variety of checklists to help you to prepare yournotebook computer for travel, getting through customs and using your modem whenyou are on the road.
! Chapter 8, “Using Peripheral Devices,” to master procedures for connectingexternal devices like an external monitor, headphones, a printer, or speakers.
! Chapter 9, “Using Multimedia,” for steps on integrating video and sound clips intoimpressive presentations.
! Chapter 10, “Solving System Problems,” for simple solutions to common problemsthat may arise while operating your notebook.
! Chapter 11, “Getting Service and Support,” for information about getting help whenyou need it from NEC Computers Inc. (NECC).
! Appendix A, “Setting Up a Healthy Work Environment,” for guidelines that helppromote a healthy work setting.
! Appendix B, “Specifications,” to review NEC Versa system specifications.

x Using This Guide
! Appendix C, “Frequently Asked Questions,” (FAQs) for a look at questions thatusers commonly ask and the answers to those questions.
Text Setup
To make this guide as easy to use as possible, text is set up as follows.
! Warnings, cautions, and notes have the following format:
Warnings alert you to situations that could result in seriouspersonal injury or loss of life.
Cautions indicate situations that can damage the systemhardware or software.
Note Notes give particularly important information about whatever is being described.
! Names of keys are printed as they appear on the keyboard, for example, Ctrl, Alt, orEnter.
! Text that you must type or keys that you must press are presented in bold type. Forexample, type dir and press Enter.
Related Documents
See the following documents for additional information on your NEC Versa notebookcomputer:
! The NEC Versa SXi Quick Setup sheet helps get your system up and running.
! The NEC Versa SXi Quick Reference card provides an easy-to-carry reference toLED meanings, controls, function key combinations, and NECC help numbers.(The quick reference card does not ship with some systems purchased outside of theUnited States and Canada.)
! The NEC Info Center is a fully navigational pdf document containing feature andspecification information about your NEC Versa system.

1Introducing Your NEC Versa
! Before You Begin
! About Your NEC Versa SXi Notebook
! Around the Front of the System
! Around the Back of the System
! Around the Left Side of the System
! Around the Right Side of the System
! Around the Bottom of the System
! About the Port Replicator

1-2 Introducing Your NEC Versa
Before you Begin
Prolonged or improper use of a computer workstation maypose a risk of serious injury. To reduce your risk of injury, set up and use your computerin the manner described in Appendix A, “Setting Up a Healthy Work Environment.”
After completing the steps in the Quick Setup sheet that comes with your computer,your NEC Versa SXi notebook computer is ready to go! To get started, do thefollowing:
! Read Appendix A, “Setting Up a Healthy Work Environment,” for guidelines thathelp you use your computer productively and safely. Information includes how toset up and use your computer to reduce your risk of developing nerve, muscle, ortendon disorders.
! Take the online Tour to get acquainted with the NEC Versa’s informationresources. The Tour is part of the NEC Info Center. Use the Application and DriverCD that ships with your NEC Versa SXi system to install the NEC Info Center.
Read through this guide to familiarize yourself with the NEC Versa.

Introducing Your NEC Versa 1-3
About Your NEC Versa SXi NotebookThe NEC Versa SXi notebook computer offers you a portable system filled withexciting resources for home, business or travel. Standard features include a powerfulIntel® Pentium III 650-MHz, 700-MHz, or 750-MHz microprocessor, all withSpeedStep™. Intel’s SpeedStep technology allows you to customize high-performancecomputing on your notebook system to optimize performance speed and conservebattery life. The 14.1-inch TFT XGA LCD panel provides high-resolution display forsharp, effective visuals.
In addition, your system provides a high-performance hard disk drive, a diskette driveor SuperDisk™ drive, PC card support, and a 24X CD-ROM drive, a CD Read/Writedrive or a 8X DVD-ROM drive. To optimize your connectivity options, some modelsship with an internal mini-PCI modem or combination internal mini-PCI LAN/modem.As a multimedia system, your NEC Versa also provides the tools needed to create andpresent impressive images using video clips and sound.
NEC Versa SXi notebook computer
To get comfortable with your notebook, read the following sections and take a touraround your system!

1-4 Introducing Your NEC Versa
Around the Front of the SystemThe NEC Versa is compact with features on every side. First, look at the front of theNEC Versa. The following sections describe front features, beginning with the liquidcrystal display (LCD) panel.
LCD Panel
Your NEC Versa SXi comes with a 1024x768, 16 million color LCD panel that youcan adjust for a comfortable viewing position. To adjust the viewing angle, gently tiltthe LCD panel into position. Your system is equipped with a 14.1-inch color Thin FilmTransistor (TFT) Extended Graphics Array (XGA) panel.
To adjust the LCD panel brightness press the Fn-F8 and Fn-F9 functions keys. Formore details about using the system’s function keys, see the section, “Keyboard,” laterin this chapter.
The LCD panel provides the following status LEDs.
! Power Status LED — lights green when the system is under AC power. When thesystem is under battery power, this LED lights to indicate the following:
— Lights green when the system power is on.
— Blinks green when the system is in Standby (Windows 98/2000) or Suspend(Windows NT) mode.
— Lights yellow (blinks when in Windows 98/2000 Standby mode or WindowsNT Suspend mode) to indicate that battery power is at 8% capacity or less.
— Lights amber (blinks when in Windows 98/2000 Standby mode or Windows NTSuspend mode) to indicate that battery power is at 3% capacity or less.
! Battery Charging LED — lights to indicate battery charging activity. Lights amberwhen the battery is charging.

Introducing Your NEC Versa 1-5
Base Unit
The base unit of your NEC Versa offers the following features, which are describedafter the figure.
LCD panel and base unit
A – Keyboard D – LCD PanelB – Operating Status LEDs E – NEC VersaGlideC – Power Button
! Keyboard — 85 keys with the standard QWERTY-key layout. (Models purchasedoutside of the U.S. and Canada ship with country-specific keyboard layouts.)
! Operating Status LEDs — Keeps you informed of your NEC Versa’s currentoperating status. See the following section for details about the operating statusLEDs.
! Power Button — Press the Power button to power on, power off, and to resumefrom Standby (Windows 98/2000) or Suspend (Windows NT) mode.
! LCD Panel — Provides a high-resolution display for sharp, effective visuals onyour NEC Versa.
! NEC VersaGlide — The NEC VersaGlide works like a standard computer mouse.Simply move your fingertip over the VersaGlide to control the position of themouse pointer. Use the selection buttons below the VersaGlide to select menuitems. VersaGlide settings and features are described in detail in Chapter 2.

1-6 Introducing Your NEC Versa
Operating Status LEDs and Microphone
Operating status LEDs and microphone
A – IDE Device D – Caps LockB – VBIII Device E – Scroll LockC – Microphone F – Num Lock
! IDE Device — lights when the NEC Versa writes data to or retrieves data from theinternal hard disk drive
! VBIII Device — lights when the NEC Versa writes data to or retrieves data from adevice in the VersaBay III.
! Microphone — A strategically positioned built-in microphone allows you to recordmonophonic sound directly into your notebook computer. See Chapter 9, “UsingMultimedia,” for details about recording.
! Caps Lock — lights when Caps Lock is in effect.
! Scroll Lock — lights when Scroll Lock is in effect.
! Num Lock — lights when Num Lock mode is active.
Introducing Your NEC Versa 1-7
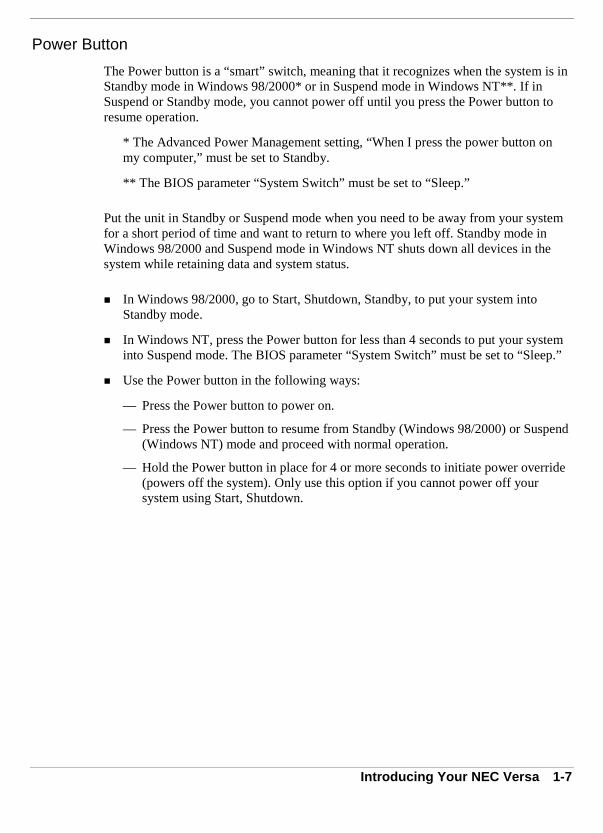
Power Button
The Power button is a “smart” switch, meaning that it recognizes when the system is inStandby mode in Windows 98/2000* or in Suspend mode in Windows NT**. If inSuspend or Standby mode, you cannot power off until you press the Power button toresume operation.
* The Advanced Power Management setting, “When I press the power button onmy computer,” must be set to Standby.
** The BIOS parameter “System Switch” must be set to “Sleep.”
Put the unit in Standby or Suspend mode when you need to be away from your systemfor a short period of time and want to return to where you left off. Standby mode inWindows 98/2000 and Suspend mode in Windows NT shuts down all devices in thesystem while retaining data and system status.
! In Windows 98/2000, go to Start, Shutdown, Standby, to put your system intoStandby mode.
! In Windows NT, press the Power button for less than 4 seconds to put your systeminto Suspend mode. The BIOS parameter “System Switch” must be set to “Sleep.”
! Use the Power button in the following ways:
— Press the Power button to power on.
— Press the Power button to resume from Standby (Windows 98/2000) or Suspend(Windows NT) mode and proceed with normal operation.
— Hold the Power button in place for 4 or more seconds to initiate power override(powers off the system). Only use this option if you cannot power off yoursystem using Start, Shutdown.

1-8 Introducing Your NEC Versa
Keyboard
The NEC Versa keyboard offers the following features, which are described after thefigure.
Keyboard
A – Function Keys D – Control KeysB – Numeric Keys E – Windows KeysC – Cursor Control Keys F – Typewriter Keys
! Function keys — Twelve function keys, F1 through F12, are available on the NECVersa keyboard. These keys work together with the Fn key to activate specialfunctions. Several keys are preprogrammed with dual functions, some of which areprinted in blue on the key.
Function keys are application-driven. See the specific application’s user guide forinformation about how each function key works within the application you areusing.
The following function key combinations are preprogrammed for the NEC VersaSXi computer.
Fn-F3 — Toggles between three video modes; LCD, CRT, or both (LCD and CRT).
Fn-F4 — Sets Standby power management mode on, in Windows NT.
— In Windows NT, press any key to resume from Standby mode.
— No function when Windows 98/2000 configured for Advanced Configurationand Power Interface (ACPI). In Windows 98/2000, Standby is equivalent toWindows 95 Suspend mode. To resume from Windows 98/2000 Standby mode,press the Power button.

Introducing Your NEC Versa 1-9
Fn-F6 — toggles the system beep on and off.
Fn-F7 — Toggles between various power management levels in Windows NT.Beeps indicate the level chosen as follows:
1 beep Off
2 beeps Custom
3 beeps Highest Performance
4 beeps Longest Life
No function when Windows 98/2000 configured for Advanced Configuration andPower Interface (ACPI).
Fn-F8 — Increases the LCD panel brightness.
Fn-F9 — Decreases the LCD panel brightness.
Fn-F10 — Toggles LCD expansion mode (DOS only).
Fn-ESC — Initiates a Save-to-RAM, in Windows NT. Saves your workingenvironment to memory.
An additional preprogrammed function key, Fn-Left Ctrl, simulates pressing the rightcontrol key for support of IBM 327x connections.
! Numeric keypad — Pressing NumLock on the keyboard activates the numerickeypad numbers and functions printed in blue on the keys.
The keypad lets you type numbers and mathematical operands (+, -) as you wouldon a calculator. The keypad is ideal for entering long lists of numbers.
When you press NumLock again, the keys revert to their normal functions astypewriter keys.
! Cursor Control keys — Cursor control keys let you position the cursor on the screenwhere you want. On the screen, the cursor is a blinking underline, block, or verticalline depending on the application. The cursor indicates where the next text typed isinserted.
! Control keys — Ctrl, Alt, Fn, and Shift are controls used in conjunction with otherkeys to change their functions. To use control keys, press and hold the control keywhile pressing another key. For example, “press Ctrl c” means to hold down theCtrl key and type the letter c. How the key combination works depends on theapplication you are running.
1-10 Introducing Your NEC Versa
! Windows keys — In Windows, you can use the following two keys to facilitateyour work.
Quick access to shortcut menus
Displays the Start menu
! Typewriter keys — The typewriter keys (also called alphanumeric keys) are used toenter text and characters. Keys with blue printing on them behave differently whencombined with control keys or the Fn key.
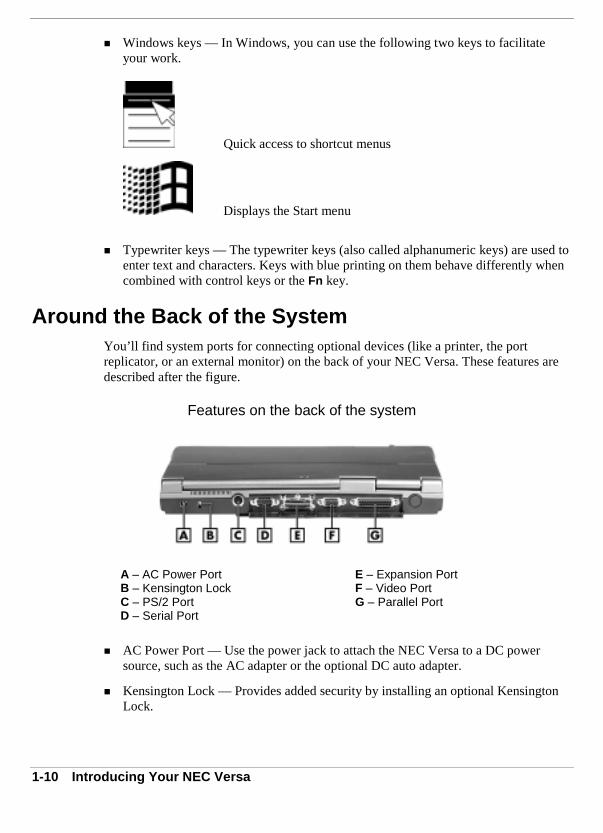
Around the Back of the SystemYou’ll find system ports for connecting optional devices (like a printer, the portreplicator, or an external monitor) on the back of your NEC Versa. These features aredescribed after the figure.
Features on the back of the system
A – AC Power Port E – Expansion PortB – Kensington Lock F – Video PortC – PS/2 Port G – Parallel PortD – Serial Port
! AC Power Port — Use the power jack to attach the NEC Versa to a DC powersource, such as the AC adapter or the optional DC auto adapter.
! Kensington Lock — Provides added security by installing an optional KensingtonLock.

Introducing Your NEC Versa 1-11
! PS/2 Port — Connects an external PS/2-style mouse or a PS/2-style keyboard to thesystem. With an optional Y-cable adapter, you can connect both a mouse and akeyboard at the same time.
! Serial Port — Connects an external modem or other serial device.
! Expansion Port — Use this port to connect the NEC Port Replicator.
! Video Port — Attaches an external monitor to your NEC Versa. You can run theLCD display and the external monitor simultaneously or run either alone.
! Parallel Port — Connects a parallel printer or other parallel device. The port is anEnhanced Capabilities Port (ECP). The ECP standard provides you with a greaterprocessing speed than the conventional parallel port. It also supports EnhancedParallel Port (EPP), bi-directional and uni-directional protocols.
Around the Left Side of the SystemThe left side of your NEC Versa offers the following features, which are described afterthe figure.
Left side features
A – PC Card Slots G – Volume ControlB – LAN Port (optional) H – IR PortC – Modem Port (optional) I – Left Stereo SpeakerD – USB Port J – Battery Release Latch (Left)E – External Microphone K – LCD Lid Latch (Left)F – Headphones/External Speakers
! PC Card slots — Provide two slots for inserting two Type II PC cards or one TypeIII PC card.
! LAN Port — Uses an RJ-45 cable to connect your system to a local area network.(Available if optional mini-PCI LAN/modem combo installed.)

1-12 Introducing Your NEC Versa
! Modem Port — Uses an RJ-11 cable to connect your internal modem to an analogtelephone line. (Available if optional mini-PCI modem or mini-PCI LAN/modemcombo installed.)
! USB Port — The Universal Serial Bus (USB) port allows you to connect up to 127USB-equipped peripheral devices (printers, monitors, scanners, etc.) to your NECVersa.
! External Microphone (MIC) — Connects an external microphone for monophonicrecording or amplification through the unit. Plugging in an external microphonedisables the built-in microphone.
! Headphones/External Speakers — Connects external headphones or speakers toyour NEC Versa. Plugging in headphones or speakers disables the built-in systemspeakers. The headphone/speaker port supports SP/DIF.
! Volume Control — Allows you to control the speaker and headphone volume.
! IR Port — Use this infrared (IR) port to transfer files between your NEC Versa andan IR-equipped desktop or notebook computer or to print to an IR-capable printer.
! Left Stereo Speaker — Provides stereo sound for your multimedia presentations orlistening pleasure. The built-in sound system also supports 3D sound, whichsimulates the latest surround-sound technology.
! Battery Release Latch — Releases and removes the system’s main battery.
! LCD Lid Latch — Secures the LCD panel when closed.

Introducing Your NEC Versa 1-13
Around the Right Side of the SystemThe right side of the NEC Versa offers the following features, which are described afterthe figure.
Right side features
A – Battery Release Latch (Right) D – VersaBay IIIB – Right Stereo Speaker E – FanC – LCD Lid Latch (Right)
! Battery Release Latch — Releases and removes the system’s main battery.
! Right Stereo Speaker — Provides stereo sound for your multimedia presentations orlistening pleasure. The built-in sound system also supports 3D sound, whichsimulates the latest surround-sound technology.
! LCD Lid Latch — Secures the LCD panel when closed.
! NEC VersaBay III™ — A 24X CD-ROM drive, a CD Read/Write drive, aSuperDisk drive, or a 8X DVD-ROM drive comes installed in the NEC VersaBayIII on the right side of your system.
! Fan — Allows your system to cool properly and maintain a safe operatingtemperature.
Always keep the fan vents unobstructed to allow propersystem cooling.

1-14 Introducing Your NEC Versa
Around the Bottom of the SystemThe bottom of the NEC Versa offers the following features, which are described afterthe figure.
Bottom features
A – Height Adjustment Feet D – Battery BayB – NEC VersaBay III Release Lock E – NEC VersaBay III Release LatchC – Memory Module Bay
! Height Adjustment Feet — Modifies the angle of the NEC Versa for easier viewingand typing.
! NEC VersaBay III™ Release Lock — Unlocks the VersaBay III for deviceremoval.
! Memory Module Bay — Stores the system’s memory modules.
! Battery Bay — Contains the system’s main, eight-cell or twelve-cell, Lithium-Ion(Li-Ion) battery.
! NEC VersaBay III Release Latch — Releases a device from the NEC VersaBay III.

Introducing Your NEC Versa 1-15
About the Port ReplicatorThe NEC Port Replicator is an accessory that duplicates some of the ports found on theback of your NEC Versa SXi system. The Kensington lock secures the NEC Versa SXito the Port Replicator and secures the Port Replicator to the desk. Keep the NEC PortReplicator in your office connected to peripherals while you take your NEC Versa SXion the road.
The ports on the Port Replicator are as follows.
! Parallel Port — Connects to a printer. You can change the LPT Mode in the Setupprogram.
! AC Power Port — Connects to an AC adapter.
! PS/2 Mouse Port — Connects to a PS/2 mouse.
! PS/2 Keyboard Port — Connects to a 6-pin standard PS/2-style keyboard.
! USB Port — Connects up to 127 peripheral devices to your notebook computer.
! VGA Port — Connects to an external VGA/SVGA monitor.
! Ethernet Port — Connects via an RJ45 connector to the system’s built-inmodem/LAN card.
! Serial Port — Connects to a serial device, such as an external modem.
Port Replicator
A – Parallel Device Port D – VGA Port G – USB PortB – AC Power Port E – Serial Device Port H – Mouse PortC – External Keyboard Port F – Ethernet LAN Port I – Docking Lever
2Getting Started
! NEC VersaGlide
! Power Sources for Your NEC Versa
! AC Adapter
! Main Battery Pack
! System Batteries
! System Care
2-2 Getting Started
NEC VersaGlideThe NEC VersaGlide is an easy way to control the cursor with your finger. Lightlyglide your finger across the NEC VersaGlide and the cursor follows. The NECVersaGlide provides standard mouse functionality, plus more. VersaGlide featuresinclude:
! Single tap to the touchpad, equivalent to a single click of the primary mousebutton.
! Double tap to the touchpad, equivalent to a double click of the primary mousebutton.
! Click and hold, then drag your finger across the VersaGlide touchpad, equivalentto a click and drag of the primary mouse button.
! Slide your finger along the right side of the touchpad to scroll your document orscreen.
Try all of the features and decide which you prefer. If you find the double tap or any ofthe other features difficult to use, go to the next section for general directions aboutadjusting the touchpad properties.
Making VersaGlide Adjustments
The NEC VersaGlide offers a number of options that let you customize how itfunctions. The options let you control the cursor speed, select button orientation, enableor disable tapping, define auto jumps, enable easy-scrolling, and configure gestures toinitiate selected functions by tapping in a designated area of the touchpad.
To access these options, locate the Control Panel and double click on the mouse icon.Use the context-sensitive help to learn more about each option. Select the option, thenpress F1 to access context sensitive help.
VersaGlide Tips
Follow these basic ergonomic tips while working:
! Use a light touch on the VersaGlide surface.
! Set up the NEC Versa with your keyboard and VersaGlide at a comfortable height.Keep your forearms parallel to the floor. Your wrists should be relaxed and straight.
! While using the keyboard and VersaGlide, keep your shoulders and arms as relaxedas possible.
! Take regular breaks from the computer to rest your eyes. Perform stretchingexercises to relax your fingers, hands, wrists, forearms, and shoulders.
See Appendix A, “Setting Up a Healthy Work Environment,” for more information.
Getting Started 2-3
Power Sources for Your NEC VersaThe NEC Versa can be powered using two different sources, making it a truly portablesystem.
Operate your NEC Versa just about anywhere using one of the following powersources:
! the AC adapter connected to an electrical wall outlet (using AC power)
! the optional Auto adapter. (For details about its use, refer to the accessory sheet thatships with this option.)
Read the following sections for specific information about using the NEC powersources.
AC AdapterUse the AC adapter and power cable that came with your NEC Versa to run yourcomputer on alternating current (AC) power, or to recharge the battery pack. Use theAC adapter whenever a wall outlet is nearby.
Keep the adapter connected whenever possible. The AC adapter charges the batterywhen it is connected, whether the NEC Versa is powered on or off.
Do not attempt to disassemble the AC adapter. The ACadapter has no user-replaceable or serviceable parts inside. Dangerous voltage in theAC adapter can cause serious personal injury or death. The AC adapter is intended foruse with a computer and must meet EN609050 standards.
Connecting the AC Adapter
Note The AC power cable type that your system uses depends on the countrywhere you are using it. Contact the local dealer to purchase the correct power cable.
Connect the AC adapter as follows:
1. Connect the AC adapter cable to the power port on the back of your NEC Versa.
2. Plug one end of the AC power cable into the AC adapter and the other end into aproperly grounded 120- or 240-volt wall outlet.

2-4 Getting Started
Do not cover or place objects on the AC adapter. Keeping theadapter clear of objects lets the adapter cool properly during use.
Only use the AC adapter that comes with your NEC Versa SXi. Although other adapterslook similar, using them can damage your system.
Powering On Your System
Power on the system as follows:
1. Locate the latches on the left and right side of the LCD panel, slide them towardthe front of the system, and raise the panel.
2. Locate and press the Power button to turn on system power. For additionalinformation about Power control buttons and power LEDs, refer to Chapter 1,“Introducing Your NEC Versa.”
Powering On with Windows 2000
If you installed a generic Windows 2000 operating system or disabled hibernatesupport, a message about the hibernation file appears at power on. Enable Hibernatesupport to remove this message.
Follow these steps to enable Hibernate support:
1. On the Windows taskbar, click Start, Settings, and Control Panel.
2. Double click Power Options.
3. Select the Hibernate tab.
4. Check the box to enable Hibernate support.
5. Click OK and close Control Panel.

Getting Started 2-5
Main Battery PackThe NEC Versa comes with a rechargeable Lithium-Ion (Li-Ion) battery pack that’seasy to install and remove.
To prevent accidental battery ignition or explosion, adhere tothe following:
! Keep the battery away from extreme heat.
! Keep metal objects away from the battery connectors to prevent a short circuit.
! Make sure the battery is properly installed in the battery bay.
! Read the precautions printed on the battery.
Determining Battery Status
Your NEC Versa system provides tools to help you keep track of the main battery’spower level. If your system is configured (default setting) to display the power icon onthe taskbar in the Windows environments, an electrical plug appears when the system isconnected to an AC power source. A battery icon displays when the system is notconnected to an AC power source.
Use the system’s power meter to determine battery status. Access the system’s powermeter in the following ways:
! Move the cursor over the power icon on the taskbar to display the remaining batterypower for the system’s main battery.
! Right click the power icon on the taskbar to open the power meter or to adjustpower properties.
! Double click the power icon on the taskbar to display the remaining power for themain battery.
! Go to Start, Settings, Control Panel, and double click the Power icon and select thePower Meter tab.
Systems running the Window NT operating system use SystemSoft’s PowerProfiler™to determine battery status. Simply click the battery icon on the taskbar to launch thePowerProfiler battery page.

2-6 Getting Started
Low Battery Status
When battery power is low (8% or less), the power LED lights yellow. When batterypower is very low (3% or less) the power LED lights amber. When your system is in alow battery status, do one of the following:
! Power off the system, remove the battery pack and replace it with a fully chargedbattery.
! Leave the battery pack in the system and connect your NEC Versa to the ACadapter and a wall outlet. If you connect the system to AC power and keep thesystem within standard operating temperatures, the battery recharges inapproximately 2–3 hours whether or not you use your system.
Returning the Battery to its Normal State
To return the battery to its normal state, try the following:
! remove and then reinstall the battery
! reinstall the battery in your NEC Versa and fully recharge the battery (to 100%).
Extending Battery Life
While on the road, it is important to be aware of the simple things you can do to extendthe life of the system’s main battery. One way is to keep the brightness setting low. Usethe Fn+F8 and Fn+F9 function keys to control the brightness.
Conserving Battery Power
In the Windows 98/2000 environment, the default setting for a critical low battery stateis Standby. Standby does not power down your system to conserve battery power.
NECC recommends that you change the Windows 98/2000 Standby default setting fora critical low battery state to Hibernate to prevent data loss during battery-poweredsystem operation.
The power management state, Hibernate or Save-To-File (STF), saves the system’scurrent working environment to the system’s hard drive, then powers down the systemto conserve battery power. You can configure your power management settings to enterhibernation when your system reaches a critical low battery state.
Change the Windows 98/2000 Standby default powermanagement setting for a critical low battery state to Hibernate to prevent data lossduring battery-powered system operation.
Getting Started 2-7
Follow these steps to modify the default setting for a critical low battery state:
1. From the Windows Start menu, select Settings and Control Panel.
2. Double click Power Options in Windows 2000 or Power Management in Windows98 and select the Alarm tab.
3. Click the Alarm Action button in the Critical Battery Alarm section.
4. Use the dropdown box labeled, “When the alarm goes off, the computer will:” tochange the default setting to Hibernate.
5. Click OK to exit Alarm Actions.
6. Click OK to exit Power Options in Windows 2000 or Power Management inWindows 98.
7. Close the Control Panel.
Battery Handling
Keep the following in mind when removing or replacing a battery.
! Turn off power to the system after use. Keeping system power on can degradebattery performance and shorten battery life.
! Clean the battery connectors with a dry cloth when they get dirty.
! Keep the battery out of the reach of children.
Replacing the Battery
The following symptoms indicate that battery life is nearing an end. Replace batteriesthat display these symptoms.
! Shorter work times.
! Discoloration, warping.
! Hot to the touch.
! Strange odor.
Replace the battery pack installed in your NEC Versa system as follows.
1. Save your files, exit Windows, and put your system into Standby mode (Windows98/2000), Suspend mode (Windows NT) or turn off system power.

2-8 Getting Started
2. Locate and press the battery release latches.
Pressing the battery release latches
A – Battery Release Latches
3. Slide the battery out of the system.
Removing the battery

Getting Started 2-9
4. Slide the battery into the bay until securely locked into place.
Inserting the battery pack

2-10 Getting Started
Battery Precautions
To prevent accidental battery ignition, rupture, or explosion, adhere to the followingprecautions.
There is a danger of explosion if the battery isincorrectly replaced. Replace only with the same or equivalent type recommendedby the manufacturer. Discard used batteries according to the manufacturer’sinstructions.
To avoid personal injury and property damage, read these battery precautions onhandling, charging, and disposing Li-Ion batteries.
! Keep the battery away from heat sources including direct sunlight, open fires,microwave ovens, and high-voltage containers. Temperatures over 140º F(60ºC) may cause damage.
! Do not drop or impact the battery.
! Do not disassemble the battery.
! Do not solder the battery.
! Do not puncture the battery.
! Do not use a battery that appears damaged or deformed, has any rust on itscasing, is discolored, overheats, or emits a foul odor.
! Keep the battery dry and away from water.
! Keep metal objects away from battery connectors. Metal objects in contactwith the connectors can cause a short circuit and damage.
If the battery leaks:
! If the battery leaks onto skin or clothing, wash the area immediately withclean water. Battery fluid can cause a skin rash and damage fabric.
! If battery fluid gets into eyes, DO NOT rub; rinse with clear water immediatelyand consult a doctor.
! Take extra precautions to keep a leaking battery away from fire. There is adanger of ignition or explosion.
Precautions for Recharging the Battery
Adhere to the following precautions when recharging the main battery.
! Use only the NEC battery charger designed for your NEC Versa battery type.Different NEC Versa models require different batteries and battery chargers.
! Charge the battery for the specified charge time only.
! During charging, keep the environmental temperature between 41°F and 95°F (5°Cto 35°C).
! Read the instructions that came with the battery charger before charging the battery.

Getting Started 2-11
System BatteriesYour NEC Versa is equipped with a main, Lithium-Ion battery and two backupbatteries that help to prevent data loss.
Main Battery
The eight-cell or twelve-cell Lithium-Ion (Li-Ion) battery provides the main powersource in your NEC Versa SXi computer. See Appendix B for a list of batteryspecifications. In addition to this battery, the CMOS battery and bridge battery alsoprovide system power.
CMOS Battery
This lithium battery provides battery backup and prevents data loss in the system’scomplementary metal oxide semiconductor (CMOS) RAM. This memory area containsinformation on the system’s configuration, for example, date, time, drives, andmemory. The CMOS battery charges when your NEC Versa is connected to AC power.The CMOS battery may discharge completely if the NEC Versa notebook remainsunused for an extended period of time.
Bridge Battery
The bridge battery saves your system status in Standby (Windows 98/2000) or Suspend(Windows NT) mode, giving you time to install a fully charged battery or plug in ACpower when your battery charge becomes low.
The bridge battery should be replaced only by an authorized NECC technician.
Connect your NEC Versa system to AC power for a full 24hours before using it on battery power for the first time. Doing so insures that the bridgebattery is fully charged and that no data is lost during a battery change.
2-12 Getting Started
System CareThe NEC Versa is a durable, dependable system built for extensive use and travel.Follow these guidelines to maintain the condition and performance of your computer.
Immediately turn off and unplug the NEC Versa under thefollowing conditions:
! The power cord is damaged or frayed.
! Liquid spills on or into the NEC Versa.
! Someone drops the system or damages the casing.
Precautions for System Use
Follow these precautions when using your NEC Versa SXi computer, AC adapter, andVersaBay III.
! Avoid dropping or bumping the computer or the AC adapter.
! Do not stack heavy objects on the computer, the AC adapter, or the battery packs.
! Avoid moving the NEC Versa during system operation, especially while the harddisk or VersaBay III device is being accessed.
! When using the AC adapter, make sure the power source falls within the system’scompatible range of 100-240 volts AC. Never use the AC adapter if the voltage fallsoutside of this range. (Watch for this when traveling to other countries.)
! Turn computer power off before attaching or removing non-plug and play devices.
! Do not push any foreign objects into the NEC Versa bays, connectors, and slots.
! Do not set the computer on top of a magnetized area. Doing so can destroy the dataon your hard disk drive. (Some airline tray tables are magnetic.)
! Avoid using the computer or AC adapter for extended periods in direct sunlight.
! Do not use the system in humid or dusty environments.
! Turn computer power off before cleaning it.
! Avoid exposing the NEC Versa or AC adapter to extreme changes in temperature orhumidity. If it is unavoidable, allow your NEC Versa to adjust to room temperaturebefore use.
! When cleaning the system, use a soft, clean, dry cloth. Avoid wiping the displaysurface with abrasive material, including rough fabric. Do not use a cleaningsolution; this may damage the notebook’s plastic.
! If the AC adapter becomes extremely hot, unplug the adapter and let it cool.
! Keep the AC adapter away from the IR ports.

Getting Started 2-13
Storage Requirements
Store the computer and AC adapter in an environment that meets the followingconditions:
If the temperature of the NEC Versa suddenly rises or falls (forexample, when you move the system from a cold place to a warm place), vaporcondenses inside the system. Turning on the system under this condition can damagethe internal system components.
Before turning on the system, wait until the system’s internal temperature equalizes withthe new environment and any internal moisture can evaporate.
! Maintain storage temperatures between -4°F and 104°F (-20°C and 40°C).
! Keep the storage area free from vibration and magnetic fields.
! Keep the system and its components away from organic solvents or corrosive gases.
! Avoid leaving the system and its components in direct sunlight or near heat sources.
Routine Cleaning
Clean or dust your system as follows:
Never use harsh solutions, household cleaners, or spraycleaners that contain caustic materials on the NEC Versa computer.
These cleaners are usually high in alkalinity which is measured in pH. Using thesecleaners can cause the plastic surface to crack or discolor.
! LCD screen — Carefully wipe the LCD screen with a soft cloth or a screen wipedesigned for that purpose. Special screen wipes are available through your localcomputer dealer.
! System case — NECC recommends that you carefully wipe the case with a slightlydamp, almost dry cloth.

3Using the BIOS Setup Utility
! Introducing BIOS Setup
! Entering BIOS Setup
! Checking/Setting System Parameters
! Managing System Power
! Updating the BIOS
! Identifying the Switch Settings

3-2 Using the BIOS Setup Utility
Introducing BIOS SetupYour NEC Versa SXi computer comes with a hardware program called BIOS Setupthat allows you to view and set system parameters. BIOS Setup also allows you to setpassword features that protect your system from unauthorized use.
Use BIOS Setup to:
! set the current time and date
! customize your operating system to reflect your computer hardware
! secure your system with a password
! balance your performance needs with power conservation.
Entering BIOS SetupAccess the BIOS utility at power-on. Just press F2 when the following prompt appears.
Press <F2> to Enter BIOS Setup.
When you press F2 to enter BIOS Setup, the system interrupts the Power-On Self-Test(POST) and displays the current CMOS RAM settings.
If the system detects an error during POST, it prompts you with a double beep and amessage: “Press <F1> to resume.” If you press F1, the system enters BIOS Setupautomatically. If you want to fix the error, carefully read the error message that appearsabove the prompt (taking notes if you want), and press F2. You will see this message ifyour CMOS battery becomes fully discharged.
Pausing the Screen
To pause the screen during POST to view the BIOS revision number and other POSTmessages, press and hold the Insert key while using the Power button to power on thesystem. The message “<Ins> pressed, Press F1 to run setup” appears. Press F1 to enterBIOS Setup. To pause the screen without entering the BIOS setup, simply press thePause key during POST. Once paused, press any key to continue.

Using the BIOS Setup Utility 3-3
BIOS Setup Main Menu
After you press F2, the system displays the BIOS Setup Main Menu screen, similar tothe following.
BIOS Setup Main Menu
Use the up and down arrow keys (located on the lower right corner of the keyboard) totoggle through the BIOS Setup menu items. Press Enter to activate a selection.
Looking at Screens
BIOS setup screens have three areas as described next.
! Parameters — The left side of the screen. This area lists parameters and theircurrent settings.
! Available Options and Help — The right side of the screen. This area lists alternatesettings and Help text for each parameter.
! Key Legend — The bottom right corner of the screen. These lines display the keysthat move the cursor and select parameters.
Options that are grayed out are not available for the current selection.
3-4 Using the BIOS Setup Utility
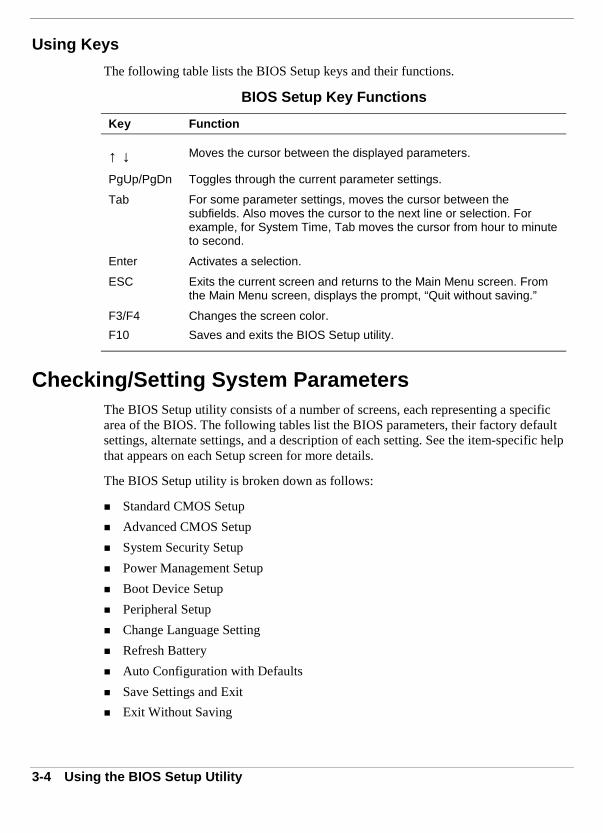
Using Keys
The following table lists the BIOS Setup keys and their functions.
BIOS Setup Key Functions
Key Function
↑ ↓ Moves the cursor between the displayed parameters.
PgUp/PgDn Toggles through the current parameter settings.
Tab For some parameter settings, moves the cursor between thesubfields. Also moves the cursor to the next line or selection. Forexample, for System Time, Tab moves the cursor from hour to minuteto second.
Enter Activates a selection.
ESC Exits the current screen and returns to the Main Menu screen. Fromthe Main Menu screen, displays the prompt, “Quit without saving.”
F3/F4 Changes the screen color.
F10 Saves and exits the BIOS Setup utility.
Checking/Setting System ParametersThe BIOS Setup utility consists of a number of screens, each representing a specificarea of the BIOS. The following tables list the BIOS parameters, their factory defaultsettings, alternate settings, and a description of each setting. See the item-specific helpthat appears on each Setup screen for more details.
The BIOS Setup utility is broken down as follows:
! Standard CMOS Setup
! Advanced CMOS Setup
! System Security Setup
! Power Management Setup
! Boot Device Setup
! Peripheral Setup
! Change Language Setting
! Refresh Battery
! Auto Configuration with Defaults
! Save Settings and Exit
! Exit Without Saving

Using the BIOS Setup Utility 3-5
Resetting System Parameters
To reset all parameters to the default settings, highlight and press Enter to select AutoConfiguration with Defaults from the BIOS Setup Main Menu. Use the arrow keys toselect Yes and press Enter.
Standard CMOS Setup
Use the Standard CMOS Setup screen to view the System Time, System Date and tomodify drive parameters and related settings.
Standard CMOS Setup
Parameter Default Setting Alternate Setting(s)
Date mm/dd/yyyy
System Memory (automatically detected)
Time hh/mm/ss
Diskette Drive A 1.44 MB, 3 1/2 Not installed
Internal Auto CD/DVD, SuperDsk, NotInstalled, User Defined
VersaBay Auto CD/DVD, SuperDsk, NotInstalled, User Defined
Boot Sector VirusProtection
Disabled Enabled
! Date — Sets your NEC Versa’s calendar month, day and year. These settingsremain in memory even after you turn off system power.
To set the date use the Tab or arrow keys to move from field to field. Use the PgUpor PgDn key to change the numbers within each field.
! System Memory — Displays the amount of system memory currently installed inyour system.
! Time — Sets the time, enter the current hour, minute, and second in hr/min/sec,24-hour format.
To set the time use the Tab or arrow keys to move from field to field. Use the PgUpor PgDn key to change the numbers within each field.
! Diskette Drive — Designates the drive type for your diskette drive.
! Internal Devices — Assigns devices to the internal drive and VersaBay device inyour system.

3-6 Using the BIOS Setup Utility
! Boot Sector Virus Protection — Write protects the boot sector of the hard disk driveto avoid infection by some virus types.
Advanced CMOS Setup
Use the Advanced CMOS Setup to set the following functions.
Advanced CMOS Setup
Parameter Default Setting Alternate Setting(s)
LCD Panel ViewExpansion
On Off
PS/2 Port Warm Swap Enabled Disabled
Internal Mouse Enabled Auto, Disabled
Graphics Aperture Size 256 MB 4, 8, 16, 32, 64, 128 MB
! LCD Panel View Expansion — Specifies whether the panel view is reduced/off orexpanded/on.
! PS/2 Port Warm Swap — Specifies whether or not you can swap a PS/2 deviceduring system suspension.
! Internal Mouse — Specifies whether or not you can use both the internal and theexternal mouse.
! Graphics Aperture Size — Selects the graphics aperture size used by the AGP videodevice, a memory window that optimizes access to accelerated graphics memory.

Using the BIOS Setup Utility 3-7
System Security Setup
Use the System Security Setup to establish system passwords.
System Security Setup
Parameter Default Setting Alternate Setting(s)
Assign SupervisorPassword
Press Enter
Assign User Password Press Enter
Boot Password Required Yes No
Resume PasswordRequired
Yes No
Assign HDD Password Press Enter
Internal HDD Password Disabled Enabled
VersaBay HDD Password Disabled Enabled
! Assign Supervisor Password — Establishes password protection for entering theBIOS Setup utility, booting the system, and resuming from Standby. (Resume fromStandby, not applicable in Windows 98/2000 with ACPI.)
! Assign User Password — Establishes a user password once a supervisor passwordis set.
! Boot Password Required — Indicates whether or not a password is required duringsystem boot.
! Resume Password Required — Indicates whether or not a password is requiredduring system resume. Boot Password must be defined to activate this parameter.
! Assign HDD Password — Allows you to assign a password to allow or restrictaccess to the hard disk drive contents.
! Internal HDD Password — Enables or disables the HDD password.
! VersaBay HDD password — Enables or disables the VersaBay III password.
Establishing System Passwords
To establish password protection for entering the BIOS Setup utility or accessing thesystem at startup, you must set the supervisor password before setting a user password.
! To enter a password simply select Assign Supervisor Password, enter the password,re-enter the password to confirm, and press any key to continue. Repeat theprocedure to set the user password.

3-8 Using the BIOS Setup Utility
! To initiate password protection while you step away from your system, simply pressCtrl, Alt, Backspace. The Caps lock and Scroll lock LEDs alternately flashindicating that you must enter a password to resume operation.
In Windows 98, to establish password protection for resuming from Standby orHibernation modes you must do the following:
! Set a Windows password in Control Panel, Password Properties, ChangePasswords.
! Enable the option “Prompt for password when the computer goes off standby,” inControl Panel, Power Management Properties, Advanced.
In Windows 2000, to establish password protection for resuming from Standby orHibernation modes you must do the following:
! Press Ctrl, Alt, Del and select Change Password.
! Enable the option “Prompt for password when the computer goes off standby,” inControl Panel, Power Options Properties, Advanced.
Hard Disk Drive Passwords
Your NEC Versa allows you to establish password protection for the internal hard diskdrive and for an optional hard disk drive installed in the NEC VersaBay III. Hard diskdrive (HDD) password protection restricts access to the drive, only if the drive isremoved from your NEC Versa and installed in another system. You are not required toenter your hard disk drive passwords while the drive remains in your current system.
The HDD passwords are written to the system BIOS and to the hard disk drive toensure that the password protection travels with the drive when moved from system tosystem.
Establishing Hard Disk Drive Passwords
To establish password protection for your system’s hard disk drive you must establish amaster password, establish a user password, and enable the established passwords forthe internal HDD and for an HDD installed in the NEC VersaBay III. Follow thesesteps to establish HDD passwords and to enable HDD password protection.
1. Enter the BIOS setup, highlight and select the System Security Setup.
2. Highlight Assign HDD Password and press Enter.
The system prompts you to enter a master password.
3. Enter a master HDD password and press Enter.
The system prompts you to enter the password again to verify.
Using the BIOS Setup Utility 3-9
4. Enter the master password and press Enter.
The system confirms the creation of the master password and prompts you to entera user password.
5. Enter a user password and press Enter.
The system prompts you to enter the password again to verify.
6. Enter the user password and press Enter.
7. Highlight and select Internal HDD Password and use the PgUp/PgDn keys toenable the selection. (Follow this step to enable password protection for theinternal HDD.)
8. Highlight and select VersaBay HDD Password and use the PgUp/PgDn keys toenable the selection. (Follow this step to enable password protection for an HDDinstalled in the NEC VersaBay III.)
Changing Hard Disk Drive Passwords
To change hard disk drive passwords, enter the System Security Setup, highlightInternal HDD Password and enter the current password that you wish to change. If youenter the current master password, you are prompted to enter a new master password. Ifyou enter the current user password, you are prompted to enter the new user password.If you do not wish to establish a new master or user password, press Esc instead ofentering a new password. Save your changes and exit BIOS setup.
Using Hard Disk Drive Password Protection
To facilitate the transfer of one or more HDDs between systems, establish a singlemaster password (and store the password in a secure place). Forgetting your masterpassword results in the inability to access the data on your hard drive. Establishdifferent user passwords to limit access to specific systems.
If you set the master and user password on a hard drive, thepasswords can never be removed. They can be changed. If the master password isforgotten and the drive is installed in another system, you cannot access the data on thehard drive.
If the hard drive is installed in another NEC Versa system with hard disk drive securityenabled, the password must be entered to allow access to the hard drive. If this NECVersa system does not support hard disk drive security, you cannot access thedata on the hard drive.
With hard disk drive security enabled on the original NEC Versa system, the systemboots normally.

3-10 Using the BIOS Setup Utility
If the hard drive is installed in another NEC Versa system with security enabled, youmust enter the master password to access the hard disk drive. If the hard drive isinstalled in another NEC Versa system with security disabled, you are prompted toenter the master password and then a new user password.
Moving the Hard Disk Drive
When a password protected HDD is moved from its original system and installed inanother system and the system is powered on, error messages appear indicating that thedrive is locked. Next, the Security Setup screen appears requiring the user to enter themaster password to unlock the drive. To unlock the drive, highlight the HDD passwordline and enter the master password, when prompted.
If you wish to move an HDD from one system to another, follow steps 1 through 6 inthe section, “Establishing Hard Disk Drive Passwords,” before installing the HDD in adifferent system. Install the HDD in the desired system, then follow steps 7 and 8, asdesired, to establish HDD protection.
To take advantage of HDD password protection in another system, the system must beequipped with the same HDD password protection feature. To determine if the systemhas HDD password, check the System Security Setup in the BIOS setup to see if thereare provisions for establishing HDD passwords.
Power Management Setup
If your Versa SXi system ships with the Windows 98/2000 operating system, theAdvanced Configuration and Power Interface (ACPI) controls most power managementfunctions through the Power Management Properties screen in Windows 98 (PowerOptions Properties screen in Windows 2000). For details about ACPI powermanagement, see the section, “Managing System Power,” later in this chapter. TheBIOS Power Management Setup screen is described next. Use SystemSoft’sPowerProfiler to manage power in the Windows NT environment. Access thePowerProfiler icon on the Windows NT taskbar.
Use the Power Management Setup to balance high performance and energyconservation.
Power Management Setup
Parameter DefaultSetting
Alternate Setting(s)
System Switch Power Button Sleep Button
Power Managementunder AC
Off On
Power Savings Level Longest Life High Perform/Custom/Off
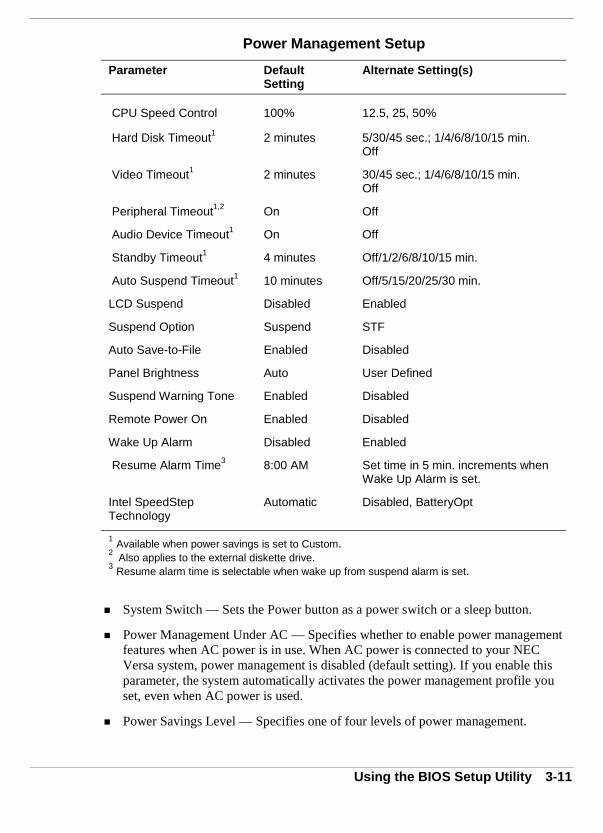
Using the BIOS Setup Utility 3-11
Power Management Setup
Parameter DefaultSetting
Alternate Setting(s)
CPU Speed Control 100% 12.5, 25, 50%
Hard Disk Timeout1 2 minutes 5/30/45 sec.; 1/4/6/8/10/15 min.Off
Video Timeout1 2 minutes 30/45 sec.; 1/4/6/8/10/15 min.Off
Peripheral Timeout1,2 On Off
Audio Device Timeout1 On Off
Standby Timeout1 4 minutes Off/1/2/6/8/10/15 min.
Auto Suspend Timeout1 10 minutes Off/5/15/20/25/30 min.
LCD Suspend Disabled Enabled
Suspend Option Suspend STF
Auto Save-to-File Enabled Disabled
Panel Brightness Auto User Defined
Suspend Warning Tone Enabled Disabled
Remote Power On Enabled Disabled
Wake Up Alarm Disabled Enabled
Resume Alarm Time3 8:00 AM Set time in 5 min. increments whenWake Up Alarm is set.
Intel SpeedStepTechnology
Automatic Disabled, BatteryOpt
1 Available when power savings is set to Custom.2 Also applies to the external diskette drive.3 Resume alarm time is selectable when wake up from suspend alarm is set.
! System Switch — Sets the Power button as a power switch or a sleep button.
! Power Management Under AC — Specifies whether to enable power managementfeatures when AC power is in use. When AC power is connected to your NECVersa system, power management is disabled (default setting). If you enable thisparameter, the system automatically activates the power management profile youset, even when AC power is used.
! Power Savings Level — Specifies one of four levels of power management.

3-12 Using the BIOS Setup Utility
— High Performance — provides good battery life and best performance with onlyminimal power conservation. Use while on the road or traveling short distances.
— Longest Life — provides best battery life, the maximum amount of powersavings, and good performance. Use while traveling long distances.
— Off — disables power management and all device timeouts. Works well in anoffice environment while powering your NEC Versa with AC power.
— Custom — lets you define power management levels and specific devicetimeouts according to your own needs and present environment. Custom letsyou set the following timeouts.
Custom Timeout Options
Option Definition
CPU Speed Control Sets CPU performance at one of four levels.
Hard Disk Timeout Sets the time delay before your hard disk powersdown.
Video Timeout Sets the time delay before your video powers off.
Peripheral Timeout Sets the time delay before your peripherals arecontrolled by power management.
Audio DeviceTimeout
Enables and disables audio timeout.
Standby Timeout Selects the system standby timeout period.
Auto SuspendTimeout
Defines how much time elapses from the time thesystem enters Standby mode to the time the systemautomatically enters Suspend mode.
! LCD Suspend — Allows you to suspend/resume when the LCD panel is closed.
! Suspend Option — Specifies either Suspend or Save to File (STF) when the LCDSuspend parameter is enabled. For more details about using this parameter, see thesection, “Managing System Power,” later in this chapter.
! Automatic STF — Enables the system, after 30 minutes in Suspend mode, to savethe current working environment to a special file on the hard disk and to powerdown the system.
For details about creating the save-to-file area, see the section, “HDPREPEZUtility,” in Chapter 4.
! Panel Brightness — Selects the LCD screen brightness.

Using the BIOS Setup Utility 3-13
! Suspend Warning Tone — Specifies whether the system warning tone sounds whenSuspend mode starts. It is best to keep this option enabled.
! Remote Power On — Allows the modem or LAN to wake the system on a ringsignal.
! Wake Up from Suspend Alarm/Resume Alarm Time — Allows the alarm to resumethe system from suspend. Designates the time parameter in five minutes increments.(Not applicable in Windows 98/2000 with ACPI.)
! Intel SpeedStep™ Technology — Optimizes CPU performance when the system ispowered under AC or by battery.
Boot Device Setup
Boot Device Setup allows you to define the following functions.
Boot Device Setup
Parameter Default Setting Alternate Setting(s)
Quick Boot Enabled Disabled
Silent Boot Enabled Disabled, Black
Boot Display Device Simul. Mode CRT only, LCD only
BootUp NumLock Auto On, Off
1st Boot Device1 SuperDsk Disabled/1st Fnd IDE/FloppyCD/DVD/SCSI/Network
2nd Boot Device1 CD/DVD Disabled/1st FndIDE/Floppy/SuperDsk
3rd Boot Device1 Floppy Disabled/1st Fnd IDE/SuperDskCD/DVD
4th Boot Device1 1st Fnd IDE Disabled/Floppy/SuperDskCD/DVD
Try Other Boot Devices Yes No
1st IDE Hard Drive Internal VersaBay
2nd IDE Hard Drive VersaBay Internal
1 Bootable device when set to IDE hard drive. Only one IDE device is bootable.
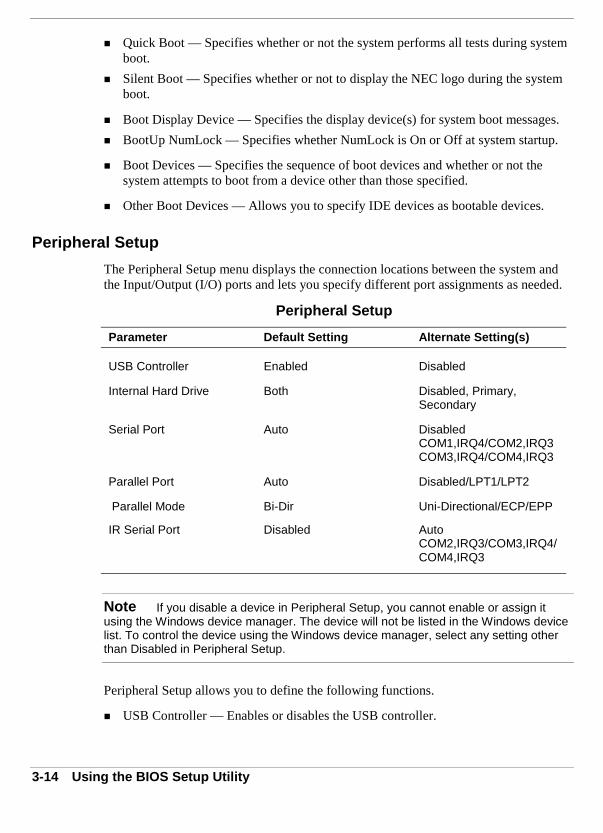
3-14 Using the BIOS Setup Utility
! Quick Boot — Specifies whether or not the system performs all tests during systemboot.
! Silent Boot — Specifies whether or not to display the NEC logo during the systemboot.
! Boot Display Device — Specifies the display device(s) for system boot messages.
! BootUp NumLock — Specifies whether NumLock is On or Off at system startup.
! Boot Devices — Specifies the sequence of boot devices and whether or not thesystem attempts to boot from a device other than those specified.
! Other Boot Devices — Allows you to specify IDE devices as bootable devices.
Peripheral Setup
The Peripheral Setup menu displays the connection locations between the system andthe Input/Output (I/O) ports and lets you specify different port assignments as needed.
Peripheral Setup
Parameter Default Setting Alternate Setting(s)
USB Controller Enabled Disabled
Internal Hard Drive Both Disabled, Primary,Secondary
Serial Port Auto DisabledCOM1,IRQ4/COM2,IRQ3COM3,IRQ4/COM4,IRQ3
Parallel Port Auto Disabled/LPT1/LPT2
Parallel Mode Bi-Dir Uni-Directional/ECP/EPP
IR Serial Port Disabled AutoCOM2,IRQ3/COM3,IRQ4/COM4,IRQ3
Note If you disable a device in Peripheral Setup, you cannot enable or assign itusing the Windows device manager. The device will not be listed in the Windows devicelist. To control the device using the Windows device manager, select any setting otherthan Disabled in Peripheral Setup.
Peripheral Setup allows you to define the following functions.
! USB Controller — Enables or disables the USB controller.

Using the BIOS Setup Utility 3-15
! Internal Hard Drive — Enables or disables the IDE controller.
! Serial Port — Disables the port or changes its IRQ and COM port assignment.
! Parallel Port/Parallel Mode — Disables or reassigns the parallel port and selects aparallel port mode.
! IR Serial Port — Enables, disables or reassigns the IR serial port.
Other BIOS Setup Options
BIOS Setup offers other options, including the following:
! Change Language Setting — Controls the BIOS setup language display. Englishand French are the available options.
! Refresh Battery — Launches the Refresh Battery utility. Once launched, the utilityfully discharges your battery to eliminate any residual memory effect. Oncerefreshed, your battery is conditioned to recharge to its full capacity. To rechargethe battery, connect your NEC Versa to AC power. This process may take up tofour hours to complete.
! Auto Configuration with Defaults — Loads default settings.
! Save Settings and Exit — Accepts changes made to current settings, saves toCMOS, and exits BIOS Setup.
! Exit Without Saving — Reverts to previously selected settings and exits Setup.
3-16 Using the BIOS Setup Utility
Managing System PowerIn the Windows 98/2000 environment, your NEC Versa manages its power resourcesusing the Advanced Configuration and Power Interface (ACPI) while the system ispowered on using AC or DC (battery) power. ACPI enables the operating system tomanage the power given to each attached device and to turn off a device when not inuse.
In the Windows NT environment, your NEC Versa also uses SystemSoft’sPowerProfiler to manage power resources and to balance performance with batteryconservation. Access PowerProfiler via its taskbar icon or via the Programs menu.
Take advantage of the opportunity to manage power on your system to:
! Minimize battery drain.
! Preserve the life of your NEC Versa.
! Save time. When you return from that urgent call or meeting, you don’t have toreboot, just press the Power button to resume system operation.
Windows 98 Power Management Properties
In Windows 98, most ACPI power management settings are controlled throughWindows Power Management Properties, not through the BIOS Setup Utility, unlessotherwise noted. To access Windows Power Management Properties, go to Start,Settings, Control Panel, and double click Power Management.
The Power Management Properties features are broken down as follows:
! Power Schemes
! Alarms
! Power Meter
! Advanced
! Hibernate

Using the BIOS Setup Utility 3-17
Windows 98 Power Schemes
Use the Power Schemes options to define the appropriate Power scheme for yoursystem, and to set timeouts for standby, LCD panel, and hard disk. Define parametersfor your system when running under AC or DC (battery) power.
Power Schemes
Parameter Default Setting Alternate Setting(s)
Power Schemes Portable/Laptop Home/Office Desk,Always On
System Standby(Plugged In)
After 20 Minutes 1, 2, 3, 5, 10, 15, 20, 25,30, 45 minutes; 1, 2, 3, 4,5 hours; Never
System Standby(Running on batteries)
After 5 Minutes1, 2, 3, 5, 10, 15, 20, 25,30, 45 minutes; 1, 2, 3, 4,5 hours; Never
Turn off monitor(Plugged In)
After 15 Minutes 1, 2, 3, 5, 10, 15, 20, 25,30, 45 minutes; 1, 2, 3, 4,5 hours; Never
Turn off monitor(Running on batteries)
After 2 Minutes 1, 2, 3, 5, 10, 15, 20, 25,30, 45 minutes; 1, 2, 3, 4,5 hours; Never
Turn off hard disks(Plugged In)
After 30 Minutes 3, 5, 10, 15, 20, 25, 30, 45minutes; 1, 2, 3, 4, 5hours; Never
Turn off hard disks(Running on batteries)
After 3 Minutes 3, 5, 10, 15, 20, 25, 30, 45minutes; 1, 2, 3, 4, 5hours; Never
! Power schemes — Defines the most appropriate power scheme for your computer.
! System standby — Selects the system standby timeout period for your system whenrunning under AC or DC power.
! Turn off monitor — Selects the time delay before your LCD panel turns off.
! Turn off hard disks — Selects the time delay before your hard disk(s) power down.

3-18 Using the BIOS Setup Utility
Windows 98 Alarms
Use the Alarms screen to define when the battery alarm activates. Define the alarm toeither sound, display a warning message, or invoke Standby, Hibernate or Shutdown.
Alarms
Parameter Default Setting Alternate Setting(s)
Low battery alarm 10% 0-100%
Alarm Action Notification Display message Sound alarm
Alarm Action Power level none Standby, Hibernate,Shutdown
Critical battery alarm 3% 0-100%
Alarm Action Notification Display message Sound alarm
Alarm Action Power level Standby Hibernate, Shutdown,none
! Low battery alarm — Defines a low battery alarm percentage, notification, andsystem action.
! Critical battery alarm — Defines a critical battery alarm percentage, notification,and system action.
Windows 98 Power Meter
The Power Meter screen displays the remaining battery power and charging status forthe primary and secondary batteries. Choose to display either a percentage progress baror a battery icon with percentage indicator for your battery status information.

Using the BIOS Setup Utility 3-19
Windows 98 Advanced
The Advanced window allows you to select behaviors for the taskbar icon, standbypassword, LCD panel, when closed, and the Power button.
Advanced
Parameter Default Setting Alternate Setting(s)
Always show icon ontaskbar
checked unchecked
Prompt for passwordwhen computer goes offstandby
unchecked checked
When I close the lid on mycomputer
Standby Hibernate, Shutdown,None1
When I press the Powerbutton on my computer
Shutdown Standby, Hibernate
1 When None is selected, LCD panel turns off when closed.
! Always show icon on the taskbar — Determines whether or not the Power Metericon displays on the taskbar.
! Prompt for password when computer goes off standby — Determines whether ornot the system prompts for your Windows password when resuming from Standby.
! When I close the lid of my computer — Defines the system action when the LCDpanel is closed.
! When I press the Power button on my computer — Defines the system action whenthe Power button is used.
Windows 98 Hibernate
Use the Hibernate window to enable hibernate support. When your system hibernates itperforms a save-to-disk or save-to-file (STF). Your current working environment issaved to the hard disk. Use the Power button to resume from hibernation and yoursystem returns to its previous state.

3-20 Using the BIOS Setup Utility
Windows 2000 Power Options Properties
In Windows 2000, most ACPI power management settings are controlled throughWindows Power Options Properties, not through the BIOS Setup utility. To accessWindows 2000 Power Options Properties, go to Start, Settings, Control Panel, anddouble click Power Options.
The Power Options Properties features are broken down as follows:
! Power Schemes
! Alarms
! Power Meter
! Advanced
! Hibernate
Windows 2000 Power Schemes
Use the Power Schemes options to define the appropriate Power scheme for yoursystem, and to set timeouts for standby, LCD panel, and hard disk. Define parametersfor your system when running under AC (plugged in) or DC (running on batteries)power.
Power Schemes
Parameter Default Setting Alternate Setting(s)
Power Schemes Portable/Laptop Home/Office Desk,Presentation, Always On,Minimal PowerManagement, Max Battery
Turn off monitor(Plugged In)
After 15 Minutes 1, 2, 3, 5, 10, 15, 20, 25,30, 45 minutes; 1, 2, 3, 4,5 hours; Never
Turn off monitor(Running on batteries)
After 5 Minutes 1, 2, 3, 5, 10, 15, 20, 25,30, 45 minutes; 1, 2, 3, 4,5 hours; Never
Turn off hard disks(Plugged In)
After 30 Minutes 3, 5, 10, 15, 20, 25, 30, 45minutes; 1, 2, 3, 4, 5hours; Never
Turn off hard disks(Running on batteries)
After 3 Minutes 3, 5, 10, 15, 20, 25, 30, 45minutes; 1, 2, 3, 4, 5hours; Never
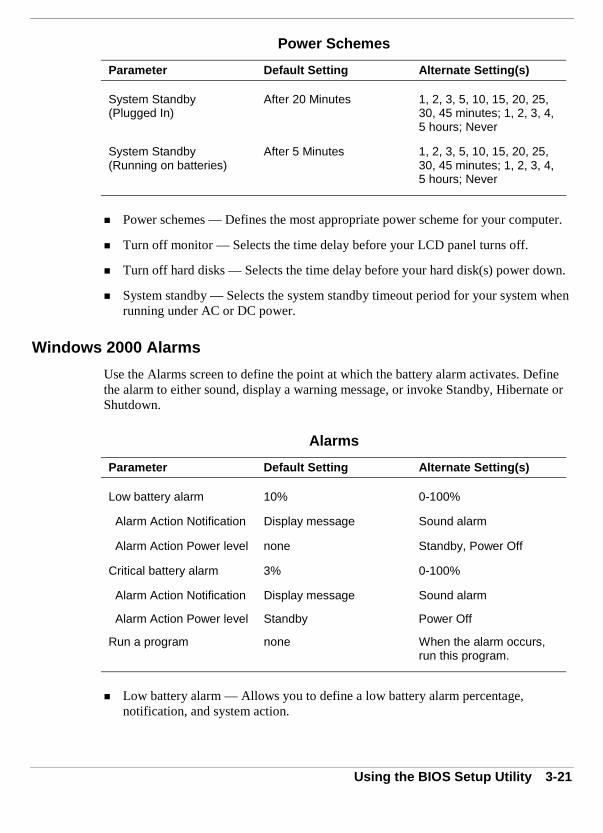
Using the BIOS Setup Utility 3-21
Power Schemes
Parameter Default Setting Alternate Setting(s)
System Standby(Plugged In)
After 20 Minutes 1, 2, 3, 5, 10, 15, 20, 25,30, 45 minutes; 1, 2, 3, 4,5 hours; Never
System Standby(Running on batteries)
After 5 Minutes 1, 2, 3, 5, 10, 15, 20, 25,30, 45 minutes; 1, 2, 3, 4,5 hours; Never
! Power schemes — Defines the most appropriate power scheme for your computer.
! Turn off monitor — Selects the time delay before your LCD panel turns off.
! Turn off hard disks — Selects the time delay before your hard disk(s) power down.
! System standby — Selects the system standby timeout period for your system whenrunning under AC or DC power.
Windows 2000 Alarms
Use the Alarms screen to define the point at which the battery alarm activates. Definethe alarm to either sound, display a warning message, or invoke Standby, Hibernate orShutdown.
Alarms
Parameter Default Setting Alternate Setting(s)
Low battery alarm 10% 0-100%
Alarm Action Notification Display message Sound alarm
Alarm Action Power level none Standby, Power Off
Critical battery alarm 3% 0-100%
Alarm Action Notification Display message Sound alarm
Alarm Action Power level Standby Power Off
Run a program none When the alarm occurs,run this program.
! Low battery alarm — Allows you to define a low battery alarm percentage,notification, and system action.

3-22 Using the BIOS Setup Utility
! Critical battery alarm — Allows you to define a critical battery alarm percentage,notification, and system action.
! Run a program — Allows you to run a specific program when an alarm occurs.
Windows 2000 Power Meter
The Power Meter screen displays the remaining battery power and charging status forthe primary and secondary batteries. Choose to display either a percentage progress baror a battery icon with percentage indicator for your battery status information.
Windows 2000 Advanced
The Advanced window allows you to select behaviors for the taskbar icon, standbypassword, LCD panel, when closed, and the Power button.
Advanced
Parameter Default Setting Alternate Setting(s)
Always show icon ontaskbar
unchecked checked
Prompt for passwordwhen computer goes offstandby
checked unchecked
When I close the lid on mycomputer
None1 Standby, Power Off
When I press the Powerbutton on my computer
Power Off Standby
1 When None is selected, LCD panel turns off when closed.
! Always show icon on the taskbar — determines whether or not the Power Metericon displays on the taskbar.
! Prompt for password when computer goes off standby — Determines whether ornot the system prompts for your Windows password when resuming from Standby.
! When I close the lid of my computer — Defines the system action when the LCDpanel is closed.
! When I press the Power button on my computer — Defines the system action whenthe Power button is used.
Using the BIOS Setup Utility 3-23
Windows 2000 Hibernate
Use the Hibernate window to enable hibernate support, see the amount of free diskspace, and the amount of disk space required to hibernate. When your systemhibernates it performs a save-to-disk or save-to-file (STF). Your current workingenvironment is saved to the hard disk. Use the Power button to resume fromhibernation and your system returns to its previous state.
Windows 98/2000 Power Management States
ACPI uses different levels or states of power management. The power managementstates occur automatically, based on the system’s default settings, or manually, wheninvoked. Settings are configurable to occur while on battery power or AC power.
The Windows 98/2000 ACPI power management states include:
! LCD timeout — manages power at the lowest level by shutting down the LCD.
! Standby — also known as Save-to-RAM (STR), Standby manages power by savingyour current working environment to memory and shutting down most systemdevices. Conserves more power than an LCD timeout.
! Hibernate — also known as Save-to-Disk, or Save-to-File (STF) manages power bysaving the current working environment to an area on your hard disk, then poweringoff your system. Conserves the most battery power.
Recognizing the Windows 98/2000 Power Management States
It is important to recognize your system’s behavior when in each of these powermanagement states. The following table describes the system behavior for each powermanagement state.

3-24 Using the BIOS Setup Utility
Windows 98/2000 Power Management Behavior
LCD Timeout Standby (STR) Hibernate (STF)
DefaultSetting
2 Minutes, DC power
15 Minutes, AC power
5 Minutes, DC power
20 minutes, AC power
30 minutes after Standby.1,2
ManuallyInvoke
Close LCD panel. Go to Start, Shutdown,Standby.
Close LCD panel.3
Press Power button.3
Systembehavior
LCD panel is blank.
Status LED lightsgreen.
LCD panel is blank.
Status LED blinks green.
LCD panel is blank.
Status LED turns off.
Progress bar indicates thatcurrent workingenvironment is saved tohard disk.
Resume Press any key. Press Power button. Press Power button.
Progress bar appearsduring process.
1 Only when BIOS “Suspend Option” set to STF and BIOS “Auto Save to File” set to enabled.2 Also when 3% battery power remaining, if BIOS set as in number 1.3 Only when set in Advanced Windows Power Management Properties.
Windows NT Power Management States
APM uses different levels or states of power management. These power managementstates occur automatically, based on your system’s default settings, or manually, wheninvoked. Settings are configured to occur while on battery power or on AC power.
The Windows NT APM power management states include:
! Standby — manages power at the lowest level by shutting down the LCD, hard diskdrive, and CPU.
! Suspend — also known as Save-to-RAM (STR), Suspend mode manages power bysaving your current working environment to memory and shutting down mostsystem devices. Conserves more power than Standby mode.
! Save-to-file (STF) — also known as Save-to-Disk, STF mode manages power bysaving the current working environment to an area on your hard disk, then poweringoff your system. Conserves the most battery power.

Using the BIOS Setup Utility 3-25
Recognizing the Windows NT Power Management States
It is important to recognize your system’s behavior when in each of these powermanagement states. The following table describes the system behavior for each powermanagement state.
Windows NT Power Management Behavior
Standby Suspend (STR) Save-to-File (STF)
DefaultSetting
4 Minutes 10 minutes after Standby. 30 minutes after Suspend.1,3
Manuallyinvoke
Fn-F4 Press Power button for lessthan 4 seconds2 orClick Start, Suspend.
Fn-Power
Systembehavior
LCD panel is blank.
Status LED lightsgreen.
LCD panel is blank.
Status LED blinks green.
Progress bar indicates thatcurrent working environmentis saved to memory.
LCD panel is blank.
Status LED turns off.
Progress bar indicates thatcurrent working environmentis saved to hard disk.
Resume Press any key Press Power button.
Progress bar appears duringprocess.
Press Power button.
Progress bar appears duringprocess.
1. Must configure Suspend Option in BIOS as STF.
2. Must configure System Switch in BIOS as Sleep button.
3. Automatic STF when there is only 3% power remaining in the system.

3-26 Using the BIOS Setup Utility
Updating the BIOSThe BIOS is code transmitted onto your system’s Flash ROM. As indicated in thischapter, you use the BIOS Setup utility to configure your system’s software andhardware features. Use the BIOS Update Diskette, for your specific model, to updateyour NEC Versa system BIOS.
Note You only need to update the BIOS if NECC makes significant improvementsor fixes to the current system BIOS. Your authorized NECC dealer or NECC SupportServices representative can help you determine this.
To update the system BIOS you must:
! Obtain the BIOS Update
! Prepare the BIOS Update Diskette
! Perform the BIOS Update
Obtaining the BIOS Update
If you are informed that the default BIOS needs an update contact Support Services at(800) 632-4525, Fax (801) 981-3133, or access the web site, www.nec-computers.comto obtain a copy of the BIOS update.
Note If you purchased and are using this computer outside the U.S. or Canada,please contact a local NECC or dealer in your country.
Preparing the BIOS Update Diskette
Before using the BIOS update diskette you must make the diskette BIOS flash ready.Refer to the readme.txt file on the diskette before using the diskette.
Follow these instructions to prepare the BIOS Update Diskette.
1. Scan your hard drive for any computer viruses.
2. Unlock the write protect notch on the diskette, if necessary.
3. Insert the diskette into the file bay drive.
Using the BIOS Setup Utility 3-27
4. Type a:install (where a: is the floppy diskette drive) at the DOS prompt and followthe on-screen instructions.
Install.bat copies the DOS system files from your hard drive onto the BIOS UpdateDiskette to make it BIOS flash ready.
The system prompts you when the process is complete.
5. Scan the BIOS Update Diskette for computer viruses.
The diskette is ready for use.
6. Follow the instructions later in this chapter, “Performing the BIOS Update.”
Performing the BIOS Update
Follow these steps to perform the BIOS update. Before you begin, be sure to:
! Connect the computer to AC power and power off the computer.
! Configure the Boot Device Setup to boot from a diskette.
! Document all customized BIOS settings.
1. Insert the BIOS Update diskette into the diskette drive.
2. Power on the computer with the diskette in the drive. The computer boots andautomatically loads the utility. A message similar to the following appears:
The NEC BIOS Update Utility should not be used to modify the BIOS in a Versasystem which is docked. If your Versa is docked, please exit the BIOS UpdateUtility, power down, and undock your Versa before running the utility. Plug in yourAC cable before restarting the flash utility.
3. Press Enter to continue.
The utility checks the currently installed BIOS version and the diskette’s BIOSversion. The Main menu appears.
4. Use the arrow keys to highlight the “Display BIOS Version” option on the MainMenu. Use this option to check the currently installed BIOS version and theversion of the new replacement BIOS.
Press any key to return to the Main menu.
5. Highlight the “Install New BIOS” option and press Enter.
6. Press Y and then press Enter. After a brief pause, a message appears telling you toremove the diskette from the drive.
3-28 Using the BIOS Setup Utility
7. Remove the diskette and press any key to continue. The utility updates the BIOS.
Power off your computer. The next time you power on your computer, you willhave the latest NEC Versa SXi computer BIOS revision level.
8. Power on your computer. A CMOS Checksum error message appears and promptsyou to press F1 to enter Setup.
9. Press F1 to enter Setup and restore the default parameter settings.
10. Be sure to modify any custom settings that you may have configured.
Identifying the Switch SettingsA four-position dip switch is located on the main board inside the system. Thefollowing list identifies each switch setting and its function.
! Switch 1 — Keyboard select; Default is “ON” for U.S. 85 key keyboard
! Switch 2 — Keyboard select; Default is “OFF” for U.S. 85 key keyboard
! Switch 3 — Logo select; Default is “OFF” for U.S.
! Switch 4, Password Override Switch — The default setting is “OFF.” If you forgetyour password and cannot access the data on your NEC Versa, change the setting to“ON” and your current password is erased.

4Using the Operating System and Utilities
! Windows Introduction
! NEC Utilities
! SpeedStep Applet
! Application and Driver CD
! NEC Info Center
! Partition Magic
! Product Recovery CD

4-2 Using the Operating System and Utilities
Windows IntroductionYour NEC Versa comes pre-installed with either the Windows 2000, Windows 98Second Edition (SE), or Windows NT operating system. These Microsoft® operatingsystems provide a means of running applications, navigating through your filestructure, and using your notebook computer. Each operating system offers its ownlook and employs its own tools through an easy-to-use graphical interface.
Windows 2000
Windows 2000 gives you the newest features offered by Microsoft, including aDesktop with room to maneuver, taskbar icons for quick access to installedapplications, a system performance and monitoring manager, enhanced entertainmentfeatures, and a fully integrated Internet experience.
Desktop Icons
With Windows 2000, the following icons are installed on your desktop:
! My Computer — Provides access to drives, printers, the control panel, networkfeatures, and scheduled tasks.
! Recycle Bin — Gives you a trash container in which to put and discard unwantedfiles or allows you to restore those same files back to their original location.
! My Network Places — When on a network, provides access to network printers andother computers on your network. Use My Network Places to browse through thecomputers in your workgroup and the computers in the entire network.
! My Documents — Provides you with a convenient place to store documents,graphics, and other files for quick access.
! Connect to the Internet — Runs the Internet Connection wizard that helps you to setup your computer to access the Internet.
Note Before connecting to the Internet, you must either connect an optional modemand a working phone line to your system or install a LAN card for network access.
Your NEC Versa comes with all the software you need to get started on the mostpopular services available today. For a fee, online services give you access to theInternet, email, the world wide web, travel information, news reports, and more.

Using the Operating System and Utilities 4-3
Note Before choosing and registering for an online service, you must connect anoptional modem to your system and to a working phone line. The phone line must beanalog. If you are unsure what type of line you have, call your local phone company.
If you are using this product outside of the United States or Canada, some onlineservices may require a long-distance or international call.
! NEC Customize — Gives you the option to launch the Application and Driver CD.
! Internet Explorer — Provides your default internet program. Also access InternetExplorer under Start, Programs, Internet Explorer.
Taskbar Icons
With Windows 2000, three icons appear on the taskbar. Use the cursor to hover overthe icon and display its function, right click the icon to display its menu options, ordouble click the icon to launch it.
The following icons normally appear on the left side of the Windows 2000 taskbar.
! Internet Explorer — Allows you to browse the internet or view local HTML files.Also access Internet Explorer under Start, Programs, Internet Explorer.
! Outlook Express — Provides your default email program with secure andpersonalized features for email and newsgroup communication. Also accessOutlook Express under Start, Programs, Outlook Express.
! Show Desktop — Minimizes all active screens to display your desktop.
See the Windows 2000 online help for detailed instructions on using Windows2000.
Windows 98 Second Edition
Windows 98 gives you the features offered by Microsoft, including a Desktop withroom to maneuver, a taskbar for quick access to a variety of system functions, state-of-the-art plug and play support, powerful system utilities, enhanced entertainmentfeatures, and a fully integrated Internet experience.
Desktop Icons
With Windows 98, the following icons are installed on your desktop:
! My Computer — Provides access to drives, printers, the control panel, networkfeatures, and scheduled tasks.
! Recycle Bin — Gives you a trash container in which to put and discard unwantedfiles or allows you to restore those same files back to their original location.

4-4 Using the Operating System and Utilities
! Internet Explorer — Allows you to browse the Internet or view local HTML files.Also access Internet Explorer under Start, Programs, Internet Explorer.
! Set Up the Microsoft Network — Provides a setup program that allows you to sign-up for the Microsoft Network. If you already have an account, use this interface tosign-on to the Microsoft Network.
! Network Neighborhood — Appears when your computer is connected to a network.Use the network neighborhood to browse through the computers in your workgroupand the computers in the entire network.
! My Briefcase — Provides a mechanism for file synchronization between the NECVersa and another system.
! My Documents — Provides you with a convenient place to store documents,graphics, and other files for quick access.
! Connect to the Internet — Runs the Internet Connection wizard that helps you to setup your computer to access the Internet.
Note Before connecting to the Internet, you must either connect an optional modemand a working phone line to your system or install a LAN card for network access.
! Online Services — Includes setup icons for a variety of online services.
Your NEC Versa comes with all the software you need to get started on the mostpopular services available today. For a fee, online services give you access to theInternet, email, the world wide web, travel information, news reports, and more.
Note Before choosing and registering for an online service, you must connect anoptional modem to your system and to a working phone line. The phone line must beanalog. If you are unsure what type of line you have, call your local phone company.
If you are using this product outside of the United States, some online services mayrequire a long-distance or international call.
! NEC Customize — Gives you the option to launch the Application and Driver CDor install the NEC VersaBay III Swap utility.
! Outlook Express — Provides your default email program with secure andpersonalized features for email and newsgroup communication. Also accessOutlook Express under Start, Programs, Internet Explorer.

Using the Operating System and Utilities 4-5
Taskbar Icons
With Windows 98, a number of icons appear on the taskbar. Use the cursor to hoverover the icon and display its function, right click the icon to display its menu options,or double click the icon to launch it.
The following icons normally appear on the left side of the Windows 98 taskbar.
! Internet Explorer — Allows you to browse the Internet or view local HTML files.Also access Internet Explorer under Start, Programs, Internet Explorer.
! Outlook Express — Provides your default email program with secure andpersonalized features for email and newsgroup communication. Also accessOutlook Express under Start, Programs, Internet Explorer.
! Show Desktop — Minimizes all active screens to display your desktop.
The following icons normally appear on the right side of the Windows 98 taskbar.
! Task Scheduler — Enables you to schedule tasks, such as Disk Defragmenter, torun regularly. Also access Task Scheduler under Start, Programs, Accessories,System Tools, Scheduled Tasks.
! Power Management Properties — Displays your current power source and totalremaining battery power. Access Power Management Properties under Start,Settings, Control Panel, Power Management.
! Infrared Monitor — Allows you to enable, disable, and control the infraredcommunication on your notebook computer.
! NEC VersaGlide — Allows you to adjust your VersaGlide (mouse) properties. Alsoaccess NEC VersaGlide under Start, Settings, Control Panel, Mouse.
! SpeedStep Applet — Allows you to customize high-performance computing onyour notebook computer. Only appears on systems with a SpeedStep equippedprocessor.
! Volume Control — Adjusts the volume and speaker balance when you play audiofiles. Also access Volume Control under Start, Programs, Accessories,Entertainment, Volume Control.
! Time Clock — Allows you to adjust the time and date, rearrange active windows onyour desktop, create a new toolbar or customize your existing toolbar.
For more information about the desktop and taskbar icons, refer to the Windows 98online help.

4-6 Using the Operating System and Utilities
Windows NT
Windows NT allows you to run applications created specially for Windows NT andWindows 95. You can also run applications created for other versions of Windows,MS-DOS®.
Windows NT gives you a variety of features offered by Microsoft, including a desktopto maneuver, a taskbar for quick navigation between open windows, and more. Thefollowing icons appear on the desktop.
! My Computer — Provides access to drives, printers, the Control Panel, and networkfeatures.
! Network Neighborhood — Appears when your computer is connected to a network.Use the network neighborhood to browse through the computers in your workgroupand the computers in the entire network.
! Inbox — Lets you access the Microsoft mail software and services.
! Internet Explorer — Allows you to browse the internet or view local HTML files.Also access Internet Explorer under Start, Programs, Internet Explorer.
! NEC Customize — Gives you the option to launch the Application and Driver CD,or install the NEC-supplied mouse driver.
! My Briefcase — Provides a mechanism for file synchronization between the NECVersa and another system.
! Recycle Bin — Gives you a trash container in which to put and discard unwantedfiles or allows you to restore those same files back to their original location.
NEC UtilitiesNECC provides several programs and routines designed to make your NEC Versa runmore efficiently.
The NEC utilities include:
! NEC Customize utility
! HDPREPEZ utility
NEC Customize Utility
In Windows 2000 systems, Windows 98 systems, and Windows NT systems, the NECCustomize utility gives you the option to install or launch:
! Application and Driver CD — You must use this option to install softwareapplications, drivers, etc.
! NEC VersaBay III Swap utility (Windows 98 only) — You must use this option totake advantage of hot swapping your VersaBay III devices.

Using the Operating System and Utilities 4-7
! NEC-supplied mouse driver (Windows NT only) — Use this option to takeadvantage of the VersaGlide features described in Chapter 4, “Using the SystemDrives and Bays.”
NEC Customize Utility Screen
The NEC Customize utility screen consists of the following.
! A window at the top half of the screen lists the available options.
! The window below the options list displays a description of each option when theoption is highlighted.
! The Launch button initiates a selected option when clicked.
! The More Info button provides an overview of the NEC Customize utility.
! The Exit button closes the NEC Customize utility.
Using the NEC Customize Utility
Follow these steps to use the NEC Customize Utility.
1. Double click the NEC Customize icon.
2. From the display window, select the desired option.
3. Click Launch to initiate the selected option.
4. Follow the on-screen instructions to process the selected option.
For some of the selected options you are prompted to reboot your system.
5. If necessary, click Exit to close the NEC Customize dialog box.
HDPREPEZ Utility
The power management state referred to as Save-To-File (STF) saves the system’scurrent working environment to the system’s hard drive, then powers down the systemto conserve battery power. The HDPREPEZ function creates a file large enough (512MB) to accommodate the entire memory contents of your system. The STF file iscreated the first time that you run your system’s setup program.
Note For more details about the HDPREPEZ utility, see the HDPREPEZ.TXT file inthe NECUTILS/HDPREP directory.

4-8 Using the Operating System and Utilities
Using HDPREPEZ with Windows 98
In Windows 98, run the HDPREPEZ utility if you increase the memory capacity inyour NEC Versa beyond the factory installed base memory or if you install a genericWindows 98 operating system.
Follow these steps to run the HDPREPEZ utility.
1. Power off and restart your NEC Versa.
2. At the statement “Starting Windows 98,” press F8.
3. From the Startup menu, select the “Safe Mode Command Prompt Only” option.
4. Enter MS-DOS. At the c: prompt, type cd \necutils\hdprep and press Enter tochange to the \necutils\hdprep directory.
5. Type HDPREPEZ and press Enter. The utility automatically prepares your NECVersa for the newly installed memory.
6. Power off your system and then power on. A file, large enough to accommodateyour system’s memory is created on the hard disk drive.
Using HDPREPEZ with Windows NT
If you install a generic Windows NT operating system on your NEC Versa SXi, use theApplication and Driver (A&D) CD to load the HDPREPEZ utility to increase the sizeof or to create the STF file. Follow the instructions on the A&D CD to run theHDPREPEZ utility.
SpeedStep AppletSome processors that ship with the NEC Versa SXi notebook computer include Intel’sSpeedStep technology that allows you to customize high-performance computing onyour NEC Versa to optimize processing speed and to conserve battery life.
If your processor is equipped with SpeedStep technology, an icon appears on yourtaskbar allowing you to adjust processing properties. However, the default settings arerecommended for optimal performance and battery conservation.
Application and Driver CDA variety of third-party software applications, drivers, utilities, internet browsers andthe NEC Info Center are provided on the Application and Driver (A&D) CD that shipswith your NEC Versa SXi system. Some of the drivers are already installed as part ofyour operating system environment. The additional software on the Application andDriver CD lets you take full advantage of your system resources.

Using the Operating System and Utilities 4-9
Use the Application and Driver CD to install the software of your choice. Somesoftware applications install their own desktop icon allowing quick access to theapplication. You can also access an application through the Start, Programs menu.
Launching the CD with Windows 98
Follow these procedures to launch the Application and Driver CD using NECCustomize with Windows 98.
1. Insert the Application and Driver CD into the CD-ROM drive.
2. Double click the NEC Customize icon, if necessary.
3. Highlight Launch Application and Driver CD.
4. Click launch.
The Application and Driver CD dialog box appears.
Launching the CD with Windows NT/2000
Follow these procedures to launch the Application and Driver CD using NECCustomize with Windows NT.
1. Insert the Application and Driver CD into the CD-ROM drive.
2. Double click the NEC Customize icon.
3. Select Launch Application and Driver CD.
4. Click Install to launch the CD.
The Application and Driver CD dialog box appears.
Application and Driver CD Dialog Box
The Application and Driver CD dialog box consists of the following components.
! Selection Tabs — Located just below the title bar, each tab represents a softwarecategory. The selection tabs include applications, drivers, utilities, internetbrowsers, and the NEC Info Center.
! Description — Located in the bottom portion of the dialog box, the text describesthe selected or highlighted software category or application, driver, etc.
! Install — Clicking the Install button installs the selected software.
! Exit — Clicking the Exit button closes the Application and Driver CD dialog box.
4-10 Using the Operating System and Utilities
Installing the Application and Driver CD Software
Once the Application and Driver CD dialog box appears, follow these steps to installthe desired software.
1. Click the selection tab of your choice.
2. Click the desired application, driver, or utility.
3. Click the Install button to install your selection.
Follow the on-screen instructions to install your selection.
4. Click Exit to close the Application and Driver CD dialog box.
5. Remove the CD from the CD-ROM drive when the installation is complete.
NEC Info CenterThe Application and Driver CD contains the NEC Info Center, a fully navigationalonline document that provides information for the traveling professional and thefeatures and specifications of your NEC Versa system.
Installing the NEC Info Center
To install the NEC Info Center simply follow the instructions, presented earlier in thischapter, for launching the A&D CD and installing the software. For the most currentversion of the NEC Versa SXi User’s Guide, check our web site at http://www.nec-computers.com/.
Uninstalling the NEC Info Center
Use one of the following methods to uninstall the NEC Info Center.
1. Use this method to uninstall the NEC Info Center using the Windows Add/RemovePrograms feature.
! Go to Start, Settings, Control Panel, and double click Add/Remove Programs.
! Use the scroll bar, if necessary, to display the NEC Info Center item.
! Highlight NEC Info Center and click the Add/Remove button.
! Select Automatic as the uninstall method and click Next.
! Click Finish to complete the uninstall.
! When the uninstall is complete, click OK and close the Control Panel window.

Using the Operating System and Utilities 4-11
2. Use this method to uninstall the NEC Info Center using the Wise uninstall feature.
! Access the C:\NEC INFO directory on your hard disk drive.
! Double click the unwise.exe file or icon to remove all files and directoriesassociated with the NEC Info Center.
Partition MagicDividing the hard disk drive into several partitions lets you efficiently organizeoperating systems, programs, and data. Partition Magic, included on the A&D CD thatships with your system, allows you to optimize hard disk drive space with an easy clickof the mouse. Visually create, format, shrink, expand, and move hard disk partitions inminutes.
Your NEC Versa with an internal hard disk drive consisting of a single FAT 32partition, drive C:. Use Partition Magic if you want to create multiple partitions andconvert your hard disk drive to FAT 16 partitions.
For systems running the Windows NT operating system, use the Disk Administrator inthe Administrative Tools menu to repartition your hard drive.
Before using Partition Magic, refer to the associated cautionarynotes on the Application and Driver CD. The cautionary notes contain importantinformation about designating the partitions on the hard disk drive.
The partitions must be properly designated before using the Product Recovery CD toreinstall your operating system. If the partitions on the hard disk drive are not properlydesignated, it will appear as though data loss has occurred after using the ProductRecovery CD.
Product Recovery CDThe Product Recovery CD contains the NEC Product Recovery utility that allows youto restore your system to its initial installations state.
If you determine that you need to restore your system to its initial installation statefollow the instructions provided here.
Note Only use the Product Recovery utility to restore your system to its initialinstallation state as a last resort. Check the problem checklist in Chapter 10 forinformation about solving problems before using the CD. The Product Recovery utilityprovides options that either remove or replace existing files, a process that may result indata loss.
4-12 Using the Operating System and Utilities
Before using the Product Recovery CD, enter the BIOS SetupUtility and restore the BIOS default settings. Save the default settings before exiting theBIOS Setup utility.
Guidelines for Using the Product Recovery CD
Follow these guidelines when using the Product Recovery CD.
! Use AC power.
! Remove all optional hardware such as PC cards, USB devices, printers, andmonitors.
Product Recovery CD Options
The Product Recovery CD and utility provides you with a number of choices. Move thecursor over each selection on the NEC Product Recovery utility screen to display adescription of the selection in the window at the right side of the screen.
! Restore System — Select this option to restore your hard disk drive to its initialinstallation state. Restore System allows you to restore your system in one of thefollowing ways.
— Full Disk Drive — Completely rebuilds your hard disk drive, destroying allexisting data in the process. Once you choose this option, you are prompted toconfirm your choice. When your choice is confirmed, the recovery proceedswithout requiring any intervention or responses on your part. Simply walk awayand return in about half an hour.
Note Use the Full Disk Drive restore option if your hard disk consists of onepartition (drive).
— Partition Only — Lets you preserve your existing hard disk drive partitionstructure and format only the primary partition without affecting the extendedpartition(s). Partition Only formats drive C: (of a multiple partitioned drive) andrestores drive C: to its initial installation state. Additional partitions, e.g., drivesD:, E:, etc., remain intact. For important information about partitioning yourhard disk drive, see the section, “Partition Magic,” earlier in this chapter.
Note Use the Partition Only restore option if your hard disk is partitioned into two ormore partitions (drives).
! Exit — Exits the NEC Product Recovery utility.

Using the Operating System and Utilities 4-13
Full Disk Drive Restore
If your preinstalled software becomes unusable and you cannot boot from the hard disk,use the Product Recovery Utility to restore your system to its initial shippingconfiguration. The Full Disk Drive restore option erases the hard disk completelybefore reinstalling the files.
The Full Disk Drive restore option deletes all files on the harddrive and replaces them with the original factory installed files.
Only use the Full Disk Drive restore option if the preinstalled software is unusable.
Use the Product Recovery utility to perform a Full Disk Drive restore as follows:
1. Check the Product Recovery CD title and make sure that it is the correct CD foryour NEC Versa computer and operating system.
2. Put the CD into the CD-ROM drive tray, close the drive door, and power on yoursystem.
3. Read the License Agreement screen that appears. Use the VersaGlide touchpad toposition the cursor on the Accept button. Left click to accept the agreement.
You have the option of accepting or declining the agreement. If you decline theagreement, the recovery utility exits.
4. In the NEC Product Recovery utility screen, use the VersaGlide touchpad tochoose Full Disk Drive to restore your hard disk drive to its original factoryinstalled state.
Choose your restore option carefully to prevent losing data andapplications installed on your system.
5. Read the Warning screen.
A warning displays indicating that your hard disk is about to be erased.
6. Select Continue to proceed to perform a Full Disk Drive restore.
If you select Back, the recovery utility returns to the prior screen which has an exitoption.
If you select Continue, a screen with progress bars displays and lets you know theprogress of the recovery.

4-14 Using the Operating System and Utilities
Do not turn off or disturb the system during the recoveryprocess.
7. When the recovery process is complete, you are prompted to remove the CD fromthe CD-ROM drive and reboot your system.
8. Press Enter, click Reboot, or press Alt-R to reboot your system.
A series of hardware detection screens display, the system reboots and theWindows Setup screen appears. Follow the on-screen instructions to set upWindows.
You are required to reenter your Microsoft license number.
Partition Only Restore
If your preinstalled software on drive C: of your multiple partitioned drive becomesunusable and you cannot boot from the hard disk, use the Product Recovery utility torestore your primary partition to its initial shipping configuration.
Use the Partition Only restore option only if your hard diskdrive consists of multiple partitions and if drive C: contains the operating system andrelated drivers. Move all other data and applications to other partitions (drives) or thePartition Only restore process will erase them completely.
The Partition Only restore option deletes all files on drive C: and replaces them with theoriginal factory installed files. Only use the Partition Only restore option if thepreinstalled software on drive C: is unusable.
For important information about partitioning your hard disk drive, see the section,“Partition Magic,” earlier in this chapter.
Use the Product Recovery utility to perform a Partition Only restore as follows:
1. Check the Product Recovery CD title and make sure that it is the correct CD foryour NEC Versa computer and operating system.
2. Put the CD into the CD-ROM drive tray, close the drive door, and reboot yourcomputer.
3. Read the License Agreement screen that appears. Use the VersaGlide touchpad toposition the cursor on the Accept button. Left click to accept the agreement.
You have the option of accepting or declining the agreement. If you decline theagreement, the recovery utility exits.

Using the Operating System and Utilities 4-15
4. In the NEC Product Recovery utility screen, use the VersaGlide touchpad tochoose Partition Only to restore drive C: of a multiple partitioned drive to itsoriginal factory installed state.
Choose your restore option carefully to prevent losing data andapplications installed on your system.
If the hard disk is configured with multiple or extended partitions you may have toreinstall some software to restore configuration settings and shared files.
5. Read the Warning screen.
A warning displays indicating that drive C: (the primary drive/partition) is about tobe erased and formatted. It may be necessary to reinstall software to the otherdrives (partitions) to reestablish Start Menu links and other configurationrequirements stored on drive C:.
6. Select Continue to proceed to perform a Partition Only restore.
If you select Back, the recovery utility returns to the prior screen which has an exitoption.
If you select Continue, a screen with progress bars displays and lets you know theprogress of the recovery.
Do not turn off or disturb the system during the recoveryprocess.
7. When the recovery process is complete, you are prompted to remove the CD fromthe CD-ROM drive and reboot your system.
8. Press Enter, click Reboot, or press Alt-R to reboot your system.
A series of hardware detection screens display, the system reboots, and theWindows Setup screen appears. Follow the on-screen instructions to set upWindows.
You are required to reenter your Microsoft license number.

5Using the System Drives and Bays
! SuperDisk Drive
! NEC VersaBay III
! NEC VersaBay III Swap Utility
! 24X CD-ROM Drive
! CD Read/Write Drive
! 8X DVD-ROM Drive
! Hard Disk Drive
! Memory Modules

5-2 Using the System Drives and Bays
SuperDisk DriveThe SuperDisk drive offers many improvements on the standard diskette drivetechnology, including faster data access, greater reliability, and higher recordingcapacities. The drive uses the latest laser-servo (LS) technology, which writes to andreads from specially designed 120-MB diskettes as well as standard 720-KB and1.44-MB diskettes.
The SuperDisk drive offers the following features which are described after the figure.
! Emergency Eject Hole — allows you to manually remove a disk from theSuperDisk drive if the eject function is disabled by software or a power failure.
To remove a disk, insert the end of a paper clip into the eject hole and push in. TheSuperDisk ejects.
! Release Button — ejects the SuperDisk. Press this button when power is on to inserta SuperDisk into or remove a SuperDisk from the drive.
! Status LED — lights during data read operations. Do not eject the SuperDisk orturn off the NEC Versa when the indicator is lit.
Formatting Diskettes in the SuperDisk Drive
When formatting a diskette in the SuperDisk drive while in DOS mode, you mayencounter the following error messages:
! For 720-KB and 1.44-MB diskettes the error message states“Invalid media or Track 0 bad – disk unusable,”“Extended Error 1g - format terminated.”
! For a 120-MB SuperDisk the error message states“Parameters not supported by drive.”
When in DOS mode, the message text may vary. These error messages indicate that thediskette you are attempting to format is write-protected. Simply write-enable thediskette before formatting.
NEC VersaBay IIIThe NEC VersaBay III is the drive bay located on the right side of the system. YourNEC Versa ships with a 24X CD-ROM drive, CD read/write drive, SuperDisk drive, or8X DVD-ROM drive installed in the bay. In Windows 2000, you can swap devices outof the NEC VersaBay III with system power on. In Windows 98, the NEC VersaBay IIIsupports warm swapping which allows you to remove and replace a device while yourNEC Versa is in a sleep state. For details about using the warm swap utility, refer to thesection, “NEC VersaBay III Swap Utility,” later in this chapter.

Using the System Drives and Bays 5-3
In addition to the CD-ROM drive, CD read/write drive, SuperDisk drive, orDVD-ROM drive, the NEC VersaBay III accepts a second hard disk drive.
Contact your NECC dealer to purchase options and accessories for your NEC Versanotebook computer.
NEC VersaBay III Swap UtilityThe NEC VersaBay III supports hot swapping of some bay devices. Hot swappingextends the power of Plug-and-Play technology to your NEC VersaBay III devices byallowing you to swap a CD-ROM drive, CD read/write drive, SuperDisk drive,or DVD-ROM drive in the NEC VersaBay III while your system is on. This dynamicsolution further increases the flexibility of your already versatile notebook computer.
Installing the NEC VersaBay III Swap Utility
Use the NEC Customize utility to install the NEC VersaBay III Swap utility. For detailsabout using the NEC Customize utility, see Chapter 4 “Using the Operating System andUtilities.”
Once the swap utility is installed on your system, a small icon appears in the lowerright hand corner of the Windows taskbar. Moving your cursor over the icon displaysinformation about the NEC VersaBay III. The balloon message that appears indicates ifthe bay is empty or if a device is installed. Because hot swapping is only supported forthe CD-ROM drive, CD read/write drive, SuperDisk drive, and DVD-ROM drive, theballoon message may not be accurate if you install a hard disk drive. Your system mustbe powered off before installing a hard disk drive in the NEC VersaBay III.
Using the NEC VersaBay III Swap Utility
With the NEC VersaBay III Swap utility running on your notebook computer, you canhot swap a CD-ROM drive, CD read/write drive, SuperDisk drive, or DVD-ROM drivein the NEC VersaBay III. Please note the following when using the swap utility:
! Windows 98 Power Management must be enabled to use the swap utility.
! Windows 2000 supports hot swapping.
! Hot swapping is not supported under Windows NT.
! The swap utility only supports the hot swapping of a CD-ROM drive, CD read/writedrive, SuperDisk drive, or DVD-ROM drive. Other devices installed in theVersaBay will work properly. However, hot swapping other devices is notsupported.
Hot swapping other devices can damage the device, thesystem, or both.

5-4 Using the System Drives and Bays
Swap devices in the NEC VersaBay III as follows:
1. If you have files open on the device you are planning to remove, close them.
2. Double click on the swap utility taskbar icon to display the menu.
3. A dialog box appears identifying the device in the NEC VersaBay III along with aSwap Device button.
4. Click the Swap Device button.
5. Click Yes to continue.
6. Remove the current device from the NEC VersaBay III and install the new device.
References to the drive letter listed under My Computer and the Windows Explorerchange automatically when the device is swapped or removed. The balloon messagethat appears when you move your cursor over the taskbar icon also changes to reflectthe new VersaBay status.
Removing a Device from the NEC VersaBay III
Use the following steps to remove a device from the NEC VersaBay III.
Your system must be powered on but not in a sleep state or powered off beforeremoving or inserting devices in the NEC VersaBay III.
1. Use the NEC VersaBay III Swap utility or power off the system.
2. Close the LCD panel and turn the system upside down.
3. Locate the NEC VersaBay III release lock and release latch on the bottom of theunit.
4. Slide the lock to the unlocked position before releasing the latch.
5. Slide the latch toward the rear of the system and hold it.

Using the System Drives and Bays 5-5
6. Pull the device out of the system.
Note If you release the latch before completely removing the device, the devicecasing catches on the inside of the latch.
Removing the device
Installing a Device in the NEC VersaBay III
Use the following steps to install a device in the NEC VersaBay III.
Your system must be powered on but not in a sleep state or powered off beforeremoving or inserting devices in the NEC VersaBay III.
1. Use the NEC VersaBay III Swap utility or power off the system.
2. Close the LCD panel and turn the system upside down.
3. Locate the NEC VersaBay III release lock and release latch on the bottom of theunit.
4. Slide the lock to the unlocked position, if necessary.
5. Slide the latch toward the rear of the system and hold it.
6. Align the device in the NEC VersaBay III and push it in until it locks into place.

5-6 Using the System Drives and Bays
7. Slide the lock back to the locked position.
Inserting the CD-ROM drive
8. Turn the system over and open the LCD panel.
9. Press the Power button to power on or resume operation.
Other NEC VersaBay III Devices
Customizing your NEC Versa is easy using the NEC VersaBay III. If you find yourequire additional hard disk space simply remove the standard device and install anoptional hard disk drive.
Your system must be powered off before removing or inserting a hard disk drive in theNEC VersaBay III.
Add another hard disk drive as follows.
1. Power off your system.
2. Remove the installed device from the NEC VersaBay III as described in steps 2-6in “Removing a Device from the NEC VersaBay III.”
3. Install the new hard drive in the NEC VersaBay III as described in steps 2-9 in“Installing a Device in the NEC VersaBay III.”
4. Once you power on, the system automatically recognizes the newly installed drive.

Using the System Drives and Bays 5-7
24X CD-ROM DriveYour NEC Versa may ship with a 24X CD-ROM drive that features the latest inCD-ROM technology. The CD-ROM drive is assigned an available drive letter. Use theCD-ROM drive to load and start programs from a compact disc (CD) or to play youraudio CDs. The 24X CD-ROM drive is fully compatible with Kodak MultisessionPhoto CDs™ and standard audio CDs.
The CD-ROM drive operates at different speeds depending on whether the CD you areusing contains data or music. This allows you to get your data faster and to seesmoother animation and video.
The CD-ROM drive offers the following features.
! Emergency Eject Hole — allows you to manually remove a disc from the CD-ROMdrive if the eject function is disabled by software or a power failure.
To remove a disc, insert the end of a paper clip into the eject hole, and push in untilyou hear a click. Manually open the drawer.
! Release Button — ejects the CD tray. Press this button when power is on to insert aCD into or remove a CD from the drive.
! Status LED — lights during data read operations. Do not eject the CD or turn offthe NEC Versa when the indicator is lit.
CD Loading
To insert a CD into the CD-ROM drive, follow these steps.
1. Press the Release button. The CD tray emerges a short way out of the drive door.
2. Gently pull the tray out until you can easily position a disc in the tray.
3. Put your CD, printed side up, into the circular impression in the tray.
4. Push the CD tray in until it clicks shut.
Note Some CDs vibrate when playing. This does not affect the CD-ROM drive.

5-8 Using the System Drives and Bays
CD Care
When handling CDs, keep the following guidelines in mind.
! Always pick up the disc by its edges.
! Avoid scratching or soiling the side of the disc that has no printing or writing on it.This is the data side of the disc.
! Do not write on or apply labels to either side of the disc.
! Keep the disc away from direct sunlight or high temperatures.
! Clean fingerprints or dust from the disc by wiping it with a soft cloth. Gently brushthe cloth from the center of the disc toward the edge.
Avoid using benzene, paint thinner, record cleaner, staticrepellent, or any other chemical on the disc. Chemicals and cleaners can damage thedisc.
Changing the Auto Play Setting
Your system’s shipping configuration may not allow a CD to automatically play uponinsertion. Although this feature makes using your CDs very convenient, it may interferewith the system's power management function.
Follow these instructions to enable or disable the Auto play feature.
1. From the Windows 98 Start menu, select Settings and Control Panel.
2. In the Control Panel, highlight and double-click the System icon.
3. Select the Device Manager tab.
4. Locate and open the CD-ROM folder.
5. Highlight the appropriate CD-ROM line.
6. Press the Properties button at the bottom of the window and select the Settings tab.
7. Proceed as follows:
! To enable Auto Play, click to add a check mark next to the line “Auto insertnotification.”
! To disable Auto Play, click to remove the check mark next to the line “Autoinsert notification.”

Using the System Drives and Bays 5-9
8. Select OK twice to accept the settings in the Settings tab and exit the Propertieswindow.
9. To activate the new setting, reboot the system when prompted.
CD Read/Write DriveYour NEC Versa may ship with a CD read/write drive with Easy CD Creator thatfeatures the latest in CD-ROM technology. Use the CD read/write drive to load andstart programs from a compact disc (CD) or to play your audio CDs. The CD read/writedrive is fully compatible with Kodak Multisession Photo CDs™ and standard audioCDs.
In addition, the Easy CD Creator application allows you to write information to a CDand backup information from your hard disk drive to a CD. For detailed informationabout using the CD read/write drive and installing the Easy CD Creator, refer to theaccessory sheet that ships with your system.
8X DVD-ROM DriveThe 8X DVD-ROM drive offers many improvements over the standard CD-ROMtechnology including superior video and audio playback, faster data access, and greaterstorage capacities. The drive uses the latest DVD technology which reads fromspecially designed DVD discs as well as standard audio and video CDs.
In addition, some DVD-ROM drives ship with the NEC SoftDVD Player that allowsyou to play movies in DVD format. For detailed information about using the 8XDVD-ROM drive and installing the NEC SoftDVD Player, refer to the accessory sheetthat ships with your system.
The DVD-ROM drive offers the following features.
! Release Button — ejects the DVD tray. Press this button when power is on to inserta DVD into or remove a DVD from the drive.
! Status LED — lights during data read operations. Do not eject the DVD or turn offthe NEC Versa when the indicator is lit.
! Emergency Eject Hole — allows you to manually remove a disc from theDVD-ROM drive if the eject function is disabled by software or a power failure.
To remove a disc, insert the end of a paper clip into the eject hole, and push in untilyou hear a click. Manually open the drawer.
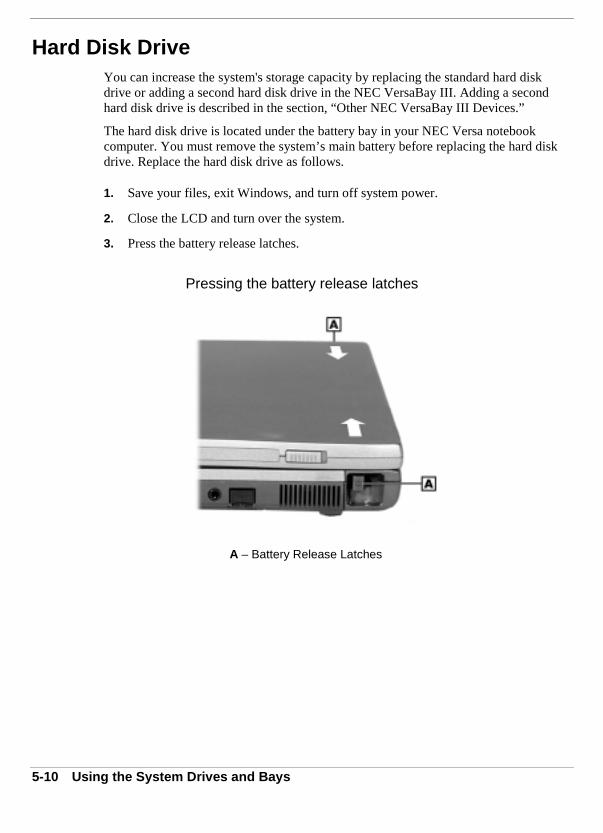
5-10 Using the System Drives and Bays
Hard Disk DriveYou can increase the system's storage capacity by replacing the standard hard diskdrive or adding a second hard disk drive in the NEC VersaBay III. Adding a secondhard disk drive is described in the section, “Other NEC VersaBay III Devices.”
The hard disk drive is located under the battery bay in your NEC Versa notebookcomputer. You must remove the system’s main battery before replacing the hard diskdrive. Replace the hard disk drive as follows.
1. Save your files, exit Windows, and turn off system power.
2. Close the LCD and turn over the system.
3. Press the battery release latches.
Pressing the battery release latches
A – Battery Release Latches

Using the System Drives and Bays 5-11
4. Slide the battery out of the system.
Removing the battery
5. Remove the disk drive as follows:
! Locate the disk drive lock lever. Push the lock lever to the left.
Locating the lock lever
A – Lock Lever

5-12 Using the System Drives and Bays
! Pull the lever toward the front of the system and pull the drive out of the bay.
Removing the drive

Using the System Drives and Bays 5-13
6. Replace the new drive as follows:
! Slide the drive into the drive bay.
! Push the lock lever toward the rear of the system. Slide it to the right to securethe drive.
Replacing the drive
7. Slide the battery into the battery bay until securely locked into place.
Inserting the battery

5-14 Using the System Drives and Bays
Memory ModulesYour NEC Versa computer comes standard with 64 or 128 megabytes (MB) of randomaccess memory (RAM). You can increase system memory to a maximum of 512 MB,depending on your model. The RAM combinations vary depending on which two of thelisted single bank SO-DIMMs are used.
! 64-MB memory module
! 128-MB memory module
! 256-MB memory module
Only install NECC supplied/approved memory module optionsto ensure proper functionality of your NEC Versa notebook computer.
Contact your NECC dealer for information about available NECC-supplied/approvedmemory modules.
Before handling any internal components, discharge staticelectricity from yourself and your clothing by touching a nearby metal surface.
Follow these steps to install a memory module.
1. Power off the NEC Versa and disconnect any peripheral devices.
2. Turn over the system and locate the memory module bay.
3. Remove the screw and bay cover.
4. Locate the connectors and alignment key on the SO-DIMM.
5. Locate the SO-DIMM expansion port and proceed as follows:

Using the System Drives and Bays 5-15
! Hold the SO-DIMM at a 45 degree angle and align the SO-DIMM contactswith the socket in the system. Push the connector into the socket.
! Press down on the edge of the SO-DIMM opposite the contacts until the locktabs on the sides snap into place, securing the module.
Installing the SO-DIMM
If you are replacing a SO-DIMM and need to remove one that is already installed,do so as follows:
! Press the locking tabs away from the sides of the SO-DIMM and hold whilegently lifting on the edge of the SO-DIMM.
! When the edge of the SO-DIMM pops up and is at approximately a 60 degreeangle, pull the SO-DIMM from the socket.
Removing an installed SO-DIMM
5-16 Using the System Drives and Bays
6. Replace the memory module bay cover and screw.
7. Turn over the system and power on.

6Communicating with Your NEC Versa
! PC Cards
! Mini-PCI Modem
! Mini-PCI LAN/Modem
! Internet Connections
! IR Port

6-2 Communicating with Your NEC Versa
PC CardsYour NEC Versa SXi system is equipped with two PC card slots. Type II cards aresupported in both slots, while Type III cards only are supported in the bottom slot.
PC cards are all approximately the same size and vary only in thickness. All have astandard 68-pin connector. Your NEC Versa supports the installation of the PC cardsdescribed next.
Type II Cards
Type II cards have a thickness of 5.0 millimeters (mm). Type II cards are often storageor communication devices such as Static Random Access Memory (SRAM), ReadOnly Memory (ROM), Flash Memory, LAN, and Small Computer System Interface(SCSI). Typically Type II cards include input/output (I/O) features such as modems.
Type II Extended Cards
Many PC cards are Type II extended cards. The extended card has an additionalphysical component that protrudes beyond the traditional card size. The extension canbe as large as 40 mm deep by 9.65 mm high. This extension provides room foradditional electronics as well as a location for external connectors.
Type III Cards
Type III cards are thicker (10.5 mm) than Type II cards. Type III card uses includeadvanced function I/O cards with additional features such as wireless modems,multimode cards (cards with more than one function such as a combined modem andLAN card), and small hard drive storage.
Communication Cards
You can use both fax/modem and network PC cards with your NEC Versa. Here aresome suggestions to help you get the best system performance.
Note If you are using this unit outside of the United States or Canada, contact alocal NECC dealer for availability information.
! Network Cards — You can use a network card with your system to gain access to alocal area network (LAN).
You can insert a network card in either slot.

Communicating with Your NEC Versa 6-3
! Fax/Modem Cards — You can use a PC card modem with your system tocommunicate with others via fax, email, or connect to an online service or bulletinboard.
You can insert a fax/modem card in either slot.
Note Outside the U.S. and Canada, you might need a modem and telephoneadapter approved for the local telephone system. Check with your local dealer for detailsabout purchasing this equipment.
Always insert the fax/modem card before using your fax/modem software application.If you start the application before inserting the fax/modem card, the applicationtypically does not find the card.
Storage Cards
When you insert a memory or storage card in an NEC notebook computer, it appears asa unique drive as long as the system has an available interrupt for the card.
Other Cards
Many other kinds of PC cards are available for notebook computers. They include thefollowing cards:
! Global Positioning System (GPS) — enables the tracking of remote units (forexample, delivery trucks)
! Serial — adds an extra serial communications port
! Multimedia — combines animation and sound
PC Card Slots
Your NEC Versa SXi notebook integrates two CardBus slots for inserting two Type IIPC cards or one Type III PC card. The 32-bit CardBus also has zoomed video supportin the bottom slot (slot 1).
Note The 32-bit CardBus structure is backward compatible, but also accepts newCardBus cards.
Using the system’s PC card slots, you can add optional PC cards and connect externaldevices to your NEC Versa. These devices include peripheral devices, such as modems,LAN cards, and storage cards.

6-4 Communicating with Your NEC Versa
Using the PC Card Slots
When using PC cards in your NEC Versa system, please note the following:
! To ensure optimal functionality when using SRAM cards in your NEC Versa, insertthe SRAM card in the top PC card slot.
! Before using two PC cards at the same time in your NEC Versa system, you mayhave to disable another system device to release an IRQ (system interrupt) for PCcard use.
To disable a device (such as the serial port) in Windows 98/2000, go to Start,Settings, Control Panel, System, and access the Device Manager. To disable adevice in Windows NT, reboot your system, enter the BIOS setup and access thePeripheral Setup menu.
Inserting a PC Card
To insert a PC card, follow these steps.
1. Align the card so that the 68-pin connector points towards the slot and the arrowshows on the top face of the card.
2. Slide the card into either slot. (Install Type III cards in the bottom slot, only.) Alow tone followed by a high tone lets you know that the card is fully inserted andrecognized. If you turn off the sound through the function keys or volume control,no sound is emitted. If you insert the card before powering on the system, the tonesare emitted during bootup.
Other tone sequences such as high, then low tones, indicate that the card isinserted, but the card type is unknown.
3. Use the software preinstalled on your system to check PC card slot availability.
In Windows 98, look for the PC Card icon in the Control Panel or on the right sideof the taskbar. It shows which slot contains a PC card and which is empty.
In Windows NT, use SystemSoft’s CardWizard to monitor the status of yoursystem’s PC card activity. Access CardWizard via the taskbar icon or via thePrograms menu.

Communicating with Your NEC Versa 6-5
Removing a Card
Follow these steps to remove a PC card in Windows 98.
1. Double click My Computer, double click Control Panel, and double click the PCcard icon or simply double click the PC card icon on the taskbar.
2. Select the PC card to remove, and select Stop.
The Windows operating system alerts you if any applications are still using thecard. If all applications using the card are closed, services for that card are shutdown. You receive a message saying that it is safe to remove the card.
3. Press the button on the side of the PC card in the slot.
In Windows NT, use SystemSoft’s CardWizard to monitor the status of your system’sPC card activity. Access CardWizard via the taskbar icon or via the Programs menu.
PC Card Modems
You can use a PC card modem with your NEC Versa to communicate with others viafax, email, or connect to an online service or bulletin board. Depending on the PC cardmodem that you purchase, you may have to install PC card drivers, prior to using thecard.
Follow these steps to use your PC card modem.
1. Connect an RJ-11 cable to the modem port on the card.
2. Connect the other end of the RJ-11 cable to an analog phone line.
3. Slide the PC card modem into one of the PC card slots.
4. Refer to the user guide that ships with your PC card modem for detailedinstructions about how to use the PC card modem.
Note When using a modem outside the U.S. and Canada, you might need aninternational telephone adapter. You can buy this at an electronics supply store.
6-6 Communicating with Your NEC Versa
Mini-PCI ModemYour NEC Versa SXi may ship with a mini-PCI modem. The mini-PCI modem is aninternal modem that allows you to connect to the Internet, send a fax, or access youremail.
To take advantage of the mini-PCI modem, simply connect an RJ-11 cable to themodem port on the left side of your system. The LAN and modem ports are onlyavailable if your system is equipped with these optional components.
Mini-PCI LAN/ModemYour NEC Versa SXi may ship with an internal mini-PCI Modem/LAN that combinesthe functionality of a LAN and modem to allow you to connect to a local area network,connect to the Internet, send a fax, or access your email.
To take advantage of the internal LAN/Modem, simply connect an RJ-45 cable to theLAN port on the left side of the system or an RJ-11 cable to the modem port on the leftside of your system. The LAN and modem ports are only available if your system isequipped with these optional components.
Installing the Online LAN/Modem Guides
For additional information about LAN features or your modem’s AT commands ands-registers, use the A&D CD to install the online LAN or modem guides for yoursystem. To determine the guide that is appropriate for your system, go to Start,Settings, Control Panel, System, and select the Device Manager tab. Double clickModem (if your system is equipped with an optional modem or an optionalcombination LAN/modem) to identify the name of your system’s modem. Double clickNetwork adapters (if your system is equipped with an optional combinationLAN/modem) to identify the name of your system’s LAN. Use the A&D CD to installthe online guide of the same name to your NEC Versa hard drive.
Internet ConnectionsYour NEC Versa SXi system is equipped with the Windows operating system toprovide a fully-integrated internet experience. Use the Internet Connection Wizard toconfigure your system for email and internet access. Sign up for a new account orconfigure your system to use an existing account.

Communicating with Your NEC Versa 6-7
Before using the Internet Connection wizard to transfer an existing account for emailand internet access, you need an internet service provider (ISP) account and some or allof the following configuration information:
! the dial-up telephone number
! TCP/IP settings
! port settings
! a user name/logon and password
! your email address
! the name of a POP3, IMAP, or HTTP server (for incoming mail)
! the name of an SMTP server (for outgoing mail)
Internet Connection Wizard in Windows 98/2000
Access the Internet Connection Wizard in Windows 98/2000 through its desktop icon.The Windows 98/2000 Internet Connection Wizard offers the following choices:
! Sign-up for a new internet account. Take advantage of the Microsoft InternetReferral Service.
! Transfer an existing internet account.
! Manually configure an internet account or connect through a local area network(LAN).
Launch the connection wizard and follow the on-screen prompts to configure yoursystem for internet access.
The Windows 98/2000 Internet Connection Wizard automatically configures your dial-up connection. Next, enter your logon and password to establish a live connection.Once the live connection is established, launch your internet browser to access theInternet or launch your email application to send and receive email.
If you are connected to a LAN, your live connection is already established. Simplylaunch your internet browser or email application.
Connecting to the Internet in Windows NT
In Windows NT, use the operating system’s network configuration options to establishyour internet connection. For details about using the network configuration options,refer to the Windows NT online help.
6-8 Communicating with Your NEC Versa
IR PortThe IR port on the right side of your system lets your NEC Versa SXi computercommunicate with other devices that also use infrared technology. The IR port isInfrared Data Association (IrDA) compatible. You can easily transfer files betweenyour NEC Versa and an IR-equipped desktop, or print to an IR-equipped printerwithout using cables.
IR transfer speed ranges from 2.4 Kbit/sec to 4.0 Mbit/sec. You can choose the IRtransfer speed through the Infrared icon in the Windows control panel. Double click theicon and select the options to access the speed parameter.
Your NEC Versa transfers data at the speed compatible with the receiving device.
Your NEC Versa ships with the IR port disabled. Before usingthe IR port for the first time, you must enable the device. See detailed instructions in thesections that follow.
Infrared Communications
Follow these guidelines when using the IR port to communicate with another infrareddevice.
! Position the NEC Versa SXi no more than three feet away from the IR peripheraldevice you are using.
! Make sure that there is no greater than a 30º angle between the computer and thedevice.
Using the IR Port
For optimal performance when using the IR (infrared) port for file transfer, printing,and other infrared communication, the Windows 98/2000 operating system is equippedwith infrared drivers for infrared communication on your NEC Versa.
Enabling the IR Port in Windows 98
Follow these steps to enable the IR port in Windows 98.
1. Right click the infrared icon and choose Enable Infrared Communication, highlightOpen to open the Infrared Monitor window, or go to Start, Settings, Control Panel,and double click the infrared icon.
2. Select the Options tab and place a check in the box labeled “Enable infraredcommunication.”
Communicating with Your NEC Versa 6-9
3. Click Apply, then click OK to close the Infrared Monitor window.
Enabling the IR Port in Windows 2000
Follow these steps to enable the IR port in Windows 2000.
1. From the Windows taskbar, select Start, Settings, Control Panel, and double clickthe Wireless Link icon.
2. Select the Hardware tab and click the Properties button.
3. Under Device usage:, select Use the device (enable). Click OK, then click OKagain to close the Wireless Link window.

7Traveling Tips
! Preparing for Travel
! Packing for Travel
! Using Power Sources
! Getting Through Customs
! Using Your Modem

7-2 Traveling Tips
Preparing for TravelThe NEC Versa SXi computer makes a natural traveling companion. With a littlepreparation you can use the computer anywhere you go, to prepare your businessdocuments, confirm your travel plans, surf the internet, or simply stay in touch withthose back home!
Here is what you should do before you leave home:
Note Speed the trip through airport security by carrying a charged system.Inspectors want to see the screen display a message. The boot message is usuallysufficient.
If your system is fully charged, the inspection only takes a minute or so. Otherwise, beprepared to attach the AC adapter and power cable. And if you don’t have these, theinspection might include a disassembly of the system.
! Back up your NEC Versa’s hard disk.
! Insert a fully charged battery to make sure your system is ready to quickly boot upat the airport security check.
! Fully charge all your batteries.
! Tape your business card to your NEC Versa, AC adapter, and batteries.
! If you run your system with battery power, maximize battery life by usingpower-saving features whenever possible.
! Take along any application or data files on diskette that you might need.
! Check that you have everything you need before you leave on a trip.
! Carry the AT&T’s Worldwide Calling Guide. (For more information, see thesection later in this chapter, “Using Your Modem.”
Packing for TravelThe following are what you should take with you when you travel with your NECVersa.
! Extra fully charged batteries
! Single-outlet surge protector
! Appropriate AC plug adapter for international voltage requirements
! Extra phone cord to access hard to reach wall jacks

Traveling Tips 7-3
! Copy of proof of purchase for your computer and other equipment or customsregistration form for customs check
! Customer support phone numbers for your software (domestic and international)
! NEC Versa Quick Reference card
! AC extension cord.
Using Power SourcesWith the right accessories, you can run your NEC Versa almost anywhere! Yoursystem self-adjusts to various power sources. The United States, Canada, and most ofCentral and South America use 120-volt alternating current (AC). Most other countriesof the world use 240-volt AC. The NEC Versa adapts to voltages ranging from 100 to240 volts.
There are a few countries with areas that use direct current (DC) as their main powersource. You need a DC-to-AC converter in particular areas of Argentina, Brazil, India,Madeira, and South Africa.
To use your system overseas, you need an adapter plug. There are several differentplugs available worldwide. You can buy these at an electronics supply store.
Getting Through CustomsWith so many countries in the world, you can be sure that there are a variety of customsregulations. Plan wisely to get your NEC Versa notebook computer through customs bycarrying the appropriate documentation to assure the customs agent that your system isnot a recent purchase.
Travelers are often asked, when returning to their home country, whether or not theypurchased the computer while outside of the country. Sometimes, the proof of purchasesuch as a bill of sale, insurance policy, or purchase receipt is sufficient. Taking alongthe purchase receipt for your notebook computer may sound practical, but may notalways suffice, particularly when the purchaser of the computer is your company andthe original receipt is not available to you.
Another alternative to a proof of purchase document is a Certificate of Registration, adocument that is issued when you register your notebook computer with the CustomsService prior to departure. The certificate of registration contains a brief description ofyour computer and lists appropriate serial numbers for identification. The document isavailable from the customs web site at http://www.customs.ustreas.gov/.
To avoid hassle when moving your system through customs, you may want to obtain acertificate of registration and carry it, and your Versa notebook computer, whereveryou may travel!
7-4 Traveling Tips
Using Your ModemWhether you are on a business trip or vacation, connecting to the Internet while youtravel can be expensive and frustrating unless you are prepared. Here are some tips onhow to avoid frustration and expense while on the road.
1. Before leaving home, check with your Internet Service Provider to see if it has:
! a local access number at your point of destination.
! a toll-free number that can also save you money.
In the absence of a local ISP access number or toll-free number, charging the call toyour home phone can be less expensive than charging the call to your hotel room.
2. Prepare your system for phone line access in another country.
! Line access outside of a hotel may require the addition of a “9” preceding thephone number string. Be sure to modify your dial-up connection, as required.
! To circumvent unusual dial tone sounds sometimes encountered in hotels, youmay have to modify a modem configuration setting to ignore the dial tone. Fordetails specific to your modem, refer to the AT command section of yourmodem user’s guide.
3. Always check the phone line to determine whether or not it is digital vs. analog.NEVER use your modem with a digital phone line. Doing so can destroy yourmodem!
4. Use AT&T’s Worldwide Calling Guide, a resource that provides instructions fordealing with unfamiliar phone systems. For more information about the callingguide, access the web site at http:/www.att.com/traveler/.

8Using Peripheral Devices
! External Monitor
! Printer
! External Keyboard/Mouse
! External Audio Options
! USB Devices
! Port Replicator

8-2 Using External Devices
External MonitorYou can add a standard external monitor to your NEC Versa using a display signalcable (usually provided with the monitor). One end of the cable must have a 15-pinconnector for the system.
Note For optimal performance when connecting an external monitor, use only aDDC-compliant monitor. Refer to the user’s guide that ships with the monitor or checkwith your supplier, to determine if your external monitor is DDC-compliant.
Follow these steps to connect an external monitor to your NEC Versa.
1. Check that the NEC Versa is powered off and the monitor power switch is turnedoff.
2. Open the port cover on the back of the system and locate the monitor port.
3. Attach the 15-pin cable connector to the monitor port on the system. Secure thecable connection with the screws provided.
4. Connect the monitor power cable and plug it into a properly grounded wall outlet.
5. Follow any setup instructions in the monitor’s user’s guide.
6. Turn on power to the system and device.
7. Press Fn-F3 to toggle through the video modes.
PrinterYou can attach a printer with either a parallel or a serial connector. A parallel printerconnector has 25 pins; a serial connector has 9 pins. Some printers come with bothtypes of connectors.
Parallel Devices
To install a parallel device such as a printer, you need a cable with a male 25-pinconnector for the system and, for most parallel printers, a Centronics®-compatible36-pin connector.
Note When you connect a printer, be sure to install the appropriate printer driverthrough the Windows Control Panel.
Using External Devices 8-3
Connect a parallel device to your NEC Versa as follows.
1. Check that power to both the NEC Versa and the device is off.
2. Open the port cover on the back of the system and locate the parallel port.
3. Align and connect the 25-pin parallel cable connector to the parallel port on thesystem. Secure the cable with the screws provided.
4. Align and connect the other end of the cable to the parallel port on the device.Lock the connector clips.
5. Connect the power cable to the device and a properly grounded wall outlet.
6. Turn on power to the system and the device.
Note Check that the device is online before you try to use it. See the instructionsthat came with the device for more information.
Serial Devices
To install a serial device such as a printer or an external modem, you need a cable witha female 9-pin connector.
Note When you connect a printer or modem, be sure to install the appropriate driverthrough the Windows Control Panel.
Follow these steps to connect a serial device to your NEC Versa.
1. Check that power to both the NEC Versa and the device is off.
2. Open the port cover on the back of the system and locate the serial port.
3. Align and connect the 9-pin connector with the serial port on the system. Securethe connection with the screws provided.
4. Align and connect the other end of the cable to the appropriate port on the device.Secure the connections with the screws provided.
5. Connect the power cable to the device and a properly grounded wall outlet.
6. Turn on power to the system and the device.
Note Make sure your device is online before trying to use it. See the device specificguide for instructions.

8-4 Using External Devices
External Keyboard/MouseYou can add a full-size PS/2-style keyboard or PS/2-style mouse to your NEC Versausing the Plug and Play feature. The PS/2 style keyboard and the PS/2 style mouse arewarm insertable allowing you to connect the devices while the NEC Versa is poweredon. You can continue to use the system keyboard and VersaGlide touchpad while anexternal keyboard or mouse is connected.
Note For information about disabling the VersaGlide while an external mouse isconnected, see Chapter 3, “Using the BIOS Setup Utility.” The Internal Mouseparameter in the Advanced CMOS Setup section of the BIOS Setup parameters allowsyou to enable or disable the VersaGlide touchpad.
To attach both an external keyboard and a external mouse at the same time, use theoptional NEC Y-adapter. For ordering information, contact your NECC dealer.
Note If you purchased this product outside the U.S. or Canada, contact the localNECC office or their dealers for ordering information.
To connect an external keyboard or mouse simply put the system into a sleep state,connect the device to the keyboard/mouse port, then resume the system when theconnection is secure. You are now ready to use your external keyboard or mouse.
External Audio OptionsThe NEC Versa comes equipped with built-in audio ports that let you play sound.
Connect audio jacks, like a microphone, headphones, or external speakers to the audioports as follows. The headphone/external speaker port supports SP/DIF.
1. Locate the audio port that you want to use.
2. Plug the jack into the appropriate port on the left side of the NEC Versa.
Note If you are using external speakers or an external microphone and experiencesound distortion or feedback, lower the volume.
Some feedback is caused by having the microphone and speakers too close to eachother, so moving the external audio option away from the unit may also help.

Using External Devices 8-5
USB DevicesYour NEC Versa SXi is equipped with one USB port that increases your connectivitychoices. The USB port on the left side of your system allow you to connect up to 127USB-equipped peripheral devices to your NEC Versa notebook computer for Windows98 systems, only. These peripherals may include digital cameras, scanners, printers,CD-ROM drives, modems, keyboards, telephones, and game devices.
USB devices called USB hubs can serve as connection ports for other USB peripherals.Only one device needs to be plugged into your NEC Versa. Additional peripherals canbe connected in a daisy chain configuration where one device is connected to another ina series. Up to 127 devices can be connected together in this way.
Some external devices require additional power and may require an externally poweredUSB hub.
Connecting USB devices to your system may reduce batterylife. Always connect your system to an AC power source before connecting USBdevices.
Connect an external USB device to your system as follows.
1. Locate the USB port.
2. Plug in the USB device to optimize your notebook possibilities.
Port ReplicatorUse the following steps to connect the NEC Versa SXi to the Port Replicator.
1. Remove any devices connected to the back of the NEC Versa.
2. Push the docking lever on the right side of the NEC Port Replicator towards therear of the replicator.
3. Open the port cover on the rear of the NEC Versa. Remove the expansion portcover by pulling it out of its slot in the port cover. Close the port cover.
4. Place the NEC Versa system’s rear bottom corners on the side guides of the NECPort Replicator. Pull the docking lever of the replicator forward to securely dockthe NEC Versa.

9Using Multimedia
! Audio
! Video
! Multimedia Applications

9-2 Using Multimedia
AudioThe NEC Versa provides entertainment-level sound quality through internal stereospeakers or external headphones. It handles MIDI files, digital audio files, and analogaudio sources. This means the NEC Versa recognizes .WAV, .MID, and .AVI files.The system is 3D-stereo, Sound Blaster PRO™ compatible.
Recording
All information on a computer must be stored in digital form. Analog audio signalsfrom sources such as tape cassettes or music CDs must be digitized before beingrecorded and stored on disk.
You can make recordings from two classes of audio input: line level and microphonelevel. Line level accepts analog audio signals from electronic sources such as tapecassettes, VCRs, and CD players through the Line-In port. Microphone level inputscome through the microphone port or internal microphone.
Note When using the built-in microphone, make sure the speaker volume is turneddown before using the microphone or feedback may occur.
The following procedure describes how to use the Microsoft® Sound Recorder to recordsound into a file on the NEC Versa.
1. To record from an external device such as a portable CD or tape player, you need acable with audio jacks on both ends. Set up your hardware as follows:
! Connect one end of the audio cable to the Line-Out jack on the externaldevice. (On some devices, you can record from the headphones port.)
! Connect the other end of the cable to the Microphone port on the NEC Versa(to record monaural sound).
2. Go to Start, Programs, Accessories, Entertainment (Windows 98/2000) orMultimedia (Windows NT), and select Sound Recorder.
3. Specify the default sound quality before you record.
! Select Audio Properties from the Sound recorder edit menu.
! Use the Effects menu to adjust recording volume, device and quality settings.
4. Select File, New from the Sound Recorder menu bar.
5. Click the Record button (solid round dot) to begin recording.

Using Multimedia 9-3
6. Click the Stop button (solid rectangle) to stop recording.
7. Select File, Save As from the Sound Recorder menu bar.
8. Name and save your file.
You can play your recording in Sound Recorder or in Media Player. See the section,“Playing Back,” later in this chapter.
Playing Back
You can play back your recorded soundtrack through stereo headphones, the internalNEC Versa stereo speakers, or external stereo speakers. You can play .wav and .midfiles as well as CD audio. Adjust the volume with the volume control knob on the leftside of the system or through the software using the sound horn on the taskbar.
Play audio from files or audio devices as follows. This example shows how to use theMedia player option in Accessories. You can also play audio through the SoundRecorder. See the Sound Recorder help files for details on its use.
1. Go to Start, Program, Accessories, Entertainment (Windows 98/2000) orMultimedia (Windows NT) and select the Windows Media Player option.
2. Click File and specify the file name of your audio source.
3. Once your file is open or your source specified, press the Play button.
4. Press the square Stop button to stop playing the audio.
Optimizing the Sound Quality
To ensure optimal sound quality when using the record and playback features on yourNEC Versa be sure to configure the microphone volume control as follows.
1. Right click the sound horn on the right side of the taskbar.
2. Click Open Volume Controls, select the Options menu, and select Properties.
3. Scroll down in the Show the following controls window, place a check in theMicrophone box and click OK.
4. Click Open Volume Controls, select the Options menu, and select AdvancedControls.
5. Remove the check from the Mute box on the Microphone panel.
6. From Advanced Controls, click the Advanced button on the microphone panel,check the box labeled 1 20dB Setting, then click Close.
9-4 Using Multimedia
Adjust the microphone volume to remove feedback.
You are now ready to record and playback on your NEC Versa notebookcomputer!
CD-ROM Input
You can record music and sound effects from a CD (compact disc) and store them onyour hard disk. The audio signal from the CD-ROM drive connects directly to yourNEC Versa. Simply follow the instructions in the section earlier in this chapter,“Recording,” to record sound from your CD player.
Microphone
You can capture and record sounds through the internal microphone on the NEC Versaor through an external microphone that connects to the system through the microphoneport. You can record voice-overs for narration, reminders, or special instructions.
See “Recording,” explained earlier in this chapter, for details about recording soundwith the microphone. Although the example given shows how to record sound from aCD or tape, the procedure is the same for recording with a microphone.
Mixing
With the Microsoft Sound Recorder on your NEC Versa, you can mix data from twoseparate .wav files to create a new sound file. You can also mix the microphone volumeto create soft background sounds to accompany a voice-over or another more prominentsound. Mixing lets you blend digital and MIDI audio files to get the final, high-qualitysoundtrack you want.
See the online help that is available with the Sound Recorder for more information.
Using Headphones
The NEC Versa headphone port delivers sound at half a watt. Stereo headphones (notshipped with your system) plug in through the headphone jack located on the left sideof the NEC Versa. Adjust the volume with the volume control knob on the left side ofthe system or through the software using the sound horn on the taskbar.
Using Multimedia 9-5
Using External Stereo Speakers
For full stereo sound impact, you can plug a pair of stereo speakers into the headphonejack located on the right side of the system. Adjust the volume with the volume controlknob on the left side of the system, through the software using the sound horn on thetaskbar, or through the controls on the speakers.
Using the Built-In Speakers
The NEC Versa has built-in stereo speakers that are always available. Adjust thevolume with the volume control knob on the left side of the system or through thesoftware using the sound horn on the taskbar.
Digital Audio Output
Your NEC Versa headphone/external speaker port supports SP/DIF, allowing you tocreate digital audio output. With the use of a commercially available optical outputcable and optical disk device, you can create .wav and .mid files.
MIDI Files
The musical instrument digital interface (MIDI) lets you enhance a presentation byadding computer-generated music and sound effects. Using MIDI, you can recordmultiple tracks of performances from a master controller, such as a keyboard, andorchestrate playback on one or more instruments. You can also purchase a wide rangeof public domain and commercial recordings in MIDI format.
MIDI files require only a fraction of the storage space of digital audio files.
VideoThe NEC Versa SXi computer features a dazzling TFT 16 million color high-resolutiondisplay for sharp, effective visuals on the NEC Versa or on an external CRT monitor.The NEC Versa XGA TFT display has high resolution of 1024 x 768 pixels.
Use the Windows Media Player to run full motion, full-screen MPEG video. For detailsabout using the Windows Media Player, refer to the section earlier in this chapter,“Playing Back.”
Using Digital Video Files
With commercial video capture hardware and application software, you can plug anyvideo device, including VCRs, televisions, camcorders, and laser disc players into yourNEC Versa and record motion graphics to your hard drive.
Use a video frame grabber and store a stream of grabbed stills on your hard disk.

9-6 Using Multimedia
Using Animation Files
You can create a dynamic presentation using an animation application. Animation canillustrate a concept, drive home an important point, or command attention. Graphicsanimation can add punch to a presentation with an animated illustration, a flashingarrow, or a flying logo.
Multimedia ApplicationsA growing number of multimedia applications are available for PC users. Thesemultimedia software packages include graphics packages, animation software, andpresentation authoring systems as follows:
! Animation software allows you to create 3-D effects and 3-D titles and add interestto an otherwise static presentation.
! Authoring packages let you pull all the elements of your design into an exciting,interactive multimedia presentation.

10Solving System Problems
! Problem Checklist
! Start-Up Problems
! If You Need Assistance

10-2 Solving System Problems
Problem ChecklistFirst check the items in the following list. If these items don’t help, see the table thatfollows the list.
! The computer is powered on and the Power LED illuminates green.
! The electrical outlet to which your AC adapter is connected is working. Test theoutlet by plugging in a lamp or other electrical device.
! All cables are tightly connected.
! The display setting is configured correctly.
! The display brightness control is adjusted properly.
! If using battery power, check that the battery pack is properly inserted and fullycharged.
Troubleshooting
Problem Resolution
The system does notpower on.
If you are operating the system with battery power,check that the battery pack is correctly inserted. Attachthe AC adapter to recharge the battery.
If you have the AC adapter attached, check that youare using a working electrical outlet.
LCD screen is dark andblank.
Power-saving mode has shut off the backlight. Press akeyboard key or move the mouse.
The built-in LCD may not be selected. Press Fn-F3once or twice to select the LCD video mode.
Screen brightness needs adjustment. Use the Fn-F8and Fn-F9 functions keys.
The system entered Suspend (Windows NT) mode orStandby (Windows 98/2000) mode due to low batterypower. Plug in the AC adapter or replace the batterypack, and then press the Power button to resumeoperation.
Battery power does notlast long.
Use power-saving modes.
Fully charge and discharge the battery several times torecondition it.
Replace the battery.
Information on the LCD isdifficult to see.
Use the Fn-F8 and Fn-F9 functions keys to adjust thebrightness control.

Solving System Problems 10-3
Troubleshooting
Problem Resolution
An optional componentdoes not work.
Make sure the component is securely installed orconnected. Verify that the system parameter for the I/Oport configuration is set correctly in Setup.
The Power button doesnot resume the systemfrom:Suspend (Windows NT) orStandby (Windows98/2000) mode.
If system does not resume, it may have automaticallyentered Suspend (Windows NT) or Standby (Windows98/2000) on a low battery. Attach the AC adapter andtry again.
The system does notautomatically enterSuspend (Windows NT) orStandby (Windows98/2000).
A disk drive might be busy. Wait until the disk drivestops and try again.
Check that Auto Play is disabled. See "Changing theAuto Play Setting" in Chapter 5 for details.
Upon resuming from amanual STF the systemdisplays the message,”Following systemcomponent(s) changedsince last Suspend(Windows NT) or Standby(Windows 98/2000) –System Memory. Do youwant to (B)oot or (P)owerdown?”
Power down the system and reseat the memory.
If new memory was installed prior to manual STF,remove new memory before resuming from Suspend(Windows NT) or Standby (Windows 98/2000) mode.
Start-Up ProblemsThe system displays an invalid configuration error message at power on when there arethe following conditions:
! the current configuration information does not match configuration informationstored in Auto Setup, such as when an internal option is added.
! the system loses configuration information.
If either condition is true, the system displays an “invalid configuration information”message.
To continue start-up procedures, press F2 (or F1 when prompted) and run the Setuputility to set current system parameters.

10-4 Solving System Problems
Note When the NEC Versa detects an error related to display devices, it cannotdisplay on either the LCD or a CRT. The system warns you by beeping.
Post Error Messages
The NEC Versa SXi computer has a built-in checking program that automatically testsits components when you turn the system power on. This diagnostic test is called thePower-On Self-Test (POST). If the system finds a problem during the POST, thesystem displays an error message or emits a series of beep signals. If this happens,follow the instructions in the POST Error Messages table or the Beep Code table, asappropriate.
If an error message appears before the operating system starts, look up the errormessage in the following table. Follow the instructions. If you see other error messages,the hardware might need repair.
Post Error Messages
Message Resolution
Address line is short Error in the address decoding circuitry on the systemboard. Contact your service representative for service.
C: Drive Error Hard disk drive C: does not respond. Confirm that C:hard disk type in Setup is correct.
C:Drive Failure Hard disk drive C: does not respond. You may need toreplace the hard disk drive. Contact your servicerepresentative for service.
Cache Memory Bad, DoNot Enable Cache
Cache memory is defective. It must be replaced.Contact your service representative for service.
CH-2 Timer Error Most ISA computers include two timers. There is anerror in timer 2. Contact your service representative forservice.
CMOS Battery State Low CMOS RAM is powered by a battery. The batterypower is low. Connect the system to AC power tocharge the CMOS battery. If the battery does notcharge, contact your service representative to replacethe CMOS battery.
CMOS Checksum Failure After CMOS RAM values are saved, a checksum valueis generated for error checking. The previous value isdifferent from the current value. Run Setup to reset thevalue.

Solving System Problems 10-5
Post Error Messages
Message Resolution
CMOS System OptionsNot Set
The values stored in CMOS RAM are either corrupt ornonexistent. Run Setup to reset the value.
CMOS Display TypeMismatch
The amount of memory on the system board is differentthan the amount in CMOS RAM. Run Setup to reset thevalue.
CMOS Time and Date NotSet
Run Setup to set the time and date.
Diskette Boot Failure The boot diskette is corrupt. It cannot be used to bootthe computer. Use another boot disk and follow the on-screen instructions.
DMA Error Error in the DMA controller. Contact your servicerepresentative to replace the CMOS battery.
DMA#1 Error Error in the first DMA channel. Contact your servicerepresentative for service.
DMA#2 Error Error in the second DMA channel. Contact your servicerepresentative for service.
FDD Controller Failure The BIOS cannot communicate with the floppy diskcontroller. Contact your service representative to checkall appropriate connections.
HDD Controller Failure The BIOS cannot communicate with the hard disk drivecontroller. Contact your service representative to checkall appropriate connections.
INTR #1 Error Interrupt channel 1 failed POST. Contact your servicerepresentative for service.
INTR #2 Error Interrupt channel 2 failed POST. Contact your servicerepresentative for service.
Invalid Boot Diskette The BIOS can read the diskette in the disk drive, butcannot boot the computer. Use another boot diskette.
Keyboard is LockedUnlock It
The keyboard lock on the computer is engaged. Thecomputer must be unlocked to continue.
Keyboard Error There is a timing problem with the keyboard. Set theKeyboard option in Setup to Not Installed to skip thekeyboard POST routines.
KB/interface Error There is an error in the keyboard connector. Contactyour representative for service.

10-6 Solving System Problems
Post Error Messages
Message Resolution
Off Board Parity Error Parity error in an expansion slot. Contact your servicerepresentative to be sure that the memory module isinstalled correctly.
The error format is:OFF BOARD PARITY ERRORADDR(HEX) = (XXXX)XXXX is the hex address where the error occurred.
On Board Parity Error Parity error in system board memory. Contact yourservice representative for service.
Parity Error ???? Parity error in system memory at an unknown address.Contact your service representative for service.
Beep Codes
Fatal errors that occur during POST are communicated through a series of beeps. Allbeep code errors, except beep code 8, are fatal errors and do not allow the system tocontinue to boot.
If beep codes occur during POST, check the items in the Problem Checklist (at the startof this chapter), verify that all the hardware is set up properly and securely connected,and try rebooting. If you still get a beep code, go to the section “If You NeedAssistance” at the end of this chapter.
Beep Codes are listed in the table that follows.
Beep Codes
Number ofBeeps
Error Description
1 Refresh Failure The memory refresh circuitry on themotherboard is faulty.
2 Parity Error Parity error in the first 64 KB ofmemory.
3 Base 64 KB MemoryFailure
Memory failure in the first 64 KB.
4 Timer Not Operational Memory failure in the first 64 KB ofmemory or Timer 1 on themotherboard is not functioning.

Solving System Problems 10-7
Beep Codes
Number ofBeeps
Error Description
5 Processor Failure The CPU on the motherboardgenerated an error.
6 Gate A20 Failure The keyboard controller may be bad.The BIOS cannot switch to protectedmode.
7 Processor ExceptionInterrupt Error
The CPU generated an exceptioninterrupt.
8 Display MemoryRead/Write Error
The system video adapter is eithermissing or its memory is faulty. (Thisis not a fatal error.)
9 ROM Checksum Error The ROM checksum value does notmatch the value encoded in the BIOS.
10 CMOS ShutdownRegister Read/WriteError
The shutdown register for CMOSRAM failed.
11 Cache Error/ExternalCache Bad
The external cache is faulty.
If You Need AssistanceIf you have a problem with your computer, first review the checklist andtroubleshooting table at the beginning of this chapter.
If you still have a problem, see Chapter 11, “Getting Service and Support,” for detailsabout contacting NECC.
Note If you purchased and are using this product outside the U.S. or Canada,please contact the local NECC office or their dealers for the support and serviceavailable in your country.

11Getting Service and Support
! Service and Support Contact Information
! NECC Web Site
! NECC FTP Site
! NECC Support Services
! Email/Fax to Support Services

11-2 Getting Service and Support
Service and Support Contact Information
Service Contact Information
NECC Web and FTP Sites Web address: www.nec-computers.com
FTP site: ftp.neccsdeast.com
NECC Support Services (U.S. andCanada customers only)
800-632-4525Fax: 801-981-3133
Email to NECC Support Servicesthrough a commercial onlineservice or the Internet
Internet email address:[email protected]
Note If you purchased your computer outside of the U.S. or Canada, please contactthe local NECC office or their dealers for support and service.
If you have access to a telephone, modem, and/or fax machine, you can use theseservices to obtain information about your system at any time, day or night, seven days aweek.
Not only do these services provide information about your NEC system, they can alsobe used to answer your questions and help solve any problems you may have with yoursystem, should that ever be necessary.
Getting Service and Support 11-3
NECC Web SiteIf you have a modem or are connected to a network with internet access, you can accessthe NECC Web site. You can do this through a commercial online service or throughyour Internet account. The NECC web site contains general information about NECCand its products, an online store, press releases, reviews, and service and supportinformation.
Look in the Service and Support area for the following:
! technical documentation, including Frequently Asked Questions, reference manuals,and warranty information
! BIOS updates, drivers, and Setup Disk files to download
! contact information, including telephone numbers for Technical Support and linksto vendor Web sites
! Click, the NECC Customer Service newsletter
! an automated email form for your technical support questions
! a Reseller’s area (password accessible).
To access NECC’s Home Page, enter the following Internet Uniform Resource Locator(URL) in your browser:
http://www.nec-computers.com/
NECC FTP SiteUse the Internet to access the NECC FTP (file transfer protocol) site to downloadvarious files (video drivers, printer drivers, BIOS updates, and Setup Disk files). Thefiles are essentially the same files as on the NECC Web site.
To access the NECC FTP site, enter the following Internet ftp address through yourservice:
ftp.neccsdeast.com/
Once in the FTP site, select the pubs directory link and follow the links to choose anddownload the file(s) you want.

11-4 Getting Service and Support
NECC Support ServicesNECC also offers direct technical support through Support Services. (NECC SupportServices is for U.S. and Canadian customers only; international customers shouldcontact the local NEC office or dealer for the support and service available in yourcountry.)
Direct assistance is available 24 hours a day, 7 days a week. Call the NECC SupportServices, toll free, at 1-800-632-4525 (U.S. and Canada only) for the following support.
! System hardware — toll-free phone support is limited to the length of the standardwarranty.
For hardware support after the standard warranty, get system hardware support for afee.
! Preinstalled software — toll-free phone support for 90 days from the time of yourfirst call to the NECC Support Services.
After the initial 90 days, get preinstalled software support for a fee.
Please have available your system’s name, model number, serial number, and as muchinformation as possible about your system’s problem before calling.
For outside the U.S. or Canada, please contact your local NEC office or dealer for thesupport and service available in your country.
Email/Fax to Support ServicesThe NECC Support Services offers technical support by email over the Internetnetwork if you have a modem. The Internet address is:
You can also fax technical questions to the NECC Support Services if you have accessto a fax machine or fax/modem. The fax number is:
801-981-3133
When using the email or fax support service, you should include the following words inthe subject field for prompt response from the appropriate technical person:
! Desktop
! Monitor
! Notebook.
Getting Service and Support 11-5
You should provide as much specific information about your questions as possible.Also, if you are sending a fax, please include your voice telephone number, faxnumber, model number and system serial number with the question. You will receive aresponse to your questions within one business day.

ASetting Up a Healthy Work Environment
! Making Your Computer Work for You
! Arrange Your Equipment
! Adjust Your Chair
! Adjust Your Input Devices
! Adjust Your Screen or Monitor
! Vary Your Workday
! Pre-Existing Conditions andPsychosocial Factors

A-2 Setting Up a Healthy Work Environment
Making Your Computer Work for YouComputers are everywhere. More and more people sit at computers for longer periodsof time. This appendix explains how to set up your computer to fit your physical needs.This information is based on ergonomics - the science of making the workplace fit theneeds of the worker.
Some nerve, tendon, and muscle disorders (musculoskeletal disorders) may beassociated with repetitive activities, improper work environments, and incorrect workhabits. Examples of musculoskeletal disorders that may be associated with certainforms of repetitive activities include: carpal tunnel syndrome, tendinitis, tenosynovitis,de Quervain's tenosynovitis, and trigger finger, as well as other nerve, tendon, andmuscle disorders.
Prolonged or improper use of a computer workstation maypose a risk of serious injury. To reduce your risk of injury, set up and use your computerin the manner described in this appendix.
Although some studies have shown an association between increasing hours ofkeyboard use and the development of some musculoskeletal disorders, it is still unclearwhether working at a computer causes such disorders. Some doctors believe that usingthe keyboard and mouse may aggravate existing musculoskeletal disorders.
Note Contact a doctor if you experience pain, tenderness, swelling, burning,cramping, stiffness, throbbing, weakness, soreness, tingling and/or numbness in thehands, wrists, arms, shoulders, neck, back, and/or legs.
Some people are more susceptible to developing these disorders due to pre-existingconditions or psychosocial factors (see “Pre-existing Conditions and PsychosocialFactors” later in the appendix).
To reduce your risk of developing these disorders, follow the instructions in thisappendix. If you experience discomfort while working at your computer or afterwards,even at night, contact a doctor as soon as possible. Signs of discomfort might includepain, tenderness, swelling, burning, cramping, stiffness, throbbing, weakness, soreness,tingling and/or numbness in the hands, wrists, arms, shoulders, neck, back, and/or legs.
Note To increase your comfort and safety when using your notebook computer asyour primary computer system at your home or office, note the followingrecommendations:
! use a separate, external keyboard attached to your notebook computer
! use a separate, external monitor attached to your notebook computer.

Setting Up a Healthy Work Environment A-3
Arrange Your EquipmentArrange your equipment so that you can work in a natural and relaxed position. Placeitems that you use frequently within easy reach. Adjust your workstation setup to theproper height (as described in this appendix) by lowering the table or stand that holdsyour computer equipment or raising the seat height of your chair. Position yournotebook computer directly in front of you for increased safety and comfort.
Adjust Your ChairYour chair should be adjustable and stable. Vary your posture throughout the day.
Check the following:
! Keep your body in a relaxed yet upright position. The backrest of your chair shouldsupport the inward curve of your back.
! Use the entire seat and backrest to support your body. Tilt the backrest slightly (90°to 105°). The angle formed by your thighs and back should be 90° or more.
! Your seat depth should allow your lower back to comfortably contact the backrest.Make sure that the backs of your lower legs do not press against the front of thechair.
! Extend your lower legs slightly so that the angle between your thighs and lowerlegs is 90° or more.
! Place your feet flat on the floor. Only use a footrest when attempts to adjust yourchair and workstation fail to keep your feet flat.
! Be sure that you have adequate clearance between the top of your thighs and theunderside of your workstation.
! Use armrests or forearm supports to support your forearms. If adjustable, thearmrests or forearm supports should initially be lowered while all the otheradjustments discussed in this appendix are made. Once all these adjustments arecompleted, raise the armrests or adjust the forearm supports until they touch theforearms and allow the shoulder muscles to relax.
Adjust Your Input DevicesNote the following points when positioning your notebook computer or any externalinput devices.
! Position your keyboard directly in front of you. Avoid reaching when using yourkeyboard or mouse.

A-4 Setting Up a Healthy Work Environment
! If you use a mouse, position it at the same height as the keyboard and next to thekeyboard. Keep your wrists straight and use your entire arm when moving a mouse.Do not grasp the mouse tightly. Grasp the mouse lightly and loosely.
! Adjust the keyboard height so that your elbows are near your body and yourforearms are parallel to the floor, with your forearms resting on either armrests orforearm supports, in the manner described previously. If you do not have armrestsor forearm supports, your upper arms should hang comfortably at your sides.
! Adjust the keyboard slope so that your wrists are straight while you are typing.
! Type with your hands and wrists floating above the keyboard. Use a wrist pad onlyto rest your wrists between typing. Avoid resting your wrists on sharp edges.
! Type with your wrists straight. Instead of twisting your wrists sideways to presshard-to-reach keys, move your whole arm. Keep from bending your wrists, hands,or fingers sideways.
! Press the keys gently; do not bang them. Keep your shoulders, arms, hands, andfingers relaxed.
Adjust Your Screen or MonitorCorrect placement and adjustment of the screen or external monitor can reduce eye,shoulder, and neck fatigue. Check the following when you position the screen orexternal monitor.
! Adjust the height of your screen or external monitor so that the top of the screen isat or slightly below eye level. Your eyes should look slightly downward whenviewing the middle of the screen or external monitor.
! Position your screen or external monitor no closer than 12 inches and no furtheraway than 28 inches from your eyes. The optimal distance is between 14 and 18inches.
! Rest your eyes periodically by focusing on an object at least 20 feet away. Blinkoften.
! Position the screen or external monitor at a 90° angle to windows and other lightsources to minimize glare and reflections. Adjust the monitor tilt so that ceilinglights do not reflect on your screen or external monitor.
! If reflected light makes it hard for you to see your screen or external monitor, use ananti-glare filter.
! Clean your screen or external monitor regularly. Use a lint-free, non-abrasive clothand a non-alcohol, neutral, non-abrasive cleaning solution or glass cleaner tominimize dust.

Setting Up a Healthy Work Environment A-5
! Adjust the screen or external monitor's brightness and contrast controls to enhancereadability.
! Use a document holder placed close to the screen or external monitor.
! Position whatever you are looking at most of the time (the screen or referencematerial) directly in front of you to minimize turning your head while you aretyping.
! Get regular eye check-ups.
Vary Your WorkdayIf you use your computer for prolonged periods, follow these instructions.
! Vary your tasks throughout the day.
! Take frequent short breaks that involve walking, standing, and stretching. Duringthese breaks, stretch muscles and joints that were in one position for an extendedperiod of time. Relax muscles and joints that were active.
! Use a timer or reminder software to remind you to take breaks.
! To enhance blood circulation, alter your sitting posture periodically and keep yourhands and wrists warm.
Note For more information on workstation setup, see the American NationalStandard for Human Factors Engineering of Visual Display Terminal Workstations.ANSI/HFS Standard No. 100-1988. The Human Factors Society, Inc., P.O. Box 1369,Santa Monica, California 90406.
Pre-Existing Conditions andPsychosocial Factors
Pre-existing conditions that may cause or make some people more susceptible tomusculoskeletal disorders include the following: hereditary factors, vascular disorders,obesity, nutritional deficiencies (e.g., Vitamin B deficiency), endocrine disorders (e.g.,diabetes), hormonal imbalances, connective tissue disorders (e.g., arthritis), priortrauma (to the hands, wrists, arms, shoulders, neck, back, or legs), priormusculoskeletal disorders, aging, fluid retention due to pregnancy, poor physicalconditioning and dietary habits, and other conditions.
Psychosocial factors associated with these disorders include: workplace stress, poor jobsatisfaction, lack of support by management, and/or lack of control over one's work.

A-6 Setting Up a Healthy Work Environment
Contact a doctor if you experience pain, tenderness, swelling, burning, cramping,stiffness, throbbing, weakness, soreness, tingling and/or numbness in the hands, wrists,arms, shoulders, neck, back, and/or legs.
This appendix was prepared in consultation with Dr. David Rempel of the University ofCalifornia/San Francisco Ergonomics Program and Mr. M.F. Schneider ofHUMANTECH, Inc., Ann Arbor, Michigan.
BSpecifications
! System Components
! Memory Map
! Interrupt Controllers
B-2 Specifications
System ComponentsThe following system component specifications are standard except where noted.
System ProcessorIntel Pentium III, 650-MHz, 700-MHz, 750-MHz with SpeedStep
Architecture64-bit Peripheral Component Interconnect (PCI) bus
Random Access Memory! Standard Main Memory
— 64-MB SDRAM 3.3V SO-DIMM, 64 bit data path, 100-MHz, CBR-refresh
! Optional Expansion — 1 slot
— Expandable in 64-MB, 128-MB 256-MB increments
— Maximum 512 MB
! Video RAM — 8 MB SDRAM (External) 125-MHz
! L1 Cache RAM — 16 KB code, 16 KB data, 4 way set associate, Write Back (data)
! L2 Cache RAM — 256 KB/On-die, TAG RAM: 32K x 8 bit, Speed: 15ns
Read-Only Memory512 KB x 8 bit, Flash ROM
Calendar ClockYear/month/day/hour/minute/second maintained by internal back-up battery
Specifications B-3
Input/Output (I/O) FacilitiesIntegrated industry-standard interfaces
! Parallel — 1 port, 25-pin D-sub (ECP and EPP support)
! Serial — 1 port, 9-pin D-sub
! Infrared — 1 port, IrDA-1 compatible
! VGA — 1 port, 15-pin high-density D-sub
! External Keyboard/External Mouse — 1 port, PS/2, 6-pin MiniDin; exclusionaryuse or both supported with optional Y-cable adapter
! Expansion — 1 port, 100-pin for optional NEC Port Replicator
! Microphone — 1 port, Mini Jack
! Stereo Headphones — 1 port, Mini Jack, .5 watts per channel
! DC In — 1 port, for AC adapter cable
! USB port — 1 port, 4 pin
! LAN port — RJ-45 interface (optional)
! Modem port — RJ-11 interface (optional)
SpeakersTwo built-in, 1.5 watts (W) each with a maximum 3W output
! 16-bit stereo, 48 Khz
! 64-Voice wave table synthesizer support
! 3D stereo sound
! Sound BlasterPRO compatible
! MIDI Roland: MPU401, UART Mode compatible
! ESS Maestro2E Rev. B (PCI Audio) + ESS 1921 (AC97 Link)
PC Card Slots! Two 32-bit card slots for two Type II PC cards or one Type III PC card, 5 V or 3.3
V interface
! 32-bit CardBus support

B-4 Specifications
LCD PanelThe LCD panel is a 14.1-inch or high resolution active matrix Thin Film Transistor(TFT), Extended Graphics Array (XGA) color display
— Resolution — 1024 x 768
— Colors — 16 million, maximum
KeyboardMembrane 85 keys (both U.S. and International) with standard QWERTY-key layout(International keyboards are country-specific)
! Function keys — 12 keys
! Cursor Control keys — 8 keys; arrow keys arranged in inverted T layout
! Numeric keypad — embedded
! Fn key — function key for ROM-based key functions
! Stroke — 3 mm
! Height — 9.5 mm
! Pitch — 19 mm
SuperDisk™ Drive! Formatted Capacity:
— Optical diskette — 120 MB
— High Density floppy diskette — 1.44 MB
— Double Density floppy diskette — 720 KB
! Data Transfer Rate
— 120-MB: 680 KB/S (max.)
— 1.44-MB: 150 KB/S (max.)
— 720-KB: 75 KB/S (max.)
! Track to track seek rate
— 120-MB: 20ms (typ)
— 1.44-MB/720-KB: 25ms (typ)
Specifications B-5
Hard Disk DriveSpecifications vary depending upon model:
! Ultra DMA/33 support
! Capacity — Internal 6.x, 12.x, or 18.x GB
! Drive height — 9.5 mm
! Read/write track-to-track seek rate — 3 ms – 4.5 ms
! Average seek time — 12 ms – 14 ms
! Revolutions per minute — 4000 - 4200
! Data transfer rate
— 16.6 MB/sec (PIO mode4/DMA mode2)
— 33.3 MB/sec (ultra DMA)
! Media data rates — 88.0 bit/sec – 118.0 bit/sec
! Mean Time Between Errors (MTBF) — 300,000 hours
24X-speed CD-ROM Drive! Type — 5-inch CD-ROM Pack
! Average Data Transfer Rates
— 2550 KB/second (mode 1)
— 2907 KB/ second (mode2)
! Read Rate — 3600 KB/sec max, 2550 KB/sec avg
! Burst Transfer Rate — 16.7 MB/sec, PIO mode4/DMA mode
! Average Access Time
— 120 ms (Random)
— 250 ms (Fullstroke)
! Memory Buffer — 128 KB
! Interface — IDE (ATAPI)
! Photo CD Compatibility — Multisession Photo CD,Video CD (CD-1, CD-I Ready, CD-G, CD-Plus, CD-DA,CD-EXTRN, and CD-ROM XA)

B-6 Specifications
8X DVD-ROM Drive! Dimensions — 12.7 mm (h), 128.0 mm (w), 127.0 mm (d)
! Burst Transfer Rate — 16.67 MB/sec, PIO/Multiword DMA
! Read Rate
— CD, 3600 KB/sec max.
— DVD, 8115 KB/sec max.
! Average Access Time
— DVD, 270 ms (Random), 480 ms (Full Stroke)
— CD, 180 ms (Random), 270 ms (Full Stroke)
! Data Buffer — 512 KB
! Interface — IDE (ATAPI)
! CD Compatibility — CD-Audio, CD-ROM (mode 2, form 1, form 2), CD-ROMXA (mode 2, form 1, form2), CD-I (mode 2, form 1, form 2, Ready, Bridge), CD-WO, CD-RW, Photo CD, Video CD, Enhanced Music CD, CD-TEXT
! DVD Compatibility — DVD-5, DVD-9, DVD-10, DVD-R (3.95G)
CD Read/Write Drive! Speed
— Read, max 20X
— CDRW max 14X
! Read Transfer Rate
— 150 KB/s, normal speed
— 3000 KB/s, 20X, maximum speed
— 16.6 MB/s, Mode 4 PIO
— 16.6 MB/s, Multi Mode 2 DMA mode (not Ultra DMA)
! Write Transfer Rate
— 150 KB/s, normal speed
— 300 KB/s, 2X speed
— 600 KB/s, 4X speed
! Audio Out — 0.8 +/-0.25 Vrms

Specifications B-7
! Operating Conditions
— Shock, 1G (11ms)/read, 0.5G (11ms)/write
— Vibration, 0.2G/read, 0.1G/write
PowerAC Adapter
! Input Voltage — 100 to 240 volts (V) AC, 50 or 60 Hz, 1.5 A
! Output Voltage — 19.0 V DC, 60 Watt
! Australia, Europe and Asia use an AC power cable specific to each country’sstandards.
Battery Pack
! Type — eight- or twelve-cell Lithium Ion (Li-Ion)
! Output Voltage — 14.4 V
! Capacity — 3600 mAh (eight-cell) or 5400 mAh (twelve-cell)
! Recharging Time —- Approximately 3 hours when the system is on or off.
Bridge Battery
When fully charged, backs up memory contents and system status when in Standby(Windows 98/2000) or Suspend (Windows NT) mode, giving you time to install a fullycharged main battery.
DimensionsSystem
! Width — 12.1 in. (308 mm)
! Depth — 9.9 in. (253 mm)
! Height — 1.4 in. (36.25 mm)
Weight6.4 lb (2.9 kg) – with 8-cell battery

B-8 Specifications
Recommended EnvironmentOperation
! Temperature — 41°F to 95°F (5°C to 35°C)
! Relative Humidity — 20% to 80% (Noncondensing)
Storage
! Temperature — -4°F to 104°F (-20°C to 40°C)
! Relative Humidity — 20% to 80% (Noncondensing)
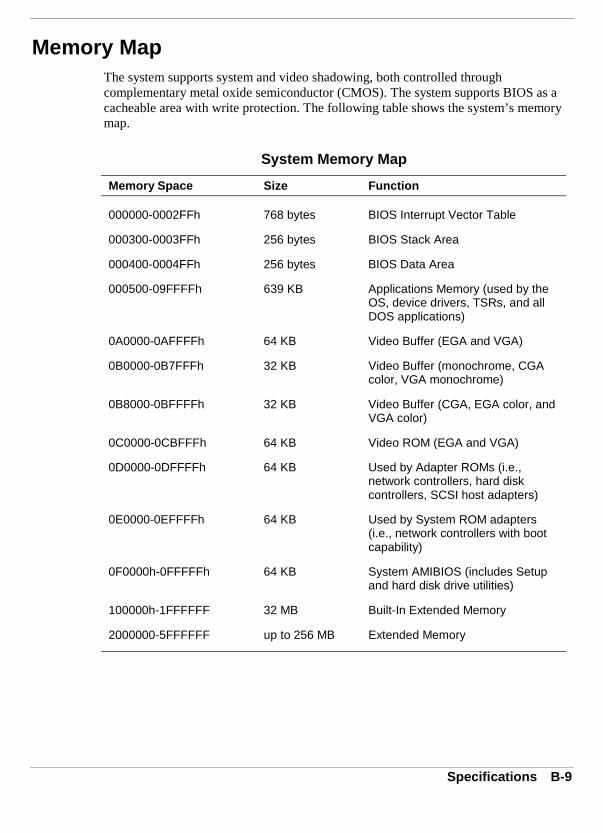
Specifications B-9
Memory MapThe system supports system and video shadowing, both controlled throughcomplementary metal oxide semiconductor (CMOS). The system supports BIOS as acacheable area with write protection. The following table shows the system’s memorymap.
System Memory Map
Memory Space Size Function
000000-0002FFh 768 bytes BIOS Interrupt Vector Table
000300-0003FFh 256 bytes BIOS Stack Area
000400-0004FFh 256 bytes BIOS Data Area
000500-09FFFFh 639 KB Applications Memory (used by theOS, device drivers, TSRs, and allDOS applications)
0A0000-0AFFFFh 64 KB Video Buffer (EGA and VGA)
0B0000-0B7FFFh 32 KB Video Buffer (monochrome, CGAcolor, VGA monochrome)
0B8000-0BFFFFh 32 KB Video Buffer (CGA, EGA color, andVGA color)
0C0000-0CBFFFh 64 KB Video ROM (EGA and VGA)
0D0000-0DFFFFh 64 KB Used by Adapter ROMs (i.e.,network controllers, hard diskcontrollers, SCSI host adapters)
0E0000-0EFFFFh 64 KB Used by System ROM adapters(i.e., network controllers with bootcapability)
0F0000h-0FFFFFh 64 KB System AMIBIOS (includes Setupand hard disk drive utilities)
100000h-1FFFFFF 32 MB Built-In Extended Memory
2000000-5FFFFFF up to 256 MB Extended Memory
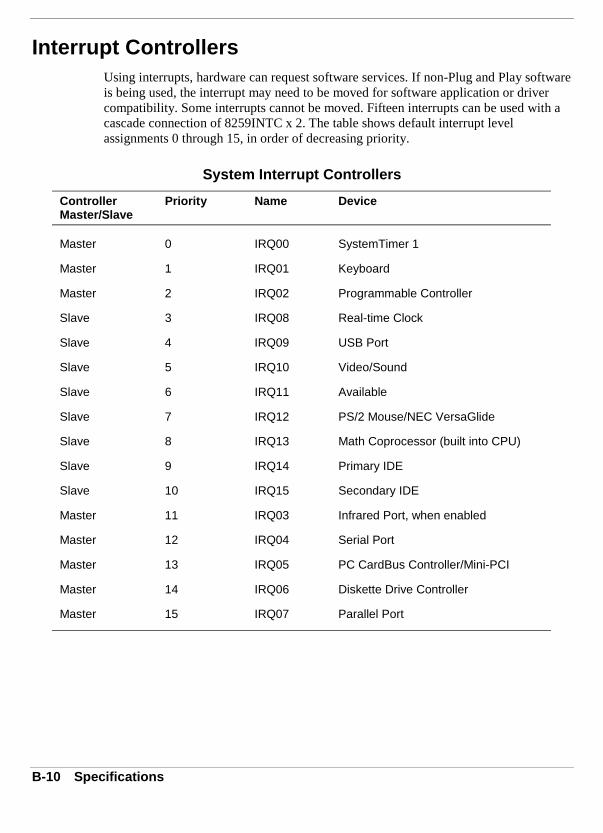
B-10 Specifications
Interrupt ControllersUsing interrupts, hardware can request software services. If non-Plug and Play softwareis being used, the interrupt may need to be moved for software application or drivercompatibility. Some interrupts cannot be moved. Fifteen interrupts can be used with acascade connection of 8259INTC x 2. The table shows default interrupt levelassignments 0 through 15, in order of decreasing priority.
System Interrupt Controllers
ControllerMaster/Slave
Priority Name Device
Master 0 IRQ00 SystemTimer 1
Master 1 IRQ01 Keyboard
Master 2 IRQ02 Programmable Controller
Slave 3 IRQ08 Real-time Clock
Slave 4 IRQ09 USB Port
Slave 5 IRQ10 Video/Sound
Slave 6 IRQ11 Available
Slave 7 IRQ12 PS/2 Mouse/NEC VersaGlide
Slave 8 IRQ13 Math Coprocessor (built into CPU)
Slave 9 IRQ14 Primary IDE
Slave 10 IRQ15 Secondary IDE
Master 11 IRQ03 Infrared Port, when enabled
Master 12 IRQ04 Serial Port
Master 13 IRQ05 PC CardBus Controller/Mini-PCI
Master 14 IRQ06 Diskette Drive Controller
Master 15 IRQ07 Parallel Port

CFrequently Asked Questions
! External Mouse
! Display
! PC Cards
! Diskette Drive
! Booting
! Power Management
! Miscellaneous
C-2 Frequently Asked Questions
External Mouse
How can a PS/2 mouse and an external keyboard be connected to thenote book at the same time?
The NEC Versa SXi computer has only one PS/2 port that accommodateseither a mouse or a keyboard. You can get around this by purchasing an optional Yadapter or NEC Versa Port Replicator. Both options provide two PS/2-style ports.
Contact your NECC dealer for ordering information.
Why won't a serial mouse work when connected to the PS/2 port withthe appropriate adapter?
The NEC Versa SXi computer is designed to find a mouse connected tothe PS/2 port only. The system does not recognize a serial mouse with an adapter.
Display
What is the maximum resolution I can run in simultaneous mode?
The maximum resolution in simultaneous mode is 1024 x 768 for XGApanels. You can obtain higher resolutions if you connect a higher-resolution externalmonitor and switch to CRT-only mode.

Frequently Asked Questions C-3
How can I change my video drivers?
In Windows, go to Start, Settings, Control Panel, and double click theDisplay icon. Click the Settings tab, click Advanced Properties, click on the Adaptertab and Update Driver or click Change. Click Show all devices from the Select Devicescreen. Find the video driver you need, or insert a diskette or CD into the appropriatedrive. Click on Have Disk and follow the on-screen instructions to install the videodriver.
PC Cards
In which slots do my PC cards go?
Your PC cards can go into either slot if they are NEC-approved cards.Other software may not support the use of both slots. Type III cards only fit in thebottom slot (slot 0).
Is there any instance when a modem or network card is onlysupported in one slot?
This could be true in cases where the PC card firmware is being upgraded.Read the release notes that accompany the upgrade.

C-4 Frequently Asked Questions
Can I run two of the same type cards simultaneously?
Yes, Windows 98 or Windows 2000 configures each card. If they are bothmodems, configure each for a different Com port and different available interruptsunder the ports icon in the Windows Control Panel or from Device Manager inWindows 98 or Windows 2000.
In Windows NT, SystemSoft’s CardWizard configures each card. Use CardWizard tomonitor PC card status in the Windows NT environment.
Why do certain PC cards cause my battery life to drop noticeably?
Certain hard disk cards and wireless radio cards consume more powerthan others and can impact battery life. When not using any PC card, close allapplications using the card and pop it part of the way out of the slot to save power.
In Setup, I disabled or reconfigured peripheral devices (like the portsor sound), yet I am unable to use the freed IRQs or I/O address resources with myPC Cards?
To provide a stable platform free of conflicts, NECC excluded someresources from PC card use.

Frequently Asked Questions C-5
Diskette Drive
Why can't I boot from the diskette drive?
To boot from the diskette drive, be sure that you have a diskette in thediskette drive containing operating system files. Be sure to check the Boot DeviceSetup parameters in the BIOS Setup Utility to determine the designated sequence ofboot devices. See Chapter 3, “Using the BIOS Setup Utility.”
See your operating system documentation for information about creating systemdiskettes.
What happens if I leave a diskette in my diskette drive?
Shutting down your system with a diskette in the diskette drive candamage the data on your diskette and your diskette drive. You should remove thediskette before powering off.
How do I format a diskette?
In Windows, double click on the My Computer icon and then right click(click the right-hand mouse button) on the 3.5-inch Floppy or SuperDisk icon(depending upon your hardware configuration. Select Format and choose the formatprocess that best suits your needs.
To format high density 1.44-MB diskettes - In DOS, type format a: and press Enter. Ifyou want a bootable diskette, type format a: /s and press Enter.

C-6 Frequently Asked Questions
What type of diskette do I use in my diskette drive?
Some systems ship with a 1.44-megabyte (MB) diskette drive that uses3.5-inch high density (HD) diskettes. These diskettes are also called double-sided,high-density (DSHD) diskettes. You can store 1.44 MB of information on thesediskettes.
Your diskette drive can also use 3.5-inch double-sided, double-density (DSDD)diskettes. These diskettes only hold 720 kilobytes of data - about half the amount ofdata that 1.44-MB diskettes hold.
Some systems ship with the SuperDisk™ drive that uses 120-MB diskettes. You canstore up to 120-MB of information on these diskettes. The SuperDisk drive is backwardcompatible and uses 720-KB and 1.44-MB diskettes.
Booting
What is the difference between a warm boot and a cold boot?
A warm boot restarts the system while system power is on. A warm bootis also a software reset. A warm boot clears volatile system memory and reloads theoperating system.
In Windows, go to Start, Shut Down, Restart the computer. In DOS mode, press Ctrl,Alt, and Del to warm boot the system.
A cold boot is a system start with power off. A cold boot also resets the hardware. Itchecks the hardware and reloads the operating system.
To perform a cold boot, go to Start, Shut Down, to shut down the computer. If power ison, turn the power off using the system unit Power button, wait at least five seconds,and then turn the power on.

Frequently Asked Questions C-7
Power Management
Does my system come with power management features enabled?
Your system’s default settings are configured with power managementfeatures enabled when on DC (battery) power and disabled when on AC power. InWindows NT, use the BIOS Setup utility to modify the default settings, if desired.
If you do not use the keyboard, mouse, or drives for the preset length of inactive time,your screen goes blank and your system goes into a power saving mode of operation.This is known as Standby mode (Windows NT) or LCD timeout (Windows 98/2000).
When your screen goes blank, just press the Space Bar or move your mouse toreactivate your system. If the power status LED blinks, the system has entered the nextlevel of power management, Suspend mode (Windows NT) or Standby mode(Windows 98/2000). See the following questions and answers.
What is the purpose of Suspend to RAM? (Windows NT)
Suspend-to-RAM in Windows NT places the system in a deeper state of“sleep” and requires that you press the Power button again to bring it back to Activemode. (The System Switch BIOS parameter must be set to “Sleep.”)
Putting your system into Suspend initiates the Suspend power-saving mode and is aconvenient way of conserving energy when you are going to be away from your systemfor short period of time.

C-8 Frequently Asked Questions
What is the purpose of Suspend to RAM? (Standby in Windows98/2000)
You can initiate full Suspend-to-RAM in Windows 98/2000 by accessingStart, Shut Down, Standby. This places the system in a deeper state of “sleep” andrequires that you press the Power button to resume operation.
Putting your system into Standby initiates the Standby power-saving mode and is aconvenient way of conserving energy when you are going to be away from your systemfor a short period of time.
What is the function of Suspend-to-File? (Windows NT)
In Windows NT, Suspend-to-File provides the greatest power savings byputting the system in a maximum power shutdown. When the system goes into STFmode, it saves data and system status and then shuts off power to all components. STFmode lets you save power without first saving your work. Resuming from STF moderequires less time than performing a cold boot.
Your system must be configured for STF. In the BIOS Power Management Setup,enable the “Auto save-to-file” parameter.

Frequently Asked Questions C-9
What is the function of Suspend-to-File? (Hibernation in Windows98/2000)
Suspend-to-File (Hibernation) provides the greatest power savings byputting the system into a maximum power shutdown. When the system goes into STFmode, it saves data and system status and then shuts off power to all components. STFmode lets you save power without first saving your work. Resuming from STF moderequires less time than performing a cold boot.
Your system must be configured for STF/Hibernation. In Windows 98 PowerManagement Properties, check the box labeled “enable hibernate support,” under theHibernate tab. In Windows 2000, in the BIOS Power Management Setup, enable the“Auto save-to-file” parameter.
How do I bring my system out of Standby mode (Windows NT) orLCD timeout (Windows 98/2000)?
Press the Power button to bring the system out of Standby mode. Movingyour VersaGlide pointer or using your keyboard brings the system out of LCD timeout.
How do I bring my system out of Suspend mode (Windows NT) orStandby mode (Windows 98/2000)?
Press the Power button to bring the system out of Suspend mode(Windows NT) or Standby mode (Windows 98/2000).

C-10 Frequently Asked Questions
What is a time-out?
A time-out is the amount of time your system or a particular component isinactive.
Can I disable my system's power management features?
Yes. In the Windows NT environment, simply press the PowerManagement switch, Fn+F7 on the system keyboard until you hear a single beep. OtherPower Management settings include:
! Custom, 2 beeps
! Highest Performance, 3 beeps
! Longest Life, 4 beeps
In Windows 98, click on Start, Settings, Control Panel. In Control Panel, double clickon the Power icon. In the Power Properties screen, uncheck “Allow Windows tomanage power use on this computer.”
Miscellaneous
How do I set the time and date?
You can change the time and date in Windows as follows.
! Double click the time in the lower right corner of the screen.
! Change the date and time as needed.

Frequently Asked Questions C-11
How do I speed up my application?
If the application you are using runs really slow, close any otherapplications you are not using - this should speed things up.
If your application still runs slow, you might consider installing additional memory (see“Memory Modules” in Chapter 5).
Also, refer to your operating system's documentation for tips on optimizing systemperformance.
Why do I get a message “Insufficient memory” when I run somegames? I have 64 MB of memory.
The “Insufficient memory” refers to the 640 kilobytes of (DOS) basememory. Since there are drivers being loaded at power on, the amount of memory canbe lower than the game requires.
Contact the game manufacturer and request advice to create a boot disk. This loadsonly the drivers necessary to run the game.
How do I find help in a Windows application?
If you need help in a Windows application, click on a Help button or Helpmenu item. Most applications provide online help. If the application doesn't providethese, try pressing F1.

C-12 Frequently Asked Questions
I’m having a problem using the IR port. What can I do?
Verify that the IR port is enabled. Enter the BIOS Setup Utility, access thePeripheral Setup menu and be sure that the IR serial port setting contains an availableCOM port and IRQ setting.
Check that both the sending and receiving system and device are using the sametransmission software.
If you are transmitting underneath a fluorescent light, try repositioning the system anddevice so that they are not directly under the fluorescent light.
Reference the IR setup online help for further information.
Glossary 1
Glossary
A
AC adapterA device that connects an NEC Versa notebook computer and an AC wall outlet toprovide AC power for running the system and recharging the battery.
A/D conversionThe process of converting an analog signal into a digital signal.
animationThe art of making things appear to move in two-dimensional (2-D) or three-dimensional (3-D) space and making events happen over time.
applications programsSoftware designed to perform specific functions, like solving business or mathematicalproblems.
audioThe range of acoustic, mechanical, or electrical frequencies that humans hear.
B
base RAMArea of system memory between 0 and 640 kilobytes available to the user for theoperating system and application programs.
BIOSBasic Input Output System. A collection of computer routines, usually burnt into ROM,that controls the real-time clock, keyboard, disk drives, video display, and otherperipheral devices.
bitBinary digit. The smallest unit of computer data.
bits per second(bps) A unit of transmission. Also called baud rate.
boardPrinted circuit board (PCB). Board on which computer components are soldered andthin wires are printed to connect the components.

2 Glossary
bootTo start up a computer. See cold boot and warm boot.
busAn electronic circuit within a computer used for transmitting data or electrical powerfrom one device to another.
byteGroup of eight contiguous bits.
C
CardBusA 32-bit high-performance bus defined by the new PC Card Standard and released bythe PCMCIA standards body and trade associations. CardBus offers wider and faster32-bit bus and bus mastering operation for improved adapter performance and canoperate at speeds up to 32-MHz.
CDCompact disc. A polished metal platter capable of storing digital information. The mostprevalent types of compact disks or those used by the music industry to store digitalrecordings and CDs used to store computer data. Both types are read-only, whichmeans that once the data is recorded onto them, they can only be read or played.
CD audioAlso called digital audio, uses the same format as conventional music CDs. CD audiosounds have been digitized at a high sampling rate.
CD read/write driveThe CD read/write drive loads and starts programs from a compact disc (CD) or playsyour audio CDs. It also writes information to a CD.
CD-ROM driveCompact Disc Read-Only Memory. A computer-controlled device that reads high-capacity optical discs and sends the output to the computer.
clockElectronic timer used to synchronize computer operations.
CMOSComplementary Metal Oxide Semiconductor. A chip that contains nonvolatile memoryin the NEC Versa. CMOS is backed up by an internal battery that preservesclock/calendar data and system configuration parameters stored in CMOS.

Glossary 3
cold bootProcess of starting up the computer by turning on the power. If power is already on, theprocess means to turn off the computer and turn it on again. A cold boot reinitializes alldevices.
crtCathode-Ray Tube. A type of display screen used in desktop monitors. It forms thescreen image using tiny dots called, pixels. See also LCD.
cursorA movable image on the display screen that indicates where the next entered dataappears.
D
defaultA value, option, or setting that the computer automatically selects until you direct itotherwise.
digital audioRecorded sounds such as speech and sound effects. These are played back by the audiocircuit’s Digital-to-Analog Converter (DAC).
digital soundA description of a sound wave that consists of binary numbers.
digitizingThe process of converting an analog signal into a digital representation.
disketteA thin flexible platter coated with a magnetic material for storing information.
diskette driveA magnetic drive that writes on and retrieves data from a diskette.
DSTNDualscan Super-Twisted Nematic. A type of technology used in some NEC Versa LCDscreen displays.
DVDA denser, faster CD that can hold video as well as audio and computer data. Short fordigital versatile disk or digital video disk, this new type of CD-ROM holds a minimumof 4.7-GB (gigabytes), enough for a full-length movie.
4 Glossary
E
enhanced VGAA video interface that offers more colors or higher resolution than VGA.
extended RAMThe area of RAM above the first megabyte of memory in the system available forenhancing system performance.
F
FIRFast Infrared, an infrared technology that sends data at 4.0 Mbit/second(4 million bits per second).
FM synthesisA technique for synthesizing sound that uses a combination of modulated sine waves toproduce different waveforms.
function keyThe set of keys on the keyboard (usually F1 through F12) that let you get help and errormessage information or quickly select frequently used commands.
H
hard diskA rigid magnetic storage device that provides fast access to stored data.
hardwareThe electrical and mechanical parts from which a computer is made.
hertz(Hz) A unit of frequency equal to one cycle per second.
hot keyCombination of two or three keys that you press simultaneously for a particularfunction.
I
input/output(I/O) The process of transferring data between the computer and external devices.

Glossary 5
IDEIntelligent Drive Electronics. A hard disk drive type that has controller electronics builtinto the drive and delivers high throughput.
infrared communicationTechnology that uses infrared waves to communicate data between the IR-equippeddevices without the use of cables. The IR port on the NEC Versa is Infrared DataAssociation (IrDA) compatible.
interfaceA connection that enables two devices to communicate.
interruptA special control signal from an I/O device that diverts the attention of themicroprocessor from the program to a special address.
K
kilobyte(KB) 1024 bytes.
L
LANLocal Area Network.
LCDLiquid Crystal Display. An LCD consists of a thin sandwich of two glass plates withsealed edges, containing nematic liquid-crystal material that forms the screen image.NEC Versa displays are LCD type.
loadTo copy a program into the computer's memory from a storage device.
M
megabyte(MB) 1,048,576 bytes.
memoryElectronic storage area in a computer that retains information and programs. Acomputer has two types of memory — read-only memory (ROM) and random accessmemory (RAM).
6 Glossary
menuA video display of programs or options.
microprocessorA semiconductor central processing unit that is the principal component of amicrocomputer. Usually contained on a single chip that includes an arithmetic logicunit, control logic, and control-memory unit.
MIDIMusical Instrument Digital Interface. A standard serial bus, digital interface designed toconnect electronic musical devices. MIDI has no innate sound of its own.
mini-PCIA communications standard that offers smaller size, greater design flexibility, andreduced cost for mobile platforms.
MIRMedium Infrared, an infrared technology that sends data at 1.152 Mbit/second(1,152,000 bits per second).
MMXA set of 57 multimedia instructions built into Intel's Pentium microprocessors. MMX-enabled microprocessors handle many common multimedia operations, such as digitalsignal processing (DSP), that are normally handled by a separate sound or video card.However, only software especially written to call MMX instructions — MMX-enabledsoftware — can take advantage of the MMX instruction set.
modeA method of operation; for example, the NEC Versa operates in either normal orpower-saving modes.
modemMOdulator-DEModulator. A device that links computers over a telephone line.
MPEG (1, 2, 3)The MPEG (Moving Pictures Experts Group) standard is used to encode motionimages. The MPEG player program in Windows lets you play back MPEG files.
multimediaIntegrated forms of electronic media such as sound, text, graphics, and video.
Glossary 7
N
nonvolatile memoryStorage media that retains its data when system power is turned off. Nonvolatilememory in the NEC Versa is a complementary metal oxide semiconductor (CMOS)chip which is backed up by an internal battery. The backup battery preserves theclock/calendar data and system configuration parameters stored in CMOS. See volatilememory.
O
operating systemSet of programs that manage the overall operation of the computer.
overwriteStoring information at a location where information is already stored, thus destroyingthe original information.
P
pageA type of message transmission in which a message is sent or received via modem to apaging device from a computer (with paging communications software) or telephone.
parallel interfaceInterface that communicates multiple data bits at a time.
parallel printerA printer with a parallel interface.
parameterA characteristic of a device or system.
partitionProcess of dividing mass storage (hard disk drive) into isolated or separate sections.Partitioning a hard drive creates additional logical drives, e.g., a 5.1-GB hard drivepartitioned into three logical drives creates drives C, D, and E. Partitioning facilitatesfile management by allowing you to isolate the computer’s operating system to drive Cwhile storing applications and data files on separate drives D and E (also referred to aspartitions).
passwordA string of characters that the user must enter before the system allows access orsystem privileges.

8 Glossary
PC CardsA credit card sized peripheral interface standard for portable devices. Types of PCcards (also known as PCMCIA cards) currently offered by major vendors includefax/modems, LAN, storage cards, and wireless communications devices.
peripheralInput or output device not under direct computer control. A printer is a peripheraldevice.
pixelsPicture elements. Tiny dots that make up a screen image.
portProvides the means for an interface between the microprocessor and external devices.A cable connector is usually plugged into the port to attach the device to the computer.
processorIn a computer, a functional unit that interprets and executes instructions.
promptA special symbol indicating the beginning of an input line. Also a message that appearson the screen indicating that the user must take a certain action.
Q
QWERTYThe QWERTY keyboard, designed in the 1800s for mechanical typewriters, refers tothe first six keys (QWERTY) on the top row of letters on the standard keyboard.
R
RAMRandom Access Memory. A storage device into which data is entered and from whichdata is retrieved in a nonsequential manner.
readTo extract data from a storage device such as a diskette.
ROMRead-Only Memory. Memory in which stored data cannot be modified by the userexcept under special conditions.

Glossary 9
resetThe process of returning a device to zero or to an initial or arbitrarily selectedcondition.
resolutionThe degree of screen image clarity. Video display resolution is determined by thenumber of pixels on the screen. Resolution is usually specified in pixels by scan lines,for example, 640 by 480. See pixels.
RS-232CStandard interface for serial devices. This port is sometimes referred to as the serialport.
S
scannerAn optical device that reads printed material and converts it to a computer screenimage.
serial interfaceAn interface that communicates information one bit at a time.
serial printerA printer with a serial interface.
SIRSerial Infrared, an infrared technology that sends data at 2.4 Mbit/second (2,400,000bits per second).
SO-DIMMSmall outline dual-inline memory module. A small circuit board that holds memorychips. A dual in-line memory module (DIMM) has a 64-bit path.
softwarePrograms that run on a computer such as operating systems, word processors, andspreadsheets.
SpeedStep technologyIntel’s SpeedStep technology provided with some Pentium III processors lets youcustomize high-performance computing on your notebook computer. When powered bya battery, the processor drops its computing speed to lower power consumption andconserve battery life.

10 Glossary
SP/DIFSony and Philips Digital Interconnect Format. SP/DIF enables a computer system toproduce digital audio output through the use of an optical output cable to an opticaldisk device.
Standby (Windows 98/2000) or Suspend (Windows NT) modeA state of power management that puts the system to “sleep.” Standby/Suspend modeshuts down all devices in the system while retaining data and system status.
SuperDiskA high capacity diskette drive that uses laser-servo technology to read from and writeto specially designed 120-MB diskettes. The SuperDisk is backward compatible andreads 1.44-MB and 720-KB diskettes.
SVGASuper Video Graphics Array. Graphics technology that supports up to 256 or morecolors and a graphics resolution of 800 by 600 pixels.
system boardThe main printed circuit board inside the system unit into which other boards and majorchip components, such as the system microprocessor, are connected.
s-videoShort for super-video, a technology for transmitting video signals over a cable bydividing the video information into two separate signals: one for color, and the other forbrightness. When sent to a television, s-video produces sharper images and superiorcolor definition.
T
TFTThin Film Transistor. A type of NEC Versa LCD color screen that supports 256 ormore colors.
U
USBUniversal Serial Bus. This new external bus standard supports the connection of up to127 peripheral devices, such as mice, modems, and keyboards. USB supports plug-and-play installation on some systems.
Glossary 11
V
VersaGlideA small, touch-sensitive pad used as a pointing device on your NEC Versa notebookcomputer. With the VersaGlide, you can move your finger along the pad to move thecursor or simulate a mouse click by tapping the pad.
VGAVideo Graphics Array. Graphics technology that supports up to 256 colors and agraphics resolution of 640 by 480 pixels.
volatile memoryStorage media that loses its data when system power is turned off. Standard memoryand memory that you add to the NEC Versa are volatile memory. See nonvolatilememory.
W
warm bootProcess of resetting the computer without turning off the power through keyboard input(pressing Ctrl, Alt, and Del keys simultaneously). The system returns to an initial orarbitrarily selected condition.
warm swapProcess of swapping devices in and out of a computer system without turning off thepower. The system must be in a sleep state before removing or inserting a device.
waveformA graphic representation of a sound wave as displayed on an oscilloscope, whichconverts sound waves into electronic signals.
writeTo record or store information to a storage device.
X
XGAExtended Graphics Array. This high-resolution graphics standard supports640 x 480 – 1024 x 768 pixel and 16 million simultaneous colors. XGA also supportsnon-interlaced monitors.

12 Glossary
Z
zoomed videoA direct high-speed connection between the video, audio, and graphics subsystemswithin the computer that provides the high-quality path required for smooth videoplayback or TV tuner transmission. Zoomed video technology allows data transferdirectly between a PC card and VGA controller allowing notebook computers toconnect via PC card to real-time multimedia devices such as video cameras.

Index-1
AAC adapter, 7-2
connecting, 2-3power port, 1-10using, 2-3
ACPI, 3-10, 3-16, 3-20advanced power settings, 3-19, 3-22alarms, 3-18, 3-21hibernation, 3-19, 3-23power management states, 3-23power meter, 3-18, 3-22power schemes, 3-17, 3-20
Advanced Configuration and Power Interface,3-10, 3-16, 3-20
Advanced power settings, 3-19, 3-22Alarm
critical battery, 3-18, 3-22low battery, 3-18, 3-21
Alarms, 3-18, 3-21APM
power management states, 3-24Application and Driver CD, 4-9
dialog box, 4-9installing, 4-10launching, 4-9
AudioAVI files, 9-2MIDI files, 9-2WAV files, 9-2
Auto play, 5-8Automatic STF, 3-12
BBattery
bay, 1-14bridge, 2-11charging LED, 1-4CMOS, 2-11extending life, 2-6handling, 2-7inserting, 2-9
main, 2-11precautions, 2-10recharging precautions, 2-10refresh, 3-15release latch, 1-12, 1-13system, 2-11when to change, 2-7
BIOSlanguage setting, 3-15obtaining update, 3-26performing update, 3-27preparing update disk, 3-26updating, 3-26
BIOS setupadvanced CMOS, 3-6boot device, 3-13checking parameters, 3-4entering, 3-2introducing, 3-2main menu, 3-3other options, 3-15pausing the screen, 3-2peripheral, 3-14screens, 3-3standard CMOS, 3-5system security, 3-7using keys, 3-4
Bootpassword, 3-7sector virus protection, 3-6
Bridge battery, 2-11
CCD
auto play, 5-8care, 5-8loading, 5-7read/write drive, 5-9
CD-ROM drive, 5-7, 9-4features, 5-7
Cleaning your NEC Versa, 2-13Closing LCD panel, 3-19, 3-22
Index

Index-2
CMOS battery, 2-11Connecting
AC adapter, 2-3Control keys, 1-9Critical battery alarm, 3-18, 3-22Cursor control keys, 1-9
DDetermining battery status, 2-5Digital video files, 9-5Dip switch settings, 3-28Diskette
drive, 3-5DVD-ROM drive, 5-9
EEmail/fax support services, 11-4Entering BIOS setup, 3-2Establishing passwords, 3-7External
audio options, 8-4keyboard, 8-4monitor, 8-2mouse, 8-4speakers, 9-5
FFan, 1-13FAQs
booting, C-6diskette drive, C-5display panel, C-2external mouse, C-2miscellaneous, C-10PC cards, C-3power management, C-7
FTP site, 11-3Full disk restore, 4-13Function keys, 1-8
GGetting through customs, 7-3Graphics aperture, 3-6
HHard disk
turning off, 3-21Hard disk drive, 5-10
moving, 3-10turning off, 3-17
HDD password, 3-7, 3-8HDPREPEZ utility
using, 4-8Headphones, 1-12, 9-4Height adjustment feet, 1-14Hibernate
mode, 3-19, 3-23Windows 98/2000, 3-23
Hibernation, 3-19, 3-23Hot swap, 5-3
IIncreasing system memory, 5-14Inserting the battery pack, 2-9Installing
hard disk drive, 5-10LAN/Modem guides, 6-6SO-DIMMs, 5-14
Installing peripheral devicesexternal monitor, 8-2keyboard, 8-4mouse, 8-4parallel device, 8-2printer, 8-2serial device, 8-3USB, 8-5
Internaldevices, 3-5hard disk drive, 3-15, 5-10HDD password, 3-7mouse, 3-6speakers, 9-5
Internet Connection WizardWindows 98/2000, 6-7
Internet Connections, 6-7Interrupt controllers, B-10

Index-3
IR port, 1-12, 3-15, 6-8enabling in Windows 2000, 6-9enabling in Windows 98, 6-8guidelines for using, 6-8using, 6-8
KKensington Lock, 1-10Keyboard, 1-5, 1-8
LLAN
port, 1-11LCD
closing panel, 3-19lid latch, 1-12, 1-13panel, 1-5panel features, 1-4panel view expansion, 3-6Suspend, 3-12timeout in Windows 98/2000, 3-23
LCD panelclosing, 3-22
Low batteryalarm, 3-18, 3-21power, 2-6
MMain battery, 2-5, 2-11Main power source
DC power, 7-3Managing system power, 3-16Memory
expansion, 5-14map, B-9module bay, 1-14modules, 5-14
Microphone, 1-6, 1-12, 9-4MIDI files, 9-5Mini-PCI
LAN/Modem, 6-6modem, 6-6
Mixing, 9-4Monitor
turning off, 3-17, 3-21Mouse port, 1-11
Multimediaapplications, 9-6digital files, 9-5microphone, 9-4MIDI files, 9-5mixing, 9-4playing back, 9-3recording, 9-2using animation files, 9-6using external speakers, 9-5using headphones, 9-4using internal speakers, 9-5
NNEC Customize utility, 4-6
using, 4-7NEC Info Center
installing, 4-10uninstalling, 4-10
NEC SoftDVD Player, 5-9NEC utilities, 4-6NEC VersaBay III, 1-13, 5-2
installing devices, 5-5other devices, 5-6release latch, 1-14release lock, 1-14removing devices, 5-4
NEC VersaBay III Swap utility, 5-3installing, 5-3using, 5-3
NEC VersaGlide, 1-5NECC
email/fax, 11-4FTP site, 11-3support services, 11-4web site, 11-3
Numeric keypad, 1-9
OObtaining BIOS update, 3-26Operating systems
Windows 2000, 4-2Windows 98, 4-3Windows NT, 4-6
Optimizing sound quality, 9-3

Index-4
PPacking for travel, 7-2Panel brightness, 3-12Parallel
devices, 8-2port, 1-11, 3-15
Partition Magic, 4-11Partition only restore, 4-14Partitioning the hard drive, 4-11Password
establishing, 3-7, 3-8hard disk drive, 3-7, 3-8Standby, 3-19, 3-22supervisor, 3-7user, 3-7
PC cardslots, 1-11, 6-3
PC cardscommunication cards, 6-2inserting a card, 6-4modem, 6-5modems, 6-5removing a card, 6-5storage, 6-3Type II, 6-2Type II extended, 6-2Type III, 6-2
Pentium III microprocessor, 1-3Performing BIOS update, 3-27Peripheral Component Interconnect (PCI), 1-3Playing back, 9-3Port Replicator, 1-15
port descriptions, 1-15POST error messages, 10-4Power
button, 1-5, 1-7, 3-11connections, 7-3meter, 3-18, 3-22pressing button, 3-19schemes, 3-17, 3-20, 3-21status LEDs, 1-4
Power buttonpressing, 3-22
Power management, 3-16setup, 3-10states in Windows 98/2000., 3-23
states in Windows NT, 3-24system behavior in Windows 98/2000, 3-23system behavior in Windows NT, 3-25under AC, 3-11Windows 98, 3-16
Power optionsWindows 2000, 3-20
Powering on, 2-4Power-on self test (POST), 3-2Precautions, 2-12Preparing
BIOS update disk, 3-26for travel, 7-2
Pressing Power button, 3-19, 3-22Problem checklist, 10-2Product Recovery CD, 4-11
guidelines, 4-12Product Recovery utility, 4-11
full disk restore, 4-12, 4-13options, 4-12partition only restore, 4-12, 4-14
PS/2 Warm Swap, 3-6
RRecharging the battery, 2-6Recommended operating environment, B-8Recording, 9-2
sound quality, 9-3Remote power on, 3-13Replacing the battery pack, 2-7Resume password, 3-7RJ-45 port, 1-11
SSave-to-file (STF), 3-24Serial
devices, 8-3port, 1-11, 3-15
Service and support, 11-2Setting boot devices, 3-14Setting up a healthy work environment, A-2Show icon on taskbar, 3-19, 3-22Smart switch, 1-12Specifications
battery pack, B-7bridge battery, B-7

Index-5
calendar clock, B-2CD-ROM drive, B-5hard disk drive, B-5input/output facilities, B-3keyboard, B-4LCD panel, B-4PC card slots, B-3power, B-7Random access memory, B-2Read-only memory, B-2speakers, B-3SuperDisk drive, B-4system processor, B-2
SpeedStep technology, 4-8Standard CMOS setup, 3-5Standby
password, 3-19, 3-22Windows 98/2000, 3-23Windows NT, 3-24
Start-up problems, 10-3Stereo speakers, 1-12, 1-13Storage requirements, 2-13SuperDisk drive, 5-2
formatting diskettes, 5-2Supervisor password, 3-7Support services, 11-4Suspend
mode, 3-12, 3-24warning tone, 3-13
Switch settings, 3-28System
batteries, 2-11date, 3-5dimensions, B-7memory, 3-5parameters, 3-4resetting parameters, 3-5Standby, 3-17, 3-21switch, 3-11time, 3-5
System care, 2-12cleaning, 2-13precautions, 2-12storage requirements, 2-13
System featuresback, 1-10
bottom, 1-14front, 1-4left, 1-11right, 1-13
TTaskbar icon, 3-19, 3-22Technical support, 10-7Travel
getting through customs, 7-3packing for, 7-2preparing for, 7-2using power sources, 7-3using your modem, 7-4
UUpdating the BIOS, 3-26USB ports, 1-12, 8-5User password, 3-7Using
AC adapter, 2-3modem, 7-4NEC VersaGlide, 2-2power sources abroad, 7-3
VVersaGlide
adjustments, 2-2features, 2-2tips, 2-2
Videoport, 1-11
Volume control, 1-12
WWeb site, 11-3Windows
2000, 4-298, 4-398 desktop icons, 4-398 taskbar icons, 4-5introduction, 4-2keys, 1-10NT, 4-6power management, 3-16

Index-6
Windows 2000power options, 3-20taskbar icons, 4-3
YY-cable adapter, 1-11

Regulatory Statements 1
Regulatory Statements
The following regulatory statements include the Federal Communications Commission(FCC) Radio Frequency Interference Statement, compliance statements for Canada andEurope, battery disposal and replacement information, and the Declaration ofConformity.
FCC Statement for United States Only
Changes or modifications to this unit not expressly approvedby the party responsible for compliance could void the user’s authority to operate theequipment.
Note This equipment has been tested and found to comply with the limits for a ClassB digital device, pursuant to Part 15 of the FCC Rules. These limits are designed toprovide reasonable protection against harmful interference in a residential installation.This equipment generates, uses and can radiate radio frequency energy and, if notinstalled and used in accordance with the instructions, may cause harmful interferenceto radio communications.
However, there is no guarantee that interference will not occur in a particularinstallation. If this equipment does cause harmful interference to radio or televisionreception, which can be determined by turning the equipment off and on, the user isencouraged to try to correct the interference by one or more of the following measures.
! Reorient or relocate the receiving antenna.
! Increase the separation between the equipment and receiver.
! Connect the equipment to an outlet on a circuit different from the one to which thereceiver is connected.
! Consult the dealer or an experienced radio/TV technician for help.
Canadian Department of Communications Compliance StatementThis Class B digital apparatus meets all requirements of the CanadianInterference-Causing Equipment Regulations (pursuant to ICES-003 Issue 2,Revision 1).
Avis de conformité aux normes du ministere des communications duCanada
Cet equipment numérique de la Classe B respecte toutes les exigences du Reglementsur le matérial brouillage du Canada (en conformité avec ICES-003 Emission 2,Révision 1).

2 Regulatory Statements
European Community Directive Conformance Statement
This product is in conformity with the protection requirements of EC Council Directive89/336/EEC on the approximation of laws of the Member States relating toelectro-magnetic compatibility. This product satisfied the Class B limits of EN55022.
Battery Replacement
A lithium battery in some computers maintains system configuration information. Inthe event that the battery fails to maintain system configuration information, NECCrecommends that you replace the battery. For battery replacement information, callyour NECC dealer.
There is a danger of explosion if the battery is incorrectlyreplaced. Replace only with the same or equivalent type recommended by themanufacturer. Discard used batteries according to the manufacturer’s instructions.
Il y a danger d’explosion s’il y a replacementincorrect de la batterie. Remplacer uniquement avec une batterie du même type ou d’untype recommandé par le constructeur. Mettre au rébut les batteries usagéesconformément aux instructions du fabricant.
Battery Disposal
The main battery is made of Lithium Ion (Li-Ion) and the CMOS clock battery is madeof Lithium.
Contact your local waste management officials for other information regarding theenvironmentally sound collection, recycling, and disposal of the batteries.
Mini-PCI FCC Registration Numbers
If your system has a built-in mini-PCI modem, the FCC registration number of yoursystem is H8NTAI-34309-ME-E REN 0.4. If your system has a built-in mini-PCILAN/modem, the FCC registration number of your system is 2U6MLA-34036-M5-EREN 0.5A.

NEC Computers Inc.
DECLARATION OF CONFORMITY
We, the Responsible Party
NEC Computers Inc.15 Business Park Way
Sacramento, CA 95828
declare that the product
NEC Versa SXi
is in compliance with FCC CFR47 part 15 for Class B digitaldevices.