pt s-b master · g general goals (content mastery, ... t texas essential knowledge and skills...
TRANSCRIPT

www.ggconsulting.com
Power Tools
Guide to Creating Standards-Based
Goals & Objectives

www.ggconsulting.com 1
Power Tools ______________________________________
Table of Contents Introduction to Power Tools ........................................................................................ 2 Section 1: Accessing Power Tools.............................................................................. 3 -Key to Accessing SEM Banks of Goals/Objectives ........................... 4 -Goal Bank Notes................................................................................. 5 Section 2: PLAAFP...................................................................................................... 6 Section 2: Open IEP................................................................................................... 12 -Defaults............................................................................................. 12 -Standard/Goal ................................................................................... 14 -Objectives/Benchmarks .................................................................... 20 -Aligning District/TAKS-Alt/Speech Goals with TEKS................... 23 -Behavior Intervention Plan (BIP) ..................................................... 25 -Progress Reports ............................................................................... 27 -Print/Preview Criteria ....................................................................... 29 -IEP Tips ............................................................................................ 33 Section 3: Progress Toolbox ...................................................................................... 35 Section 4: Goals Bank................................................................................................ 40 Section 5: IEP Administrative Reports ...................................................................... 41 Section 6: Accessing Records/Reports in SEM ......................................................... 44 -Basic Navigation............................................................................... 45 -Changing Your Password ................................................................. 46 -Selecting a Student ........................................................................... 47
-Previewing/Printing Student Records............................................... 48 -Running Reports ............................................................................... 49

www.ggconsulting.com 2
Introduction to Power Tools
The Power Tools module was designed in the fall of 2009 to enable the SEM user to create progress reports quickly and efficiently. Power Tools, a program accessed from the I-Suite screen, allows the user to work in a small database outside of SEM, thereby increasing network speed for all users. In the Progress Toolbox, setting a “progress mode” reduces the number of steps needed to efficiently create individualized progress reports. Progress reports can be printed in bulk, and a built-in tracking system allows users to monitor their own progress (which students’ progress reports have been completed, which are in progress, and which are still needed).
In Power Tools, PLAAFP statements can be created manually or by utilizing existing sources of data (e.g., IEP progress, FIE information). For those districts that subscribe to the Texas Test Results Reader (TR)2, a link is provided for immediate access to state assessment information. A TAKS analysis will identify the student’s strengths and areas of need. Built-in wizards will guide the user through adding the four critical components of standards-based goals and objectives: timeframe, conditions, behavior, and criterion. Power Tools features a goals bank, providing users with a means to preview/print SEM goals and objectives. TEKS standards and student expectations can be printed by grade level and subject area. For those TEKS standards that are vertically-aligned across multiple grade levels, all student expectations for the selected grade level and lower will print (e.g., if an English goal appears in the TEKS curriculum for grades 4, 5, and 6, objectives for grades 4 and 5 will print when 5th grade was selected for printing). This allows users to identify pre-requisite skills needed to master a goal. Administrators and supervisors can also utilize Power Tools to generate staff reports to determine whether staff members are completing progress reports in a timely manner. It is important to note that the functionality of the standards-based goals and objectives enhancements made in the spring of 2010 are also available in the Special Education Manager, version 9.2, once the standards-based option is selected in File Maintenance > Options/Directories. Although Power Tools is highly recommended due to its other features, it is NOT required to write standards-based goals and objectives.
www.ggconsulting.com 3
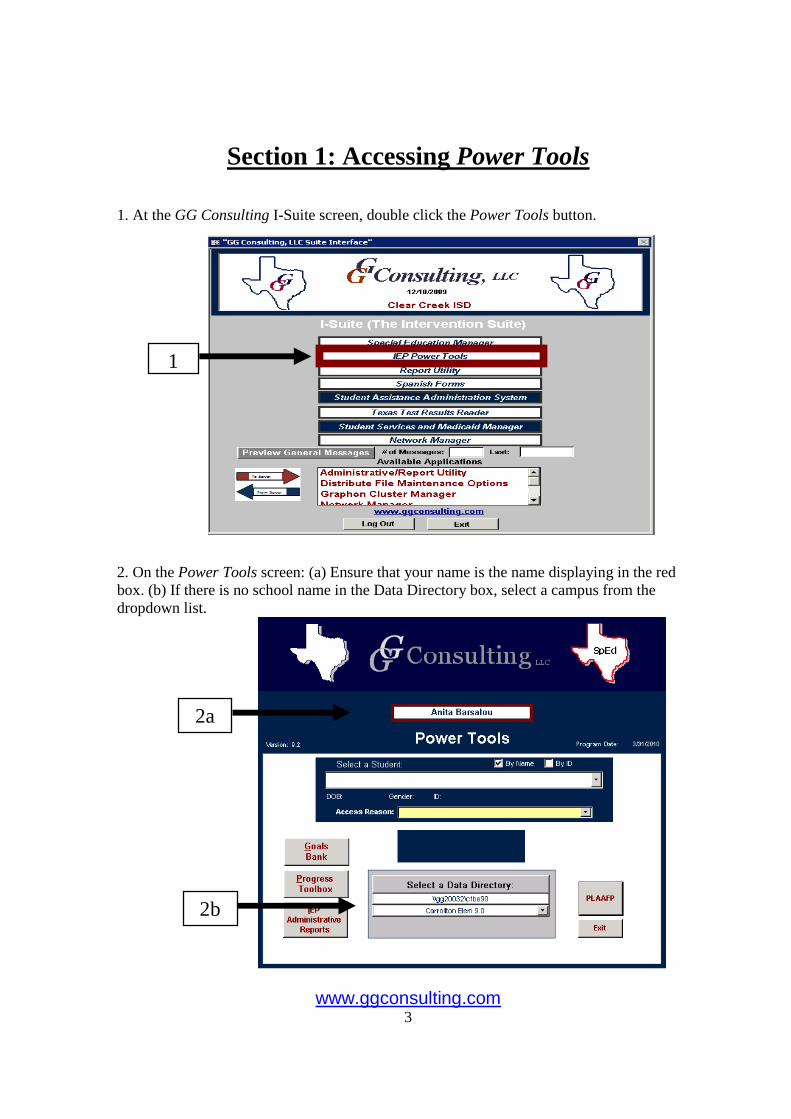
Section 1: Accessing Power Tools 1. At the GG Consulting I-Suite screen, double click the Power Tools button. 2. On the Power Tools screen: (a) Ensure that your name is the name displaying in the red box. (b) If there is no school name in the Data Directory box, select a campus from the dropdown list.
1
2a
2b
www.ggconsulting.com 4
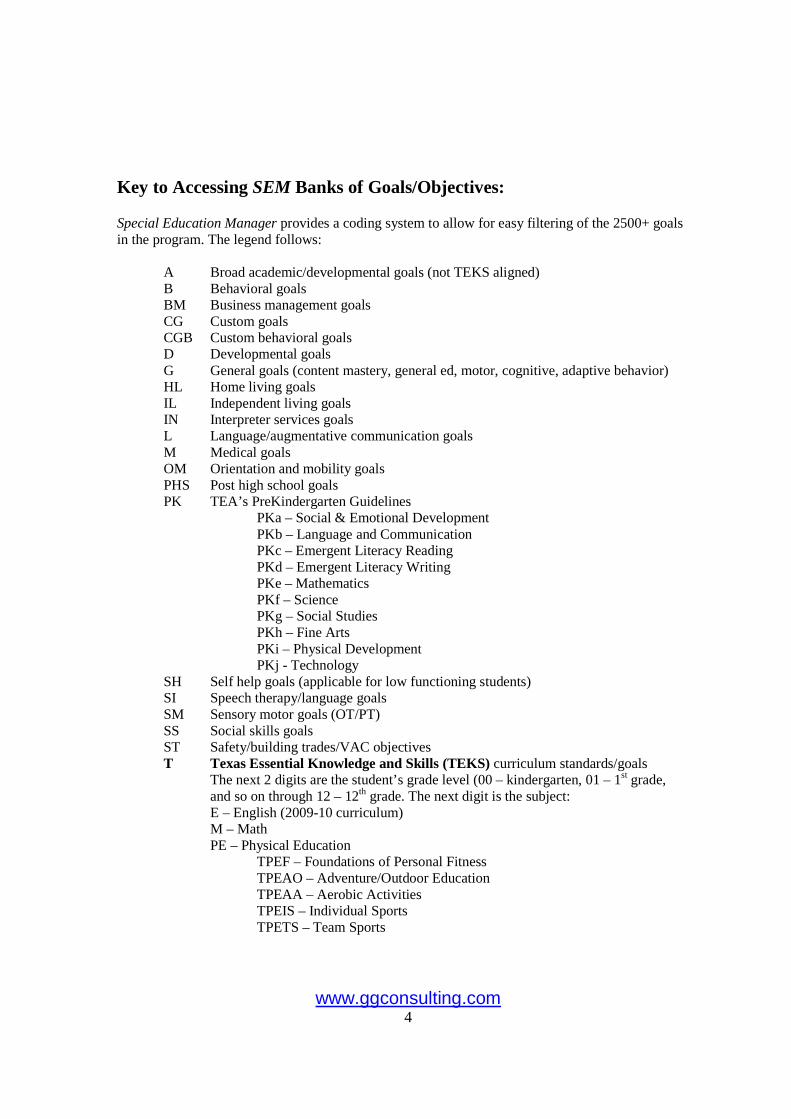
Key to Accessing SEM Banks of Goals/Objectives: Special Education Manager provides a coding system to allow for easy filtering of the 2500+ goals in the program. The legend follows:
A Broad academic/developmental goals (not TEKS aligned) B Behavioral goals BM Business management goals CG Custom goals CGB Custom behavioral goals D Developmental goals G General goals (content mastery, general ed, motor, cognitive, adaptive behavior) HL Home living goals IL Independent living goals IN Interpreter services goals L Language/augmentative communication goals M Medical goals OM Orientation and mobility goals PHS Post high school goals PK TEA’s PreKindergarten Guidelines PKa – Social & Emotional Development PKb – Language and Communication PKc – Emergent Literacy Reading PKd – Emergent Literacy Writing PKe – Mathematics PKf – Science PKg – Social Studies PKh – Fine Arts PKi – Physical Development PKj - Technology SH Self help goals (applicable for low functioning students) SI Speech therapy/language goals SM Sensory motor goals (OT/PT) SS Social skills goals ST Safety/building trades/VAC objectives T Texas Essential Knowledge and Skills (TEKS) curriculum standards/goals The next 2 digits are the student’s grade level (00 – kindergarten, 01 – 1st grade, and so on through 12 – 12th grade. The next digit is the subject: E – English (2009-10 curriculum) M – Math PE – Physical Education TPEF – Foundations of Personal Fitness TPEAO – Adventure/Outdoor Education TPEAA – Aerobic Activities TPEIS – Individual Sports TPETS – Team Sports
www.ggconsulting.com 5
S – Science (2010-11 curriculum) 00 through 08 – Kindergarten through 8th grade At high school, curriculum is coded by course name: SAqu – Aquatics SAst – Astronomy
SBio - Biology SChem - Chemistry SEar – Earth Science SEnv – Environmental Science SIPC – Integrated Physics & Chemistry SPhys – Physics
SS – Social Studies TEC – TEKS Economics (not grade-level specific) TGV – TEKS Government (not specific to a grade level) TPSY – TEKS Psychology (not specific to a grade level) TSY – TEKS Sociology (not specific to a grade level) (Note: For high school subjects that are not grade-level specific, the 2-digit grade
level is omitted.) VC Vision goals V Vocational goals VOC Additional vocational goals
Goal Bank Notes: 1. The TAKS-Alt essence statements have been included in the SEM bank of goals. Since these goals apply to less than 2% of students, they have been omitted from initially appearing in the list of TEKS goals. To access these goals, simply uncheck the “Exclude TAKS-Alt Goals” checkbox on the Standard/Goal Display All Selector screen. 2. Districts/Coops have the ability to develop their own banks of goals and objectives. These banks can be entered into SEM’s District Goals and Objectives popup menu by staff with administrative or unlimited access. (For additional information, see the Administrative section of the Special Education Manager manual.) Once added, these goals are accessed by moving the check from “Special Education Manager Goals” to the “District/Coop Developed Goals” checkbox on the IEP/BIP goal screen.
www.ggconsulting.com 6
Section 2: PLAAFP
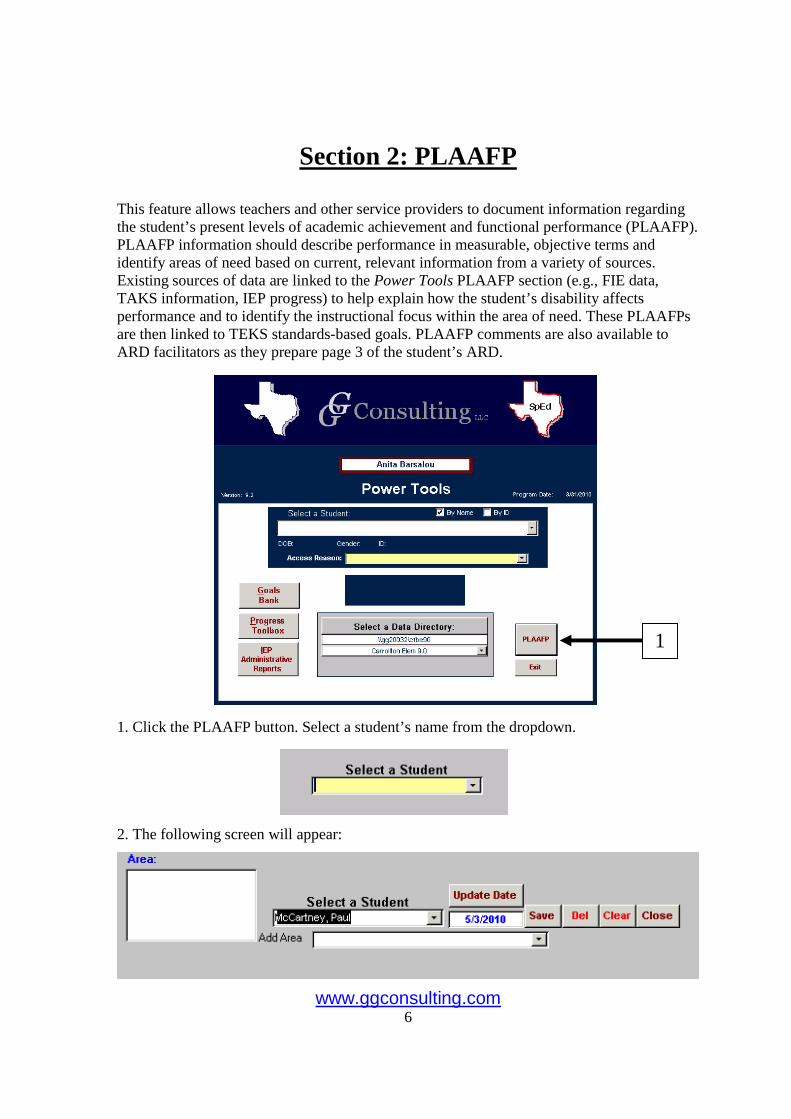
This feature allows teachers and other service providers to document information regarding the student’s present levels of academic achievement and functional performance (PLAAFP). PLAAFP information should describe performance in measurable, objective terms and identify areas of need based on current, relevant information from a variety of sources. Existing sources of data are linked to the Power Tools PLAAFP section (e.g., FIE data, TAKS information, IEP progress) to help explain how the student’s disability affects performance and to identify the instructional focus within the area of need. These PLAAFPs are then linked to TEKS standards-based goals. PLAAFP comments are also available to ARD facilitators as they prepare page 3 of the student’s ARD. 1. Click the PLAAFP button. Select a student’s name from the dropdown. 2. The following screen will appear:
1

www.ggconsulting.com 7
3. Select a PLAAFP area from the “Add Area” dropdown or select (highlight) an existing PLAAFP area from the box in the top left corner. Answer Yes or No as appropriate to the Update Date question.
OR The following screen will appear. If information was entered previously, it will populate the appropriate fields. The user can opt to add to existing information or click the “Clear” button to start anew. 4. If selecting PLAAFPs from Part II of a recent full and individual evaluation report, click the PLAAFP FIE button. A PLAAFP Builder screen will open.

www.ggconsulting.com 8
5. Click the “Use Last FIE Info” button. 6. A list of competencies from Part II of the FIE will be displayed. Highlight one or more skill areas. Click “Update”. 7. As appropriate, PLAAFP comments can be edited in this window. To add this information to the student’s PLAAFP, click “Append” and “Close”. 8. If additional editing is necessary, the user can double click in the large text field to view more information on a larger screen. Any time the symbol is present, the user has the capability of expanding the text field. Additionally, from within the larger field, spell check is available. 9. Click the “PLAAFP TAKS” button if completing a TAKS Analysis using (TR)2. On the PLAAFP Builder page, click “Use TAKS Analysis” button.
www.ggconsulting.com 9
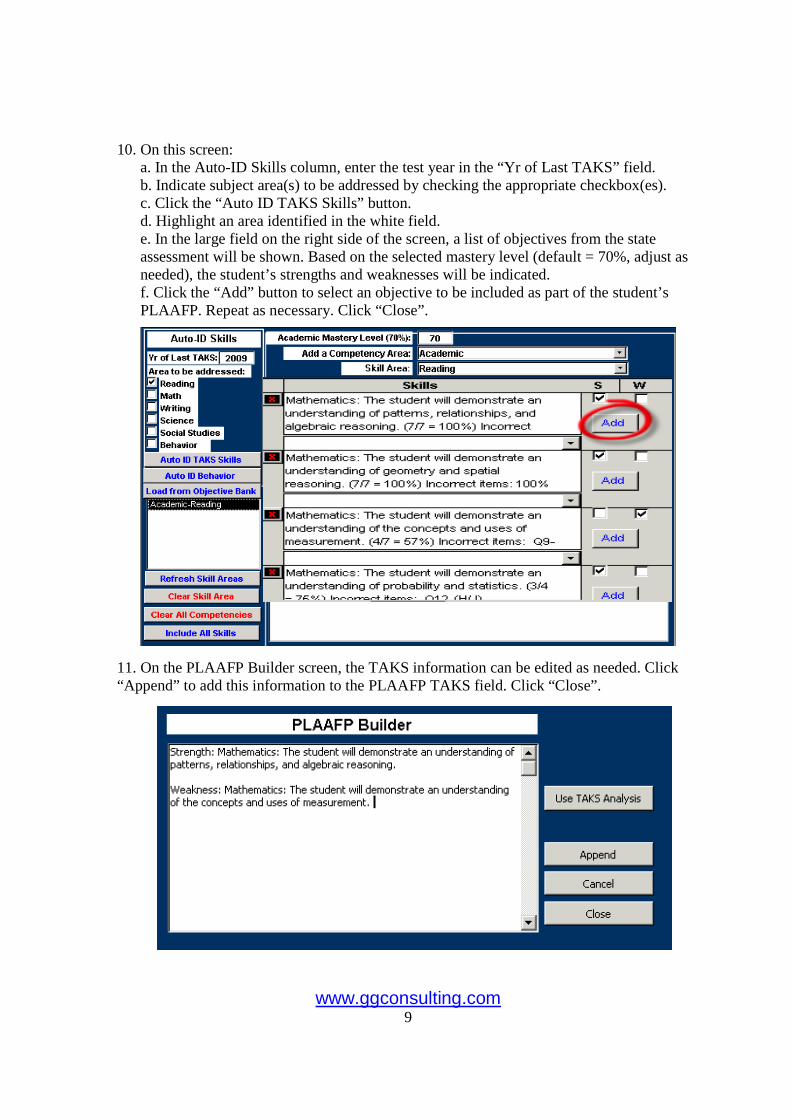
10. On this screen: a. In the Auto-ID Skills column, enter the test year in the “Yr of Last TAKS” field. b. Indicate subject area(s) to be addressed by checking the appropriate checkbox(es). c. Click the “Auto ID TAKS Skills” button. d. Highlight an area identified in the white field. e. In the large field on the right side of the screen, a list of objectives from the state
assessment will be shown. Based on the selected mastery level (default = 70%, adjust as needed), the student’s strengths and weaknesses will be indicated.
f. Click the “Add” button to select an objective to be included as part of the student’s PLAAFP. Repeat as necessary. Click “Close”.
11. On the PLAAFP Builder screen, the TAKS information can be edited as needed. Click “Append” to add this information to the PLAAFP TAKS field. Click “Close”.

www.ggconsulting.com 10
12. Again, PLAAFP information can be edited in this field if needed. 13. Click the “Goal Review” button to preview goals from the student’s last IEP. 14. Select the “Previous Goals” button on the PLAAFP Builder page. 15. Highlight the desired goal(s). Click “Update” and “Close”. 16. The PLAAFP Builder will be populated with the selected goal(s) and comments from the last progress report written for this goal. Comments can be edited at this time. 17. To add these comments to the PLAAFP screen, click “Append”. Click “Close”. 18. Additional information, such as results of benchmark testing, current grades, classroom performance, effective strategies, etc. can be provided in the two remaining fields.

www.ggconsulting.com 11
PLAAFP Tips: 1. Links to the FIE, TAKS data, and goal progress reports will only be available if that information has been previously entered into SEM. To complete the TAKS analysis, the district/co-op must subscribe to Texas Test Results Reader (TR)2. 2. The district has the ability to change/add/edit the PLAAFP areas that are available in the dropdown. It is important for administration to determine whether the dropdown will have areas of disability, subject areas, or both. 3. It is up to the service provider to determine which of the areas to use when creating a student’s PLAAFP. Information should be entered into the different fields as appropriate for the individual student. 4. Once created, PLAAFP information is available to the service provider while working in the IEP/BIP form after selecting a standard. 5. For those districts that have not purchased Power Tools, PLAAFP information can be entered in the same manner described above by clicking on the Delibs/PLAAFP button at the SEM Main Menu. 6. ARD facilitators can include PLAAFP information on ARD p. 3 by:
a. Logon to Special Education Manager. b. Go to Student Records, select a student, and provide a Reason for Access. c. Click on the ARD Meeting Forms file cabinet. d. Add/edit the ARD Committee Meeting Report* form. e. Navigate to ARD p. 3, section E. Academic/Functional PLAAFP. f. Place a check in the “Use single expanding text field” checkbox. g. Clicking “Separate Page (3b)” is optional. However, if a lot of information is to
be imported, a separate page is recommended. h. Click the “Use List” button. i. Select the student’s service provider(s). j. The program will determine if PLAAFP information has been provided by each
service provider selected. If it has, add the information to ARD p. 3 as appropriate. This information can be edited as needed. If no information has been entered by a service provider, a message to that effect will be displayed.
www.ggconsulting.com 12
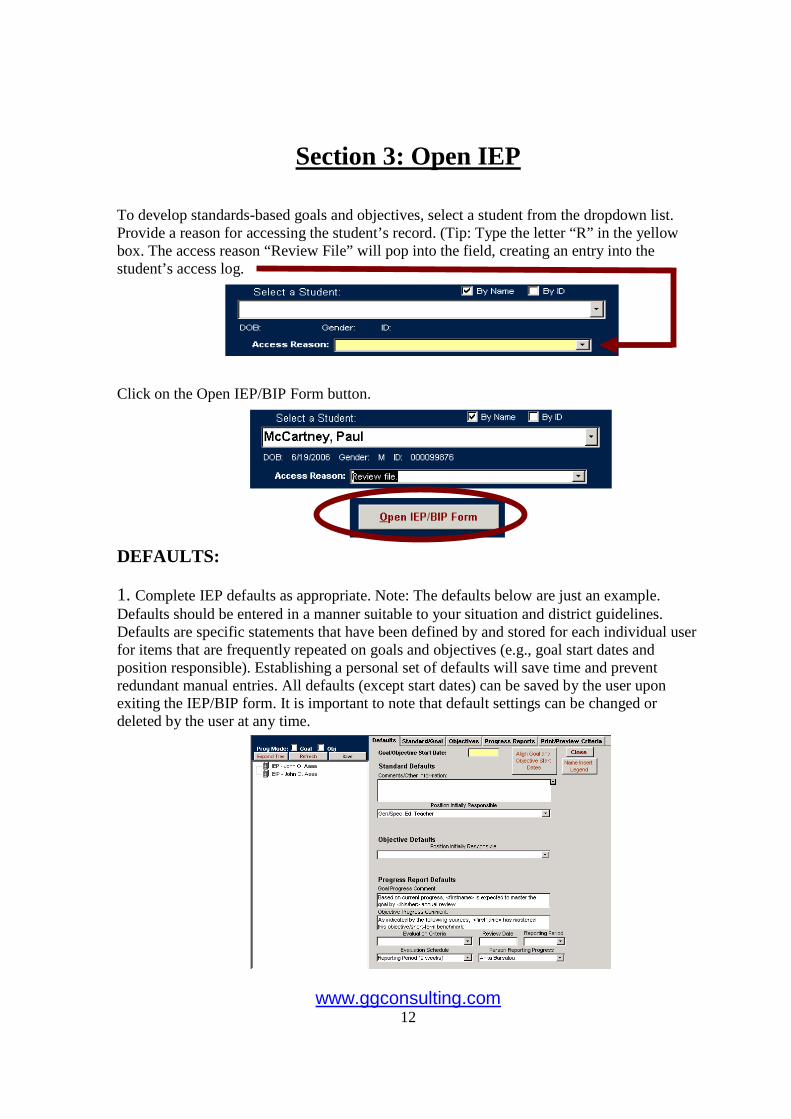
Section 3: Open IEP To develop standards-based goals and objectives, select a student from the dropdown list. Provide a reason for accessing the student’s record. (Tip: Type the letter “R” in the yellow box. The access reason “Review File” will pop into the field, creating an entry into the student’s access log. Click on the Open IEP/BIP Form button. DEFAULTS: 1. Complete IEP defaults as appropriate. Note: The defaults below are just an example. Defaults should be entered in a manner suitable to your situation and district guidelines. Defaults are specific statements that have been defined by and stored for each individual user for items that are frequently repeated on goals and objectives (e.g., goal start dates and position responsible). Establishing a personal set of defaults will save time and prevent redundant manual entries. All defaults (except start dates) can be saved by the user upon exiting the IEP/BIP form. It is important to note that default settings can be changed or deleted by the user at any time.

www.ggconsulting.com 13
2. The default start date must be entered each time the user enters the IEP/BIP. The start date is typically the date of the student’s upcoming ARD but can be later if services will not begin immediately. Use of a built-in calendar reduces potential user error and enhances speed/efficiency. (The calendar is available by double clicking into any date field found throughout the application).
3. Click the “Align Draft Goal and Objective Start Dates” button to align the start date for all draft goals and objectives. Any goal/objective that is in draft will now reflect this date. The start date can easily be re-aligned for draft goals/objectives in the event that an annual ARD meeting is rescheduled. To do this, enter the new date in the Goal/Objective Start Date field. Click the “Align Draft Goal and Objective Start Dates” button. 4. Enter “Position Initially Responsible” for both goals and objectives. The user can choose a position from the dropdown list, manually type in a position, or use a combination of the two. 5. Progress report defaults can be completed at this time or prior to the completion of the first IEP progress report. 6. Click on the “Name Insert Legend” button to access a code table that will automatically insert the student’s name, appropriate pronoun, or article into the progress comment defaults. This legend allows the user to automate the personalization of defaults.

www.ggconsulting.com 14
7. To personalize default comments, begin typing the progress comment. When appropriate, click on the “Name Insert Legend” button. Double click on the appropriate code (e.g., <firstname>). Close the legend by clicking the “X”. When a progress report is created, the inserted code will be replaced with the student’s information (e.g., name, he/she, his/her). STANDARD/GOAL:
1. Prior to adding a standard, ensure that user defaults (Person Responsible, start date) have been addressed. Click on the Standard/Goal tab. 2. Click either the “Add Standard/Goal” or “Display All” button. 3. The “Add Standard/Goal” opens to the following screen:

www.ggconsulting.com 15
4. If the “Add Standard/Goal” button is selected, choose standards by clicking on the dropdown arrow to the right of the Standard field. Enter the standard code or scroll to the standard. Highlighting the desired standard adds it to the student’s IEP tree. 5. Using the “Display All” button is the preferred method of adding a standard as it allows the user to quickly filter through the banks of TEKS standards/goals and then add multiple standards at one time. If the “Display All” button is selected, the following screen will appear:
a. Start typing the first few characters of the code in the box at the top left (e.g., T03E = a TEKS English standard at the 3rd grade level).
b. Once filtered to the desired grade level/subject, select the standards to include in the IEP by checking the check box to the right of the goal.
c. After selecting the goal(s), click the “Add Selected Goals” button.

www.ggconsulting.com 16
d. Click “Close” on the Standard/Goal Selector form. Standards have now been added to the student’s IEP.
6. Import PLAAFP comments by clicking the “Add PLAAFP” button. 7. The PLAAFP Builder screen will open. Click the “Use Staff PLAAFPs” button. 8. On the next screen, select the names of those individuals who provide services to the student. Click “Update”. 9. If no PLAAFP information had been entered by a selected staff member, the following message will be displayed:

www.ggconsulting.com 17
10. When PLAAFP comments are found, the system will provide the user with the choice to import each statement in each subject area. If the PLAAFP comment is appropriate for inclusion with the selected standard, click “Yes”. If not, click “No”. Repeat decision for each comment. 11. Once selected for inclusion with the standard, comments can be edited by the user. When finished, click “Append” and “Close”. . 12. The standard now looks like this:
www.ggconsulting.com 18
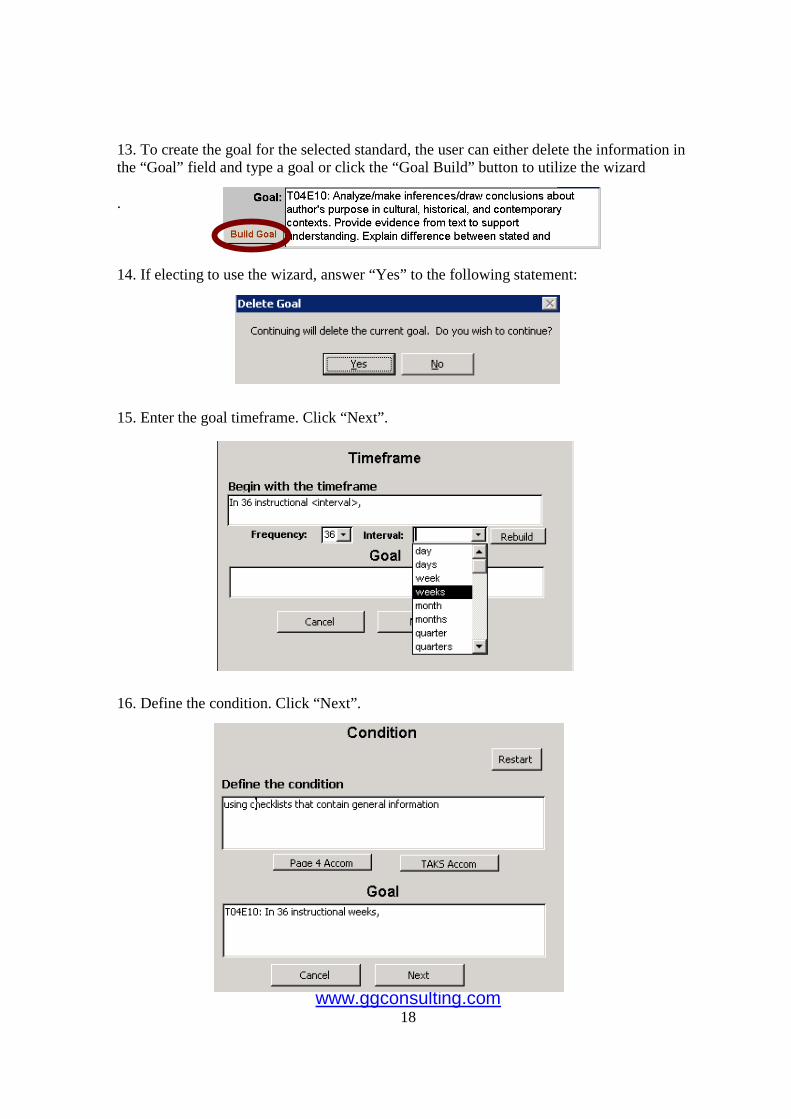
13. To create the goal for the selected standard, the user can either delete the information in the “Goal” field and type a goal or click the “Goal Build” button to utilize the wizard . 14. If electing to use the wizard, answer “Yes” to the following statement: 15. Enter the goal timeframe. Click “Next”. 16. Define the condition. Click “Next”.

www.ggconsulting.com 19
17. Indicate the behavior. The user can either type a behavior or select the appropriate student expectation from the dropdown menu when available. Click “Next”. 18. Provide criteria for determining mastery of the goal. The user can either type their own information into the field or choose from the dropdown lists provided. These dropdowns are derived from district-controlled popups and can be customized for the district. Click “Close” when finished. 19. The goal is now displayed on the Standard/Goal screen in the Goal field. By double clicking into the field, the user can further edit and/or spell check the goal statement.

www.ggconsulting.com 20
20. Click “Refresh” to see the completed goal in the student’s IEP tree. Once written, a blue draft goal will have replaced the green standard. Hover over the standard/goal to display more of the statement. 21. Repeat this process for each standard/goal. OBJECTIVES/BENCHMARKS:
1. Highlight a goal (goal will turn red indicating that it is currently being viewed/edited. The selected PLAAFP/Standard/Goal will appear on the right side of the screen. Click on the Objectives tab.
www.ggconsulting.com 21
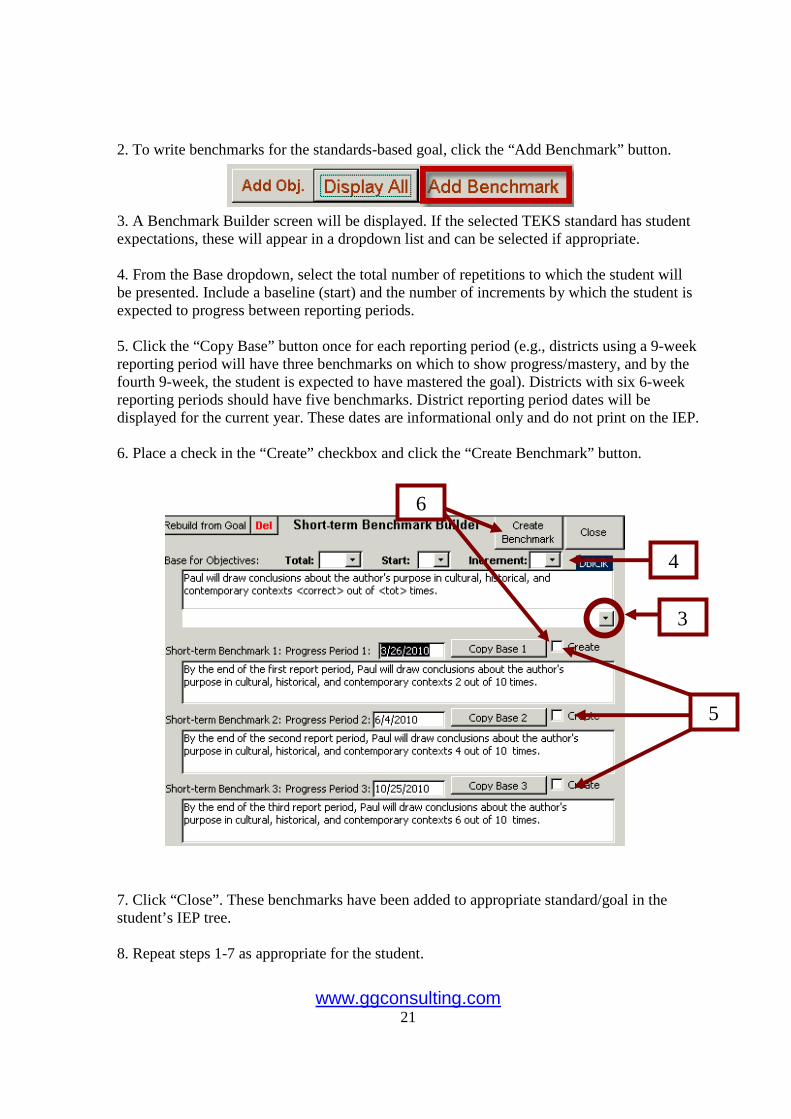
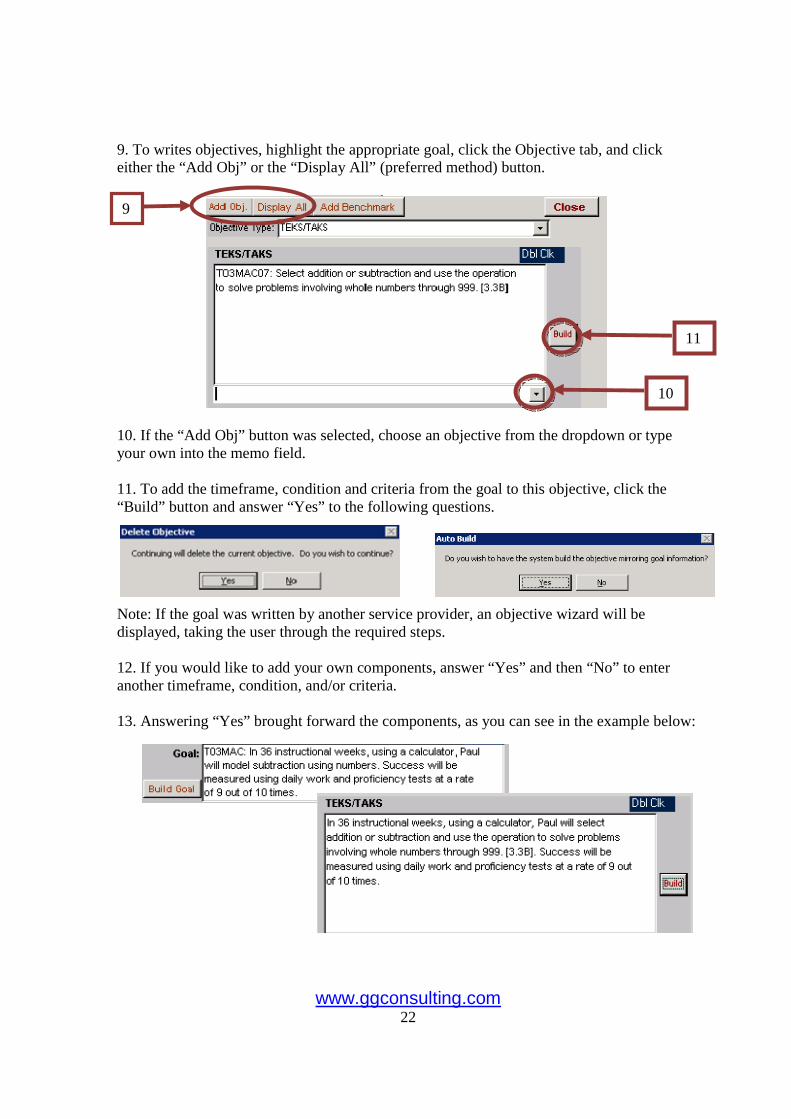
2. To write benchmarks for the standards-based goal, click the “Add Benchmark” button. 3. A Benchmark Builder screen will be displayed. If the selected TEKS standard has student expectations, these will appear in a dropdown list and can be selected if appropriate. 4. From the Base dropdown, select the total number of repetitions to which the student will be presented. Include a baseline (start) and the number of increments by which the student is expected to progress between reporting periods. 5. Click the “Copy Base” button once for each reporting period (e.g., districts using a 9-week reporting period will have three benchmarks on which to show progress/mastery, and by the fourth 9-week, the student is expected to have mastered the goal). Districts with six 6-week reporting periods should have five benchmarks. District reporting period dates will be displayed for the current year. These dates are informational only and do not print on the IEP. 6. Place a check in the “Create” checkbox and click the “Create Benchmark” button. 7. Click “Close”. These benchmarks have been added to appropriate standard/goal in the student’s IEP tree. 8. Repeat steps 1-7 as appropriate for the student.
3
5
6
4
www.ggconsulting.com 22
9. To writes objectives, highlight the appropriate goal, click the Objective tab, and click either the “Add Obj” or the “Display All” (preferred method) button. 10. If the “Add Obj” button was selected, choose an objective from the dropdown or type your own into the memo field. 11. To add the timeframe, condition and criteria from the goal to this objective, click the “Build” button and answer “Yes” to the following questions. Note: If the goal was written by another service provider, an objective wizard will be displayed, taking the user through the required steps. 12. If you would like to add your own components, answer “Yes” and then “No” to enter another timeframe, condition, and/or criteria. 13. Answering “Yes” brought forward the components, as you can see in the example below:
10
9
11

www.ggconsulting.com 23
14. If “Display All” was selected, place a check in the Select checkbox next to those objectives to be added. Once selected, an objective can be manually edited by the service provider, or the “Build” button can be clicked to add the components from the goal. If the goal was written by another service provider, an objective wizard will be displayed, taking the user through the required steps. 15. Edit objectives further as needed. Click the “Add/Update Selected Objectives”. Click “Close”. Objective Tip: The user may wish to insert numbers in front of benchmarks/objectives to set print order.
ALIGNING DISTRICT/TAKS-ALT/SPEECH GOALS WITH TEKS: 1. To align District-Developed, TAKS-Alt, or Speech goals with TEKS standards, select a standard from the Standard/Goal “Display All” tab. 2. Type the TEKS standard code in the field with the flashing cursor.
www.ggconsulting.com 24
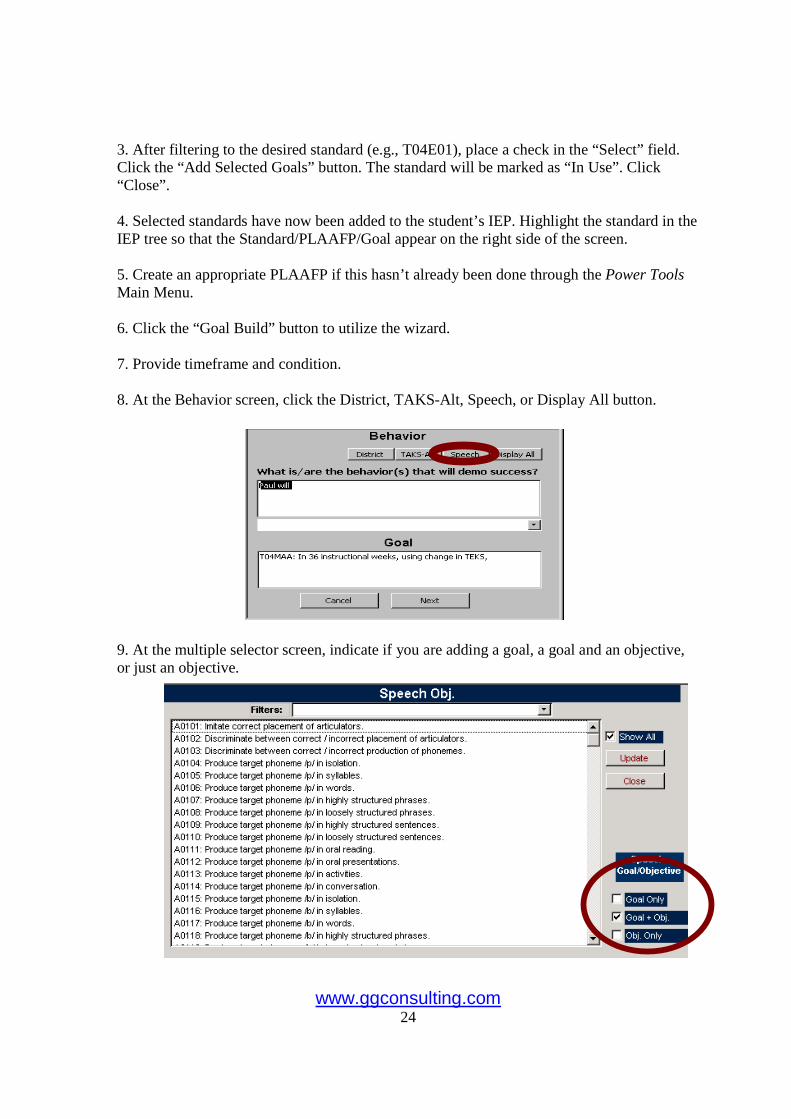
3. After filtering to the desired standard (e.g., T04E01), place a check in the “Select” field. Click the “Add Selected Goals” button. The standard will be marked as “In Use”. Click “Close”. 4. Selected standards have now been added to the student’s IEP. Highlight the standard in the IEP tree so that the Standard/PLAAFP/Goal appear on the right side of the screen. 5. Create an appropriate PLAAFP if this hasn’t already been done through the Power Tools Main Menu. 6. Click the “Goal Build” button to utilize the wizard. 7. Provide timeframe and condition. 8. At the Behavior screen, click the District, TAKS-Alt, Speech, or Display All button. 9. At the multiple selector screen, indicate if you are adding a goal, a goal and an objective, or just an objective.

www.ggconsulting.com 25
10. Objectives can be filtered by goal by selecting a speech goal in the filter dropdown and unchecking the “Show All” box. 11. Highlight the appropriate objective(s). Click “Update”. The screen will close and take you back to the wizard. Click “Next”. 12. Complete the Evaluation Method/Criteria using the wizard or by entering information into the field. Click “Close”. 13. Wording, punctuation, etc. can be edited as needed from the Standard/Goal screen or by double clicking into the goal field. 14. Repeat steps as needed. BEHAVIOR INTERVENTION PLAN (BIP):
1. Click either the “Add Goal” button or the “Display All” button. 2. If the “Add Goal” button is selected, choose goals by using the pull-down list to the right of the Goal field. Enter the goal code or scroll to the goal and click on the desired goal.
3.
www.ggconsulting.com 26
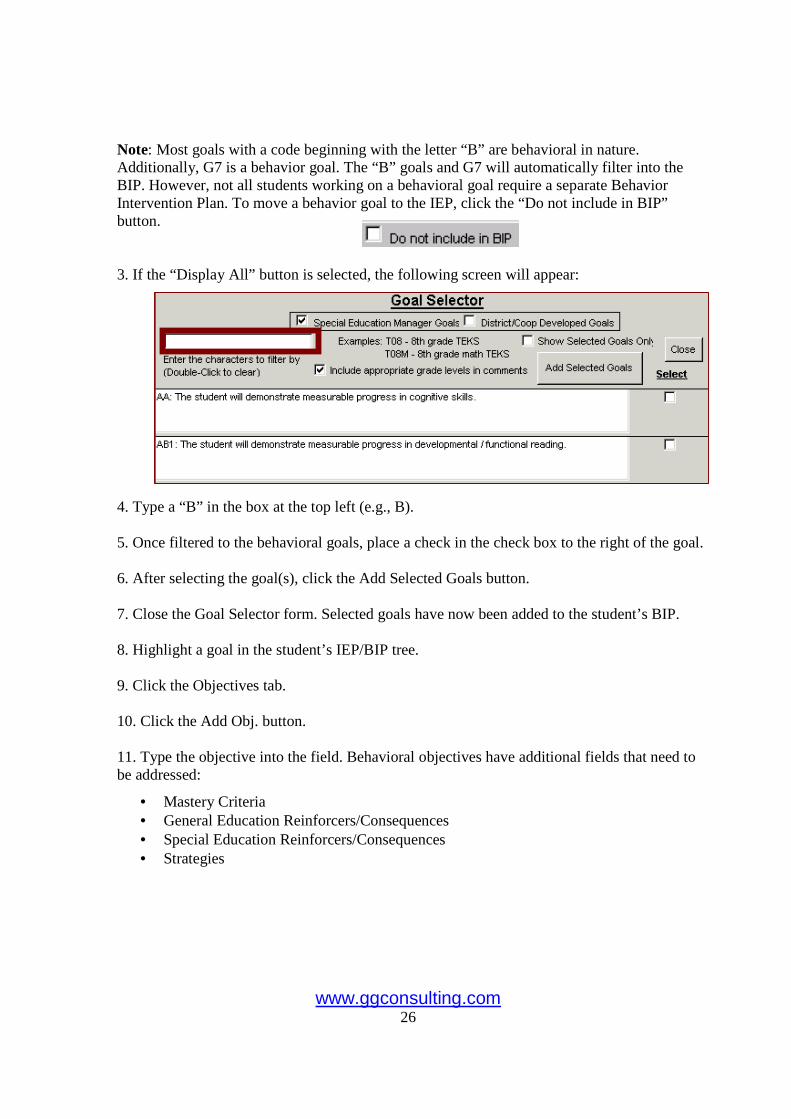
Note: Most goals with a code beginning with the letter “B” are behavioral in nature. Additionally, G7 is a behavior goal. The “B” goals and G7 will automatically filter into the BIP. However, not all students working on a behavioral goal require a separate Behavior Intervention Plan. To move a behavior goal to the IEP, click the “Do not include in BIP” button. 3. If the “Display All” button is selected, the following screen will appear: 4. Type a “B” in the box at the top left (e.g., B). 5. Once filtered to the behavioral goals, place a check in the check box to the right of the goal. 6. After selecting the goal(s), click the Add Selected Goals button. 7. Close the Goal Selector form. Selected goals have now been added to the student’s BIP. 8. Highlight a goal in the student’s IEP/BIP tree. 9. Click the Objectives tab. 10. Click the Add Obj. button. 11. Type the objective into the field. Behavioral objectives have additional fields that need to be addressed:
• Mastery Criteria • General Education Reinforcers/Consequences • Special Education Reinforcers/Consequences • Strategies

www.ggconsulting.com 27
12. Repeat this process until all goals/objectives have been added.
PROGRESS REPORTS: 1. It is recommended that the Progress Toolbox is used to create progress reports (see Section IV). However, when necessary, progress can be reported through the Open IEP screen. Click the “Prog Mode: Goal” checkbox if completing progress reports at the goal level. 2. At the following message, click “Yes” if you would like all progress report dates to default to the date in the message. 3. Place a check in the “Obj” checkbox if completing progress reports at the objective level. If you have already selected “Goal”, you will not receive the above date message again. However, if you are only completing progress reports at the objective level, you will receive the above message. If you wish the dates to default, answer “Yes”.

www.ggconsulting.com 28
Note: By clicking “Progress Mode”, you will only be allowed to complete progress reports on goals and objectives that were approved by the ARD committee and included in a locked ARD (locked goals and objectives are displayed in the IEP tree in black). If draft IEPs (blue in color) must be updated, click the Progress Reports tab and then click the Add Review button to manually enter progress comments. 4. Click on the first goal or objective for which you would like to complete a progress report. The progress report field will open on the right side of the screen. Defaults will be inserted. The user can edit and/or add to any comment already displayed in the progress report field. 5. Click on the next goal or objective to add/edit progress information. Repeat until all progress reports have been completed. 6. When finished creating progress reports for that student, click “Save” and then “Close”. 7. If the user clicks the Close button prior to saving changes, the following message will appear. Click “Yes” if changes are to be saved. 8. As appropriate, answer “Yes” or “No” to the following prompt:
9. If goals and objectives have not been locked into an ARD, but a progress report is needed, the user can manually enter comments. Prior to manually completing progress reports, set user defaults on the Defaults tab: Evaluation Criteria, Review Date, Evaluation Schedule, and Person Reporting Progress (teacher/service provider). The next reporting period date will display in the Review Date and Progress Period date fields. This date can be manually overwritten when necessary.
www.ggconsulting.com 29
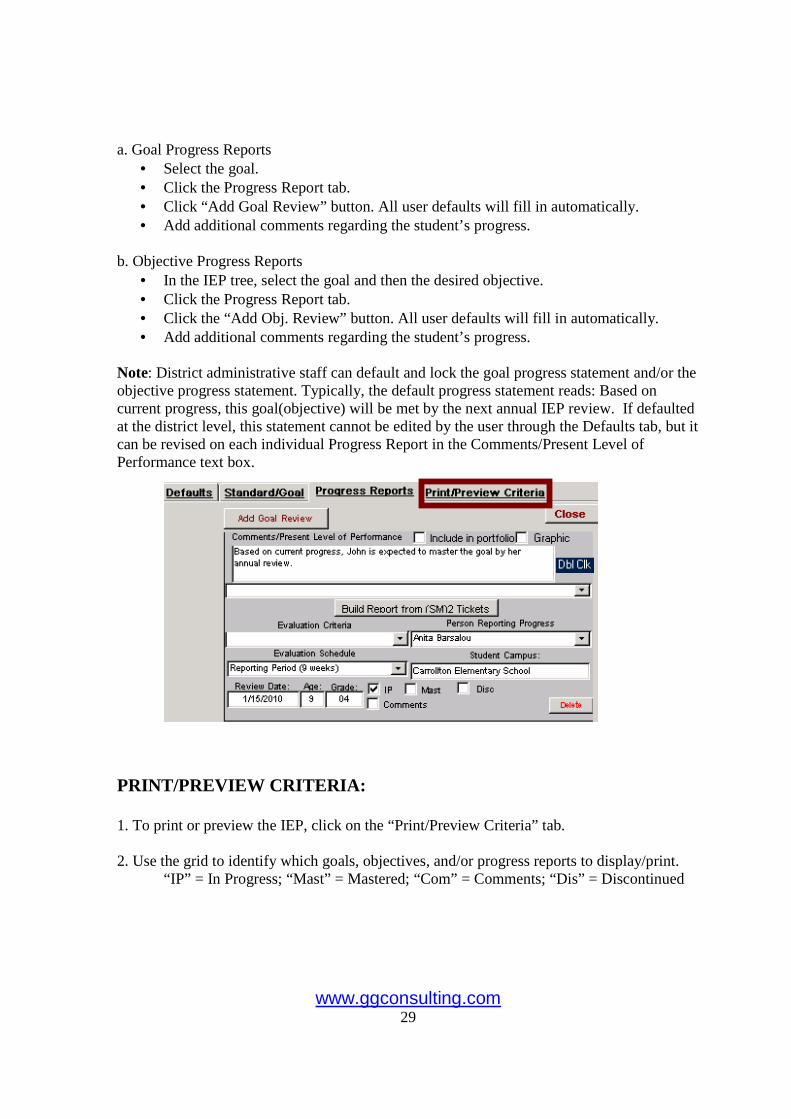
a. Goal Progress Reports • Select the goal. • Click the Progress Report tab. • Click “Add Goal Review” button. All user defaults will fill in automatically. • Add additional comments regarding the student’s progress.
b. Objective Progress Reports
• In the IEP tree, select the goal and then the desired objective. • Click the Progress Report tab. • Click the “Add Obj. Review” button. All user defaults will fill in automatically. • Add additional comments regarding the student’s progress.
Note: District administrative staff can default and lock the goal progress statement and/or the objective progress statement. Typically, the default progress statement reads: Based on current progress, this goal(objective) will be met by the next annual IEP review. If defaulted at the district level, this statement cannot be edited by the user through the Defaults tab, but it can be revised on each individual Progress Report in the Comments/Present Level of Performance text box.
PRINT/PREVIEW CRITERIA: 1. To print or preview the IEP, click on the “Print/Preview Criteria” tab. 2. Use the grid to identify which goals, objectives, and/or progress reports to display/print. “IP” = In Progress; “Mast” = Mastered; “Com” = Comments; “Dis” = Discontinued

www.ggconsulting.com 30
(In the example below, only “In Progress” goals and objectives will display when the IEP is printed or previewed.) 3. Helpful hint: In the criteria grid, the user can double click any column or row title to check/uncheck all boxes in that column/row. 4. Enter a date range to indicate which goals and objectives are to be displayed/printed. 5. Once criteria and dates have been selected, click “Refresh” to view only the desired goals and objectives between the appropriate range of dates. If more goals exist than can be displayed, click “Expand” to increase the size of the list box. 6. Goals will print alphabetically unless customized to print in a desired order. To sort, drag and drop the goals into the preferred order. 7. By placing checks in the boxes in front of the goals, the user can get a print out of a subset of goals. For example, if a student is receiving occupational therapy and speech, the occupational therapist can select and print out a copy of just OT goals. 8. Goals, objectives, and progress reports will be printed if the start and end dates fall in the range or the start date falls on or before the range end date and the end date is blank.

www.ggconsulting.com 31
9. Select Print Criteria:
a. Check which title is to be printed (“IEP”, “BIP” or IEP/BIP). b. Enter range of dates. If the desired range of dates are equal to the dates from the last annual ARD, click the “Last Annual ARD” button. The annual ARD date will display in the start date and a date one year from the annual ARD date will display in the second field. Similarly, If the dates of service should be from the last locked ARD (e.g., a Brief), click “Last Locked ARD” button. c. Check/uncheck the box to indicate whether to print the date range. d. When printing progress reports, select the “Print Goals/Objectives with most recent progress only” option if you want to print only those objectives with a current progress report. e. Check/uncheck the box to indicate whether each goal is to begin on a new page. f. Check/uncheck the box to indicate whether the criteria grid is to be printed/not printed at the top of the first page. g. Check/uncheck the box to indicate if the date of the report (current date) is to be printed. h. Check/uncheck “Condensed Form” to print a shorter version of the IEP. i. Check/uncheck whether the goals are to print in Alpha order.
10. Once the preferred settings have been selected, the user can save these printing defaults by clicking the “Save Defaults” button. 11. The user can select the desired number of copies to be printed by clicking on the > arrow under “Copies”.
9b
10

www.ggconsulting.com 32
12. Click “Print” or “Display”. If the IEP is displayed, use the page selectors at the bottom of the screen to move from page to page. 13. If desired, the word “Draft” can be displayed/printed to the right of newly added items until those goals and objectives have been included in a locked ARD form set. 14. Use the magnifying glass (cursor) to enlarge portions of a page. 15. To print while IEP is in display mode, click the printer icon in the toolbar. The user is able to print a subset of pages by displaying them on the screen, noting the range of page numbers, and using the Windows File-Print option. 16. To create a teacher/service provider progress tracking grid: a. On the Criteria screen, choose the goals to be included on the tracking sheet. b. On the Print screen, check Tracker. c. Enter the first date to be included on the grid in the Start field (typically the first day of
a new reporting period). d. Select an interval using the pull-down list (e.g., daily, weekly, every 2 weeks, or every
3 weeks). Click “Continue”.
b & c

www.ggconsulting.com 33
e. The tracking sheet will be displayed and can be printed at this time. Thirty slots are provided to manually record the student’s progress on each of his/her IEP objectives. This information can be used for planning purposes and to track IEP progress.
IEP TIPS:
• To delete a DRAFT goal, objective, or progress report, click on the “Delete” key found on that screen.
• Utilize the built-in calendar by double clicking in any date field.
• When goals or objectives are entered, do not enter an “End Date”. When a goal/objective is mastered or discontinued and the next ARD Committee Meeting Report* is locked, the ARD date will automatically be entered as the end date.
• Opening the IEP Tree – To quickly expand the IEP tree to see all goals, objectives
and progress reports, click the Expand Tree button.

www.ggconsulting.com 34
• Colors in the IEP tree are meaningful: Green – A standard has been added and will have (temp) in front until a goal has been
written for that standard. Blue – Draft goals, objectives, and/or progress reports. Red – The goal/objective that is currently being viewed/edited on the right side of the
screen. Black – Goals and/or objectives that have been approved by an ARD committee and
locked with the ARD Committee Meeting Report*.
• More of the goal/objective in the IEP tree can be viewed by clicking the >> button. To close this screen, click the << button.
• Changes need to be made to the IEP popups to fully benefit from the standards-based
programming. The following should be added to the IEP Mastery Criteria popup: <correct> out of <tot> times. Wording and the parentheses () around the percentages should also be deleted (e.g., delete “seventy percent” and the () around the number so that only 70% displays. Additional percentages may need to be added (e.g., 55%, 65%, 85%, etc.).
www.ggconsulting.com 35
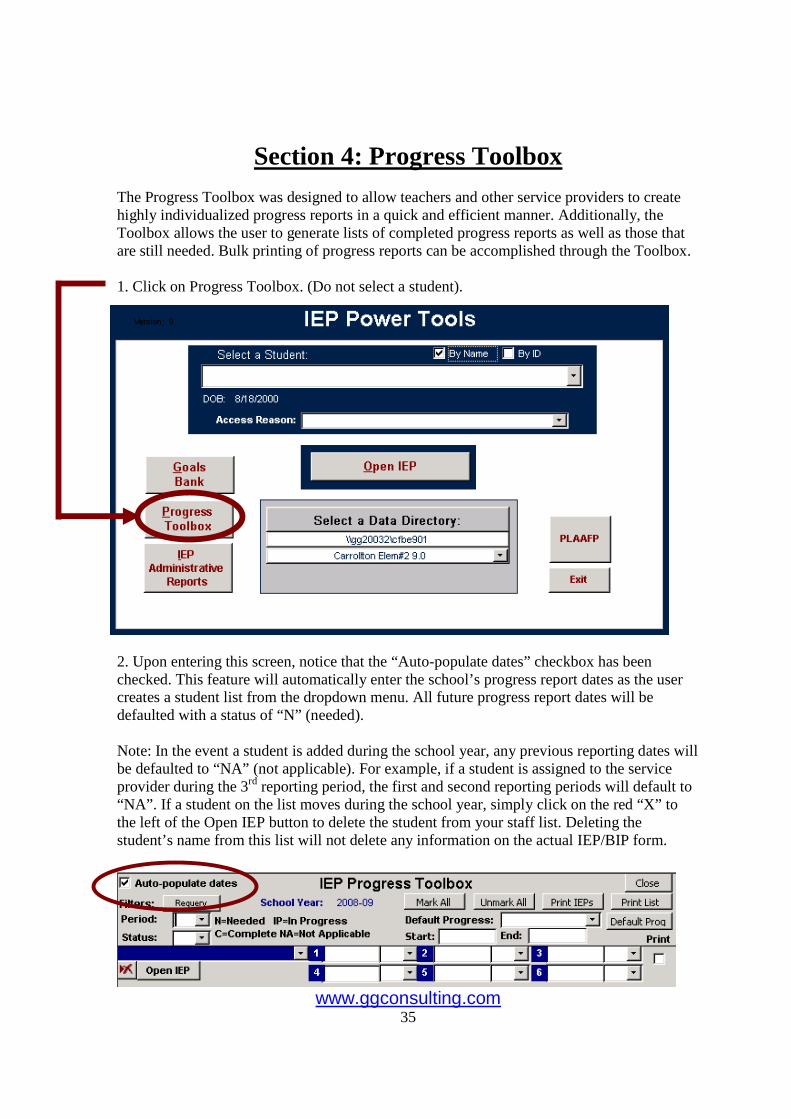
Section 4: Progress Toolbox
The Progress Toolbox was designed to allow teachers and other service providers to create highly individualized progress reports in a quick and efficient manner. Additionally, the Toolbox allows the user to generate lists of completed progress reports as well as those that are still needed. Bulk printing of progress reports can be accomplished through the Toolbox. 1. Click on Progress Toolbox. (Do not select a student). 2. Upon entering this screen, notice that the “Auto-populate dates” checkbox has been checked. This feature will automatically enter the school’s progress report dates as the user creates a student list from the dropdown menu. All future progress report dates will be defaulted with a status of “N” (needed). Note: In the event a student is added during the school year, any previous reporting dates will be defaulted to “NA” (not applicable). For example, if a student is assigned to the service provider during the 3rd reporting period, the first and second reporting periods will default to “NA”. If a student on the list moves during the school year, simply click on the red “X” to the left of the Open IEP button to delete the student from your staff list. Deleting the student’s name from this list will not delete any information on the actual IEP/BIP form.

www.ggconsulting.com 36
3. To establish the level of progress reporting, click on the Default Progress dropdown. From the list, indicate the level at which progress reports will be completed: Goal, Objective, or Goal & Objective. Next, click the Default Prog button to the right of the dropdown. A prompt verifying your selection will be displayed. Click “Yes” to accept your selection. Hint: If the user is writing short-term benchmarks for a student, it would be appropriate to evaluate progress at the objective level during each of the nine-week reporting periods. Prior to the student’s annual ARD, progress on the goal should be evaluated. 4. Click on the dropdown arrow. From the list, select a student for whom you need to complete progress reports. As one student is added to the list, the program will generate an additional row for the next student entry.
5. Click on “Open IEP” under the student’s name to access the progress report. An automated entry will be placed in the SEM Student Information-Other Info/Access Log indicating that you accessed the student’s IEP. In SEM, the IEP/BIP will appear as a draft form in the student’s ARD Meeting Forms file cabinet. 6. A message will appear asking if you wish to default the progress report date to the next reporting period date. If so, click “Yes”. If not, click “No” and adjust the Review Date on the Defaults screen. 7. Complete/adjust other Progress Report Defaults as appropriate.
4

www.ggconsulting.com 37
8. Click on the first goal or objective for which a progress report is to be completed. The progress report field will open on the right side of the screen. Defaults will be inserted. The user can edit and/or add to any comment already displayed in the progress report field. 9. Click on the next goal or objective until all progress reports have been completed. 10. When finished creating progress reports for that student, click “Save” and then “Close”. 11. If the user clicks the Close button prior to saving changes, the following message will appear. Click “Yes” if changes should be saved. 12. As appropriate, choose “Yes” or “No” at the following prompt: 13. Upon exiting the student’s IEP, you will be prompted to indicate whether all progress reports for this student have been completed (“C”) or are still “In Progress” (“IP”). Answer “Yes” or “No” accordingly.

www.ggconsulting.com 38
14. Choose the next student in the list. Repeat steps 6-14. To print all progress reports from the Toolbox screen: 1. Enter Start and End dates (located above list of students): The user has two options for the start date from this screen. If only the current progress report is to be printed (e.g., only the 4th 6-week report), enter that progress report date as the start date. If all progress reports for the current year are to be included, use the date of the first day of school. 2. Check the box under “Print” for those progress reports you wish to print, or click the “Mark All” button to print all students’ progress reports.
OR
&

www.ggconsulting.com 39
3. Click “Print IEPs”. 4. If you wish to print a list of students to show the status of progress reports, click on “Print List”. These lists can be filtered (e.g., N = Needed, IP = In Progress, or C = Completed). In the following example, only students who have progress reports “In Progress” during the 6th reporting period would be displayed:

www.ggconsulting.com 40
Section 5: Goals Bank 1. Click Goals Bank.
2. Select goal area by type (e.g., TEKS, Speech, etc.).
3. TEKS goals can be printed by subject and filtered by grade level. 4. The default is set so that the TAKS-Alt goals (TAKS-Alt essence statements) do not automatically print out with other TEKS standards. When needed, the TAKS-Alt goals can be printed by placing a check into the TAKS-Alt checkbox.
www.ggconsulting.com 41
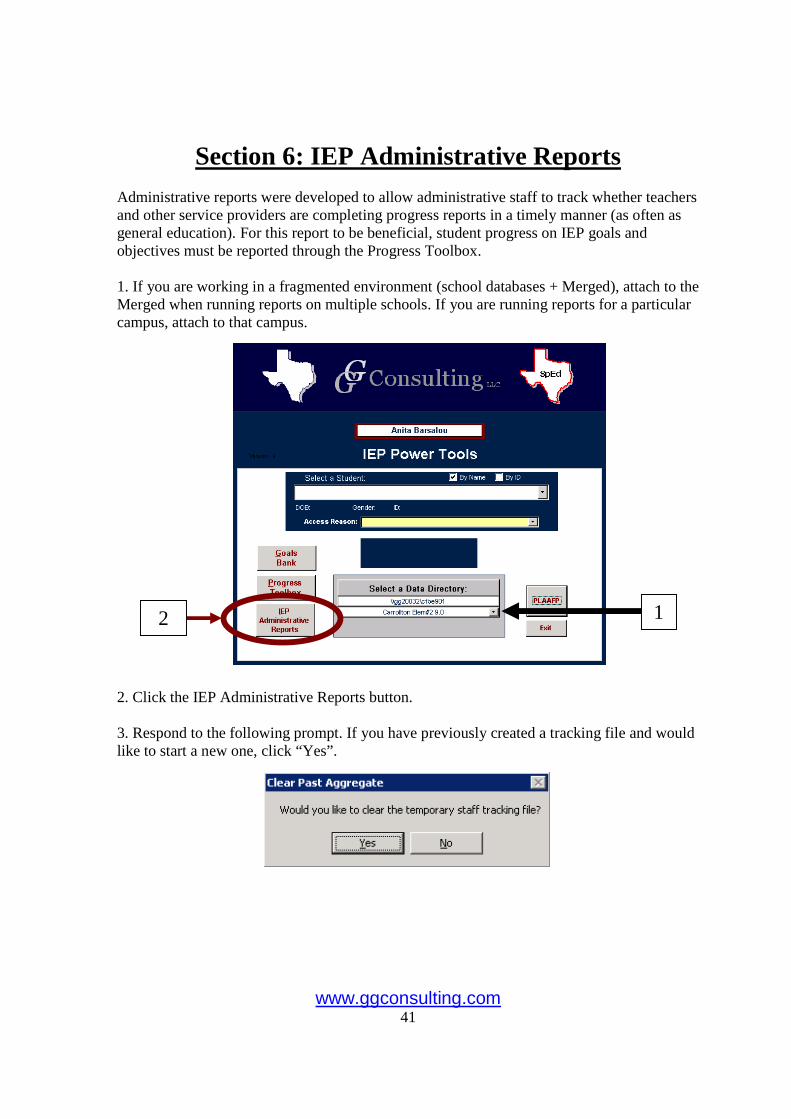
Section 6: IEP Administrative Reports Administrative reports were developed to allow administrative staff to track whether teachers and other service providers are completing progress reports in a timely manner (as often as general education). For this report to be beneficial, student progress on IEP goals and objectives must be reported through the Progress Toolbox. 1. If you are working in a fragmented environment (school databases + Merged), attach to the Merged when running reports on multiple schools. If you are running reports for a particular campus, attach to that campus. 2. Click the IEP Administrative Reports button. 3. Respond to the following prompt. If you have previously created a tracking file and would like to start a new one, click “Yes”.
1 2

www.ggconsulting.com 42
4. At the following screen, click the Select Staff button: 5. Staff can be filtered by position and/or school. If filtering, click the Requery button after making your selections. 6. Click Close.

www.ggconsulting.com 43
7. Click the Merge Staff button. 8. Student lists for each selected staff member will be generated. 9. Tracking reports can now be created by filtering a reporting period (1-6 or All) and a status (N, IP, C, or All). For example, the following report indicates which students have “Completed” progress reports for the 6th reporting period.
www.ggconsulting.com 44
Section 7: Accessing Records/Reports in SEM
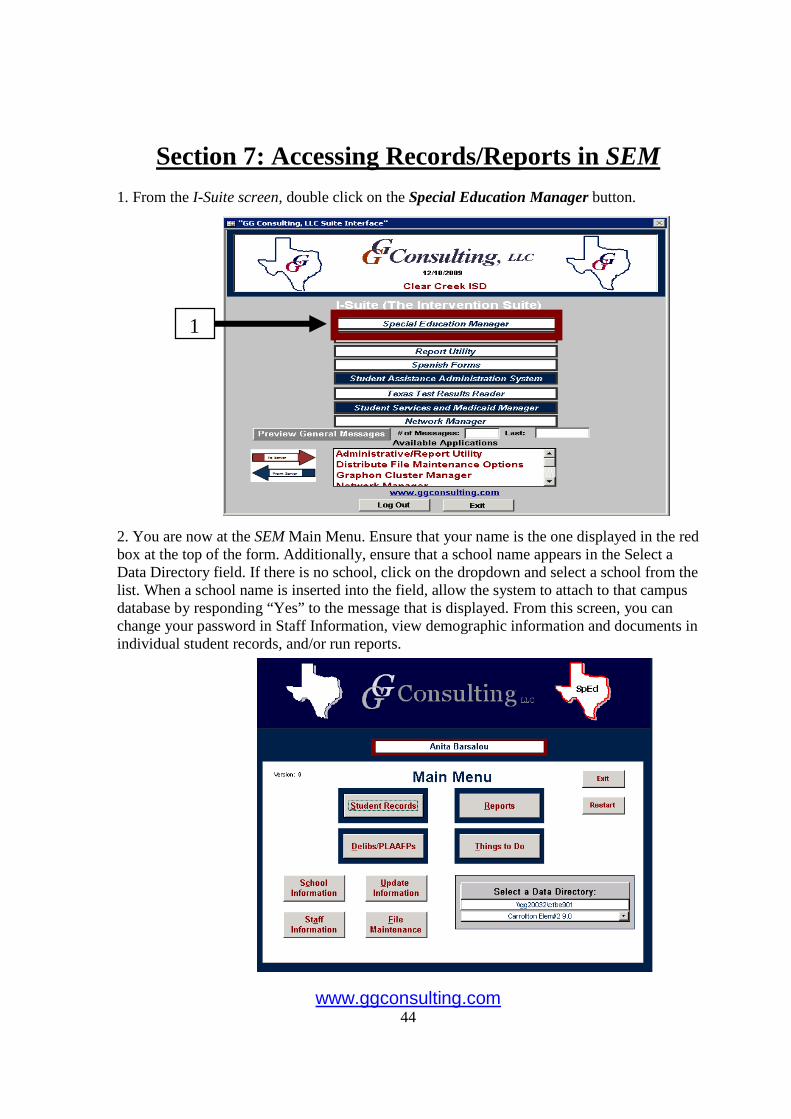
1. From the I-Suite screen, double click on the Special Education Manager button.
2. You are now at the SEM Main Menu. Ensure that your name is the one displayed in the red box at the top of the form. Additionally, ensure that a school name appears in the Select a Data Directory field. If there is no school, click on the dropdown and select a school from the list. When a school name is inserted into the field, allow the system to attach to that campus database by responding “Yes” to the message that is displayed. From this screen, you can change your password in Staff Information, view demographic information and documents in individual student records, and/or run reports.
1

www.ggconsulting.com 45
BASIC NAVIGATION: Familiarize yourself with the Main Menu. This is your navigation system for Special Education Manager. Users have access to all of the students in each of the schools with which they work. In the Data Directory dropdown, schools to which the user has access will be listed. If a school is missing from this list, contact the SEM Help Desk. • Student Records: Student demographics, forms used for ARD meetings,
assessment/evaluation, referral, vocational and transition information are stored here. Student Records is essentially the “hub” of the Special Education Manager.
• Reports: Can be used by all individuals to access an array of pre-defined reports. Reports
are divided into 4 areas: State, Compliance, Student List, and Miscellaneous Reports/Exports.
• Delibs/PLAAFPs: Used to enter ARD meeting deliberations outside of the actual ARD
document. This function enables more than one staff member to enter deliberations at one time. Information entered through this function is either appended (added) to or overwrites information that has been entered on the ARD deliberations page. Student competencies can also be entered here, but the primary entry point for PLAAFPs is in Power Tools.
• Things to Do: Used as an organizational/management tool for case managers and
administrative staff. Things to Do compiles information on students in need of ARDs, completed ARDs, students in need of FIEs, etc. Additionally, built-in ARD/ITP scheduler and an ARD/ITP meeting notice and label generators are available. Individuals may access information for their respective students, while administrative staff may access any user’s students by selecting the staff member’s name. Administrative staff may also assign any staff member Unlimited Schedule Access in Staff Information. This function is useful for those who maintain notices, etc. for other staff members.
• School Information: Used to enter and access school information for each school within
the district/co-op. • Update Information: This feature is designed to inform you of the latest enhancements
made to the application. You will be prompted to view an update document after updates are made within the application.
• Staff Information: Used by the district’s SEM coordinator to enter and access staff member information such as names, positions, schools/programs to which access is given, etc. This screen is where a user’s password can be changed. It is also recommended that all users add their e-mail address on this screen. If any information on this screen is inaccurate, contact the SEM Help Desk for assistance.

www.ggconsulting.com 46
• File Maintenance: Used to maintain SEM file structure and data. It includes such functions as transferring records to/from other SEM databases/users, backing up data, creating/loading Pop-up menus, and other data maintenance functions.
CHANGING YOUR PASSWORD: 1. To change your password, click on the Staff Information button. 2. In the Select a Staff Member field, begin typing your name or click on the dropdown arrow and scroll to find your name. 3. At the bottom of your screen, delete the current entry in the Password field and add your own unique password. This password must be 6 characters or less, and it is not case sensitive. 4. Click the Close button. Click the Yes button both times a message pops up, click OK. 5. Your e-mail address can be added/edited by clicking the button.
1
2

www.ggconsulting.com 47
SELECTING A STUDENT: 1. From the Main Menu, click the Student Records button. 2. Click on the dropdown arrow and/or begin typing the student’s last name in the Select a Student field until the student’s name populates the field. 3. Provide an Access Reason (e.g., Review File). 4. The following file cabinets are now available for previewing:
a) Student Information (General, Parent, Enrollment, etc.) b) ARD Meeting Forms c) ITP Meeting Forms d) Vocational Assessment Forms e) Assessment/Evaluation Forms f) Referral Forms g) S-BIP Forms (by subscription only) h) Other Forms
5. Staff with IEP Access cannot add or delete students, change IDs, or edit forms except the IEP/BIP. Secondary teachers will be provided access to transition forms. If any student information appears inaccurate or needs to be updated, contact your program administrator.
2
4

www.ggconsulting.com 48
1 3
PREVIEWING/PRINTING STUDENT RECORDS:
1. Highlight the appropriate filing cabinet (e.g., ARD Meeting Forms), and all available sets of this form type will be displayed by date. (L) indicates that the form set has been locked, meaning the data has been archived and cannot be changed. A (D) indicates that the form set is in draft mode and is incomplete. 2. Choose the appropriate date to “open” the file cabinet. 3. All forms associated with the selected form set date are displayed in the box on the right hand side. 4. Highlight the desired form. 5. Click the Preview Form or the Print Form button.
6. If the “ARD Committee Meeting Report*” form was selected, an ARD Page Selector screen will be displayed. Choose the Select All button or place a check in the box to the left of the desired pages. Click Preview and/or Print.
www.ggconsulting.com 49
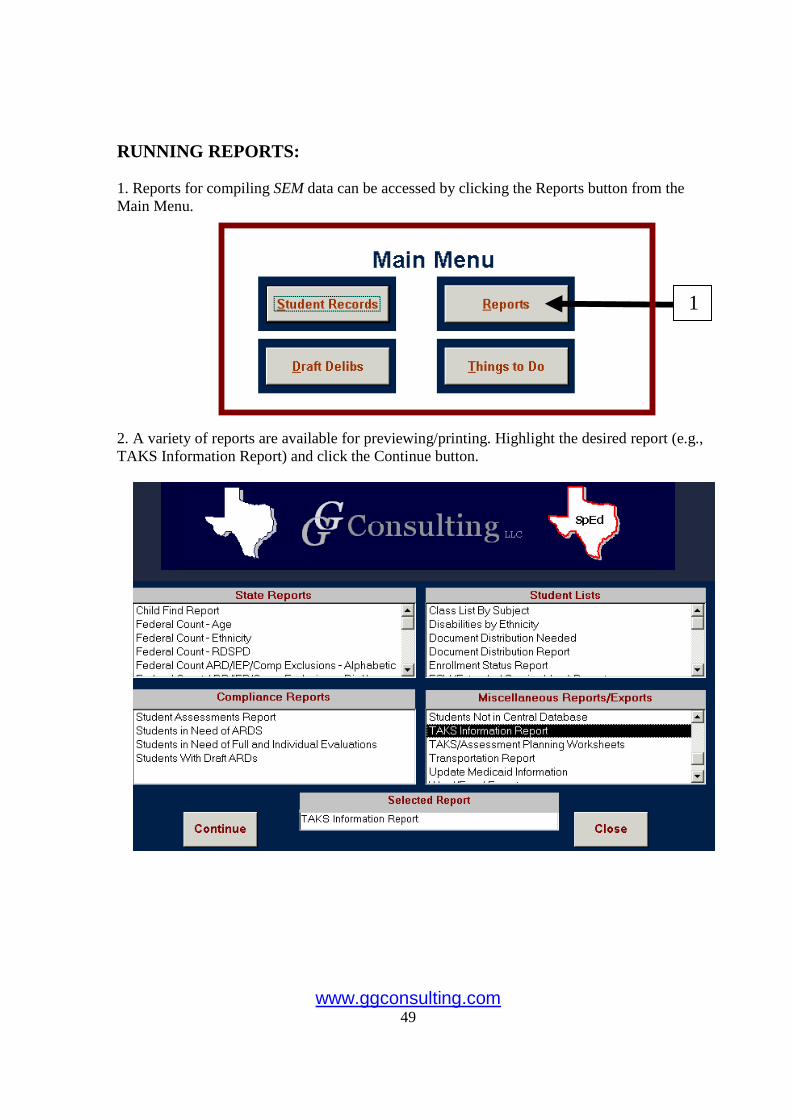
RUNNING REPORTS: 1. Reports for compiling SEM data can be accessed by clicking the Reports button from the Main Menu.
2. A variety of reports are available for previewing/printing. Highlight the desired report (e.g., TAKS Information Report) and click the Continue button.
1

www.ggconsulting.com 50
3a
3c
3b
3. At the Report Selection Criteria screen, the user selects their data by: a. Filtering - All reports are generally filtered by Student, School, Case Manager, or
District. Additional filtering can include grade, ethnicity, and/or gender (see above). Some reports, such as the TAKS Information Report, have additional filtering (subject, test type, accommodations).
b. Date Ranges - Reports require varying types of date ranges to obtain the desired information: ARD date range, compliance date, or time of service. For example, if a report is run to see which students have a particular service (e.g., occupational therapy) during a specific time period (e.g., Fall semester) then the date range should be limited to only the Fall semester (e.g., 8/24/2009 to 1/15/2010).
c. Enrollment Statuses – Enrollment statuses can be selected on each report screen. Generally, the following statuses are chosen: Active, Initial, and Transfer. These three statuses indicate students who are eligible and currently receiving services through special education.
www.ggconsulting.com 51
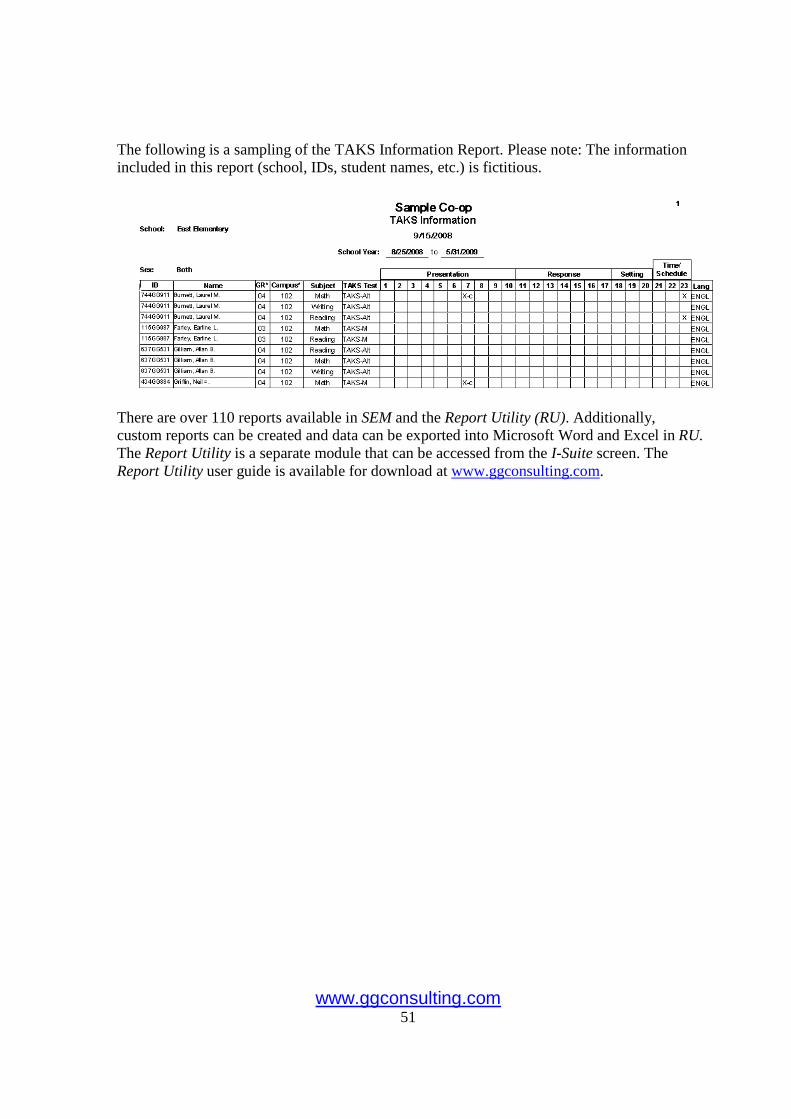
The following is a sampling of the TAKS Information Report. Please note: The information included in this report (school, IDs, student names, etc.) is fictitious.
There are over 110 reports available in SEM and the Report Utility (RU). Additionally, custom reports can be created and data can be exported into Microsoft Word and Excel in RU. The Report Utility is a separate module that can be accessed from the I-Suite screen. The Report Utility user guide is available for download at www.ggconsulting.com.