ptec 155 – developmental disabilities module 29 sensory ... · ptec 155 – developmental...
TRANSCRIPT
PTEC 155 – DEVELOPMENTAL DISABILITIES
MODULE 29
SENSORY INTEGRATION
Napa Valley College PTEC 155 – Developmental Disabilities
Module 29 – Sensory Integration
1
TABLE OF CONTENTS
Introduction ................................................................................................................................. 1 Objectives ............................................................................................................................. 2 – 5 Principles .................................................................................................................................... 6 Vocabulary ................................................................................................................................. 7 Study Guides: 1 – Reflex Development ........................................................................................... 8 – 16 2 – Types of Cerebral Palsy Braces ....................................................................... 17 – 36 3 – Development of Oral Control and Feeding Techniques .................................... 37 – 49 Article: “Sensory Motor Integration and the Developmentally Disabled Client” (Author: Cindy Davis) ............................................................................................ 50 – 51 Sensory Motor Development Information Sheet ................................................................ 52 – 54

Napa Valley College PTEC 155 – Developmental Disabilities
Module 29 – Sensory Integration
2
INTRODUCTION The client with developmental disabilities often exhibits feeding and orthopedic difficulties, which inhibit the normal growth and developmental processes. Abnormal reflexive behavior beyond normal developmental limits may also be observed. Assessment skills and special intervention techniques need to be developed by the student in order to deal effectively with these areas. Techniques dealing with orthopedic and feeding difficulties, as well as abnormal reflexive behaviors, should be evaluated and assessed by the entire team---the attending physician, occupational therapist and/or physical therapist, etc. ---before the student implements any intervention and/or treatment plan. Knowledge of first aid and emergency procedures including emergency equipment is necessary when working with a feeding program.
Napa Valley College PTEC 155 – Developmental Disabilities
Module 29 – Sensory Integration
3
OBJECTIVES
THEORY: The successful student will achieve a passing score on a written comprehensive examination based on materials dealing with techniques used to teach and train clients with developmental disabilities in the areas of feeding, positioning, and using orthotic equipment. ASSESSMENT: There will be a written comprehensive objective type test; multiple choice, true/false, and matching questions. MAKE UP TESTS MAY BE AN ESSAY TEST!! INSTRUCTIONAL MEDIA: Study Guides
1. Reflex Development 2. Types of Cerebral Palsy Braces 3. Development of Oral Control and Feeding Techniques
ARTICLES: Davis, C. “Sensory Motor Integration and the Developmentally Disabled Client”
Napa Valley College PTEC 155 – Developmental Disabilities
Module 29 – Sensory Integration
4
OBJECTIVES The successful student will be able to: 1. Identify the following aspects of the development of reflexes: a. Identify the following reflexes with their appropriate descriptions of their anatomical
positions: (1) Amphibian (2) Asymmetrical tonic neck reflex (3) Body righting (4) Extensor thrust (5) Moro reflex (6) Neck righting (7) Protective extension (8) Symmetrical tonic neck reflex (9) Tonic labyrinthine (a) Prone position (b) Supine position b. Identify those reflexes that are abnormal if found beyond one year of age. c. Identify the reflex-inhibiting postures used to control pathological reflexes. 2. Identify the following aspects of orthotic bracing with the cerebral palsy client: a. Identify the purpose for orthotic bracing b. Identify principles, which govern the use of orthopedic equipment. c. Select from a list general instructions regarding appropriate application of orthotic
equipment.
Napa Valley College PTEC 155 – Developmental Disabilities
Module 29 – Sensory Integration
5
d. Match the following orthotic equipment with their appropriate uses and/or purposes: (1) Cerebral palsy flexion chair (2) Hip abductor brace (3) Posture panel (4) Sit board (5) Standing table (tilt table)
(6) Traction ease sling (7) Trunk support brace - body brace (8) Wheelchair
3. Identify the following aspects of the feeding process: a. Match the following anatomical structures with their appropriate functions in the feeding
process:
(1) Epiglottis (2) Hard palate (3) Larynx (4) Lips (5) Mandible (6) Pharynx (7) Soft palate (8) Teeth (9) Tongue
b. Identify normal reflexive behaviors in the feeding process including those which
disappear and those which remain throughout life:
(1) Biting (2) Chewing (3) Coughing (4) Gagging (5) Rooting reflex (6) Sucking (7) Swallowing
c. Identify steps, which should occur in the normal eating process (physiology of eating). d. Identify problem areas in oral control. e. Identify basic considerations for successful spoon-feeding.
Napa Valley College PTEC 155 – Developmental Disabilities
Module 29 – Sensory Integration
6
f. Identify the correct feeding techniques for the following: (1) Cup-drinking (2) Spoon-feeding g. Identify correct facilitation techniques with the appropriate problem feeding areas. (1) Bite reflex (2) Delayed opening of mouth (3) Delayed Swallowing
(4) Facilitate chewing (5) Inability to close mouth (6) Inability to remove food from spoon (7) Problems with fluids and cup drinking (8) Tongue thrust

Napa Valley College PTEC 155 – Developmental Disabilities
Module 29 – Sensory Integration
7
PRINCIPLES
RELATED TO REFLEXES
1. Reflexes are automatic and cannot be controlled voluntarily. 2. Reflexes are sequential and normal for different developmental ages. 3. An infant’s reflexes allow for first movements against gravity. 4. Some reflexes are present throughout life and act as protective mechanisms.
Napa Valley College PTEC 155 – Developmental Disabilities
Module 29 – Sensory Integration
8
VOCABULARY
Abduction Orthotic
Adduction Palate—hard, soft
Apedal amphibian Pharynx
Asymmetry Postural
Aspiration Posture panel
Bipedal Protective extension reflex
Bolus Protracted jaw
Cerebral palsy flexion chair Quadrupedal
Dysphagia Reciprocation
Epiglottis Retracted jaw
Equilibrium Reverse swallowing
Extensor thrust reflex Righting Reactions
Facilitate Body righting
Gag Reflex Neck righting reflex Hip abductor brace Rooting reflex
Hyperextension Scoliosis Hypertonicity Sit board Hypotonicity Spasm
Incisors Symmetry Inhibit Tongue thrust Kyphosis Tonic neck reflex Larynx Asymmetrical Lordosis Symmetric Mandible Tonic labyrinthine Moro reflex Traction ease sling Occlusion Trunk support brace
Napa Valley College PTEC 155 – Developmental Disabilities
Module 29 – Sensory Integration
9
STUDY GUIDE I REFLEX DEVELOPMENT
A partial list of normal reflexes and reactions and their period of duration are listed in this study guide. The health care worker who is working with cerebral palsied individuals will often see some of these reflexes, which remain beyond normal age periods and may interfere with voluntary motor planning. Persistent abnormal reflexes require special programming and treatments. Knowledge and understanding of these areas will assist the health care worker to be more effective in carrying out prescribed treatments. Formal testing, evaluation, and recommendations for remediation must be done by persons on the health care team. Primitive reflexes are essential to normal development. They prepare the child for such voluntary movements such as rolling over, sitting, crawling, standing, etc. In normal development, primitive spinal and brain stem reflexes gradually diminish so that higher patterns of righting and equilibrium reactions may appear. When the inhibitory control of the higher cerebral centers are disrupted, primitive reflexes dominate, thus interfering with normal sensorimotor development. Neurological development is sequential and reflex maturation may be evaluated in terms of a client’s particular level of reflexes present. There are three levels of reflexive development. 1. Apedal-predominance of primitive spinal and brain stem reflexes. Motor development is of a
supine-lying individual. 2. Quadrupedal – predominance of midbrain development with righting reactions and motor
development of an individual who can turn over, assume crawling and sitting positions. 3. Bipedal – at cortical level. Equilibrium has developed and the individual can assume a
standing position and can ambulate. Level of Reflex 1. Spinal Level – spinal reflexes coordinate muscles of the extremities in patterns of either total
flexion or extension. Positive reactions should not remain beyond two months of age. 2. Brainstem Level – brainstem reflexes are “static” postural reflexes that change muscle tone
throughout the body due to changes in head position. Positive reactions beyond six months of age may indicate delayed maturation of the central nervous system. Complete domination by primitive brainstem reflexes results in an apedal individual.
3. Midbrain Level – righting reactions interact with each other to establish normal head and body
relationship in space as well as in relation with each other. The first reactions develop after birth and reach maximum effect about ten months of age to twelve months of age. As cortical control increases, righting reactions are gradually inhibited and disappear towards the end of the fifth year. Righting reactions enable the child to sit up, roll over, crawl, and creep.
4. Automatic Movement Reactions – Autonomic movement reactions are reflexes that are not
strictly righting reflexes but are produced by stimulation of the semicircular canal of the ear. The persistence or absence of these reactions can be observed in clients with pathological conditions.
Napa Valley College PTEC 155 – Developmental Disabilities
Module 29 – Sensory Integration
10
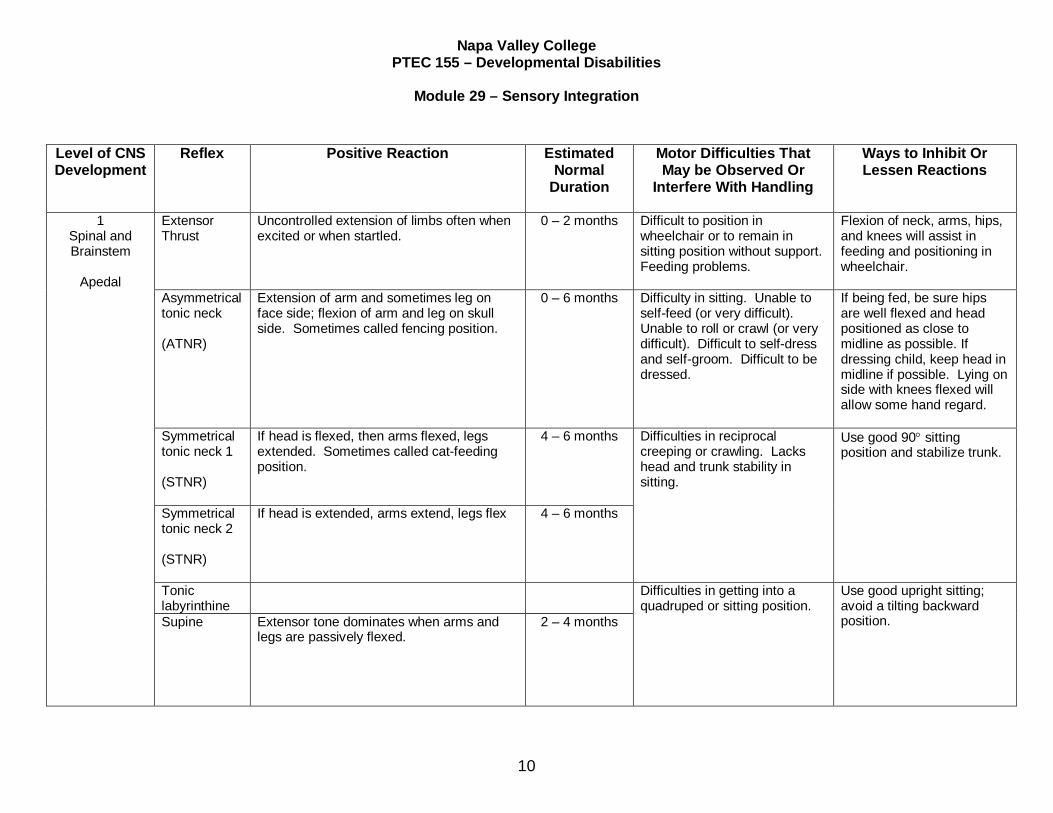
5. Cortical Levels – With the maturation of equilibrium reactions, the individual will have
integrated previous reflexes and will be bipedal. Individuals will be able to control muscle tone and adapt to changes in the body’s center of gravity. Equilibrium reactions emerge between the sixth through the twelfth months of age and remain throughout life.
The chart on the following page includes specific reflexes of all levels of reflexive development. It includes definitions of reflexes, estimated normal duration, motor difficulties that may be observed or which interfere with handling as well as ways to inhibit or lessen these reactions.
Napa Valley College PTEC 155 – Developmental Disabilities
Module 29 – Sensory Integration
10
Level of CNS Development
Reflex Positive Reaction Estimated Normal
Duration
Motor Difficulties That May be Observed Or
Interfere With Handling
Ways to Inhibit Or Lessen Reactions
1 Spinal and Brainstem
Apedal
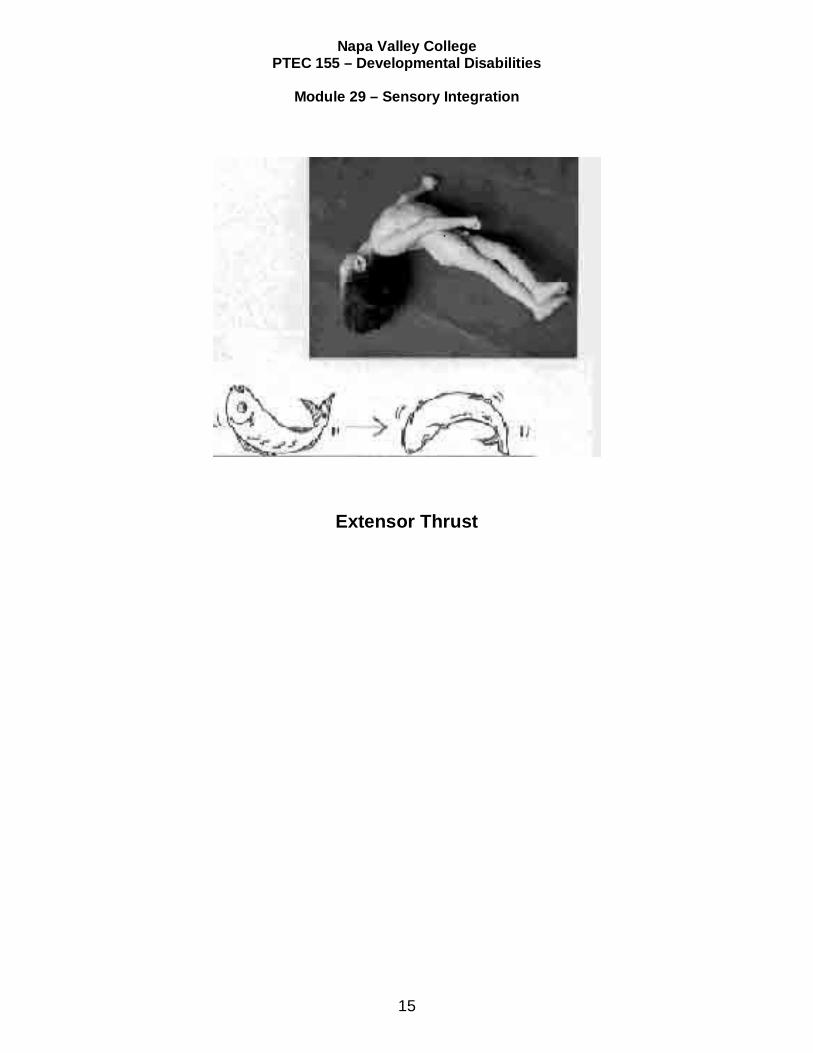
Extensor Thrust
Uncontrolled extension of limbs often when excited or when startled.
0 – 2 months Difficult to position in wheelchair or to remain in sitting position without support. Feeding problems.
Flexion of neck, arms, hips, and knees will assist in feeding and positioning in wheelchair.
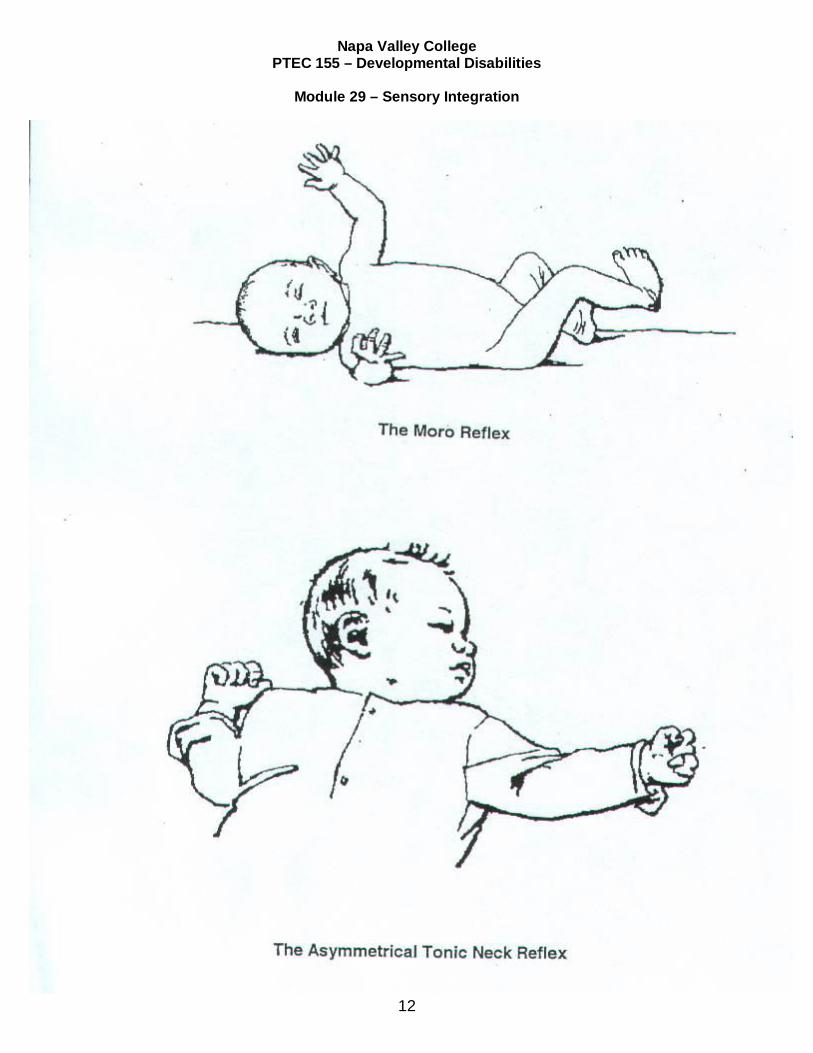
Asymmetrical tonic neck (ATNR)
Extension of arm and sometimes leg on face side; flexion of arm and leg on skull side. Sometimes called fencing position.
0 – 6 months Difficulty in sitting. Unable to self-feed (or very difficult). Unable to roll or crawl (or very difficult). Difficult to self-dress and self-groom. Difficult to be dressed.
If being fed, be sure hips are well flexed and head positioned as close to midline as possible. If dressing child, keep head in midline if possible. Lying on side with knees flexed will allow some hand regard.
Symmetrical tonic neck 1 (STNR)
If head is flexed, then arms flexed, legs extended. Sometimes called cat-feeding position.
4 – 6 months Difficulties in reciprocal creeping or crawling. Lacks head and trunk stability in sitting.
Use good 90 sitting position and stabilize trunk.
Symmetrical tonic neck 2 (STNR)
If head is extended, arms extend, legs flex 4 – 6 months
Tonic labyrinthine
Difficulties in getting into a quadruped or sitting position.
Use good upright sitting; avoid a tilting backward position. Supine Extensor tone dominates when arms and
legs are passively flexed.
2 – 4 months
Napa Valley College PTEC 155 – Developmental Disabilities
Module 29 – Sensory Integration
10
Level of CNS Development
Reflex Positive Reaction Estimated Normal
Duration
Motor Difficulties That May be Observed Or
Interfere With Handling
Ways to Inhibit Or Lessen Reactions
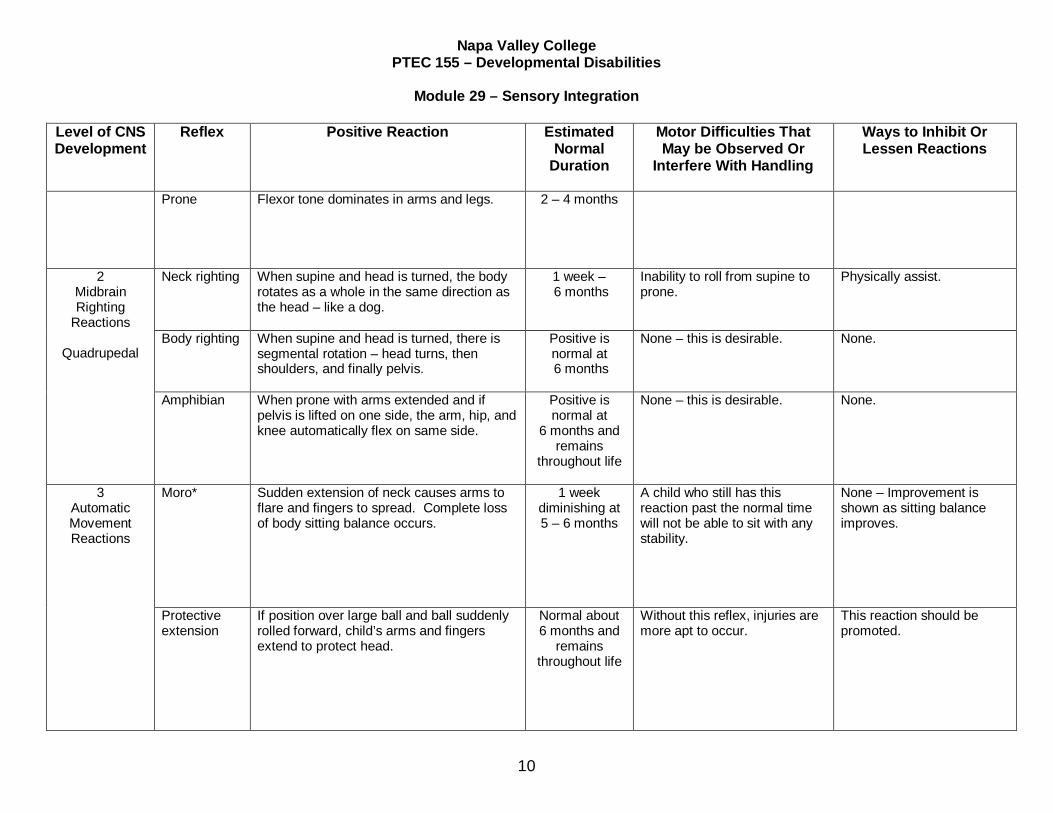
Prone Flexor tone dominates in arms and legs.
2 – 4 months
2 Midbrain Righting
Reactions
Quadrupedal
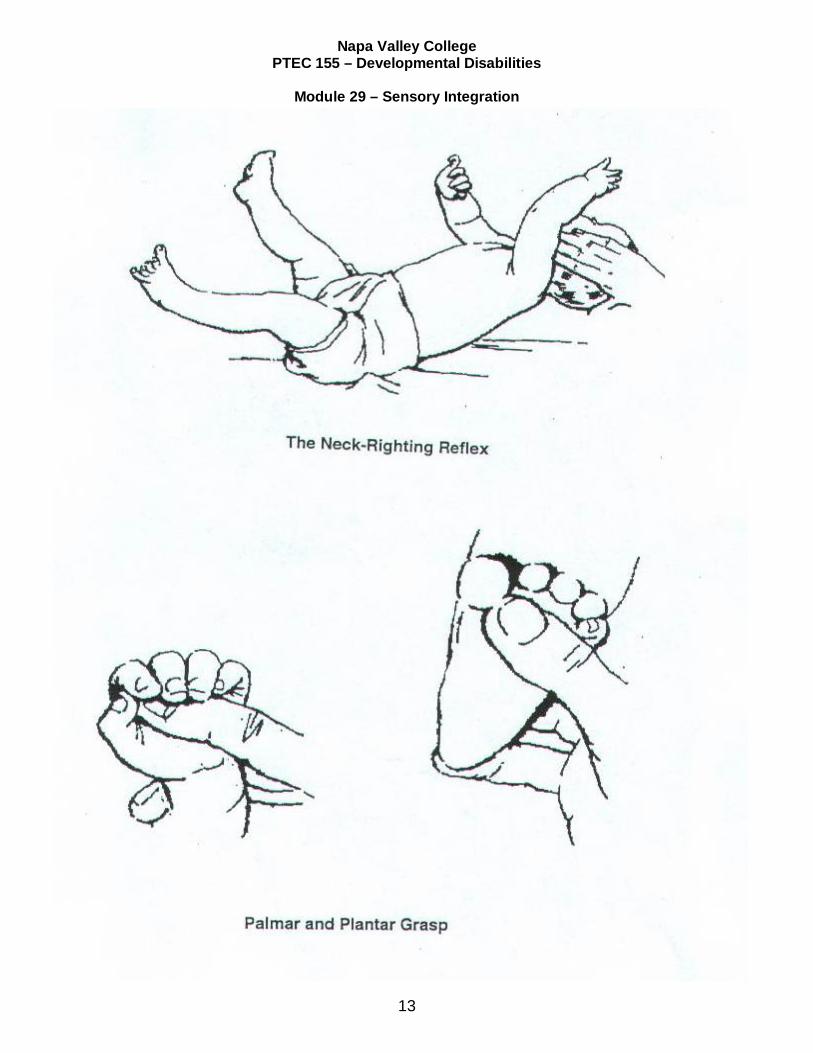
Neck righting When supine and head is turned, the body rotates as a whole in the same direction as the head – like a dog.
1 week – 6 months
Inability to roll from supine to prone.
Physically assist.
Body righting When supine and head is turned, there is segmental rotation – head turns, then shoulders, and finally pelvis.
Positive is normal at 6 months
None – this is desirable. None.
Amphibian When prone with arms extended and if pelvis is lifted on one side, the arm, hip, and knee automatically flex on same side.
Positive is normal at
6 months and remains
throughout life
None – this is desirable. None.
3 Automatic Movement Reactions
Moro* Sudden extension of neck causes arms to flare and fingers to spread. Complete loss of body sitting balance occurs.
1 week diminishing at 5 – 6 months
A child who still has this reaction past the normal time will not be able to sit with any stability.
None – Improvement is shown as sitting balance improves.
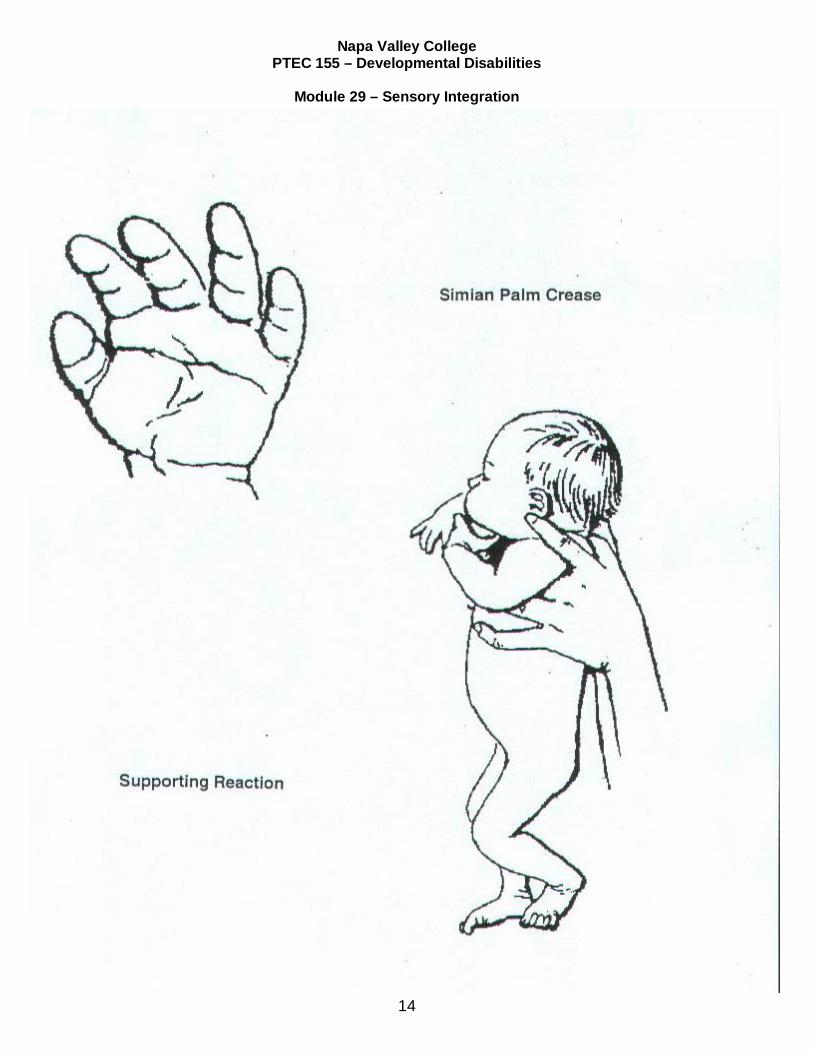
Protective extension
If position over large ball and ball suddenly rolled forward, child’s arms and fingers extend to protect head.
Normal about 6 months and
remains throughout life
Without this reflex, injuries are more apt to occur.
This reaction should be promoted.
Napa Valley College PTEC 155 – Developmental Disabilities
Module 29 – Sensory Integration
10
Level of CNS Development
Reflex Positive Reaction Estimated Normal
Duration
Motor Difficulties That May be Observed Or
Interfere With Handling
Ways to Inhibit Or Lessen Reactions
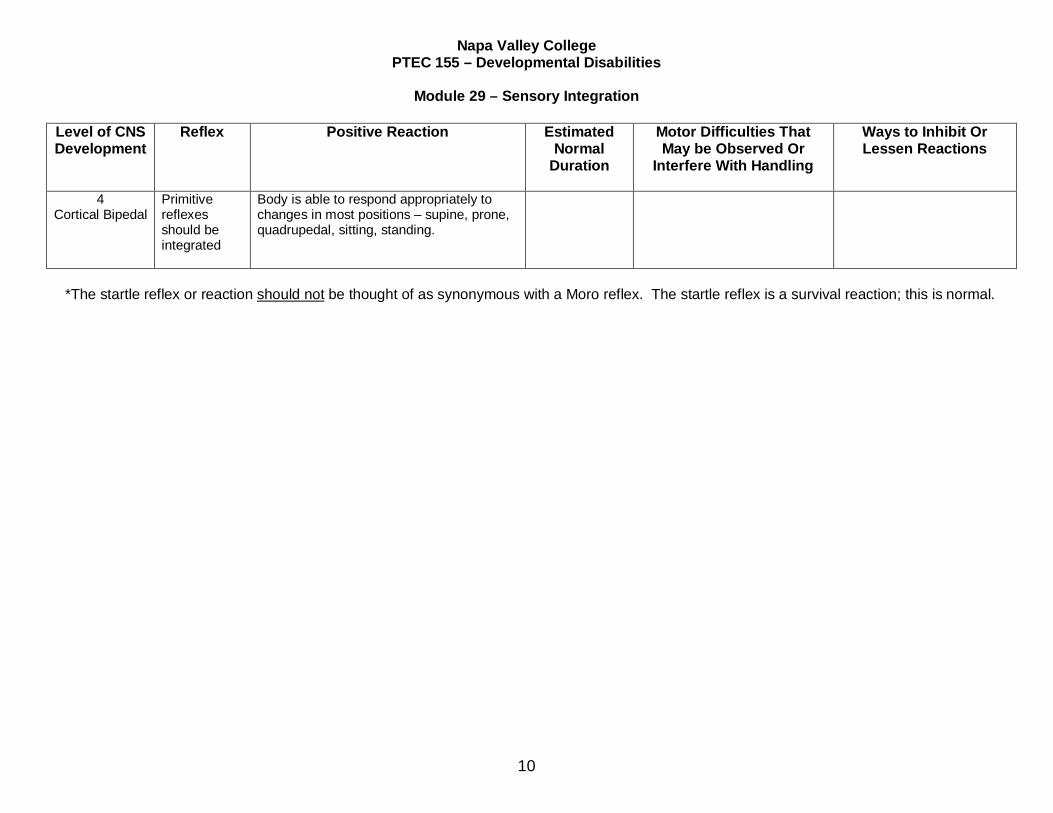
4 Cortical Bipedal
Primitive reflexes should be integrated
Body is able to respond appropriately to changes in most positions – supine, prone, quadrupedal, sitting, standing.
*The startle reflex or reaction should not be thought of as synonymous with a Moro reflex. The startle reflex is a survival reaction; this is normal.

Napa Valley College PTEC 155 – Developmental Disabilities
Module 29 – Sensory Integration
11
INFANT REFLEXES PICTURES GOES HERE
Napa Valley College PTEC 155 – Developmental Disabilities
Module 29 – Sensory Integration
12
Napa Valley College PTEC 155 – Developmental Disabilities
Module 29 – Sensory Integration
13
Napa Valley College PTEC 155 – Developmental Disabilities
Module 29 – Sensory Integration
14
Napa Valley College PTEC 155 – Developmental Disabilities
Module 29 – Sensory Integration
15
Extensor Thrust
Napa Valley College PTEC 155 – Developmental Disabilities
Module 29 – Sensory Integration
16
STUDY GUIDE 2 TYPES OF CEREBRAL PALSY BRACES
General Instructions Regarding Application of Equipment 1. Review the purpose of the equipment in light of the rationale stated in the introduction of this
module. 2. Review the instructions given for application. Often directions are written on the equipment to
assist you (i.e., top, right, left, etc.). Straps may be marked to indicate the degree of tightness. 3. Visualize equipment on client ---how it is designed to assist the client. 4. Do not change “permanent adjustments” without consulting therapist. Consult therapist
without hesitancy if fitting or breakage problems occur. Remember that all equipment is individually fitted to the client. Extension time and money are involved.
5. Should pressure area occur, examine source. If equipment has been applied properly, then
consult therapist for an evaluation. This is critical if the client is nonverbal and/or has sensory loss to the extremities—your visual observation is the only data source.
6. It is the therapist’s responsibility to inform you of details of application and wearing time (i.e.,
day wear, night wear, 24-hour wear, etc.). However, it is also your responsibility to become informed about all aspects of client care.
Specific Pieces of Equipment – Use and Application 1. Wheelchair a. Use – to allow client to be in upright position to:
(1) Be more functional
(2) Prevent respiratory complications
(3) Widen environment
(4) Provide mobility
b. Application – (see attached sheet on proper positioning in wheelchair). Wheelchair seat should have a one-half inch clearance on all sides of client
2. Posture Panel
a. Use – to reinforce the sling back of the wheelchair to allow for better back support b. Application – Apply and stabilize in an optimum position in the chair at time of sitting
evaluation
Napa Valley College PTEC 155 – Developmental Disabilities
Module 29 – Sensory Integration
17
3. Sit Board
a. Use
(1) To reinforce and distribute the client’s weight on a wider sitting area of the wheelchair sling seat. If chair seat is not reinforced, the sling seat often causes internal rotation of the hip and pressure areas on bony prominences
(2) To raise seating level, if necessary
b. Application – Apply when initially evaluating client’s sitting posture
4. Body Brace
a. Use – to stabilize trunk in upright position. When attached to wheelchair, prevents client from sliding out due to overactive musculature b. Application
(1) If brace is attached to wheelchair, tilt chair backward and place client in brace
(2) Fit as low as possible leaving enough room for hip flexion and avoiding contact with the axilla but still leaving scapular movement free (3) Unhook front body plate from brace without releasing straps
(4) Attachment of lower hooks to wheelchair is vital to successful use of brace. IF
omitted, client is likely to slide away from back of chair and develop pressure areas on axilla
(5) Attach upper brace hooks to wheelchair
(6) New concepts and bracing and bracing materials sometimes require the brace
to be applied in a horizontal position (in bed, etc.). See physician’s orders or therapist evaluation
5. Head supports
a. Types
(1) Traction ease – for moderate support
b. Use – To support head and allow lateral head motion (rotation) as well as slight up-and-down motion while client is in wheelchair
c. Application
(1) To remove, release Velcro closure at back or front of head support, and then
slip upright bar from metal sleeve which is attached to body brace
Napa Valley College PTEC 155 – Developmental Disabilities
Module 29 – Sensory Integration
18
(2) To apply, position client with body brace in wheelchair and apply head support reversing procedure for removal
(3) Do not release any of the straps, springs etc.; these have been fitted to meet
the particular client’s needs. Only the use of the Velcro closure is necessary for application
6. Hip Abductor Brace
a. Use – to position client in hip abduction to prevent hip dislocation. Also, provides stability if client has potential for ambulation b. Application
(1) Apply when client is in bed to achieve best fit
(2) Velcro straps are attached to anterior of thighs. Occasionally, buckles are used rather than Velcro if client tends to pull straps apart
(3) Hip locks in 90-degree flexion to prevent client from involuntarily straightening
hips and sliding out of chair. If extensor thrust is severe, brace may be strapped to wheelchair
(4) To diaper client, simply remove thigh cuffs. It is not necessary to remove entire
brace 7. Combination Hip and Body Brace
a. Use – to position in upright position and to keep hips in abduction and at 90 degrees at the hip joint b. Application – same as body brace
8. Cerebral Palsy Arm Device
a. Use – To give stability to shoulder girdle and to assist in additional arm and hand movements to allow client to be more independent in functional activities b. Application – Due to the complexity and individuality of each cerebral palsy arm brace,
the occupational therapist should demonstrate initially the procedures to apply the brace and show how the individual parts benefit the particular client
9. Other Pieces of Equipment
a. Other major pieces of equipment are used occasionally. When used, ward will be informed of their application and use b. Specific Pieces
(1) Orthotic Shoes
Napa Valley College PTEC 155 – Developmental Disabilities
Module 29 – Sensory Integration
19
(a) Use – These shoes are prescribed by a physician and are specially built
by an orthotist. The reason for wearing them is usually to:
i. Stabilize an ankle ii. Position the ankle in a specific position and provide a firmer base
and traction for ambulation
(b) Application
i. Usually the shoe or shoes will be marked “right” or “left” because sometimes the shoes may not have much shape to them due to the orthopedic corrections ii. Be sure heel is well down into the heel of shoes and that toes
are not curled up within the shoes
(2) Short Leg Brace
(a) Use – same as orthotic shoes
i. To stabilize the ankle ii. To prevent foot drop
iii. Both 1 and 2
(b) Application
i. Usually the shoe or shoes or the calf strap on the braces will be
marked “right” or “left” as the short leg braces have metal stabilizing bars on either side of the shoes. However, if the braces have only one stabilizing bar, it always goes on the lateral side of each ankle
ii. Be sure heel is well down into heel of shoes and that toes are
not curled up within the shoes
(3) Standing Table or Tilt Table
(a) Use – To promote muscle tone in extensor muscles of body in preparation for mobilization in the upright position
(b) Application
i. Place table in horizontal position ii. Position client supine on table surface with feet at foot platform
Napa Valley College PTEC 155 – Developmental Disabilities
Module 29 – Sensory Integration
20
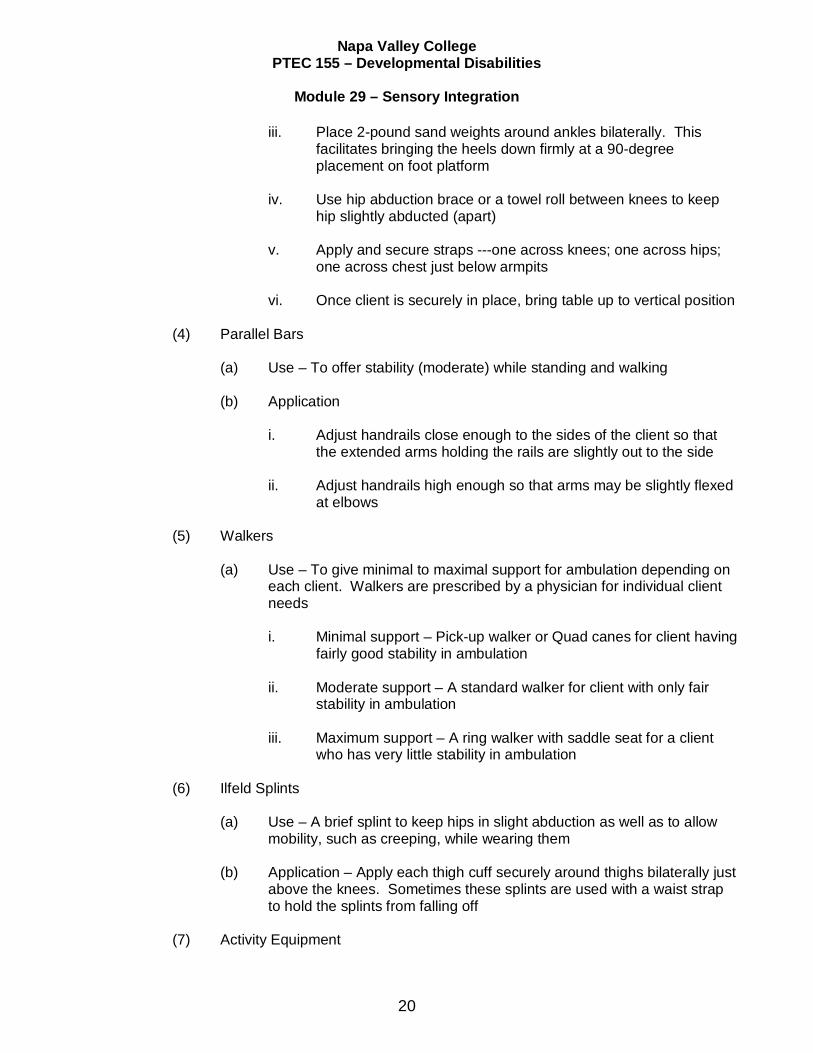
iii. Place 2-pound sand weights around ankles bilaterally. This facilitates bringing the heels down firmly at a 90-degree placement on foot platform
iv. Use hip abduction brace or a towel roll between knees to keep
hip slightly abducted (apart)
v. Apply and secure straps ---one across knees; one across hips; one across chest just below armpits
vi. Once client is securely in place, bring table up to vertical position
(4) Parallel Bars
(a) Use – To offer stability (moderate) while standing and walking (b) Application
i. Adjust handrails close enough to the sides of the client so that the extended arms holding the rails are slightly out to the side ii. Adjust handrails high enough so that arms may be slightly flexed
at elbows
(5) Walkers
(a) Use – To give minimal to maximal support for ambulation depending on each client. Walkers are prescribed by a physician for individual client needs i. Minimal support – Pick-up walker or Quad canes for client having fairly good stability in ambulation
ii. Moderate support – A standard walker for client with only fair stability in ambulation
iii. Maximum support – A ring walker with saddle seat for a client
who has very little stability in ambulation
(6) Ilfeld Splints
(a) Use – A brief splint to keep hips in slight abduction as well as to allow mobility, such as creeping, while wearing them
(b) Application – Apply each thigh cuff securely around thighs bilaterally just
above the knees. Sometimes these splints are used with a waist strap to hold the splints from falling off
(7) Activity Equipment
Napa Valley College PTEC 155 – Developmental Disabilities
Module 29 – Sensory Integration
21
(a) Prone Scooter
i. Use
(aa) To encourage client to lift head and to reciprocate with hands and legs; to stimulate balance reactions
(bb) To allow client to be more independent in mobility and
broaden environment
ii. Application
(aa) Position client prone on scooter with head free from body platform
(bb) Allow legs to be free moving (some scooters do not allow
for leg movement and are designed for the more severely involved child)
(cc) Secure client by straps around abdomen
(b) Treatment Roll
i. Use
(aa) To encourage neck and head control (bb) To stimulate joint receptors in the shoulder girdle for
preparation for supporting upper extremities in creeping and protective extension
ii. Application
(aa) Position roll under chest just below armpits bringing
shoulders and arms forward over the roll and in front of client
(bb) Place client lengthwise on roll with an arm and leg on
either side of roll
Napa Valley College PTEC 155 – Developmental Disabilities
Module 29 – Sensory Integration
22
STUDY GUIDE 3 DEVELOPMENT OF ORAL CONTROL AND FEEDING TECHNIQUES
Permission granted by Pat Largent of Lanterman State Hospital
to include this material in CAPPTC modules
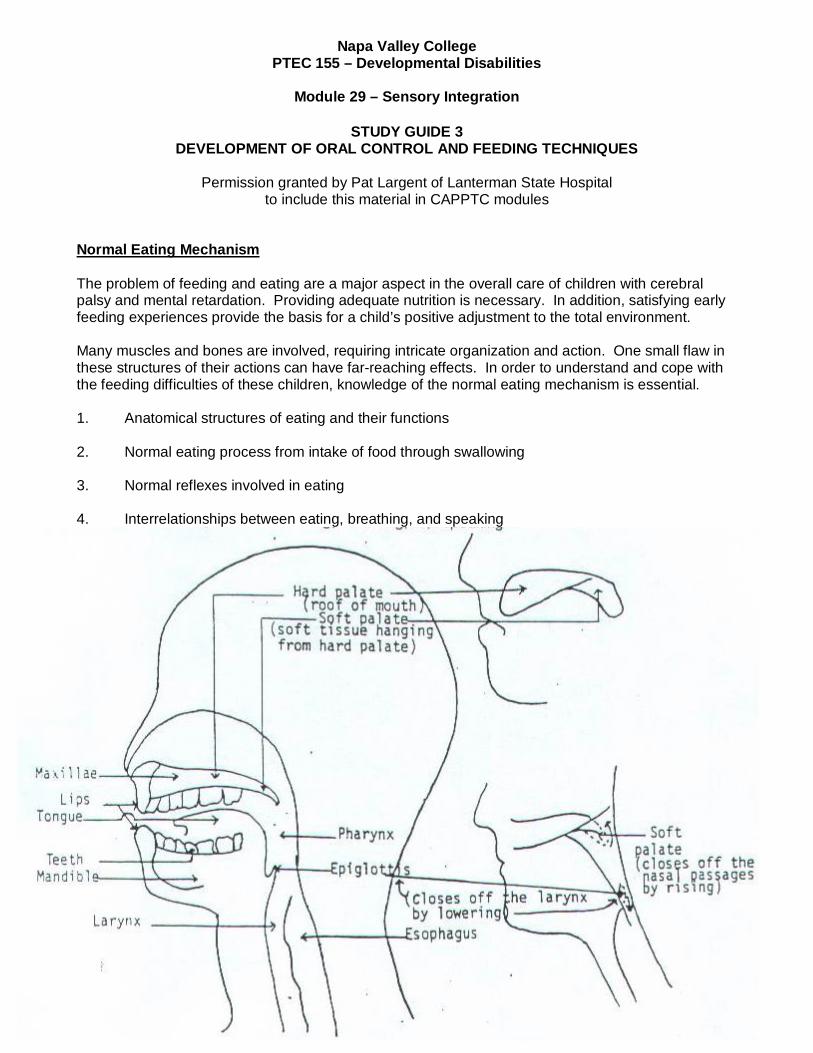
Normal Eating Mechanism The problem of feeding and eating are a major aspect in the overall care of children with cerebral palsy and mental retardation. Providing adequate nutrition is necessary. In addition, satisfying early feeding experiences provide the basis for a child’s positive adjustment to the total environment. Many muscles and bones are involved, requiring intricate organization and action. One small flaw in these structures of their actions can have far-reaching effects. In order to understand and cope with the feeding difficulties of these children, knowledge of the normal eating mechanism is essential. 1. Anatomical structures of eating and their functions 2. Normal eating process from intake of food through swallowing 3. Normal reflexes involved in eating 4. Interrelationships between eating, breathing, and speaking
Napa Valley College PTEC 155 – Developmental Disabilities
Module 29 – Sensory Integration
23
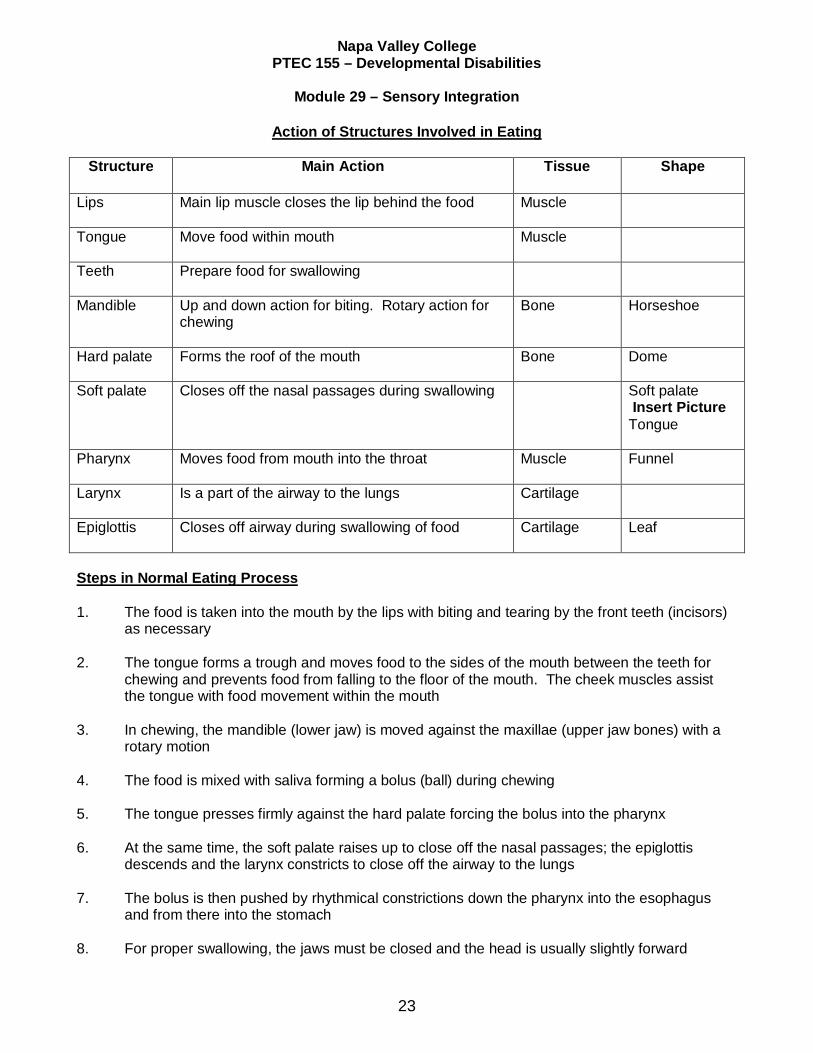
Action of Structures Involved in Eating
Structure
Main Action Tissue Shape
Lips Main lip muscle closes the lip behind the food Muscle
Tongue Move food within mouth Muscle
Teeth
Prepare food for swallowing
Mandible Up and down action for biting. Rotary action for chewing
Bone Horseshoe
Hard palate Forms the roof of the mouth Bone Dome
Soft palate Closes off the nasal passages during swallowing Soft palate Insert Picture Tongue
Pharynx Moves food from mouth into the throat Muscle Funnel
Larynx Is a part of the airway to the lungs Cartilage
Epiglottis Closes off airway during swallowing of food Cartilage Leaf
Steps in Normal Eating Process 1. The food is taken into the mouth by the lips with biting and tearing by the front teeth (incisors)
as necessary 2. The tongue forms a trough and moves food to the sides of the mouth between the teeth for
chewing and prevents food from falling to the floor of the mouth. The cheek muscles assist the tongue with food movement within the mouth
3. In chewing, the mandible (lower jaw) is moved against the maxillae (upper jaw bones) with a
rotary motion 4. The food is mixed with saliva forming a bolus (ball) during chewing 5. The tongue presses firmly against the hard palate forcing the bolus into the pharynx 6. At the same time, the soft palate raises up to close off the nasal passages; the epiglottis
descends and the larynx constricts to close off the airway to the lungs 7. The bolus is then pushed by rhythmical constrictions down the pharynx into the esophagus
and from there into the stomach 8. For proper swallowing, the jaws must be closed and the head is usually slightly forward
Napa Valley College PTEC 155 – Developmental Disabilities
Module 29 – Sensory Integration
24
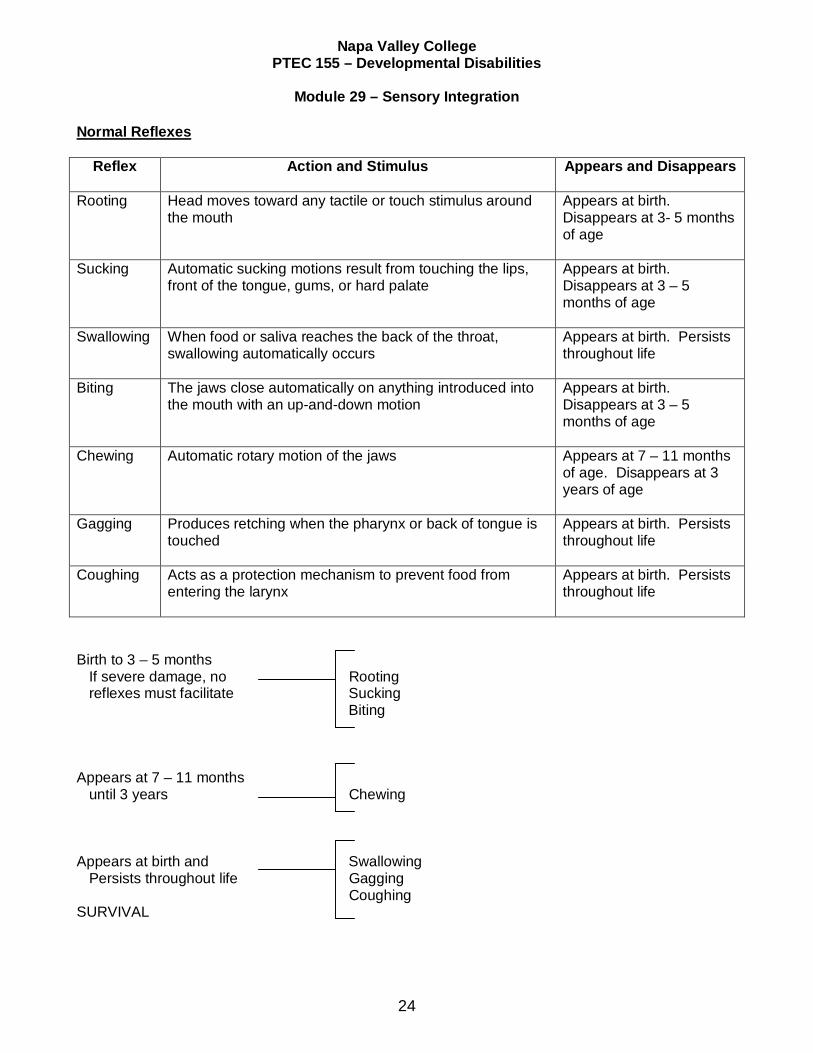
Normal Reflexes
Reflex Action and Stimulus Appears and Disappears
Rooting Head moves toward any tactile or touch stimulus around the mouth
Appears at birth. Disappears at 3- 5 months of age
Sucking Automatic sucking motions result from touching the lips, front of the tongue, gums, or hard palate
Appears at birth. Disappears at 3 – 5 months of age
Swallowing When food or saliva reaches the back of the throat, swallowing automatically occurs
Appears at birth. Persists throughout life
Biting The jaws close automatically on anything introduced into the mouth with an up-and-down motion
Appears at birth. Disappears at 3 – 5 months of age
Chewing Automatic rotary motion of the jaws
Appears at 7 – 11 months of age. Disappears at 3 years of age
Gagging Produces retching when the pharynx or back of tongue is touched
Appears at birth. Persists throughout life
Coughing Acts as a protection mechanism to prevent food from entering the larynx
Appears at birth. Persists throughout life
Birth to 3 – 5 months If severe damage, no Rooting reflexes must facilitate Sucking Biting Appears at 7 – 11 months until 3 years Chewing Appears at birth and Swallowing Persists throughout life Gagging Coughing SURVIVAL
Napa Valley College PTEC 155 – Developmental Disabilities
Module 29 – Sensory Integration
25
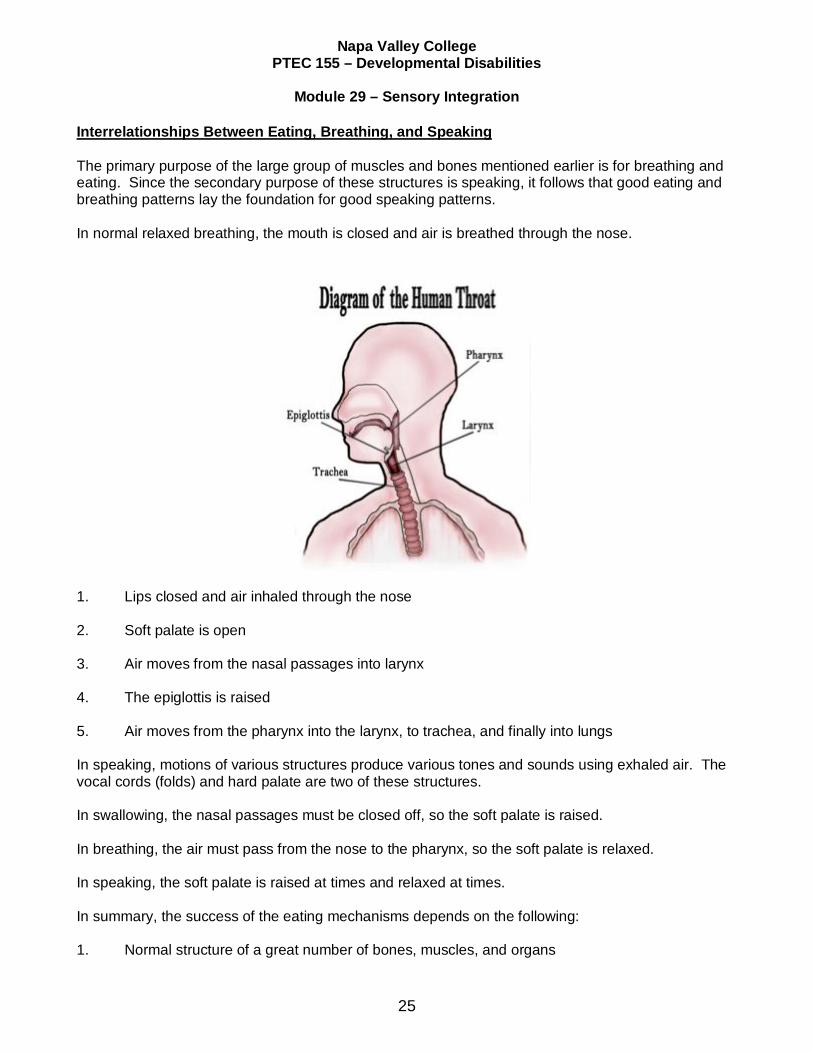
Interrelationships Between Eating, Breathing, and Speaking The primary purpose of the large group of muscles and bones mentioned earlier is for breathing and eating. Since the secondary purpose of these structures is speaking, it follows that good eating and breathing patterns lay the foundation for good speaking patterns. In normal relaxed breathing, the mouth is closed and air is breathed through the nose.
1. Lips closed and air inhaled through the nose 2. Soft palate is open 3. Air moves from the nasal passages into larynx 4. The epiglottis is raised 5. Air moves from the pharynx into the larynx, to trachea, and finally into lungs In speaking, motions of various structures produce various tones and sounds using exhaled air. The vocal cords (folds) and hard palate are two of these structures. In swallowing, the nasal passages must be closed off, so the soft palate is raised. In breathing, the air must pass from the nose to the pharynx, so the soft palate is relaxed. In speaking, the soft palate is raised at times and relaxed at times. In summary, the success of the eating mechanisms depends on the following: 1. Normal structure of a great number of bones, muscles, and organs
Napa Valley College PTEC 155 – Developmental Disabilities
Module 29 – Sensory Integration
26
2. Proper function of these structures 3. The influence of the number of reflexes 4. The delicate balance involved in coordinating the three systems of eating, breathing, and
speaking Problem Areas in Oral Control and Their Causes 1. Hypersensitive and exaggerated oral musculature 2. None or minimal lip movements (retracted lips) 3. Inability to open or close jaw voluntarily 4. Inability to suck – swallow (newborn) 5. Inability to bite 6. Persistent bite reflex 7. Limited tongue movements (forward and back only or retracted) 8. Malocclusion of teeth and/or jaw 9. Inability to chew (no rotary movements of jaw achieved) 10. Hyposensitive or hypersensitive gag reflex 11. Inadequate swallow (lack of complete jaw closure) 12. Difficulty in swallowing (reverse swallowing) 13. Poor positioning (or a child who is difficult to position) 14. Inadequate diet – textured food is not provided when oral musculature is ready or needs the
stimulation The causes of the above are usually, with the exception of No. 13 and 14, due to the following: 1. Severe central nervous system involvement with the following: a. Severe extensor spasticity
b. Prolonged and exaggerated (pathological) oral and gross motor reflexes
Napa Valley College PTEC 155 – Developmental Disabilities
Module 29 – Sensory Integration
27
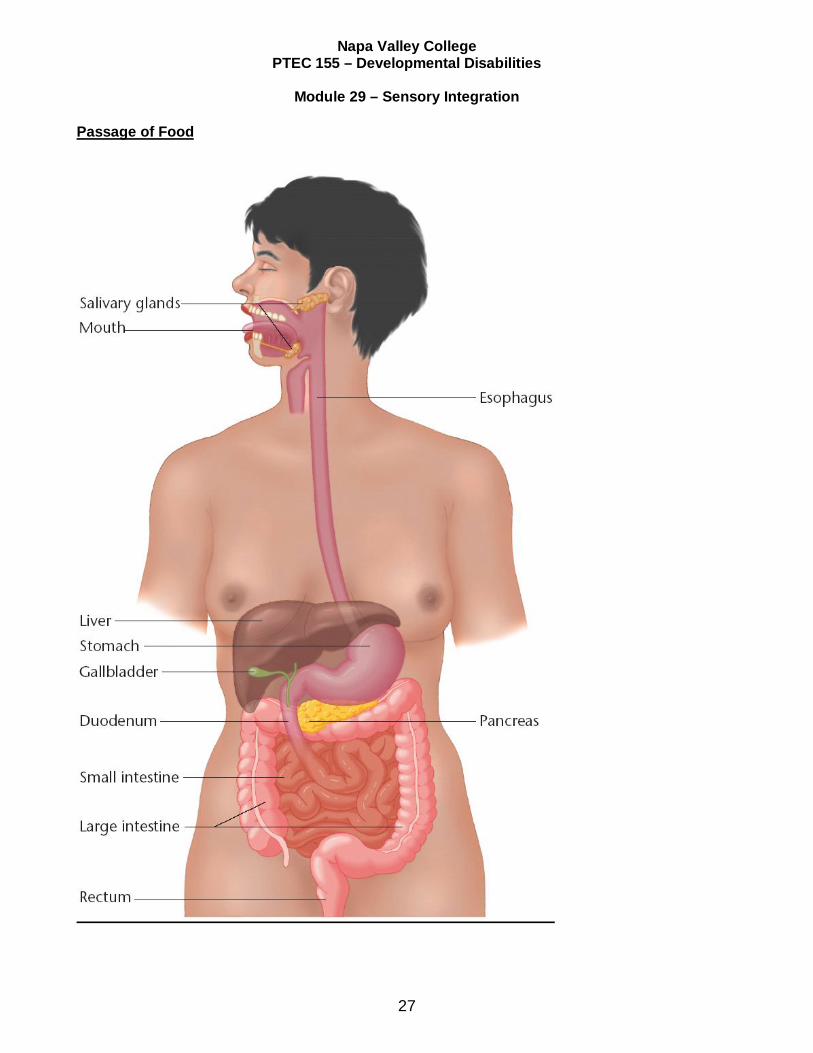
Passage of Food
Napa Valley College PTEC 155 – Developmental Disabilities
Module 29 – Sensory Integration
28
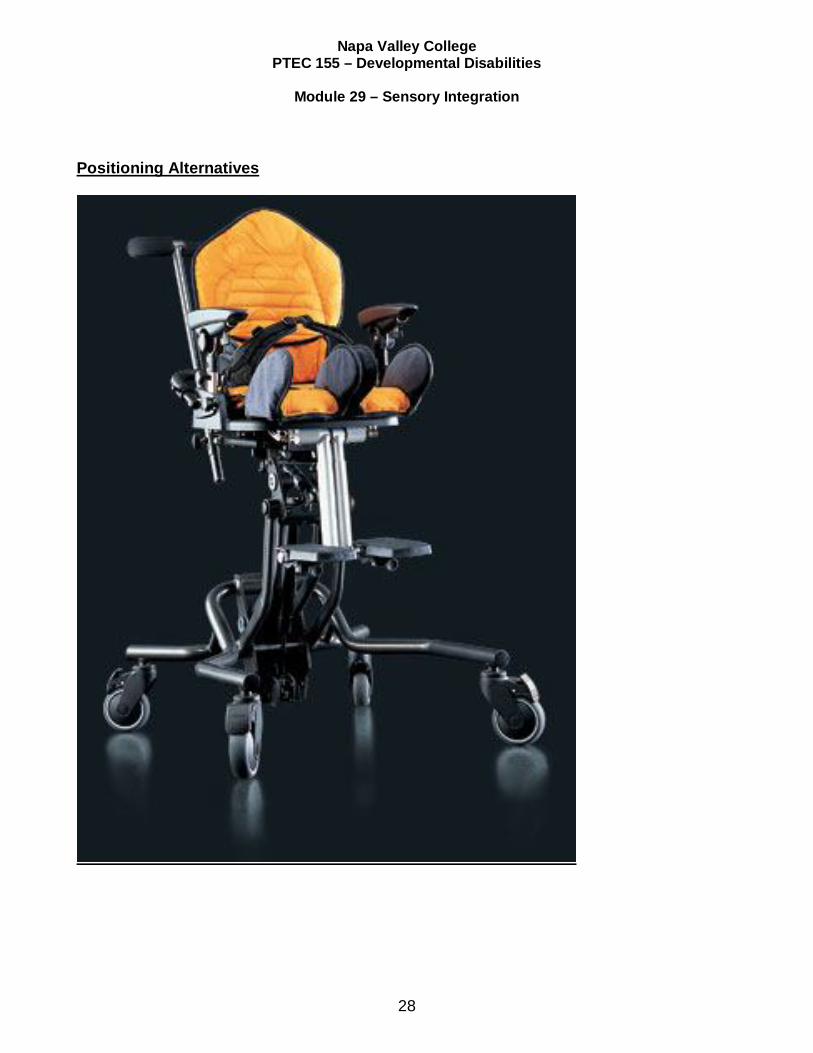
Positioning Alternatives
Napa Valley College PTEC 155 – Developmental Disabilities
Module 29 – Sensory Integration
29
Feeding Procedures Some basic considerations for successful spoon-feeding are as follows: 1. Be patient and pleasant 2. Use soothing voice 3. Allow plenty of time 4. Praise frequently 5. If necessary, work at gaining child’s attention 6. Assist when necessary 7. Keep a routine and use repetition 8. Keep instructions simple 9. Avoid distracting surroundings
Napa Valley College PTEC 155 – Developmental Disabilities
Module 29 – Sensory Integration
30
10. Position appropriately:
a. Stabilize the child in an upright position with child’s head tilted slightly forward and child’s feet on the floor or the footplates of chair or wheelchair b. A child in bed should be rolled up into a sitting position with child’s head supported and
tilted slightly forward. Child may be fed in supine or side lying – only if necessary
c. The person feeding the child must have both hands free to execute the feeding technique
d. The person feeding the child should stand or sit in front or beside the child who is being
fed 11. Things to avoid:
a. Avoid scraping the mouth or chin with the spoon after each spoonful of food as it may stimulate mouth to open and interfere with chewing. If necessary, remove excess food with the spoon just prior to placing the spoon into the mouth b. Avoid stabilizing the head by placing your hand on top of the client’s head
c. Avoid using utensils that are too large for the child’s mouth as it encourages abnormal
oral responses, i.e., sucking, biting reflexes
d. Avoid unnecessary nursing care procedures during meals
e. Avoid oversized servings unless otherwise ordered
f. Avoid isolating child for meals; eating with peers or family is part of the social aspects of meals
g. Avoid feeding the child when the child’s head is tilted backwards
Napa Valley College PTEC 155 – Developmental Disabilities
Module 29 – Sensory Integration
31
Feeding Techniques
1. Spoon-Feeding a. Insert spoon, with a small amount of food, horizontally into the mouth
b. Exert a quick, light pressure with the bowl of the spoon on the middle of the tongue to inhibit tongue thrust and to initiate reflex jaw closure
c. Manually depress the upper lip to remove food from the spoon if client is unable to do
so or does it with the teeth
d. Avoid touching the bottom lip or teeth with the spoon when removing spoon. THIS MAY TRIGGER BITE REFLEX
e. Slowly remove the spoon from the mouth and manually close the lip and jaw (slightly)
for chewing and to aid in swallowing (if child does not close lips)
f. Watch for signs of swallowing before presenting the next spoonful of food 2. Cup Drinking
a. Hold cup between your thumb and index finger with the lip of the cup facing the palm of your hand b. Cradle the client’s chin in the palm of your hand and hold the rim of the cup between
the client’s lips
c. Stabilize the child’s head with the arm that is holding the cup – stabilize head in midline and slightly forward
d. Exert light pressure with your long finger against the child’s lower lip to obtain lip seal
on rim of cup 3. Straw Drinking
a. Use a flexible straw placed in front of the teeth b. Place your long finger under the chin at the root of the tongue, your index finger under
the lower lip, and your thumb across the lower lip
c. Compress your thumb and index fingers together to effect a seal
d. Break seal at intervals to permit breathing
Napa Valley College PTEC 155 – Developmental Disabilities
Module 29 – Sensory Integration
32
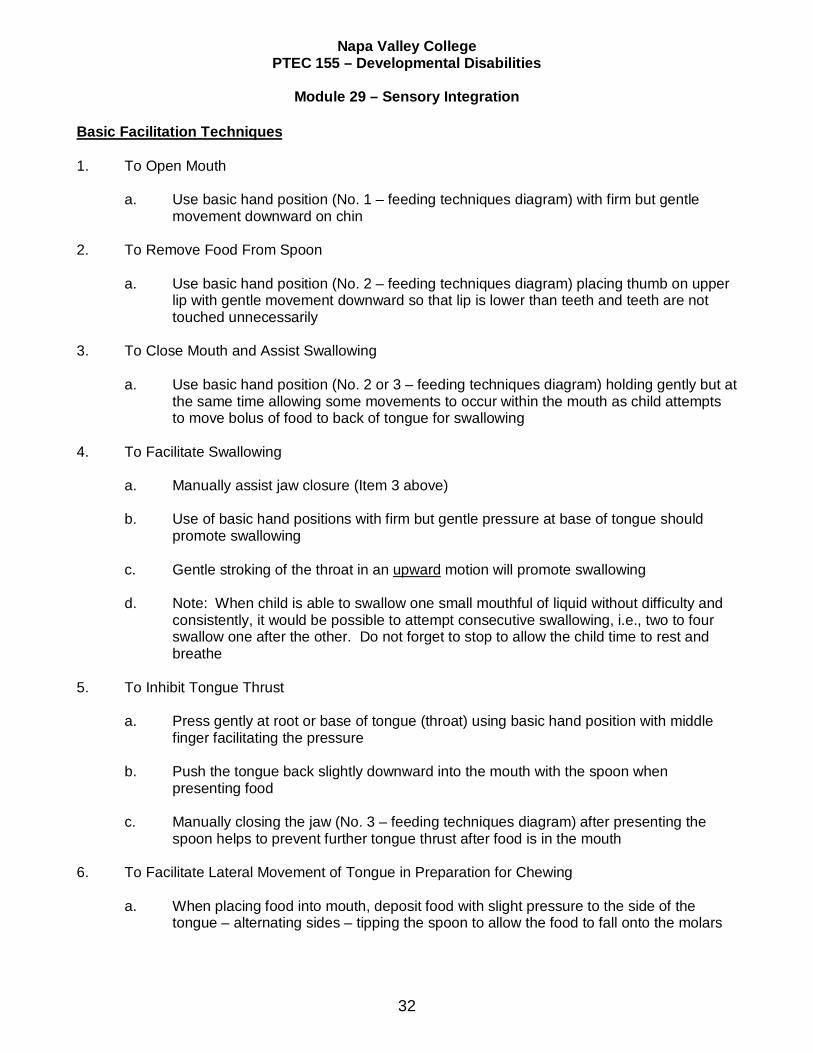
Basic Facilitation Techniques 1. To Open Mouth a. Use basic hand position (No. 1 – feeding techniques diagram) with firm but gentle movement downward on chin 2. To Remove Food From Spoon
a. Use basic hand position (No. 2 – feeding techniques diagram) placing thumb on upper lip with gentle movement downward so that lip is lower than teeth and teeth are not touched unnecessarily
3. To Close Mouth and Assist Swallowing
a. Use basic hand position (No. 2 or 3 – feeding techniques diagram) holding gently but at the same time allowing some movements to occur within the mouth as child attempts to move bolus of food to back of tongue for swallowing
4. To Facilitate Swallowing
a. Manually assist jaw closure (Item 3 above) b. Use of basic hand positions with firm but gentle pressure at base of tongue should
promote swallowing
c. Gentle stroking of the throat in an upward motion will promote swallowing
d. Note: When child is able to swallow one small mouthful of liquid without difficulty and consistently, it would be possible to attempt consecutive swallowing, i.e., two to four swallow one after the other. Do not forget to stop to allow the child time to rest and breathe
5. To Inhibit Tongue Thrust
a. Press gently at root or base of tongue (throat) using basic hand position with middle finger facilitating the pressure b. Push the tongue back slightly downward into the mouth with the spoon when
presenting food
c. Manually closing the jaw (No. 3 – feeding techniques diagram) after presenting the spoon helps to prevent further tongue thrust after food is in the mouth
6. To Facilitate Lateral Movement of Tongue in Preparation for Chewing
a. When placing food into mouth, deposit food with slight pressure to the side of the tongue – alternating sides – tipping the spoon to allow the food to fall onto the molars
Napa Valley College PTEC 155 – Developmental Disabilities
Module 29 – Sensory Integration
33
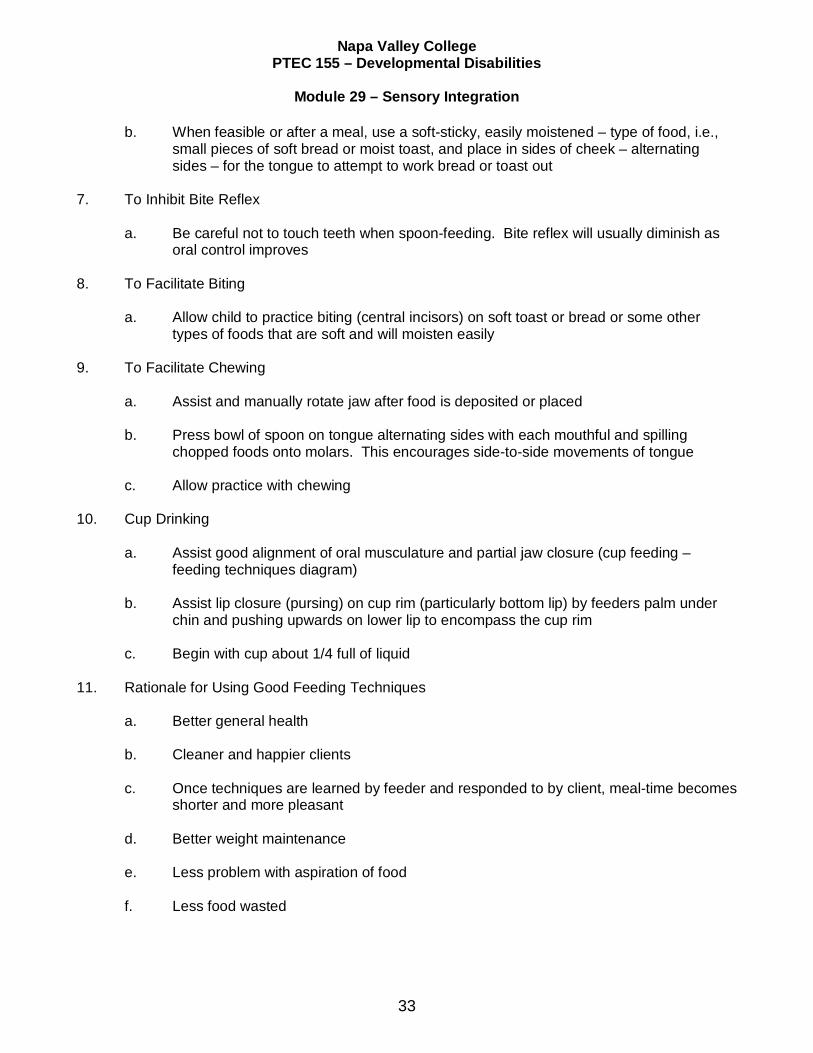
b. When feasible or after a meal, use a soft-sticky, easily moistened – type of food, i.e., small pieces of soft bread or moist toast, and place in sides of cheek – alternating sides – for the tongue to attempt to work bread or toast out
7. To Inhibit Bite Reflex
a. Be careful not to touch teeth when spoon-feeding. Bite reflex will usually diminish as oral control improves
8. To Facilitate Biting
a. Allow child to practice biting (central incisors) on soft toast or bread or some other types of foods that are soft and will moisten easily
9. To Facilitate Chewing
a. Assist and manually rotate jaw after food is deposited or placed b. Press bowl of spoon on tongue alternating sides with each mouthful and spilling
chopped foods onto molars. This encourages side-to-side movements of tongue
c. Allow practice with chewing 10. Cup Drinking
a. Assist good alignment of oral musculature and partial jaw closure (cup feeding – feeding techniques diagram) b. Assist lip closure (pursing) on cup rim (particularly bottom lip) by feeders palm under
chin and pushing upwards on lower lip to encompass the cup rim
c. Begin with cup about 1/4 full of liquid 11. Rationale for Using Good Feeding Techniques
a. Better general health b. Cleaner and happier clients
c. Once techniques are learned by feeder and responded to by client, meal-time becomes
shorter and more pleasant
d. Better weight maintenance
e. Less problem with aspiration of food
f. Less food wasted
Napa Valley College PTEC 155 – Developmental Disabilities
Module 29 – Sensory Integration
34
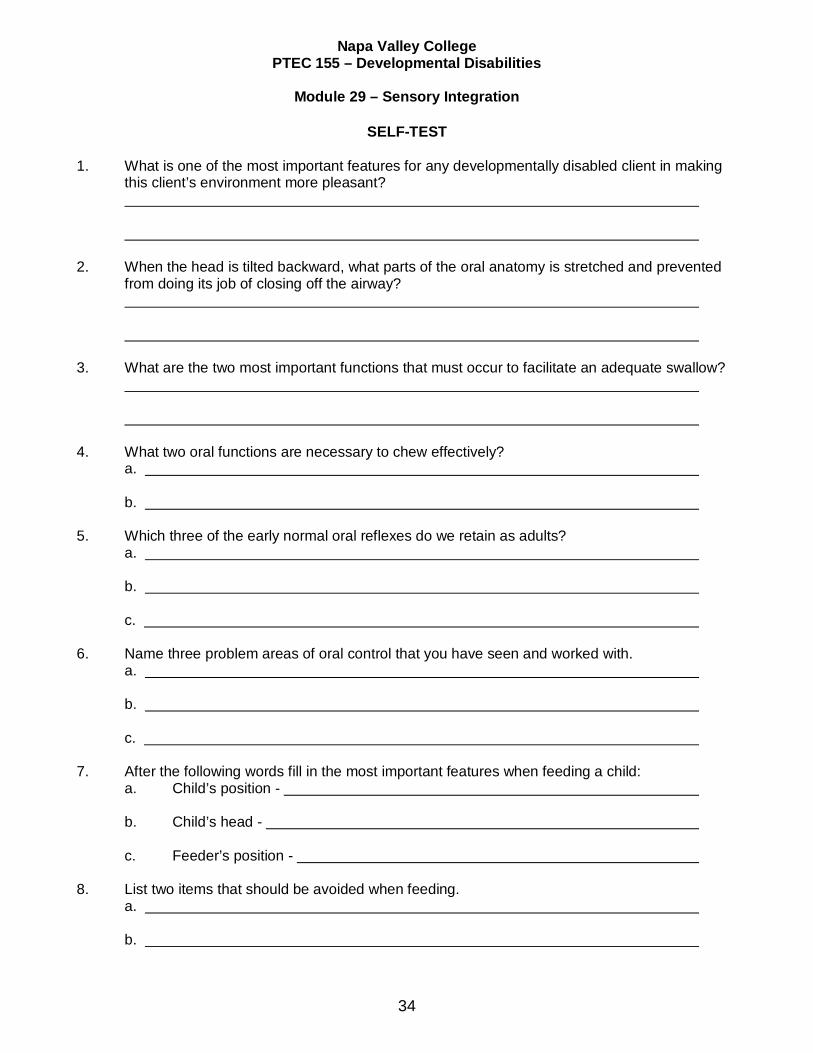
SELF-TEST
1. What is one of the most important features for any developmentally disabled client in making this client’s environment more pleasant? 2. When the head is tilted backward, what parts of the oral anatomy is stretched and prevented
from doing its job of closing off the airway? 3. What are the two most important functions that must occur to facilitate an adequate swallow? 4. What two oral functions are necessary to chew effectively?
a.
b. 5. Which three of the early normal oral reflexes do we retain as adults?
a.
b.
c. 6. Name three problem areas of oral control that you have seen and worked with.
a.
b.
c. 7. After the following words fill in the most important features when feeding a child:
a. Child’s position - b. Child’s head - c. Feeder’s position -
8. List two items that should be avoided when feeding.
a.
b.
Napa Valley College PTEC 155 – Developmental Disabilities
Module 29 – Sensory Integration
35
Sensory Motor Integration and the Developmentally Disabled Client
By Cindy Davis, Developmental Specialist, R.N. II
Jean Ayres, an authority in the field of sensory motor integration, makes the following statement:
Because sensory and motor development are intimately related, and because activities in these areas are functionally inseparable, attention to these two aspects of bodily activity are combined in the concept of sensorimotor development. (Sensory Integration and Learning Disorders)
Sensory motor integration techniques are carefully sequenced, individualized experiences, which guide the client to a state of competence in relating to his environment. The basic goal of sensory interactive procedures is to “enhance the brain’s ability to learn how” to perform. It improves the central nervous system’s ability to make an appropriate motor response for the sensory input; to differentiate one part of the body from another; to complete academic skills or to make adaptive responses. In other words, the sensory integrative approach does not teach specific skills, but rather aids the development of the brain’s capacity to perceive, remember, process, and motor plan. To accomplish this goal, sensory channels are stimulated in much a manner as to elicit motor responses specific to each stimulus. In order to perceive the environment, and individual has eight sensory channels. The commonly observed senses and the receptor organs are: visual (eyes), auditory (ears), tactile (skin), gustatory (tongue), olfactory (nose). The remaining three systems are essential for an individual’s ability to perceive through the other sensory systems efficiently. These systems and their receptors are: vestibular (inner ear), proprioceptive and kinesthetic (bones, joints, muscles, tendons, and ligaments). The vestibular sense receives information regarding equilibrium and motion. Proprioception provides information to the central nervous system regarding the bones, joints, ligaments, tendons, and muscles. The kinesthetic sense receives sensory input regarding the relationship of the body to the environment and the relationship of the parts of the body to each other. Processing of the various types of sensory input allows for an individual’s ability to accurately respond to environmental demands. Some sensory systems may not mature as rapidly or as “normally” as others. Deficits in reception of information may then cause incorrect responses to the stimuli. Other areas of dysfunction may occur in the processing of the sensory stimuli or in the ability to respond accurately. A Failure or delay in any of these areas results in a breakdown of the organism, i.e., feedback dysfunction. It is at this point that sensory integrative techniques can provide remediating activities. The focus of sensory motor remediation is the whole individual. The specific functioning of each sensory system, the interrelationship of the systems, the processing skills (neurological) and motor ability are all coordinated to achieve the specific objectives. Maturation of the organism, efficient memory reception, improved processing skills and adequate motor skills are all goals of remediation. Early postures and movement are reflexive in nature. Gradual maturation of the central nervous system and the differentiation of memory and motor areas progresses toward more effective and efficient responses to the environment. These adaptive responses are the individual’s ability to respond to sensory input. Adaptive responses are purposeful and goal-directed. The
Napa Valley College PTEC 155 – Developmental Disabilities
Module 29 – Sensory Integration
36
effectiveness of the adaptive response depends on the type of functioning of the feedback systems. During sensory motor integrative activities, a specific sensory channel is stimulated. The stimuli will cause the individual to actively perform a motoric act. Initially the skill may be very simple, but when performed frequently it becomes automatic. Perhaps the motor act is simply turning the head to locate a sound. Later the same auditory location activity could be generalized to warn an individual that an automobile is approaching. The latter involves a great deal of sensory and motor integration skill to locate the sound, interpret it, and make the appropriate motor response. Sensory motor integration is used by all people in their daily lives. Most of us have mature skills to receive the sensory stimuli, process the information and complete a motoric response appropriate to the stimulation. However, the Developmentally Disabled client frequently has difficulty with the reception of sensory information, the processing of the input or the performance of the motor act. Steps within the developmental process are often never attained, are circumvented, or the person becomes stalemated at one level. Sensory motor integration provides sequential stimulation activities aimed at maturing the whole system. Most Developmentally Disabled clients are functioning at levels, which indicate the need for learning about themselves. In order to achieve body awareness one must be able to differentiate and process sensory input. Likewise, to feel self-worth (improved job performance, improved self-help skills, etc.) the Developmentally Disabled client needs to be able to make responses and adaptive responses to their environment. A sensory motor approach affords this by providing stimulation activities to encourage maturation of the sensory and motor systems, as well as the saturation of the central nervous systems. The active responses increase motor skills, thereby improving the self-image. In conclusion, sensory motor integration concentrates on the needs of the whole client rather than the individual parts. Maturation of the client through developmentally organized activities is a goal. The client is required to actively participate using their senses, their nervous system and their motoric skills in order to achieve higher levels of maturation. This maturation is then reflected in the client’s improved self-image, pre-academic and academic skills, work habits, and general well being.
Napa Valley College PTEC 155 – Developmental Disabilities
Module 29 – Sensory Integration
37
SENSORY MOTOR DEVELOPMENT INFORMATION SHEET
I. Integration of sensory information is essential to the development of both learning and
motor skills.
A. Conscious movement is a sensory motor activity that needs to be trained in both aspects, the sensory and the motor in order to avoid any “splintering” of the learning for a child who does not have a perceptual-motor match
B. Simultaneous sensory input must match the motor response
II. Each of the sensory modalities has a sequence of development. The sensory modalities
do not begin to develop simultaneously: they develop in sequence e.g., vestibular before visual, tactile before auditory, etc. If there is a deficit in the development of the sensory progression, it will effect the development of the next sense in the sequence
III. Deficits in motor development are accompanied by lack of postural and bilateral
integration
A. Primitive postural reflexes have not been integrated during the process of sensory-motor development
B. Perceptual-motor information is distorted in the presence of residual postural
reflexes resulting in abnormal muscle tone and tactual and kinesthetic defensiveness
C. Failure to achieve adequate postural reaction, i.e., righting and equilibrium
reactions, produces symptoms which indicate a failure on the part of the brain stem integrating centers to contribute their part to the cortical processes. For example:
1. Poor eye muscle control 2. Inability to cross mid-line
3. Visual – auditory deficits: inability to fix and locate, track, pursue
4. Poor body schema and body image: lack of differentiation, laterality,
directionality
5. Inability to motor plan and problem solve IV. The remediation program should:
A. Promote sensory integration and ability to relate to environment B. Develop independent movement of the head, eye muscles and extremities
C. Achieve greater flexibility and toning of muscles
Napa Valley College PTEC 155 – Developmental Disabilities
Module 29 – Sensory Integration
38
D. Improve visual – auditory perception and skills
E. Expedite the development of objective manipulation and locomotion
F. Always be Fun! If it isn’t pleasurable it’s not therapeutic
Levels of Formation and Functions of the Brain and Central Nervous System
I. General Principles:
A. The organization of the structures and functions of the nervous system places the older structures anatomically at the lowest and least complex level. The spinal cord is at the lowest level and the cortex, which matures later, is at the highest level. Function of the CNS develops in a caudal-cephalo direction (bottom to top) and proximo-distal (middle to outer)
B. Remediation programs will stress working with lower functions before higher.
Higher levels do not function at their best without adaptive lower function. The outer layers of the brain will not function at their best unless the inner layers are well organized
II. Levels of Function:
A. Spinal Cord Function
1. Conducts incoming sensory nerve impulses and outgoing motor nerve impulses up and down the spinal cord 2. Integrate spinal cord reflexes (Flexor Withdrawal, Extensor Thrust, and
Crossed Extension) and develops coordinated movement patterns
3. Sensory impulses from bone, tendon and muscle receptors make connections in the spinal cord which influence motor output
B. Brain Stem Function
1. Receives sensory input from every sense and is the major center for sensory integration 2. Reflexes are developing both sensory and motor differentiation 3. Maintains a balance of arousal state, the levels of excitation and inhibition
4. Modifies ongoing motor activity such as sucking, swallowing, head and
eye movements
Napa Valley College PTEC 155 – Developmental Disabilities
Module 29 – Sensory Integration
39
C. Cerebellum Function
1. Modifies brain stem and cerebral cortex with inhibitory and excitatory mechanisms 2. Receives information from peripheral receptors and sensory motor areas
of the cortex
3. Coordinates muscular activity at an unconscious level (postural and locomotor activities)
4. Important for proper timing and coordination
D. Mid-Brain Function
1. The “energizer” provides the drive to explore and consciously attend 2. Reflexes and reactions are forming coordinated patterns of posture,
movement and locomotion: perceptual motor match
3. Develops visual form and space perception
E. Cortical Function
1. Organizes sensory activity 2. Influences integration at lower levels by facilitation and inhibition
3. Provides larger areas for receiving sensory information
F. Reticular Activating System Function
1. Network of nerve pathways running through CNS 2. Responsible for state of awareness, degree of alertness
3. Inhibitory/excitatory effect on motor neurons which control our actions and
behavior
Napa Valley College PTEC 155 – Developmental Disabilities
Module 29 – Sensory Integration
40
Slide 1
Sensory Motor IntegrationSensory Motor Integration
All behavior must be a product of All behavior must be a product of sensory processingsensory processing
PTEC 155 MODULE #29
___________________________________
___________________________________
___________________________________
___________________________________
___________________________________
___________________________________
___________________________________
Slide 2
___________________________________
___________________________________
___________________________________
___________________________________
___________________________________
___________________________________
___________________________________
Slide 3
___________________________________
___________________________________
___________________________________
___________________________________
___________________________________
___________________________________
___________________________________

Napa Valley College PTEC 155 – Developmental Disabilities
Module 29 – Sensory Integration
41
Slide 4
___________________________________
___________________________________
___________________________________
___________________________________
___________________________________
___________________________________
___________________________________
Slide 5
___________________________________
___________________________________
___________________________________
___________________________________
___________________________________
___________________________________
___________________________________
Slide 6
___________________________________
___________________________________
___________________________________
___________________________________
___________________________________
___________________________________
___________________________________
Napa Valley College PTEC 155 – Developmental Disabilities
Module 29 – Sensory Integration
42
Slide 7 IntroductionIntroduction
Name the eight sensory channelsName the eight sensory channels Identify the goal of sensory integrative Identify the goal of sensory integrative
proceduresprocedures Areas of dysfunctionAreas of dysfunction
___________________________________
___________________________________
___________________________________
___________________________________
___________________________________
___________________________________
___________________________________
Slide 8 VOCABULARYVOCABULARY
symmetrysymmetry orthoticorthotic hypotonicityhypotonicity dysphagiadysphagia
___________________________________
___________________________________
___________________________________
___________________________________
___________________________________
___________________________________
___________________________________
Slide 9 Level of ReflexLevel of Reflex
SpinalSpinal BrainstemBrainstem MidbrainMidbrain AutonomicAutonomic CorticalCortical
___________________________________
___________________________________
___________________________________
___________________________________
___________________________________
___________________________________
___________________________________
Napa Valley College PTEC 155 – Developmental Disabilities
Module 29 – Sensory Integration
43
Slide 10 Types of ReflexesTypes of Reflexes
NormalNormalamphibianamphibianbody rightingbody rightingprotective extensionprotective extension
___________________________________
___________________________________
___________________________________
___________________________________
___________________________________
___________________________________
___________________________________
Slide 11 PositioningPositioning
Align head in midline positionAlign head in midline position 1/2 inch clearance of body in wheelchair1/2 inch clearance of body in wheelchair improves client breathing and circulationimproves client breathing and circulation never adjust wheelchair or change adaptive never adjust wheelchair or change adaptive
equipmentequipment clientclient’’s weight is distributed evenlys weight is distributed evenly
___________________________________
___________________________________
___________________________________
___________________________________
___________________________________
___________________________________
___________________________________
Slide 12
•Steps in the normal eating process
Interrelationship between eating, breathing, and speaking
Feeding procedures
•Steps in the normal eating process
Interrelationship between eating, breathing, and speaking
Feeding procedures
___________________________________
___________________________________
___________________________________
___________________________________
___________________________________
___________________________________
___________________________________
Napa Valley College PTEC 155 – Developmental Disabilities
Module 29 – Sensory Integration
44
Slide 13
___________________________________
___________________________________
___________________________________
___________________________________
___________________________________
___________________________________
___________________________________