public sector timecard online
TRANSCRIPT

PUBLIC SECTORTIMECARD ONLINE

TIMECARD ONLINE 2
NOTICE
SUNGARD PUBLIC SECTOR LLC MAKES NO REPRESENTATIONS OR WARRANTIES, ORAL OR WRITTEN, EXPRESS OR IMPLIED, WITH RESPECT TO THE SYSTEM, SERVICES, SOFTWARE, DOCUMENTATION, OPERATING ENVIRONMENT, ANY OTHER SOFTWARE OR SERVICES PROVIDED HEREUNDER OR ANY OTHER MATTER ADDRESSED HEREUNDER, AND SUNGARD PUBLIC SECTOR LLC EXPLICITLY DISCLAIMS ALL OTHER WARRANTIES, EXPRESS OR IMPLIED, INCLUDING THE IMPLIED WARRANTIES OF TITLE, MERCHANTABILITY AND FITNESS FOR A SPECIFIC PURPOSE. SunGard Public Sector LLC shall not be liable for errors contained herein or for incidental or consequential damages in connection with the furnishing, performance or use of this material. This documentation is proprietary and confidential information of SunGard Public Sector LLC. Copying, reproduction or distribution is strictly prohibited. All rights reserved.
Copyright © 2008 by
SunGard Public Sector LLC
890 Fortress Street
Chico, CA 95973
Should you wish to make a comment, or if you find an error in the text, please contact us via email:
TIMECARD ONLINE 3
Document Change Log
Version Date Change Description
7.9.1 September 2008 7.9.1 Version

TIMECARD ONLINE 4
Contents
1 Timecard Online - Timecard Entry via Portal Application ............................................. 5
1.1 Overview .................................................................................................................................. 5 1.1.1 Timecard Groups ........................................................................................................................6 1.1.2 Granting Access .........................................................................................................................7 1.1.3 Panels.........................................................................................................................................9 1.1.4 Basic Layout .............................................................................................................................11 1.1.5 Standard Configuration Settings ...............................................................................................15 1.1.6 Active Periods...........................................................................................................................18 1.1.7 Group Settings Hierarchy..........................................................................................................19 1.1.8 Work Flow.................................................................................................................................27
1.2 Timecard Online Panels.........................................................................................................29 1.2.1 Panel Directories ......................................................................................................................29 1.2.2 Employee Panel........................................................................................................................30 1.2.3 Screen Display..........................................................................................................................30 1.2.4 Leave Panel..............................................................................................................................31 1.2.5 Position Panels .........................................................................................................................32 1.2.6 Group Setting............................................................................................................................32 1.2.7 Detail Panels.............................................................................................................................33 1.2.8 Account Detail Panel ................................................................................................................34 1.2.9 Ring in/out Detail Panel ............................................................................................................35 1.2.10 QA Detail Panel ........................................................................................................................35 1.2.11 GLKey / JLKey Detail Panel......................................................................................................36 1.2.12 Teacher / Substitute Detail Panel .............................................................................................37 1.2.13 Verify Panels.............................................................................................................................38
1.3 Employee- Leave Tracking .................................................................................................... 40

TIMECARD ONLINE 5
1 Timecard Online - Timecard Entry via Portal Application
1.1 Overview Timecard Online is a true portal application designed to push timecard data entry out to the edge of the organization.
Basics:
Intended for Employees or Small Departments entering their own time. Performs minimal Validation / Processing steps at Data Entry. Targets an Interface Table rather than Timecard table directly. Interface Process performs additional Validation / Processing steps.
Goals:
Edge Application Simple Intuitive Reliable Flexible Reportable

TIMECARD ONLINE 6
Work Flow Capable
1.1.1 Timecard Groups For Timecard Online, employees are classified into user-defined groupings. A Group Code is assigned to each employee master record. The actual column name for that code is py_emp_part1, so the Group Code is often referred to as PART1. PART1 is central to the timecard process. It is the basis for timecard security and Group Settings (configurations). Clients should take care in the design of their PART1 codes. Good planning here is essential to success.
Examples for Group Code (PART1):
Location (same as Work Site)
Department
Supervisor
Bargaining Unit
Etc.

TIMECARD ONLINE 7
For clients using base HR as a front-end to Payroll, PART1 (and a second code PART2) are automatically populated as employee information flows from HR into PY. Both codes are configurable through common code settings, either globally or at the Entity level. For detailed information about setup for this feature, refer to Common Code documentation for HRPY/TCPARTS and/or HRPY/TCPxxxx (where xxxx refers to an Entity Code).
The following is a list of available HR attributes that may be used to populate PART1 and PART2. This mechanism also provides a setup for combining two attributes (or parts of two attributes) into PART1 and PART2.
TYPE Employee type BARGUNIT Bargaining unit DEPARTMENT Department ENTITY_ID Entity STAT PY status HR_STATUS HR status CALENDAR Pay calendar CKDIST Check distribution CYCLE Pay cycle WORKSITE Work site DIVISION Division EDUC_CD01 Education code 1 EDUC_CD02 Education code 2 SKILL_CD05 Skill code 5 SEL_CD02 Selection code 2 MISC_CD01 Miscellaneous code 1 SUPERID Supervisor ID (from PCNTBLE) associated with the primary pay assignment HR1 - HR28 One to 28 spare items
For clients not using the base HR product, the Payroll Utility mask PYUTRS may also be used to populate those columns. See the PY Gen Master setup for Sort Parts (mask PYUPGN) to define Part1 and Part2 prior to running that utility.
1.1.2 Granting Access Access to Timecard Online requires an IFAS User-ID be set up in NUUPUS. Only employees with valid User-ID and password are permitted access. There are two basic access classes. Timecard access allows an employee to enter his/her own time entries. Timekeep access allows an employee to enter time for all employees he/she has security access to.

TIMECARD ONLINE 8
Timecard Access – In the following example, the User ID “711” is Employee ID “711” with TIMECARD access. The Association Code holds the User Access Type and the Association Value holds the Employee ID, which is required. The IFAS User-ID is not required to match the Employee ID, but is probably a convenient convention to use.
TIMECARD access does not require the IFAS User ID to have any standard IFAS Security setup. Access is controlled entirely within the Timecard Online application.
Special Utility - To help with the initial setup of employees as TIMECARD users, there is a utility process, mask NUUTNU, that may be run. That process may be run for an individual employee, for a selected group or for all employees. The utility will prompt for a template User ID to be used as the basis for creating new TIMECARD User ID’s. Refer to the Nucleus User Guide for more information about options for running that utility and refer to the Common Code documentation for NUFG/NU945C and NUSC/NWUSERTO common codes.

TIMECARD ONLINE 9
TIMEKEEP Access – In the example below, the user has TIMEKEEP access. Employee ID is “SUPER1”. The additional FINANCE class grants access to the Timecard Online configuration settings.
With TIMEKEEP Access, the Employee ID in the Associated Value is not required unless the Timekeeper lacks security access to his own records. In that case, adding the Employee ID allows the user enter his/her own timecards.
TIMEKEEP Access Security– TIMEKEEP Access does require standard IFAS Security setup. In addition to the standard Payroll security that may be in place, security on Part1 and Part2 is used to restrict the list of employees that a Timekeeper may access. Part1 and Part2 Security is managed through an added ‘derived filter’ (where clause on the HR_PE_MSTR) within each defined security role assigned to a TIMEKEEP user. For example, granting access to a Timekeeper for employees with PART1 in the range “ABC” through “ABX” would show this filter:
(hr_pe_mstr.py_emp_part1 >= 'ABC' AND hr_pe_mstr.py_emp_part1 <= 'ABX')
Similarly, “hr_pe_mstr.py_emp_part2” is used to reference PART2. Refer to the Role Security Guide for more detailed information about this setup.
1.1.3 Panels Many of the configurable features in Timecard Online deal with Panels. Panels are simply blocks of items that display together and work together logically within the application. Some of the items are for displaying information and some are for accepting data entry.

TIMECARD ONLINE 10
Each timecard session is presented to the user as a set of various panels working together as a group and configured for the type of employee logged in.
The Timecard Online configuration settings identify which panels are used and by which employee groups. There are both standard panels and custom panels available, placed in standard directory structures for the application to reference. Panels are of the following types:
Employee Panel – Displays basic employee information and provides the choice for which pay period is being entered.
Leave Panel – Displays available leave balances for eligible employees.
Position Panel – Provides for multiple, one-week grids for entering time on a daily basis. Days of the week are displayed across the top and possible hour codes are displayed down the left side. Employees with multiple positions will select the correct Position Tab at the top of this panel and enter hours in the appropriate cell in the grid for correct date and hour code.
Detail Panel – Optional Detail Panels may be specified for employees who must enter more detailed timecard information, such as Account Numbers, Work Order Numbers, Reason Codes, Comments, Time-Clock in/out times, etc. Any Detail Panel is accessed from a specific Position Panel cell (Position/Date/Hour Code).
Verify Panel – This panel displays an acknowledgement by the employee that his/her timecard is true and accurate. The text of that message is defined by the client. This is an optional feature.

TIMECARD ONLINE 11
1.1.4 Basic Layout This is the basic view for all timecard users. At the top are two tabs allowing access to Employee Panel (shown) or Leave Panel. The Leave Info tab will cause the Leave Panel to overlay the Employee Panel, displaying available Leave Balances.
Selected Period
Typically, there is a time each pay cycle when one pay period is being completed and the next one being started. It may be necessary to accept timecard entries into both periods during that transition. Clients have the option to configure two Active Pay Periods for each cycle to be

TIMECARD ONLINE 12
available for timecard entry. If using that option, there will be a drop-down in the Employee Panel allowing the user to choose which Period is being entered.
Position Panel
Below the Employee Panel are additional tabs identifying the various Positions assigned to an employee. The main grid below the Position Tabs is the Position Panel. The Position Panel is specific to the Position Tab that is highlighted. It displays one week at-a-time for a given position. Users navigate between weeks by the Prev/Next buttons or by selecting the Calendar drop-down and choosing a date. They navigate among various Position Assignments by selecting one of the Position Tabs.
At its simplest, then, timecard entry requires the user to choose the correct Position, Date and Hour Code and enter a number of hours in the correct cell.
Detail Panel
Optional Detail Panels may be specified for employees who must enter more detailed timecard information, such as Account Numbers, Work Order Numbers, Reason Codes, Comments, Time-Clock in/out times, etc. Each Position Panel may have an associated Detail Panel appropriate for the type of additional detail information that may be needed. Note that each Position Panel may have a different Detail Panel if needed.

TIMECARD ONLINE 13
Any Detail Panel is accessed by clicking on a specific cell on a Position Panel (Position/Date/Hour Code). If there is a Detail Panel configured, an ellipsis will appear that allows the user to open the Detail Panel.

TIMECARD ONLINE 14
This is the Detail Panel for this Position, Hour Code and Date.
Detail Panel Buttons
APPLY – this button will save any changes and remain on the Detail Panel.
SAVE – this button will save any changes and exit the Detail Panel.
ADD – will create additional open lines when the Detail Panel grid is full.
CLOSE – will exit the Detail Panel without saving any changes.

TIMECARD ONLINE 15
Submit Time
When an employee has entered all timecard information for a pay period, he/she will submit the entries for review and approval by a supervisor. Typically, clicking on the Submit button brings up the Submit Verify Panel, which requires a second ‘submit’ step to acknowledge the message about truth and accuracy of the data.
1.1.5 Standard Configuration Settings There are 2 fundamental types of configuration settings within Timecard Online, Global Settings and Group Settings. Global Settings apply generally to all Timecard users within the organization. Group Settings are used to tailor the timecard application to specific employee groups according to the Group Code (PART1) assignments discussed above.
TIMECARD ONLINE 16
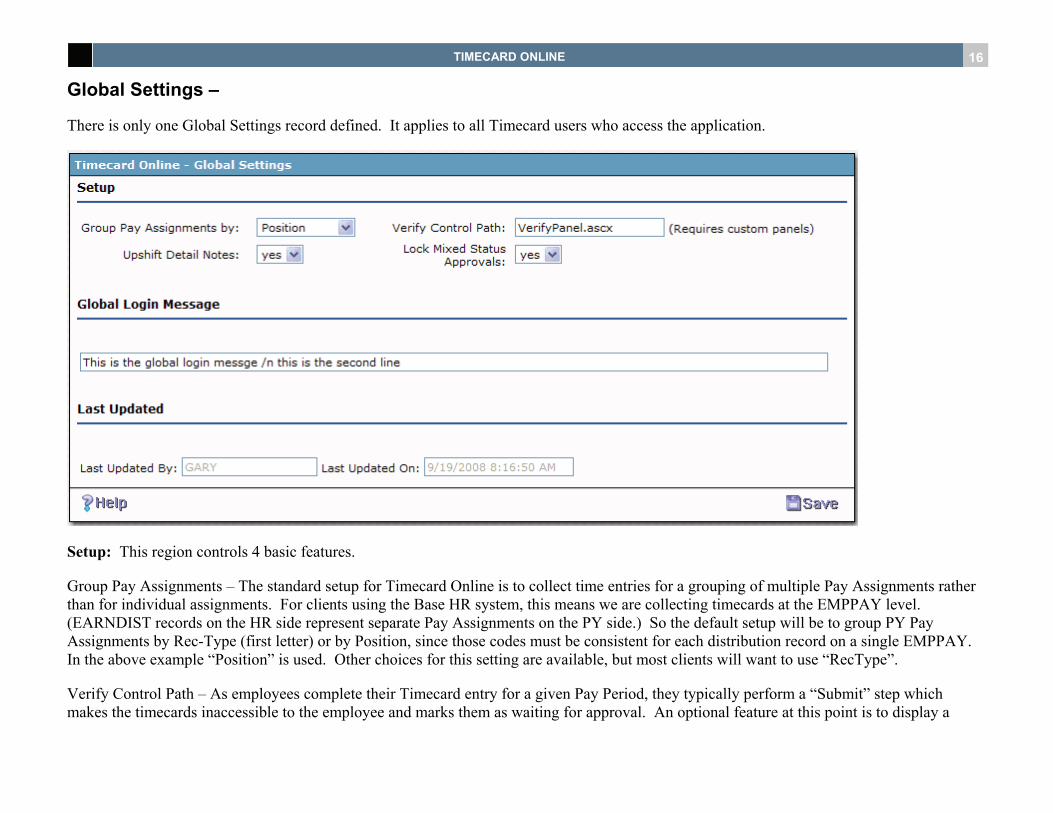
Global Settings –
There is only one Global Settings record defined. It applies to all Timecard users who access the application.
Setup: This region controls 4 basic features.
Group Pay Assignments – The standard setup for Timecard Online is to collect time entries for a grouping of multiple Pay Assignments rather than for individual assignments. For clients using the Base HR system, this means we are collecting timecards at the EMPPAY level. (EARNDIST records on the HR side represent separate Pay Assignments on the PY side.) So the default setup will be to group PY Pay Assignments by Rec-Type (first letter) or by Position, since those codes must be consistent for each distribution record on a single EMPPAY. In the above example “Position” is used. Other choices for this setting are available, but most clients will want to use “RecType”.
Verify Control Path – As employees complete their Timecard entry for a given Pay Period, they typically perform a “Submit” step which makes the timecards inaccessible to the employee and marks them as waiting for approval. An optional feature at this point is to display a

TIMECARD ONLINE 17
message that requires a second <enter> key acknowledging that the timecards entered are truthful and accurate. The text of the message is created by the client and built into the “Verify Panel” in this setting.
Upshift Detail Notes – Optional Text Notes (comments) may be entered with each detailed timecard entry. This setting will automatically cause those Notes to be up-shifted, if desired, for more consistent searching and reporting on those items.
Locked Mixed Status Approvals – This field is relevant only when using Work Flow Code values of KEY.GlKey, KEY.JlKey or KEY.Wo options. With these options status for time entry is tracked at the detail level. This means that a particular time period being displayed on the position panel may have timecard entries with mixed status values. To disallow an employee’s ability to modified records in this state, set this field to “yes”.
Global Login Message
This is a custom message that will appear as each user logs into the Timecard Online application. It may be set up as one standard message that always appears or may be routinely changed as needed. The “/n” convention may be used to break the message into 2 or more lines, as shown in the example above. Leaving this box blank will eliminate any message from appearing.
Last Updated
This is simply a User ID and timestamp identifying the last user and time when settings were changed.

TIMECARD ONLINE 18
1.1.6 Active Periods
This region is used to maintain the list of current, active periods available for Timecard Online entry. At any time, there may be up to two pay periods identified for each Pay Cycle that employees may select for entering time.
The purpose of having two periods available is to account for the transition period between one period and the next. As one period is being closed for processing, the next one is immediately available for use. So the Active Periods settings must be maintained on a regular basis by central payroll staff or other system administrator.
Entity – The field denotes the entity associated with the active periods being defined.
Add /Delete/Edit – The Add fields may be used for creating new entries for Active Periods. The Delete button will delete the entire line to its left. The Edit button will open the entire line to its right for editing.
Current Period – The current period is the prior of two periods that may be configured as active for each pay cycle.
Next Period – This is the second of two periods active for the pay cycle.

TIMECARD ONLINE 19
Period Start/End Dates – Each Active Period will by default have a begin/end date range based on the Pay Period Definition. Those dates automatically limit timecard entry for each period to be within that range. The Start/End dates configured here provide an override to that default range. In the example above for the Monthly Payroll cycle, timecard entry is enforced to be in the range from the 21st of the prior month to the 20th of the current month. This allows clients to apply their own policies for allowable time frames. NOTE: The end date may not be set after the regular Pay Period end date.
Cycle / Description – Each pair of Pay Periods must be from the same Pay Cycle (Monthly, Bi-Weekly, etc.). The Cycle and Description are used to identify the 2-digit cycle for the periods on each line and a user-defined description identifying what that payroll cycle is for the organization.
1.1.7 Group Settings Hierarchy Each employee group can have its own Group Settings if needed. Clients with many employee Groups defined, however, may want to take advantage of a Group Hierarchy that may be used in setting up multiple Group Settings. The mechanism for this hierarchy uses a trailing wild-card character “*” to classify multiple Groups under a single Group Settings Configuration. This can be a much more efficient approach by reducing the total number of Group Settings needed. This is also a primary reason that Group Codes (PART1) within an organization should be very carefully planned.
As an example, an organization has many employee groups identified by Group Codes beginning with “AB”, such as ABC, ABX, AB75, etc. If all such groups can use the same basic configuration, then a Group Setting under “AB*” can be used to apply to all. If group AB75 needs a specific configuration that is different from the other AB groups, a specific AB75 Group Settings can be created in addition to the AB* settings. The process searches for a specific Group Settings initially and uses that if found. Otherwise, it continues searching for the longest matching generic (wild-card) Group Settings and uses that. Ultimately, if no other configuration is found, a Group Settings identified as “*” will be used.
Therefore, all clients will define a Group Settings configuration for Group “*”. Some clients will have multiple, Group Settings configured for specific Group Codes. Some will have multiple generic (wild-card) Group Settings defined. Again, clients should plan very carefully the structure of the PART1 (and PART2) codes.
Group Settings

TIMECARD ONLINE 20
There may be multiple Group Settings specified according to the needs of the organization. Group Settings are based on Entity and PART1 values on the employee master record. Again, PART1 and Group Code are synonymous.

TIMECARD ONLINE 21
Group Codes: This region is to identify the list of Group Settings Codes and a description for each.
Entity – The entity field denotes which entity the settings are to be applied to.
Group Setting – Enter a specific Group Code to be configured or a partial Group Code with a single wild-card character (“*”) at the end. The partial Group Code must use consecutive characters starting with the left-most character. That is, only ending characters may be dropped and replaced by the *.
Example: Group Code: ABCDE

TIMECARD ONLINE 22
Valid Group Settings Codes: ABCDE
AB*
ABC*
A*
*
Group Description – Enter a user-defined description that makes sense within the organization.
Setup: This section controls basic formatting, validations and other operations.
Start Day of the Week - Enter the day of the week that the one-week grid display should begin with.
Input Format Mask – Enter the numeric format (indicating decimal places) by which the number of hours will be entered.
PM Assignment First – For employees with multiple Position Tabs, this setting may be used to force the PM Position to be the left-most tab on the screen.
Check Leave Balances – This setting controls whether Available Leave Balances are checked when Leave Hours are entered.
Yes – Block if available Leave Balance is exceeded.
No – Don’t check available Leave Balance.
Warn – Issue warning if Leave Balance is exceeded, but allow the entry.
Work Flow Code – This setting controls how Timecard Approvals are routed within the client’s Work Flow model. Various options are available for populating this code, but most clients will probably want to set this to the Supervisor ID.
Days Allowed before Period Start – This setting will increase the allowable date range for timecard entry by X number of days prior to the normal Period Start date. For a full description of how dates are enforced, refer to the section on Date Range Rules/Logic below.
Days Excluded before Period End – This setting will limit the allowable date range for timecard entry by X number of days prior to the normal Period End date.

TIMECARD ONLINE 23
Display Format Mask - Enter the numeric format (indicating decimal places) by which the number of hours will be displayed.
Pay Assignment Sort Field – Select from a list of options the left-to-right sort order for the Position Tabs at the top of the screen. This setting only applies in the case of multiple Position Assignments for an employee. There are several choices available, but Position Description is typically used.
Use Verify Submit Panel – This setting controls whether the Verify Submit Panel is used or not. It also may specify whether the Submit Button is functional or not. The standard setup is to require the employee to press a button to submit his/her timecards for approval. On pressing the Submit button, the Verify Panel displays a message by which the employee acknowledges that his/her time entries are true and accurate. This acknowledgement requires a second <enter> step by the employee. There are three settings for this control:
Yes – The Verify Panel will display and acknowledgement is required.
No – The Verify Panel does not display; no acknowledgement is asked.
Disable Submit – The Submit button is inactivated.
The Disable Submit setting is intended for use with TIMEKEEP access where a “mass submit” performed by the Work Flow Approval model may be preferred.
Perform GL Validation – For Detail Panels where GL Account Numbers are being entered, this setting provides an option to validate the Accounts or not. If set to “Yes”, the validation will detect undefined Accounts and Accounts invalid by date.
Employee Panel: This section simply identifies the Employee Panel used and its title.
Control Path – Identifies the Panel name and directory path.
Panel Title – User-defined descriptive label for the Panel.
Leave Panel: This section simply identifies the Leave Panel used and its title.
Display Leave Panel First – This setting causes the Leave Panel to display initially instead of the Employee Panel. The Employee Panel and Leave Panel occupy the same screen area, so that only one of them displays at a time. By default, the Employee Panel displays initially and the Leave Panel is accessed by clicking on the Leave Tab.
Control Path – Identifies the Panel name and directory path.
Panel Title – User-defined descriptive label for the Panel.

TIMECARD ONLINE 24
Batch Name: This section identifies the Batch (Set) naming convention used in automatically assigning the Batch Name to the timecards created for the Group.
The Batch Name may be a combination of literal and attribute values selected by each site as appropriate. Typically the batch name will include some Constant (literal) value and the Pay Period ID, such as “TC0801002”. The user will decide what parts go into the batch name and in what order. For the example above, specify the constant “TC” first, then the Period ID.
Add Batch Part: - Pieces of the batch name are built from these choices.
Constant – enter a literal value in the Value box.
HrPeMaster – select an attribute from the drop-down list in the Value box.
PyPerMaster - select an attribute from the drop-down list in the Value box.
Value – enter a literal value or attribute from the drop-down list.
Length – specify the number of positions from this part included in the Batch Name.
Format – specify a date format if a date-type attribute is used.
Position Panels: This section identifies the Position Panel associated with the Group and any specific Detail Panel if used. It also provides certain validation and process control settings for the Detail Panel.
Group By – this field is a read only field that echo’s back the currently selected Group by Assignments from the global settings page.
Group By Value – the value to associate the panels with. This may include the wildcard “*”.
Control Path – enter the relative path and panel name for this Position.
Detail Control Path – enter the path and name for an associated Detail Panel to use.
The following settings relate to the Detail Panel:
Time Format – enter regular or military for Ring-In/Out Detail Panel entry.
Reason Codes – enter the Reason Code group that goes with this Detail Panel. See mask PYUPPC for more detailed information.

TIMECARD ONLINE 25
Detail Time Entry – choose from the following:
yes – allow the optional use of the specified Detail Panel
no – disallow the use of any Detail Panel for this Position Panel
forced – require the use of the Detail Panel for time entry
Round to Nearest – this feature provides validations and rounding functions.
Summary of Date Range Rules/Logic –
Valid dates for timecard entry are controlled by Timecard Settings, by Pay Period Definition, by Schedule Code definition and by Employee-level dates. Dates that are invalid for timecard entry are grayed-out in the screen display.
By default, data entry is restricted by pay period Begin/End range.
By Global Settings, each Active Pay Period may have an alternative Begin/End range assigned that overrides the Pay Period Definition Begin/End range. In no case, though, can an override date be set after the Pay Period End Date.
By Group Setting, an adjustment by X days prior to the Begin Date boundary may be made. This adjustment will extend the Begin Date boundary to be X days prior to either the Pay Period Begin Date or the Global Override Begin Date. A similar Group Setting is available to adjust the End Date limit back X days. The Begin Date adjustment may be set to a negative value. The End Date adjustment may not be negative.
The Employee Master Begin/End dates will further restrict the available dates for timecard entry. If the Employee Begin is after the normal Begin Date or if the Employee End Date is before the normal End Date, additional dates are grayed out.
The Employee Termination Date will also restrict data entry by disallowing any timecard entries on dates after the Termination Date.
The Employee Pay Assignment effective dates may further restrict the enterable date range if the assignment starts after the normal Begin Date or stops before the normal End Date.
Finally, a switch setting on an individual Day Code for the Calendar Schedule may prevent timecard entry for that specific Day Code. For example, on a particular Calendar and Schedule, we could prevent all timecard entries on Sundays or days marked as Holidays.

TIMECARD ONLINE 26
Miscellaneous Settings – There are standard configuration options available within Timecard Online under Global Settings and Group Settings that are described above. In addition to those, there are settings and controls that are outside Timecard Online itself that have a bearing on the process.
TC Lock Flag – A control setting on the Pay Period definition allows a Payroll user to suspend further entry into Timecard Online.
Optional settings:
(blank) Full Access; Employees may enter their Timecards.
'L' Fully Locked; No Access.
'T' Timekeeper and Payroll Access only.
Hour Definition – The list of hour codes which displays on the Timecard Online screens is limited by Pay Class. Only those hour codes that are in the Pay Class assigned to each employee may be displayed. That list is further controlled by markers set on the Hour Definition screen PYUPHH. The Relate Code(3) items are used for this purpose.
Hours must be marked ‘T C’ in order to appear in Timecard Online. Additionally, the sort order is controlled by the numeric value in the third item within Relate Code(3) (‘0001’ in the example). The lower numbers sort to the top of the list.

TIMECARD ONLINE 27
Calendar/Schedule – Timecard Online is sensitive to the individual calendars and work schedules attached to each employee’s various Pay Assignments. For example, days marked as holiday types are highlighted by a different color.
Schedule TC-Flag - A special process switch, located on the Schedule Screen (mask PYUPSC) is used to mark days on the calendar that are not allowed to accept timecard entries. On the timecard screen all such days are grayed out and inoperable.
Exclude Job/Position – Individual Job or Position Definitions may be excluded from timecard entry by setting the first Misc Cd to ‘TCEX’. Timecard Online will automatically suppress the display of any Pay Assignment that uses one of the excluded Job or Position Codes. For clients using Base HR, that means setting the first Misc Cd for PCNTBLE or JOBTBLE.
The PY mask is PYUPJB.
1.1.8 Work Flow Timecard Online has been designed to take full advantage of the IFAS Work Flow process to allow a supervisor to review and approve timecard entries prior to acceptance. Using Work Flow with Timecard Online is optional. Though typically each client will customize its own Work Flow setup, a standard, basic Work Flow model is delivered with the product as a starting point.
The Work Flow model is designed to recognize Timecards that are organized according to a user-defined WF-CODE. Each set of timecards for an employee will be grouped according to that code. The most common setup will be to group records by Supervisor ID, though many other options exist.
The Work Flow model may be set up to notify employees and timekeepers when entries are rejected or when approved. The notification process uses the e-mail address stored with the NUUPUS user configuration. The NUUTNU utility has an option to automatically populate that e-mail address from the one that is stored in HR.

TIMECARD ONLINE 28
Sample Approval Task List based on Supervisor ID as the WF grouping:
The above example shows the Work Flow Approval Task list for a login by the user “SUPER2”. There are 2 employees shown who have submitted time for this supervisor to review. The details shown on the right side are for the employee (ID 71600) that is currently highlighted from the list on the left side. Clicking on a different employee ID will bring up the details for that employee.
Timecards are approved or rejected at the Employee ID level or at the Timecard Set level. The supervisor may approve individual employees by marking the check box associated with separate Employee ID’s or mark the check box associated with the whole Timecard Set. Once checked, they are then approved (green check mark), rejected (red X) or delegated for another to review (blue arrow).

TIMECARD ONLINE 29
1.2 Timecard Online Panels Timecard Online allows configurable ‘panels’ to be assigned at the group level. Each group can have its own Employee and Leave Panels. The position panels are further configurable by position. Each position or range of positions within a group can be assigned a different panel. If one position requires Work Order but another doesn’t, two different panels can be built and assigned accordingly. Each position panel may have an accompanying detail panel. Below is an example list of the default panels that are shipped with Timecard Online.
1.2.1 Panel Directories There may be various standard and custom Timecard Panels available for use at each client site. A standard directory structure defines where those panels reside. The directory path is comprised of 2 sections, a ‘virtual root’ path plus a relative path beyond the root. For example, a literal path is:
C:\inetpub\wwwroot\IFAS7\Netsight7Screens\Timecard\PanelControls\GenericPanels\JLKeyDetailPanel.aspx
The first part of the path above “C:\inetpub\wwwroot\ifas7” will be the root path for a virtual root, usually the ifas7 virtual root as configured by IIS.
The second part of the path can be considered the relative path, which should be standard at all client sites and is used in the Configuration Settings.
In the example above the virtual path for the panel is: PanelControls/GenericPanels/JLKeyDetailPanel.aspx
PanelControls/GenericPanels/JLKeyDetailPanel.aspx
There are 3 basic levels of organization:
1) Base Control Panels – These panels define the basic properties and functions to the base software. There is one Base Panel for each panel type. The properties of each Base Panel are inherited by any Custom or Generic Panel that the client may specify. Whether to specify a Custom or Generic Panel is optional. The software will function properly with only the Base Control Panels specified.
DetailPanel.ascx

TIMECARD ONLINE 30
EmployeePanel.ascx
LeavePanel.ascx
PositionPanel.ascx
VerifyPanel.ascx
Relative Path example: PanelControls/PositionPanel.ascx
2) GenericPanels – Subdirectory holding all generic panels from which all clients may choose. There may be multiple examples for each type of Timecard Panel listed here.
Relative Path example: PanelControls/GenericPanels/CalendarPositionPanel.ascx
3) Custom – Subdirectory holding client folders of client-specific panels.
Relative Path example: PanelControls/Custom/Springfield/Spring1DetailPanel.ascx
1.2.2 Employee Panel Group Setting:
Control Path: PanelControls/EmployeePanel.ascx
1.2.3 Screen Display

TIMECARD ONLINE 31
1.2.4 Leave Panel
Group Setting
Control Path: PanelControls/LeavePanel.ascx
Screen Display (Default balances for 7007, 7008, 7010, and 7014):

TIMECARD ONLINE 32
1.2.5 Position Panels
1.2.6 Group Setting Control Path: PanelControls/PostionPanel.ascx

TIMECARD ONLINE 33
Screen Display:
Group Setting
Control Path: PanelControls/GenericPanels/CalendarPositionPanel.ascx
1.2.7 Detail Panels Detail Control Path: the Detail Control Path is relative to the location of the Position Panel. The Detail Panel can either reside in the same directory as the position panel or the path to the correct directory can be specified.

TIMECARD ONLINE 34
1.2.8 Account Detail Panel Group Setting:
Control Path: GenericPanels/AccountDetailPanel.ascx
Screen Display:

TIMECARD ONLINE 35
1.2.9 Ring in/out Detail Panel Group Setting:
Control Path: GenericPanels/RingInOutDetailPanel.ascx
Screen Display:
1.2.10 QA Detail Panel Group Setting:

TIMECARD ONLINE 36
Control Path: GenericPanels/FQADetailPanel.ascx
Screen Display:
1.2.11 GLKey / JLKey Detail Panel Group Setting:

TIMECARD ONLINE 37
Control Path: GenericPanels/JLKeyDetailPanel.ascx
Screen Display:
1.2.12 Teacher / Substitute Detail Panel Group Setting:

TIMECARD ONLINE 38
Control Path: GenericPanels/TeacherSubDetailPanel.ascx
Screen Display:
1.2.13 Verify Panels Global Settings:

TIMECARD ONLINE 39
The name will be the same for all Verify Panels. For each different location of the Position Panels you are using, the Verify Panel file will also need to reside. This will allow the position panel to open the verify panel control.
Control Path: PanelControls/VerifyPanel.ascx
Group Settings:
Use Verify Submit Panel: Select “yes” to enable the use of the Verify Panel for each group.
Screen Display (after clicking on the submit button):

TIMECARD ONLINE 40
1.3 Employee- Leave Tracking The Leave tracking screen gives easy access to the accrued leave information for the employee. It is available as a separate tab and is also accessible via the menu under the Paycheck area of the Employee Online.
The left pane that displays employee entity list is available only to users who have “TimeKeep” and “Finance” association. For all other EO users, only leave information pertaining to self is available.
ID: This display only field shows the employee ID (previously defined on the Employee Definition Screen).
Name: This field displays the employee's full name (in last, first, middle initial order) as previously defined on the Employee Definition Screen.
Leave Type: This field shows the available leave type for the employee. The leave types are special hour bases that are configured using the PYHB common codes.
Years of Detail: This indicates the number of years for which the leave detail information is sought. The drop-down shows 1 through 10, and >10, defaults to 1 (i.e., if a search is done for 1 year, it lists the leave transactions for the current year only).

TIMECARD ONLINE 41
Current Balance: The current Balance that is available per the selected leave type for the employee. This field is not visible until the user does a search on that leave type. This is the current balance from the employee’s PY Accumulator record.
Details inside the Grid
Date: Indicates the date on which the leave transaction occurred.
Period: The period for which the leave transaction occurred.
Trans Amt: The number of hours added to or subtracted from the leave balance.
Hour: The Hour Code for the hours added or subtracted.
Code: The short description for this Hour.
End Balance: The intermediate balances available after each transaction.