pull chain speed control reverse switch xtr …€¦ · pull chain speed control reverse switch xtr...
TRANSCRIPT

Casablanca Fan Co. - Factory Service Department - Technical Library
VII 7.4s . 1
The Casablanca 4-Speed series of fansfeature a 4-speed, pull chain fan control and aforward/reverse slide switch.
PULL CHAIN SPEED CONTROL
REVERSE SWITCH
XTR MOTOR
PRINTED CIRCUIT BOARD
LIGHT KIT PULL CHAIN
Casablanca Fan Co. - Factory Service Department - Technical Library
VII 7.4s . 2
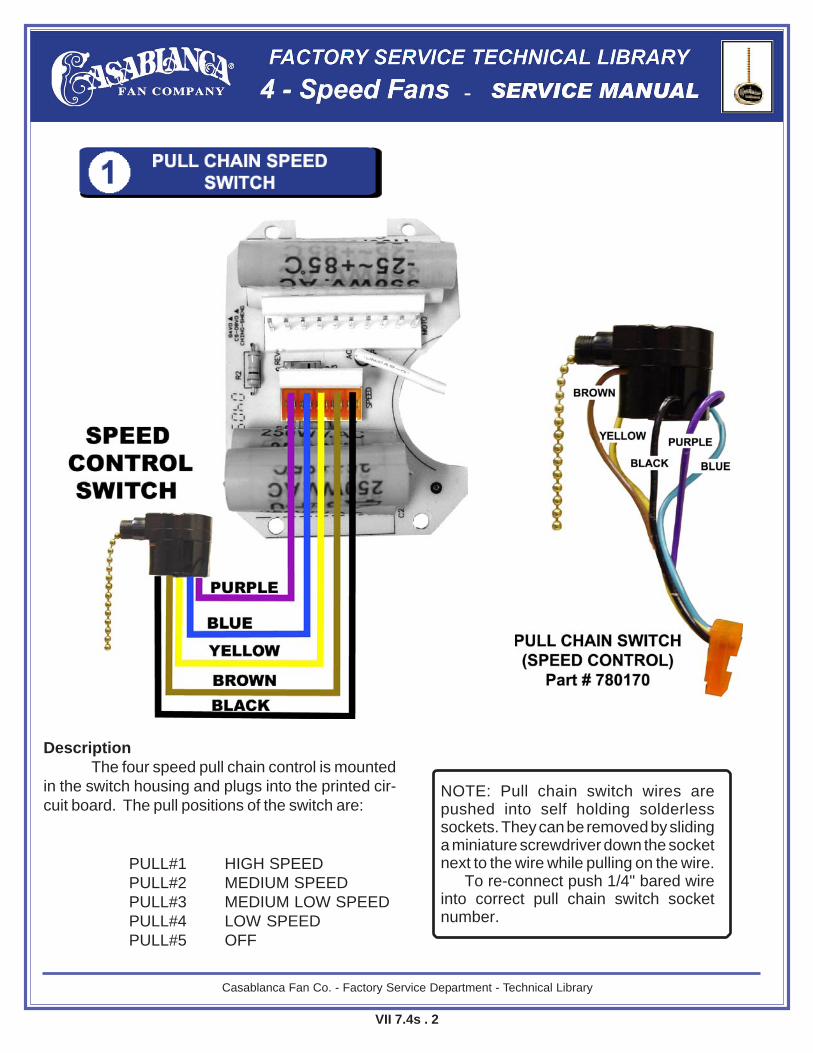
PULL#1 HIGH SPEEDPULL#2 MEDIUM SPEEDPULL#3 MEDIUM LOW SPEEDPULL#4 LOW SPEEDPULL#5 OFF
NOTE: Pull chain switch wires arepushed into self holding solderlesssockets. They can be removed by slidinga miniature screwdriver down the socketnext to the wire while pulling on the wire.
To re-connect push 1/4" bared wireinto correct pull chain switch socketnumber.
DescriptionThe four speed pull chain control is mounted
in the switch housing and plugs into the printed cir-cuit board. The pull positions of the switch are:

Casablanca Fan Co. - Factory Service Department - Technical Library
VII 7.4s . 3
CIRCUIT DIAGRAM
Rating:6A125VAC
ReplacementTo replace a faulty pull-chain switch, trace the brown,
yellow, blue, black, purple and yellow leads from the switch tothe printed circuit board connector. Unplug the plastic con-nector from the circuit board. Unscrew the knurled nut on theoutside of the switch housing. When replacing the control,slide the new switch and chain through the switch housinghole, making sure the lockwasher is between the switchand the inside of the housing. Then, securely tighten thenut to hold it in place. (Do not use pliers to tighten the nut.)Plug the keyed connector into the correct position. Be surethe connectors are properly mated before testing.
QUICK STEPS:Step 1
Unplug the 5-way connector from the printed circuit board.Step 2
Remove the knurled nut holding the switch in the switchhousing.
Step 3Push the switch back to remove.
Step 4Insert the new switch - don't forget the washer!
Step 5Screw on the knurled nut - finger tight only!
Step 6Plug in the 5 -way connector making sure the pins arelined up and that the yellow wire is on the end.
4 - SPEED PULL CHAIN SWITCH ASSEMBLY ELECTRONIC TESTING
OperationThe four speed pull chain switch is a four position rotary switch
that selects run capacitors on the PCB (Printed Circuit Board) toalter the fan speed. One of the positions (D) does not select a ca-pacitor so the fan turns off.
PULL #1 HIGH SPEED BROWN APULL #2MEDIUM SPEED YELLOW, BLUE & PURPLE BPULL #3MEDIUM LOW SEED BLUE & PURPLE CPULL #4 LOW SEED PURPLE CPULL #5OFF (120V AC) BLACK D
TestingRemove the socket connector from the PCB. With a conti-
nuity checker or resistance meter check as follows:Connect one probe to Pin 1 then check that when the other
probe is placed on Pin 2, then Pin 3 then Pin 4 then5 that infiniteohms (no continuity) is measured in one position of the pull chain.This is the OFF switch position.
Now pull the chain once and measure 0 ohms (continuity)between 1 and 2, pull again for 0 ohms (continuity) between 1 and3, 4,5 pull again for 0 ohms (continuity) between 1,4 and 5.

Casablanca Fan Co. - Factory Service Department - Technical Library
VII 7.4s . 4
Slide Reverse SwitchSwitch is held in place by spring mounting clip. It is
important that the tangs on the switch are in-between themounting plate and switch housing.
MOUNTING CLIP
REVERSE SWITCH (SLIDE)
DescriptionThe reverse switch is mounted in the switch
housing, and plugs onto the printed circuit board. It is atwo position slide switch that reverses the direction ofrotation.
PRINTEDCIRCUITBOARD
CONNECTOR
DescriptionThe pull chain reverse switch is used on fans
that are used in damp locations, and plugs into theprinted circuit board. It is a two position pull chain switchthat reverses the direction of rotation.
IMPORTANT NOTEFans installed in a damp location, a
slide switchis not used. But a pull chainswitch is used to meet U.L. requirementsfor 'damp' environment operation.
FOR DAMP LOCATION
REVERSE SWITCH (PULL CHAIN)

Casablanca Fan Co. - Factory Service Department - Technical Library
VII 7.4s . 5
ReplacementTo remove the faulty reverse switch trace the white, gray,
yellow and purple leads from the reverse switch to the con-nector on the circuit board. Unplug the reverse switch con-nector from the circuit board. Then, slide the switch up andaway from the switch housing's spring clip. When installing anew subassembly, slide the reverse switch's end flanges downbetween the switch housing and the spring clip. With the re-verse switch in place plug its connector back into the PCB,making sure that it is positioned correctly.
REVERSE SWITCH ASSEMBLY ELECTRONIC TESTING
TestingThe readings are made with the reverse switch
assembly disconnected from the electrical circuit. Ifthe above results are not obtained the reverse switchassembly is defective and needs to be replaced.
PROBES SLIDE READINGS
1 - 3 left open2 - 4 left 0 ohms
2 - 3 right 0 ohms2 - 4 right open
Step 1Unplug the 4-way connector from the printed circuitboard.
Step 2Slide old switch out of housing.
Step 3Push the new switch back into the housing being carefulto keep the reverse switch tangs in-between the clip andswitch housing.
Step 4Plug the three pin connector back into the printed circuitboard.
QUICK STEPS
OperationThe reverse switch is a two position slide switch
that connects the power to ether the forward directionwinding, or the reverse direction winding of the 4-Speedmotor.

Casablanca Fan Co. - Factory Service Department - Technical Library
VII 7.4s . 6
REVERSE SWITCH ASSEMBLY ELECTRONIC TESTING
TestingThe readings are made with the reverse switch
assembly disconnected from the electrical circuit. Ifthe above results are not obtained the reverse switchassembly is defective and needs to be replaced.
PROBES SLIDE READINGS
1 - 3 pull open2 - 4 pull 0 ohms
2 - 3 pull 0 ohms2 - 4 pull open
OperationThe reverse switch is a two position pull-chain
switch that connects the power to ether the forwarddirection winding, or the reverse direction winding ofthe 4-Speed motor.
ReplacementTo replace a faulty reverse switch, trace the brown, blue,
purple and yellow leads from the switch to the printed circuitboard connector. Unplug the plastic connector from the cir-cuit board. Unscrew the knurled nut on the outside of theswitch housing. When replacing the control, slide the newswitch and chain through the switch housing hole, makingsure the lockwasher is between the switch and the in-side of the housing. Then, securely tighten the nut to hold itin place. (Do not use pliers to tighten the nut.) Plug the keyedconnector into the correct position. Be sure the connectorsare properly mated before testing.
QUICK STEPS:Step 1
Unplug the 4-way connector from the printed circuit board.Step 2
Remove the knurled nut holding the switch in the switchhousing.
Step 3Push the switch back to remove.
Step 4Insert the new switch - don't forget the washer!
Step 5Screw on the knurled nut - finger tight only!
Step 6Plug in the 4 -way connector making sure the pins are linedup and that the yellow wire is on the end.

Casablanca Fan Co. - Factory Service Department - Technical Library
VII 7.4s . 7
Description:
The XTR - 200 motors is a 20 pole, permanent split capacitor induction motors. Simply put, thismeans the motor runs on AC power and has a capacitor connected across its two windings. The capacitor'kicks' the motor into action and also smooths out the AC power so that it does not run with an annoyinghum. The motor has two windings inside so that the direction of rotation can be changed by switchingconnection of the AC power from one winding to the other. The moving parts are made of a rugged die castaluminum constructions. With 200mm x 20mm silicon low carbon steel laminations. A heavy cast ironflywheel is built-in for smoother operation-perfectly balanced. Making the XTR-200 motor Quiet, no vibra-tion and a very reliable direct drive motor.
XTR 200 MOTOR WIRING DIAGRAM
Motor Information - (CONTINUED) -

Casablanca Fan Co. - Factory Service Department - Technical Library
VII 7.4s . 8
If the readings below are not obtained, the motor is defectiveand needs to be replaced.
If the motor is found to be defective, call the Service Departmentfor replacement instructions.

Casablanca Fan Co. - Factory Service Department - Technical Library
VII 7.4s . 16
4-SPEED PRINTED CIRCUIT BOARD (PCB)
DescriptionThe printed circuit board (PCB) allows connection of the XTR-200 Motor, Pull Chain Speed Switch and Reverse Switch.
Line voltage is brought to the PCB from the canopy via Pin 1of the XTR-200 Motor socket. It is next routed directly to D ofthe pull chain speed switch via the PCB and Pins on the pullchain connector.
The pull chain switch position determines which motor runcapacitor (s) is used on the PCB and this in turn determinesthe fan speed.
Which winding will receive the voltage is determined by theposition of the reverse switch i.e. forward or backward.
Line voltage return is from the center tapped motor windings.
PC BOARD used in fans that are rated for DAMPLOCATION.
(Figure #1) (Figure #2)
Note: The 4 Speed fans use one of two PC Boards, for fans with the UL rating for uses in damp location. The PC Boardwith part number 7801730 is used as shown in (Figure #2). All other 4 Speed fans use PC Board with part number 7801710as shown in (Figure #1). The only difference between the two boards is that the Start Capacitor has be positioned uprightand not flat as shown. On the damp location fans a reverse pull chain switch is used and the start capacitor must be placedupright or the reverse pull chain switch will not fit into the switch housing.

Casablanca Fan Co. - Factory Service Department - Technical Library
VII 7.4s . 17
ReplacementTo replace a faulty PC Board, this can be done with the fanhanging from the ceiling. With the POWER turned OFF at thecircuit breaker, remove the glass and light kit from the fan.Remove the switch housing cap as shown in (Figure #1) so thatyou have easy access to the electronics of the fan. Remove thereverse and speed control switch as shown in (Figure #2). Thenremove the PC Board from the switch housing as shown in(Figure #3) and (Figure #4), the PC board is held into the switchhousing by 4 STANDOFFS as shown in (Figure #5). Make surethat you keep the FISH PAPER as shown in (Figure #5); the FISHPAPER will be needed and installed with the new PC Board. Onceyou have installed the new PC Board, check and make sure thatthe plugs are plugged into the PC Board correctly as shown in(Figure # 6).
(Figure #1)
(Figure #2)
(Figure #3)
(Figure #5)
(Figure #4)
(Figure #6)

Casablanca Fan Co. - Factory Service Department - Technical Library
VII 7.4s . 18
Before doing any in-depth troubleshooting, it is wise togive the ceiling fan a good visual inspection for mechanicalproblems or poor electrical connections. To do this thoroughly:
1. Spin the fan blades by hand to be sure that they rotatefreely and are not rubbing against any fan surfaces.
2. Remove the switch housing bottom cap and check all thewire connections at the printed circuit board. Unplug eachconnector or set of connectors one at a time. Inspect thewire-lead side of each connector; each wire should be fullyinserted.
3. Inspect for shorted wires to the switch housing. The re-verse switch leads must have adequate clearance to the switchhousing.
The wire has lifted out of the connector, and isNOT making electrical continuity.
EDGE VIEW
Printed Circuit Board
The EDGE VIEW shows the positioning and place-ment of the Printed Circuit Board, Insulation paper, anda Stand-off.
Mechanical DisassemblyThe printed circuit board is mounted inside the switch
housing, with four stand-offs and insulation paper. Three con-nectors are plugged into the printed circuit board as shown.
IMPORTANT NOTE!There are no field serviceable components on
the printed circuit board. If a fault condition isdetermined the complete assemble must bechanged.Be sure to inspect the run capacitor to identify thatit matches the one that you are removing and isthe correct PCB for the motor.
Insulation paper Stand-off

Casablanca Fan Co. - Factory Service Department - Technical Library
VII 7.4s . 19
LIGHT KIT PULL CHAIN SWITCH ASSEMBLY ELECTRONIC TESTING
Ohm. meter readings:
PROBES: PULL #: READINGS:
A + B #1 openA + B #2 0 ohms
The readings are made with the pull chain switch as-sembly disconnected from the electrical circuit.
If the above results are not obtained, the pull chain as-sembly is defective and needs to be replaced.
NOTE: This light switch is optional andnot required for fan operation.
P/N #1037080
DescriptionThe light kit pull chain is mounted inside the
switch housing, if a light kit is installed. The pullchain provides ON - OFF control of the light kit:
PULL # LIGHT FUNCTION
#1 ON#2 OFF

Casablanca Fan Co. - Factory Service Department - Technical Library
VII 7.4s . 20
Operation:Two pull-chain switches on the fan, control the fan andlights. Using the fan control pull-chain switch (Figure.33):1. Pull: fan ON, low speed2. Pull: medium speed3. Pull: high speed4. Pull: fan OFFUsing the optional light pull-chain switch:1. Pull: light ON2. Pull: light OFF
Direction of blade rotation is controlled by the slideswitch on the side of the switch housing.No changes in household wiring are required.
COLLAR
SWITCHHOUSING
Optional Light Kit Installationa) Refer to light kit instructions to assemble and attachyour light kit correctly.b) Remove the two (2) 8-32 screws from the switchhousing cap.c) Remove the plug from switch housing.d) Install pull-chain switch and finger tighten collar onswitch.e) Connect one wire from pull-chain switch to the BLUED1-Option wire. Secure splice with a wire nut.f) Connect other wire from pull-chain switch to BLACKwire from light kit. Secure splice with a wire nut.g) Connect WHITE wire from switch housing to WHITEwire from light kit. Secure splice with a wire nut.h) At the fan housing pole, connect the BLACK andBLUE wires.
NOTE: If a separate circuit is used tocontrol the lights from a wall control, theBLUE D1-Option wire at the top of the fanshould be connected to that circuitinstead of the BLACK power wire in thecanopy.
SWITCHHOUSING

Casablanca Fan Co. - Factory Service Department - Technical Library
VII 7.4s . 21
WIRING DIAGRAM 4-SPEED FANS

Casablanca Fan Co. - Factory Service Department - Technical Library
VII 7.4s . 22
WIRING DIAGRAM 4-SPEED FANSUL DAMP LOCATION

Casablanca Fan Co. - Factory Service Department - Technical Library
VII 7.4s . 23
TROUBLESHOOTING GUIDE FOR 4-Speed FANS
TROUBLE POSSIBLE CAUSE POSSIBLE REMEDIES
wall speed control.1.A Replace reverse switch assy1.B Replace PCB assembly.1.C Replace motor unit.
2.A Replace four-speed pull-chainswitch assembly.
2.B Replace PCB assembly.
3.A Tighten thumb screws & bulbs.3.B Tighten canopy screws & cross
bar assembly.3.C Tighten blade holder screws.3.D Tighten motor housing screws.3.E Check & adjust.
3.F Adjust case position & tighten screw.3.G Replace with capacitor wallspeed control.
1.0 Fan runs slowly in eitherdirection if rotation is started byhand; will not reverse.
2.0 Fan will not operate at properspeeds or will not operate at anyspeed.
3.0 Fan is noisy during operation.
1.A Faulty reverse switch.1.B Faulty capacitor.1.C Open motor winding.
2.A Faulty four-speed pullchainswitch assembly.
2.B Faulty capacitor.
3.A Loose glass or bulbs on light kit.3.B Loose canopy.
3.C Loose blade holder screws.3.D Loose motor housing screws.3.E Loose wire nuts in switch housingor canopy.
3.F Interference between motor& switch housing.
3.G Motor noise caused by solid state