pullet rearing for modern hen production
TRANSCRIPT

1
Pullet Rearing for Modern Hen
Production
Pennsylvania Sales and Service Meeting
State College, PA
Sept. 17, 2015
John G. Brown, DVM, MAM
Senior Veterinarian
Zoetis

2
Introduction
• Goal is to have a ready to lay pullet at target body
weight, with good skeletal development and high levels
of immunity to disease.
• This is not significantly different than in the past despite
the dramatic changes in hen housing and space
requirements for layers.
• Some differences approaches are needed depending on
the layer housing that pullets are going into.
• Let’s start with the basics, then discuss some
differences.
* Source: “Americans want antibiotic-free chicken, and the industry is listening,” National Public Radio, Feb. 19, 2014
3
Preparing for the Arrival of Baby Chicks
Surprising as it may seem, pullet growing does not start the morning the chicks arrive.
Several weeks of planning and work should have occurred before the chick truck arrives.
1). Remove old feed, manure and stray live chickens from previous flock
2). Repair broken or malfunctioning equipment, water lines, etc.
3). Disinfect water lines.
4). Place rodent bait and traps after old feed is removed and before cleaning and
disinfecting house to allow rodents to get hungry and eat the bait.
5). Clean and disinfect the house thoroughly. Test to ensure efficacy of cleaning.
6). Downtime….though this is an economic issue, downtime is your friend. A minimum of
two weeks is recommended from cleaning and disinfecting to placement of chicks.
This is just the beginning of the journey to produce top quality pullets.
4
Preparing for the Arrival of Baby Chicks
Next is the preparation of the cleaned and disinfected house to accept the baby chicks.
1). Fog or fumigate the house about a week prior to chicks arriving.
2). Begin warming the house about 2 days prior to chick arrival depending on
environmental temperatures.
3). Equipment and air temperatures should be acclimated to the set point temperatures to
avoid chilling the chicks.
4). Place cage papers on the cage floor covering the entire floor up to the front of the cage
and almost to the drinkers…remember the chick is small and has never been on wire
before and will not walk on wire to get to the drinker.
5). Check humidity…I prefer humidity for baby chicks to be at least 60% though some
breeder management guides suggest slightly lower levels.
5
Placing of the Baby Chicks
Where in the house you place the baby chick is as important as how you place them.
1). Higher cages are brighter and warmer than cages in the middle or lower levels. Ensure
there are no shadows on feeders or especially water nipples.
2). Baby chicks can not regulate their own body temperatures so it is up to us to do that for
them. Brooding temperatures vary by breed but typically are between 88-95°F.
3). Have feed on the cage papers in the center and towards the front of the cage to try and
draw the chicks toward the feeder troughs.
4). Water nipples should have a drop of water hanging and water lines with low water
pressure to make access to water simple. Use 360° nipples.
5). Trigger water several times and have the nipple lines at eye level initially then slowly
raise to lines so that the birds have to look up slightly for water.
6). Cold water can chill the chicks so care should be taken to not flush the water lines
initially to create colder water than the chick can handle.
6
First Week of Life
The baby chick should virtually double in size during this first week of life. This early
growth is critical for development of organ tissues and initial framework for the skeletal
development that will occur during later growth.
1). Feed on cage papers for first 3 days unless hatchery trimmed, in which case you
probably want to feed on the paper for a few more days.
2). Cage papers need to be removed between 7-10 days of age to keep them from getting
to wet or covered with manure.
3). Lighting programs—Personally I like the intermittent lighting program with two hours off
and four hours on around the clock for a few days to one week. This appears to get the
birds time to rest and time to eat and gets them off to a better start. If this program is not
used, at least 1-2 hours of darkness per day is recommended.
7
Weeks 2-6
• This is the time of the chicks development when the internal organs undergo rapid
development especially the intestinal tract, the skeletal foundation, muscle, and the
immune system.
• Stresses during this time can lead to long term problems associated with the immune
response and the absorption of nutrients later in life.
• Pullet managers must keep in mind that the chick is still an infant at this time and
temperature, water availability, feed availability and humidity are still very critical to the
chicks development.
• Monitoring of body weights should begin during this time and continued through the rest
of the pullet cycle.

8
Weeks 7-12
• This is the time frame when the majority of the skeletal system is deposited and the
major muscle growth occurs.
• By 12 weeks of age, the flock is typically at about 80% of the stimulation body weight.
• During this phase of growth, stress that occurs can reduce the skeletal development and
body weight development.
• Monitoring of body weights will signal a problem and allow time to react to reverse the
negative effects of whatever it is that has happened. If you are not looking at body
weights and wait until the flock is 17 weeks of age and weigh the birds and find out they
are light or lack uniformity it is too late to fix it.
• During this time the flock should reach the constant day length that they will be
maintained on until stimulation into production. Some breeds might recommend reach
that target earlier some a little later so I would refer you to the breeder management
guides for specifics.

9
Weeks 13-17
• This is the time when the birds growth is slowing but the growth that is occurring is critical
in nature.
• Ovaries are beginning to develop, fat reserves are being placed, cortical bone is being
deposited for use during high egg production.
• During this stage, there is a gradual increase in the amount of estrogen being produced
and thus overfeeding can lead to excess fat deposition especially in the pelvic area and
can lead to prolapse and higher mortality.
• Also lack of feed consumption can slow the development of reproductive organs and fat
and result in delayed onset of production.

10
What about Floor or Aviary Pullets
• The basics remain the same…good body weight, strong vaccination program,
appropriate lighting program, good uniformity.
• Starting chicks on floor involved slightly higher (2-5°F) temperatures, brooder rings!!!
• Aviary pullets need to be kept “in the system” for several weeks (6-8 weeks) to ensure
easy access to feed and water, good early muscle development to allow for jumping up
and down off slatted area, ease of applying early vaccinations.
• Once released from the “system” the flock needs to be walked in the evenings to
encourage the birds to go up in the system during the night. This helps reduce floor eggs
in the lay house.
• Watch for coccidiosis once the birds have access to floor. Vaccination for coccidia (as is
the case in cages) has been met with mixed results due to lack of cycling needed to
develop immunity.
11
Lighting Programs
• As discussed in the section on first week, intermittent lighting program for the first week is
an excellent way to start the flock off.
• Following that first week, generally there is a stepdown of the day length weekly until a
constant day length is attained based on breed and light leakage in the pullet house.
• I personally prefer to use the shortest day length longer than 10 hours on whites and
longer than 8 hours on browns that allows for the flock to attain desired body weights and
the house light leakage allows.
• This allows for longer stimulation into production. Egg size needs and breed of pullet also
must be considered.
• Management Guides!!! Available and have excellent information so use them!

12
Ventilation
• I am not a ventilation expert so will refer you to the management guides for their
recommendations.
• A rule of thumb is to make sure the temperature is at the recommended level and the
birds are not panting or huddling. In many situations, the birds will tell you how the
temperature in the house feels to them.
• If in doubt or having issues, contact someone with ventilation expertise as soon as
possible.

13
Water
• Water is the most important nutrient but is one that is oftentimes overlooked.
• Little research has been done on pullet water quality needs. In general my philosophy is
that if you won’t drink the water, neither should the chicks.
• How many waterers per chick depends on the system. Usually 8-10 chicks per nipple in a
cage but want access to two waterers if the number is greater than 8.
• Water flow should be sufficient that there is plenty of water available at maximum water
demand which is usually just after lights go on and the first feeding occurs.
14
Feeding
• Feeder space should be close to 2 inches per bird in a cage system. On floor systems
with round pan feeders, 35-50 birds per pan is adequate and 2 inches of feeder space if
a trough feeder is used.
• Feeding frequency is a valuable tool to ensure pullet uniformity. Stacking the feedings
fairly close together in morning and evening will allow both the “boss” bird in the cage and
the more timid bird in the cage to get access to sufficient feed.
• Allow for time to clean the troughs out during the day to ensure fines are consumed.
• Weigh the birds at a minimum every other week during grow to know where you stand.
• Contact your nutritionist if body weights are significantly lower than expected and feed
consumption is normal.

15
Space Requirements
• Pullets should be grown on 48-54 square inches per birds after reaching 4-5 weeks of
age. Prior to this, the flock can be started on higher density but should be spread out by 5
weeks of age.
• Floor space on pullets should be about 1 square foot per pullet. This allows for good
growth and more easy flow through the house.
• Pullets that are crowded typically have low body weights, poor uniformity, and will likely
have more mortality.
16
Lighting
• Pullets should be started on bright lights to be certain the pullets can find feed and water.
• Once they have found the feed and water well, the light intensity should be reduced to
approximately 0.5 ft candle. This reduction should be done over a period of a few weeks
but can be done quickly should cannibalism be observed.
• Cannibalism can be easily controlled if you act quickly. At first sign of tail head pecking,
my recommendation is to drop the light intensity and add some salt to the water for a few
days.
• Be certain that the light intensity in the pullet houses matches or is less than the layer
house or you run the risk of delaying onset of production due to the intensity drop from
pullet to layer.

17
Vaccination Program
• Vaccination program should be designed to include only vaccines for which exposure to
the disease causing agent is likely.
• Program should be designed to produce as little stress as possible.
• Typical vaccination programs include Marek’s Disease, Newcastle Disease, Infectious
Bronchitis, Fowl Pox, Infectious Laryngotracheitis, Salmonella, Infectious Bursal Disease,
and AE. Other vaccines that are used in areas where necessary include MG and E. coli.
• Vaccines that require handling of the pullets should be planned so as the flock has
attained most of its skeletal growth before being handled. The fewer the handlings the
better.
• I will show an example of a vaccination program with all the above vaccines included.
18
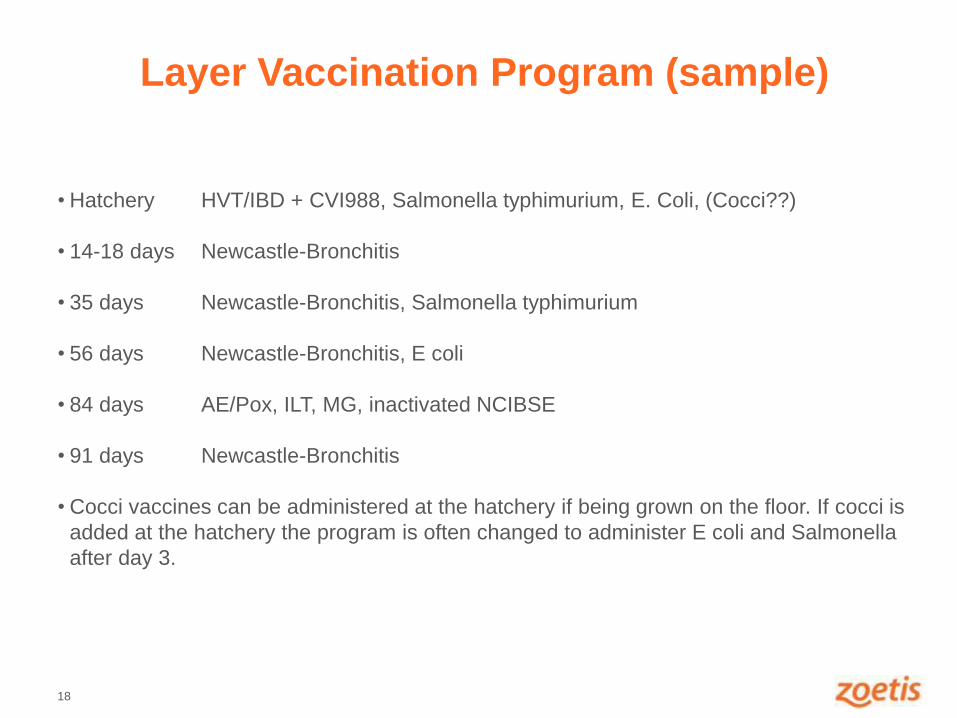
Layer Vaccination Program (sample)
• Hatchery HVT/IBD + CVI988, Salmonella typhimurium, E. Coli, (Cocci??)
• 14-18 days Newcastle-Bronchitis
• 35 days Newcastle-Bronchitis, Salmonella typhimurium
• 56 days Newcastle-Bronchitis, E coli
• 84 days AE/Pox, ILT, MG, inactivated NCIBSE
• 91 days Newcastle-Bronchitis
• Cocci vaccines can be administered at the hatchery if being grown on the floor. If cocci is
added at the hatchery the program is often changed to administer E coli and Salmonella
after day 3.

19
Overview
• Raising good quality pullets comes down to paying attention to the details.
• Those details can be summarized in the acronym below:
• F – Feed
• L – Lights
• A – Air
• W – Water
• S – Space
A salesman that I first worked with in this area had a saying that has stuck with me
since…he always said to “plan the work and then work the plan”.

QUESTIONS?
COMMENTS?
