puncture repair training guide - tech tire repair solutions
TRANSCRIPT

828WTECHREPAIRMANUAL
Puncture Repair Training Guide· PASSENGER TIRES · LIGHT TRUCK TIRES
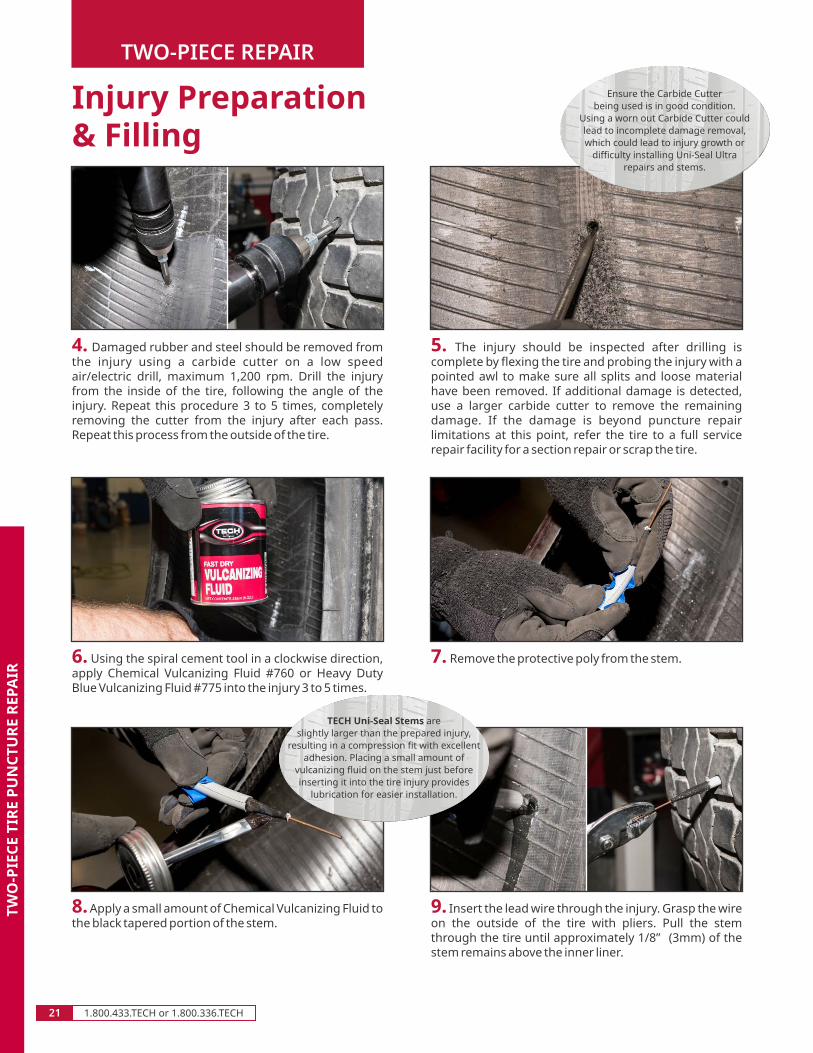
· TRUCK TIRES

Table of Contents
17PAGE Two-Piece RepairSECTION 2
09PAGE One-Piece RepairSECTION 1
05PAGE Tire Inspecton Overview
Industry Guidelines08PAGE
07PAGE Non-Repairable Conditions
03PAGE Tire Construction Basics
02PAGE Tire Repair Introduction
01PAGE Puncture Repair Pre-Test

TECH UNIVERSITY
Puncture Repair Pre-Test
1) To properly remove buffing dust and steel shavings from the repair area,
B. False
9) The UL6 (250UL) Uni-Seal Ultra can be used to repair a ¼”(6mm) injury in
3) The drying time for #760 Chemical Vulcanizing Fluid is 3-5 minutes
A. True
A. True
A. True
A. True B. False
A. True
B. False
technicians should use a scraper and Rub-O-Matic.
B. False
B. False
5) Tech 738 Security Coat is recommended to seal the overbuffed area in all
B. False
B. False
A. True
B. False
Tech’s #270 Carbide Cutter is not recommended to exceed 1,200 RPM.2) For proper removal of the injury and to eliminate possible scorching,
tubeless tires.
A. True
4) Tech Uni-seal Ultras are non-reinforced and can be used in Radial tires only.
is 3/8” (10mm).
7) A 2600 RPM air buffer is acceptable for buffing the inner liner of the tire.
6) The maximum injury size in a passenger tire considered to be a nail hole
8) Tech Repair units can be used with any brand of vulcanizing fluid. A. True
A. True
B. False
A. True
B. False
10) Pre-cleaning the inner liner with a rubber scraper & Rub-O-Matic before
radial and bias tires.
repairing is not necessary in certain tires?
NAME ______________________________________ DATE _______________________
1.800.433.TECH or 1.800.336.TECH1

PROPER TIRE REPAIR
Introduction
Throughout this training program, the user will learn about the
construction of the tires being worked on, the industry standards for
proper tire repair, and the different methods of properly repairing
puncture injuries in tires.
This saves the owner of the tire money and reduces waste. If a tire is
repaired improperly, it can result in an unsafe condition for both the
technician installing the tire on the wheel and then the vehicle, and
also for the driver of the vehicle. Improper repairs can lead to further
loss of air pressure when the tire is in service, which can result in
premature tire failure, causing an accident which could lead to serious
injuries or even deaths. Improper repairs can also lead to frustration
for the owner of the tire by having to get the repair reworked, which
can be costly, or having to repeatedly add air to the tire due to a slow
leak. These improperly repaired tires typically have a shorter life span,
which can lead to more frequent tire replacement, higher fuel costs
and more tires going into landfills.
You can be assured that when a tire is properly repaired with a TECH
repair unit, it will be as safe as a new tire.
Proper tire repair is an essential component of tire life cycle
management. Utilizing a proper tire repair program from TECH can
help to prolong the life of the tire casing by installing a permanent,
worry-free repair. With experience in tire repair manufacturing dating
back to 1939, TECH is dedicated to providing the highest quality tire
repairs in the market. TECH repair units have been manufactured and
tested to meet or exceed all industry requirements of new tires.
When tires are repaired properly, the tire’s usable life is extended.
www.techtirerepairs.com 2

1.800.433.TECH or 1.800.336.TECH3
RADIAL AND BIAS PLY
Tire Construction Basics
Tread
Cap Tread
CrownShoulder
Shoulder
It is important to understand that pneumatic tires are high pressure air containers and the air inside of the tire is what supports the load of the vehicle, not the tire itself. If a tire does not have enough air pressure for the load being carried, the tire will over flex and likely fail. When dealing with light truck (LT), medium and heavy truck tires with steel body plies it is also important to understand that when these tires are operated in an under inflated or overloaded condition, the tire may be susceptible to a zipper rupture during the inflation process and additional inspection of the tire is required.
Radial tires have body plies that run straight across the tire at a 90-degree angle to the beads. Passenger and many LT tires typically utilize fabric cords such as polyester, while some larger LT tires, medium, or heavy truck tires are made with
Currently, there are two types of tires in production: bias and radial ply. Bias ply tires have body plies that wrap around one bead and run diagonally across the tire and wrap around the opposite bead. Bias tires will always have at least two layers of body plies that wrap around the tire in alternating directions and intersect in the crown at nearly a right angle. The nature of the flexing of bias tires allows for greater distortion in the tread area, typically leading to a faster wear rate than radial tires, as well as lower fuel economy.
When inflating a tire, the tire must be strong enough to contain the inflation pressure. Due to this pressure, tires are reinforced with either fabric or steel body plies that wrap around the bead bundle. The bead bundle is a steel wire hoop that holds the tire firmly against the rim and prevents the tire from leaking or slipping.
a single ply of steel cords. Underneath the tread are multiple layers of belts consisting of fabric and/or steel cords to help stabilize the tire. These belts allow the tread to maintain even contact with the road surface, which leads to longer tread life and better fuel economy.
RADIAL BIAS

SPEED RATINGS
Letter MPH km/h S 112 180 T 118 190
W 168 270
U 124 200
(Y) 186+ 300+
H 130 210
Y 186 300
Z 149+ 240+ V 149 240
www.techtirerepairs.com 4
265 = Section Width in millimeters (measured at the
The dimensions of a tire are identified in the tire’s size. For example, the information provided in tire size P265/60R18 gives the following information: P = Passenger Tire (light truck tires begin with prefix LT)
widest part of the tire sidewall to sidewall) /60 = Aspect Ratio or section height to width ratio in % (for this tire, 265mm X .60 = 159mm sidewall height) R = Radial tire 18 = Rim diameter in inches
An example of a truck tire size is 11R22.5
22.5 = Rim diameter and type (Rims with ".5" in the rim size are tubeless or drop-center rims, while rim sizes which are whole numbers such as 20,
11 = Section width in inches R = Radial Tire
are typically multi-piece, tube-type rims)
Another component of the tire to be aware of is the date the tire was manufactured. Every tire used in highway applications is required to have a DOT code stamped on the sidewall. This code starts with the letters "DOT" to signify that the tire meets Department of Transportation standards for highway use. The last four digits of the DOT code identify the date the tire was manufactured by week and year. The first two digits of the date signify the week the tire was manufactured in while the last two digits indicate the year. For example, a tire manufactured 3516 was manufactured the 35th week of the year 2016. Tires manufactured prior to the year 2000 had a three-digit date code: two digits for the week but only one for the year (example: 356 = 35th week of either 1986 or 1996). There are currently no regulations stating a maximum age for tires in use, but age should be a factor in determining whether a tire should remain in service.
When inflating a passenger tire, always refer to the Tire and Loading Information placard located on the driver side door jamb. This placard will identify the proper inflation pressure and maximum load for the OE tires. When inflating LT, medium and heavy tires, it is recommended to refer to the Tire and Rim Association’s Load & Inflation tables for recommended operating pressure. Failure to maintain proper inflation pressure can result in many unfavorable conditions for the tire. Under inflation will result in faster, irregular wear of the tire’s tread and may also lead to higher fuel consumption for the vehicle. This condition may also lead to premature tire failure.
On passenger and LT tires, a service description is stamped next to the tire’s size. This service description will identify the tires load index and speed rating.
For example: P265/60R 18 110H
The load index will consist of a two or three digit number indicating the tire's load carrying capacity. Speed Index is a letter designation identifying the tire’s maximum speed threshold. Exceeding either of these limitations may lead to premature tire failure due to over-flexing and/or heat fatigue.
110 = maximum load of 2337 pounds H = maximum speed of 130 MPH
SECTIONHEIGHT
SECTIONWIDTH

1.800.433.TECH or 1.800.336.TECH5
Tire Inspection
· Broken, damaged, kinked or exposed bead bundle (See Image 7 on page 7)
· Damage to the cords that exceeds the limitations in the Centech &
· Radial skive brush such as: #RSB3 or #RSB3E
Thermacure Radial Repair Chart
Recommended Tools for Tire Inspection:
1. External
A thorough inspection of the casing is critical to ensuring that the repair being performed will be worth the investment. In order to perform a proper inspection of the casing, the technician will need to be well educated on inspection procedures and have a few basic tools and proper lighting at their disposal.
Tires should not be repaired if any of the following conditions are present:
· Weather checking which exceeds 2/32” (1.5mm) (See Image 9 on page 7)
· Low RPM Buffer (Max. 5,000 RPM) such as: S1036, CP873K or S1032AC
· #919 Probe
Kit or #JS78606 – Rechargeable Slim LED Work Light
· Multiple injuries to the same body cord(s)
· Minimum 200 lumens work light such as: #JSTECHLIGHT – Tire Spreader Light
· Rotary gouge, such as #S2045, to remove loose rubber
· Tires with 2/32” (1.5mm) or less remaining tread depth unless planned for
· Any signs of a potential zipper rupture (ripples, bulges, or softness in the upper sidewall, or crunching or popping sounds when flexed)
discolored inner liner (See Image 2 on page 7)
· Impact breaks (See Image 10 on page 7)
retreading (See Image 5 on page 7)
· Injuries in the non-repairable bead area to the body cords
· Porous or loose inner liners · Open liner splices which expose body cords · Injuries to the body cords beyond repairable limits · Evidence of run-flat or overloading damage such as wrinkled, creased or
For more information, refer to "Radial Tire Conditions Analysis Guide" produced by the Technology and Maintenance Council (TMC) of the American Trucking Association or "Passenger & Light Truck Tire Conditions Manual" Produced by the Tire Industry Association (TIA).
· Radial and/or circumferential cracking
2. Internal
OVERVIEW

www.techtirerepairs.com 6
When inspecting Steel body ply LT, medium or heavy truck tires returning to service, it is important to understand the risks of potential zipper ruptures. When working with these tires, it is required by the Occupational Safety and Health Administration to check the tire pressure prior to servicing the tires. If the pressure is at 80% or less of its recommended operating pressure, the tire must be dismounted and inspected for a potential zipper rupture.
For more information on zipper ruptures, refer to Tire Information Service Bulletin Vol. 33, Number 5 "Inspection Procedures to Identify Potential Zipper Ruptures in Steel Cord Radial Truck, Bus and Light Truck Tires" produced by the US Tire Manufacturers Association.
Zipper ruptures are circumferential ruptures in the sidewall caused by operating the tire in an under inflated and/or overloaded condition. These conditions allow for over flexing of the sidewall which can result in overheating of the casing and potential catastrophic tire failure. It is always recommended to inflate these tires with the valve core removed, in a safety cage with a clip-on chuck and sufficient length of air hose to keep the technician away from the sidewall of the tire during the inflation process.
Zipper Rupture in a Light Truck Tire with steel body plies.

1.800.433.TECH or 1.800.336.TECH7
Non-Repairable Conditions
The tire inspection process is critical in determining if the tire can safely be repaired and returned to service. The inspection should be done with the tire removed from the wheel and placed on a tire spreader using adequate lighting. The technician must be able to examine the tire beads, interior and exterior sidewalls, and the tread area.
1. Injury no greater than 1/4” for passenger tires. Injury no greater than 3/8” for light truck/truck tires.
2. Run flat or under-inflated 3. Inner liner separation
4. Casing separation 5. Excessive tread wear 6. Exposed plies/cables
7. Deformed bead, exposed fabric or steel
8. If injury angle exceeds 35 degrees, a 2-piece repair must be used.
9. Ozone cracking
10. Tire damage from impacts
TIRE INSPECTION

www.techtirerepairs.com 8
Industry Guidelines
PROPER PUNCTURE REPAIR
S T T S
A-BNON-REPAIRABLE
AREA
CROWN AREA
LT., TRUCK& AG. TIRES
PASSENGER TIRES
1 1/2”(40mm)
1 1/2”(40mm)
1”(25mm)
1”(25mm)
¼" (6mm) after damage removal. Steel body ply LT, medium and heavy truck tires have a maximum puncture repair size of 3/8" (10mm) after damage removal.
When repairing punctures in tires it is important to be aware of tire industry guidelines and recommendations. When repairing tires, puncture repairs are limited to the Crown (T-T) area of the tire. The maximum size is dependent upon the type of tire being repaired. Passenger and fabric body ply LT tires have a maximum puncture repair size of
PROPER TIRE REPAIR
There is no tire industry limit to the number of puncture repairs that may be performed in standard passenger, LT, medium or heavy truck tires. Multiple repairs may be performed so long as the injuries are far enough apart that the repair units will not overlap and they are offset so that the injuries are not damaging the same body plies in a radial tire. In a bias tire, the injuries must be limited to one per quadrant. When repairing high-performance tires with speed ratings of H or higher, or run-flat tires, Tech does place a limit of one repair on the tire.
IMPROPER TIRE REPAIR
• Removal of the tire from the rim so proper inspection may be performed • Removal of the damaged material with a carbide cutter
• Reinforce and seal the injury with a repair unit
• Buffing the inner liner to a #1 or #2 buffed texture • Fill the injury with a vulcanizing rubber stem (or rope rubber
• NEVER use a plug only or patch only repair
In order to perform a proper, permanent puncture repair on a tire, the following steps must always be used:
in a heat cure application)
VULCANIZING RUBBER STEM
TECH REPAIR UNITREPAIR UNIT SEALS & REINFORCES INNER LINER
VULCANIZING RUBBER STEM SEALS PREPARED INJURY
REPAIR UNIT
NO INJURY PREPARATIONNO VULCANIZING RUBBER STEM TO SEAL THE INJURY
REPAIRS MUST NOT OVERLAP!
REPAIRS MUST NOT BE IN THE
SAME BODY PLY!

1.800.433.TECH or 1.800.336.TECH9
ONE-PIECE REPAIR
Uni-Seal Ultra Tire Repair
TECH Uni-Seal Ultra and Uni-Seal Ultra Max repairs are one-piece patch/plug units designed for puncture repairs in the crown area of passenger, LT and truck tires. Uni-Seal Ultra repairs feature chemical cushion gum both on the repair base and stem, providing maximum adhesion in the injury and to the inner liner of the tire. Uni-Seal Ultras also feature a lead wire on the stem for easy installation of the repair unit. All TECH Uni-Seal Ultra and Uni-Seal Ultra Max can be installed in any radial or bias tire.
When using Uni-Seal Ultra repairs, it is important to identify the type of tire being worked on prior to installing the repair to ensure the proper repair unit is being installed. The 249UL may be used on passenger tires only, whereas the 250UL may be used in passenger, LT and medium truck tires. The 251UL, 290UL and 291UL may be used in steel cord LT and medium truck tires.
Another factor to consider when using Uni-Seal repairs is the angle of the injury. Industry standards state that the maximum angle for a one-piece repair is 25 degrees. TECH’s Uni-Seal Ultra repairs, however, have been proven with rigorous testing to be safe for angles up to 35 degrees. If these maximum angles are exceeded, it could cause adverse effects on the repair leading to premature repair failure. For this reason, it is recommended to utilize the two-piece repair method for injuries with extreme angles.
Failure to properly repair tire could cause SUDDEN TIRE FAILURE, RESULTING
IN SERIOUS INJURY OR DEATH. Carefully read and follow these instructions.
WARNING
ON
E-P
IEC
E T
IRE
PU
NC
TU
RE
RE
PA
IR

www.techtirerepairs.com 10
ONE-PIECE TIRE REPAIR LIMITATIONS
NOTE: THIS CHART SERVES ONLY AS A SUGGESTED GUIDELINE. INDUSTRY RECOMMENDED PRACTICES AND TIRE MANUFACTURER’S RECOMMENDATIONS SHOULD ALSO BE FOLLOWED.
Type of Tire Repair Unit Carbide Cutter
UL3 (249UL)
UL6 (250UL)
UL3 (249UL)
UL6 (250UL)
UL3 (249UL)
UL6 (250UL)
UL6 (250UL)
UL8 (251UL)
UL10 (291UL)
UL10N (290UL)
UL13 (292UL)
CC3 (269)
CC6 (270)
CC3 (269)
CC6 (270)
CC3 (269)
CC6 (270)
CC6 (270)
CC8 (271)
CC10 (271/38)
CC10 (271/38)
CC13 (272)
RUN FLAT TIRE
PERFORMANCETIRE RATED
H, V, W, Y OR Z
STANDARDPASSENGER & FABRIC CORD
LIGHT TRUCK TIRES
STEEL CORDLIGHT,
MEDIUM &HEAVY
TRUCK TIRE
Prepared CrownInjury Size
Ø
Number ofRepairs Per Tire
3mm (1/8”)
6mm (1/4”)
3mm (1/8”)
6mm (1/4”)
3mm (1/8”)
6mm (1/4”)
6mm (1/4”)
8mm (5/16”)
10mm (3/8”)
10mm (3/8”)
13mm (1/2”)
1
1
1
1
NO LIMIT
NO LIMIT
NO LIMIT
NO LIMIT
4
4
4
UNI-SEAL ULTRA REPAIR CHART®
Repairs mustnot overlapor be on the
same radial ply.
S T T S
A-BNON-REPAIRABLE
AREA
CROWN AREA
PASSENGER TIRES
1 1/2”(40mm)
1 1/2”(40mm)
1”(25mm)
1”(25mm)
Uni-Seal Ultra repairs are designed for use
in the Crown (T-T) area of the tire only.
35°35°
35° ANGLE MAXIMUM
LT., TRUCK& AG. TIRES
ON
E-P
IEC
E T
IRE
PU
NC
TU
RE
RE
PA
IR
sources of ignition.
· Failure to follow industry recommendations may result in premature tire failure.
performance, or run flat tires may differ. These policies supersede those of TECH.
Ultra repairs. Tech will not be responsible for any damages or losses, direct or indirect,
· Tire industry recommendations state all injuries must be filled with a rubber stem or
· Tire manufacturers’ warranties and policies regarding repair of radial passenger,
PLEASE READ BEFORE PERFORMING ANY TIRE REPAIR:
failure. This could result in serious injury or death.
· Protective eyewear must be worn while repairing tires.
· Chemicals used during the repair process are extremely flammable. Do not use near
· Failure to follow procedures in this manual will void Tech’s warranty relating to Uni-Seal ®
· Although a tire may be rated for high speed, TECH does not endorse the operation of
suitable vulcanizing material and a repair unit applied to the inner liner.
related to or associated with the failure to follow the instructions contained in this manual.
a motor vehicle in an unsafe or unlawful manner.
· Failure to follow the procedures shown in this manual may result in premature tire

1.800.433.TECH or 1.800.336.TECH11
ONE-PIECE REPAIR
Performance Tire Nail Hole Repair Kit
®FEATURING UNI-SEAL ULTRA
Tech 100 Locking Cabinet
ON
E-P
IEC
E T
IRE
PU
NC
TU
RE
RE
PA
IR
debris from entering the injury, which protects
®• Uni-Seal Ultra Repairs prevent moisture and
• Meets or exceeds tire manufacturers’
tires, speed rated tires, and standard passenger
the steel belts from corrosion
®• Uni-Seal Ultra Repairs passed the FMVSS 139
• TECH’s Performance Tire Repair Kit includes the
• Permanently seals inner liner
recommended practices
kit has all the necessary tools to repair run-flat
tire test created under the TREAD Act
tires
• One kit does it all! 898 Performance Tire repair
warranties, and also meets industry
RM-4 Uni-Seal Ultra How-To-Repair Manual®
ITEM NO. 898 KIT CONTAINS:
249UL Uni-Seal Ultras
250UL Uni-Seal Ultras
269 Carbide Cutter
270P Carbide Cutter
TRT105 Measuring Tool
704A Rub-O-Matic
738 Security Coat
760 Vulcanizing Fluid
S1032AC Low RPM Buffer
S1040 Adaptor
S1043 Adaptor
S1046 (2) Adaptors
S893 Texture Brush
RH140 Contour Wheel
910 Cement Tool
911 Allen Wrench
913 Slip Joint Pliers
915 Spiral Cement Tool
933 Rubber Scraper
936 Stitcher
951 Paint Sticks (12)
S923 Safety Glasses
TK Knife
RM-4 Repair Manual
111TM Repair Template

TECH TIP:
Insert the TRT105 measuring tool into the
injury from the inside of the tire. Apply firm
pressure to the handle while rotating the tool
in a circular motion. When the tool meets
resistance, find the closest visible line to the
inner liner. Refer to the illustration (right) to
determine the injury size.
Use UL3 (249UL) withCC3 (269) Cutter
Use UL6 (250UL) withCC6 (270) Cutter
Use UL8 (251UL) withCC8 (271) Cutter
Use UL10 (291UL) withCC10 (271/38) Cutter
Use UL13 (292UL) withCC13 (272) Cutter
www.techtirerepairs.com 12
Tire Inspection &Pre-Cleaning O
NE
-PIE
CE
TIR
E P
UN
CT
UR
E R
EP
AIR
Locate and mark all damage on the inside and outside of the tire while checking for separation.1.
2. Determine the size and angle of the injury using the
TRT105 injury measuring tool. If the angle exceeds 35
degrees, a two-piece repair must be used.
3. Pre-clean the inner liner with Rub-O-Matic Rubber
Cleaner #704 or #704A and a scraper 2 to 3 times to
remove contaminants.

TECH TIPS:
to a #1 or #2 buffed texture using a
maximizing adhesion.
· Tire industry puncture repair guidelines
state that the inner liner should be buffed
low speed air tool, maximum 5,000 rpm.
chance of trapped air while
· An even velvet texture minimizes the
1.800.433.TECH or 1.800.336.TECH13
ONE-PIECE REPAIR
InjuryPreparation
ON
E-P
IEC
E T
IRE
PU
NC
TU
RE
RE
PA
IR
4. Outline the area to be buffed 1/2” larger than the
repair or use the appropriate repair template.
5. Using a low speed buffer (maximum 5,000 rpm) and
an appropriate inner liner buffing wheel, buff the entire
outlined area to a #1 or #2 buffed texture.
6. Damaged rubber and steel should be removed from
the injury using a carbide cutter on a low speed
air/electric drill, maximum 1,200 rpm. Drill the injury
from the inside of the tire 3 to 5 times, followed by 3 to 5
times from the outside. In passenger tires, drilling the
injury can be done with a 2,500 rpm air buffer as long as
care is taken not to scorch the injury channel.
7. The injury should be inspected after drilling is
complete by flexing the tire and probing the injury with a
pointed awl to make sure all splits and loose material
have been removed.

www.techtirerepairs.com 14
ON
E-P
IEC
E T
IRE
PU
NC
TU
RE
RE
PA
IR
Cleaning &Cement Application
10. Apply a thin, even coat of Chemical Vulcanizing
Fluid #760 or Heavy Duty Blue Vulcanizing Fluid #775 to
the buffed surface.
11. Allow 3-5 minutes drying time for #760 or 5-8
minutes for #775. Additional drying time may be
necessary in adverse weather conditions. Vulcanizing
Fluid must be completely dry.
8. Use a soft wire brush on a low rpm buffer to remove
buffing debris. Do not apply excess pressure as this could
alter the buffed texture and reduce repair adhesion.
Remove all debris from the tire using a vacuum, being
careful not to contact and contaminate the buffed
surface.
9. Using a fluted cement tool for injuries 6mm (1/4”) or
smaller or a spiral cement tool for larger punctures,
apply Chemical Vulcanizing Fluid #760 or Heavy Duty
Blue Vulcanizing Fluid #775 to the injury 3 to 5 times.
TECH TIPS:
and oil will occur.· Do not use a compressed air line to clean the buffed area, as contamination from moisture
· When cleaning the tire, care should be taken to not let anything touch the buffed surface.
This will adversely affect the vulcanizing fluid and potentially lead to premature repair failure.
chemical vulcanizing fluid.
· Do not use any outside heat sources or open flame to shorten the drying time of vulcanizing fluid.
· Rub-O-Matic rubber cleaner can be used to remove buffing dust and debris if it is applied using a clean, lint-free cloth. 3 to 5 minutes of drying time should be allowed before applying

TECH TIP:
Tech Uni-Seal Stems are slightly larger than the prepared injury, resulting in a compression fit with excellent adhesion. Placing a small amount of vulcanizing fluid on the stem just before inserting it into the tire injury provides lubrication for easier installation.
1.800.433.TECH or 1.800.336.TECH15
ON
E-P
IEC
E T
IRE
PU
NC
TU
RE
RE
PA
IR
ONE-PIECE REPAIR
Repair Installation& Finishing
16. Press down the repair with your thumb from the
center out.
17. With the blue poly still positioned under the cap,
stitch the repair unit from the center out using firm
pressure.
14. Apply a small amount of vulcanizing fluid to the black
tapered portion of the stem. Relax the beads of the tire.
Insert the lead wire through the injury.
15. Grasp the wire with pliers and pull the stem
through the tire until the cap forms a slight indentation.
12. Remove the blue poly from the stem by pulling and
twisting the repair as shown.
13. Reposition the poly on the cap to prevent
contamination of the gray gum and allow easier removal
of trapped air during installation.

www.techtirerepairs.com 16
ON
E-P
IEC
E T
IRE
PU
NC
TU
RE
RE
PA
IR
TECH TIP:
TECH Security Coat #738 and Butyl Liner Repair Sealer #739
are designed to replace the inner liner that was removed
during the buffing process and promote better air retention.
18. Remove the poly from the cap, press down the sides
and continue stitching toward the edges of the repair.
Stitch with firm pressure in the opposite direction to
ensure air is removed.
19. Remove the clear protective poly from the top of
the repair.
20. Seal the edge of the repair and the over buffed area
of the inner liner with Tech Security Coat #738 or Butyl
Liner Repair Sealer #739.
21. With the stem relaxed, cut off the excess 1/8” (3mm)
above the tread surface.
22. The tire is ready to return to service.

TWO-PIECE REPAIR
Tech Two-PieceRepair System
The TECH Two-Piece Repair System is designed to produce a safe, permanent repair for passenger, LT and medium truck tires. A proper two-piece repair consists of a vulcanizing rubber stem or rope rubber to fill and permanently seal the injury channel, in conjunction with a separate repair unit which reinforces the tire and seals the inner liner. This repair system meets all tire industry guidelines for proper puncture repairs.
The TECH Two-Piece Repair System is widely used throughout the tire industry due to its reliability and versatility. One-piece patch/plug repairs like the TECH Uni-Seal Ultras are limited to a maximum angle, but a two-piece repair does not have this same restriction. The angle of the injury alone will not preclude a technician from using a two-piece repair. Another aspect of the two-piece method is the variety of types of repair units and filler materials that are available to fit your shop’s needs. When filling the injury, the technician may utilize TECH’s Uni-Seal Ultra Stems, such as the 250-1UL, 251-1UL or 291-1UL; TECH Permacure repairs such as the 220, 222, or 224; or TECH Flow-Seal repairs such as the 204, 206, 208 or 209. When reinforcing the tire on the inside, the technician may use TECH’s Centech repair units for radial tires only, BP repairs for bias tires only, or TECH’s All-Purpose and Multi-Purpose repairs which may be used for either type of tire. The two-piece method can also be adapted to fit any heat cure system, such as retreading with the use of TECH Thermacure repairs. With all of these options, there will be a solution for any needs your shop has for two-piece puncture repairs.
Failure to properly repair tire could cause SUDDEN TIRE FAILURE, RESULTING
IN SERIOUS INJURY OR DEATH. Carefully read and follow these instructions.
WARNING
1.800.433.TECH or 1.800.336.TECH17
TW
O-P
IEC
E T
IRE
PU
NC
TU
RE
RE
PA
IR

suitable vulcanizing material and a repair unit applied to the inner liner.
· Tire manufacturers’ warranties and policies regarding repair of radial passenger,
PLEASE READ BEFORE PERFORMING ANY TIRE REPAIR:
failure. This could result in serious injury or death.
· Failure to follow procedures in this manual will void TECH’s warranty. TECH will not be
· Protective eyewear must be worn while repairing tires.
· Tire industry recommendations state all injuries must be filled with a rubber stem or
· Failure to follow industry recommendations may result in premature tire failure.
performance, or run flat tires may differ. These policies supersede those of TECH.
· Although a tire may be rated for high speed, TECH does not endorse the operation of a motor vehicle in an unsafe or unlawful manner.
· Chemicals used during the repair process are extremely flammable. Do not use near sources of ignition.
· Failure to follow the procedures shown in this manual may result in premature tire
responsible for any damages or losses, direct or indirect, related to or associated with the failure to follow the instructions contained in this manual.
TWO-PIECE TIRE REPAIR LIMITATIONS
All injuries larger than those defined in the chart, or outside the specified
T-T area for passenger tires or S-S area for Truck tires,
must be treated as a section repair.
S T T S
NON-REPAIRABLEAREA
CROWN AREA
SHOULDER(S-T) Shoulder Area is
1” (25mm) for Passenger, 1.5” (40mm) for Truck Tires
www.techtirerepairs.com 18
TW
O-P
IEC
E T
IRE
PU
NC
TU
RE
RE
PA
IR
ULS10 (291-1UL)
Type of Tire Prepared Injury Size
Crown AreaRepair Unit
Uni-Seal UltraStem Carbide Cutter Shoulder Area
Repair Unit
6mm (1/4”)Passenger Tires T Rated or Below & LT Tires Through Load Range D
CT-10 or 111CC6 (270)ULS6 (250-1UL) CT-12HD
6mm (1/4”)1 Per Tire
H, V, W, Y, or Z Rated Performance Tires
CT-10 or 111CC6 (270)ULS6 (250-1UL) –
Run FlatTires
6mm (1/4”)1 Per Tire CT-10 or 111CC6 (270)ULS6 (250-1UL) –
6mm (1/4”)
8mm (5/16”)
10mm (3/8”)
Light Truck Tires Load Range E& Above
CT-10 or 111
CT-12 or 111
CT-20 or 112
CC6 (270)
CC8 (271)
CC10 (271/38)
ULS6 (250-1UL)
ULS8 (251-1UL)
ULS10 (291-1UL)
CT-22
CT-22
CT-24
6mm (1/4”)
8mm (5/16”)
10mm (3/8”)
Truck Tires CT-10HD or 111
CT-12HD or 111
CT-20 or 112
CC6 (270)
CC8 (271)
CC10 (271/38)
ULS6 (250-1UL)
ULS8 (251-1UL)
CT-24
CT-24
CT-26
REPAIRS MUST NOT OVERLAP!
REPAIRS MUST NOT
BE IN THE SAME BODY PLY!

Radial TruckPuncture Repair Kit
1.800.433.TECH or 1.800.336.TECH19
TWO-PIECE REPAIR
TW
O-P
IEC
E T
IRE
PU
NC
TU
RE
RE
PA
IR
! Contains enough repair materials to properly repair 40 radial punctures without restocking
! Comes fully assembled and ready to use
! Sturdy lockable case for security and convenience
! Transportable for ease of use while doing field repairs
Uni-Seal Stems
n 1 – 704A Rub-O-Matic
CUTTERS & ADAPTORS
n 1 – CC8 (271) 8mm (5/16”) Carbide Cutter
n 1 Box – 166 (CT-12HD) Radial Repairs
n 1 Box – 170 (CT-20) Radial Repairs
n 1 Box – ULS8 (251-1UL) 8mm (5/16”)
CHEMICALS
n 1 – 738 Security Coat
n 1 – 760 Chemical Vulcanizing Fluid
n 1 – CC10 (271/38) 10mm (3/8”) Carbide Cutter
n 1 – S1041/38 Quick Change Adaptor
n 2 – S1046 Quick Change Adaptor
n 1 Box – ULS10 (291-1UL) 10mm (3/8”)
n 1 – S1041 Quick Change Adaptor
Uni-Seal Stems
REPAIRSTOOLS AND ACCESSORIES
n 1 – 896BOX Tool Storage Box
n 1 – 911 Allen Wrench for Quick Change Adaptors
n 1 – S1032AC Air Buffer 2,600 RPM
n 1 – S892 Texture Brush 3” (75mm)
n 1 – 170TM Repair Template
n 1 – RM-5 Repair Manual
n 1 – TRT105 Injury Measuring Tool
n 1 – 919 Pointed Awl
n 1 – 936 1/8” (3mm) Stitcher
n 1 – 933 Rubber Scraper
n 1 – 913 8” (200mm) Slip Joint Pliers
n 1 – 940 X2T Taper Point Skiver Knife
n 1 – RH102 Rubberhog Flared Buffing Wheel
n 1 – S923 Safety Glasses
n 1 – MSDS Sheets
n 1 – 912 Allen Wrench for Air Tool
n 1 – S1035 Air Drill 500 RPM
n 1 – 915 Spiral Cement Tool
n 1 – 951 Hex White Paint Sticks (12 count)
ITEM NO. 896 KIT CONTAINS:

TECH TIP:Insert the TRT105 measuring tool into the injury from
the inside of the tire. Apply firm pressure to the handle
while rotating the tool in a circular motion. When the
tool meets resistance, find the closest visible line to the
inner liner. Refer to the illustration (right) to determine
the injury size.
www.techtirerepairs.com 20
Tire Inspection &Pre-Cleaning
Use ULS6 (250-1UL) with
CC6 (270) Cutter
Use ULS6 (250-1UL) with
CC6 (270) Cutter
Use ULS8 (251-1UL) with
CC8 (271) Cutter
Use ULS10 (291-1UL) with
CC10 (271/38) Cutter
Use 252-1 with
CC13 (272) Cutter
WARNINGAll Passenger, Light Truck, Medium Truck and Heavy Truck Tires must
be removed from the rim and inspected before any repair is made!
TW
O-P
IEC
E T
IRE
PU
NC
TU
RE
RE
PA
IR
1. Locate and mark all damage on the inside and outside of the tire while checking for separation.
2. Determine the size and angle of the injury using the TRT105 injury measuring tool.
3. Pre-clean the inner liner with Rub-O-Matic Rubber Cleaner #704 or #704A and a scraper 2 to 3 times to remove contaminants. This will promote better repair unit adhesion and prolong the life of buffing wheels by preventing buildup of contaminants.
1.800.433.TECH or 1.800.336.TECH21
TWO-PIECE REPAIR
Injury Preparation & Filling
TW
O-P
IEC
E T
IRE
PU
NC
TU
RE
RE
PA
IR
4. Damaged rubber and steel should be removed from the injury using a carbide cutter on a low speed air/electric drill, maximum 1,200 rpm. Drill the injury from the inside of the tire, following the angle of the injury. Repeat this procedure 3 to 5 times, completely removing the cutter from the injury after each pass. Repeat this process from the outside of the tire.
5. The injury should be inspected after drilling is complete by flexing the tire and probing the injury with a pointed awl to make sure all splits and loose material have been removed. If additional damage is detected, use a larger carbide cutter to remove the remaining damage. If the damage is beyond puncture repair limitations at this point, refer the tire to a full service repair facility for a section repair or scrap the tire.
6. Using the spiral cement tool in a clockwise direction, apply Chemical Vulcanizing Fluid #760 or Heavy Duty Blue Vulcanizing Fluid #775 into the injury 3 to 5 times.
7. Remove the protective poly from the stem.
8. Apply a small amount of Chemical Vulcanizing Fluid to the black tapered portion of the stem.
9. Insert the lead wire through the injury. Grasp the wire on the outside of the tire with pliers. Pull the stem through the tire until approximately 1/8” (3mm) of the stem remains above the inner liner.
Ensure the Carbide Cutter
being used is in good condition.
Using a worn out Carbide Cutter could
lead to incomplete damage removal,
which could lead to injury growth or
difficulty installing Uni-Seal Ultra
repairs and stems.
TECH Uni-Seal Stems are
slightly larger than the prepared injury,
resulting in a compression fit with excellent
adhesion. Placing a small amount of
vulcanizing fluid on the stem just before
inserting it into the tire injury provides
lubrication for easier installation.

TW
O-P
IEC
E T
IRE
PU
NC
TU
RE
RE
PA
IR
www.techtirerepairs.com 22
Repair Installation& Finishing
TECH TIPS:
· Rub-O-Matic rubber cleaner can be used to remove buffing dust and debris if it is applied using a clean, lint-free cloth. · When cleaning the tire, care should be taken to not let anything touch the buffed surface.
3 to 5 minutes of drying time should be allowed before applying chemical vulcanizing fluid.
· Do not use a compressed air line to clean the buffed area, as contamination from moisture and oil will occur.
· Do not use any outside heat sources or open flame to shorten the drying time of chemical vulcanizing fluid. This will adversely affect the vulcanizing fluid and potentially lead to premature repair failure.
14. Bend the repair back and push up on the edges of the repair with your fingers to break the perforation on the protective poly on the back of the repair. Partially remove the poly, exposing the middle portion of the repair.
15. Relax the beads of the tire. Center the repair unit over the filled injury. Press down the center of the repair unit with your thumb. (If the repair is a Centech or BP repair unit, be sure to align the bead arrows with the beads of the tire.)
10. Outline the area to be buffed 1/2” (13mm) larger than the repair being used, or use the appropriate repair template.
11. Using a low speed buffer (maximum 5,000 rpm) and an appropriate inner liner wheel, buff the stem flush to the inner liner. Buff the entire outlined area on the inner liner to a #1 or #2 texture.
12. Use a soft wire brush on a low speed buffer to remove buffing dust and debris from the buffed area. Avoid applying excessive pressure, as this could remove texture and reduce adhesion of the repair unit to the tire. Remove the debris from the tire using a vacuum.
13. Apply a thin, even coat of Chemical Vulcanizing Fluid #760 or Heavy Duty Blue Vulcanizing Fluid #775 to the buffed surface. Allow 3-5 minutes drying time for #760 or 5-8 minutes for #775. Additional drying time may be required in adverse weather conditions.
Tire industry guidelines state
that the inner liner should be buffed
to a #1 or #2 buffed texture using a low
speed air tool, maximum 5,000 rpm.
An even velvet texture minimizes the
chance of trapped air while
maximizing adhesion.

TW
O-P
IEC
E T
IRE
PU
NC
TU
RE
RE
PA
IR
1.800.433.TECH or 1.800.336.TECH23
TWO-PIECE REPAIR
Repair Installation& Finishing
TECH TIP:
TECH Security Coat #738 and Butyl Liner Repair Sealer #739
are designed to replace the inner liner that was removed
during the buffing process and promote better air retention.
20. With the stem relaxed, cut off the excess, leaving 1/8” (3mm) remaining above the tread surface.
21. The tire is now ready to return to service.
16. With the blue poly still positioned under the repair unit, stitch the repair unit from the center out, using firm pressure.
17. Remove the poly from under the repair unit, press down the edges of the repair and continue stitching toward the edges of the repair.
18. Remove the clear protective poly from the top of the repair.
19. Seal the edge of the repair and the over buffed area of the inner liner with Tech Security Coat #738 or Butyl Liner Repair Sealer #739.

P.O. Box 486, Johnstown, Ohio 43031-0486, USA
PHONE: 740-967-9015 FAX: 740-967-1039 1-800-433-TECH or 1-800-336-TECH
www.techtirerepairs.com
© Copyright 2019, TECH Printed in USA Revised 9/19 828W
Johnstown, Ohio
Turnhout, Belgium Rovereto, Italy
Shanghai, China
Tokyo, Japan
Sao Paulo, Brazil
TECH distributes our products to more than 95 countries.
World-Renowned Tire & Wheel Service Solutions
Bangkok, Thailand
Belfast, Ireland