pwc port — cleat pwc drive on instructions - dandy … drive on instructions should you have a...
TRANSCRIPT

PWC Drive on Instructions
Should you have a warranty claim, we may require that you provide a photograph or, in some cases, return theDandy Dock / 2XL part to the place of purchase. In order for warranty to be valid, original sales receipt mustaccompany warranty claim. NOTE: Shipping costs are not included in warranty.
NOTE: All plastic has an inherent tendency to create static electricity. If you have a concern, contact Dandy Dock.
1-800-825-7719 (toll free U.S.A. only) 1-712-243-24301501 Owner Avenue, Atlantic, IA 50022 USA
Please call us with your questions and comments
Dandy Dock® / 2XL Warranty — USA & CanadaDandy Dock Inc. warrants to the original owner all polyethylene plasticcomponents for five (5) years from date of purchase to be free of defects inmaterial and workmanship. For a copy of the Dandy Dock / 2XL complete warrantycall Dandy Dock / 2XL.
www.dandydocks.com
4-2230 04/17/17
®
Dandy Dock®/ 2XL Warranty — InternationalDandy Dock Inc. warrants to the original owner all polyethylene plasticcomponents for two (2) years [one (1) year for commercial use] from date ofpurchase to be free of defects in material and workmanship. All other accessorieshave a one (1) year limited warranty. For a copy of the Dandy Dock / 2XL completewarranty call Dandy Dock / 2XL.
PWC Port — CleatThe purpose of the cleat is to provide an area on the PWC Port to temporarily tieoff another PWC, tie down a cover or other similar light duty tasks. The cleat is not designed to anchor the PWC Port or to tie two units together.If two units are to be tied/attached together there is a Side-by-Side Kit designedfor that specific purpose. In addition, there are various anchoring options availableso the cleat should never be used for this purpose.
2XL2XL
2XL2XL
2XL2XL


1501 Owner Avenue, Atlantic, IA 50022 USA10/04/12
1-800-825-7719www.dandydocks.com
1501 Owner Avenue, Atlantic, IA 50022 USA10/04/12
1-800-825-7719www.dandydocks.com
Table of Contents
Dandy Dock® - Dandy Dock 2XL™
Fixed Dock AttachmentFloating Dock AttachmentSide by Side Connecting KitSide by Side Connecting Kit for Dandy Dock 2XLDandy Dock 2XL Keel Roller Replacment2000 Series Attachment2000 Series Offset AttachmentWinch
................................................................................1............................................................................2
..........................................................................3..............................................4
........................................................5.................................................................................6
........................................................................7........................................................................................................10
Table of Contents
Some products in this instruction book are protected by one or more of the following patents.USA patents: 6,073,572; 5,281,055; 7,481,175; and 6,179,525 B1Canadian patents: 2,308,617; 2,328,022
Some products in this instruction book are protected by one or more of the following patents.USA patents: 6,073,572; 5,281,055; 7,481,175; and 6,179,525 B1Canadian patents: 2,308,617; 2,328,022

Fixed Dock Attachment 1-800-825-7719www.dandydocks.com
Instructions for: Fixed Dock Attachment Kit (4-2118)
1
2
1-800-825-7719www.dandydocks.com
Fixed Dock Attachment
(a)
(b)
4
Instructions for: Fixed Dock Attachment Kit (4-2118)
1
2
(a)
(b)
4
1501 Owner Avenue, Atlantic, IA 50022 USA08/14/12
1501 Owner Avenue, Atlantic, IA 50022 USA08/14/12
Step 1Install roller closest to the Roller Bracket. Secure with the washers and cotter pins.
Tools Needed(1) 3/4” Wrench(2) 9/16” WrenchesNot available in metricNeeded Itemspipe size 2” sch 40 pipe or maxdia of 2.375” (50 Dn mm sch 40)
Step 2Determine location of port installation (front or side). Attach the two Roller Brackets to the front or side of the port. Use the 1/2” (13 mm) bolts and lock washers (25ft/lbs)(3.46 kg/m).
Step 4(a)Float port up to pipe and install front rollers. (b)Leave cotter pins and washers off when inserting roller axle into the roller. Next secure roller with cotter pins and washers.
Step 3On a fixed dock it is recommended to get a pipe long enough to drive into the ground, in some cases this is all that is needed to hold the port in place. If you have a very secure fixed dock you can mount the pipe to the dock but if the dock is not of the best integrity it is not recommended because it will work the dock loose if you are in a high wake area. It is recommended that you drive the pipe in the ground and mount it to a fixed dock if applicable. Note: pipe size 2” sch 40 pipe or max dia of 2.375”. (50 Dn mm sch 40) Roller Bracket on center 4’ (1.2192 m) front & 6’ (1.8288 m)side.
1

Floating Dock Attachment 1-800-825-7719www.dandydocks.com 1-800-825-7719www.dandydocks.com
Floating Dock Attachment
1501 Owner Avenue, Atlantic, IA 50022 USA08/14/12
1501 Owner Avenue, Atlantic, IA 50022 USA08/14/12
Instructions for: Floating Dock (4-2219)
1
2
3
Step 1Center Pivot Pin in Small Hinge Bracket and drill thru the Pivot Pin with 1/4” (6.5 mm).
Tools Needed(1) Drill - 1/4” (6.5 mm) & 7/16“(11 mm) drill bit(1) 3/4” (18 mm) Wrench(2) 9/16” Wrenches
Step 2Attach the two Small Hinge Brackets to the front of the port. Turn the hinge part up or down depending on how high your dock is off the water. Use the 1/2” (12 mm) bolt and lock washer (25ft/lbs)(3.46 kg/m)Step 3(a) Attach one Large Hinge Bracket with Pivot Pin to the Small Hinge Bracket. Then algin the Large Hinge Bracket with dock to determine bolt hole location. If you are on a very high dock there is an extension plate available to accommodate your situation. You may want to put your PWC on the port at this time to see how it makes the float set in the water, if the entrance end of the port is high with the craft on it you will want to raise the front of the port to give is a slight down hill appearance for easy roll off. Remember, if it rolls off to hard the mount is too low, rolls off too easy you are too high.(b) Mark holes. Drill with 7/16” (11 mm) bit. 3/8” (9 mm) bolts, washers and lock washer not supplied. Recommended 4 to 6 mounting holes. Mount the Large Port Bracket to the dock and attach port hinge and secure with Pivot Pin. Repeat on next bracket.
Step 4(a)Algin hinge point of port and dock. (b) Insert Pivot Pin with the 1/4” 6.5 mm) hole up. (c) Secure Pivot Pin with cotter pin.
Note: If mouting port to wooden floating dock use 3/8” (9 mm) Lag Bolts (screw based)
(a)
(b)
Port
4(a)
(b)
(c)
Not available in metric Not available in metric
2
Side by Side Attachment 1-800-825-7719www.dandydocks.com
Instructions for: Side by Side Kit (4-2150)
1-800-825-7719www.dandydocks.com
Side by Side Attachment
Instructions for: Side by Side Kit (4-2150)
1501 Owner Avenue, Atlantic, IA 50022 USA08/14/12
1501 Owner Avenue, Atlantic, IA 50022 USA08/14/12
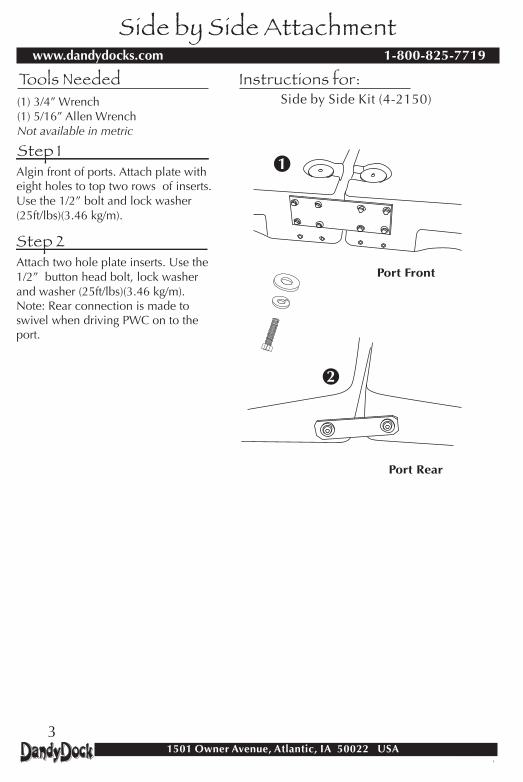
1Step 1Algin front of ports. Attach plate with eight holes to top two rows of inserts. Use the 1/2” bolt and lock washer (25ft/lbs)(3.46 kg/m).
Tools Needed(1) 3/4” Wrench(1) 5/16” Allen WrenchNot available in metric
Step 2Attach two hole plate inserts. Use the 1/2” button head bolt, lock washer and washer (25ft/lbs)(3.46 kg/m).Note: Rear connection is made to swivel when driving PWC on to the port.
Port Front
2
Port Rear
3

1501 Owner Avenue, Atlantic, IA 50022 USA10/04/12
1501 Owner Avenue, Atlantic, IA 50022 USA10/04/12
1Step 1Algin front of ports. Attach plate with eight holes to top two rows of inserts. Use the 1/2” bolt and lock washer (25ft/lbs)(3.46 kg/m).
Tools Needed(1) 3/4” Wrench(2) 9/16“ Wrenches(1) 5/16” Allen WrenchNot available in metric
Step 2Insert Orange Side by Side Strap around port handles (Middle & Port Entrance)
Step 3Insert 3/8” bolt with washer into Orange Side By Side Strap and secure with washer and Nylon Nut.
Port Front
2XL Side by Side
2Port Handles
3
4
1501 Owner Avenue, Atlantic, IA 50022 USA10/04/12
1501 Owner Avenue, Atlantic, IA 50022 USA10/04/12
1
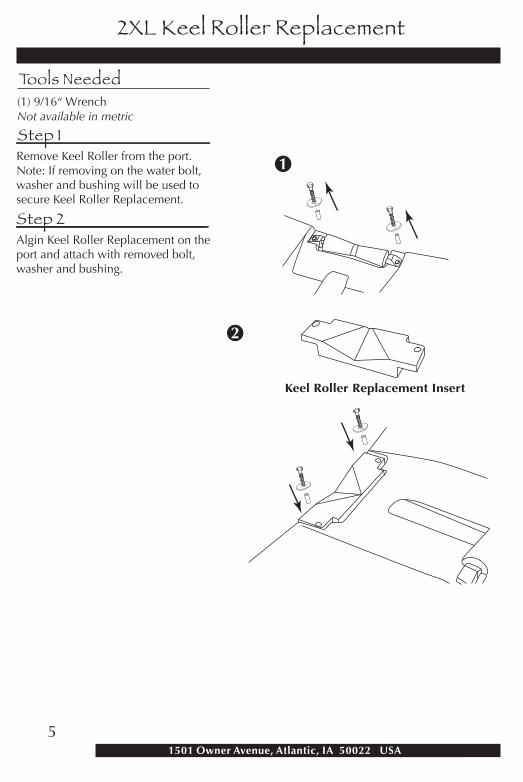
Step 1Remove Keel Roller from the port. Note: If removing on the water bolt, washer and bushing will be used to secure Keel Roller Replacement.
Tools Needed(1) 9/16“ WrenchNot available in metric
Step 2Algin Keel Roller Replacement on the port and attach with removed bolt, washer and bushing.
Keel Roller Replacement Insert
2XL Keel Roller Replacement
2
1
Step 1Remove Keel Roller from the port. Note: If removing on the water bolt, washer and bushing will be used to secure Keel Roller Replacement.
Tools Needed(1) 9/16“ WrenchNot available in metric
Step 2Algin Keel Roller Replacement on the port and attach with removed bolt, washer and bushing.
Keel Roller Replacement Insert
2XL Keel Roller Replacement
2
5

Connect-A-Dock 2000 Series Attachment1-877-742-3071www.dandydocks.com
Instructions for: 2000 Series Attachment Kit
2
3
1-800-825-7719www.dandydocks.com
Connect-A-Dock 2000 Series Attachment
1
(a)
4
(b)
Instructions for: 2000 Series Attachment Kit
2
3
1
(a)
4
(b)
1501 Owner Avenue, Atlantic, IA 50022 USA04/17/17
1501 Owner Avenue, Atlantic, IA 50022 USA04/17/17
Step 2Install roller closest to the Roller Bracket. Secure with the washers and cotter pins.
Step 1Determine port location (Front or Side). Insert Metal Pole Connectors into float section connector slots. Tighten all bolts in the dock using25 lbs/ft (3.46 kg/m) of torque.
Tools Needed(1) 3/4” Wrench(2) 9/16” WrenchesNot available in metric
Step 3Attach the two Roller Brackets to the front or side of the port. Use the 1/2” bolts and lock washers (25ft/lbs)(3.46 kg/m).
Step 4(a)Float port up to Roller Pole Connectors. (b)Install front rollers. Leave cotter pins and washers off when inserting roller axle into the roller. Next secure roller with cotter pins and washers.
6

Connect-A-Dock 2000 Series Offset 1-800-825-7719www.dandydocks.com
Instructions for: 2000 Series Offset Attachment Kit (4-2209)
3
Step 7Determine port location to the dock, insert Metal Pole Connectors into float section connector slots. As in Step 1. Tighten all bolts in the dock using 25 lbs/ft (3.46 kg/m) of torque.
Step 10If connecting more then two ports side by side continue to Step 11.
Step 8(a)Attach Offset Roller Bracket to port with bolts, washers and lock washers - hand tight. (b)Algin Offset Roller Bracket around Metal Pole Connector. (c) Center the roller on the Metal Pole Connector and tighten the bolts. Tighten all bolts in the dock using 25 lbs/ft (3.46 kg/m) of torque.
Step 9Follow Step 4 (b) to attach second roller.
1-800-825-7719www.dandydocks.com
Connect-A-Dock 2000 Series Offset
2 1
8
(a)
(a)
(b)
(c)
port
Roller BracketRight-Offset
Roller Bracket
Dock
4
6
(b)
1501 Owner Avenue, Atlantic, IA 50022 USA08/14/12
1501 Owner Avenue, Atlantic, IA 50022 USA08/14/12
Step 2Install roller closest to the Roller Bracket. Secure with the washers and cotter pins.
Step 6Install roller closest to the Roller Offset Bracket. Secure with the washers and cotter pins.
Step 1Determine port location. Insert Metal Pole Connectors into float section connector slots. Tighten all bolts in the dock using 25 lbs/ft (3.46 kg/m) of torque.
Tools Needed(1) 3/4” Wrench(2) 9/16” WrenchesNot available in metric
Step 3Attach the two Roller Brackets to the front or side of the port. Use the 1/2” bolts and lock washers (25ft/lbs)(3.46 kg/m).
Step 4(a)Float port up to Roller Pole Connectors. (b)Install front rollers. Leave cotter pins and washers off when inserting roller axle into the roller. Next secure roller with cotter pins and washers.
Step 5Follow the Side by Side Bracket instructions and connect all ports together.
7

Connect-A-Dock 2000 Series Offset 1-800-825-7719www.dandydocks.com
Instructions for: 2000 Series Offset Attachment Kit (4-2209)
3
Step 7Determine port location to the dock, insert Metal Pole Connectors into float section connector slots. As in Step 1. Tighten all bolts in the dock using 25 lbs/ft (3.46 kg/m) of torque.
Step 10If connecting more then two ports side by side continue to Step 11.
Step 8(a)Attach Offset Roller Bracket to port with bolts, washers and lock washers - hand tight. (b)Algin Offset Roller Bracket around Metal Pole Connector. (c) Center the roller on the Metal Pole Connector and tighten the bolts. Tighten all bolts in the dock using 25 lbs/ft (3.46 kg/m) of torque.
Step 9Follow Step 4 (b) to attach second roller.
1-800-825-7719www.dandydocks.com
Connect-A-Dock 2000 Series Offset
2 1
8
(a)
(a)
(b)
(c)
port
Roller BracketRight-Offset
Roller Bracket
Dock
4
6
(b)
1501 Owner Avenue, Atlantic, IA 50022 USA08/14/12
1501 Owner Avenue, Atlantic, IA 50022 USA08/14/12
Step 2Install roller closest to the Roller Bracket. Secure with the washers and cotter pins.
Step 6Install roller closest to the Roller Offset Bracket. Secure with the washers and cotter pins.
Step 1Determine port location. Insert Metal Pole Connectors into float section connector slots. Tighten all bolts in the dock using 25 lbs/ft (3.46 kg/m) of torque.
Tools Needed(1) 3/4” Wrench(2) 9/16” WrenchesNot available in metric
Step 3Attach the two Roller Brackets to the front or side of the port. Use the 1/2” bolts and lock washers (25ft/lbs)(3.46 kg/m).
Step 4(a)Float port up to Roller Pole Connectors. (b)Install front rollers. Leave cotter pins and washers off when inserting roller axle into the roller. Next secure roller with cotter pins and washers.
Step 5Follow the Side by Side Bracket instructions and connect all ports together.
8

11
13
Connect-A-Dock 2000 Series Offset 1-800-825-7719www.dandydocks.com
Instructions for: 2000 Series Offset Attachment Kit (4-2209)
Tools Needed(1) 3/4” Wrench(2) 9/16” Wrenches
Step 11Locate a center float section connector slot, between the Roller Bracket & Offset Roller Bracket connects. Follow Step 1 to attach Metal Pole Connector.
Step 12Follow Step 6 to install roller on to Offset Roller Bracket.
1-800-825-7719www.dandydocks.com
Connect-A-Dock 2000 Series Offset
(a)
RollerBracket
Right-OffsetRoller Bracket
Left-OffsetRoller Bracket
Front Side bySide Bracket
Port
Dock
Left-OffsetRoller Bracket
Step 13(a) The Offset Roller Bracket will be bolted on top of the Side by Side Front Bracket. Test the alginment of the Offset Roller Bracket to the Metal Pole Connector to see which bolts will need to be removed from the Side by Side Front Bracket. (b)Remove bolts and attach the Offset Roller Bracket. (c) Center Offset Roller Bracket on the Metal Pole Connector and tighten the bolts. Tighten all bolts in the dock using 25 lbs/ft (3.46 kg/m) of torque.
(a) (b) (b)
(c)
1501 Owner Avenue, Atlantic, IA 50022 USA08/14/12
1501 Owner Avenue, Atlantic, IA 50022 USA08/14/12
9
Dandy Dock Winch 1-800-825-7719www.dandydocks.com
Instructions for: Winch (4-2153)
3
1-800-825-7719www.dandydocks.com
Dandy Dock Winch
1(a)
(b)
(c)
2(a)
Strap
(b)
(c)
Instructions for: Winch (4-2153)
3
1(a)
(b)
(c)
2(a)
Strap
(b)
(c)
1501 Owner Avenue, Atlantic, IA 50022 USA08/14/12
1501 Owner Avenue, Atlantic, IA 50022 USA08/14/12
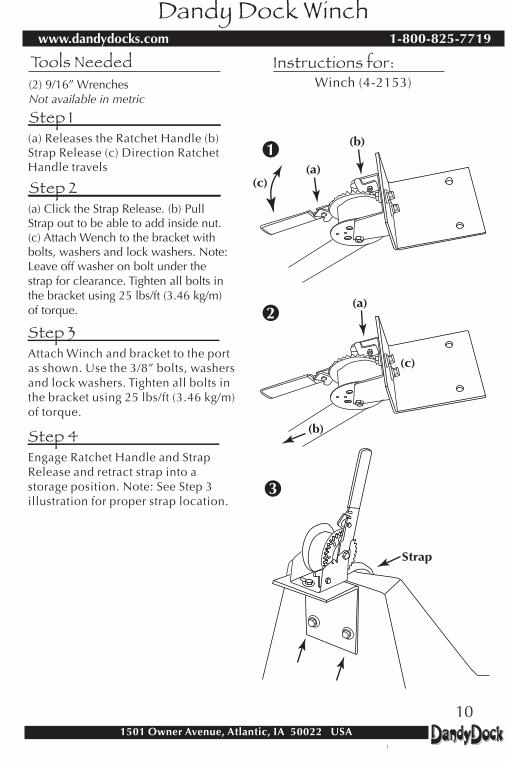
Step 2(a) Click the Strap Release. (b) Pull Strap out to be able to add inside nut. (c) Attach Wench to the bracket with bolts, washers and lock washers. Note: Leave off washer on bolt under the strap for clearance. Tighten all bolts in the bracket using 25 lbs/ft (3.46 kg/m) of torque.
Step 1(a) Releases the Ratchet Handle (b) Strap Release (c) Direction Ratchet Handle travels
Tools Needed(2) 9/16” WrenchesNot available in metric
Step 3Attach Winch and bracket to the port as shown. Use the 3/8” bolts, washers and lock washers. Tighten all bolts in the bracket using 25 lbs/ft (3.46 kg/m) of torque.
Step 4Engage Ratchet Handle and Strap Release and retract strap into a storage position. Note: See Step 3 illustration for proper strap location.
10


PWC Drive on Instructions
Should you have a warranty claim, we may require that you provide a photograph or, in some cases, return theDandy Dock / 2XL part to the place of purchase. In order for warranty to be valid, original sales receipt mustaccompany warranty claim. NOTE: Shipping costs are not included in warranty.
NOTE: All plastic has an inherent tendency to create static electricity. If you have a concern, contact Dandy Dock.
1-800-825-7719 (toll free U.S.A. only) 1-712-243-24301501 Owner Avenue, Atlantic, IA 50022 USA
Please call us with your questions and comments
Dandy Dock® / 2XL Warranty — USA & CanadaDandy Dock Inc. warrants to the original owner all polyethylene plasticcomponents for five (5) years from date of purchase to be free of defects inmaterial and workmanship. For a copy of the Dandy Dock / 2XL complete warrantycall Dandy Dock / 2XL.
www.dandydocks.com
4-2230 04/17/17
®
Dandy Dock®/ 2XL Warranty — InternationalDandy Dock Inc. warrants to the original owner all polyethylene plasticcomponents for two (2) years [one (1) year for commercial use] from date ofpurchase to be free of defects in material and workmanship. All other accessorieshave a one (1) year limited warranty. For a copy of the Dandy Dock / 2XL completewarranty call Dandy Dock / 2XL.
PWC Port — CleatThe purpose of the cleat is to provide an area on the PWC Port to temporarily tieoff another PWC, tie down a cover or other similar light duty tasks. The cleat is not designed to anchor the PWC Port or to tie two units together.If two units are to be tied/attached together there is a Side-by-Side Kit designedfor that specific purpose. In addition, there are various anchoring options availableso the cleat should never be used for this purpose.
2XL2XL
2XL2XL
2XL2XL