python for android
DESCRIPTION
Python for AndroidTRANSCRIPT

Python for Android DocumentationRelease 1.2
Mathieu Virbel
October 06, 2014


Contents
1 Toolchain 31.1 Introduction . . . . . . . . . . . . . . . . . . . . . . . . . . . . . . . . . . . . . . . . . . . . . . . 31.2 How does it work ? . . . . . . . . . . . . . . . . . . . . . . . . . . . . . . . . . . . . . . . . . . . . 31.3 Prerequisites . . . . . . . . . . . . . . . . . . . . . . . . . . . . . . . . . . . . . . . . . . . . . . . 31.4 Usage . . . . . . . . . . . . . . . . . . . . . . . . . . . . . . . . . . . . . . . . . . . . . . . . . . . 51.5 Meta-data . . . . . . . . . . . . . . . . . . . . . . . . . . . . . . . . . . . . . . . . . . . . . . . . . 71.6 Customize your distribution . . . . . . . . . . . . . . . . . . . . . . . . . . . . . . . . . . . . . . . 7
2 Examples 132.1 Prebuilt VirtualBox . . . . . . . . . . . . . . . . . . . . . . . . . . . . . . . . . . . . . . . . . . . . 132.2 Hello world . . . . . . . . . . . . . . . . . . . . . . . . . . . . . . . . . . . . . . . . . . . . . . . . 132.3 Compass . . . . . . . . . . . . . . . . . . . . . . . . . . . . . . . . . . . . . . . . . . . . . . . . . 14
3 Python API 193.1 Android (android) . . . . . . . . . . . . . . . . . . . . . . . . . . . . . . . . . . . . . . . . . . . 193.2 Activity (android.activity) . . . . . . . . . . . . . . . . . . . . . . . . . . . . . . . . . . . . 193.3 Billing (android.billing) . . . . . . . . . . . . . . . . . . . . . . . . . . . . . . . . . . . . . 203.4 Broadcast (android.broadcast) . . . . . . . . . . . . . . . . . . . . . . . . . . . . . . . . . . 213.5 Mixer (android.mixer) . . . . . . . . . . . . . . . . . . . . . . . . . . . . . . . . . . . . . . . 223.6 Runnable (android.runnable) . . . . . . . . . . . . . . . . . . . . . . . . . . . . . . . . . . . 233.7 Service (android.service) . . . . . . . . . . . . . . . . . . . . . . . . . . . . . . . . . . . . . 23
4 Java API (pyjnius) 254.1 Activity . . . . . . . . . . . . . . . . . . . . . . . . . . . . . . . . . . . . . . . . . . . . . . . . . . 254.2 Action . . . . . . . . . . . . . . . . . . . . . . . . . . . . . . . . . . . . . . . . . . . . . . . . . . 264.3 Hardware . . . . . . . . . . . . . . . . . . . . . . . . . . . . . . . . . . . . . . . . . . . . . . . . . 27
5 Contribute 295.1 Extending Python for android native support . . . . . . . . . . . . . . . . . . . . . . . . . . . . . . 295.2 Create your own recipes . . . . . . . . . . . . . . . . . . . . . . . . . . . . . . . . . . . . . . . . . 30
6 Related projects 31
7 FAQ 337.1 arm-linux-androideabi-gcc: Internal error: Killed (program cc1) . . . . . . . . . . . . . . . . . . . . 337.2 _sqlite3.so not found . . . . . . . . . . . . . . . . . . . . . . . . . . . . . . . . . . . . . . . . . . . 33
8 Indices and tables 35
i

Python Module Index 37
ii

Python for Android Documentation, Release 1.2
Python for android is a project to create your own Python distribution including the modules you want, and create anapk including python, libs, and your application.
• Forum: https://groups.google.com/forum/#!forum/python-android
• Mailing list: [email protected]
Contents 1

Python for Android Documentation, Release 1.2
2 Contents

CHAPTER 1
Toolchain
1.1 Introduction
In terms of comparaison, you can check how Python for android can be useful compared to other projects.
Project Native Python GUI libraries APK generation Custom buildPython for android Yes Yes Yes YesPGS4A Yes Yes Yes NoAndroid scripting No No No NoPython on a chip No No No No
Note: For the moment, we are shipping only one “java bootstrap” needed for decompressing all the files of yourproject, create an OpenGL ES 2.0 surface, handle touch input and manage an audio thread.
If you want to use it without kivy module (an opengl es 2.0 ui toolkit), then you might want a lighter java bootstrap,that we don’t have right now. Help is welcome :)
1.2 How does it work ?
To be able to run Python on android, you need to compile it for android. And you need to compile all the libraries youwant for android too. Since Python is a language, not a toolkit, you cannot draw any user interface with it: you needto use a toolkit for it. Kivy can be one of them.
So for a simple ui project, the first step is to compile Python + Kivy + all others libraries. Then you’ll have what wecall a “distribution”. A distribution is composed of:
• Python libraries
• All selected libraries (kivy, pygame, pil...)
• A java bootstrap
• A build script
You’ll use the build script for create an “apk”: an android package.
1.3 Prerequisites
Note: There is a VirtualBox Image we provide with the prerequisites along with Android SDK and NDK preinstalledto ease your installation woes. You can download it from here.
3

Python for Android Documentation, Release 1.2
Warning: The current version is tested only on Ubuntu oneiric (11.10) and precise (12.04). If it doesn’t work onother platforms, send us patch, not bug report.
You need the minimal environment for building python. Note that other libraries might need other tools (cython isused by some recipes, and ccache to speedup the build):
sudo apt-get install build-essential patch git-core ccache ant python-pip python-dev
If you are on a 64 bit distro, you should install these packages too :
sudo apt-get install ia32-libs libc6-dev-i386
On debian Squeeze amd64, those packages were found to be necessary :
sudo apt-get install lib32stdc++6 lib32z1
Ensure you have the latest cython version:
pip install --upgrade cython
You must have android SDK and NDK. Right now, it’s prefered to use:
• SDK API 8 or 14 (15 will not work until a new NDK is released)
• NDK r5b or r7
You can download them at:
http://developer.android.com/sdk/index.htmlhttp://developer.android.com/sdk/ndk/index.html
If it’s your very first time into android SDK, don’t forget to follow documentation for recommended components at:
http://developer.android.com/sdk/installing/adding-packages.html
You need to download at least one platform into your environment, sothat you will be able to compile your application and set up an AndroidVirtual Device (AVD) to run it on (in the emulator). To start with,just download the latest version of the platform. Later, if you plan topublish your application, you will want to download other platforms aswell, so that you can test your application on the full range ofAndroid platform versions that your application supports.
After installing them, export both installation path, NDK version and API to use:
export ANDROIDSDK=/path/to/android-sdkexport ANDROIDNDK=/path/to/android-ndkexport ANDROIDNDKVER=rXexport ANDROIDAPI=X
# exampleexport ANDROIDSDK="/home/tito/code/android/android-sdk-linux_86"export ANDROIDNDK="/home/tito/code/android/android-ndk-r7"export ANDROIDNDKVER=r7export ANDROIDAPI=14
Also, you must configure you’re PATH to add the android binary:
4 Chapter 1. Toolchain

Python for Android Documentation, Release 1.2
export PATH=$ANDROIDNDK:$ANDROIDSDK/platform-tools:$ANDROIDSDK/tools:$PATH
1.4 Usage
1.4.1 Step 1: compile the toolchain
If you want to compile the toolchain with only kivy module:
./distribute.sh -m "kivy"
After a long time, you’ll get a “dist/default” directory containing all the compiled libraries and build.py script topackage your application using thoses libraries.
You can include other modules (or “recipes”) to compile using -m:
./distribute.sh -m "openssl kivy"
./distribute.sh -m "pil ffmpeg kivy"
You can also specify a specific version for each package. Please note that the compilation might break if you don’tuse the default version. Most recipes have patch to fixes android issues, and might not apply if you specify a version.We also recommend to clean build/ before changing version.:
./distribute.sh -m "openssl kivy==master"
The list of available recipes is available at: https://github.com/kivy/python-for-android/tree/master/recipes
From python-for-android 1.1, you can now specify pure-python package into the -m. It will use virtualenv and pip toinstall pure-python modules into the distribution. Please note that compiler are deactivated, and will break any modulewho try to compile something. If compilation is needed, write a recipe:
./distribute.sh -m "requests pygments kivy"
Note: Recipes download a defined version of their needed package from the internet, and build from it, if youknow what you are doing, and want to override that, you can export the env variable P4A_recipe_name_DIR and thisdirectory will be copied and used instead.
Available options to distribute.sh:
-d directory Name of the distribution directory-h Show this help-l Show a list of available modules-m ’mod1 mod2’ Modules to include-f Restart from scratch (remove the current build)-u ’mod1 mod2’ Modules to update (if already compiled)
1.4.2 Step 2: package your application
Go fo your custom python distribution:
cd dist/default
Use the build.py for creating the APK:
./build.py --package org.test.touchtracer --name touchtracer \--version 1.0 --dir ~/code/kivy/examples/demo/touchtracer debug
1.4. Usage 5

Python for Android Documentation, Release 1.2
Then, the android package (APK) will be generated at:
bin/touchtracer-1.0-debug.apk
Warning: Some files and modules for python are blacklisted by default to save a few megabytes on the final apkfile, in case your applications doesn’t find a standard python module, check the src/blacklist.txt file remove themodule you need from the list, and try again.
Available options to build.py:
-h, --help show this help message and exit--package PACKAGE The name of the java package the project will be
packaged under.--name NAME The human-readable name of the project.--version VERSION The version number of the project. This should consist
of numbers and dots, and should have the same numberof groups of numbers as previous versions.
--numeric-version NUMERIC_VERSIONThe numeric version number of the project. If notgiven, this is automatically computed from theversion.
--dir DIR The directory containing public files for the project.--private PRIVATE The directory containing additional private files for
the project.--launcher Provide this argument to build a multi-app launcher,
rather than a single app.--icon-name ICON_NAME
The name of the project’s launcher icon.--orientation ORIENTATION
The orientation that the game will display in. Usuallyone of "landscape", "portrait" or "sensor".
--permission PERMISSIONSThe permissions to give this app.
--ignore-path IGNORE_PATHIgnore path when building the app
--icon ICON A png file to use as the icon for the application.--presplash PRESPLASH
A jpeg file to use as a screen while the applicationis loading.
--install-location INSTALL_LOCATIONThe default install location. Should be "auto","preferExternal" or "internalOnly".
--compile-pyo Compile all .py files to .pyo, and only distribute thecompiled bytecode.
--intent-filters INTENT_FILTERSAdd intent-filters xml rules to AndroidManifest.xml
--blacklist BLACKLISTUse a blacklist file to match unwanted file in thefinal APK
--sdk SDK_VERSION Android SDK version to use. Default to 8--minsdk MIN_SDK_VERSION
Minimum Android SDK version to use. Default to 8--window Indicate if the application will be windowed
6 Chapter 1. Toolchain
Python for Android Documentation, Release 1.2
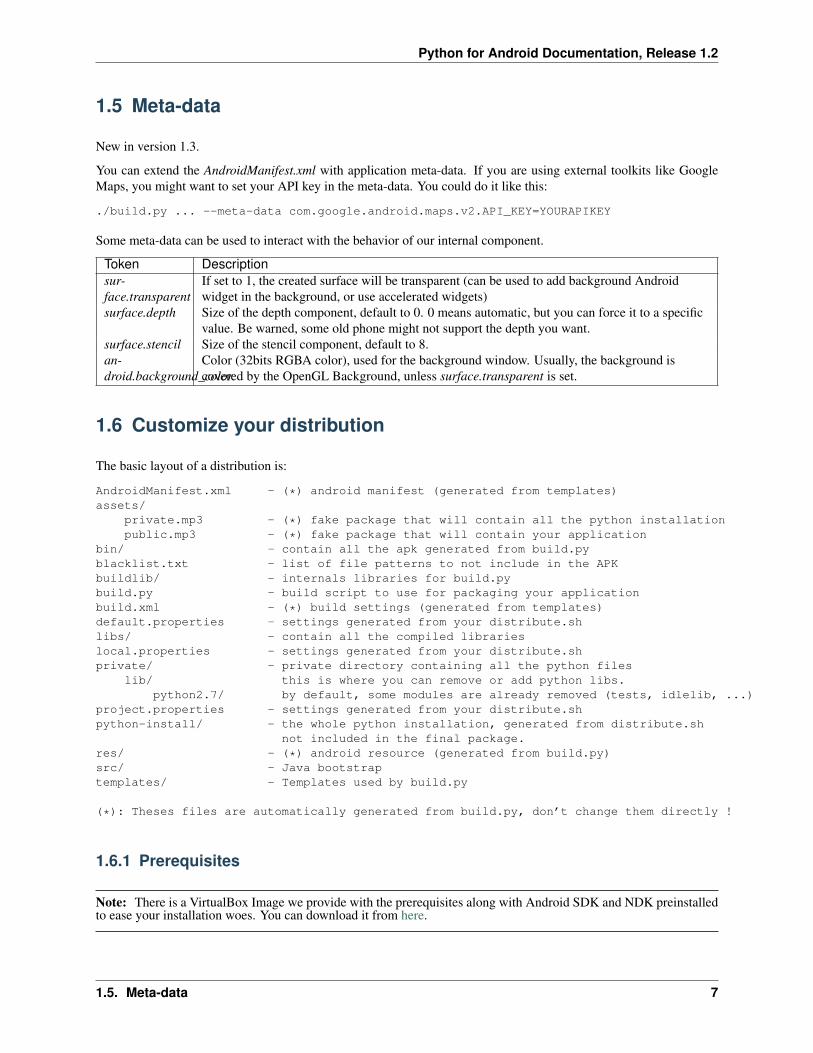
1.5 Meta-data
New in version 1.3.
You can extend the AndroidManifest.xml with application meta-data. If you are using external toolkits like GoogleMaps, you might want to set your API key in the meta-data. You could do it like this:
./build.py ... --meta-data com.google.android.maps.v2.API_KEY=YOURAPIKEY
Some meta-data can be used to interact with the behavior of our internal component.
Token Descriptionsur-face.transparent
If set to 1, the created surface will be transparent (can be used to add background Androidwidget in the background, or use accelerated widgets)
surface.depth Size of the depth component, default to 0. 0 means automatic, but you can force it to a specificvalue. Be warned, some old phone might not support the depth you want.
surface.stencil Size of the stencil component, default to 8.an-droid.background_color
Color (32bits RGBA color), used for the background window. Usually, the background iscovered by the OpenGL Background, unless surface.transparent is set.
1.6 Customize your distribution
The basic layout of a distribution is:
AndroidManifest.xml - (*) android manifest (generated from templates)assets/
private.mp3 - (*) fake package that will contain all the python installationpublic.mp3 - (*) fake package that will contain your application
bin/ - contain all the apk generated from build.pyblacklist.txt - list of file patterns to not include in the APKbuildlib/ - internals libraries for build.pybuild.py - build script to use for packaging your applicationbuild.xml - (*) build settings (generated from templates)default.properties - settings generated from your distribute.shlibs/ - contain all the compiled librarieslocal.properties - settings generated from your distribute.shprivate/ - private directory containing all the python files
lib/ this is where you can remove or add python libs.python2.7/ by default, some modules are already removed (tests, idlelib, ...)
project.properties - settings generated from your distribute.shpython-install/ - the whole python installation, generated from distribute.sh
not included in the final package.res/ - (*) android resource (generated from build.py)src/ - Java bootstraptemplates/ - Templates used by build.py
(*): Theses files are automatically generated from build.py, don’t change them directly !
1.6.1 Prerequisites
Note: There is a VirtualBox Image we provide with the prerequisites along with Android SDK and NDK preinstalledto ease your installation woes. You can download it from here.
1.5. Meta-data 7

Python for Android Documentation, Release 1.2
Warning: The current version is tested only on Ubuntu oneiric (11.10) and precise (12.04). If it doesn’t work onother platforms, send us patch, not bug report.
You need the minimal environment for building python. Note that other libraries might need other tools (cython isused by some recipes, and ccache to speedup the build):
sudo apt-get install build-essential patch git-core ccache ant python-pip python-dev
If you are on a 64 bit distro, you should install these packages too :
sudo apt-get install ia32-libs libc6-dev-i386
On debian Squeeze amd64, those packages were found to be necessary :
sudo apt-get install lib32stdc++6 lib32z1
Ensure you have the latest cython version:
pip install --upgrade cython
You must have android SDK and NDK. Right now, it’s prefered to use:
• SDK API 8 or 14 (15 will not work until a new NDK is released)
• NDK r5b or r7
You can download them at:
http://developer.android.com/sdk/index.htmlhttp://developer.android.com/sdk/ndk/index.html
If it’s your very first time into android SDK, don’t forget to follow documentation for recommended components at:
http://developer.android.com/sdk/installing/adding-packages.html
You need to download at least one platform into your environment, sothat you will be able to compile your application and set up an AndroidVirtual Device (AVD) to run it on (in the emulator). To start with,just download the latest version of the platform. Later, if you plan topublish your application, you will want to download other platforms aswell, so that you can test your application on the full range ofAndroid platform versions that your application supports.
After installing them, export both installation path, NDK version and API to use:
export ANDROIDSDK=/path/to/android-sdkexport ANDROIDNDK=/path/to/android-ndkexport ANDROIDNDKVER=rXexport ANDROIDAPI=X
# exampleexport ANDROIDSDK="/home/tito/code/android/android-sdk-linux_86"export ANDROIDNDK="/home/tito/code/android/android-ndk-r7"export ANDROIDNDKVER=r7export ANDROIDAPI=14
Also, you must configure you’re PATH to add the android binary:
export PATH=$ANDROIDNDK:$ANDROIDSDK/platform-tools:$ANDROIDSDK/tools:$PATH
8 Chapter 1. Toolchain

Python for Android Documentation, Release 1.2
1.6.2 Usage
Step 1: compile the toolchain
If you want to compile the toolchain with only kivy module:
./distribute.sh -m "kivy"
After a long time, you’ll get a “dist/default” directory containing all the compiled libraries and build.py script topackage your application using thoses libraries.
You can include other modules (or “recipes”) to compile using -m:
./distribute.sh -m "openssl kivy"
./distribute.sh -m "pil ffmpeg kivy"
You can also specify a specific version for each package. Please note that the compilation might break if you don’tuse the default version. Most recipes have patch to fixes android issues, and might not apply if you specify a version.We also recommend to clean build/ before changing version.:
./distribute.sh -m "openssl kivy==master"
The list of available recipes is available at: https://github.com/kivy/python-for-android/tree/master/recipes
From python-for-android 1.1, you can now specify pure-python package into the -m. It will use virtualenv and pip toinstall pure-python modules into the distribution. Please note that compiler are deactivated, and will break any modulewho try to compile something. If compilation is needed, write a recipe:
./distribute.sh -m "requests pygments kivy"
Note: Recipes download a defined version of their needed package from the internet, and build from it, if youknow what you are doing, and want to override that, you can export the env variable P4A_recipe_name_DIR and thisdirectory will be copied and used instead.
Available options to distribute.sh:
-d directory Name of the distribution directory-h Show this help-l Show a list of available modules-m ’mod1 mod2’ Modules to include-f Restart from scratch (remove the current build)-u ’mod1 mod2’ Modules to update (if already compiled)
Step 2: package your application
Go fo your custom python distribution:
cd dist/default
Use the build.py for creating the APK:
./build.py --package org.test.touchtracer --name touchtracer \--version 1.0 --dir ~/code/kivy/examples/demo/touchtracer debug
Then, the android package (APK) will be generated at:
bin/touchtracer-1.0-debug.apk
1.6. Customize your distribution 9

Python for Android Documentation, Release 1.2
Warning: Some files and modules for python are blacklisted by default to save a few megabytes on the final apkfile, in case your applications doesn’t find a standard python module, check the src/blacklist.txt file remove themodule you need from the list, and try again.
Available options to build.py:
-h, --help show this help message and exit--package PACKAGE The name of the java package the project will be
packaged under.--name NAME The human-readable name of the project.--version VERSION The version number of the project. This should consist
of numbers and dots, and should have the same numberof groups of numbers as previous versions.
--numeric-version NUMERIC_VERSIONThe numeric version number of the project. If notgiven, this is automatically computed from theversion.
--dir DIR The directory containing public files for the project.--private PRIVATE The directory containing additional private files for
the project.--launcher Provide this argument to build a multi-app launcher,
rather than a single app.--icon-name ICON_NAME
The name of the project’s launcher icon.--orientation ORIENTATION
The orientation that the game will display in. Usuallyone of "landscape", "portrait" or "sensor".
--permission PERMISSIONSThe permissions to give this app.
--ignore-path IGNORE_PATHIgnore path when building the app
--icon ICON A png file to use as the icon for the application.--presplash PRESPLASH
A jpeg file to use as a screen while the applicationis loading.
--install-location INSTALL_LOCATIONThe default install location. Should be "auto","preferExternal" or "internalOnly".
--compile-pyo Compile all .py files to .pyo, and only distribute thecompiled bytecode.
--intent-filters INTENT_FILTERSAdd intent-filters xml rules to AndroidManifest.xml
--blacklist BLACKLISTUse a blacklist file to match unwanted file in thefinal APK
--sdk SDK_VERSION Android SDK version to use. Default to 8--minsdk MIN_SDK_VERSION
Minimum Android SDK version to use. Default to 8--window Indicate if the application will be windowed
1.6.3 Meta-data
New in version 1.3.
You can extend the AndroidManifest.xml with application meta-data. If you are using external toolkits like GoogleMaps, you might want to set your API key in the meta-data. You could do it like this:
10 Chapter 1. Toolchain

Python for Android Documentation, Release 1.2
./build.py ... --meta-data com.google.android.maps.v2.API_KEY=YOURAPIKEY
Some meta-data can be used to interact with the behavior of our internal component.
Token Descriptionsur-face.transparent
If set to 1, the created surface will be transparent (can be used to add background Androidwidget in the background, or use accelerated widgets)
surface.depth Size of the depth component, default to 0. 0 means automatic, but you can force it to a specificvalue. Be warned, some old phone might not support the depth you want.
surface.stencil Size of the stencil component, default to 8.an-droid.background_color
Color (32bits RGBA color), used for the background window. Usually, the background iscovered by the OpenGL Background, unless surface.transparent is set.
1.6.4 Customize your distribution
The basic layout of a distribution is:
AndroidManifest.xml - (*) android manifest (generated from templates)assets/
private.mp3 - (*) fake package that will contain all the python installationpublic.mp3 - (*) fake package that will contain your application
bin/ - contain all the apk generated from build.pyblacklist.txt - list of file patterns to not include in the APKbuildlib/ - internals libraries for build.pybuild.py - build script to use for packaging your applicationbuild.xml - (*) build settings (generated from templates)default.properties - settings generated from your distribute.shlibs/ - contain all the compiled librarieslocal.properties - settings generated from your distribute.shprivate/ - private directory containing all the python files
lib/ this is where you can remove or add python libs.python2.7/ by default, some modules are already removed (tests, idlelib, ...)
project.properties - settings generated from your distribute.shpython-install/ - the whole python installation, generated from distribute.sh
not included in the final package.res/ - (*) android resource (generated from build.py)src/ - Java bootstraptemplates/ - Templates used by build.py
(*): Theses files are automatically generated from build.py, don’t change them directly !
1.6. Customize your distribution 11

Python for Android Documentation, Release 1.2
12 Chapter 1. Toolchain

CHAPTER 2
Examples
2.1 Prebuilt VirtualBox
A good starting point to build an APK are prebuilt VirtualBox images, where the Android NDK, the Android SDKand the Kivy Python-For-Android sources are prebuilt in an VirtualBox image. Please search the Download Sectionfor such an image. You will also need to create a device filter for the Android USB device using the VirtualBox OSsettings.
2.2 Hello world
If you don’t know how to start with Python for Android, here is a simple tutorial for creating an UI using Kivy, andmake an APK with this project.
Note: Don’t forget that Python for android is not Kivy only, and you might want to use other toolkit libraries. Whenother toolkits will be available, this documentation will be enhanced.
Let’s create a simple Hello world application, with one Label and one Button.
1. Ensure you’ve correctly installed and configured the project as said in the Prerequisites
2. Create a directory named helloworld:
mkdir helloworldcd helloworld
3. Create a file named main.py, with this content:
import kivykivy.require(’1.0.9’)from kivy.lang import Builderfrom kivy.uix.gridlayout import GridLayoutfrom kivy.properties import NumericPropertyfrom kivy.app import App
Builder.load_string(’’’<HelloWorldScreen>:
cols: 1Label:
text: ’Welcome to the Hello world’Button:
text: ’Click me! %d’ % root.counter
13

Python for Android Documentation, Release 1.2
on_release: root.my_callback()’’’)
class HelloWorldScreen(GridLayout):counter = NumericProperty(0)def my_callback(self):
print ’The button has been pushed’self.counter += 1
class HelloWorldApp(App):def build(self):
return HelloWorldScreen()
if __name__ == ’__main__’:HelloWorldApp().run()
4. Go to the python-for-android directory
5. Create a distribute with kivy:
./distribute.sh -m kivy
6. Go to the newly created default distribution:
cd dist/default
7. Plug your android device, and ensure you can install development application
8. Build your hello world application in debug mode:
./build.py --package org.hello.world --name "Hello world" \--version 1.0 --dir /PATH/TO/helloworld debug installd
9. Take your device, and start the application!
10. If it’s goes wrong, open the logcat by doing:
adb logcat
The final debug APK will be located in bin/hello-world-1.0-debug.apk.
If you want to release your application instead of just making a debug APK, you must:
1. Generate a non-signed APK:
./build.py --package org.hello.world --name "Hello world" \--version 1.0 --dir /PATH/TO/helloworld release
2. Continue by reading http://developer.android.com/guide/publishing/app-signing.html
See also:
Kivy demos You can use them for creating APK too.
2.3 Compass
The following example is an extract from the Compass app as provided in the Kivy examples/android/compass folder:
14 Chapter 2. Examples

Python for Android Documentation, Release 1.2
# ... importsHardware = autoclass(’org.renpy.android.Hardware’)
class CompassApp(App):
needle_angle = NumericProperty(0)
def build(self):self._anim = NoneHardware.magneticFieldSensorEnable(True)Clock.schedule_interval(self.update_compass, 1 / 10.)
def update_compass(self, *args):# read the magnetic sensor from the Hardware class(x, y, z) = Hardware.magneticFieldSensorReading()
# calculate the angleneedle_angle = Vector(x , y).angle((0, 1)) + 90.
# animate the needleif self._anim:
self._anim.stop(self)self._anim = Animation(needle_angle=needle_angle, d=.2, t=’out_quad’)self._anim.start(self)
def on_pause(self):# when you are going on pause, don’t forget to stop the sensorHardware.magneticFieldSensorEnable(False)return True
def on_resume(self):# reactivate the sensor when you are back to the appHardware.magneticFieldSensorEnable(True)
if __name__ == ’__main__’:CompassApp().run()
If you compile this app, you will get an APK which outputs the following screen:
Figure 2.1: Screenshot of the Kivy Compass App (Source of the Compass Windrose: Wikipedia)
2.3. Compass 15

Python for Android Documentation, Release 1.2
2.3.1 Hello world
If you don’t know how to start with Python for Android, here is a simple tutorial for creating an UI using Kivy, andmake an APK with this project.
Note: Don’t forget that Python for android is not Kivy only, and you might want to use other toolkit libraries. Whenother toolkits will be available, this documentation will be enhanced.
Let’s create a simple Hello world application, with one Label and one Button.
1. Ensure you’ve correctly installed and configured the project as said in the Prerequisites
2. Create a directory named helloworld:
mkdir helloworldcd helloworld
3. Create a file named main.py, with this content:
import kivykivy.require(’1.0.9’)from kivy.lang import Builderfrom kivy.uix.gridlayout import GridLayoutfrom kivy.properties import NumericPropertyfrom kivy.app import App
Builder.load_string(’’’<HelloWorldScreen>:
cols: 1Label:
text: ’Welcome to the Hello world’Button:
text: ’Click me! %d’ % root.counteron_release: root.my_callback()
’’’)
class HelloWorldScreen(GridLayout):counter = NumericProperty(0)def my_callback(self):
print ’The button has been pushed’self.counter += 1
class HelloWorldApp(App):def build(self):
return HelloWorldScreen()
if __name__ == ’__main__’:HelloWorldApp().run()
4. Go to the python-for-android directory
5. Create a distribute with kivy:
./distribute.sh -m kivy
6. Go to the newly created default distribution:
cd dist/default
7. Plug your android device, and ensure you can install development application
16 Chapter 2. Examples

Python for Android Documentation, Release 1.2
8. Build your hello world application in debug mode:
./build.py --package org.hello.world --name "Hello world" \--version 1.0 --dir /PATH/TO/helloworld debug installd
9. Take your device, and start the application!
10. If it’s goes wrong, open the logcat by doing:
adb logcat
The final debug APK will be located in bin/hello-world-1.0-debug.apk.
If you want to release your application instead of just making a debug APK, you must:
1. Generate a non-signed APK:
./build.py --package org.hello.world --name "Hello world" \--version 1.0 --dir /PATH/TO/helloworld release
2. Continue by reading http://developer.android.com/guide/publishing/app-signing.html
See also:
Kivy demos You can use them for creating APK too.
2.3.2 Compass
The following example is an extract from the Compass app as provided in the Kivy examples/android/compass folder:
# ... importsHardware = autoclass(’org.renpy.android.Hardware’)
class CompassApp(App):
needle_angle = NumericProperty(0)
def build(self):self._anim = NoneHardware.magneticFieldSensorEnable(True)Clock.schedule_interval(self.update_compass, 1 / 10.)
def update_compass(self, *args):# read the magnetic sensor from the Hardware class(x, y, z) = Hardware.magneticFieldSensorReading()
# calculate the angleneedle_angle = Vector(x , y).angle((0, 1)) + 90.
# animate the needleif self._anim:
self._anim.stop(self)self._anim = Animation(needle_angle=needle_angle, d=.2, t=’out_quad’)self._anim.start(self)
def on_pause(self):# when you are going on pause, don’t forget to stop the sensorHardware.magneticFieldSensorEnable(False)return True
2.3. Compass 17

Python for Android Documentation, Release 1.2
def on_resume(self):# reactivate the sensor when you are back to the appHardware.magneticFieldSensorEnable(True)
if __name__ == ’__main__’:CompassApp().run()
If you compile this app, you will get an APK which outputs the following screen:
Figure 2.2: Screenshot of the Kivy Compass App (Source of the Compass Windrose: Wikipedia)
18 Chapter 2. Examples

CHAPTER 3
Python API
The Python for android project includes a Python module called “android”. It consists of multiple parts which aremostly there to facilitate the use of the Java API.
This module is not designed to be comprehensive. Most of the Java API is also accessible with PyJNIus, so if youcan’t find what you need here you can try using the Java API directly instead.
3.1 Android (android)
android.check_pause()This should be called on a regular basis to check to see if Android expects the application to pause. If it returnstrue, the app should call android.wait_for_resume(), after storing its state as necessary.
android.wait_for_resume()This function should be called after android.check_pause() and returns true. It does not return untilAndroid has resumed from the pause. While in this function, Android may kill the app without further notice.
android.map_key(keycode, keysym)This maps an android keycode to a python keysym. The android keycodes are available as constants in theandroid module.
3.2 Activity (android.activity)
The default PythonActivity has a observer pattern for onActivityResult and onNewIntent.
android.activity.bind(eventname=callback, ...)This allows you to bind a callback to an Android event: - on_new_intent is the event associated to theonNewIntent java call - on_activity_result is the event associated to the onActivityResult java call
android.activity.unbind(eventname=callback, ...)Unregister a previously registered callback with bind().
Example:
# This example is a snippet from an NFC p2p app implemented with Kivy.
from android import activity
def on_new_intent(self, intent):if intent.getAction() != NfcAdapter.ACTION_NDEF_DISCOVERED:
return
19

Python for Android Documentation, Release 1.2
rawmsgs = intent.getParcelableArrayExtra(NfcAdapter.EXTRA_NDEF_MESSAGES)if not rawmsgs:
returnfor message in rawmsgs:
message = cast(NdefMessage, message)payload = message.getRecords()[0].getPayload()print ’payload: {}’.format(’’.join(map(chr, payload)))
def nfc_enable(self):activity.bind(on_new_intent=self.on_new_intent)# ...
def nfc_disable(self):activity.unbind(on_new_intent=self.on_new_intent)# ...
3.3 Billing (android.billing)
This billing module gives an access to the In-App Billing:
1. Setup a test account, and get your Public Key
2. Export your public key:
export BILLING_PUBKEY="Your public key here"
3. Setup some In-App product to buy. Let’s say you’ve created a product with the id “org.kivy.gopremium”
4. In your application, you can use the billing module like this:
from android.billing import BillingServicefrom kivy.clock import Clock
class MyBillingService(object):
def __init__(self):super(MyBillingService, self).__init__()
# Start the billing service, and attach our callbackself.service = BillingService(billing_callback)
# Start a clock to check billing service message every secondClock.schedule_interval(self.service.check, 1)
def billing_callback(self, action, *largs):’’’Callback that will receive all the events from the Billing service’’’if action == BillingService.BILLING_ACTION_ITEMSCHANGED:
items = largs[0]if ’org.kivy.gopremium’ in items:
print "Congratulations, you have a premium acess"else:
print "Unfortunately, you don’t have premium access"
def buy(self, sku):# Method to buy something.self.service.buy(sku)
20 Chapter 3. Python API

Python for Android Documentation, Release 1.2
def get_purchased_items(self):# Return all the items purchasedreturn self.service.get_purchased_items()
5. To initiate an in-app purchase, just call the buy() method:
# Note: start the service at the start, and never twice!bs = MyBillingService()bs.buy(’org.kivy.gopremium’)
# Later, when you get the notification that items have been changed, you# can still check all the items you bought:print bs.get_purchased_items(){’org.kivy.gopremium’: {’qt: 1}}
6. You’ll receive all the notifications about the billing process in the callback.
7. Last step, create your application with –with-billing $BILLING_PUBKEY:
./build.py ... --with-billing $BILLING_PUBKEY
3.4 Broadcast (android.broadcast)
Implementation of the android BroadcastReceiver. You can specify the callback that will receive the broadcast event,and actions or categories filters.
class android.broadcast.BroadcastReceiverWarning: The callback will be called in another thread than the main thread. In that thread, be careful notto access OpenGL or something like that.
__init__(callback, actions=None, categories=None)
Parameters
• callback – function or method that will receive the event. Will receive the context andintent as argument.
• actions – list of strings that represent an action.
• categories – list of strings that represent a category.
For actions and categories, the string must be in lower case, without the prefix:
# In java: Intent.ACTION_HEADSET_PLUG# In python: ’headset_plug’
start()Register the receiver with all the actions and categories, and start handling events.
stop()Unregister the receiver with all the actions and categories, and stop handling events.
Example:
class TestApp(App):
def build(self):self.br = BroadcastReceiver(
3.4. Broadcast (android.broadcast) 21

Python for Android Documentation, Release 1.2
self.on_broadcast, actions=[’headset_plug’])self.br.start()# ...
def on_broadcast(self, context, intent):extras = intent.getExtras()headset_state = bool(extras.get(’state’))if headset_state:
print ’The headset is plugged’else:
print ’The headset is unplugged’
# Don’t forget to stop and restart the receiver when the app is going# to pause / resume mode
def on_pause(self):self.br.stop()return True
def on_resume(self):self.br.start()
3.5 Mixer (android.mixer)
The android.mixer module contains a subset of the functionality in found in the pygame.mixer module. It’s intendedto be imported as an alternative to pygame.mixer, using code like:
try:import pygame.mixer as mixer
except ImportError:import android.mixer as mixer
Note that if you’re using the kivy.core.audio module, you don’t have to do anything, it is all automatic.
The android.mixer module is a wrapper around the Android MediaPlayer class. This allows it to take advantage ofany hardware acceleration present, and also eliminates the need to ship codecs as part of an application.
It has several differences with the pygame mixer:
• The init() and pre_init() methods work, but are ignored - Android chooses appropriate settings automatically.
• Only filenames and true file objects can be used - file-like objects will probably not work.
• Fadeout does not work - it causes a stop to occur.
• Looping is all or nothing, there is no way to choose the number of loops that occur. For looping to work, theandroid.mixer.periodic() function should be called on a regular basis.
• Volume control is ignored.
• End events are not implemented.
• The mixer.music object is a class (with static methods on it), rather than a module. Calling methods likemixer.music.play() should work.
22 Chapter 3. Python API

Python for Android Documentation, Release 1.2
3.6 Runnable (android.runnable)
Runnable is a wrapper around the Java Runnable class. This class can be used to schedule a call of a Python functioninto the PythonActivity thread.
Example:
from android.runnable import Runnable
def helloworld(arg):print ’Called from PythonActivity with arg:’, arg
Runnable(helloworld)(’hello’)
Or use our decorator:
from android.runnable import run_on_ui_thread
@run_on_ui_threaddef helloworld(arg):
print ’Called from PythonActivity with arg:’, arg
helloworld(’arg1’)
This can be used to prevent errors like:
• W/System.err( 9514): java.lang.RuntimeException: Can’t create handler inside thread that has not calledLooper.prepare()
• NullPointerException in ActivityThread.currentActivityThread()
Warning: Because the python function is called from the PythonActivity thread, you need to be careful aboutyour own calls.
3.7 Service (android.service)
Services of an application are controlled through the class AndroidService.
class android.service.AndroidService(title, description)Run service/main.py from the application directory as a service.
Parameters
• title (str) – Notification title, default to ‘Python service’
• description (str) – Notification text, default to ‘Kivy Python service started’
start(arg)Start the service.
Parameters arg (str) – Argument to pass to a service, through the environment variablePYTHON_SERVICE_ARGUMENT. Defaults to ‘’
stop()Stop the service.
Application activity part example, main.py:
3.6. Runnable (android.runnable) 23

Python for Android Documentation, Release 1.2
from android import AndroidService
...
class ServiceExample(App):
...
def start_service(self):self.service = AndroidService(’Sevice example’, ’service is running’)self.service.start(’Hello From Service’)
def stop_service(self):self.service.stop()
Application service part example, service/main.py:
import osimport time
# get the argument passedarg = os.getenv(’PYTHON_SERVICE_ARGUMENT’)
while True:# this will print ’Hello From Service’ continually, even when the application is switchedprint argtime.sleep(1)
24 Chapter 3. Python API

CHAPTER 4
Java API (pyjnius)
Using PyJNIus to access the Android API restricts the usage to a simple call of the autoclass constructor function anda second call to instantiate this class.
You can access through this method all Java Android API, e.g. to get the DisplayMetrics of an Android device couldfetched using the following piece of code:
DisplayMetrics = autoclass(’android.util.DisplayMetrics’)metrics = DisplayMetrics()metrics.setToDefaults()self.densityDpi = metrics.densityDpi
You can access all fields and methods as described in the Java Android DisplayMetrics API as shown here with themethod setToDefaults() and the field densityDpi. Before you use o view a field, you should always call setToDefaultsto initiate to the default values of the device.
Currently only JavaMethod, JavaStaticMethod, JavaField, JavaStaticField and JavaMultipleMethod are built intoPyJNIus, therefore such constructs like registerListener or something like this have to be coded still in Java. Forthis the Android module described below is available to access some of the hardware in Android devices.
4.1 Activity
If you want the instance of the current Activity, use:
• PythonActivity.mActivity if you are running an application
• PythonService.mService if you are running a service
class org.renpy.android.PythonActivity
mInfoInstance of an ApplicationInfo
mActivityInstance of PythonActivity.
registerNewIntentListener(NewIntentListener listener)Register a new instance of NewIntentListener to be called when onNewIntent is called.
unregisterNewIntentListener(NewIntentListener listener)Unregister a previously registered listener from registerNewIntentListener()
registerActivityResultListener(ActivityResultListener listener)Register a new instance of ActivityResultListener to be called when onActivityResult is called.
25

Python for Android Documentation, Release 1.2
unregisterActivityResultListener(ActivityResultListener listener)Unregister a previously registered listener from PythonActivity.registerActivityResultListener()
class org.renpy.android.PythonActivity_ActivityResultListener
Note: This class is a subclass of PythonActivity, so the notation will bePythonActivity$ActivityResultListener
Listener interface for onActivityResult. You need to implementing it, create an instance and use it withPythonActivity.registerActivityResultListener().
onActivityResult(int requestCode, int resultCode, Intent data)Method to implement
class org.renpy.android.PythonActivity_NewIntentListener
Note: This class is a subclass of PythonActivity, so the notation will bePythonActivity$NewIntentListener
Listener interface for onNewIntent. You need to implementing it, create an instance and use it withregisterNewIntentListener().
onNewIntent(Intent intent)Method to implement
4.2 Action
class org.renpy.android.ActionThis module is built to deliver data to someone else.
send(mimetype, filename, subject, text, chooser_title)Deliver data to someone else. This method is a wrapper around ACTION_SEND
Parameters
mimetype: str Must be a valid mimetype, that represent the content to sent.
filename: str, default to None (optional) Name of the file to attach. Must be a absolutepath.
subject: str, default to None (optional) Default subject
text: str, default to None (optional) Content to send.
chooser_title: str, default to None (optional) Title of the android chooser window, defaultto ‘Send email...’
Sending a simple hello world text:
android.action_send(’text/plain’, text=’Hello world’,subject=’Test from python’)
Sharing an image file:
# let’s say you’ve make an image in /sdcard/image.pngandroid.action_send(’image/png’, filename=’/sdcard/image.png’)
26 Chapter 4. Java API (pyjnius)

Python for Android Documentation, Release 1.2
Sharing an image with a default text too:
android.action_send(’image/png’, filename=’/sdcard/image.png’,text=’Hi,\n\tThis is my awesome image, what do you think about it ?’)
4.3 Hardware
class org.renpy.android.HardwareThis module is built for accessing hardware devices of an Android device. All the methods are static and public,you don’t need an instance.
vibrate(s)Causes the phone to vibrate for s seconds. This requires that your application have the VIBRATE permis-sion.
getHardwareSensors()Returns a string of all hardware sensors of an Android device where each line lists the informations aboutone sensor in the following format:
Name=name,Vendor=vendor,Version=version,MaximumRange=maximumRange,MinDelay=minDelay,Power=power,Type=type
For more information about this informations look into the original Java API for the Sensors Class
accelerometerSensorThis variable links to a generic3AxisSensor instance and their functions to access the accelerometer sensor
orientationSensorThis variable links to a generic3AxisSensor instance and their functions to access the orientation sensor
magenticFieldSensor
The following two instance methods of the generic3AxisSensor class should be used to enable/disable the sensorand to read the sensor
changeStatus(boolean enable)Changes the status of the sensor, the status of the sensor is enabled, if enable is true or disabled, if enableis false.
readSensor()Returns an (x, y, z) tuple of floats that gives the sensor reading, the units depend on the sensor as shownon the Java API page for SensorEvent. The sesnor must be enabled before this function is called. If thetuple contains three zero values, the accelerometer is not enabled, not available, defective, has not returneda reading, or the device is in free-fall.
get_dpi()Returns the screen density in dots per inch.
show_keyboard()Shows the soft keyboard.
hide_keyboard()Hides the soft keyboard.
wifi_scanner_enable()Enables wifi scanning.
Note: ACCESS_WIFI_STATE and CHANGE_WIFI_STATE permissions are required.
4.3. Hardware 27

Python for Android Documentation, Release 1.2
wifi_scan()Returns a String for each visible WiFi access point
(SSID, BSSID, SignalLevel)
4.3.1 Further Modules
Some further modules are currently available but not yet documented. Please have a look into the code and you arevery welcome to contribute to this documentation.
28 Chapter 4. Java API (pyjnius)

CHAPTER 5
Contribute
5.1 Extending Python for android native support
So, you want to get into python-for-android and extend what’s available to python on android ?
Turns out it’s not very complicated, here is a little introduction on how to go about it. Without Pyjnius, the schema toaccess to Java API from Cython is:
[1] Cython -> [2] C JNI -> [3] Java
Think about acceleration sensors : you want to get the acceleration values in python noth-ing is available natively, but you have a java API for that : the google API is available herehttp://developer.android.com/reference/android/hardware/Sensor.html
You can’t use it directly, you need to do your own API to use it in python, this is done in 3 steps
5.1.1 Step 1: write the java code to create very simple functions to use
like : accelerometer Enable/Reading In our project, this is done in the Hardware.java: https://github.com/kivy/python-for-android/blob/master/src/src/org/renpy/android/Hardware.java you can see how it’s implemented
5.1.2 Step 2 : write a jni wrapper
This is a C file to be able to invoke/call Java functions from C, in our case, step 2 (and 3) are done inthe android python module. The JNI part is done in the android_jni.c: https://github.com/kivy/python-for-android/blob/master/recipes/android/src/android_jni.c
5.1.3 Step 3 : you have the java part, that you can call from the C
You can now do the Python extension around it, all the android python part is done in https://github.com/kivy/python-for-android/blob/master/recipes/android/src/android.pyx
→ [python] android.accelerometer_reading [C] android_accelerometer_reading [Java] Hard-ware.accelerometer_reading()
The jni part is really a C api to call java methods. a little bit hard to get it with the syntax, but working with currentexample should be ok
29

Python for Android Documentation, Release 1.2
5.1.4 Example with bluetooth
Start directly from a fork of https://github.com/kivy/python-for-android
The first step is to identify where and how they are doing it in sl4a, it’s really easy, because everything is already doneas a client/server client/consumer approach, for bluetooth, they have a “Bluetooth facade” in java.
http://code.google.com/p/android-scripting/source/browse/android/BluetoothFacade/src/com/googlecode/android_scripting/facade/BluetoothFacade.java
You can learn from it, and see how is it’s can be used as is, or if you can simplify / remove stuff you don’t want.
From this point, create a bluetooth file in python-for-android/tree/master/src/src/org/renpy/android in Java.
Do a good API (enough simple to be able to write the jni in a very easy manner, like, don’t pass any custom java objectin argument).
Then write the JNI, and then the python part.
3 steps, once you get it, the real difficult part is to write the java part :)
5.1.5 Jni gottchas
• package must be org.renpy.android, don’t change it.
5.2 Create your own recipes
A recipe is a script that contain the “definition” of a module to compile. The directory layout of a recipe for a<modulename> is something like:
python-for-android/recipes/<modulename>/recipe.shpython-for-android/recipes/<modulename>/patches/python-for-android/recipes/<modulename>/patches/fix-path.patch
When building, all the recipe build must go to:
python-for-android/build/<modulename>/<archiveroot>
For example, if you want to create a recipe for sdl, do:
cd python-for-android/recipesmkdir sdlcp recipe.sh.tmpl sdl/recipe.shsed -i ’s#XXX#sdl#’ sdl/recipe.sh
Then, edit the sdl/recipe.sh to adjust other information (version, url) and complete build function.
30 Chapter 5. Contribute

CHAPTER 6
Related projects
• PGS4A: http://pygame.renpy.org/ (thanks to Renpy to make it possible)
• Android scripting: http://code.google.com/p/android-scripting/
• Python on a chip: http://code.google.com/p/python-on-a-chip/
31

Python for Android Documentation, Release 1.2
32 Chapter 6. Related projects

CHAPTER 7
FAQ
7.1 arm-linux-androideabi-gcc: Internal error: Killed (program cc1)
This could happen if you are not using a validated SDK/NDK with Python for Android. Go toprerequisites.rst to see which one are working.
7.2 _sqlite3.so not found
We recently fixed sqlite3 compilation. In case of, you must:
• Install development headers for sqlite3 if it’s not already installed. On Ubuntu:
apt-get install libsqlite3-dev
• Compile the distribution with (sqlite3 must be the first argument):
./distribute.sh -m ’sqlite3 kivy’
• Go into your distribution at dist/default
• Edit blacklist.txt, and remove all the lines concerning sqlite3:
sqlite3/*lib-dynload/_sqlite3.so
And then, sqlite3 will be compiled, and included in your APK.
33

Python for Android Documentation, Release 1.2
34 Chapter 7. FAQ

CHAPTER 8
Indices and tables
• genindex
• modindex
• search
35

Python for Android Documentation, Release 1.2
36 Chapter 8. Indices and tables

Python Module Index
aandroid, 19android.activity, 19android.billing, 20android.broadcast, 21android.mixer, 22android.runnable, 23android.service, 23
oorg.renpy.android, 25
37
Python for Android Documentation, Release 1.2
38 Python Module Index

Index
Symbols__init__() (android.broadcast.BroadcastReceiver
method), 21
AaccelerometerSensor (org.renpy.android.Hardware
attribute), 27Action (class in org.renpy.android), 26android (module), 19android.activity (module), 19android.billing (module), 20android.broadcast (module), 21android.mixer (module), 22android.runnable (module), 23android.service (module), 23AndroidService (class in android.service), 23
Bbind() (in module android.activity), 19BroadcastReceiver (class in android.broadcast), 21
CchangeStatus() (org.renpy.android.Hardware method), 27check_pause() (in module android), 19
Gget_dpi() (org.renpy.android.Hardware method), 27getHardwareSensors() (org.renpy.android.Hardware
method), 27
HHardware (class in org.renpy.android), 27hide_keyboard() (org.renpy.android.Hardware method),
27
MmagenticFieldSensor (org.renpy.android.Hardware
attribute), 27map_key() (in module android), 19
OonActivityResult() (org.renpy.android.PythonActivity_ActivityResultListener
method), 26onNewIntent() (org.renpy.android.PythonActivity_NewIntentListener
method), 26org.renpy.android (module), 25orientationSensor (org.renpy.android.Hardware attribute),
27
PPythonActivity (class in org.renpy.android), 25PythonActivity.mActivity (in module org.renpy.android),
25PythonActivity.mInfo (in module org.renpy.android), 25PythonActivity_ActivityResultListener (class in
org.renpy.android), 26PythonActivity_NewIntentListener (class in
org.renpy.android), 26
RreadSensor() (org.renpy.android.Hardware method), 27registerActivityResultListener()
(org.renpy.android.PythonActivity method), 25registerNewIntentListener()
(org.renpy.android.PythonActivity method), 25
Ssend() (org.renpy.android.Action method), 26show_keyboard() (org.renpy.android.Hardware method),
27start() (android.broadcast.BroadcastReceiver method), 21start() (android.service.AndroidService method), 23stop() (android.broadcast.BroadcastReceiver method), 21stop() (android.service.AndroidService method), 23
Uunbind() (in module android.activity), 19unregisterActivityResultListener()
(org.renpy.android.PythonActivity method), 26
39

Python for Android Documentation, Release 1.2
unregisterNewIntentListener()(org.renpy.android.PythonActivity method), 25
Vvibrate() (org.renpy.android.Hardware method), 27
Wwait_for_resume() (in module android), 19wifi_scan() (org.renpy.android.Hardware method), 27wifi_scanner_enable() (org.renpy.android.Hardware
method), 27
40 Index