python guis
TRANSCRIPT
Python GUIs
Preface
Unless your robot is completely autonomous, you'll probably want a nice, centralized, and graphical way to control it. Really, you can use anything that can output to serial. Python is a really easy way to accomplish this with minimal programming thanks to its easy syntax and some well built libraries like pySerial, Tkinter, and Tornado.
Python provides a easy-to-use library called Tkinter that allows the user to make GUIs. This is a good way to get a nice windowed GUI on nearly most platforms (Windows, Mac, Linux). It requires minimal setup, and is relatively simple to use.
Another option for a Graphical User Interface is Tornado, which is a web server. With a web server, you can control your system from anywhere with an internet connection with anything with a web browser.
Basics of a Tkinter GUI
Introduction
It is often necessary to being to communicate with a robot while it is in use. This can be done simply through a remote control or more complexly through a GUI. The GUI can allow the robot to both send an receive information while a remote control will only be able to send to the robot. A simple way to make a GUI is through Python Tkinter. Using Tkinter along with Serial, the code will allow easy communication between the robot.
This tutorial will show how to use various parts of Tkinter and show how to make a GUI look good.
Importing Library
At the start of the code, it is necessary to import the necessary libraries:
from Tkinter import *
Importing the library in this fashion means that when the library is used, it does not have to be called every time. For communication between a robot, it will also be necessary to import the Serial library. To learn more about that, see Serial Commands.
Making a GUI
The first thing that must be done is to make the window that the GUI will be in. This is done with the following code:
root = Tk() #Makes the windowroot.wm_title("Window Title") #Makes the title that will appear in the top leftroot.config(background = "#FFFFFF") #sets background color to white#put widgets hereroot.mainloop() #start monitoring and updating the GUI. Nothing below here runs.
This gives a very basic window with a white background.
When making a Python GUI, there are several different widgets that can be used. Here, the following widgets will be discussed:
• Frame • Label • Entry • Button • Canvas • Text
Frame
Frames are useful for the organization of a GUI. Frames get built into the grid of the window and then in turn each have a grid of their own. This means that nesting frames may be necessary if the GUI is going to look nice. To add a frame, the following code is needed:
leftFrame = Frame(root, width=200, height = 600)leftFrame.grid(row=0, column=0, padx=10, pady=2)
The first line means that leftFrame will rest in root, which is the name that the window was given. The height and width are specified, but the frames re-size to what is put inside. The second line places the frame in the first grid spot open in root (0,0).
Label
A label allows either text or a picture to be placed. The text inside the label can be updated later if necessary. To add a label, the following code is needed:
firstLabel = Label(leftFrame, text="This is my first label")firstLabel.grid(row=0, column=0, padx=10, pady=2)
This rests firstLabel in left frame with the following text in the first spot of leftFrame.
To get a picture in the label, the following code is used:
imageEx = PhotoImage(file = 'image.gif')Label(leftFrame, image=imageEx).grid(row=0, column=0, padx=10, pady=2)
The image should be in the same folder that the Python file is in. Using PhotoImage, the image file should be a GIF or PGM.
Entry
The Entry widget is an input widget. It allows the user to type something that can then be read into the program. To use this widget, the following code is helpful:
userInput = Entry(leftFrame, width = 10) #the width refers to the number of charactersuserInput.grid(row=0, column=0, padx=10, pady=2)
#get the text inside of userInputuserInput.get()
It may be necessary to get the inside of the entry when a button is pushed or when the user strikes enter.
Button
A button causes a specified action to occur. To use a button, the following is needed:
newButton = Button(leftFrame, text="Okay", command=btnClicked)newButton.grid(row=0, column=0, padx=10, pady=2)
The command specified in the button is a function that will be called. The function holds the code that should fire when the button is pushed. This function should be above when the button is made.
Canvas
A canvas allows for various shapes and designs to be drawn onto it. These shapes will remain if more are added unless the shape's pixels are completely overwritten. To add a canvas, the following code is used:
newCanvas = Canvas(leftFrame, width=100, height=100, bg='white')
newCanvas.grid(row=0, column=0, padx=10, pady=2)
This gets the canvas. To draw on the canvas there are a large number of functions available, such as create_arc and create_line.
Text
A Text widget can either be written in or can be written to. To use it, the following is needed:
newText = Text(leftFrame, width=50, height=8, takefocus=0)newText.grid(row=0, column=0, padx=10, pady=2)
#write to widgetnewText.insert(0.0, "Text to insert") #0.0 is beginning of widget
The Text widget is good for creating logs since the data will remain and the user can look back at it.
GUI Example
It is often useful to map out what the GUI is going to look like before starting on it so that all the frames can be nested appropriately. A sketch should be made for the GUI so that it can be visualized, such as the following:
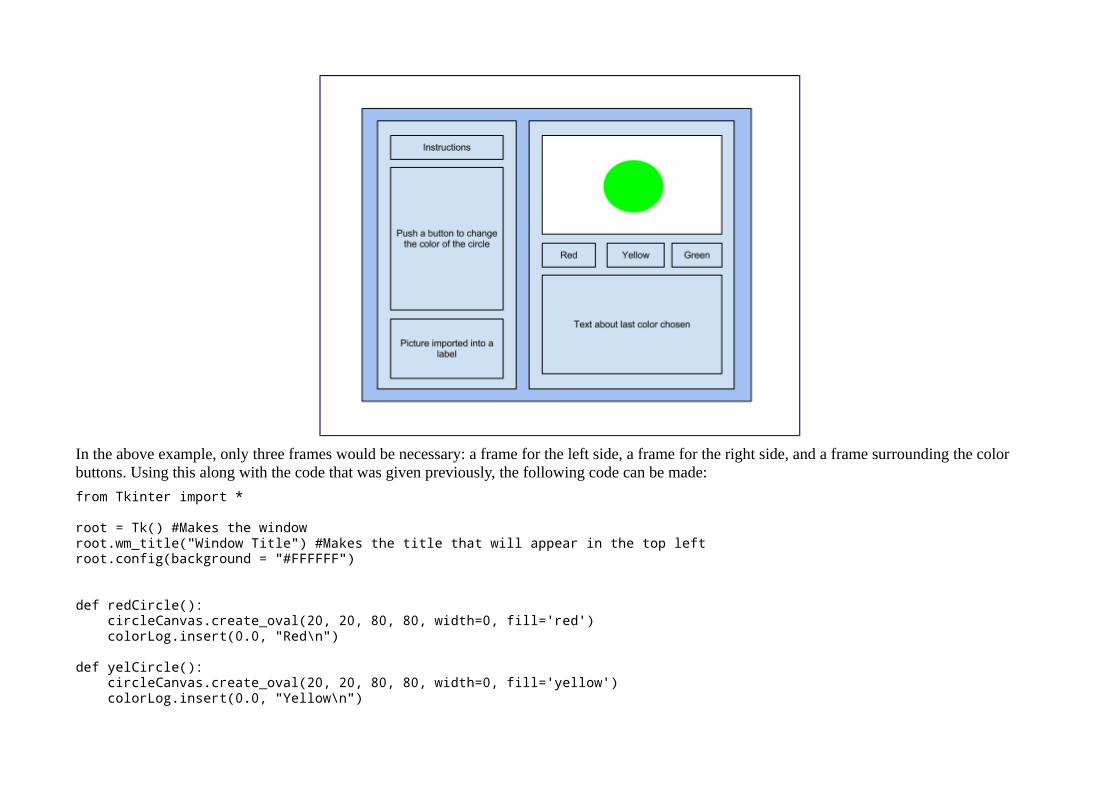
In the above example, only three frames would be necessary: a frame for the left side, a frame for the right side, and a frame surrounding the color buttons. Using this along with the code that was given previously, the following code can be made:
from Tkinter import *
root = Tk() #Makes the windowroot.wm_title("Window Title") #Makes the title that will appear in the top leftroot.config(background = "#FFFFFF")
def redCircle(): circleCanvas.create_oval(20, 20, 80, 80, width=0, fill='red') colorLog.insert(0.0, "Red\n")
def yelCircle(): circleCanvas.create_oval(20, 20, 80, 80, width=0, fill='yellow') colorLog.insert(0.0, "Yellow\n")
def grnCircle(): circleCanvas.create_oval(20, 20, 80, 80, width=0, fill='green') colorLog.insert(0.0, "Green\n")
#Left Frame and its contentsleftFrame = Frame(root, width=200, height = 600)leftFrame.grid(row=0, column=0, padx=10, pady=2)
Label(leftFrame, text="Instructions:").grid(row=0, column=0, padx=10, pady=2)
Instruct = Label(leftFrame, text="1\n2\n2\n3\n4\n5\n6\n7\n8\n9\n")Instruct.grid(row=1, column=0, padx=10, pady=2)try: imageEx = PhotoImage(file = 'image.gif') Label(leftFrame, image=imageEx).grid(row=2, column=0, padx=10, pady=2)except: print("Image not found")
#Right Frame and its contentsrightFrame = Frame(root, width=200, height = 600)rightFrame.grid(row=0, column=1, padx=10, pady=2)
circleCanvas = Canvas(rightFrame, width=100, height=100, bg='white')circleCanvas.grid(row=0, column=0, padx=10, pady=2)
btnFrame = Frame(rightFrame, width=200, height = 200)btnFrame.grid(row=1, column=0, padx=10, pady=2)
colorLog = Text(rightFrame, width = 30, height = 10, takefocus=0)colorLog.grid(row=2, column=0, padx=10, pady=2)
redBtn = Button(btnFrame, text="Red", command=redCircle)redBtn.grid(row=0, column=0, padx=10, pady=2)
yellowBtn = Button(btnFrame, text="Yellow", command=yelCircle)yellowBtn.grid(row=0, column=1, padx=10, pady=2)
greenBtn = Button(btnFrame, text="Green", command=grnCircle)greenBtn.grid(row=0, column=2, padx=10, pady=2)
root.mainloop() #start monitoring and updating the GUI
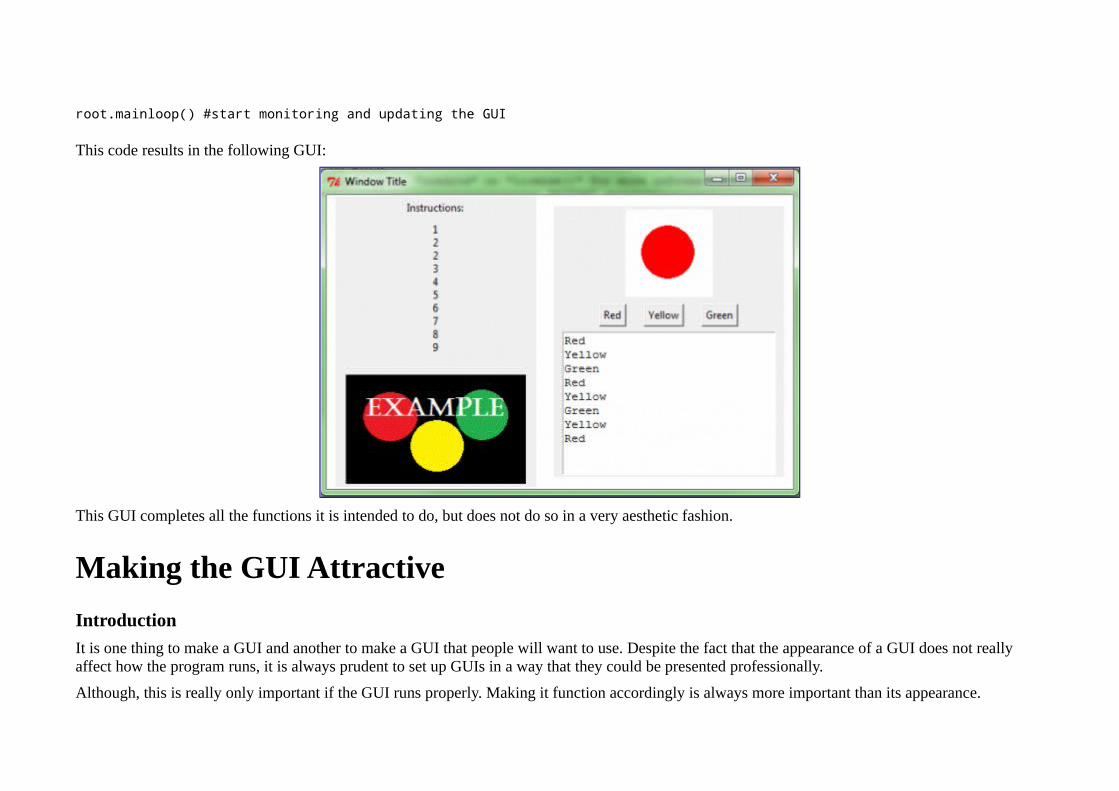
This code results in the following GUI:
This GUI completes all the functions it is intended to do, but does not do so in a very aesthetic fashion.
Making the GUI Attractive
Introduction
It is one thing to make a GUI and another to make a GUI that people will want to use. Despite the fact that the appearance of a GUI does not really affect how the program runs, it is always prudent to set up GUIs in a way that they could be presented professionally.
Although, this is really only important if the GUI runs properly. Making it function accordingly is always more important than its appearance.
Note: This will focus on improving the GUI example from the previous tutorial.
Making Frames the Same Height
When GUIs with multiple frames are built, it can be seen that each frame is its own unique size based on what is in each frame. Usually, this is a nuisance. Fortunately, there is an easy fix: Sticky.
This gets added when you put it in the grid:
leftFrame.grid(row=0, column=0, padx=10, pady=2, sticky=N+S)
The options for Sticky are: N, E, S, W.
Justification of Text in Labels
If there is only one line of text in the label, the text can be justified by using Anchor. However, sometimes it is necessary to have more than one line of text, such as the instructions label. In this case, it is necessary to use Wraplength to get the text wrapped. Unfortunately, this wants the wrap length in pixels rather than characters, so that can be a bit of a guessing game to get it right. If there is more than one line of text, it should also include Justify.
The code below shows an example of justification of multiple text to the left:
Instruct = Label(leftFrame, width=22, height=15, text=instructions, takefocus=0, wraplength=170, anchor=W, justify=LEFT)
The options for Anchor are: N, NE, E, SE, S, SW, W, NW, CENTER.
The options for Justification are: LEFT, RIGHT, CENTER.
Fonts
The main thing with fonts, is not to pick really obnoxious fonts that people are not going to want to look at. Simple fonts are better for the main GUI and if a stylized font is desired for only select portions, that is fine as long as the stylized font is not too crazy.
Fonts are added by using the following code:
Instruct = Label(leftframe, width=30, height=9, text=instructions, takefocus=0, wraplength=275, font=("MS Serif", 12), anchor=W, justify=LEFT, background=framebg)
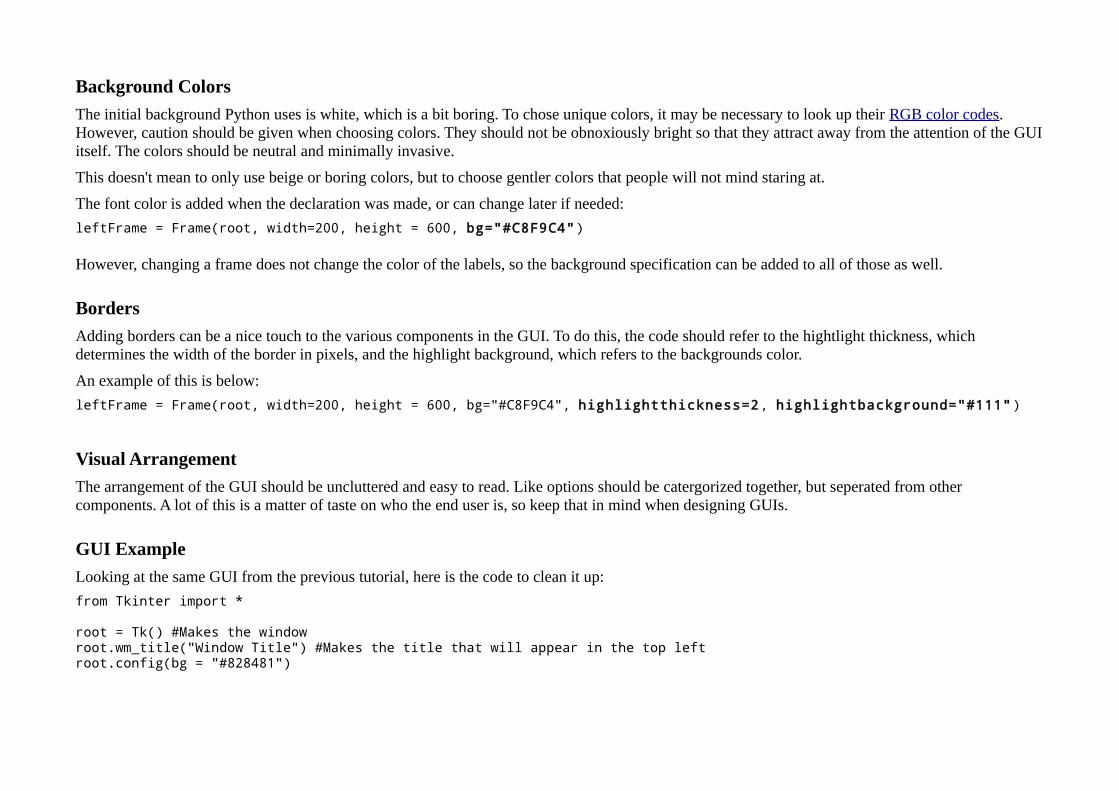
Background Colors
The initial background Python uses is white, which is a bit boring. To chose unique colors, it may be necessary to look up their RGB color codes. However, caution should be given when choosing colors. They should not be obnoxiously bright so that they attract away from the attention of the GUI itself. The colors should be neutral and minimally invasive.
This doesn't mean to only use beige or boring colors, but to choose gentler colors that people will not mind staring at.
The font color is added when the declaration was made, or can change later if needed:
leftFrame = Frame(root, width=200, height = 600, bg="#C8F9C4")
However, changing a frame does not change the color of the labels, so the background specification can be added to all of those as well.
Borders
Adding borders can be a nice touch to the various components in the GUI. To do this, the code should refer to the hightlight thickness, which determines the width of the border in pixels, and the highlight background, which refers to the backgrounds color.
An example of this is below:
leftFrame = Frame(root, width=200, height = 600, bg="#C8F9C4", highlightthickness=2, highlightbackground="#111")
Visual Arrangement
The arrangement of the GUI should be uncluttered and easy to read. Like options should be catergorized together, but seperated from other components. A lot of this is a matter of taste on who the end user is, so keep that in mind when designing GUIs.
GUI Example
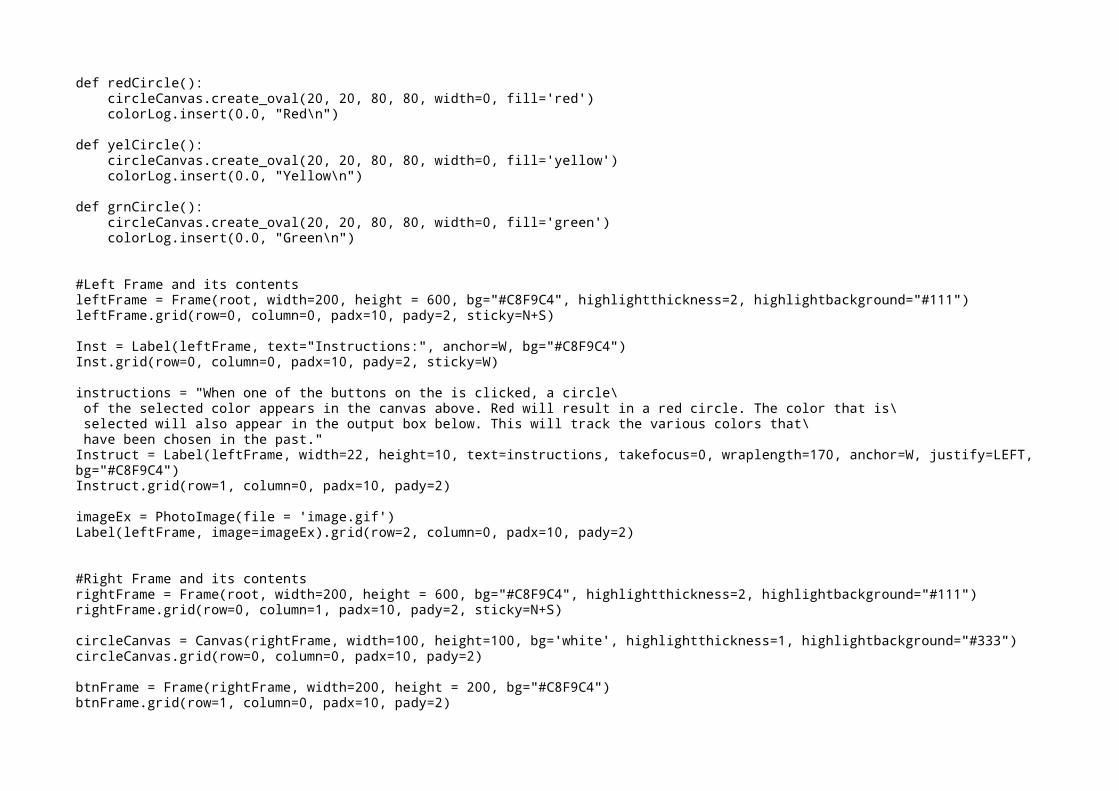
Looking at the same GUI from the previous tutorial, here is the code to clean it up:
from Tkinter import *
root = Tk() #Makes the windowroot.wm_title("Window Title") #Makes the title that will appear in the top leftroot.config(bg = "#828481")
def redCircle(): circleCanvas.create_oval(20, 20, 80, 80, width=0, fill='red') colorLog.insert(0.0, "Red\n")
def yelCircle(): circleCanvas.create_oval(20, 20, 80, 80, width=0, fill='yellow') colorLog.insert(0.0, "Yellow\n")
def grnCircle(): circleCanvas.create_oval(20, 20, 80, 80, width=0, fill='green') colorLog.insert(0.0, "Green\n")
#Left Frame and its contentsleftFrame = Frame(root, width=200, height = 600, bg="#C8F9C4", highlightthickness=2, highlightbackground="#111")leftFrame.grid(row=0, column=0, padx=10, pady=2, sticky=N+S)
Inst = Label(leftFrame, text="Instructions:", anchor=W, bg="#C8F9C4")Inst.grid(row=0, column=0, padx=10, pady=2, sticky=W)
instructions = "When one of the buttons on the is clicked, a circle\ of the selected color appears in the canvas above. Red will result in a red circle. The color that is\ selected will also appear in the output box below. This will track the various colors that\ have been chosen in the past."Instruct = Label(leftFrame, width=22, height=10, text=instructions, takefocus=0, wraplength=170, anchor=W, justify=LEFT, bg="#C8F9C4")Instruct.grid(row=1, column=0, padx=10, pady=2)
imageEx = PhotoImage(file = 'image.gif')Label(leftFrame, image=imageEx).grid(row=2, column=0, padx=10, pady=2)
#Right Frame and its contentsrightFrame = Frame(root, width=200, height = 600, bg="#C8F9C4", highlightthickness=2, highlightbackground="#111")rightFrame.grid(row=0, column=1, padx=10, pady=2, sticky=N+S)
circleCanvas = Canvas(rightFrame, width=100, height=100, bg='white', highlightthickness=1, highlightbackground="#333")circleCanvas.grid(row=0, column=0, padx=10, pady=2)
btnFrame = Frame(rightFrame, width=200, height = 200, bg="#C8F9C4")btnFrame.grid(row=1, column=0, padx=10, pady=2)
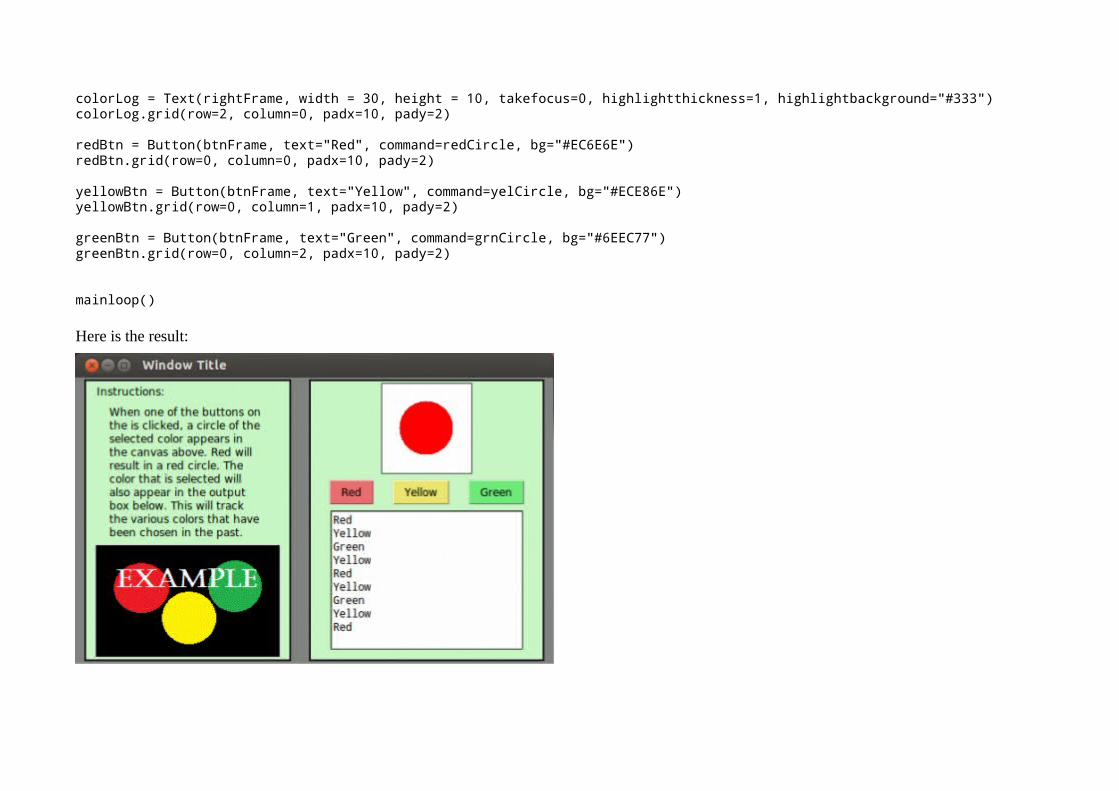
colorLog = Text(rightFrame, width = 30, height = 10, takefocus=0, highlightthickness=1, highlightbackground="#333")colorLog.grid(row=2, column=0, padx=10, pady=2)
redBtn = Button(btnFrame, text="Red", command=redCircle, bg="#EC6E6E")redBtn.grid(row=0, column=0, padx=10, pady=2)
yellowBtn = Button(btnFrame, text="Yellow", command=yelCircle, bg="#ECE86E")yellowBtn.grid(row=0, column=1, padx=10, pady=2)
greenBtn = Button(btnFrame, text="Green", command=grnCircle, bg="#6EEC77")greenBtn.grid(row=0, column=2, padx=10, pady=2)
mainloop()
Here is the result:

Python Web UI with Tornado
Introduction
So, you want a GUI for your robot. Sure, you could make a nice GUI in Python with Tkinter, but there are some really good reasons to try it as a website instead:
• A web GUI can be accessed from almost any location • A well-designed web GUI can be used on almost any device like a tablet or a phone • HTML, CSS, and Javascript are well documented, powerful, and very flexible • HTML can be easily made to look very nice
There are some drawbacks to implementing your GUI as a website though:
• It is only able to start communication one-way (browser to server, server responds) • Great for buttons and other input • Requres continuous polling or a commet to get data to be pushed to the browser
• It adds another "layer" of complexity to your code • Several different languages (C++ on Arduino, Python Server, and HTML+CSS+Javascript in browser) • The server has to relay information from the browser to the robot
Installing Python Tornado
I used the Tornado web server for my projects. It is better than just using CGI, since the environment is always loaded while the server is running instead of loading it every time a request is made. CGI would be problematic then, since serial.begin would be run every time a request was made, which simply wouldn't work since the Arduino would also restart all the time.
On Ubuntu, the installation is as easy as:
sudo apt-get install python-tornado python-serial
Using Tornado with the Serial Library
So one of the challenges with this is that reading serial input in python is usually blocking, so the webserver becomes unresponsive to browsers' requests while waiting for serial input.
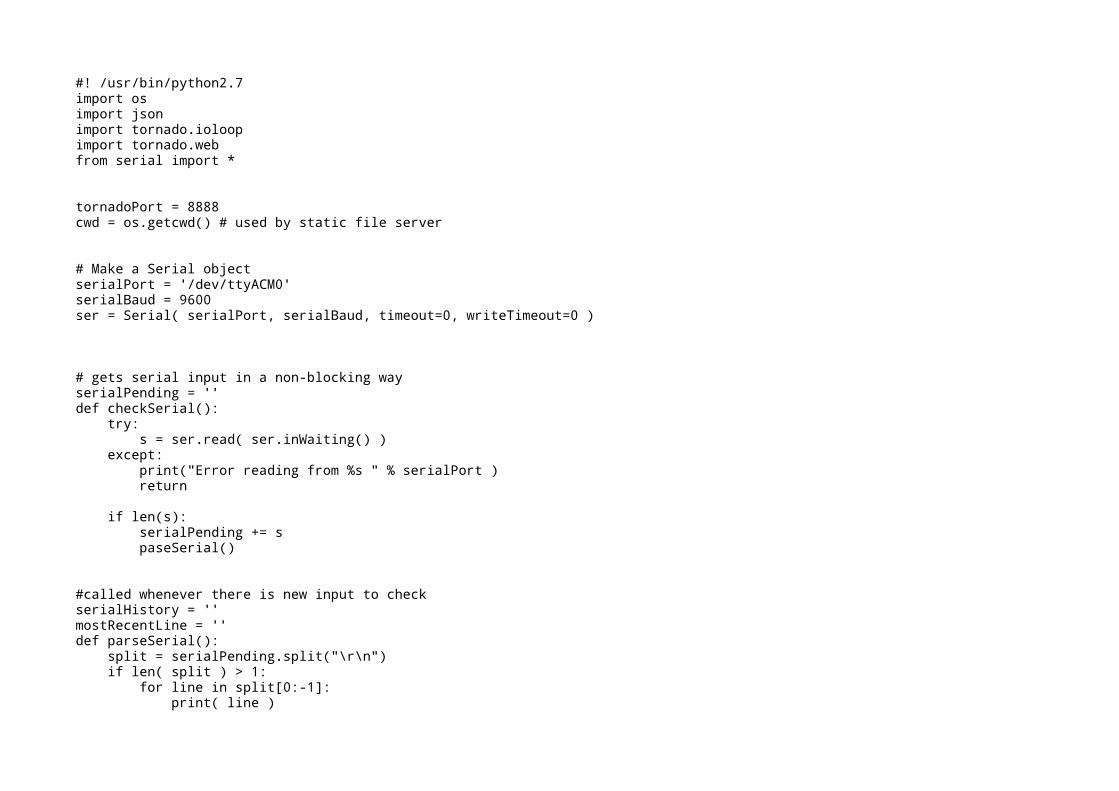
#! /usr/bin/python2.7import osimport jsonimport tornado.ioloopimport tornado.webfrom serial import *
tornadoPort = 8888cwd = os.getcwd() # used by static file server
# Make a Serial objectserialPort = '/dev/ttyACM0'serialBaud = 9600ser = Serial( serialPort, serialBaud, timeout=0, writeTimeout=0 )
# gets serial input in a non-blocking wayserialPending = ''def checkSerial(): try: s = ser.read( ser.inWaiting() ) except: print("Error reading from %s " % serialPort ) return if len(s): serialPending += s paseSerial()
#called whenever there is new input to checkserialHistory = ''mostRecentLine = ''def parseSerial(): split = serialPending.split("\r\n") if len( split ) > 1: for line in split[0:-1]: print( line )
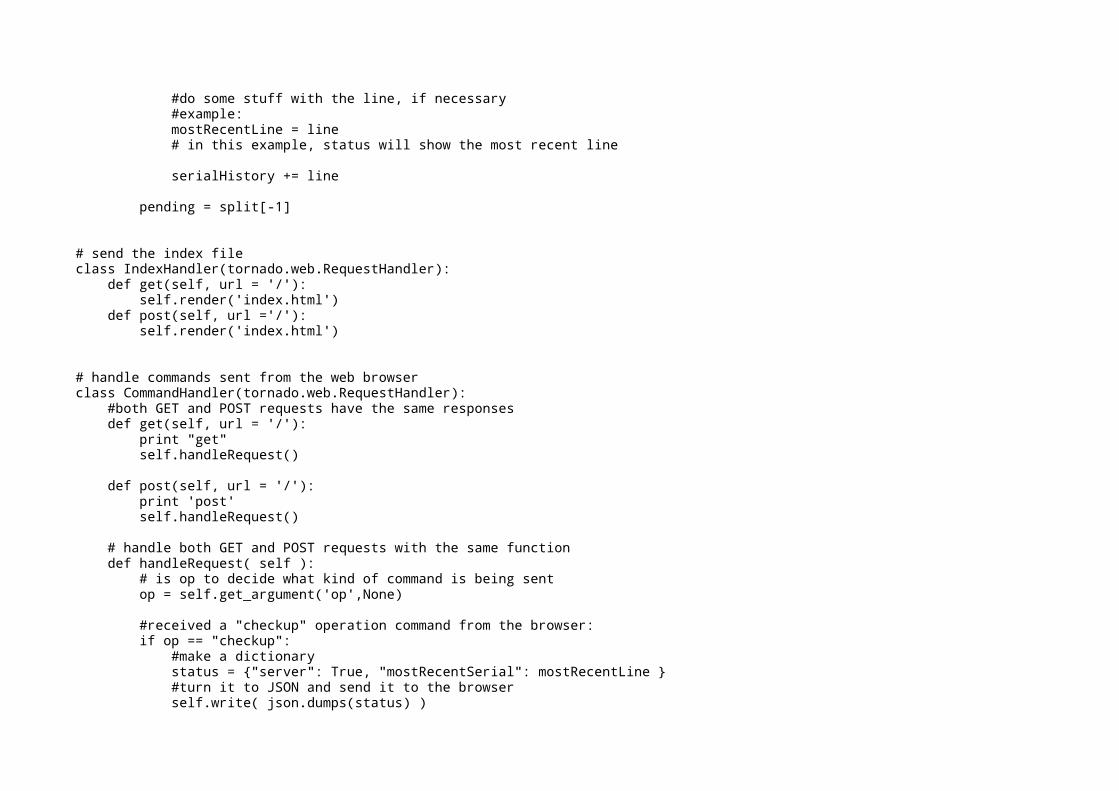
#do some stuff with the line, if necessary #example: mostRecentLine = line # in this example, status will show the most recent line
serialHistory += line
pending = split[-1]
# send the index fileclass IndexHandler(tornado.web.RequestHandler): def get(self, url = '/'): self.render('index.html') def post(self, url ='/'): self.render('index.html')
# handle commands sent from the web browserclass CommandHandler(tornado.web.RequestHandler): #both GET and POST requests have the same responses def get(self, url = '/'): print "get" self.handleRequest() def post(self, url = '/'): print 'post' self.handleRequest() # handle both GET and POST requests with the same function def handleRequest( self ): # is op to decide what kind of command is being sent op = self.get_argument('op',None) #received a "checkup" operation command from the browser: if op == "checkup": #make a dictionary status = {"server": True, "mostRecentSerial": mostRecentLine } #turn it to JSON and send it to the browser self.write( json.dumps(status) )
#operation was not one of the ones that we know how to handle else: print op print self.request raise tornado.web.HTTPError(404, "Missing argument 'op' or not recognized")
# adds event handlers for commands and file requestsapplication = tornado.web.Application([ #all commands are sent to http://*:port/com #each command is differentiated by the "op" (operation) JSON parameter (r"/(com.*)", CommandHandler ), (r"/", IndexHandler), (r"/(index\.html)", tornado.web.StaticFileHandler,{"path": cwd}), (r"/(.*\.png)", tornado.web.StaticFileHandler,{"path": cwd }), (r"/(.*\.jpg)", tornado.web.StaticFileHandler,{"path": cwd }), (r"/(.*\.js)", tornado.web.StaticFileHandler,{"path": cwd }), (r"/(.*\.css)", tornado.web.StaticFileHandler,{"path": cwd }),])
if __name__ == "__main__": #tell tornado to run checkSerial every 10ms serial_loop = tornado.ioloop.PeriodicCallback(checkSerial, 10) serial_loop.start() #start tornado application.listen(tornadoPort) print("Starting server on port number %i..." % tornadoPort ) print("Open at http://127.0.0.1:%i/index.html" % tornadoPort ) tornado.ioloop.IOLoop.instance().start()
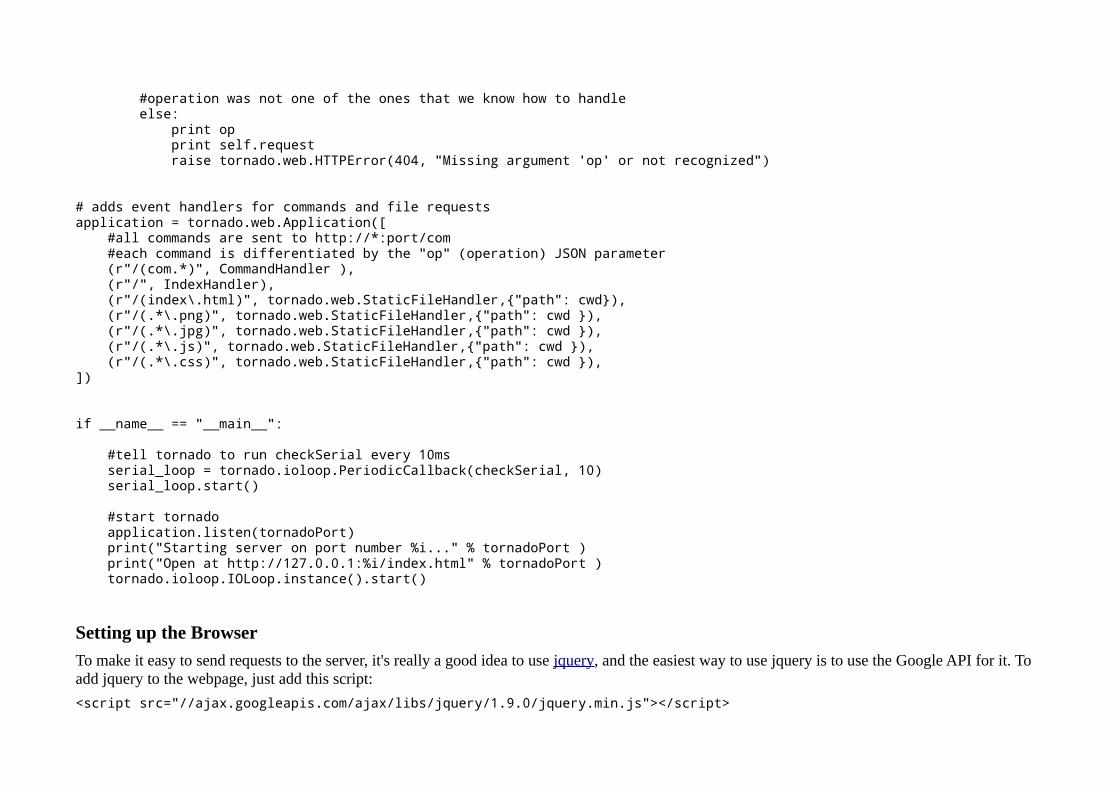
Setting up the Browser
To make it easy to send requests to the server, it's really a good idea to use jquery, and the easiest way to use jquery is to use the Google API for it. To add jquery to the webpage, just add this script:
<script src="//ajax.googleapis.com/ajax/libs/jquery/1.9.0/jquery.min.js"></script>
So to start, we'll just have a simple webpage that has a div. When the div is clicked, jquery will ask the status of the tornado webserver.
<!DOCTYPE html><html><head><title>Python Tornado Test Page</title><script src="http://ajax.googleapis.com/ajax/libs/jquery/1.8.2/jquery.min.js"></script><script>function serverResponded( data ) { /* log the event data, so you can see what's going on. Shows up in the console on your browser. (Chrome: Tools > Developer Tools > Console) */ console.log( data ); // check the server status, and report it on the screen if ( data.server === true ) { $('#status .value').html("OK"); } else { $('#status .value').html("NOT OK"); } // add the last serial to the div on the screen $('#serial .value').html( data.mostRecentSerial );}
$(document).ready( function() { /* handle the click event on the clickme */ $('#clickme').click( function() { params = { op: "checkup" }; $.getJSON( 'http://localhost:8888/com' , params, serverResponded ); });});</script></head><body> <div id="clickme" style="cursor: pointer;">CLICK ME</div> <div id="status"> Server Status: <span class="value">?</span>
</div> <div id="serial"> Last Serial Input: <span class="value"></span> </div></body>
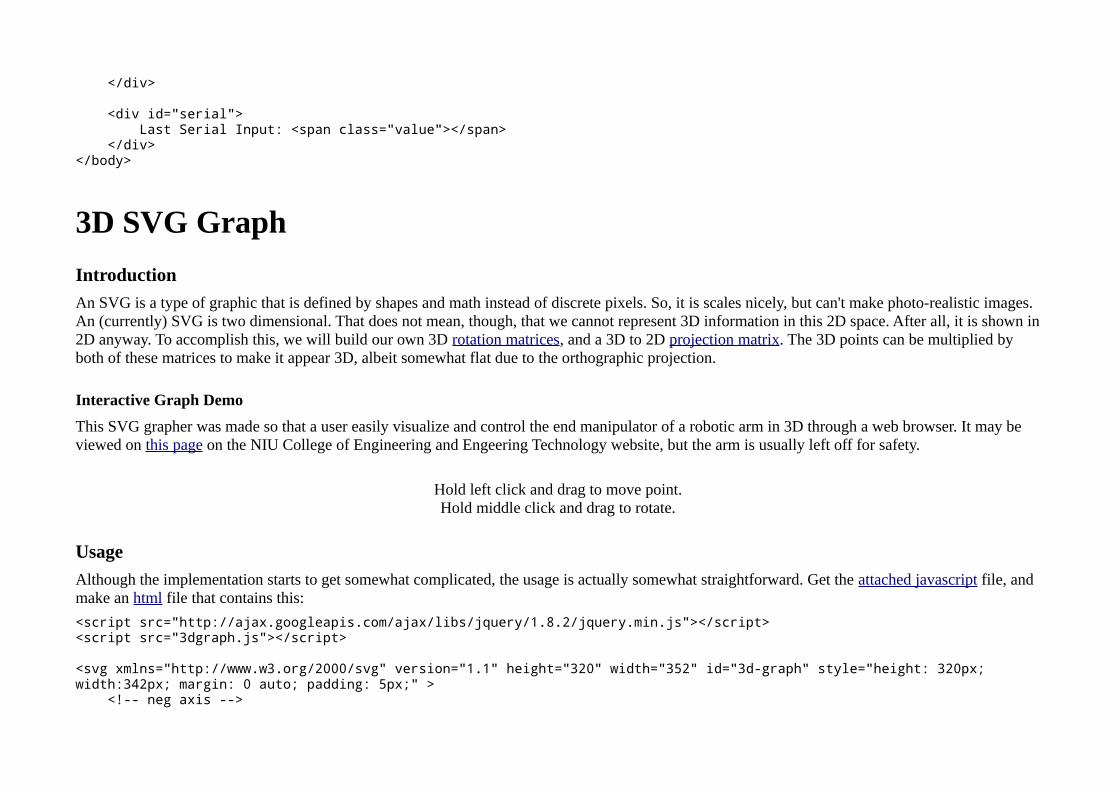
3D SVG Graph
Introduction
An SVG is a type of graphic that is defined by shapes and math instead of discrete pixels. So, it is scales nicely, but can't make photo-realistic images. An (currently) SVG is two dimensional. That does not mean, though, that we cannot represent 3D information in this 2D space. After all, it is shown in 2D anyway. To accomplish this, we will build our own 3D rotation matrices, and a 3D to 2D projection matrix. The 3D points can be multiplied by both of these matrices to make it appear 3D, albeit somewhat flat due to the orthographic projection.
Interactive Graph Demo
This SVG grapher was made so that a user easily visualize and control the end manipulator of a robotic arm in 3D through a web browser. It may be viewed on this page on the NIU College of Engineering and Engeering Technology website, but the arm is usually left off for safety.
Hold left click and drag to move point. Hold middle click and drag to rotate.
Usage
Although the implementation starts to get somewhat complicated, the usage is actually somewhat straightforward. Get the attached javascript file, and make an html file that contains this:
<script src="http://ajax.googleapis.com/ajax/libs/jquery/1.8.2/jquery.min.js"></script><script src="3dgraph.js"></script>
<svg xmlns="http://www.w3.org/2000/svg" version="1.1" height="320" width="352" id="3d-graph" style="height: 320px; width:342px; margin: 0 auto; padding: 5px;" > <!-- neg axis -->
<line x1="100" y1="250" x2="400" y2="250" id="neg-axis-x" style="stroke:rgba(250,200,200,0.5);stroke-width:2"/> <line x1="100" y1="250" x2="100" y2="0" id="neg-axis-y" style="stroke:rgba(200,250,200,0.5);stroke-width:2"/> <line x1="100" y1="250" x2="0" y2="400" id="neg-axis-z" style="stroke:rgba(200,200,250,0.5);stroke-width:2"/> <!-- axis --> <line x1="100" y1="250" x2="400" y2="250" id="axis-x" style="stroke:rgb(200,0,0);stroke-width:2"/> <line x1="100" y1="250" x2="100" y2="0" id="axis-y" style="stroke:rgb(0,200,0);stroke-width:2"/> <line x1="100" y1="250" x2="0" y2="400" id="axis-z" style="stroke:rgb(0,0,200);stroke-width:2"/></svg>
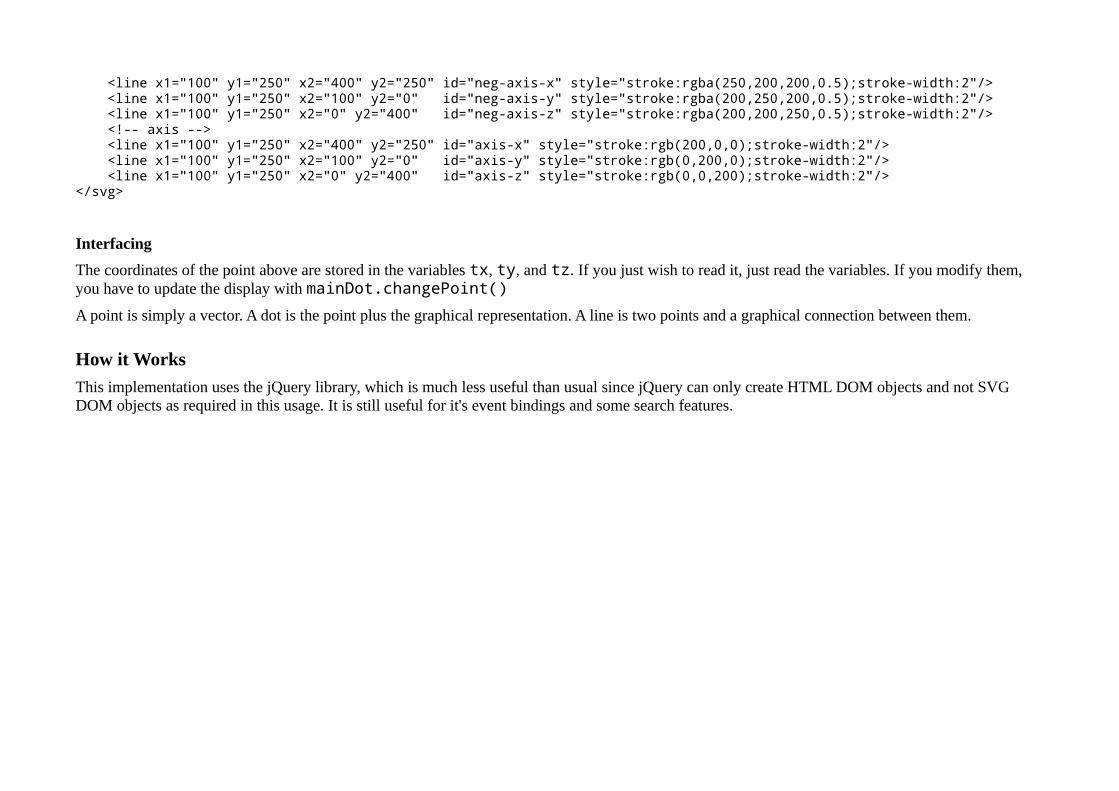
Interfacing
The coordinates of the point above are stored in the variables tx, ty, and tz. If you just wish to read it, just read the variables. If you modify them, you have to update the display with mainDot.changePoint()
A point is simply a vector. A dot is the point plus the graphical representation. A line is two points and a graphical connection between them.
How it Works
This implementation uses the jQuery library, which is much less useful than usual since jQuery can only create HTML DOM objects and not SVG DOM objects as required in this usage. It is still useful for it's event bindings and some search features.

There is a point class with an x, y, and z. Points are used to in the graphical classes Dot and Line, where line has two points for a start and an end. Points are multiplied by rotation and projection matrices to turn their 3 dimensions into 2 dimensions. The rotation matrix angles are modified by mouse movement during a click event. When the rotation matrix is changed, the points must be multiplied with the new matrix and the result must be updated on the SVG.
In this specific usage, there were 7 points used for the axes. A zero point and points at the maximum and minimum (positive and negative) for each direction. There is a dot at the point you want to visualize in the 3D space, as well as 3 guide lines to help with perspective. The guide lines are entirely necessary. It would also be possible to plot a curved line by using many Line classes or even making your own class that uses the SVG path tag to generate a smooth curve. Another possible feature might be to put a Dot class at a point on the lone closest to the mouse and showing the x,y, and z coordinates.
Attachments: 3dgraph.js.txt
Tkinter with Serial
Introduction
To use Python as a graphical interface for an Arduino powered robot, programmatically read the USB with the pySerial library. However, waiting for input from pySerial's Serial object is blocking, which means that it will prevent your GUI from being responsive. The process cannot update buttons or react to input because it is busy waiting for the serial to say something.
The first key is to use the root.after(milliseconds) method to run a non-blocking version of read in the tkinter main loop. Keep in mind that when TkInter gets to the root.mainloop() method, it is running its own while loop. It needs the things in there to run every now and then in order to make the
interface respond to interactions. If you are running your own infinite loop anywhere in the code, the GUI will freeze up. Alternatively, you could write your own infinite loop, and call root.update() yourself occasionally. Both methods achieve basically the same goal of updating the GUI.
However, the real issue is making sure that reading from serial is non-blocking. Normally, the Serial.read() and Serial.readline() will hold up the whole program until it has enough information to give. For example, a Serial.readline() won't print anything until there is a whole line to return, which in some cases might be never! Even using the after() and update() methods will still not allow the UI to be updated in this case, since the function never ends. This problem can be avoided with the timeout=0 option when enitializing the Serial object, which will cause it to return nothing unless something is already waiting in the Serial object's buffer.
Codefrom serial import *from Tkinter import *serialPort = "/dev/ttyACM0"baudRate = 9600ser = Serial(serialPort , baudRate, timeout=0, writeTimeout=0) #ensure non-blocking#make a TkInter Windowroot = Tk()root.wm_title("Reading Serial")# make a scrollbarscrollbar = Scrollbar(root)scrollbar.pack(side=RIGHT, fill=Y)# make a text box to put the serial outputlog = Text ( root, width=30, height=30, takefocus=0)log.pack()# attach text box to scrollbarlog.config(yscrollcommand=scrollbar.set)scrollbar.config(command=log.yview)#make our own buffer#useful for parsing commands#Serial.readline seems unreliable at times tooserBuffer = ""def readSerial(): while True: c = ser.read() # attempt to read a character from Serial #was anything read? if len(c) == 0: break
# get the buffer from outside of this function global serBuffer # check if character is a delimeter if c == '\r': c = '' # don't want returns. chuck it if c == '\n': serBuffer += "\n" # add the newline to the buffer #add the line to the TOP of the log log.insert('0.0', serBuffer) serBuffer = "" # empty the buffer else: serBuffer += c # add to the buffer root.after(10, readSerial) # check serial again soon# after initializing serial, an arduino may need a bit of time to resetroot.after(100, readSerial)root.mainloop()