python turtles tutorial ggc s3 · pdf filetutorial 1 overview: explore drawing a square and a...
TRANSCRIPT

Python & Turtle Graphics
Tutorial
GGC S3

Programming Skills Objectives:
Identify and program Python code in JES (Jython Environment for Students) and save into their file area with proper extension. (ProgramName.py)
Use following commands to draw shapes and designs with Turtles.
Use comments in program to describe what code will do.
Troubleshoot and solve coding errors and problems.
Run code from written programs and from program and command area.
Define and use Python functions.
Use the "for i in range(x)" commands to do repeats.

Opening JES Software
Click JES icon on the desktop to open the
JES software.

Tutorial 1 Overview:Explore drawing a Square and a Rectangle
with the Python Turtle Commands in JES
In this tutorial, you will practice using the Command Area to test and draw a Square and a Rectangle.
Use the up arrow key to show previous commands you made in the Command Area to make programming faster.
Make sure you load the World and Turtle program you create FIRST before using the Command Area to draw your shapes.
Modify any Turtle commands you typed in the Program Area in order to create the shape you want.
Turtle Commands used in this Tutorial:
turtle.forward()
turtle.turn()
turtle.penUp()
turtle.penDown()
turtle.moveTo(x, y)
Move on to the next slide to begin typing!

Create World and Turtle
First step is to create a World and a Turtle.
In the Program Area of the JES editor,
type in the following code to create a
world and a turtle:
world = makeWorld(400, 400)
turtle = makeTurtle(world)
Double check your code with the picture
to the right.

Program commands to make the Turtle move
Type the following commands below
your World code to make your turtle
move:
turtle.forward(100)
turtle.turn(90)
Optional: Create a comment for your
program.

Save and Load Program
Save file as “Lastname_Square.py” inside
the Python Turtles folder that is on the
desktop.
Click File Save Program AS Desktop
Python & Turtle Graphics Save
Click “Load Program” to create the
World.
A new window will open up and you
should have a turtle in your window.

Using Command Area to test and draw your square
The JES Command Area allows you to test your codes right away.
Use the Command Area to test and find a correct path for your turtle to draw your square.
Only use the following two turtle commands:
turtle.forward(100)
turtle.turn(90)
Having Trouble?: Hit the space bar to reveal the remaining commands your turtle needs to draw a square.

Turtle Square
Now that you have figured
out the path to create your
square, type the correct
code into the Program
Area.
Click “Load Program” and
you should now have a
Square!

Pick Up and Move Turtle
Next step is to have the Turtle draw a
Rectangle in the same World.
But before you do that, the turtle needs
to be moved to a new location.
Use the penUp(), moveTo(), and
penDown() to accomplish this task.
Type in the code you see in the image to
the right under your Square Turtle code.
Option: Use Comments to make your
program easy to read and for you to
understand.

Pick Up and Move Turtle
Save and then click “Load Program”.
Your Turtle should now be in a new
location.
Note: Multiple JES windows will open
when you click “Load Program”. Be sure
to close the windows when you are finish
with each tutorial. This avoids slowing
down the computer.

STOP! Time to Switch Roles
If you need help, ask for assistance.
Be sure SWITCH ROLES before moving on
to the next tutorial!

Draw a Rectangle
Squares and Rectangles are very similar.
What can we modify or use in the Square Turtle commands to draw a Rectangle?
Be sure to switch positions and have the other partner draw the Rectangle.
Use the Command Area to test your code out, then type in the correct code into the Program Area.
HINT: Copy only the Square Turtle commands, then modify every other turtle.forward(100) command to a smaller number.

Draw a Rectangle
Save and then click “Load Program”.
You should now have a Rectangle and a
Square in your World.

Tutorial 2: Creating Python Functions for Shapes and Designs in JES
Remember using the Command Area is good for short experiments.
Longer programs need to be coded and then saved in the Program Area.
You can achieve this by placing your Turtle commands in Functions.
Save your “LastName_Square.py” program. We will create a new JES program file to use
for Tutorial 2 through 4.
Go to File New Program Save Program As Desktop Python & Turtle Graphics
Save File Name as “LastName_Functions.py”.
Reminder: Multiple JES windows will open when you click “Load Program”. Be sure to close
the windows when you are finish with each tutorial. This avoids slowing down the computer.

Create a World and a Turtle
Begin by creating your World and Turtle In
the Program Area of the JES editor, type
in the following code below:
world = makeWorld(400, 400)
turtle = makeTurtle(world)
Double check your code with the picture
to the right.

Create a Function to Draw a Triangle
Begin the function with def
def keyword means you are creating a new command for your turtle.
Then, type the name of the function, and the input “turtle” between parentheses:
makeTriangle(turtle)
End the line with a colon (“ : ”)
Next, type in the following turtle commands you see in the image to right to create a Triangle. These commands makes up the body of the function.
The body of the function needs to be indented (Hint: Use two spaces).

REMEMBER: The Most Common JES Issue is Forgetting to Load
Your function does NOT exist for JES until
you load it
Before you load it, the program is just a bunch of characters.
Loading encodes it as an executable function
Save and Save As
You must Save before Loading
You must Load before you can use your function
An “Unloaded” function doesn’t exist yet.

Call Triangle Function
Save and then click “Load Program”.
A World window with a Turtle will open.
Now, call your makeTriangle(turtle)
function by typing the function name in
the Command Area.
Then hit the enter key.
This calling will allow the Turtle to draw a
Triangle in the World.
Congrats! You have
successfully created a
Python Function!

STOP! Time to Switch Roles
If you need help, ask for assistance.
Be sure SWITCH ROLES before moving on
to the next tutorial!
Reminder: Multiple JES windows will open
when you click “Load Program”. Be sure
to close the windows when you are finish
with each tutorial. This avoids slowing
down the computer.

Tutorial 3: Introducing the For Loop-Using a For Loop in a Function
Loops are simply parts of a program that run over
and over again to reduce the amount of times you
type the same command.
The phrase “for i in range” sets the number of times
you want to run a command or a series of
commands.
You specify how many times you want to run the
turtle commands to repeat inside the parenthesis of
the range function.
TIP: In JES, a For Loop must end with a colon (:) and
be indented by two spaces in a Function.

betterSquare(turtle) Function
Begin by defining the betterSquare(turtle) function under your makeTriangle(turtle) function.
Then type in the for loop and turtle commands you see in the image.
Be sure to indent the for loop and your turtle commands.
Next, save and click “Load Program”.
Now call your function by typing betterSquare(turtle) into the Command Area.
Be sure to hit the enter key to complete the call of your function.

betterSquare(turtle) Function Review
Remember the two commands to draw a square
turtle.forward(100)
Turtle.turn(90)
See how you can use a for loop to minimize the lines of code needed to draw a square.
Notice how the for loop tells the turtle to make 4 rounds of the forward(100) and turn(90) command to draw the square.

makeCircle(turtle) Function
Begin by defining the makeCircle(turtle) function.
Then type in the for loop and turtle commands you see in the image.
Be sure to indent the for loop and your turtle commands.
Next, save and click “Load Program”.
Now call your function by typing makeCircle(turtle) into the Command Area.
This will allow the Turtle to draw a Circle.
Notice how the for loop tells the Turtle to repeat the commands forward(20) and turn(20) 18 times to complete the Circle.

Tutorial 4: Using an Old Function within a New Function (Square)
Create a spiralSquare(turtle) Function
by using the betterSquare(turtle)
function.
Re-using an old shape function within
a new function allows your Python
program to create cool designs!
Type in the code you see in the
image.
Save and Load program!
Be sure to call you spiralSquare(turtle)
function in Command Area!

YOUR RESULTS SHOULD LOOK LIKE THIS!
spiralSquare(turtle)

STOP! Time to Switch Roles
If you need help, ask for assistance.
Be sure SWITCH ROLES before moving on
to the next tutorial!
Reminder: Multiple JES windows will open
when you click “Load Program”. Be sure
to close the windows when you are finish
with each tutorial. This avoids slowing
down the computer.

Tutorial 4: Using an Old Function within a New Function (Triangle)
Create a windMill(turtle) Function by
using the makeTriangle(turtle) function.
Re-using an old shape function within a
new function allows your Python program
to create cool designs!
Type in the code you see in the image.
Save and Load program!
Be sure to call your windMill(turtle)
function in Command Area!

YOUR RESULTS SHOULD LOOK LIKE THIS!
windmill(turtle)
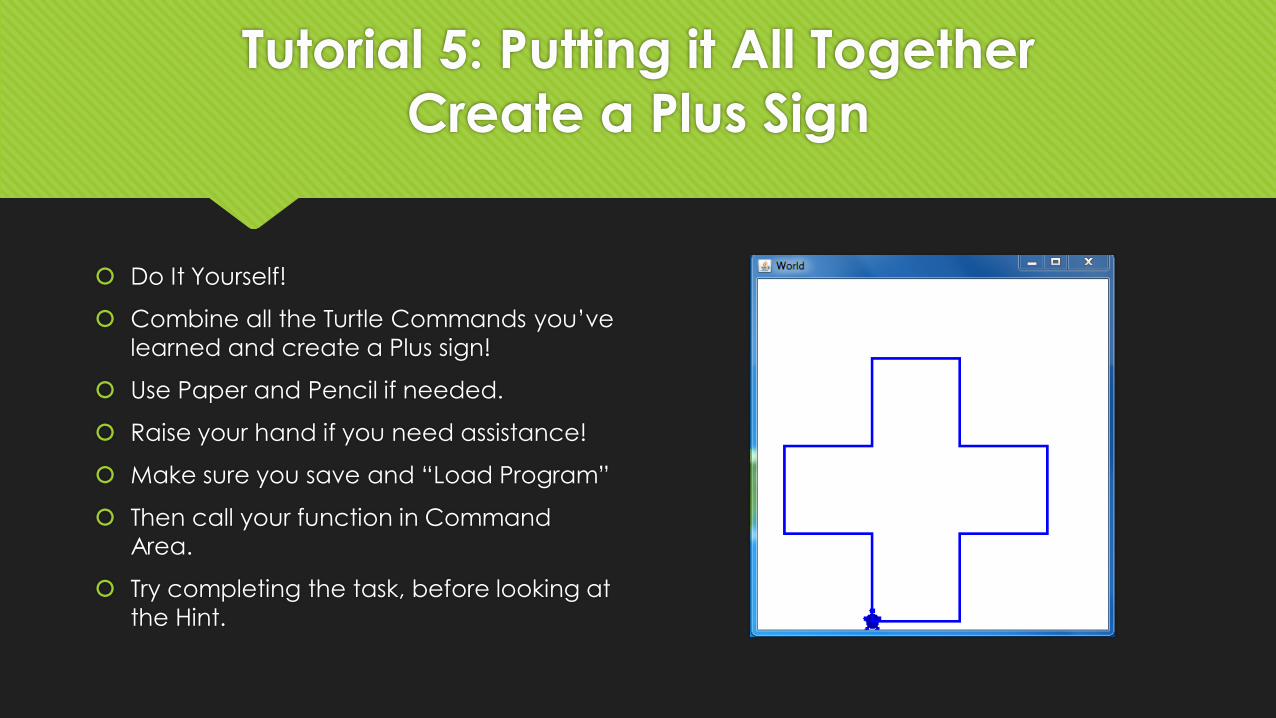
Tutorial 5: Putting it All TogetherCreate a Plus Sign
Do It Yourself!
Combine all the Turtle Commands you’ve
learned and create a Plus sign!
Use Paper and Pencil if needed.
Raise your hand if you need assistance!
Make sure you save and “Load Program”
Then call your function in Command
Area.
Try completing the task, before looking at
the Hint.

Tutorial 5: Putting it All TogetherCreate a Plus Sign
Use any of the following turtle commands
turtle.forward(distance)- command to move the turtle in the directions it’s facing. Default
distance is 100 pixels.
turtle.turn(degrees)- turns the turtle in 90 degrees depending on the direction its facing.
turtle.moveTo(x, y)- command to place the turtle in a new location in the world.
turtle.penUp()- command to pick the pen up.
turtle.penDown()- command to put the pen down again to draw.
turtle.penWidth = (1-10) - allows you to change the size of the pen
turtle.color = red (blue, green . . .) -or- (255, 255, 255) RGB notation- allows you to change the
color of the pen and turtle.

makePlus(turtle) Function Hint Example

CONGRATULATIONS!
You have successfully completed the Python Turtles Tutorial.
BONUS: Do more with your spiral and windmill designs by adding colors!
CHALLENGE: Create your initials using the JES and Turtle commands!

BONUS: Doing More with Turtle Colors!

BONUS: Doing More with Turtle Colors!

Challenge: Use all the turtle commands you have learned and create your initials!
turtle.forward(distance)- command to move the turtle in the directions it’s facing.
Default distance is 100 pixels.
turtle.turn(degrees)- turns the turtle in 90 degrees depending on the direction its
facing.
turtle.moveTo(x, y)- command to place the turtle in a new location in the world.
turtle.penUp()- command to pick the pen up.
turtle.penDown()- command to put the pen down again to draw.
turtle.penWidth = (1-10) - allows you to change the size of the pen
turtle.color = red (blue, green . . .) -or- (255, 255, 255) RGB notation- allows you to
change the color of the pen and turtle.

Survey
Copy and paste the URL below into your browser to take the survey!
Thanks, we appreciate your feedback!
http://tinyurl.com/ggctech