pythonic cs1: build a mobile app - media.readthedocs.org · 3.github and readthedocs are free, ......
TRANSCRIPT

Pythonic CS1: Build a Mobile AppRelease 0.2.0
Ric Yik
November 29, 2016


Modules
1 You Can Build an App to Impact the World 3
2 Understanding Requirements of the Mobile App 5
3 Prototyping the Mobile App with MIT App Inventor 9
4 Building the Mobile App with Python and Kivy 15
5 Adding functionalities into the Mobile Learning App 25
6 Final Project 33
i

ii

Pythonic CS1: Build a Mobile App, Release 0.2.0
Welcome to Pythonic CS1: Build a Mobile App. In this course, you will learn and practise Python programming andcomputer science concepts by building a mobile app. You will learn how to conceptualize an idea into a real mobileapp. The course covers a light-weight software development process, including requirment engineering, prototyping,coding and testing, and more.
This course assumes you a novice or no prior programming experience, by firstly introducing basics of programmingin MIT App Inventor, a visual programming language which allows you to learn programming concepts with visualbuilding blocks, and gradually move your learning pathway towards programming in Python.
Apart from learning concepts and practices on computer science and programming, this course would also equip youwith the skills needed for setting up your own toolkit for development, including set up a Linux virtual machine withintegrated development environment (IDE), GitHub the version control system, and Kivy the framework for buildingmobile apps in Python.
Modules 1

Pythonic CS1: Build a Mobile App, Release 0.2.0
2 Modules

CHAPTER 1
You Can Build an App to Impact the World
Welcome to the age that everyone can build an app to impact the world. Building an app has becoming very easy, fun,and very meaningful than ever.
One of the most meaningful app that you can build is a mobile learning app. By building a mobile learning app, youcan not only learn the aspects of computer science and programming, but also help other people by contributing theeducation community. In other words, you can teach by learning and sharing!
Is it ever possible? In here we would introduce the story of Amol Bhave, a student from India who built his ownMOOC class at his age of 17 that impressed MIT and featured in MIT News. He build his own class just right afterhe has learnt something and found there is no other course which can fulfill his desire to learn deeper. His class thenbecame very successful with about 1,000 students participating in it.
We believe you can also do that. Let’s learn and build your own mobile learning app!
3

Pythonic CS1: Build a Mobile App, Release 0.2.0
4 Chapter 1. You Can Build an App to Impact the World

CHAPTER 2
Understanding Requirements of the Mobile App
Welcome to this module. As in the previous module, we have learnt how an individual like you and me can build ourown learning app that impacts the world and impress big players like MIT.
We believe you can also do that :) Before you get started, in this module we would like to discuss and analysis therequirements of the mobile learning app that you are going to build. Understanding requirements is an important poartsoftware development process that helps you to conceptualize and build your app to successfully solve real problemand impact the world.
Excited? Let’s get started :)
2.1 How to Understand Requirements
Understanding requirements is the first and important steps to build our mobile app successfully. In fact, it is anessential stepping stone for every software project to be succesful.
At high level, we need to know the following factors to understands the requirements of an app:
1. Who are the stakeholders of the app?
2. How do their existing way of accomplishing their needs / goals / tasks?
3. What are their “pain points”?
4. What are their budget to solve their “pain points”, including how much time / cost can they afford to build andoperate the solution?
Then, we may start making progress by:
1. Analysing the requirements and propose our work
2. Prototyping our app to get feedbacks from our stakeholders
3. Building, testing, getting further feedbacks from our stakeholders and keep improving.
Let’s begin by understanding who are the stakeholders of our app and how do they work.
2.2 Who Are the Stakeholders of Our App and How Do They Work
Let’s begin by taking a look on how the following stakeholders use this course web site, as a course authoring andpublishing workflow:
1. Educators may update course material via GitHub.
5

Pythonic CS1: Build a Mobile App, Release 0.2.0
2. Once the educators has committed the changes to GitHub, GitHub will trigger a webhook to ReadTheDocs.
3. ReadTheDocs would parsee the course material written in reStructuredText language, and convert them intoHTML with navigation menu, themes, and cosmestics.
4. Learners may visit the course home page to access the latest course content.
Next, we can compare and contrast the strengths and weaknesses of this solution.
2.3 Current Solution: Strengths, Weaknesses, and Opportunities
2.3.1 Strengths of Current Solution
1. Git and GitHub provides a platform for teachers to concurrently author the content, and have all changes ver-sioned.
2. GitHub and ReadTheDocs works perfectly together to continously push the latest content available to the learn-ers.
3. GitHub and ReadTheDocs are free, such that there is no cost of hosting and no server to be maintained.
2.3.2 Weaknesses of Current Solution
1. GitHub and ReadTheDocs can only host static content, which limits the interactivity of the course. As a pro-gramming class it is ideal to allow students editing and running programming quiz without leaving the course.Existing in-browser solutions are either lack of 3rd party libraries support, or requires running and maintainingexpensive servers, which are not ideal to be plugged into the our current solution.
2. The current solution is web-based, and is inheriently less responsive than mobile app.
2.3.3 Opportunities to Improve Current Soution
1. Build a mobile learning app which synchronize static content from GitHub / ReadTheDocs, and run program-ming quizzes inside mobile device.
2. With Python and Kivy is possible to build a Python programming environment like this Android app. As theprogram is executed inside an Android phone, we can preload the 3rd libraries required, and the program can berun natively in an Android phone without a need of any expensive server.
With these opportunies, let’s foucs on the requirements of our mobile learning app.
2.4 Requirements of Our Mobile Learning App
Let’s drill down in detail for the requirements:
1. We are currently hosting our course homepage in GitHub. GitHub is a version control system that allowscollaborators to contribute content and code concurrently in a common repository. GitHub allows static contentlike articles and videos to be hosted and navigated via ReadTheDocs web interface. A requirement of the MobileLearning App is to download the latest content from GitHub and display it as clickable menu item accordingly.Each menu item has an ID and description.
2. Each page of course content is presented sequently to learners. For article content, it is scrollable vertically.User can click on previous / next button for its corresponding previous / next screen of content. We do not havemuch Video content currently so let’s assume we are hosting only text content for now.
6 Chapter 2. Understanding Requirements of the Mobile App

Pythonic CS1: Build a Mobile App, Release 0.2.0
3. For programming quiz, a text editor is presented with the starter code and the learner would complete theprogram. There is a “Run Test” button which check the correctness of the program by executing it locally in theAndroid phone.
4. For the last page of the screen, the next button will bring the menu screen. Similarly, for the first page of thescreen, the previous button will bring the menu screen.
2.4. Requirements of Our Mobile Learning App 7
Pythonic CS1: Build a Mobile App, Release 0.2.0
8 Chapter 2. Understanding Requirements of the Mobile App

CHAPTER 3
Prototyping the Mobile App with MIT App Inventor
The objective of this module is to let student to rapidly prototype the Mobile Learning App with MIT App Inven-tor. App Inventor is a good way to let you to start learning programming quickly by visual blocks and event-drivenprogramming paradigm.
App Inventor allows you to learn how to build prototype to capture and validate user requirements. This prototype issomething that you can refer to later on when you implement a more complete version of the app by Python.
At this point, only certain visual components are in-scope for Prototype, with simple synchronization of course contentfrom GitHub are implemented.
3.1 What Is And Why Prototyping
Prototpying is a way to build a partially completed / functional software product, aiming at getting user feedback assoon as possible, a well as addressing risk as early as possible.
By this nature, a successful protyping should be:
1. Delivering something visual and presentable to end user, in order to gain their feedback. Ideally, the coreuserexperience and interactivity should be in-scope as early as possible.
2. Addressing key risks as early as possible. One possible way to achieve this is by focusing on build a functionalcode for the risky parts and leaving the less risky parts to be imcompleted / to be polished later.
3. Becuase we are only choosing some key features and user experiences to be prototyped, it is possible thatdirection can be changed. Therefore, to reduce the cost of prototyping, the supporting tools must be easy andfelxible enough.
As we can see in the next page, MIT App Inventor is a great tool for building functional and interactive Mobile Appquickly. Before we start building a full feldged version of our mobile app, let’s get started by prototyping one quickly.
3.2 How to Build a Prototype with MIT App Inventor
MIT App Inventor is a visual UI and programming environment which allow us to build fully functional visual Androidapplication in a short period of time.
3.2.1 What Values Does MIT App Inventor Bring into Our Prototype?
For our context of building our prototype, MIT App Inventors provides the following features which fits our needperfectly to build our prototype.
9
Pythonic CS1: Build a Mobile App, Release 0.2.0
1. Easy to setup: Visit here to start building the UI by drag-and-drop within the web browser.
2. Instant feedback: Install AI2 Companion from Google Play store to try the app instantly while you build theprotoype, therefore speeding up the feedback cycle.
3. Connectivity to GitHub: One of the key feature of our mobile app is the ability ot sync up content instantlyfrom GitHub, as well as ability to navigate among pages of these course contents as a graph of interconnecteddocuments. App Inventor has built-in Web connectivity which allows us to download the course content assource file from GitHub and to extract contents / links from it accordingly. This way we can address thefeasibility of synchronizing from GitHub as early as possible.
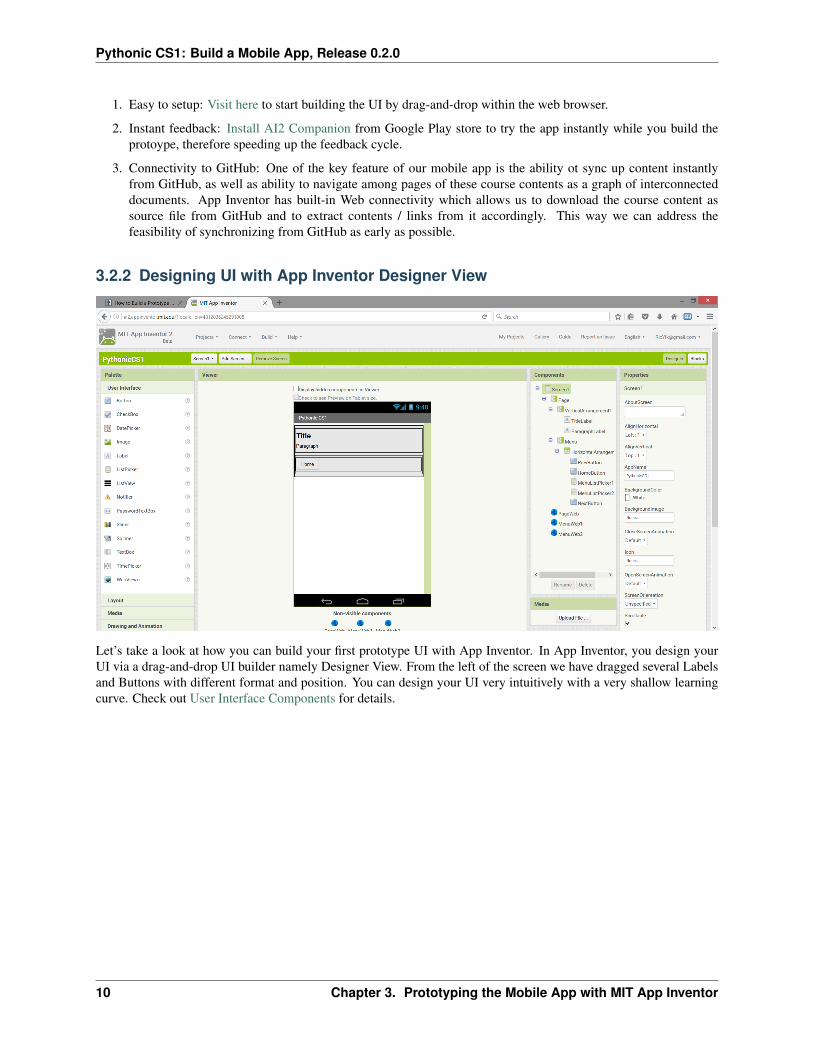
3.2.2 Designing UI with App Inventor Designer View
Let’s take a look at how you can build your first prototype UI with App Inventor. In App Inventor, you design yourUI via a drag-and-drop UI builder namely Designer View. From the left of the screen we have dragged several Labelsand Buttons with different format and position. You can design your UI very intuitively with a very shallow learningcurve. Check out User Interface Components for details.
10 Chapter 3. Prototyping the Mobile App with MIT App Inventor
Pythonic CS1: Build a Mobile App, Release 0.2.0
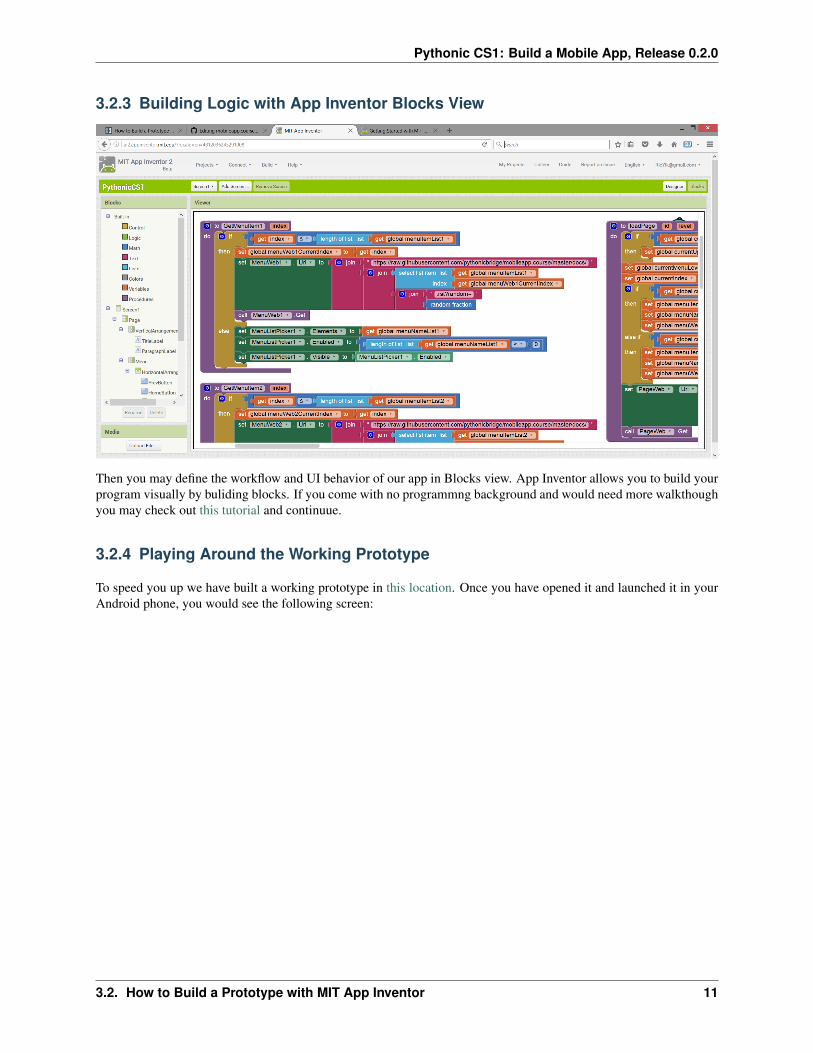
3.2.3 Building Logic with App Inventor Blocks View
Then you may define the workflow and UI behavior of our app in Blocks view. App Inventor allows you to build yourprogram visually by buliding blocks. If you come with no programmng background and would need more walkthoughyou may check out this tutorial and continuue.
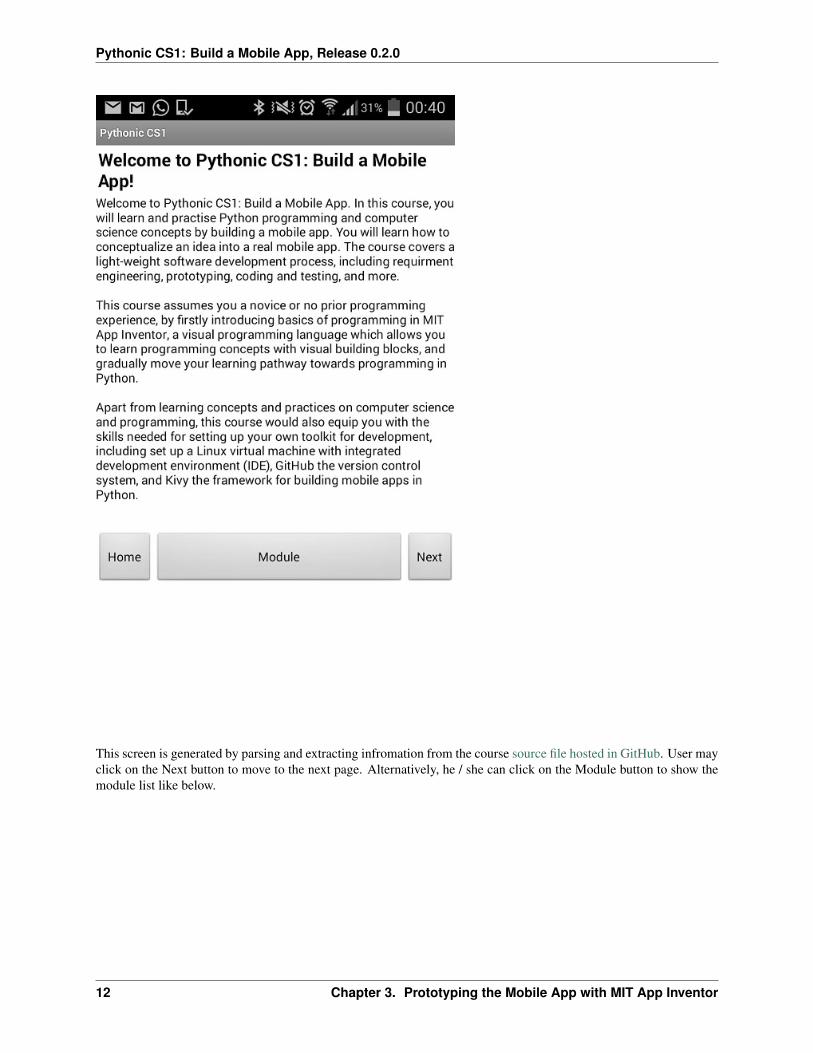
3.2.4 Playing Around the Working Prototype
To speed you up we have built a working prototype in this location. Once you have opened it and launched it in yourAndroid phone, you would see the following screen:
3.2. How to Build a Prototype with MIT App Inventor 11
Pythonic CS1: Build a Mobile App, Release 0.2.0
This screen is generated by parsing and extracting infromation from the course source file hosted in GitHub. User mayclick on the Next button to move to the next page. Alternatively, he / she can click on the Module button to show themodule list like below.
12 Chapter 3. Prototyping the Mobile App with MIT App Inventor

Pythonic CS1: Build a Mobile App, Release 0.2.0
3.2.5 Questions / Exercise for You
Please try the following exercises to faciliate your learning:
1. Try testing the app by clicking the Next button in the mobile app, and check if the corresponding Next page isshown. As a cross-check you can refer to this course web site. The Next button in the mobile app and the courseweb site should be the same.
2. Open the blocks view for the mobile app, can you locate the logic for deciding which page is the next page?
3. Based on what you have observed by testing and readind the code, in your own words, can you describe thealgorithm of deciding which page is the next page?
3.2. How to Build a Prototype with MIT App Inventor 13

Pythonic CS1: Build a Mobile App, Release 0.2.0
4. Visit the Tree Traversal Wikipedia Page. Do you think our logic for deciding the next page is better to bedescribed as Breath-first or Depth-first? Is the logic traversing by pre-order, in-order, or post-order?
5. As a Minimum Viable Product, we have chosen not to implement logic for displaying image as well as supportfor Prev button. As a programming exercise, can you help implementing them? You may start from this locationfor the starter code and remix it on your own.
3.3 What You Have Learned from the Prototype
Well done! By here you have built your first mobile app prototype which is functional and have validated it against thebasic requirements. You have also learnt the unbderlying coding and the CS concepts that powered this mobile app.
In the next module, you will start realizing the prototype you have built in here by writing your first Python mobileapp. Stay tuned :)
14 Chapter 3. Prototyping the Mobile App with MIT App Inventor

CHAPTER 4
Building the Mobile App with Python and Kivy
In last module you have learnt how to build a prototype by App Inventor. In this module, you will start learning howto build our mobile app in Python.
In this module, you will learn how to download and setup a Virtual Box Ubuntu Linux image and proceed to the KivyMobile App SDK and PyCharm Community IDE installation. You may also learn how to use Git and GitHub to getthe starter code for the mobile app and work on it.
We will guide you to complete these activities step-by-step. Let’s get started :)
4.1 Setting up Your Development Environment
Let’s get the hands dirty by doing some setup. We will explain what you have done later. Just feel free to try it out fornow :)
4.1.1 Download and Install Virtual Box and Ubuntu Linux
1. Download and install Virtual Box.
2. Download and add Ubuntu 64 Bit Virtual Box image into your Virtual Box. Latest version is recommended.Please refer to the web site for user name and password.
4.1.2 Install Kivy, Git, and PIP
1. Start the Ubuntu. Input the username and password obtained in the last step to login. Right click desktop andchoose open terminal.
2. In the terminal, run the following command:
sudo apt-get upgradesudo apt-get install python-kivysudo apt-get install gitsudo apt-get install python-pip
4.1.3 Intall Pycharm IDE
1. In your Ubuntu. Open Firefox. And download Pycharm Commnity Edition for Linux
2. By default, it would be saved at ~/Downloads.
15

Pythonic CS1: Build a Mobile App, Release 0.2.0
3. Open terminal again. Type the following:
cd ~/Downloadstar xvzf pycharm*.tar.gzrm pycharm*.tar.gzmv pycharm* ~/pycharm
4.1.4 Running PyCharm
1. Open terminal.
2. Run Pycharm in terminal by:
~/pycharm/bin/pycharm.sh
If PyCharm asked for Key binding / mappings, choose Eclipse for the sake of this course.
In the next section. You will learn about what you have just setup.
4.2 Working with Pycharm IDE, Git, and Kivy
4.2.1 What is Pycharm
Pycharm is a Python Integrated Development Environemnt which streamlines your development, testing, debugging,and version control experience. Altnhough you can watch this Pycharm IDE Video Tutorial to see how Pycharm canhelp you, let’s again get the hand dirty by working out the following tutorial :)
4.2.2 Launching Pycharm
1. Open a terminal.
2. Run the following command.
~/pycharm/bin/pycharm.py
16 Chapter 4. Building the Mobile App with Python and Kivy

Pythonic CS1: Build a Mobile App, Release 0.2.0
4.2.3 Pycharm IDE: Look and Feel
Your usual PyCharm setup would look like this. In short, you have a list of files in your project on the left hand side,and opened files on the right hand side. You may create / edit Python code and auto-code completion would happenlike other IDEs. Alternatively, you can press CTRL-SPACE to force auto-code completion dialog to be shown if itdoesn’t.
Sometimes, you may typed some code which cause compilation error. For insance, you are using a class but forget toimport it into your source. Then you may try pressing ALT-ENTER and Pycharm would attempt fixing this for you.
Sometimes, you would like to override a function which has been defined in the base class. You may press ALT-INSERT to help you choosing the function which you want to override. Pycharm will then fill in the function signaturefor you.
4.3 Let’s Play Around PyCharm, Git / GitHub, and Kivy Together!
If you still remmeber, in the previous setup page you have not only installed PyCharm IDE, but also Git and Kivy.Let’s also play around them a bit to know how things are working together.
4.3.1 Step 1: Forking a Project into Your GitHub Account
To get started using Git and GitHub. You need a GitHub account.
1. Create a GitHub account if you do not have one.
2. Visit Kivy Crash Course and press the Fork button.
4.3. Let’s Play Around PyCharm, Git / GitHub, and Kivy Together! 17

Pythonic CS1: Build a Mobile App, Release 0.2.0
4.3.2 Step 2: Clone the Forked Project into Your Machine via PyCharm IDE
Now you have forked a project into your GitHub account. Next step is to clone this project into your local machine.To do this:
1. Follow the steps as mentioned in here. Locate the kivycrashcourse repo to be cloned into your machine.
2. If it is successful, you should be seeing a screen like the following in step 3.
18 Chapter 4. Building the Mobile App with Python and Kivy

Pythonic CS1: Build a Mobile App, Release 0.2.0
4.3.3 Step 3: Running Your first Kivy App
At this point your have setup yout PyCharm environemnt together with the Kivy Crash Course. While you may watchthe video for the full crash course, you may run your own copy of Kivy app. Here is how to do it:
1. Open after.py like the screen above.
2. Press ALT-SHIFT-F10 to run the program. Note at the 1st attempt PyCharm may be processing in backgroundsuch that you cannot run the app until it has finish. You can find out PyCharm’s progress by looking at the lowerright corner of the screen. Be patient and run again after it has finished.
3. If you can see a new window like below, that means you have setup the things you need to start building app inPyCharm and Kivy. Well done!
4.3. Let’s Play Around PyCharm, Git / GitHub, and Kivy Together! 19

Pythonic CS1: Build a Mobile App, Release 0.2.0
4.4 Building the Mobile Learning App in Python and Kivy
Let’s back to to our focus on building a mobile learning app. Recapping what we have prototyped, we are buildinga mobile learning app which allows contributor to create / modify content via Git / GitHub. And the content can besycnrhonized automatically to ReadTheDocs as well as our mobile learning app. Let’s learn it by doing it.
4.4.1 Step 1: Fork the Starter Code into Your GitHub Account
1. Please fork from this URL. Please refer to the previous sections if you are not sure how to do it.
4.4.2 Step 2: Clone to PyCharm
1. Like what we did previously. Please refer to the previous document for details.
4.4.3 Step 3: Switch to 0.1.0 Branch
Please type the following. We will explain why we need to do that in the next module :)
20 Chapter 4. Building the Mobile App with Python and Kivy
Pythonic CS1: Build a Mobile App, Release 0.2.0
git checkout release/0.1.0
4.4.4 Step 4: Run the Starter Code
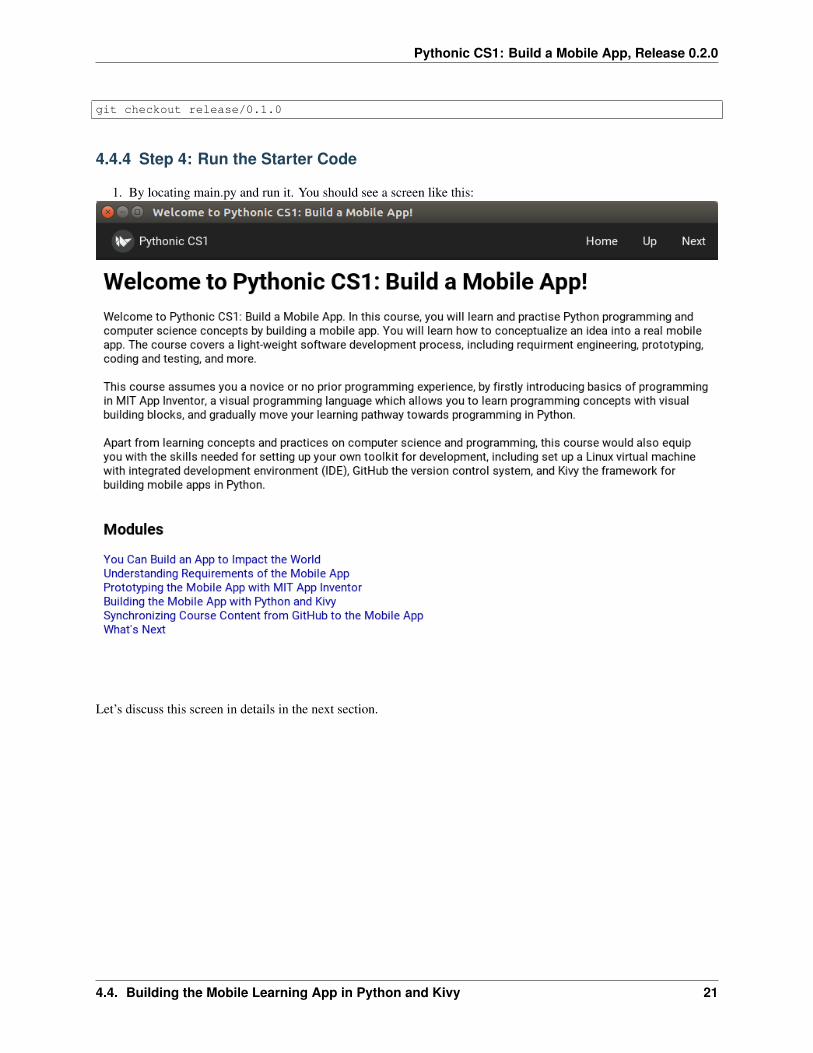
1. By locating main.py and run it. You should see a screen like this:
Let’s discuss this screen in details in the next section.
4.4. Building the Mobile Learning App in Python and Kivy 21

Pythonic CS1: Build a Mobile App, Release 0.2.0
4.5 Understanding Events in the Mobile Learning App
The mobile learning app fetch the course content from GitHub and present it to the user. Navigation menu includingHome, Up, and Next are working the similar way like our Prototype. Unlike the prototype, as Kivy label supports refand other markups, we can embed the menu directly into the document such that it looks more natural.
Whenever user clics on either the navigation menu or the menu, Kivy would send an event as a function call to ourPython code. To understand what does that mean, let’s try adding breakpoints into our program.
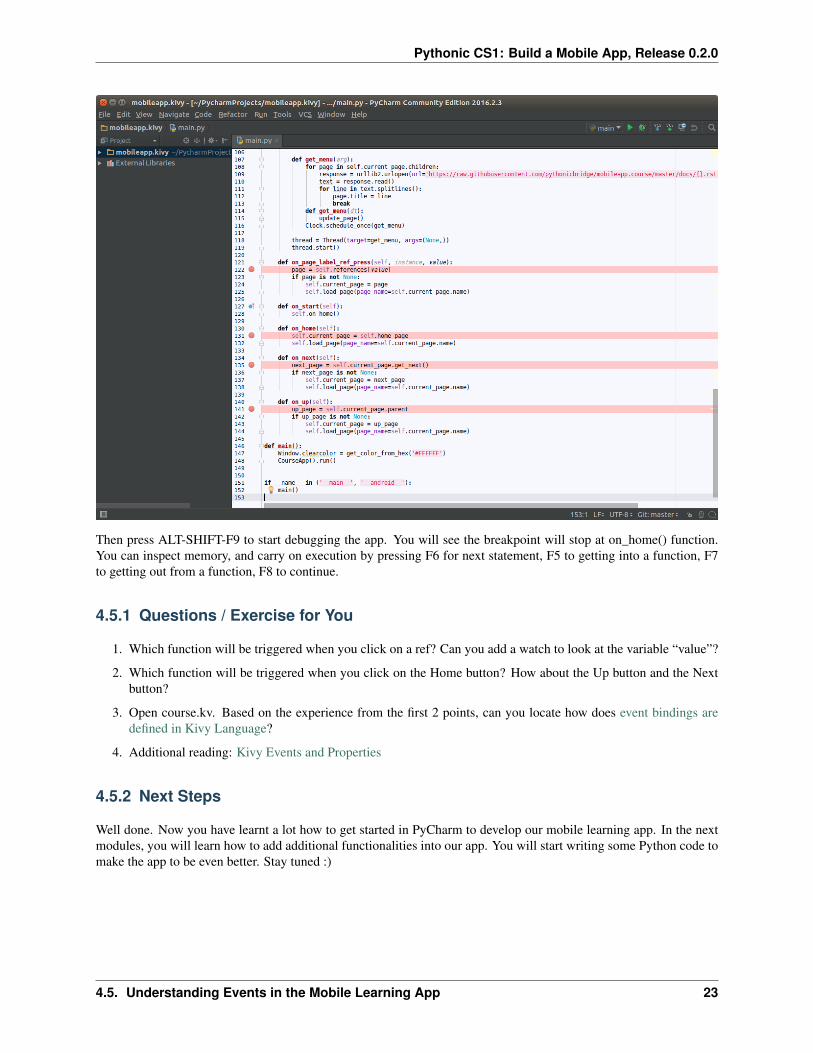
In general, breakpoint can be added by clicking the line number which you want your program to be paused when itreaches that line. Let’s trying adding breakpoints like the screen below:
22 Chapter 4. Building the Mobile App with Python and Kivy
Pythonic CS1: Build a Mobile App, Release 0.2.0
Then press ALT-SHIFT-F9 to start debugging the app. You will see the breakpoint will stop at on_home() function.You can inspect memory, and carry on execution by pressing F6 for next statement, F5 to getting into a function, F7to getting out from a function, F8 to continue.
4.5.1 Questions / Exercise for You
1. Which function will be triggered when you click on a ref? Can you add a watch to look at the variable “value”?
2. Which function will be triggered when you click on the Home button? How about the Up button and the Nextbutton?
3. Open course.kv. Based on the experience from the first 2 points, can you locate how does event bindings aredefined in Kivy Language?
4. Additional reading: Kivy Events and Properties
4.5.2 Next Steps
Well done. Now you have learnt a lot how to get started in PyCharm to develop our mobile learning app. In the nextmodules, you will learn how to add additional functionalities into our app. You will start writing some Python code tomake the app to be even better. Stay tuned :)
4.5. Understanding Events in the Mobile Learning App 23

Pythonic CS1: Build a Mobile App, Release 0.2.0
24 Chapter 4. Building the Mobile App with Python and Kivy

CHAPTER 5
Adding functionalities into the Mobile Learning App
So far, we have built basic functionality of the mobile learning app. In this module, we would focus on adding newfunctionalitiies into the app. We would like to add support for
1. Demostration: External Hpyerlink Support
2. Exercise: Image
3. Next Module: Programming Editor
5.1 How to Add a new Feature to the Mobile Learning App
In this module, we would like to demostrate on how to add a new feature to the mobile learning app. Imagine thefollowing scenario and goals:
1. You and me are assigned to develop new features for the mobile learning app.
2. I am developing a new feature to support external hyperlink. I will show you how I do it.
3. You are developing a new feature to support images. You are developing it while I am also developing myfeature concurently.
4. Once your changes and my changes are ready, we will create a new release, namely 0.2.0.
5. If you remember, we are having our last release as 0.1.0. So here we would like to make sure our changes willonly be visible right after 0.1.0 and will be releasd in 0.2.0.
Here we would like to outline what we should do to achieve the goals above:
1. Create a git feature branch from git master.
2. Create 1 more test cases for the new feature we are adding. Build our feature to pass the test case.
3. Integrating changes into master
4. Create a release branch from master when my change and your chnages are ready.
Let’s walk though them step-by-step.
25
Pythonic CS1: Build a Mobile App, Release 0.2.0
5.2 How to Create a Feature Branch in Git
5.2.1 Steps
Let’s demostrate the first step by creating a new feature branch from master. First I will type the following from myterminal
cd <<your git clone folder>>git checkout mastergit pullgit checkout -b feature/hyperlink
The command above will:
1. Get the latest code from master
2. Create a new feature branch from master, namely feature/hyperlink.
I can verify I am in my feature branch by typing:
git branch
It will highlight my current branch.
5.2.2 Why a Feature Branch
The followings are reasons why we make a feature branch from master:
1. It allows me to develop my feature without impacting the others.
2. It allows me to select a right moment, where my changes are ready and tested, to be integrated into master withother people changes to collectively make a new release.
5.2.3 Discussions
1. Note the arrangement above is just one possible way of branching. As our project is simple we choose simplemodel.
2. You may watch this video for some other advanced branching models.
5.3 How to Add a Unit Test
5.3.1 What is and Why Unit Test
Unit test and unit testing are important concepts and activities that help us to write high quality code with productivity.Let’s highlight the folowing advantages:
1. It allows part of our program to be test independently from ther others, hence helping us to focus on what weare testing.
2. Unit testing can be automated, hence giving us a ability of testing our program automatically.
3. It allows us to accumulate a suite of test cases. Imagine if I develop my feature with its corresponding test casesand you also do the same. Collectively we can test the different features of the program automatically.
26 Chapter 5. Adding functionalities into the Mobile Learning App

Pythonic CS1: Build a Mobile App, Release 0.2.0
5.3.2 Understanding Requirements
Let’s demostrate how to add a Unit to test the feature I am building, i.e. support of external hyperlink. Let’s understandthe requirements:
As you can see above, hyperlinks are not displayed properly in the screen. We would like to add support for hyperlinksuch that:
1. We would read the page line-by-line, and replace all ‘link description <link>‘_ patterns such that theyare instead become [ref=link]link description[/ref]. For example, the above link should be presented as[ref=https://en.wikipedia.org/wiki/Unit_testing]unit testing[/ref].
2. There can be 1 or more hyperlink within single line. Each of them should be handled accordingly.
3. Once clicked, a web browser should be launched to display the corresponding web page.
Let’s add a Unit Test for parsing and formatting the hyperlink as required above. We will leave launching a webbrowser to be done in the next module.
5.3.3 Adding Unit Test with Pycharm
1. Add a method format_hyperlink(self, line) inside CourseApp class. For now, let’s simply add return line as itsimplementation.
2. Add a file test_CourseApp.py. It should look like this. Press ALT-SHIFT-10 to run it.
5.3. How to Add a Unit Test 27

Pythonic CS1: Build a Mobile App, Release 0.2.0
As you can see. Pycharm will show you how many test cases are you passing / failing. In this case, as we haven’timplement anything yet in our format_hyperlink(self, line) function, it is expected that we have failing cases. Here weare demostrating one important feature on how unit test can be used to drive our development effort that:
1. Before startng writing code, write test which fail first.
2. Make change to pass tests.
3. Repeat until you have passed all tests.
In later modules, you will see how we make use of unit testing to not just improve the correctness of our code, but alsoimprove the quality of our code. We collectively call this effort a Test-driven Development (TDD) methdology. Fornow, let’s focus on writing code to passes all of our test cases first.
5.3.4 Implementing the Function to Pass the Tests
Let’s try implementing the function like the following:
def format_hyperlink(self, line):return re.sub('`(.*) <([^>]*)>`_', r'[ref=\2]\1[/ref]', line)
And run the test again. This time we have passed 2 cases, but leaving 1 case failing:
28 Chapter 5. Adding functionalities into the Mobile Learning App

Pythonic CS1: Build a Mobile App, Release 0.2.0
Now let’s fix our code to be the following:
def format_hyperlink(self, line):return re.sub('`([^`]*) <([^>]*)>`_', r'[ref=\2]\1[/ref]', line)
And run the test again. This time we have passed all tests. Cool!
5.3. How to Add a Unit Test 29
Pythonic CS1: Build a Mobile App, Release 0.2.0
5.3.5 Discussion
1. In the implementation above, we are using Regular Expression module to help us extracting information from apattern and replacing the matching pattern with the re-formatted information that was extracted previously. Youmay check out this video for a tutorial.
2. Once you have finished, in your own word, can you explain what does teh regular expression do which passesall the tests?
3. Then, in your own word, can you explain why the first attempt does not work for more than 1 hyperlink?
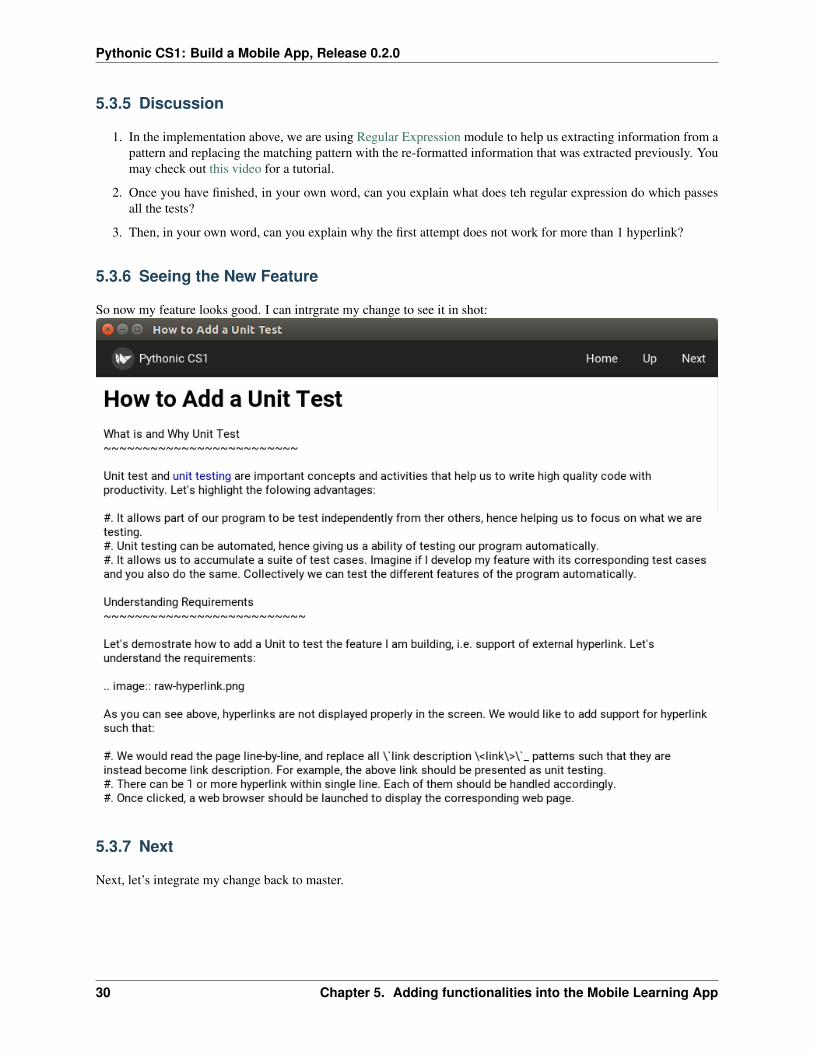
5.3.6 Seeing the New Feature
So now my feature looks good. I can intrgrate my change to see it in shot:
5.3.7 Next
Next, let’s integrate my change back to master.
30 Chapter 5. Adding functionalities into the Mobile Learning App
Pythonic CS1: Build a Mobile App, Release 0.2.0
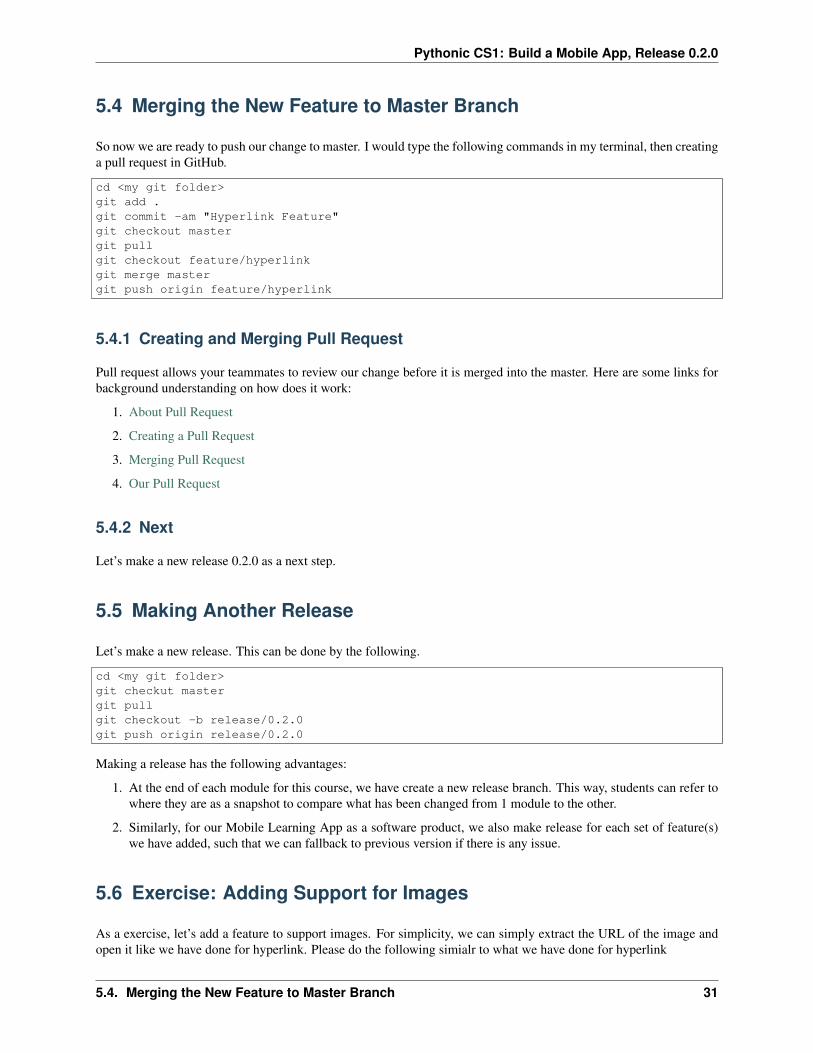
5.4 Merging the New Feature to Master Branch
So now we are ready to push our change to master. I would type the following commands in my terminal, then creatinga pull request in GitHub.
cd <my git folder>git add .git commit -am "Hyperlink Feature"git checkout mastergit pullgit checkout feature/hyperlinkgit merge mastergit push origin feature/hyperlink
5.4.1 Creating and Merging Pull Request
Pull request allows your teammates to review our change before it is merged into the master. Here are some links forbackground understanding on how does it work:
1. About Pull Request
2. Creating a Pull Request
3. Merging Pull Request
4. Our Pull Request
5.4.2 Next
Let’s make a new release 0.2.0 as a next step.
5.5 Making Another Release
Let’s make a new release. This can be done by the following.
cd <my git folder>git checkut mastergit pullgit checkout -b release/0.2.0git push origin release/0.2.0
Making a release has the following advantages:
1. At the end of each module for this course, we have create a new release branch. This way, students can refer towhere they are as a snapshot to compare what has been changed from 1 module to the other.
2. Similarly, for our Mobile Learning App as a software product, we also make release for each set of feature(s)we have added, such that we can fallback to previous version if there is any issue.
5.6 Exercise: Adding Support for Images
As a exercise, let’s add a feature to support images. For simplicity, we can simply extract the URL of the image andopen it like we have done for hyperlink. Please do the following simialr to what we have done for hyperlink
5.4. Merging the New Feature to Master Branch 31
Pythonic CS1: Build a Mobile App, Release 0.2.0
1. Create a feature branch feature/image
2. Write a function format_image(self, line). When you can see ‘.. image : hyperlink.png’ in the line, return[ref=https://github.com/pythonicbridge/mobileapp.course/raw/master/docs/hyperlink.png]hyperlink.png: Clickto view[/ref]
3. Build a Unit Test to test the feature.
4. Integrate the new function into the main.py.
5. Commit your change locally.
32 Chapter 5. Adding functionalities into the Mobile Learning App

CHAPTER 6
Final Project
By this module, you should have built a fully functional Mobile Learning App, which maintains its course contentdynamically from GitHub, such that it is generic and flexible. Well done!
Also, we would like to discuss the possibility to extend the Mobile Learning App by, for instance, the possibility toinclude a programming quiz module as future work. Due to the time constraint we will leave this as a final project forthe students as planned :)
Optionally, we would like to show how to compile the Kivy app into a standalone APK Package that can be uploadedto Google Play store.
Let’s begin :)
6.1 Final Project: Implement a Programming Quiz in Our MobileLearning App
Recall the steps we need to implement a new feature to our app:
1. Understand our requirements.
2. Implement the user interface.
3. Write a test case.
4. Implement the test case to pass the test.
5. Integrate our change.
We will follow the steps exactly to implement the programming quiz feature. Due to the time constraints, for now wewill disucss the high level design and leave the actual implementation as an exercise for the students.
6.1.1 Final Project: Requirements
Requirements
As usual we will read the RST file for their instruction. For simplicity, assume we have the following RST content:
.. code:: python
# PROGRAMMING QUIZ
import unittest2
33

Pythonic CS1: Build a Mobile App, Release 0.2.0
def say_hello(something):return something
class ProgrammingQuiz(unittest2.TestCase):def test1(self):
self.assertEqual('Hello world', say_hello('world'))
# END OF PROGRAMMING QUIZ
When we intrepret the code directive, followed by # PROGRAMMING QUIZ comment, our application should be:
1. Replace the whole code block as a ref, similar to what we did for hyperlink.
2. We should also store everything found in this block into a CodeInput box such that it allows student to startediting the source code to complete the programming quiz.
3. We should also provide buttons for students to (1) start over, (2) execute the code by running the unittest.main()and present the result, (3) go back to the page which triggers the programming test.
4. We expect to have a seperate screen for programming quiz. You may check out this video on how to add anotherscreen via Screen Manager in Kivy framework.
5. We should have a way to (1) execute the program, (2) output of test cases, either passing or failing. For (1), wecan look at this function. For (2) we can look at this article and this documentation.
Technical Requirements
1. After you have implemented your change, if you copy your main.py into your mobile phone, you will foundthat the mobile app cannot be run. It is due to that CodeInput box requires Pygments for its syntax highlightingfunction, but Pygments is missing in Kivy launcher. To handle this, you may either (1), Fallback to Text Input(by adding a import fallback handler), (2) or add Pygments dependency and build via Buildozer as mentionedin the next page.
2. (Optional) Ideally, we should provide a way to store and retrieve the programing quiz history such that studentscan track and revise later. Ideally, we should be able to leverage GitHub Gist for storage. This way, studentand write their code on-the-go in cell phone, and carry on coding in front of desktop computer by checking outthe Gist. Support of this feature is not hard but it involves a bit of integration effort. Cosider this as the finalchallenges :)
Starter Code / Test Cases
There is no starter code / start test cases for this time. You may refer to previous module on how to start :)
6.1.2 Final Project: Sample Programming Quiz
Sample Programming Quiz
If you implement the things correctly, the following code block will become a link the a programming quiz when yourmobile app visit this page:
# PROGRAMMING QUIZ
import unittest2
def say_hello(something):
34 Chapter 6. Final Project

Pythonic CS1: Build a Mobile App, Release 0.2.0
return something
class ProgrammingQuiz(unittest2.TestCase):def test_say_hello(self):self.assertEqual('Hello world', say_hello('world'))
# END OF PROGRAMMING QUIZ
And the screen would look something like this:
Reference Implementation
Due to the time constraint, we do not provide a reference implementation for this one (as planned). We might considerimplementing one if time is still allowed. Stay tuned :)
6.2 Optional: How to build an App Which is Ready for Deploymentinto Google Play Store
So far we have been using Kivy Launcher to run our main.py file without any compliation. It works great for devel-opment. But if we want to deploy the app as a standalone program into Google Play Store, we need a way to build an
6.2. Optional: How to build an App Which is Ready for Deployment into Google Play Store 35

Pythonic CS1: Build a Mobile App, Release 0.2.0
APK Package. APK Package is a package that contains the following information:
1. The compiled binary files and libraries required for the app.
2. A manifest file describing the attributes for the app, such as orientation, permission needed, etc.
Kivy has a mechanism called buildozer that help us creating this package. Let’s see how does it work.
6.2.1 Step 1: Install Buildozer
sudo pip install buildozersudo dpkg --add-architecture i386sudo apt-get updatesudo apt-get install build-essential ccache git libncurses5:i386 libstdc++6:i386 libgtk2.0-0:i386 libpangox-1.0-0:i386 libpangoxft-1.0-0:i386 libidn11:i386 python2.7 python2.7-dev openjdk-8-jdk unzip zlib1g-dev zlib1g:i386
6.2.2 Step 2: Setup Buildozer for Our Mobile App
cd <your app folder>buildozer initvi buildozer.spec
This will open the buildozer.spec file. You may change permission / libraries needed in here. Click here for details.
6.2.3 Step 3: Run Buildozer
buildozer -v android debug
This will start the compilation. The first run will take long as it will download Android SDK and Android NDK. Thesubsquent run will be much faster.
Once the complication is done you should be able to see an apk file in <your app dir>/bin folder. You may use uploadthis file into your Google Drive and download it into your phone. Click on the APK file to install. If you ask forpermission, grant it and it should complete the installation.
6.2.4 Step 4: Upload to Google Play Store (optional)
Click here for details. This step is optional as you need to pay google momey to do it :)
6.2.5 Additional Resources
1. Kivy Crash Course: Buildozer
2. Android Permissions
36 Chapter 6. Final Project