q3x laser contrast sensor - farnell · pdf fileq3x laser contrast sensor ... a defective unit...
TRANSCRIPT

Q3X Laser Contrast Sensor
Instruction Manual
Original Instructions181485 Rev. A6 January 2015
181485

Contents1 Product Description ........................................................................................................ 3
1.1 Models ....................................................................................................................................31.2 Overview ................................................................................................................................ 31.3 Features ................................................................................................................................. 3
1.3.1 Display and Indicators ......................................................................................................41.3.2 Buttons .........................................................................................................................4
1.4 Laser Description and Safety Information .................................................................................... 52 Installation .....................................................................................................................6
2.1 Install the Safety Label ............................................................................................................. 62.2 Sensor Orientation ................................................................................................................... 62.3 Sensor Mounting ......................................................................................................................62.4 Wiring Diagram ........................................................................................................................72.5 Cleaning and Maintenance .........................................................................................................7
3 Sensor Programming ..................................................................................................... 83.1 Setup Mode .............................................................................................................................8
3.1.1 Output Operation ..........................................................................................................103.1.2 TEACH Menu ................................................................................................................ 103.1.3 Offset Percentage ......................................................................................................... 103.1.4 Response Speed ........................................................................................................... 103.1.5 Output Timing Delays ....................................................................................................113.1.6 Input Wire Function ...................................................................................................... 123.1.7 Sensitivity ................................................................................................................... 123.1.8 Display View ................................................................................................................ 123.1.9 Exit the Top Menu .........................................................................................................123.1.10 Reset to Factory Defaults ............................................................................................. 12
3.2 Manual Adjustments ............................................................................................................... 133.3 Remote Input ........................................................................................................................ 13
3.3.1 Select the TEACH mode using the Remote Input ............................................................... 143.3.2 Reset to Factory Defaults Using the Remote Input .............................................................15
3.4 Locking and Unlocking the Sensor Buttons ..................................................................................153.5 TEACH Procedures ..................................................................................................................15
3.5.1 Two-Point Static TEACH .................................................................................................153.5.2 Dynamic TEACH ............................................................................................................173.5.3 Window Set ................................................................................................................. 183.5.4 Light Set ..................................................................................................................... 193.5.5 Dark Set ......................................................................................................................20
3.6 Sync Master/Slave ..................................................................................................................214 Specifications .............................................................................................................. 22
4.1 Dimensions ........................................................................................................................... 234.2 Performance Curves ............................................................................................................... 23
5 Abbreviations .............................................................................................................. 246 Troubleshooting ...........................................................................................................267 Accessories ...................................................................................................................27
7.1 Cordsets ............................................................................................................................... 277.2 Brackets ............................................................................................................................... 27
8 Contact Us ................................................................................................................... 299 Banner Engineering Corp Limited Warranty ................................................................. 30
Q3X Laser Contrast Sensor

1 Product DescriptionLaser Expert™ diffuse sensor with bipolar (1 PNP & 1 NPN) output. Patent pending.
• Solves challenging part-detection applications with small contrastdifferences
• High-speed part detection as fast as 250 µs, capturing up to 2,000events per second
• Angled three-digit display is easily viewed from multiple vantagepoints
• Display provides clear user feedback for easy setup, and bright outputindicator provides high visibility of sensor operation
• Intuitive setup utilizing two tactile buttons located below the display• Rugged nickel-plated zinc, laser-marked housing suitable for use even
in environments where cutting fluids and oils might be present• Robust immunity to fluorescent light interference• Temperature-compensated design improves reliable detection during
changing temperature conditions.
WARNING: Not To Be Used for Personnel Protection
Never use this device as a sensing device for personnel protection. Doing so could lead toserious injury or death. This device does not include the self-checking redundant circuitry necessaryto allow its use in personnel safety applications. A sensor failure or malfunction can cause either anenergized or de-energized sensor output condition.
1.1 Models
Model Sensing Range Output Type Cable
Q3XTBLD-Q8 300 mm (11.81 in) Bipolar: 1 NPN, 1 PNP Euro M12 5-pin integral connector
1.2 OverviewThe Q3X Sensor is a Class 2 laser Expert™ diffuse sensor with bipolar (1 PNP & 1 NPN) outputs. The normal sensor state isRun mode. From Run mode, the switch point value can be changed and the selected TEACH method can be performed. Thesecondary sensor state is Setup mode. From Setup mode, the TEACH mode can be selected, all standard operatingparameters can be adjusted, and a factory reset can be done.
1.3 Features
1
3
2
Figure 1. Sensor Features
1. Output Indicator (Amber)2. Display3. Buttons
Q3X Laser Contrast Sensor
www.bannerengineering.com - Tel: 763.544.3164 3

1.3.1 Display and Indicators
Figure 2. Display in Run Mode
1. Stability Indicator (STB = Green)2. Active TEACH Indicators
• DYN = Dynamic TEACH selected (Amber)• WND = Symmetric window thresholds are
active (Amber)
In Run mode, the 3-digit, 7-segment display value represents normalized signal strength (NSS). The NSS is expressed asthe percentage of the received light divided by the current threshold. The NSS display range is 0 to 990, which isequivalent to excess gain values of 0 to 9.9 or more. A NSS display range of 999 indicates a saturated received light signaland does not correspond to a specific excess gain value.
In single threshold teach modes (Two-Point Static, Dynamic, Light Set, or Dark Set), the output switches at a displayedvalue of 100 (excess gain of 1.0).
In Window Set teach mode, the value 100 represents the taught signal strength. The displayed value is the percentage ofthe received light divided by the taught signal strength. The output switches at displayed values above and below 100 asdetermined by the user-selected window offset percentage.Output Indicator
• On—Outputs conducting (closed)• Off—Outputs not conducting (open)
Stability Indicator (STB)• On—Stable light signal received• Flashing—Light intensity is within the switching threshold hysteresis band• Off—No light signal received
Active TEACH Indicators (DYN and WND)• DYN and WND off—Two-Point Static , Light Set, or Dark Set TEACH mode selected (Two-Point Static TEACH is the
default).• DYN and/or WND flashing—The sensor is in TEACH mode.• DYN on—Dynamic TEACH mode selected• WND on—Symmetric Window thresholds are active. The switch points are above and below 100 by the offset
percentage
1.3.2 Buttons
Use the sensor buttons (-)(MODE) and (+)(TEACH) to program the sensor.See Sensor Programming on page 8 for programming instructions.
(-)(MODE)• Decrease gain: press and release (-)(MODE), then press and hold (-)(MODE) to rapidly decrease gain• Enter Setup mode: press and hold (-)(MODE) for longer than 2 seconds• Navigate the sensor menu: press (-)(MODE)• Change setting values: press and hold (-)(MODE) to decrease numeric values
(+)(TEACH)• Increase gain: press and release (+)(TEACH), then press and hold (+)(TEACH) to rapidly increase gain• Start the currently selected TEACH mode: press and hold (+)(TEACH) for longer than 2 seconds (Two-Point Static
TEACH is the default)
Q3X Laser Contrast Sensor
4 www.bannerengineering.com - Tel: 763.544.3164

• Navigate the sensor menu: press (+)(TEACH)• Change setting values: press and hold (+)(TEACH) to increase numeric values
(-)(MODE) and (+)(TEACH)• Select menu items in Setup mode: press (-)(MODE) and (+)(TEACH) simultaneously• Select and save a parameter and return to Run mode: press (-)(MODE) and (+)(TEACH) simultaneously for
longer than 2 seconds
When navigating the menu systems, the menu items loop.
1.4 Laser Description and Safety Information
For Safe Laser Use - Class 2 Lasers• Do not stare at the laser.• Do not point the laser at a person’s eye.• Mount open laser beam paths either above or below eye level, where practical.• Terminate the beam emitted by the laser product at the end of its useful path.
CAUTION: Use of controls or adjustments or performance of procedures other than those specifiedherein may result in hazardous radiation exposure. Do not attempt to disassemble this sensor forrepair. A defective unit must be returned to the manufacturer.
CAUTION: Never stare directly into the sensor lens. Laser light can damage your eyes. Avoidplacing any mirror-like object in the beam. Never use a mirror as a retroreflective target.
Class 2 Lasers
Class 2 lasers are lasers that emit visible radiation in the wavelength range from 400 nm to 700 nm, where eyeprotection is normally afforded by aversion responses, including the blink reflex. This reaction may be expected toprovide adequate protection under reasonably foreseeable conditions of operation, including the use of opticalinstruments for intrabeam viewing.
Class 2 Laser Safety Notes
Low-power lasers are, by definition, incapable of causing eye injury within the duration of a blink (aversion response) of0.25 seconds. They also must emit only visible wavelengths (400 to 700 nm). Therefore, an ocular hazard may exist onlyif individuals overcome their natural aversion to bright light and stare directly into the laser beam.
Laser wavelength: 655 nmOutput: < 0.42 mWPulse Duration: 5 µs
Q3X Laser Contrast Sensor
www.bannerengineering.com - Tel: 763.544.3164 5

2 Installation2.1 Install the Safety Label
The safety label must be installed on Q3X sensors that are used in theUnited States.
NOTE: Position the label on the cable in a location thathas minimal chemical exposure.
1. Remove the protective cover from the adhesive on the label.2. Wrap the label around the Q3X cable, as shown.3. Press the two halves of the label together.
Figure 3. Safety Label Installation
2.2 Sensor OrientationCorrect sensor-to-target orientation is important to ensure proper sensing. To ensure reliable detection, orient the sensoras shown in relation to the target to be detected.
Figure 4. Optimal Orientation of Target to Sensor
2.3 Sensor Mounting1. If a bracket is needed, mount the sensor onto the bracket.2. Mount the sensor (or the sensor and the bracket) to the machine or equipment at the desired location. Do not
tighten at this time.3. Check the sensor alignment.4. Tighten the screws to secure the sensor (or the sensor and the bracket) in the aligned position.
Q3X Laser Contrast Sensor
6 www.bannerengineering.com - Tel: 763.544.3164

2.4 Wiring Diagram
3
1
2
4
5
10-30V dc
InputWire
Load
Load
+
–
NOTE: Open lead wires must be connected to a terminal block.
1
453
2
Key
1 = Brown2 = White3 = Blue4 = Black5 = Gray
NOTE: The input wire function is user-selectable. The default for the input wire function is off(disabled).
2.5 Cleaning and MaintenanceHandle the sensor with care during installation and operation. Sensor windows soiled by fingerprints, dust, water, oil, etc.may create stray light that may degrade the peak performance of the sensor. Blow the window clear using filtered,compressed air, then clean as necessary using 70% isopropyl alcohol and cotton swabs or water and a soft cloth.
Q3X Laser Contrast Sensor
www.bannerengineering.com - Tel: 763.544.3164 7

3 Sensor ProgrammingProgram the sensor using the buttons on the sensor or the input wire (limited programming options; see Remote Input onpage 13 for details).
In addition to programming the sensor, use the input wire to disable the buttons for security, preventing unauthorized oraccidental programming changes. See Locking and Unlocking the Sensor Buttons on page 15 for more information.
3.1 Setup Mode1. Access Setup mode from Run mode by pressing and holding MODE for longer than 2 seconds.
2. Use or to navigate through the top menu.
3. Select the desired submenu by pressing and simultaneously.
4. Press or to view the available options in the submenu.5. Select a submenu option.
• Press and simultaneously to select and save a submenu option and return to the top menu.
• Press and simultaneously for longer than 2 seconds to select and save a submenu option andreturn to Run mode.
NOTE: The current submenu selection is solid, all other selections flash.
To exit Setup mode from the top menu and return to Run mode, navigate to and press and
simultaneously, or press and hold and simultaneously for longer than 2 seconds to return to Run mode fromanywhere in the top menu.
Q3X Laser Contrast Sensor
8 www.bannerengineering.com - Tel: 763.544.3164

no: do not reset to factory defaultsyes: reset to factory defaults
Two-Point Static TeachDynamic Teach
Light SetWindow Set
Top Menu Sub Menu
off: no delays enabledon: enable on and/or off delay (set value in Delay Timer menu)1 Shot, fixed output pulse duration
LO = Single fixed duration, On pulse when moving into light stateDO = Single fixed duration, On pulse when moving into dark state
sec range, set Delay Timer value (seconds have decimal)
laser off when pulled lowset: Remote Teach input
off: input is not active, ignore pulses
Master sync line for two sensor cross talk avoidance (response speed is 25 ms)Slave sync line for two sensor cross talk avoidance (response speed is 25 ms)
display ondisplay on, inverteddisplay off (enters sleep mode after 60 seconds)display off, inverted (enters sleep mode after 60 seconds)
end: exit setup
to
Teach Process Selection
Output Operation
Response Speed
Output Timing Delays
Delay Timer
Input Wire Function
Sensitivity
Display Read
Exit Setup
Reset to Factory Defaults
Available when set to “1Sh”
Available when set to “on” ms
( default setting)
BOTH
BOTH
BOTH
BOTH
BOTH
BOTH
BOTH
BOTH
BOTH
BOTH
BOTH
Light OperateDark Operate
Dark Set
(min, 10, 20, 30, 40, 50) - Window & Light Set options (20% is default for Light Set and Window) (min, 25, 50, 100, 200) - Dark Set options ( 50% is default for Dark Set)
set Response Speed to 250 microsecondsset Response Speed to 1 millisecondset Response Speed to 5 milliseconds
Offset Percentage
high sensitivitylow sensitivity
standard sensitivity
Menu not present when is set to “off” ("ond" and "ofd" default to 0, “dt1” defaults to 1 or 10 depending on response speed setting)
Pct menu present when teach is set to Window, Light, or Dark
BOTH
sets selection
Response Speed menu not present when Input Wire Function set to Master or Slave
Figure 5. Setup Mode Menu Map
Q3X Laser Contrast Sensor
www.bannerengineering.com - Tel: 763.544.3164 9

3.1.1 Output Operation
Use this menu to select the output operation mode. The default is light operate.
• —Light operate. The output is on when the sensor detects a light state
• —Dark operate. The output is on when the sensor detects a dark state
3.1.2 TEACH Menu
Use this menu to select the TEACH mode. The default is two-point static TEACH mode.
• —Two-point static TEACH
• —Dynamic TEACH
• —Window set
• —Light set
• —Dark set
After the TEACH mode is selected, from Run mode, press and hold TEACH for longer than 2 seconds to access the TEACHmode and teach the sensor. See TEACH Procedures on page 15 for additional information and remote input TEACHinstructions.
When Window set, Light set, or Dark set are selected, the sensor returns to the Setup menu and the Offset Percentage
menu ( ) becomes available to set the offset percentage.
3.1.3 Offset Percentage
Use this menu to select the offset percentage when Window set, Light set, or Dark set TEACH modes are selected. Thedefault is 20% for Window and Light Set, and 50% for Dark Set.
Window and Light Set options:
• —minimum
• —10%
• —20%
• —30%
• —40%
• —50%
Dark Set options:
• —minimum
• —25%
• —50%
• —100%
• —200%
3.1.4 Response Speed
Use this menu to select the response speed. The default is 1 millisecond.
• —250 microseconds
• —1 millisecond
• —5 milliseconds
Q3X Laser Contrast Sensor
10 www.bannerengineering.com - Tel: 763.544.3164
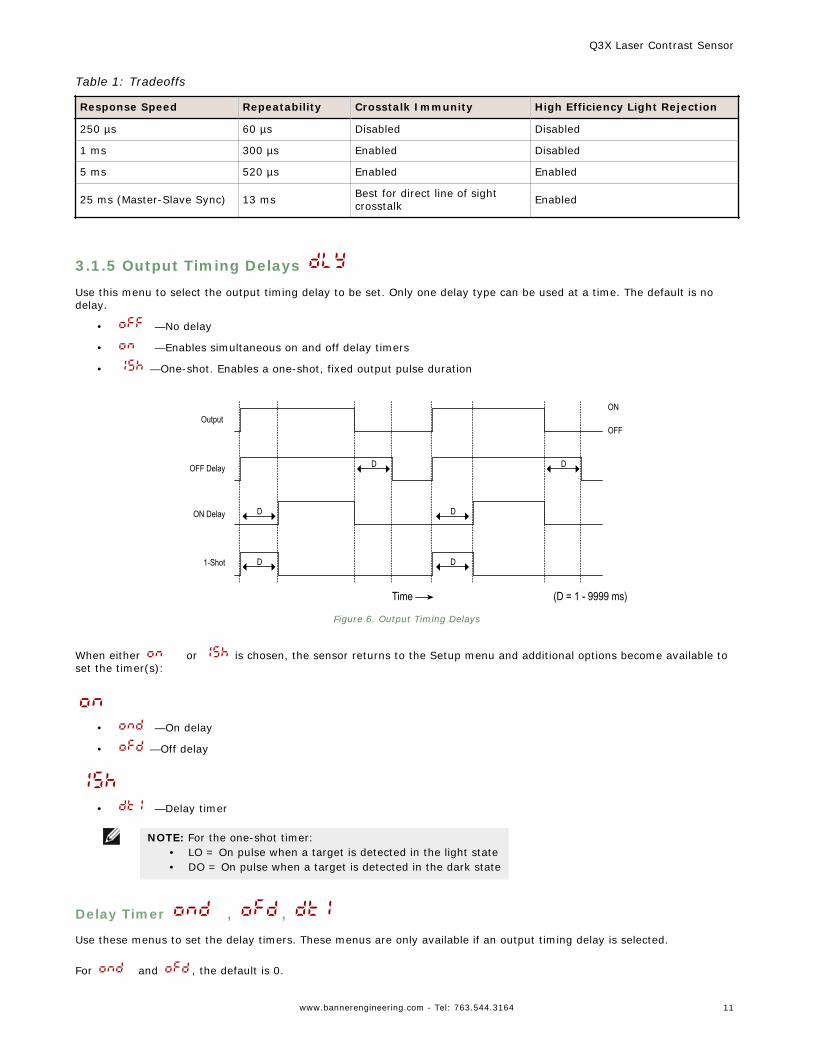
Table 1: Tradeoffs
Response Speed Repeatability Crosstalk Immunity High Efficiency Light Rejection
250 µs 60 µs Disabled Disabled
1 ms 300 µs Enabled Disabled
5 ms 520 µs Enabled Enabled
25 ms (Master-Slave Sync) 13 ms Best for direct line of sightcrosstalk Enabled
3.1.5 Output Timing Delays
Use this menu to select the output timing delay to be set. Only one delay type can be used at a time. The default is nodelay.
• —No delay
• —Enables simultaneous on and off delay timers
• —One-shot. Enables a one-shot, fixed output pulse duration
Output
OFF Delay
ON Delay
Time
1-Shot
ON
OFF
D
D
D
D
D D
(D = 1 - 9999 ms)
Figure 6. Output Timing Delays
When either or is chosen, the sensor returns to the Setup menu and additional options become available toset the timer(s):
• —On delay
• —Off delay
• —Delay timer
NOTE: For the one-shot timer:• LO = On pulse when a target is detected in the light state• DO = On pulse when a target is detected in the dark state
Delay Timer , ,
Use these menus to set the delay timers. These menus are only available if an output timing delay is selected.
For and , the default is 0.
Q3X Laser Contrast Sensor
www.bannerengineering.com - Tel: 763.544.3164 11

For , the default is 1 ms when the response speed is 1 ms, or 10 ms when the response speed is either 250 µs or 5ms.
Use or to scroll through the values. Values greater than 10 increase or decrease by increments of 10. Millisecondvalues do not include the decimal point; seconds values include the decimal point.
• 1 to 9 ms• 10 to 90 ms• 100 to 900 ms• 1.0 to 9.0 s• 10.0 to 90.0 s
3.1.6 Input Wire Function
Use this menu to select the input wire function. The default is off.
• —Ignore all pulses
• —Laser off when pulled low
• —Remote TEACH input
• —Master sync line output for two-sensor cross-talk avoidance
• —Slave sync line output for two-sensor cross-talk avoidance
To configure sensors for master-slave operation, see Sync Master/Slave on page 21.
3.1.7 Sensitivity
Use this menu to set the sensitivity. The default is standard.
• —High sensitivity. Use this setting for low contrast sensing
• —Standard sensitivity
• —Low sensitivity. Use this setting to stabilize the output in high vibration applications
3.1.8 Display View
Use this menu to select the display view. The default is right-reading.
• —Right-reading
• —Inverted
• —Right-reading and the display enters sleep mode after 60 seconds
• —Inverted and the display enters sleep mode after 60 seconds
When the sensor is in sleep mode, the display wakes with the first button press.
3.1.9 Exit the Top Menu
Navigate to and press TEACH and MODE together to exit the top menu and return to Run mode.
Setup mode can also be exited by pressing and holding and simultaneously for longer than 2 seconds fromanywhere in the top menu.
3.1.10 Reset to Factory Defaults
Use this menu to restore the sensor to the factory default settings. Select to return to the sensor menu without
restoring the defaults. Select to restore the sensor to the factory default settings and return to Run mode.
Q3X Laser Contrast Sensor
12 www.bannerengineering.com - Tel: 763.544.3164

Factory Default Settings
Setting Factory Default
Display view ( ) —Right-reading, no sleep mode
Input wire function ( ) —Ignore all pulses
Offset Percent ( ) —20%, Window and Light Set
—50%, Dark Set
Output operation ( ) —Light operate
Output timing delays ( ) —No delay
Response speed ( ) —1 ms
Sensitivity ( ) —Standard sensitivity
TEACH process selection ( ) —Two-point static TEACH
3.2 Manual Adjustments
Manually increase or decrease gain using or .
1. From Run mode, press either or one time. The current signal strength value flashes slowly.
2. Press to decrease the sensor's gain or to increase the sensor's gain, or press and hold or to rapidlydecrease or increase gain. After 1 second, the normalized signal strength flashes rapidly, the new setting isaccepted, and the sensor returns to Run mode.
3.3 Remote InputUse the input wire to program the sensor remotely. To program the sensor using the input wire, remote input must be
enabled ( = , Input Wire Function on page 12). The remote input provides limited programming options (see Figure 7 on page 14). Pulse the remote input according to the diagram and the instructions provided in this manual.
The length of the individual programming pulses is equal to the value T: 0.04 seconds ≤ T ≤ 0.8 seconds.
Q3X Laser Contrast Sensor
www.bannerengineering.com - Tel: 763.544.3164 13

1x
2x Teach Selection
Starts selected Teach (same function as pressing Teach Button for > 2 sec)1x Second pulse completes Teach (Two-point and Dynamic Teach only)
0.04 seconds < T < 0.8 secondsTiming between Pulse groups > 1 second
Pulse Timing (T)(gray wire is input wire)
2x1x Two-point static background suppression
Dynamic background suppression
4x3x One-point window set
One-point light set
4x
2x1x Button Unlock
Button Lock
Button Lock
8x Reset to Factory Defaults (maintains remote input = SET)
Remote Input
5x One-point dark set
REMO
TE S
ETUP
REMO
TE
TEAC
H= Set
Figure 7. Remote Input Map
3.3.1 Select the TEACH mode using the Remote Input
1. Access the TEACH selection.
Action Result
Double-pulse the remote input.T T
T displays.
2. Select the desired TEACH mode.
Action Result
Pulses TEACH Mode
1T
Two-point static TEACH
2T T
TDynamic TEACH
3T T
T
T
TOne-point window set
4T T
T T T
T TOne-point light set
5T T
T
T
T
T
T
T
TOne-point dark set
The selected TEACH method displays for afew seconds and the sensor returns to Runmode.
Q3X Laser Contrast Sensor
14 www.bannerengineering.com - Tel: 763.544.3164

3.3.2 Reset to Factory Defaults Using the Remote Input
Eight-pulse the remote input to apply the factory defaults and return to Run mode.
T
T
T
T
T
T
T
T
T
T
T
T T
T
T
NOTE: The input wire function remains at remote teach input ( ).
3.4 Locking and Unlocking the Sensor ButtonsUse the lock and unlock feature to prevent unauthorized or accidental programming changes.Button Instructions
To lock or unlock the sensor using the buttons, press and hold and immediately press four times.
Remote Input Instructions1. Access the remote input.
Action Result
Four-pulse the remote input.T T
T T T
T T The sensor is ready to have the buttonstate defined and the current state
( or ) displays.
2. Lock or unlock the sensor buttons.
Action Result
Single-pulse the remote input to unlock the sensor.T displays and the sensor returns to
Run mode.
Double-pulse the remote input to lock the sensor.T T
T displays and the sensor returns to
Run mode.
3.5 TEACH Procedures
3.5.1 Two-Point Static TEACH
Two-point TEACH sets a single switching threshold. The sensor centers the switch point between two taught conditionswith the Output ON condition on one side and the Output OFF condition on the other.
Sensor positions threshold midway
between taught conditions
Darkest(no signal)
Most Light(saturated
signal)
Output OFF Output ON
2nd TaughtCondition
1st TaughtCondition
Positionadjusted by
Manual Adjust
Figure 8. Two-Point TEACH (Light Operate shown)
Q3X Laser Contrast Sensor
www.bannerengineering.com - Tel: 763.544.3164 15

NOTE: The sensor must be set to = to use the following instructions.
NOTE: To program the sensor using remote input, remote input must be enabled ( = )
1. Present the target.
Method Action Result
Push Button Present the first target. The sensor-to-target distance must be withinthe sensor's range. The target's value displays.
Remote Input
2. Start the TEACH mode.
Method Action Result
Push Button Press and hold TEACH for longer than 2 seconds. and flash alternately
on the display. The DYN and WNDindicators flash.
Remote Input No action required. n/a
3. Teach the sensor.
Method Action Result
Push Button Press TEACH to teach the target. The sensor is taught the first target.
and flash alternatelyon the display. The DYN and WNDindicators flash.
Remote Input Single-pulse the remote input.T
4. Present the target.
Method Action Result
Push ButtonPresent the second target. The sensor-to-target distance must bewithin the sensor's range.
and flash alternatelyon the display. The DYN and WNDindicators flash.Remote Input
5. Teach the sensor.
Method Action Result
Push Button Press TEACH to teach the target.The sensor is taught the secondtarget and the sensor returns to Runmode.Remote Input Single-pulse the remote input.
T
Table 2: Expected TEACH Behavior for Two-Point Static TEACH
Condition TEACH Result Display
At least one taught condition isbetween the minimum and maximumsignal level limits.
Sets the threshold between the twotaught conditions.
The current NSS displays.
Both taught conditions are darker thanthe minimum signal value limit.
Sets the threshold at the minimumlevel. Sets the sensor at the maximumdetection condition.
briefly displays, and then thecurrent NSS displays.
Both taught conditions are brighterthan the maximum signal value limit.
Sets the threshold at the maximumlevel. Sets the sensor at the minimumdetection condition.
briefly displays, and then thecurrent NSS displays.
Both taught conditions are at the samesignal level. This is a Calibration Set.
Sets the threshold slightly below thetwo taught conditions. briefly displays, and then the
current NSS displays.
Q3X Laser Contrast Sensor
16 www.bannerengineering.com - Tel: 763.544.3164

3.5.2 Dynamic TEACH
Dynamic TEACH sets a single switching threshold during machine run conditions. Dynamic TEACH is recommended forapplications where a machine or process may not be stopped for teaching. During Dynamic TEACH, the sensor takesmultiple samples of the light and dark conditions and automatically sets the switch point at the optimum level.
Sensor positions threshold midway
between taught conditions
Darkest(no signal)
Most Light(saturated
signal)
Output OFF Output ON
Darkest TaughtCondition
Lightest TaughtCondition
Positionadjusted by
Manual Adjust
Figure 9. Dynamic TEACH (Light Operate shown)
NOTE: The sensor must be set to = to use the following instructions.
NOTE: To program the sensor using remote input, remote input must be enabled ( = )
1. Present the target.
Method Action Result
Push Button Present the first target. The sensor-to-target distance must be withinthe sensor's range. The target's value displays.
Remote Input
2. Start the TEACH mode.
Method Action Result
Push Button Press and hold TEACH for longer than 2 seconds. and flash alternately
on the display. The DYN indicatorflashes.
Remote Input No action required. n/a
3. Teach the sensor.
Method Action Result
Push Button Press TEACH to teach the target. The sensor begins sampling target
intensity information and
and flash alternately on thedisplay. The DYN indicator flashes.
Remote Input Single-pulse the remote input.T
4. Present the targets.
Method Action Result
Push Button
Present additional targets. The sensor-to-target distance must bewithin the sensor's range.
The sensor continues to sampletarget intensity information and
and flash alternatelyon the display. The DYN indicatorflashes.
Remote Input
5. Teach the sensor.
Q3X Laser Contrast Sensor
www.bannerengineering.com - Tel: 763.544.3164 17

Method Action Result
Push Button Press TEACH to stop teaching the sensor.The sensor sets the switchingthreshold and returns to Run mode.Remote Input Single-pulse the remote input.
T
Table 3: Expected TEACH Behavior for Dynamic TEACH
Condition TEACH Result Display
At least one taught condition isbetween the minimum and maximumsignal level limits.
Sets the threshold between the twoconditions.
The current NSS displays.
All conditions are darker than theminimum signal value limit.
Sets the threshold at the minimumlevel. Sets the sensor at the maximumdetection condition.
briefly displays, and then thecurrent NSS displays.
All conditions are brighter than themaximum signal value limit.
Sets the threshold at the maximumlevel. Sets the sensor at the minimumdetection condition.
briefly displays, and then thecurrent NSS displays.
All conditions are at the same signallevel. This is a Calibration Set.
Sets the threshold slightly below thetwo taught conditions. briefly displays, and then the
current NSS displays.
3.5.3 Window Set
Window set sets a sensing window using the window offset percentage. Use the menu to set the window offsetpercentage. The default is 20%.
Darkest(no signal)
Most Light(saturated
signal)
Single taught point
Sensing window sizeadjusted by
Manual Adjust
Output OFF Output OFFOutput ON
Figure 10. Window Set (Light Operate shown)
NOTE: The sensor must be set to = to use the following instructions.
NOTE: To program the sensor using remote input, remote input must be enabled ( = )
1. Present the target.
Method Action Result
Push Button Present the target. The sensor-to-target distance must be within thesensor's range. The target's value displays.
Remote Input
2. Start the TEACH mode.
Method Action Result
Push Button Press and hold TEACH for longer than 2 seconds. and flash alternately
on the display. The WND indicatorflashes.
Q3X Laser Contrast Sensor
18 www.bannerengineering.com - Tel: 763.544.3164

Method Action Result
Remote Input No action required. n/a
3. Teach the sensor.
Method Action Result
Push Button Press TEACH to teach the target. The sensor sets the window andreturns to Run mode.
Remote Input Single-pulse the remote input.T flashes briefly on the display
and the sensor returns to Run mode.
Table 4: Expected TEACH Behavior for Window Set
Condition TEACH Result Display
A valid condition is detected. Sets a symmetric window around thetaught condition. The threshold window
is set by the value.
The current NSS displays.
The taught condition is at a valid lowsignal level.
Sets a symmetric window around thetaught condition, using the minimumoffset value.
The achieved percent briefly displays,and then the current NSS displays.
The taught condition is less than theminimum detection range.
Sets a single threshold at the minimumlevel. Sets the sensor at the maximumdetection condition.
briefly displays, and then thecurrent NSS displays.
The taught condition plus the offset isgreater than the detection range.
Sets a single threshold at themaximum level. Sets the sensor at theminimum detection condition.
briefly displays, and then thecurrent NSS displays.
3.5.4 Light Set
Light set sets a switching threshold a user-selectable percent offset below the presented condition. Use the menu toset the offset percentage. The default is 20%.
Output OFF
Darkest(no signal)
Most Light(saturated
signal)
Output ON
Condition Presented
Threshold position adjusted by
Manual Adjust
Sensor positions thethreshold slightly belowthe presented condition
Figure 11. Light Set (Light Operate shown)
NOTE: The sensor must be set to = to use the following instructions.
NOTE: To program the sensor using remote input, remote input must be enabled ( = )
1. Present the target.
Q3X Laser Contrast Sensor
www.bannerengineering.com - Tel: 763.544.3164 19

Method Action Result
Push Button Present the target. The sensor-to-target distance must be within thesensor's range. The target's value displays.
Remote Input
2. Start the TEACH mode.
Method Action Result
Push Button Press and hold TEACH for longer than 2 seconds. and flash alternately
on the display. The DYN and WNDindicators flash.
Remote Input No action required. n/a
3. Teach the sensor.
Method Action Result
Push Button Press TEACH to teach the sensor. The sensor sets the switchingthreshold and returns to Run mode.
Remote Input Single-pulse the remote input.T flashes briefly on the display
and the sensor returns to Run mode.
Table 5: Expected TEACH Behavior for Light Set
Condition TEACH Result Display
A valid condition is detected. Sets the threshold at a value less thanthe taught condition, as defined by the
value.
The current NSS displays.
The taught condition is at a low signallevel.
Sets the threshold at a percentagegreater than the value defined by the
value.
The percent offset needed with thepresented target briefly displays, thenthe current NSS displays.
The taught condition is darker than theminimum signal value limit.
Sets the threshold at the minimumlevel. Sets the sensor at the maximumdetection condition.
briefly displays, and then thecurrent NSS displays.
The taught condition is brighter thanthe maximum signal value limit.
Sets the threshold at the maximum
level minus the value.
The current NSS displays.
3.5.5 Dark Set
Dark set sets a switching threshold a user-selectable percent offset above the presented condition. Use the menu toset the offset percentage. The default is 50%.
Threshold position adjusted by
Manual Adjust
Sensor positionsthreshold slightly abovethe presented condition
Darkest(no signal)
Most Light(saturated
signal)
Output OFF Output ON
Condition Presented
Figure 12. Dark Set (Light Operate shown)
Q3X Laser Contrast Sensor
20 www.bannerengineering.com - Tel: 763.544.3164

NOTE: The sensor must be set to = to use the following instructions.
NOTE: To program the sensor using remote input, remote input must be enabled ( = )
1. Present the target.
Method Action Result
Push Button Present the target. The sensor-to-target distance must be within thesensor's range. The target's value displays.
Remote Input
2. Start the TEACH mode.
Method Action Result
Push Button Press and hold TEACH for longer than 2 seconds. and flash alternately
on the display. The DYN and WNDindicators flash.
Remote Input No action required. n/a
3. Teach the sensor.
Method Action Result
Push Button Press TEACH to teach the sensor. The sensor sets the switchingthreshold and returns to Run mode.
Remote Input Single-pulse the remote input.T flashes briefly on the display
and the sensor returns to Run mode.
Table 6: Expected TEACH Behavior for Dark Set
Condition TEACH Result Display
A valid condition is detected. Sets the threshold at a value greaterthan the taught condition, as defined
by the value.
The current NSS displays.
The taught condition is a low signallevel.
Sets the threshold at a percentagegreater than the value defined by the
value.
The percent offset needed with thepresented target briefly displays, thenthe current NSS displays.
The taught condition is darker than theminimum signal value limit.
Sets the threshold at the minimumlevel. Sets the sensor at the maximumdetection condition.
briefly displays, and then thecurrent NSS displays.
The taught condition is brighter thanthe maximum signal value limit.
Sets the threshold at the maximumlevel. Sets the sensor at the minimumdetection condition.
briefly displays, and then thecurrent NSS displays.
3.6 Sync Master/SlaveTwo Q3X sensors may be used together in a single sensing application. To eliminate crosstalk between the two sensors,configure one sensor to be the master and one to be the slave. In this mode, the sensors alternate taking measurementsand the response speed is 25 ms.
1. Configure the first sensor as the master; navigate: > .
2. Configure the second sensor as the slave; navigate: > .3. Connect the gray (input) wires of the two sensors together.
Q3X Laser Contrast Sensor
www.bannerengineering.com - Tel: 763.544.3164 21

4 SpecificationsSensing Beam
Visible red Class 2 laser, 655 nm
Supply Voltage (Vcc)10 to 30 V dc
Power and Current, exclusive of loadSupply Power: < 675 mWCurrent consumption: < 28 mA at 24 V dc
Sensing Range300 mm (11.81 in)
Output ConfigurationBipolar (1 PNP & 1 NPN) output
Output RatingOff-state Leakage Current: < 10 µANPN On-state saturation voltage: < 200 mV at 10 mA and <1.0 V at 100 mAPNP On-state saturation voltage: < 1 V at 10 mA and < 2.0 Vat 100 mA
Input WireAllowable Input Voltage Range: 0 to VccActive Low (internal weak pullup—sinking current): LowState < 2.0 V at 1 mA max.
Supply Protection CircuitryProtected against reverse polarity, over-voltage, and transientvoltages
Repeatability60 µs
Beam Spot Size
Beam Spot Size (FWHM)
2.24 mm
0.79 mmy
x 1.52 mm
0.55 mm 0.27 mm
0.55 mm
Distance30 mm 150 mm 300 mm
x
yBeamSpot
Pattern
Response SpeedUser selectable:
• —250 microseconds
• —1 millisecond
• —5 milliseconds
Delay at Power Up1 s
Ambient Light Immunity> 5000 lux
Maximum TorqueSide mounting: 1 N·m (9 in·lbs)Nose mounting: 10 N·m (88 in·lbs)
Connector5-pin Euro M12 Integral Connector
ConstructionHousing: Nickel-plated zinc die-castSide cover: Nickel-plated aluminumLens cover: Scratch-resistant PMMA acrylicLightpipes and display window: PolysulfoneAdjustment buttons: 316 stainless steel
VibrationMIL-STD-202G, Method 201A (10 to 60 Hz, 0.06 in (1.52mm) double amplitude, 2 hours each along X, Y and Zaxes), with sensor operating
ShockMIL-STD-202G, Method 213B, Condition I (100G 6x along X,Y and Z axes, 18 total shocks), with sensor operating
Environmental RatingIP67 per IEC60529IP68 per IEC60529IP69K per DIN40050-9
Operating ConditionsTemperature: −10 °C to +55 °C (+14 °F to +131 °F)Humidity: 35% to 95% relative humidity
Storage Temperature–25 °C to +75 °C (−13 °F to +167 °F)
Certifications
UL pending
Q3X Laser Contrast Sensor
22 www.bannerengineering.com - Tel: 763.544.3164

4.1 Dimensions
All measurements are listed in millimeters (inches), unless noted otherwise.
35.26 1.21
M18 X 1-6g
M12 X 1-6g
18.00
18.05
14.90
24.1012.05
1.30
3.30
Ø3.30
3.80
47.10
1.50
34.80
24.30
3.50 EMITTER
RECEIVER
4.2 Performance Curves
DISTANCE (mm)
EXCE
SS G
AIN
11
10
10
100
100
1000
1000
Figure 13. Excess Gain for Standard Sensitivity
NOTE: For High Sensitivity the ExcessGain increases by a factor of 1.5. ForLow Sensitivity the Excess Gaindecreases by a factor of 0.75
DISTANCE (mm)0 50 100 150 200 250 300
BEAM
PAT
TERN
(mm
)
- 2.5-2.0-1.5-1.0-0.50.00.51.01.52.02.5
Figure 14. Beam Pattern
Q3X Laser Contrast Sensor
www.bannerengineering.com - Tel: 763.544.3164 23

5 AbbreviationsThe following table describes the abbreviations used on the sensor display.
Abbreviation Description
No light received
The signal is saturated
One shot
First
One point
Second
Two-point static TEACH (static background suppression)
Bottom—The sensor is at minimum gain during a manual adjustment or after a TEACH
Calibration set
Output timing delays
Dark operate
Dark set
Display read
Delay timer
Dynamic TEACH
Excess gain
Exit to Run mode
Go
High sensitivity
Input wire function
Light operate or low sensitivity
Lock
Laser off
Light set
Minimum
Master
Off delay
On delay
Output operation
Q3X Laser Contrast Sensor
24 www.bannerengineering.com - Tel: 763.544.3164

Abbreviation Description
Offset percentage
Reset to factory defaults
Sensitivity
Input wire = remote teach function
or
Set (used in the TEACH procedures)
Standard sensitivity
Slave
Response speed
Stop
Teach process selection
Top—The sensor is at maximum gain during a manual adjust or after a TEACH
Window set
Unlock
Q3X Laser Contrast Sensor
www.bannerengineering.com - Tel: 763.544.3164 25

6 TroubleshootingTable 7: Troubleshooting Codes
Code Description Resolution
No light received For some applications, reposition thesensor or the target
The signal is saturated For some applications, reposition thesensor or the target
Table 8: Error Codes
Code Description Resolution
Output short circuit Check the wiring for an electrical shortcircuit
Laser fault Contact Banner Engineering to resolve
The display is blank and the outputindicator flashes
EEPROM or System Fault Contact Banner Engineering to resolve
Q3X Laser Contrast Sensor
26 www.bannerengineering.com - Tel: 763.544.3164

7 Accessories7.1 CordsetsAll measurements are listed in millimeters, unless noted otherwise.
5-Pin Threaded M12/Euro-Style Cordsets (Single Ended)
Model Length Style Dimensions Pinout (Female)
MQDC1-501.5 0.50 m (1.5 ft)
Straight
44 Typ.
ø 14.5M12 x 1
2
34
1
5
1 = Brown2 = White3 = Blue4 = Black5 = Gray
MQDC1-506 1.83 m (6 ft)
MQDC1-515 4.57 m (15 ft)
MQDC1-530 9.14 m (30 ft)
MQDC1-506RA 1.83 m (6 ft)
Right-Angle
32 Typ.[1.26"]
30 Typ.[1.18"]
ø 14.5 [0.57"]M12 x 1
MQDC1-515RA 4.57 m (15 ft)
MQDC1-530RA 9.14 m (30 ft)
7.2 BracketsAll measurements are listed in millimeters, unless noted otherwise.
SMBQ4X..• Swivel bracket with tilt
and pan movement forprecision adjustment
• Easy sensor mounting toextruded rail T-slots
• Metric and inch size boltsavailable
• Side mounting of somesensors with the 3 mmscrews included with thesensor
40
43
AB
B = 7 × M3 × 0.5
Model Bolt Thread (A)
SMBQ4XFA 3/8 - 16 × 2¼ in
SMBQ4XFAM10 M10 - 1.5 × 50
SMBQ4XFAM12 n/a; no bolt included. Mountsdirectly to 12 mm (½ in) rods
SMB18FA..• Swivel bracket with tilt and
pan movement for precisionadjustment
• Easy sensor mounting toextruded rail T-slots
• Metric and inch size boltsavailable
• 18 mm sensor mountinghole
66
69A
B
Hole size: B=ø 18.1
Model Bolt Thread (A)
SMB18FA 3/8 - 16 × 2 in
SMB18FAM10 M10 - 1.5 × 50
SMB18FAM12 n/a; no bolt included. Mountsdirectly to 12 mm (½ in) rods
Q3X Laser Contrast Sensor
www.bannerengineering.com - Tel: 763.544.3164 27

SMB18A• Right-angle mounting
bracket with a curvedslot for versatileorientation
• 12-ga. stainless steel• 18 mm sensor mounting
hole• Clearance for M4 (#8)
hardware
30
41
46
A BC
Hole center spacing: A to B = 24.2Hole size: A = ø 4.6, B = 17.0 × 4.6, C = ø 18.5
Q3X Laser Contrast Sensor
28 www.bannerengineering.com - Tel: 763.544.3164

8 Contact UsCorporate Headquarters
Address:Banner Engineering Corporate9714 Tenth Avenue NorthMinneapolis, Minnesota 55441, USA
Phone: +1 763 544 3164Website: www.bannerengineering.com
Europe
Address:Banner Engineering EMEAPark Lane Culliganlaan 2FDiegem B-1831, Belgium
Phone: +32 (0)2 456 0780Website: www.bannerengineering.com/euEmail: [email protected]
Turkey
Address:Banner Engineering TurkeyBarbaros Mah. Uphill Court Towers A Blok D:4934746 Batı Ataşehir Istanbul Türkiye
Phone: +90 216 688 8282Website: www.bannerengineering.com.trEmail: [email protected]
India
Address:Banner Engineering India Pune Head QuartersOffice No. 1001, 10th Floor Sai Capital, Opp. ICC Senapati Bapat RoadPune 411016, India
Phone: +91 (0) 206 640 5624Website: www.bannerengineering.co.inEmail: [email protected]
Mexico
Address:Banner Engineering de Mexico Monterrey Head OfficeEdificio VAO Av. David Alfaro Siqueiros No.103 Col. Valle Oriente C.P.66269San Pedro Garza Garcia, Nuevo Leon, Mexico
Phone: +52 81 8363 2714 or 01 800 BANNERE (toll free)Website: www.bannerengineering.com.mxEmail: [email protected]
Brazil
Address:Banner do BrasilRua Barão de Teffé nº 1000, sala 54Campos Elíseos, Jundiaí - SP, CEP.: 13208-761, Brasil
Phone: +1 763 544 3164Website: www.bannerengineering.com.brEmail: [email protected]
China
Address:Banner Engineering Shanghai Rep OfficeXinlian Scientific Research Building Level 12, Building 21535 Hongmei Road, Shanghai 200233, China
Phone: +86 212 422 6888Website: www.bannerengineering.com.cnEmail: [email protected]
Japan
Address:Banner Engineering JapanCent-Urban Building 305 3-23-15 Nishi-Nakajima Yodogawa-KuOsaka 532-0011, Japan
Phone: +81 (0)6 6309 0411Website: www.bannerengineering.co.jpEmail: [email protected]
Taiwan
Address:Banner Engineering Taiwan8F-2, No. 308 Section 1, Neihu RoadTaipei 114, Taiwan
Phone: +886 (0)2 8751 9966Website: www.bannerengineering.com.twEmail: [email protected]
South Korea
Address:Banner Engineering Korea8th Fl, CM Bldg, 32-7, Songpa-Dong Songpa-GuSeoul 138-849, South Korea
Phone: +82 (0)2 417 0285Website: www.bannerengineering.co.krEmail: [email protected]
Q3X Laser Contrast Sensor
www.bannerengineering.com - Tel: 763.544.3164 29

9 Banner Engineering Corp Limited WarrantyBanner Engineering Corp. warrants its products to be free from defects in material and workmanship for one year followingthe date of shipment. Banner Engineering Corp. will repair or replace, free of charge, any product of its manufacturewhich, at the time it is returned to the factory, is found to have been defective during the warranty period. This warrantydoes not cover damage or liability for misuse, abuse, or the improper application or installation of the Banner product.
THIS LIMITED WARRANTY IS EXCLUSIVE AND IN LIEU OF ALL OTHER WARRANTIES WHETHER EXPRESS ORIMPLIED (INCLUDING, WITHOUT LIMITATION, ANY WARRANTY OF MERCHANTABILITY OR FITNESS FOR APARTICULAR PURPOSE), AND WHETHER ARISING UNDER COURSE OF PERFORMANCE, COURSE OF DEALING ORTRADE USAGE.
This Warranty is exclusive and limited to repair or, at the discretion of Banner Engineering Corp., replacement. IN NOEVENT SHALL BANNER ENGINEERING CORP. BE LIABLE TO BUYER OR ANY OTHER PERSON OR ENTITY FORANY EXTRA COSTS, EXPENSES, LOSSES, LOSS OF PROFITS, OR ANY INCIDENTAL, CONSEQUENTIAL ORSPECIAL DAMAGES RESULTING FROM ANY PRODUCT DEFECT OR FROM THE USE OR INABILITY TO USE THEPRODUCT, WHETHER ARISING IN CONTRACT OR WARRANTY, STATUTE, TORT, STRICT LIABILITY,NEGLIGENCE, OR OTHERWISE.
Banner Engineering Corp. reserves the right to change, modify or improve the design of the product without assuming anyobligations or liabilities relating to any product previously manufactured by Banner Engineering Corp.
Q3X Laser Contrast Sensor
30 www.bannerengineering.com - Tel: 763.544.3164