qualified voter file - cornerstone ondemand
TRANSCRIPT

MI DEPARTMENT OF STATE, BUREAU OF ELECTIONS
Qualified Voter File Chapter 6 - Absentee Voter Tracking
QVF Help Desk
2/28/2020
QVF Chapter 6 contains information on the following:
• Generating absentee applications for permanent absentee voters
• Exporting permanent AV voter info to a .CSV file
• Processing absentee ballot requests for Military and Overseas voters
• Recording information about absentee voter applications and ballots
• Generating mailing labels for absentee ballots
• Spoiling or rejecting a ballot

MI Dept. of State, Bureau of Elections
QVF Ch. 6 Updated 02.28.2020
Page 1 of 29
Table of Contents Mass AV .......................................................................................................................................................................... 2
Dual AV Applications ................................................................................................................................................... 5
Inconsistent Dual AV Applications........................................................................................................................... 5
Exporting Permanent Absentee Voter Data for Applications ...................................................................................... 5
Introduction to AV Tracking Preferences ........................................................................................................................ 6
Other AV Screen Options and Functions ................................................................................................................ 7
AV Details (Manual AV Tracking) .................................................................................................................................... 8
To Send and Print an Application/Label to Default Address ....................................................................................... 9
To Send and Print an Application/Label to a Different Address .................................................................................. 9
Edit Application Status .............................................................................................................................................. 10
Application Undeliverable ...................................................................................................................................... 10
Application Invalid ................................................................................................................................................. 10
To Receive an Application and Send a Ballot to Default Address ............................................................................ 11
To Receive an Application and Send a Ballot to a Different Address ....................................................................... 12
To Receive a Ballot ................................................................................................................................................... 14
Edit Ballot Status ....................................................................................................................................................... 14
Spoil a Ballot .......................................................................................................................................................... 14
Reject a Ballot ....................................................................................................................................................... 15
Mark a Ballot as Undeliverable .............................................................................................................................. 15
Making Corrections ................................................................................................................................................... 15
AV Scan ......................................................................................................................................................................... 15
To Send an Application ............................................................................................................................................. 18
To Receive an Application and Send a Ballot to the Default Address ...................................................................... 19
To Receive an Application and Send a Ballot to a Different Address ....................................................................... 21
To Receive a Ballot ................................................................................................................................................... 23
Mark Ballots Undeliverable .................................................................................................................................... 24
Auto OK ..................................................................................................................................................................... 24
ID-Unconfirmed Notice .................................................................................................................................................. 25
If a voter marked ID-Unconfirmed requests an AV application: ................................................................................ 25
If a voter marked ID-Unconfirmed requests an AV Ballot: ........................................................................................ 25
If the voter marked ID-Unconfirmed returns the ballot: ............................................................................................. 25
If the voter is still marked ID-Unconfirmed on Election Day: ..................................................................................... 25
Error Messages ............................................................................................................................................................. 26
Print Queue ................................................................................................................................................................... 26
MOVE Ballots ................................................................................................................................................................ 28
Federal Write-In Absentee Ballots (FWABs) ............................................................................................................. 29

MI Dept. of State, Bureau of Elections
QVF Ch. 6 Updated 02.28.2020
Page 2 of 29
Mass AV To generate and print absentee ballot applications for your permanent absentee list of voters:
1. Click the Absentee Voter menu
2. Click Mass AV Application
3. Review your selections for Region Type, Region, and Main
Election, Precinct Type, etc. and change them if necessary.
Note: To print dual applications for a Primary and the corresponding General Election, select the Primary date from
the Main Election drop-down, and the General date from the Secondary/General drop-down. Please refer to the Dual
AV Applications section of this manual for further details.
4. Select the precinct(s) for which you want to record applications
5. Click Search
Note: By default, all Perm AV voters will be included in your search
results unless you specify otherwise from the Perm AV Voters drop-down
menu. The search may include: All permanent absentee voters, those
without applications sent, or those whose applications have not yet been
returned.
The Search portion of the screen collapses and the search results grid displays the permanent absentee voters,
selected automatically.
6. Change the printing options if you want something other than the defaults set in you AV Preferences (Output
Format and Print Now/Print Later)
7. Click Preview/Print to go to the Printing Options menu based upon your selected output

MI Dept. of State, Bureau of Elections
QVF Ch. 6 Updated 02.28.2020
Page 3 of 29
a. If Output Format = Applications (QVF Front, Pre Printed, Postcard)
From the Printing Options window that appears, choose from the following options to print:
1. Select the precinct or ballot information you want included from the Precinct Label
drop-down menu. This will help you sort the applications and can even identify the type of ballot the voter
should receive once the application is returned.
2. Change the sorting if necessary from the Sort By drop-down menu.
3. Click OK
b. If Output Format = Label
From the Printing Options window that appears, choose from the following options to print:
1. Select the Extra Address Label Option
• Mailing/Residential Address – one label per voter. Prints the permanent mailing address
when available; otherwise the residential address prints
• Residential Address Only – regardless of a permanent mailing address, one label is
printed per voter with the residential address only
• Residential and Mailing Address – a residential address label is printed for each voter and
a second label is printed for those with a permanent mailing address

MI Dept. of State, Bureau of Elections
QVF Ch. 6 Updated 02.28.2020
Page 4 of 29
2. Label Count (if it needs to be changed)
3. Select the precinct or ballot information you want included from the Precinct Label drop-down menu.
This will help you sort the applications and can even identify the type of ballot the voter should receive
once the application is returned.
4. Change the sorting if necessary from the Sort By drop-down menu
5. Click OK
The absentee ballot applications for the selected voters will be downloaded and opened in a new tab as a PDF. Click
the printer icon to print the applications. The icon may vary depending on your PDF program.
Once printing is complete, close the .pdf tab and return to the QVF Mass AV page to complete the next step of the
process to save the applications to the QVF database.
To record the date that the applications are sent:
(If you have logged out of the QVF and started a new session from the time you generated the applications, perform
Steps 1-5 to search and select the permanent absentee voters again before completing the steps below.
1. Click Record Sent Date
2. From the Application Sent Date window that
appears, record the date the applications
will be mailed to voters
3. Click OK

MI Dept. of State, Bureau of Elections
QVF Ch. 6 Updated 02.28.2020
Page 5 of 29
The App Sent column in the search
results grid is updated with the sent
date.
Dual AV Applications To print or save dual applications, both election dates (Primary and corresponding General) must be selected when
completing Step 3 of the process (See pg. 2). This will ensure that both election dates are listed on the application
and the voter can request a ballot for one or both election dates.
Inconsistent Dual AV Applications
If you try to issue a dual application to a voter who is only eligible to receive an application for one of those election
dates, a red icon appears next to their name. This typically happens when a voter is moving. When this occurs,
deselect the voter to proceed with the dual applications for other voters. You may also choose to exclude those
voters by checking the “Do Not Show Inconsistent Voters” in the Search section.
Exporting Permanent Absentee Voter Data for Applications Permanent absentee voter data can be exported in a .CSV file to send to a vendor for printing applications. The
Precinct Type used to generate this file will be the Precinct value used within the file. Therefore, if you want Ballot
Style or Counting Board information on the applications, choose the corresponding Precinct Type from the drop-
down menu.
After selecting your region, election date(s), precincts and voters, perform the following steps:
1. Choose “Export To CSV/Text” from the Output Format menu
2. Click Preview/Print
3. Save the file

MI Dept. of State, Bureau of Elections
QVF Ch. 6 Updated 02.28.2020
Page 6 of 29
Introduction to AV Tracking Preferences
The defaults selected in your profile preferences will carry over to your AV Details and AV scan screens. To revisit
the default settings without leaving the AV module, click the AV Preferences button shown on the AV Details or AV
Scan screens.
AV General Preferences
AV Scan Pop-Up Display Time (Sec): number of seconds the confirmation screen appears when using the Auto OK feature in
AV Scan
Set Print Now as Default: generates the application, mailing label, or ballot label to print immediately. When this option is not
checked, Print Later is the default and items will go to the Print Queue instead
Stick AV Receive Date: remembers the last application received date used and pre-fills the date in the field
Ballot Number Lockout Type: allows QVF to accommodate duplicate ballot numbers, depending on the number sequence(s)
used
None: allows you to duplicate a ballot number at any time
Precinct: allows you to issue a ballot number once per precinct
Counting Board: allows you to issue a ballot number once per Counting Board
Ballot Style: allows you to issue a ballot number once per ballot style (this is usually the best option)
Auto Increment: determines how the ballot number will auto advance. QVF can remember the last number used by precinct,
ballot style, counting board, or election
Show AV Tooltip: Conveniently located hover box appears when resting your mouse over the “Absentee Voter” button from the
voter registration screen showing the application and ballot sent and received dates and the ballot number where applicable
AV Application Preferences
AV App Output Format: the default format to print an application or mailing label for an application. You can select QVF
printed, Pre-Printed or post cards printing
AV Precinct Type: the default precinct type to use when searching for voters when processing absentees. You can sort by Ward
Precinct, School Precinct, Combined Precinct, ballot style, and counting board
Show PERM AV: Select the show Perm AV check box if you would like the Perm AV box on the AV applications. If you do
not maintain a Perm AV list, you would not select this box
Print Clerk Title on AV App: add or remove the clerk title to the absentee voting applicatio

MI Dept. of State, Bureau of Elections
QVF Ch. 6 Updated 02.28.2020
Page 7 of 29
AV Label Preferences
AV Label Output Format: default preference for a single label printer or sheets of labels. The AV label choices are Labels 2 or
3 across and dymo label printing
AV Label Precinct Type: precinct type or ballot style information that you want included on an application or ballot label. You
can sort by Ward Precinct, School Precinct, Combined Precinct, ballot style, and counting board
AV Label Sort Option: sorts labels on a sheet by precinct and name or precinct and address. You can sort by precinct/name or
precinct/address
Print Queue Sort Option: sorts labels printed from the Print Queue either by last name, ballot number, or issued time. The sort
options are by name, ballot number, issued time, precinct/name, precinct/ballot number or precinct/issued time
Extra Label: prints an extra label with the residential address when a voter also uses a permanent mailing or alternate address
Duplicate Dymo Label: prints a duplicate label from the single label printer
Include Ballot Number: prints the ballot number on the label
Mass AV Label
Extra Address Label: designates the type of address to use when including an extra label from the Mass AV module. Extra
label printing can be sorted by Print mailing/residential address, print residential address only, or print residential and mailing
address
AV Output Format: select how you would like your mass av labels printed by QVF App (front), Pre Printed App, postcard,
label 2 or 3 across, or if you would like to export to CSV (excel)
Other AV Screen Options and Functions
Main Election: The upcoming election date.
Secondary/General Election: When the upcoming election is a Primary, the corresponding General Election can be
selected from this menu to record a dual application, which is an application for an absentee ballot for both the
Primary and General Election dates.
Application History –
Undeliverable – check this box when an application is returned from the Post Office as undeliverable
Invalid/Invalid Reason – check this box if a voter was not eligible to receive an application or if the
application was denied and indicate the reason from the drop-down menu
Invalid Description - use this field to describe why an application was invalid, when “OTHER” is selected
from the Invalid Reason menu
App Address: the address where the application is sent. When available, the voter’s permanent mailing address is
used by default; otherwise, the residential address is used. If the absent voter application is being mailed to an
alternate address different from the permanent mailing or residential, it can be entered here.
Ballot Address: the address where the ballot is sent. When available, the voter’s permanent mailing address is used
by default; otherwise, the residential address is used. If the voter requests the ballot be mailed to an alternate
address different from the permanent mailing or residential, it can be entered here.
Preview: will generate a copy of an application (after a sent date has been saved) based on AV Preferences.
Dymo Label: will print a copy of the mailing label for an application or ballot and will also operate to include and extra
label or duplicate label based on other AV Label Preference

MI Dept. of State, Bureau of Elections
QVF Ch. 6 Updated 02.28.2020
Page 8 of 29
AV Details (Manual AV Tracking) 1. Perform a voter search
a. Click the Voter menu and select a voter search option
b. Enter some of the voter’s information into the search criteria fields
c. Click Search
2. Locate your voter in the search results grid and click their Edit button
3. At the bottom of the Voter’s record click their Absentee Voter button
4. Review the Election information and make any changes if necessary
5. Review the Voter Information: status, precinct, ballot style, age, and
signature

MI Dept. of State, Bureau of Elections
QVF Ch. 6 Updated 02.28.2020
Page 9 of 29
6. Ballot Options and Print Options will default to the preferences set in your profile. The Ballot Options section
is collapsed but can be viewed by clicking on the heading.
Note: Click the AV Preferences button to see or change your default AV processing options.
To Send and Print an Application/Label to Default Address To record an application with the default application address, proceed with the following steps. To record an
application to an address different from the one identified by the App Address button, skip to “To Send and Print an
Application/Label to a Different Address”.
1. Enter a date in the Applications Sent field either manually (MM/DD/YYYY), or select a date from the calendar
icon
2. Click Save
An application or mailing label will be generated based on your av preferences and printing options.
The App Address button will indicate with a red letter if the application or label will be printed with the:
• residential address (R),
• permanent mailing address (M).
To Send and Print an Application/Label to a Different Address Follow the steps listed below if the application is being sent to an address different
from the one identified by the App Address button.
1. Enter a date in the Applications Sent field
2. Click App Address
3. Enter the alternate application mailing address
4. Click Close

MI Dept. of State, Bureau of Elections
QVF Ch. 6 Updated 02.28.2020
Page 10 of 29
5. Click Save/Print on the AV Details screen, and an application or label will be generated based on your
preferences.
Note: If you get any red error messages
regarding a voter’s status or ineligibility
for an application or ballot, please refer
to the “Error Messages” portion of this
document.
The App Address button will update to
reflect the type of address being used
(residential, mailing, alternate) after the
date has been saved and the Application
History grid will populate with the status of
the application.
Note: You can add date ranges for alternate application and ballot addresses to be recorded for the appropriate
Election Date
To generate a copy of an application, click Preview.
To generate another mailing label, click Dymo Label. When “Extra Label” is checked in AV Preferences, this
generates two labels - one with the application address and one with the residential address. When “Duplicate Label”
is checked in AV Preferences, two labels with the application address will be printed.
Edit Application Status The application status section can be opened or collapsed by clicking on the small arrow next to the heading. Once
an application is recorded with a sent date the application status can be edited before being received.
Application Undeliverable: if an application is returned by the Post Office as undeliverable, check the undeliverable box
and click Save to update the application status.
Application Invalid: if an application is invalid you can check the Invalid box and select a reason from the Invalid
Reason drop-down menu. If the reason is “OTHER”, you must include a brief description.
MI Dept. of State, Bureau of Elections
QVF Ch. 6 Updated 02.28.2020
Page 11 of 29
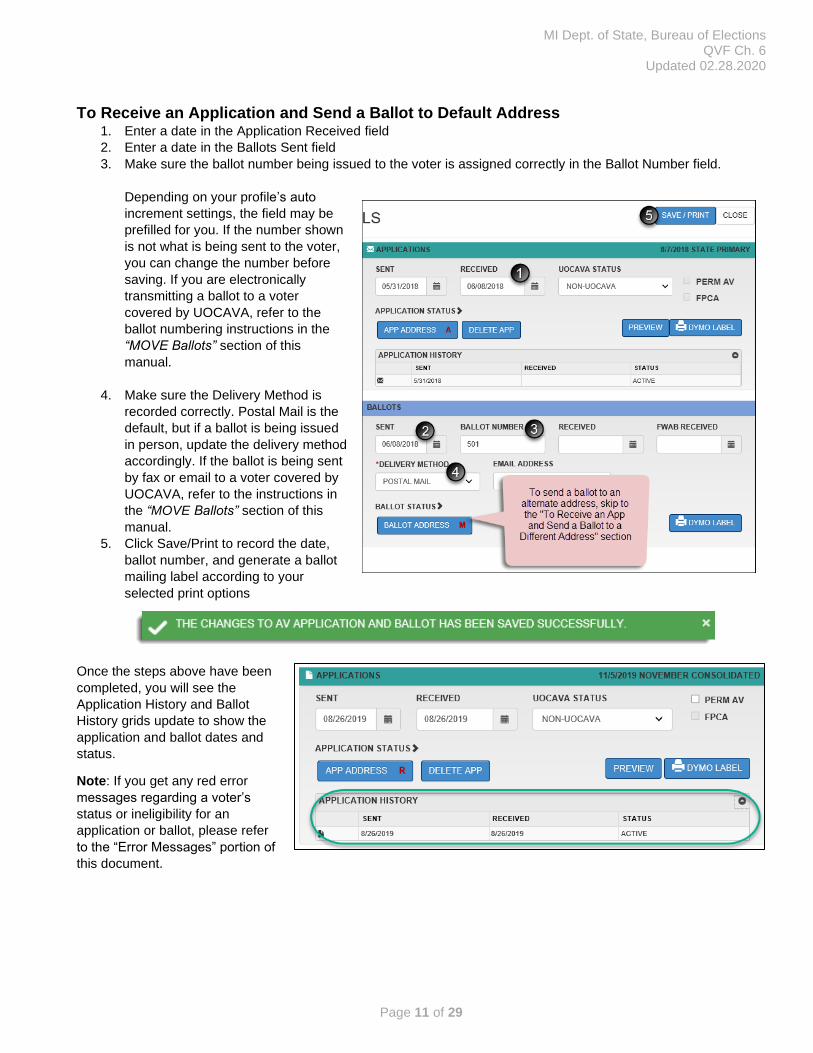
To Receive an Application and Send a Ballot to Default Address 1. Enter a date in the Application Received field
2. Enter a date in the Ballots Sent field
3. Make sure the ballot number being issued to the voter is assigned correctly in the Ballot Number field.
Depending on your profile’s auto
increment settings, the field may be
prefilled for you. If the number shown
is not what is being sent to the voter,
you can change the number before
saving. If you are electronically
transmitting a ballot to a voter
covered by UOCAVA, refer to the
ballot numbering instructions in the
“MOVE Ballots” section of this
manual.
4. Make sure the Delivery Method is
recorded correctly. Postal Mail is the
default, but if a ballot is being issued
in person, update the delivery method
accordingly. If the ballot is being sent
by fax or email to a voter covered by
UOCAVA, refer to the instructions in
the “MOVE Ballots” section of this
manual.
5. Click Save/Print to record the date,
ballot number, and generate a ballot
mailing label according to your
selected print options
Once the steps above have been
completed, you will see the
Application History and Ballot
History grids update to show the
application and ballot dates and
status.
Note: If you get any red error
messages regarding a voter’s
status or ineligibility for an
application or ballot, please refer
to the “Error Messages” portion of
this document.

MI Dept. of State, Bureau of Elections
QVF Ch. 6 Updated 02.28.2020
Page 12 of 29
To Receive an Application and Send a Ballot to a Different Address If the ballot is being sent to an address different than what is indicated on the Ballot Address button, proceed with the
following steps to generate a ballot mailing label with the correct mailing address prior to saving the date and ballot
number.
1. Enter a date in the Application
Received field
2. Enter a date in the Ballots
Sent field
3. Make sure the ballot number
being issued to the voter is
assigned correctly in the Ballot
Number field.
Depending on your profile’s auto
increment settings, the field may be
prefilled for you. If the number shown
is not what is being sent to the voter,
you can change the number before
saving. If you are electronically
transmitting a ballot to a voter covered
by UOCAVA, refer to the ballot
numbering instructions in the “MOVE
Ballots” section of this manual.
4. Make sure the Delivery
Method is recorded correctly.
Postal Mail is the default, but if
a ballot is being issued in person, update the delivery method accordingly. If the ballot is being sent by fax or
email to a voter covered by UOCAVA, refer to the instructions in the “MOVE Ballots” section of this manual.

MI Dept. of State, Bureau of Elections
QVF Ch. 6 Updated 02.28.2020
Page 13 of 29
5. Click Ballot Address
6. Enter the alternate mailing address
indicated on the voter’s absentee
application. You can click Clear to erase
the existing information and enter an
alternate mailing address or click Copy
Residential or Copy App Address
7. Click Close
8. Click Save/Print to record the date,
ballot number, and generate a ballot
mailing label according to your selected
print options
Note: If you get any red error messages
regarding a voter’s status or ineligibility for
an application or ballot, please refer to the
“Error Messages” portion of this document.
Note: You can add date ranges for alternate application and ballot addresses to be recorded for the appropriate
Election Date
Once the steps above have been completed, you will see the Application History and Ballot History grids update to
show the application and ballot dates and status. The Ballot Address button also updates to reflect the type of
address the ballot will be sent to (residential, mailing, alternate).
Note: After a ballot has
been saved, you can use
the Dymo Label button in
the Ballots section of the
screen to print another
ballot mailing label to a
single label printer.

MI Dept. of State, Bureau of Elections
QVF Ch. 6 Updated 02.28.2020
Page 14 of 29
To Receive a Ballot 1. Enter a date in the Ballots Received field either manually (MM/DD/YYYY), or select a date from the calendar
icon
2. Click Save
A green confirmation message appears at the top of the screen when the ballot has been received successfully and
the Ballot History grid will update with the received date.
Edit Ballot Status The functions to change a ballot’s status to spoiled, rejected, or undeliverable are found under the Ballot Status
heading. If the Ballot Status section is collapsed, click the heading to open the spoil, reject and undeliverable
options.
Spoil a Ballot
1. Click the Spoil box to spoil the current Active ballot listed in the Ballot History grid
2. Click Save/Print
To issue a new ballot, refer to the “To Send a Ballot” section of this manual.

MI Dept. of State, Bureau of Elections
QVF Ch. 6 Updated 02.28.2020
Page 15 of 29
Reject a Ballot
1. Click the Reject box to reject the current Active ballot listed in the Ballot Status grid
2. Select a Ballot Rejection Reason from the drop-down menu
3. Click Save/Print
Mark a Ballot as Undeliverable
1. Click the Undeliverable box to indicate that the current Active ballot was returned from the Post Office
2. Click Save/Print
Making Corrections
Delete App: Clicking this button deletes the application. Use this to correct any errors made while recording the
application, then record the application with the correct information. Applications can only be deleted if a ballot is not
already assigned.
Delete Ballot: Clicking this button deletes the ballot. Use this to correct any errors made while recording the ballot,
and then record the correct information.
Undo: To undo the last action performed, click the undo button, the title of which will identify the action being
undone, such as “Undo Spoil”.
AV Scan
AV scan lets you record your absentee voter information more quickly by pre-filling a date into specified fields. It can
be used to manually search a voter’s name, id number, or ballot number. It can also be used to search by scanning a
barcode from an application or label. It is helpful to process several voters at once efficiently. There is also an Auto
OK feature which reduces the number of mouse clicks required to enter the information. When processing AVs in the
AV Scan, the last six transactions will be displayed in the Activity Log to help you keep track of what has been done
each time you open the module.
To access AV Scan, click the Absentee Voter menu and select AV Scan.

MI Dept. of State, Bureau of Elections
QVF Ch. 6 Updated 02.28.2020
Page 16 of 29
Make sure you have the search criteria set the way you want. They may already be set based upon your account
Preferences or you can make changes. For dual applications, select the primary election date from the Main Election
menu and the corresponding general election date from the Secondary/General menu. Keep in mind that if you are
responsible for absentee voters from a neighboring jurisdiction, you may need to set your region to something
broader than your Jurisdiction, such as School District.
Note: to process only voters with a Military or Overseas Civilian UOCAVA status, check the “Search Only UOCAVA
Voters” box.
Add a checkmark to the action(s) you wish to assign a date to. The date will default to the current date or you can
change the date by clicking the calendar icon.
Important: Review your default AV processing settings by clicking the AV Preferences button before you begin
recording applications or ballots. This will open a pop-up of your AV Preferences without leaving the AV Scan
module.
Search for a voter by typing in the name (last name, first name), ballot number, or voter id number. When a search is
performed, the search criteria section will collapse, and matches will display in a grid below the Search Term field.

MI Dept. of State, Bureau of Elections
QVF Ch. 6 Updated 02.28.2020
Page 17 of 29
When a match is found,
select the voter and click
Process. The voter’s AV
Details will open in a pop-up
window.
If you search for the voter by
scanning a barcode instead,
the AV Details screen will
appear automatically without
having to click Process.
The AV Details button on this
screen takes you to the
selected voter’s AV Details
page in order to make edits to
their application or ballot
status or print additional
copies of applications or
labels without leaving the AV Scan module.
The Edit button on this screen takes you out of the AV Scan module and to the voter’s registration record.
Note: Voters with a permanent mailing address will be indicated with a “Y” in the Mailing Address (MA) column. QVF
uses mailing addresses by default when available rather than the residential address.
You can add a voter to the perm av list easily and quickly search for a voter and mark them as Perm AV without
selecting an election date. You can use an election date if you chose.
1. Check “process AV”
2. Search for voter
3. Check “perm av”
Voter is then marked as a perm av voter

MI Dept. of State, Bureau of Elections
QVF Ch. 6 Updated 02.28.2020
Page 18 of 29
To Send an Application Check the Send App box and search for the voter by scanning a barcode or searching by the name and clicking
Process.
1. The chosen date is populated in the application sent field
a. If the application is being sent to an address different from the type of address indicated on the App
Address button, click the App Address button to change the address that will be saved/printed on the
application or label.
• residential address (R)
• permanent mailing address (M)
• alternate address (A) - does not carry over from one
election to the next

MI Dept. of State, Bureau of Elections
QVF Ch. 6 Updated 02.28.2020
Page 19 of 29
b. Enter the alternate application mailing address
c. Click Close
2. Click Save/Print
Once the application sent date is saved, an
application or mailing label will be generated
based on your printing options and the address
used will be indicated on the App Address
button. The pop-up window closes, returning
you to the AV Scan screen to process the next
voter.
To Receive an Application and Send
a Ballot to the Default Address Check the Receive App and Send Ballot boxes and search for the voter by scanning a barcode or searching by the
name and clicking Process. When the Receive App and Send Ballot boxes are checked, an additional “Ballot Sent
Date” field appears, allow you to more easily record different dates to the application and ballot if necessary.

MI Dept. of State, Bureau of Elections
QVF Ch. 6 Updated 02.28.2020
Page 20 of 29
Important: Before saving the ballot number, review your ballot and printing options to make sure AV Scan operates
the way you need it to.
• Ballot Number Lockout: allows the recording of duplicate ballot
numbers based on the option selected
• Auto Increment: auto advances the ballot number based upon the
option selected
• Print Options: print now prints a ballot mailing label from the Dymo
label printer. Print later sends a ballot mailing label to the Print Queue
to print on a full sheet of labels
1. The chosen date from the previous screen is populated in the
Application Received field.
a. If the application is from a voter covered by UOCAVA, indicate the UOCAVA status in the menu and
if the application was the Federal Post Card Application, also check the FPCA box.
2. The chosen date from the previous screen is populated in the Ballot Sent field
3. Enter the ballot number being issued to the voter if it is not pre-populated in the Ballot Number field. Make
sure the ballot number being issued to the voter is assigned correctly. Depending on your profile’s auto
increment settings, the field may be prefilled for you. If the number is not what is being sent to the voter, you
can change the number before saving. If you are electronically transmitting a ballot to a voter covered by
UOCAVA, refer to the ballot numbering instructions in the “MOVE Ballots” section of this manual.
4. Make sure the Delivery Method is recorded correctly. Postal Mail is the default, but if a ballot is being issued
in person, update the delivery method accordingly. If the ballot is being sent by fax or email to a voter
covered by UOCAVA, refer to the instructions in the “MOVE Ballots” section of this manual.
5. Click Save/Print

MI Dept. of State, Bureau of Elections
QVF Ch. 6 Updated 02.28.2020
Page 21 of 29
Note: If you get any red error messages regarding a voter’s status or ineligibility for an application or ballot, please
refer to the “Error Messages” portion of this document.
To Receive an Application and Send a Ballot to a Different Address If the ballot is being sent to an address different from the voter’s residential or permanent mailing address, proceed
with the following steps to generate a ballot mailing label with the correct mailing address prior to saving the date and
ballot number.
Check the Receive App and Send Ballot boxes, search for the voter by scanning a barcode or searching the name
and clicking process.
Important: Before saving the ballot number, review your ballot and printing
options to make sure AV Scan operates the way you need it to. These are also
found under AV Preferences.
• Ballot Number Lockout: allows the recording of duplicate ballot
numbers based on the option selected
• Auto Increment: auto advances the ballot number based upon the
option selected
• Print Options: print now prints a ballot mailing label from the Dymo
label printer. Print later sends a ballot mailing label to the Print Queue to
print on a full sheet of labels
1. The chosen date from the previous screen is populated in the Application Received field.
a. If the application is from a voter covered by UOCAVA, indicate the UOCAVA status in the menu and
if the application was the Federal Post Card Application, also check the FPCA box.

MI Dept. of State, Bureau of Elections
QVF Ch. 6 Updated 02.28.2020
Page 22 of 29
Note: If you get any red error messages regarding a voter’s status or ineligibility for an application or ballot, please
refer to the “Error Messages” portion of this document.
2. The chosen date from the previous screen is populated in the Ballot Sent field
3. Enter the ballot number being issued to the voter if it is not pre-populated in the Ballot Number field. Make
sure the ballot number being issued to the voter is assigned correctly. Depending on your profile’s auto
increment settings, the field may be prefilled for you. If the number is not what is being sent to the voter, you
can change the number before saving. If you are electronically transmitting a ballot to a voter covered by
UOCAVA, refer to the ballot numbering instructions in the “MOVE Ballots” section of this manual.
4. Make sure the Delivery
Method is recorded correctly.
Postal Mail is the default, but
if a ballot is being issued in
person, update the delivery
method accordingly. If the
ballot is being sent by fax or
email to a voter covered by
UOCAVA, refer to the
instructions in the “MOVE
Ballots” section of this
manual.
5. Click Ballot Address
6. Enter the alternate mailing address indicated on the voter’s absentee application. You can click Clear to
erase the existing information and enter an alternate mailing address or click Copy Residential if the
application is going to the residential
address rather than the permanent
mailing address
7. Click Close. The alternate address is
applied and the address window closes.
8. Click Save/Print to record the date,
ballot number, and generate a ballot
mailing label according to your selected
print options
Once the ballot sent date is saved, a ballot label will be generated based on your printing options and pop-up closes,
returning you to the AV Scan screen. The Activity Log will display a
record of the transaction. The activity log also provides a ballot
received tally by session.

MI Dept. of State, Bureau of Elections
QVF Ch. 6 Updated 02.28.2020
Page 23 of 29
To Receive a Ballot Check the Receive Ballot box, search for the voter by scanning a barcode or searching the name and clicking
process.
1. The chosen date from the previous screen is populated in the Ballot Received field
2. Click Save/Print

MI Dept. of State, Bureau of Elections
QVF Ch. 6 Updated 02.28.2020
Page 24 of 29
The AV Details pop-up closes, returning you to the AV Scan. The Activity Log will
display a record of the transaction.
Mark Ballots Undeliverable
From AV Scan, check the “Mark Ballots Undeliverable” box and process the voter to indicate the current active ballot
was undeliverable. This can also be done from AV Details under the “Ballot Status” section. Click on the heading to
open or collapse the section.
Auto OK The Auto OK function allows you to enter dates and ballot numbers efficiently without the need to type anything or
click the Save button. It is a tool to quickly enter information into QVF after the processes of verification have already
been completed. When the Auto OK box is checked, a screen pops up explaining its purpose and to proceed with
caution.
When checked, the Auto OK will enter the information into the specified fields based on your selected date and av
processing preferences (the lockout, auto increment, and print options set in your profile). A confirmation screen will
appear briefly (display time is set in your profile preferences). The primary signature will appear in the box unless a
secondary signature is available. If you wish to quickly record the receipt of a large quantity of ballots, check the
“Auto OK” and “Receive Ballot” boxes and begin scanning the returned ballot envelopes.

MI Dept. of State, Bureau of Elections
QVF Ch. 6 Updated 02.28.2020
Page 25 of 29
ID-Unconfirmed Notice A voter marked ID-Unconfirmed will need to meet the federal identification requirement before their ballot can be
tabulated. See the Election Official’s Manual Ch. 2 on Voter Registration for a list of acceptable documents.
If a voter marked ID-Unconfirmed
requests an AV application: • If the voter submitted a voter
registration form at the same time as
the AV app with their DLN/PID or last
4 of their SSN, wait 2 days to see if
the voter’s status updates to ID-
Confirmed. If the status updates,
issue the application.
• If the 2 days have elapsed and the
voter status has not updated, or if the
voter did not provide documentation
to meet the federal ID requirement,
issue the AV application along with
the ID-Unconfirmed notice (that will
pop up in a new tab in QVF as you
send the voter the application). The
notice can be reprinted from the ID
Unconfirmed button.
If a voter marked ID-Unconfirmed
requests an AV Ballot: • Issue the ballot along with the ID-
Unconfirmed notice (that will pop up
in a new tab in QVF as you send the
voter the ballot). The notice directs
the voter to not place the required
documentation in the ballot return
envelope. The notice can be
reprinted from the ID Unconfirmed
button.
If the voter marked ID-Unconfirmed returns the ballot: • If the voter still has not provided the required identification documentation:
o Receive the ballot in QVF, set the ballot aside, and wait to see if the information
comes in before election day.
o If the voter provides the information prior to election day, update the voter’s ID
Confirmed field and process the ballot as usual.
If the voter is still marked ID-Unconfirmed on Election Day: • Send the ballot to the precinct or AV Counting Board for processing, keeping it separate from the other
ballots. Instruct the election inspectors to open the ballot envelope to see if the voter returned the required
documentation along with the AV ballot.
o If no documentation is provided, the ballot may not be counted and should be returned to the clerk
and rejected as ID-Unconfirmed.
o If the documentation is included with the ballot, the ballot should be processed as usual and the
documentation returned to the clerk, who will update the voter’s ID Confirmed field.

MI Dept. of State, Bureau of Elections
QVF Ch. 6 Updated 02.28.2020
Page 26 of 29
Error Messages When a voter is ineligible to vote by absentee ballot, QVF will display a message indicating the reason you are
unable to record an application or a ballot. An application/ballot cannot be recorded in QVF unless/until the reason
for the error message is resolved. The procedures for meeting such requirements can be found in the Election
Officials’ Manual Chapter 2.
• Inactive Voter Status (IVF – Y-C): Voters who are in the inactive voter file because a notice was sent to
confirm their address should resolve the status issue before receiving a ballot. If they do not, they are still
eligible to receive an absentee ballot; however, that ballot must be processed as a challenged ballot on
Election Day and QVF will alert you to this fact. Click OK on the warning pop-up to continue issuing the
ballot. For further detail on the IVF, please refer to the Election Officials’ Manual Chapter 2. The procedure
for preparing challenged ballots can be found in the Election Officials’ Manual, Chapter 11.
Print Queue
When generating absent voter applications, application mailing labels, or ballot mailing labels,
using the Print Later option sends items to the Print Queue, so they can be printed later one at a
time or in batches.
1. In the Print Queue, search for documents by Print Type, such as AV App or AV Label; Region Type, and
Region
2. Click Search and a list of documents yet to be printed appears

MI Dept. of State, Bureau of Elections
QVF Ch. 6 Updated 02.28.2020
Page 27 of 29
To include items
that have already
been printed in your
search, check the
appropriate box
and click Search.
Select the items you wish to print with the check marks or the Select All button
Click Print Document
Review print options and make changes if necessary. Print options will vary by type of
print job (AV App, AV Label)
Click OK
A new tab will open in the web browser with the selected documents
Print the documents
After printing, close the tab to return to the
Print Queue
When items have printed successfully, and
you no longer need them in the Queue, click
Mark Printed. Items previously selected to
print will remain checked. If you want items to
appear as not printed, deselect them before
clicking Mark Printed.

MI Dept. of State, Bureau of Elections
QVF Ch. 6 Updated 02.28.2020
Page 28 of 29
MOVE Ballots Only voters with a UOCAVA status of Military, Overseas Civilian, or Overseas-Legacy who have submitted an absent
voter application or Federal Post Card Application within the calendar year are eligible to receive an electronically
transmitted ballot. Once a UOCAVA voter’s application has been received in QVF, you will be able to generate a
PDF file containing their ballot and related voting and mailing instructions. This file can then be saved to your
computer and attached to an email sent to the voter or printed and sent by fax.
If the voter submitted an application prior to 45 days before the upcoming election and the regular ballots ordered by
the county are not available, you can use QVF to generate a MOVE ballot to fulfill their request to meet the 45-day
deadline to send their ballot either by postal mail, fax, or email.
When a voter submits an absentee ballot application, the receipt of that application can be recorded directly on the
voter’s record. The date of the application is also recorded, and this information is linked to their absentee voter
details screen. The UOCAVA status and original application received date is pre-filled for every election they are
eligible to vote in through the calendar year.
If the voter submitted the Federal Post Card Application (FPCA) which doubles as a voter registration and absentee
ballot application, you must select “Federal Post Card Application” from the Registration Location menu before
saving the application date in order to indicate the use of the specific form and get the FPCA indicator box checked
for Federal reporting purposes. For further detail and instructions regarding voters covered by UOCAVA and the
MOVE ballot process, please refer to the Military and Overseas Voter Manual.
To receive a New Application
1. Enter a date in the Application Received field either manually (MM/DD/YYYY), or select a date from the
calendar icon
2. Record the voter’s UOCAVA status in the drop-down menu
a. If the application was specifically a Federal Post Card Application, make sure the FPCA box is
checked as well
3. Click Save
To Record a MOVE Ballot
1. Enter a date in the Ballots Sent field either manually (MM/DD/YYYY), or select a date from the calendar icon
2. Record the ballot number. If the ballot is being sent by email, fax, or if it is a printed copy of the QVF
generated MOVE ballot being sent by postal mail record the ballot with an “ET” number. Your first ballot will
be ET1, then ET2, and so on.
3. Record the Delivery Method as requested by the voter on their application. Postal Mail is the default, but if a
ballot is being sent by fax or email, update the delivery method accordingly.
a. For emailed ballots, record the email address the ballot is being sent to
b. For MOVE ballots sent by postal mail, click the Ballot Address button to enter the address the voter
requested the ballot be mailed to
4. Click Save
The ballot sent date and ballot number will be saved and a label, if necessary, will be generated based upon your
selected print options.

MI Dept. of State, Bureau of Elections
QVF Ch. 6 Updated 02.28.2020
Page 29 of 29
To Generate a MOVE Ballot
The MOVE button appears only after a voter’s application received date and UOCAVA status have been saved. To
generate a PDF file containing the voter’s ballot and instructions, proceed with the following steps:
1. Click MOVE BALLOT
2. A pop-up displays when the file is available to download. Click OK
The file should appear at the bottom of your screen, though the appearance will vary depending upon your web
browser. These instructions are for Internet Explorer 11 and Adobe Acrobat Reader DC.
3. Choose Open to view the file. Review the ballot and instructions for accuracy. The ballot generated is
specific to the ballot style QVF determines that voter should receive based on their address and associated
districts.
4. Save the file to your computer
5. Open a new email message and attach the MOVE Ballot file. For a sample email message, refer to the
MOVE Email Message Template available in the Elections eLearning Center.
6. Send the email with the MOVE ballot to the voter
For further detail and instructions regarding voters covered by UOCAVA and the MOVE ballot process, please refer
to the Military and Overseas Voter Manual.
Federal Write-In Absentee Ballots (FWABs) You may receive a Federal Write-In Ballot from a military or overseas voter for
you to count in the event the ballot the clerk already sent is not returned in time
to count on election day. If you receive an FWAB, you must record the receipt of
the FWAB as it will act as a place-holder for the clerk-issued ballot in case it
needs to be sent to the polls on election day to duplicate and tabulate.