quick beginnings for db2 connect personal editionusers.sdsc.edu/~jrowley/db2/qb - db2 connect...
TRANSCRIPT
IBM®
DB2 Connect™
Quick Beginnings forDB2 Connect
™
Personal Edition
Version 8
GC09-4834-00
���


IBM®
DB2 Connect™
Quick Beginnings forDB2 Connect
™
Personal Edition
Version 8
GC09-4834-00
���
Before using this information and the product it supports, be sure to read the general information under Notices.
This document contains proprietary information of IBM. It is provided under a license agreement and is protected bycopyright law. The information contained in this publication does not include any product warranties, and anystatements provided in this manual should not be interpreted as such.
You can order IBM publications online or through your local IBM representative.v To order publications online, go to the IBM Publications Center at www.ibm.com/shop/publications/order
v To find your local IBM representative, go to the IBM Directory of Worldwide Contacts atwww.ibm.com/planetwide
To order DB2 publications from DB2 Marketing and Sales in the United States or Canada, call 1-800-IBM-4YOU(426-4968).
When you send information to IBM, you grant IBM a nonexclusive right to use or distribute the information in anyway it believes appropriate without incurring any obligation to you.
© Copyright International Business Machines Corporation 1993-2002. All rights reserved.US Government Users Restricted Rights – Use, duplication or disclosure restricted by GSA ADP Schedule Contractwith IBM Corp.
Contents
Part 1. About DB2 Connect . . . . 1
Chapter 1. An Introduction to DB2 Connect 3DB2 Connect product offerings . . . . . . 3Accessing host or iSeries DB2 data using DB2Connect Personal Edition . . . . . . . . 5Managing connections to databases using theConfiguration Assistant . . . . . . . . 8Developing applications using the DB2Application Development Client . . . . . 9Typical steps required to install and configureDB2 Connect Personal Edition . . . . . . 10
Part 2. Planning and installation 13
Chapter 2. Installing DB2 Connect PE onWindows. . . . . . . . . . . . . 15Installation requirements for DB2 ConnectPersonal Edition (Windows). . . . . . . 15Memory requirements for DB2 ConnectPersonal Edition (Windows). . . . . . . 16Disk requirements for DB2 Connect PersonalEdition (Windows) . . . . . . . . . . 17Extending the directory schema (Windows2000 and Windows .NET) . . . . . . . 18Installing DB2 Connect Personal Edition(Windows) . . . . . . . . . . . . 19Non-Administrator installation of DB2Connect (Windows) . . . . . . . . . 21
Chapter 3. Installing DB2 Connect PE onLinux . . . . . . . . . . . . . . 23Installation requirements for DB2 ConnectPersonal Edition (Linux) . . . . . . . . 23Memory requirements for DB2 ConnectPersonal Edition (Linux) . . . . . . . . 24Disk requirements for DB2 Connect PersonalEdition (Linux) . . . . . . . . . . . 25Mounting the DB2 CD-ROM (Linux) . . . . 26Installing DB2 Connect Personal Edition(Linux). . . . . . . . . . . . . . 27
Part 3. Preparing host and iSeriesdatabases for DB2 Connectcommunications . . . . . . . . 31
Chapter 4. Preparing DB2 for OS/390 andz/OS databases for DB2 Connectcommunications . . . . . . . . . . 33Preparing DB2 Universal Database forOS/390 and z/OS for connections from DB2Connect . . . . . . . . . . . . . 33Configuring DB2 Universal Database forOS/390 and z/OS . . . . . . . . . . 34Configuring TCP/IP for DB2 UniversalDatabase for OS/390 and z/OS . . . . . 35Configuring VTAM . . . . . . . . . 42
Chapter 5. Preparing DB2 UDB for iSeriesdatabases for DB2 Connectcommunications . . . . . . . . . . 43Preparing DB2 Universal Database for iSeriesfor connections from DB2 Connect . . . . 43
Chapter 6. Preparing DB2 for VM and VSEdatabases for DB2 Connectcommunications . . . . . . . . . . 45Preparing DB2 for VSE & VM for connectionsfrom DB2 Connect . . . . . . . . . . 45
Part 4. Configuring DB2 Connectto communicate with host andiSeries databases . . . . . . . . 47
Chapter 7. Configuring DB2 Connect tocommunicate with host and iSeriesdatabases . . . . . . . . . . . . 49Configuring a connection to host or iSeriesdatabase servers using the CA . . . . . . 49Configuration tasks . . . . . . . . . 50
Configuring a database connection usingthe Configuration Assistant (CA) . . . . 50Configuring a database connection using aprofile . . . . . . . . . . . . . 51
© Copyright IBM Corp. 1993-2002 iii
Configuring a database connection usingDiscovery . . . . . . . . . . . . 52Testing a database connection . . . . . 53
Chapter 8. Enabling multisite updates . . 55Multisite Updates . . . . . . . . . . 55Enabling Multisite Updates using the ControlCenter . . . . . . . . . . . . . . 56Testing Multisite Update using the ControlCenter . . . . . . . . . . . . . . 57Multisite update and sync point manager . . 58
Part 5. Configuring DB2 clients touse DB2 Connect . . . . . . . . 61
Chapter 9. Configuring DB2 clients to useDB2 Connect . . . . . . . . . . . 63Configuring a client to server connectionusing the Configuration Assistant (CA) . . . 63Configuration tasks . . . . . . . . . 64
Configuring a database connection usingthe Configuration Assistant (CA) . . . . 64Configuring a database connection using aprofile . . . . . . . . . . . . . 65Configuring a database connection usingDiscovery . . . . . . . . . . . . 66Testing a database connection . . . . . 67
Using Client and server profiles . . . . . 68Client profiles . . . . . . . . . . 68Creating client profiles using the exportfunction of the Configuration Assistant(CA) . . . . . . . . . . . . . 68Configuring client profiles using theimport function of the ConfigurationAssistant (CA) . . . . . . . . . . 69Exporting and importing a profile. . . . 71
Part 6. Using DB2 Connect . . . . 73
Chapter 10. Running your ownapplications . . . . . . . . . . . 75
Chapter 11. DB2 Connect and the CLIenvironment . . . . . . . . . . . 77Setting Up the CLI Environment . . . . . 77Setting Up the Windows CLI Environment . . 78Setting Up the UNIX ODBC Environment . . 80
Part 7. Appendixes . . . . . . . 83
Appendix A. Language Support . . . . . 85Changing the DB2 interface language(Windows) . . . . . . . . . . . . 85Changing the DB2 interface language (UNIX) 86Supported DB2 interface languages, locales,and code pages . . . . . . . . . . . 86Language identifiers (for running the DB2Setup wizard in another language) . . . . 91Bidirectional CCSID support . . . . . . 92Conversion of character data . . . . . . 94
Appendix B. Naming Rules . . . . . . 97Naming rules . . . . . . . . . . . 97DB2 object naming rules . . . . . . . . 97Naming Rules subtopics . . . . . . . . 99
Delimited identifiers and object names . . 99User, userID and group naming rules . . 99Federated database object naming rules 100Additional schema names information 100Additional password information . . . 101Workstation naming rules . . . . . . 102Naming rules in an NLS environment . . 103Naming rules in a Unicode environment 103
Appendix C. DB2 Universal Databasetechnical information . . . . . . . . 105Overview of DB2 Universal Databasetechnical information . . . . . . . . 105
Categories of DB2 technical information 106Printing DB2 books from PDF files . . . . 113Ordering printed DB2 books . . . . . . 114Accessing online help . . . . . . . . 114Finding topics by accessing the DB2Information Center from a browser . . . . 116Finding product information by accessingthe DB2 Information Center from theadministration tools . . . . . . . . . 118Viewing technical documentation onlinedirectly from the DB2 HTML DocumentationCD. . . . . . . . . . . . . . . 119Updating the HTML documentation installedon your machine . . . . . . . . . . 120Copying files from the DB2 HTMLDocumentation CD to a Web Server. . . . 122Troubleshooting DB2 documentation searchwith Netscape 4.x . . . . . . . . . . 122Searching the DB2 documentation . . . . 123
iv Quick Beginnings for DB2 Connect Personal Edition
Online DB2 troubleshooting information . . 124Accessibility . . . . . . . . . . . 125
Keyboard Input and Navigation . . . . 125Accessible Display . . . . . . . . 126Alternative Alert Cues . . . . . . . 126Compatibility with Assistive Technologies 126Accessible Documentation . . . . . . 126
DB2 tutorials . . . . . . . . . . . 126DB2 Information Center for topics . . . . 127
Appendix D. Notices . . . . . . . . 129Trademarks . . . . . . . . . . . . 132
Index . . . . . . . . . . . . . 135
Contacting IBM . . . . . . . . . . 139Product information . . . . . . . . . 139
Contents v

vi Quick Beginnings for DB2 Connect Personal Edition

Part 1. About DB2 Connect
© Copyright IBM Corp. 1993-2002 1

2 Quick Beginnings for DB2 Connect Personal Edition
Chapter 1. An Introduction to DB2 Connect
DB2 Connect provides connectivity to mainframe and midrange databasesfrom Windows, and UNIX-based platforms. You can connect to DB2 databaseson OS/390 and z/OS, iSeries, VSE, and VM. You can also connect to non-IBMdatabases that comply with the Distributed Relational Database Architecture(DRDA).
DB2 Connect product offerings
DB2 Connect has several connection solutions. DB2 Connect Personal Editionprovides direct connectivity to host and iSeries database series, while DB2Connect Enterprise Edition provides indirect connectivity that allows clients toaccess host and iSeries database servers through the DB2 Connect server. DB2Connect Unlimited Edition provides a unique packaging solution that makesproduct selection and licensing easier.
DB2 Connect Enterprise EditionDB2 Connect Enterprise Edition is a connectivity server thatconcentrates and manages connections from multiple desktop clientsand web applications to DB2 database servers running on host oriSeries systems. IBM’s DB2 Universal Database (UDB) for iSeries, DB2for OS/390 and z/OS, and DB2 for VSE & VM databases continue tobe the systems of choice for managing most critical data for theworld’s largest organizations. While these host and iSeries databasesmanage the data, there is a great demand to integrate this data withapplications running on Windows and UNIX workstations.
DB2 Connect Enterprise Edition enables local and remote clientapplications to create, update, control, and manage DB2 databases andhost systems using Structured Query Language (SQL), DB2 APIs(Application Programming Interfaces), ODBC (Open DatabaseConnectivity), JDBC (Java Database Connectivity), SQLJ (EmbeddedSQLJ for Java), or DB2 CLI (Call Level Interface). In addition, DB2Connect supports Microsoft Windows data interfaces such as ActiveXData Objects (ADO), Remote Data Objects (RDO), and Object Linkingand Embedding (OLE) DB.
DB2 Connect Enterprise Edition is currently available for AIX, HP-UX,Linux, Solaris, and Windows operating systems. These servers providesupport for applications running on UNIX (AIX, HP-UX, Linux, andSolaris operating environment), and Windows workstations.
© Copyright IBM Corp. 1993-2002 3
DB2 Connect Enterprise Edition is often installed on an intermediateserver to connect DB2 clients to a host or iSeries database. It can alsobe used on machines where multiple local users want to access thehost or iSeries servers directly.
For example, DB2 Connect Enterprise Edition may be installed on alarge machine with many local users. It may also be installed on aweb server, a machine that is running a Transaction Processor (TP)monitor, or other 3-tier application servers with multiple local SQLapplication processes and threads. In these cases, you can install DB2Connect Enterprise Edition on the same machine for simplicity, or ona separate machine to off-load CPU cycles.
DB2 Connect Enterprise Edition is most appropriate for environmentswhere:v Host and iSeries database servers do not support native TCP/IP
connectivity and direct connectivity from desktop workstations viaSNA is not desirable.
v Web servers run web-based applications.v Web servers run web-based application using data-aware Java
applications.v A middle-tier application server is used.v TP monitors, such as CICS, Encina, Microsoft Transaction Server
(MTS), Tuxedo, Component Broker, and MQSeries, are used.
DB2 Connect Personal Edition
DB2 Connect Personal Edition provides access from a singleworkstation to DB2 databases residing on servers such as OS/390,z/OS, OS/400, VM and VSE, as well as to DB2 Universal Databaseservers on UNIX and Windows operating systems. DB2 ConnectPersonal Edition provides the same rich set of APIs as DB2 ConnectEnterprise Edition.
This product is currently available for Linux and Windows operatingsystems.
DB2 Connect Personal Edition is used to connect a single Windowsoperating system, or Linux workstation, to a host or iSeries database.DB2 Connect Personal Edition is best suited for environments wherenative TCP/IP support is provided by the database servers, and theapplication being deployed is a traditional 2-tier client-serverapplication.
For example, DB2 Connect Personal Edition is a good choice forenabling traditional 2-tier VisualBasic and Microsoft Accessapplications. Applications that require a mid-tier application serverneed to use DB2 Connect Enterprise Edition.
4 Quick Beginnings for DB2 Connect Personal Edition

DB2 Connect Unlimited Edition
DB2 Connect Unlimited Edition is a unique package offering thatallows complete flexibility of DB2 Connect deployment and simplifiesproduct selection and licensing. This product contains both DB2Connect Personal Edition and DB2 Connect Enterprise Edition withlicense terms and conditions that allow the unlimited deployment ofany DB2 Connect product. License charges are based on the size ofthe S/390 or zSeries server that DB2 Connect users will be workingwith.
This package offering is only available for OS/390 and z/OS systems,and licensing is only valid for DB2 for OS/390 and z/OS datasources.
Related concepts:
v “DB2 Connect” in the DB2 Connect User’s Guide
v “DB2 Connect and SQL statements” in the DB2 Connect User’s Guide
v “Thin clients” in the Installation and Configuration Supplement
Related tasks:
v “Response file installation of DB2 on UNIX” in the Installation andConfiguration Supplement
v “Response file installation of DB2 on Windows” in the Installation andConfiguration Supplement
Related reference:
v “Host databases” in the DB2 Connect User’s Guide
v “DB2 Connect administration utilities” in the DB2 Connect User’s Guide
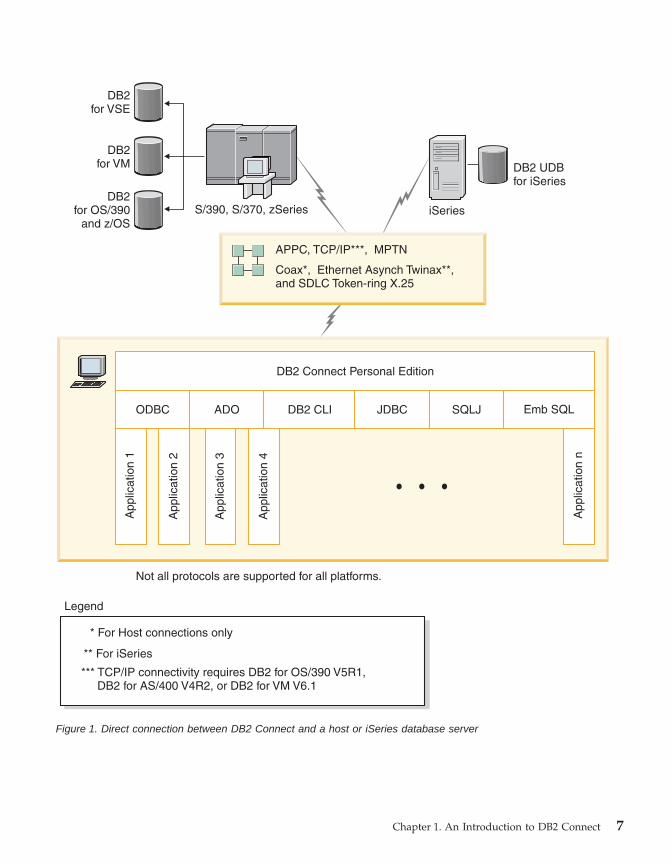
Accessing host or iSeries DB2 data using DB2 Connect Personal Edition
A direct connection without intermediate servers is a very convenient anddesirable configuration. This is especially true for situations where the host oriSeries™ database server supports TCP/IP connectivity. For example, DB2® forOS/390® Version 5.1, or DB2 for AS/400® V4R2, or DB2 for VM Version 6.1.In such a configuration, each DB2 Connect™ workstation establishes a directTCP/IP connection to DB2 for OS/390 or, for platforms with integrated SNASupport, connects via APPC to DB2 on other host and iSeries databases.
TCP/IP connectivity requires that the host or iSeries database supportTCP/IP. DB2 for OS/390 Version 5.1 or later, DB2 for AS/400 V4R2 or later,and DB2 for VM Version 6.1 or later support native TCP/IP connections. Analternative to native TCP/IP is MPTN connectivity. MPTN connections require
Chapter 1. An Introduction to DB2 Connect 5
that IBM® AnyNet® products be installed on the target database system, butdo not require the host or iSeries database to provide native TCP/IP support.
Figure 1 on page 7 shows a workstation, with DB2 Connect Personal Editioninstalled, directly connected to a host or iSeries database server.
6 Quick Beginnings for DB2 Connect Personal Edition
* For Host connections only
*** TCP/IP connectivity requires DB2 for OS/390 V5R1,DB2 for AS/400 V4R2, or DB2 for VM V6.1
** For iSeries
Legend
Not all protocols are supported for all platforms.
DB2 Connect Personal Edition
DB2for VSE
DB2for VM DB2 UDB
for iSeriesDB2
for OS/390and z/OS
S/390, S/370, zSeries iSeries
ODBC
App
licat
ion
1
App
licat
ion
2
App
licat
ion
3
App
licat
ion
4
App
licat
ion
n
ADO DB2 CLI JDBC SQLJ Emb SQL
TCP/IP***, MPTNAPPC,
Coax*, Ethernet Asynch Twinax**,and SDLC Token-ring X.25
Figure 1. Direct connection between DB2 Connect and a host or iSeries database server
Chapter 1. An Introduction to DB2 Connect 7
Managing connections to databases using the Configuration Assistant
The Configuration Assistant (CA) helps you manage your databaseconnections to remote servers. This is the preferred method to set up anyclient to server communications.
You can also use the command line processor to set up DB2® clients on anyplatform.
With the CA, you can:v Catalog databases so that they can be used by applications. Three methods
are available:– Use a profile provided by a database administrator to automatically
define your connections. Client access is automatically set up for thatdatabase.
– Search the network for available databases and select one. Client accessis automatically set up for for those databases defined in the profile. DB2Connect™ Personal Edition cannot search for host or iSeries™ databasesexcept through a DB2 Connect Enterprise Edition server that has host oriSeries databases defined.
– Manually configure a connection to a database by entering the requiredconnection parameters.
v Remove cataloged databases, or change the properties of a catalogeddatabase.
v Export and import client profiles that contain database and configurationinformation for a client.
v Test connections to local or remote databases identified on your system.v Bind applications to a database by selecting utilities or bind files from a list.v Add, change, remove CLI/ODBC data sources, and configure CLI/ODBC
configuration settings.v Tune the client configuration parameters on your system. Parameters are
logically grouped and suggested settings are provided on the interface asparameters are selected.
v Update the database server password.
Related tasks:
v “Configuring a client to server connection using the Configuration Assistant(CA)” in the Quick Beginnings for DB2 Servers
v “Binding database utilities on DB2 Connect” in the Quick Beginnings for DB2Connect Personal Edition
v “Configuring a connection to host or iSeries database servers using the CA”on page 49
8 Quick Beginnings for DB2 Connect Personal Edition
Developing applications using the DB2 Application Development Client
The DB2 Application Development Client is a collection of tools that aredesigned to meet the needs of database application developers. It includeslibraries, header files, documented APIs, and sample programs to buildcharacter-based, multimedia, or object-oriented applications.
A platform-specific version of the DB2 Application Development Client isavailable on each server CD-ROM. In addition, the Developer Edition packagecontains the Application Development Clients for multiple supportedoperating systems. The Personal Developer’s Edition package contains theApplication Development CD-ROMs for Windows and Linux. The UniversalDeveloper’s Edition package contains the Application Development CD-ROMsfor all supported operating systems.
Through a DB2 client, these applications can access all servers and, by usingthe DB2 Connect product (or the DB2 Connect functionality supplied withDB2 Enterprise Server Edition), they can also access DB2 UDB for iSeries, DB2for OS/390 and z/OS, and DB2 for VSE & VM database servers.
The DB2 Application Development Client allows you to develop applicationsthat use the following interfaces:v Embedded SQLv Call Level Interface (CLI) development environment (which is compatible
with ODBC from Microsoft)v Java Database Connectivity (JDBC)v Embedded SQL for Java (SQLj)v DB2 Application Programming Interfaces (APIs) that use administrative
functions to manage a DB2 database.
Related concepts:
v “DB2 Developer's Edition Products” in the Application Development Guide:Programming Client Applications
Related reference:
v “DB2 Application Development Client” in the Application Development Guide:Building and Running Applications
Chapter 1. An Introduction to DB2 Connect 9
Typical steps required to install and configure DB2 Connect Personal Edition
Setting up DB2® Connect is a multi-step process. The topic will discuss thetypical steps required to installing and configuring DB2 Connect™ PersonalEdition.1. Determine how you want to use DB2 Connect in your network.2. Verify that you have the correct hardware and software prerequisites on
both your workstation and the host database server.3. Verify that your host or iSeries™ database server is configured to accept
connections from DB2 Connect servers.4. Install your DB2 Connect software. You will use this workstation to
configure and verify your host and iSeries connections.5. After installation, establish the connection between DB2 Connect and your
host or iSeries database system.DB2 Connect can locate and configure all TCP/IP and most SNAconnections for you. You can use the Configuration Assistant (CA) to findthe host database.
Note: You should consider switching to TCP/IP as SNA may no longer besupported in future release of DB2 Connect. SNA requiressignificant configuration knowledge and the configuration processitself can prove to be error prone. TCP/IP is simple to configure,has lower maintenance costs, and provides superior performance.
6. Bind the programs and utilities provided with DB2 Connect to your hostor iSeries database.
7. Test the host or iSeries connection.8. You are now ready to use DB2 Connect with all your applications.
Workstations that will be used for application development should havethe DB2 Application Development Client installed.
9. If you want to use this workstation to administer DB2 for OS/390® andz/OS, or DB2 Universal Database™ for UNIX, Windows® servers, installthe DB2 Administration Client.
Related tasks:
v “Binding database utilities on DB2 Connect” in the Quick Beginnings for DB2Connect Personal Edition
v “Configuring a connection to host or iSeries database servers using the CA”on page 49
Related reference:
v “Memory requirements for DB2 Connect Personal Edition (Windows)” onpage 16
10 Quick Beginnings for DB2 Connect Personal Edition
v “Memory requirements for DB2 Connect Personal Edition (Linux)” on page24
v “Disk requirements for DB2 Connect Personal Edition (Windows)” on page17
v “Disk requirements for DB2 Connect Personal Edition (Linux)” on page 25
Chapter 1. An Introduction to DB2 Connect 11

12 Quick Beginnings for DB2 Connect Personal Edition

Part 2. Planning and installation
© Copyright IBM Corp. 1993-2002 13

14 Quick Beginnings for DB2 Connect Personal Edition
Chapter 2. Installing DB2 Connect PE on Windows
Installation requirements for DB2 Connect Personal Edition (Windows)
To install a DB2 Connect Personal Edition, the following operating system,software, and communications requirements must be met:
Operating system requirementsOne of:v Windows 98v Windows MEv Windows NT Version 4 with Service Pack 6a or higherv Windows 2000v Windows XP (32-bit and 64-bit)v Windows .NET (32-bit and 64-bit)
Software requirements
v If you plan to use the Tivoli Storage Manager facilities for backupand restore of your databases, you require the Tivoli StorageManager Client Version 3 or later.
v If you plan to use the Simple Network Management Protocol(SNMP) subagent, you require DPI 2.0 provided by IBMSystemView Agent. SNMP is not supported with DB2 offerings onWindows 64-bit platforms.
v Java Runtime Environment (JRE) Version 1.3.1 is required to runDB2’s Java-based tools, such as the Control Center.
Communication requirements
v You can use APPC, TCP/IP, and MPTN (APPC over TCP/IP)v For SNA (APPC) connectivity, one of the following communication
products is required:– Windows 98 and Windows ME
- IBM Personal Communications Version 5.0 (CSD 3) or later.– Windows NT:
- IBM Communications Server Version 6.1.1 or later.- IBM Personal Communications Version 5.0 (CSD 3) or later.
– Windows 2000:- IBM Communications Server Version 6.1.1 or later.- IBM Personal Communications Version 5.0 (CSD 3) or later.
© Copyright IBM Corp. 1993-2002 15
– Windows XP:- IBM Personal Communications Version 5.5 (APAR IC23490)
– Microsoft SNA Server Version 3 Service Pack 3 or later.
Notes:
1. You should consider switching to TCP/IP as SNA may nolonger be supported in future releases of DB2 Connect. SNArequires significant configuration knowledge and theconfiguration process itself can prove to be error prone. TCP/IPis simple to configure, has lower maintenance costs, andprovides superior performance.
2. SNA is not supported on Windows XP (64-bit) and Windows.NET (64-bit).
Related tasks:
v “Installing DB2 Connect Personal Edition (Linux)” on page 27
Related reference:
v “Memory requirements for DB2 Connect Personal Edition (Windows)” onpage 16
v “Disk requirements for DB2 Connect Personal Edition (Windows)” on page17
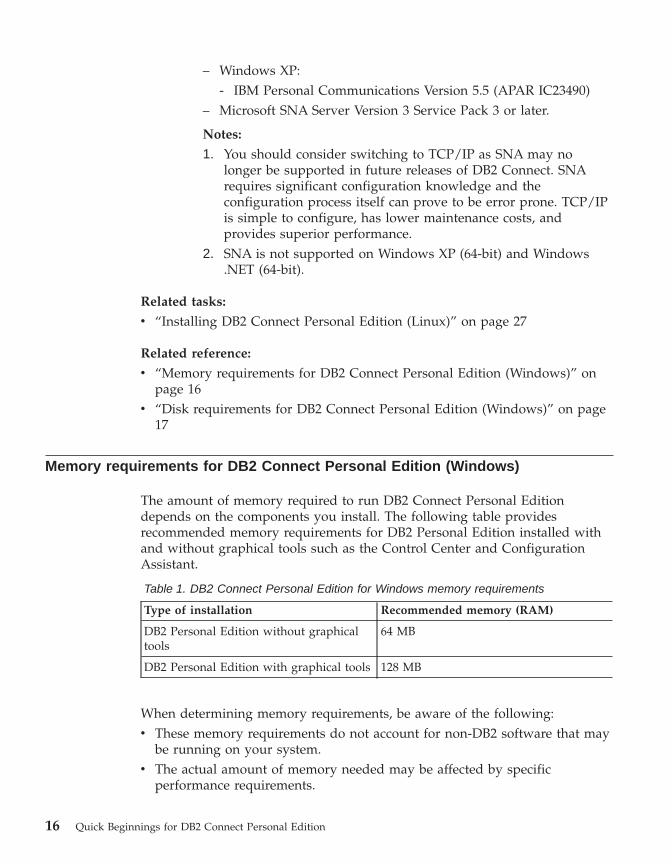
Memory requirements for DB2 Connect Personal Edition (Windows)
The amount of memory required to run DB2 Connect Personal Editiondepends on the components you install. The following table providesrecommended memory requirements for DB2 Personal Edition installed withand without graphical tools such as the Control Center and ConfigurationAssistant.
Table 1. DB2 Connect Personal Edition for Windows memory requirements
Type of installation Recommended memory (RAM)
DB2 Personal Edition without graphicaltools
64 MB
DB2 Personal Edition with graphical tools 128 MB
When determining memory requirements, be aware of the following:v These memory requirements do not account for non-DB2 software that may
be running on your system.v The actual amount of memory needed may be affected by specific
performance requirements.
16 Quick Beginnings for DB2 Connect Personal Edition
Related tasks:
v “Installing DB2 Connect Personal Edition (Windows)” on page 19
Related reference:
v “Disk requirements for DB2 Connect Personal Edition (Windows)” on page17
v “Installation requirements for DB2 Connect Personal Edition (Windows)” onpage 15
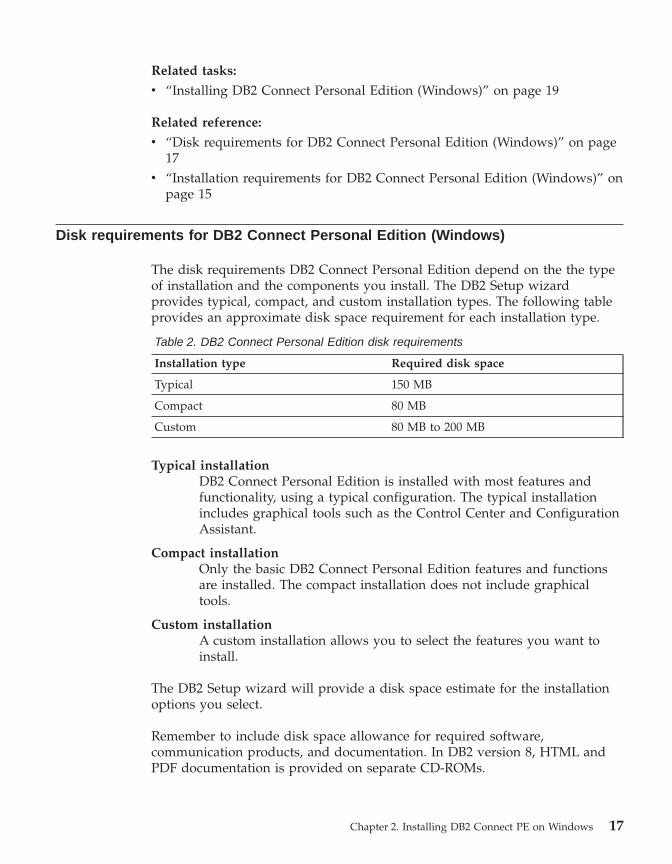
Disk requirements for DB2 Connect Personal Edition (Windows)
The disk requirements DB2 Connect Personal Edition depend on the the typeof installation and the components you install. The DB2 Setup wizardprovides typical, compact, and custom installation types. The following tableprovides an approximate disk space requirement for each installation type.
Table 2. DB2 Connect Personal Edition disk requirements
Installation type Required disk space
Typical 150 MB
Compact 80 MB
Custom 80 MB to 200 MB
Typical installationDB2 Connect Personal Edition is installed with most features andfunctionality, using a typical configuration. The typical installationincludes graphical tools such as the Control Center and ConfigurationAssistant.
Compact installationOnly the basic DB2 Connect Personal Edition features and functionsare installed. The compact installation does not include graphicaltools.
Custom installationA custom installation allows you to select the features you want toinstall.
The DB2 Setup wizard will provide a disk space estimate for the installationoptions you select.
Remember to include disk space allowance for required software,communication products, and documentation. In DB2 version 8, HTML andPDF documentation is provided on separate CD-ROMs.
Chapter 2. Installing DB2 Connect PE on Windows 17
Related tasks:
v “Installing DB2 Connect Personal Edition (Windows)” on page 19
Related reference:
v “Memory requirements for DB2 Connect Personal Edition (Windows)” onpage 16
v “Installation requirements for DB2 Connect Personal Edition (Windows)” onpage 15
Extending the directory schema (Windows 2000 and Windows .NET)
Extending the directory schema is part of the larger task of Installing DB2(Windows).
If you plan to use LDAP with Windows 2000 or Windows .NET, you mustextend the directory schema to contain DB2 object classes and attributedefinitions. You must do this once before you install DB2.
Prerequisites:
Your Windows user account must have Schema Administration authority.
Procedure:
To extend the directory schema, logon to a domain controller and execute thedb2schex.exe program from the installation CD with Schema Administrationauthority. You can execute this program with Schema Administrationauthority, without logging off and logging on again, as follows:
runas /user:MyDomain\Administrator x:\db2\common\db2schex.exe
where x: represents the CD-ROM letter. When db2schex.exe completes, youcan continue with the installation.
Your next step is Starting the DB2 Setup wizard (Windows).
Related reference:
v “Installation requirements for DB2 servers (Windows)” in the QuickBeginnings for DB2 Servers
18 Quick Beginnings for DB2 Connect Personal Edition
Installing DB2 Connect Personal Edition (Windows)
This task describes how to install DB2 Connect Personal Edition on Windowsoperating systems.
Prerequisites:
Before you launch the DB2 Setup wizard:v Ensure that your system meets the following requirements:
– Hardware, distribution, and software requirements– Memory requirements– Disk requirements
v If you are installing on Windows 2000 or Windows .NET and intend to useLightweight Directory Access Protocol (LDAP), you must extend thedirectory schema.
v It is recommended that you use an Administrator account to perform theinstallation. The Administrator account must belong to the localadministrator’s group on the Windows computer where you are installingyour DB2 product and should have the following advanced user rights:– Act as part of the operating system– Create token object– Increase quotas– Replace a process level token
You can perform the installation without advanced user rights, but thesetup program may be unable to validate accounts.
v If you want to install DB2 Connect with a non-Administrator account, referto the non-administrator installation of DB2 Connect.
Procedure:
To install DB2 Connect Personal Edition:1. Log on to the system as a user with administrator authority.2. Close all programs so the installation program can update files as
required.3. Insert the CD-ROM into the drive. The auto-run feature automatically
starts the DB2 Setup wizard. The DB2 Setup wizard will determine thesystem language, and launch the setup program for that language. If youwant to run the setup program in a different language, or the setupprogram failed to auto-start, you can run invoke the DB2 Setup wizardmanually.
Chapter 2. Installing DB2 Connect PE on Windows 19
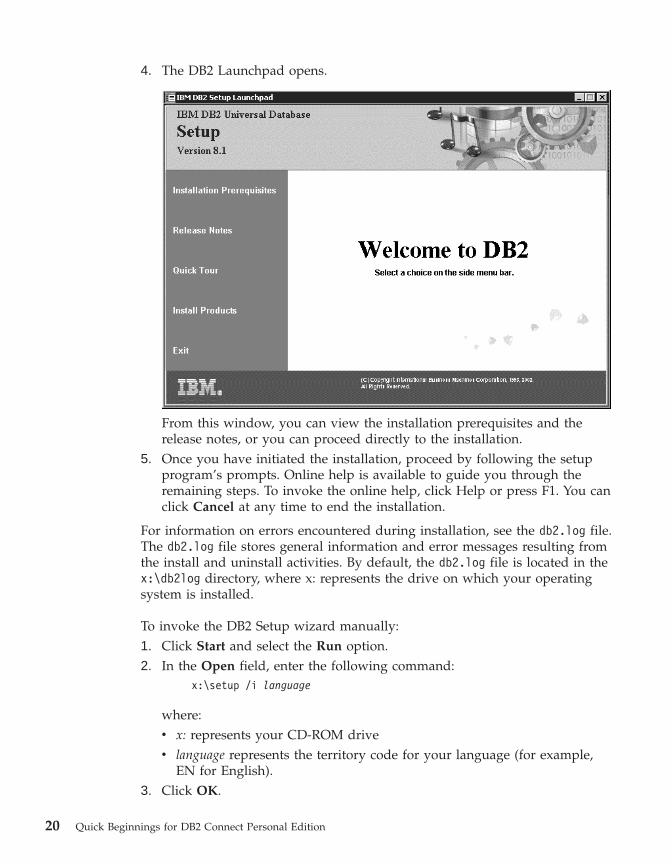
4. The DB2 Launchpad opens.
From this window, you can view the installation prerequisites and therelease notes, or you can proceed directly to the installation.
5. Once you have initiated the installation, proceed by following the setupprogram’s prompts. Online help is available to guide you through theremaining steps. To invoke the online help, click Help or press F1. You canclick Cancel at any time to end the installation.
For information on errors encountered during installation, see the db2.log file.The db2.log file stores general information and error messages resulting fromthe install and uninstall activities. By default, the db2.log file is located in thex:\db2log directory, where x: represents the drive on which your operatingsystem is installed.
To invoke the DB2 Setup wizard manually:1. Click Start and select the Run option.2. In the Open field, enter the following command:
x:\setup /i language
where:v x: represents your CD-ROM drivev language represents the territory code for your language (for example,
EN for English).3. Click OK.
20 Quick Beginnings for DB2 Connect Personal Edition
Related concepts:
v “Typical steps required to install and configure DB2 Connect PersonalEdition” on page 10
Related tasks:
v “Extending the directory schema (Windows 2000 and Windows .NET)” onpage 18
Related reference:
v “Memory requirements for DB2 Connect Personal Edition (Windows)” onpage 16
v “Disk requirements for DB2 Connect Personal Edition (Windows)” on page17
v “Installation requirements for DB2 Connect Personal Edition (Windows)” onpage 15
v “db2setup - Install DB2” in the Command Reference
Non-Administrator installation of DB2 Connect (Windows)
For a non-Administrator’s installation, which is only available on Windows®
NT, Windows 2000 Professional, and Windows XP, the account you are loggedon as must belong to a group with more authority than the Guests group. Forexample, you can log on as a user account that belongs to the Users group orthe Power Users group.
Some information about DB2® Connect that must appear in the registry mustbe entered in the HKEY_CURRENT_USER folder in the registry. Althoughmany items will be stored under the HKEY_LOCAL_MACHINE folder in theregistry for non-Administrator installations of DB2 Connect, the environmentsettings must be changed in HKEY_CURRENT_USER.
System shortcuts must be changed to user shortcuts for the non-Administratorinstall. Moreover, since services are required to install any of the DB2Connect™ products, but cannot be created without administrative authority,services that would be automatically started are run as processes when anon-administrator installs.
The following are installation situations you might encounter in anenvironment where both administrator and non-administrator installationsexist:v A non-Administrator has installed DB2 Connect, and then an Administrator
attempts to install DB2 Connect on the same machine. The Administratorwill get a message that the product is already installed. The Administrator
Chapter 2. Installing DB2 Connect PE on Windows 21
does have the authority to uninstall and reinstall the product to get aroundthis issue. These products cannot co-exist on Windows platforms becausethere is only a single registry and you can not have DB2 installed multipletimes.
v A non-administrator has installed DB2 Connect, and then a secondnon-Administrator attempts to install DB2 Connect on the same machine. Inthis scenario, the installation will fail, and return an error message that theuser must be an Administrator to install the product.
v An Administrator has installed DB2 Connect, and then a non-Administratorattempts to install DB2 Connect on the same machine. In this scenario, theinstall will fail, and return an error message that the user must be anAdministrator to install the product. An Administrator always has theauthority to uninstall or reinstall.
Related tasks:
v “Installing DB2 Connect Personal Edition (Windows)” on page 19v “Installing DB2 Connect Enterprise Edition (Windows)” in the Quick
Beginnings for DB2 Connect Personal Edition
22 Quick Beginnings for DB2 Connect Personal Edition
Chapter 3. Installing DB2 Connect PE on Linux
Installation requirements for DB2 Connect Personal Edition (Linux)
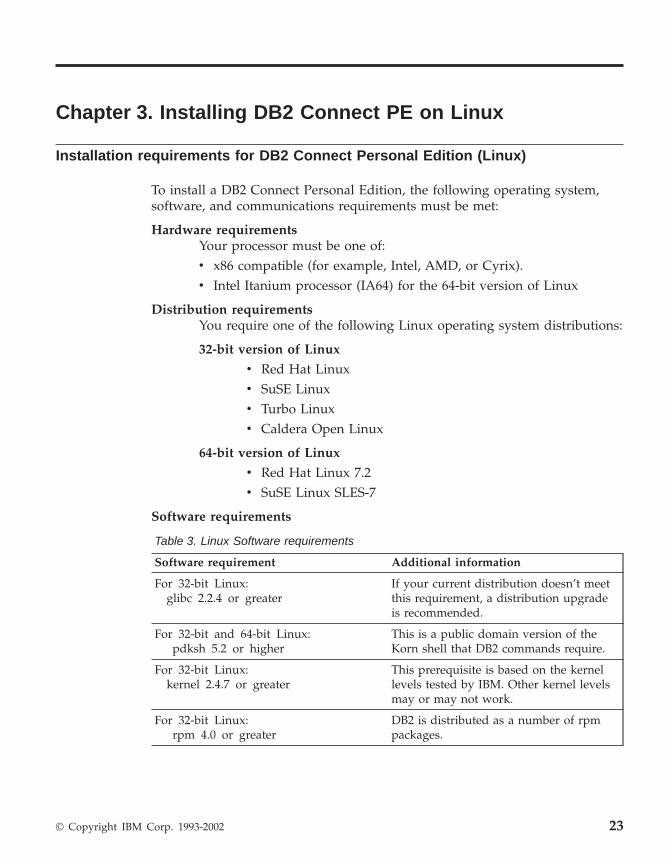
To install a DB2 Connect Personal Edition, the following operating system,software, and communications requirements must be met:
Hardware requirementsYour processor must be one of:v x86 compatible (for example, Intel, AMD, or Cyrix).v Intel Itanium processor (IA64) for the 64-bit version of Linux
Distribution requirementsYou require one of the following Linux operating system distributions:
32-bit version of Linux
v Red Hat Linuxv SuSE Linuxv Turbo Linuxv Caldera Open Linux
64-bit version of Linux
v Red Hat Linux 7.2v SuSE Linux SLES-7
Software requirements
Table 3. Linux Software requirements
Software requirement Additional information
For 32-bit Linux:glibc 2.2.4 or greater
If your current distribution doesn’t meetthis requirement, a distribution upgradeis recommended.
For 32-bit and 64-bit Linux:pdksh 5.2 or higher
This is a public domain version of theKorn shell that DB2 commands require.
For 32-bit Linux:kernel 2.4.7 or greater
This prerequisite is based on the kernellevels tested by IBM. Other kernel levelsmay or may not work.
For 32-bit Linux:rpm 4.0 or greater
DB2 is distributed as a number of rpmpackages.
© Copyright IBM Corp. 1993-2002 23
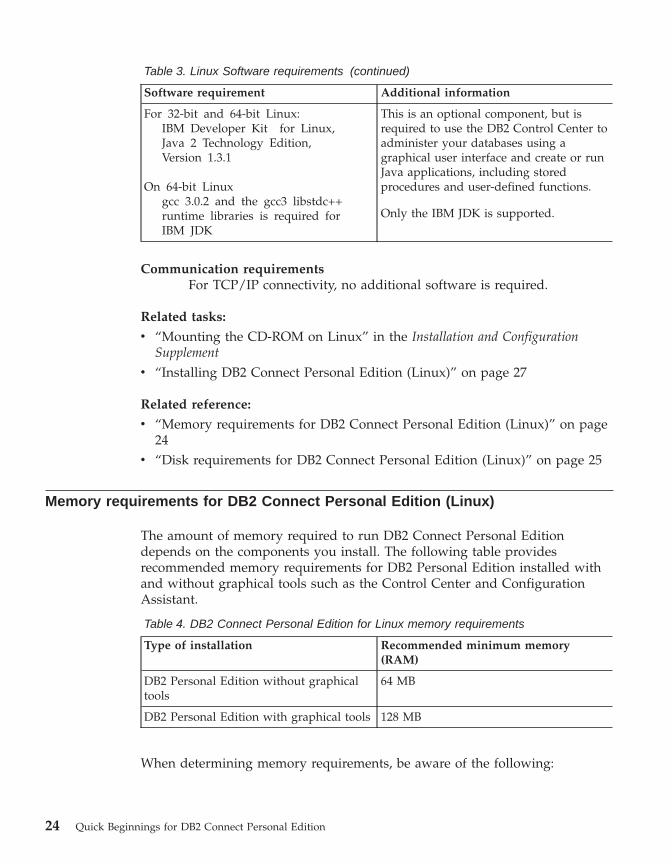
Table 3. Linux Software requirements (continued)
Software requirement Additional information
For 32-bit and 64-bit Linux:IBM Developer Kit for Linux,Java 2 Technology Edition,Version 1.3.1
On 64-bit Linuxgcc 3.0.2 and the gcc3 libstdc++runtime libraries is required forIBM JDK
This is an optional component, but isrequired to use the DB2 Control Center toadminister your databases using agraphical user interface and create or runJava applications, including storedprocedures and user-defined functions.
Only the IBM JDK is supported.
Communication requirementsFor TCP/IP connectivity, no additional software is required.
Related tasks:
v “Mounting the CD-ROM on Linux” in the Installation and ConfigurationSupplement
v “Installing DB2 Connect Personal Edition (Linux)” on page 27
Related reference:
v “Memory requirements for DB2 Connect Personal Edition (Linux)” on page24
v “Disk requirements for DB2 Connect Personal Edition (Linux)” on page 25
Memory requirements for DB2 Connect Personal Edition (Linux)
The amount of memory required to run DB2 Connect Personal Editiondepends on the components you install. The following table providesrecommended memory requirements for DB2 Personal Edition installed withand without graphical tools such as the Control Center and ConfigurationAssistant.
Table 4. DB2 Connect Personal Edition for Linux memory requirements
Type of installation Recommended minimum memory(RAM)
DB2 Personal Edition without graphicaltools
64 MB
DB2 Personal Edition with graphical tools 128 MB
When determining memory requirements, be aware of the following:
24 Quick Beginnings for DB2 Connect Personal Edition
v These memory requirements do not account for non-DB2 software that maybe running on your system.
v Specific performance requirements may increase the minimum amount ofmemory needed.
Related tasks:
v “Installing DB2 Connect Personal Edition (Linux)” on page 27
Related reference:
v “Disk requirements for DB2 Connect Personal Edition (Linux)” on page 25v “Installation requirements for DB2 Connect Personal Edition (Linux)” on
page 23
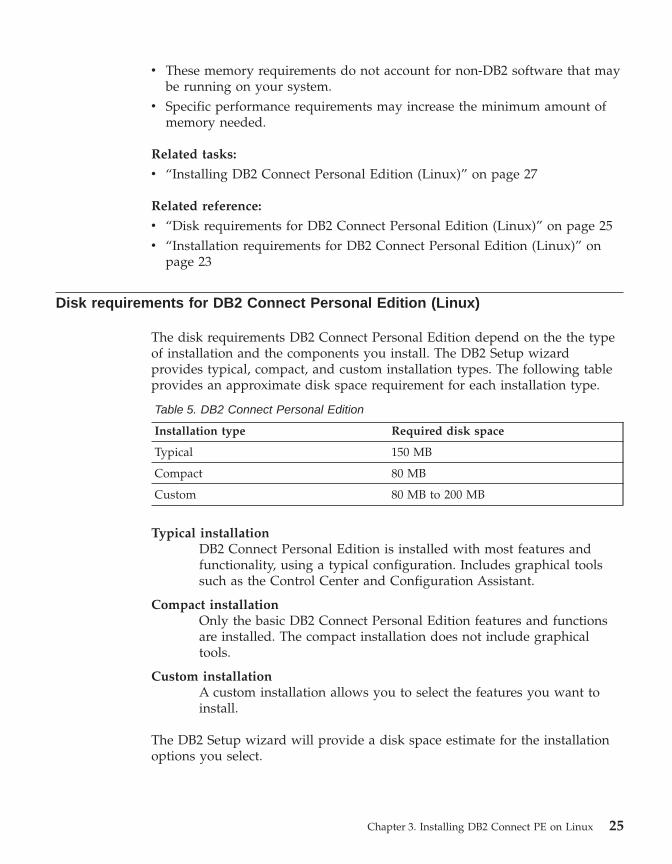
Disk requirements for DB2 Connect Personal Edition (Linux)
The disk requirements DB2 Connect Personal Edition depend on the the typeof installation and the components you install. The DB2 Setup wizardprovides typical, compact, and custom installation types. The following tableprovides an approximate disk space requirement for each installation type.
Table 5. DB2 Connect Personal Edition
Installation type Required disk space
Typical 150 MB
Compact 80 MB
Custom 80 MB to 200 MB
Typical installationDB2 Connect Personal Edition is installed with most features andfunctionality, using a typical configuration. Includes graphical toolssuch as the Control Center and Configuration Assistant.
Compact installationOnly the basic DB2 Connect Personal Edition features and functionsare installed. The compact installation does not include graphicaltools.
Custom installationA custom installation allows you to select the features you want toinstall.
The DB2 Setup wizard will provide a disk space estimate for the installationoptions you select.
Chapter 3. Installing DB2 Connect PE on Linux 25
Remember to include disk space allowance for required software,communication products, and documentation. In DB2 version 8, HTML andPDF documentation is provided on separate CD-ROMs.
Related tasks:
v “Installing DB2 Connect Personal Edition (Linux)” on page 27
Related reference:
v “Memory requirements for DB2 Connect Personal Edition (Linux)” on page24
v “Installation requirements for DB2 Connect Personal Edition (Linux)” onpage 23
Mounting the DB2 CD-ROM (Linux)
Mounting the DB2 CD-ROM (Linux) is part of the larger task of Installing DB2.
You must mount the installation CD-ROM before you can run the DB2 Setupwizard.
Prerequisites:
You must logon with a user ID that has root authority.
Procedure:
Many Linux distributions will automatically mount the CD. The mount pointis often /mnt/cdrom or /media/cdrom. If your mount point is /mnt/cdrom, enterthe following command:
mount /mnt/cdrom
Some distributions disable execute privileges on CD-ROM devices by default.To mount with execute permission at mount point /mnt/cdrom, issue thefollowing command as root:
mount -o exec /mnt/cdrom
If your CD-ROM was not automatically mounted, enter:mount -t iso9660 -o ro /dev/cdrom /mnt/cdrom
where /mnt/cdrom represents the mount point of the CD-ROM.
Related tasks:
v “Starting the DB2 Setup wizard (Linux)” in the Quick Beginnings for DB2Personal Edition
26 Quick Beginnings for DB2 Connect Personal Edition
Installing DB2 Connect Personal Edition (Linux)
We recommend that you use the DB2 Setup wizard to install DB2 ConnectPersonal Edition on Linux. The DB2 Setup wizard is a Java-based installationtool that automates the installation and configuration of any DB2 products. Ifyou prefer not to use this wizard, you can install a DB2 product manuallyusing the db2_install script.
Prerequisites:
Before beginning your installation:v Ensure that your system meets the following requirements:
– Hardware, distribution, and software requirements– Memory requirements– Disk requirements
v You require root authority to perform the installation.v The DB2 product CD-ROM must be mounted on your system. See
mounting the DB2 installation CD.
Procedure:
To install DB2 Connect Personal Edition on Linux:1. Log on to the system as a user with root authority.2. Change to the directory where the CD-ROM is mounted by entering the
following command:cd /mnt/cdrom
where /mnt/cdrom represents the mount point of the CD-ROM.3. Enter the ./db2setup command to start the DB2 Setup wizard. You must
have X windows running to launch the graphical installer. After a few
Chapter 3. Installing DB2 Connect PE on Linux 27
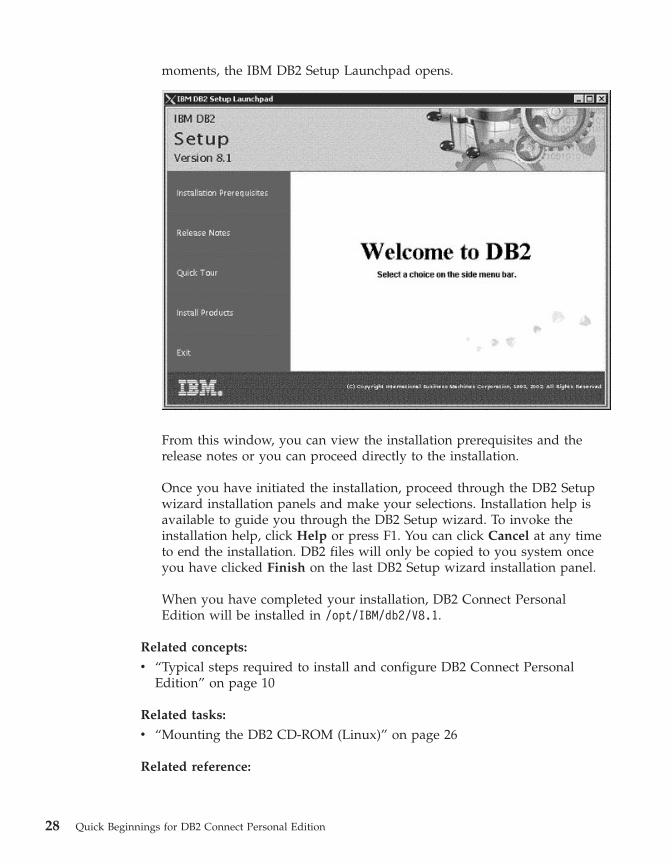
moments, the IBM DB2 Setup Launchpad opens.
From this window, you can view the installation prerequisites and therelease notes or you can proceed directly to the installation.
Once you have initiated the installation, proceed through the DB2 Setupwizard installation panels and make your selections. Installation help isavailable to guide you through the DB2 Setup wizard. To invoke theinstallation help, click Help or press F1. You can click Cancel at any timeto end the installation. DB2 files will only be copied to you system onceyou have clicked Finish on the last DB2 Setup wizard installation panel.
When you have completed your installation, DB2 Connect PersonalEdition will be installed in /opt/IBM/db2/V8.1.
Related concepts:
v “Typical steps required to install and configure DB2 Connect PersonalEdition” on page 10
Related tasks:
v “Mounting the DB2 CD-ROM (Linux)” on page 26
Related reference:
28 Quick Beginnings for DB2 Connect Personal Edition
v “Memory requirements for DB2 Connect Personal Edition (Linux)” on page24
v “Disk requirements for DB2 Connect Personal Edition (Linux)” on page 25v “Installation requirements for DB2 Connect Personal Edition (Linux)” on
page 23
Chapter 3. Installing DB2 Connect PE on Linux 29

30 Quick Beginnings for DB2 Connect Personal Edition

Part 3. Preparing host and iSeries databases for DB2Connect communications
These topics describe the steps required to configure host and iSeries databaseservers to accept connections from DB2 Connect workstations. These stepsmust be performed by users who have the necessary system privileges andspecial expertise, such as your network or system administrator, or your DB2administrator.
For more information on configuring host and iSeries database servers, referto the following publications:v The DB2 for OS/390 and z/OS Installation Guide contains the most complete
and up-to-date information for DB2 Universal Database for OS/390 andz/OS.
v Distributed Relational Database Cross Platform Connectivity and Applicationscontains useful post-configuration information.
v AS/400 Distributed Database Programming
The sample values used in this section match those used elsewhere in thisbook. When you follow the instructions provided you must substitute yourown values for elements such as network name, Logical Unit (LU) name, andmode name.
© Copyright IBM Corp. 1993-2002 31

32 Quick Beginnings for DB2 Connect Personal Edition
Chapter 4. Preparing DB2 for OS/390 and z/OS databasesfor DB2 Connect communications
Preparing DB2 Universal Database for OS/390 and z/OS for connections fromDB2 Connect
Your VTAM administrator and your host system administrator must configureVTAM and OS/390 or z/OS to prepare DB2 Universal Database for OS/390and z/OS to receive inbound connection requests from your DB2 Connectworkstation.
This topic provides:v Examples of VTAM definitions required at your DB2 Universal Database for
OS/390 and z/OS host for use with DB2 Connect SNA connections. Theseshould be compared with current definitions.
v Instructions for establishing TCP/IP network connections between DB2Connect and DB2 Universal Database for OS/390 and z/OS.
v DB2 host configuration steps. Many details of these steps changed with theintroduction of DB2 UDB for OS/390 Version 5.1. Most of these steps applyto SNA users, but some also apply to users who will connect to DB2Universal Database for OS/390 and z/OS via TCP/IP.
If you anticipate that DB2 for OS/390 or z/OS will participate in a multisiteupdate transaction (two-phase commit) then refer to the Enabling MultisiteUpdates topic.
Procedure:
To prepare DB2 Universal Database for OS/390 and z/OS to receiveconnection requests from DB2 Connect, you need to configure your protocol:v Configuring DB2 Universal Database for OS/390 and z/OSv Configuring TCP/IP for DB2 Universal Database for OS/390 and z/OSv Configuring VTAM
Related tasks:
v “Configuring DB2 Universal Database for OS/390 and z/OS” on page 34v “Configuring TCP/IP for DB2 Universal Database for OS/390 and z/OS”
on page 35v “Configuring VTAM” on page 38v “Enabling Multisite Updates using the Control Center” on page 56
© Copyright IBM Corp. 1993-2002 33
Configuring DB2 Universal Database for OS/390 and z/OS
Before you can use DB2 Connect, your DB2 Universal Database for OS/390and z/OS Administrator must configure DB2 Universal Database for OS/390and z/OS to permit connections from DB2 Connect workstations. This sectionindicates the minimum updates required to permit a DB2 Connect client tomake a connection to the DB2 Universal Database for OS/390 and z/OSdatabase server. For more detailed examples, refer to the DB2 for OS/390 andz/OS Installation Guide.
Recommended APARs:
DB2 for OS/390 and z/OS Version 7: Apply the fixes for APARs PQ50016 andPQ50017.
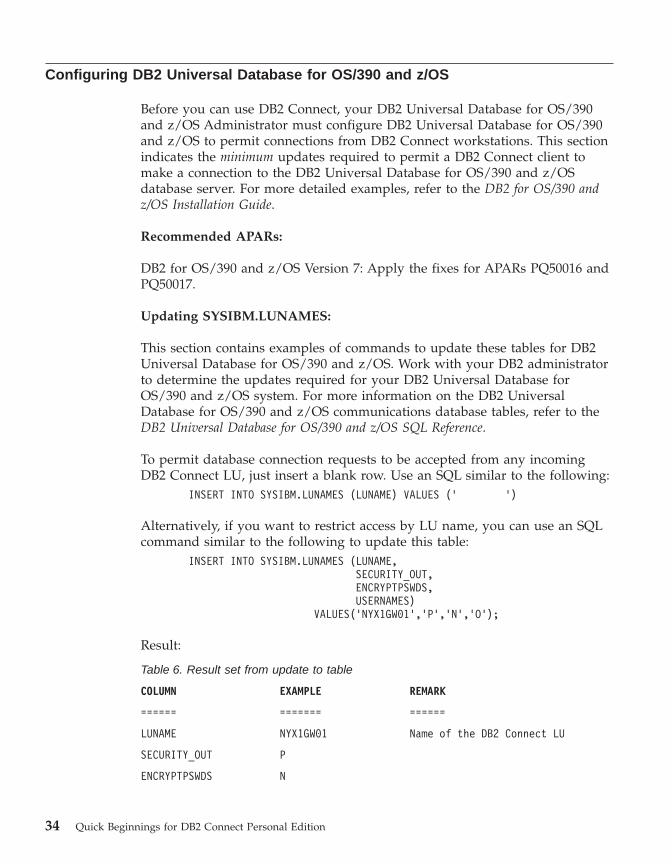
Updating SYSIBM.LUNAMES:
This section contains examples of commands to update these tables for DB2Universal Database for OS/390 and z/OS. Work with your DB2 administratorto determine the updates required for your DB2 Universal Database forOS/390 and z/OS system. For more information on the DB2 UniversalDatabase for OS/390 and z/OS communications database tables, refer to theDB2 Universal Database for OS/390 and z/OS SQL Reference.
To permit database connection requests to be accepted from any incomingDB2 Connect LU, just insert a blank row. Use an SQL similar to the following:
INSERT INTO SYSIBM.LUNAMES (LUNAME) VALUES (’ ’)
Alternatively, if you want to restrict access by LU name, you can use an SQLcommand similar to the following to update this table:
INSERT INTO SYSIBM.LUNAMES (LUNAME,SECURITY_OUT,ENCRYPTPSWDS,USERNAMES)
VALUES(’NYX1GW01’,’P’,’N’,’O’);
Result:
Table 6. Result set from update to table
COLUMN EXAMPLE REMARK
====== ======= ======
LUNAME NYX1GW01 Name of the DB2 Connect LU
SECURITY_OUT P
ENCRYPTPSWDS N
34 Quick Beginnings for DB2 Connect Personal Edition
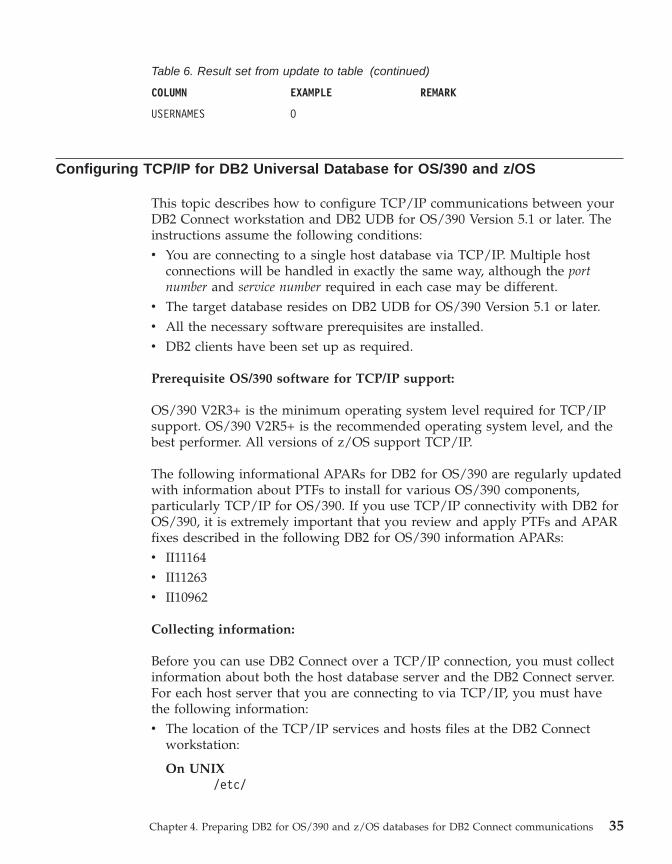
Table 6. Result set from update to table (continued)
COLUMN EXAMPLE REMARK
USERNAMES O
Configuring TCP/IP for DB2 Universal Database for OS/390 and z/OS
This topic describes how to configure TCP/IP communications between yourDB2 Connect workstation and DB2 UDB for OS/390 Version 5.1 or later. Theinstructions assume the following conditions:v You are connecting to a single host database via TCP/IP. Multiple host
connections will be handled in exactly the same way, although the portnumber and service number required in each case may be different.
v The target database resides on DB2 UDB for OS/390 Version 5.1 or later.v All the necessary software prerequisites are installed.v DB2 clients have been set up as required.
Prerequisite OS/390 software for TCP/IP support:
OS/390 V2R3+ is the minimum operating system level required for TCP/IPsupport. OS/390 V2R5+ is the recommended operating system level, and thebest performer. All versions of z/OS support TCP/IP.
The following informational APARs for DB2 for OS/390 are regularly updatedwith information about PTFs to install for various OS/390 components,particularly TCP/IP for OS/390. If you use TCP/IP connectivity with DB2 forOS/390, it is extremely important that you review and apply PTFs and APARfixes described in the following DB2 for OS/390 information APARs:v II11164v II11263v II10962
Collecting information:
Before you can use DB2 Connect over a TCP/IP connection, you must collectinformation about both the host database server and the DB2 Connect server.For each host server that you are connecting to via TCP/IP, you must havethe following information:v The location of the TCP/IP services and hosts files at the DB2 Connect
workstation:
On UNIX/etc/
Chapter 4. Preparing DB2 for OS/390 and z/OS databases for DB2 Connect communications 35
On Windows NT, Windows 2000, Windows XP and Windows .NETUsually %SystemRoot%\system32\drivers\etc\, where%SystemRoot% represents the Windows install path directory.
On Windows 98 and Windows MEUsually x:\windows\, where x: represents the Windows install pathdirectory.
You may want to add the host information to a domain name server to avoidmaintaining this file on multiple systems.
v The locations of the equivalent files at the target DB2 Universal Databasefor OS/390 and z/OS host.
v The TCP/IP port number defined to DB2 Universal Database for OS/390 andz/OS.
Note: The associated service name information is not exchanged between theDB2 Connect workstation and DB2 Universal Database for OS/390and z/OS.
Port number 446 has been registered as the default for communication froma DB2 Connect workstation.
v The TCP/IP addresses and host names for both the host and the DB2Connect workstation.
v The LOCATION NAME of the DB2 for OS/390 database server.v The user ID and password to be used when issuing CONNECT requests to
the database at the host or iSeries server.
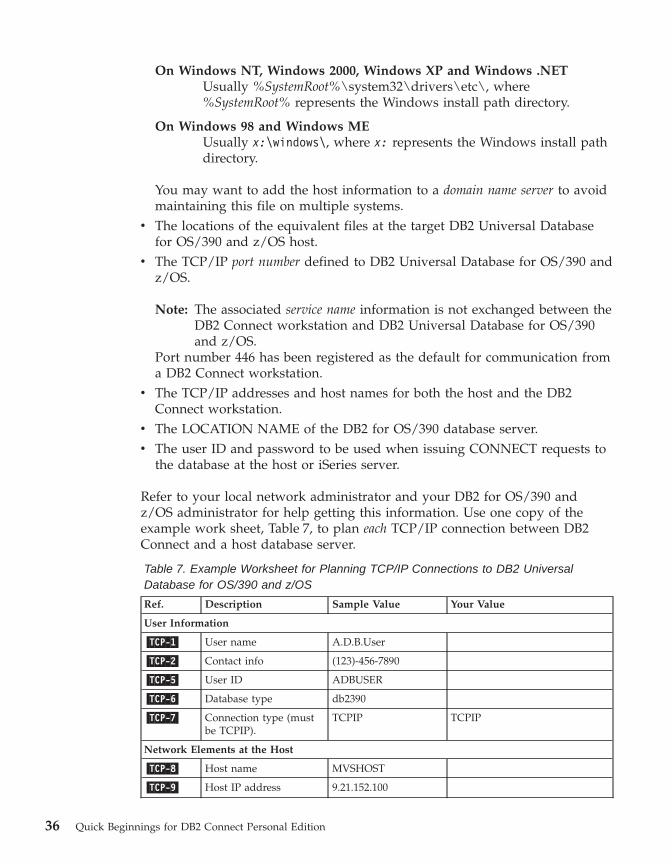
Refer to your local network administrator and your DB2 for OS/390 andz/OS administrator for help getting this information. Use one copy of theexample work sheet, Table 7, to plan each TCP/IP connection between DB2Connect and a host database server.
Table 7. Example Worksheet for Planning TCP/IP Connections to DB2 UniversalDatabase for OS/390 and z/OS
Ref. Description Sample Value Your Value
User Information
�TCP-1� User name A.D.B.User
�TCP-2� Contact info (123)-456-7890
�TCP-5� User ID ADBUSER
�TCP-6� Database type db2390
�TCP-7� Connection type (mustbe TCPIP).
TCPIP TCPIP
Network Elements at the Host
�TCP-8� Host name MVSHOST
�TCP-9� Host IP address 9.21.152.100
36 Quick Beginnings for DB2 Connect Personal Edition
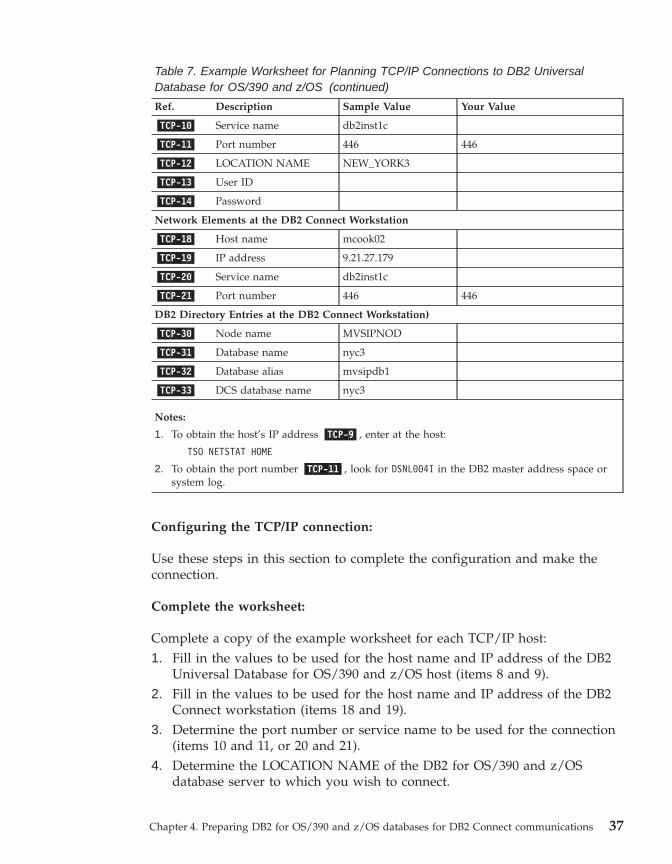
Table 7. Example Worksheet for Planning TCP/IP Connections to DB2 UniversalDatabase for OS/390 and z/OS (continued)
Ref. Description Sample Value Your Value
�TCP-10� Service name db2inst1c
�TCP-11� Port number 446 446
�TCP-12� LOCATION NAME NEW_YORK3
�TCP-13� User ID
�TCP-14� Password
Network Elements at the DB2 Connect Workstation
�TCP-18� Host name mcook02
�TCP-19� IP address 9.21.27.179
�TCP-20� Service name db2inst1c
�TCP-21� Port number 446 446
DB2 Directory Entries at the DB2 Connect Workstation)
�TCP-30� Node name MVSIPNOD
�TCP-31� Database name nyc3
�TCP-32� Database alias mvsipdb1
�TCP-33� DCS database name nyc3
Notes:
1. To obtain the host’s IP address �TCP-9�, enter at the host:
TSO NETSTAT HOME
2. To obtain the port number �TCP-11�, look for DSNL004I in the DB2 master address space orsystem log.
Configuring the TCP/IP connection:
Use these steps in this section to complete the configuration and make theconnection.
Complete the worksheet:
Complete a copy of the example worksheet for each TCP/IP host:1. Fill in the values to be used for the host name and IP address of the DB2
Universal Database for OS/390 and z/OS host (items 8 and 9).2. Fill in the values to be used for the host name and IP address of the DB2
Connect workstation (items 18 and 19).3. Determine the port number or service name to be used for the connection
(items 10 and 11, or 20 and 21).4. Determine the LOCATION NAME of the DB2 for OS/390 and z/OS
database server to which you wish to connect.
Chapter 4. Preparing DB2 for OS/390 and z/OS databases for DB2 Connect communications 37
5. Determine the values to be used for user ID and PASSWORD whenconnecting to the host database.
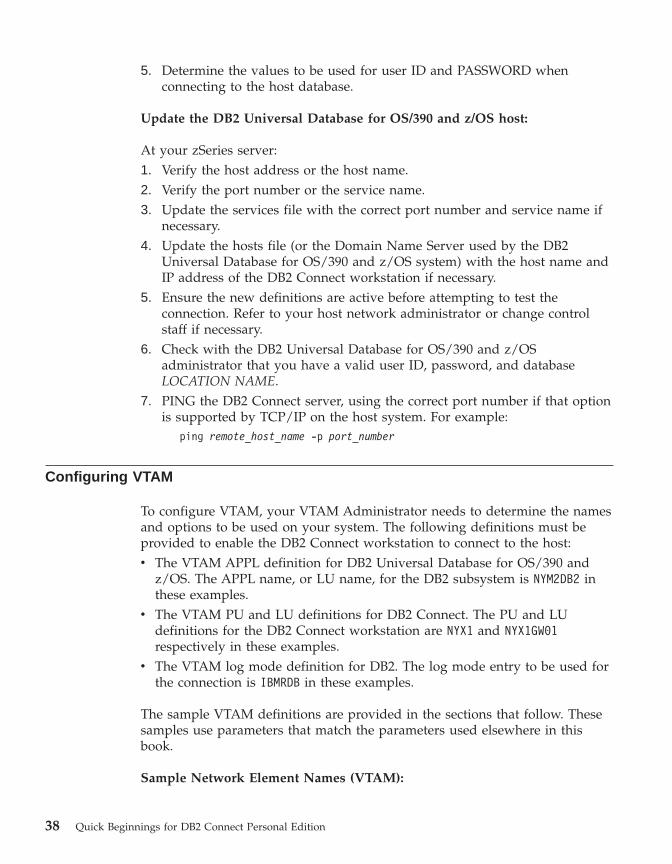
Update the DB2 Universal Database for OS/390 and z/OS host:
At your zSeries server:1. Verify the host address or the host name.2. Verify the port number or the service name.3. Update the services file with the correct port number and service name if
necessary.4. Update the hosts file (or the Domain Name Server used by the DB2
Universal Database for OS/390 and z/OS system) with the host name andIP address of the DB2 Connect workstation if necessary.
5. Ensure the new definitions are active before attempting to test theconnection. Refer to your host network administrator or change controlstaff if necessary.
6. Check with the DB2 Universal Database for OS/390 and z/OSadministrator that you have a valid user ID, password, and databaseLOCATION NAME.
7. PING the DB2 Connect server, using the correct port number if that optionis supported by TCP/IP on the host system. For example:
ping remote_host_name -p port_number
Configuring VTAM
To configure VTAM, your VTAM Administrator needs to determine the namesand options to be used on your system. The following definitions must beprovided to enable the DB2 Connect workstation to connect to the host:v The VTAM APPL definition for DB2 Universal Database for OS/390 and
z/OS. The APPL name, or LU name, for the DB2 subsystem is NYM2DB2 inthese examples.
v The VTAM PU and LU definitions for DB2 Connect. The PU and LUdefinitions for the DB2 Connect workstation are NYX1 and NYX1GW01respectively in these examples.
v The VTAM log mode definition for DB2. The log mode entry to be used forthe connection is IBMRDB in these examples.
The sample VTAM definitions are provided in the sections that follow. Thesesamples use parameters that match the parameters used elsewhere in thisbook.
Sample Network Element Names (VTAM):
38 Quick Beginnings for DB2 Connect Personal Edition
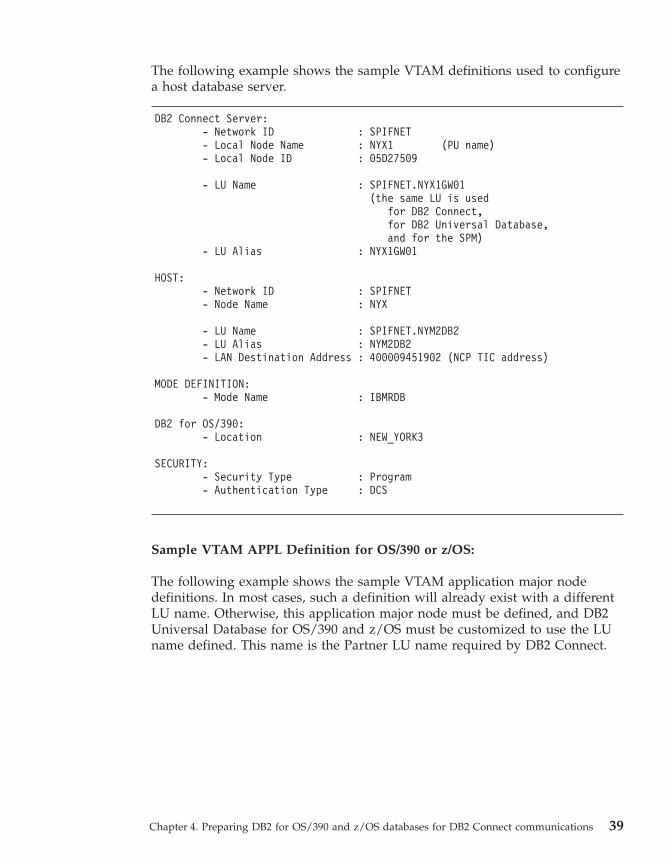
The following example shows the sample VTAM definitions used to configurea host database server.
DB2 Connect Server:- Network ID : SPIFNET- Local Node Name : NYX1 (PU name)- Local Node ID : 05D27509
- LU Name : SPIFNET.NYX1GW01(the same LU is used
for DB2 Connect,for DB2 Universal Database,and for the SPM)
- LU Alias : NYX1GW01
HOST:- Network ID : SPIFNET- Node Name : NYX
- LU Name : SPIFNET.NYM2DB2- LU Alias : NYM2DB2- LAN Destination Address : 400009451902 (NCP TIC address)
MODE DEFINITION:- Mode Name : IBMRDB
DB2 for OS/390:- Location : NEW_YORK3
SECURITY:- Security Type : Program- Authentication Type : DCS
Sample VTAM APPL Definition for OS/390 or z/OS:
The following example shows the sample VTAM application major nodedefinitions. In most cases, such a definition will already exist with a differentLU name. Otherwise, this application major node must be defined, and DB2Universal Database for OS/390 and z/OS must be customized to use the LUname defined. This name is the Partner LU name required by DB2 Connect.
Chapter 4. Preparing DB2 for OS/390 and z/OS databases for DB2 Connect communications 39
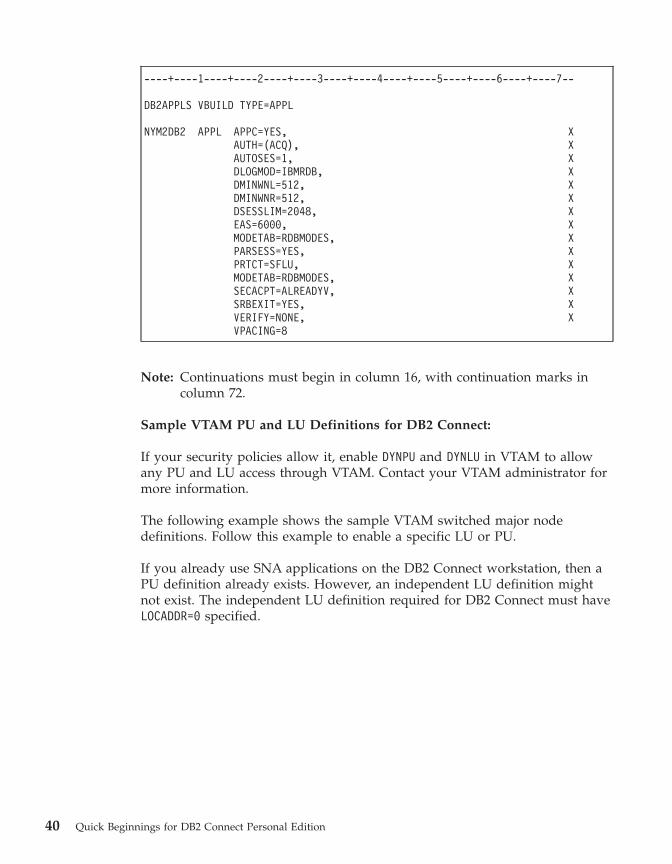
----+----1----+----2----+----3----+----4----+----5----+----6----+----7--
DB2APPLS VBUILD TYPE=APPL
NYM2DB2 APPL APPC=YES, XAUTH=(ACQ), XAUTOSES=1, XDLOGMOD=IBMRDB, XDMINWNL=512, XDMINWNR=512, XDSESSLIM=2048, XEAS=6000, XMODETAB=RDBMODES, XPARSESS=YES, XPRTCT=SFLU, XMODETAB=RDBMODES, XSECACPT=ALREADYV, XSRBEXIT=YES, XVERIFY=NONE, XVPACING=8
Note: Continuations must begin in column 16, with continuation marks incolumn 72.
Sample VTAM PU and LU Definitions for DB2 Connect:
If your security policies allow it, enable DYNPU and DYNLU in VTAM to allowany PU and LU access through VTAM. Contact your VTAM administrator formore information.
The following example shows the sample VTAM switched major nodedefinitions. Follow this example to enable a specific LU or PU.
If you already use SNA applications on the DB2 Connect workstation, then aPU definition already exists. However, an independent LU definition mightnot exist. The independent LU definition required for DB2 Connect must haveLOCADDR=0 specified.
40 Quick Beginnings for DB2 Connect Personal Edition
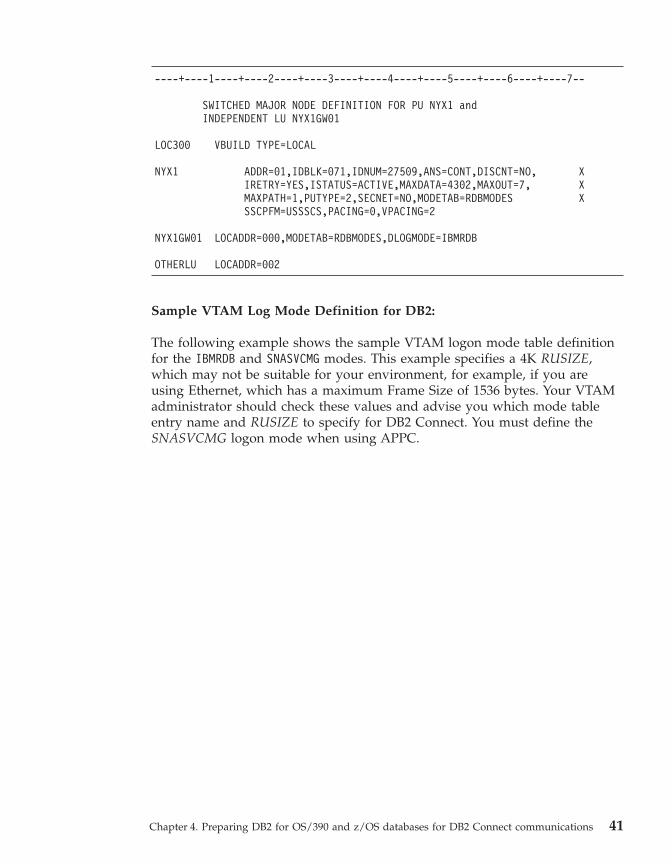
----+----1----+----2----+----3----+----4----+----5----+----6----+----7--
SWITCHED MAJOR NODE DEFINITION FOR PU NYX1 andINDEPENDENT LU NYX1GW01
LOC300 VBUILD TYPE=LOCAL
NYX1 ADDR=01,IDBLK=071,IDNUM=27509,ANS=CONT,DISCNT=NO, XIRETRY=YES,ISTATUS=ACTIVE,MAXDATA=4302,MAXOUT=7, XMAXPATH=1,PUTYPE=2,SECNET=NO,MODETAB=RDBMODES XSSCPFM=USSSCS,PACING=0,VPACING=2
NYX1GW01 LOCADDR=000,MODETAB=RDBMODES,DLOGMODE=IBMRDB
OTHERLU LOCADDR=002
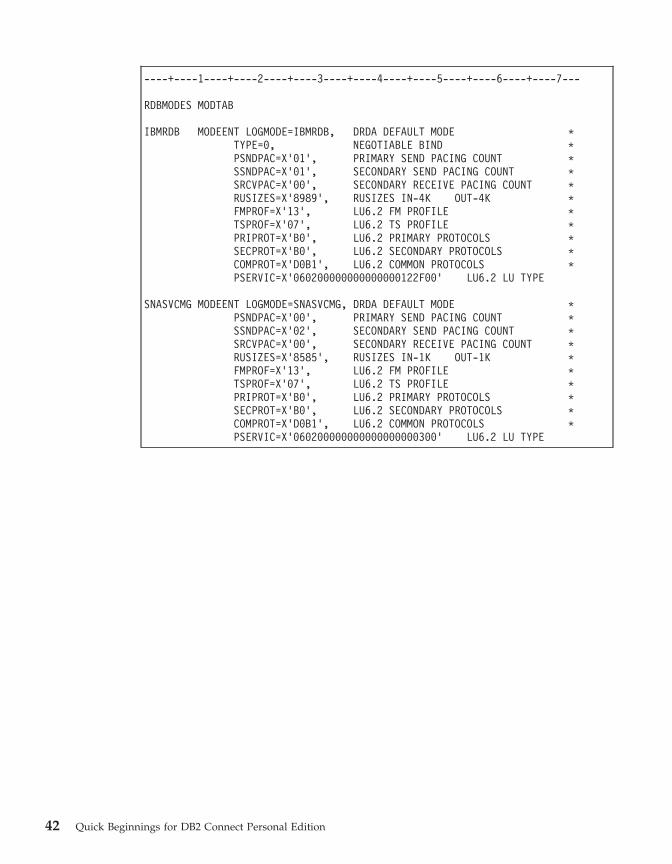
Sample VTAM Log Mode Definition for DB2:
The following example shows the sample VTAM logon mode table definitionfor the IBMRDB and SNASVCMG modes. This example specifies a 4K RUSIZE,which may not be suitable for your environment, for example, if you areusing Ethernet, which has a maximum Frame Size of 1536 bytes. Your VTAMadministrator should check these values and advise you which mode tableentry name and RUSIZE to specify for DB2 Connect. You must define theSNASVCMG logon mode when using APPC.
Chapter 4. Preparing DB2 for OS/390 and z/OS databases for DB2 Connect communications 41
----+----1----+----2----+----3----+----4----+----5----+----6----+----7---
RDBMODES MODTAB
IBMRDB MODEENT LOGMODE=IBMRDB, DRDA DEFAULT MODE *TYPE=0, NEGOTIABLE BIND *PSNDPAC=X’01’, PRIMARY SEND PACING COUNT *SSNDPAC=X’01’, SECONDARY SEND PACING COUNT *SRCVPAC=X’00’, SECONDARY RECEIVE PACING COUNT *RUSIZES=X’8989’, RUSIZES IN-4K OUT-4K *FMPROF=X’13’, LU6.2 FM PROFILE *TSPROF=X’07’, LU6.2 TS PROFILE *PRIPROT=X’B0’, LU6.2 PRIMARY PROTOCOLS *SECPROT=X’B0’, LU6.2 SECONDARY PROTOCOLS *COMPROT=X’D0B1’, LU6.2 COMMON PROTOCOLS *PSERVIC=X’060200000000000000122F00’ LU6.2 LU TYPE
SNASVCMG MODEENT LOGMODE=SNASVCMG, DRDA DEFAULT MODE *PSNDPAC=X’00’, PRIMARY SEND PACING COUNT *SSNDPAC=X’02’, SECONDARY SEND PACING COUNT *SRCVPAC=X’00’, SECONDARY RECEIVE PACING COUNT *RUSIZES=X’8585’, RUSIZES IN-1K OUT-1K *FMPROF=X’13’, LU6.2 FM PROFILE *TSPROF=X’07’, LU6.2 TS PROFILE *PRIPROT=X’B0’, LU6.2 PRIMARY PROTOCOLS *SECPROT=X’B0’, LU6.2 SECONDARY PROTOCOLS *COMPROT=X’D0B1’, LU6.2 COMMON PROTOCOLS *PSERVIC=X’060200000000000000000300’ LU6.2 LU TYPE
42 Quick Beginnings for DB2 Connect Personal Edition
Chapter 5. Preparing DB2 UDB for iSeries databases forDB2 Connect communications
Preparing DB2 Universal Database for iSeries for connections from DB2Connect
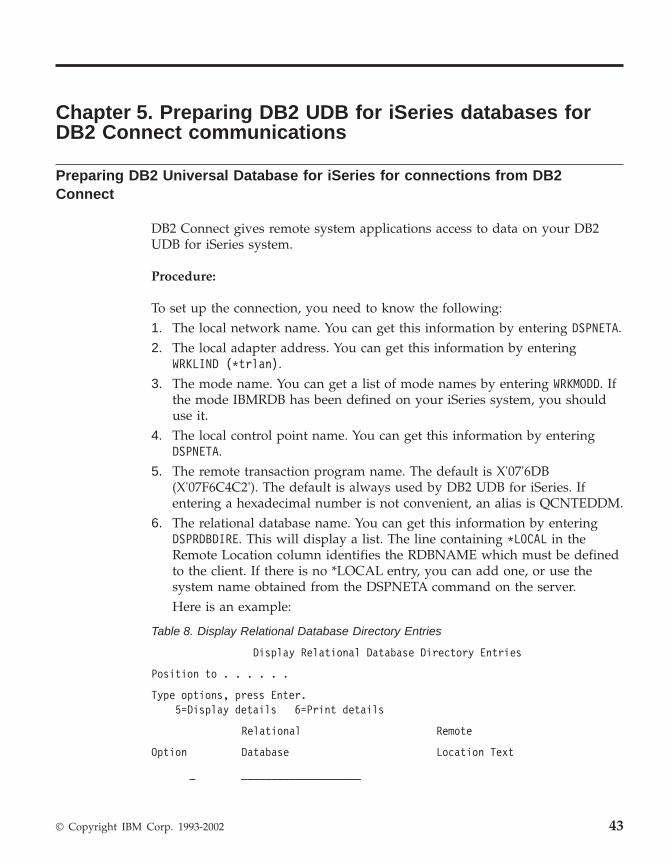
DB2 Connect gives remote system applications access to data on your DB2UDB for iSeries system.
Procedure:
To set up the connection, you need to know the following:1. The local network name. You can get this information by entering DSPNETA.2. The local adapter address. You can get this information by entering
WRKLIND (*trlan).3. The mode name. You can get a list of mode names by entering WRKMODD. If
the mode IBMRDB has been defined on your iSeries system, you shoulduse it.
4. The local control point name. You can get this information by enteringDSPNETA.
5. The remote transaction program name. The default is X'07'6DB(X'07F6C4C2'). The default is always used by DB2 UDB for iSeries. Ifentering a hexadecimal number is not convenient, an alias is QCNTEDDM.
6. The relational database name. You can get this information by enteringDSPRDBDIRE. This will display a list. The line containing *LOCAL in theRemote Location column identifies the RDBNAME which must be definedto the client. If there is no *LOCAL entry, you can add one, or use thesystem name obtained from the DSPNETA command on the server.Here is an example:
Table 8. Display Relational Database Directory Entries
Display Relational Database Directory Entries
Position to . . . . . .
Type options, press Enter.5=Display details 6=Print details
Relational Remote
Option Database Location Text
_ ____________________
© Copyright IBM Corp. 1993-2002 43
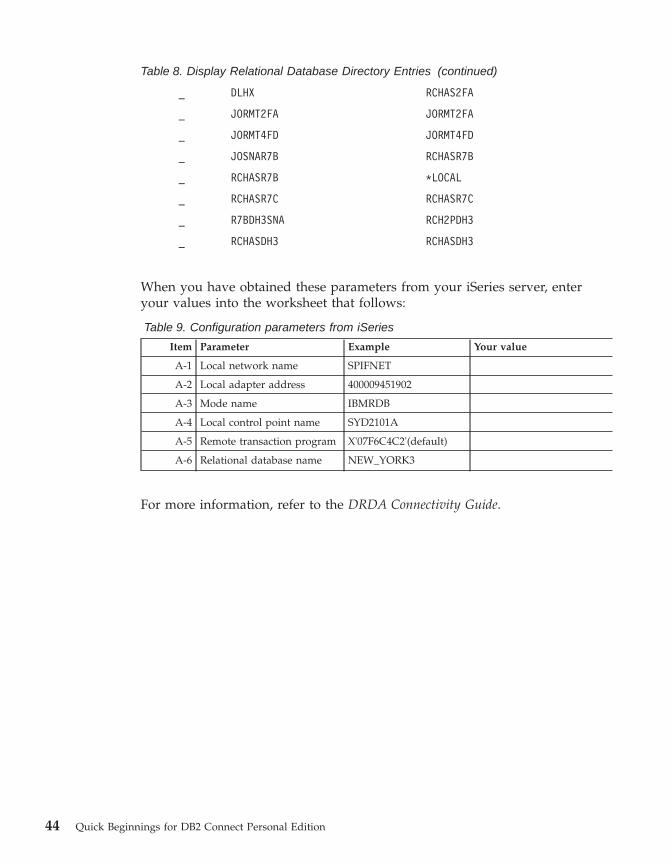
Table 8. Display Relational Database Directory Entries (continued)
_ DLHX RCHAS2FA
_ JORMT2FA JORMT2FA
_ JORMT4FD JORMT4FD
_ JOSNAR7B RCHASR7B
_ RCHASR7B *LOCAL
_ RCHASR7C RCHASR7C
_ R7BDH3SNA RCH2PDH3
_ RCHASDH3 RCHASDH3
When you have obtained these parameters from your iSeries server, enteryour values into the worksheet that follows:
Table 9. Configuration parameters from iSeries
Item Parameter Example Your value
A-1 Local network name SPIFNET
A-2 Local adapter address 400009451902
A-3 Mode name IBMRDB
A-4 Local control point name SYD2101A
A-5 Remote transaction program X'07F6C4C2'(default)
A-6 Relational database name NEW_YORK3
For more information, refer to the DRDA Connectivity Guide.
44 Quick Beginnings for DB2 Connect Personal Edition
Chapter 6. Preparing DB2 for VM and VSE databases forDB2 Connect communications
Preparing DB2 for VSE & VM for connections from DB2 Connect
For information about how to set up DB2 for VSE & VM as an applicationserver, refer to the DRDA Connectivity Guide.
Related concepts:
v “DB2 for VM” in the Connectivity Supplement
v “DB2 for VSE” in the Connectivity Supplement
Related tasks:
v “Preparing the application requester or application server for DRDAcommunications (VM)” in the Connectivity Supplement
© Copyright IBM Corp. 1993-2002 45

46 Quick Beginnings for DB2 Connect Personal Edition
Part 4. Configuring DB2 Connect to communicate withhost and iSeries databases
© Copyright IBM Corp. 1993-2002 47

48 Quick Beginnings for DB2 Connect Personal Edition
Chapter 7. Configuring DB2 Connect to communicate withhost and iSeries databases
Configuring a connection to host or iSeries database servers using the CA
This task describes how to connect DB2 Connect Personal Edition (PE) or DB2Connect Enterprise Edition to a remote database host or iSeries databaseserver using the Configuration Assistant (CA). The Configuration Assistant isa DB2 GUI tool that can be used to configure database connections and otherdatabase settings.
The Configuration Assistant (CA) was referred to as the Client ConfigurationAssistant (CCA) in previous releases of DB2.
Prerequisites:
v The Configuration Assistant must be installed on DB2 Connect workstation.In DB2 version 8, the Configuration Assistant is available as part of the DB2Administration Client and DB2 Application Development Client.
v The remote server must be configured to accept inbound client requests. Bydefault, the server installation program detects and configures mostprotocols on the server for inbound client connections.
Procedure:
To configure a connection to a database using the CA, select one of thefollowing methods:v Connecting to a database using discoveryv Connecting to a database using a profilev Connecting to a database manually using the CA
Related tasks:
v “Configuring a database connection using Discovery” on page 52v “Configuring a database connection using a profile” on page 51v “Configuring a database connection using the Configuration Assistant
(CA)” on page 50
© Copyright IBM Corp. 1993-2002 49

Configuration tasks
Configuring a database connection using the Configuration Assistant(CA)
If you have the information for the database you want to connect to and theserver upon which it resides, you can manually enter all of the configurationinformation. This method is analogous to entering commands via thecommand line processor, however, the parameters are presented graphically.
Prerequisites:
Before you configure a connection to a database using the CA:v Ensure that you have a valid DB2 user ID.v If adding a database to a system that has a DB2 Server or DB2 Connect
server product installed, ensure that you have a user ID with SYSADM orSYSCTRL authority for the instance.
Procedure:
To add a database to your system manually using the CA:1. Log on to the system with a valid DB2 user ID.2. Start the CA. The CA can be started from the Start menu on Windows or
using the db2ca command on both Windows and UNIX systems.3. On the CA menu bar, under Selected, choose Add a database using
wizard.4. Select the Manually configure a connection to a database radio button
and click Next.5. If you are using Lightweight Directory Access Protocol (LDAP), select the
radio button that corresponds to the location where you would like yourDB2 directories to be maintained. Click Next.
6. Select the radio button that corresponds to the protocol that you want touse from the Protocol list.If DB2 Connect is installed on your machine and you select TCP/IP orAPPC, you have the option to select The database physically resides ona host or OS/400 system. If you select this check box, you will have theoption of selecting the type of connection that you want to make to thehost or OS/400 database:v To make a connection through a DB2 Connect gateway, select the
Connect to the server via the gateway radio button.v To make a direct connection, select the Connect directly to the server
radio button.
Click Next.
50 Quick Beginnings for DB2 Connect Personal Edition

7. Enter the required communication protocol parameters and click Next.8. Enter the database alias name of the remote database that you want to
add in the Database name field and a local database alias name in theDatabase alias field.If you are adding a host or OS/400 database, type the Location name foran OS/390 or z/OS database, the RDB name for an OS/400 database, orthe DBNAME for a VSE or VM database in the Database name field.Optionally add a comment that describes this database in the Commentfield.Click Next.
9. If you are planning to use ODBC, register this database as an ODBC datasource. ODBC must be installed to perform this operation.
10. Click Finish. You are now able to use this database. Select the Exit menuaction to close the CA.
Related tasks:
v “Configuring a database connection using Discovery” on page 52v “Configuring a database connection using a profile” on page 51v “Testing a database connection” on page 53
Configuring a database connection using a profile
A server profile contains information about server instances on a system, anddatabases within each server instance. A client profile contains databaseinformation that was cataloged on another client system. Use the steps in thefollowing task to connect to a database using a profile.
Prerequisites:
Before you connect to a database through the CA using a profile:v Ensure that you have a valid DB2 user ID.v If adding a database to a system that has a DB2 Server or DB2 Connect
server product installed, ensure that you have a user ID with SYSADM orSYSCTRL authority for the instance.
Procedure:
To connect to a database using a profile:1. Log on to the system with a valid DB2 user ID.2. Start the CA. The CA can be started from the Start menu on Windows or
using the db2ca command on both Windows and UNIX systems.3. On the CA menu bar, under Selected, choose Add a database using
wizard.
Chapter 7. Configuring DB2 Connect to communicate with host and iSeries databases 51
4. Select the Use a profile radio button and click Next.5. Click the ... push button and select a profile. Select a remote database from
the object tree that is displayed from the profile, and if the databaseselected is a gateway connection, select a connection route to the database.Click the Next push button.
6. Enter a local database alias name in the Database alias field andoptionally enter a comment that describes this database in the Commentfield. Click Next.
7. If you are planning to use ODBC, register this database as an ODBC datasource. ODBC must be installed to perform this operation.
8. Click Finish. You are now able to use this database. Select the Exit menuaction to exit the CA.
Related tasks:
v “Creating client profiles using the export function of the ConfigurationAssistant (CA)” on page 68
v “Testing a database connection” on page 53
Configuring a database connection using Discovery
You can use the Discovery feature of the Configuration Assistant to search anetwork for databases.
Prerequisites:
Before you configure a connection to a database using Discovery:v Ensure that you have a valid DB2 user ID.v If adding a database to a system that has a DB2 Server or DB2 Connect
server product installed, ensure that you have a user ID with SYSADM orSYSCTRL authority for the instance.
Restrictions:
A DB2 Administration Server (DAS) must be running and enabled for theDiscovery feature of the CA to return information about DB2 systems.
Procedure:
To add a database to your system using Discovery:1. Log on to the system with a valid DB2 user ID.2. Start the CA. The CA can be started from the Start menu on Windows or
using the db2ca command on both Windows and UNIX systems.3. On the CA menu bar, under Selected, choose Add a database using
wizard.
52 Quick Beginnings for DB2 Connect Personal Edition
4. Select the Search the network radio button and click Next.5. Double-click on the folder beside Known Systems to list all the systems
known to your client.6. Click the [+] sign beside a system to get a list of the instances and
databases on it. Select the database that you want to add, click the Nextpush button,
7. Enter a local database alias name in the Database alias field andoptionally enter a comment that describes this database in the Commentfield.
8. If you are planning to use ODBC, register this database as an ODBC datasource. ODBC must be installed to perform this operation.
9. Click Finish. You are now able to use the database you added. Click Closeto exit the CA.
Related tasks:
v “Configuring a database connection using the Configuration Assistant(CA)” on page 50
v “Configuring a database connection using a profile” on page 51v “Testing a database connection” on page 53
Testing a database connection
After configuring the database, the database connection should be tested.
Procedure:
To test a database connection:1. Start the CA.2. Highlight the database in the details view and invoke the Test Connection
menu action. The Test Connection window opens.3. Select the type of connection that you would like to test (CLI is the
default). Enter a valid user ID and password for the remote database andclick Test Connection. If the connection is successful, a messageconfirming the connection appears on the Results page.If the connection test failed, you will receive a help message. To changeany settings you may have incorrectly specified, select the database in thedetails view and invoke the Change Database menu action.
Related tasks:
v “Configuring a database connection using Discovery” on page 52v “Configuring a database connection using the Configuration Assistant
(CA)” on page 50v “Configuring a database connection using a profile” on page 51
Chapter 7. Configuring DB2 Connect to communicate with host and iSeries databases 53

54 Quick Beginnings for DB2 Connect Personal Edition
Chapter 8. Enabling multisite updates
Multisite Updates
Multisite update, also known as distributed unit of work (DUOW) andtwo-phase commit, is a function that enables your applications to update datain multiple remote database servers with guaranteed integrity. For example, abanking transaction that involves the transfer of money from one account toanother in a different database server.
In such a transaction, it is critical that updates which implement debitoperations on one account do not get committed unless updates required toprocess credits to the other account are committed as well. The multisiteupdate considerations apply when data representing these accounts ismanaged by two different database servers.
DB2® products provide comprehensive support for multisite updates. Thissupport is available for applications developed using regular SQL as well asapplications that use transaction processing monitors (TP monitors) thatimplement the X/Open XA interface specification. Examples of such TPmonitors products include IBM® TxSeries (CICS and Encina), IBM Messageand Queuing Series, IBM Component Broker Series, IBM San Francisco Projectas well as Microsoft® Transaction Server (MTS), BEA Tuxedo and severalothers. There are different setup requirements depending on whether nativeSQL multisite update or TP monitor multisite update is used.
Both the native SQL and TP monitor multisite update programs must beprecompiled with the CONNECT 2 SYNCPOINT TWOPHASE options. Both can usethe SQL Connect statement to indicate which database they want to be usedfor the SQL statements that follow. If there is no TP monitor to tell DB2 it isgoing to coordinate the transaction (as indicated by DB2 receiving the xa_opencalls from the TP monitor to establish a database connection), then the DB2software will be used to coordinate the transaction.
When using TP monitor multisite update, the application must requestcommit or rollback by using the TP monitor’s API, for example CICS®
SYNCPOINT, Encina® Abort(), MTS SetAbort(). When using native SQLmultisite update, the normal SQL COMMIT and ROLLBACK must be used.
TP monitor multisite update can coordinate a transaction that accesses bothDB2 and non-DB2 resource managers such as Oracle, Informix™ or SQLServer.Native SQL multisite update is used with DB2 servers only.
© Copyright IBM Corp. 1993-2002 55
For a multisite update transaction to work, each of the databases participatingin a distributed transaction must be capable of supporting distributed unit ofwork. Currently, the following DB2 servers provided DUOW support thatenabled them to participate in distributed transactions:v DB2 UDB for UNIX® and Windows® Version 5 or laterv DB2 for OS/390® Version 5.1v DB2 UDB for OS/390 Version 6.1 or laterv DB2 for z/OS™ Version 7v DB2 UDB for iSeries™ Version 4 or laterv DB2 Server for VM and VSE V5.1 or later (SNA only)
A distributed transaction can update any mix of supported database servers.For example, your application can update several tables in DB2 UDB onWindows NT or Windows 2000, a DB2 for OS/390 and z/OS database, and aDB2 UDB for iSeries database, all within a single transaction.
Related concepts:
v “Remote unit of work” in the DB2 Connect User’s Guide
v “Distributed requests” in the DB2 Connect User’s Guide
v “Multisite update and sync point manager” on page 58
Related tasks:
v “Enabling Multisite Updates using the Control Center” on page 56v “Testing Multisite Update using the Control Center” on page 57
Enabling Multisite Updates using the Control Center
You can use the Control Center to provide multisite updates.
Procedure:
To enable multistie updates:1. Launch the Multisite Update Wizard. From the Control Center.2. Click the [+] sign to expand the tree view.3. With the right mouse button, select the instance that you wish to
configure. A pop-up menu opens.4. Select Multisite Update —> Configure menu item.5. The Multisite Update Wizard provides a notebook-type interface. Each
page of the wizard will prompt you for certain information about yourconfiguration.
56 Quick Beginnings for DB2 Connect Personal Edition
a. Specify a Transaction Processor (TP) monitor. This field will show thedefaults for the TP monitor you have enabled. If you do not want touse a TP monitor, select Do Not Use a TP Monitor. Click Next.
b. Specify the communications protocols you will use. Click Next.c. Specify a Transaction Manager database. This panel defaults to the first
database you connect to (1ST_CONN). You can leave this default orselect another catalogued database. Click Next.
d. Specify the types of database servers involved in the update, and alsowhether or not TCP/IP is to be used exclusively.
e. Specify the sync point manager settings. This page will only appear ifthe settings on the previous page indicate that you need to use DB2’ssync point manager in a multisite update scenario.
Related concepts:
v “Multisite Updates” on page 55
Related tasks:
v “Testing Multisite Update using the Control Center” on page 57
Testing Multisite Update using the Control Center
You can test your multisite update setup using the Control center.
Procedure:
To test multisite update:1. Select the instance with the right mouse button and choose the Multisite
Update —> Test menu option from the pop-up menu. The Test MultisiteUpdate window opens.
2. Select the databases you want to test from the available databases in theAvailable Databases list box. You can use the arrow buttons (> and >>) inthe middle to move selections to and from the Selected databases list box.You can also change the selected userid and password by directly editingthem in the Selected databases list box.
3. When you have finished your selection, click OK. The Multisite UpdateTest Result window opens.
4. The Multisite Update Test Result window shows which of the databasesyou selected succeeded or failed the update test. The window will showSQL codes and error messages for those that failed. Click Close to closethe window.
5. Click Close to close the Test Multisite Update window.
Chapter 8. Enabling multisite updates 57
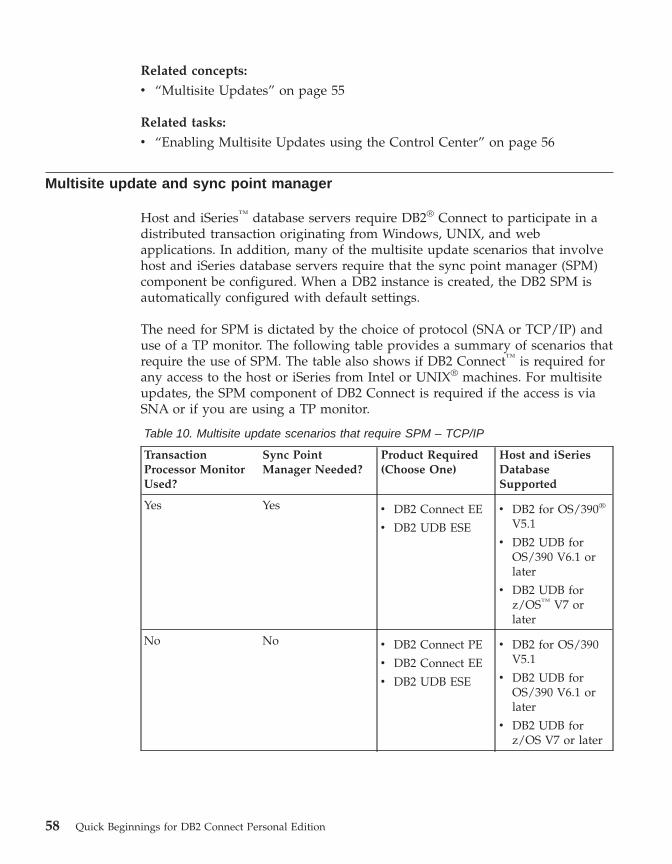
Related concepts:
v “Multisite Updates” on page 55
Related tasks:
v “Enabling Multisite Updates using the Control Center” on page 56
Multisite update and sync point manager
Host and iSeries™ database servers require DB2® Connect to participate in adistributed transaction originating from Windows, UNIX, and webapplications. In addition, many of the multisite update scenarios that involvehost and iSeries database servers require that the sync point manager (SPM)component be configured. When a DB2 instance is created, the DB2 SPM isautomatically configured with default settings.
The need for SPM is dictated by the choice of protocol (SNA or TCP/IP) anduse of a TP monitor. The following table provides a summary of scenarios thatrequire the use of SPM. The table also shows if DB2 Connect™ is required forany access to the host or iSeries from Intel or UNIX® machines. For multisiteupdates, the SPM component of DB2 Connect is required if the access is viaSNA or if you are using a TP monitor.
Table 10. Multisite update scenarios that require SPM – TCP/IP
TransactionProcessor MonitorUsed?
Sync PointManager Needed?
Product Required(Choose One)
Host and iSeriesDatabaseSupported
Yes Yes v DB2 Connect EE
v DB2 UDB ESE
v DB2 for OS/390®
V5.1
v DB2 UDB forOS/390 V6.1 orlater
v DB2 UDB forz/OS™ V7 orlater
No No v DB2 Connect PE
v DB2 Connect EE
v DB2 UDB ESE
v DB2 for OS/390V5.1
v DB2 UDB forOS/390 V6.1 orlater
v DB2 UDB forz/OS V7 or later
58 Quick Beginnings for DB2 Connect Personal Edition
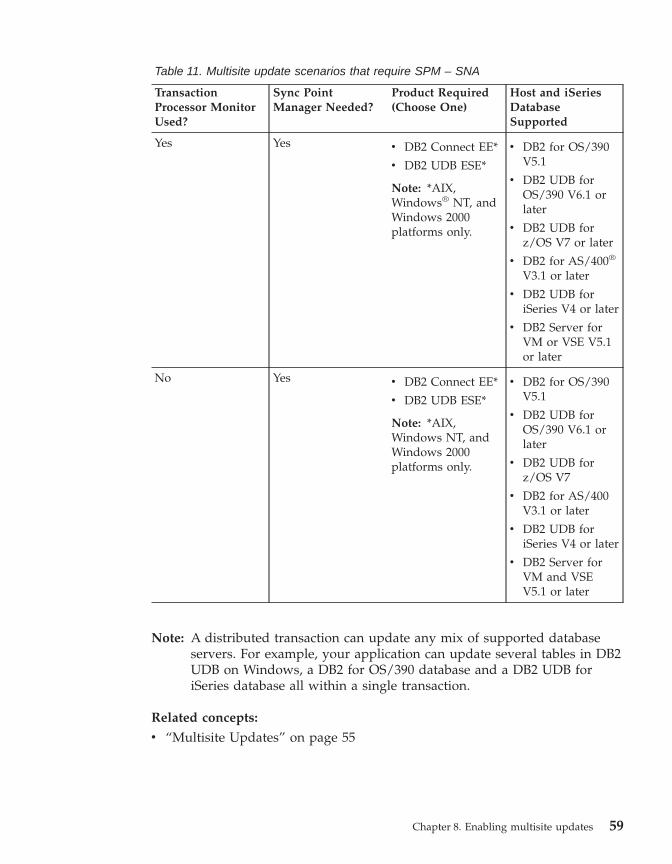
Table 11. Multisite update scenarios that require SPM – SNA
TransactionProcessor MonitorUsed?
Sync PointManager Needed?
Product Required(Choose One)
Host and iSeriesDatabaseSupported
Yes Yes v DB2 Connect EE*
v DB2 UDB ESE*
Note: *AIX,Windows® NT, andWindows 2000platforms only.
v DB2 for OS/390V5.1
v DB2 UDB forOS/390 V6.1 orlater
v DB2 UDB forz/OS V7 or later
v DB2 for AS/400®
V3.1 or later
v DB2 UDB foriSeries V4 or later
v DB2 Server forVM or VSE V5.1or later
No Yes v DB2 Connect EE*
v DB2 UDB ESE*
Note: *AIX,Windows NT, andWindows 2000platforms only.
v DB2 for OS/390V5.1
v DB2 UDB forOS/390 V6.1 orlater
v DB2 UDB forz/OS V7
v DB2 for AS/400V3.1 or later
v DB2 UDB foriSeries V4 or later
v DB2 Server forVM and VSEV5.1 or later
Note: A distributed transaction can update any mix of supported databaseservers. For example, your application can update several tables in DB2UDB on Windows, a DB2 for OS/390 database and a DB2 UDB foriSeries database all within a single transaction.
Related concepts:
v “Multisite Updates” on page 55
Chapter 8. Enabling multisite updates 59

60 Quick Beginnings for DB2 Connect Personal Edition
Part 5. Configuring DB2 clients to use DB2 Connect
© Copyright IBM Corp. 1993-2002 61

62 Quick Beginnings for DB2 Connect Personal Edition
Chapter 9. Configuring DB2 clients to use DB2 Connect
When installing DB2 Connect Personal Edition, you can also choose to installa DB2 run-time client. These topics detail the instructions of how to configurea connection from the DB2 run-time client to a DB2 UDB server. The DB2run-time client can connect to databases on Windows and UNIX, as well ashost or iSeries databases using DB2 Connect. You can connect directly to hostor iSeries databases using DB2 Connect Personal Edition, if you have itinstalled on the same workstation as the DB2 run-time client, or you canconnect through a DB2 Connect Enterprise Edition server.
Configuring a client to server connection using the Configuration Assistant (CA)
This task describes how to connect your DB2 client to a remote database usingthe Configuration Assistant (CA). The Configuration Assistant is a DB2 GUItool that can be used to configure database connections and other databasesettings.
The Configuration Assistant (CA) was referred to as the Client ConfigurationAssistant (CCA) in previous releases of DB2.
Prerequisites:
v The Configuration Assistant must be installed on your DB2 client. For DB2version 8, the Configuration Assistant is available as part of the DB2Administration Client and DB2 Application Development Client.
v The remote server must be configured to accept inbound client requests. Bydefault, the server installation program detects and configures mostprotocols on the server for inbound client connections.
Procedure:
To configure a connection to a database using the CA, select one of thefollowing methods:v Connecting to a database using discoveryv Connecting to a database using a profilev Connecting to a database manually using the CA
© Copyright IBM Corp. 1993-2002 63
Configuration tasks
Configuring a database connection using the Configuration Assistant(CA)
If you have the information for the database you want to connect to and theserver upon which it resides, you can manually enter all of the configurationinformation. This method is analogous to entering commands via thecommand line processor, however, the parameters are presented graphically.
Prerequisites:
Before you configure a connection to a database using the CA:v Ensure that you have a valid DB2 user ID.v If adding a database to a system that has a DB2 Server or DB2 Connect
server product installed, ensure that you have a user ID with SYSADM orSYSCTRL authority for the instance.
Procedure:
To add a database to your system manually using the CA:1. Log on to the system with a valid DB2 user ID.2. Start the CA. The CA can be started from the Start menu on Windows or
using the db2ca command on both Windows and UNIX systems.3. On the CA menu bar, under Selected, choose Add a database using
wizard.4. Select the Manually configure a connection to a database radio button
and click Next.5. If you are using Lightweight Directory Access Protocol (LDAP), select the
radio button that corresponds to the location where you would like yourDB2 directories to be maintained. Click Next.
6. Select the radio button that corresponds to the protocol that you want touse from the Protocol list.If DB2 Connect is installed on your machine and you select TCP/IP orAPPC, you have the option to select The database physically resides ona host or OS/400 system. If you select this check box, you will have theoption of selecting the type of connection that you want to make to thehost or OS/400 database:v To make a connection through a DB2 Connect gateway, select the
Connect to the server via the gateway radio button.v To make a direct connection, select the Connect directly to the server
radio button.
Click Next.
64 Quick Beginnings for DB2 Connect Personal Edition
7. Enter the required communication protocol parameters and click Next.8. Enter the database alias name of the remote database that you want to
add in the Database name field and a local database alias name in theDatabase alias field.If you are adding a host or OS/400 database, type the Location name foran OS/390 or z/OS database, the RDB name for an OS/400 database, orthe DBNAME for a VSE or VM database in the Database name field.Optionally add a comment that describes this database in the Commentfield.Click Next.
9. If you are planning to use ODBC, register this database as an ODBC datasource. ODBC must be installed to perform this operation.
10. Click Finish. You are now able to use this database. Select the Exit menuaction to close the CA.
Related tasks:
v “Configuring a database connection using Discovery” on page 52v “Configuring a database connection using a profile” on page 51v “Testing a database connection” on page 53
Configuring a database connection using a profile
A server profile contains information about server instances on a system, anddatabases within each server instance. A client profile contains databaseinformation that was cataloged on another client system. Use the steps in thefollowing task to connect to a database using a profile.
Prerequisites:
Before you connect to a database through the CA using a profile:v Ensure that you have a valid DB2 user ID.v If adding a database to a system that has a DB2 Server or DB2 Connect
server product installed, ensure that you have a user ID with SYSADM orSYSCTRL authority for the instance.
Procedure:
To connect to a database using a profile:1. Log on to the system with a valid DB2 user ID.2. Start the CA. The CA can be started from the Start menu on Windows or
using the db2ca command on both Windows and UNIX systems.3. On the CA menu bar, under Selected, choose Add a database using
wizard.
Chapter 9. Configuring DB2 clients to use DB2 Connect 65

4. Select the Use a profile radio button and click Next.5. Click the ... push button and select a profile. Select a remote database from
the object tree that is displayed from the profile, and if the databaseselected is a gateway connection, select a connection route to the database.Click the Next push button.
6. Enter a local database alias name in the Database alias field andoptionally enter a comment that describes this database in the Commentfield. Click Next.
7. If you are planning to use ODBC, register this database as an ODBC datasource. ODBC must be installed to perform this operation.
8. Click Finish. You are now able to use this database. Select the Exit menuaction to exit the CA.
Related tasks:
v “Creating client profiles using the export function of the ConfigurationAssistant (CA)” on page 68
v “Testing a database connection” on page 53
Configuring a database connection using Discovery
You can use the Discovery feature of the Configuration Assistant to search anetwork for databases.
Prerequisites:
Before you configure a connection to a database using Discovery:v Ensure that you have a valid DB2 user ID.v If adding a database to a system that has a DB2 Server or DB2 Connect
server product installed, ensure that you have a user ID with SYSADM orSYSCTRL authority for the instance.
Restrictions:
A DB2 Administration Server (DAS) must be running and enabled for theDiscovery feature of the CA to return information about DB2 systems.
Procedure:
To add a database to your system using Discovery:1. Log on to the system with a valid DB2 user ID.2. Start the CA. The CA can be started from the Start menu on Windows or
using the db2ca command on both Windows and UNIX systems.3. On the CA menu bar, under Selected, choose Add a database using
wizard.
66 Quick Beginnings for DB2 Connect Personal Edition
4. Select the Search the network radio button and click Next.5. Double-click on the folder beside Known Systems to list all the systems
known to your client.6. Click the [+] sign beside a system to get a list of the instances and
databases on it. Select the database that you want to add, click the Nextpush button,
7. Enter a local database alias name in the Database alias field andoptionally enter a comment that describes this database in the Commentfield.
8. If you are planning to use ODBC, register this database as an ODBC datasource. ODBC must be installed to perform this operation.
9. Click Finish. You are now able to use the database you added. Click Closeto exit the CA.
Related tasks:
v “Configuring a database connection using the Configuration Assistant(CA)” on page 50
v “Configuring a database connection using a profile” on page 51v “Testing a database connection” on page 53
Testing a database connection
After configuring the database, the database connection should be tested.
Procedure:
To test a database connection:1. Start the CA.2. Highlight the database in the details view and invoke the Test Connection
menu action. The Test Connection window opens.3. Select the type of connection that you would like to test (CLI is the
default). Enter a valid user ID and password for the remote database andclick Test Connection. If the connection is successful, a messageconfirming the connection appears on the Results page.If the connection test failed, you will receive a help message. To changeany settings you may have incorrectly specified, select the database in thedetails view and invoke the Change Database menu action.
Related tasks:
v “Configuring a database connection using Discovery” on page 52v “Configuring a database connection using the Configuration Assistant
(CA)” on page 50v “Configuring a database connection using a profile” on page 51
Chapter 9. Configuring DB2 clients to use DB2 Connect 67
Using Client and server profiles
Client profiles
Client profiles are used to configure database connections between DB2®
clients and servers. A client profile is generated from a client using the exportfunction of the Configuration Assistant (CA) or by using the db2cfexpcommand. The information contained in a client profile is determined duringthe export process. Depending on the settings chosen, it can containinformation such as the following:v Database connection information (including CLI or ODBC settings).v Client settings (including database manager configuration parameters and
DB2 registry variables).v CLI or ODBC common parameters.v Configuration data for the local APPC or NetBIOS communications
subsystem.
Once the information in a client profile has been determined, it can be used toconfigure other clients by using either the import function of the CA, or byimporting profiles using the db2cfimp command. Clients can import all or asubset of the configuration information in an existing profile.
Related tasks:
v “Configuring a database connection using a profile” on page 51v “Exporting and importing a profile” on page 71v “Creating client profiles using the export function of the Configuration
Assistant (CA)” on page 68v “Configuring client profiles using the import function of the Configuration
Assistant (CA)” on page 69
Creating client profiles using the export function of the ConfigurationAssistant (CA)
Client profiles are used to create connections between DB2 clients and servers.The information contained in a client profile is determined during the exportprocess. Once the information in a client profile has been determined, it canbe used to configure other clients by using the import process.
Procedure:
To create client profiles using the export function of the CA, perform thefollowing steps:1. Start the CA.2. Click Export. The Select Export Option window opens.
68 Quick Beginnings for DB2 Connect Personal Edition
3. Select one of the following options:v If you want to create a profile that contains all of the databases
cataloged on your system, and all of the configuration information forthis client, select the All radio button, click OK, and go to Step 8.
v If you want to create a profile that contains all of the databasescataloged on your system without any of the configuration informationfor this client, select the Database connection information radio button,click OK, and go to Step 8.
v If you want to select a subset of the databases that are cataloged onyour system, or a subset of the configuration information for this client,select the Customize radio button, click OK, and go to the next step.
4. Select the databases to be exported from the Available databases box andadd them to the Selected databases box by clicking on the push button. Toadd all of the available databases to the Databases to be exported box,click the >> button.
5. Select the check boxes from the Select custom export option box thatcorrespond to the options that you want to set up for the target client.
6. Click OK. The Export Client Profile window opens.7. Enter a path and file name for this client profile and click OK. The DB2
Message window opens.8. Click OK.
Once you have completed this task, you must then use the import function toconfigure other clients.
Related concepts:
v “Client profiles” on page 68
Related tasks:
v “Configuring a database connection using a profile” on page 51v “Exporting and importing a profile” on page 71v “Configuring client profiles using the import function of the Configuration
Assistant (CA)” on page 69
Configuring client profiles using the import function of the ConfigurationAssistant (CA)
This task must be performed to configure client profiles after using the exportfunction of the CA. Client profiles are used to create connections between DB2clients and servers. The information contained in a client profile is determinedduring the export process. Once the information in a client profile has beendetermined, it can be used to configure other clients by using the importprocess.
Chapter 9. Configuring DB2 clients to use DB2 Connect 69
Procedure:
To configure client profiles using the import function of the CA, perform thefollowing steps:1. Start the CA.2. Click Import. The Select Profile window opens.3. Select a client profile to import and click OK. The Import Profile window
opens.4. You can choose to import all or a subset of the information in a Client
Profile. Select one of the following import options:v To import everything in a client profile, select the All radio button. If
you choose this option, you are now ready to start using your DB2product.
v To import a specific database or settings that are defined in a ClientProfile, select the Customize radio button. Select the check boxes thatcorrespond to the options that you want to customize.
5. Click OK.6. You are presented with a list of systems, instances, and databases. Select
the database that you want to add and click Next.7. Enter a local database alias name in the Database alias field and
optionally enter a comment that describes this database in the Commentfield. Click Next.
8. If you are planning to use ODBC, register this database as an ODBC datasource.
Note: ODBC must be installed to perform this operation.a. Ensure that the Register this database for ODBC check box is
selected.b. Select the radio button that describes how you would like to register
this database:v If you would like all users on your system to have access to this
data source, select the As a system data source radio button.v If you would like only the current user to have access to this data
source, select the As a user data source radio button.v If you would like to create an ODBC data source file to share
database access, select the As a file data source radio button andenter the path and file name for this file in the File data sourcename field.
c. Click the Optimize for application drop down box and select theapplication for which you want to tune the ODBC settings.
d. Click Finish to add the database that you selected. The Confirmationwindow opens.
70 Quick Beginnings for DB2 Connect Personal Edition
9. Click the Test Connection push button to test the connection. TheConnect to DB2 Database window opens.
10. In the Connect to DB2 Database window, enter a valid user ID andpassword for the remote database and click OK. If the connection issuccessful, a message confirming the connection appears.If the connection test failed, you will receive a help message. To changeany settings that you may have incorrectly specified, click the Changepush button in the Confirmation window to return to the Add DatabaseWizard.
11. You are now able to use this database. Click Add to add more databases,or click Close to exit the Add Database Wizard. Click Close again to exitthe CA.
Related concepts:
v “Client profiles” on page 68
Related tasks:
v “Configuring a database connection using a profile” on page 51v “Exporting and importing a profile” on page 71v “Creating client profiles using the export function of the Configuration
Assistant (CA)” on page 68
Exporting and importing a profile
Procedure:
If you did not use a configuration profile when you installed your DB2product using the response file that was created by the response file generator,you can enter the db2cfexp command to create a configuration profile. Thedb2cfimp command can then be used to import a configuration profile.
You can also use the CA to export and import a configuration profile.
Chapter 9. Configuring DB2 clients to use DB2 Connect 71

72 Quick Beginnings for DB2 Connect Personal Edition
Part 6. Using DB2 Connect
© Copyright IBM Corp. 1993-2002 73

74 Quick Beginnings for DB2 Connect Personal Edition
Chapter 10. Running your own applications
You can build and run DB2® applications with a DB2 ApplicationDevelopment Client installed. You can also run DB2 applications on the DB2Run-Time Client and the DB2 Administration Client.
Various types of applications can access DB2 databases:v Applications developed using the DB2 Application Development Client that
include embedded SQL, APIs, stored procedures, user-defined functions orcalls to the DB2 CLI.
v ODBC applications such as Lotus® Approach.v JDBC applications and applets.v Net.Data® macros containing HTML and SQL.
On Windows® operating systems, the following can also access DB2databases:v ActiveX Data Objects (ADO) implemented in Microsoft® Visual Basic and
Microsoft Visual C++v Remote Data Objects (RDO) implemented in Microsoft Visual Basicv Object Linking and Embedding (OLE) Automation Routines (UDFs and
Stored Procedures)v Object Linking and Embedding Database (OLE DB) table functions
An application on a DB2 client can access a remote database without knowingits physical location. The DB2 client determines the location of the database,manages the transmission of the requests to the database server, and returnsthe results.
To run a database client application:1. Ensure the server is configured and running.2. Ensure that the database manager is started on the database server to
which the application program is connecting. If it is not, you must issuethe db2start command at the server before starting the application.
3. Ensure that you can connect to the database that the application uses.4. Bind the utilities and the applications to the database.5. Run the application program.
Related concepts:
v “DB2 Supported Programming Interfaces” in the Application DevelopmentGuide: Programming Client Applications
© Copyright IBM Corp. 1993-2002 75
Related reference:
v “DB2 Application Development Client” in the Application Development Guide:Building and Running Applications
76 Quick Beginnings for DB2 Connect Personal Edition
Chapter 11. DB2 Connect and the CLI environment
Setting Up the CLI Environment
Runtime support for DB2 CLI applications is contained in all DB2 clients.Support for building and running DB2 CLI applications is contained in theDB2 Application Development (DB2 AD) Client. This section describes thegeneral setup required for DB2 CLI runtime support.
The CLI/ODBC driver will autobind on the first connection to the database,provided the user has the appropriate privilege or authorization. Theadministrator may want to perform the first connect or explicitly bind therequired files.
Prerequisites:
Before you set up your CLI environment, ensure you have set up theapplication development environment.
Procedure:
In order for a DB2 CLI application to successfully access a DB2 database:1. Ensure the DB2 CLI/ODBC driver was installed during the DB2 client
install.2. Catalog the DB2 database and node if the database is being accessed from
a remote client.On the Windows platform, you can use the CLI/ODBC Settings GUI tocatalog the DB2 database.
3. Optional: Explicitly bind the DB2 CLI/ODBC bind files to the databasewith the command:
db2 bind ~/sqllib/bnd/@db2cli.lst blocking all sqlerror continue \messages cli.msg grant public
On the Windows platform, you can use the CLI/ODBC Settings GUI tobind the DB2 CLI/ODBC bind files to the database.
4. Optional: Change the DB2 CLI/ODBC configuration keywords by editingthe db2cli.ini file, located in the sqllib directory on Windows, and inthe sqllib/cfg directory on UNIX platforms.On the Windows platform, you can use the CLI/ODBC Settings GUI to setthe DB2 CLI/ODBC configuration keywords.
© Copyright IBM Corp. 1993-2002 77
Once you have completed the above steps, proceed to setting up yourWindows CLI environment, or setting up your UNIX ODBC environment ifyou are running ODBC applications on UNIX.
Related concepts:
v “Initialization and Termination in CLI Overview” in the CLI Guide andReference, Volume 1
Related tasks:
v “Initializing CLI Applications” in the CLI Guide and Reference, Volume 1
v “Setting Up the UNIX ODBC Environment” on page 80v “Setting Up the Windows CLI Environment” on page 78
Related reference:
v “BIND” in the Command Reference
v “CATALOG DATABASE” in the Command Reference
Setting Up the Windows CLI Environment
This task tells you how to perform Windows client access to DB2 using CLI orODBC.
Prerequisites:
Before setting up the Windows CLI environment, ensure that the CLIenvironment has been set up.
Restrictions:
When using the Configuration Assistant on Windows 64-bit platforms, ODBCData Sources can be configured only for 64-bit applications. ODBC DataSources for 32-bit applications need to be configured using the Microsoft32-bit ODBC Data Source Administrator (32-bit odbcad32.exe) that is includedwith the Windows 64-bit operating system.
Procedure:
Before DB2 CLI and ODBC applications can successfully access a DB2database from a Windows client, perform the following steps on the clientsystem:1. Verify that the Microsoft ODBC Driver Manager and the DB2 CLI/ODBC
driver are installed. On Windows operating systems they are both installedwith DB2 unless the ODBC component is manually unselected during the
78 Quick Beginnings for DB2 Connect Personal Edition
install. DB2 will not overwite a newer version of the Microsoft ODBCDriver Manager if one is found. To verify that they both exist on themachine:a. Start the Microsoft ODBC Data Sources icon in the Control Panel, or
run the odbcad32.exe command from the command line.b. Click on the ″Drivers″ tab.c. Verify that IBM DB2 ODBC DRIVER is shown in the list.
If either the Microsoft ODBC Driver Manager or the IBM DB2 CLI/ODBCdriver is not installed, then rerun the DB2 install and select the ODBCcomponent on Windows operating systems.
Note: The latest version of the Microsoft ODBC Driver Manager isincluded as part of the Microsoft Data Access Components (MDAC)and is available for download fromhttp://www.microsoft.com/data/.
2. Register the DB2 database with the ODBC driver manager as a datasource. On Windows operating systems you can make the data sourceavailable to all users of the system (a system data source), or only thecurrent user (a user data source). Use either of these methods to add thedata source:v Using the Configuration Assistant:
a. Select the DB2 database alias that you want to add as a data source.b. Click on the ″Properties″ push button. The Database Properties
window opens.c. Select the ″Register this database for ODBC″ check box.d. Use the radio buttons to add the data source as either a user, system,
or file data source.v Using the Microsoft ODBC Administration tool, which you can access
from the icon in the Control Panel or by running odbcad32.exe from thecommand line:a. The list of user data sources appears by default. If you want to add
a system data source click on the ″System DSN″ button, or the″System DSN″ tab (depending on the platform).
b. Click on the ″Add″ push button.c. Double-click on the IBM DB2 ODBC Driver in the list.d. Select the DB2 database to add and click on OK.
v Use the CATALOG command to register the DB2 database with the ODBCdriver manager as a data source:
CATALOG [ user | system ] ODBC DATA SOURCE
Chapter 11. DB2 Connect and the CLI environment 79
Using this command, an administrator could create a command lineprocessor script to register the required databases. This script could thenbe run on all machines that require access to DB2 databases throughODBC.
3. Optional: Configure the DB2 CLI/ODBC driver using the ConfigurationAssistant:a. Select the DB2 database alias you want to configure.b. Click on the ″Properties″ push button. The Database Properties
window opens.c. Click on the ″Settings″ push button. The CLI/ODBC Settings window
opens.d. Click on the ″Advanced″ push button. You can set the configuration
keywords in the window that opens. These keywords are associatedwith the database alias name, and affect all DB2 CLI/ODBCapplications that access the database.
4. If you have installed ODBC access (as described above), you can nowaccess DB2 data using ODBC applications.
Related concepts:
v “db2cli.ini Initialization File” in the CLI Guide and Reference, Volume 1
v “Initialization and Termination in CLI Overview” in the CLI Guide andReference, Volume 1
Related tasks:
v “Initializing CLI Applications” in the CLI Guide and Reference, Volume 1
v “Setting Up the CLI Environment” on page 77v “Building CLI Applications on Windows” in the CLI Guide and Reference,
Volume 1
v “Building CLI Routines on Windows” in the CLI Guide and Reference, Volume1
Setting Up the UNIX ODBC Environment
This topic explains how to set up UNIX client access to DB2 for ODBCapplications. (If your application is a DB2 CLI application, your CLIenvironmental setup will be complete once the task in the Prerequisitessection is performed.)
Prerequisites:
Before setting up the UNIX ODBC environment, ensure you have set up theCLI environment.
80 Quick Beginnings for DB2 Connect Personal Edition
Procedure:
For ODBC applications on UNIX that need to access a DB2 database, followthe steps described below.1. Ensure that an ODBC Driver Manager is installed and that each user that
will use ODBC has access to it. DB2 does not install an ODBC DriverManager, so you must use the ODBC Driver Manager that was suppliedwith your ODBC client application or ODBC SDK in order to access DB2data using that application.
2. Set up .odbc.ini, the end-user’s data source configuration. Each user IDhas a separate copy of this file in their home directory. Note that the filestarts with a dot. Although necessary files are usually updatedautomatically by the tools on most platforms, users of ODBC on UNIXplatforms will have to edit them manually.Using an ASCII editor, update the file to reflect the appropriate datasource configuration information. To register a DB2 database as an ODBCdata source there must be one stanza (section) for each DB2 database.The .odbc.ini file must contain the following lines:v in the [ODBC Data Source] stanza:
SAMPLE=IBM DB2 ODBC DRIVER
which indicates that there is a data source called SAMPLE that used theIBM DB2 ODBC DRIVER;
v in the [SAMPLE] stanza:on AIX, for example,
[SAMPLE]Driver=/u/thisuser/sqllib/lib/libdb2.aDescription=Sample DB2 ODBC Database
on Solaris, for example,[SAMPLE]Driver=/u/thisuser/sqllib/lib/libdb2.soDescription=Sample DB2 ODBC Database
which indicates that the SAMPLE database is part of the DB2 instancelocated in the directory /u/thisuser.
3. Ensure that the application execution environment has reference to theODBC Driver Manager by including libodbc.a (for AIX) or libodbc.so(for UNIX) in the LIBPATH (for AIX) or LD_LIBRARY_PATH (for UNIX)environment variables.
4. Enable a system-wide .odbc.ini file to be used by setting the ODBCINIenvironment variable to the fully qualified pathname of the .ini file. SomeODBC driver managers support this feature which allows for centralizedcontrol. The following examples show how to set ODBCINI:
Chapter 11. DB2 Connect and the CLI environment 81
in the C shell,setenv ODBCINI /opt/odbc/system_odbc.ini
in the Bourne or Korn shell,ODBCINI=/opt/odbc/system_odbc.ini;export ODBCINI
5. Once the .odbc.ini file is set up, you can run your ODBC application andaccess DB2 databases. Refer to the documentation that comes with yourODBC application for additional help and information.
Related concepts:
v “Comparison of DB2 CLI and Microsoft ODBC” in the CLI Guide andReference, Volume 1
v “Initialization and Termination in CLI Overview” in the CLI Guide andReference, Volume 1
Related tasks:
v “Initializing CLI Applications” in the CLI Guide and Reference, Volume 1
v “Setting Up the CLI Environment” on page 77v “Building CLI Applications on UNIX” in the CLI Guide and Reference, Volume
1
v “Building CLI Routines on UNIX” in the CLI Guide and Reference, Volume 1
82 Quick Beginnings for DB2 Connect Personal Edition

Part 7. Appendixes
© Copyright IBM Corp. 1993-2002 83

84 Quick Beginnings for DB2 Connect Personal Edition
Appendix A. Language Support
Changing the DB2 interface language (Windows)
The interface language of DB2 is the language that appears in messages, help,and graphical tool interfaces. When installing DB2, you have the option ofinstalling support for one or more languages. If, at some time afterinstallation, you want to change the interface language for DB2 to one of theother installed interface languages, use the steps outlined in this task.
Do not confuse languages supported by DB2 with languages supported by theDB2 interface. Languages supported by DB2, that is, languages that data canexist in, are a superset of languages supported by the DB2 interface.
Prerequisites:
The DB2 interface language you want to use must be installed on yoursystem. DB2 interface languages are selected and installed when you installDB2 using the DB2 Setup wizard. If you change the interface language of DB2to a supported interface language that has not been installed, the DB2interface language will default to the operating system language first, and ifthat is not supported, English.
Procedure:
Changing the interface language for DB2 on Windows requires that youchange the default language setting for your Windows operating system.
To change the DB2 interface language on Windows:1. Through the Control Panel on your Windows operating system, select
Regional Options.2. In the Regional Options dialog window, change the default language
setting for the system to the language in which you want to interface withDB2.
Refer to your operating system help for additional information aboutchanging the default system language.
Related reference:
v “Supported territory codes and code pages” in the Administration Guide:Planning
v “Supported DB2 interface languages, locales, and code pages” on page 86
© Copyright IBM Corp. 1993-2002 85
Changing the DB2 interface language (UNIX)
The interface language of DB2 is the language that appears in messages, help,and graphical tool interfaces. When installing DB2, you have the option ofinstalling support for one or more languages. If, at some time afterinstallation, you want to change the interface language for DB2 to one of theother installed interface languages, use the steps outlined in this task.
Do not confuse languages supported by DB2 with languages supported by theDB2 interface. Languages supported by DB2, that is, languages that data canexist in, are a superset of languages supported by the DB2 interface.
Prerequisites:
Support for the DB2 interface language you want to use must be installed onyour system. DB2 interface language support is selected and installed whenyou install DB2 using the DB2 Setup wizard. If you change the interfacelanguage of DB2 to a supported interface language that has not been installed,the DB2 interface language will default to the operating system language first,and if that is not supported, English.
Procedure:
To change the DB2 interface language on UNIX systems, set the LANGenvironment variable to the desired locale.
For example, to interface with DB2 in French using DB2 for AIX, you musthave French language support installed and you must set the LANGenvironment variable to a French locale, for example, fr_FR.
Related reference:
v “Supported territory codes and code pages” in the Administration Guide:Planning
v “Supported DB2 interface languages, locales, and code pages” on page 86
Supported DB2 interface languages, locales, and code pages
The following two tables list the languages (by operating system) supportedby the DB2 interface, the language locale, and the code page for each locale.The DB2 interface includes messages, help, and graphical tool interfaces.
Do not confuse languages supported by DB2 with languages supported by theDB2 interface. Languages supported by DB2 that is, languages that data canexist in, are a superset of languages supported by the DB2 interface.
86 Quick Beginnings for DB2 Connect Personal Edition
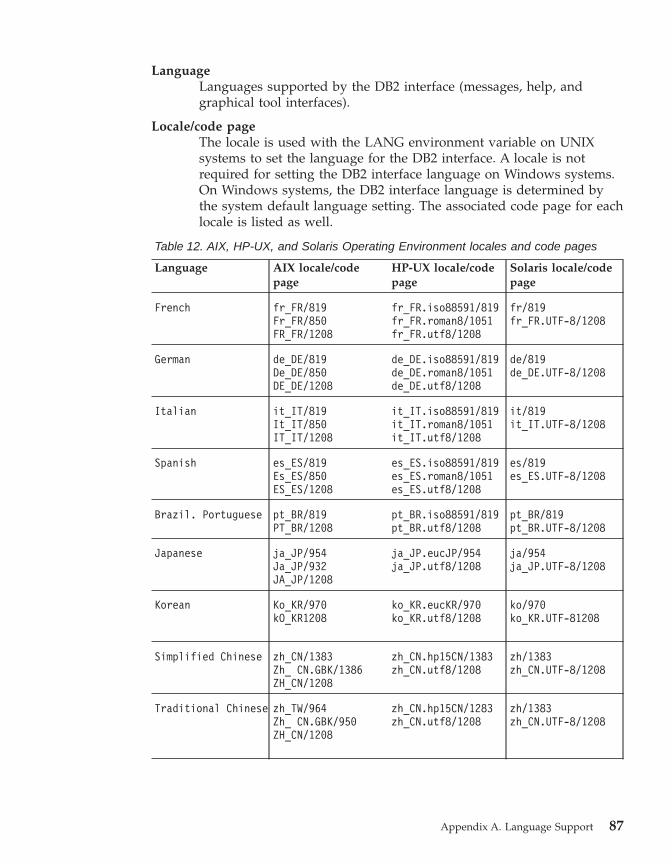
LanguageLanguages supported by the DB2 interface (messages, help, andgraphical tool interfaces).
Locale/code pageThe locale is used with the LANG environment variable on UNIXsystems to set the language for the DB2 interface. A locale is notrequired for setting the DB2 interface language on Windows systems.On Windows systems, the DB2 interface language is determined bythe system default language setting. The associated code page for eachlocale is listed as well.
Table 12. AIX, HP-UX, and Solaris Operating Environment locales and code pages
Language AIX locale/codepage
HP-UX locale/codepage
Solaris locale/codepage
French fr_FR/819Fr_FR/850FR_FR/1208
fr_FR.iso88591/819fr_FR.roman8/1051fr_FR.utf8/1208
fr/819fr_FR.UTF-8/1208
German de_DE/819De_DE/850DE_DE/1208
de_DE.iso88591/819de_DE.roman8/1051de_DE.utf8/1208
de/819de_DE.UTF-8/1208
Italian it_IT/819It_IT/850IT_IT/1208
it_IT.iso88591/819it_IT.roman8/1051it_IT.utf8/1208
it/819it_IT.UTF-8/1208
Spanish es_ES/819Es_ES/850ES_ES/1208
es_ES.iso88591/819es_ES.roman8/1051es_ES.utf8/1208
es/819es_ES.UTF-8/1208
Brazil. Portuguese pt_BR/819PT_BR/1208
pt_BR.iso88591/819pt_BR.utf8/1208
pt_BR/819pt_BR.UTF-8/1208
Japanese ja_JP/954Ja_JP/932JA_JP/1208
ja_JP.eucJP/954ja_JP.utf8/1208
ja/954ja_JP.UTF-8/1208
Korean Ko_KR/970kO_KR1208
ko_KR.eucKR/970ko_KR.utf8/1208
ko/970ko_KR.UTF-81208
Simplified Chinese zh_CN/1383Zh_ CN.GBK/1386ZH_CN/1208
zh_CN.hp15CN/1383zh_CN.utf8/1208
zh/1383zh_CN.UTF-8/1208
Traditional Chinese zh_TW/964Zh_ CN.GBK/950ZH_CN/1208
zh_CN.hp15CN/1283zh_CN.utf8/1208
zh/1383zh_CN.UTF-8/1208
Appendix A. Language Support 87

Table 12. AIX, HP-UX, and Solaris Operating Environment locales and codepages (continued)
Language AIX locale/codepage
HP-UX locale/codepage
Solaris locale/codepage
Danish da_DK/819Da_DK/850DA_DK/1208
da_DK.iso88591/819da_DK.roman8/1051da_DK.utf8/1208
da/819da_DK.UTF-8/1208
Dutch nl_NL/819NL_NL/
N/A N/A
Finnish fi_FI/819Fi_FI/850FI_FI/1208
fi_FI.iso88591/819fi_FI.roman8/1051fi_FI.utf8/1208
fi/819fi_FI.UTF-8/1208
Norwegian no_NO/819No_NO/850NO_NO/1208
no_NO.iso88591/819no_NO.roman8/850no_NO.utf8/1208
no/819no_NO.UTF-8/1208
Swedish Sv_SE/819sv_SE/850SV_SE/1208
sv_SE.iso88591/819sv_SE.roman8/1051sv_SE.utf8/1208
sv/819sv_SE.UTF-8/1208
Czech cs_CZ/912CS_CZ/1208
cs_CZ.utf8/1208 cs_CZ.UTF-8/1208
Hungarian hu_HU/912HU_HU/1208
hu_HU.utf8/1208 hu_HU.UTF-8/1208
Polish pl_PL/912PL_PL/1208
pl_PL.utf8/1208 nl_NL.UTF-8/1208
Turkish tr_TR/920TR_TR/1208
tr_TR.utf8/1208 tr_TR.UTF-8/1208
Russian ru_RU/915RU_RU/1208
ru_RU.utf8/1208 ru_RU.UTF-8/1208
Bulgarian bg_BG/915BG_BG/1208
bg_BG.iso88595/915bg_BG.utf8/1208
bg_BG.UTF-8/1208
Slovenian sl_SI/912SL_SI/1208
sl_SI.iso88592/912sl_SI.utf8/1208
sl_SI/912sl_SI.UTF-8/1208
88 Quick Beginnings for DB2 Connect Personal Edition
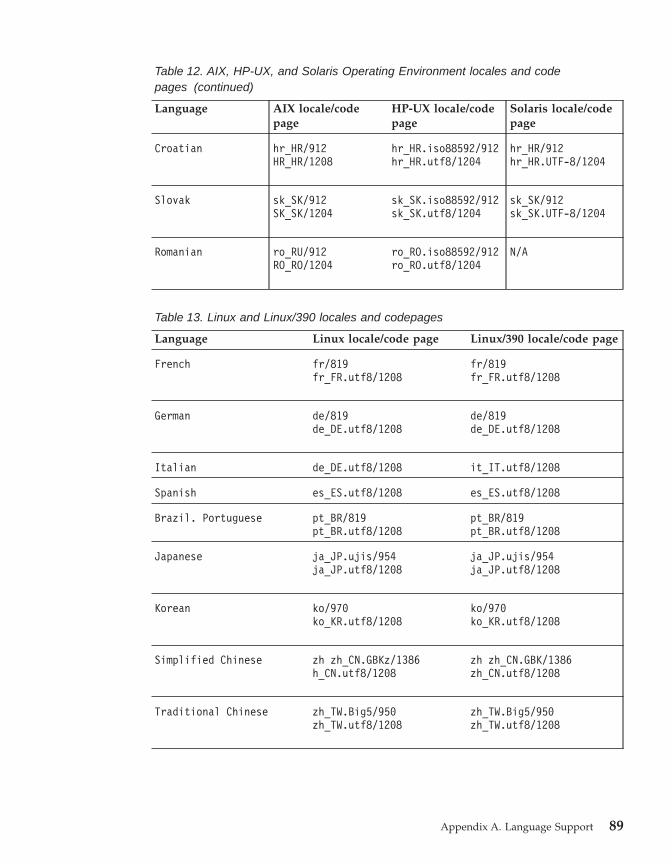
Table 12. AIX, HP-UX, and Solaris Operating Environment locales and codepages (continued)
Language AIX locale/codepage
HP-UX locale/codepage
Solaris locale/codepage
Croatian hr_HR/912HR_HR/1208
hr_HR.iso88592/912hr_HR.utf8/1204
hr_HR/912hr_HR.UTF-8/1204
Slovak sk_SK/912SK_SK/1204
sk_SK.iso88592/912sk_SK.utf8/1204
sk_SK/912sk_SK.UTF-8/1204
Romanian ro_RU/912RO_RO/1204
ro_RO.iso88592/912ro_RO.utf8/1204
N/A
Table 13. Linux and Linux/390 locales and codepages
Language Linux locale/code page Linux/390 locale/code page
French fr/819fr_FR.utf8/1208
fr/819fr_FR.utf8/1208
German de/819de_DE.utf8/1208
de/819de_DE.utf8/1208
Italian de_DE.utf8/1208 it_IT.utf8/1208
Spanish es_ES.utf8/1208 es_ES.utf8/1208
Brazil. Portuguese pt_BR/819pt_BR.utf8/1208
pt_BR/819pt_BR.utf8/1208
Japanese ja_JP.ujis/954ja_JP.utf8/1208
ja_JP.ujis/954ja_JP.utf8/1208
Korean ko/970ko_KR.utf8/1208
ko/970ko_KR.utf8/1208
Simplified Chinese zh zh_CN.GBKz/1386h_CN.utf8/1208
zh zh_CN.GBK/1386zh_CN.utf8/1208
Traditional Chinese zh_TW.Big5/950zh_TW.utf8/1208
zh_TW.Big5/950zh_TW.utf8/1208
Appendix A. Language Support 89
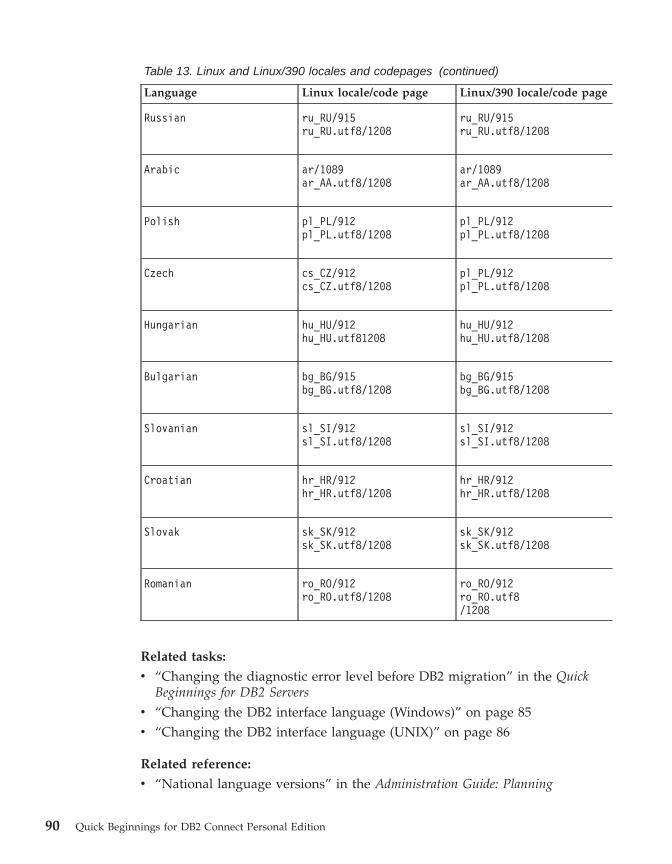
Table 13. Linux and Linux/390 locales and codepages (continued)
Language Linux locale/code page Linux/390 locale/code page
Russian ru_RU/915ru_RU.utf8/1208
ru_RU/915ru_RU.utf8/1208
Arabic ar/1089ar_AA.utf8/1208
ar/1089ar_AA.utf8/1208
Polish pl_PL/912pl_PL.utf8/1208
pl_PL/912pl_PL.utf8/1208
Czech cs_CZ/912cs_CZ.utf8/1208
pl_PL/912pl_PL.utf8/1208
Hungarian hu_HU/912hu_HU.utf81208
hu_HU/912hu_HU.utf8/1208
Bulgarian bg_BG/915bg_BG.utf8/1208
bg_BG/915bg_BG.utf8/1208
Slovanian sl_SI/912sl_SI.utf8/1208
sl_SI/912sl_SI.utf8/1208
Croatian hr_HR/912hr_HR.utf8/1208
hr_HR/912hr_HR.utf8/1208
Slovak sk_SK/912sk_SK.utf8/1208
sk_SK/912sk_SK.utf8/1208
Romanian ro_RO/912ro_RO.utf8/1208
ro_RO/912ro_RO.utf8/1208
Related tasks:
v “Changing the diagnostic error level before DB2 migration” in the QuickBeginnings for DB2 Servers
v “Changing the DB2 interface language (Windows)” on page 85v “Changing the DB2 interface language (UNIX)” on page 86
Related reference:
v “National language versions” in the Administration Guide: Planning
90 Quick Beginnings for DB2 Connect Personal Edition
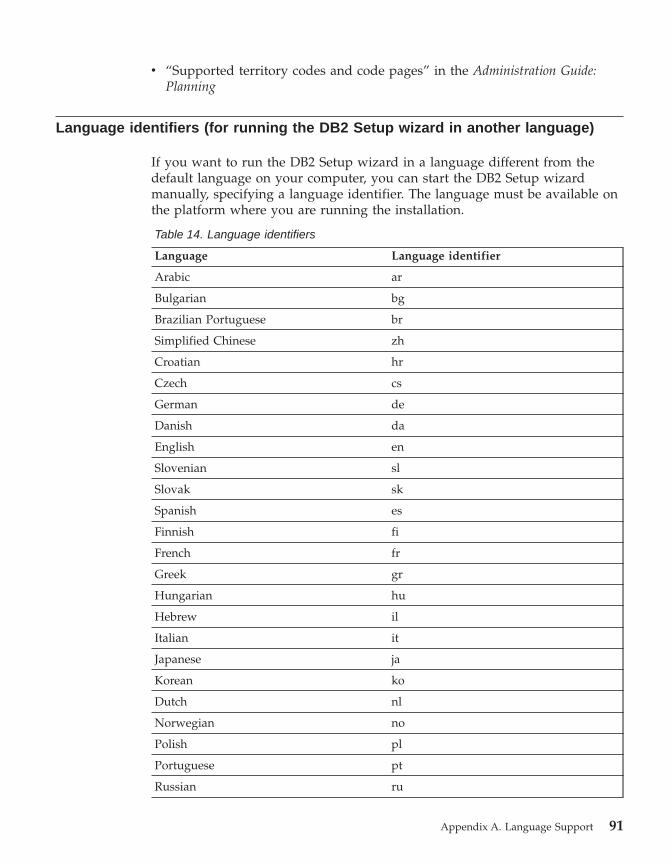
v “Supported territory codes and code pages” in the Administration Guide:Planning
Language identifiers (for running the DB2 Setup wizard in another language)
If you want to run the DB2 Setup wizard in a language different from thedefault language on your computer, you can start the DB2 Setup wizardmanually, specifying a language identifier. The language must be available onthe platform where you are running the installation.
Table 14. Language identifiers
Language Language identifier
Arabic ar
Bulgarian bg
Brazilian Portuguese br
Simplified Chinese zh
Croatian hr
Czech cs
German de
Danish da
English en
Slovenian sl
Slovak sk
Spanish es
Finnish fi
French fr
Greek gr
Hungarian hu
Hebrew il
Italian it
Japanese ja
Korean ko
Dutch nl
Norwegian no
Polish pl
Portuguese pt
Russian ru
Appendix A. Language Support 91
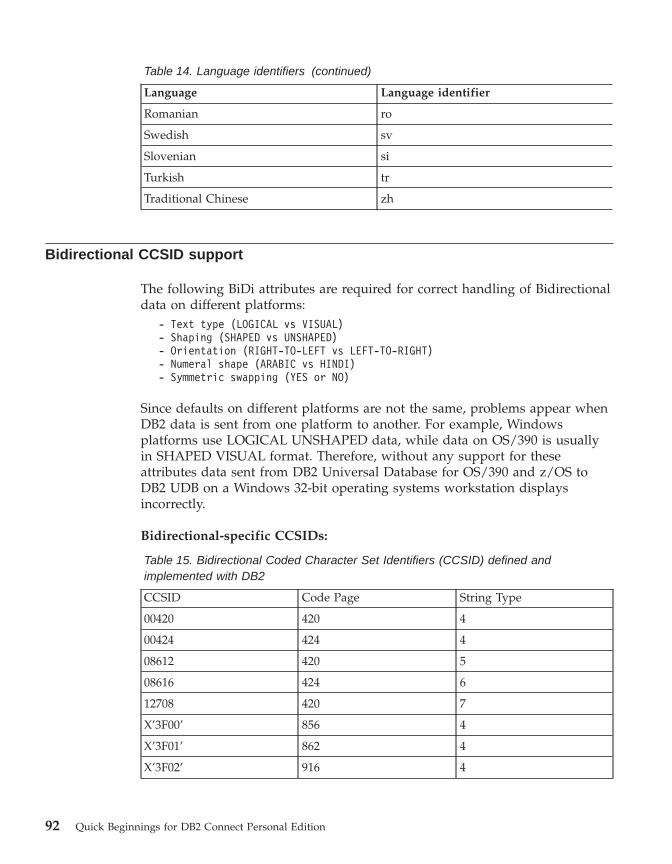
Table 14. Language identifiers (continued)
Language Language identifier
Romanian ro
Swedish sv
Slovenian si
Turkish tr
Traditional Chinese zh
Bidirectional CCSID support
The following BiDi attributes are required for correct handling of Bidirectionaldata on different platforms:
- Text type (LOGICAL vs VISUAL)- Shaping (SHAPED vs UNSHAPED)- Orientation (RIGHT-TO-LEFT vs LEFT-TO-RIGHT)- Numeral shape (ARABIC vs HINDI)- Symmetric swapping (YES or NO)
Since defaults on different platforms are not the same, problems appear whenDB2 data is sent from one platform to another. For example, Windowsplatforms use LOGICAL UNSHAPED data, while data on OS/390 is usuallyin SHAPED VISUAL format. Therefore, without any support for theseattributes data sent from DB2 Universal Database for OS/390 and z/OS toDB2 UDB on a Windows 32-bit operating systems workstation displaysincorrectly.
Bidirectional-specific CCSIDs:
Table 15. Bidirectional Coded Character Set Identifiers (CCSID) defined andimplemented with DB2
CCSID Code Page String Type
00420 420 4
00424 424 4
08612 420 5
08616 424 6
12708 420 7
X’3F00’ 856 4
X’3F01’ 862 4
X’3F02’ 916 4
92 Quick Beginnings for DB2 Connect Personal Edition
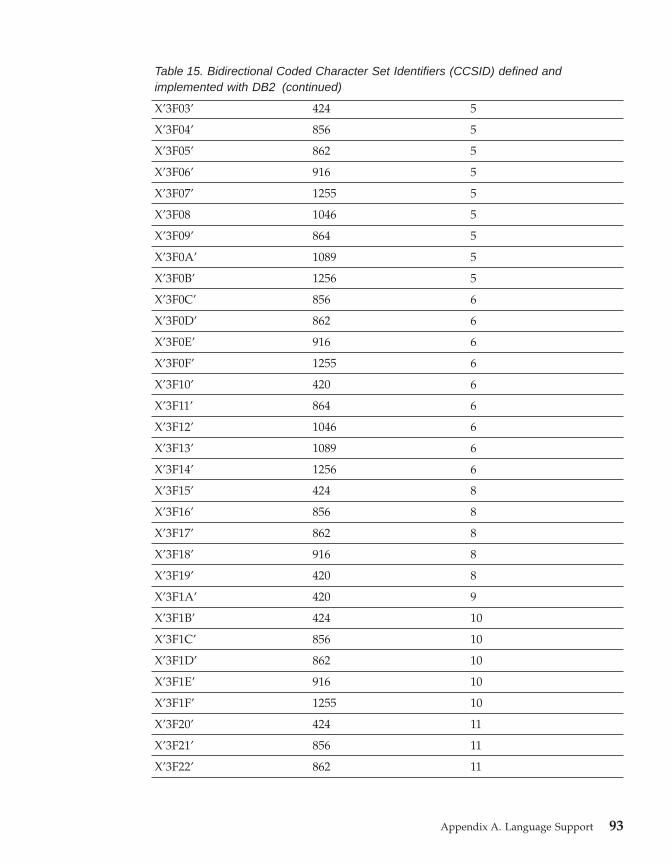
Table 15. Bidirectional Coded Character Set Identifiers (CCSID) defined andimplemented with DB2 (continued)
X’3F03’ 424 5
X’3F04’ 856 5
X’3F05’ 862 5
X’3F06’ 916 5
X’3F07’ 1255 5
X’3F08 1046 5
X’3F09’ 864 5
X’3F0A’ 1089 5
X’3F0B’ 1256 5
X’3F0C’ 856 6
X’3F0D’ 862 6
X’3F0E’ 916 6
X’3F0F’ 1255 6
X’3F10’ 420 6
X’3F11’ 864 6
X’3F12’ 1046 6
X’3F13’ 1089 6
X’3F14’ 1256 6
X’3F15’ 424 8
X’3F16’ 856 8
X’3F17’ 862 8
X’3F18’ 916 8
X’3F19’ 420 8
X’3F1A’ 420 9
X’3F1B’ 424 10
X’3F1C’ 856 10
X’3F1D’ 862 10
X’3F1E’ 916 10
X’3F1F’ 1255 10
X’3F20’ 424 11
X’3F21’ 856 11
X’3F22’ 862 11
Appendix A. Language Support 93
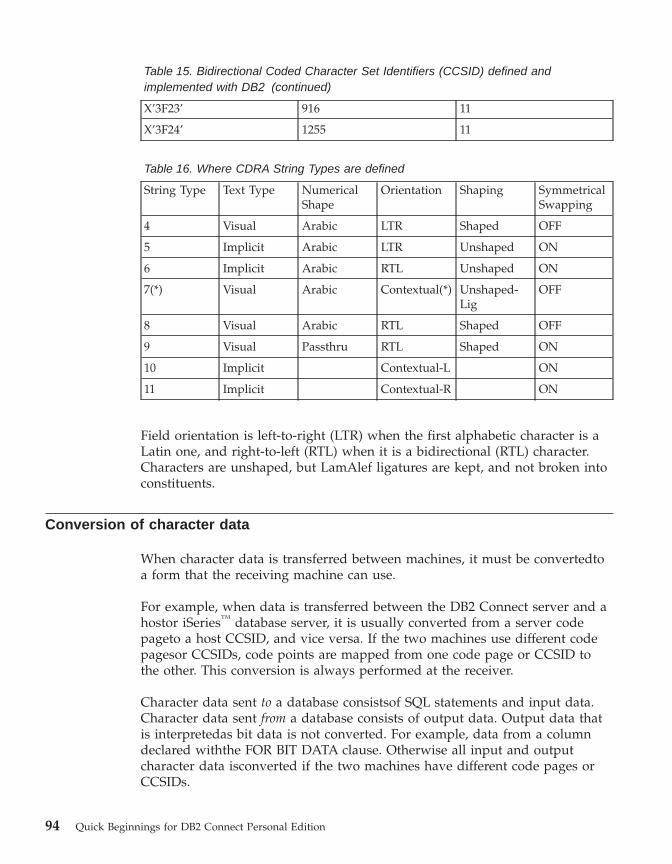
Table 15. Bidirectional Coded Character Set Identifiers (CCSID) defined andimplemented with DB2 (continued)
X’3F23’ 916 11
X’3F24’ 1255 11
Table 16. Where CDRA String Types are defined
String Type Text Type NumericalShape
Orientation Shaping SymmetricalSwapping
4 Visual Arabic LTR Shaped OFF
5 Implicit Arabic LTR Unshaped ON
6 Implicit Arabic RTL Unshaped ON
7(*) Visual Arabic Contextual(*) Unshaped-Lig
OFF
8 Visual Arabic RTL Shaped OFF
9 Visual Passthru RTL Shaped ON
10 Implicit Contextual-L ON
11 Implicit Contextual-R ON
Field orientation is left-to-right (LTR) when the first alphabetic character is aLatin one, and right-to-left (RTL) when it is a bidirectional (RTL) character.Characters are unshaped, but LamAlef ligatures are kept, and not broken intoconstituents.
Conversion of character data
When character data is transferred between machines, it must be convertedtoa form that the receiving machine can use.
For example, when data is transferred between the DB2 Connect server and ahostor iSeries™ database server, it is usually converted from a server codepageto a host CCSID, and vice versa. If the two machines use different codepagesor CCSIDs, code points are mapped from one code page or CCSID tothe other. This conversion is always performed at the receiver.
Character data sent to a database consistsof SQL statements and input data.Character data sent from a database consists of output data. Output data thatis interpretedas bit data is not converted. For example, data from a columndeclared withthe FOR BIT DATA clause. Otherwise all input and outputcharacter data isconverted if the two machines have different code pages orCCSIDs.
94 Quick Beginnings for DB2 Connect Personal Edition
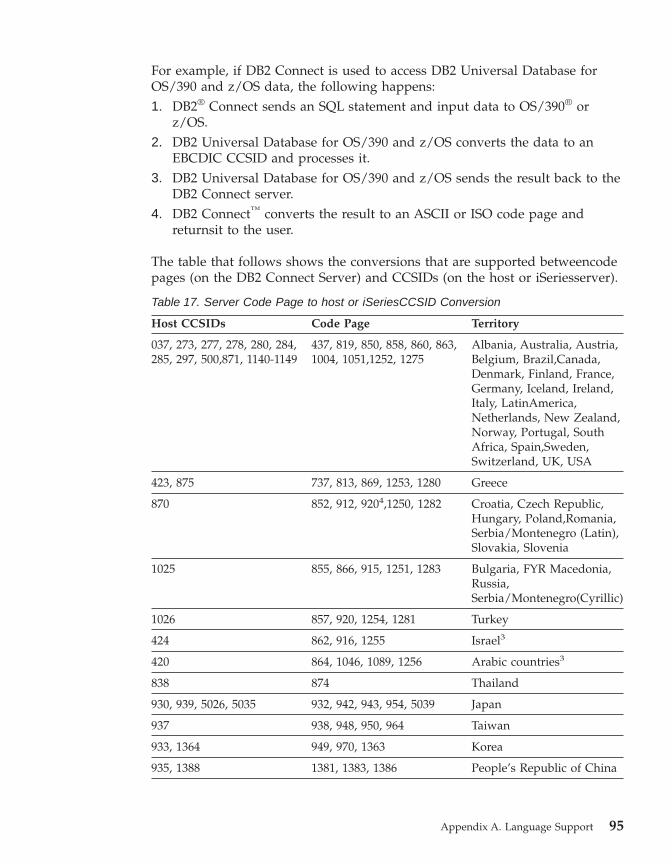
For example, if DB2 Connect is used to access DB2 Universal Database forOS/390 and z/OS data, the following happens:1. DB2® Connect sends an SQL statement and input data to OS/390® or
z/OS.2. DB2 Universal Database for OS/390 and z/OS converts the data to an
EBCDIC CCSID and processes it.3. DB2 Universal Database for OS/390 and z/OS sends the result back to the
DB2 Connect server.4. DB2 Connect™ converts the result to an ASCII or ISO code page and
returnsit to the user.
The table that follows shows the conversions that are supported betweencodepages (on the DB2 Connect Server) and CCSIDs (on the host or iSeriesserver).
Table 17. Server Code Page to host or iSeriesCCSID Conversion
Host CCSIDs Code Page Territory
037, 273, 277, 278, 280, 284,285, 297, 500,871, 1140-1149
437, 819, 850, 858, 860, 863,1004, 1051,1252, 1275
Albania, Australia, Austria,Belgium, Brazil,Canada,Denmark, Finland, France,Germany, Iceland, Ireland,Italy, LatinAmerica,Netherlands, New Zealand,Norway, Portugal, SouthAfrica, Spain,Sweden,Switzerland, UK, USA
423, 875 737, 813, 869, 1253, 1280 Greece
870 852, 912, 9204,1250, 1282 Croatia, Czech Republic,Hungary, Poland,Romania,Serbia/Montenegro (Latin),Slovakia, Slovenia
1025 855, 866, 915, 1251, 1283 Bulgaria, FYR Macedonia,Russia,Serbia/Montenegro(Cyrillic)
1026 857, 920, 1254, 1281 Turkey
424 862, 916, 1255 Israel3
420 864, 1046, 1089, 1256 Arabic countries3
838 874 Thailand
930, 939, 5026, 5035 932, 942, 943, 954, 5039 Japan
937 938, 948, 950, 964 Taiwan
933, 1364 949, 970, 1363 Korea
935, 1388 1381, 1383, 1386 People’s Republic of China
Appendix A. Language Support 95

Table 17. Server Code Page to host or iSeriesCCSID Conversion (continued)
Host CCSIDs Code Page Territory
1112, 1122 921, 922 Estonia, Latvia, Lithuania
1025 915, 1131, 1251, 1283 Belarus
1123 1124, 1125, 1251 Ukraine
Notes:
1. Code page 1004 is supported as code page 1252.2. In general, data can be converted from a code page to a CCSID and
backagain to the same code page with no change. The following are theonly exceptionsto that rule:v In double-byte character set (DBCS) code pages, some data containing
user-definedcharacters may be lost.v For single-byte code pages defined within mixed-byte code pages,
andfor some newer single-byte code pages, characters that do not existin boththe source and the target may be mapped to substitutioncharacters and thenlost when the data is converted back to the originalcode page.
3. For bidirectional languages, a number of special ″BiDi CCSIDS″ havebeendefined by IBM® and are supported by DB2 Connect.If the bidirectional attributesof the database server are different from thoseof the client you can usethese special CCSIDS to manage the difference.See the DB2 Connect ReleaseNotes for detailed information about how toset them up for host or iSeriesconnections.
4. This code page is not support of VM systems.
Related concepts:
v “Guidelines for character conversion” in the Administration Guide:Performance
96 Quick Beginnings for DB2 Connect Personal Edition
Appendix B. Naming Rules
Naming rules
Unless otherwise specified, all names can include the following characters:v A through Z. When used in most names, characters A through Z are
converted from lowercase to uppercase.v 0 through 9v @, #, $, and _ (underscore)
Names cannot begin with a number or with the underscore character.
Do not use SQL reserved words to name tables, views, columns, indexes, orauthorization IDs.
There are other special characters that might work separately depending onyour operating system and where you are working with DB2. However, whilethey might work, there is no guarantee that they will work. It is notrecommended that you use these other special characters when namingobjects in your database.
You also need to consider object naming rules, workstation naming rules,naming rules in an NLS environment, and naming rules in a Unicodeenvironment.
Related concepts:
v “General rules for naming objects and users” in the Administration Guide:Implementation
v “DB2 object naming rules” on page 97v “Workstation naming rules” on page 101v “User, userID and group naming rules” on page 99v “Federated database object naming rules” on page 100
DB2 object naming rules
All objects follow the General Naming Rules. In addition, some objects haveadditional restrictions shown below.
© Copyright IBM Corp. 1993-2002 97
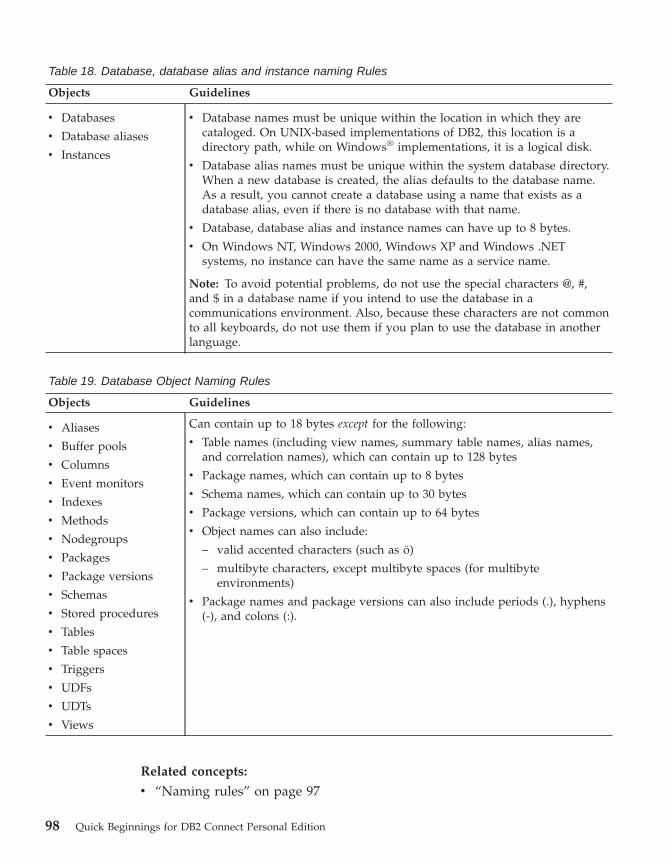
Table 18. Database, database alias and instance naming Rules
Objects Guidelines
v Databases
v Database aliases
v Instances
v Database names must be unique within the location in which they arecataloged. On UNIX-based implementations of DB2, this location is adirectory path, while on Windows® implementations, it is a logical disk.
v Database alias names must be unique within the system database directory.When a new database is created, the alias defaults to the database name.As a result, you cannot create a database using a name that exists as adatabase alias, even if there is no database with that name.
v Database, database alias and instance names can have up to 8 bytes.
v On Windows NT, Windows 2000, Windows XP and Windows .NETsystems, no instance can have the same name as a service name.
Note: To avoid potential problems, do not use the special characters @, #,and $ in a database name if you intend to use the database in acommunications environment. Also, because these characters are not commonto all keyboards, do not use them if you plan to use the database in anotherlanguage.
Table 19. Database Object Naming Rules
Objects Guidelines
v Aliases
v Buffer pools
v Columns
v Event monitors
v Indexes
v Methods
v Nodegroups
v Packages
v Package versions
v Schemas
v Stored procedures
v Tables
v Table spaces
v Triggers
v UDFs
v UDTs
v Views
Can contain up to 18 bytes except for the following:
v Table names (including view names, summary table names, alias names,and correlation names), which can contain up to 128 bytes
v Package names, which can contain up to 8 bytes
v Schema names, which can contain up to 30 bytes
v Package versions, which can contain up to 64 bytes
v Object names can also include:
– valid accented characters (such as ö)
– multibyte characters, except multibyte spaces (for multibyteenvironments)
v Package names and package versions can also include periods (.), hyphens(-), and colons (:).
Related concepts:
v “Naming rules” on page 97
98 Quick Beginnings for DB2 Connect Personal Edition
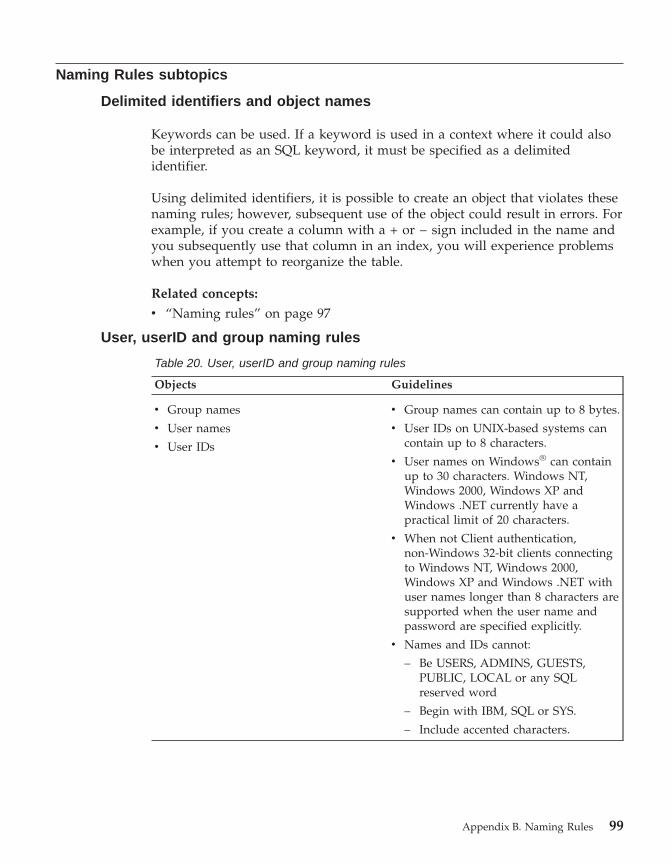
Naming Rules subtopics
Delimited identifiers and object names
Keywords can be used. If a keyword is used in a context where it could alsobe interpreted as an SQL keyword, it must be specified as a delimitedidentifier.
Using delimited identifiers, it is possible to create an object that violates thesenaming rules; however, subsequent use of the object could result in errors. Forexample, if you create a column with a + or − sign included in the name andyou subsequently use that column in an index, you will experience problemswhen you attempt to reorganize the table.
Related concepts:
v “Naming rules” on page 97
User, userID and group naming rules
Table 20. User, userID and group naming rules
Objects Guidelines
v Group names
v User names
v User IDs
v Group names can contain up to 8 bytes.
v User IDs on UNIX-based systems cancontain up to 8 characters.
v User names on Windows® can containup to 30 characters. Windows NT,Windows 2000, Windows XP andWindows .NET currently have apractical limit of 20 characters.
v When not Client authentication,non-Windows 32-bit clients connectingto Windows NT, Windows 2000,Windows XP and Windows .NET withuser names longer than 8 characters aresupported when the user name andpassword are specified explicitly.
v Names and IDs cannot:
– Be USERS, ADMINS, GUESTS,PUBLIC, LOCAL or any SQLreserved word
– Begin with IBM, SQL or SYS.
– Include accented characters.
Appendix B. Naming Rules 99
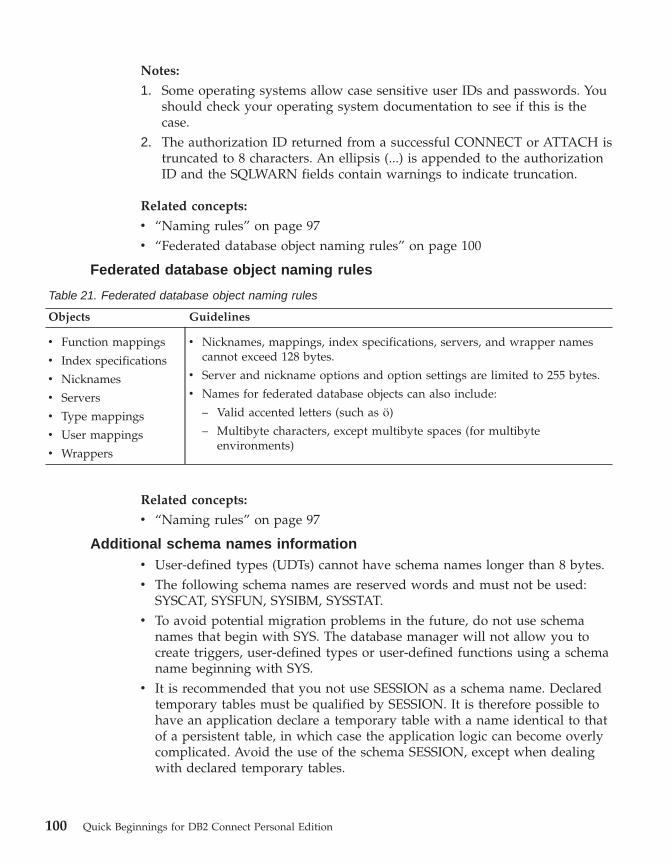
Notes:
1. Some operating systems allow case sensitive user IDs and passwords. Youshould check your operating system documentation to see if this is thecase.
2. The authorization ID returned from a successful CONNECT or ATTACH istruncated to 8 characters. An ellipsis (...) is appended to the authorizationID and the SQLWARN fields contain warnings to indicate truncation.
Related concepts:
v “Naming rules” on page 97v “Federated database object naming rules” on page 100
Federated database object naming rules
Table 21. Federated database object naming rules
Objects Guidelines
v Function mappings
v Index specifications
v Nicknames
v Servers
v Type mappings
v User mappings
v Wrappers
v Nicknames, mappings, index specifications, servers, and wrapper namescannot exceed 128 bytes.
v Server and nickname options and option settings are limited to 255 bytes.
v Names for federated database objects can also include:
– Valid accented letters (such as ö)
– Multibyte characters, except multibyte spaces (for multibyteenvironments)
Related concepts:
v “Naming rules” on page 97
Additional schema names informationv User-defined types (UDTs) cannot have schema names longer than 8 bytes.v The following schema names are reserved words and must not be used:
SYSCAT, SYSFUN, SYSIBM, SYSSTAT.v To avoid potential migration problems in the future, do not use schema
names that begin with SYS. The database manager will not allow you tocreate triggers, user-defined types or user-defined functions using a schemaname beginning with SYS.
v It is recommended that you not use SESSION as a schema name. Declaredtemporary tables must be qualified by SESSION. It is therefore possible tohave an application declare a temporary table with a name identical to thatof a persistent table, in which case the application logic can become overlycomplicated. Avoid the use of the schema SESSION, except when dealingwith declared temporary tables.
100 Quick Beginnings for DB2 Connect Personal Edition
Related concepts:
v “Naming rules” on page 97
Additional password information
You may be required to perform password maintenance tasks. Since suchtasks are required at the server, and many users are not able or comfortableworking with the server environment, performing these tasks can pose asignificant challenge. DB2® UDB provides a way to update and verifypasswords without having to be at the server. For example, DB2 for OS/390®
Version 5 supports this method of changing a user’s password. If an errormessage SQL1404N “Password expired” is received, use the CONNECTstatement to change the password as follows:
CONNECT TO <database> USER <userid> USING <password>NEW <new_password> CONFIRM <new_password>
The “Password change” dialog of the DB2 Configuration Assistant (CA) canalso be used to change the password.
Related concepts:
v “Naming rules” on page 97v “DB2 object naming rules” on page 97v “Workstation naming rules” on page 101v “User, userID and group naming rules” on page 99v “Federated database object naming rules” on page 100v “Delimited identifiers and object names” on page 99v “Additional schema names information” on page 100
Workstation naming rules
A workstation name specifies the NetBIOS name for a database server, databaseclient, or DB2® Personal Edition that resides on the local workstation. Thisname is stored in the database manager configuration file. The workstationname is known as the workstation nname.
In addition, the name you specify:v Can contain 1 to 8 charactersv Cannot include &, #, or @v Must be unique within the network
In a partitioned database system, there is still only one workstation nname thatrepresents the entire partitioned database system, but each node has its ownderived unique NetBIOS nname.
Appendix B. Naming Rules 101
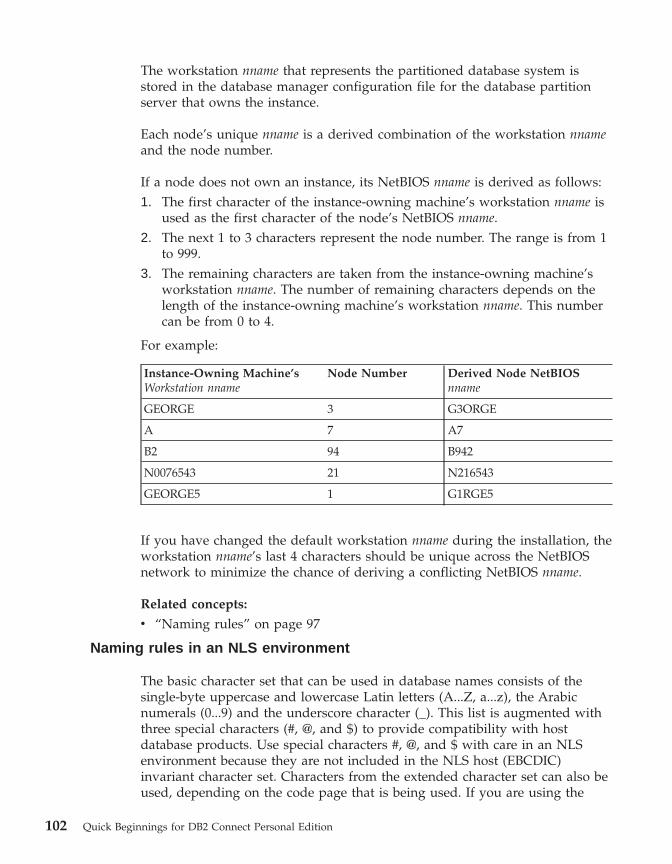
The workstation nname that represents the partitioned database system isstored in the database manager configuration file for the database partitionserver that owns the instance.
Each node’s unique nname is a derived combination of the workstation nnameand the node number.
If a node does not own an instance, its NetBIOS nname is derived as follows:1. The first character of the instance-owning machine’s workstation nname is
used as the first character of the node’s NetBIOS nname.2. The next 1 to 3 characters represent the node number. The range is from 1
to 999.3. The remaining characters are taken from the instance-owning machine’s
workstation nname. The number of remaining characters depends on thelength of the instance-owning machine’s workstation nname. This numbercan be from 0 to 4.
For example:
Instance-Owning Machine’sWorkstation nname
Node Number Derived Node NetBIOSnname
GEORGE 3 G3ORGE
A 7 A7
B2 94 B942
N0076543 21 N216543
GEORGE5 1 G1RGE5
If you have changed the default workstation nname during the installation, theworkstation nname’s last 4 characters should be unique across the NetBIOSnetwork to minimize the chance of deriving a conflicting NetBIOS nname.
Related concepts:
v “Naming rules” on page 97
Naming rules in an NLS environment
The basic character set that can be used in database names consists of thesingle-byte uppercase and lowercase Latin letters (A...Z, a...z), the Arabicnumerals (0...9) and the underscore character (_). This list is augmented withthree special characters (#, @, and $) to provide compatibility with hostdatabase products. Use special characters #, @, and $ with care in an NLSenvironment because they are not included in the NLS host (EBCDIC)invariant character set. Characters from the extended character set can also beused, depending on the code page that is being used. If you are using the
102 Quick Beginnings for DB2 Connect Personal Edition
database in a multiple code page environment, you must ensure that all codepages support any elements from the extended character set you plan to use.
When naming database objects (such as tables and views), program labels,host variables, cursors, and elements from the extended character set (forexample, letters with diacritical marks) can also be used. Precisely whichcharacters are available depends on the code page in use.
Extended Character Set Definition for DBCS Identifiers:
In DBCS environments, the extended character set consists of all thecharacters in the basic character set, plus the following:v All double-byte characters in each DBCS code page, except the double-byte
space, are valid letters.v The double-byte space is a special character.v The single-byte characters available in each mixed code page are assigned
to various categories as follows:
Category Valid Code Points within each Mixed Code Page
Digits x30-39
Letters x23-24, x40-5A, x61-7A, xA6-DF (A6-DF for code pages 932 and 942only)
SpecialCharacters
All other valid single-byte character code points
Related concepts:
v “Naming rules” on page 97v “DB2 object naming rules” on page 97v “Workstation naming rules” on page 101
Naming rules in a Unicode environment
In a UCS-2 database, all identifiers are in multibyte UTF-8. Therefore, it ispossible to use any UCS-2 character in identifiers where the use of a characterin the extended character set (for example, an accented character, or amultibyte character) is allowed by DB2® UDB.
Clients can enter any character that is supported by their environment, and allthe characters in the identifiers will be converted to UTF-8 by the databasemanager. Two points must be taken into account when specifying nationallanguage characters in identifiers for a UCS-2 database:v Each non-ASCII character requires two to four bytes. Therefore, an n-byte
identifier can only hold somewhere between n/4 and n characters,
Appendix B. Naming Rules 103
depending on the ratio of ASCII to non-ASCII characters. If you have onlyone or two non-ASCII (for example, accented) characters, the limit is closerto n characters, while for an identifier that is completely non-ASCII (forexample, in Japanese), only n/4 to n/3 characters can be used.
v If identifiers are to be entered from different client environments, theyshould be defined using the common subset of characters available to thoseclients. For example, if a UCS-2 database is to be accessed from Latin-1,Arabic, and Japanese environments, all identifiers should realistically belimited to ASCII.
Related concepts:
v “Naming rules” on page 97v “DB2 object naming rules” on page 97v “Workstation naming rules” on page 101
104 Quick Beginnings for DB2 Connect Personal Edition
Appendix C. DB2 Universal Database technical information
Overview of DB2 Universal Database technical information
DB2 Universal Database technical information can be obtained in thefollowing formats:v Books (PDF and hard-copy formats)v A topic tree (HTML format)v Help for DB2 tools (HTML format)v Sample programs (HTML format)v Command line helpv Tutorials
This section is an overview of the technical information that is provided andhow you can access it.
Categories of DB2 technical informationThe DB2 technical information is categorized by the following headings:v Core DB2 informationv Administration informationv Application development informationv Business intelligence informationv DB2 Connect informationv Getting started informationv Tutorial informationv Optional component informationv Release notes
The following tables describe, for each book in the DB2 library, theinformation needed to order the hard copy, print or view the PDF, or locatethe HTML directory for that book. A full description of each of the books inthe DB2 library is available from the IBM Publications Center atwww.ibm.com/shop/publications/order
The installation directory for the HTML documentation CD differs for eachcategory of information:htmlcdpath/doc/htmlcd/%L/category
where:
© Copyright IBM Corp. 1993-2002 105
v htmlcdpath is the directory where the HTML CD is installed.v %L is the language identifier. For example, en_US.v category is the category identifier. For example, core for the core DB2
information.
In the PDF file name column in the following tables, the character in the sixthposition of the file name indicates the language version of a book. Forexample, the file name db2d1e80 identifies the English version of theAdministration Guide: Planning and the file name db2d1g80 identifies theGerman version of the same book. The following letters are used in the sixthposition of the file name to indicate the language version:
Language IdentifierArabic wBrazilian Portuguese bBulgarian uCroatian 9Czech xDanish dDutch qEnglish eFinnish yFrench fGerman gGreek aHungarian hItalian iJapanese jKorean kNorwegian nPolish pPortuguese vRomanian 8Russian rSimp. Chinese cSlovakian 7Slovenian lSpanish zSwedish sTrad. Chinese tTurkish m
No form number indicates that the book is only available online and does nothave a printed version.
106 Quick Beginnings for DB2 Connect Personal Edition
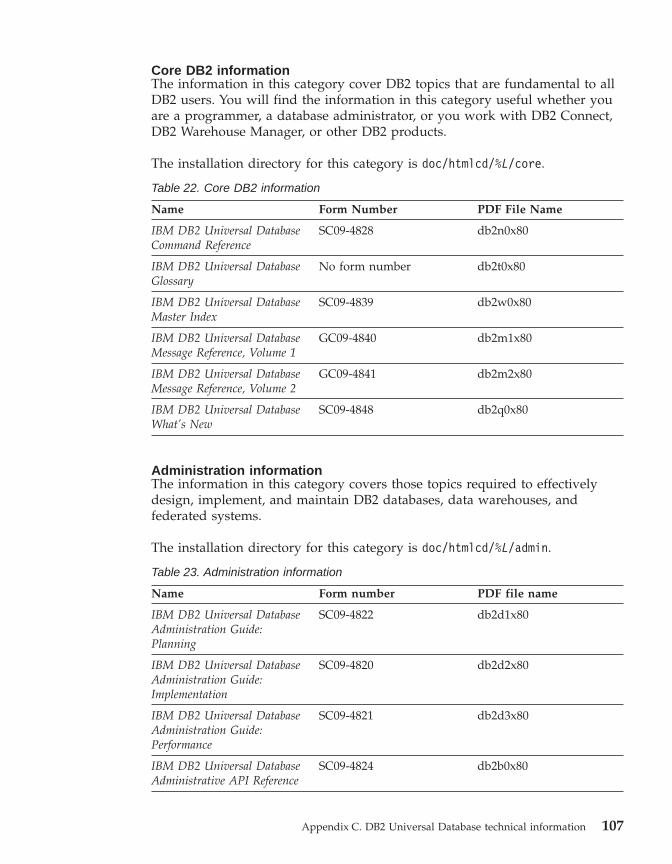
Core DB2 informationThe information in this category cover DB2 topics that are fundamental to allDB2 users. You will find the information in this category useful whether youare a programmer, a database administrator, or you work with DB2 Connect,DB2 Warehouse Manager, or other DB2 products.
The installation directory for this category is doc/htmlcd/%L/core.
Table 22. Core DB2 information
Name Form Number PDF File Name
IBM DB2 Universal DatabaseCommand Reference
SC09-4828 db2n0x80
IBM DB2 Universal DatabaseGlossary
No form number db2t0x80
IBM DB2 Universal DatabaseMaster Index
SC09-4839 db2w0x80
IBM DB2 Universal DatabaseMessage Reference, Volume 1
GC09-4840 db2m1x80
IBM DB2 Universal DatabaseMessage Reference, Volume 2
GC09-4841 db2m2x80
IBM DB2 Universal DatabaseWhat’s New
SC09-4848 db2q0x80
Administration informationThe information in this category covers those topics required to effectivelydesign, implement, and maintain DB2 databases, data warehouses, andfederated systems.
The installation directory for this category is doc/htmlcd/%L/admin.
Table 23. Administration information
Name Form number PDF file name
IBM DB2 Universal DatabaseAdministration Guide:Planning
SC09-4822 db2d1x80
IBM DB2 Universal DatabaseAdministration Guide:Implementation
SC09-4820 db2d2x80
IBM DB2 Universal DatabaseAdministration Guide:Performance
SC09-4821 db2d3x80
IBM DB2 Universal DatabaseAdministrative API Reference
SC09-4824 db2b0x80
Appendix C. DB2 Universal Database technical information 107
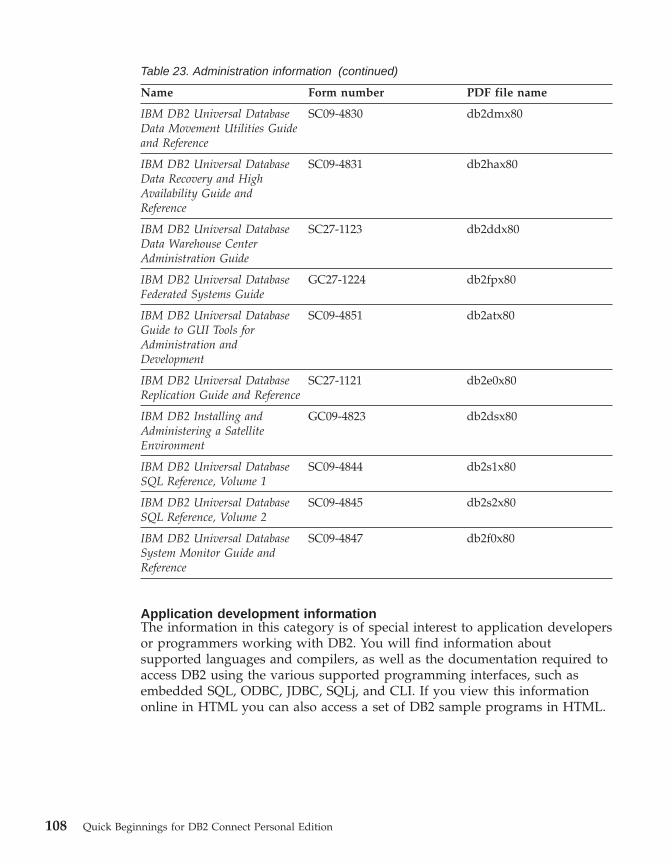
Table 23. Administration information (continued)
Name Form number PDF file name
IBM DB2 Universal DatabaseData Movement Utilities Guideand Reference
SC09-4830 db2dmx80
IBM DB2 Universal DatabaseData Recovery and HighAvailability Guide andReference
SC09-4831 db2hax80
IBM DB2 Universal DatabaseData Warehouse CenterAdministration Guide
SC27-1123 db2ddx80
IBM DB2 Universal DatabaseFederated Systems Guide
GC27-1224 db2fpx80
IBM DB2 Universal DatabaseGuide to GUI Tools forAdministration andDevelopment
SC09-4851 db2atx80
IBM DB2 Universal DatabaseReplication Guide and Reference
SC27-1121 db2e0x80
IBM DB2 Installing andAdministering a SatelliteEnvironment
GC09-4823 db2dsx80
IBM DB2 Universal DatabaseSQL Reference, Volume 1
SC09-4844 db2s1x80
IBM DB2 Universal DatabaseSQL Reference, Volume 2
SC09-4845 db2s2x80
IBM DB2 Universal DatabaseSystem Monitor Guide andReference
SC09-4847 db2f0x80
Application development informationThe information in this category is of special interest to application developersor programmers working with DB2. You will find information aboutsupported languages and compilers, as well as the documentation required toaccess DB2 using the various supported programming interfaces, such asembedded SQL, ODBC, JDBC, SQLj, and CLI. If you view this informationonline in HTML you can also access a set of DB2 sample programs in HTML.
108 Quick Beginnings for DB2 Connect Personal Edition
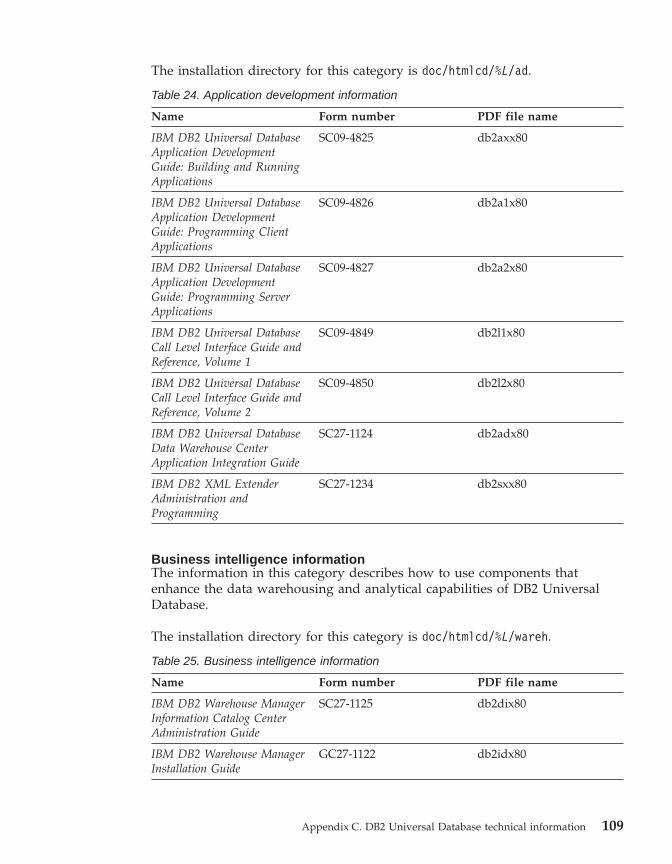
The installation directory for this category is doc/htmlcd/%L/ad.
Table 24. Application development information
Name Form number PDF file name
IBM DB2 Universal DatabaseApplication DevelopmentGuide: Building and RunningApplications
SC09-4825 db2axx80
IBM DB2 Universal DatabaseApplication DevelopmentGuide: Programming ClientApplications
SC09-4826 db2a1x80
IBM DB2 Universal DatabaseApplication DevelopmentGuide: Programming ServerApplications
SC09-4827 db2a2x80
IBM DB2 Universal DatabaseCall Level Interface Guide andReference, Volume 1
SC09-4849 db2l1x80
IBM DB2 Universal DatabaseCall Level Interface Guide andReference, Volume 2
SC09-4850 db2l2x80
IBM DB2 Universal DatabaseData Warehouse CenterApplication Integration Guide
SC27-1124 db2adx80
IBM DB2 XML ExtenderAdministration andProgramming
SC27-1234 db2sxx80
Business intelligence informationThe information in this category describes how to use components thatenhance the data warehousing and analytical capabilities of DB2 UniversalDatabase.
The installation directory for this category is doc/htmlcd/%L/wareh.
Table 25. Business intelligence information
Name Form number PDF file name
IBM DB2 Warehouse ManagerInformation Catalog CenterAdministration Guide
SC27-1125 db2dix80
IBM DB2 Warehouse ManagerInstallation Guide
GC27-1122 db2idx80
Appendix C. DB2 Universal Database technical information 109
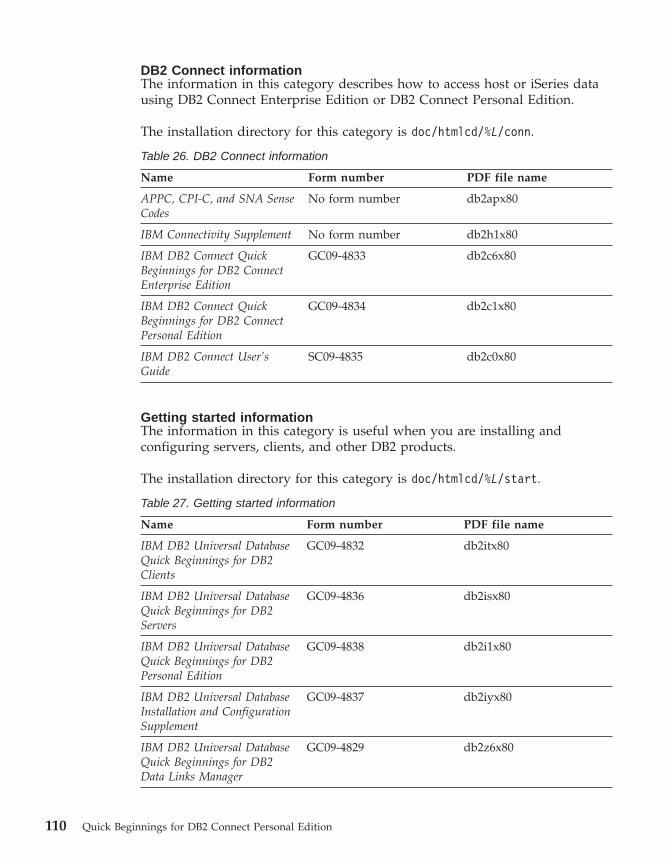
DB2 Connect informationThe information in this category describes how to access host or iSeries datausing DB2 Connect Enterprise Edition or DB2 Connect Personal Edition.
The installation directory for this category is doc/htmlcd/%L/conn.
Table 26. DB2 Connect information
Name Form number PDF file name
APPC, CPI-C, and SNA SenseCodes
No form number db2apx80
IBM Connectivity Supplement No form number db2h1x80
IBM DB2 Connect QuickBeginnings for DB2 ConnectEnterprise Edition
GC09-4833 db2c6x80
IBM DB2 Connect QuickBeginnings for DB2 ConnectPersonal Edition
GC09-4834 db2c1x80
IBM DB2 Connect User’sGuide
SC09-4835 db2c0x80
Getting started informationThe information in this category is useful when you are installing andconfiguring servers, clients, and other DB2 products.
The installation directory for this category is doc/htmlcd/%L/start.
Table 27. Getting started information
Name Form number PDF file name
IBM DB2 Universal DatabaseQuick Beginnings for DB2Clients
GC09-4832 db2itx80
IBM DB2 Universal DatabaseQuick Beginnings for DB2Servers
GC09-4836 db2isx80
IBM DB2 Universal DatabaseQuick Beginnings for DB2Personal Edition
GC09-4838 db2i1x80
IBM DB2 Universal DatabaseInstallation and ConfigurationSupplement
GC09-4837 db2iyx80
IBM DB2 Universal DatabaseQuick Beginnings for DB2Data Links Manager
GC09-4829 db2z6x80
110 Quick Beginnings for DB2 Connect Personal Edition
Tutorial informationTutorial information introduces DB2 features and teaches how to performvarious tasks.
The installation directory for this category is doc/htmlcd/%L/tutr.
Table 28. Tutorial information
Name Form number PDF file name
Business Intelligence Tutorial:Introduction to the DataWarehouse
No form number db2tux80
Business Intelligence Tutorial:Extended Lessons in DataWarehousing
No form number db2tax80
Development Center Tutorialfor Video Online usingMicrosoft Visual Basic
No form number db2tdx80
Information Catalog CenterTutorial
No form number db2aix80
Video Central for e-businessTutorial
No form number db2twx80
Visual Explain Tutorial No form number db2tvx80
Optional component informationThe information in this category describes how to work with optional DB2components.
The installation directory for this category is doc/htmlcd/%L/opt.
Table 29. Optional component information
Name Form number PDF file name
IBM DB2 Life Sciences DataConnect Planning, Installation,and Configuration Guide
GC27-1235 db2lsx80
IBM DB2 Spatial ExtenderUser’s Guide and Reference
SC27-1226 db2sbx80
IBM DB2 Universal DatabaseData Links ManagerAdministration Guide andReference
SC27-1221 db2z0x80
Appendix C. DB2 Universal Database technical information 111
Table 29. Optional component information (continued)
Name Form number PDF file name
IBM DB2 Universal DatabaseNet Search ExtenderAdministration andProgramming GuideNote: HTML for thisdocument is not installedfrom the HTMLdocumentation CD.
SH12-6740 N/A
Release notesThe release notes provide additional information specific to your product’srelease and FixPak level. They also provides summaries of the documentationupdates incorporated in each release and FixPak.
Table 30. Release notes
Name Form number PDF file name HTML directory
DB2 Release Notes See note. See note. doc/prodcd/%L/db2ir
where %L is thelanguage identifier.
DB2 Connect ReleaseNotes
See note. See note. doc/prodcd/%L/db2cr
where %L is thelanguage identifier.
DB2 Installation Notes Available onproduct CD-ROMonly.
Available onproduct CD-ROMonly.
Note: The HTML version of the release notes is available from theInformation Center and on the product CD-ROMs. To view the ASCIIfile:v On UNIX-based platforms, see the Release.Notes file. This file is
located in the DB2DIR/Readme/%L directory, where %L represents thelocale name and DB2DIR represents:– /usr/opt/db2_08_01 on AIX– /opt/IBM/db2/V8.1 on all other UNIX operating systems
v On other platforms, see the RELEASE.TXT file. This file is located inthe directory where the product is installed.
Related tasks:
v “Printing DB2 books from PDF files” on page 113
112 Quick Beginnings for DB2 Connect Personal Edition
v “Ordering printed DB2 books” on page 114v “Accessing online help” on page 114v “Finding product information by accessing the DB2 Information Center
from the administration tools” on page 118v “Viewing technical documentation online directly from the DB2 HTML
Documentation CD” on page 119
Printing DB2 books from PDF files
You can print DB2 books from the PDF files on the DB2 PDF DocumentationCD. Using Adobe Acrobat Reader, you can print either the entire book or aspecific range of pages.
Prerequisites:
Ensure that you have Adobe Acrobat Reader. It is available from the AdobeWeb site at www.adobe.com
Procedure:
To print a DB2 book from a PDF file:1. Insert the DB2 PDF Documentation CD. On UNIX operating systems,
mount the DB2 PDF Documentation CD. Refer to your Quick Beginningsbook for details on how to mount a CD on UNIX operating systems.
2. Start Adobe Acrobat Reader.3. Open the PDF file from one of the following locations:
v On Windows operating systems:x:\doc\language directory, where x represents the CD-ROM drive letterand language represents the two-character territory code that representsyour language (for example, EN for English).
v On UNIX operating systems:/cdrom/doc/%L directory on the CD-ROM, where /cdrom represents themount point of the CD-ROM and %L represents the name of the desiredlocale.
Related tasks:
v “Ordering printed DB2 books” on page 114v “Finding product information by accessing the DB2 Information Center
from the administration tools” on page 118v “Viewing technical documentation online directly from the DB2 HTML
Documentation CD” on page 119
Related reference:
Appendix C. DB2 Universal Database technical information 113
v “Overview of DB2 Universal Database technical information” on page 105
Ordering printed DB2 books
Procedure:
To order printed books:v Contact your IBM authorized dealer or marketing representative. To find a
local IBM representative, check the IBM Worldwide Directory of Contacts atwww.ibm.com/shop/planetwide
v Phone 1-800-879-2755 in the United States or 1-800-IBM-4YOU in Canada.v Visit the IBM Publications Center at
www.ibm.com/shop/publications/order
Related tasks:
v “Printing DB2 books from PDF files” on page 113v “Finding topics by accessing the DB2 Information Center from a browser”
on page 116v “Viewing technical documentation online directly from the DB2 HTML
Documentation CD” on page 119
Related reference:
v “Overview of DB2 Universal Database technical information” on page 105
Accessing online help
The online help that comes with all DB2 components is available in threetypes:v Window and notebook helpv Command line helpv SQL statement help
Window and notebook help explain the tasks that you can perform in awindow or notebook and describe the controls. This help has two types:v Help accessible from the Help buttonv Infopops
The Help button gives you access to overview and prerequisite information.The infopops describe the controls in the window or notebook. Window andnotebook help are available from DB2 centers and components that have userinterfaces.
114 Quick Beginnings for DB2 Connect Personal Edition
Command line help includes Command help and Message help. Commandhelp explains the syntax of commands in the command line processor.Message help describes the cause of an error message and describes anyaction you should take in response to the error.
SQL statement help includes SQL help and SQLSTATE help. DB2 returns anSQLSTATE value for conditions that could be the result of an SQL statement.SQLSTATE help explains the syntax of SQL statements (SQL states and classcodes).
Note: SQL help is not available for UNIX operating systems.
Procedure:
To access online help:v For window and notebook help, click Help or click that control, then click
F1. If the Automatically display infopops check box on the General pageof the Tool Settings notebook is selected, you can also see the infopop for aparticular control by holding the mouse cursor over the control.
v For command line help, open the command line processor and enter:– For Command help:
? command
where command represents a keyword or the entire command.
For example, ? catalog displays help for all the CATALOG commands,while ? catalog database displays help for the CATALOG DATABASEcommand.
v For Message help:? XXXnnnnn
where XXXnnnnn represents a valid message identifier.
For example, ? SQL30081 displays help about the SQL30081 message.v For SQL statement help, open the command line processor and enter:
– For SQL help:? sqlstate or ? class code
where sqlstate represents a valid five-digit SQL state and class coderepresents the first two digits of the SQL state.
For example, ? 08003 displays help for the 08003 SQL state, while ? 08displays help for the 08 class code.
– For SQLSTATE help:
Appendix C. DB2 Universal Database technical information 115
help statement
where statement represents an SQL statement.
For example, help SELECT displays help about the SELECT statement.
Related tasks:
v “Finding topics by accessing the DB2 Information Center from a browser”on page 116
v “Viewing technical documentation online directly from the DB2 HTMLDocumentation CD” on page 119
Finding topics by accessing the DB2 Information Center from a browser
The DB2 Information Center accessed from a browser enables you to accessthe information you need to take full advantage of DB2 Universal Databaseand DB2 Connect. The DB2 Information Center also documents major DB2features and components including replication, data warehousing, metadata,Life Sciences Data Connect, and DB2 extenders.
The DB2 Information Center accessed from a browser is composed of thefollowing major elements:
Navigation treeThe navigation tree is located in the left frame of the browser window.The tree expands and collapses to show and hide topics, the glossary,and the master index in the DB2 Information Center.
Navigation toolbarThe navigation toolbar is located in the top right frame of the browserwindow. The navigation toolbar contains buttons that enable you tosearch the DB2 Information Center, hide the navigation tree, and findthe currently displayed topic in the navigation tree.
Content frameThe content frame is located in the bottom right frame of the browserwindow. The content frame displays topics from the DB2 InformationCenter when you click on a link in the navigation tree, click on asearch result, or follow a link from another topic or from the masterindex.
Prerequisites:
To access the DB2 Information Center from a browser, you must use one ofthe following browsers:v Microsoft Explorer, version 5 or laterv Netscape Navigator, version 6.1 or later
116 Quick Beginnings for DB2 Connect Personal Edition
Restrictions:
The DB2 Information Center contains only those sets of topics that you choseto install from the DB2 HTML Documentation CD. If your Web browser returnsa File not found error when you try to follow a link to a topic, you mustinstall one or more additional sets of topics DB2 HTML Documentation CD.
Procedure:
To find a topic by searching with keywords:1. In the navigation toolbar, click Search.2. In the top text entry field of the Search window, enter two or more terms
related to your area of interest and click Search. A list of topics ranked byaccuracy displays in the Results field.Entering more terms increases the precision of your query while reducingthe number of topics returned from your query.
3. In the Results field, click the title of the topic you want to read. The topicdisplays in the content frame.
To find a topic in the navigation tree:1. In the navigation tree, click the book icon of the category of topics related
to your area of interest. A list of subcategories displays underneath theicon.
2. Continue to click the book icons until you find the category containingthe topics in which you are interested. Categories that link to topicsdisplay the category title as an underscored link when you move thecursor over the category title. The navigation tree identifies topics with apage icon.
3. Click the topic link. The topic displays in the content frame.
To find a topic or term in the master index:1. In the navigation tree, click the “Index” category. The category expands to
display a list of links arranged in alphabetical order in the navigation tree.2. In the navigation tree, click the link corresponding to the first character of
the term relating to the topic in which you are interested. A list of termswith that initial character displays in the content frame. Terms that havemultiple index entries are identified by a book icon.
3. Click the book icon corresponding to the term in which you areinterested. A list of subterms and topics displays below the term youclicked. Topics are identified by page icons with an underscored title.
4. Click on the title of the topic that meets your needs. The topic displays inthe content frame.
Appendix C. DB2 Universal Database technical information 117
Related concepts:
v “Accessibility” on page 125v “DB2 Information Center for topics” on page 127
Related tasks:
v “Finding product information by accessing the DB2 Information Centerfrom the administration tools” on page 118
v “Updating the HTML documentation installed on your machine” on page120
v “Troubleshooting DB2 documentation search with Netscape 4.x” on page122
v “Searching the DB2 documentation” on page 123
Related reference:
v “Overview of DB2 Universal Database technical information” on page 105
Finding product information by accessing the DB2 Information Center from theadministration tools
The DB2 Information Center provides quick access to DB2 productinformation and is available on all operating systems for which the DB2administration tools are available.
The DB2 Information Center accessed from the tools provides six types ofinformation.
Tasks Key tasks you can perform using DB2.
ConceptsKey concepts for DB2.
ReferenceDB2 reference information, such as keywords, commands, and APIs.
TroubleshootingError messages and information to help you with common DB2problems.
SamplesLinks to HTML listings of the sample programs provided with DB2.
TutorialsInstructional aid designed to help you learn a DB2 feature.
Prerequisites:
118 Quick Beginnings for DB2 Connect Personal Edition
Some links in the DB2 Information Center point to Web sites on the Internet.To display the content for these links, you will first have to connect to theInternet.
Procedure:
To find product information by accessing the DB2 Information Center fromthe tools:1. Start the DB2 Information Center in one of the following ways:
v From the graphical administration tools, click on the InformationCenter icon in the toolbar. You can also select it from the Help menu.
v At the command line, enter db2ic.2. Click the tab of the information type related to the information you are
attempting to find.3. Navigate through the tree and click on the topic in which you are
interested. The Information Center will then launch a Web browser todisplay the information.
4. To find information without browsing the lists, click the Search icon to theright of the list.Once the Information Center has launched a browser to display theinformation, you can perform a full-text search by clicking the Search iconin the navigation toolbar.
Related concepts:
v “Accessibility” on page 125v “DB2 Information Center for topics” on page 127
Related tasks:
v “Finding topics by accessing the DB2 Information Center from a browser”on page 116
v “Searching the DB2 documentation” on page 123
Viewing technical documentation online directly from the DB2 HTMLDocumentation CD
All of the HTML topics that you can install from the DB2 HTMLDocumentation CD can also be read directly from the CD. Therefore, you canview the documentation without having to install it.
Restrictions:
Appendix C. DB2 Universal Database technical information 119
Because the following items are installed from the DB2 product CD and notthe DB2 HTML Documentation CD, you must install the DB2 product to viewthese items:v Tools helpv DB2 Quick Tourv Release notes
Procedure:
1. Insert the DB2 HTML Documentation CD. On UNIX operating systems,mount the DB2 HTML Documentation CD. Refer to your Quick Beginningsbook for details on how to mount a CD on UNIX operating systems.
2. Start your HTML browser and open the appropriate file:v For Windows operating systems:
e:\Program Files\sqllib\doc\htmlcd\%L\index.htm
where e represents the CD-ROM drive, and %L is the locale of thedocumentation that you wish to use, for example, en_US for English.
v For UNIX operating systems:/cdrom/Program Files/sqllib/doc/htmlcd/%L/index.htm
where /cdrom/ represents where the CD is mounted, and %L is the localeof the documentation that you wish to use, for example, en_US forEnglish.
Related tasks:
v “Finding topics by accessing the DB2 Information Center from a browser”on page 116
v “Copying files from the DB2 HTML Documentation CD to a Web Server”on page 122
Related reference:
v “Overview of DB2 Universal Database technical information” on page 105
Updating the HTML documentation installed on your machine
It is now possible to update the HTML installed from the DB2 HTMLDocumentation CD when updates are made available from IBM. This can bedone in one of two ways:v Using the Information Center (if you have the DB2 administration GUI
tools installed).v By downloading and applying a DB2 HTML documentation FixPak .
120 Quick Beginnings for DB2 Connect Personal Edition
Note: This will NOT update the DB2 code; it will only update the HTMLdocumentation installed from the DB2 HTML Documentation CD.
Procedure:
To use the Information Center to update your local documentation:1. Start the DB2 Information Center in one of the following ways:
v From the graphical administration tools, click on the InformationCenter icon in the toolbar. You can also select it from the Help menu.
v At the command line, enter db2ic.2. Ensure your machine has access to the external Internet; the updater will
download the latest documentation FixPak from the IBM server ifrequired.
3. Select Information Center —> Update Local Documentation from themenu to start the update.
4. Supply your proxy information (if required) to connect to the externalInternet.
The Information Center will download and apply the latest documentationFixPak, if one is available.
To manually download and apply the documentation FixPak :1. Ensure your machine is connected to the Internet.2. Open the DB2 support page in your Web browser at:
www.ibm.com/software/data/db2/udb/winos2unix/support3. Follow the link for version 8 and look for the ″Documentation FixPaks″
link.4. Determine if the version of your local documentation is out of date by
comparing the documentation FixPak level to the documentation level youhave installed. This current documentation on your machine is at thefollowing level: DB2 v8.1 GA.
5. If there is a more recent version of the documentation available thendownload the FixPak applicable to your operating system. There is oneFixPak for all Windows platforms, and one FixPak for all UNIX platforms.
6. Apply the FixPak:v For Windows operating systems: The documentation FixPak is a self
extracting zip file. Place the downloaded documentation FixPak in anempty directory, and run it. It will create a setup command which youcan run to install the documentation FixPak.
v For UNIX operating systems: The documentation FixPak is acompressed tar.Z file. Uncompress and untar the file. It will create adirectory named delta_install with a script called installdocfix. Runthis script to install the documentation FixPak.
Appendix C. DB2 Universal Database technical information 121
Related tasks:
v “Copying files from the DB2 HTML Documentation CD to a Web Server”on page 122
Related reference:
v “Overview of DB2 Universal Database technical information” on page 105
Copying files from the DB2 HTML Documentation CD to a Web Server
The entire DB2 information library is delivered to you on the DB2 HTMLDocumentation CD, so you can install the library on a Web server for easieraccess. Simply copy to your Web server the documentation for the languagesthat you want.
Procedure:
To copy files from the DB2 HTML Documentation CD to a Web server, use theappropriate path:v For Windows operating systems:
E:\Program Files\sqllib\doc\htmlcd\%L\*.*
where E represents the CD-ROM drive and %L represents the languageidentifier.
v For UNIX operating systems:/cdrom:Program Files/sqllib/doc/htmlcd/%L/*.*
where cdrom represents the CD-ROM drive and %L represents the languageidentifier.
Related tasks:
v “Searching the DB2 documentation” on page 123
Related reference:
v “Supported DB2 interface languages, locales, and code pages” on page 86v “Overview of DB2 Universal Database technical information” on page 105
Troubleshooting DB2 documentation search with Netscape 4.x
Most search problems are related to the Java support provided by webbrowsers. This task describes possible workarounds.
Procedure:
122 Quick Beginnings for DB2 Connect Personal Edition
A common problem with Netscape 4.x involves a missing or misplacedsecurity class. Try the following workaround, especially if you see thefollowing line in the browser Java console:Cannot find class java/security/InvalidParameterException
v On Windows operating systems:From the DB2 HTML Documentation CD, copy the supplied x:ProgramFiles\sqllib\doc\htmlcd\locale\InvalidParameterException.class file tothe java\classes\java\security\ directory relative to your Netscapebrowser installation, where x represents the CD-ROM drive letter and localerepresents the name of the desired locale.
Note: You may have to create the java\security\ subdirectory structure.v On UNIX operating systems:
From the DB2 HTML Documentation CD, copy the supplied /cdrom/ProgramFiles/sqllib/doc/htmlcd/locale/InvalidParameterException.class file tothe java/classes/java/security/ directory relative to your Netscapebrowser installation, where cdrom represents the mount point of theCD-ROM and locale represents the name of the desired locale.
Note: You may have to create the java/security/ subdirectory structure.
If your Netscape browser still fails to display the search input window, try thefollowing:v Stop all instances of Netscape browsers to ensure that there is no Netscape
code running on the machine. Then open a new instance of the Netscapebrowser and try to start the search again.
v Purge the browser’s cache.v Try a different version of Netscape, or a different browser.
Related tasks:
v “Searching the DB2 documentation” on page 123
Searching the DB2 documentation
To search DB2’s documentation, you need Netscape 6.1 or higher, orMicrosoft’s Internet Explorer 5 or higher. Ensure that your browser’s Javasupport is enabled.
A pop-up search window opens when you click the search icon in thenavigation toolbar of the Information Center accessed from a browser. If youare using the search for the first time it may take a minute or so to load intothe search window.
Restrictions:
Appendix C. DB2 Universal Database technical information 123
The following restrictions apply when you use the documentation search:v Boolean searches are not supported. The boolean search qualifiers and and
or will be ignored in a search. For example, the following searches wouldproduce the same results:– servlets and beans– servlets or beans
v Wildcard searches are not supported. A search on java* will only look forthe literal string java* and would not, for example, find javadoc.
In general, you will get better search results if you search for phrases insteadof single words.
Procedure:
To search the DB2 documentation:1. In the navigation toolbar, click Search.2. In the top text entry field of the Search window, enter two or more terms
related to your area of interest and click Search. A list of topics ranked byaccuracy displays in the Results field.Entering more terms increases the precision of your query while reducingthe number of topics returned from your query.
3. In the Results field, click the title of the topic you want to read. The topicdisplays in the content frame.
Note: When you perform a search, the first result is automatically loaded intoyour browser frame. To view the contents of other search results, clickon the result in results lists.
Related tasks:
v “Troubleshooting DB2 documentation search with Netscape 4.x” on page122
Online DB2 troubleshooting information
With the release of DB2® UDB Version 8, there will no longer be aTroubleshooting Guide. The troubleshooting information once contained in thisguide has been integrated into the DB2 publications. By doing this, we areable to deliver the most up-to-date information possible. To find informationon the troubleshooting utilities and functions of DB2, access the DB2Information Center from any of the tools.
Refer to the DB2 Online Support site if you are experiencing problems andwant help finding possible causes and solutions. The support site contains a
124 Quick Beginnings for DB2 Connect Personal Edition
large, constantly updated database of DB2 publications, TechNotes, APAR(product problem) records, FixPaks, and other resources. You can use thesupport site to search through this knowledge base and find possible solutionsto your problems.
Access the Online Support site atwww.ibm.com/software/data/db2/udb/winos2unix/support, or by clickingthe Online Support button in the DB2 Information Center. Frequentlychanging information, such as the listing of internal DB2 error codes, is nowalso available from this site.
Related concepts:
v “DB2 Information Center for topics” on page 127
Related tasks:
v “Finding product information by accessing the DB2 Information Centerfrom the administration tools” on page 118
Accessibility
Accessibility features help users with physical disabilities, such as restrictedmobility or limited vision, to use software products successfully. These are themajor accessibility features in DB2® Universal Database Version 8:v DB2 allows you to operate all features using the keyboard instead of the
mouse. See “Keyboard Input and Navigation”.v DB2 enables you customize the size and color of your fonts. See “Accessible
Display” on page 126.v DB2 allows you to receive either visual or audio alert cues. See “Alternative
Alert Cues” on page 126.v DB2 supports accessibility applications that use the Java™ Accessibility API.
See “Compatibility with Assistive Technologies” on page 126.v DB2 comes with documentation that is provided in an accessible format.
See “Accessible Documentation” on page 126.
Keyboard Input and Navigation
Keyboard InputYou can operate the DB2 Tools using only the keyboard. You can use keys orkey combinations to perform most operations that can also be done using amouse.
Appendix C. DB2 Universal Database technical information 125
Keyboard FocusIn UNIX-based systems, the position of the keyboard focus is highlighted,indicating which area of the window is active and where your keystrokes willhave an effect.
Accessible DisplayThe DB2 Tools have features that enhance the user interface and improveaccessibility for users with low vision. These accessibility enhancementsinclude support for customizable font properties.
Font SettingsThe DB2 Tools allow you to select the color, size, and font for the text inmenus and dialog windows, using the Tools Settings notebook.
Non-dependence on ColorYou do not need to distinguish between colors in order to use any of thefunctions in this product.
Alternative Alert CuesYou can specify whether you want to receive alerts through audio or visualcues, using the Tools Settings notebook.
Compatibility with Assistive TechnologiesThe DB2 Tools interface supports the Java Accessibility API enabling use byscreen readers and other assistive technologies used by people withdisabilities.
Accessible DocumentationDocumentation for the DB2 family of products is available in HTML format.This allows you to view documentation according to the display preferencesset in your browser. It also allows you to use screen readers and otherassistive technologies.
DB2 tutorials
The DB2® tutorials help you learn about various aspects of DB2 UniversalDatabase. The tutorials provide lessons with step-by-step instructions in theareas of developing applications, tuning SQL query performance, workingwith data warehouses, managing metadata, and developing Web servicesusing DB2.
Before you begin:
Before you can access these tutorials using the links below, you must installthe tutorials from the DB2 HTML Documentation CD-ROM.
126 Quick Beginnings for DB2 Connect Personal Edition
If you do not want to install the tutorials, you can view the HTML versions ofthe tutorials directly from the DB2 HTML Documentation CD. PDF versions ofthese tutorials are also available on the DB2 PDF Documentation CD.
Some tutorial lessons use sample data or code. See each individual tutorial fora description of any prerequisites for its specific tasks.
DB2 Universal Database tutorials:
If you installed the tutorials from the DB2 HTML Documentation CD-ROM,you can click on a tutorial title in the following list to view that tutorial.
Business Intelligence Tutorial: Introduction to the Data Warehouse CenterPerform introductory data warehousing tasks using the DataWarehouse Center.
Business Intelligence Tutorial: Extended Lessons in Data WarehousingPerform advanced data warehousing tasks using the Data WarehouseCenter. (Not provided on CD. You can download this tutorial from theDownloads section of the Business Intelligence Solutions Web site athttp://www.ibm.com/software/data/bi/.)
Development Center Tutorial for Video Online using Microsoft® Visual BasicBuild various components of an application using the DevelopmentCenter Add-in for Microsoft Visual Basic.
Information Catalog Center TutorialCreate and manage an information catalog to locate and use metadatausing the Information Catalog Center.
Video Central for e-business TutorialDevelop and deploy an advanced DB2 Web Services application usingWebSphere® products.
Visual Explain TutorialAnalyze, optimize, and tune SQL statements for better performanceusing Visual Explain.
DB2 Information Center for topics
The DB2® Information Center gives you access to all of the information youneed to take full advantage of DB2 Universal Database™ and DB2 Connect™
in your business. The DB2 Information Center also documents major DB2features and components including replication, data warehousing, theInformation Catalog Center, Life Sciences Data Connect, and DB2 extenders.
The DB2 Information Center accessed from a browser has the followingfeatures:
Appendix C. DB2 Universal Database technical information 127

Regularly updated documentationKeep your topics up-to-date by downloading updated HTML.
SearchSearch all of the topics installed on your workstation by clickingSearch in the navigation toolbar.
Integrated navigation treeLocate any topic in the DB2 library from a single navigation tree. Thenavigation tree is organized by information type as follows:v Tasks provide step-by-step instructions on how to complete a goal.v Concepts provide an overview of a subject.v Reference topics provide detailed information about a subject,
including statement and command syntax, message help,requirements.
Master indexAccess the information in topics and tools help from one masterindex. The index is organized in alphabetical order by index term.
Master glossaryThe master glossary defines terms used in the DB2 InformationCenter. The glossary is organized in alphabetical order by glossaryterm.
Related tasks:
v “Finding topics by accessing the DB2 Information Center from a browser”on page 116
v “Finding product information by accessing the DB2 Information Centerfrom the administration tools” on page 118
v “Updating the HTML documentation installed on your machine” on page120
128 Quick Beginnings for DB2 Connect Personal Edition
Appendix D. Notices
IBM may not offer the products, services, or features discussed in thisdocument in all countries. Consult your local IBM representative forinformation on the products and services currently available in your area. Anyreference to an IBM product, program, or service is not intended to state orimply that only that IBM product, program, or service may be used. Anyfunctionally equivalent product, program, or service that does not infringeany IBM intellectual property right may be used instead. However, it is theuser’s responsibility to evaluate and verify the operation of any non-IBMproduct, program, or service.
IBM may have patents or pending patent applications covering subject matterdescribed in this document. The furnishing of this document does not giveyou any license to these patents. You can send license inquiries, in writing, to:
IBM Director of LicensingIBM CorporationNorth Castle DriveArmonk, NY 10504-1785U.S.A.
For license inquiries regarding double-byte (DBCS) information, contact theIBM Intellectual Property Department in your country/region or sendinquiries, in writing, to:
IBM World Trade Asia CorporationLicensing2-31 Roppongi 3-chome, Minato-kuTokyo 106, Japan
The following paragraph does not apply to the United Kingdom or anyother country/region where such provisions are inconsistent with local law:INTERNATIONAL BUSINESS MACHINES CORPORATION PROVIDES THISPUBLICATION “AS IS” WITHOUT WARRANTY OF ANY KIND, EITHEREXPRESS OR IMPLIED, INCLUDING, BUT NOT LIMITED TO, THEIMPLIED WARRANTIES OF NON-INFRINGEMENT, MERCHANTABILITY,OR FITNESS FOR A PARTICULAR PURPOSE. Some states do not allowdisclaimer of express or implied warranties in certain transactions; therefore,this statement may not apply to you.
This information could include technical inaccuracies or typographical errors.Changes are periodically made to the information herein; these changes willbe incorporated in new editions of the publication. IBM may make
© Copyright IBM Corp. 1993-2002 129
improvements and/or changes in the product(s) and/or the program(s)described in this publication at any time without notice.
Any references in this information to non-IBM Web sites are provided forconvenience only and do not in any manner serve as an endorsement of thoseWeb sites. The materials at those Web sites are not part of the materials forthis IBM product, and use of those Web sites is at your own risk.
IBM may use or distribute any of the information you supply in any way itbelieves appropriate without incurring any obligation to you.
Licensees of this program who wish to have information about it for thepurpose of enabling: (i) the exchange of information between independentlycreated programs and other programs (including this one) and (ii) the mutualuse of the information that has been exchanged, should contact:
IBM Canada LimitedOffice of the Lab Director8200 Warden AvenueMarkham, OntarioL6G 1C7CANADA
Such information may be available, subject to appropriate terms andconditions, including in some cases payment of a fee.
The licensed program described in this document and all licensed materialavailable for it are provided by IBM under terms of the IBM CustomerAgreement, IBM International Program License Agreement, or any equivalentagreement between us.
Any performance data contained herein was determined in a controlledenvironment. Therefore, the results obtained in other operating environmentsmay vary significantly. Some measurements may have been made ondevelopment-level systems, and there is no guarantee that thesemeasurements will be the same on generally available systems. Furthermore,some measurements may have been estimated through extrapolation. Actualresults may vary. Users of this document should verify the applicable data fortheir specific environment.
Information concerning non-IBM products was obtained from the suppliers ofthose products, their published announcements, or other publicly availablesources. IBM has not tested those products and cannot confirm the accuracyof performance, compatibility, or any other claims related to non-IBMproducts. Questions on the capabilities of non-IBM products should beaddressed to the suppliers of those products.
130 Quick Beginnings for DB2 Connect Personal Edition
All statements regarding IBM’s future direction or intent are subject to changeor withdrawal without notice, and represent goals and objectives only.
This information may contain examples of data and reports used in dailybusiness operations. To illustrate them as completely as possible, the examplesinclude the names of individuals, companies, brands, and products. All ofthese names are fictitious, and any similarity to the names and addresses usedby an actual business enterprise is entirely coincidental.
COPYRIGHT LICENSE:
This information may contain sample application programs, in sourcelanguage, which illustrate programming techniques on various operatingplatforms. You may copy, modify, and distribute these sample programs inany form without payment to IBM for the purposes of developing, using,marketing, or distributing application programs conforming to the applicationprogramming interface for the operating platform for which the sampleprograms are written. These examples have not been thoroughly tested underall conditions. IBM, therefore, cannot guarantee or imply reliability,serviceability, or function of these programs.
Each copy or any portion of these sample programs or any derivative workmust include a copyright notice as follows:
© (your company name) (year). Portions of this code are derived from IBMCorp. Sample Programs. © Copyright IBM Corp. _enter the year or years_. Allrights reserved.
Appendix D. Notices 131
Trademarks
The following terms are trademarks of International Business MachinesCorporation in the United States, other countries, or both, and have been usedin at least one of the documents in the DB2 UDB documentation library.
ACF/VTAMAISPOAIXAIXwindowsAnyNetAPPNAS/400BookManagerC Set++C/370CICSDatabase 2DataHubDataJoinerDataPropagatorDataRefresherDB2DB2 ConnectDB2 ExtendersDB2 OLAP ServerDB2 Universal DatabaseDistributed Relational
Database ArchitectureDRDAeServerExtended ServicesFFSTFirst Failure Support TechnologyIBMIMSIMS/ESAiSeries
LAN DistanceMVSMVS/ESAMVS/XANet.DataNetViewOS/390OS/400PowerPCpSeriesQBICQMFRACFRISC System/6000RS/6000S/370SPSQL/400SQL/DSSystem/370System/390SystemViewTivoliVisualAgeVM/ESAVSE/ESAVTAMWebExplorerWebSphereWIN-OS/2z/OSzSeries
The following terms are trademarks or registered trademarks of othercompanies and have been used in at least one of the documents in the DB2UDB documentation library:
Microsoft, Windows, Windows NT, and the Windows logo are trademarks ofMicrosoft Corporation in the United States, other countries, or both.
Intel and Pentium are trademarks of Intel Corporation in the United States,other countries, or both.
132 Quick Beginnings for DB2 Connect Personal Edition
Java and all Java-based trademarks are trademarks of Sun Microsystems, Inc.in the United States, other countries, or both.
UNIX is a registered trademark of The Open Group in the United States andother countries.
Other company, product, or service names may be trademarks or servicemarks of others.
Appendix D. Notices 133

134 Quick Beginnings for DB2 Connect Personal Edition
Index
Aaccessibility
features 125adding
databases 50, 64application development
using ODBC 75using the DB2 Application
Development Client 9
BBiDi
language support 94
CCCSID (coded character set
identifier)bidirectional languages 94bidirectional support
required attributes 92CLI (Call Level Interface)
environmental setup 77client profiles
configuring using the importfunction 69
creating using the exportfunction 68
export function 68import function 68overview 68
code pagesconversion
exceptions 94supported 86
communication protocolsDRDA host access
configuration 35Configuration Assistant (CA)
configuring a connection to thehost database server 49
configuring a connection to theiSeries database server 49
configuring a databaseconnection
general 50, 64configuring client profiles 69creating client profiles 68
configuringconnection, using the
Configuration Assistant 49DB2 Connect Personal
Edition 10connecting
to a database using a profile 51,65
connectionsConfiguration Assistant 8direct to host or iSeries
database 5DRDA hosts through
communications server 35overview 8
Control Centermultisite updates 56
Ddata
conversionscharacter 94
database connectionsconfiguring
using a profile 51, 65using Discovery 52, 66using the Configuration
Assistant (CA) 50, 64testing 53, 67
database objectsnaming rules
NLS 102Unicode 103
databasesconfiguring 53, 67
DB2code pages 86interface languages 86locales 86
DB2 Application Development Clientoverview 9
DB2 CD-ROMmounting
on Linux 26DB2 clients
overview 8DB2 Connect
non-Administratorinstallation 21
DB2 Connect (continued)preparing DB2 for VSE & VM for
connections 45DB2 Connect Enterprise Edition
product description 3DB2 Connect PE
product description 3DB2 Connect Personal Edition
configuring 10disk requirements 25installation requirements
Windows 15installing
Linus 27overview 10Windows 19
memory requirementsLinux 24Windows 16
DB2 documentation searchusing Netscape 4.x 122
DB2 Information Center 127DB2 objects
naming rules 97DB2 Setup wizard
language identifiers 91DB2 tutorials 126DB2 Universal Database for OS/390
and z/OSupdating system tables 34
DBCS (double-byte character set)naming rules 102
directory schemaextending
on Windows 2000 andWindows .NET 18
disability 125discovery feature
configuring a databaseconnection 52, 66
disk requirementsDB2 Connect Personal
Edition 17, 25distributed unit of work
multisite updates 55supported servers 55two-phase commit 55
© Copyright IBM Corp. 1993-2002 135
distribution requirementsLinux
32-bit 2364-bit 23
Eexport function
creating client profiles 68exporting
profiles 71
Ffederated databases
object naming rules 100fixed disks
hardware requirements 17, 25
Ggroups
naming rules 99
Hhardware requirements 25
fixed disk 17
Iimport function
configuring client profiles 69importing
profiles 71installing
client 17, 25DB2 Connect Personal
Edition 10server 17, 25
interface languages 86changing
on UNIX 86on Windows 85
iSeriesconfiguring DB2 Connect 43configuring DB2 for DB2
Connect 43DSPNETA 43DSPRDBDIRE 43WRKLIND 43
Llanguage identifiers, DB2 Setup
wizard 91languages
bidirectional support 94Linux
installingDB2 Connect Personal
Edition 27
Linux (continued)installing (continued)
mounting the CD-ROM 26memory requirements
DB2 Connect PersonalEdition 24
localessupported 86
Mmanually adding databases 50, 64Multisite Update Wizard 56multisite updates
Control Center 56distributed unit of work
(DUOW) 55enabling 55sync point manager 58testing 57
Nnaming conventions
general 97naming rules
delimited identifiers and objectnames 99
for DB2 objects 97for federated database
objects 100for users, userIDs and
groups 99for workstations 101national languages 102schema names 100Unicode 103
national language support (NLS)bidirectional CCSID support 92converting character data 94
OODBC (open database connectivity)
setting up UNIXenvironment 80
onlinehelp, accessing 114
ordering DB2 books 114OS/390
configuring DB2 UniversalDatabase 34
Ppasswords
updating 101verifying 101
printed books, ordering 114product packaging 3
profileexporting 71importing 71
Sschema names
description 100settings
CLI environmentrun-time support 77Windows 78
SQLkeywords 99
sync point manager (SPM)scenarios 58
TTCP/IP
configurationhost connections 5, 35
DB2 UDB for OS/390 and z/OSconfiguration 33
territory codespage support 94
transaction processing monitorsmultisite updates 55
transactionsdistributed
supported servers 55multisite updates 55
troubleshootingDB2 documentation search 122online information 124
tutorials 126two-phase commit
enabling 55
UUnicode (UCS-2)
identifiers 103naming rules 103
units of work (UOW)distributed 55
UNIXchanging the DB2 interface
language 86setting up ODBC
environment 80user IDs
naming rules 99
VVSE and VM for connections
preparing DB2 from DB2Connect 45
136 Quick Beginnings for DB2 Connect Personal Edition

VTAMpreparing OS/390 or z/OS for
DB2 Connect 33sample definitions 38sample logon mode table
entry 38sample PU and LU
definitions 38
WWindows
changing the DB2 interfacelanguage 85
CLI environment 78installation requirements
DB2 Connect PersonalEdition 15
installingDB2 Connect Personal
Edition 19DB2 Connect,
non-Administrator 21memory requirements
DB2 Connect PersonalEdition 16
setting up CLI environment 78Windows .NET, extending the
directory schema 18Windows 2000
extending the directoryschema 18
wizardsMultisite Update 56
workstations(nname), naming rules 101
Zz/OS
configuring DB2 UniversalDatabase 34
Index 137

138 Quick Beginnings for DB2 Connect Personal Edition
Contacting IBM
In the United States, call one of the following numbers to contact IBM:v 1-800-237-5511 for customer servicev 1-888-426-4343 to learn about available service optionsv 1-800-IBM-4YOU (426-4968) for DB2 marketing and sales
In Canada, call one of the following numbers to contact IBM:v 1-800-IBM-SERV (1-800-426-7378) for customer servicev 1-800-465-9600 to learn about available service optionsv 1-800-IBM-4YOU (1-800-426-4968) for DB2 marketing and sales
To locate an IBM office in your country or region, check IBM’s Directory ofWorldwide Contacts on the web at www.ibm.com/planetwide
Product information
Information regarding DB2 Universal Database products is available bytelephone or by the World Wide Web atwww.ibm.com/software/data/db2/udb
This site contains the latest information on the technical library, orderingbooks, client downloads, newsgroups, FixPaks, news, and links to webresources.
If you live in the U.S.A., then you can call one of the following numbers:v 1-800-IBM-CALL (1-800-426-2255) to order products or to obtain general
information.v 1-800-879-2755 to order publications.
For information on how to contact IBM outside of the United States, go to theIBM Worldwide page at www.ibm.com/planetwide
© Copyright IBM Corp. 1993-2002 139
����
Part Number: CT16ANA
Printed in U.S.A.
GC09-4834-00
(1P)
P/N:
CT16ANA
Spin
ein
form
atio
n:
��
�IB
M®
DB
2Co
nnec
t™
Qui
ckBe
ginn
ings
for
DB
2Co
nnec
tPer
sona
lEd
ition
Vers
ion
8