quick installation guide -...
TRANSCRIPT

V1
Quick Installation Guide
W150NRWireless 150 N Home Router
Guía de instalación rápida
1. Before You Start
2. Hardware Installation 2
3. Configure the Wireless Router 4
1
Version 05.13.2009
Contents
English 1
Troubleshooting 8
Quick Installation Guide - KEEBOX W150NR Version 08.16.2010
Wireless Tips 10

!A computer with a wired or wireless network adapter properly installed!Web Browser: Internet Explorer (6.0 or higher)!Broadband Internet!Installed Cable or DSL Modem
!W150NR!CD-ROM (User's Guide)!Multi-Language Quick Installation Guide!1 x 2dBi detachable antenna!Cat.5 Ethernet Cable (1.5m/4.9ft)!Power Adapter (5V DC, 1.2A)
1
Installation Requirements
Verify Package Contents
Before You Start
1 English
Gather all information related to your Internet connection before you start. If necessary, contact your Internet Service Provider (ISP).
!DHCP: Automatically obtains IP Address from your ISP.!PPPoE: Requires Username and Password login information from your ISP.!PPTP: Requires account information with Username and Password.
Hardware Installation
Quick Installation Guide - KEEBOX W150NR English 2
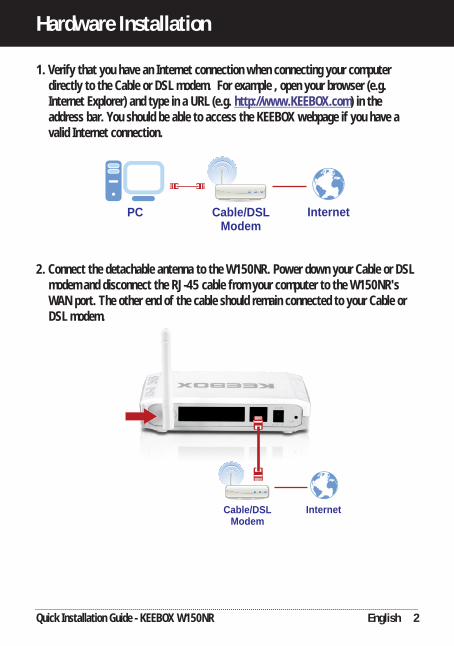
1. Verify that you have an Internet connection when connecting your computer directly to the Cable or DSL modem. For example , open your browser (e.g. Internet Explorer) and type in a URL (e.g. ) in the address bar. You should be able to access the KEEBOX webpage if you have a valid Internet connection.
http://www.KEEBOX.com
Cable/DSLModem
InternetPC
2. Connect the detachable antenna to the W150NR. Power down your Cable or DSL modem and disconnect the RJ-45 cable from your computer to the W150NR's WAN port. The other end of the cable should remain connected to your Cable or DSL modem.
Cable/DSLModem
Internet

3
Troubleshooting
3 English
3. Connect one end of the provided RJ-45 cable to the W150NR's LAN port. Connect the other end of the cable to the computer's Ethernet port. Connect the Power Adapter to the W150NR and then to a power outlet. Power up your Cable or DSL modem.
Cable/DSLModem
InternetPC
PowerOutlet
4. Verify that the following panel lights are on: Power (Solid), WAN (Blinking), WLAN (Blinking), and LAN (Blinking)
Power
WAN
WLAN
LAN

Configure the Wireless Router
It is recommended that you configure the Wireless Router from a wired computer.
1. Open your web browser, type in the Address bar, and then press Enter.
http://192.168.10.1
2. Enter the User Name and Password, and then click Login. User Name: admin
By default, there is no password. Note: User name is case sensitive.
3. Click Wizard.
Quick Installation Guide - KEEBOX W150NR English 4

5. Configure the settings based on information provided by your ISP. Follow the wizard instructions to complete the configuration.
Each Internet Connection type may have different options.
!DHCP: Automatically obtains IP Address from your ISP.!PPPoE: Requires Username and Password login information from your ISP.!PPTP: Requires account information with Username and Password.
5 English
4. Click Next.
Troubleshooting
Quick Installation Guide - KEEBOX W150NR English 6
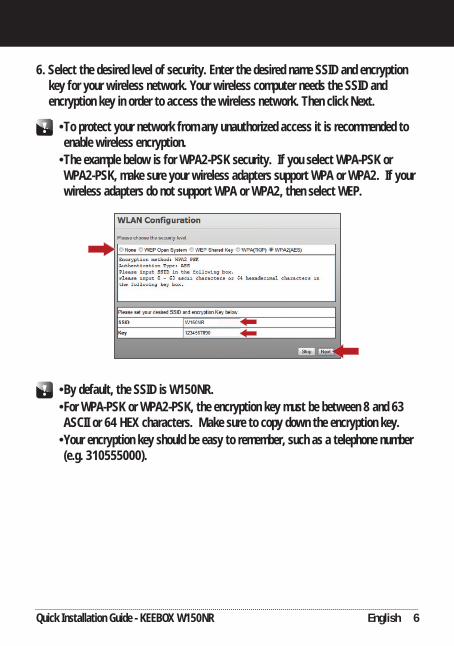
!To protect your network from any unauthorized access it is recommended to enable wireless encryption.
!The example below is for WPA2-PSK security. If you select WPA-PSK or WPA2-PSK, make sure your wireless adapters support WPA or WPA2. If your wireless adapters do not support WPA or WPA2, then select WEP.
6. Select the desired level of security. Enter the desired name SSID and encryption key for your wireless network. Your wireless computer needs the SSID and encryption key in order to access the wireless network. Then click Next.
!
!For WPA-PSK or WPA2-PSK, the encryption key must be between 8 and 63 ASCII or 64 HEX characters. Make sure to copy down the encryption key.
!Your encryption key should be easy to remember, such as a telephone number (e.g. 310555000).
By default, the SSID is W150NR.

8. Open up your browser and enter in a URL (e.g. ) to verify that you have Internet connection.
www.KEEBOX.com
For detailed information regarding the W150NR's configuration and advanced settings, please refer to the Troubleshooting section, User's Guide CD-ROM, or KEEBOX's website at .http://www.KEEBOX.com
Your configuration is now complete.
7 English
7. Click Apply.
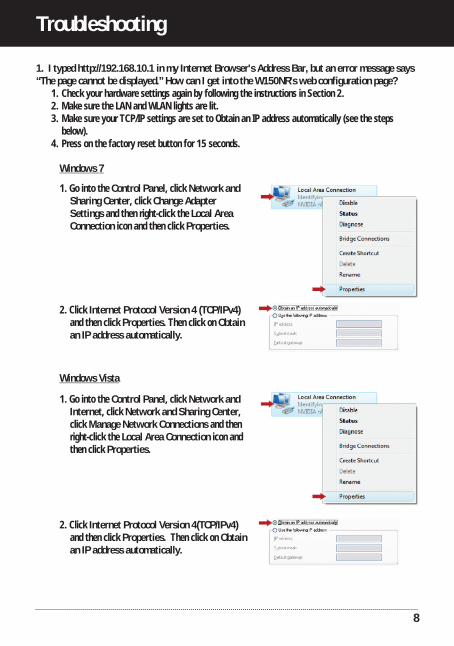
1. I typed http://192.168.10.1 in my Internet Browser's Address Bar, but an error message says “The page cannot be displayed.” How can I get into the W150NR's web configuration page?
1.2. Make sure the LAN and WLAN lights are lit. 3. Make sure your TCP/IP settings are set to Obtain an IP address automatically (see the steps
below).4. Press on the factory reset button for 15 seconds.
Check your hardware settings again by following the instructions in Section 2.
Troubleshooting
Windows 7
1. Go into the Control Panel, click Network and Sharing Center, click Change Adapter Settings and then right-click the Local Area Connection icon and then click Properties.
2. Click Internet Protocol Version 4 (TCP/IPv4) and then click Properties. Then click on Obtain an IP address automatically.
Windows Vista
1. Go into the Control Panel, click Network and Internet, click Network and Sharing Center, click Manage Network Connections and then right-click the Local Area Connection icon and then click Properties.
2. Click Internet Protocol Version 4(TCP/IPv4) and then click Properties. Then click on Obtain an IP address automatically.
8

Windows XP/2000
1. Go into the Control Panel, double-click the Network Connections icon and then right-click the Local Area Connection icon and then click Properties.
2. Click Internet Protocol (TCP/IP) and then click Properties. Then click on Obtain an IP address automatically.
2. I am not sure what type of Internet Account Type I have for my Cable/DSL connection. How do I find out?
Contact your Internet Service Provider's (ISP) support service for the correct information.
3. The Wizard does not appear. What should I do?1. Click on Wizard on the left hand side. 2. Near the top of the browser, “Pop-up blocked” message may appear. Right click on the message
and select Always Allow Pop-ups from This Site. 3. Disable your browser’s pop up blocker.
4. I went through the Wizard, but I can not get onto the Internet. What should I do?1. Verify that you can get onto the Internet with a direct connection into your modem. 2. Contact your ISP and verify all the information that you have in regards to your Internet connection
settings is correct.3. Power cycle your modem and router. Unplug the power to the modem and router. Wait 30
seconds, and then reconnect the power to the modem. Wait for the modem to fully boot up, and then reconnect the power to the router.
5. I cannot make a wireless connection to the Router. What should I do?1. Double check that the WLAN light on the Router is lit. 2. Power cycle the W150NR. Unplug the power to the W150NR. Wait 15 seconds, then plug the
power back in to the W150NR. 3. Contact the manufacturer of your wireless network adapter and make sure the wireless network
adapter is configured with the proper SSID. The default SSID is W150NR.4. Please refer to the Wireless Tips section if you continue to have wireless connectivity problems.
If you still encounter problems or have any questions regarding the W150NR, please contact KEEBOX technical support.
Quick Installation Guide - KEEBOX W150NR9

Wireless Tips
The following are some general wireless tips to help minimize the impact of interference within an environment.
Assign your network a unique SSID. Do not use anything that would be identifying like “Smith Family Network”. Choose something that you would easily identify when searching for available wireless networks.
Do not turn off the SSID broadcast. The SSID broadcast is intended to be on and turning it off can cause connectivity issues. The preferred method of securing a wireless network is to choose a strong form of encryption with a strong and varied encryption key.
Note: after setting up the SSID, encryption type and encryption key/passphrase, please make a note of them for future reference. You will need this information to connect your wireless computers to the wireless router/access point.
Change the channel. Most wireless access points and routers are defaulted to channel 6. If you have a site survey tool that will display the channels you can plan your channel selection around neighboring access points to minimize interference from them. If your site survey tool does not display the channel try using channels 1 or 11.
If using 802.11n you should be securing the network with WPA2 security.
Note: Due to Wi-Fi certification considerations if you choose WEP, WPA or WPA2-TKIP encryption this device may operate in legacy wireless mode (802.11b/g). You may not get 802.11n performance as these forms of encryption are not supported by the 802.11n specification.
Please also make sure that the wireless hardware is not placed in any type of shelving or enclosures.
Avoid stacking hardware on top of each other to prevent overheating issues. Maintain enough free space around the hardware for good ventilation and airflow. There should also be plenty of free space around the antennas to allow the wireless signal to propagate.
There are a number of other environmental factors that can impact the range of wireless devices.
1. Adjust your wireless devices so that the signal is traveling in a straight path, rather than at an angle. The more material the signal has to pass through the more signal you will lose.
2. Keep the number of obstructions to a minimum. Each obstruction can reduce the range of a wireless device. Position the wireless devices in a manner that will minimize the amount of obstructions between them.
10

3. Building materials can have a large impact on your wireless signal. In an indoor environment, try to position the wireless devices so that the signal passes through less dense material such as dry wall. Dense materials like metal, solid wood, glass or even furniture may block or degrade the signal.
4. Antenna orientation can also have a large impact on your wireless signal. Use the wireless adapter’s site survey tool to determine the best antenna orientation for your wireless devices.
5. Interference from devices that produce RF (radio frequency) noise can also impact your signal. Position your wireless devices away from anything that generates RF noise, such as microwaves, HAM radios, Walkie-Talkies and baby monitors.
6. Any device operating on the 2.4GHz frequency will cause interference. Devices such as 2.4GHz cordless phones or other wireless remotes operating on the 2.4GHz frequency can potentially drop the wireless signal. Although the phone may not be in use, the base can still transmit wireless signal. Move the phone’s base station as far away as possible from your wireless devices.
If you are still experiencing low or no signal consider repositioning the wireless devices or installing additional access points. The use of higher gain antennas may also provide the necessary coverage depending on the environment.
Quick Installation Guide - KEEBOX W150NR11

Limited Warranty
KEEBOX warrants its products against defects in material and workmanship, under normal use and service, for the following lengths of time from the date of purchase.
W150NR – 1 Year WarrantyAC/DC Power Adapter, Cooling Fan, and Power Supply carry a 1 year warranty
If a product does not operate as warranted during the applicable warranty period, KEEBOX shall reserve the right, at its expense, to repair or replace the defective product or part and deliver an equivalent product or part to the customer. The repair/replacement unit's warranty continues from the original date of purchase. All products that are replaced become the property of KEEBOX. Replacement products may be new or reconditioned. KEEBOX does not issue refunds or credit. Please contact the point-of-purchase for their return policies.
KEEBOX shall not be responsible for any software, firmware, information, or memory data of customer contained in, stored on, or integrated with any products returned to KEEBOX pursuant to any warranty.
There are no user serviceable parts inside the product. Do not remove or attempt to service the product by any unauthorized service center. This warranty is voided if (i) the product has been modified or repaired by any unauthorized service center, (ii) the product was subject to accident, abuse, or improper use (iii) the product was subject to conditions more severe than those specified in the manual.
Warranty service may be obtained by contacting KEEBOX within the applicable warranty period and providing a copy of the dated proof of the purchase. Upon proper submission of required documentation a Return Material Authorization (RMA) number will be issued. An RMA number is required in order to initiate warranty service support for all KEEBOX products. Products that are sent to KEEBOX for RMA service must have the RMA number marked on the outside of return packages and sent to KEEBOX prepaid, insured and packaged appropriately for safe shipment. Customers shipping from outside of the USA and Canada are responsible for return shipping fees. Customers shipping from outside of the USA are responsible for custom charges, including but not limited to, duty, tax, and other fees.
WARRANTIES EXCLUSIVE: IF THE KEEBOX PRODUCT DOES NOT OPERATE AS WARRANTED ABOVE, THE CUSTOMER'S SOLE REMEDY SHALL BE, AT KEEBOX'S OPTION, REPAIR OR REPLACE. THE FOREGOING WARRANTIES AND REMEDIES ARE EXCLUSIVE AND ARE IN LIEU OF ALL OTHER WARRANTIES, EXPRESSED OR IMPLIED, EITHER IN FACT OR BY OPERATION OF LAW, STATUTORY OR OTHERWISE, INCLUDING WARRANTIES OF MERCHANTABILITY AND FITNESS FOR A PARTICULAR PURPOSE. KEEBOX NEITHER ASSUMES NOR AUTHORIZES ANY OTHER PERSON TO ASSUME FOR IT ANY OTHER LIABILITY IN CONNECTION WITH THE SALE, INSTALLATION MAINTENANCE OR USE OF KEEBOX'S PRODUCTS.
KEEBOX SHALL NOT BE LIABLE UNDER THIS WARRANTY IF ITS TESTING AND EXAMINATION DISCLOSE THAT THE ALLEGED DEFECT IN THE PRODUCT DOES NOT EXIST OR WAS CAUSED BY CUSTOMER'S OR ANY THIRD PERSON'S MISUSE, NEGLECT, IMPROPER INSTALLATION OR TESTING, UNAUTHORIZED ATTEMPTS TO REPAIR OR MODIFY, OR ANY OTHER CAUSE BEYOND THE RANGE OF THE INTENDED USE, OR BY ACCIDENT, FIRE, LIGHTNING, OR OTHER HAZARD.
LIMITATION OF LIABILITY: TO THE FULL EXTENT ALLOWED BY LAW KEEBOX ALSO EXCLUDES FOR ITSELF AND ITS SUPPLIERS ANY LIABILITY, WHETHER BASED IN CONTRACT OR TORT (INCLUDING NEGLIGENCE), FOR INCIDENTAL, CONSEQUENTIAL, INDIRECT, SPECIAL, OR PUNITIVE DAMAGES OF ANY KIND, OR FOR LOSS OF REVENUE OR PROFITS, LOSS OF BUSINESS, LOSS OF INFORMATION OR DATE, OR OTHER FINANCIAL LOSS ARISING OUT OF OR IN CONNECTION WITH THE SALE, INSTALLATION, MAINTENANCE, USE, PERFORMANCE, FAILURE, OR INTERRUPTION OF THE POSSIBILITY OF SUCH DAMAGES, AND LIMITS ITS LIABILITY TO REPAIR, REPLACEMENT, OR REFUND OF THE PURCHASE PRICE PAID, AT KEEBOX'S OPTION. THIS DISCLAIMER OF LIABILITY FOR DAMAGES WILL NOT BE AFFECTED IF ANY REMEDY PROVIDED HEREIN SHALL FAIL OF ITS ESSENTIAL PURPOSE.
Governing Law: This Limited Warranty shall be governed by the laws of the state of California.
Some KEEBOX products include software code written by third party developers. These codes are subject to the GNU General Public License ("GPL") or GNU Lesser General Public License ("LGPL").
Go to http://www.KEEBOX.com/gpl or http://www.KEEBOX.com Download section and look for the desired KEEBOX product to access to the GPL Code or LGPL Code. These codes are distributed WITHOUT WARRANTY and are subject to the copyrights of the developers. KEEBOX does not provide technical support for these codes. Please go to http://www.gnu.org/licenses/gpl.txt or http://www.gnu.org/licenses/lgpl.txt for specific terms of each license.
KB2010V1


CertificationsThis equipment has been tested and found to comply with FCC and CE Rules. Operation is subject to the following two conditions:(1) This device may not cause harmful interference.(2) This device must accept any interference received. Including interference that may cause
undesired operation.
NOTE: THE MANUFACTURER IS NOT RESPONSIBLE FOR ANY RADIO OR TV INTERFERENCE CAUSED BY UNAUTHORIZED MODIFICATIONS TO THIS EQUIPMENT. SUCH MODIFICATIONS COULD VOID THE USER’S AUTHORITY TO OPERATE THE EQUIPMENT.
ADVERTENCIAEn todos nuestros equipos se mencionan claramente las caracteristicas del adaptador de alimentacón necesario para su funcionamiento. El uso de un adaptador distinto al mencionado puede producir daños fisicos y/o daños al equipo conectado. El adaptador de alimentación debe operar con voltaje y frecuencia de la energia electrica domiciliaria existente en el pais o zona de instalación.
Waste electrical and electronic products must not be disposed of with household waste. Please recycle where facilities exist. Check with you Local Authority or Retailer for recycling advice.

Copyright © 2010 KEEBOX. All Rights Reserved.