quick reference card - ms office 2010 general shortcut...
TRANSCRIPT

Quick Reference Card - MS Office 2010
ISSC Leiden University | PO Box 9512 | 2300 RA Leiden | 071 527 8888 | [email protected]
General Shortcut Keys
Word / Excel / Outlook / PowerPoint
Save Ctrl + S Print Ctrl + P Copy Ctrl + C Paste Ctrl + V Undo typing Ctrl + Z Cut Ctrl + X Open Ctrl + O Close Ctrl + W New document Ctrl + N Help F1 Start of document Ctrl + Home Bold Ctrl + B End of document Ctrl + End Italic Ctrl + I Underline Ctrl + U Spell check F7 Select all Ctrl + A Search Ctrl + F Zoom in/out Ctrl + Scroll wheel
Excel
Select entire row Shift + Space Edit cell F2 Select column Ctrl + Space Hide row Ctrl + 0 Delete cell contents Delete Insert AutoSum ALT + =
Word
Align left Ctrl + L Heading 1 Ctrl + Alt + 1 Align right Ctrl + R Heading 2 Ctrl + Alt + 2 Centre text Ctrl + E Heading 3 Ctrl + Alt + 3 Justify Ctrl + J Heading 4 Ctrl + Alt + 4 New paragraph Ctrl + Enter New line Shift + Enter
Outlook
Send/receive mail F9 Reply Ctrl + R Reply to all Alt + L Address book Ctrl + Shift + B
PowerPoint
Add new slide Ctrl + M Presentation Help F1 (in presentation mode)
1. Quick Access Toolbar 2. Backstage 3. The Ribbon 4. Group 5. Open dialogue window
Shortcut Keys Shortcut keys allow you to perform actions by simply pressing a few keys. You can perform most actions with between two and five keystrokes. You use a shortcut key as follows: Press Alt. The keyboard shortcuts are shown for each action that is available in the current view. Press the letter that is shown in the keyboard shortcut for the action required.
Quick Access Toolbar The Quick Access Toolbar is a toolbar that you can customise by placing regularly used commands there. You do this by clicking on the arrow next to the toolbar and selecting a command. You can add more commands by clicking on More Commands… selecting the command you require and clicking the Add>> button.
If you don’t want the Quick Access Toolbar in its current location, you can move it elsewhere. You do this by clicking on the list arrow next to the Toolbar and by then clicking Show Below the Ribbon.
Compatibility Mode If you open a file in the old format, MS Office will open it in the compatibility mode. This means that specific MS Office options will be disabled so that no functionality is used that is not supported in older versions of MS Office.
If you open an old file format and wish to use the new MS Office 2010 functionality, click on File and in the Info category click on
the Convert button.
Save as PDF In many of the Office 2010 programmes you have the possibility to convert the open document into PDF format without needing another programme.
Click the File tab and under the option Save & Send, select Create PDF/XPS Document. Choose a location to save the PDF document and click the Publish button. In order to send a copy of the active document in PDF format: on the File tab, select Save & Send and choose the Send Using E-mail option. Click the Send as PDF button.
2
3
1
4
5

Quick Reference Card - MS Word 2010
ISSC Leiden University | PO Box 9512 | 2300 RA Leiden | 071 527 8888 | [email protected]
Word
Mini Toolbar When you select a piece of text, a mini toolbar appears in which a number of frequently used layout options can be applied:
Applying a style Select the text and in the Styles group choose the style you require. For example, Heading 1 for a chapter title and Heading 2 for the title of a section.
Automatic table of contents If you have given all headers and texts the correct style you can generate an automatic table of contents. You do this by going to the References tab in the ribbon and then clicking on Table of Contents.
Navigation pane Use the navigation pane to navigate quickly through a document, either per header (the correct header styles need to be used) or per page. In the View tab, tick the Navigation Pane option.
Navigation Click on a specific title to jump to the corresponding place in the document. Changing the order Drag a heading in the navigation pane to move this and the associated text. Searching Click in the Search Document field and type in the search term. Word will already begin searching while you are typing. The results will be marked yellow in the text.
Table Inserting a table On the Insert tab click the Table button. Select the required number of rows and columns in the box that appears. Quick Tables Pre-formatted tables can be saved as a style that can then be used in other documents. Create a table with set values and select the desired formatting. On the Insert tab, click the Table button, select Quick Tables and then select Save.
Selection To Quick Tables Gallery. In the Create New Building Block dialogue box enter the name and description of the table. Click OK to save this as a new table style. Inserting or deleting a row or column. In Table Tools, go to the Layout tab on the ribbon and then use the following buttons:
Please note: the Table Tools are only visible if you have clicked inside the table.
Headers and footers Adding a header or footer Click the Insert tab on the ribbon and click Header or Footer. You can then choose the style you require. This replaces the existing headers and footers. Modifying a header or footer Double-click in the margin at the top or bottom of the document. The header and footer will become active. Double-click the text in the document to restore it.
Adding page numbers Click the Insert tab on the ribbon and click Page Number.
Inserting an image Click the Insert tab on the ribbon and click Picture (select it yourself from the hard disk) or Clip Art (standard images).
Inserting a Symbol On the Insert tab you will find the Symbol button. This shows the last twenty symbols you used. Click More Symbols… in the context menu to view a dialogue box with all the symbols.

Quick Reference Card - MS Excel 2010
ISSC Leiden University | PO Box 9512 | 2300 RA Leiden | 071 527 8888 | [email protected]
Excel
Format as table Format as Table can be found on the Home tab. The selected cells will be converted into a table with a quick filter in the uppermost row. If the cell range is uninterrupted, Excel determines the range itself. If you want to convert the table into a normal range, you can do this in the Table Tools tab in the ribbon using the Convert to Range option.
Applying a filter On the Data tab, in the Sort & Filter group, click the Filter button. A filter is then applied.
Conditional Formatting Conditional format sets a cell’s format according to certain conditions. This means, for example, that data can be displayed with alternating shades or that cells with different values can be highlighted. Select the cells to format. On the Home tab click the Conditional Formatting button and choose the category and command.
Freeze Row/Column Select the cell below and to the right of the rows and columns you want to freeze. Go to the View tab and in the Window group click Freeze Panes. Select the first option: Freeze Panes.
Adding a header or footer Go to the Insert tab and in the Text group click Header & Footer. You can then select specific names in the Header & Footer Elements group.
Worksheets Add a new worksheet To add a new worksheet click Shift + F11. Delete a worksheet Right-click the worksheet and select Delete. Renaming a sheet Right-click the worksheet and select Rename. Moving or copying a worksheet Click and drag the worksheet to move it. To copy it, hold down Ctrl and then drag the worksheet. Protect or share a sheet
Click the Review tab and go to the Changes group to protect or share the sheet.
Sparklines Sparklines are new to Microsoft Excel 2010. They are tiny charts that fit into a cell in a worksheet and display the data visually. Use sparklines to indicate trends in a series of values, such as seasonal increases or decreases, economic cycles or to highlight minimum and maximum values.
Select an empty cell or group of empty cells in which you wish to insert one or more sparklines. On the Insert tab, in the Sparklines group, click the type of sparkline you want to create: Line, Column or Win/Loss.
In the Data Range box type (or select) the range of cells that contain the data upon which you want to base the sparklines.
Typing in commands directly When you type in a command, all the possible commands appear after you have typed in the ‘=’ sign and the first letter. Once you have made your selection the system shows which arguments need to be entered.
Quick Reference Card – MS Outlook 2010
ISSC Leiden University | PO Box 9512 | 2300 RA Leiden | 071 527 8888 | [email protected]
Outlook
Change screen view Minimise the ribbon
Click (top right) or Ctrl + F1.
Click this button again to display the ribbon again. Minimise the navigation pane and To-Do bar. To create more space, the Navigation Pane on the left of the screen and the To-Do bar can be minimised. Click the button shown on the right. More settings can be found on the View tab, in the Layout group.
Signature Open a new message. On the Message tab go to the Include group and click Signature followed by Signatures....
On the E-mail Signature tab click New. Type a name for the signature and then click OK.
In the Edit Signature box, type the text that you wish to include in the signature and click Save.
Out of office assistant Click File and click Automatic Replies. In the Automatic Replies dialogue box, click the option I am currently out of the office. In the AutoReply only once to each sender with the following text: field type the message you want to send when you are absent. Click OK.
Searching In the navigation pane click the folder in which you wish to search. In the Search field, click the search term and press ENTER. Items with the typed text will be displayed and the search term highlighted. Type more items if you wish to refine the search term. Click in the Search tab if you wish to expand the search to include all folders or all Outlook items.
Shared mailbox To add a shared mailbox, right-click the e-mail address and select Data File Properties.
Click the Advanced button and then the Advanced tab. Click the Add.. button and type the name of the shared mailbox. Click OK in all open dialogue boxes (3x). The shared mailbox will now appear in the folder list.
Calendar groups If you have a set of calendars that you often view together, for example of your immediate colleagues or project team, you can create calendar groups so that you can see the combined schedules at a glance. Creating a calendar group In the calendar on the Home tab, click the Calendar Groups button and select Create New Calendar Group. Type a name for the new group and click OK. Click in the Search field and type the name you wish to add. Select the name that you want to add from the list and then click Group Members and OK. View a calendar group Select the check box in front of the name of the Calendar Group or click the name itself; all associated calendars will be displayed.
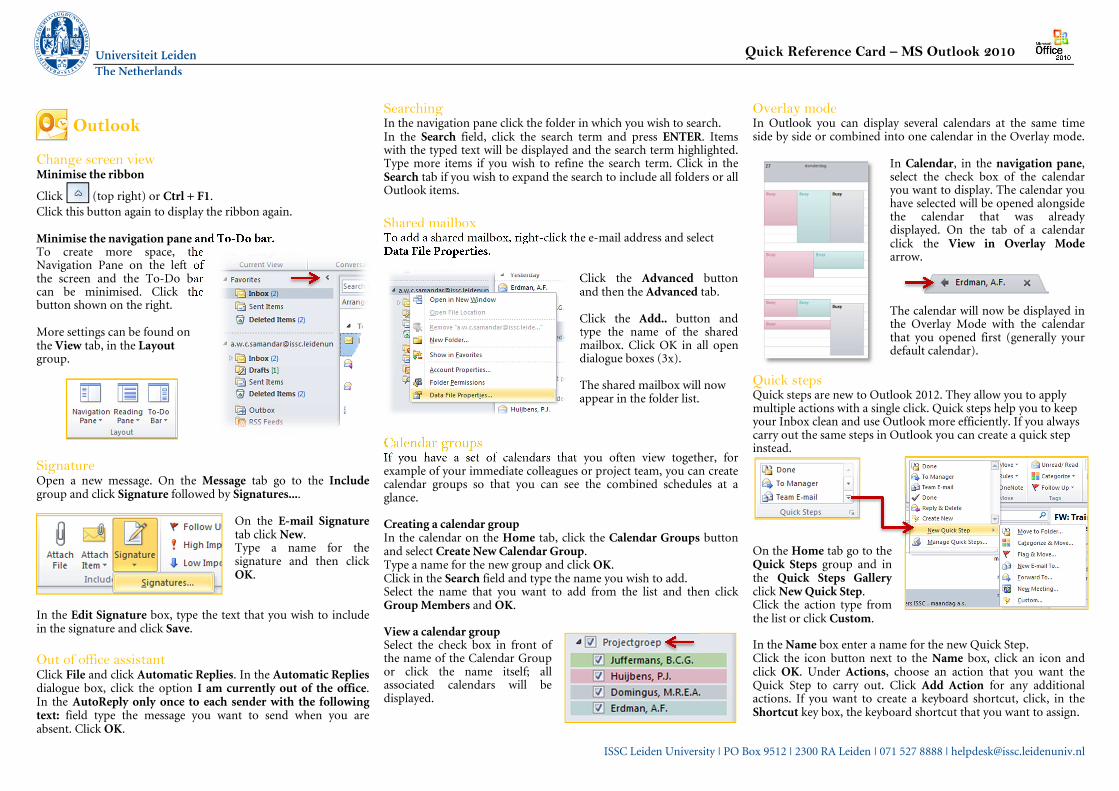
Overlay mode In Outlook you can display several calendars at the same time side by side or combined into one calendar in the Overlay mode.
In Calendar, in the navigation pane, select the check box of the calendar you want to display. The calendar you have selected will be opened alongside the calendar that was already displayed. On the tab of a calendar click the View in Overlay Mode arrow.
The calendar will now be displayed in the Overlay Mode with the calendar that you opened first (generally your default calendar).
Quick steps Quick steps are new to Outlook 2012. They allow you to apply multiple actions with a single click. Quick steps help you to keep your Inbox clean and use Outlook more efficiently. If you always carry out the same steps in Outlook you can create a quick step instead.
On the Home tab go to the Quick Steps group and in the Quick Steps Gallery click New Quick Step. Click the action type from the list or click Custom. In the Name box enter a name for the new Quick Step. Click the icon button next to the Name box, click an icon and click OK. Under Actions, choose an action that you want the Quick Step to carry out. Click Add Action for any additional actions. If you want to create a keyboard shortcut, click, in the Shortcut key box, the keyboard shortcut that you want to assign.

Quick Reference Card – MS PowerPoint 2010
ISSC Leiden University | PO Box 9512 | 2300 RA Leiden | 071 527 8888 | [email protected]
PowerPoint
Presenter View This view makes it possible to
view the presentation with speaker’s notes on a computer (for example, your laptop), while the audience views the presentation without notes on an extra monitor or beamer. On the Slide Show tab, in the Monitors group, click Use Presenter View. Note: this option can only be used if two monitors are connected.
Reuse slides To import one or more slides from an existing presentation without having to open this, go to the Home tab, in the Slides group, click the New Slide button and select Reuse Slides… Click the Browse button and select Browse File… Select the presentation that contains the slide(s) that needs to be imported and click on the slide(s) in the window.
Organise in sections In Microsoft PowerPoint 2010 you can use the new Sections option to organise your slides much like how you use folders to organise your files into logical groups. You can store groups of slides in such groups. In the Normal or Slide Sorter view, right-click between the two slides where you want to add a section and select Add Section. If you want to give the section a more meaningful name, right-click the Untitled Section marker and click Rename Section.
Use mouse as laser pointer To emphasise something on a slide the mouse pointer can be used as a laser pointer. In the Slide Show display simply press and hold the CTRL button and the left mouse button.
Smart Art A Smart Art graphic is a visual representation of information that can be created quickly and easily. You can choose from many different layouts, to communicate your message or ideas effectively. On the Insert tab click the SmartArt option. If you create a SmartArt graphic, you need to choose a type of SmartArt graphic, such as Process, Hierarchy, Cycle or Relationship. Each type of SmartArt graphic contains different layouts. After you have chosen a layout you can easily switch the layout or type of SmartArt graphic. Most of the text and other content, colours, styles, effects and text formatting will automatically be carried over to the new layout.
New transition effects Slide transitions are animated effects that are visible in the Slide Presentation display when you move to the next slide.
Add a transition to a slide In the pane with the Outline and Slides tab, click the Slides tab. Select the miniature of the slide to which you want to apply a transition. Go to the Transitions tab and, in the Transition To This Slide group, click the transition effect you want to apply to this slide. You can click the Apply To All button if you want to apply the same transition to all the slides in your presentation.
Click the Preview button to see the result.
Video You can embed or can link to a video in your PowerPoint presentation. If you embed your video you do not need to worry about lost files during your presentation because all the files are included in the presentation. If you want to limit the size of your presentation, you can link to a video file. Embed video Click on the file in which you want to embed a video. On the Insert tab go to the Media group and click the arrow under Video and then click Video from File. In the Insert Video dialogue box, locate and click the video you want to embed and then click Insert. Link to a video file Repeat the above but in the last step click the down arrow by the Insert button and click Link to File. Reduce file size You can improve playback performance and save disk space by compressing your media files.
Open the presentation that contains the audio or video files. On the File tab click Info and in the Media Size and Performance section click Compress Media. Select the quality of the video from the list. This determines the size of the video.