quick reference guide: import accounting lines to gec · quick reference guide: import accounting...
TRANSCRIPT

Quick Reference Guide: Import Accounting Lines to GEC
1 | P a g e
4
Instructions: This document offers instructions for using the Import File–GEC to input
transaction details into the GEC Accounting Lines in KFS. It serves as a supplement to the step-
by-step instructions for creating a GEC.
Creating a General Error Correction (GEC) in KFS requires entering information from eData
about the specific transaction to be corrected in the Accounting Lines. The FROM side contains
the incorrect information (Account, Sub-Account, Object, etc.). The TO side contains the fixed
or corrected information. There are two ways to input transaction details into the Accounting
Lines on the GEC:
Manually entering information from the Transaction Details report in eData
o For step-by-step instructions, see the Quick Reference Guide: General Error
Correction
Using the eData Import File–GEC custom report and Import Lines option in KFS
Note: An asterisk (*) denotes a required field.
Using the Import File–GEC Custom Report in eData
Follow these instructions to use the Import File–GEC Custom Report in eData:
1. Log into AccessPlus.
2. Click uBusiness then eData.
3. Click Continue.
Quick Reference Guide: Import Accounting Lines to GEC
2 | P a g e
4
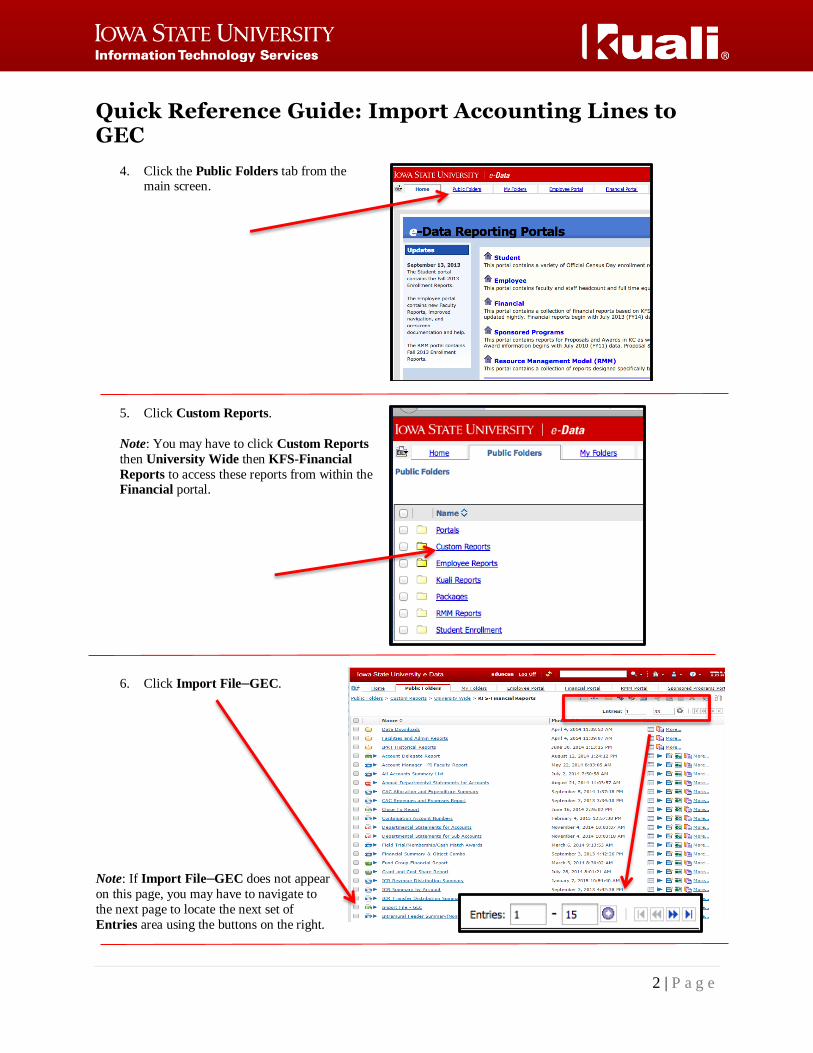
4. Click the Public Folders tab from the main screen.
5. Click Custom Reports.
Note: You may have to click Custom Reports
then University Wide then KFS-Financial
Reports to access these reports from within the Financial portal.
6. Click Import File–GEC.
Note: If Import File–GEC does not appear
on this page, you may have to navigate to
the next page to locate the next set of
Entries area using the buttons on the right.
Quick Reference Guide: Import Accounting Lines to GEC
3 | P a g e
4
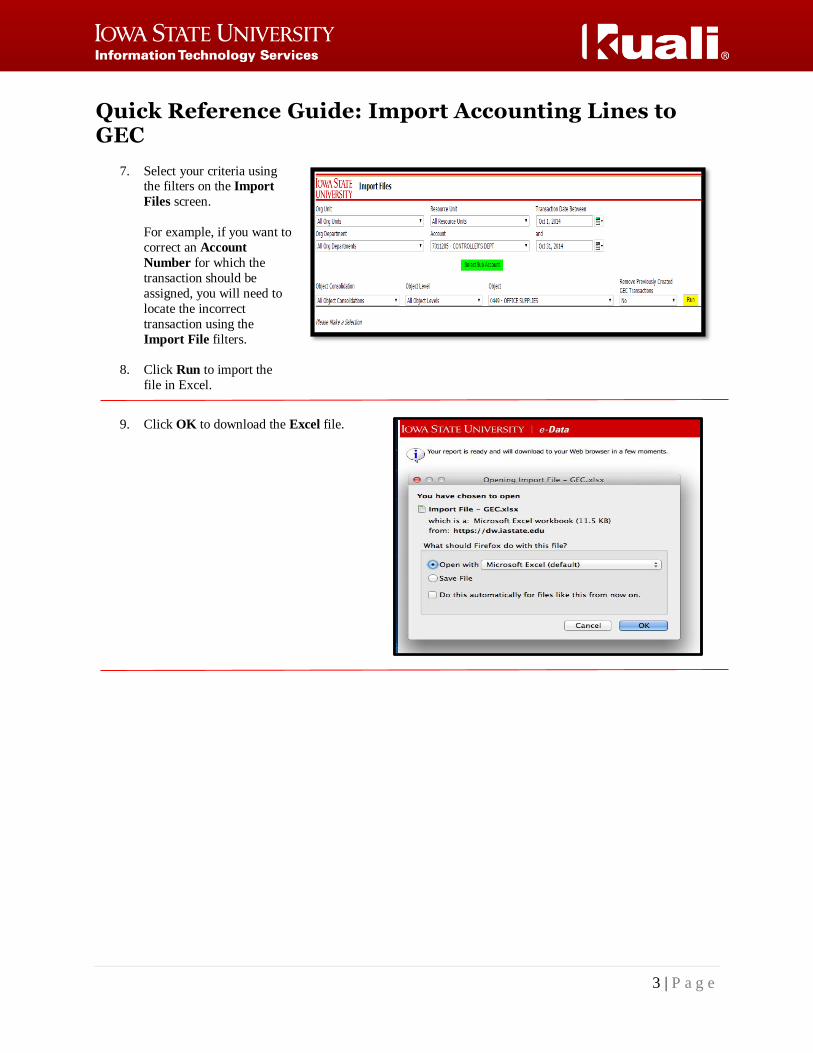
7. Select your criteria using the filters on the Import
Files screen.
For example, if you want to
correct an Account
Number for which the
transaction should be
assigned, you will need to
locate the incorrect
transaction using the
Import File filters.
8. Click Run to import the
file in Excel.
9. Click OK to download the Excel file.

Quick Reference Guide: Import Accounting Lines to GEC
4 | P a g e
4
Saving Incorrect and Correct Transaction Details in Two CSV Files
This section will guide you in creating and saving two separate CSV files:
Current (incorrect) transaction(s) – information to add in the FROM Accounting Lines
Fixed (correct) transaction(s) – information to add in the TO Accounting Lines
Adding and Deleting Transaction Details Using the Import File–GEC
The Import File–GEC custom report in eData produces an Excel file with transactions related
to the selected Account. Use the following instructions to add and/or delete information on the
worksheet:
Note: Red columns need to be completed.
Note: The Excel file contains a sheet for credits (receipts) and a sheet for debits (expenses) with transaction details
for the selected Account. Be sure to repeat the process for debits and save the Worksheets separately.
10. Add missing or required information to the row of transaction details you want to import into KFS.
11. Delete any rows that are correct and do not need corrections processed through KFS.
12. Delete rows 1 through 6 on the Excel Worksheet.

Quick Reference Guide: Import Accounting Lines to GEC
5 | P a g e
4
Use the following instructions to Save information to be imported into the FROM and TO
Accounting Lines on the GEC:
13. Click File then Save as a file name
(i.e. “Incorrect_Account” in the
Filename field).
14. Change Save as type to CSV
(Comma delimited).
15. Verify that the correct directory is
being used (i.e. Desktop).
16. Click Save and note the location so that you can import this file later.
17. Click OK if you receive
this message.
18. Click YES if you receive
this message.
Note: You now have a saved CSV file to import in the FROM Accounting Line.
To create corrected information to upload to the TO Accounting Line:
19. Edit the CSV file to reflect corrections (i.e. change Account Number).
20. Repeat steps 13-18 to edit and save a file for the TO Accounting Line.

Quick Reference Guide: Import Accounting Lines to GEC
6 | P a g e
4
Using the Import Lines Upload to KFS
To import the required (*) From and To information in the Accounting Lines:
21. Open KFS.
22. Select General Error Correction from
Financial Processing in the
Transactions menu.
23. Enter the Description and
Explanation of items
needing correction.
Note: If you intend to have
multiple uploads in the accounting
lines, use a generic Description,
i.e. “Sept Miscodes”.
24. Click Import Lines on the right side of the Accounting Lines to import information on the FROM side
(incorrect transaction detail).
25. Click Browse to upload the saved CSV file (i.e. Incorrect_Account”) then click OK.
26. Click Add next to Browse.

Quick Reference Guide: Import Accounting Lines to GEC
7 | P a g e
4
Note: You will see that the FROM line is populated with transaction details from your CSV file.
27. Click Import Lines on the right side of the Accounting Lines to import information on the TO side
(correct transaction detail).
28. Click Browse to upload your second saved CSV file (i.e. Correct_Account”) then click OK.
29. Click Add next to Browse.
Note: You will see that the TO line is now populated with transaction details from your CSV file.

Quick Reference Guide: Import Accounting Lines to GEC
8 | P a g e
4
Note: If an expense is
being moved to a Grant
Account, respond to the
four (4) questions in the
Error Certification tab.
30. Click Submit and check
for errors. The
document is now en
route to the Fiscal
Officer(s) listed on the
account(s).
31. Click Close to return to
the Main Menu.
32. For Grant Account
corrections, click Yes
on the Certification
screen to route the
transaction to the Fiscal
Officer(s) listed on the
Account(s).
A
C
B
D