quick sizing tips for hp integrated citrix xenserver system /xen/day1/hp server... · quick sizing...
TRANSCRIPT

Quick sizing tips for HP integrated Citrix XenServer
Executive summary............................................................................................................................... 3 Solution definition ................................................................................................................................ 3 Sizing considerations ........................................................................................................................... 5
Assess your environment ................................................................................................................... 5 Which systems are the best candidates for virtualization ................................................................... 5 Which systems are not the best candidates for virtualization.............................................................. 5
Determine your goals ....................................................................................................................... 5 Server consolidation tools ................................................................................................................. 6
General sizing best practices and guidelines .......................................................................................... 7 Leave room for expansion ................................................................................................................. 7 What resources you should worry about: the “Core Four”..................................................................... 8 CPU tips and sizing guidelines .......................................................................................................... 8
Virtual CPU tips............................................................................................................................ 9 Memory tips and sizing guidelines ..................................................................................................... 9
HP integrated XenServer memory usage.......................................................................................... 9 Average VM memory usage ........................................................................................................ 10 Leaving room to grow ................................................................................................................. 10 Additional memory sizing tips...................................................................................................... 10
Network tips and sizing guidelines................................................................................................... 11 Storage tips and sizing guidelines.................................................................................................... 12
Choosing the right storage type ................................................................................................... 12 Local or shared disk storage ........................................................................................................ 12 Local storage sizing and tips........................................................................................................ 13 Remote storage selection ............................................................................................................. 13
Interpreting performance data ............................................................................................................. 13 CPU utilization data ....................................................................................................................... 14 Memory utilization data.................................................................................................................. 14 Network utilization data ................................................................................................................. 14 Disk utilization data........................................................................................................................ 14 How many physical servers are needed? .......................................................................................... 16 Distribution of virtual machines across physical servers ....................................................................... 16
Summary .......................................................................................................................................... 16 Appendix A ...................................................................................................................................... 17 Appendix B....................................................................................................................................... 18
Overview ...................................................................................................................................... 18 How much utilization data should be captured .................................................................................. 18
The process ............................................................................................................................... 18 Setting up Perfmon logging.......................................................................................................... 19

Viewing captured Perfmon data ................................................................................................... 21 For more information.......................................................................................................................... 23
Executive summary Smaller IT environments are continually challenged to keep up with the needs of the organizations they support. Every IT organization faces the challenges of deploying ever increasing numbers of servers and making it faster and easier to manage and deploy new servers all while saving costs. Smaller environments, moreover, must address these challenges with a fraction of the budget and very often without dedicated in-house expertise.
Virtualization technology has entered the enterprise mainstream. Today, the technology is established as a proven solution for increasing server hardware utilization, consolidating existing servers, controlling physical server sprawl while making it faster and easier to deploy new servers all while reducing costs. But, adoption by business users is split, with large enterprise organizations committed and underway with major deployments of production virtual servers, while many other businesses are still evaluating virtualization technology.
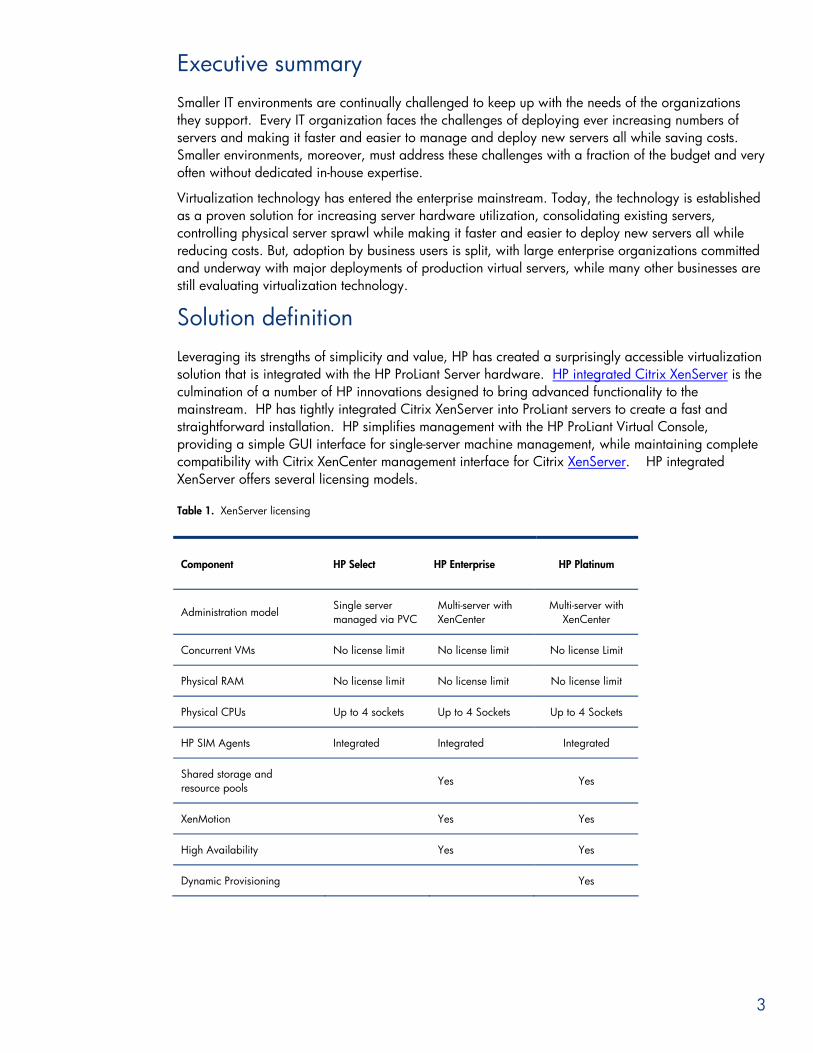
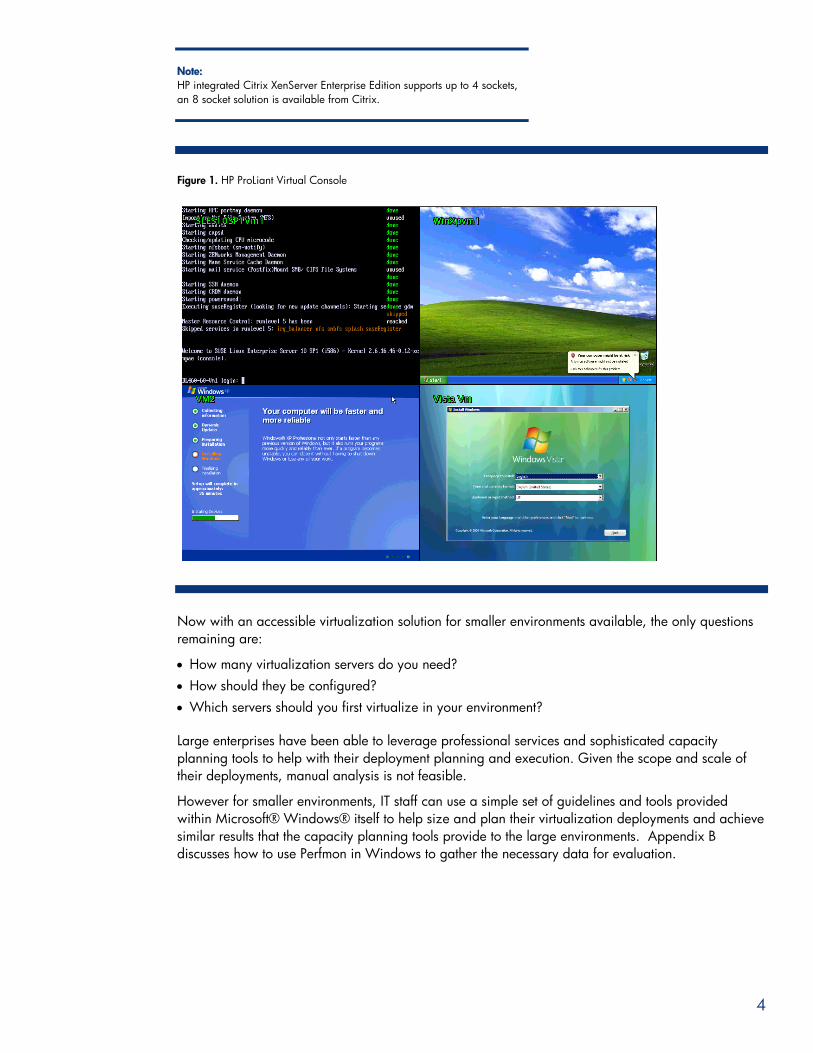
Solution definition Leveraging its strengths of simplicity and value, HP has created a surprisingly accessible virtualization solution that is integrated with the HP ProLiant Server hardware. HP integrated Citrix XenServer is the culmination of a number of HP innovations designed to bring advanced functionality to the mainstream. HP has tightly integrated Citrix XenServer into ProLiant servers to create a fast and straightforward installation. HP simplifies management with the HP ProLiant Virtual Console, providing a simple GUI interface for single-server machine management, while maintaining complete compatibility with Citrix XenCenter management interface for Citrix XenServer. HP integrated XenServer offers several licensing models.
Table 1. XenServer licensing
Component HP Select HP Enterprise
HP Platinum
Administration model Single server managed via PVC
Multi-server with XenCenter
Multi-server with XenCenter
Concurrent VMs No license limit No license limit No license Limit
Physical RAM No license limit No license limit No license limit
Physical CPUs Up to 4 sockets Up to 4 Sockets Up to 4 Sockets
HP SIM Agents Integrated Integrated Integrated
Shared storage and resource pools
Yes Yes
XenMotion Yes Yes
High Availability Yes Yes
Dynamic Provisioning Yes
3
Note: HP integrated Citrix XenServer Enterprise Edition supports up to 4 sockets, an 8 socket solution is available from Citrix.
Figure 1. HP ProLiant Virtual Console
Now with an accessible virtualization solution for smaller environments available, the only questions remaining are:
• How many virtualization servers do you need? • How should they be configured? • Which servers should you first virtualize in your environment?
Large enterprises have been able to leverage professional services and sophisticated capacity planning tools to help with their deployment planning and execution. Given the scope and scale of their deployments, manual analysis is not feasible.
However for smaller environments, IT staff can use a simple set of guidelines and tools provided within Microsoft® Windows® itself to help size and plan their virtualization deployments and achieve similar results that the capacity planning tools provide to the large environments. Appendix B discusses how to use Perfmon in Windows to gather the necessary data for evaluation.
4
Sizing considerations
Assess your environment One of the first things to do is assess your current environment. If consolidating, you already have some idea about the servers that you would like to move to a virtual environment. Think in general about the types of systems and applications that you want to target initially and some of the systems that you want to save for a later project or perhaps leave on physical systems, but note that not all physical servers are candidates for virtualization. If creating new virtual machines (VMs), the decision on what to run in the VM has already been made.
Which systems are the best candidates for virtualization If new to virtualization, start with the servers running applications that are low utilization and not mission critical. Once comfortable with a virtualization strategy you can run mission critical and high utilization systems as virtual machines (VMs).
First look at the servers you use for testing and development work or target the systems that are generally not running at peak capacity. Examples of these are collaboration servers such as Wiki and Microsoft Office SharePoint servers, intranet and general purpose web servers, file and print servers. Other infrastructure servers that you can also target are DHCP, DNS, and AD Servers. Also, older servers that are out of support/maintenance contracts that could be more prone to a hardware failure or nearing the end of a lease term. Another target for virtualization are servers running older versions of operating systems such as Windows 2000 Server, which in general will be running on the oldest server hardware. The applications running on these older operating systems may not be able to upgrade to a new operating system, or you are not ready to upgrade both an application and an operating system simultaneously.
Which systems are not the best candidates for virtualization Virtualizing servers that are currently maxing the physical hardware will not gain any hardware economies unless the servers are running on hardware that is older than 4 or 5 years. While the level of overhead with the XenServer virtualization platform is generally under 10% of the systems resources the goal is to be able to run multiple virtual machines on a server, so moving a high utilization server to a virtual machine won’t allow you to take advantage of the ability to split up a physical server between multiple virtual machines, unless this is an older physical server.
Additionally systems that have specialized hardware requirements won’t be compatible with running in a virtual environment. Examples are telephony or fax servers that require specialized adapter cards, applications that require older parallel port license dongles or systems that use SSL or other hardware encryption accelerators.
Determine your goals Generally the first step when deploying a virtualization platform is to increase utilization of physical server hardware and reduce the number of physical servers required for running an environment. But other goals such as making it easier to backup and restore servers, doing server maintenance without any downtime, a disaster recovery/high availability plan to protect your environment from downtime due to physical hardware failures are excellent reasons to implement server virtualization. If an application’s availability is paramount to the success of your business, and any downtime could be devastating, using virtual machines and high availabilities of HP integrated XenServer Enterprise Edition can help solve this problem.
5

NOTE: HP integrated Citrix XenServer is easy to deploy and use, and has the ability to support high end capabilities as well by upgrading the license key to an enterprise or higher level license.
While knowing your end goal can help you plan what type of system to deploy you are not without options in the future. For example, start by consolidating DNS/DHCP and AD servers, web servers, and print servers into virtual machines running on HP integrated Citrix XenServer Select Edition running on a single ProLiant server using local storage. In this scenario you get virtualization deployed, taking advantage of the basic partitioning capability virtualization provides enabling higher rates of utilization running multiple virtual servers on one physical server. As confidence in virtualization grows you can add a second ProLiant Server running HP integrated XenServer, HP shared storage, and upgrade to an enterprise license to enable higher end capabilities like zero downtime movement of virtual machines with XenMotion between servers, automatic initial placement of virtual machines on the physical server with the most available resources, and the ability to automatically recover your virtual machines on another server in the event of a physical server failure using the high availability features of HP integrated XenServer Enterprise Edition.
To make full server backup and recovery simpler or implement a disaster recovery plan, those capabilities are actually enabled simply by the ability to take any of your virtual machines and export them to a single portable file. That file contains the virtual machine settings, the operating systems, applications, and data all in one single unit. This exported virtual machine can then be imported to any other server to allow a complete restore of the servers. This restore could happen in the same location or in a multi-site disaster recovery solution involving a second location. With import/export, the advantage is the same physical hardware is not needed. A VM exported from a ProLiant DL360 rack server can be imported to a ProLiant BL465c blade server, with both servers running HP integrated XenServer, and having networks configured similar. This is not the same as live migration with XenMotion. XenMotion requires an enterprise license and CPU hardware compatibility as requirements to create a resource pool within XenServer.
Server consolidation tools When consolidating physical servers to virtual machines you can install a fresh copy of Windows into a new virtual machine, install all the necessary applications and move the data to the new virtual machine. Another solution is to capture your existing physical servers and turn them into virtual machines. These so called Physical to Virtual (P2V) tools will capture an existing operating system, applications, settings, and data and convert that image into a virtual machine without having to recreate those servers from scratch. Third-party solutions for doing P2V are on the market, but both HP and Citrix have tools enabling P2V migration.
HP Server Migration Pack (SMP) – Universal Edition supports Physical2Virtual migration from any physical server, transferring all data, applications, and settings automatically. HP SMP is a stand-alone application, but can be integrated with other HP Insight Control products like HP Systems Insight Manager. HP SMP requires a source physical server, a virtual machine destination, and an x86-system running Windows 2003/2008/XP to run the SMP-Universal application. Supported operating systems for P2V are Windows 2000 Server, Windows 2003 Server and Windows 2008 Server. Aside from doing P2V migrations, HP SMP will also allow Physical2ProLiant (migrate from another platform to a ProLiant server), Virtual2ProLiant (migrate a virtual machine to a physical ProLiant server), or Virtual2Virtual (migrate between two different types of virtual machines).
Citrix now has a basic Windows P2V tool called XenConvert. XenConvert is designed to allow easy conversion of existing physical servers into XenServer virtual machines. It is suitable for environments
6

where you have a smaller set of physical servers you want to capture and convert as it requires some manual work on each physical server.
Important This guide provides a general sizing overview. This is not to be used as a final sizing recommendation. There are many customer specific details that can impact the application of the general sizing information presented in this guide. HP recommends proof-of-concept testing in a non-production environment using the actual target application as a matter of best practice for all application deployments. Testing the actual target application in a test/staging environment identical to, but isolated from, the production environment is the most effective way to estimate systems behavior.
General sizing best practices and guidelines This section provides some general sizing best practices to consider when planning your virtualization deployment with HP integrated XenServer. The section then ends with some sizing guidelines that you can use to quickly get an idea of what type of systems you will need based on average sizes of source systems we have seen across a large number of customers.
Leave room for expansion
The HP integrated XenServer virtualization platform allows adjusting the allocated resources of virtual machines over time; you don’t need to get your resource settings exactly right when you first create virtual machines. If you incorrectly allocate memory to a virtual machine you adjust the memory amount up or down as needed. If running out of disk space in your file and print server virtual machine you can easily expand the size of the virtual disk drive or even add additional disk drives and grow your file systems to give yourself extra capacity. A number of these operations such as adding an extra disk drive or connecting to an additional network can even be done while your virtual machine is up and running with no downtime to your users.
While you can grow your virtual machines with simple software settings, the same is not true of your physical servers. When planning your virtualization deployment it is recommended you purchase servers additional headroom to allow expansion. Start by running a small number of virtual machines per physical server with the intention of adding additional virtual machines over time as needed.
The problem of running out of resources on a physical server can be address by utilizing XenServer, XenMotion and High Availability capabilities. If a physical server is low on resources and still has physical space to add more resources (more memory, open CPU sockets, open slots for network cards) with XenServer resource pooling you can migrate VMs to other servers, bringing down the physical server, and adding necessary resources such as memory, CPUs, or disks to the server.
If you plan to use the XenMotion live migration capability or the high availability features of XenServer you must have additional resources on all your virtualization servers to accept virtual machines from the other servers. The amount of additional resources you will need on each server depends on how many virtualization servers you have in your environment. For example, with two servers, each server must have enough physical resources to support all of the virtual machines. This means with both systems running each is utilizing no more than 50% of it physical resources. If using three servers, then each server only needs enough physical resource to support half of the VM load, thereby reducing the amount of physical resources needed on each server.
HP integrated XenServer Enterprise Edition actually has a maintenance mode feature that will automatically distribute virtual machines to other servers in the resource pool and automatically
7

spread the load, allowing for the server to be brought down. The HA (high availability) feature will restart and spread virtual machines over the remaining servers in the pool in the event of a server suddenly failing.
What resources you should worry about: the “Core Four”
Servers and applications don’t use resources at the exact same time or use the same type of resources equally. One server might be a file server that uses network and storage during the daytime, another server is a batch processing system that uses a lot of CPU during the night. Not only are the resources possibly used differently, they may also be used more heavily at different times of the day, month, or even quarter. A sales support system may be taxed heavily at the end of a month or quarter and then next to nothing at the start of the month or quarter when the accounting system may be used more heavily. Consider this when looking at the servers to virtualize, and when deciding what virtual machines to run on which HP integrated Citrix XenServers.
Also the planning guidelines provided later in this section have enough buffer room to account for differences in physical server performance. The average server running on physical hardware today uses less than 15% of its total system capacity and even when running multiple virtual machines on a physical server you generally won’t run over 50-60% of total system capacity even while getting very nice rates of consolidation. When planning allow enough headroom to account for virtual machines to spike their activity from time to time and have plenty of power for all the virtual machines.
One of the reasons that virtualization has become so prevalent is that today’s servers provide more power than a large percentage of the applications deployed would ever require. That coupled with the fact that generally only one application is installed inside each operating system instance makes consolidation with virtualization beneficial. You can still isolate your applications into their own operating system while improving utilization of your physical servers.
So which resources should you worry about? Trying to account for every last component in a server such as bus speed, memory speed, memory type, I/O adapter type or CPU cache sizes when thinking about planning can be daunting. Today’s HP servers and the processors that run inside them provide such high levels of performance that for planning purposes you can focus on a more limited set of resources, the “Core Four”.
• CPU • RAM • Network I/O • Disk
NOTE: The following sizing tips assume low to medium-low utilization workloads for the resource categories mentioned above. It also assumes that you will be deploying the solution on new server hardware. Keep in mind that the average utilization for an x86 server is less than 15% which means the overwhelming majority of your servers will fit into these utilization categories. Also keep in mind that for the purposes of making these guidelines broadly applicable these suggestions have quite a bit of buffer room built in such that you may find yourself able to easily add more virtual machine to your servers over time.
CPU tips and sizing guidelines For purposes of CPU sizing we are mainly going to concern ourselves with the number of cores on the system. Both Intel® and AMD™ have shifted focus away from the speed of their processors to the number of cores provided on each physical chip. If you choose to run the highest range of VMs per
8

box specified below you would be well served to choose from the higher end of the speed range provided by your preferred CPU vendor.
While the HP integrated XenServer virtualization platform won’t exclusively use a single CPU core, for the planning purposes assume the XenServer server will use one CPU core on the system leaving the remaining cores available for running virtual machines.
The sizing rule of thumb for CPUs with XenServer is to split the resources of a single CPU core between 4-6 virtual machines. So for example if you had an HP ProLiant server with 2 Dual Core CPUs or one Quad Core CPU you could run between 12-18 VMs on that box, reserving one core for the XenServer hypervisor.
The HP integrated XenServer includes an advanced load balancing CPU scheduler that will automatically spread the VMs between the available CPU cores on your system to provide the best levels of performance automatically with no user intervention.
Virtual CPU tips While talking about physical CPU sizing it is also important to think about how many virtual CPUs (vCPUs) you allocate to your virtual machines. XenServer supports up to 8 vCPUs per virtual machine. Each vCPU maps down to a physical CPU core on your server, the physical CPU cores can be shared between multiple virtual CPUs. Over-allocating vCPUs will not gain performance, and in many instances may degrade performance. As with multiple cores on a physical system performance will not always increase as you add cores to your operating system. Check with your OS vendor on the number of CPU cores that the operating system version supports, for example standard versions of Windows 2003 only support up to 4 CPU cores.
When creating virtual machines start by allocating a single vCPU to the virtual machine, keeping in mind most systems use less than 15% of the available CPU resources so adding additional virtual CPUs won’t do anything to increase performance.
Allocate more than 1 virtual CPU if running a virtual machine that is maxing out its current 1 vCPU allocation and the application that can take advantage of multiple CPU cores. Multi-threaded 32-bit applications will benefit from additional vCPUs but more is not always better. Citrix XenApp will perform better with additional vCPUs, but remember, allocating too many vCPUs to a VM can impact performance of the VM and the entire physical server. Information on sizing XenApp on XenServer can be found at www.hp.com/solutions/ActiveAnswers/hpsbc . HP integrated XenServer allows you to adjust the number of virtual CPUs allocated to the virtual machines.
Also it is important to NOT allocate more virtual CPUs to a virtual machine than physical cores available on the system. For example, if there are four physical CPU cores on a system don’t create a virtual machine with 8 virtual CPUs on it. Over-allocating the number of vCPUs affects not only the performance of the VM, but the physical server and all other VMs on the server.
Memory tips and sizing guidelines Unlike CPU cycles or network bandwidth that can be shared between virtual machines, resources such as memory are hard allocated to virtual machines. But it is not just a case of totaling up how much memory the virtual machines will use to come to a resource requirement. Consider the memory usage for XenServer itself, extra memory for future use and memory to support live migration of virtual machines. HP integrated XenServer memory usage First, how much memory will XenServer need to run on your system? XenServer memory usage is based on how much physical memory exists on the server itself. When calculating the memory used by XenServer there are two components to consider. First is the memory used by the XenServer
9
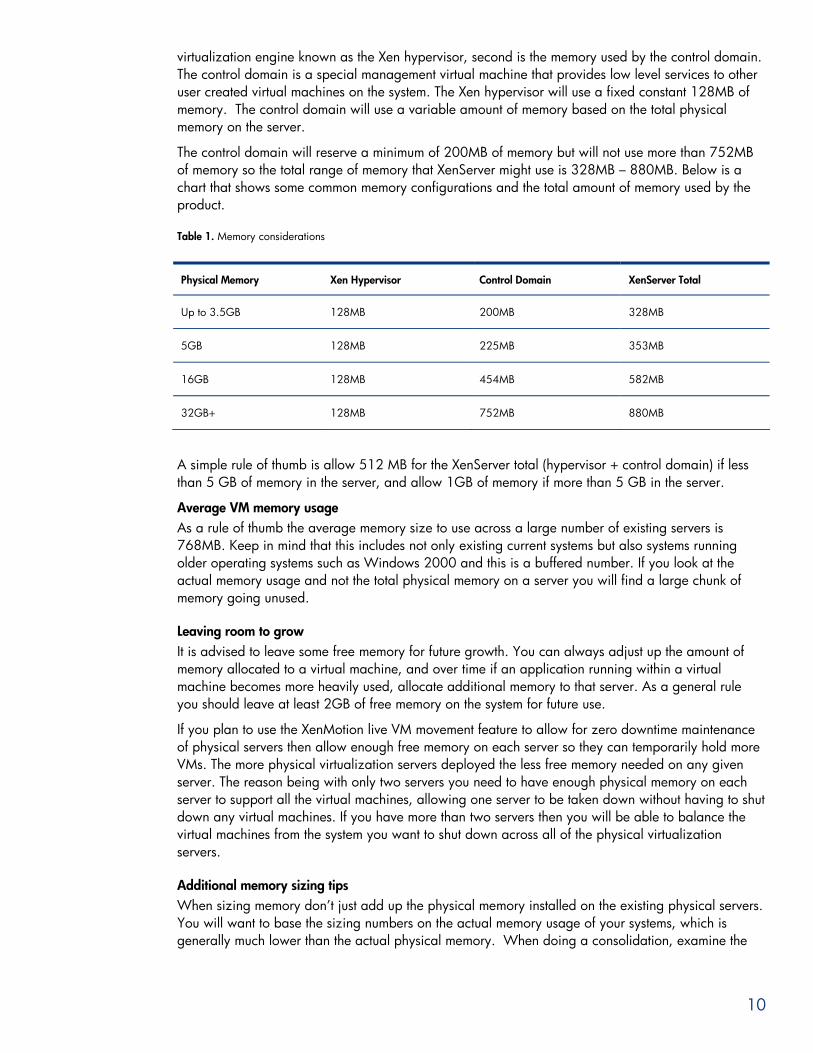
virtualization engine known as the Xen hypervisor, second is the memory used by the control domain. The control domain is a special management virtual machine that provides low level services to other user created virtual machines on the system. The Xen hypervisor will use a fixed constant 128MB of memory. The control domain will use a variable amount of memory based on the total physical memory on the server.
The control domain will reserve a minimum of 200MB of memory but will not use more than 752MB of memory so the total range of memory that XenServer might use is 328MB – 880MB. Below is a chart that shows some common memory configurations and the total amount of memory used by the product.
Table 1. Memory considerations
Physical Memory Xen Hypervisor Control Domain XenServer Total
Up to 3.5GB 128MB 200MB 328MB
5GB 128MB 225MB 353MB
16GB 128MB 454MB 582MB
32GB+ 128MB 752MB 880MB
A simple rule of thumb is allow 512 MB for the XenServer total (hypervisor + control domain) if less than 5 GB of memory in the server, and allow 1GB of memory if more than 5 GB in the server.
Average VM memory usage As a rule of thumb the average memory size to use across a large number of existing servers is 768MB. Keep in mind that this includes not only existing current systems but also systems running older operating systems such as Windows 2000 and this is a buffered number. If you look at the actual memory usage and not the total physical memory on a server you will find a large chunk of memory going unused.
Leaving room to grow It is advised to leave some free memory for future growth. You can always adjust up the amount of memory allocated to a virtual machine, and over time if an application running within a virtual machine becomes more heavily used, allocate additional memory to that server. As a general rule you should leave at least 2GB of free memory on the system for future use.
If you plan to use the XenMotion live VM movement feature to allow for zero downtime maintenance of physical servers then allow enough free memory on each server so they can temporarily hold more VMs. The more physical virtualization servers deployed the less free memory needed on any given server. The reason being with only two servers you need to have enough physical memory on each server to support all the virtual machines, allowing one server to be taken down without having to shut down any virtual machines. If you have more than two servers then you will be able to balance the virtual machines from the system you want to shut down across all of the physical virtualization servers.
Additional memory sizing tips When sizing memory don’t just add up the physical memory installed on the existing physical servers. You will want to base the sizing numbers on the actual memory usage of your systems, which is generally much lower than the actual physical memory. When doing a consolidation, examine the
10
amount of memory the current physical systems are using, and come as close to that as possible. For new VMs, it will be an initial best guess, based on the suggestions stated earlier.
Also be sure you don’t under allocate memory for your virtual machines. If you starve your virtual machines of memory they will end up swapping to disk within their own operating systems. Something that you don’t have to worry about with the XenServer platform is double swapping. For the best performance allow enough memory so the VM does not have to swap, even under heavy use conditions.
So what is the simple answer for memory? If consolidating physicals servers to VMs, it is straight forward. Look at the current physical servers to see how much actual memory is being used. Total amount of memory needed is equal to:
[memory required for Hypervisor/Control domain] + [sum of memory from physical servers] + [memory needed to support live migration VMs] + 2GB overhead + [what makes you feel comfortable]
If creating new VMs, memory will have to start as an estimate. Operating systems like Windows XP require 512 MB, but depending on usage can benefit from 1 GB, and some operating systems will not utilize over 4 GB of memory. Some VMs running operating systems like Linux can run in as little as 256 MB of memory, depending on what the VM is doing. Also, look at the application that will be running in the VM to see what is has as memory requirements. From the Average VM Memory Usage, 768MB-1GB is a good starting point. Remember, you can always come back and adjust the amount of memory allocated to a virtual machine, so you don’t have to get the exact right answer to start. Replace/add to the [sum of memory from physical servers] with the memory estimate.
Network tips and sizing guidelines Network bandwidth is another category of resource that like CPU cycles can be shared between multiple virtual machines on a system. Note that with the HP integrated XenServer Enterprise Edition you have the ability to set specific bandwidth throttling rates per virtual network interface but in the default configuration, the virtual machines will share available network bandwidth on their assigned NIC. The rule of thumb sizing for networking is 10 VMs per Gigabit Ethernet NIC assuming a Gigabit Ethernet networking, with a low to medium-low utilization (15% and under) per VM.
The interesting data points for networking will be the average Bytes Total/sec and the maximum Bytes Total/sec. The numbers presented by tools like Perfmon may be more readable by converting into Mbits/Sec which is more commonly used in networking.
To convert from Bytes Total/sec to Mbits/Sec apply the following formula: Mbit/Sec = (Bytes/Sec X 8) / 1048576
Beyond the number of virtual machines to run on each virtualization server there are other factors that will affect the number of NICs required for each environment. If you are using IP based storage such as iSCSI or plan to use the NIC bonding feature you will need to increase the number of NICs on the servers. iSCSI allows use of standard TCP/IP networking along with standard NICs, cabling, and switch infrastructure to move storage traffic between virtualization servers and shared network storage. If you plan to deploy iSCSI based shared storage best practices recommends allocating a dedicated network just to handle the iSCSI traffic, keeping the iSCSI storage traffic isolated from the network traffic created by the client virtual machines.
HP integrated XenServer supports NIC bonding, allowing the combining of two NICs into a pair for highly available networking and allows increased bandwidth to each network by using the two NICs. Both of the NICs in the bonded pair will be connected to the same physical network and both NICs in
11

the pair will be actively sending and receiving network packets. In the event of a failure with either NIC, its cabling, or other networking components XenServer will automatically failover to the other NIC in the bonded pair ensuring no disruption to the virtual machines. If deploying NIC bonding add one additional NIC for each connected network to be bonded.
Storage tips and sizing guidelines Storage sizing is likely to be the most variable class of resource usage from customer to customer and even from server to server. While the average disk usage will vary greatly between environments across a large number of servers you will find that the average disk usage is around 12GB per server. For every file server with 200GB of space there are a large number of servers using less than 6GB of disk space.
Just as with the other resource classes you can grow the amount of disk space allocated to virtual machines. However, XenServer will not allow decreasing the amount of disk space allocated to a virtual machine. This is done as a data protection mechanism. While it is a fairly simple operation to increase the amount of disk space allocated to a virtual machine and grow the file systems within that VM to use the disk space, removing space requires first shrinking the file systems within the virtual machine. If not done correct it is quite easy to damage/destroy data, and therefore is not permitted as an operation. For this reason be very diligent about not over allocating disk space for virtual machines. Most of the P2V conversion systems will not shrink the source servers file system during the transfer process so the amount of disk space used on the source system will match the disk space used on the destination virtual machine. Sizing for storage tends to be fairly simple operation of checking the current disk allocation on the servers that you want to consolidate to the virtualization platform. If new VMs, the operating system and applications to run in the VMs will determine the initial storage requirements.
Choosing the right storage type The type of storage depends on a number of factors. How many virtual machines you plan to run per host, how many virtualization servers you plan to deploy, and if you want to use higher end features in the HP integrated XenServer platform such as XenMotion, automatic initial VM placement, and High Availability (HA) need consideration from the VM point of view. Also, backup options and capabilities, recovery options, and cost will figure greatly into the decision process.
Local or shared disk storage The decision on using local or shared disk storage comes down to one main question: Do you want the ability to run and move your virtual machines between your different virtualization servers? If the answer is no and you plan to deploy a small number of virtualization servers then use local storage on each of the virtualization servers. Moving a virtual machine from one virtualization server to another must be done by shutting down the virtual machine, exporting it from the source server and importing it to the destination server. Depending on the size of the virtual machine this could take some time, but does allow moving VMs from server to server providing recovery from a failed server.
Using shared storage with the HP integrated XenServer Enterprise Edition allows live migration of virtual machines between servers, allowing a physical server to be taken down for maintenance. When starting a VM, HP integrated XenServer Enterprise Edition will automatically place the VM on the physical server with enough free capacity or you can specify which server to launch the virtual machine on. In the case of a physical server failure you have the capability to re-launch virtual machines on other servers in your environment manually, or with shared storage and HP integrated XenServer Enterprise Edition there is the option of configuring high availability (HA) for the VMs within a pool of servers. Information about the VMs is stored on the shared storage, and each VM restart status can be defined within the HA configuration. Protected VMs will automatically be restarted on another server in the pool in the event of failure of the original server. The HA function requires 356 MB of storage space on the shared storage to keep the HA heartbeat information.
12

HP integrated XenServer allows you to copy/move virtual machines from one type of storage to another, so it is possible to start with local storage as a basic setup and add shared storage in the future.
Local storage sizing and tips With local storage, beyond calculating total space requirements, you will want to leave room for future growth of virtual disk drives. Also if starting with a small number of virtual machines per server you will want to even add more space to the physical systems to allow for additional virtual machines in the future. A good rule of thumb is to start by allocating 25% more disk space than the total disk space required by the virtual machine, allowing for growth. If creating new VMs and unsure about space requirements then use the 12GB average value as a guide, with the 25% additional space that would come out to 15GB per future virtual machine. If there are other disk space usage requirements then you would want to adjust this number up. If consolidating physical servers using a P2V tool then each VM will use as much disk space as the disks on the physical server selected for conversion. (NOTE: if the C: file system on a physical server is 33GB, then the VM will be 33 GB.)
Consideration about the type and speed of storage and what type of RAID setup to use needs to be done. HP ProLiant servers use Smart Array technology to support RAID setup on local storage. If planning to run 10 or fewer virtual machines on each box with average storage I/O needs, SATA storage can be used for storage of virtual machines. For more than 10 virtual machines per box SAS storage is a better fit. As the number of virtual machines increases on the server, you should start increasing the spindle speeds for the drives you purchase, and look at increasing the number of spindles in the storage RAID sets.
Remote storage selection When using remote storage the sizing calculations and performance recommendations mentioned in the local storage section still apply but you will generally purchase much more disk space for future growth. Normally, network based storage supports multiple environments, from virtualization to web storage, user storage, or mail storage. When sizing for remote storage use the same calculations mentioned for local storage to determine the amount of storage for the VMs, but this storage is now shared between multiple servers. Take into consideration all storage requirements of all of the servers that will be leveraging the shared storage.
Interpreting performance data To determine how to apply these guidelines to your environment you will need to do some data gathering. If doing a P2V consolidation on existing servers then use Perfmon to gather performance data in Windows systems. For Linux servers tools like top, iostat, sar, and vmstat can be utilized to determine utilization levels. Use whatever tools available or you are comfortable with to determine the current CPU and network utilization. Once you have captured your data (see Appendix B for assistance in using Perfmon) the next step will be to view the resulting data to help with the sizing process. A spreadsheet similar to Appendix A can be used to track data about each VM you plan to create, making it easier to understand the total resource needs.
If creating a new virtualization environment with new VMs, then a “best-guess” may be the only choice if no performance data is available. In situations like this it is always better to under-estimate the resources to support a VM, and increase as needed. However, do not under-estimate the physical resources.
The physical CPU and network resources of the server are shared between the virtual machines and the goal is to determine if your server workload fits into the low to medium-low utilization category, the medium utilization category, or a higher utilization category. When looking at memory and disk utilization data those resources are not shared between virtual machines so you will need to track the
13

resource requirements for each of your virtual machines. Also keep in mind that the guidance provided on sizing provides plenty of buffer room, you can always adjust settings over time.
CPU utilization data There are two interesting data points around CPU utilization. The first and most important will be the average CPU utilization over the data collection period. If the server workload is less than 15% it fits into the low to medium-low utilization category. Also take a look at the Maximum CPU utilization number so see what the highest spike is. The last step will be to look for any sustained periods of intense CPU activity. An occasional spike won’t be an issue but if there are consistent rates of high utilization during the business day you will want to account for that in the sizing, and take into consideration when determining what VMs to run on which servers. If you determine that your system falls into the medium utilization category of 15-30% CPU utilization then count that virtual machine as 2 for sizing purposes. If using the sizing rule of thumb of 4-6 VMs per CPU core for a low to medium-low utilization system, use 2-3 VMs per core for a medium utilization.
Memory utilization data The memory data that is collected via Perfmon is actually a measure of free physical memory on the system. The number needed for sizing is the actual amount of memory used by the server. The data to focus on in the memory utilization data will be the minimum amount of free memory available on the system during the collection period. Take the minimum amount of free memory and subtract from the total physical memory to come up with the maximum physical memory utilization during the collection period.
Once the maximum amount of physical memory utilized by the server during the collection period has been determined add a buffer of 75% to come up with the amount of memory you should allocate to your virtual machine. Even by adding 75% to the maximum memory utilization, the number will in the majority of cases result in a smaller allocation than the amount of physical memory on the box.
Network utilization data When looking at network utilization the total number of bytes transferred per second is the data point to focus on. If you find that the bytes total/sec number is larger than expected, the bytes sent and received data can give you additional insight into the type of network loading created by your server.
The server networking resource usage fits into a low to medium-low utilization category for anything less than 80Mbit/Sec. If you have a high maximum number, review the collection period data to determine if the high number was caused by a momentary peak or is the sign of increased general utilization. If the networking resource usage is between 80-160 Mbit/Sec assume the system fits into the medium utilization category and count this system as 2 VMs worth of resources for planning purposes.
Disk utilization data As discussed previously, disk space is a set resource that does not get adjusted when converting an existing server to a virtual machine. For this data point, total up the existing disk allocations for the physical servers if doing a consolidation, for new VMs follow the previously defined guidelines.
If you plan to migrate applications and data from an existing server to a new virtual machine that you setup you should then take the current disk utilization into account for planning purposes.
From in the previous networking section, it is recommended that when using IP based remote storage such as iSCSI you create a dedicated network for that traffic. HP integrated XenServer Enterprise Edition or higher must be used, the Select edition does not contain shared remote storage support. As mentioned in the previous sections you can start with local storage and easily upgrade to remote
14

storage at a later point with an upgrade from a Select license to an Enterprise license and the addition of the required storage hardware. XenServer allows you to move VMs from local storage to remote storage.
With shared storage, a decision on shared direct attached storage (DAS) versus storage area network (SAN) disk arrays using must be made. Shared DAS is a cost-effective deployment for smaller environments, supporting a limited number of physical servers with limited growth potential. SAN provides shared disk capacity over dedicated iSCSI or Fibre Channel networks. HP offers multiple iSCSI and SAN solutions.
If you plan to deploy only a few HP integrated XenServer Enterprise virtualization servers with limited plans for future growth, then you can choose to deploy the HP StorageWorks 2000sa Modular Smart Array shared direct attached storage solution. The solution provides an easy to deploy high performance shared storage solution but has limited future growth. The primary consideration is that in a standard configuration you cannot scale beyond connecting to up to four physical servers.
If you plan to deploy more than two HP integrated XenServer Enterprise virtualization servers and have plans for expanded future growth then it makes sense to deploy a HP iSCSI based solution. The choice between the type of HP iSCSI solution to deploy will depend on the initial number of servers you plan to deploy and your plans for future growth.
Table 2. iSCSI recommendations
Initial # of Servers Future Growth Higher End Features Recommended Solution
2-4 Limited Not Required HP AiO Storage
4-8 Limited Not Required MSA 2000i
4+ Significant Fault Tolerance, Replication EVA 4400/8800
Another solution for SAN connectivity is fibre channel. There are low-cost fibre channel SAN solutions to align with the iSCSI solutions, MSA2000fc and the EVA (Enterprise Virtual Array) solutions. In choosing the correct storage solution it may be better to break down storage into basic, advanced, and enterprise, looking at the desired features/support needed.
Local storage would be very basic storage. Fault tolerance is from the RAID configurations of the Smart Array controllers in the HP ProLiant servers, and there are no other paths to the storage. Shared direct-attached storage would be a better basic storage configuration. Again, fault tolerance is from the RAID configurations in the shared DAS, but there is now the gain of being able to do live migrations, configure high availability to achieve a better level of redundancy using multiple servers.
Using HP StorageWorks Modular Smart Array (MSA) storage is more advanced, whether iSCSI or Fibre, allowing for fault tolerance across the drives, redundant paths to the storage, optional snapshot and cloning capabilities for high availability.
At the enterprise level, the HP Enterprise Virtual Array (EVA) with much higher storage capacities, support for more servers, either 4 Gb or 8 Gb per second fibre connectivity, remote replication solutions, replication management, and support for iSCSI.
The final decision on storage is determined by your requirements. Do not need live migration capabilities, HA for VMs is not required, willing to perform export/import to move VMs between servers, then local storage will be sufficient. Otherwise, shared storage is required. For shared storage, what features are most important? Direct attached storage offers shared storage with limited capacity and very limited number of attached servers and is a good basic solution. High capacity, DR capability, high server connect support require an enterprise level HP EVA solution.
15

16
How many physical servers are needed? Memory and disk space are static, the data you developed determined the actual physical requirements. Use the sizing guidelines to determine the CPU and network requirements.
Once all of the data has been collected and used to determine total resource requirements, the last step is to determine the size and number of physical ProLiant servers. Memory becomes the most limiting factor in determining which server to use, then number of CPU cores in the server. Total physical memory in the server must be enough to support all the VM requirements plus live migration requirements, and the same is true for CPU cores. Ensure there are enough cores in the physical server to support the number of VMs to be run, including support for live migration and high availability. Other factors to consider is if live migration and pools are part of your virtualization environment then multiple servers and shared storage are required.
As discussed previously, if live migration and HA are part of you planning, more servers with less resources may be a better solution.
Distribution of virtual machines across physical servers When deciding how to distribute virtual machines across physical servers look at the utilization data and make an effort to mix and match virtual machines with dissimilar resource requirements. The goal is to balance the resource loading on the physical server, mix memory heavy VMs with some network heavy and CPU heavy VMs. Do not overload a physical server with virtual machines that use heavy CPU resources as an example. If you mix with memory and network I/O heavy virtual machines you will be able to keep the overall usage of resources per server more balanced.
Summary The HP integrated Citrix XenServer virtualization platform is an easy to deploy bare metal virtualization platform perfect for any environment. This paper has provided tips and guidelines to help you plan and size for your virtualization deployment using the XenServer platform. The tips provided will allow you to determine what your physical resource requirements will be and provide useful tips on how to best consolidate your existing physical environment to a virtual environment. Once you have finished your initial project you will find a large number of benefits of running a virtual environment: increased levels of server availability by using XenMotion and automatic high availability, easy backup and restore using simple VM exports, and increased levels of utilization as you deploy new servers in your environment.
17
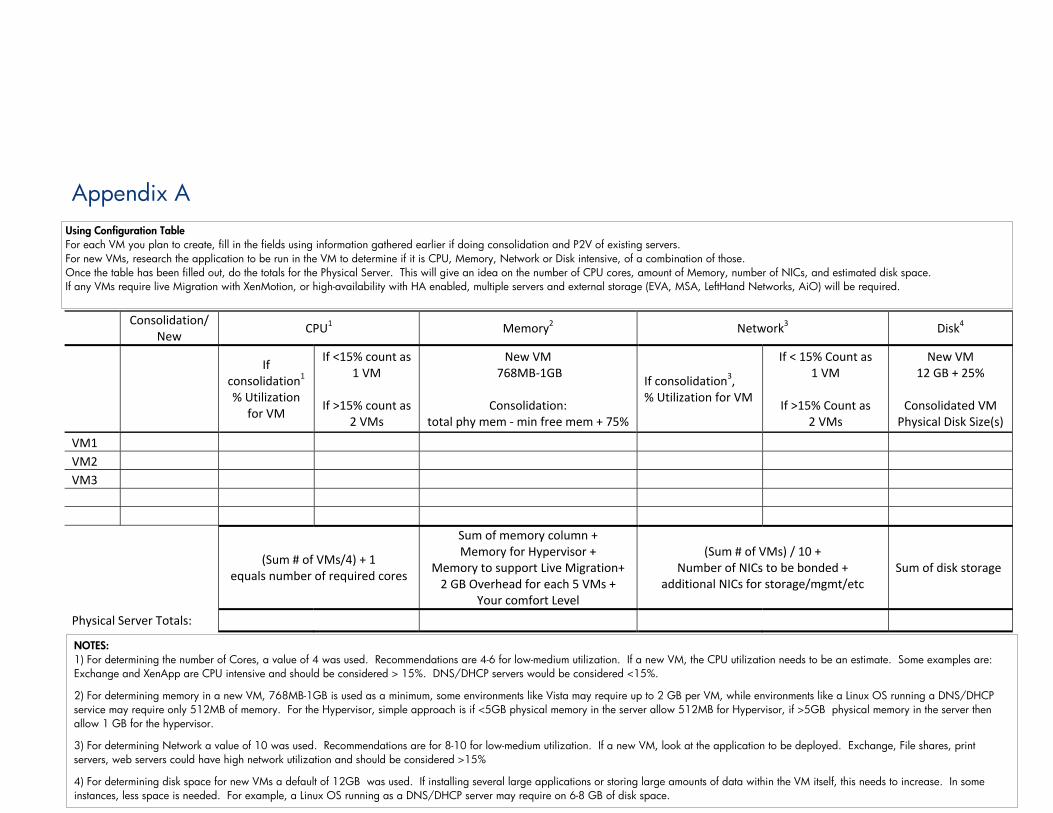
Appendix A
Consolidation/
New CPU1 Memory2 Network3 Disk4
If consolidation1 % Utilization
for VM
If <15% count as 1 VM
If >15% count as
2 VMs
New VM 768MB‐1GB
Consolidation:
total phy mem ‐ min free mem + 75%
If consolidation3, % Utilization for VM
If < 15% Count as 1 VM
If >15% Count as
2 VMs
New VM 12 GB + 25%
Consolidated VM Physical Disk Size(s)
VM1 VM2 VM3
(Sum # of VMs/4) + 1 equals number of required cores
Sum of memory column + Memory for Hypervisor +
Memory to support Live Migration+ 2 GB Overhead for each 5 VMs +
Your comfort Level
(Sum # of VMs) / 10 + Number of NICs to be bonded +
additional NICs for storage/mgmt/etc Sum of disk storage
Physical Server Totals:
1) For determining the number of Cores, a value of 4 was used. Recommendations are 4-6 for low-medium utilization. If a new VM, the CPU utilization needs to be an estimate. Some examples are: Exchange and XenApp are CPU intensive and should be considered > 15%. DNS/DHCP servers would be considered <15%.
2) For determining memory in a new VM, 768MB-1GB is used as a minimum, some environments like Vista may require up to 2 GB per VM, while environments like a Linux OS running a DNS/DHCP service may require only 512MB of memory. For the Hypervisor, simple approach is if <5GB physical memory in the server allow 512MB for Hypervisor, if >5GB physical memory in the server then allow 1 GB for the hypervisor.
4) For determining disk space for new VMs a default of 12GB was used. If installing several large applications or storing large amounts of data within the VM itself, this needs to increase. In some instances, less space is needed. For example, a Linux OS running as a DNS/DHCP server may require on 6-8 GB of disk space.
3) For determining Network a value of 10 was used. Recommendations are for 8-10 for low-medium utilization. If a new VM, look at the application to be deployed. Exchange, File shares, print servers, web servers could have high network utilization and should be considered >15%
Once the table has been filled out, do the totals for the Physical Server. This will give an idea on the number of CPU cores, amount of Memory, number of NICs, and estimated disk space. If any VMs require live Migration with XenMotion, or high-availability with HA enabled, multiple servers and external storage (EVA, MSA, LeftHand Networks, AiO) will be required.
For new VMs, research the application to be run in the VM to determine if it is CPU, Memory, Network or Disk intensive, of a combination of those. For each VM you plan to create, fill in the fields using information gathered earlier if doing consolidation and P2V of existing servers. Using Configuration Table
NOTES:

Appendix B
Overview This next section will walk you through step-by-step using built-in Windows tools to help you with sizing your virtualization servers. The goal is not to have you run through detailed calculations on every single resource class but rather provide you with enough data to understand if your server fits into the low to medium-low utilization category used to drive the sizing guidelines. This process will also provide you with the data you need to determine how much hard allocated system resources such as memory and disk space will be required for your virtualization servers. Remember that CPU and networking resources are shared between the virtual machines so understanding that your servers fit into a general resource utilization category is all that is required.
In the interest of simplification you can divide your servers into three categories of utilization. The first low to medium-low utilization which on average consume less than 15% of their current systems resources, the next category would be medium utilization systems that on average consume between 15-30% of their current servers resources, the last category would be medium to high utilization servers. Going back to the earlier sections you will want to focus first on the low to medium-low utilization servers and then progress to virtualizing the next class of systems.
How much utilization data should be captured It is recommended that you capture at least 1 week worth of utilization data during a normal work week to give you a feel for the average resource utilization requirements for your existing servers. Once you have captured your 1 week of data you can always drill into specific period of time such as the 5 day work week. Also if you have servers that are only used during certain times of the month or quarter you are best served capturing their utilization around those dates. You will also want to make sure you pick a typical week to capture the data making sure a normal number of people are using the systems and there are no holidays or companywide activities that might overly skew your results.
The process The next few pages will walk you through setting up the Windows Perfmon tool to collect utilization data on each one of the servers you determine are targets for consolidation. The following step will be to view the collected data and then use the results to classify your systems into utilization categories and determine your resource requirements.
18

Setting up Perfmon logging The process below will walk you through setting up the Windows Perfmon tool to capture relevant performance information that will help give you a more accurate view into your current servers resource requirements.
1. Launch the Windows Perfmon tool. Open the Start Menu, Select the Run Option, type perfmon in the open field and click OK. You can also find a shortcut for the Perfmon tool in the Control Panel under Administrator Tools.
2. Open the Performance Logs and Alerts object in the left hand portion of the tool, and then select the Counter Logs object.
Figure B-1. Performance logs
3. Right Click in the right panel of the tool and select the New Log Settings… option. 4. Enter a Name for the new log such as VirtSizing and click OK. 5. You will now need to add the counters for tracking utilization for CPU, network, and memory
usage. NOTE: As discussed previously you will need to allocate the same disk space for your VM that you have on your source system.
19

Figure B-2. Adding Counters
6. Click the Add Counters… button and add the following counters to your log settings. CPU Performance object Processor Counter % Processor Time (Instance _Total) Memory Performance object Memory Counter Available Mbytes Network Performance object Network Counters Bytes Total/sec
Bytes Sent/sec Bytes Received/sec
7. Once you have added the counters you can close the Add Counter dialog. Then Click the Schedule Tab and enter the number of days you want to capture data for (example 7 days) under the stop log option.
8. Click OK to close the Log Settings Dialog and you will notice that the new log settings you created is now green which lets you know it is actively collecting data.
20

Viewing captured Perfmon data Once you have finished capturing the data from your server you can also use Perfmon to view the resulting data. You can use the results to help determine if your servers fall into the low to medium-low utilization categories that drove the guidelines presented in earlier sections of this paper.
1. Launch the Windows Perfmon tool. Open the Start Menu, Select the Run Option, type perfmon in the open field and click OK. You can also find a shortcut for the perfmon tool in the Control Panel under Administrator Tools.
Figure B-3. Viewing captured data
2. Select the System Monitor object in the left hand portion of the tool. Currently the System
Monitor will be showing live performance information from the current server. 3. Click the View Log Data button which is the fourth button from the left highlighted above in
blue. 4. In the Source tab in the Data Source section select Log Files and click the add button. 5. Select the log file you created previously from the setting up Perfmon section. 6. Now Click the Data tab, remove any existing counters and add the following counters to
display your captured data. CPU Performance object Processor Counter % Processor Time Memory Performance object Memory Counter Available Mbytes Network Performance object Network Counters Bytes Total/sec (Per NIC)
Bytes Sent/sec (Per NIC Bytes Received/sec (Per NIC)
21
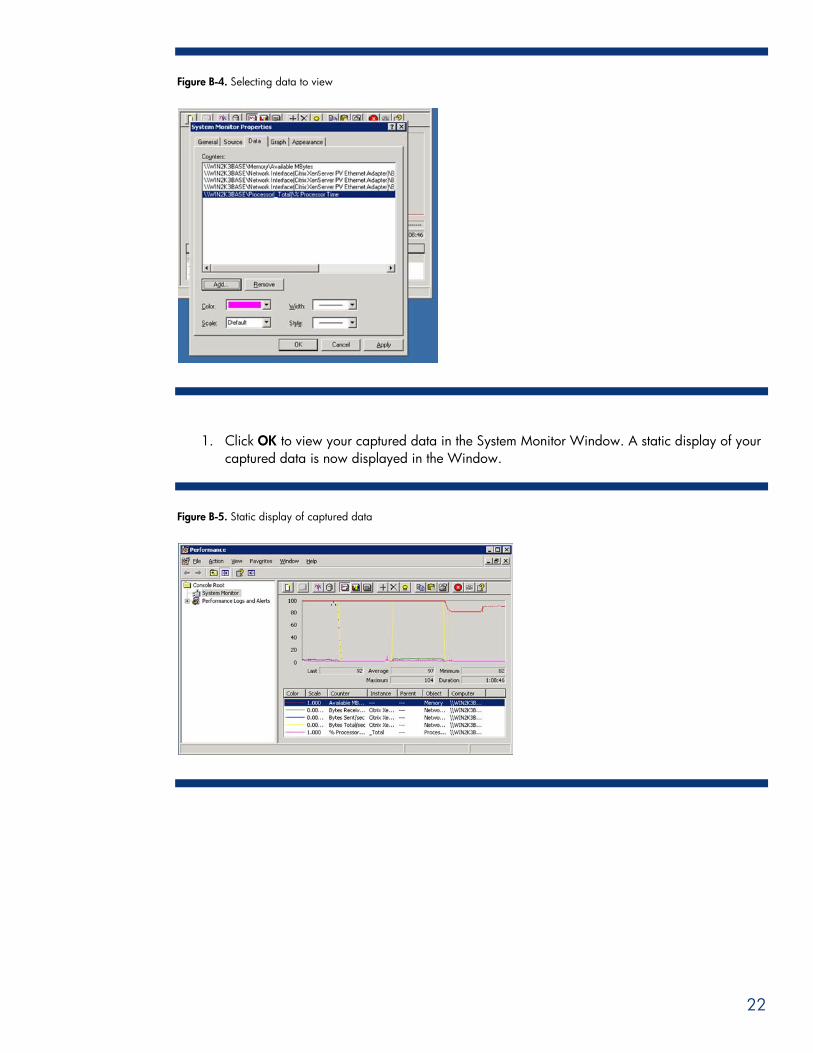
Figure B-4. Selecting data to view
1. Click OK to view your captured data in the System Monitor Window. A static display of your captured data is now displayed in the Window.
Figure B-5. Static display of captured data
22

For more information HP integrated Citrix XenServer Certification Support Matrix, www.hp.com/go/citrixcert
www.hp.com/hpsHP Services,
HP Servers, www.hp.com/go/servers
HP Storage, www.hp.com/go/storage
HP Solution Centers, www.hp.com/go/solutioncenters
HP ActiveAnswers, www.hp.com/go/activeanswers
HP Enterprise Configurator, www.hp.com/products/configurator
How to buy HP products, www.hp.com/buy
www.hp.com/storage/simplyHP StorageWorks,
Sizing XenApp on XenServer, www.hp.com/solutions/ActiveAnswers/hpsbc
http://www.citrix.com/xenserverCitrix XenServer,
Citrix, www.citrix.com
To help us improve our documents, please provide feedback at http://h20219.www2.hp.com/ActiveAnswers/us/en/solutions/technical_tools_feedback.html.
Technology for better business outcomes © Copyright 2009 Hewlett-Packard Development Company, L.P. The information contained herein is subject to change without notice. The only warranties for HP products and services are set forth in the express warranty statements accompanying such products and services. Nothing herein should be construed as constituting an additional warranty. HP shall not be liable for technical or editorial errors or omissions contained herein.
Microsoft and Windows are U.S. registered trademarks of Microsoft Corporation. AMD is a trademark of Advanced Micro Devices, Inc. Intel is a trademark of Intel Corporation in the U.S. and other countries.
4AA2-4719ENW, February 2009