quick start for hardware installation - avaya
TRANSCRIPT

Quick Start for Hardware Installation:Avaya G450 Media Gateway
03-602053Issue 5
November 2009

© 2009 Avaya Inc.All Rights Reserved.
NoticeWhile reasonable efforts were made to ensure that the information in this document was complete and accurate at the time of printing, Avaya Inc. can assume no liability for any errors. Changes and corrections to the information in this document may be incorporated in future releases.For full support information, please see the complete document, Avaya Support Notices for Hardware Documentation, document number03-600759.To locate this document on our Web site, simply go to http://www.avaya.com/support and search for the document number in the search box.
Documentation disclaimerAvaya Inc. is not responsible for any modifications, additions, or deletions to the original published version of this documentation unless such modifications, additions, or deletions were performed by Avaya. Customer and/or End User agree to indemnify and hold harmless Avaya, Avaya's agents, servants and employees against all claims, lawsuits, demands and judgments arising out of, or in connection with, subsequent modifications, additions or deletions to this documentation to the extent made by the Customer or End User.
Link disclaimerAvaya Inc. is not responsible for the contents or reliability of any linked Web sites referenced elsewhere within this documentation, and Avaya does not necessarily endorse the products, services, or information described or offered within them. We cannot guarantee that these links will work all of the time and we have no control over the availability of the linked pages.
WarrantyAvaya Inc. provides a limited warranty on this product. Refer to your sales agreement to establish the terms of the limited warranty. In addition, Avaya’s standard warranty language, as well as information regarding support for this product, while under warranty, is available through the following Web site:http://www.avaya.com/support.
CopyrightExcept where expressly stated otherwise, the Product is protected by copyright and other laws respecting proprietary rights. Unauthorized reproduction, transfer, and or use can be a criminal, as well as a civil, offense under the applicable law.
Avaya supportAvaya provides a telephone number for you to use to report problems or to ask questions about your product. The support telephone number is 1-800-242-2121 in the United States. For additional support telephone numbers, see the Avaya Web site: http://www.avaya.com/support.

Issue 5 November 2009 3
Chapter 1: Before you start
Before you install your Avaya G450 Media Gateway, prepare all the information, resources, and tools that you need during the installation process.
Preparing the Pre-Installation WorksheetThe Electronic Pre-installation Worksheet (EPW) is a customized Excel spreadsheet that you can use to collect configuration information. The EPW verifies that you have a complete set of installation information. Once filled out by the customer and project manager, the EPW can be loaded directly into the Avaya Installation Wizard (IW) or Gateway Installation Wizard (GIW) for configuration. The EPW should be completed before the installation. Download the latest version of the EPW spreadsheet from the Avaya Web site at http://support.avaya.com/avayaiw.
Preparing contacts you might needEnsure that you have the names and phone numbers of any people you might need to contact at the installation site. This list might include the people responsible for network architecture, system administration, site security, site deliveries, etc.
Preparing installation filesEnsure that you load the latest versions of all firmware files for the G450, S8300, and media modules onto your laptop before configuration. If you install a G450 without an S8300 Server, the configuration process prompts you for the filenames of all firmware files needed. You can download the firmware files needed for your installation from the Avaya Support Web site, at http://support.avaya.com.
Preparing the G450 serial numberIn order to register the gateway to CM, you need the serial number of the G450. The serial number is printed on a sticker on the back of the G450 chassis.
Obtaining RFA accessYou need to obtain a personal Single Sign-On (SSO) for Remote Feature Activation (RFA) web site authentication login before going to the site for installation. You must complete the authentication process before you can be assigned an SSO authentication login.

Before you start
4 Quick Start for Hardware Installation: Avaya G450 Media Gateway
As a first-time user:
● Business Partners should point their browsers to the Business Partner portal option sales_market, services-voice, training tools and procedures to select RFA.
● Associates should point their browsers to the Avaya Associate portal.
● Contractors should point their browsers to Avaya.com.
● Alternatively go directly to http://rfa.avaya.com.From that point, log into SSO and complete the process to obtain your personal login.
Downloading CM license and authentication files to your laptopIf you are installing a G450 with an S8300 Server as a primary controller, you need license and authentication files for the Communication Manager.
1. Create a directory on your laptop for storing license and authentication files.
2. Access the Internet from your laptop and go to rfa.avaya.com.3. Login using your SSO login and password. The AFS and RFA information home page appears.
4. Start the RFA application from the RFA information page. To create and download the license file and authentication file, follow the instructions outlined in the Avaya Remote Feature Activation (RFA) User Guide, 03-300149.
5. Use the download or e-mail capabilities of the RFA web site to download the license and authentication files to your laptop.
Preparing the INADS IP addressThe INADS IP address is required in order to configure the S8300’s modem for alarming. Use the Automatic Registration Tool (ART) to obtain an IP address for an INADS alarming modem.
1. Access the ART Web site on your laptop.
2. Select Administer S8x00 Server products for installation script, and then log in.
3. Enter the customer information, select Installation Script, and click Start Installation script & IP Addr Admin. A script file is created and downloaded or e-mailed to you.
Preparing needed hardware● Laptop – to configure the Avaya G450 Media Gateway, you need to prepare a laptop with a serial port.
The laptop must have Internet Explorer installed. If you install a G450 without an S8300, you must prepare the laptop with a Windows 2000 or Windows XP operating system and a TFTP server.
● Modem – in order to set up a remote configuration of the G450, you must prepare a USB modem. Currently, the G450 supports the MultiTech USB modem, model MT5634ZBA-USB-V92, and the

Preparing tools needed for mounting
Issue 5 November 2009 5
USRobotics USB modem, model 5637. If a USB modem is not available, you can also use a serial modem, the Multitech MultiModem ZBA, MT5634ZBA-V92.
Preparing tools needed for mountingTo mount on a rack or wall, prepare a Phillips head screwdriver.To mount on a wall prepare also:
● A 48 in. x 48 in. (1.2 m x 1.2 m) plywood board (US: 3/4 inch plywood), 0.75 in (20 mm) thick.
● Minimum of four wood screws● Minimum of four screws (pan head at least ½ in, # 10-12 screw) to fasten the G450 to the wall
You might also need wire cutters to attach the grounding conductors, if your site uses a ground block.
Choosing the installation siteEnsure that the location where you install your G450 fulfills the following requirements:
● Cables are away from sources of electrical noise such as radio transmitters, broadcast amplifiers, power lines, fluorescent light fixtures
● Water or moisture cannot enter the case of the chassis.
● Air can flow freely around all sides of the chassis.
● The vents on the sides of the case are not blocked.● The installation is no more than 25 feet (7.6 m) from an approved ground or close enough for use with
the supplied secondary grounding conductor.
Note:Note: If the installation location is greater than the length of the supplied secondary grounding
conductor from an approved ground, you must contact a licensed electrician to install a supplementary ground conductor.
● The environmental conditions match the following requirements:● Ambient temperature – 32o to 104oF (0o to 40oC)
● Relative humidity – 10-90% relative humidity
● Minimum clearance for ventilation – 18 in. (45 cm)● Weight support – 22.5-35 lbs (10-16 kg)

Before you start
6 Quick Start for Hardware Installation: Avaya G450 Media Gateway

Issue 5 November 2009 7
Chapter 2: Unpack the device
! CAUTION:CAUTION: Wear an anti-static wrist ground strap whenever you handle components of a G450 Media
Gateway. Connect the strap to an approved ground, such as an unpainted metal surface.
EquipmentOpen the box that contains the G450, and ensure that it contains the following components and accessories:
● One G450 chassis. The required media modules that may be installed.
● An Accessory Kit (see Table 1).
Removing the Power Supply UnitsFor ease of installation, it is recommended to remove the power supply unit(s) before unpacking the G450.
1. Open the package. Note that the G450 is lying flat. Turn it so that the rear panel is facing up.
2. Remove the power supply unit (PSU). If you ordered two power supplies, remove them both.
a. Loosen the two PSU captive screws, one on each side of the PSU.
b. Grasp the two side handles and pull the PSU up and out.
c. Place the PSU carefully on the table.
Other componentsThe Avaya Partner Contact Closure adjunct box, if ordered, is packaged separately.

Unpack the device
8 Quick Start for Hardware Installation: Avaya G450 Media Gateway
Table 1: G450 Accessory Kit
Fifteen 3/8 in. Flat Head Screws One Grounding Cable Assembly Four Rubber Standoffs
Two 19 in. Rack mount brackets One Cable Management Assembly One Ground Screw
Two 5/16 in. Round Head Screw Two Serrated Lock Washers One Jumper for Bridging NVRAM init Pins

Issue 5 November 2009 9
Chapter 3: Mount the device
You can position the G450 on a suitable table, or mount it in a rack or on the wall. Once the G450 is mounted, re-insert the Power Supply Units.
Positioning on a tableTo install the Avaya G450 Media Gateway as a tabletop unit:
1. Remove the four rubber standoffs from their package.
2. Turn the device upside down.
3. Position each standoff into one of the mounting sites, near each corner of the chassis.
Mounting in a rackYou can fasten the G450 to a standard 19-inch rack either at the front of the G450 or at its middle. Before you mount the G450, attach the mounting brackets to the device.
Front mounting bracket placement
Attach a regular mounting bracket to one side of the G450, near the front, as shown in Figure 1. Attach a mounting bracket with cable guides to the other side of the G450, as shown in to Figure 3.
Middle mounting bracket placement
Attach regular mounting brackets to both sides of the G450, as shown in Figure 2. You can also attach a mounting bracket with cable guides on one side of the G450, as shown in Figure 3.
Figure 1: Front mounting bracket placement

Mount the device
10 Quick Start for Hardware Installation: Avaya G450 Media Gateway
Figure 2: Middle mounting bracket placement
Figure 3: Attaching a mounting bracket with cable guides
Attaching mounting bracketsFollow these steps to attach the mounting brackets:
1. Position a bracket over the holes in the chassis in the desired mounting position.2. Affix the bracket to the chassis with five flat head 3/8 in. screws.
3. Tighten the screws with the screwdriver.
Rack mounting the G4501. Insert two mounting screws, one on either side of the rack. These will be the bottom screws of the
mounting brackets. Turn the screws only 3-4 times, so that a part of them is protruding.2. Position the G450 in the rack so that the bottoms of the brackets are resting on the protruding screws.
3. Position the G450 in the rack. Ensure that there is adequate ventilation.
4. Insert five mounting screws on each side. 5. Verify that the G450 is level and horizontal.
6. Tighten the mounting screws. Avoid overtightening.

Mounting on the wall
Issue 5 November 2009 11
7. Either tighten the two bottom-most screws inserted in step 1, or remove them completely.
8. Verify that ventilation vents are not obstructed.
Mounting on the wallTo mount the G450 on a wall, use the two mounting brackets without cable guides. You can also add a mounting bracket with cable guides if desired (refer to Figure 3).
Note:Note: a 48 in. x 48 in. (1.2 m x 1.2 m) plywood board (US: 3/4 inch plywood), 0.75 in (20 mm)
thickThe plywood and the hardware to mount the plywood are customer-provided.
1. If the wall does not have a portion of plywood available, mount , horizontally onto the wall. Make sure the plywood is sufficiently anchored in the wall. Use a minimum of four wood screws and ensure the screws are driven into wall studs, or use four wall anchors rated not less than 50 pounds (22.5 kg) shear strength each.
2. Mark the plywood with the location of the G450 bracket screw holes before fastening the plywood to the wall.
3. Position the G450 so that its front panel is facing up, and secure it to the plywood using a minimum of four screws (pan head at least ¾ in, #10-12 screw).
Figure 4: Wall mounting bracket placement
Installing the power supply unitsWhen the G450 chassis is installed, first insert the power supply unit(s) if you removed them before installation (refer to Removing the Power Supply Units on page 7).
1. Position the power supply unit before the opening at the rear of the G450 and engage both sides of the PSU in the interior guides.
2. Slide the PSU slowly into the chassis, maintaining an even pressure to assure that the PSU does not become twisted or disengaged from the guides.
3. Close and tighten the two PSU captive screws, one on each side of the PSU.

Mount the device
12 Quick Start for Hardware Installation: Avaya G450 Media Gateway
Figure 5: Inserting the power supply unit

Issue 5 November 2009 13
Chapter 4: Install media modules
The required media modules may be pre-installed in the G450 chassis. If this is the case, skip this chapter.
If the media modules are not pre-installed, or if you want to replace modules or add new media modules, install the necessary media modules and related components to support the configuration required for your site. If this Media Gateway needs to function as an ICC or as an LSP, install an S8300 Server module.
Figure 6: The G450 front panel ports and slots
Figure notes:
1. System LEDs2. USB ports3. Console port4. Services port5. ETR (Emergency Transfer Relay) port6. CCA (Contact Closure) port7. ETH WAN ports8. ETH LAN ports9. RST button
10. ASB button
11. V1 — slot for media module or S8300 Server
12. V2 — media module slot13. V3 — media module slot14. V4 — media module slot15. V5 — media module slot16. V6 — media module slot17. V7 — media module slot18. V8 — media module slot
1 2 3 4 5 6 7 8
10
9
11
12
13
14
15
16
17
18

Install media modules
14 Quick Start for Hardware Installation: Avaya G450 Media Gateway
Table 2: Permitted slots for media modules
Media module Permitted slots Description
MM340 V3, V4, V8 Provides one E1/T1 WAN port for connecting to a WAN endpoint device.
MM342 V3, V4, V8 Provides one USP WAN port for connecting to a WAN endpoint device.
MM710 V1 – V8 Provides one E1/T1 trunk port for connecting an E1/T1 telephone trunk.
MM710B V1 – V8 Provides one E1/T1 trunk port for connecting an E1/T1 telephone trunk.
MM711 V1 – V8 Provides eight universal analog ports for connecting analog telephones or trunks.
MM712 V1 – V8 Provides eight ports for connecting DCP telephones.
MM714 V1 – V8 Provides four analog ports for analog telephones and four analog ports for analog trunks.
MM714B V1 – V8 Provides four analog ports for analog telephones, four analog ports for analog trunks, and an emergency transfer relay.
MM716 V1 – V8 Provides one amphenol connector that connects to a punch down block to provide 24 analog line ports.
MM717 V1 – V8 Provides one amphenol connector that connects to a punch down block to provide 24 ports for connecting DCP telephones.
MM720 V1 – V8 Provides eight ports for connecting up to eight ISDN trunks or 16 ISDN BRI stations.
MM722 V1 – V8 Provides two ports for connecting ISDN trunks.
S8300 V1 Server

Installing an S8300 server module
Issue 5 November 2009 15
Installing an S8300 server moduleYou can only insert the S8300 in slot V1 on the left side of the Avaya G450 Media Gateway.
1. If you are inserting an S8300C or S8300D module, rIf you are installing an S8300B, remove the plate above slot V1, labelled “Remove before removing or inserting S8300 module”.
2. Remove the blank plate from slot V1.
3. Position the media module before the V1 bay opening and engage both sides of the module in the interior guides.
4. Slide the S8300 module slowly into the chassis. Maintain an even pressure to ensure that the module does not become twisted or disengaged from the guides.
Figure 7: Inserting the S8300 Server module
5. Apply firm pressure to engage the connectors. 6. Tighten the spring-loaded captive screws on the front of the module to lock the S8300 Server module
into the chassis.7. If you are inserting an S8300 module, rIf you are installing an S8300B, replace the plate labelled
“Remove before removing or inserting S8300 module” above slot V1 and tighten the screws on the front of the plate.
Installing other Media Modules
Combination LimitationsThe following limitations apply to combining media modules in the G450:
● No more than three MM340/MM342 WAN modules

Install media modules
16 Quick Start for Hardware Installation: Avaya G450 Media Gateway
● The MM760 is not supported
The following limitations apply to combining media modules in the G450:
● Three MM340/MM342 WAN modules
● The MM760 is not supported
Inserting media modulesMedia modules are restricted to certain slots. Ensure that you insert each module in a slot appropriate for that module. For a list of allowable slots for each media module, see Table 2.
Insert the media modules needed for your configuration.

Issue 5 November 2009 17
Chapter 5: Install Media Resources, PSU, and Memory
You can optionally add or remove media resources (VoIP) modules, a power supply unit (PSU), or a memory upgrade kit for increasing the number of supported announcement files.
For instructions on how to install the upgrade memory kit, refer to Job Aid: Replacing the Field Replaceable Units (FRUs) for the Avaya G450 Media Gateway, 03-602059.
Note:Note: There are two hardware versions of the G450, referred to as G450 1.x and G450 2.x. G450
1.x is the G450 version with hardware suffix 1, and the G450 2.x is the G450 version with hardware suffix 2. On the G450 version 1.x, the ASB button is to the right of the RST button.On the G450 version 2.x, the RST button is above the ASB button.In cases where the instructions differ depending on the G450 version, instructions are given for both versions.
Adding or removing media resourcesYou can add or remove media resources (VoIP) modules in the G450 main board. To do so, you must pull out the G450 main board. The G450 supports hot insertion and removal of the main board without power drop. However, all services are suspended while the G450 main board is out, and all calls are disconnected. Any translation and other data that is in the running configuration but has not been saved to the startup configuration is lost.This procedure requires the following steps:
1. Removing the G450 main board.
2. Adding or removing media resource modules: MP20 and MP80.3. Inserting the G450 main board.
Removing the G450 main board1. Unscrew the two captive screws, one at each side of the G450 main board front panel.2. Open the latches on both sides of the main board.
3. Grasp the latches and pull out the main board from its slot.
4. Place the main board carefully on a table.

Install Media Resources, PSU, and Memory
18 Quick Start for Hardware Installation: Avaya G450 Media Gateway
Figure 8: Removing and inserting the G450 main board
Adding or removing media resource modules: MP20 and MP80The G450 main board has four slots for VoIP engines. Each slot can accommodate either an MP20 (Media Processor 20) module or an MP80 (Media Processor 80) module. An MP20 provides 25 channels for G.711 and G.726 and 20 channels for G.729, and an MP80 provides 80 channels.
Note:Note: The G450 prior to release 5.2.1 supports up to 240 channels.
The G450 supports a maximum of 320 active channels. Therefore, any combination of MP80 and MP20 in the four DSP slots can be supported.
5. To insert an MP20 or MP80 module:
a. Locate the MP20 or MP80 module slot. The location differs depending on the hardware version of the G450 (see Figure b and Figure 9).

Adding or removing media resources
Issue 5 November 2009 19
b. Location of MP20 and MP80 module slots in a G450 1.x
Figure notes:
1. MP20 or MP80 module slot2. MP20 or MP80 module slot
3. MP20 or MP80 module slot4. MP20 or MP80 module slot
Install Media Resources, PSU, and Memory
20 Quick Start for Hardware Installation: Avaya G450 Media Gateway
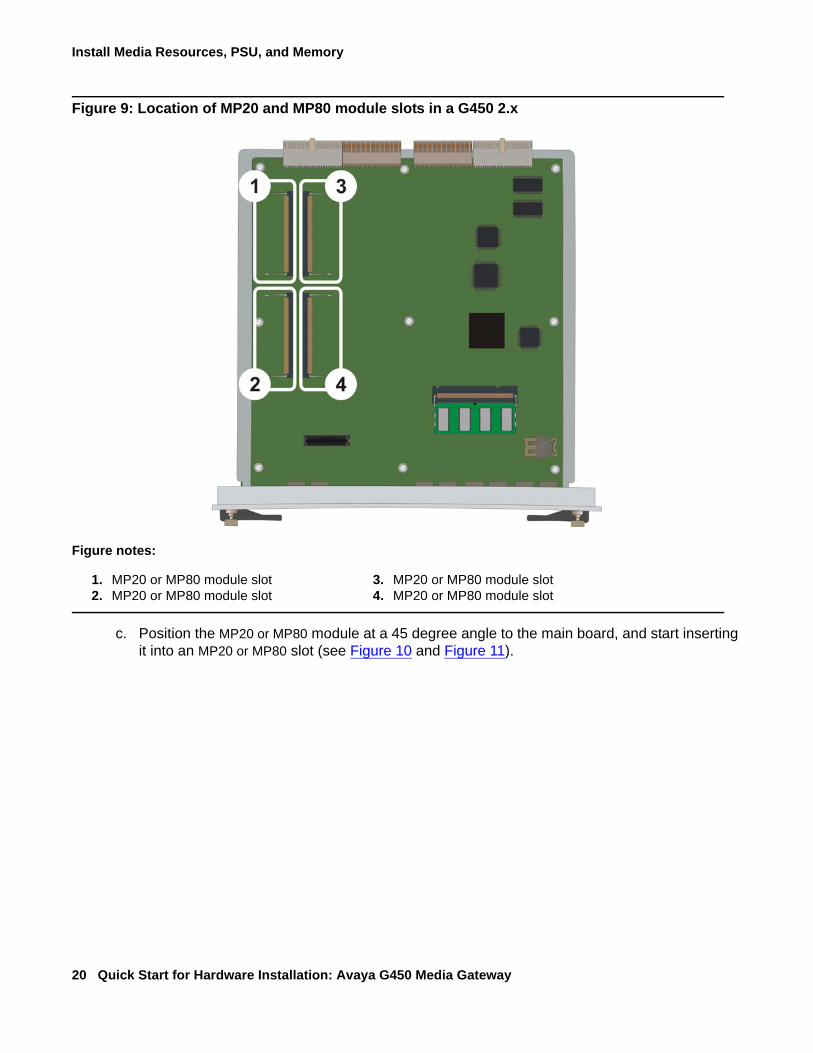
Figure 9: Location of MP20 and MP80 module slots in a G450 2.x
c. Position the MP20 or MP80 module at a 45 degree angle to the main board, and start inserting it into an MP20 or MP80 slot (see Figure 10 and Figure 11).
Figure notes:
1. MP20 or MP80 module slot2. MP20 or MP80 module slot
3. MP20 or MP80 module slot4. MP20 or MP80 module slot

Adding or removing media resources
Issue 5 November 2009 21
Figure 10: Adding or removing an MP20 or MP80 module in a G450 1.x
Figure notes:1. VoIP module locking screw
1
Install Media Resources, PSU, and Memory
22 Quick Start for Hardware Installation: Avaya G450 Media Gateway
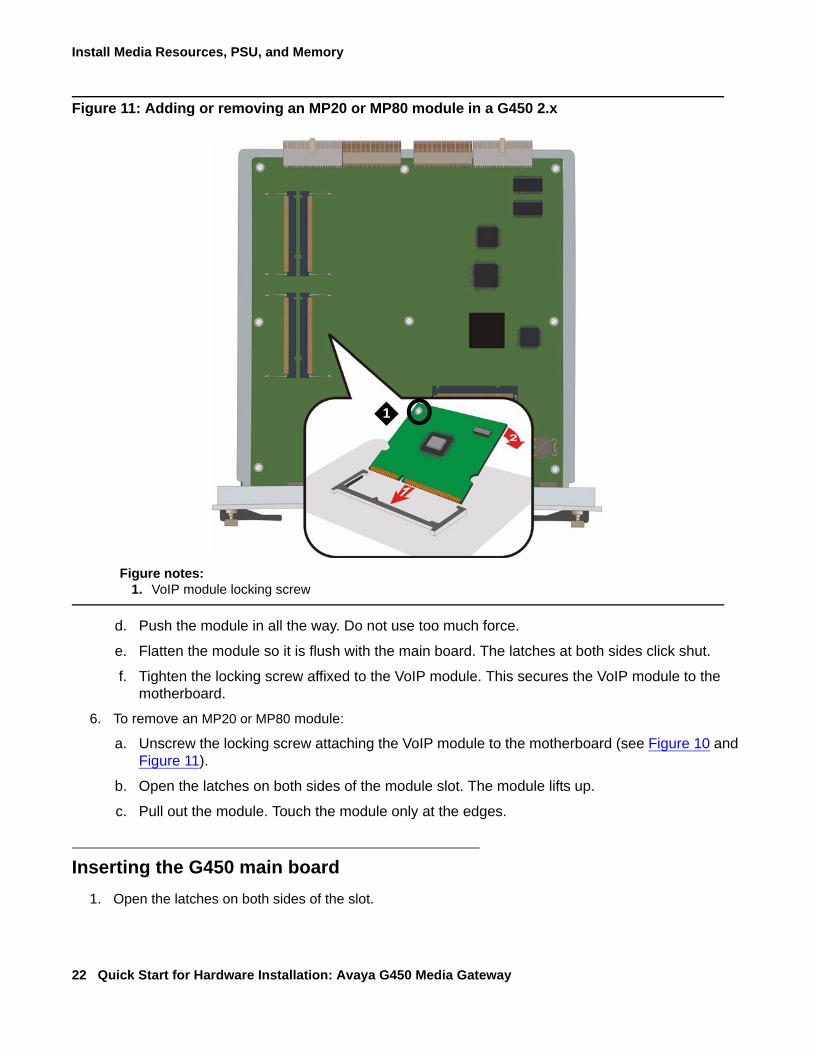
Figure 11: Adding or removing an MP20 or MP80 module in a G450 2.x
Figure notes:1. VoIP module locking screw
d. Push the module in all the way. Do not use too much force.
e. Flatten the module so it is flush with the main board. The latches at both sides click shut.
f. Tighten the locking screw affixed to the VoIP module. This secures the VoIP module to the motherboard.
6. To remove an MP20 or MP80 module:
a. Unscrew the locking screw attaching the VoIP module to the motherboard (see Figure 10 and Figure 11).
b. Open the latches on both sides of the module slot. The module lifts up.
c. Pull out the module. Touch the module only at the edges.
Inserting the G450 main board1. Open the latches on both sides of the slot.
1

Inserting a power supply unit
Issue 5 November 2009 23
2. Insert the G450 main board vertically into the slot.
3. Push the main board in until the latches begin to close.
4. Close and tighten the two captive screws on the front panel.
Inserting a power supply unitThe G450 provides full redundant, load sharing power supply units (1 + 1). A single power supply unit provides sufficient power for any G450 configuration. If you choose to install two power supply units, they operate in a load sharing mode.
Figure 12: Inserting a power supply unit
1. Position the power supply unit before the opening and engage both sides of the unit in the interior guides.
2. Slide the power supply unit slowly into the chassis, maintaining an even pressure to assure that the unit does not become twisted or disengaged from the guides.
3. Close and tighten the captive screws next to the power supply handles on the rear panel.
4. Connect a power cable to the power connector on the power supply unit.5. Plug the power cable into a mains socket.

Install Media Resources, PSU, and Memory
24 Quick Start for Hardware Installation: Avaya G450 Media Gateway

Issue 5 November 2009 25
Chapter 6: Power up
Grounding requirementsNote:
Note: Grounding requirements differ widely from country to country. In addition to the grounding instructions presented in this section, you must follow the local electrical installation codes for your location.
You must use two safety grounds to ensure safe operation of the G450 Media Gateway:
Both safety grounds must be connected to an approved ground (see Chapter 2 of Installing and Upgrading the Avaya G450 Media Gateway, 03-602054, for the definition of an approved ground). If a power cord accompanies the G450, use that cord whenever possible.
! WARNING:WARNING: Connection of both grounds (the AC power cord and the supplementary ground conductor) is
required for safe operation of the G450 Media Gateway.
! WARNING:WARNING: An improper ground can cause electrical shock, equipment failures, and service outages.
Connecting ground conductors1. Place the ring terminal of the 10 AWG (4.0 mm2) Supplementary Ground Conductor on the ground
screw that was provided in the accessories box.
2. Insert the ground screw on the rear of the chassis adjacent to the ground symbol and securely tighten the screw such that it cannot be loosened without the use of a tool.
● The ground conductor that is part of the AC power cord.
● The field-installed green/yellow conductor, referred to as the supplementary ground conductor.

Power up
26 Quick Start for Hardware Installation: Avaya G450 Media Gateway
Using a ground blockA ground block must be provided for use with multiple Media Gateway installations. If the ground block is to be used, you must supply it and have it installed by an electrician. To attach the supplementary ground conductor (that is already attached to the grounding screw on the chassis) to a ground block:
1. Cut the supplementary ground conductor to the length needed to terminate the conductor into one of the terminals of the ground block. Do not coil the supplementary ground conductor.
2. Attach one end of the remaining 10 AWG (4 mm2) ground wire to one of the terminals in the ground block and the other end to an approved ground.
3. Cut this ground wire to the length needed to reach the approved ground. Do not coil this wire.
Connecting power1. Connect the AC power cable to the inlet receptacle on the rear of the chassis.2. Connect the other end of the power cable into a mains socket.
LED sequenceWhen you turn on the G450, the following LED sequence occurs:
1. The PWR LED on the front panel lights, indicating the operational status of the power supply unit (see Table 3).
2. The CPU LED lights if the firmware is running.
3. At least one LED on each media module lights initially and then goes off after about 20 seconds.
Table 3: Power Supply Unit PWR LED
LED Name State Color Indication
PWR Power On Green Power is OK
On Red A power fault
Off The PSU unit is broken or not powered

Issue 5 November 2009 27
Chapter 7: Prepare for configuration
Before you prepare the G450 for configuration, ensure that you load the completed Electronic Pre-Installation Worksheet onto the laptop. You should also load any CM license and authentication files and any firmware files that you have prepared onto the laptop.
Preparations for configuration differ depending on whether your G450 contains an S8300 Server. This chapter describes both options.
Preparing a G450 with an S8300 serverUse the Avaya Installation Wizard (IW) to configure the G450 with an S8300.
1. Connect a laptop computer to the Services port of the S8300, using a crossover cable.2. Make sure the laptop is configured as follows:
● IP Address: 192.11.13.5
● NetMask: 255.255.255.252● Disable DNS
● Clear the primary WINS and secondary WINS IP Addresses
● Disable the Proxy Server in the Internet Explorer3. Launch Internet Explorer on the laptop and type the following URL to access the S8300 Server Home
Page: http://192.11.13.6.The welcome screen for Avaya Integrated Management appears.
4. Click Continue. The Logon screen for Integrated Management appears.
5. Enter the appropriate login name and password.
6. Ask a customer representative for a login name and password that the customer would like for the superuser login. If you are a business partner, you can also repeat this procedure to add the dadmin login.
Note:Note: Make sure the customer can change this login, its password, or its permissions later.
7. From the Integrated Management main menu, select Launch Maintenance Web Interface.
8. From the navigation menu of the Maintenance Web Pages, select Security > Administrator Accounts.
The Administrator Accounts screen appears.9. Select Add Login.
10. Select Privileged Administrator and click Submit. The Administrator Logins -- Add Login: Privileged Administrator screen appears.

Prepare for configuration
28 Quick Start for Hardware Installation: Avaya G450 Media Gateway
11. Type a login name for the account in the Login name field.
12. Verify the following:
● susers appears in the Primary group field.● prof18 appears in the Additional groups (profile) field. prof18 is the code for the customer
superuser.
● /bin/bash appears in the Linux shell field.● /var/home/login name appears in the Home directory field, where login name is the name you
entered in step 11.13. Skip the fields Lock this account and Date on which account is disabled-blank to ignore.
14. For the Select type of authentication option, select password.
Note:Note: Do not lock the account or set the password to be disabled.
15. Enter the password in the Enter password or key field and the Re-enter password or key field.
16. In the section Force password/key change on next login select no.
17. Click Submit.The system informs you that the login is added successfully.
18. From the Integrated Management main menu, select Launch Avaya IW. The Avaya Installation Wizard (IW) opening screen appears.
Configuring the G450 and S8300 using the Avaya IWStep through the screens of the Avaya IW to configure the S8300 and the G450. Take note of the following items:
1. On the initial IW screen, you can upgrade the wizard if you have a more current version of the AIW.rpm wizard file. You can download the most current version of the AIW.rpm wizard file from the Avaya Web site at http://support.avaya.com/avayaiw. The format of the name of the file is si_S8300-<version_number>.noarch.rpm, where <version_number> is the Avaya IW version number.
2. On the Import EPW screen, import the Electronic Pre-Installation Worksheet (EPW) that was prepared.3. On the Usage Options screen, verify the role of this S8300 server.
4. Use the NVRAM Init screen to initialize the G450.
5. On the Date/Time screen, set the correct date, time, and time zone.6. Click Continue in the Communication Manager Software Upgrade screen. You cannot use the Avaya
IW to upgrade Communication Manager software. Use the Software Update Manager instead.7. On the SES Co-Res screen, you can optionally enable SES.
8. If you have a software update (patch) file for Communication Manager, use the Software Update screen to select the file and update the software.
9. On the Phone Message Files screen, you can install standard and custom phone message files.

Preparing a G450 without an S8300 server
Issue 5 November 2009 29
10. On the Media Server - IP Addresses screen, enter IP information for the S8300.
11. If you selected the Install this media server as an LSP option in the Usage Options screen, the LSP Controller screen appears. Enter the primary controller IP addresses for registration and synchronization.
12. You can configure optional services: Uninterruptible Power Supply (UPS), Domain Name Service (DNS), Network Time Protocol (NTP), or INADS remote support.
13. If you are not using IW to generate basic translations, select the Translation will be added after the installation option on the Translation Source screen.
14. On the Security File screen, load the CM License file that you prepared from your laptop.15. On the IP Addresses screen, click to configure the following information for the G450:
a. To specify the details of the Primary Management Interface of the G450, use the PMI screen.
b. To specify SNMP community strings and trap destinations, use the SNMP screens.c. To specify the Media Gateway Controller(s) used to manage the G450 and the Transition Point
information, use the MGC List screen. Click Ping Test to test the accessibility of each MGC.16. On the Firmware screen, upgrade G450 and media module firmware. New firmware files can be
loaded from your laptop directly into the server /tftpboot directory, if needed.17. Use the Change Master Key - Optional screen to optionally change the master key which is used to
encrypt gateway secrets (passwords, etc.) in the gateway configuration file.18. If you have a service contract, the Gateway Authentication screen displays the installed gateway
Authentication file.19. Review the status of the Field Replaceable Units (FRU) in the FRU Status screen.20. On the TFTP Server screen, configure the media gateway TFTP server capability to upload IP Phone
configuration files.
21. You can configure the modem in the modem configuration screens.
22. If you selected the option Use this wizard to create basic translations in the Translation Source screen, you can configure Telephony, Trunking, and Endpoints.
23. Optionally configure alarming for the modem, OSS alarming, and SNMP alarming.24. Optionally change the root password on the media gateway.
25. On the Authentication File screen, load the CM authentication file that you prepared from your laptop.
Preparing a G450 without an S8300 serverYou can use the Gateway Installation Wizard (GIW) to configure the Avaya G450 Media Gateway without an S8300. You can perform the configuration on site, or prepare the G450 for a remote configuration.
1. Install the GIW software on your laptop. You can download the GIW software from the Avaya support Web site, at http://support.avaya.com/avayaiw and go to File Downloads.
2. Connect the flat RJ-45 to RJ-45 cable to the DB-9 cable adapter
3. Plug the RJ-45 cable into the G450 Console port.

Prepare for configuration
30 Quick Start for Hardware Installation: Avaya G450 Media Gateway
4. Plug the DB-9 end of the cable into a COM port of the laptop.
5. Double-click the GIW icon on the laptop to open the Gateway Installation Wizard. The Overview screen appears.
6. Click Continue. The Gateway Connection Details screen appears.
7. Select Select if this is any Gateway other than G430a. At the prompt, enter username root and password root.b. Change the password when prompted.
8. Click Continue. The Initialize Components screen appears.
9. To perform an on site configuration using the GIW, continue with Configuring the G450 using the GIW on page 30. To prepare for a remote configuration, continue with Preparing for a remote configuration of the G450 on page 31.
Configuring the G450 using the GIW1. On the Initialize Components screen, check the options that are appropriate for your installation.
2. On the Import EPW screen, import the Electronic Pre-Installation Worksheet (EPW) that was prepared.
3. Use the IP Address screen to configure addresses and communication parameters for the G450. Click to configure the following information for the media gateway:
a. To specify the details of the Primary Management Interface of the G450, use the PMI screen.
b. To specify SNMP community strings and trap destinations, use the SNMP screens.c. To specify the Media Gateway Controller(s) used to manage the G450, and the Transition Point
information, use the MGC List screen. Click Ping Test to test the accessibility of each MGC.4. On the Firmware screen, identify the TFTP server used for file transfer, and specify the firmware
upgrade files to load.5. Use the Change Master Key - Optional screen to optionally change the master key which is used to
encrypt gateway secrets (passwords, etc.) in the gateway configuration file.6. The Gateway Authentication screen displays the installed gateway Authentication file.
7. Review the status of the Field Replaceable Units (FRU) in the FRU Status screen.8. On the TFTP Server screen, configure the media gateway TFTP server capability to upload IP Phone
configuration files.
9. You can configure the modem in the modem configuration screens.10. Change the root password on the media gateway.
11. Click Finish to complete the G450 configuration.
Note:Note: If you run GIW, ensure that services can log in to the system using USB modem
after you run the GIW.

Preparing a G450 without an S8300 server
Issue 5 November 2009 31
Preparing for a remote configuration of the G450The G450 can be remotely configured through the network or via a modem.
Preparing for a remote configuration of the G450 through the network
If you need to prepare the G450 for remote configuration through the network, run the installation script for newly installed gateways. The installation script configures the gateway’s basic network parameters required to achieve network connectivity: VLAN number, IP address, IP netmask, IP address for the default router, MGCs list, and hostname. A remote technician can then further configure the gateway as required.
Run the installation script after installing the G450 and connecting it to power, as described in previous chapters.
Note:Note: The installation script is supported from branch gateway firmware version 29.22.x.
1. Prepare a laptop with SSH client software.
2. Set the laptop's TCP/IP properties as follows:
- IP address: 192.11.13.5- Subnet mask: 255.255.255.252
- Disable DNS service
- Disable WINS Resolution
3. Connect the laptop computer to the G450 Services port, using an Ethernet cable.4. SSH to 192.11.13.6.5. At the prompt, enter username root and password root.6. At the prompt, configure a new password.
7. At the prompt, enter y to configure basic gateway connectivity.
Note:Note: If you enter n but then change your mind, you can use the script-config CLI command
to run the installation script, so long as you have not saved any configuration changes you may have made.
8. You are prompted to configure the following parameters. For each parameter, you can enter a value, or press Enter to accept the default value shown in square brackets:
- VLAN number- IP address for the primary management interface
- Subnet mask for the primary management interface
- IP address for the default gateway (router)- Up to four IP addresses to specify the Media Gateway Controllers
- Hostname for the G450

Prepare for configuration
32 Quick Start for Hardware Installation: Avaya G450 Media Gateway
9. The settings you configured are displayed, and you are prompted for confirmation.
● If you confirm the settings, they are saved and the G450 reboots.
● If you do not confirm the settings, you are prompted to re-configure them. If you enter y, the parameters are presented again for configuration.
10. Connect the Ethernet port to the network to enable remote access to the gateway. A remote technician can now further configure the gateway using the CLI.
Preparing for a remote configuration of the G450 via a modem
If you need to prepare the G450 for a remote configuration via a modem, you must attach a modem and enable it using the GIW.
Note:Note: If you have an Avaya Service contract, no configuration is necessary for Services personnel
to remotely access the gateway through a USB modem. Simply connect the modem to a USB port and plug in a loop start dial tone line into it, and a remote technician can dial in to the G450 and complete the configuration using the CLI interface.
Note:Note: You must provide the loop start dial tone for the modem to dial in to the Media Gateway.
1. Click Continue until the Modem Type Selection screen appears.
2. Select the type of modem you are using, and click Continue. 3. In the Modem Configuration screen, enter the modem parameters. If you are configuring a USB
modem and do not have an Avaya Service contract, select Enable CHAP Authentication and enter the CHAP secret key.
4. Click Continue until you exit the Gateway Installation Wizard.5. Connect the modem that you specified in Step 2 and plug in a loop start dial tone line into it .
6. Dial in to the modem to ensure that it is set up correctly.
7. A remote technician can now dial in to the G450 and complete the configuration using the script-config CLI command to run the installation script.
Next steps
Using Avaya IW and GIWThe full configuration process is performed using the Avaya Installation Wizard or Gateway Installation Wizard interface. For more detailed information about IW and GIW:
● See the online help for IW and GIW at http://support.avaya.com/avayaiw.
● Review Job Aid: Avaya Installation Wizard, 555-245-754, and Job Aid: Avaya Gateway Installation Wizard, 555-245-756.

Next steps
Issue 5 November 2009 33
Using the Command Line InterfaceFor information about configuring the G450 with the Command Line Interface:
● For instructions on how to connect to the CLI, review Chapter 4 of Administration for the Avaya G450 Media Gateway, 03-602055 - Accessing the Avaya Media Gateway.
● For detailed information about CLI commands, refer to the Avaya Aura G450 CLI Reference, 03-602056.

Prepare for configuration
34 Quick Start for Hardware Installation: Avaya G450 Media Gateway