quick start guide - microinvest · 2016-03-22 · keyboard shortcut ctrl+s. settings are visible...
TRANSCRIPT

Quick Start Guide
Microinvest Warehouse Pro Light
Restaurant
2016
2
s o f t wa r e c o m p a n y s i n c e 1 9 8 4
Address: 215 Tzar Boris III blvd., 1618 Sofia, Bulgaria
tel./fax: +359 2 9555515, National Tel: +359 700 44 700
e-mail: [email protected], http://en.microinvest.net
I. Application Installation
During the initial installation of the product, the application “gets to know” the computer system, on which it shall work and configures its features. The memory, processor and disk space are tested, as
well as the availability of local network, printer and other peripheral devices. In order to facilitate the
procedure, it is necessary that:
The operation system MS Windows is stable;
The date format in Short Date Format is dd.mm.yyyy.
The application can be installed from a CD-ROM or by obtaining the installation file directly from
our web site http://www.en.microinvest.net.
Installing from CD-ROM
Place the CD-ROM containing Microinvest Warehouse Pro Light in the CD drive of the computer. Wait while the installation file loads. The main application window with the list of products
appears.
Note: If the installation file does not load within 30 seconds after the CD is placed, you must select the CD-ROM and start Autorun.exe or go to the “Products” folder and select the application you wish to
install.
1. The installation process consists of 3 stages:
System checking and installation of the required additional applications (Microsoft.NET
Framework, Crystal Reports, Windows Installer);
Selection of working directory;
Copying of files in the working directory.
2. After the installation process is completed, the last window contains an option to start the
application.
Installing from the Internet
Go to http://www.en.microinvest.net, then go to the product page of the Microinvest Warehouse Pro
Light. Click the Download button.
1. The installation file will be saved on your computer.
2. The installation process consists of 3 stages:
System checking and installation of the necessary additional applications (Microsoft.NET
Framework, Crystal Reports, Windows Installer);
Selection of working directory;
Copying of files in the working directory.
Please, note that Microinvest Warehouse Pro Light point of sale application can be
downloaded and installed for a free 30 day trial, after which you should purchase a license key.
3
s o f t wa r e c o m p a n y s i n c e 1 9 8 4
Address: 215 Tzar Boris III blvd., 1618 Sofia, Bulgaria
tel./fax: +359 2 9555515, National Tel: +359 700 44 700
e-mail: [email protected], http://en.microinvest.net
II. Microinvest Warehouse Pro Light Installation Steps
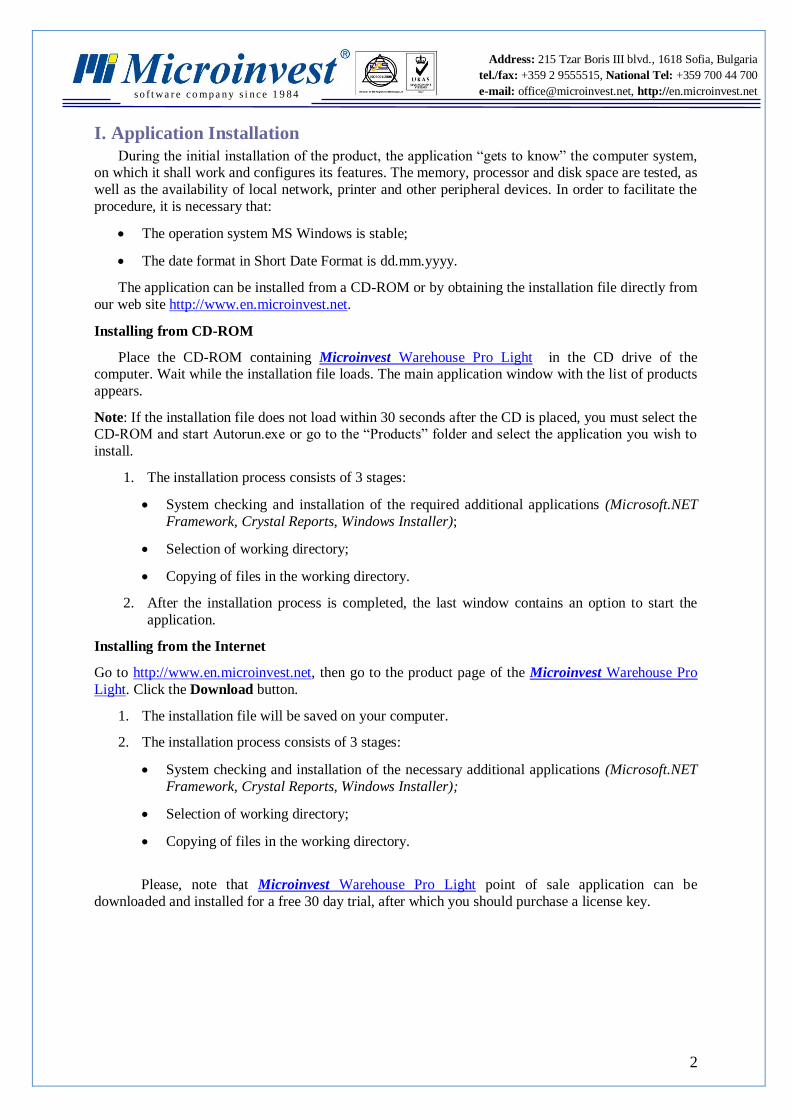
1. Choose the language you will work with. Then press OK.
2. The installation wizard will start up, press Next.
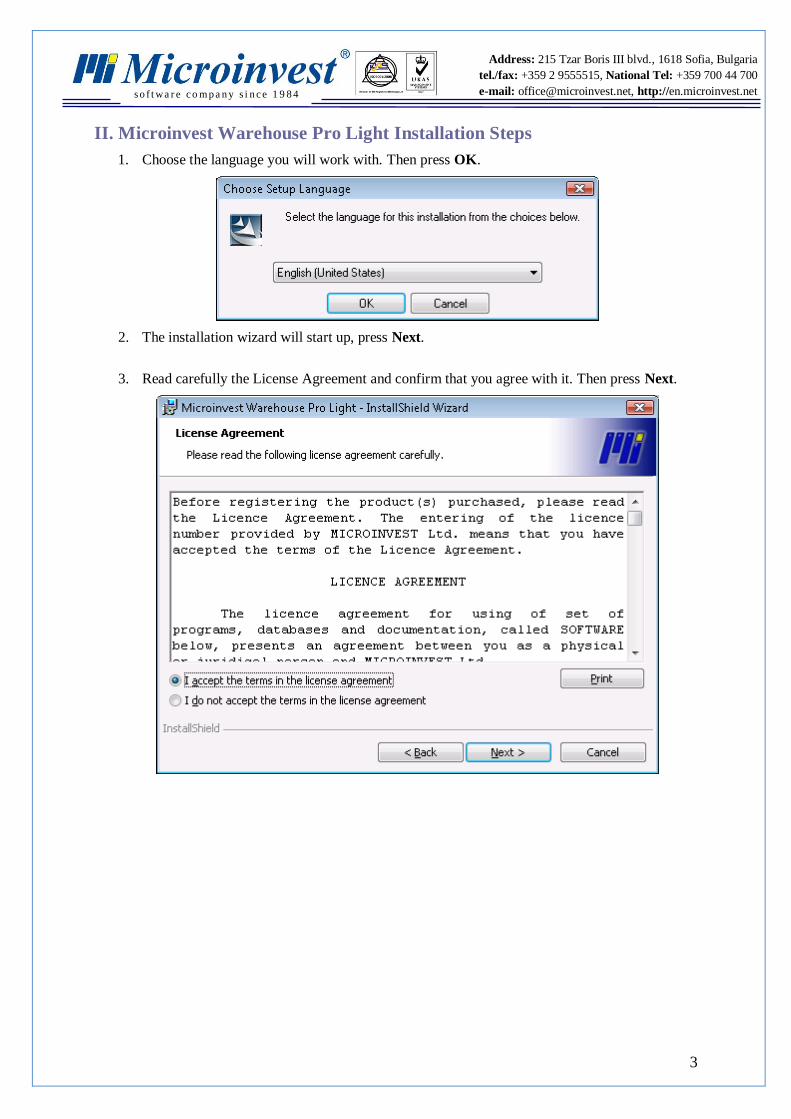
3. Read carefully the License Agreement and confirm that you agree with it. Then press Next.
4
s o f t wa r e c o m p a n y s i n c e 1 9 8 4
Address: 215 Tzar Boris III blvd., 1618 Sofia, Bulgaria
tel./fax: +359 2 9555515, National Tel: +359 700 44 700
e-mail: [email protected], http://en.microinvest.net
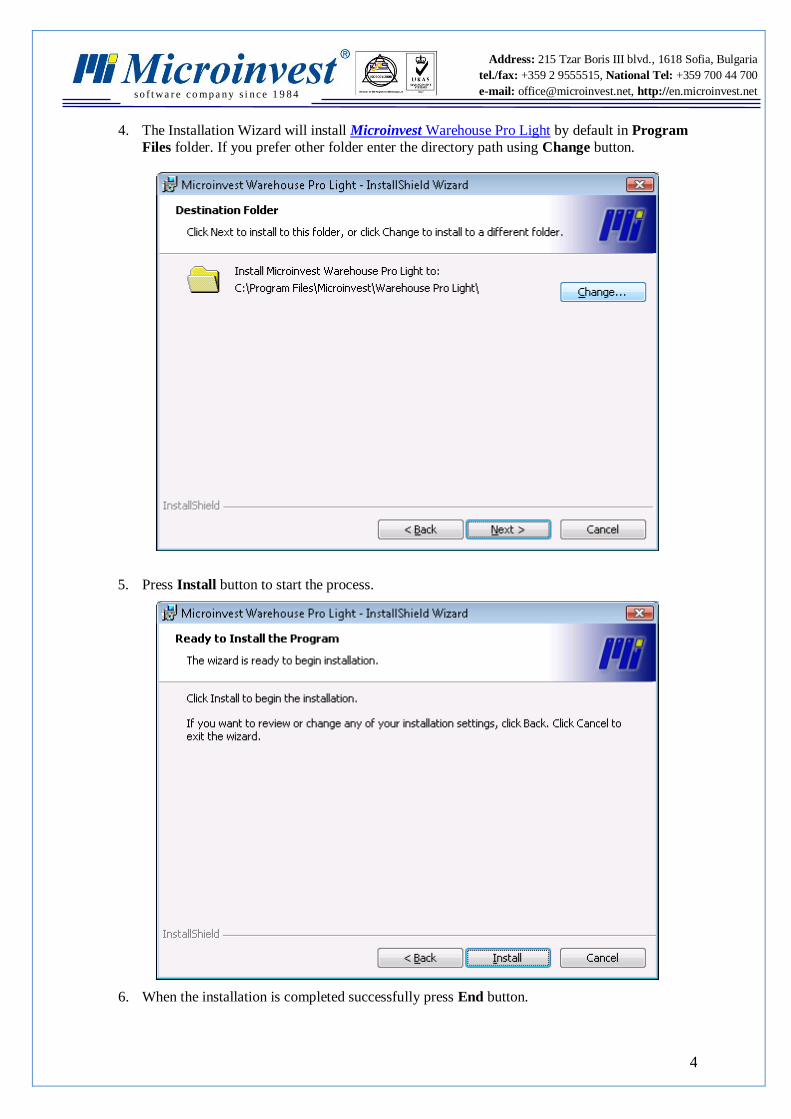
4. The Installation Wizard will install Microinvest Warehouse Pro Light by default in Program
Files folder. If you prefer other folder enter the directory path using Change button.
5. Press Install button to start the process.
6. When the installation is completed successfully press End button.
5
s o f t wa r e c o m p a n y s i n c e 1 9 8 4
Address: 215 Tzar Boris III blvd., 1618 Sofia, Bulgaria
tel./fax: +359 2 9555515, National Tel: +359 700 44 700
e-mail: [email protected], http://en.microinvest.net
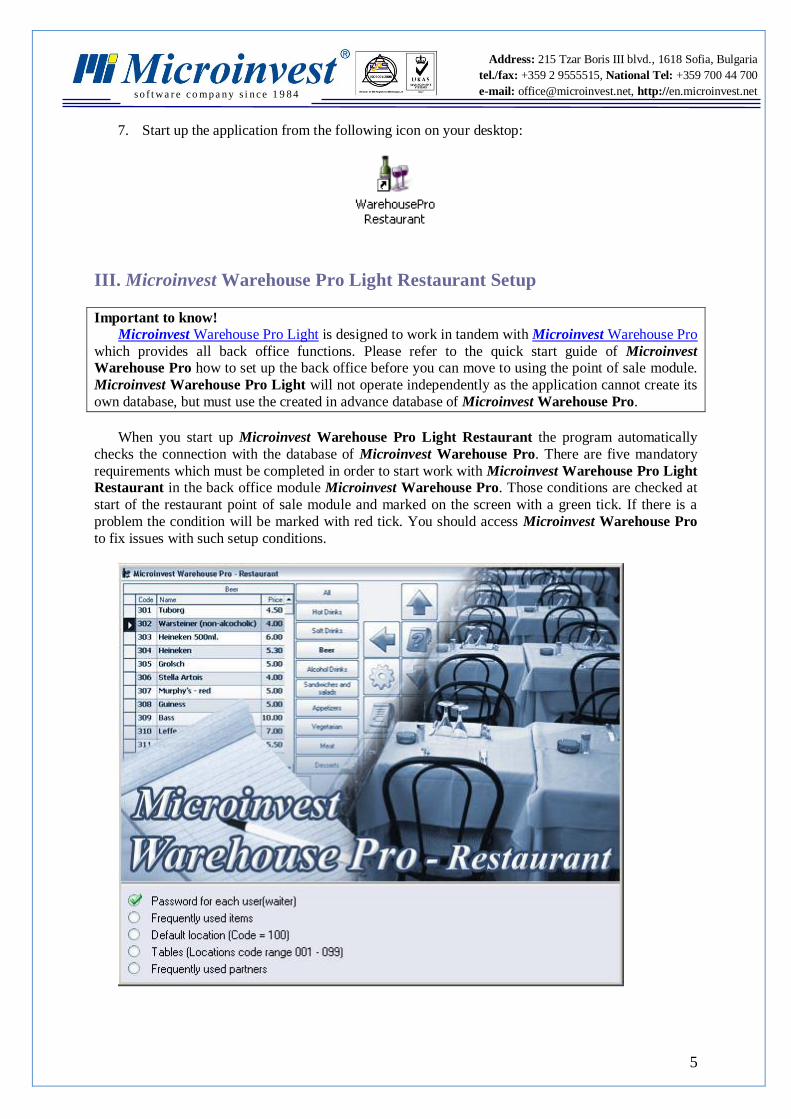
7. Start up the application from the following icon on your desktop:
III. Microinvest Warehouse Pro Light Restaurant Setup
Important to know!
Microinvest Warehouse Pro Light is designed to work in tandem with Microinvest Warehouse Pro
which provides all back office functions. Please refer to the quick start guide of Microinvest
Warehouse Pro how to set up the back office before you can move to using the point of sale module.
Microinvest Warehouse Pro Light will not operate independently as the application cannot create its
own database, but must use the created in advance database of Microinvest Warehouse Pro.
When you start up Microinvest Warehouse Pro Light Restaurant the program automatically
checks the connection with the database of Microinvest Warehouse Pro. There are five mandatory
requirements which must be completed in order to start work with Microinvest Warehouse Pro Light
Restaurant in the back office module Microinvest Warehouse Pro. Those conditions are checked at
start of the restaurant point of sale module and marked on the screen with a green tick. If there is a
problem the condition will be marked with red tick. You should access Microinvest Warehouse Pro
to fix issues with such setup conditions.

6
s o f t wa r e c o m p a n y s i n c e 1 9 8 4
Address: 215 Tzar Boris III blvd., 1618 Sofia, Bulgaria
tel./fax: +359 2 9555515, National Tel: +359 700 44 700
e-mail: [email protected], http://en.microinvest.net
ATTENTION: All of the steps below ought to be done in the main module of Microinvest
Warehouse Pro!
Listed below are the settings required for Microinvest Warehouse Pro Light Restaurant :
Condition 1: Define passwords for each user (waiter) - Create New Users with unique passwords, at
least one:
Steps: Go to Edit => Users => New enter the name and the password and in filed State pick
up the following option ”The user is frequently used” to sort before others. Save the
information at the end by pressing Save button.
Condition 2: Frequently Used Items – Mark all items which will be used in Microinvest Warehouse
Pro Light Restaurant as “Frequently used” and divide them in groups.
Steps: Go to Edit =>Items. Select item and press Edit. Then from State field pick up
“Frequently used”. Go to Groups tab to create new group or use already existing one. Save
the information at the end by pressing State button.
Condition 3: Define default locations with Code=100 – This is the billing center of the restaurant
module. If you have large restaurant with few billing centers, you can set up the second center with Code=200, the third to be with Code=300, and so on.
Steps: Go to Edit => Locations=> New with code 100, write name and from State field pick
up “The location is frequently used, sort before others”. Save the information.
Condition 4: Define the Tables in your restaurant (Locations code range 001-099). All tables within
the first billing center of the restaurant (defined with Code=100 in a previous step) will be set up as
new locations with codes 1, 2, 3…99. If you want to set up another location within the same restaurant (another floor for instance), you set up a new billing location with a code of 200 and each
table handled by this location will be with a code of 101 through 199.
Steps: Go to Edit => Locations => New write with codes from 1 to 99 with names. Most
frequently the names are Table 1, Table 2… Table99. Then from State field pick up “The
location is frequently used, sort before others”. Save the information
Condition 5: Frequently used partners – you should mark all clients you will work with in the
restaurant.
Steps: Go to Edit =>Partners => New. From General Information write the name of the
Partner and from State field pick up “Partner is frequently used, sort before others”. Then go
to Additional Information choose Type to be Client. Save the information.
Important note: Check splitting (explained in a later section of this QuickStart guide) is a
regular function for some restaurants and bars. To be able to use it in restaurant module, you
need to set up two or three clients in the main back office system (Microinvest Warehouse Pro) between which you can split and transfer customer checks and orders.
Start Microinvest Warehouse Pro Light Restaurant again from the icon on the desktop. Enter user name and password to open the main window.
7
s o f t wa r e c o m p a n y s i n c e 1 9 8 4
Address: 215 Tzar Boris III blvd., 1618 Sofia, Bulgaria
tel./fax: +359 2 9555515, National Tel: +359 700 44 700
e-mail: [email protected], http://en.microinvest.net
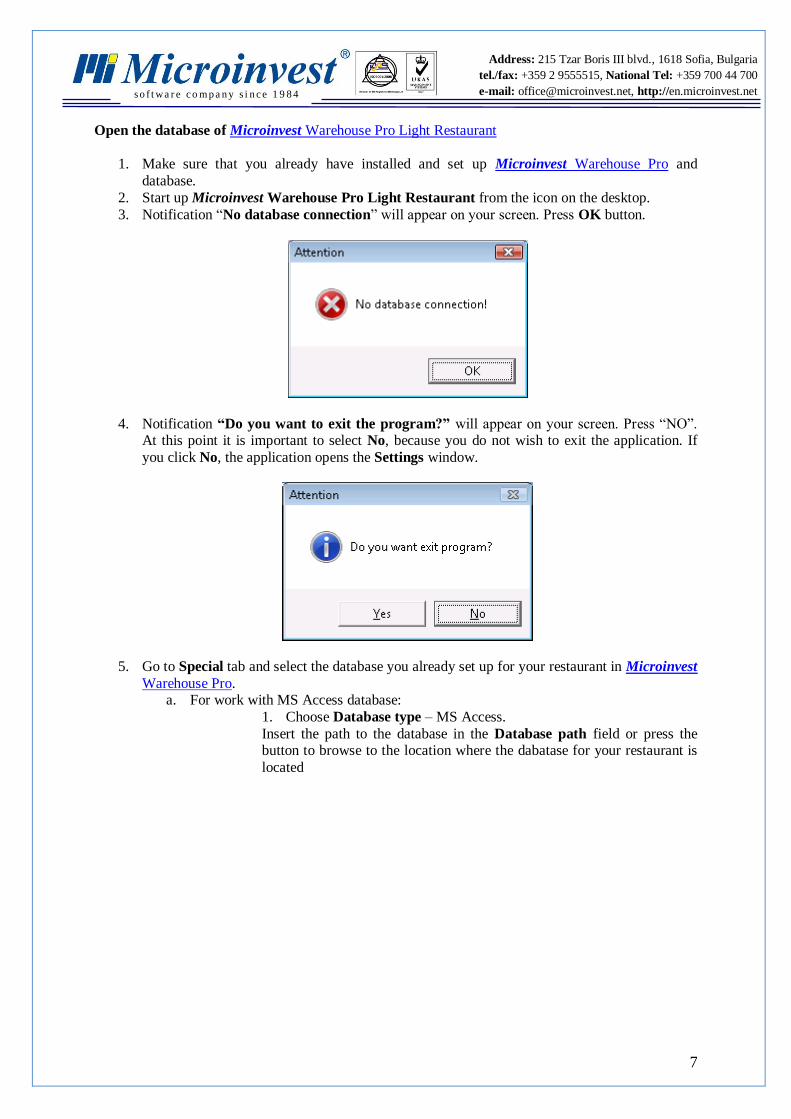
Open the database of Microinvest Warehouse Pro Light Restaurant
1. Make sure that you already have installed and set up Microinvest Warehouse Pro and
database.
2. Start up Microinvest Warehouse Pro Light Restaurant from the icon on the desktop.
3. Notification “No database connection” will appear on your screen. Press OK button.
4. Notification “Do you want to exit the program?” will appear on your screen. Press “NO”. At this point it is important to select No, because you do not wish to exit the application. If
you click No, the application opens the Settings window.
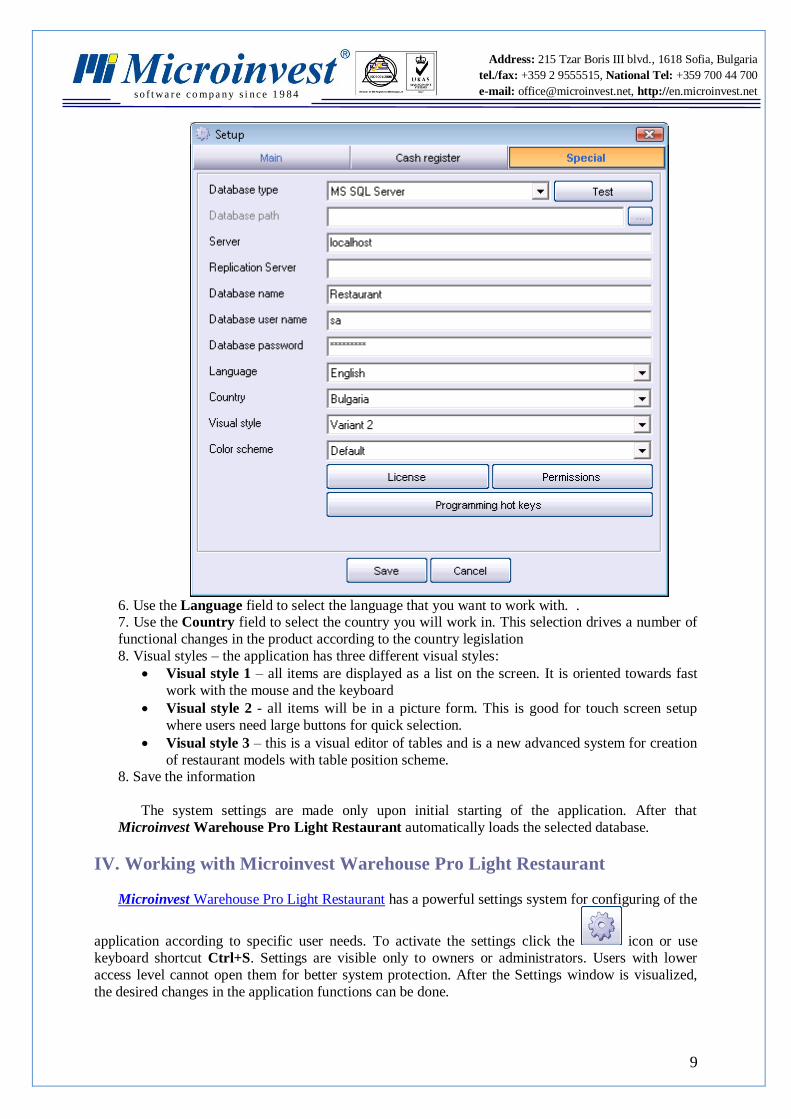
5. Go to Special tab and select the database you already set up for your restaurant in Microinvest
Warehouse Pro. a. For work with MS Access database:
1. Choose Database type – MS Access.
Insert the path to the database in the Database path field or press the button to browse to the location where the dabatase for your restaurant is
located

8
s o f t wa r e c o m p a n y s i n c e 1 9 8 4
Address: 215 Tzar Boris III blvd., 1618 Sofia, Bulgaria
tel./fax: +359 2 9555515, National Tel: +359 700 44 700
e-mail: [email protected], http://en.microinvest.net
For work with SQL Server database:
- Choose Database type - MS SQL Server
- In the Server name field fill in the name or IP address of the
computer on which SQL Server is installed.
- In the Database name field fill in the name of the database or click
the button to the right to select an existing database (if all other fields
are filled in accurately);
- In the Database user name field fill in the username for access to the
database.
- In the Database password field fill in the password for access to the
database.
9
s o f t wa r e c o m p a n y s i n c e 1 9 8 4
Address: 215 Tzar Boris III blvd., 1618 Sofia, Bulgaria
tel./fax: +359 2 9555515, National Tel: +359 700 44 700
e-mail: [email protected], http://en.microinvest.net
6. Use the Language field to select the language that you want to work with. . 7. Use the Country field to select the country you will work in. This selection drives a number of
functional changes in the product according to the country legislation
8. Visual styles – the application has three different visual styles:
Visual style 1 – all items are displayed as a list on the screen. It is oriented towards fast
work with the mouse and the keyboard
Visual style 2 - all items will be in a picture form. This is good for touch screen setup
where users need large buttons for quick selection.
Visual style 3 – this is a visual editor of tables and is a new advanced system for creation
of restaurant models with table position scheme. 8. Save the information
The system settings are made only upon initial starting of the application. After that
Microinvest Warehouse Pro Light Restaurant automatically loads the selected database.
IV. Working with Microinvest Warehouse Pro Light Restaurant
Microinvest Warehouse Pro Light Restaurant has a powerful settings system for configuring of the
application according to specific user needs. To activate the settings click the icon or use
keyboard shortcut Ctrl+S. Settings are visible only to owners or administrators. Users with lower
access level cannot open them for better system protection. After the Settings window is visualized,
the desired changes in the application functions can be done.
10
s o f t wa r e c o m p a n y s i n c e 1 9 8 4
Address: 215 Tzar Boris III blvd., 1618 Sofia, Bulgaria
tel./fax: +359 2 9555515, National Tel: +359 700 44 700
e-mail: [email protected], http://en.microinvest.net
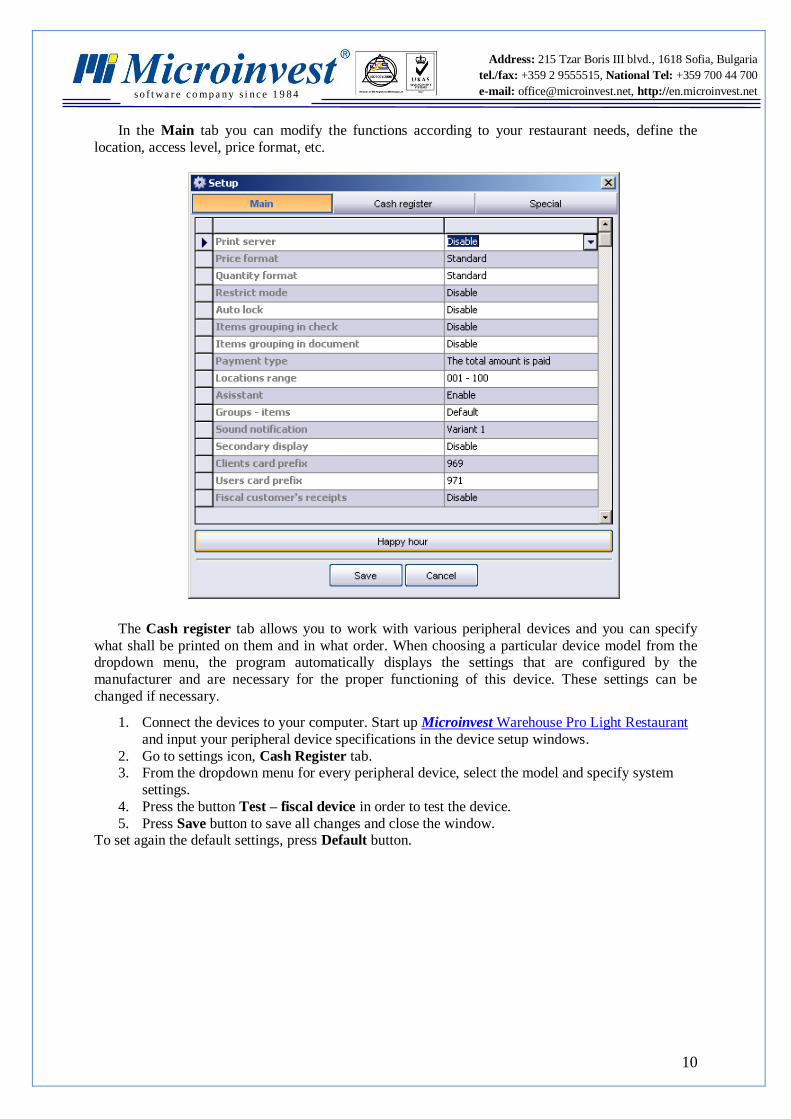
In the Main tab you can modify the functions according to your restaurant needs, define the
location, access level, price format, etc.
The Cash register tab allows you to work with various peripheral devices and you can specify
what shall be printed on them and in what order. When choosing a particular device model from the dropdown menu, the program automatically displays the settings that are configured by the
manufacturer and are necessary for the proper functioning of this device. These settings can be
changed if necessary.
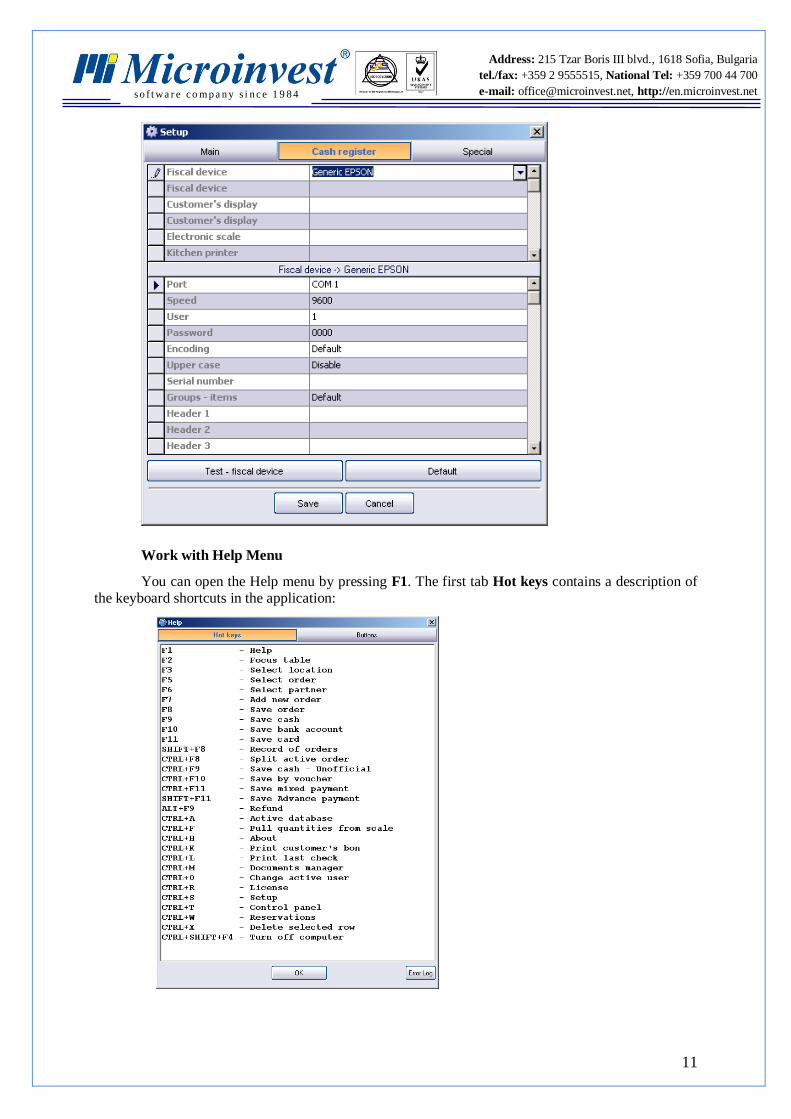
1. Connect the devices to your computer. Start up Microinvest Warehouse Pro Light Restaurant
and input your peripheral device specifications in the device setup windows.
2. Go to settings icon, Cash Register tab. 3. From the dropdown menu for every peripheral device, select the model and specify system
settings.
4. Press the button Test – fiscal device in order to test the device.
5. Press Save button to save all changes and close the window. To set again the default settings, press Default button.
11
s o f t wa r e c o m p a n y s i n c e 1 9 8 4
Address: 215 Tzar Boris III blvd., 1618 Sofia, Bulgaria
tel./fax: +359 2 9555515, National Tel: +359 700 44 700
e-mail: [email protected], http://en.microinvest.net
Work with Help Menu
You can open the Help menu by pressing F1. The first tab Hot keys contains a description of the keyboard shortcuts in the application:

12
s o f t wa r e c o m p a n y s i n c e 1 9 8 4
Address: 215 Tzar Boris III blvd., 1618 Sofia, Bulgaria
tel./fax: +359 2 9555515, National Tel: +359 700 44 700
e-mail: [email protected], http://en.microinvest.net
All function can be accessed via the buttons on the screen as well:
When the application is ready for work and the user has logged in, the main application window is
activated.
13
s o f t wa r e c o m p a n y s i n c e 1 9 8 4
Address: 215 Tzar Boris III blvd., 1618 Sofia, Bulgaria
tel./fax: +359 2 9555515, National Tel: +359 700 44 700
e-mail: [email protected], http://en.microinvest.net
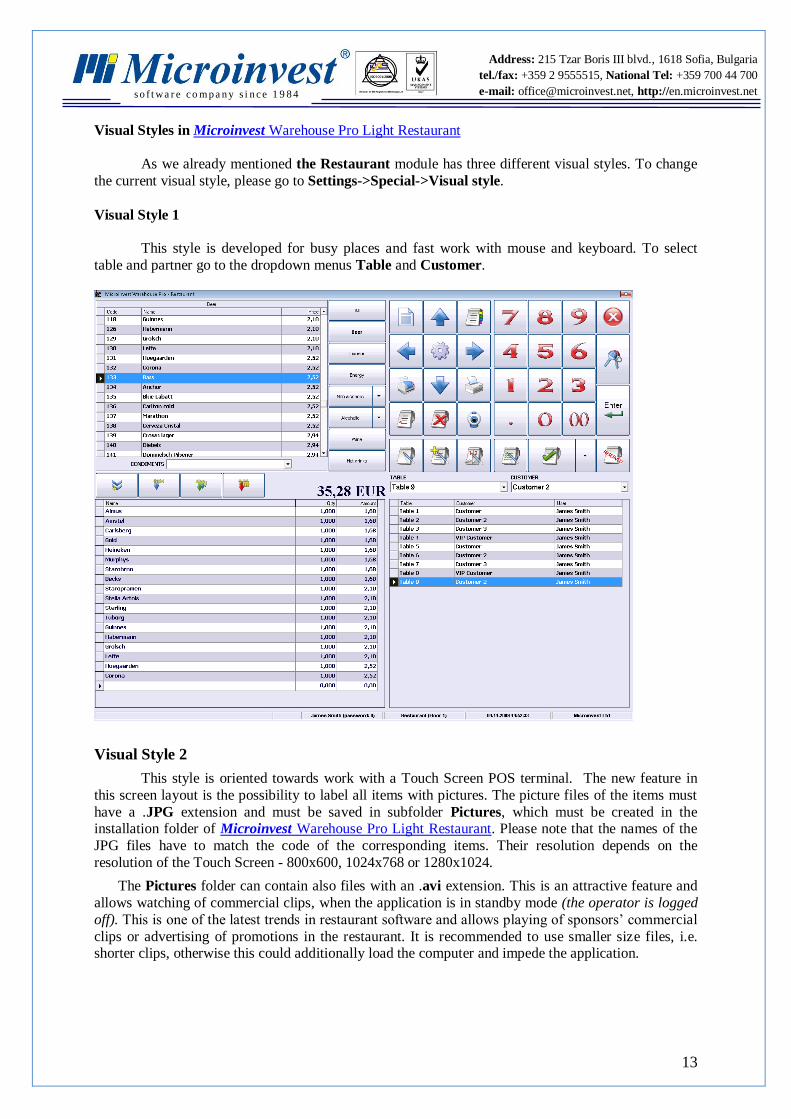
Visual Styles in Microinvest Warehouse Pro Light Restaurant
As we already mentioned the Restaurant module has three different visual styles. To change
the current visual style, please go to Settings->Special->Visual style.
Visual Style 1
This style is developed for busy places and fast work with mouse and keyboard. To select
table and partner go to the dropdown menus Table and Customer.
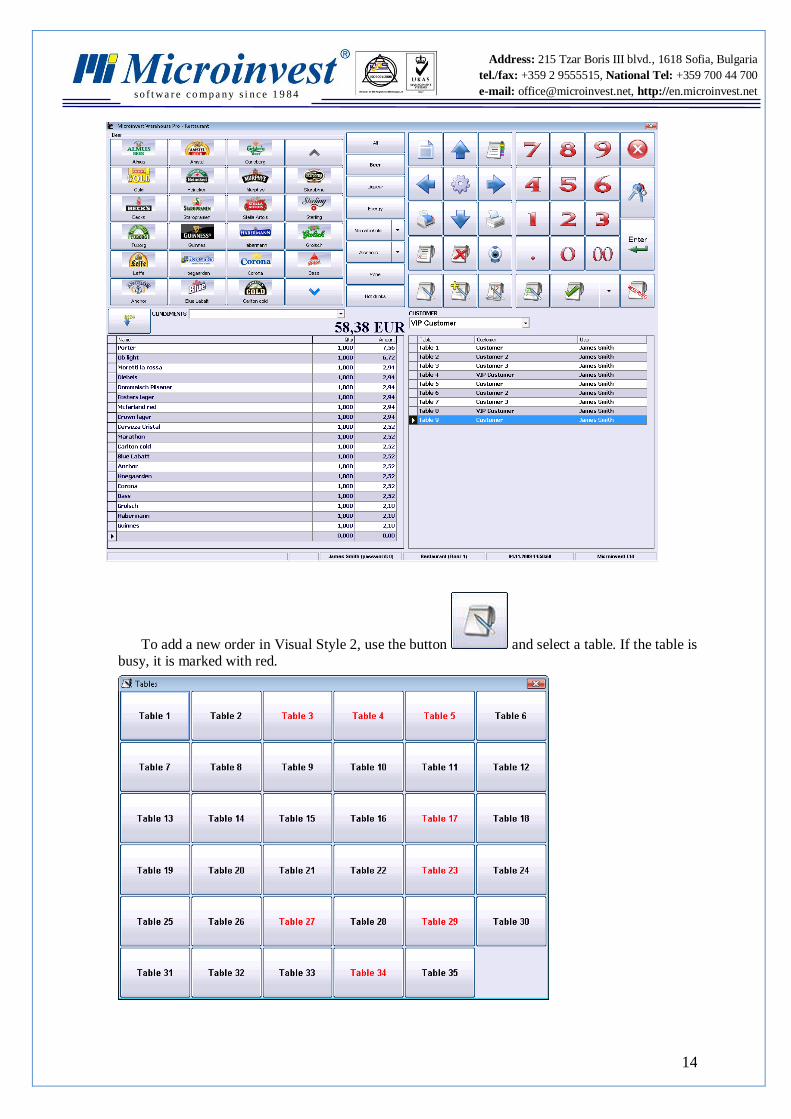
Visual Style 2
This style is oriented towards work with a Touch Screen POS terminal. The new feature in
this screen layout is the possibility to label all items with pictures. The picture files of the items must
have a .JPG extension and must be saved in subfolder Pictures, which must be created in the installation folder of Microinvest Warehouse Pro Light Restaurant. Please note that the names of the
JPG files have to match the code of the corresponding items. Their resolution depends on the
resolution of the Touch Screen - 800x600, 1024x768 or 1280x1024.
The Pictures folder can contain also files with an .avi extension. This is an attractive feature and
allows watching of commercial clips, when the application is in standby mode (the operator is logged
off). This is one of the latest trends in restaurant software and allows playing of sponsors’ commercial
clips or advertising of promotions in the restaurant. It is recommended to use smaller size files, i.e. shorter clips, otherwise this could additionally load the computer and impede the application.
14
s o f t wa r e c o m p a n y s i n c e 1 9 8 4
Address: 215 Tzar Boris III blvd., 1618 Sofia, Bulgaria
tel./fax: +359 2 9555515, National Tel: +359 700 44 700
e-mail: [email protected], http://en.microinvest.net
To add a new order in Visual Style 2, use the button and select a table. If the table is busy, it is marked with red.
15
s o f t wa r e c o m p a n y s i n c e 1 9 8 4
Address: 215 Tzar Boris III blvd., 1618 Sofia, Bulgaria
tel./fax: +359 2 9555515, National Tel: +359 700 44 700
e-mail: [email protected], http://en.microinvest.net
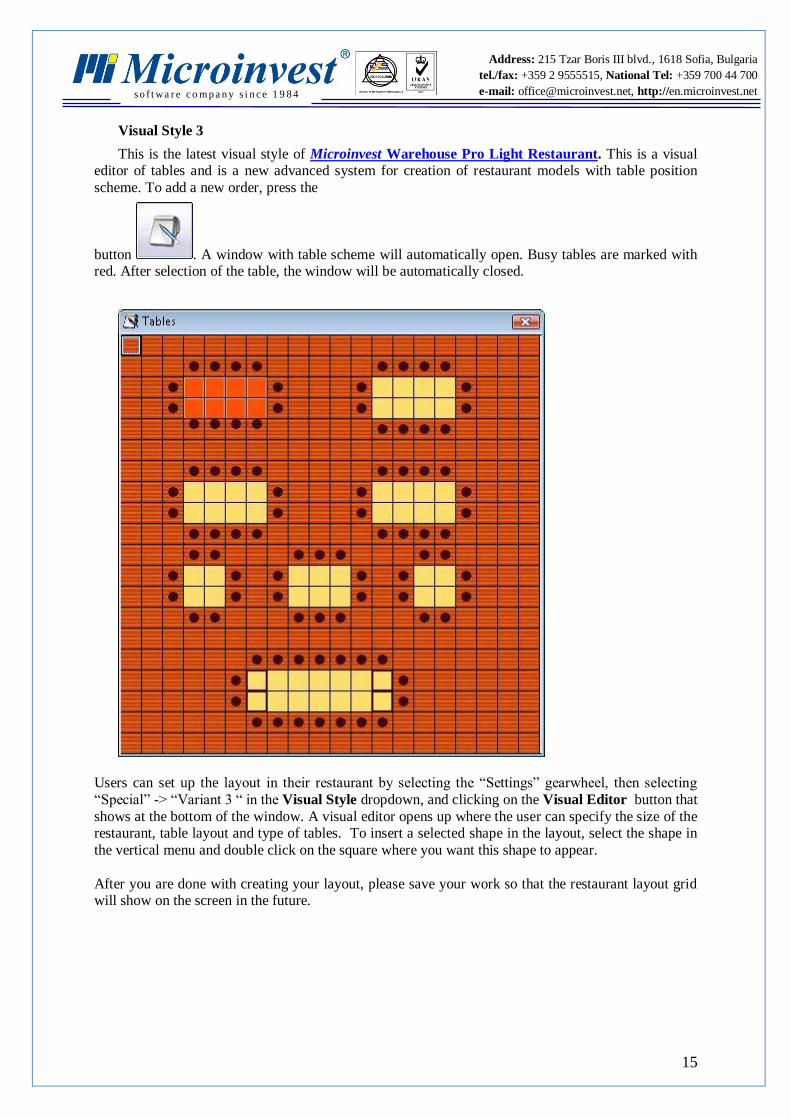
Visual Style 3
This is the latest visual style of Microinvest Warehouse Pro Light Restaurant. This is a visual editor of tables and is a new advanced system for creation of restaurant models with table position
scheme. To add a new order, press the
button . A window with table scheme will automatically open. Busy tables are marked with red. After selection of the table, the window will be automatically closed.
Users can set up the layout in their restaurant by selecting the “Settings” gearwheel, then selecting
“Special” -> “Variant 3 “ in the Visual Style dropdown, and clicking on the Visual Editor button that
shows at the bottom of the window. A visual editor opens up where the user can specify the size of the restaurant, table layout and type of tables. To insert a selected shape in the layout, select the shape in
the vertical menu and double click on the square where you want this shape to appear.
After you are done with creating your layout, please save your work so that the restaurant layout grid will show on the screen in the future.
16
s o f t wa r e c o m p a n y s i n c e 1 9 8 4
Address: 215 Tzar Boris III blvd., 1618 Sofia, Bulgaria
tel./fax: +359 2 9555515, National Tel: +359 700 44 700
e-mail: [email protected], http://en.microinvest.net
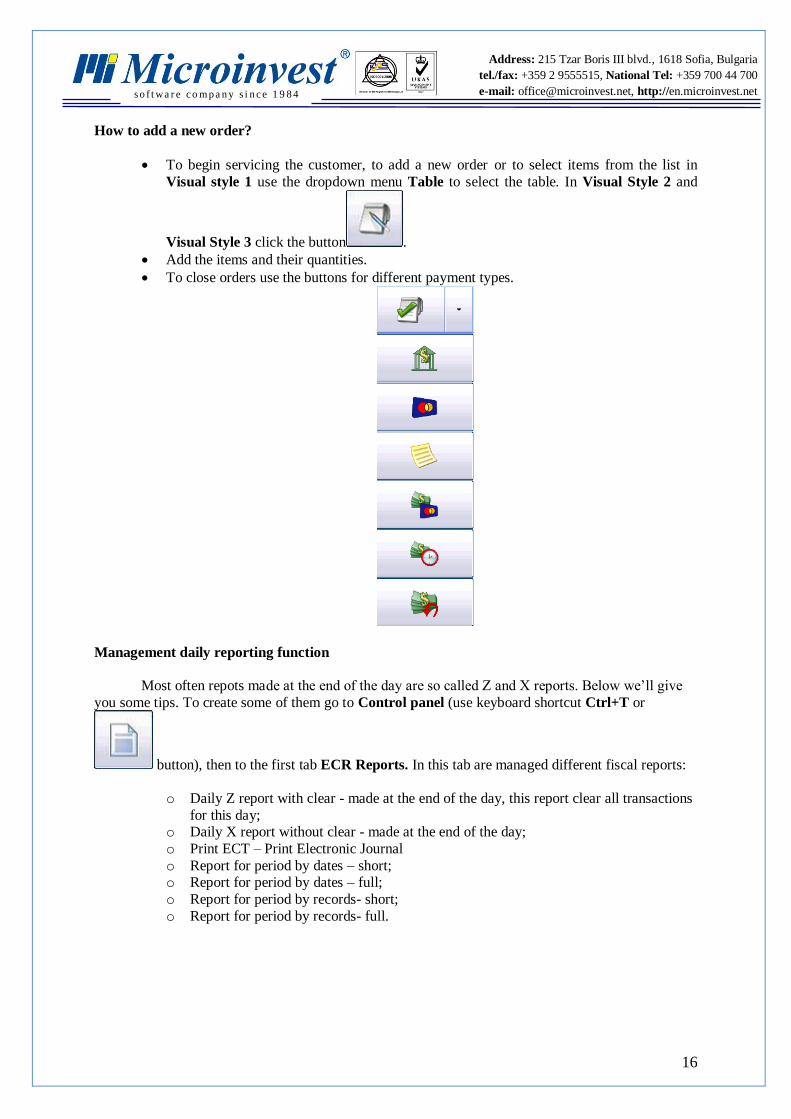
How to add a new order?
To begin servicing the customer, to add a new order or to select items from the list in
Visual style 1 use the dropdown menu Table to select the table. In Visual Style 2 and
Visual Style 3 click the button .
Add the items and their quantities.
To close orders use the buttons for different payment types.
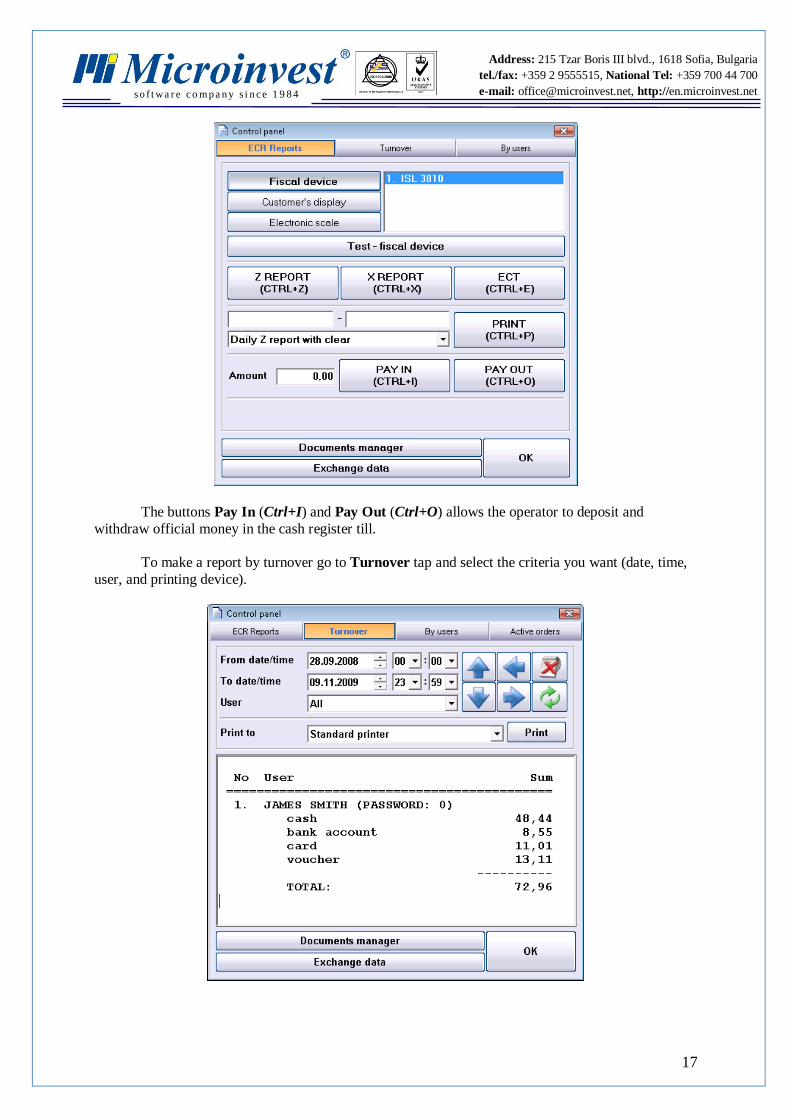
Management daily reporting function
Most often repots made at the end of the day are so called Z and X reports. Below we’ll give
you some tips. To create some of them go to Control panel (use keyboard shortcut Ctrl+T or
button), then to the first tab ECR Reports. In this tab are managed different fiscal reports:
o Daily Z report with clear - made at the end of the day, this report clear all transactions
for this day; o Daily X report without clear - made at the end of the day;
o Print ECT – Print Electronic Journal
o Report for period by dates – short; o Report for period by dates – full;
o Report for period by records- short;
o Report for period by records- full.
17
s o f t wa r e c o m p a n y s i n c e 1 9 8 4
Address: 215 Tzar Boris III blvd., 1618 Sofia, Bulgaria
tel./fax: +359 2 9555515, National Tel: +359 700 44 700
e-mail: [email protected], http://en.microinvest.net
The buttons Pay In (Ctrl+I) and Pay Out (Ctrl+O) allows the operator to deposit and
withdraw official money in the cash register till.
To make a report by turnover go to Turnover tap and select the criteria you want (date, time,
user, and printing device).
18
s o f t wa r e c o m p a n y s i n c e 1 9 8 4
Address: 215 Tzar Boris III blvd., 1618 Sofia, Bulgaria
tel./fax: +359 2 9555515, National Tel: +359 700 44 700
e-mail: [email protected], http://en.microinvest.net
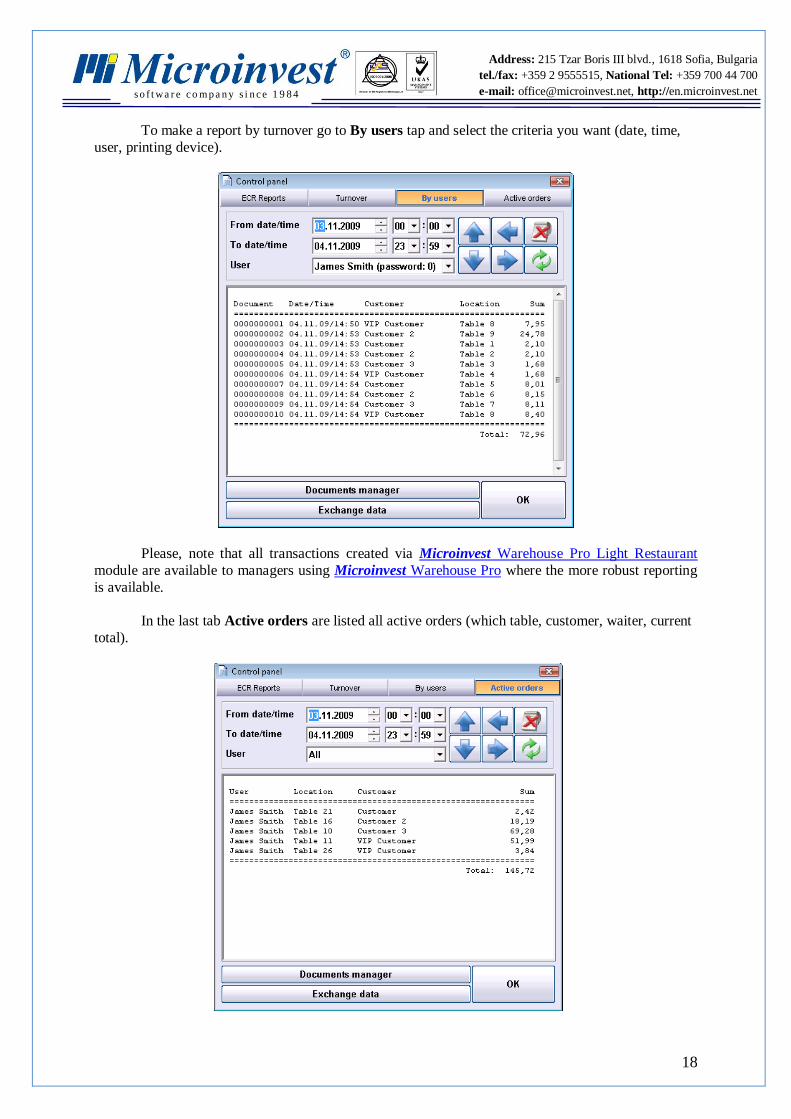
To make a report by turnover go to By users tap and select the criteria you want (date, time,
user, printing device).
Please, note that all transactions created via Microinvest Warehouse Pro Light Restaurant
module are available to managers using Microinvest Warehouse Pro where the more robust reporting
is available.
In the last tab Active orders are listed all active orders (which table, customer, waiter, current
total).
19
s o f t wa r e c o m p a n y s i n c e 1 9 8 4
Address: 215 Tzar Boris III blvd., 1618 Sofia, Bulgaria
tel./fax: +359 2 9555515, National Tel: +359 700 44 700
e-mail: [email protected], http://en.microinvest.net
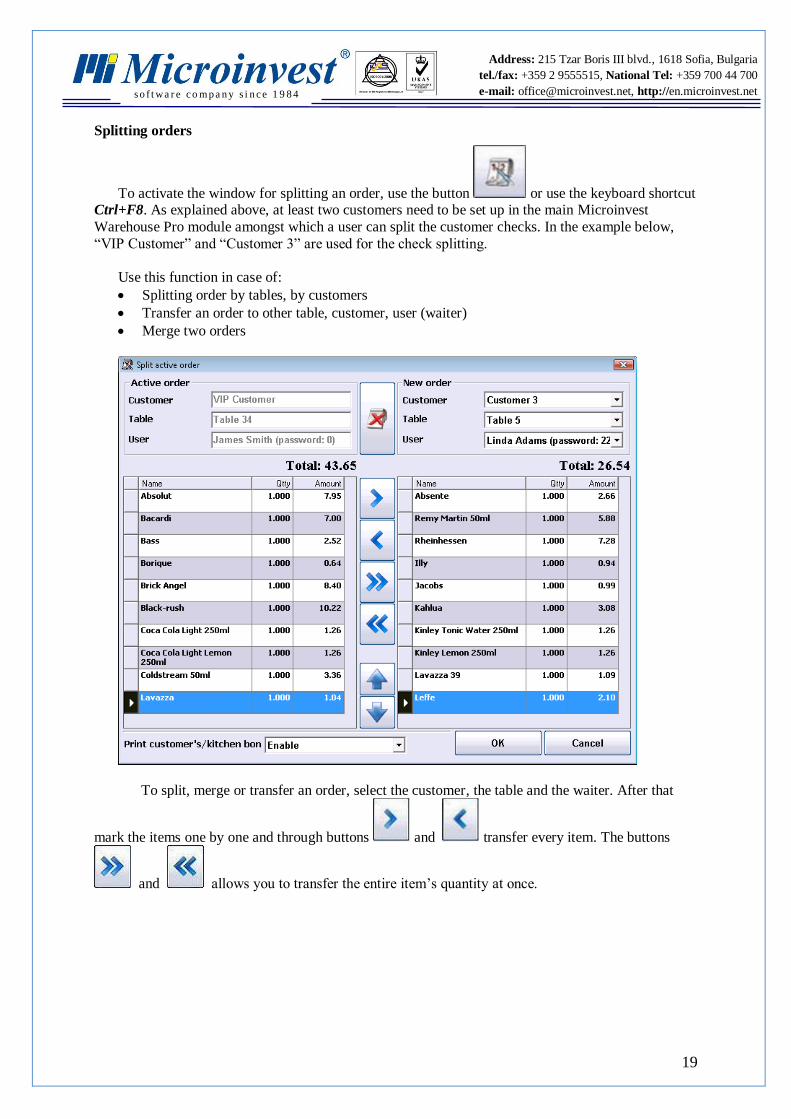
Splitting orders
To activate the window for splitting an order, use the button or use the keyboard shortcut Ctrl+F8. As explained above, at least two customers need to be set up in the main Microinvest
Warehouse Pro module amongst which a user can split the customer checks. In the example below,
“VIP Customer” and “Customer 3” are used for the check splitting.
Use this function in case of:
Splitting order by tables, by customers
Transfer an order to other table, customer, user (waiter)
Merge two orders
To split, merge or transfer an order, select the customer, the table and the waiter. After that
mark the items one by one and through buttons and transfer every item. The buttons
and allows you to transfer the entire item’s quantity at once.
20
s o f t wa r e c o m p a n y s i n c e 1 9 8 4
Address: 215 Tzar Boris III blvd., 1618 Sofia, Bulgaria
tel./fax: +359 2 9555515, National Tel: +359 700 44 700
e-mail: [email protected], http://en.microinvest.net
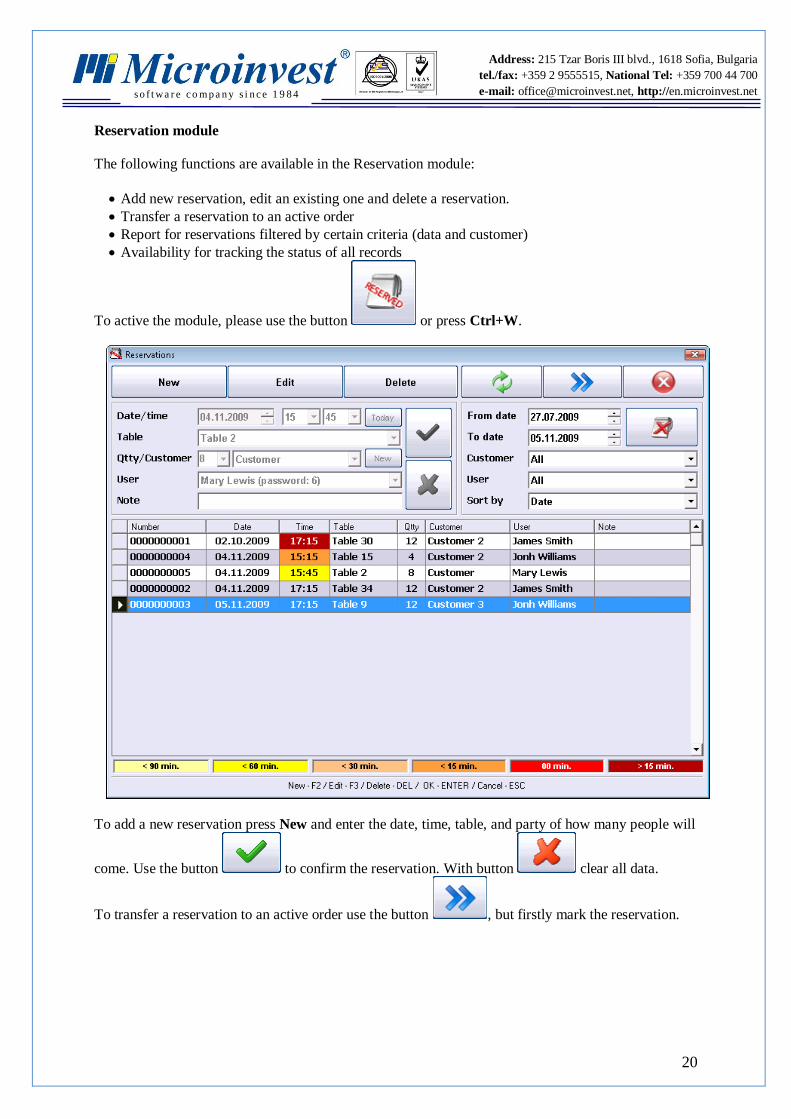
Reservation module
The following functions are available in the Reservation module:
Add new reservation, edit an existing one and delete a reservation.
Transfer a reservation to an active order
Report for reservations filtered by certain criteria (data and customer)
Availability for tracking the status of all records
To active the module, please use the button or press Ctrl+W.
To add a new reservation press New and enter the date, time, table, and party of how many people will
come. Use the button to confirm the reservation. With button clear all data.
To transfer a reservation to an active order use the button , but firstly mark the reservation.
21
s o f t wa r e c o m p a n y s i n c e 1 9 8 4
Address: 215 Tzar Boris III blvd., 1618 Sofia, Bulgaria
tel./fax: +359 2 9555515, National Tel: +359 700 44 700
e-mail: [email protected], http://en.microinvest.net
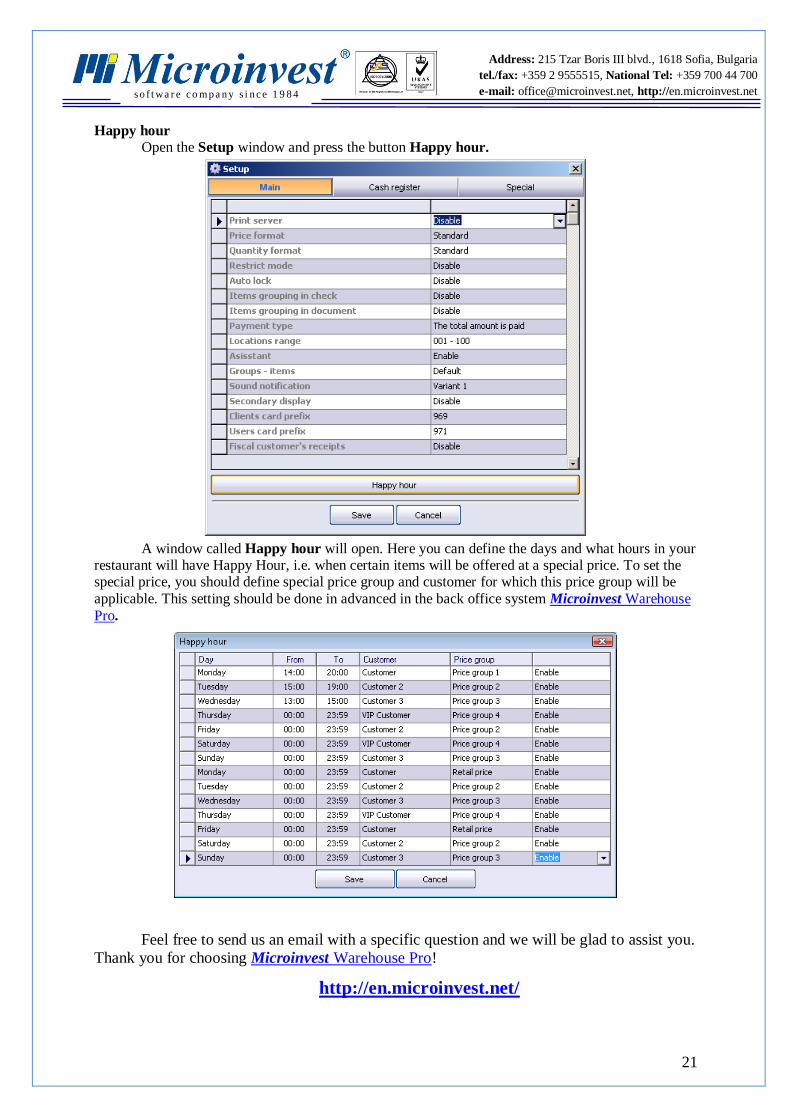
Happy hour
Open the Setup window and press the button Happy hour.
A window called Happy hour will open. Here you can define the days and what hours in your restaurant will have Happy Hour, i.e. when certain items will be offered at a special price. To set the special price, you should define special price group and customer for which this price group will be
applicable. This setting should be done in advanced in the back office system Microinvest Warehouse
Pro.
Feel free to send us an email with a specific question and we will be glad to assist you.
Thank you for choosing Microinvest Warehouse Pro!
http://en.microinvest.net/