quick start guide rex 100 3g|lte - helmholz benelux
TRANSCRIPT

Quick Start Guide REX 100 3G|LTE
www.helmholz.de
Version
3enas of FW 1.9.0

Quick Start Guide REX 100 3G|LTE2
Content
1. Introduction 3
2. Preparing the REX 100 unit 3
3. Access to the myREX24-V2 portal 5
4. Initial REX configuration via the myREX24-V2 portal 8
5. Router configuration transfer options 11
6. Establishing a VPN connection to your REX 100 14
7. Tips and tricks 15
8. Remote maintenance of Ethernet CPUs 18
9. Description of LEDs and buttons 19
10. Restoring the REX 100 router to its default settings 21
11. Load configuration/firmware update from USB stick 21
12. Technical data 22
Quick Start Guide REX 100 3G|LTE 3
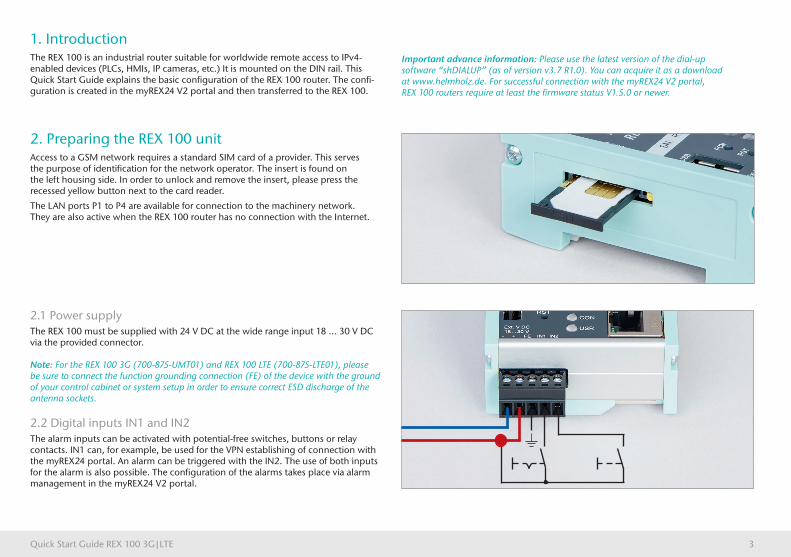
2. Preparing the REX 100 unitAccess to a GSM network requires a standard SIM card of a provider. This serves the purpose of identification for the network operator. The insert is found on the left housing side. In order to unlock and remove the insert, please press the recessed yellow button next to the card reader.
The LAN ports P1 to P4 are available for connection to the machinery network. They are also active when the REX 100 router has no connection with the Internet.
1. IntroductionThe REX 100 is an industrial router suitable for worldwide remote access to IPv4- enabled devices (PLCs, HMIs, IP cameras, etc.) It is mounted on the DIN rail. This Quick Start Guide explains the basic configuration of the REX 100 router. The confi-guration is created in the myREX24 V2 portal and then transferred to the REX 100.
Important advance information: Please use the latest version of the dial-up software “shDIALUP” (as of version v3.7 R1.0). You can acquire it as a download at www.helmholz.de. For successful connection with the myREX24 V2 portal, REX 100 routers require at least the firmware status V1.5.0 or newer.
2.1 Power supplyThe REX 100 must be supplied with 24 V DC at the wide range input 18 ... 30 V DC via the provided connector.
Note: For the REX 100 3G (700-875-UMT01) and REX 100 LTE (700-875-LTE01), please be sure to connect the function grounding connection (FE) of the device with the ground of your control cabinet or system setup in order to ensure correct ESD discharge of the antenna sockets.
2.2 Digital inputs IN1 and IN2The alarm inputs can be activated with potential-free switches, buttons or relay contacts. IN1 can, for example, be used for the VPN establishing of connection with the myREX24 portal. An alarm can be triggered with the IN2. The use of both inputs for the alarm is also possible. The configuration of the alarms takes place via alarm management in the myREX24 V2 portal.
Quick Start Guide REX 100 3G|LTE4
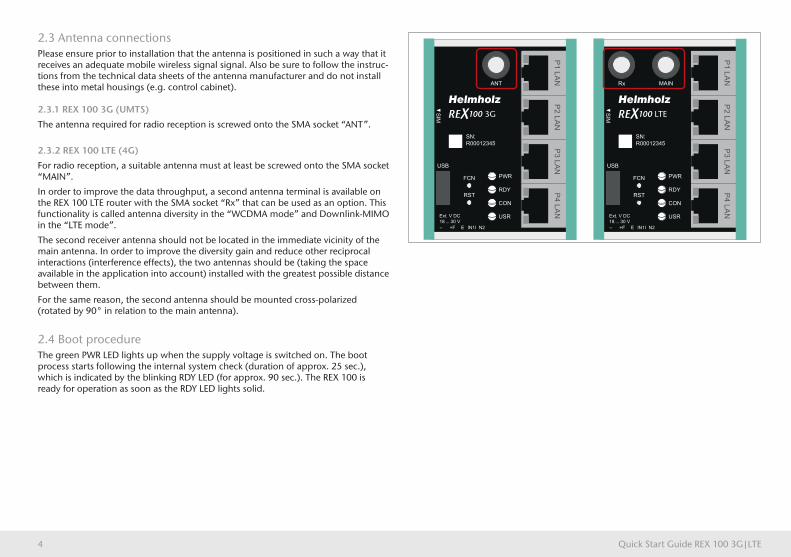
2.3 Antenna connectionsPlease ensure prior to installation that the antenna is positioned in such a way that it receives an adequate mobile wireless signal signal. Also be sure to follow the instruc-tions from the technical data sheets of the antenna manufacturer and do not install these into metal housings (e.g. control cabinet). 2.3.1 REX 100 3G (UMTS)
The antenna required for radio reception is screwed onto the SMA socket “ANT”.
2.3.2 REX 100 LTE (4G)
For radio reception, a suitable antenna must at least be screwed onto the SMA socket “MAIN”.
In order to improve the data throughput, a second antenna terminal is available on the REX 100 LTE router with the SMA socket “Rx” that can be used as an option. This functionality is called antenna diversity in the “WCDMA mode” and Downlink-MIMO in the “LTE mode”.
The second receiver antenna should not be located in the immediate vicinity of the main antenna. In order to improve the diversity gain and reduce other reciprocal interactions (interference effects), the two antennas should be (taking the space available in the application into account) installed with the greatest possible distance between them.
For the same reason, the second antenna should be mounted cross-polarized (rotated by 90° in relation to the main antenna).
2.4 Boot procedureThe green PWR LED lights up when the supply voltage is switched on. The boot process starts following the internal system check (duration of approx. 25 sec.), which is indicated by the blinking RDY LED (for approx. 90 sec.). The REX 100 is ready for operation as soon as the RDY LED lights solid.
P4 LANP1 LAN
P2 LANP3 LAN
+F E IN1I N2–
FCN
RST
PWR
RDY
CON
USR
SN:R00012345
ANT
USB
SIM
P4 LANP1 LAN
P2 LANP3 LAN
+F E IN1I N2–
FCN
RST
PWR
RDY
CON
USR
SN:R00012345
MAIN
USB
Rx
SIM
Quick Start Guide REX 100 3G|LTE 5
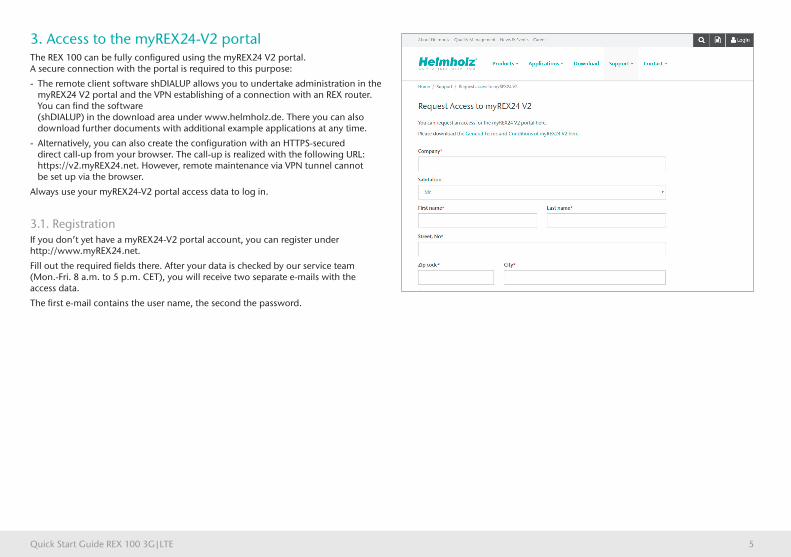
3. Access to the myREX24-V2 portalThe REX 100 can be fully configured using the myREX24 V2 portal. A secure connection with the portal is required to this purpose:
- The remote client software shDIALUP allows you to undertake administration in the myREX24 V2 portal and the VPN establishing of a connection with an REX router. You can find the software (shDIALUP) in the download area under www.helmholz.de. There you can also download further documents with additional example applications at any time.
- Alternatively, you can also create the configuration with an HTTPS-secured direct call-up from your browser. The call-up is realized with the following URL: https://v2.myREX24.net. However, remote maintenance via VPN tunnel cannot be set up via the browser.
Always use your myREX24-V2 portal access data to log in.
3.1. RegistrationIf you don’t yet have a myREX24-V2 portal account, you can register under http://www.myREX24.net.
Fill out the required fields there. After your data is checked by our service team (Mon.-Fri. 8 a.m. to 5 p.m. CET), you will receive two separate e-mails with the access data.
The first e-mail contains the user name, the second the password.

Quick Start Guide REX 100 3G|LTE6
Notes:
- Alternatively, the login page can also be reached under: https://v2.myrex24.net. Any up-to-date browser can be used for this purpose. Chrome and Firefox are recommended.
- Your login name is composed of a user name preceding the @ character and the name of your company. Example: User@Account
- Please change your password after logging in for the first time.
- If necessary, you can also create and administer additional users after logging into the myREX24-V2 portal.
3.2 Logging in to the myREX24 V2 portalOnce you install and start the shDIALUP software, you can use your login data to log in to the myREX24 V2 portal.
Select “V2.myREX24.net” in the server list.
3.3 Navigation in the portalOnce a user has logged in for the first time, he or she is guided through a tutorial. The navigation, basic settings, and the change from the Simplified to the Extended view is shown.
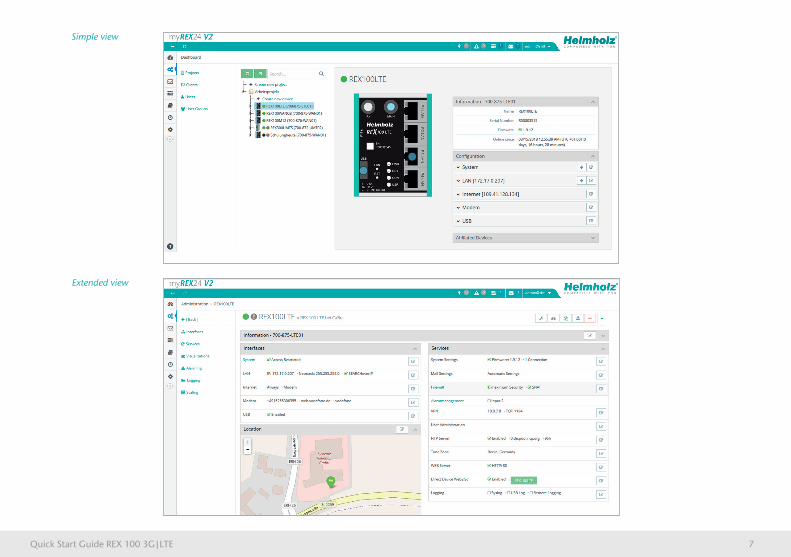
3.4 Simplified and extended viewThe configuration of the devices can be carried out in the myREX24 V2 portal in two views: simplified and extended.
Standard is the simplified view, but one can switch between the views at any time.
The simplified view is used for the most part in the subsequent course of the Quick Start Guide. The extended view is also presented in some places for purposes of illustration.
Quick Start Guide REX 100 3G|LTE 7
Simple view
Extended view

Quick Start Guide REX 100 3G|LTE8
4. Initial REX configuration via the myREX24-V2 portalThe following information describes the basic configuration steps required in order to be able to set up a REX router for a VPN connection. A description of the extended functions can be found with the online help or in the manuals/white papers. You can go to the online help in the myREX24 V2 portal via the question mark symbol in the lower left area of the screen .
When you have logged in for the first time, the myREX24 portal guides you through a brief tutorial.
Please change the password for your myREX24 account following the tutorial.
4.1 Create new projectA project is the highest level for carrying out the following tasks:
- Device administration
- Remote maintenance
- Monitoring and alarms
- Data protocoling
- Visualizations
Each router is assigned to a project. In order to create a new project, please click on Administration.
The tutorial also leads to this point . The project is now assigned a name.
?

Quick Start Guide REX 100 3G|LTE 9
4.2 Create new deviceA router can be added in the tree structure using the plus symbol or with a right-click of the mouse. If a project does not yet have a router, the same function is made available in the main view by way of the green button “Create new device”.
Clicking on the respective button starts the configuration assistant, which guides the user through the settings.
4.3 Configure REX 100 (connection data)Three simple steps are adequate for the minimal configuration of the router:
- Selection of the device type
- Network settings
- Transfer of the configuration to the REX router
4.3.1 Step 1 “Device” – Selection of the type and nameIn step 1, only the selection of the router type and the assignment of a clear name is necessary.
The name can be freely selected, but only numbers and letters are allowed. (0 to 9, A to Z, a to z, no spaces).

Quick Start Guide REX 100 3G|LTE10
4.3.2 Step 2 “Internet” – Network settingsIn step 2, the network configuration for the LAN and mobile wireless side of the device is defined.
- LAN All REX 100 routers come with the IP address of 192.168.0.100/24 as a default. Modify the IP address and the subnet mask in keeping with the specifications from the machinery network.
- Modem The parameters for the APN access point (Access Point Name) of the card provider and the correct SIM PIN must be available to you and be stored here. There are already several providers available for selection (sorted by country). In the event that the correct provider is not present, this can also be entered manually.
4.3.3 Step 3 “Configuration” – Transfer of the configurationThe minimal configuration is now complete and must be transferred to the REX 100.
The configuration is downloaded with a click on the download button and can be transferred with a FAT-formated USB stick to the REX router. This step is described in chapter 5.1 (page 12).

Quick Start Guide REX 100 3G|LTE 11
5. Router configuration transfer optionsThe created device configuration can be transferred to the actual REX 100 unit in a variety of ways.
- Download configuration to the PC (via USB stick)
The configuration file is saved on the PC and can subsequently transferred to the REX 100 using a USB stick. (Subsequent procedure described in chapter 5.1)
- Transfer configuration to the device (LAN connection – only possible via shDIALUP)
The configuration is transferred via a local LAN connection from the PC on which shDIALUP is installed to the device.You can select this procedure if the REX 100 can be reached directly through the local network (LAN).
- Synchronization (retroactive changes)
When the router has already been configured and a connection with the portal established, any change to the configuration can be carried out via the existing VPN connection (subsequent procedure described in chapter 5.2).
For purposes of simplification, only the transfer via USB stick (point 1) is explained in this Quick Start Guide, and how retroactive changes can be transferred via the function “Synchronization” (Point 3).

Quick Start Guide REX 100 3G|LTE12
5.1 Transferring the configuration using a USB flash drive
Prerequisites for this are:
- A PC with USB connection
- An Internet connection with the myREX24 V2 portal
- A FAT-formated USB stick
In the myREX24-V2 portal, select the “Download configuration to PC” option in the device settings.
Download the configuration file provided by the myREX24 portal to your PC and save it on a FAT-formated USB stick.
The file is called myrex24.mbn for the initial commissioning of the REX 100. (All of the following configuration files generated for this router are automatically generated by the system as myrex24.mbnx.)
Do not rename this file.
Now carry out the steps described on page 21 in chapter 11 “Load configuration/firmware update from the USB stick”.

Quick Start Guide REX 100 3G|LTE 13
5.2 Synchronization
As soon as you have logged into your account of the REX 100, you can transfer retroactive changes at any time through “Synchronization”.
Where there is an existing myREX24-V2 portal connection, the REX 100 checks cycli-cally whether there is a new configuration available and then loads it automatically. When, for example, you have edited the LAN IP address, the “Device configuration is not up to date” symbol appears next to the Online LED.
Click on Synchronization to initiate this.
Synchronization in the simplified view Synchronization in the extended view

Quick Start Guide REX 100 3G|LTE14
The synchronization function is confirmed through the following dialog.
In this menu you can set a variety of user-defined settings, such as the sending of information/confirmation mails.
The REX router now adopts the new settings and restarts. As soon as the boot process has concluded, the REX router logs into the portal again.
6. Establishing a VPN connection to your REX 100Note: The following steps presume that the REX 100 has already been configured and that you have successfully logged into your account at the portal. A VPN connection can only be started with shDIALUP. The connection button is not shown in the browser view.
Logged in REX 100 routers are identified with a green circle in the dashboard. The VPN connection is established by clicking on the connection button .
The number of active connections is shown in the menu bar.
Once a connection to the REX 100 has been established, all the IP packets that are valid for the applicable LAN network on the system side will be forwarded. Further parameters for the VPN-IP/IP subnet mask are shown in the lower status bar.
0

Quick Start Guide REX 100 3G|LTE 15
7. Tips and tricks7.1 Establishing of connection isn’t working7.1.1 Check device status
The status of the REX 100 shows the connection status and the active configuration data of the router. To this purpose, the REX 100 must be accessible in the LAN, me-aning that the TCP/IP address of a PC must be in the same IP subnet. To this purpose, enter the LAN IP address of the REX 100 into the address bar of a browser.
Authenticate yourself with the standard
- user: helmholz and the
- password: router
To view more information on each step of the connection, click on the Info icon in the status fields.
Note: If the interface is not accessible, please check the corresponding setting in the myREX24 portal. Make sure that there are no address space conflicts with any other network interfaces (do not assign the same IP address more than once) in order to be able to communicate with the REX 100.
The connection status with the REX 100 is represented with an orange LED . In order to end the connection of a remote access, please click the in the meantime yellow and animated connection button and then confirm the disconnection of the remote connection.

Quick Start Guide REX 100 3G|LTE16
7.1.2 VPN port
- The REX 100 establish an outbound TCP connection with the address VPN-V2.myrex24.net (5.39.123.21). This communication takes place via the port 1194 as a standard.
- In order to be able to establish a secure connection to the myREX24 V2 server, at least one of the following TCP ports (80, 443, or 1194) for the VPN tunnel must be open.
Please clarify which setting is required in advance with the responsible IT department on site. You can adjust the port correspondingly in the VPN settings of the REX 100.
7.1.3 Diagnostics page
In the event of irregularities or malfunctions when establishing the connection, the diagnostics page of the REX 100 supports you with troubleshooting. In the event of an error, the technical support of Helmholz requires the respective result from the individual and autonomous test functions.

Quick Start Guide REX 100 3G|LTE 17
7.1.4 Establishing a connection via a proxy
It is possible to store a proxy on the configuration page of the REX 100. The required parameters can be adapted under the Internet settings of the router.
7.2 Device configuration: Services – NTP serverFor purposes of time synchronization of the REX 100, this carries out a comparison at regular intervals. Where necessary, you can individually set the preset NTP server and the interval.
Note: The REX 100 requires a current time setting to function correctly.
7.3 Mobile connection is interruptedIf the provider for mobile communication remote maintenance interrupts the connection of your REX 100 router, this may have occurred for the following reasons, among others:
- Wrong user name/ password
- Ports blocked by the provider
- Credit of prepaid SIM cards used up
Quick Start Guide REX 100 3G|LTE18
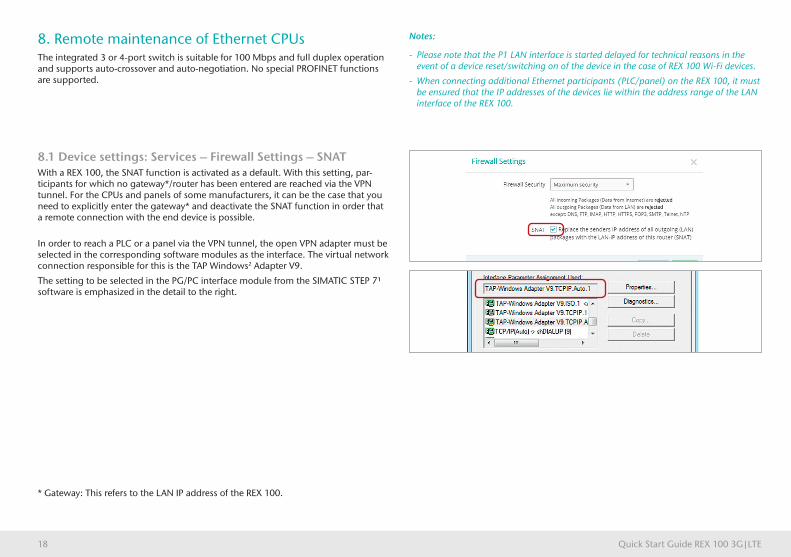
8. Remote maintenance of Ethernet CPUsThe integrated 3 or 4-port switch is suitable for 100 Mbps and full duplex operation and supports auto-crossover and auto-negotiation. No special PROFINET functions are supported.
8.1 Device settings: Services – Firewall Settings – SNATWith a REX 100, the SNAT function is activated as a default. With this setting, par-ticipants for which no gateway*/router has been entered are reached via the VPN tunnel. For the CPUs and panels of some manufacturers, it can be the case that you need to explicitly enter the gateway* and deactivate the SNAT function in order that a remote connection with the end device is possible.
In order to reach a PLC or a panel via the VPN tunnel, the open VPN adapter must be selected in the corresponding software modules as the interface. The virtual network connection responsible for this is the TAP Windows2 Adapter V9.
The setting to be selected in the PG/PC interface module from the SIMATIC STEP 7¹ software is emphasized in the detail to the right. * Gateway: This refers to the LAN IP address of the REX 100.
Notes:
- Please note that the P1 LAN interface is started delayed for technical reasons in the event of a device reset/switching on of the device in the case of REX 100 Wi-Fi devices.
- When connecting additional Ethernet participants (PLC/panel) on the REX 100, it must be ensured that the IP addresses of the devices lie within the address range of the LAN interface of the REX 100.

Quick Start Guide REX 100 3G|LTE 19
9. Description of LEDs and buttons9.1 Description of LEDs and buttons
PWR Indicator light for the power supply
RDY Readiness indicator (this LED must show a solid light after a max. of 110 sec.)
CON Off: There is no active Internet or VPN connection
Solid light: Internet connection active or possible, but VPN connection inactive
Flashing (1.5 Hz): VPN connection is active
Rapid flashing (3 Hz): The router is attempting to establish a VPN connection
USR Solid light: When loading default settings, firmware files, or device configurations
Flashing (1.5 Hz): A portal configuration was recognized on the USB stick (see FCN button)
Rapid flashing (3 Hz): A firmware file was recognized on the USB stick (see FCN button)
FCN 1. Function key for manually establishing the connection with the portal server
2. If the USR LED starts flashing, this means that you have ten seconds to press this button in order to load data from an inserted USB stick.
RST Reset button for restarting the router
Button functions
P4 LANP1 LAN
P2 LANP3 LAN
Ext. V DC18 ... 30 V
+ FE IN1 IN2–
FCN
RST
PWR
RDY
CON
USR
SN:R00012345
ANT
USB
SIM
Quick Start Guide REX 100 3G|LTE20
The device is not connected with the portal
The device has logged in at the portal and is thus online.
Depending upon the device type, the device is connected with
- a machine connected with the device (PLC)
- the website of a connected machine
- the integrated web server of the device (router)
The device configuration is not up to date. This means:
- the configuration of a newly created device has not yet been transferred to the device
- or the changed configuration of an existing device has not yet been transferred to the device/no synchronization has been carried out.
This symbol can be displayed in connection with any of the symbols named above.
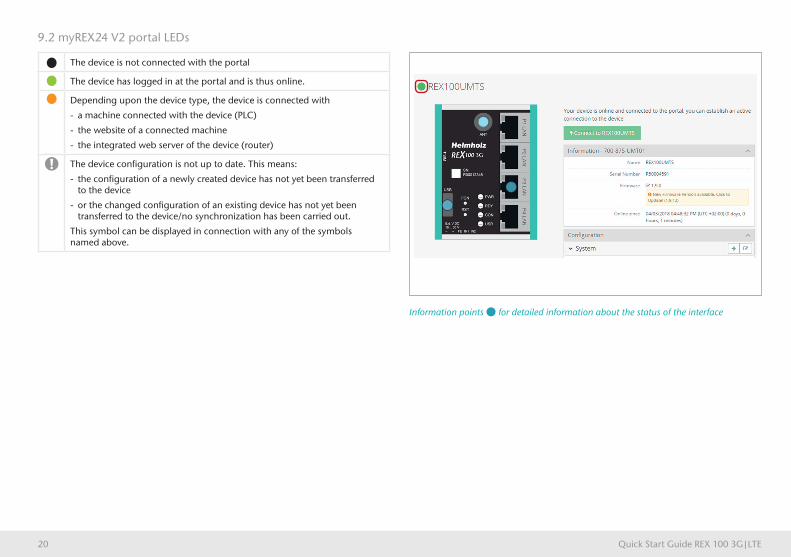
9.2 myREX24 V2 portal LEDs
Information points for detailed information about the status of the interface

Quick Start Guide REX 100 3G|LTE 21
10. Restoring the REX 100 router to its default settingsIn order to reset the REX 100 to the factory settings, the following steps are necessary:
- Apply a supply voltage (or press “RST”) until the PWR LED lights up.
- Wait until the RDY LED flashes.
- Press the FCN button for approx. 10–15 seconds until the USR LED flashes orange.
- After you release the FCN button, the REX 100 reboots and once again has the factory settings.
11. Load configuration/firmware update from USB stickTo provide the REX 100 with a configuration or perform a firmware update from a USB stick, please carry out the following steps:
- The start process of the device must be completed (PWR & RDY LEDs light up continuously).
- Save the file in the root directory of a standard FAT-formated USB stick. Important! Do not change the file name.
- Insert the USB stick into the USB interface of the REX 100.
- Once the USR LED starts flashing, you will have ten seconds to press the FCN button. Then hold it pressed until the USR LED lights steadily.
- During the operation, the voltage supply should not be interrupted.
- Once the USR LED lights up continuously, you can release the FCN button, at which point the data will be loaded from the USB stick.
- The process is complete once the PWR and RDY LEDs light up again permanently.
Important: The IP address of the REX 100 LAN interface is reset to 192.168.0.100/24.
Note: Ensure that either only the firmware file or only the configuration file is found in the root directory of the USB stick. If you wish to update both the firmware and the configuration, carry out the following steps consecutively for each file.
Note: Once the configuration file has been successfully transferred, the file will automatically be renamed “Xmyrex24.mbn”, making it impossible to accidentally reuse it a second time.

Quick Start Guide REX 100 3G|LTE22
12. Technical data
REX 100 3G, 4 x LAN (switch)/1 x 3G modem (UMTS) (700-875-UMT01)
Dimensions (DxWxH) 32 x 59 x 76 mm
Weight Approx. 130 g
Number of inputs | type 2 | (DC) 24 V, as per DIN EN 61131-2 Type 2
GSM modem Quad-band GPRS/EDGE data interface
- Antenna terminal SMA socket (exterior thread)
- SIM card type Standard SIM, 1.8 V/3 V
- GSM frequency bands GSM/GPRS/EDGE: 850, 900, 1800, 1900
- UMTS frequency bands UMTS/HSPA: 800/850, 900, AWS 1700, 1900, 2100 class 1
- Transmit power Class 1, E2, 3, 4
- Data transmission rate HSPA+ (upload: 5.76 Mbps | download: 21.0 Mbps)
LAN interface 4
- Type 10 Base-T/100 Base-T
- Connection RJ45 socket
- Transmission rate 10/100 Mbps
USB interface
- Protocol USB 2.0 host
- Connection USB A socket
Status indicator 4 LEDs function status 8 LEDs Ethernet status
Voltage supply 24 V DC, 18–30 V DC
Current draw Max. 250 mA with DC 24 V
Environment requirements
- Ambient temperature -40 °C ... +75°C
- Transport and storage tempe-rature
-40 °C … +85 °C
- Relative air humidity 95 % r H without condensation
- Pollution degree 2
- Protection rating IP20
Certifications CE, UL
UL UL 61010-1/ UL 61010-2-201
- Voltage supply DC 24 V (18 ... 30 V DC, SELV and limited energy circuit)
- Pollution degree 2
- Altitude Up to 2,000 m
- Temperature cable rating 87 °C

Quick Start Guide REX 100 3G|LTE 23
REX 100 LTE, 4 x LAN (switch)/1 x LTE modem (700-875-LTE01)
Dimensions (DxWxH) 32 x 59 x 76 mm
Weight Approx. 130 g
Number of inputs | type 2 | (DC) 24 V, as per DIN EN 61131-2 Type 2
GSM modem
- GSM modem Multiband GSM/GPRS/WCDMA/LTE data interface
- Antenna terminal SMA socket (exterior thread)
- SIM card type Standard SIM, 1.8 V/3 V
- GSM frequency bands GSM 900, DCS1800
- UMTS frequency bands B5(850), B8 (900), B1 (2100)
- LTE frequency bands (MHz) B20 (800), B3 (1800), B7 (2600)
- Transmit power Class 1, E2, 3, 4
- Data transmission rate HSPA+ (upload 5.76 Mbps | download 42.0 Mbps); LTE (upload 50 Mbps | download 100 Mbps)
LAN interface 4
Type 10 Base-T/100 Base-T
Connection RJ45 socket
Transmission rate 10/100 Mbps
USB interface
- Protocol USB 2.0 host
- Connection USB A socket
Status indicator 4 LEDs function status 8 LEDs Ethernet status
Voltage supply DC 24 V, 18 ... 30 V DC
Current draw max. 250 mA with DC 24 V
Environment requirements
- Ambient temperature -40 °C ... +75°C
- Transport and storage tempe-rature -40 °C … +85 °C
- Relative air humidity 95 % r H without condensation
- Pollution degree 2
- Protection rating IP20
- Certifications CE, UL
UL UL 61010-1/ UL 61010-2-201
- Voltage supply DC 24 V (18 ... 30 V DC, SELV and limited energy circuit)v
- Pollution degree 2
- Altitude Up to 2,000 m
- Temperature cable rating 87 °C

Helmholz GmbH & Co. KG | Hannberger Weg 2 | 91091 Großenseebach | Germany | Phone +49 9135 7380-0 | Fax +49 9135 7380-110 | [email protected] | www.helmholz.de
Notes:
The contents of this Quick Start Guide have been checked by us so as to ensure that they match the hardware and software described. However, we assume no liability for any existing differences, as these cannot be fully ruled out. The information in this Quick Start Guide is, however, updated on a regular basis.
When using your purchased products, please make sure to use the latest version of this Quick Start Guide, which can be viewed and downloaded on the Internet at www.helmholz.de.
Our products contain open source software, among others. This software is subject to the respectively relevant license conditions. We can send you the corresponding license conditions, including a copy of the complete license text together with the product. They are also provided in our download area of the respective products under www.helmholz.de. We also offer to send you or any third party the complete corresponding source text of the respective open source software for an at-cost fee of 10.00 Euro as a DVD upon request. This offer is valid for a period of three years, starting from the date of product delivery.
Our customers are important to us. We are pleased to receive suggestions for improvement and new impulses.. Should you have any questions concerning the use of the product, please contact Helmholz Support by telephone or write an e-mail an [email protected]
1) Simatic and STEP 7 are registered trademarks of Siemens AG. 2) Windows is a registered trademark of the Microsoft Corporation.