quickbooks point of sale for retail user’s...
TRANSCRIPT

QuickBooks Point of Sale for Retail
User’s Guide®

ii
The following Software License and Services Agreement contains the terms, conditions, obligations, responsibil-ities, liabilities and remedies concerning your use of QuickBooks Point of Sale.
Software License and Services Agreement
For
1) QUICKBOOKS POINT OF SALE
1. Agreement Controls the Relationship
This Software License and Services Agreement ("Agreement") sets forth all terms and conditions, obligations, responsibilities, liabilities and remedies as between (a) you and (b) Intuit Canada, a General Partnership, ("Intuit") and the Representatives (defined in Section 11) in regards to your use of QuickBooks Point-of-Sale, and any related services, materials, and documentation. This
Agreement applies to all versions of the Software. Do not use the Software until you have carefully read the following Agreement. QuickBooks Point of Sale may be referred to as the "Software", and may include setup assistance ("Setup Service" as defined below) and an Update Service (as defined below), to the extent set forth herein. The continuous service option available to you if you obtain the Software directly from Intuit (as more fully described below) may also be referred to as the "Service." By using the Software, you confirm that you (a) have read and understood this Agreement, (b) accept and agree to be bound by its terms and conditions, (c) acknowledge that this Agreement sets forth your exclusive remedies in respect of any claims you may have related to the Software, and (d) understand that this Agreement fully sets out the obligations and limitations of liabilities of Intuit, its licensors and the Representatives to you, notwithstanding any other prior or contemporaneous writing (including any related packaging or advertisements), promise, understanding, or oral representations made by any party, including Intuit.
2. Rejection of Agreement
2.1 If you purchased a license to the Software and/or signed up to the Service but do not agree with or consent to be bound by the terms of this Agreement, you must (a) immediately discontinue all use of the Software and/or Service, related materials or documentation; (b) immediately delete from your computer any software provided to you as part of the Software and/or Service, and destroy any and all copies made by you (or with your permission) of any portion of such software; and (c) within ten (10) days, return to Intuit, all items provided to you as part of the Software plus documentation evidencing the date and amount you paid for your purchase of the Software at retail, or subscription to the Service (e.g. dated receipt, shipping invoice) to the address set forth in Section 13.3.
2.2 If you comply with the terms of Section 2.1, you shall receive a full refund of any monies you paid for the Software/Service.
2.3 If the Software was pre-installed on your computer or disks came packaged with your computer at no extra charge, and you do not agree with this Agreement, do not use the Software.
3. Services and Support
3.1 For your continued compliance with this Agreement, and any modification to this Agreement made by Intuit in accordance with Section 13.1, you shall have access to the Software/Service in accordance with the following provisions: (a) if you purchased the Service for QuickBooks Point of Sale (which may include the Software), which generally means that you will be paying for your use of the Software on a monthly (or other periodic) basis, you shall receive as part of your basic Service: (i) unlimited access to the features of the Software subscribed to by you; (ii) Setup Service, defined below; (iii) Update Service, defined below; (iv) Support Service, defined below; and (v) Version Protection, defined below. You must subscribe to the Service for a minimum of two (2) years, with the Service fees payable monthly by you (or on a different time basis upon agreement between Intuit and you). After two (2) years: (x) the Service is cancelable by you in accordance with this Agreement, and (y) you are considered to have purchased your license to the Software, entitling you to the Update Service for so long as Intuit supports your release of the Software, even if you cancel your Service subscription. (b) if you purchased the Software at retail or directly from Intuit (technically, purchase of a license to use the Software), you shall receive: (i) unlimited access to the features of the Software; (ii) Setup Service, defined below; (iii) Update Service, defined below, for so long as Intuit supports your release of the Software. As part of your purchase of the Software or Service, you may also be provided with certain software that, subject to the terms of this Agreement, you may store on or access via your computer. Intuit's obligations under this Section 3.1 are contingent upon you installing all updates and error corrections within thirty (30) days of their being provided to you by Intuit (or its Representatives). Please see Section 6 for the duration of the Service as applicable to you.

iii
3.2 Services. Setup Service is available only to purchasers QuickBooks Point of Sale. (a) Setup Service means the initial assistance made available by Intuit (by telephone and via the quickbooks.ca website) to help you install the Software, set up your company file, setup the QuickBooks Point of Sale for retail administrator, setup QuickBooks Point of Sale for each sales terminal and to start you successfully on your way with QuickBooks Point of Sale, for a period based on your needs, not to exceed 30 days from product registration. (b) Update Service, which is available to all QuickBooks purchasers, means updates and error corrections made generally available to users of the Software, and possibly certain feature enhancements in Intuit's discretion, but not including new releases of the software. (c) Media Delivery Service means your right to request delivery by mail of any updates and error corrections (and new releases, if you have purchased the Support Service) on CD-ROM. (d) Support Service means your unlimited access to consulting about the Software and technical support for so long as Intuit supports your release of the Software. Intuit reserves the right to limit the length of telephone calls made as part of the support service. (e) Version Protection means your right to new releases of the Software during any month (or other time period) in which you have paid for the Service.
3.3 As determined by Intuit in its sole discretion, the Software, Service and related services are provided (a) elec-tronically via the world-wide-web and/or (b) via media (e.g. CD-ROM). You may be charged an additional fee if Intuit makes the Software and/or Service available (y) both electronically and via media and you chose media or (z) in different media forms and you chose the form which is identified as having an additional fee.
3.4 In its sole discretion, Intuit may provide technical support for the current release/version of the Software and the immediately preceding release/version for a period of six (6) months following the date the subsequent release/version is made generally available to Software/Service customers. You may access the prices of technical support by calling Intuit at 1-888-333-8580.
4. License Grants
4.1 Single-User License: When you sign up for a single license of the Software, you are granted a non-exclusive, limited license for one (1) individual to access the Software/Service on a single computer located within the geographic boundaries of Canada (except that use is permitted outside of Canada only during temporary travel abroad). You are permitted to make one (1) backup copy of the applicable Software as an archival copy. Notwith-standing the foregoing, the QuickBooks POS for Retail Administrator Software can be loaded on a separate computer without necessitating an additional user license. You may also use your backup copy to replace the applicable Software in the event the Software loaded on the licensed computer is lost or is damaged and rendered unusable, however, your use of the replacement copy of the Software will be subject to the terms and conditions set forth in this Agreement. You may print one (1) copy of any online user documentation in relation to the Service and/or the Software. You must register the Software within the specified period in order to keep using the Software. Your failure to timely register the Software shall result in the immediate termination of your license grant hereunder, and your access to the Software may be terminated, in which event you shall not be entitled to any refund.
4.2 Licenses for Multi-Users (Multiple Terminals)
4.2.1 If you want multiple users to have the ability to use the Software you have licensed, you are required to pay an additional license fee for each additional user, which will be subject to the same restrictions as the single user license. You may access the price schedule for additional user licenses at www.quickbooks.ca/fees.html, or by calling Intuit at 1-888-333-8580. By way of example only, if you have paid for five (5) user licenses of the Software, you are granted a limited non-exclusive license to (a) have up to five (5) individuals (who are your owners, employees, or contractors) access the Software/Service; (b) download the Software on up to five (5) computers located within the geographic boundaries of Canada (except that use is permitted outside of Canada only during temporary travel abroad) which may be used by up to five (5) individuals (who are your owners, employees, or contractors); (c) place a copy of your Software data file on a network; and (d) make up to four (4) additional copies of the printed materials provided to you by Intuit (if any) and/or print up to five (5) copies of any online user documentation in relation to the Software/Service.
4.2.2 Subject to the number of licenses paid for by you and the terms of this Agreement, you may have up to five (5) individuals simultaneously use QuickBooks Point of Sale. Use of the Software by more than five (5) users at the same time may result in the failure of the Software, performance degradation, errors and/or loss of data, and shall be considered a material breach of this Agreement.

iv
4.3 Trial-User License: If you have signed up for a trial-user version of the Software/Service, you are granted a limited non-exclusive license to use the Software so that one (1) individual may access the Software/Service on a single computer located within the geographic boundaries of Canada (except that use is permitted outside of Canada only during temporary travel abroad). You may print one (1) copy of any online user documentation in relation to the Service and/or the Software, however, you cannot make multiple copies of any online user docu-mentation or printed materials that accompany the Software (if any). Your trial-user license is only valid for limited number of uses of the Software/Service, or as otherwise may be specified on the packaging or as identified when you signed up for the trial-user version of the Software. You understand that upon the expiration of your trial user license, you must purchase a license to the Software or sign up for the Service if you seek their continued use, in the absence of which, you may not be able to use/access the Software or any data you entered into the Software.
5. License Restrictions
5.1 The Software and Service contain Intuit trade secrets. You may not disclose such trade secrets or decompile, reverse engineer, disassemble, or otherwise reduce the Software to human-perceivable form.
5.2 You may not modify, adapt, translate, rent, sublicense, assign (except as permitted under Section 5.4), lend, resell for profit, distribute, or network any portion of the Service, the Software, disk(s), or related materials, or create derivative works based thereon or any part thereof.
5.3 The Service and any Software and materials provided to you are protected by Canadian and other copyright laws and international treaties. Unless expressly permitted under your applicable license grant in Section 4.1, 4.2, or 4.4, any of the following actions by you, among others, would be considered violations of this Agreement.
(a) Enabling others to use your Software or Service registration or access codes, passwords, Installation and License Key Codes (as may be provided by Intuit), or serial number(s) (if any);
(b) Making additional copies or duplicating any aspect of the Software/Service, by any means, including electronic transmission;
(c) Copying any portion of the printed materials, if any, accompanying the Software, or printing multiple copies of any user documentation; or
(d) Installing the Software on computers used by individuals who do not have license grants under the Software or Service.
5.4 Subject to Intuit's approval, you may only transfer/assign your right(s) in and to the Software to a third party, or sell the computer on which the Software is installed to a third party, provided that, within fifteen (15) days of the transfer/assignment to that third party, (a) you notify Intuit of the transfer/assignment and complete any transfer forms required by Intuit, (b) the third party enters into the most current version of the Agreement for the Software or Service as provided by Intuit; and (c) the third party provides Intuit with complete payment infor-mation, as deemed acceptable by Intuit, for purposes of paying the Service Fee(s) and all other fees which might be due and owing in connection with your prior use of the Service. If you transfer/assign your rights to the Software to any third party, you may not keep a copy of such software or any related materials/documentation for yourself.
6. Payment for the Service
6.1 If you obtained the Software directly from Intuit, whether via quickbooks.ca or telephone, the fees and terms of payment for use of the Service are:
6.1.1 Once every calendar month (or other time period as mutually agreed upon by you and Intuit) ("Service Period"), you authorize Intuit to debit your bank account or charge to your "credit card" identified by you, a fee (plus any and all applicable taxes) for access to the Service ("Service Fee"). "Credit card" means bank issued credit cards, debit cards, electronic funds transfers, or such other means of payment as deemed acceptable by Intuit in its sole discretion. Any other fees owed by you under this Agreement will be debited to your bank account or charged to your credit card at the time such fees are due. Every twelve (12) months from the date you first subscribe to the Service and every subsequent twelve (12) month period starting on the anniversary date of your subscription shall be a "Subscription Year".
6.1.2 The current Service Fee per Service Period (which for purposes of this Section 6.1.2 shall be a calendar month (or other agreed time period)) for the Service, based upon the number of user licenses, can be accessed online via www.quickbooks.ca/fees.html or by calling Intuit at 1-888-333-8580. Intuit may modify the Service Fee at any time by providing notice in the manner set forth in Section 13.1 at least sixty (60) days before the modified rate takes effect. Unless you cancel the Service under Section 2 or 8, all Service Fees paid by you are non-refundable.

v
6.1.3 It is your sole responsibility to ensure that Intuit has your valid and current bank account or credit card information to ensure prompt payment. You agree to give Intuit immediate notice of anything that might impede payment, such as expiration of the card, replacement of your card with another or your card being at or over your credit limit. If your credit card, or other form of payment, is declined, expired or the credit card issuer or financial institution otherwise denies payment, Intuit may continue to try to process your credit card payment and/or charge you an administrative fee. Further, if your account falls into arrears, you will be denied access to the Service which will not be reinstated until you pay all past due Service Fee(s), applicable administrative fees and, as determined by Intuit in its discretion, prepay the Service Fee(s) for up to twelve (12) months in advance. If you fail to keep your account current, Intuit may send your account to a collections agency.
6.2 Unless you cancel the Service under Section 2 or 8, all Service Fees paid by you are non-refundable.
7. Cancellation Policy
7.1 You may cancel your subscription to the Service at any time by notifying Intuit of your cancellation in accordance with Section 13.2. Intuit will charge to your credit card all fees owed by you under this Agreement until your cancellation takes effect.
7.1.1 Your cancellation will be effective by the close of your applicable Service Period in which Intuit receives your cancellation notice, however, if Intuit receives your notice with less than ten (10) business days left in the then existing Service Period, your cancellation will take effect at the close of the following Service Period, which in no event shall exceed one (1) calendar month. By way of example only, if your subscription to the Service started on January 15, and Intuit received your notice of cancellation on October 20, your cancellation would be effective by November 15. If Intuit received your cancellation notice after November 5, your cancellation would be effective by December 15 and you would be required to pay for the Service Period which started on November 15.
7.2 If you have obtained a subscription under Section 6.1, and you cancel your subscription prior to the end of a Subscription Year, you may be subject to an early cancellation fee for Service rendered and Software provided to you ("Early Cancellation Fee") in addition to any other fees and taxes owed by you under this Agreement. Current Early Cancellation Fees can be accessed via www.quickbooks.ca/fees.html or by calling Intuit at 1-888-333-8580. To determine whether an Early Cancellation Fee may apply to your cancellation, please see as follows:
7.2.1 Cancellation During Initial Subscription Year: If you have obtained the Service under Section 6.1, and you cancel so that your cancellation is effective prior to the end of your initial Subscription Year, Intuit, subject to Section 2 and 8, will charge your credit card, and you agree to pay, the applicable Early Cancellation Fee.
7.2.2 Cancellation After the Initial Subscription Year: If you cancel so that your cancellation is effective prior to the end of any Subscription Year (not including the initial Subscription Year), Intuit will charge your credit card, and you agree to pay, the applicable Early Cancellation Fee.
7.3 Deactivation Code: Intuit may embed a deactivation code in the Software which, upon cancellation/termi-nation of this Agreement or your failure to pay fees owed by you (if any) under this Agreement, may automatically bar your access to the Service and all data you entered into the Software.
8. 60 Day Money Back Guarantee
In the event you determine that you are not satisfied with the Service/Software, whether obtained under Section 3.1(a) or (b) hereof, you may cancel your order for a full refund (minus applicable shipping, handling and support/service fees) if within sixty (60) days of purchasing the Software or first signing up for the Service you:
(a) send to the address set forth in Section 13.3: the Software and all items provided to you as part of the Service, your notice of cancellation, and documentation evidencing the date and amount you paid for your subscription to the Service, if you are subject to Section 6.1 above (e.g. dated receipt, shipping invoice);
(b) delete any Software and documentation downloaded or loaded onto your computer; and
(c) destroy any and all copies made by you (or with your permission) of any portion of the Software/Service.

vi
9. Limited Warranty
9.1 Intuit warrants that all CD-Rom disk(s), diskettes or other media (collectively, "disk(s)") provided to you as part of the Software or in relation to the Service, when under normal use, shall be free from defects in material and workmanship for sixty (60) days from the date of shipment of the disk(s) to you. For disk(s) that do not operate as warranted, Intuit shall, at its option, repair/replace the disk(s) at no additional cost to you provided that you send Intuit a replacement request, the defective disk(s), and documentation evidencing the date and amount for which you subscribed to the Service (e.g., dated receipt, shipping invoice) under Section 3.1(a) or paid for the Software under Section 3.1(b), prior to the expiration of the sixty (60) day warranty period. If you identify a defect after the warranty period, Intuit may make a replacement disk(s) available if you send to Intuit: your replacement request, the defective disk(s), and a cheque made payable to "Intuit Canada" in the applicable amount plus applicable tax. You can access the cost for replacement disks online via www.quickbooks.ca/fees.html or by calling Intuit at 1-888-333-8580. For all orders shipped within Canada, please add all applicable provincial and local sales tax as well as tax on shipping and handling based on your shipping address. Any request for the replacement of defective disk(s) (with the items identified in this Section 9.1) must be sent to Intuit as set forth at Section 13.3.
9.2 THIS SECTION SETS FORTH INTUIT'S ENTIRE LIABILITY AND YOUR EXCLUSIVE REMEDIES IN THE EVENT OF YOUR DISSATISFACTION WITH THE SERVICE, THE SOFTWARE, DEFECTIVE DISKS OR APPLICABLE SETUP SERVICE, UPDATE SERVICE, TECHNICAL SUPPORT/SUPPORT SERVICE PROVIDED AS PART OF OR IN CONNECTION WITH THE SERVICE OR THE SOFTWARE.
10. Limited Warranty and Disclaimers
EXCEPT AS PROVIDED IN SECTION 9 AND TO THE MAXIMUM EXTENT PERMITTED BY APPLICABLE LAW, THE SOFTWARE, THE SERVICE, ANY RELATED DOCUMENTATION, MATERIALS AND TECHNICAL SUPPORT OR RELATED SERVICES PROVIDED TO YOU IN CONNECTION WITH THE SERVICE ARE PROVIDED "AS-IS" AND YOU ACCEPT THE ENTIRE RISK AS TO THEIR QUALITY AND PERFORMANCE. TO THE MAXIMUM EXTENT PERMITTED BY APPLICABLE LAW, INTUIT, ITS AFFILIATED COMPANIES, AND THEIR LICENSORS DISCLAIM ALL OTHER REPRESENTATIONS, WARRANTIES AND CONDITIONS, WHETHER EXPRESS OR IMPLIED, REGARDING THE SOFTWARE, THE SERVICE, DISK(S), RELATED DOCUMENTATION, AND OTHER MATERIALS AND TECHNICAL SUPPORT, INCLUDING THEIR FITNESS FOR A PARTICULAR PURPOSE, MERCHANTABLE QUALITY, OR NONINFRINGEMENT. INTUIT DOES NOT WARRANT THAT THE SOFTWARE OR SERVICE SHALL PERFORM ERROR FREE OR WITHOUT INTERRUPTION, OR THAT THEY ARE FREE FROM BUGS, VIRUSES, ERRORS, OR OTHER PROGRAM LIMITATIONS, NOR DOES INTUIT WARRANT ACCESS TO THE INTERNET OR ANY OTHER SERVICE INCLUDING THIRD PARTY SERVICES TO WHICH YOU MAY CONNECT THROUGH THE SOFTWARE OR THE SERVICE. NO ORAL OR WRITTEN INFORMATION OR ADVICE GIVEN BY INTUIT AND ITS LICENSORS, THEIR RESPECTIVE EMPLOYEES, DISTRIBUTORS, DEALERS OR AGENTS SHALL INCREASE THE SCOPE OF THE ABOVE REPRESENTATIONS, WARRANTIES OR CONDITIONS, OR CREATE ANY NEW REPRESEN-TATIONS, WARRANTIES OR CONDITIONS IN CONNECTION WITH THE SOFTWARE OR THE SERVICE IN THIS AGREEMENT. INTUIT MAKES NO REPRESENTATIONS OR WARRANTIES REGARDING ANY THIRD PARTY CONTENT, EVEN IF ACCESSED THROUGH THE SOFTWARE OR THE SERVICE BY MEANS OF A LINK OR OTHERWISE, INCLUDING WITHOUT LIMITATION ANY REPRESENTATIONS OR WARRANTIES REGARDING THE OWNERSHIP OR FUNCTIONALITY OF SUCH CONTENT. SOME JURISDICTIONS MAY NOT ALLOW THE EXCLUSION OF IMPLIED REPRESENTATIONS, WARRANTIES AND CONDITIONS, SO THE ABOVE EXCLUSIONS MAY NOT APPLY TO YOU. IN THAT EVENT, TO THE EXTENT YOUR JURISDICTION PERMITS LIMITATIONS ON DURATION OF IMPLIED WARRANTIES, ANY IMPLIED REPRESENTATIONS, WARRANTIES OR CONDITIONS ARE LIMITED IN DURATION TO SIXTY (60) DAYS FROM THE DATE YOU PURCHASED THE SOFTWARE OR SIGNED UP FOR THE SERVICE (AS THE CASE MAY BE), OR TO THE SHORTEST PERIOD PERMITTED BY APPLICABLE LAW, IF LONGER. THIS WARRANTY GIVES YOU SPECIFIC LEGAL RIGHTS, AND YOU MAY HAVE OTHER RIGHTS AS WELL, WHICH VARY ACCORDING TO JURISDICTION.
11. Limitation of Liability and Damages
11.1 THE ENTIRE AND SOLE LIABILITY OF INTUIT AND ITS SUBSIDIARIES, AFFILIATES, LICENSORS, PARTICI-PATING FINANCIAL INSTITUTIONS, THIRD-PARTY CONTENT OR SERVICE PROVIDERS, DISTRIBUTORS, DEALERS OR SUPPLIERS ("REPRESENTATIVES") FOR ANY REASON SHALL BE LIMITED TO: (i) THE AMOUNT PAID BY YOU TO INTUIT OR ITS AUTHORIZED RESELLER FOR THE SERVICE DURING THE SIX (6) MONTHS IMMEDIATELY PRECEDING THE DATE WHICH, AS DETERMINED BY A COURT OF COMPETENT JURISDICTION, YOU WERE HARMED BY THE SERVICE, OR (ii) IF YOU OBTAINED THE SOFTWARE FROM ITS AUTHORIZED RESELLER UNDER SECTION 3.1(b) ABOVE, THE AMOUNT PAID BY YOU TO SUCH RESELLER. TO THE MAXIMUM EXTENT PERMITTED BY APPLICABLE LAW, INTUIT AND ITS REPRESENTATIVES ARE NOT LIABLE FOR ANY INDIRECT, SPECIAL, INCIDENTAL, OR CONSEQUENTIAL DAMAGES (INCLUDING, BUT NOT LIMITED TO, DAMAGES FOR LOSS OF BUSINESS, LOSS OF PROFITS OR INVESTMENT, OR THE LIKE), WHETHER BASED ON BREACH OF CONTRACT, BREACH OF WARRANTY, TORT (INCLUDING NEGLIGENCE), PRODUCT LIABILITY OR OTHERWISE, EVEN IF INTUIT OR ITS REPRESENTATIVES HAVE BEEN ADVISED OF THE POSSIBILITY OF SUCH DAMAGES, AND EVEN IF A REMEDY SET FORTH HEREIN IS FOUND TO HAVE FAILED OF ITS ESSENTIAL PURPOSE. INTUIT'S AND ITS REPRESENTATIVES' TOTAL LIABILITY TO YOU FOR ALL DAMAGES FROM ANY CAUSE WHATSOEVER WILL BE LIMITED TO: (i) THE AMOUNT PAID BY YOU FOR THE SIX (6) MONTHS OF THE SERVICE IMMEDIATELY PRECEDING THE DATE WHICH, AS DETERMINED BY A COURT OF COMPETENT JURIS-

vii
DICTION, YOU WERE HARMED BY YOUR USE OF THE SERVICE, OR (ii) IF YOU OBTAINED THE SOFTWARE FROM ITS AUTHORIZED RESELLER UNDER SECTION 3.1(b) ABOVE, THE AMOUNT PAID BY YOU FOR THE SOFTWARE TO SUCH RESELLER. SOME JURISDICTIONS MAY NOT ALLOW THE LIMITATION AND/OR EXCLUSION OF LIABILITY FOR CERTAIN CATEGORIES OF DAMAGES, SO THE ABOVE LIMITATION OR EXCLUSION MAY NOT APPLY TO YOU.
11.2 These limitations of damages set forth above are fundamental elements of the basis of the bargain between Intuit and you. Intuit would not be able to have provided the Service and/or the Software without such limita-tions.
12. Debit and Credit Card Processing and other Online Services
Access to credit and debit card processing, and any other services available through the Internet and selected Intuit products may be provided by your financial institution or other third party and not Intuit ("Online Services"). Online Services shall also include services available to you in or from the Software, often co-branded with Intuit and third party brands, in which a third party is primarily responsible for making added functionality available to you. You agree not to hold Intuit liable for any loss or damage of any sort incurred as a result of any such dealings with any services provided by your financial institution or other third party. Intuit generally does not control the independent contractors providing Online Services, and thus such Online Services may not be available to you at all times or for extended periods of time, even if such services are indicated as being available in the Software or documentation or on the Software packaging. In addition, all Online Services are subject to change without notice. Your access may be limited from time to time, depending on the service provided by your Internet service provider or your financial institution or other third party service provider. You may be billed for these Online Services by your financial institution or other third party, not Intuit, and such financial institution or other third party may have its own service agreement which will govern the Online Services it provides. You agree to be responsible for all telephone charges associated with your Internet and Online Services usage.
13. Notice and Returns
13.1 Notification by Intuit to You: From time to time, Intuit may modify any term or condition of this Agreement. Intuit also may terminate this Agreement as set forth in Section 14. Intuit will notify you of such modifications or termination of this Agreement by making such notice(s) accessible on line via www.quick-books.ca/eula.html . In its sole discretion, Intuit may also provide notification by other means such as e-mail and post. Unless stated otherwise in this Agreement, the effective date of a modification to this Agreement shall be as specified in the applicable notice but, in no event, shall it be less than sixty (60) days from the date the notice was first made accessible at www.quickbooks.ca/eula.html. You agree that it is your sole responsibility to routinely visit this web page for such notices and to ascertain how any modifications of this Agreement may impact your use of the Software/Service. If you do not accept the modifications to the Agreement or an applicable price change, you may cancel your subscription to the Service (or any services provided as part of your Software purchase made under Section 3.1(b) if applicable) as set forth in Section 7.1. Your continued use of the Service will constitute acceptance of the modifications.
13.2 Notification by You to Intuit: Any notification to be provided by you to Intuit under this Agreement must be made by one of the following means:
(a) a letter mailed to: Intuit Canada, P.O. Box 4182, Edmonton, Alberta, T6E 4T2; or
(b) a telephone call to 1-888-333-8580.
13.3 Address for Product Returns: All product returns under this Agreement must be sent via registered mail to: Intuit Canada, P.O. Box 4182, Edmonton, Alberta T6E 4T2.
13.4 Address for Contacting Intuit: If you have any questions concerning this Agreement, you may contact Intuit by writing to: Intuit Canada, P.O. Box 4182, Edmonton, Alberta T6E 4T2, Attn: Legal Department.
14. Termination
This Agreement may be terminated by Intuit immediately and without notice if you fail to comply with any term or condition of this Agreement. Intuit may also terminate this Agreement and your rights to the Service at any time by providing you with no less than ninety (90) days notice in the manner set forth in Section 13.1. Upon such termination, you must immediately return to Intuit the Software and all other materials provided to you under this Agreement, as well as destroy any complete and partial copies of the Software, including all backup copies and all other materials provided as part of the Software or Service.

viii
15. General Provisions
In the event of a conflict between this Agreement and the software license agreement included in the manual you receive in connection with the initial shipment of Software to you, the terms and conditions of this Agreement shall control. This Agreement does not limit any rights that Intuit may have under trade secret, copyright, patent, trademark or other laws. Your breach of this Agreement may subject you to civil and criminal liability. The Repre-sentatives are not authorized to make modifications to this Agreement, or to make any additional representations, commitments, or warranties binding on Intuit, unless such are in writing and signed by an officer of Intuit. Accordingly, such additional statements by Representatives are not binding on Intuit and you should not rely upon such statements. If any provision of this Agreement is invalid or unenforceable under applicable law, then that provision will be deemed, to the extent necessary, amended or omitted, and the remaining provisions will continue in full force and effect. The validity and performance of this Agreement shall be governed by Alberta law (without reference to choice of law principles), except as to copyright and trademark matters, which are covered by Canadian federal laws and international treaties. This Agreement is deemed entered into at Edmonton, Alberta, and shall be construed as to its fair meaning and not strictly for or against either party.
16. Export Restrictions
You acknowledge and agree that the Software is subject to restrictions and controls imposed by the Export and Import Permits Act (Canada) and Regulations under the Export and Import Permits Act (the "Acts") as well as by the United States Export Administration Act and Export Administration Regulations. You agree and certify that neither the Software nor any part or direct product thereof is being or will be acquired, shipped, transferred or exported, directly or indirectly, outside Canada (other than to the United States) or is being or will be used for any purpose prohibited by the Acts; provided, however, that any person may travel to countries not prohibited by the Acts for a period of three (3) months with the Software when it is installed on their personal computer and not otherwise used or transferred in violation of the Acts.
17. Privacy Policy
Intuit gathers certain end user information and personal data from its customers. Intuit adheres to all applicable laws governing the protection of any individual personal data provided to Intuit in connection with the use of Intuit products/services. Please go to www.Intuit.com/canada/privacy.html to review Intuit's current privacy policy in full. The privacy policy is subject to change without notice.
18. Trademarks
Easy Step, Intuit, the Intuit Logo, MacInTax, Quicken, QuickBooks, Qcard, and TurboTax are registered trademarks or service marks of Intuit Inc. or one of its subsidiaries. Billminder, Bizminder, Business Cash Finder, Deduction Finder, Easy Quote, End Financial Hassles, Financial Calendar, Impot Rapide, Impot Rapide Edition Pro, Intelli-Charge, Open Financial Exchange, Pocket Quicken, QuickBooks Payroll Service, QuickBooks Basic, QuickBooks Premier, QuickBooks Premier: Accountant Edition, QuickBooks Premier Payroll Service, QuickBooks Premier: Accountant Edition Payroll Service, QuickBooks Pro, QuickBooks Pro Payroll Service, QuickBooks logiciel comptable, QuickBooks Pro logiciel comptable, QuickFill, QuickInvoice, QuickMath, Quick Pay, Quick Report, Quick Scroll, QuickTax, QuickTax Deluxe, QuickTax for Macintosh, QuickTax ProSeries, QuickTax Web, Quick-TaxWeb.ca, Quick Tour, QuickWealth Planner, Quick Zoom, Quicken.ca, Quicken Deluxe, Quicken French, Quicken Home & Business, SmartAudit, TaxAdvisor, Tax Partner and TurboForms, among others, are trademarks or service marks of Intuit, Intuit Inc. or one of its subsidiaries.
Any other product names, marks, symbols, trade names, company names and/or logos which appear within this product are the property of their respective owners and appear through the courtesy of such owners. Such marks are protected by Canadian law on trademark and unfair competition and may also be registered in the Canadian Intellectual Property Office and/or in the U.S. Patent and Trademark Office.
19. Language
It is the express wish of the parties that this agreement and all related documents be drawn up in English. C'est la volonté expresse des parties que la présente convention ainsi que les documents qui s'y rattachent soient rédigés en anglais.
Copyright © 2001 Intuit Canada Limited. Copyright © 2002, 2003 Intuit Canada, a General Partnership. All rights reserved.
http://www.intuit.com/canada

ix
Limited Warranties for End-Users
1. Hardware Component Manufacturers Limited Warranty
a. The hardware included in this QuickBooks® Point of Sale Solution for Retailers bundle (“POS bundle”) is warranted by the respective manufacturers to be free from defects in materials and workmanship and to conform to the manufac-turer’s published specifications applicable to the products purchased at the time of shipment. This limited warranty does not cover the QuickBooks Point of Sale Software (“POS Software”) included in this POS bundle (which software is covered under separate limited warranties listed below) and does not cover any product which is (i) improperly installed or used; (ii) damaged by accident or negligence, including failure to follow the proper maintenance, service, and cleaning schedule; or (iii) damaged as a result of (A) modification or alteration by the purchaser or other party, (B) excessive voltage or current supplied to or drawn from the interface connections, (C) static electricity or electro-static discharge, (D) operation under conditions beyond the specified operating param-eters, or (E) repair or service of the product by anyone other than the manufacturer’s authorized representatives.
b. The manufacturers of the specific equipment covered by this limited warranty are:
M-S Cash Drawer Corporation (model CF-MEDIA-WHITE cash drawer)
Star Micronics America, Inc. (model TSP613C direct thermal receipt printer)
Welch Allyn Data Collection, Inc. d/b/a Hand Held Products (model HH3220 barcode scanner)
ID Innovations, Inc. (MSR-PS2 credit card reader)
c. The limited warranty shall extend for a period of two (2) years from the original date of purchase by the end-user buyer. For the first thirty (30) days from the original date of purchase by the end-user buyer, such buyer may return the product(s) for a refund. Such refund shall be for the purchase price of the product(s) less the retail cost of any missing or damaged components and less a charge for wear and tear (if applicable). Shipping costs charged upon the initial shipment of the product(s) (if applicable) will not be refunded nor will any costs incurred by buyer in returning the products.
d. Any defective product specified under this limited warranty must be returned within the warranty period for repair or replacement at the manufacturer’s discretion and only upon determination by the manufacturer that the product is defective due to defects in materials or workmanship. Warranty returns under this limited warranty shall be in accordance with the return procedures spedified in step 6. TO THE MAXIMUM EXTENT PERMITTED BY APPLICABLE LAW, THE FOREGOING LIMITED WARANTY IS IN LIEU OF ALL OTHER REPRESENTATIONS, COVENANTS, CONDITIONS OR WARRANTIES, EITHER EXPRESSED OR IMPLIED, ORAL OR WRITTEN, INCLUDING, WITHOUT LIMITATION, ANY IMPLIED WARRANTIES OF MERCHANTABLE QUALITY, AND FITNESS FOR A PARTICULAR PURPOSE. SOME JURISDICTIONS DO NOT ALLOW LIMITATIONS ON IMPLIED WARRANTIES AND CONDITIONS, SO THESE LIMITATIONS MAY NOT APPLY TO YOU. IN THAT EVENT, TO THE EXTENT YOUR JURISDICTION PERMITS LIMITATIONS ON DURATION OF IMPLIED WARRANTIES, ANY IMPLIED WARRANTIES OR CONDITIONS ARE LIMITED IN DURATION TO NINETY (90) DAYS FROM THE ORIGIANL DATE OF PURCHASE, OR TO THE SHORTEST PERIOD PERMITTED BY APPLICABLE LAW, IF LONGER. THIS WARRANTY GIVES YOU SPECIFIC LEGAL RIGHTS, AND YOU MAY HAVE OTHER RIGHTS AS WELL, WHICH VARY ACCORDING TO JURISDICTION.
e. THE MANUFACTURER’S RESPONSIBILITY AND BUYER’S SOLE AND EXCLUSIVE REMEDY UNDER THIS LIMITED WARRANTY IS LIMITED TO THE REPAIR OR REPLACEMENT OF THE DEFECTIVE PRODUCT. IN NO EVENT SHALL THE MANUFACTURER, ITS DISTRIBUTORS, AGENTS OR EMPLOYEES, BE LIABLE FOR INDIRECT, INCIDENTAL, OR CONSEQUENTIAL DAMAGES, AND, IN NO EVENT, SHALL ANY LIABILITY OF THE MANUFAC-TURER, ITS AGENTS OR EMPLOYEES ARISING IN CONNECTION WITH ANY PRODUCT SOLD HEREUNDER (WHETHER SUCH LIABILITY ARISES FROM A CLAIM BASED ON CONTRACT, WARRANTY, TORT, OR OTHERWISE) EXCEED THE ACTUAL AMOUNT PAID TO THE MANUFACTURER FOR THE PRODUCT. THESE LIMITATIONS ON LIABILITY SHALL REMAIN IN FULL FORCE AND EFFECT EVEN WHEN THE MANUFACTURER MAY HAVE BEEN ADVISED OF THE POSSIBILITY OF SUCH INJURIES, LOSSES, OR DAMAGES. SOME STATES, PROVINCES, OR COUNTRIES DO NOT ALLOW THE EXCLUSION OR LIMITATIONS OF INCIDENTAL OR CONSE-QUENTIAL DAMAGES, SO THE ABOVE LIMITATION OR EXCLUSION MAY NOT APPLY TO YOU.
f. All provisions of this Hardware Component Manufacturers Limited Warranty are separate and severable, which means that if any provision is held invalid and unenforceable, such determination shall not affect the validity of enforceability of the other provisions hereof.

x
2. Intuit Limited Warranty of Interoperability
Intuit warrants that the POS Software will operate with hardware components included in the POS bundle for the first sixty (60) days from the original date of purchase by the end-user buyer. This limited warranty is contingent upon use of the POS Software in accordance with its documentation and these hardware components in accordance with the instructions, installation configuration and PC system requirements specified in the docu-mentation accompanying the POS bundle and as provided by Intuit from time to time, and the terms and condi-tions of the software license to the POS Software. This limited warranty does not cover any product which is (i) improperly installed or used; (ii) damaged by accident or negligence, including failure to follow the proper main-tenance, service, and cleaning schedule; or (iii) damaged as a result of (A) modification or alteration by the purchaser or other party, (B) excessive voltage or current supplied to or drawn from the interface connections, (C) static electricity or electro-static discharge, (D) operation under conditions beyond the specified operating param-eters, or (E) repair or service of the product by anyone other than the manufacturer’s authorized representatives. Under the foregoing warranty, Intuit’s entire liability and end-user’s sole and exclusive remedy is limited to return of the POS Software for a refund of the retail value of the POS Software. Warranty returns under this limited warranty shall be in accordance with the return procedures specified below.
3. DISCLAIMER OF WARRANTIES
EXCEPT AS OTHERWISE SET FORTH IN THE ABOVE LIMITED WARRANTY OR INTEROPERABILITY AND THE POS SOFTWARE LICENSE AGREEMENT, AND TO THE MAXIMUM EXTENT PERMITTED BY APPLICABLE LAW, INTUIT DISCLAIMS AN NEGATES ALL OTHER REPRESENTATIONS, COVENANTS, WARRANTIES, AND CONDI-TIONS, WHETHER EXPRESSED OR IMPLIED, INCLUDING WITHOUT LIMITATION, IMPLIED WARRANTIES OF MERCHANTABLE QUALITY, FITNESS FOR A PARTICULAR PURPOSE, CONFORMITY TO MODELS OR SAMPLES AND NONINFRINGEMENT. SOME JURISDICTIONS DO NOT ALLOW LIMITATIONS ON IMPLIED WARRANTIES AND CONDITIONS, SO THESE LIMITATIONS MAY NOT APPLY TO YOU. IN THAT EVENT, TO THE EXTENT YOUR JURISDICTION PERMITS LIMITATIONS ON DURATION OF IMPLIED WARRANTIES, ANY IMPLIED WARRANTIES OR CONDITIONS ARE LIMITED IN DURATION TO NINETY (90) DAYS FROM THE ORIGINAL DATE OF PURCHASE, OR TO THE SHORTEST PERIOD PERMITTED BY APPLICABLE LASE, IF LONGER. THIS WARRANTY GIVES YOU SPECIFIC LEGAL RIGHTS, AND YOU MAY HAVE OTHER RIGHTS AS WELL, WHICH VARY ACCORDING TO JURISDICTION.
4. LIMITATION OF LIABILITY AND DAMAGES
THE ENTIRE LIABILITY OF INTUIT, ITS AGENTS OR EMPLOYEES FOR ANY REASON SHALL BE LIMITED TO THE RETAIL VALUE OF THE POS SOFTWARE UNLESS OTHERWISE SEPARATELY AGREED. TO THE MAXIMUM EXTENT PERMITTED BY APPLICABLE LAW, INTUIT, ITS AGENTS OR EMPLOYEES ARE NOT LIABLE FOR ANY INDIRECT, SPECIAL, INCIDENTAL, OR CONSEQUENTIAL DAMAGES (INCLUDING, BUT NOT LIMITED TO: DAMAGES FOR LOSS OF BUSINESS, LOSS OF PROFITS OR INVESTMENT, OR THE LIKE), WHETHER BASED ON BREACH OF CONTRACT, BREACH OF WARRANTY, TORT (INCLUDING NEGLIGENCE), PRODUCT LIABILITY OR OTHERWISE, EVEN IF INTUIT, ITS AGENTS OR EMPLOYEES HAVE BEEN ADVISED OF THE POSSIBILITY OF SUCH DAMAGES, AND EVEN IF A REMEDY SET FORTH HEREIN IS FOUND TO HAVE FAILED OF ITS ESSENTIAL PURPOSE. SOME STATES DO NOT ALLOW THE LIMITATION AND/OR EXCLUSION OF LIABILITY FOR INCI-DENTAL OR CONSEQUENTIAL DAMAGES, SO THE ABOVE LIMITATION OR EXCLUSION MAY NOT APPLY TO YOU. THE LIMITATIONS OF DAMAGES SET FORTH ABOVE ARE FUNDAMENTAL ELEMENTS OF THE BASIS OF THE BARGAIN BETWEEN INTUIT AND YOU. INTUIT WOULD NOT BE ABLE TO HAVE PROVIDED THIS POS SOFTWARE WITHOUT SUCH LIMITATIONS.
5. Thirty (30) Day Money Back Satisfaction
Hardware Component Manufacturers Limited Warranty
For the first thirty (30) days from the original date of purchase by the end-user buyer, such buyer may return the specified hardware component(s) for any reason, including but not limited to failure of the hardware components to work together, for a refund per the terms of the Hardware Component Manufacturers Limited Warranty. Warranty returns under this limited warranty shall be in accordance with the return procedures below.
6. Return Procedures for POS bundle
For warranty returns of the POS bundle for repair, replacement or for a refund of the purchase price as the case may be and as specified above, please call Intuit Customer Service during normal business hours, excluding Intuit holidays, at (800) 250-9845 to obtain product return instructions. Returns for a refund within the first thirty (30) days from the original date of purchase by the end-user buyer must include the POS Software and all hardware components. Returns must be accompanied by a dated receipt and shipped within the applicable limited warranty period specified above. Neither the manufacturers of the hardware in the POS bundle nor Intuit is responsible for loss or damage to data or component hardware during shipment of the POS bundle. Under no circumstances shall there be a refund of shipping and handling charges, insurance and any other related fees to the end-user. For warranty returns of the POS Software purchased as a stand alone item separate from the POS bundle, please see separate return procedures specified under the software license accompanying the POS Software.

xi
7. Miscellaneous
a. These limited warranties are incorporated into and are essential and material provisions of the terms and condi-tions of sale of the POS bundle to you. The validity and performance of this Agreement shall be governed by Alberta law (without reference to choice of law principles), except as to copyright and trademark matters which are covered by Canadian federal laws and international treaties.
b. It is the express wish of the parties that this agreement and all related documents be drawn up in English. C’est la volonte expresse des parties que la presente convention ainsi que les documents qui s’y rattachent soient rediges en anglais.
c. Intuit, at it's discretion, may limit the amount of warranty replacements it performs for any customer. If warranty replacements become excessive, Intuit may recommend the customer purchase other supported hardware from an alternate vendor or investigate the possible causes of the repeated hardware failures before a replacement is offered.

xii

xiii
ContentsChapter 1 Introduction 1
About QuickBooks POS for Retail, 2
POS for Retail system, 2QuickBooks, 3POS for Retail Administrator, 3POS for Retail, 4How does POS for Retail integration work?, 4The POS for Retail Store, 5What do I need?, 5
Chapter 2 Installing QuickBooks 7Installing QuickBooks, 8
Creating a company file, 8
Chapter 3 Installing the POS for Retail Administrator 9Installing POS for Retail Administrator, 10
Running POS for Retail Administrator for the first time, 10
Chapter 4 Installing POS for Retail 13Installing POS for Retail, 14
Running POS for Retail for the first time, 15Installing POS for Retail on a Network, 16
Contacting Intuit, 18
Be prepared when you call, 18QuickBooks registration, 18QuickBooks technical support, 18

xiv
Chapter 5 Setting up QuickBooks inventory 19QuickBooks - Inventory, 20
What QuickBooks Inventory can do for you, 20Accounts for tracking Inventory, 20Setting up for tracking inventory, 21Tips for setting up inventory items, 24Managing your inventory, 25Setting up non-inventory parts (Items), 27Setting up a Service Item, 28Changing Inventory Prices, 29Taking physical inventory, 30
Chapter 6 Setting up QuickBooks customers 33QuickBooks - Customers, 34
Setting up customers, 34Checklist for setting up customers and jobs, 35Customer Information and how it's used in QuickBooks, 36Adding Customers, 37
Chapter 7 Setting up employees in POS for Retail 39Setting up employees in QuickBooks, 40
Entering standard employee defaults, 40Setting up employees, 41Making an employee inactive, 41Defining custom fields for an employee, 42
Chapter 8 POS for Retail Administrator 43Getting to know POS for Retail Administrator, 44
POS for Retail Administrator toolbar, 44
xv
Chapter 9 POS for Retail Administrator options 47POS for Retail Administrator Options, 48
General tab, 48Lists tab, 52Transactions tab, 52Currency tab, 53Scanning tab, 53Reports tab, 55Web tab, 58Security tab, 58
Chapter 10 POS for Retail Administrator functions 61POS for Retail Administrator Functions, 62
Product List, 62Product Prices, 63Product Labels, 65Layaway Customer List, 71Currency Conversion List, 73Registration Number List, 74Monitor, 75Tools, 77
Chapter 11 The POS for Retail screen 81Getting to know POS for Retail, 82
Chapter 12 POS for Retail options 85Setting Up POS for Retail, 86
General tab, 86Lists tab, 88Keyboard tab, 89Configuring your POS for Retail keyboard, 90Scanner tab, 95Customer Display tab, 97Receipt Printer tab, 98Invoice Printer tab, 99Cash Drawer tab, 100Scale tab, 101Report Printer tab, 101

xvi
Chapter 13 POS for Retail function key options 103POS for Retail Function Key Options, 104
Chapter 14 POS for Retail transactions 125POS for Retail Transactions, 126
General Function Keys, 126Sales Person, 135Entering Products for a Transaction, 136Tendering the Transaction, 137Currency Conversion, 142Gift Certificates (Vouchers), 143Hold a Transaction, 144Transaction Corrections, 145Discounts, 147Surcharges, 150Layaway, 152Customer Accounts, 156Cash Management, 160Receipt/Invoice Printer Functions, 162Browsing the Web, 162
Chapter 15 End of Day procedure 165End Of Day, 166
Chapter 16 Fixing problems 169Troubleshooting, 170
What do I do when…, 170
Chapter 17 Supported POS devices 173Index of Supported POS Devices, 174
Index 179

C H A P T E R 1
1
Welcome to QuickBooks POS for Retail! This chapter
describes how QuickBooks POS, QuickBooks POS for
Retail Administrator, and QuickBooks work together
to give you a complete point-of-sale and accounting
system. CHAPTER 1
Introduction
How does QuickBooks POSfor Retail work?
About QuickBooks POS for Retail
2
POS for Retail system
2
QuickBooks 3
POS for Retail Administrator
3
POS for Retail 4
How does POS for Retail integration work?
4
The POS for Retail Store
5
What do I need? 5

2 CHAPTER 1 Introduction
About QuickBooks POS for RetailElectronic cash registers have functioned speedily and accurately for decades. The electronic cash registers available today are exceptionally 'smart' and have a wide range of calculation and tender functions. They have one major drawback, they are designed to carry out only those functions required to record and total sales and compute change. This restricted functionality is a distinct disadvantage in the retail marketplace today.
To keep ahead of the competition, retailers need to manage their total business with ease and accuracy. Sales at the register, tax collection, inventory status, financial position, and customer/supplier data all need to be monitored. You need to be able to make sales quickly. Customers are in a hurry. Your system must cope with a wide variety of tenders, such as cash, various credit cards, cheques and vouchers. Layaway has re-emerged as a popular form of purchase and manual layaway processes are slow and tedious. Therefore, there is a need to be able to track and administer layaways. You need instant access to sales figures and inventory. Only then can you make wise decisions based on real-time information.
POS for Retail is designed to deliver all of the functionality and speed that the modern, competitive retailer requires, in a user-friendly and affordable PC-based package.
Development of earlier PC systems generally took the simple path of developing POS software that allowed the user to link to any accounting package. Both applications were standalone systems, with limitations on the ability of the accounting system to support the POS application. POS for Retail represents a significant improvement. The applications have been developed concurrently. This has maximized the advantages of switching to PC technology. The power and flexibility of a world-class small- business accounting system, QuickBooks, has been completely integrated with the superior functionality, speed and efficiency of a PC-based POS device to produce a total retail package that is second to none.
Information is shared between POS for Retail and QuickBooks via the POS for Retail Administrator. It only needs to be entered once. POS for Retail functions as a cash register, while QuickBooks maintains inventory, purchase orders, customer, vendor, and employee details, as well as performing accounting and reporting functions. The POS for Retail Administrator creates elements in QuickBooks needed to process sales such as payment methods, payment items, discounts, and surcharges. Additionally, POS for Retail utilizes several accounts to manage undeposited funds and till accounts.
Many PC-based POS systems are developed to use one particular brand or style of hardware. POS for Retail uses pre-configured hardware from the most popular hardware manufacturers.
POS for Retail is not a static product. It is continually improved and further developed to keep pace with the needs of the retail sector. As new hardware becomes available the necessary programming is added to allow you to make use of the latest technology.
POS for Retail system
POS for Retail consists of three components that are fully integrated to provide a simple, yet powerful, total retail management system.

About QuickBooks POS for Retail 3
QuickBooks
This is the accounting component. It is used to manage accounts, create purchase orders, store customer and supplier information, manage inventory and carry out general accounting and reporting functions. QuickBooks can also be used to produce a large variety of financial management reports.
POS for Retail Administrator
This is the POS management component. It handles the system tasks, manages the database and the terminals and acts as the interface between QuickBooks and the POS for Retail terminals.
Having POS for Retail Administrator as a separate entity from POS for Retail allows the terminals to operate as standalone cash registers. It also clearly separates the back office tasks from the point-of-sale tasks.
QuickBooks and POS for Retail Administrator must be installed on the same computer.

4 CHAPTER 1 Introduction
POS for Retail
This is the point-of-sale component that is located at the front of the store on a computer. It operates the cash drawer, receipt printer, and scanner. It processes sales, invoices, layaways etc. in the same manner as an electronic cash register. It has the same speed and ease of operation and the same functionality.
The POS for Retail software can be installed on as many terminals as you want; however, each terminal requires a separate license.
How does POS for Retail integration work?
QuickBooks
QuickBooks is the "financial manager" of the system. It helps you maintain all the financial details of the store. It tracks all the prices, the stock levels, and the buy points of inventory. It knows how much stock you have on hand, at what point you will need to order more, at what price you normally sell it and what discounts apply to what customers.
QuickBooks tracks your financial status - how much you have in your account, who owes you money, and to whom you owe money.
QuickBooks records customer detail - addresses, account details, and applied discounts. You make price changes or create new customers within QuickBooks.
QuickBooks takes information that is passed to it through the Administrator from POS for Retail terminals and makes daily adjustments to its accounts and files. It can then produce a myriad of reports that allow you to make informed decisions regarding your business.

About QuickBooks POS for Retail 5
For example it can tell you the inventory items that are profitable and those that are not. It can prompt you to order particular items when stock becomes low. It can show you which are your good months and which are your low sales months, allowing you to make provisions for staffing and financial management.
POS for Retail Administrator
The POS for Retail Administrator is the "office manager" of the system. Whenever you require price changes or customer updates, it passes this information to the terminals. It also passes back the information that the terminal has stored during the day so that inventory and accounts can be maintained. Used properly, this system maintains a perpetual inventory, giving you accurate, to-the-minute, inventory details of stock on hand and item sales.
POS for Retail
POS for Retail receives information from QuickBooks via the Administrator and uses it to perform the cash register functions. After end-of-day processing, the information goes back via the Administrator so that inventory and accounts can be adjusted and balanced. It also passes back the customer records that were added on-the-fly at the register that day.
The three components are partitioned to give security and allow access to parts of the package that are required when needed.
The POS for Retail Store
There are three types of POS for Retail stores.
� The small store with one computer on which all three POS for Retail components are installed. All the tasks necessary to run the store, and back office, and for the financial management of the business, are performed on the one computer.
� The larger store with two computers. One computer is placed in a non-public area of the store and is installed with QuickBooks and POS for Retail Administrator for admin-istrative tasks. The other computer is on the counter or checkout and acts as a register terminal.
� The store with two or more points of sale. This store also has one computer in a non-public area of the store installed with QuickBooks and POS for Retail Administrator. Each point-of-sale has a register terminal computer.
What do I need?
For information about installing the software, see “Installing QuickBooks” on page 8, “Installing POS for Retail Administrator” on page 10, and “Installing POS for Retail” on page 14.

6 CHAPTER 1 Introduction
One Computer
The minimum recommended hardware configuration is:
You can add the following:
Two Computers
It is necessary to have QuickBooks and POS for Retail Administrator on the same computer. It's recommended that these two applications reside on a back office terminal and POS for Retail on the front terminal. The two computers are linked together via a network, enabling POS for Retail Administrator to receive data from each component.
This is the recommended configuration for a small, single point-of-sale, store. It has the advantage of separating the back office and sales functions of the business. It keeps sales staff separate from the accounts and administration and ensures that the POS terminal is always available to serve customers.
It is good practice to have the POS for Retail database installed on the POS terminal so the back office computer does not need to be running for the terminal to process sales.
Note: The specifications for a two-computer setup are the same as for a one-computer setup, but for each computer. You also require a network card for each machine and sufficient networking cable to connect them. We advise you to obtain the assistance of a computer professional when installing your network.
For more information about installing POS for Retail onto a network, see “Installing POS for Retail on a Network” on page 16.
More Than Two Computers
Your organization can have as many POS terminals as are required to process sales.
As with the two-computer setup, the back office computer has QuickBooks and the POS for Retail Administrator installed on it. The terminals must all have POS for Retail installed. A POS for Retail license is required for each terminal and can be purchased from Intuit.
The POS for Retail database can be installed on any computer, but we advise you to install it on a POS terminal. If you do not, the back office computer will need to be running for the terminals to operate.
� Pentium 166Mhz
� 32Mb RAM
� 1 Gb hard drive
� Cash drawer � Invoice or Report Printer
� Scanner � Pole display
� Receipt printer (serial only) � Scale

C H A P T E R 2
7
This chapter describes what you need to do to get
QuickBooks installed on your computer. CHAPTER 2
Installing QuickBooks
How do Iinstall
QuickBooks?
Installing QuickBooks
8

8 CHAPTER 2 Installing QuickBooks Pro
Installing QuickBooksTo successfully install POS for Retail, the components must be installed in the following order:
1 QuickBooks R5 or later
Note: To check the which release of QuickBooks you have, press CTRL+1. If the release number is less than R5, use the POS for Retail CD to upgrade your version of QuickBooks.
2 POS for Retail Administrator
3 POS for Retail.
Refer to the QuickBooks Startup Guide for installation instructions, hardware requirements, and software requirements.
Creating a company file
It is necessary to create a company file in QuickBooks before installing and setting up POS for Retail Administrator. Without a company file the POS for Retail Administrator installation will fail.
QuickBooks must be installed, registered, and have a company file created before installing POS for Retail.
Also, it’s necessary to setup QuickBooks inventory before using POS for Retail. For more on setting up QuickBooks inventory, see “QuickBooks - Inventory” on page 20.
When POS for Retail Administrator is installed, the installation program adds custom fields to QuickBooks.
POS for Retail requires the use of these fields; so do not enter inventory, items, customers, employees, and suppliers yet.

C H A P T E R 3
9
This chapter tells you how to install POS for Retail
Administrator and how to do the initial set
up. CHAPTER 3
Installing the POS for Retail Administrator
How do I install POS for Retail
Administrator?
Installing POS for Retail Administrator
10
Running POS for Retail Administrator for the first time
10

10 CHAPTER 3 Installing the Administrator
Installing POS for Retail AdministratorThis section describes the procedure to install the POS for Retail Administrator on your Administrator computer. If you have a network of two or more computers, see “Installing POS for Retail on a Network” on page 16.
To install POS for Retail Administrator:1 Shut down all running programs and any virus protection software you may have.
(Some virus protection software can interfere with the Installer.)
2 If the POS for Retail CD isn’t still in your computer's CD-ROM drive from upgrading QuickBooks, put it in. The installer should start in a few moments.
� If the Installer doesn't start automatically, from the Windows Start menu, select Run. Type the drive letter associated with your CD-ROM drive, then type :\autorun.exe and click OK (for example, d:\autorun.exe).
3 In the Welcome to POS for Retail window, click Install POS for Retail Administrator.
4 In the Welcome to POS for Retail Setup Wizard window, click Next to begin.
5 In the End User License Agreement window, click Yes after reading the agreement, then click Next.
6 In the Select Install Location window, click Next to select the default folder or click Browse to navigate to the folder you want.
7 From the Start Copying Files window, click Next to begin copying the necessary POS for Retail Administrator files to your computer.
8 You’re prompted to reboot your computer, click Now, then click Finish.
9 Once your computer has rebooted, follow the steps below to setup POS for Retail Administrator below.
Running POS for Retail Administrator for the first time
Before installing POS for Retail, you'll need to set up a few options in POS for Retail Administrator.
To run POS for Retail Administrator:1 On your Windows desktop, double-click the POS for Retail Administrator icon .
The Welcome to POS for Retail Administrator window appears.
2 Click Next. The POS for Retail Database Location window appears.
3 Click Next to accept the default POS for Retail Administrator database file (POS for Retail.PDB) or if you have an existing database file, click Find to automatically locate it on your hard drive.
QuickBooks must be installed, registered, and have a company file created before installing POS for Retail Administrator.

Installing POS for Retail Administrator 11
4 In the QuickBooks Company File Location window, type the path for your QuickBooks company file (.QBW) or click Find to automatically locate it on your hard drive.
5 Click Next to continue. The Build the POS for Retail Database window appears.
6 Click Next to build the POS for Retail database. Files are created in QuickBooks for POS for Retail to use and the POS for Retail.PDB is created with the data from QuickBooks.
7 When the database is built, click Finish. The Transfer Data from QuickBooks window appears.
8 Click Next to continue. The Select Transfer Information appears.
9 Click Next to transfer the files from QuickBooks. POS for Retail Administrator transfers the listed files from QuickBooks to create the POS for Retail.PDB. By default all Transfer Information is selected.
10 When the file transfer is complete, click Finish.
The POS for Retail Administrator Options screen appears to allow you to configure some necessary options for POS for Retail.
11 For a detailed explanation of all options, see “POS for Retail Administrator Functions” on page 62. It isn't mandatory to set all options before installing POS for Retail.
12 When you are ready, close POS for Retail Administrator and follow the instructions in the next chapter to install POS for Retail.

12 CHAPTER 3 Installing the Administrator

C H A P T E R 4
13
This chapter tells you how to install POS for Retail
and how to get it set up. CHAPTER 4
Installing POS for Retail
How do I install
QuickBooks POS?
Installing POS for Retail
14
Running POS for Retail for the first time
15
Contacting Intuit 18
Installing POS for Retail on a Network
16

14 CHAPTER 4 Installing POS for Retail
Installing POS for RetailThis section describes the procedure to install POS for Retail on a single computer and on a network of two or more computers.
Note: These steps assume you have just installed and setup POS for Retail Adminis-trator and have the Welcome to POS for Retail install window open.
To install POS for Retail on a single computer:1 Shut down all running programs and any virus protection software you may have.
(Some virus protection software can interfere with the Installer.)
2 If the POS for Retail CD isn’t still in your computer's CD-ROM drive from installing POS for Retail Administrator, put it in. The installer should start in a few moments.
� If the Installer doesn't start automatically, from the Windows Start menu, select Run. Type the drive letter associated with your CD-ROM drive, then type :\autorun.exe and click OK (for example, d:\autorun.exe).
3 In the Welcome to POS for Retail window, click Install POS for Retail.
4 In the Welcome to POS for Retail Setup Wizard window, click Next to begin.
5 In the End User License Agreement window, click Yes after reading the agreement, then click Next.
6 In the Select Install Location window, click Next to select the default folder or click Browse to navigate to the folder you want.
7 From the Start Copying Files window, click Next to begin copying the necessary POS for Retail files to your computer.
8 You’re asked if you want to reboot your computer now or later, select the restart option of your choice, then click Finish.
9 Follow the steps in the next section to run and setup POS for Retail.
QuickBooks must be installed, registered, and have a company file created and POS for Retail Administrator must be installed and set up before you can install POS for Retail.
Also, it’s necessary to setup QuickBooks inventory before using POS for Retail. For more on setting up QuickBooks inventory, see “QuickBooks - Inventory” on page 20.

Installing POS for Retail 15
Running POS for Retail for the first time
Before running POS for Retail, you'll need to set up a few options.
To run POS for Retail:1 On your Windows desktop, double-click the POS for Retail icon . The Welcome to
POS for Retail window appears.
2 Click Next. The POS for Retail License Key window appears.
3 Type your License Key, then click Next. You can find your license key either on your POS for Retail CD case or on the back of your POS for Retail User Guide.
4 When you enter your license key, a serial number is generated. Write the serial number down. This serial number is required to register and get a registration number needed for the next window.
5 Call Technical Support to get your Registration Number. For information on contacting getting a registration number, see “Contacting Intuit” on page 18.
Note: To setup additional POS for Retail terminals, quote the serial number to technical support and they will give the additional registration numbers. Additional license fees apply.
6 In the POS for Retail Registration Number window, type your registration number, then click Next.
Note: You can use POS for Retail without registering it for up to 10 days. To register after the tenth day, see page 16.
7 In the POS for Retail Terminal ID window, click Next to accept the default ID or type a new ID. The default ID is your computer name.
8 In the POS for Retail Database Location window, type the path for your POS for Retail database (POS for Retail.PDB) or click Find to automatically locate it on your hard drive.
POS for Retail needs to point to the POS for Retail.PDB (POS Database) for all the necessary files (for example, Inventory).
9 Click Next to continue.
10 Click Finish to complete this step.
POS for Retail opens the QuickBooks POS for Retail Options window.
For more information on all the options, see “Setting Up POS for Retail” on page 86.
It’s necessary to setup QuickBooks inventory before using POS for Retail. For more on setting up QuickBooks inventory, see “QuickBooks - Inventory” on page 20.

16 CHAPTER 4 Installing POS for Retail
How do I register POS for Retail after the 10th day of use?
The following window appears when you start up POS for Retail 10 days after installing POS for Retail.
Installing POS for Retail on a Network
Implementing POS for Retail on a network requires the expertise of your computer supplier.
In order for POS for Retail to perform correctly files need to be shared between computers. This is a task for an expert. If you are an expert PC user then you will have no problem defining the network drives on each PC. If you are not an expert PC user, ask your supplier to configure the network and software for you.
The following are guidelines for the network installer:
Note: QuickBooks and POS for Retail Administrator must be installed on the same machine.
Two Terminals
The following instructions are how we recommend you set up your software with two terminals in store.
To setup two terminals in your store:1 Ensure the two machines are on the same network.
2 Share the drive containing the POS for Retail.PDB database file and map this drive on the other machine. We recommended that the drive be on the front terminal.
3 Make the back office machine the designated QuickBooks/POS for Retail Administrator computer. When installing POS for Retail Administrator install the POS for Retail database on the front terminal. This way if the back office machine is ever rebooted throughout the day the POS for Retail terminal won't be affected.

Installing POS for Retail 17
Three Terminals
The following instructions are how we recommend you set up your software with one back office terminal and two front office terminals in store.
To setup three terminals in your store:1 Ensure that the three machines are all on the same network.
2 Share the drive containing the POS for Retail.PDB database file and map this drive on the other two machines. We recommended that the drive be on one of the front terminals.
3 Network the three machines mapping a drive on the back terminal to each front terminal.
4 Make the back office machine the designated QuickBooks/POS for Retail Administrator computer. When installing POS for Retail Administrator install the POS for Retail database on one of the front terminals. This way if the back office machine is ever rebooted throughout the day the POS for Retail terminals won't be affected.
5 On your second front terminal map a drive to the main front terminal and install POS for Retail. When you are prompted to locate the POS for Retail.PDB it will be found on the mapped drive.
6 Repeat this for each additional POS for Retail terminals you need to set up.
Note: Ideally, if you have a spare machine that won't be used at all, we recommend that you locate both the QuickBooks company file (.QBW) and POS for Retail.PDB on this machine. This ensures that if any back or front machines crash you will not lose your data.

18 CHAPTER 4 Installing POS for Retail
Contacting Intuit
Be prepared when you call
If you need to call for assistance, you will get an answer more quickly if you:
� Make sure you have registered your copies of QuickBooks and POS for Retail and have your registration and activation numbers ready.
� Are at your computer with POS for Retail running.
� Try to remember the windows you opened and the tasks you did prior to encountering the problem. Know the exact wording of any message that appeared on the screen.
� Have a pencil and paper handy to take notes.
� Have the following information ready when you call, as it is sometimes needed:
- Model of computer and amount of memory (RAM) and hard disk space
- Accessory manufacturer, type, and model
- Windows version
- Network configuration and software version
Note: Ensure your POS device is working properly before contacting Intuit technical support. If you need assistance with your POS device, contact its manufacturer directly — Intuit Canada cannot provide assistance for POS devices.
QuickBooks registration
QuickBooks technical support
For information about...
Comments... Contact...
Registering QuickBooks POS for Retail
You can register by phone. To register by phone:1-800-250-9845Mon. - Fri., 8 am - 8 pm, Eastern Standard Time
For information about...
Comments... Contact...
Telephone Support To speak to a technical support representative on a per-incident basis.
1-800-250-9845Mon. - Fri., 8 am - 8 pm, Eastern Standard Time
QuickBooks Web site � To get the most up-to-date QuickBooks POS for Retail information, tips, and updates.
http://www.intuit.com/can-ada/quickbooks/support.shtml

C H A P T E R 5
19
If you purchase goods for resale, keep them in
inventory, and sell them, QuickBooks can help you
track the current number and value of your stock. In
addition, QuickBooks can handle the accounting
associated with buying, holding, and selling
inventory. CHAPTER 5
Setting up QuickBooks inventory
How does QuickBooks
Inventory work?
QuickBooks - Inventory
20
What QuickBooks Inventory can do for you
20
Accounts for tracking Inventory
20
Setting up for tracking inventory
21
Tips for setting up inventory items
24
Managing your inventory
25
Setting up non-inventory parts (Items)
27
Setting up a Service Item
28
Changing Inventory Prices
29
Taking physical inventory
30

20 CHAPTER 5 Setting up QuickBooks inventory
QuickBooks - InventoryThe inventory is the stock in your store, all of the items that are for sale, and how many of them you have in stock. POS for Retail gives you a 'perpetual' inventory system, that is, it calculates the stock on hand by removing stock from inventory as it is sold and adding stock to inventory as it is purchased. If it is set up and used correctly, it will tell you exactly what your stock levels are at any particular point in time.
Immediately before 'going live' (making the first sale) the actual stock levels should be entered into QuickBooks. From then on, all stock taken from the store should go through the POS for Retail terminal as a sale. All stock received from suppliers should be entered into inventory through QuickBooks. If this process is adhered to, you will always know your stock-take figures.
The key to a true perpetual inventory is in setting up the items correctly, then ensuring that the stock levels are accurate from the first day's selling using POS for Retail. If the initial stock level is correct, accurate stock levels can be maintained. It's the old principle of Garbage In/Garbage Out.
What QuickBooks Inventory can do for you
QuickBooks inventory is designed for retail and wholesale businesses that buy items ready for resale. If you have the kind of inventory that QuickBooks can track, here are some advantages of using the inventory feature:
� You can see at a glance how many items are in stock and on order.
� Every time you receive more items, QuickBooks automatically updates the value and quantity of your inventory of those items. If the items had been on order, QuickBooks reduces the number on order.
� QuickBooks warns you if you try to sell more of an item than you have in stock.
� QuickBooks warns you if you are running low on a certain item and need to reorder.
� When you sell inventory, QuickBooks tracks the cost of the goods you are selling and the income you receive. It also automatically updates the value and quantity of your inventory of those items.
Accounts for tracking Inventory
You can set up items that are not inventory items for things you purchase, things you sell, or both. QuickBooks calls such items non-inventory parts (although they do not have to be a part of anything else).
Here are some advantages of using non-inventory parts instead of inventory parts:
� If you decide you really do have inventory that QuickBooks can track, you can change a non-inventory part into an inventory part. However, you cannot change an inventory part into a non-inventory part, nor can you delete an inventory part that is used in any QuickBooks transaction.

QuickBooks - Inventory 21
� Since QuickBooks doesn't keep track of how many non-inventory parts you have on hand, you can use them for raw materials or components or anything you do not sell directly.
� You can use non-inventory parts with generic descriptions for one-of-a-kind items you sell (for example, a ring or an antique dresser). You can edit the description or sales price right on the sales form. Using generic non-inventory parts keeps the number of items on your list of items from increasing astronomically.
Setting up for tracking inventory
The level of detail you use while setting up your inventory items and accounts determines the level of detail your reports contain.
Take some time to determine the level of detail you'd like to track.
Checklist for setting up for tracking inventory in QuickBooks
If you are doing this setup as part of setting up your business in QuickBooks, the goal is to set up your inventory as of your QuickBooks start date. Then enter all purchases and sales of inventory as part of the process of entering all historical transactions between your start date and today.
On the other hand, if your business is already set up in QuickBooks but you are just beginning to purchase inventory, you are starting with zero quantities. After setting up items you plan to purchase, you are ready to enter purchase orders, purchases, and sales from now on.
What to set up
Search the QuickBooks Help index for…
Comments �
(If you collect GST/PST) Turn on and set up GST/PST tracking if you have not already done so.
GST/PST, setting up
If your GST/PST is set up first, you can indicate tax codes for inventory items when setting them up.
❏
Turn on the preference for using inventory.
preferences, inventory
QuickBooks automatically turns on this preference if you use the EasyS-tep Interview to create your company and indicate that you plan to track inventory.
❏
Create one or more income accounts for tracking income from sales of inventory.
accounts, adding to your chart of accounts
QuickBooks automatically creates two other accounts you need: � Inventory Asset, an asset account
for the value of your inventory� Cost of Goods Sold, an account for
tracking the cost of items you sell.
❏

22 CHAPTER 5 Setting up QuickBooks inventory
Accounts for tracking inventory
When you set up inventory items on your Item list, you need to associate each item with three different accounts.
QuickBooks automatically sets up the first two accounts for you. Simply indicate that you want to track inventory (either in the EasyStep Interview or in the purchases and vendors preferences). Then set up an inventory item.
� Inventory Asset account: QuickBooks uses this "other current asset" type account to track the current value of your inventory. Although most businesses need only one such account, you may set up additional other current asset accounts for inventory if you want.
� Cost of Goods Sold account: QuickBooks uses this "cost of goods sold" type account to track the cost to you of the items you have sold. On your chart of accounts, this account is below your income accounts but above your expense accounts. On a profit and loss statement, QuickBooks subtracts the total cost of goods sold from your total income to provide a gross profit before expenses. Although most businesses need only one such account, you may set up additional cost of goods sold accounts if you want.
� One or more sales income accounts: You need one or more income accounts to track the income from the resale of inventory. You can associate all or most of your inventory items with the same income account. The number of income accounts you have depends on how much detail you need to see on your profit and loss statements.
Gather the quantity and value for each inventory item you had on hand as of your QuickBooks start date.
inventory, value of
You need correct opening quantities and values to set up your inventory items in QuickBooks.
❏
Set up inventory items by adding them to your Item list.
inventory, items If you did not have any stock of an item on your QuickBooks start date, enter zero for the quantity on hand and value as of that date.
❏
Enter purchase orders for any items currently on order.
inventory, order-ing
You do not have to enter purchase orders that were received in full between your start date and today.
❏
Enter all purchases and sales of inventory between your Quick-Books start date and today.
� inventory, receiving
� inventory, sell-ing
To bring your quantities and values up to date, you must enter these prior purchases and sales.
❏
What to set up
Search the QuickBooks Help index for…
Comments �

QuickBooks - Inventory 23
Setting up inventory items
If you track inventory, the Inventory Part item type allows you to keep track of how many items remain in stock after a sale, how many items you have on order, your cost of goods sold, and the value of your inventory.
Setting up subitems or group items
If you have a long list of inventory items, you can organize your list by setting up items for general types of items (for example, garden tools). Then you can set up subitems for the items you actually sell (for example, shears, trimmers, and spades).
Note: The item you set up for the general type must be an Inventory Part itself.
Subitems must be of the same item type as the "parent" item. You can make the quantity and value of the "parent" item zero since you do not buy or sell it.
If you sell or purchase groups of inventory items as one unit, set up group items to represent the entire unit. This makes it easy to enter the unit on purchase orders, purchase forms, and sales forms. However, QuickBooks tracks the inventory of the individual items in the group, not the inventory of the group item itself. Also, the price of the group must be the sum of the prices of the individual items. (You can include an item for a discount or additional charge.)
Before you can set up inventory, you need to turn on the Preference, if you didn't in the EasyStep Interview.
To turn on the Inventory preference:1 From the Edit menu, select Preferences.
2 Select Purchases & Vendors in the scroll box.
3 On the Company tab, select "Inventory and purchase orders are active", then click OK.
4 From the Lists menu, choose Item List.
5 From the Item menu button, choose New.
6 From the Type drop-down list in the New Item window, choose Inventory Part.
7 Type an item name or number.
What you type here appears on the drop-down list of items when you complete a sales form or purchase order. Type a name or number to help you distinguish this item from all the others on the list.
If this item is a subitem of an existing item, select the "Subitem of" checkbox and specify the other item's name.
8 Fill in the Sales Information fields for information you show to customers.
9 Fill in the Inventory Information fields for easy reordering of stock.
10 (Optional) Click Custom Fields to fill in or define custom fields for this item.
11 Click Next to record and enter another.
12 Click OK to record and close the window.

24 CHAPTER 5 Setting up QuickBooks inventory
Tips for setting up inventory items� Set up an item for each kind of good you have on hand. Do not try to use the same item
for things that have different values (aside from price fluctuations).
� You can use either names or numbers for items.
� If you like to buy an item from a certain vendor, enter that vendor's name in the Preferred Vendor field.
� If you want QuickBooks to remind you to order more of an item, fill in the Reorder Point field. When the quantity on hand for that item reaches this amount, QuickBooks reminds you to reorder on the Reminders list that appears each time you start Quick-Books. (You can also choose Reminders from the Lists menu.)
� For the purchase description, enter the information the vendor needs to know. For the sales description, enter the information the customer needs to know.
� You can use custom fields to provide additional description to your items. For example, you can include the colour, size, or finish of the item.
Tracking back orders and layaways
Depending on your needs, you can track back orders and layaways in one of two ways in QuickBooks.
� Enter invoices and mark them as pending. You can then get reports on back orders or layaways by customer. You can also record any down payments or prepayments. However, pending invoices do not affect your inventory quantities on hand (because a pending invoice is not a sale). If you use pending invoices for layaways, you may inad-vertently record a sale to another customer of an item you have already set aside as a layaway.
� Or, enter postdated invoices (that is, invoices with dates some time in the future). Post-dated invoices do reduce your inventory. They do not affect your income on reports as long as the reporting period doesn't extend into the invoice dates.
Once you use an inventory item, you cannot delete it or change it to a different type of item.
Before setting up inventory items and using them, be sure that QuickBooks inventory is right for your type of business. If you record purchases or sales of an inventory item, you will not be able to delete the item unless you delete all such transactions for the item. As long as the item is on your Item list, you can-not set up a new item of the same name but different item type. (However, you can hide unwanted items so you don't see them on your list.)

QuickBooks - Inventory 25
Managing your inventory
Managing your inventory includes such tasks as viewing items you have on hand and on order, recording returns to vendors or from customers, and updating your inventory quantities.
QuickBooks keeps track of how many of each item you have in stock or on order, and even warns you if you try to sell something you don't have.
When you record inventory returns to a vendor or from a customer, QuickBooks adjusts the amount you owe the vendor or the amount the customer owes you. It also adjusts the quantity on hand and value of your inventory.
When you record changes to your physical inventory, QuickBooks automatically updates the value of your inventory.
Adjusting inventory
Many companies that have inventory take a physical inventory every 6 to 12 months, often at the end of their fiscal year. For help with taking inventory, print the physical inventory worksheet (one of the inventory reports). The worksheet shows each item name and description, preferred vendor, and quantity on hand, and has blank lines on which you can record the physical count.
Although QuickBooks automatically adjusts your quantities after every purchase and sale, you may need to adjust them yourself from time to time for reasons such as breakage, theft, shrinkage or fire. If you know about changes to your physical inventory, you should record those changes as they happen rather than at year end.
When you adjust your quantity on hand, QuickBooks assumes that the average cost of the item remains the same and adjusts your inventory value accordingly. If needed, QuickBooks also lets you adjust the value of your inventory.
For example, after doing a physical inventory, you find you have seven fewer shirts than you thought you had. You adjust your quantity down. QuickBooks then will ask you which account you would like to attribute this shrinkage to for your profit and loss statement. As you reduce the quantity, you reduce your inventory asset amount and increase your expense.
Creating custom items for your inventory part
Use inventory part items to represent materials or parts you buy, track as inventory, then resell. Through inventory part items, you can keep track of how many items remain in stock after a sale, how many items you have on order, your cost of goods sold, and the value of your inventory. Note that QuickBooks doesn't track inventory through the manufacturing process.
Don't create separate inventory part items for sales and purchases. You must use the same inventory part item on both sales forms and purchase orders to keep the inventory accurate.

26 CHAPTER 5 Setting up QuickBooks inventory
POS for Retail default custom fields
When you install POS for Retail, it adds five default fields to the Custom Fields window. We've described them below:
� Product Number: Used in POS for Retail as another form of identification for the item. The Product Number can be used to sell the item and to search for the item.
� Bar code: Used in POS for Retail as another form of identification for the item. The Bar code can be scanned, or typed in, to sell the item and can also be used to search for the item.
� Price 2, 3, and 4: These fields allow you to define multiple price levels for an "item". QuickBooks allows you to define multiple price levels for a "customer".
To define custom fields for items:1 From the Lists menu, choose Items.
2 Do one of the following:
� If you're adding a new item to the list, click the Item button and choose New.
� If you're editing information about an item, click the Item button and choose Edit.
3 In the New/Edit Item window, click Custom fields.
4 Click Define Fields.
5 For each field you want to add, select the Use checkbox and type a name for the field.
You can define up to 5 fields. The fields will be available for all item types except subtotals, sales tax items, and sales tax groups.
The last five fields are defined by POS for Retail and should not be changed. You can define the first five custom fields.

QuickBooks - Inventory 27
6 Click OK.
7 (Optional) Fill in the fields for this item.
You'll see field, the new fields in the Item Custom fields window.
If you fill in a field, the information you enter transfers automatically to any custom form where the field appears. For example, if the field is named "Colour" and you've entered "navy blue" as the colour of a particular item, the Colour field on your sales forms prefills to "navy blue" each time you enter a sale of the item.
Leave a field blank if you'd prefer to fill it in at the time you use a business form.
8 Click OK to close the item Custom Fields window.
If you are setting up a new item, fill in the information about the item in the New/Edit Item window.
9 Click OK to close the New/Edit Item window.
10 Fill in the fields, as needed, for other items on your Items list.
What's next
You can add any or all of the new fields to sales and purchase forms. If you want information from an item's record to transfer automatically to a form, you must add the field to the form.
Setting up non-inventory parts (Items)
Non-inventory parts can include the following products and goods:
Those purchased for a specific job, then charged for:
� Those you sell but do not purchase
� Those you purchase but do not resell (for example, office supplies)
� Those you purchase and resell but do not track as inventory
To create non-inventory part items:1 From the Lists menu, choose Items List.
2 From the Item menu button, choose New.
3 In the Type field of the New Item window, choose Non-inventory part.
4 Enter an item name or number.
What you enter here appears on the drop-down list of items when you are filling out a sales form or purchase order. Type a name or number that will help you distinguish this item from all the others on the list.
5 If this item is a subitem of an existing non-inventory item, select the "Subitem of" checkbox and specify the parent item's name.
The last five fields are defined by POS for Retail and should not be changed. You can define the first five custom fields.

28 CHAPTER 5 Setting up QuickBooks inventory
6 Type a description.
This description will be displayed on the sales and purchase forms.
7 Enter a price for the item.
8 (Optional) If you charge sales tax for this item, enter a tax code.
If selected "This item is purchased for and sold to a specific customer:job", you can enter both a default Purchase Tax Code and a default Sales Tax Code.
9 (Optional) Click Custom Fields to fill in any custom fields that apply to this item.
For more information, see “Creating custom items for your inventory part” on page 25.
10 In the Account field, enter an income account for sales and an expense account for purchases.
11 Record the item.
Setting up a Service Item
Service items can include professional fees or labour that you charge for or buy. For example, you can charge clients for your consulting time, but pay for janitorial services.
You can also create service items for labour handled by subcontractors. Service items for contract labour are particularly helpful if you write estimates and want to be able to compare estimated costs with actual costs.
To create a service item:1 From the Lists menu, choose Items List.
2 From the Item menu button, choose New.
3 In the Type field of the New Item window, choose Service.
4 Type an item name or number.
What you enter here appears on the drop-down list of items when you are filling out a sales form or purchase order. Enter a name or number that will help you distinguish this item from all the others on the list.
5 If this item is a subitem of an existing service item, select the "Subitem of" checkbox and specify the parent item's name.
6 Enter a description that will be displayed in the sales and purchase order forms.
7 Enter a rate for the service.
The amount can be either a flat fee or an hourly rate. Leave the field blank if this rate varies. If you purchase this service, enter the vendor's rate. If you sell this service, enter the rate you charge your customers.
8 (Optional) If you charge sales tax for this item, enter a sales tax code.
If you marked the checkbox, you can enter both a default Purchase Tax Code and a default Sales Tax Code.
You cannot change a service item to another item type.

QuickBooks - Inventory 29
9 Click Custom Fields to fill in any custom fields that apply to this item.
10 In the Account field, enter an income account for sales and an expense account for purchases.
11 Record the item.
Changing Inventory Prices
You can change the prices or rates of many items at one time through the Change Prices window. In this window you can tell QuickBooks to raise (or lower) prices or rates by a specified amount or percentage. You can change prices or rates for items individually, or have QuickBooks calculate new prices or rates on several or all items of the same type at once.
Note: You can also change prices from POS for Retail Administrator. For more infor-mation, see “Product Prices” on page 63.
To change your prices:1 From the Lists menu, choose Items List.
2 From the Activities menu button, choose Change Item Prices.
3 Enter the type of item for which you want to change prices.
4 Use one of these methods to enter the new prices:
� Type the new prices in the New Price column.
� Click Calculate Prices and type a markup that you want QuickBooks to use to calculate the new prices.
5 Click OK.
To apply a markup:1 In the check mark column, select the items to which you want to apply the markup.
Or click Select All to select all the items.
2 Type the markup in the field provided, either as a dollar amount or a percentage. If you are entering a percentage, type the percent (%) sign.
3 Select a method based on unit cost or current price.
4 Click Markup.
5 Click OK.

30 CHAPTER 5 Setting up QuickBooks inventory
Taking physical inventory
When the time comes to do a physical inventory of your stock (see “Managing your inventory” on page 25), you need to print your physical inventory worksheet.
After you have taken your physical inventory, print an inventory status report.
Physical inventory worksheet
This report shows the name, description, preferred vendor, and quantity on hand of each item in your inventory. The Physical Count column contains blank lines where you can write in the actual quantities as you make a physical count of your inventory.
To create this report:1 From the Reports menu, choose Inventory, then Physical Inventory Worksheet.
2 Click Print.
3 As you check your stock, fill in the quantities for each item in the Physical Count column of the worksheet.
4 Compare the report with the results of your shelf count. If the shelf count disagrees with the computer then you must make an adjustment on the computer.
You should have an expense account called Inventory Adjustment which will be used to account for the missing items. If not, then create one.
Search the QuickBooks help index for accounts, adding to your Chart of Accounts.
Adjusting inventory
Although QuickBooks automatically adjusts your inventory quantities after every purchase and sale, you may need to adjust them yourself from time to time. If the quantities change because of, say, fire, theft, or breakage, you need to adjust the quantity on hand for each inventory item affected.
When you adjust a quantity, QuickBooks assumes that the average cost of the item remains the same and adjusts the value accordingly. For example, if the average cost is $10 and you reduce the quantity by 2, QuickBooks reduces the value of the items on hand by $20.
You can also adjust the average value of items in inventory because of such things as spoilage or changes in seasonal demand.
This does not mean that you delete the old figure and replace it with a new one. The missing stock has to be accounted for. You must adjust the inventory in the computer.
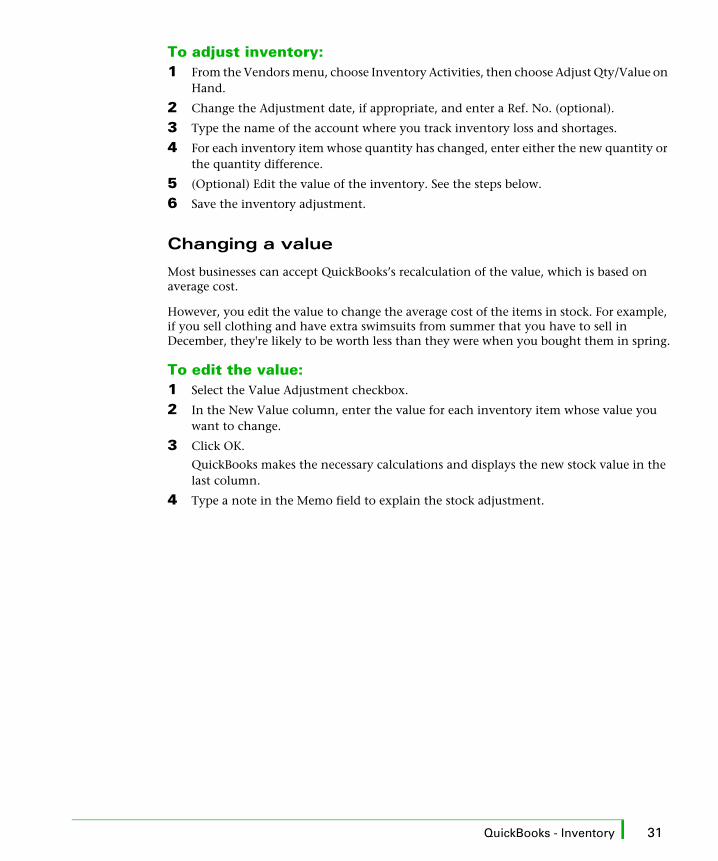
QuickBooks - Inventory 31
To adjust inventory:1 From the Vendors menu, choose Inventory Activities, then choose Adjust Qty/Value on
Hand.
2 Change the Adjustment date, if appropriate, and enter a Ref. No. (optional).
3 Type the name of the account where you track inventory loss and shortages.
4 For each inventory item whose quantity has changed, enter either the new quantity or the quantity difference.
5 (Optional) Edit the value of the inventory. See the steps below.
6 Save the inventory adjustment.
Changing a value
Most businesses can accept QuickBooks’s recalculation of the value, which is based on average cost.
However, you edit the value to change the average cost of the items in stock. For example, if you sell clothing and have extra swimsuits from summer that you have to sell in December, they're likely to be worth less than they were when you bought them in spring.
To edit the value:1 Select the Value Adjustment checkbox.
2 In the New Value column, enter the value for each inventory item whose value you want to change.
3 Click OK.
QuickBooks makes the necessary calculations and displays the new stock value in the last column.
4 Type a note in the Memo field to explain the stock adjustment.

32 CHAPTER 5 Setting up QuickBooks inventory

C H A P T E R 6
33
QuickBooks uses the word “customer” to mean any
person, business, or group that buys or pays for the
services or products that your business sells. By
entering information about customers, you save time
entering transactions later - and you can get reports
about what your customers are buying and
when. CHAPTER 6
Setting up QuickBooks customers
Do I need totrack information
about my customers?
QuickBooks - Customers
34
Setting up customers
34
Checklist for setting up customers and jobs
35
Customer Information and how it's used in QuickBooks
36
Adding Customers
37

34 CHAPTER 6 Setting up QuickBooks customers
QuickBooks - CustomersWhen you set up a customer or job, you enter information you can use over and over again, without retyping, for the following tasks:
� Fast entry of name, address, payment terms, and tax status on invoices and other sales forms
� Tracking payments received and amounts owed
� Contacting customers with overdue balances, including merging names, addresses, and balance information with Microsoft Word letters
� Reporting of sales or income by customer, profit and loss by job, and budget vs. actual by job
� Tracking reimbursable expenses by customer and job
� Printing mailing labels
Before you begin adding customers, you may want to keep in mind the following:
� Do you charge GST, HST, PST, or QST?You can assign sales tax code information to a customer. If you haven't already set up your sales tax information, it's best to do it before you add customers.
� Do you track sales by employee?You can associate each customer with an employee. If you do this, you can create sales reports that break down your sales by employee. If you want to associate customers with employees, you should set up your Employee list first.
Setting up customers
You'll use the New Customer window when you set up a customer. Enter as much or as little information as you need to get started. If you don't have all the information now, you can add it later.
You can set up customer types to further categorize your customer base.
If a customer has special tax status (only), select this checkbox to assign him or her a tax code.
For most customers, leave this checkbox clear.
Custom fields provide a way to gather more customer detail.
Click to set these up.

QuickBooks - Customers 35
If you plan to e-mail estimates and invoices to your clients, enter an e-mail address for them in the Address Info tab. Then QuickBooks can fill in the customer's e-mail address for you, when you create the sales form.
Checklist for setting up customers and jobs
What to set up CommentsSearch QuickBooks Help index for…
�
Customer types (optional) Customer types provide you with another way of categorizing your customer base.Set these up before you enter your customer information so you can enter the customer types as you go.
customers adding types ❏
Custom fields for customers
Use these fields to record additional information about the customer, like a pager number. Once you’ve set up the custom fields for one customer, the fields will appear for all customers.
custom fields, for customers, vendors, employees
❏
Customers Refer to the following table “Cus-tomer Information and how it's used in QuickBooks” to help you decide what information to add.
customers adding new ❏
Preference to track expenses by customer and job (QuickBooks only)
In QuickBooks, when you first install the program, you are set up to track expenses by customer and job. How-ever, there is a preference that allows you to turn this feature on and off. If your Write Cheques and Enter Bills windows do not have a Customer: Job column the feature is off. QuickBooks is automatically set up to track expenses by customer and job.
preferences, accounting ❏
Tax codes (only if your cus-tomer has special tax status)
If your tax codes are set up, you can assign a default tax code to custom-ers with special tax status.The customer tax code will override all item tax codes on sales forms.
In the Help Find tab: assigning tax codes to customers
❏

36 CHAPTER 6 Setting up QuickBooks customers
Customer Information and how it's used in QuickBooks
Information needed How QuickBooks uses this information
Customer name (short) or number
� Displays on Customer:Job list; sorted alphabetically (or numeri-cally)
� Displays on all drop-down lists where you choose the customer (for example, on sales forms)
� Displays on all reports that are by customer or that show the cus-tomer name on a transaction
Company name, title, first and last name (optional)
� Exports to mail merge file for use with word processor� Prefills the name in the “Bill To” field
“Bill To” name and address (optional)
Displays and prints on sales forms and cheques
“Ship To” name and address (optional)
Displays and prints on sales forms that have this field
Contact information (name, phone, FAX, e-mail address)
Name and phone display and print on the A/R collections report.If you want to e-mail estimates and invoices to customers, enter their e-mail addresses in the Address Info tab so QuickBooks can fill in the e-mail’s Address field for you.
Customer type (optional) Available as a filter for reports
Payment terms (optional if payment is due immediately)
Determines due date on invoices and on statements that include statement charges
Employee associated with sales to this customer (optional)
Determines sales by employee on sales by rep reports
Credit limit (optional) Warns you if you try to record an invoice that would put customer balance above this limit
Tax code (optional) On sales forms, overrides the GST/PST tax codes you assign to items
Custom field information (optional)
After you set up any custom fields relevant to your business, you can customize sales forms to display and print this information. Also, you can filter reports for customers that share the same information
Job information (QuickBooks only, optional)
Use only if you don’t plan to set up separate jobs for the customer.Job status displays on Customer:Job list. You can display and filter by job information on any customer list report.

QuickBooks - Customers 37
Adding Customers
To create a list of customers1 From the Lists menu, select Customer:Job List.
2 Choose New from the Customer:Job menu button.
3 In the Customer field, enter the name of the customer as you'd like it to appear on your Customer:Job list.
For example, if the customer is Ginny Holtby and you want the list to show last names first, enter Holtby, Ginny.
4 Complete the Address Info, Additional Info, Payment Info, and Job Info tabs. You can enter opening balance information on the Additional Info tab.
5 Click Next to record and enter another customer or click OK to record and close.
Defining custom fields for a customer
You can define up to 15 custom fields to track additional information about your customers. For example, you can define fields for pager number, Web site address, or spouse's name.
After you add custom fields, you can customize your sales forms to include these fields. You can also display and filter for customized field data in your reports.
POS for Retail default custom fields
When you install POS for Retail, it adds default ID and Percentage fields to the Custom Fields section of the Additional Info tab.
� ID: Allows you to of further characterize customers in POS for Retail. It can be used to quickly bring up the customer's details for purchases or payments. The ID can also be used to search for the customer in POS for Retail.
� Percentage: Allows you to set a discount percentage to a customers.
Note: There are two options that must be turned on to create and edit customers in POS for Retail: “Allow New customer entry” on page 153 and “Allow Edit Existing Customer” on page 153. If those options are not turned on, customers must be created and maintained from QuickBooks.
These custom fields are created and used by POS for Retail. When you open them, you receive a warning. Don't change or delete them.

38 CHAPTER 6 Setting up QuickBooks customers

C H A P T E R 7
39
If you decide to hire employees, POS for Retail makes
it easy for you to manage them. You can assign
employee numbers and passwords to them, create
reports showing what items an employee sold, and
print employee numbers on customer receipts.
You should also read Chapter 5, “Paying employees
and tracking time,” of your QuickBooks manual. It
explains how to set up and use the comprehensive
payroll features of QuickBooks. CHAPTER 7
Setting up employees in POS for Retail
Should I usePOS for Retail to track information about employees?
Setting up employees in QuickBooks
40
Entering standard employee defaults
40
Setting up employees
41
Making an employee inactive
41
Defining custom fields for an employee
42

40 CHAPTER 7 Setting up employees in POS for Retail
Setting up employees in QuickBooksGenerally, an employee is a person you pay on a regular and ongoing basis to perform services for your company, using materials and equipment you provide.
If your business is a sole proprietorship or an unincorporated partnership, owners and partners are not usually employees. If your company is incorporated, corporate officers who work in the business are usually employees.
If you’re not sure whether a person providing services for you is an employee, owner, or contractor, contact the Canada Customs and Revenue Agency or your accountant.
Note: When dealing with sales functions, POS for Retail refers to employees as sales people.
To set up employees, you need to:1 (Optional but recommended) Set up employee defaults in QuickBooks.
2 In QuickBooks, add new employees to your Employee list and confirm that existing employees are set up fully.
3 Transfer the employees into POS for Retail Administrator (see page 44).
4 In POS for Retail Administrator, confirm that each employee is set up the way you want.
Entering standard employee defaults
Employee defaults help you set up new employees quickly. You enter information that most employees have in common once, in the Employee Defaults window. These defaults then show up every time you set up a new employee. If the information isn’t right for an employee, you can change it for him or her as you go. If you change the defaults, the new information shows up the next time you set up a new employee. Employees that you have already set up do not change, in most cases.
Use payroll only to pay employees, not subcontractors or owners.
Set subcontractors up as vendors, have them bill you, and pay them with QuickBooks’ Pay Bills feature. To pay owners, use an owner’s draw from an equity account.

Setting up employees in QuickBooks 41
Setting up employees
Before setting up your employees in QuickBooks, you should create the payroll items you need for your business. (If you haven’t done so yet, QuickBooks gives you the chance to add them as you work.) If you’ve set up employee defaults, QuickBooks prefills some information as you set up individual employees.
Also, each of your employees needs to fill out a federal and provincial TD1 form to tell you about their filing status and what personal exemptions they will claim. You can get blank forms from the Canada Customs and Revenue Agency, if you need them.
You enter information about an employee into his or her profile in the Employee list. Each profile has three tabs:
� Address Info: contact information, social insurance number, date of birth, and hire and release dates
� Additional Info: custom fields for tracking any information you prefer
� Payroll Info: the employee’s specific salary or hourly rate and any additions, deduc-tions, or company contributions for him or her.
To adjust the payroll tax information for this employee, click Payroll Taxes.
To set up how he or she will accrue time (such as sick days or time off in lieu of overtime), click Accrual Hours.
To change how the employee collects vacation pay, click Vacation Pay.
Fill in each tab for each employee. For information about specific tasks, check the QuickBooks Startup Guide, the How Do I? menus, or the Help index.
Making an employee inactive
When an employee leaves, or is on a period of extended absence, it is not a good idea to delete them from the system. You will need their records for tax purposes, and if they return you'll have to re-enter all their information. It is better to retain their record, but prevent their name from showing up on lists and reports by putting them on hold.
To make an employee inactive:1 Display the Employee List.
2 Select the employee you want to make inactive.
3 Click the Employee menu button, then choose Make inactive.
4 The employee hasn't been deleted, their name is actually hidden.
To make an inactive entry active:1 From the Employee List, select the "Show All" checkbox.
2 Click the symbol (it's to the left of the list entry) beside the entry you want active.
3 If the list has subentries, click Yes or No to indicate whether you want the subentries to be active again.

42 CHAPTER 7 Setting up employees in POS for Retail
Defining custom fields for an employee
You can define up to 15 custom fields to track additional information about your employees. For example, you can define fields for pager number, spouse's name, children's names.
After you add custom fields, you can customize your sales forms to include these fields. You can also display and filter for customized field data in your reports.
POS for Retail default custom fields
When you install POS for Retail, it adds a default Customer ID field to the Custom Fields section of the Additional Info tab.
� ID: Allows you to of further characterize employees in POS for Retail. It can be used to quickly bring up the employee's details. The ID can also be used to search for the employee in POS for Retail.
� Password: Allows store the employees password for terminal access.
These custom fields are created and used by POS for Retail. When you open them, you receive a warning. Don't change or delete them.

C H A P T E R 8
43
The toolbars in POS for Retail Administrator and POS
for Retail are very similar. When you know one
toolbar, you’ll know both. The buttons in the toolbar
are large and easy to understand. CHAPTER 8
POS for Retail Administrator
What are the buttons for in the
Administrator?
Getting to know POS for Retail Administrator
44
POS for Retail Administrator toolbar
44

44 CHAPTER 8 POS for Retail Administrator
Getting to know POS for Retail Administrator
POS for Retail Administrator toolbar
The toolbar is located below the menu bar for easy navigation around POS for Retail Administrator.
Button Description
Click to display the list of Products.
Click to display the list of layaway customers, the number of layaways, and the amount and balance of each layaway.
Click to display a list of countries, their Currencies and the exchange rate to local currency.
Click to display a list of Terminal ID's and the Registration Numbers for each POS for Retail terminal.
Click to display the Status of the terminals, customers, pre-discount sales, actual sales and cash in drawer.
Click to launch QuickBooks.
Click to launch the Transfer wizard screen for the transfer of Inventory, Customer, Employee and Chart of Accounts information from QuickBooks to POS for Retail.
Click to launch the Post wizard screen for the transfer of transaction files from POS for Retail to QuickBooks.
Click to launch the process to compact and repair the database. Over time, data can fragment and corrupt.
Click to send a message to individual terminals or a broadcast message to all terminals.
Click to open the Options window allowing you to set options and secu-rity for POS for Retail and POS for Retail Administrator.
Click to launch the process of Deleting a terminal from the system.

Getting to know POS for Retail Administrator 45
Note: For more information on each about the functions of these buttons, see “POS for Retail Administrator Functions” on page 62.
Click to launch the default E-mail package on your system.
Click to launch the default Web browser. Choose from a list of sites you can go to for assistance or information relating to POS for Retail.
Button Description

46 CHAPTER 8 POS for Retail Administrator

C H A P T E R 9
47
The options in the POS for Retail Administrator allow
you to customize POS for Retail to suit your business.
CHAPTER 9
POS for Retail Administrator options
How can I customize POS
for Retail for my business?
POS for Retail Administrator Options
48
General tab 48
Lists tab 52
Transactions tab 52
Currency tab 53
Scanning tab 53
Reports tab 55
Web tab 58
Security tab 58

48 CHAPTER 9 QuickPOS Adminstrator options
POS for Retail Administrator OptionsPOS for Retail Administrator links QuickBooks and POS for Retail. POS for Retail Administrator manages the data transfer between these two products as well as POS for Retail maintenance functionality. It also has POS for Retail options that can be modified to suit your business requirements. The following section describes options available in POS for Retail Administrator.
To access Administrator options:� On the Toolbar, click .
General tab
The General tab lets you enter basic information about your company and select the QuickBooks company file for that the Administrator will communicate with.
Note: To use a different QuickBooks company file, QuickBooks must be in single-user mode and have the company file open that you want to change to.
To change QuickBooks to single-user mode, in QuickBooks on the File menu, select "Switch to Single-user Mode". If QuickBooks has the wrong company file open, open the correct company file.
An End-of-Day must be performed on each POS for Retail terminal, then the data must be Posted before a change of database is made.
By default, the company file and path is added here when POS for Retail Administrator is installed. This should not be changed unless absolutely necessary. For example, a new QuickBooks database has been created.
Select to consolidate transactions at the end of the day.
Select to further consolidate transactions.
The information in the Company Details section appears on the sale receipts and invoices printed with every transaction made on QuickBooks POS.
Click to change the QuickBooks company file using a wizard. This is only required if there has been a change to the company file.

POS for Retail Administrator Options 49
Summarize transactions for posting to QuickBooks
Instead of creating a separate invoice for each transaction, similar transactions are grouped together on a single invoice
For example, sales are consolidated into a single invoice and refunds into a single credit note. Other transaction types, such as customer payments, charges, and cash paid out, etc., remain as a separate posting to QuickBooks.
Some transactions can't be consolidated. For more information, see “Exceptions to the rule” on page 50 and “Separate Invoices” on page 51.
Note: Sales result in a single entry being made into the undeposited funds account, unless the sales are by different salespersons. If so, one entry is made per sales-person.
Transactions are consolidated before the End of Day processing when "Summarize transactions for posting to QuickBooks" is selected.
Summarize line items where possible
When selected, a product that is sold more than once in a day is consolidated into a single line on the invoice to be posted to QuickBooks. See the following diagram. Transactions appear on the invoice sorted in descending order, by item name, description, then price.
This option is available when the option "Summarize transactions for posting to QuickBooks" is selected.
POS for Retail consolidates transactions during the End of Day processing when the terminal has been reset.
Sale One
Item Qty1A
Sale Two
Item Qty2B
End of Day
Sale One
Item Qty1A
Sale Two
Item Qty2B
End of Day
Invoice One
Item Qty1A
Invoice Two
Item Qty2B
Invoice One
Item Qty1A2B
Transactions not summarized Transactions summarized

50 CHAPTER 9 QuickPOS Adminstrator options
Note: Transactions are consolidated only when the option "Summarize line items where possible" is selected prior to End of Day processing.
Products that are sold more than once during the day are only consolidated into a single line item on the invoice if the item name, description, and price all match.
Exceptions to the rule
If a transaction includes any of the functions below, the items in the transaction are not consolidated. Unconsolidated transactions appear at the top of the QuickBooks invoice. Consolidated transactions appear below the unconsolidated transactions. The following appears before the consolidated transactions:
The following line items have been summarized into like items, descriptions, and prices.
� Group Items: Appear on the one invoice along with the rest of the transactions and are not consolidated.
� Memo Entry: Any transactions that have a memo entry against them, appear on the one invoice with the rest of the transactions and are not consolidated.
� Cheque Number Entry: Any transactions that have a cheque number entry against them, appear on the one invoice with the rest of the transactions and are not consoli-dated.
� Number Entry: Any transactions that have a number entry against them, appear on the one invoice with the rest of the transactions and are not consolidated.
� Currency Conversion: Any transactions that have a currency conversion against them, appear on the one invoice with the rest of the transactions and are not consolidated.
� Discounts $ or %: If a discount is applied to a product, the product is consolidated with other similar products at its full price and the discount is consolidated with other discounts given that day.Products are consolidated only if their item names, descriptions, and prices match. If this is not the case for a discounted product, the product is not consolidated, but appears separately on the invoice at its undiscounted price. The discount is still consol-idated with the other discounts.
Sale One
Item Qty1A
Sale Two
Item Qty2B
End of Day
Sale One
Item Qty1A
Sale Two
Item Qty2B
End of Day
Invoice One
Item Qty1A
Invoice One
Item Qty1A2B
Transactions summarized Line items summarized

POS for Retail Administrator Options 51
� Surcharges $ or %: If a surcharge is applied to a product, the product is consolidated with other like products at its normal price and the surcharge is not consolidated with other surcharges levied that day.Products are consolidated only if their item names, descriptions, and prices match. If this is not the case for a product to which a surcharge has been applied, the product is not consolidated, but appears separately on the invoice at its normal price. The surcharge is still consolidated with the other surcharges.
� Cancelled Transactions: Not posted to QuickBooks.
� Correct Entry: If a product has been entered then 'corrected', the QuickBooks invoice includes a line item for the product and a line item for the correction.
� Void Entry: If a product has been entered then 'voided', the QuickBooks invoice includes a line item for the product and a line item for the void.
� Price Overrides: If the price of a product has been adjusted using the Price Override function QuickBooks invoice will include a separate line item for the adjusted product.
Separate Invoices
The following types of transaction are not included in the invoice containing the consolidated transactions, but instead are posted to QuickBooks in a separate invoice.
� Refunds/Returns: A separate credit note is posted to QuickBooks for every refund processed.
� Customer Accounts: A separate invoice is posted to QuickBooks for every customer account charge or payment made.
� Layaway Accounts: A separate invoice is posted to QuickBooks for every layaway account transaction processed.
Sale OneItem Price
$1.00Apple
End of Day
Discounts & surcharges summarized
Qty Total$3.003
Sale TwoItem Price
$1.00AppleQty Total
$1.802
Discount applied: $0.20
Invoice OneItem Price
$1.00AppleQty Total
$3.003$1.00Discount $1.802

52 CHAPTER 9 QuickPOS Adminstrator options
Journal Entries
The following transaction types Cash Float In, Cash Float Out, Cash Clearance, and Cash Paid out are not included in the invoice containing the consolidated transactions, but instead are posted as journal entries into QuickBooks’s accounts.
Lists tab
The Lists tab allows you customize the lists you can access from the POS for Retail Administrator by selecting the columns you want to appear in the various lists.
Transactions tab
The Transactions tab allows you to define how transactions are handled in POS for Retail and what is printed on the receipts and invoices.
Transaction Detail
Select or clear the names of the columns you want to appear in the lists.
When selected, the system adds the Terminal ID on each receipt identifying the terminal the receipt is printed from.
Every transaction in POS for Retail is recorded with a unique transaction number, which is printed on each receipt.
When selected, the system adds the Terminal ID on each receipt identifying the terminal the receipt is printed from.
When selected, the sales person's ID is recorded on each transaction. The ID must be entered before first transaction is processed.
When selected, the sales person's ID must be entered before each transaction in POS for Retail.
When selected, the sales person's ID must be entered before each transaction in POS for Retail.
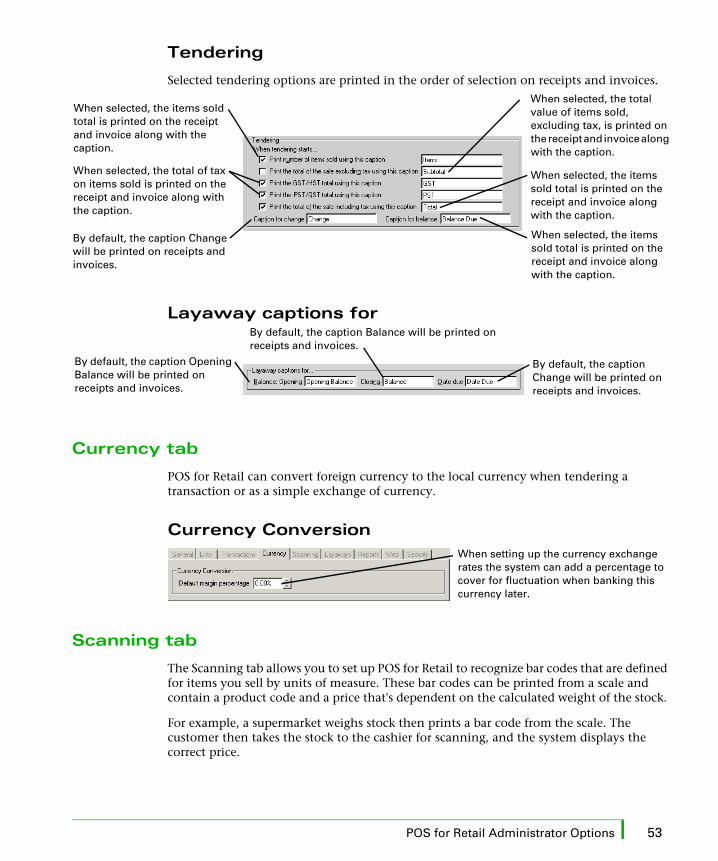
POS for Retail Administrator Options 53
Tendering
Selected tendering options are printed in the order of selection on receipts and invoices.
Layaway captions for
Currency tab
POS for Retail can convert foreign currency to the local currency when tendering a transaction or as a simple exchange of currency.
Currency Conversion
Scanning tab
The Scanning tab allows you to set up POS for Retail to recognize bar codes that are defined for items you sell by units of measure. These bar codes can be printed from a scale and contain a product code and a price that's dependent on the calculated weight of the stock.
For example, a supermarket weighs stock then prints a bar code from the scale. The customer then takes the stock to the cashier for scanning, and the system displays the correct price.
When selected, the items sold total is printed on the receipt and invoice along with the caption.
When selected, the total of tax on items sold is printed on the receipt and invoice along with the caption.
By default, the caption Change will be printed on receipts and invoices.
When selected, the total value of items sold, excluding tax, is printed on the receipt and invoice along with the caption.
When selected, the items sold total is printed on the receipt and invoice along with the caption.
When selected, the items sold total is printed on the receipt and invoice along with the caption.
By default, the caption Opening Balance will be printed on receipts and invoices.
By default, the caption Balance will be printed on receipts and invoices.
By default, the caption Change will be printed on receipts and invoices.
When setting up the currency exchange rates the system can add a percentage to cover for fluctuation when banking this currency later.

54 CHAPTER 9 QuickPOS Adminstrator options
To setup a product that uses unit of measure bar codes:1 Create an Inventory Part as usual.
2 In the Product Code custom field, add the product code.
3 Leave the Bar Code field blank.
4 In the Sales field, add the units of measure (UOM) price.
When a bar code beginning with the prefix of 2x is scanned in POS for Retail, the product is identified by the defined product code on the bar code and the price comes from the bar code.
Note: When a product is scanned POS for Retail normally searches through the product file to match the bar code scanned. When selected, the POS for Retail first checks if the bar code is one of the bar codes formatted before checking the product file.
Below are descriptions of the columns in the Bar Code Formats table.
Column Description
Prefix The default prefix for the bar code.
Format The bar code settings for the random price.
Price Inc. Tax Specifies if POS for Retail is set if tax on a random price bar code is included when a receipt printed.
Calculate UOM Specifies if POS for Retail is set to calculate the unit of mea-sure.
UOM Unit Specifies if a unit of measure is defined.
UOM Price Per Unit Specifies if a price per unit of measure is defined.
When selected, you can define bar codes in POS for Retail for items that you sell based on units of measure.
Click to view and define the bar code settings. This includes prefix definitions and unit of measure options.

POS for Retail Administrator Options 55
Unit of Measure Bar Code Format
Note: Calculate Unit of Measure ensures QuickBooks maintains accurate stock on hand and the unit of measure is printed on the customer's receipt. If this option is cleared, the quantity of one sold is recorded in QuickBooks rather than an actual unit of measure.
Reports tab
The Reports tab allows you to specify the behavior and requirements for the End-of-Day process and customize how reports are titled and are used.
End-of-Day Options
The following are options available to customize End-of-Day tasks to suit your business.
The prefix selected in the Scanning tab.
The format for the selected bar code
Select to calculate the unit of measure for the selected bar code.
Type the abbreviation for the unit of measure. For example, kg, ml, m, cm, ft, in, etc.
Select to make the selected bar code inactive.
This caption is based on the unit of measure used. Usually the same as above but with a prefixed of / or per.
When selected, you can specify reports to be automatically printed at the end-of-day process. When cleared, the reports wizard prompts you through the end-of-day process.
Click to specify the reports to automatically print at the end-of-day process.
When selected, a Balance report is printed when the terminal is reset.
When selected, the last sales person is logged off when a the terminal is reset. Based on the sales person option selected in the Transaction tab.
When selected, the cash drawer is not reset when the terminal is reset.
When selected, the cash drawer is only reconciled when the terminal is reset.
When selected, a report can't be printed until the terminal is reset.
Select to reset the transaction number when end-of-day process is complete.
When selected, the Cash Drawer Reconciliation wizard appears when the terminal is reset.
Choose the tender type(s) to be reconciled with the end-of-day process.
When selected, you're forced to print the required reports.
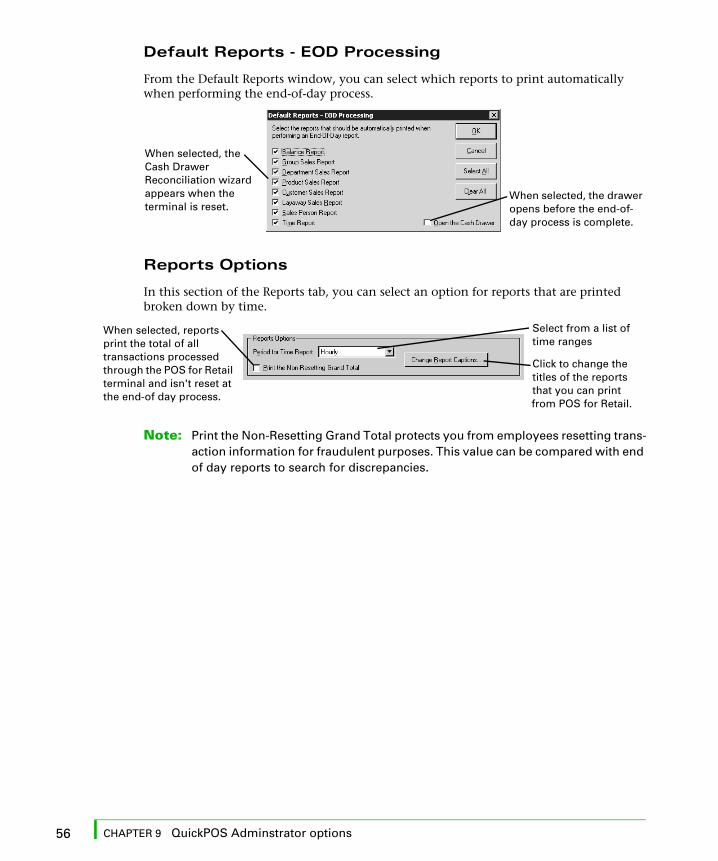
56 CHAPTER 9 QuickPOS Adminstrator options
Default Reports - EOD Processing
From the Default Reports window, you can select which reports to print automatically when performing the end-of-day process.
Reports Options
In this section of the Reports tab, you can select an option for reports that are printed broken down by time.
Note: Print the Non-Resetting Grand Total protects you from employees resetting trans-action information for fraudulent purposes. This value can be compared with end of day reports to search for discrepancies.
When selected, the Cash Drawer Reconciliation wizard appears when the terminal is reset.
When selected, the drawer opens before the end-of-day process is complete.
Select from a list of time ranges
When selected, reports print the total of all transactions processed through the POS for Retail terminal and isn't reset at the end-of day process.
Click to change the titles of the reports that you can print from POS for Retail.

POS for Retail Administrator Options 57
Report Captions
Titles
The Titles tab lists all of the report titles of the reports POS for Retail can print.
Note: The ampersand symbol (&) defines shortcut characters. For example, B&alance Report, would display as Balance Report and you would press CTRL+A to access the Balance report.
Detail
The Detail tab lists the report fields that appear on the various reports POS for Retail can print.
Click to return the captions to the defaults.

58 CHAPTER 9 QuickPOS Adminstrator options
Web tab
The Web tab allows you to define a list of Web sites that you can allow operators to access from POS for Retail. Operators are restricted to access only the Web sites you define.
Web pages are displayed within the space normally reserved for the POS for Retail Information Display and be expanded to the space used by the Transaction Display.
Note: One or more keyboard keys. For more information see “Web Browser (no default)” on page 112.
The web browser can be turned on and off by pressing the keyboard key assigned to it. For more information about using the web browser, see “Browsing the Web” on page 162.
Security tab
The Security tab allows you define passwords to protect specific areas from accidental changes being made in the POS for Retail Administrator and POS for Retail.
Note: Passwords must be between four and 16 alphanumeric characters in length.
To edit or delete, select an URL in the Web Sites list, then click Edit or Delete.
Click to add a new site to the list of sites.
Type a description for the Web site.
Type the URL or click Browse to navigate for the URL.
When selected, the operator is prevented from accessing the web site.

POS for Retail Administrator Options 59
POS for Retail Administrator
Adding or editing passwords
Note: The global manager override option can be used for all POS for Retail function keys requesting a Manager password. This option can be used as well as the Manager Override. Therefore if both options are setup and a function requires a manager override the operator has the choice of entering the Global Override password or pressing the Manager Override key.
First, select an area you want to protect using a password.
Then, click to define the password.
If you're changing a password, type the previous password here.
Type the new password again.Type the new password here.

60 CHAPTER 9 QuickPOS Adminstrator options

C H A P T E R 1 0
61
POS for Retail Administrator allows you to maintain
POS for Retail data files and manage the transfer of
data to and from QuickBooks. CHAPTER 10
POS for Retail Administrator functions
How do I setup POS for Retail
Administrator?
POS for Retail Administrator Functions
62
Product List 62
Product Prices 63
Product Labels 65
Layaway Customer List
71
Currency Conversion List
73
Registration Number List
74
Monitor 75
Tools 77

62 CHAPTER 10 POS for Retail Administrator functions
POS for Retail Administrator FunctionsThe POS for Retail Administrator is used for maintaining the POS for Retail data files, managing the transfer of data to and from QuickBooks, housekeeping, and setting up options. The following is a detailed description of the functions available from the POS for Retail Administrator.
Product List
The Product List displays all of the products available to POS for Retail, taken from your QuickBooks company file. You open the Product List by selecting Show List from the Product List section of the List menu. You can also simply click the Product List button on the toolbar, or press CTRL+P.
To find a particular item, sort the list by any of its columns by clicking on the column header. You can also search for specific text in the field that the list is currently sorted on. To change the sort order from ascending to descending, click the column header again.
Selecting items on the Product List
You can select a single product on the list, or you can mark a group of products, or a range of products.
Select a Single Item
To select a single item, click on it to highlight it. Selecting a single item will not affect any group or range you have currently marked.
Mark a group of items
To mark an item as part of a group, highlight it, then click the Prices button drop-down menu on the right and select Mark. The Mark icon appears beside the item.
To remove an item from the group, choose Unmark from the drop-down menu. To remove the entire group, choose Unmark All.

POS for Retail Administrator Functions 63
Mark a range of items
To mark a range of items, highlight the first item you want to select, then click the Prices drop-down menu and select Set Range Start. The Start Range icon appears beside the item. Now highlight the last item in the range and choose Set Range End from the drop-down menu. The End Range icon appears beside the item.
To remove the range, choose Clear Range from the drop-down menu.
Note: You can only have one group or range selected at one time. Marking an item as part of a group will erase any range you have previously selected, and marking the start or end of a range will erase any group you have previously selected.
Product Prices
With POS for Retail, you can assign multiple price levels per item. To change an item's price, from the Product list, select the item (or items) that you want to adjust their prices, then click the Prices button. Or, select Change Prices from the Prices drop-down menu.
Change Prices Window
The Change Prices window displays a list of items that you’ve selected from the Product List. (For example, if you’ve selected a range of products on the Product List, the Change Prices window will display the same range of products.) If you want to change the price of one item (the one you highlighted on the Product List), choose Selected Product, and that one item will then appear in the list.
The list of items on the Change Prices window includes the items' cost, and all the price levels that are assigned to it. If any of the price levels are below cost, an exclamation appears beside the item as a warning. This list also displays the margin percentage for each price level, so you can tell at a glance how much profit you're making on an item.

64 CHAPTER 10 POS for Retail Administrator functions
Changing the price of one item
The list of items on the Change Prices window also includes a column for each price level entitled “New Price”. To quickly change the price of an item for any price level, highlight the item, click in the New Price field, and then enter the new price.
When you make a change to an item, a small blue dot appears in the far left column to mark it as changed. Click OK or Apply to accept the new price.
Note: If you're not using a mouse, highlight the item you want with the arrow keys. The arrow keys move between the different items and their price levels. Use the spacebar to edit the New Price field.
Changing the price of several items
Besides editing the price levels one at a time, you can also make global price changes to every item on the list by using the Adjust options.
1 Under Adjust, select which prices levels you want to change. You can select all of them, or any combination you want.
2 Choose whether to change the prices by a fixed amount or a percentage.
3 Enter a value by which to change the prices. Whether you're entering a percentage or a dollar amount, the value can be positive or negative.
4 Choose whether to base the changes on the current retail price of the item, or the cost of the item (in other words, what you paid for the item).
5 Click the Calculate Adjustments button to make the changes.
6 Click OK or Apply to accept the new prices.
If you're not satisfied with the results of the calculation, you can still manually change individual items.

POS for Retail Administrator Functions 65
Product Labels
POS for Retail allows you to design and print labels for your products. Designing labels is a two fold process: first you create a label format and second, you design the layout. With these two elements in place, you can print your labels.
Designing Labels
The Print Labels window displays a list of items that you’ve selected from the Product List. (For example, if you’ve selected a range of products on the Product List, the Print Labels window will display the same range of products.) If you want to change the price of one item (the one you highlighted on the Product List), choose Selected Product, and that one item will then appear in the list.
The first time you use POS for Retail, there will be no labels from which to choose until you design them. To design labels, click the New button to create a label format which will determine how many labels print per page, and what margins and paper type to use; and then click Design to create a layout which determines what will print on each label.

66 CHAPTER 10 POS for Retail Administrator functions
Label Format
Before you begin, type a name for your new label. In order to save the label, it requires a name.
Select paper type
First, select the paper type you use to print labels.
� Labels are on sheets of paper: Select this option if you have a page printer that prints a sheet of labels at a time.
� Labels are on a continuous roll or fanfold paper: Select this option if you have a printer that prints labels on a continuous strip. When you select this option, the Number Down option is disabled, since you can continue printing until you've exhausted the roll.
Set dimensions
Now, fill in the dimensions of your labels. As you change these values, the preview diagram changes to reflect your choices. You can enter the following values:
� Margins: The margins measure the distance from the edge of the paper to the closest label edge.
� Height/Width: These measure the size of a single label.
� Pitch: The pitch measures the distance from the edge of one label to the same edge of the next label. For instance, the vertical pitch measures the height of the label plus the vertical gap between labels.
� Number: The number of labels per sheet. Continuous rolls can have more than one label across, so you can change the Number Across field, but have an infinite number down, so the Number Down field is disabled.

POS for Retail Administrator Functions 67
Label Layout
Now that you've set up the format of your labels, you need to design what will actually print on them. Switch to the Layout tab.
Components
The Components list shows all the information about the product that you can display on a label. As you check each box, that component is added to the Preview screen above. Once an item is visible in the Preview window, you can move and size it. To make this simpler, you can check the Show Boundaries box, which displays the items in a grey box to make them more visible.
In addition to the predefined components which you can add to your label, you can add any number of pictures, shapes, or items of text by clicking the appropriate buttons. Each time you click one of these buttons, an item will be added to the bottom of your Components list, named “Shape 1”, “Picture 1”, “Picture 2”, and so on.
Once a component has been added to the preview window, you can reposition it by dragging it with the mouse, or resize it by dragging the grey handle at the lower right of the component. You can also change its size and position by adjusting the item's Component Properties.
Add a picture. Until you change the pictures, they will all appear as happy faces.
Add a shape.
Add a text block.

68 CHAPTER 10 POS for Retail Administrator functions
Component Properties
For every component that you've selected, there are Component Properties that describe how to display the item on your label. Some properties are common to all components, like width and height. Other properties are specific to the item, such as the bitmap property for pictures. To adjust the properties of a component, highlight it on the list. The Component Properties panel on the right changes to reflect the properties for that item.
Basic Properties� Left: The position of the left edge of the component.
� Top: The position of the top edge of the component.
� Width: The width of the component.
� Height: The height of the component.
Properties for all Text Items� Rotate: Change the rotation of the text. You can choose any angle you like.
� Alignment: When the item box is bigger than the text in it, you can choose how the text is aligned. Choose between left, centre, or right; and top, middle or bottom.
� Font: Change the font style and point size of the text using the standard Windows font dialog box.
� Multi-line: If you want the text to break into multiple lines when printing, rather than vanishing off the right-hand edge of the item's size box, then check this box.
� Justify: If you've selected Multi-line text, these boxes determine whether the text is left, right, or centre-justified.
Bar Code Properties� Bar Colour: Change the colour of the bars in the bar code.
� Fill Colour: Change the background colour of the bar code.
Note: Certain combinations of colours won't work with some bar code scanners. Always check to ensure that your scanning equipment is able to read the combination you have chosen. Also be careful when reducing the size of the bar code. A smaller bar code can cause problems for scanning equipment, and reducing the bar code too far will produce a solid black box.
Picture Properties� Picture: Click this button to insert the bitmap of your choice for this picture.
� Size to Fit: This will stretch or shrink the bitmap to fit the borders of the picture component.

POS for Retail Administrator Functions 69
Shape Properties� Line Width: Change the line thickness of the shape.
� Shape Type drop-down: You can choose from four options: Line L-R, Line R-L, Rect-angle, or Ellipse. Line L-R will draw a diagonal line from the upper left to the lower right. Line R-L draws a diagonal from the upper right to the lower left.
� Line Colour: Change the line colour of the shape.
� Fill Shape: If you've chosen a rectangle or ellipse rather than a line, you can fill the shape.
� Fill Colour: If you've selected Fill Shape, you can change the colour of the fill.
Text Block Properties� Text: In addition to the other text properties, you can click the Text button to edit
what this text says and change the font.
Preview
When you're satisfied with the format and layout, click OK to save it. (Remember, you must have a name for your label in order to save it.) You can now print the label for your products. If you need to come back and edit the label later on, click the Design button from the Print Labels window.

70 CHAPTER 10 POS for Retail Administrator functions
Printing Labels
1 From the Product List, select the items or which you want labels printed, and then click the Labels button. Or, select Print Labels from the Labels drop-down menu. The Print Labels window appears.
2 Under Labels, from the Label Name drop-down list, select the label you want to print for the item(s).
3 (Optional) If you've only used half a sheet of labels and want to continue from where you left off, specify the row and column at which to start the printing.
4 Specify how many labels you want to print for each product; either a fixed number or the number of the items QuickBooks has entered as being On Hand for each product.
5 Under Label Printer, select the printer on which you want to print, and then click the Print button.
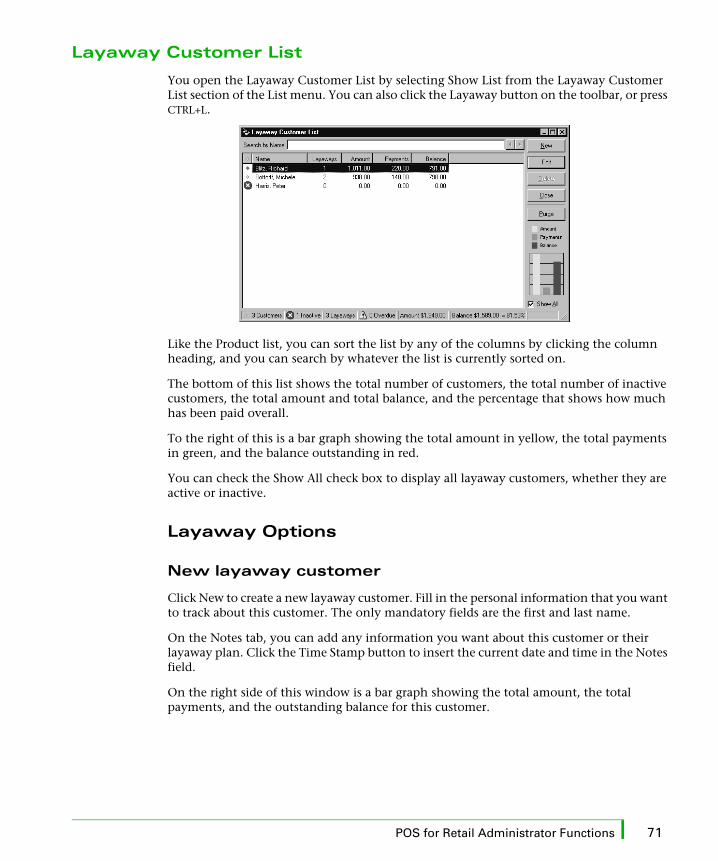
POS for Retail Administrator Functions 71
Layaway Customer List
You open the Layaway Customer List by selecting Show List from the Layaway Customer List section of the List menu. You can also click the Layaway button on the toolbar, or press CTRL+L.
Like the Product list, you can sort the list by any of the columns by clicking the column heading, and you can search by whatever the list is currently sorted on.
The bottom of this list shows the total number of customers, the total number of inactive customers, the total amount and total balance, and the percentage that shows how much has been paid overall.
To the right of this is a bar graph showing the total amount in yellow, the total payments in green, and the balance outstanding in red.
You can check the Show All check box to display all layaway customers, whether they are active or inactive.
Layaway Options
New layaway customer
Click New to create a new layaway customer. Fill in the personal information that you want to track about this customer. The only mandatory fields are the first and last name.
On the Notes tab, you can add any information you want about this customer or their layaway plan. Click the Time Stamp button to insert the current date and time in the Notes field.
On the right side of this window is a bar graph showing the total amount, the total payments, and the outstanding balance for this customer.

72 CHAPTER 10 POS for Retail Administrator functions
Edit layaway customer
Once you've created a customer, you can edit them by highlighting them on the list and clicking the Edit button. You will notice a new tab: the Layaways tab. This shows the list of layaway purchases for a customer. Layaway purchases are added at the time of the sale from the POS for Retail terminal.
When a layaway is paid off, it is removed from this list. Layaways that are overdue have the overdue symbol displayed beside them.
Note: You can only edit layaway details from within the POS for Retail system. Quick-Books does not recognize layaways.
Delete and Purge
You can use the Delete button to delete a layaway customer from the list, or you can remove a group of customers by clicking Purge.
The Purge button lets you delete all inactive layaway customers whose last layaway purchase was made before a certain date. You can also purge customers who have never purchased anything on layaway.

POS for Retail Administrator Functions 73
Currency Conversion List
You open the Currency Conversion List by selecting Show List from the Currency Conversion List section of the List menu. You can also click the Currency button on the toolbar, or press CTRL+O.
You can choose to view only active currencies, or by checking the Show All check box you can show every currency in the list.
Every currency has a name (for instance, the Samoan Tala) and a three-letter code (the default code for the Samoan Tala is WST). You can add new codes if you need to, and edit the ones you already have. Double-click the currencies in the list to edit them.
Note: Your base currency (in this case, CAD$) is chosen based on your Windows regional settings. If your currency window is using some other currency, like USD$, then you must go to the Windows Control Panel and change your Regional Settings.
Type
You can have more than one type for each currency, which lets you have different exchange rates depending on how the customer pays you. For instance, you might charge a higher exchange rate for personal cheques, and a lower exchange rate for cash.
There are no set rules to what a type stands for; you can decide what each type will represent.

74 CHAPTER 10 POS for Retail Administrator functions
CAD $1 buys
The base exchange rate is entered by setting the purchasing power of one Canadian dollar in the target currency.
Margin
You can set a percentage profit margin here, and the exchange rate will be modified to reflect this.
You can also check the Use Default Margin check box to use the default margin, which you set on the Currency tab of the Options screen. If you use the default margin for all your currencies, and you later decide to change your default margin, that change will be reflected by all the currencies at once.
Exchange Rate
As the rate and margin are set up or modified, the exchange rate is calculated and is displayed in this field.
Payment Item
A Payment Item is automatically created to link the currency transactions to QuickBooks when POS for Retail Administrator is first installed. Click this button to change the account the currency transaction is posted to in QuickBooks if required.
Registration Number List
You open this list by selecting Registration Number List from the List menu. You can also click the Registration button on the toolbar.
This is a list of all the Terminal IDs and their corresponding Registration Numbers. This list displays only the registered terminals unless you check the Show All check box, in which case it will show all the terminals on the network whether they are registered or not.

POS for Retail Administrator Functions 75
Monitor
You can monitor the business your terminals are doing using the Status graph. Select Status from the Monitor menu, or click the Status button on the toolbar, to display a graph.
By default, the graph that is displayed is the consolidated graph, which shows data from all your POS for Retail terminals rolled into one. You can also choose to plot information from selected terminals on this chart.
The chart shows the total transaction figures from POS for Retail terminals from the current day. The chart is updated automatically with each transaction, and is cleared when the End of Day report is chosen from POS for Retail and the cashier chooses to reset the terminal.
The chart displays the following columns:
� CC: CC stands for Customer Count, calculated by the number of transactions processed on POS for Retail.
� Pre-Discount Sales: A rounded amount reflecting the total sales before any discounts have been applied.
� Actual Sales: A rounded amount reflecting the total sales after any discounts have been applied.
� Cash in Drawer, Cheque in Drawer, Credit Card: For each tender (cash, cheque, or credit card), there is a bar which is a rounded amount reflecting the total of each tender taken for the day.
You can adjust the display of the Terminal Status graph using the following options, available from the Monitor drop-down menu.
Consolidation Options
Show Consolidation
This option is checked by default. When this item is checked, one of the plots on the graph will be for the consolidated totals of all the terminals.

76 CHAPTER 10 POS for Retail Administrator functions
Show Amounts
When this option is checked, the numeric totals are printed above each consolidated bar on the graph. It is on by default.
Terminals Options
Consolidation
This option is only available if at least one Terminal is displayed. This option consolidates all the terminals into one bar for each category, with the terminal data stacked vertically. If you also have Show Consolidation turned on, you will see two identical bars in each category.
Show Amounts
When this option is selected, the numeric totals are printed above each bar segment on the graph. It is on by default.
Cash in Drawer Warning
You can set a limit so that when a terminal has too much cash in the drawer, a warning is displayed. You can set the warning to display on the Administrator or the terminal, or both. You can also customize the warning that appears.
Select All Terminals
This will select all of the available terminals to appear on the graph.
Clear All Terminals
This will clear all of the selected terminals so that none appear on the graph.
Terminal 1, 2, 3…
At the bottom of this menu is a list of all available terminals, so you can select whichever ones you want individually.
Chart Type Options
2D Bar / 3D Bar
By default, the 2D Bar chart option is enabled. If you want to change it, you can select 3D Bar.

POS for Retail Administrator Functions 77
Show 3D Rotation Controls
This option is only available when you are viewing the 3D chart. It adds vertical and horizontal sliders to the side and bottom of the display, allowing you to turn the chart to a preferred angle.
Note: The POS for Retail Administrator can display many graphs at one time. To have more than one graph, each with different views, click the Status button again.
Tools
Transferring Data To and From QuickBooks
Both POS for Retail and the POS for Retail Administrator use the Item, Service, Customer, Employee and Chart of Accounts data from QuickBooks. QuickBooks, for its part, uses the sales information from POS for Retail to keep your accounts up-to-date.
Transfer
When you've added items to your inventory in QuickBooks, or have changed an item's bar code or product number, you will need to re-import that data into the POS for Retail Administrator. A transfer of information can be done at any time. Select Transfer from the Tools menu, or click the Transfer button on the toolbar, to transfer data from QuickBooks.
Note: To perform the Transfer, QuickBooks must be in single-user mode and must have the correct company database open. POS for Retail terminals do not need to be closed for the transfer.
The Transfer wizard will walk you through the steps of importing the data. The first screen is a general description of the transfer process, and you can check the “Don't show this page
Vertical
Horizontal

78 CHAPTER 10 POS for Retail Administrator functions
in the future” check box to skip it next time. If you ever want to see it again, click Transfer and then hit the Back button to come back to this page.
The wizard will ask you to select what you need transferred from QuickBooks: the Product List, the Customer List (with or without Customer Balances), the Employees List, or the Chart of Accounts List. Select the ones you need and proceed through the wizard to finish importing your QuickBooks data.
Note: If there are transactions affecting inventory stock on-hand or customer balances, it is recommended that a Process End-of-Day and Post be performed before the Transfer. If you do not want to do this, only the product list and customer list will be updated. The stock on hand and balances will not be updated.
Post
At the end of a sales day, you will have each of your POS for Retail terminals perform a Process End of Day and print out any reports you want. When you do this, a file is created for transfer to QuickBooks. When you've closed out the day on all your terminals, you can post all these transactions to QuickBooks from the POS for Retail Administrator by selecting Post from the Tools menu, or clicking the Post button on the toolbar.
Note: To perform a Post, QuickBooks must be in single-user mode and must have the correct company database open.
The Post wizard will walk you through the steps of exporting the data. As with Transfer, you can set the first screen to skip automatically when you run this wizard, since it is merely informative.
Note: If a message 'No transaction files found' appears, it is likely that you haven't run the Process End of Day from any of your POS for Retail terminals yet. Go back to your terminals and ensure that they are all closed out correctly.

POS for Retail Administrator Functions 79
Condense and Repair the Database
Condensing and Repairing the Database is a very important housekeeping task for the POS for Retail data that should be done on a regular basis. Ensure you have closed all POS for Retail terminals before beginning.
While this procedure can be helpful in the case of a corrupted data file, it cannot fix every kind of failure, so it is important to also back up your database.
Note: The POS for Retail Administrator will remind you to condense the database every 30 days.
Send a Message to a Terminal
A message can be sent from the POS for Retail Administrator to any or all of the terminals. The message will pop up automatically on the POS for Retail screen. If the POS for Retail terminal has been set to not display messages from other terminals during a transaction the message will pop up when the transaction is complete.
Delete a Terminal
This function will remove a terminal from the system. Be very careful that you select the correct terminal before selecting Delete. Ensure Process End-of-Day has been performed on the terminal before continuing, or you will lose sales information.
Send E-mail
If you have a MAPI-compliant e-mail program installed on your machine (most e-mail packages are MAPI-complaint; check your e-mail documentation to be sure), you can select this option to send an e-mail.
Start QuickBooks
Select this option to launch QuickBooks.

80

C H A P T E R 1 1
81
In this chapter, you’ll get a good understanding of
the layout of the POS for Retail screen. CHAPTER 11
The POS for Retail screen
How do Iwork in
POS for Retail?
Getting to know POS for Retail
82

82 CHAPTER 11 The POS for Retail screen
Getting to know POS for RetailPOS for Retail terminals automatically start in terminal mode. The screen looks like this.
The screen is designed to emulate a cash register - there are no fields to fill in. The operator uses the numeric keypad and function keys exactly as they would on an electronic register. You only need to use the mouse to change options, or to select End of Day processing.
Menu bar
You can access the options on the menu bar normally, using the mouse; or if you prefer to use only the keyboard, you can press F2 to access the menu bar and use the arrow keys to navigate.
User display
The item and price appear in the user display as you enter them. The numerals and letters are similar in size to an electronic register display and are easy for the operator to see.
Transaction display
As you progress through a sale, the transaction details appear in the Transaction display.
Menu barUser display
Information display
Receipt status
Transaction display
Terminal ID
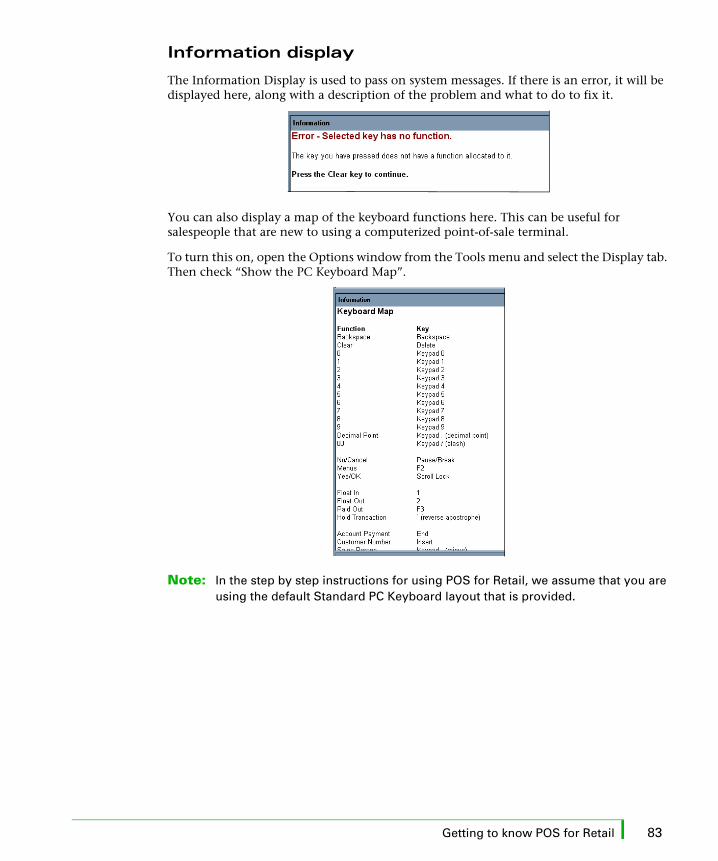
Getting to know POS for Retail 83
Information display
The Information Display is used to pass on system messages. If there is an error, it will be displayed here, along with a description of the problem and what to do to fix it.
You can also display a map of the keyboard functions here. This can be useful for salespeople that are new to using a computerized point-of-sale terminal.
To turn this on, open the Options window from the Tools menu and select the Display tab. Then check “Show the PC Keyboard Map”.
Note: In the step by step instructions for using POS for Retail, we assume that you are using the default Standard PC Keyboard layout that is provided.

84

C H A P T E R 1 2
85
This chapter helps you properly configure all the
necessary hardware, and set up POS for Retail for
your business needs. CHAPTER 12
POS for Retail options
How do Iset up
POS for Retail?
Setting Up POS for Retail
86
General tab 86
Lists tab 88
Keyboard tab 89
Configuring your POS for Retail keyboard
90
Scanner tab 95
Customer Display tab
97
Receipt Printer tab
98
Invoice Printer tab
99
Cash Drawer tab 100
Scale tab 101
Report Printer tab
101

86 CHAPTER 12 POS for Retail options
Setting Up POS for RetailIn order to get POS for Retail working for your business, you need to ensure that your hardware and software are all configured properly. To configure POS for Retail, select Options from the Tools menu to bring up the Options screen.
General tab
Terminal ID
The Terminal ID is the name you gave the terminal when you first installed POS for Retail. You can change it here if you want.
Transaction Number Start
Every POS for Retail transaction is recorded by the system with a unique Transaction Number. This number is also printed on the top of every receipt.
If you want your transactions to start from a particular number other than zero, modify the Start number. If you change the transaction start number after the system has already been in use, transactions will begin from the new number after the next End of Day report is run and the terminal reset.
Note: If you want to differentiate between sales from each terminal, you should make sure each terminal has a different start number, like 100000, 200000, and 300000. Any changes you make here will take effect after the next End of Day (if you reset the terminal). You can make changes here while the store is trading, as they will not come into effect until later.
Don't display messages from other terminals during a transaction
Messages can be sent from the POS for Retail Administrator to staff on the POS for Retail terminals, or from one POS for Retail terminal to another. Click this check box if you do not want the sales person to be interrupted with messages during a transaction. The messages will appear when the transaction is completed.

Setting Up POS for Retail 87
Display tab
The layout of the main POS for Retail screen can be changed to suit your preferences. You can make adjustments to the User Display, the Transaction Display and the Information Display.
User display
You can use the slider bar to adjust the height of the User Display. The default height is 20%. Click the Font button to change the text font, style, and colour. You can't affect the text size for the User Display because the text changes size automatically to fill the height of the window.
Transaction display
Information display
User display

88 CHAPTER 12 POS for Retail options
Transaction display
In addition to changing the size of the Transaction Display using the slider, you can choose to hide the Transaction Display completely so that the Information Display takes up the entire lower section of the POS for Retail window. You can also change whether the Transaction Display appears on the right or the left hand side of the screen. You can use the Font button to change the font, style, colour and size of the text.
Information display
The Information Display is where POS for Retail displays various lists, messages, and warnings, as well as the touch screen keyboard. You can use the Font button to change the font, style, colour and size of the text.
You can also check the Show the PC Keyboard Map check box to display the keyboard map here. This shows all of the functions that you have mapped to particular keys on the PC keyboard. This is very handy if you don't have a touch screen or a POS keyboard.
POS for Retail will also display a warning in the Information Display every time that another Windows application is brought to the foreground, indicating that POS for Retail is not the active program. You can disable this warning by checking the appropriate check box here.
Lists tab
The Lists tab allows you to control the information that POS for Retail displays in the Sales Person List, Product List, Customer List, Layaway Customer List, and Currency List. Many items of information are already selected by default when you install the program. Check the items you want the lists to display.

Setting Up POS for Retail 89
Keyboard tab
The keyboard is one of the most crucial areas associated with POS for Retail terminals. Function keys must be assigned to allow for the fast and effective processing of transactions from POS for Retail terminals.
POS for Retail can accommodate most standard PC keyboards or fully programmable POS keyboards. Both types of keyboard function identically, however the installation process for each keyboard and key layout varies slightly.
PC keyboard
If you are using a standard PC keyboard, click Design PC Keyboard Layout to assign functions to specific keys. Many options that you will want to use won't have keys assigned to them when you first run POS for Retail; you should decide what functions you need and choose keys for them. For instance, if you have no intention of selling anything on layaway, you won't need to assign those functions to keys. Keep it as simple as possible.
The Num Lock key on your keyboard determines whether the numeric keypad keys register as numbers or as arrow keys (both are usually drawn on the keys). Often when your computer is shut down, the Num Lock will be turned off, and you can't use the keypad to enter numbers. Checking this option will make your system turn the Num Lock on every time it restarts.
Note: Turn Num Lock On at Startup does not work on some personal computers.

90 CHAPTER 12 POS for Retail options
POS keyboard
If you have an external POS keyboard, click Design POS Keyboard Layout to assign the right functions to the right keys. Every POS keyboard is different, so the layout screen you see should match the POS keyboard you own.
By default, POS for Retail will be made the active program every time a key is pressed on the POS keyboard, unless you disable that option here.
Touch keyboard
If you have a touch screen, you should check the Show Touch Keyboard check box, and the keyboard will be drawn in the Information Display. Click the Design Touch Keyboard Layout button to design the keyboard that will be displayed.
Copy layout
Whichever keyboard you're using, you only need to set it up once. By clicking the Copy Layout button, you can copy a keyboard layout from another terminal, or load a keyboard layout from a disk, or save the layout you've just created to a disk for use on other terminals.
Note: When a touch screen layout is copied, a file, [terminal ID].tkz, is created that contains both the layout and any picture files attached to the layout.
Configuring your POS for Retail keyboard
PC Keyboard
The PC keyboard, sometimes called a QWERTY keyboard layout (after the first six keys - Q, W, E, R, T, Y), is standard with your computer, and can be used when you don't have any specialized hardware to use for entering sales. The numbered keys on the right hand side of the keyboard are what are known as the numeric keypad and are used to enter numbers. You press these to enter dollar amounts and quantities.
Float In Refund Numeric Keypad

Setting Up POS for Retail 91
In order to work with POS for Retail, you have to assign terminal functions to the various keys. Some keys are predefined when you install the software. For example, the “1” key (above the “Q”) is predefined as Float In. There are many more functions available than are predefined at first, and you can change all of them; you should decide what functions you want and assign keys to them as best suits your needs.
Design PC keyboard layout
1 Select a key from the list of keyboard keys. Whatever function is assigned to that key, it will be shown on the Functions list.
2 Choose a function from the Functions list, if you want to change what this key does, or change some of the options for this key's function.
3 Click Apply Function to Key to apply your changes.
The Function Options on the right change depending on what function is selected. Some functions such as Print Receipt have no options besides the caption, while others, like Product Number, have many options. If you change any of these options, click Apply Function to Key to save your changes.

92 CHAPTER 12 POS for Retail options
POS keyboard
A POS keyboard is a separate piece of hardware for your computer that gives it the look of a cash register. Some POS keyboards come partially predefined with standard alphabetical keys and POS functions, with the rest left for you to program as desired. Some come with no keys defined at all. You should decide what functions you want and make sure POS for Retail and your POS keyboard are programmed for all of them.
Design POS keyboard layout
Every POS keyboard is different; the layout will change depending on which one you've purchased. When you click Design POS Keyboard Layout, the screen you see should match the hardware in front of you. If it doesn't, you've selected the wrong model of POS keyboard.
This keyboard has been partially programmed with QWERTY alphabetical keys and POS functionality. If a key has not been programmed, it will be labelled (None) as shown in the example below.
Each key on the POS keyboard can have a POS Function and a QWERTY Function (for typing letters). When you select a key, both functions are displayed in the boxes at the top of the screen. For instance, in the diagram above, the No Sale key is mapped to the POS No Sale function as well as the letter A.

Setting Up POS for Retail 93
You can choose to display either the POS functions or the QWERTY functions on the keyboard layout by clicking on the appropriate option. It doesn't matter which one is selected; each key will still be mapped to both functions. If you need to resize the layout, change the Zoom percentage.
You can expand keys to be double width horizontally or vertically, or even a “Quad” sized key that takes up four squares, by clicking the appropriate buttons. Double-click on a key to edit what it does.
POS key functions
This window displays both the QWERTY function for the key and the POS function. As you change the POS function, the Function Options section will change to display all of the options that apply to that function. You can then set or change these options. When you're done, click Apply to save the changes.
For more information on each function, see “POS for Retail Function Key Options” on page 104.
Function description
This field briefly describes the functionality of the POS Function selected.
Function options
Each POS Function has its own set of options that are available which enables you to modify operations to suit your business requirements.
For more information on each function, see “POS for Retail Function Key Options” on page 104.

94 CHAPTER 12 POS for Retail options
Touch keyboard
If you have a touch screen for your computer, you can use the POS for Retail Touch Keyboard. The Information Display is replaced with an on-screen keyboard that will work just like a POS keyboard when you touch the screen. You can modify the layout of this virtual keyboard as much as you want.
Design touch keyboard layout
The touch screen keyboard works like a physical POS keyboard; each key can have a POS function and a standard keyboard function at the same time. Click any touch key to highlight it, and double-click to edit its function. Use the Background button to change the colour of the keyboard background.
Edit key layout
Highlight the key you want to edit, then adjust its parameters using the tabs on the right.
You can adjust the size and position of a button by changing its Left and Top position, and by changing its Width and Height. It is possible to overlap buttons this way, so you should make sure all your buttons are visible. You can also move a button by dragging it with the mouse (or your finger, if you have a touch screen).
The Text tab lets you change the text of the caption, and adjust the font, style, colour and size of the text. Click the various alignment buttons to change the vertical and horizontal positioning of the text. Clicking the Vertical box will print the text vertically, like the Subtotal button in the diagram above.

Setting Up POS for Retail 95
Note: Any text on the button will print overtop of the picture.
Show function
This will display the POS Keyboard Key Function window. It operates exactly as if the virtual keyboard were a POS keyboard. For more information, see “POS for Retail Function Key Options” on page 104.
Scanner tab
There is a wide range of bar code scanners available, and POS for Retail supports a large number of brands and models. You can choose your bar code scanner from the list of supported models or, if your scanner is not listed, select Generic Bar Code Scanner from the list.
Most scanners have a variety of programmable options that need to be set before the scanner will work correctly. The Scanner option tab displays some information which may be useful to you in setting up your scanner properly. If more assistance is required to configure your scanner, contact your scanner supplier.
In addition to the text, you can have a picture appear on the button. Click the Picture button to select the bitmap you want. You can change the picture's position using the alignment buttons, change its width or height, or check the Size to Fit check box to expand it to fill the button.

96 CHAPTER 12 POS for Retail options
Type
Select the type of scanner you have here. If your scanner isn't on the list, choose Generic Bar Code Scanner.
Connected to
You must select how your scanner is connected to your computer. It can be plugged into your computer's keyboard in place of a standard keyboard, or into a special scanner port on your POS keyboard, or into one of your computer's serial ports (COM1, COM2, etc.).
Note: If a COM port is already in use it will not appear in the list. Only available COM ports will appear in the list.
Caption
This caption is what will appear on the transaction display when a product is scanned.
Print the Bar Code Number
Check this option if you want to have the bar code number print on receipts.
Use a unit of measure or weight from scale if available
You should check this option if you have a scale attached to your terminal and you want to be able to base an item's price on its weight. The system will take the weight from the scale, and the price per unit of measure from the bar code of the item, then calculate the price.
If there is no weight on the scale and you scan a bar code, the system will look up the bar code in the Product List normally.
Required for ALL scanners
In order to work with POS for Retail, all scanners must be set with the following communications information. Go to your scanner's user manual and follow its instructions to program the scanner with the following:
� Baud Rate - 9600
� No Parity
� 8 data bits and 1 stop bit
� Prefix character - tilde (~) character
� Suffix character - a Carriage Return (CR)

Setting Up POS for Retail 97
Customer Display tab
A customer display, also known as a pole display, is a small screen that is visible to the customer at the register. It enables them to see the prices of items as they are entered at the terminal. When not in use for a sale, the Customer Display can deliver a message to customers: for example, you could have it display Next Customer when a sale is completed, or This register closed when it's not available.
You must select the type of display you have from the drop-down menu, and what serial port it's connected to on your computer.
Note: If a COM port is already in use it will not appear in the list. Only available COM ports will appear in the list.
Customer Display Message
From here, you can change the message that appears after the terminal has been idle, as well as how long it waits before displaying the message, and how fast the message will scroll across the display.
The message will only appear after POS for Retail is idle for some number of seconds; hitting any key on the terminal will “wake it up” and the Customer Message won't be displayed.

98 CHAPTER 12 POS for Retail options
Receipt Printer tab
POS for Retail supports many popular Receipt Printers, including impact and thermal printers. No additional configuration or printer drivers are necessary for setting up a Receipt Printer. Simply choose your type of receipt printer from the drop-down menu.
Note: POS for Retail works with serial Receipt Printers only.
Connected to
You must select how your receipt printer is connected to your computer. It can be plugged into a special receipt printer port on your Customer Display (if your Customer Display supports this), or into one of your computer's serial ports (COM1, COM2, etc.).
Note: If a COM port is already in use it will not appear in the list. Only available COM ports will appear in the list.
Some types of receipt printers have a paper cutter, so that the cashier doesn't have to rip the receipt off manually. If your receipt printer supports this, you should check this check box.
You can choose to print a header at the beginning of the receipt, a trailer at the end, or both. Select which you want, and edit the text that appears. These will print on every receipt.

Setting Up POS for Retail 99
Invoice Printer tab
You can print an invoice from any standard Windows printer. Select which Windows printer you want to use from the drop-down list. If no printers are available, you will have to set one up. Consult your Windows documentation for details.
When you've selected a printer, its connection information is displayed. This will either be a network path for a networked printer, or a printer port (like LPT1) for a local printer.
Clicking Properties will open the Windows Printer Properties dialog box.
If you click Fonts, you'll be able to set up what fonts the report will use when it prints.
Heading and Column Captions
If the Print the Company Details check box is checked, the invoice prints your company details at the top of the invoice. You can change the title of the invoice, as well as the title of any of the columns, by editing the text boxes.
If you want an invoice header to print as well, you can select it and edit the text for it here. The same is true if you want the invoice to have a trailer at the end.

100 CHAPTER 12 POS for Retail options
Cash Drawer tab
Most common types of cash drawers can be used with POS for Retail. They only require some other device, such as a receipt printer, to supply enough electrical power to “kick” the drawer open at the right time.
Select the type of cash drawer you're using from the drop-down menu. If you don't see the make and model you're using, select Generic Cash Drawer. You also need to select how the drawer is connected to your computer: through a special port on your Receipt Printer, or through one of the computer's serial or parallel ports (COM or LPT).
If you're connecting via a specialized port, like a receipt printer, this will supply enough power for the “kick”, but if you're connecting via your computer's serial or parallel port, you may have to make additional arrangements for power. Consult your cash drawer documentation for details.
Note: If your receipt printer has a Cash Drawer Port, often called a “Drawer Kicker Port”, it is recommended that the cash drawer be connected to it.
If a COM port is already in use it will not appear in the list. Only available COM ports will appear in the list.

Setting Up POS for Retail 101
Scale tab
If you have a scale to use in conjunction with a bar code scanner that is set up for taking “Units of Measure”, then you will need to set it up here. Choose the type of scale that is hooked up to your machine, and which of your computer's serial ports (COM1, COM2, etc.) it's attached to.
Note: If a COM port is already in use it will not appear in the list. Only available COM ports will appear in the list.
You will also need to set the captions that print for both the weight unit (for example, “kg”), and the price per unit (for example, “/kg” or “per kg”). These should be set to the measures that the scale is calibrated for, but it's important that it matches the units you're using for marking the price. If you're charging $2.00 per pound for bags of peanuts, but your scale returns a weight of 1.2 kilograms, you'll only be charging $2.40 instead of $5.28!
Report Printer tab
POS for Retail can print reports to either a receipt printer or a Windows printer. Reports are printed when you process your End of Day. Here, you should choose which printer POS for Retail will default to when printing reports. This only sets up the default; when you actually do your End of Day reports, you will be able to choose which printer to use.
Clicking the Properties button will bring up your Windows Printer Settings dialog box.

102

C H A P T E R 1 3
103
This chapter describes each function key in POS for
Retail and how you can customize the function keys
to suit your business. CHAPTER 13
POS for Retail function key options
What do allthe function
keys do?
POS for Retail Function Key Options
104

104 CHAPTER 13 QuickPOS function key options
POS for Retail Function Key Options
Clear (default is Delete)
Clear removes the current line of information in a transaction. For example, if you accidentally typed 202 for a product number, and you meant 102, pressing the Clear key erases the 202 so you can type the product number again.
Clear only removes the current data entry, it won't get rid of the last transaction entry. For that, you need to press Correct Last Entry.
Also, if you attempt to use a function key incorrectly, an error is displayed in the Information Window. You then need to press Clear to clear the error message before you can continue entering transactions.
Clear is a required function in POS for Retail; there must be a key mapped to it in order to use the program.
Backspace (default is Backspace)
Backspace works in POS for Retail exactly as it does on your computer keyboard; if you type the wrong number, Backspace will erase it. For example, if you type 105 when you meant 104, clicking Backspace once will erase the 5 and let you type the 4. To correct the entire transaction, rather than just a key, use Clear. To erase a previous transaction, hit Correct Last Entry.
Yes/OK (default is Scroll Lock)
Since POS for Retail is designed for use without a mouse, there are keys for making selections and answer questions. When you've selected an item in a list, press Yes/OK to enter it. If POS for Retail brings up a window asking you if the system should do something, use this key to answer Yes. The Yes/OK key is a required key in POS for Retail.
No/Cancel (default is Pause/Break)
This key is the opposite of Yes/OK; hit it when you want to answer No to a question or exit a list without making a choice. It is also a required key in POS for Retail.
Receipt On/Off (no default)
The Receipt On/Off key toggles the printing of receipts on or off. It is overridden only if a tender function has the Enforce Receipt Printing option checked.

POS for Retail Function Key Options 105
Training Mode On/Off (no default)
This key toggles Training Mode on or off. When Training Mode is on, whatever is in the Caption field will print at the top of receipts. You can leave this field blank, if you want.If you check Do Not Open the Cash Drawer, then cash drawer cannot be opened while in Training Mode.
You can also set Manager Override Required, which means employees cannot accidentally switch into or out of training mode without a manager's approval.
Lock Terminal (no default)
This key toggles the terminal from Locked to Unlocked. Locking a terminal protects you from theft. When leaving a POS terminal unattended it is strongly advised that the operator lock the terminal to prevent unauthorized people from opening the cash drawer. When a terminal is locked, you can't process a sale, nor can you open the cash drawer by pressing the No Sale key.
Whatever is entered as the caption appears on the Customer Display and the Main Display window of POS for Retail when the terminal is locked.
If you specify an Unlock Password, then the sales person is required to enter that password to unlock the terminal.
If you check Allow Unlock with Sales Person ID, then your sales people can enter their ID number to unlock the terminal, instead of a password.
Manager Override (no default)
You can set many functions in POS for Retail to require a Manager Override before they will function. When that happens, you hit the Manager Override key and enter the password to unlock the function for the sales person.
The caption will appear in the Main Window when the Manager Override has been activated; at that point the sales person can use the protected function.
Fill in the Manager Password field to set the password.
Rather than entering a password here, you can set a global manager password in the Administrator. If you set a password here and in the Administrator, the POS for Retail terminal password assigned to the key will be used.

106 CHAPTER 13 QuickPOS function key options
Print Receipt (no default)
If you have Receipt Printing toggled off, or if the customer wants a duplicate receipt, this key will force a receipt to print. The first time a receipt is printed, whether automatically or because you press the Print Receipt key when Printing is toggled off, it will print normally. The second time it prints, it will print with the Duplicate Caption, which you can set here.
Receipt Line Feed (no default)
This key advances the receipt printer paper by one line at a time to allow for the feeding of new rolls of paper. It has no options.
Print Invoice (no default)
This key will manually print an invoice, if a customer wants a duplicate invoice, or you don't have automatic invoice printing set. The first time an invoice is printed, whether automatically or because you press the Print Invoice key, it will print normally. The second and subsequent invoices will print with the Duplicate Caption at the top, which you can set here. Duplicate invoices are also numbered.
Send Message (no default)
Pressing the Send Message key will allow you to send a message to another terminal, or to the Administrator. This key has no options.
Menus (no default)
This key lets you access the POS for Retail menu options without a mouse. Also, if POS for Retail ceases to be the active program (if a printer error dialog box pops up in Windows, for instance), pressing this key will make POS for Retail the active program again. This key has no options.
Cash Float In (default is 1)
You hit the Cash Float In key when you're setting the amount of money that is placed into the cash register as part of the float.
Check the Open the Cash Drawer box if you want the cash drawer to open automatically when setting the float. You can choose to force a receipt to print when the float is set, or force an invoice, or both. You can also require a Manager's Override to use this key.

POS for Retail Function Key Options 107
For accounting reasons, you must select two QuickBooks accounts here: one which is decreased when money goes into the float (this is usually Undeposited Funds, but you may use a different account if you need to), and one account which increases. When you first install POS for Retail, it will create an account for you called Cash Register Funds Account to track the money actually in the register, but you can choose a different account if it suits your business requirements.
Cash Float Out (default is 2)
The Cash Float Out key is the key for taking the money out of the cash register at the end of the day.
Check the Open the Cash Drawer box if you want the cash drawer to open automatically when removing the float. You can choose to force a receipt to print when the float is removed, or force an invoice, or both. You can also require a Manager's Override to use this key.
For accounting reasons, you must select two QuickBooks accounts here: one which is decreased when money comes out of the float, and one which is increased. POS for Retail has created a QuickBooks account called Cash Register Funds Account, which is likely the account that the money is coming out of when you remove it from the till. When money comes out of the cash register, it goes into Undeposited Funds. You can change either of these accounts here if it better suits your business requirements.
Cash Paid Out (default is F3)
The Cash Paid Out key records money taken from the cash register to pay for miscellaneous items such as consumable goods.
Like all the Cash functions, you can set the cash drawer to open when you hit this key, choose which reports to print when it's pressed, and require a Manager's Override to use it.
You must also choose the accounts that the money comes out of and goes into. By default it comes out of Cash Register Funds and goes into Cash Paid Out, two accounts which are created in QuickBooks when you install POS for Retail. If your business needs require it, you can change these accounts here.

108 CHAPTER 13 QuickPOS function key options
Cash Clearance (no default)
The Cash Clearance key replaces the banking function on many cash registers. The key indicates that money has been removed from the cash drawer for deposit to a safe or the bank.
This key has the same options as Cash Float Out, since from an accounting point of view they do exactly the same thing - take money out of the till and place it in Undeposited Funds to go to the bank. Only the physical details are different, since with Cash Clearance, you presumably wouldn't take the cash drawer out. For more information, see “Cash Float Out (default is 2)” on page 107.
Hold Transaction (default is ` reverse apostrophe)
You can put a customer's transaction on hold using this key; for instance, if a customer realizes they want to go back and find one more item to go with their purchases, and you want to serve the next person in line rather than making them wait.
When you first press the button, the current transaction is put on hold, and the Hold Caption is displayed. You may then begin another transaction. When your indecisive customer returns, you press it again and the Retrieved Caption is displayed, and their transaction is brought back.
If you are in the middle of a transaction when the first customer comes back, and you press the Hold key, the current transaction is put on hold, and the old one brought back. You can only have one transaction on hold at a time on a terminal.
You can require a Manager's Override in order to use this function.

POS for Retail Function Key Options 109
Number Entry (no default)
The Number Entry key allows for a number, such as a serial number, to be entered during a transaction.
If you check the Allow Numeric Entry Only check box, the operator will only be able to enter numbers. If it's cleared, they will be able to enter letters as well.
You can set the minimum number of characters; for instance, if number entry is only used for serial numbers, and serial numbers are always at least seven characters long, this should be set to seven. If you set this option to 0, the minimum will be one.
You can also set the maximum number of characters. If this option is set to 0, the maximum will be 50.
Memo Entry (no default)
This key allows you to enter special comments for a transaction. For instance, during a clearance sale you could add a memo indicating that the goods in question were damaged at the time of purchase and are non-refundable. The memo will be printed on the receipt; it will also be stored with the transaction in QuickBooks. This key has no options.
Cheque Number Entry (no default)
Press this button to enter a cheque number that will print on the receipt. You can choose to make this key compulsory when using the Tender Cheque function.
Like the regular Number Entry key, you can set the Minimum and Maximum digits here. If the options are set to 0, they will default to a minimum of 1 and a maximum of 50.

110 CHAPTER 13 QuickPOS function key options
Tax Exempt (no default)
Press the Tax Exempt key if you want an individual item within a transaction, or the whole transaction, to be sold free of tax. This key will exempt the purchase from all taxes, both the GST and your provincial sales tax.
The Tax Exempt key is a toggle, it will also turn off the Tax Exempt status when you no longer want it applied. You can set the option here which decides when it will be turned off automatically: after a single sale has been entered, after the entire transaction has been entered, or never turn it off until you hit the key again.
You can also choose to have the caption print on receipts and invoices, as well as making this key require a Manager's Override.
Sales Person (default is - [on the keypad])
Use this key to select the sales person for a transaction. You can type your ID before hitting this key, in which case you will be entered as the sales person, or you can just hit the key, which will display the Sales Person List and you can select yourself from it.
If you want to set up multiple Sales Person keys, each with an ID built in, you can click the Preset Sales Person button and enter an ID. Then pressing this Sales Person button will automatically select that sales person. This is very useful for stores that require the sales person ID to be entered before every transaction.
If you want to prevent sales people from seeing the list of Sales Person IDs when they press this key, you can uncheck the Display ID List box. This forces your sales people to have a valid ID and makes your register more secure.

POS for Retail Function Key Options 111
Customer Account (default is Insert)
The Customer Account key lets you assign a customer to a transaction. You can either type in a customer's ID and then hit this key, or you can just press this key to display a list of customers, then choose one from the list.
The text in the Caption field will display on the Customer Display when this key is pressed. The text in the Account Name Caption, on the other hand, will display on receipts and invoices when you choose to print the Account Name. You can choose to print the Account Number or the Account Name, or both, on receipts and invoices.
If you choose to print the Billing Address, it will be printed on receipts. By default, the customer's billing address is always printed on invoices.
You can choose to show the customer's details in the Information Window. You can also choose to allow, or prevent, the adding or the editing of customers from the list when using this function.
If you check Use Customer's Percentage, then if the customer has a discount percentage set up, it will be applied to all his or her purchases. You must enter the customer's ID before you enter any items for this percentage discount to work.
Layaway Account (no default)
Use this key to select a layaway account. You need to have a layaway account selected in order to sell an item on layaway, or to make a layaway payment.
The text in the Caption field will print on the receipt next to the layaway number. The text in the Customer Name Caption will print along with the customer's name (when you've checked Print the Customer's Name, of course).
Like the Customer Account key, you can also choose to display the customer's details in the Information Window, and you can allow or prevent the adding or editing of customers' layaway accounts.

112 CHAPTER 13 QuickPOS function key options
Currency Conversion (no default)
POS for Retail can convert foreign currency to the local currency. The various currencies and their exchange rates are setup in the POS for Retail Administrator.
If there is no currency associated with this key, it will bring up a list of active currencies, and you can choose from it. If you click on the Preset Currency button, you can assign a specific currency to this key. This way you can set up a few keys that automatically convert from a common currency, like $USD.
You can force all foreign currency transactions to use only bills by checking the Don't Allow Decimal Amounts box. You can also fill in a minimum amount for currency conversions. Any amount less than this won't be allowed.
You can choose to print the exchange rate on invoices and receipts by checking the Print Exchange Rate box. You can also force a receipt or an invoice to print for any currency conversion transaction, as well as requiring a duplicate receipt to print.
Web Browser (no default)
POS for Retail has a limited ability to browse the web. You don't have unlimited access to the Internet, only to specific sites that are chosen by the POS for Retail Administrator.
To set up a key for this function, you must click the Home Page button and select one of the allowed sites from the list as your home page. This is the page that will come up when this key is pressed. If you check Hide Web Page Selection, then the home page will be the only page you can display. Otherwise you'll be able to choose any of the sites off the allowed list.
You can choose to have the web browser take up the Transaction Window as well as the Information Window, and you can choose to have the web site's URL displayed or just the description of the site in the title bar.
You can also choose to require a Manager's Override to access the web.

POS for Retail Function Key Options 113
Customer Account Payment (default is End)
If a customer is “running a tab”, or has an account with you, use the Customer Account Payment to make a payment on it. You must have a customer already selected to use this key.
You can choose to make printing a receipt or an invoice mandatory when making a payment to a customer's account.
Since this is a payment, you must select an account that the money is going into. By default, this will be Accounts Receivable.
Layaway Account Payment (no default)
Use this key to make a payment towards a customer's layaway purchase.
You can choose to make printing a receipt or an invoice mandatory when making a layaway payment.
Since this is a payment, you must select an account that the money is going into. By default, this will be Accounts Receivable.
Quantity (default is * [on the keypad])
This key allows you to multiply an item's price by some number. It is a required key.
You can set the number of decimal places allowed for a quantity. If it is set to 0, you can only enter whole numbers, like 6 soft drink cans. You can allow decimal places if for instance you wanted to be able to sell 6.5 scoops of raisins.
You can set a maximum quantity to allow here. If you enter 0 as the maximum, then there is no maximum and the sales person will be able to enter anything.
You can allow the sales person to enter a quantity of quantities if you want. This would be useful if the customer bought six 3-kilo bags of apples; you would multiply the price per kilogram for apples by 3, then 6.

114 CHAPTER 13 QuickPOS function key options
Unit of Measure (no default)
You use this key when you sell something by some unit of measure, like selling fruit by the kilogram, or lumber by the metre.
The text in the Caption field will appear on the receipt as a description of the Units of Measure, for instance Weight or Length or Volume, depending on what you're measuring.
You can set the number of decimal places you'll allow for the units of measure, as well as the maximum amount.
You need to enter the caption for the unit, as well as the price per unit. For instance, if you're entering weights, the Caption for Unit might be “kg”, and the Caption for Price per Unit might be either “/kg” or “per kg”, as you prefer.
There is also a Caption for Entry, which allows you to distinguish how the measure was entered. This would tell you that the weight was entered by the sales person, rather than coming from a scale. You may change it to whatever suits you.
No Sale (default is F4)
The No Sale button is used to open the cash drawer without recording a sale.
You can turn off the cash drawer opening on a No Sale if you want.
You can choose not to print a receipt when this key is pressed, and you can choose to require a Manager's Override to use this key.

POS for Retail Function Key Options 115
Product Number (default is Enter)
This key can be used in three ways:
� Type in a product number and press this key, selecting that product for sale
� Press the key without first entering a product number, which brings up the Product List where you can choose an item
� Assign a specific product to this key, for a one-touch sale.
As with many functions, you can choose to print the Product Number and the Product Price Level on the receipt and invoice.
You must select a Price Level for the product, and if this key is to be assigned to a specific item for a one-touch sale, you must click the Preset Product button and choose which product it's going to be.
If this key is used to sell an item or items that is sold by Units of Measure, you must check the Use Units of Measure box. POS for Retail will then look for either a manual Unit of Measure entry or a weight from a scale.
If you check the Allow Amount Entry box, the sales person can type in an amount for this item that will override any preset price. You can choose a maximum amount that the operator can enter.
The Calculate Unit of Measure box works in conjunction with the Allow Amount Entry. If this is checked, POS for Retail will take the amount the customer is being charged, along with the preset price per unit for this product, and calculate the Unit of Measure. For example, if the price of an item is $1.50 per kilogram, and the operator manually enters $6.00 for the amount, POS for Retail will calculate the Unit of Measure as 4 kilograms. You can also set the captions for these calculated Units of Measure here, both for the base unit (“L” for litres) and for the price per unit (“/L” for per litre).
Product Price Override (no default)
This key allows you to override the price of an item, regardless of its settings for manually entering a price. This function allows you to sell damaged or floor stock without having to apply discounts.
You can set a maximum price that the sales person can enter, as well as whether this function requires a Manager's Override. If you set the maximum to 0, this means there is no maximum and the operator can enter anything.

116 CHAPTER 13 QuickPOS function key options
Product Price Level (no default)
Use the Price Level key to choose which price level the item will be sold at.
You must select which price level this key activates.
You can set the option here which decides when the price level will be turned off: after a single sale has been entered, after the entire transaction has been entered, or never turn it off until you change price levels manually.You can require a Manager's Override to use this key.
Bar Code Number (default is + [on the keypad])
If a bar code is damaged or is not scanning correctly, the Bar Code Number key can be used to manually enter the bar code number and complete the sale. To use the function, type the bar code number and then press this key.
You can select whether the Barcode Number is printed on receipts here, as well as whether the Price Level prints. You can also set which price level applies when using this key.
You can also choose to use a Unit of Measure, either manually entered or from a scale, with this key. If you plan to use this option, you should set up two keys - one for unit of measure sales and one for simple product sales.
Department (no default)
The Department key is used to sell non-inventory items. Assign each non-inventory item or service you want to sell to a Department key. For example, french fries are not generally sold as a fixed number of fries per price (you would likely not enter a sale as 75 fries for $1.50). Instead, you would create a non-inventory item for french fries and assign it to a Department key. Then you would simply type 150 and hit the Department key (now the French Fry key.)
Click the Product button to select the non-inventory item to attach to this key. Then select the maximum amount that the operator can enter.

POS for Retail Function Key Options 117
You can choose to allow units of measure, either manually or from a scale, with this item. You would first enter a unit of measure by weighing an item or by entering it manually, then you would type a dollar amount and hit the Department key to make the sale.
You can also choose to Treat Entered Amounts as Negative. This is useful if you use this key for Lotto payouts or trade-ins, or other items where the payment is made to the customer.
Dollar Discount (default is Page Up)
Use this key if you want to give a discount of a fixed amount on a sale. You can apply a discount to a single item in the transaction, or to a subtotal.
You can assign a preset amount to this key, for a one-touch discount, or you can set the Preset Amount to 0, and enter it manually before you hit the Dollar Discount key. If you're going to use preset discount keys, you should create one additional key set to 0 to allow for arbitrary discounts.
You can choose to prevent this key from being used on subtotals, and you can require a Manager's Override to use it at all. Since the amount of the discount is a fixed dollar amount, it doesn't really matter whether it's applied to an item or to a subtotal.
If you check Discount Unit Price, then the discount will be applied to the per unit price. For example, if you're selling 12 root beers at a dollar apiece, and you discount the purchase by fifty cents, then they will owe $11.50. If the Discount Unit Price is checked, then the price of each can is discounted, and they will owe $6.00.
You must have a Discount Item selected. This is the Discount Item in QuickBooks that is used to track the discount. When you set up the POS for Retail Administrator, it will automatically add a Dollar Discount item to QuickBooks, but you may wish to change this to suit your business needs.
Dollar Surcharge (no default)
Use this key if you need to apply a surcharge to a purchase, like a delivery fee.
This key works very much like the Dollar Discount key, but rather than a savings to the customer this key applies an additional fee.
You can choose to allow a surcharge that's actually greater than the total value of the item, you can prevent this key from being used in subtotals, and you can choose to apply the surcharge to the Unit Price rather than the total.
You must have an Other Charge Item selected. This is the charge item in QuickBooks that is used to track the surcharge.

118 CHAPTER 13 QuickPOS function key options
Percentage Discount (default is Page Down)
Use this key if you want to give a discount of a certain percentage off the purchase price. You can apply a discount to a single item in the transaction, or to a subtotal.
You can assign a preset percentage to this key, for a one-touch discount, or you can set the Preset Percentage to 0, and enter it manually before you hit the Percentage Discount key. If you're going to use preset discount keys, you should create one additional key set to 0 to allow for arbitrary discounts.
You can choose to prevent this key from being used on subtotals, and you can require a Manager's Override to use it at all.
You must have a Discount Item selected. This is the Discount Item in QuickBooks that is used to track the discount. When you set up the POS for Retail Administrator, it will automatically add a Percentage Discount item to QuickBooks, but you may wish to change this to suit your business needs.
Percentage Surcharge (no default)
Use this key if you need to apply a surcharge based on the purchase price, for example a mandatory gratuity of 12% in a restaurant if there are more than ten people on the bill. The surcharge can be applied to a single item or to a subtotal.
This key works very much like the Percentage Discount key, but rather than a savings to the customer this key applies an additional fee.
You can choose to prevent this key from being used on subtotals.
You must have an Other Charge Item selected. This is the charge item in QuickBooks that is used to track the surcharge. The POS for Retail Administrator will have created one automatically in QuickBooks.
Correct Last Entry (no default)
The Correct Last Entry key deletes the last line item from a transaction. This function is used in the case of an operator error.
You can choose to require a Manager's Override to use this key.

POS for Retail Function Key Options 119
Correct Entry (default is F6)
The Correct Entry key corrects an entry previously entered for a transaction. It is required that the whole entry including quantity values be corrected. The item can then be left out of the transaction or the correct entry recorded.
You can choose to require a Manager's Override to use this key.
Return/Refund (default is F7)
The Refund key records the return of items sold or refund of money paid. This function can be used within a transaction or by itself.
You can choose to require a Manager's Override to use this key.
Cancel Current Transaction (default is F8)
The Cancel Current Transaction key enables an operator to cancel the transaction after it has been processed; for example, a customer can change their mind after the sale has been put through the register but before they've paid. Pressing the Cancel Current Transaction key will remove the transaction.
You can choose to require a Manager's Override to use this key.
Subtotal (default is Space Bar)
The Subtotal key totals all of the items that have been sold during a transaction. You can have as many subtotals as you like on a single transaction.
You can choose to have subtotals not print on receipts and invoices.

120 CHAPTER 13 QuickPOS function key options
Tender keys
The various Tender keys (Tender Cash, Tender Charge, Tender Cheque, Tender Credit Card, Tender Layaway and Tender Voucher) are used to pay for a sale and finish a transaction. They all have some options in common:
� Open the Cash Drawer: You can choose to have the cash drawer open when the key is pressed.
� Compulsory Amount Tender: If this option is checked, you must enter the amount of the tender before pressing the key.
� Enforce Receipt Print: With this checked, a receipt is always printed when this key is pressed.
� Enforce Invoice Print: With this checked, an invoice is always printed when this key is pressed.
� Print Duplicate Receipt: With this checked, a duplicate receipt will be always be printed.
� Minimum Amount: You can set a minimum amount for the tender. If the amount is less than this, the transaction will not be completed.
Tender Cash (default is F12)
This key records a cash payment made against a transaction.
You can choose to Allow Change Calculation After the Sale, which means you can add additional calculations after the sale has been finalized.
You must have a Payment Item assigned to this key, to track the payment in QuickBooks. The POS for Retail Administrator will have created a Payment Item called Cash in QuickBooks for you, but you can change it if you need to.

POS for Retail Function Key Options 121
Tender Cheque (default is F9)
This key records a cheque payment made against a transaction.
You can make it compulsory to enter a cheque number for cheques.
You can allow customers to overpay by cheque and get cash change back. If you do this, you will have to click the Change Options button to choose accounts for the transaction.
If you do this, you must determine which QuickBooks accounts are increased and decreased by the transaction. By default, the Cash account will be decreased when you give some to the customer, and the Cheque account will be increased by the excess amount on the cheque. You can change these accounts if you need to.
You must also have a Payment Item assigned to the payment portion of the cheque, to track it in QuickBooks. The default payment type created in QuickBooks will be called Cheque, which links to Undeposited Funds.
Tender Credit Card (default is F11)
This key records a credit card payment made against a transaction. You can have a different Tender key for each kind of credit card you accept.
If you accept more than one type of credit card, assign a different key to each one and change the Caption to reflect the type of card.
You must have a Payment Item assigned to this key, to track the payment in QuickBooks. The POS for Retail Administrator will have created a Payment Item called Credit Card in QuickBooks for you, but you can change it if you need to.

122 CHAPTER 13 QuickPOS function key options
Tender Voucher (no default)
This key records a voucher payment made against a transaction. A voucher can be a gift certificate, a coupon, or anything you choose to accept as a form of payment. Vouchers are treated as non-inventory items in QuickBooks and they are linked to an Other Current Liability account in QuickBooks.
Like a cheque, you can allow the customer to receive cash as change from a voucher payment. To do this, you must set up the asset accounts that will be increased and decreased by the transaction.
You must have a non-Inventory Item assigned to this key, to track the payment in QuickBooks. The POS for Retail Administrator will have created a non-Inventory Item called “Gift Certificate” in QuickBooks, which is linked to an “Other Current Liability” account.
Tender Account Charge (default is Home)
Use this key when the customer is putting the purchase “on their tab”, or on account, to be paid later.
If a customer wants to make a payment to their account, use the Customer Account Payment key.
You must have a Receivables Account assigned to this key, to track the payment in QuickBooks. The POS for Retail Administrator will have created an Accounts Receivable account in QuickBooks for you, but you can change this if you need to.

POS for Retail Function Key Options 123
Tender Layaway (no default)
This key finishes the sale by assigning it to the layaway account you've already chosen for this transaction (using the Layaway Account key).
You can choose to have this key print the Terms and Conditions of the layaway plan for the customer. You can also choose to have it print a receipt as well for the goods in question.
Note: The Terms and Conditions are set up in the POS for Retail Administrator from the Layaway Options tab.
You must have a Receivables Account assigned to this key, to track the payment in QuickBooks. The POS for Retail Administrator will have created an Accounts Receivable account in QuickBooks for you, but you can change this if you need to.
End of Period (no default)
The End of Period function key begins the End of Day procedure for this terminal. You can still choose End of Day from the menu, but you may find it easier to assign it to a key. Pressing this key will bring up the End of Day wizard.

124

C H A P T E R 1 4
125
POS for Retail is easy to use in transactions with your
customers. This chapter describes how to charge
customers, receive cash or payments by other
methods, give refunds and handle exchanges, and
complete other transactions in POS for Retail.CHAPTER 14
POS for Retail transactions
How do transactions work in POS for Retail?
POS for Retail Transactions
126
General Function Keys
126
Sales Person 135
Entering Products for a Transaction
136
Tendering the Transaction
137
Currency Conversion
142
Gift Certificates (Vouchers)
143
Hold a Transaction
144
Transaction Corrections
147
Discounts 147
Surcharges 150
Layaway 152
Customer Accounts
156
Cash Management
160
Receipt/Invoice Printer Functions
162
Browsing the Web
162

126 CHAPTER 14 POS for Retail transactions
POS for Retail TransactionsPOS for Retail comes with some functions for the Standard PC Keyboard preset. However, you can change your keyboard layout and reassign preset keys.
For detailed instructions on changing keyboard functions, see “POS for Retail Function Key Options” on page 104. However, some options for the functions will be explained in this chapter.
Note: Keep in mind that many function keys can be duplicated on a number of preset keys each with slightly different options.
Entering Values in POS for Retail
When entering a value in POS for Retail, you do not need to use a decimal point. For example if a customer handed over $100.00, your employee could type 10000 and press Enter. This rule applies to all values entered for various functions throughout POS for Retail.
General Function Keys
Department (no default key)
The Department key is used to sell non-inventory or service items. Assign each item to its own Department key. For example, set up services you provide, such as video rentals, as service items in QuickBooks. After you transfer your lists from QuickBooks to POS for Retail, you can assign this service to a Department key.
You can also handle different prices with a Department key: for example, a massage therapist could record a treatment that is shorter than usual by entering the reduced price and pressing the massage Department key.
� Enter the value for the item then press the preset Department function key.
Maximum Amount
The Maximum Amount option limits a sale to a certain amount. This option helps to ensure the operator does not enter an incorrect amount on a sale.

POS for Retail Transactions 127
Use Unit of Measure or scale if available
This option works in conjunction with the Unit of Measure function key or scale for POS for Retail to calculate the price.
1 Type the Unit of Measure and press the Unit of Measure function key or place the item on the scale.
2 Press the preset Open Department function key. POS for Retail checks to see if a Unit of Measure has been typed in and, if not, checks for a weight from a scale. It uses these values, if found, to calculate the price for the customer.
Treat entered amounts as Negative
When this option is checked, POS for Retail will treat any amount that is entered as a negative amount. This function is often used for tracking lottery payouts.
� Enter the value for the payout, then press the preset Open Department function key.

128 CHAPTER 14 POS for Retail transactions
Product Number (default key-Enter)
This function key can be used for many purposes. Press the Product Number function key to view the Product Number/Item list.
You can duplicate function keys but give each slightly different options. Following are examples of different ways you could use this function key.
Use Unit of Measure or scale if available
This option works in conjunction with the Unit of Measure function key or a scale and, if you set one up, a Preset Product. When you select this option, POS for Retail multiplies the price of the product by the Unit of Measure or scale reading.
1 Type the Unit of Measure and press the Unit of Measure function key or place the item on the scale.
2 Press the preset Product Number function key. POS for Retail checks to see if a Unit of Measure has been typed in and, if not, checks for a weight from a scale. It uses these values, if found, to calculate the price for the customer.
Note: The Calculate Unit of Measure option cannot be used in conjunction with this option.
Price Level
This option will allow a product to be sold by the Price Level selected.
� For example, if you set this option up without a Preset Product, when the preset key is pressed, the Product Number list will be displayed. The product you select from this list will be sold at the Price Level set up for this key.

POS for Retail Transactions 129
Preset Product
This option allows you to link a product to the preset key. This is very handy for quick sale items such as a newspaper. Rather than having to search for the item or type the code in, you can simply press the preset key and the newspaper item and price will be entered.
This option can also be used with these options:
� Use Unit of Measure or scale if available.
� Allow amount entry.
� Calculate Unit of Measure.
Allow Amount Entry
Like an Open Department key for a non-inventory product, a preset Open Product key can be setup for an inventory Part. This option will allow the operator to enter the value of the product.
� Type the amount, then press the preset Product Number function key.
Maximum Amount
Selecting the Allow Amount Entry option allows you to set up a maximum sale amount to ensure the operator does not enter incorrect data.
Calculate Unit of Measure
This option only works in conjunction with Allow Amount Entry. It divides the amount entered by the price of the Preset Product to calculate the unit of measure.
The Quantity (*) key can also be used in conjunction with a Unit of Measure and Preset Product sale:
1 Enter the Quantity (for example, 3), then press the Quantity function key (*).
2 Then, depending on the setup of your keys, do one of the following:
� Record the Unit of Measure (by entering the amount and pressing the Unit of Measure function key), then press the preset Product Number function key, or
� Weigh the item then press the preset Product Number function key, or
� Type the amount then press the preset Product Number function key.

130 CHAPTER 14 POS for Retail transactions
Product Price Level
This function allows transactions or individual items within a transaction to be sold at a selected Price Level. The Price Level is determined by what level is selected when this key is set up. What you select from the 'Stay in Level until changed or..' option (see below) determines how long this function stays active.
� Press the Product Price Level function key to activate this option. 'Price Level #' and the number level will be displayed above the User Display.
� Press the Price Level key again to disable the function (even if the option is set to Permanent).
Stay in Level until changed or…
You can choose to have the Price Level turned on for a single sale, until the end of the current transaction, or permanently.
Manager Override Required
If this option is selected, a manager must press the Manager Override function key and enter a password before the Product Price Level key can be used.
Number Entry
The Number Entry key allows for an alphanumeric code, such as a product's serial number, to be entered within a transaction. For example:
� Enter an item on a transaction as usual then enter an alphanumeric entry and press the Number Entry function key; the number is recorded in the transaction and printed on the customer receipt.
Allow Numeric Entry only
If this option is selected, POS for Retail will only allow you to enter numbers.
Minimum Characters
If this option is selected, the alphanumeric entry must be at least this number of characters.
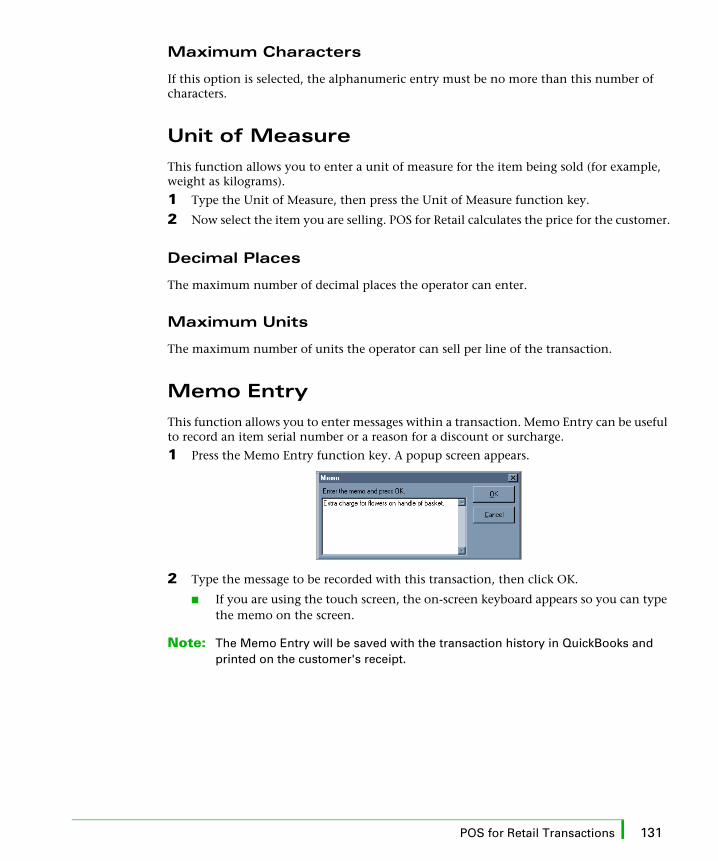
POS for Retail Transactions 131
Maximum Characters
If this option is selected, the alphanumeric entry must be no more than this number of characters.
Unit of Measure
This function allows you to enter a unit of measure for the item being sold (for example, weight as kilograms).
1 Type the Unit of Measure, then press the Unit of Measure function key.
2 Now select the item you are selling. POS for Retail calculates the price for the customer.
Decimal Places
The maximum number of decimal places the operator can enter.
Maximum Units
The maximum number of units the operator can sell per line of the transaction.
Memo Entry
This function allows you to enter messages within a transaction. Memo Entry can be useful to record an item serial number or a reason for a discount or surcharge.
1 Press the Memo Entry function key. A popup screen appears.
2 Type the message to be recorded with this transaction, then click OK.
� If you are using the touch screen, the on-screen keyboard appears so you can type the memo on the screen.
Note: The Memo Entry will be saved with the transaction history in QuickBooks and printed on the customer's receipt.

132 CHAPTER 14 POS for Retail transactions
Training Mode On/Off
Putting POS for Retail into training mode is an excellent way to give your staff a chance to practice transactions without actually affecting the inventory-on-hand figures.
� Press the Training Mode function key to turn Training on. All receipts will have Training Mode printed on the top.
� POS for Retail will stay in Training mode until you press the Training Mode function key again to turn this option off. Check the bottom of the screen to see if the word Training is displayed; if it is, Training Mode is still on.
Note: Training Mode turns off some options off in the Menu bar.
Do not open Cash Drawer
When this option is selected, the cash drawer will not open while POS for Retail is in Training Mode.
Manager Override Required
If this option is selected, a manager must press the Manager Override function key and enter a password before Training Mode can be turned on (or off).
No Sale (default key- F4)
The No Sale function is used to open the cash drawer. Each No Sale transaction is recorded for reporting purposes along with the sales person, date and time.
� Press No Sale to open the cash drawer.
Tax Exempt
This function allows transactions or individual items within a transaction to be sold free of GST or HST and your provincial sales tax (if any). What you select for the 'Apply tax exemption until changed or..' option (see below) will determine how long this function stays active.
� Press the Tax Exempt function key to prevent POS for Retail from calculating GST/HST and PST/QST. POS for Retail indicates that the option is active above the User Display.
� Whether the option is set to Permanent or not, the function can be disabled by pressing the Tax Exempt key again.
Training mode on
Tax exempt active

POS for Retail Transactions 133
Apply tax exemption until changed or…
You can choose to have the tax exemption turned on for a single sale, until the end of the current transaction, or permanently.
Manager Override Required
If this option is selected, a manager must press the Manager Override function key and enter a password before Tax Exempt can be used.
Tax Exempt Return
If an item is returned and was sold as Tax Exempt, ensure you press the Tax Exempt function key before pressing the Refund function key and entering the item.
Lock Terminal
The Lock Terminal key prevents anyone from using POS for Retail without your authorization. After a terminal is locked, you must press the Lock Terminal key again to unlock it. You can also require a password to unlock the terminal.
� Press the Lock Terminal function key if you are leaving the terminal unattended. If an operator tries to use the terminal, they will receive a message on the Information Display. The message is also displayed in the bottom left corner of POS for Retail.
� To unlock the terminal, press the Lock Terminal function key again.
Unlock Password
If this option is selected, a password must be entered to unlock the terminal.
� If the terminal is locked, press the Lock Terminal function key and a password screen will pop up.
� Enter the password and click OK, or click Cancel to exit this screen.

134 CHAPTER 14 POS for Retail transactions
Allow unlock with Sales Person ID
If selected, employees can enter their sales person ID instead of a password.
� If the terminal is locked, press the Lock Terminal function key and a password screen will pop up.
� Enter your Sales Person ID and click OK or click Cancel to exit this screen.
Manager Override
Many functions within POS for Retail can be set up so that they cannot be accessed without pressing the Manager function key and the password first.
� Press the Manager Override function key. A password screen will pop up.
� Enter the Password and click OK or click Cancel to exit this screen.
Note: If you are using the touch screen, the on-screen keyboard appears (see page 157) so you can type the password on the screen.
Send Message
Send Message functions in a similar way to the Email feature. It allows you to type a message and send it to another POS terminal or the POS for Retail Administrator.
1 Press the Send Message function key.
2 Select the terminal(s) to receive the message by clicking their checkboxes.
3 Click or TAB into the Message field, type the message to send.
4 Click OK to Send. The message will appear on the recipient's terminal within five seconds or at the completion of any transaction being processed at the time.
� If you are using the touch screen, the on-screen keyboard appears (see page 157) so you can type the memo on the screen. You can also bring up the on-screen keyboard by double-touching the Message field.

POS for Retail Transactions 135
Sales Person
Sales Person (default key '-' on numpad)
Sales persons can record their identification numbers in a transaction:
� Before beginning the transaction, type the ID to record and press the Sales Person function key.
� If the sales person does not know his or her ID, press the Sales Person function key and select it from the list that appears
.
You can also search for a Sales Person:
� "Search by" always defaults to Search by Name. Type the first couple of letters of the Sales Person's name and the list will highlight the closest match.
� To change the "Search by" criteria, press LEFT ARROW or RIGHT ARROW. The field title is displayed in bold black letters when it is selected and the list is sorted by that criterion.
� To select a Sales Person's ID, highlight it and click OK or press the 'Yes/OK' function key. Otherwise, click Cancel or the 'No'/Cancel' function key to exit this screen without selecting a Sales Person.
� If you are using the touch screen, to search for a salesperson, touch the Search field, then the Keyboard button. The on-screen keyboard appears (see page 157) so you can type the search term on the screen. You can also bring up the on-screen keyboard by double-touching the Search field.
The Sales Person's ID will now be recorded for this transaction and each following one until another ID is entered (unless the option in POS for Retail Administrator-Options-Transactions has been set to 'A Sales Person must be selected at the beginning of each transaction').
For information on which fields to display in this list, see “Lists tab” on page 88.

136 CHAPTER 14 POS for Retail transactions
Entering Products for a Transaction
There are many different methods of entering a product for a transaction:
� Type the Product Number (PLU), then press the Product Number key (by default, Enter).
� If a product has a bar code, scan it.
� If, for some reason, the product's bar code will not scan, type the bar code number and press the Bar Code key (by default, + on the numpad).
� If all else fails, search for the product in the product list. Press the Product Number key (by default, Enter) and select the product from the list.
To search for a product:
� "Search by" always defaults to Search by Description. Type the first couple of letters of the product description and the list will highlight the closest match.
� To change the "Search by" criteria, press LEFT ARROW or RIGHT ARROW. The field title is displayed in bold black letters when it is selected and the list is sorted by that criterion.
� To select a product, highlight it and click OK or press the 'Yes/OK' function key. Otherwise, click Cancel or the 'No'/Cancel' function key to exit this screen without selecting a product.
� If you are using the touch screen, to search for a product, touch the Search field, then the Keyboard button. The on-screen keyboard appears (see page 157) so you can type the search term on the screen. You can also bring up the on-screen keyboard by double-touching the Search field.

POS for Retail Transactions 137
Quantity (default key * on keypad)
POS for Retail will by default always sell one product when a product is entered for a transaction.
� To sell more than one of a product, type the quantity, press the Quantity key, and enter the product.
Tendering the Transaction
Subtotal (default key-Space Bar)� To get a Subtotal of the transaction at any time, press the Subtotal key.

138 CHAPTER 14 POS for Retail transactions
Tender Cash (default key-F12)
Enter the sale, then, if the customer wants to pay in cash:
� Enter the amount of cash the customer gives you, then press the Cash key. POS for Retail calculates the change you should give the customer.
� Or, if the customer gives you exact change, press the Cash key without entering a cash amount. The sale is completed.
Minimum Amount
If a Minimum Amount has been set up, the amount the customer is paying must be at least this amount before the operator can accept this tender.
Tender Credit Card (default key-F11)
Enter the sale, then, if the customer wants to pay by credit card, press the Credit Card key. The sale is completed.
Compulsory Amount Tender
If a Compulsory Amount Tender has been selected, the operator must type the transaction total before pressing the Credit Card key.
Minimum Amount
If a Minimum Amount has been set up, the amount the customer is paying must be at least this amount before the operator can accept this tender.

POS for Retail Transactions 139
Tender Cheque (default key-F9)
Enter the sale, then, if the customer wants to pay by cheque, press the Cheque key. The sale is completed.
Compulsory Amount Tender
If Compulsory Amount Tender has been selected, the operator must type the transaction total before pressing the Cheque key.
Compulsory Cheque Number
If Compulsory Cheque Number has been selected, the operator must enter the cheque number, then press the Cheque Number Entry function key (see below), before pressing the Cheque key.
Allow Cash Change
If Allow Cash Change has been selected, the operator can accept a cheque for more than the total transaction amount and give change in cash.
� Enter the sale, enter the amount of the cheque, then press Cheque. POS for Retail will calculate the change.
Minimum Amount
If a Minimum Amount has been set up, the amount the customer is paying must be at least this amount before the operator can accept this tender.

140 CHAPTER 14 POS for Retail transactions
Cheque Number Entry
This function is used in conjunction with Tender Cheque, allowing you to record a cheque number as part of the transaction. The cheque number is saved with the transaction history in QuickBooks and printed on the customer's receipt.
� Enter the sale, then type the cheque number and press the Cheque Number Entry function key. To complete the sale, press the Cheque function key.
Minimum Digits
If this option is selected, the cheque number must be at least this number of digits.
Maximum Digits
If this option is selected, the cheque number must be no more than this number of digits.

POS for Retail Transactions 141
Split Tender
There are times when a customer wants to pay with more than one tender. For example, the sale may come to $45.00 and the customer wants to pay $20 cash and make up the difference with a cheque.
1 Enter the sale as usual.
2 Type the cash amount (in this example, $20.00) and press the Cash key.
3 If the customer requires change from the cheque, type the cheque amount and press the Cheque key. POS for Retail completes the sale and calculates the change.
If the customer does not require change, the operator can simply press the Cheque key to complete the transaction.
This process applies to any combination of tender types and any number of tender types in one transaction.
Transaction Example (cash sale)1 Type the Sales Person ID and press the Sales Person function key (-) if required.
2 Type '3' then the Quantity function key (*).
3 Scan a product.
4 Press Cash (F12) to complete the sale.
Transaction Example (split tender)1 Type the Sales Person ID and press the Sales Person function key (-) if required.
2 Type a Product Code and press the Product Code function key (Enter).
3 Press the Subtotal function key (Space Bar).
4 Type the amount to be paid by cash and press Cash (F12).
5 Press Credit (F11) to complete the sale.

142 CHAPTER 14 POS for Retail transactions
Currency Conversion
POS for Retail can convert foreign currency to the local currency. Various currencies and their exchange rates are set up in POS for Retail Administrator. In the POS for Retail terminals, you can set up one function key as a Currency Conversion look up key and others with preset currencies.
1 Enter the items in a transaction as usual.
2 Press Subtotal when all items are entered.
3 Type the foreign currency amount.
4 If you have set up a function key for this currency, press it. Otherwise, press the Currency Conversion function key and select the correct currency from the list.
To search for a currency:
� Search by" always defaults to Search by Name. Type the first couple of letters of the currency and the list will highlight the closest match.
� To change the "Search by" criteria, press LEFT ARROW or RIGHT ARROW. The field title is displayed in bold black letters when it is selected and the list is sorted by that criterion.
� To select a currency, highlight it and click OK or press the 'Yes/OK' key. Otherwise, click Cancel or the 'No'/Cancel' \ key to exit this screen without selecting a product.
� If you are using the touch screen, to search for a currency, touch the Search field, then the Keyboard button. The on-screen keyboard appears (see page 157) so you can type the search term on the screen. You can also bring up the on-screen keyboard by double-touching the Search field.
Once you select a currency, POS for Retail displays the converted amount in the local currency.

POS for Retail Transactions 143
Don't allow decimal points
When this option is checked, the system will not allow anything smaller than a whole dollar amount.
Minimum Amount
If a minimum amount has been set up for the Currency Conversion function key, the amount the customer is paying must be at least this amount before the operator can accept this transaction.
Currency Conversion Transaction Example1 Enter the items in the transaction as usual.
2 Press Subtotal.
3 Type the foreign currency amount.
4 Select the currency.
5 Press the Cash key (F12) to complete the transaction.
Currency Conversion Transaction (no purchase required)
1 Type the foreign currency amount.
2 Select the currency.
3 Press the Cash key (F12) to complete the transaction.
Gift Certificates (Vouchers)
Selling a Gift Certificate (Voucher)
POS for Retail automatically creates a non-inventory item for gift certificates when the program is first installed. Before selling a gift certificate; you must set up an open department key with the product 'gift certificate' linked to it.
� To sell a gift certificate, type the value of the certificate, then press the Gift Certificate function key, for example, 'V' (for Voucher).
� Receive the customer's payment as you usually would (for example, press the Cash function key).

144 CHAPTER 14 POS for Retail transactions
Tender Gift Certificate (Voucher)
Use the Tender Gift Certificate key when a customer pays for a sale with a gift certificate. Gift certificates should be set up in QuickBooks as non-inventory items linked to an Other Current Liability account.
1 Enter the sale as usual.
2 Type the amount of the gift certificate and press the Tender Gift Certificate function key.
3 If the customer needs to make up the remainder of the total with another payment, enter the amount of the second payment and press the relevant Tender function key.
Allow Cash Change
If the option 'Allow Cash Change' is selected, POS for Retail calculates the change owing if the amount of a gift certificate is greater than the amount owing.
Hold a Transaction
Hold (default is ~ )
There are times when you will be half way through a transaction when the customer decides to look at one more thing. This function allows you to hold or suspend a transaction rather than cancel it and have to re-enter it when the customer is ready.
� Press the Hold function key.
Note: Only one transaction can be on Hold at a time on each POS for Retail terminal.
Restore a Transaction on Hold� To restore a transaction on hold, press the Hold function key again and continue the
transaction as usual.
� If a transaction is already on hold and an operator tries to put another transaction on hold, POS for Retail will put the new transaction on hold and make the first transaction active so it can be completed.
Note: Your stock on hand is never decremented until the transaction is completed, regardless of whether a transaction is on hold for an item or not.
Held transactions are kept in memory until an operator restores it, even after completing an End of Day process. However, a transaction on hold must be restored before POS for Retail can be closed.

POS for Retail Transactions 145
Transaction Corrections
Correct Last Entry (default is F5)
If an item is entered into a transaction by mistake or the customer changes his or her mind, press the Correct Last Entry function key to void the last item entered.
The removed item is displayed as a negative value in the transaction and prints the same way on the customer's receipt.
Manager Override Required
If this option is selected, a manager must press the Manager Override function key and enter a password before the Correct Last Entry key can be used.
Correct Entry (default key- F6)
If an item is entered into a transaction by mistake or the customer changes his or her mind, press the Correct Entry function key to void any item entered.
� Press the Correct Entry function key, then enter the item's product number, scan the item, enter the item's bar code number, or display the product list and select the item from it. POS for Retail then voids it from the transaction.
The removed item is displayed as a negative value in the transaction and prints the same way on the customer's receipt.
Manager Override Required
If this option is selected, a manager must press the Manager Override function key and enter a password before the Correct Entry key can be used.

146 CHAPTER 14 POS for Retail transactions
Refund (default is F7)
If a customer returns items, perform a Refund or Refund/Exchange.
1 Press the Refund function key, then enter the item's product number, scan the item, enter the item's bar code number, or display the product list and select the item from it.
2 Press the Tender function key for the method you'll use to refund the customer (for example, Tender Cash).
Manager Override Required
If this option is selected, a manager must press the Manager Override function key and enter a password before the Refund key can be used.
Cash Out Reversal
Press the Refund function key, then type the cash out amount to be reversed.
Refund/Exchange1 Press the Refund function key, then enter the item's product number, scan the item,
enter the item's bar code number, or display the product list and select the item from it.
2 Enter the items the customer wants in exchange or wants to purchase.
3 Press the Subtotal function key and POS for Retail will calculate who owes whom. If the subtotal is a negative amount, the operator must refund the amount to the customer. If it is a positive amount, the customer must pay the operator the outstanding amount.
4 Press the Tender function key for the method you'll use to refund the customer or the customer is using to pay (for example, Tender Cash).

POS for Retail Transactions 147
Cancel (default key-F8)
At any time while entering a transaction, press Cancel to void the whole sale.
Manager Override Required
If this option is selected, a manager must press the Manager Override function key and enter a password before the Cancel key can be used.
Discounts
Dollar amount discounts (default key - Page Up)
On Items
Enter the item as usual, then type the amount of the discount to apply to this item and press the Discount $ function key.
Preset Dollar
You can configure different Discount $ function keys with set dollar amounts.
� In this case, enter the item as usual and press the appropriate Discount $ function key to apply the discount to it.

148 CHAPTER 14 POS for Retail transactions
Manager Override Required
If this option is selected, a manager must press the Manager Override function key and enter a password before the Discount $ key can be used.
Discount Unit Price
This option applies the discount per unit you are selling. For example, if you sell three items at $5.00 each, but apply a $1.00 Discount Unit Price to the sale, the total discount would be $3.00 and the sale amount would be $12.00.
On the transaction total
This option applies the discount to the total of the transaction rather than to a particular item.
Enter the item(s) for the sale as usual, press Subtotal (space bar), then type the discount amount to apply to the sale and press the Discount $ function key (or else press the appropriate preset Discount $ key).
Don't allow discount on subtotal
This option disables subtotal discounts. A discount can still be performed on an individual item, but an attempt to discount a subtotal amount will result in an error message.
Percentage discounts (default key- Page Down)
On items
Enter the item as usual, then type the percentage discount to apply to this item and press the Discount % function key.
Preset Percentage
You can configure different Discount % function keys with set percentage amounts.
·In this case, enter the item as usual and press the appropriate Discount % function key to apply the discount to it.
Manager Override Required
If this option is selected, a manager must press the Manager Override function key and enter a password before the Discount % key can be used.

POS for Retail Transactions 149
On the transaction total
This option applies a discount to the total of the transaction rather than to a particular item.
Enter the item(s) for the sale as usual, press Subtotal (space bar), then type the discount percentage to apply to the sale and press the Discount % function key (or else press the appropriate preset Discount % key).
Don't allow discount on subtotal
Using this option disables subtotal discounts. A discount can still be performed on an individual item, but an attempt to discount a subtotal amount will result in an error message.
Item Discount % Example1 Enter the item in the transaction.
2 Type 10 then press the Discount % key.
3 Complete the sale as usual.
Total Discount % Example1 Enter the items in the transaction as usual.
2 Press Subtotal.
3 Type 10 then press the Discount % key.
4 Complete the sale as usual.
Product Price Override
The Product Price Override key is used to override the price of an item. This function allows you to sell damaged goods or floor stock at a reduced rate without having to apply discounts.
1 Type the new price for the item, then press the Product Price Override function key.
2 Enter the item whose price you are overriding.
3 Complete the sale as usual.

150 CHAPTER 14 POS for Retail transactions
Maximum Amount
A Maximum Amount helps to ensure the operator does not enter an incorrect amount and controls how much discount is applied.
Manager Override Required
If this option is selected, a manager must press the Manager Override function key and enter a password before the Price Override key can be used.
Surcharges
Dollar surcharge
The Dollar Surcharge key allows you to enter a dollar-value surcharge on a transaction, for example, for a delivery fee. POS for Retail uses an 'Other Charge' item in QuickBooks for dollar surcharges.
� Type the dollar amount of the surcharge, then press the Dollar Surcharge function key.
Preset Amount
You can configure different Dollar Surcharge function keys with set amounts.
Allow amounts greater than the item price or subtotal
When this option is selected, POS for Retail allows the operator to enter a surcharge that is greater than the price of the item or the subtotal.
Surcharge unit price
This option applies the surcharge per unit you are selling. For example, if you sell three items at $5.00 each, but apply a $1.00 Surcharge Unit Price to the sale, the total surchage would be $3.00 and the sale amount would be $18.00.

POS for Retail Transactions 151
Don't allow surcharge on subtotal
This option disables surcharges on subtotal amounts. A discount can still be performed on an individual item, but an attempt to surcharge a subtotal amount will result in an error message.
Percentage surcharge
The Percentage Surcharge key allows you to enter a percentage surcharge on a transaction, for example, for postage and handling. The percentage surcharge can be applied either to a single item or the entire transaction.
� Type the percentage amount of the surcharge, then press the Percentage Surcharge function key.
Preset Percentage
You can configure different Percentage Surcharge function keys with set percentages.
Don't allow surcharge on subtotal
This option disables surcharges on subtotal amounts. A discount can still be performed on an individual item, but an attempt to surcharge a subtotal amount will result in an error message.

152 CHAPTER 14 POS for Retail transactions
Layaway
Layaway account
The Layaway Account key indicates that the transaction to follow is a layaway. It has several different functions: to display a list of all layaway customers, add new or edit existing layaway customers, or select a customer's current layaway for a payment.
� Press the Layaway Account function key to select or create a layaway customer. If the customer has several layaway accounts, you can then select the account you need.
You can enter the items you are selling either before or after selecting a layaway customer.
Selecting a layaway customer
To search for a layaway customer:
� "Search by" always defaults to Search by Name. Type the first couple of letters of the customer's name and the list will highlight the closest match.
� To change the "Search by" criteria, press LEFT ARROW or RIGHT ARROW. The field title is displayed in bold black letters when it is selected and the list is sorted by that criterion.
� To select a customer account, highlight it and click OK or press the 'Yes/OK' key. Otherwise, click Cancel or the 'No'/Cancel' \ key to exit this screen without selecting a product.
� If you are using the touch screen, to search for a customer account, touch the Search field, then the Keyboard button. The on-screen keyboard appears (see page 157) so you can type the search term on the screen. You can also bring up the on-screen keyboard by double-touching the Search field.

POS for Retail Transactions 153
Selecting a layaway account for a specific customer
If a customer already has one or more layaway accounts, POS for Retail asks you to choose an existing account for him or her or create a new account.
� To select an existing account, choose it from the list and click OK. To create a new account, click New.
Allow New customer entry
If this option is selected, an operator can create a new customer in the layaway customer list.
1 Press the Layaway Account function key.
2 Click the New button on the right of the layaway customer List.
3 Enter the information for the new customer.
� If you are using the touch screen, touch the field into which you want to enter details, then touch the Keyboard button. The on-screen keyboard appears (see page 157) so you can type the information on the screen. You can also bring up the on-screen keyboard by double-touching the field into which you want to enter details.
4 Click OK.
Allow Edit Existing Customer
If this option is selected, an operator can edit a customer in the layaway customer list.
1 Press the Layaway Account function key.
2 Highlight the customer you want and click Edit on the right of the layaway customer list.
3 Edit the customer's information as needed.
� If you are using the touch screen, touch the field you want to edit, then touch the Keyboard button. The on-screen keyboard appears (see page 157) so you can change the information on the screen. You can also bring up the on-screen keyboard by double-touching the field you want to edit.
4 Click OK.

154 CHAPTER 14 POS for Retail transactions
Tender layaway
This function finalizes the layaway transaction, charging the amount of the sale to the customer's layaway account.
1 If the customer is putting a deposit down, enter this amount first, then select the method they are using to pay.
2 To assign the remaining amount to the customer's layaway account, press the Tender Layaway function key, which completes the transaction.
Compulsory Amount Tendered
If this option has been selected, the operator must enter the amount to be put on the customer's layaway account before pressing the Tender Layaway function key.
Minimum Amount
If a minimum amount has been set up, the transaction total must be at least this amount before the operator can accept this tender.
Layaway account payment
This option allows the operator to enter an amount to be applied to a layaway account.
1 Select the Layaway Customer.
2 Select the customer's layaway account to receive the payment.
3 Enter the amount the customer is paying.
4 Press the Layaway Account Payment function key.
5 Press the appropriate tender type key for the customer's payment to complete the transaction (for example, F12-Cash).

POS for Retail Transactions 155
Cancelling a layaway
Cancelling a layaway needs to be done in two stages: refund the layaway items (that is, return them to your inventory) and refund the customer's payments, if any.
Refund the layaway items1 To cancel a customer layaway, press the Layaway Account function key and select the
customer.
2 Select the customer's layaway account.
3 Press the Refund function key, then select the item on layaway to be refunded.
4 Press the Tender Layaway function key to complete the transaction.
Refund the customer's layaway payments (if any)1 To refund a customer's layaway payments, press the Layaway Account function key and
select the customer.
2 Select the customer's layaway account.
3 Press the Refund function key and enter the payment amount to be refunded.
4 Press the Layaway Account Payment function key.
5 Press the appropriate tender type key for the refund to the customer to complete the transaction (for example, F12-Cash).

156 CHAPTER 14 POS for Retail transactions
Customer Accounts
Operators can set up customer accounts on POS for Retail which can then be managed in QuickBooks. Three related function keys handle customer accounts in POS for Retail: one to select a Customer Account, another to charge a transaction to an account, and a third used when customers make payments on an account.
Customer Account (default key-Insert)
You can select a customer's account before you enter a sale if you know it will be charged, or you can enter a sale first and select the customer's account later, when the customer asks for the sale to be charged. To select a customer account:
� If you know the customer's ID number (or the customer knows it), type it, then press the Customer Account function key, or
� Press the Customer Account function key and select the customer from the list.
� "Search by" always defaults to Search by Customer. Type the first couple of letters of the customer's last name and the list will highlight the closest match.
� To change the "Search by" criteria, press LEFT ARROW or RIGHT ARROW. The field title is displayed in bold black letters when it is selected and the list is sorted by that criterion.
� To select a customer's account, highlight it and click OK or press the 'Yes/OK' function key. Otherwise, click Cancel or the 'No/Cancel' function key to exit this screen without selecting a Sales Person.
� If you are using the touch screen, to search for a customer's account, touch the Search field, then the Keyboard button. The on-screen keyboard appears (see page 157) so you can type the search term on the screen. You can also bring up the on-screen keyboard by double-touching the Search field.
For information on which fields to display in this list, see “Lists tab” on page 88.

POS for Retail Transactions 157
Use Customer's Percentage
If a percentage (discount or surcharge) has been set up for this customer in his or her profile in QuickBooks, select this option in POS for Retail to make the percentage active.
Note: To make the customer's discount or surcharge take effect for a transaction, you must select his or her customer account before entering any items.
Allow New Entry
If this option is selected, an operator can create a new customer in the Customer Account list in POS for Retail. You can then transfer this customer to QuickBooks.
1 Press the Customer Account function key.
2 Click New.
3 Enter the customer information in the fields provided.
� If you are using the touch screen, touch the field you want to use, then touch the Keyboard button. The on-screen keyboard appears so you can "type" the infor-mation directly on the screen. You can also bring up the on-screen keyboard by double-touching the field you want to use.
� There are two different on-screen keyboards. If a field requires both letters and numbers, you will see a standard QWERTY keyboard (left, below). If a field requires only numbers, you will see a number pad instead (right).
Note: If an error occurs, the touch screen is temporarily hidden to display an error message (see page 157). To continue, touch the 'Clear' button.
If the touch screen is active, customer account information will not appear in the Transaction display.
4 When you finish entering the customer's information, click OK.

158 CHAPTER 14 POS for Retail transactions
Allow Edit Existing Customer1 If this option is checked an operator can edit a customer's details in POS for Retail.
2 Press the Customer Account function key.
3 Highlight the customer to change and click Edit.
4 Change the customer information in the fields as needed.
� If you are using the touch screen, touch the field you want to edit, then touch the Keyboard button. The on-screen keyboard appears so you can "type" the new infor-mation directly on the screen. You can also bring up the on-screen keyboard by double-touching the field you want to edit.
5 When you finish changing the customer's information, click OK.
Tender Account Charge (default key-Home)
Once the items for the sale have been entered and the customer account selected, press the Tender Account Charge function key to complete the transaction.
� If the customer is charging the entire amount to his or her account, press the Tender Account Charge function key.
� If the customer prefers to pay for part of the transaction and charge the amount remaining, you can split the tender and the charge:
� Enter the amount the customer is paying and press the appropriate Tender function key (for example, Cash).
� Press the Tender Account Charge function key to charge the remaining amount to the customer's account.
Compulsory Amount Tender
If this option has been selected, the operator must enter the amount to be put on the customer's account before pressing the Tender Account Charge function key.
Minimum Amount
If a minimum amount has been set up, the transaction total must be at least this amount before the operator can accept this tender.
Account Payment (default key-End)
This function key is used to record a customer's payment on his or her account.

POS for Retail Transactions 159
Customer Account Charge Example� Press the Customer Account key, then select the customer from the list.
� Enter the sale items for this transaction as usual.
� Press the Account Charge key to complete the sale.
Account Payment Example� Press the Customer Account key, then select the customer from the list.
� Type the amount of payment, then press the Account Payment key.
� Press the appropriate Tender function key for the customer's method of payment (for example, Cash).
� If the payment is a split tender, enter the amount of the second payment, then press the appropriate Tender function key to complete the sale.
Account Payments and Accrual Based Accounting
If you use accrual-based accounting, you do not need to take any additional steps to apply payments to customer accounts. With this accounting method, QuickBooks does the bookkeeping in the background and your profit-and-loss statements are calculated correctly.
Account Payments and Cash Based Accounting
If you use cash-based accounting, you must take an additional step after receiving an account payment from a customer.
In POS for Retail, when a customer makes a payment, his or her account balance is updated immediately. When the transaction is posted to QuickBooks, the payment is recorded as a credit memo and the customer's total balance owing is updated.
However, if you use cash-based accounting, there is no connection in QuickBooks between the customer's payment and the specific items he or she purchased (that is, the invoice). Until this connection is created, your profit-and-loss statement will not show the correct amounts.
To connect the payment and the invoice, you must manually apply the credit memo to its invoice. (You do not have to do this as soon as you receive a payment from a customer. However, you should do it on a regular basis, such as once per week.)

160 CHAPTER 14 POS for Retail transactions
To apply a customer's payment to his or her invoice in QuickBooks:1 Select the Customers navigator.
2 Click Receive Payments.
3 From the drop-down list, select a customer who has made account payments.
4 Select the invoice you want to apply the customer's credit(s) to.
5 Click Set Credits.
6 In the Discount and Credits window, select each credit that you want to apply to the invoice.
� As you select each credit, you'll see a change in the Amount Due, Credits Used, and Payment lines of the Invoice information section at the top of the window.
7 (Optional) If you only want to use part of a particular credit, change its amount in the Amt. To Use column.
8 Click Done.
9 Repeat these steps for every customer who has made account payments.
10 Click Save and Close to leave this window.
Cash Management
Float In (default key - 1)
This function allows you to record the daily Float In amount for each cash drawer.
1 Enter the amount of the float (for example, for $100.00, type 10000), then press ENTER.
2 Press the Float In function key.
Manager Override Required
If this option is selected, a manager must press the Manager Override function key and enter a password before the Float In function key can be used.
Float Out (default key - 2)
This function allows you to record the daily Float Out amount for each cash drawer.
1 Enter the amount of the float (for example, for $100.00, type 10000), then press ENTER.
2 Press the Float Out function key.
Manager Override Required
If this option is selected, a manager must press the Manager Override function key and enter a password before the Float Out key can be used.

POS for Retail Transactions 161
Paid Out (default key - 3)
This function allows you to record amounts paid out for miscellaneous expenses.
1 Enter the amount of the pay out, then press ENTER.
2 Press the Paid Out function key.
Manager Override Required
If this option is selected, a manager must press the Manager Override function key and enter a password before the Paid Out key can be used.
Cash Clearance
The Cash Clearance function key is used to record money removed from the cash drawer for deposit into a safe or the bank. This function is also used if the cash limit warning is displayed (which you set up in POS for Retail Administrator).
1 Enter the amount to be removed from the cash drawer, then press ENTER.
2 Press the Cash Clearance function key.
Note: If you use the "Reconcile the Cash Drawer" option in the POS for Retail Adminis-trator, the amount you remove from the cash drawer with the "Cash Clearance" function is deducted from the cash-in-drawer total to be reconciled at End of Day.
Manager Override Required
If this option is selected, a manager must press the Manager Override function key and enter a password before the Cash Clearance key can be used.

162 CHAPTER 14 POS for Retail transactions
Receipt/Invoice Printer Functions
Receipt On/Off (default key - F3)
This function key turns the receipt printer off or on.
� ·Press Receipt On/Off before the next transaction. POS for Retail leaves the printer in this mode until you press Receipt On/Off again.
If you are not sure what mode you are in, check the status bar:
Print Receipt
The Print Receipt key is used to print a receipt when the receipt printer is turned off or the customer requires a duplicate receipt.
� Press the Print Receipt function key to (re)print the last transaction.
Receipt Line Feed
The Receipt Line Feed key advances the paper in the receipt printer one line at a time to allow you to feed in new rolls of paper.
� Press the Receipt Line Feed function key to feed the paper.
Print Invoice
If the "Enforce Invoice Print" option is turned off for your Tender function keys, use this key to print an invoice for the current transaction.
Duplicate invoices can also be printed at the customer's request by pressing this key.
� Press the Print Invoice function key to reprint the last transaction.
Browsing the Web
POS for Retail has a built in web browser. Web pages are displayed within the space normally reserved for the POS for Retail Information Display but can be expanded to occupy the space used by the Transaction Display as well.
Note: The POS for Retail web browser does not provide the operator with complete access to the internet. Access is restricted to a list of 'pre-approved' sites, which you must set up in the POS for Retail Administrator. For more information, see “Web tab” on page 58.

POS for Retail Transactions 163
How to Activate the Web Browser
Press the keyboard key assigned to the web browser function. The home page for the browser appears. Press the key again to close the browser.
Note: You cannot use the web browser until it is assigned to a function key. For more information, see “Web Browser (no default)” on page 112. All other POS for Retail functions are 'locked' while the browser is open.
Using the Web Browser
The POS for Retail Web Browser works the same way as Internet Explorer. For more information, click the Start button on the Windows Taskbar, select Help, and search for Internet Explorer.

164

C H A P T E R 1 5
165
In this chapter, you’ll learn what you need to do at
the end of each business day to record your daily
take, reconcile your cash drawers, and record this
information in QuickBooks. CHAPTER 15
End of Day procedure
How do Iclose down at the
end of the day?
End Of Day 166

166 CHAPTER 15 End of day procedure
End Of DayEvery day, at the close of business, you should run the end-of-day process in POS for Retail. This process generate sales reports and creates a file of transactions to be posted to QuickBooks (which you do from the POS for Retail Administrator). QuickBooks uses the information in the file to reduce your stock on hand, create the sales history for your inventory, and update customer account balances and your chart of accounts.
You can also use the end-of-day process to generate sales reports without posting the information to QuickBooks.
To customize your end-of-day procedures, use the Reports tab in the Options window in the POS for Retail Administrator (under the Tools menu). The following instructions are based on the standard end-of-day process with explanations for some optional choices.
� To start the end-of-day process, in POS for Retail, select Process End-of-Day from the Tools menu or press the keyboard key that has been assigned to this function.
Note: If you have set the "Don't show" option in the POS for Retail Administrator for a section of the wizard, that section will not appear as you work through your end-of-day process.
1 By default, the wizard displays a welcome screen. Read the information on the screen and click Next to go on.
� You can select the "Don't show this page in the future" checkbox if you don't want this screen to appear when you start the wizard in the future.

End Of Day 167
2 Select each report you want POS for Retail to generate (or click Select All to see all the reports), then click Next to go on.
� Select "Open the Cash Drawer" if you remove cash from the cash drawer as part of your end-of-day process.
Note: If the "Balance Report must be selected on RESET sales information" option has been selected in the POS for Retail Administrator and you are actually resetting the sales information (see next step), you must select the Balance Report here before going on.
3 Choose whether to generate reports only or generate reports and also prepare a file of transactions for the POS for Retail Administrator to post to QuickBooks. Whether you reset the sales information in this screen or not determines whether POS for Retail generates the file of transactions.
� Do not reset the Sales Information: Select this option if you only want to print sales reports.

168 CHAPTER 15 End of day procedure
� Reset the Sales Information: Select this option to print sales reports and create a file of transactions for the POS for Retail Administrator to post to QuickBooks.
- Reset the Transaction Number: Select this option to reset the transaction numbers back to one after POS for Retail generates the transaction file.
When you have made your selection, click Next.
4 If you selected in "Reconcile the Cash Drawer" option in POS for Retail Administrator, enter the information from the cash drawer into the wizard.
Note: Only the Tender types you selected to reconcile appear on this screen.
� Click Open the Cash Drawer to open the Cash Drawer.
� For each tender type, enter the total from the cash drawer in the field. You should not include any cash cleared with the Cash Clearance function key throughout the day in the cash total here.
Note: If any of the tender types do not balance with the amount POS for Retail recorded, POS for Retail gives you the choice of retrying or continuing. If you continue without balancing, POS for Retail prints the variance on the balance report.
When you are finished, click Next.
5 Choose which printer to use to print your reports. You can also choose to not print reports (unless the "Reports must be printed" option is selected in the POS for Retail Administrator).
� If you print the reports on your receipt printer, you can also choose to cut the paper between each report (if your printer has a paper cutter).
� If you print the reports on your Windows printer, choose the printer you want from the drop-down list.
When you have made your selection, click Next to complete the wizard.

C H A P T E R 1 6
169
This chapter helps you troubleshoot some common
problems. If you are not able to resolve your issue
with these steps, contact technical support. CHAPTER 16
Fixing problems
Solvingproblems asyou work in
POS for Retail
Troubleshooting 170
What do I do when…
170

170 CHAPTER 16 Fixing problems
TroubleshootingThe following is a guide to some of the simple things you can do before you call Intuit Canada or your hardware supplier for help. If you do call for technical support, make sure that you have this information handy when you make the call:
� The type of PC you have and its operating system (for example, Compaq, Pentium II, with Windows 98).
� The make and model of your peripheral devices (for example, POS keyboard, Jarltech 8011T).
� Any error messages that you have seen on the screen. Copy these down exactly so that you can tell the technical support specialist the error number and details.
For technical support telephone numbers, see “Contacting Intuit” on page 18.
Note: Intuit Canada does not provide support for peripheral devices, only for POS for Retail, POS for Retail Administrator, and QuickBooks. If your peripheral device is not working correctly, contact your supplier first.
What do I do when…
The screen is blank
Check that:
� The light is showing on the front of the monitor, just below the screen.
� The cords are all plugged tightly into the monitor, the computer, and the power outlet, and that the power outlet is live.
� The power is turned on
� The computer is turned on.
The computer isn't working
Check that
� The computer is turned on
� The cords are plugged tightly into both the computer and the power outlet, and the power outlet is live.
� The monitor is on.
� All the leads are firmly plugged into the sockets at the back of the PC.
The keyboard doesn't function� Check that the keyboard has been plugged into the correct port and that it is firmly
plugged in.
� If you have a standard keyboard and your number pad is not working, check that the Num Lock light is on. If not, press the Num Lock key.

Troubleshooting 171
The mouse doesn't work� Check that it is plugged in to the correct port.
� Unscrew the plate at the bottom of the mouse and remove the small rubber ball. Inspect the plastic wheels inside for grime and lint. Clean them if they are dirty, then replace the ball and plate and try again.
The scanner isn't working� Check the connection at the PC.
� Check that the scanner has power.
� Check the set-up in POS for Retail.
POS for Retail icons disappear� Double-click My Computer.
� Double-click the C: drive.
� Double-click the Program Files folder.
� Double-click the POS for Retail folder.
� Right-click Send To…, then select Desktop (as shortcut).
POS for Retail doesn't start� Double-click My Computer.
� Double-click the C: drive.
� Double-click the Program Files folder.
� Double-click the QuickBooks POS for Retail folder.
� Double-click the QuickBooks POS for Retail icon.
� POS for Retail should start.
Everything 'freezes'� Hold down the Control, Alt, and Delete keys at the same time. If the Task Manager
appears, close any programs that are not related to POS for Retail, POS for Retail Admin-istrator, or QuickBooks. (Note: you will lose any work you have not saved in programs you close!)
� There is usually nothing else that you can do but turn your computer off, wait a few moments, and turn it back on.
� As Windows starts up, it scans your disk for any errors. Follow the instructions on the screen.
I forgot to complete end of day functions� You can complete them the following morning. If in doubt, generate use the End of
Day wizard to create sales reports (without resetting the sales information) and complete end of day at the end of THIS day.

172

C H A P T E R 1 7
173
This appendix lists all the hardware devices you can
use with POS for Retail. CHAPTER 17
Supported POS devices
Whathardware can I
use withPOS for Retail?
Index of Supported POS Devices
174
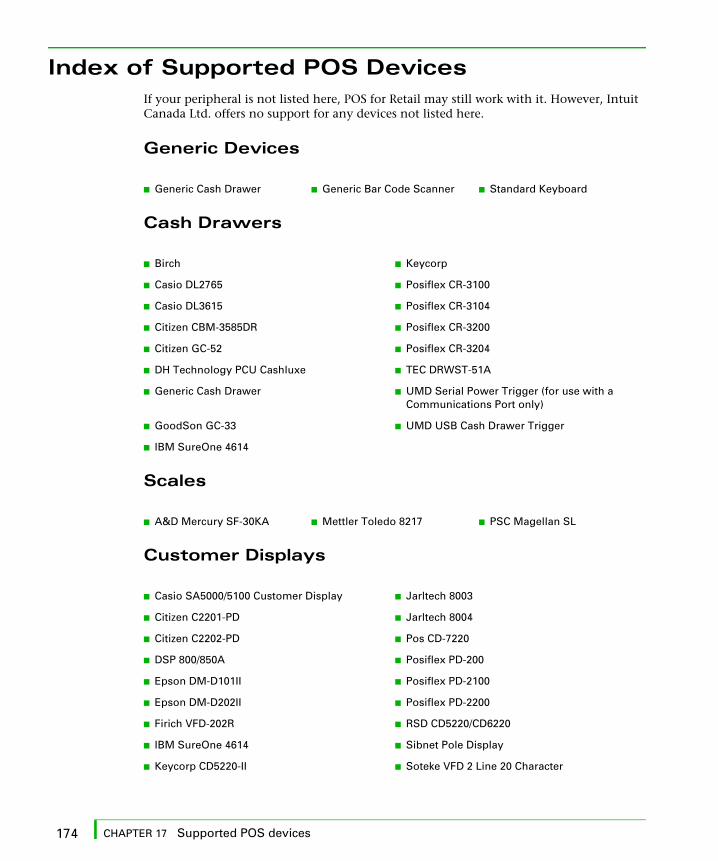
174 CHAPTER 17 Supported POS devices
Index of Supported POS DevicesIf your peripheral is not listed here, POS for Retail may still work with it. However, Intuit Canada Ltd. offers no support for any devices not listed here.
Generic Devices
Cash Drawers
Scales
Customer Displays
� Generic Cash Drawer � Generic Bar Code Scanner � Standard Keyboard
� Birch � Keycorp
� Casio DL2765 � Posiflex CR-3100
� Casio DL3615 � Posiflex CR-3104
� Citizen CBM-3585DR � Posiflex CR-3200
� Citizen GC-52 � Posiflex CR-3204
� DH Technology PCU Cashluxe � TEC DRWST-51A
� Generic Cash Drawer � UMD Serial Power Trigger (for use with a Communications Port only)
� GoodSon GC-33 � UMD USB Cash Drawer Trigger
� IBM SureOne 4614
� A&D Mercury SF-30KA � Mettler Toledo 8217 � PSC Magellan SL
� Casio SA5000/5100 Customer Display � Jarltech 8003
� Citizen C2201-PD � Jarltech 8004
� Citizen C2202-PD � Pos CD-7220
� DSP 800/850A � Posiflex PD-200
� Epson DM-D101II � Posiflex PD-2100
� Epson DM-D202II � Posiflex PD-2200
� Firich VFD-202R � RSD CD5220/CD6220
� IBM SureOne 4614 � Sibnet Pole Display
� Keycorp CD5220-II � Soteke VFD 2 Line 20 Character

Index of Supported POS Devices 175
Scanners
� ASP Bar code Zapper CCD Scanner � PSC QuickScan 6000 Laser Scanner
� Cino FuzzyScan FBC-3620 CCD Scanner � PSC VS1000 Laser Scanner
� Cino FuzzyScan FBC-3660 CCD Scanner � PSC VS1200 Laser Scanner
� Cipher Lab 1021 CCD Scanner � PSC VS800 Laser Scanner
� CompletePOS CCD Scanner � Scantech Polaris P-7010 Scanner
� Data Logic DLC7000 CCD Scanner � Sibnet 80mm CCD Scanner
� Data Logic DLL5000 Laser Scanner � Sobartek CCD Scanner
� Generic Bar code Scanner � Symbol LS2104 Laser Scanner
� Jarltech 2070C CCD Scanner � Symbol LS3203 Laser Scanner
� Jarltech Series 200x CCD Scanner � Symbol LS3603 Laser Scanner
� Keycorp CCD Scanner � Symbol LS4004 Laser Scanner
� Caner Krieg Tysso CCD-84 Scanner � Symbol LS5700/5800 Laser Scanner
� MetroLogic MS-6220 Laser Scanner � Symbol LS6004 Laser Scanner
� MetroLogic MS-951 Laser Scanner � Symbol LS9100 Laser Scanner
� Opticon ELT/XPT 5000 CCD Scanner � Symbol LT1804 Laser Scanner
� Opticon OPL 6735 Laser Scanner � Welch Allyn Imageteam 3800 Laser Scanner
� Opticon XPT 3125 CCD Scanner � Welch Allyn Scanteam 3205 Series CCD Scanner
� Posiflex CD-2800 CCD Scanner � Welch Allyn Scanteam 3215 Series CCD Scanner
� Posiflex LS-6000 Laser Scanner � Welch Allyn Valueteam 3060/3080 CCD Scanner
� PSC Duet Laser Scanner � Zebex Alpha 30 Omni-directional scanner
� PSC HS1250 Laser Scanner � Zebex Alpha Series scanner (alpha 50,60,70)
� PSC Magellan SL Laser Scanner � Zebex ZB 2200 AM CCD Scanner
� PSC QuickScan 1000 Laser Scanner

176 CHAPTER 17 Supported POS devices
Receipt Printers
Standard Keyboards
� Axiohm A470 � Epson TM-T85
� Axiohm A711 � Epson TM-T88
� Axiohm A714 � Epson TM-U200D
� Axiohm A715 � Epson TM-U210B
� Axiohm A793 � Epson TM-U300A/300B
� Axiohm A794 � Epson TM-U300D
� Casio SA5000 Receipt Printer � IBM SureOne Thermal
� Casio SA5100 Receipt Printer � Keycorp/PeriPheron Receipt Master 2000
� Citizen CBM1000 � Posiflex PP-1200
� Citizen CBM230/231 � Posiflex PP-3000
� Citizen CBM-253 � Posiflex PP-4000
� Citizen iDP3210 � SamSung SRP-350
� Citizen iDP3221 � Star TSP200
� Citizen iDP3420/3421/3423 � Star SP216FD42
� Citizen iDP3540/3541 � Star SP312FD40/342FD40
� Citizen iDP3550/3551 � Star SP317FD40/347FD40
� Citizen iDP460 � Star TSP550/552
� Custom DPT-282
� Casio SA5000 � Posiflex KB-3200 (PC Keyboard Section)
� DigiPos QM128A & KM032A (PC Keyboard Section)
� Standard 101
� DigiPos QM128A (PC Keyboard Section) � TiPro QM128A & KM032A (PC Keyboard Section)
� IBM SureOne 4614 Keyboard � TiPro QM128A PC (PC Keyboard Section)
� Keycorp K33 KeyStation � UMDM264 K01 PC
� KSI Wombat Jr. KSI-1292 PC (PC Keyboard Section)

Index of Supported POS Devices 177
POS Keyboards
� DigiPos KM064A � Posiflex3100
� DigiPos KM064A/KB064A & KM032A/KB032A � RSD ProKey 128
� DigiPos KM096A � TiPro KM064A
� DigiPos KM096A/KB096A & KM032A/KB032A � TiPro KM064A/KB064A & KM032A/KB032A
� DigiPos KM128A � TiPro KM096A
� DigiPos KM128A/KB128A & KM032A/KB032A � TiPro KM096A/KB096A & KM032A/KB032A
� DigiPos QM128A � TiPro KM128A
� DigiPos QM128A & KM032A (POS Keyboard Section)
� TiPro KM128A/KB128A & KM032A/KB032A
� Jarltech 8011M � TiPro QM128A
� Jarltech 8011T � TiPro QM128A & KM032A (POS Keyboard Section)
� KSI Wombat Jr. KSI-1292 � UMDM264K00
� OmniKey OMC3200 � UMDM264K01
� Omron KD75-02 � UMDM264S
� Posiflex KB-3200 � Posiflex3100
� Posiflex2100 � RSD ProKey 128
� Posiflex3000

178

Index 179
Numbers3D graph, 76
Aaccount payment key, 122
accountscustomer, 156editing, 153, 158layaway customers, 153layaway payments, 154
actual sales, 75
addingcustomers in QuickBooks Pro, 37passwords, 59
adjustinginventory in QuickBooks Pro, 25, 30prices, 63
administrator functions, 62
Bback orders, tracking in QuickBooks, 24
backspace, 104
balancing a till, 166
bar codemanual entry, 116number function, 116
below cost warning, 63
browsing the Web, 162
Ccancel function key, 147
cancel/no function, 104
cancellinga transaction, 147current transaction function, 119
captions for, in transactions tab, 53
cashclearance function, 108clearance function key, 161clearing from a cash drawer, 161float in function, 106float out function, 107floats, 160foreign currency, 142out reversal function key, 146paid out function, 107payment key, 120reconciling, 168recording miscellaneous expenses, 161
cash drawerlocking, 133opening, 132options, 100reconciling, 168
cashing out a till, 166
cc, 75
changinginventory prices in QuickBooks Pro, 29passwords, 59prices, 63prices in QuickBooks Pro, 29value in QuickBooks Pro, 31
chart of accounts data, 77
chart options, 76
Index

180 Index
cheque numberentry function, 109entry function key, 140
cheque payment key, 121
clear function, 104
closing a till, 166
colour, label, 68
column captions, printing, 99
comments (memo entry), 109
components, label, 67, 68
compress database, 79
condense database, 79
configuration, POS for Retail, 86
consolidatedgraph data, 75transactions, 49
correctentry function, 119entry function key, 145last entry function, 118last entry function key, 145
correcting a transaction, 145
coupon payment key, 122
creatingnon-inventory parts in QuickBooks Pro, 27
credit card payment key, 121
currencyconversion function, 112conversion in currency tab, 53conversion list, 73converting to local, 142example of transaction, 143list, options, 88searching for, 142
currency tabin POS for Retail Administrator, 53
customcreating items in QuickBooks Pro, 25default fields in QuickBooks Pro, 37, 42defining fields in QuickBooks Pro, 26
definingcustom fields in QuickBooks Pro, 37, 42
custom fieldsfor employees, 41
customeraccount function, 111account payment function, 113data, 77display options, 97list, options, 88
customersaccount payments, 159accounts, function key for, 156adding in QuickBooks Pro, 37and several payment methods, 141charging sales to accounts, 158discounts for, 147, 148editing accounts, 158editing customer accounts, 158editing layaway accounts, 153exchanges, 146gift certificates and, 143giving refunds to, 146in QuickBooks Pro, 34layaway account payments, 154layaway accounts, 152overriding prices, 149percentage for, 157receiving payments from, 137setting up in QuickBooks, 34
Ddatabase, condense and repair, 79
decimal points, in POS for Retail, 126
defaultcustom fields in QuickBooks Pro, 37, 42
definecustom fields in QuickBooks Pro, 26
definingcustom fields in QuickBooks Pro, 26
delete terminal, 79
departmentfunction, 116function key, 126
depositsremoving money from the cash drawer, 161

Index 181
designlabels, 65PC keyboard
layout, 91POS keyboard
layout, 92touch keyboard layout, 94
detail tab, in report captions, 57
dimensions, label, 66
discountpercentage function, 118
discountscustomer percentages, 157dollar amount, 147dollar function, 117examples of, 149overriding a price, 149percentage amounts, 148
duplicate invoices, printing, 162
Eediting
passwords, 59
editing a transaction, 145
e-mail send, 79
employee data, 77
employee defaults, 40
employeescustom fields, 41de-activating in QuickBooks Pro, 41defaults, 40setting up, 41setting up payroll in QuickBooks Pro, 40training, 132working with in QuickBooks Pro, 40
end of daykey, 123options, 55options in reports tab, 55procedures, 166
creating reports, 167
end of period function, 123
entering information, on-screen keyboard, 157
exchangefunction key, 146rates, 73
exchanges, 146
Ffields
custom for employees, 41
fixing problems, 170
floatin function key, 160out function key, 160
foreign currency, 73converting to local, 142example of transaction, 143searching for, 142
format label, 66
functionbackspace, 104bar code number, 116cancel, 104cancel current transaction, 119cash clearance, 108cash float in, 106cash float out, 107cash paid out, 107cheque number entry, 109clear, 104comments (memo entry), 109correct entry, 119correct, last entry, 118

182 Index
currency conversion, 112customer account, 111customer account payment, 113department, 116discount, dollar, 117discount, percentage, 118end of period, 123hold transaction, 108layaway account, 111layaway account payment, 113lock terminal, 105manager override, 105memo entry, 109no, 104no sale, 114number entry, 109ok, 104print invoice, 106print receipt, 106product number, 115product price override, 115, 116quantity, 113receipt line feed, 106receipt on/off, 104refund/return, 119return/refund, 119sales person, 110sell non-inventory items, 116send message, 106subtotal, 119surcharge, dollar, 117surcharge, percentage, 118tax exempt, 110tender account charge, 122tender cash, 120tender cheque, 121tender credit card, 121tender layaway, 123tender voucher, 122training mode on/off, 105unit of measure, 114Web browser, 112yes, 104
functions, administrator, 62
Ggift certificates, 143
payment key, 122
graph rotation, 76
graphsmultiple, 76status, 75
group, 62
GST, turning off for a sale, 132
Hhardware configuration, 86
hardware requirementsfor multiple computers, 6for one computer, 5for two computers, 6
headers, printing, 99
hold function key, 144
hold transaction function, 108
holding a transaction, 144
HST, turning off for a sale, 132
IID, 86
information display, 82, 88
installingQuickBooks Pro, 8
installing POS for Retail, 14
installing POS for Retail Administrator, 10
Internetbrowsing, 162Explorer, and POS for Retail, 162
Intuit Canada, troubleshooting, 170

Index 183
inventoryadjusting in QuickBooks Pro, 25, 30changing in QuickBooks Pro, 29custom items in QuickBooks Pro, 25in QuickBooks Pro, 20item, 62list, 62managing in QuickBooks Pro, 25QuickBooks Pro benefits, 20QuickBooks Pro tracking, 20setting up tracking in QuickBooks Pro, 21subitems in QuickBooks Pro, 23taking physical in QuickBooks Pro, 30tracking accounts in QuickBooks Pro, 22turning on, 21turning on preference in QuickBooks Pro, 23
invoiceprinter options, 99printers, 162printing, 162printing duplicates, 162
item data, 77
item list, 62function key for, 128
itemsassigning to a function key, 129create custom fields in QuickBooks Pro, 26creating custom in QuickBooks Pro, 25discounting, 147, 148laying away, 152overriding prices for, 149service, setting up in QuickBooks Pro, 28surcharges, 150, 151
Kkey
backspace, 104bar code number, 116cancel, 104cancel current transaction, 119cash clearance, 108cash float in, 106cash float out, 107cash paid out, 107cheque number entry, 109clear, 104comments (memo entry), 109correct entry, 119correct last entry, 118currency conversion, 112customer account, 111customer account payment, 113department, 116discount, dollar, 117discount, percentage, 118end of period, 123hold transaction, 108layaway account, 111layaway account payment, 113lock terminal, 105manager override, 105memo entry, 109no, 104no sale, 114number entry, 109ok, 104print invoice, 106print receipt, 106product number, 115product price override, 115, 116quantity, 113receipt line feed, 106receipt on/off, 104refund/return, 119return/refund, 119sales person, 110sell non-inventory items, 116send message, 106

184 Index
subtotal, 119surcharge, dollar, 117surcharge, percentage, 118tax exempt, 110tender account charge, 122tender cash, 120tender cheque, 121tender credit card, 121tender layaway, 123tender voucher, 122training mode on/off, 105unit of measure, 114Web browser, 112yes, 104
keyboard- (on keypad), 110(PC) layout design, 91(POS) layout design, 92(touch screen) layout design, 94* (on keypad), 113+ (on keypad), 116‘ (reverse apostrophe), 1081, 1062, 107Backspace, 104Delete key, 104End key, 113Enter key, 115F11, 121F12, 120F3, 107F4, 114F6, 119F7, 119F8, 119F9, 121Home key, 122Insert key, 111layouts, saving and loading, 90map, show, 88on-screen, 157options, 89Page Down key, 118Page Up key, 117Pause/Break key, 104Scroll Lock key, 104Space Bar, 119
Llabels, 65
colour, 68component properties, 68components, 67continuous roll, 66design, 65dimensions, 66fanfold paper, 66format, 66layout, 67margins, 66paper type, 66pictures, 67position, 68print, 70printer, 70rotations, 68shapes, 67sheet printing, 66style, 70
layaway, 53account function, 111account payment function, 113create customer, 71customer list, 71customer list, options, 88customers, 71edit customer, 71options, 71payment key, 123
layawaysaccount payments, 154accounts, function key for, 152, 153cancelling, 155editing customer accounts, 153refunding, 155tendering, 154tracking in QuickBooks, 24
layout, labels, 67
line feeds, 162
listscurrency conversion, 73layaway, 71options, 88product, 62registration numbers, 74

Index 185
lists tabin POS for Retail Administrator, 52
lock terminalfunction, 105function key, 133
lottery payouts, entering, 127
Mmanager
override function, 105override function key, 134
mark item, 62
measures, function key for, 131
memo entryfunction, 109function key, 131
menu bar, terminal, 82
messagesdon’t display, 86sending between terminals, 134sending to terminals, 79
miscellaneous expenses, recording, 161
moneycurrency, 73gift certificates, 144other currencies, 142receiving from customers, 137removing from the cash drawer, 161
monitor, 75
multiple graphs, 76
Nno sale
function, 114function key, 132
no/cancel function, 104
non-inventoryitems, selling, 126parts, setting up in QuickBooks Pro, 27
number entryfunction, 109function key, 130
number pad, on-screen, 157
numbers, entering in POS for Retail, 126
Oonline registration, for POS for Retail, 18
on-screen keyboard, 157
operatorsfunction key for, 135
optionschart, 76end of day, 55POS for Retail Adminstrator, 48
Ppaid out function key, 161
papermoving up, 162type, label, 66
pausing a transaction, 144
paying off a tab (account payment), 113

186 Index
paymentscharging to accounts, 158example of, 141gift certificates, 144layaways, 154on accounts, 159on layaway accounts, 154receiving, 137receiving several types, 141refunding layaways, 155vouchers, 144
PC keyboard, 90layout design, 91options, 89
percentages, customer, 157
phone numbersregistering POS for Retail, 18
physical inventorytaking in QuickBooks Pro, 30
pictures, label, 67
POS for Retaildescription, 2how it works, 4installing, 14introduction, 2locking, 133messages between terminals, 134system, description, 2terminal, 82
POS for Retail Administratorcurrency tab, 53description, 3installing, 10lists tab, 52options, 48reports tab, 55scanning tab, 53security tab, 58toolbar, 44transactions tab, 52Web tab, 58
POS keyboardlayout design, 92options, 90
position, label, 68
post, 78
posting transactions to QuickBooks Pro, 166
pre-discount sales, 75
price changes, 63
price levels, 63function key for, 130
priceschanging in QuickBooks Pro, 29entering in POS for Retail, 126
printcolumn captions, 99destination, choosing, 101headers, 99invoice function, 106invoice function key, 162labels, 70receipt function, 106receipt function key, 162
printer options, 99
printers, 162
productlist, 62number function, 115number function key, 128price level function, 116price level function key, 130price override function, 115
productsassigning to a function key, 129entering for a sale, 136
properties, label, 68
PST, turning off for a sale, 132
QQST, turning off for a sale, 132
quantityfunction, 113function key, 137on order
initial, entering, 22

Index 187
QuickBooks Pro, 77customers, 34inventory, 20posting transactions to, 166working with employees, 40
qwerty keyboard, 90
Rrange, 62
rebuild database, 79
receipt line feedfunction, 106function key, 162
receipt on/offfunction, 104function key, 162
receipt printerfunctions, 162options, 98
receipt status, 82
receiptsmemos on, 131printing, 162
reconciling, 168a till, 166
refund function key, 146
refund/return function, 119
refunding a transaction, 146
refunds and layaways, 155
registered terminals, 74
registering POS for Retail, 18
registration number list, 74
reindex database, 79
reinstating, employees in QuickBooks Pro, 41
repair database, 79
report captionsin reports tab, 57
reportscreating, 167print on which printer, 101printing, 168resetting sales information, 167
reports tabin POS for Retail Administrator, 55
return/refund function, 119
rotation3D graph, 76label, 68
Ssales
account payments, 159cancelling, 147cancelling layaways, 155charging to accounts, 158correcting, 145customer accounts and, 156customer percentages and, 157different tender types, 141discounts, 147, 148entering a product, 128entering products in, 136example of, 141exchanges, 146function keys for items, 129gift certificates and, 144layaways, 152, 154lottery payouts, 127maximum amounts for, 126memos on, 131no sale function key, 132non-inventory items, 126overriding prices, 149pausing, 144quantity in, 137reconciling, 168

188 Index
refunding, 146service items, 126subtotals, 137surcharges, 150, 151training mode and, 132turning off GST/PST on, 132
sales informationresetting, 167
sales personfunction, 110function key, 135list, options, 88
sales taxturning off for a sale, 132
scale options, 101
scales, 131
scanner options, 95
scanning tabin POS for Retail Administrator, 53
searchingfor a customer account, 156for a foreign currency, 142for a layaway customer, 152for a product, 128for a sales person, 135for products, 136
security tabin POS for Retail Administrator, 58
selectgroup, 62items, 62range, 62
sell non-inventory item function, 116
sende-mail, 79terminal message, 79
send messagefunction, 106function key, 134
serial numbersrecording in transactions, 130
service itemsselling, 126
setting up in QuickBooks Pro, 28
setting upcash drawers, 100customer displays, 97customers in QuickBooks, 34employee defaults, 40employee payroll in QuickBooks Pro, 40keyboard, 90non-inventory parts in QuickBooks Pro, 27printers, 99receipt printers, 98scales, 101scanners, 95unit of measure bar codes, 54
sick timeentering, 41
solving problems, 170
split tender function key, 141
standard printer options, 99
status, 75graph, 75
subitems in QuickBooks Pro inventory, 23
subtotalfunction, 119function key, 137
summarizingtransactions in POS for Retail, 49
surchargedollar amount, 150dollar function, 117percentage amounts, 151percentage function, 118
suspending a transaction, 144
Ttax exempt
function, 110function key, 132return function key, 133
tax, turning off for a sale, 132
technical supportbefore you call, 18troubleshooting, 170

Index 189
templates, for payroll, 40
tenderaccount charge function, 122cash function, 120cash function key, 138cheque function, 121cheque function key, 139credit card function, 121credit card function key, 138keys, 120layaway function, 123reconciling
money, 168types, 75voucher function, 122
tenderingin transactions tab, 53
terminal, 82delete, 79ID, 86
terminal displayinformation, 82receipt status, 82transaction, 82user, 82
terminalslocking, 133registration, 74sending messages between, 134
tilllocking, 133reconciling, 168
titles tabin report captions, 57
toolbar in POS for Retail Adminstrator, 44
touchkeyboard layout design, 94screen keyboard layout design, 94screen keyboard options, 90
touch-screen, keyboard on, 157
trackingback orders and layaways in QuickBooks Pro, 24inventory accounts in QuickBooks Pro, 22inventory in QuickBooks Pro, 20setting up for inventory in QuickBooks Pro, 21
training modefunction key, 132on/off function, 105
transactiondisplay, 82, 88number, 86
transaction detailin transactions tab, 52
transactionsaccount payments, 159cancelling, 147cancelling layaways, 155charging to accounts, 158correcting, 145customer accounts and, 156customer percentages and, 157discounts, 147, 148exchanges, 146gift certificates and, 144layaway account payments, 154layaways, 152, 154overriding prices, 149pausing, 144reconciling, 168refunding, 146resetting numbers, 168several tender types, 141summarizing in POS for Retail, 49surcharges, 150, 151
transactions tabin POS for Retail Administrator, 52
transferringQuickBooks Pro data, 77transaction to QuickBooks Pro, 166
troubleshooting, 170
turning on inventory, 21
typing informationon-screen keyboard, 157

Uunit of measure
bar codes, setting up, 54function, 114function key, 131
user display, 82, 87
Vvacation pay
entering, 41
valuechanging in QuickBooks Pro, 31
values in POS for Retail, entering, 126
voiding a transaction, 147
voucher payment key, 122
vouchers (gift certificates), 143
Wwarnings
below cost, 63
Web browser function, 112
Web tabin POS for Retail Administrator, 58
weightsfunction key for, 131scale options, 101
World Wide Web, browsing, 162
www, browsing, 162
Yyes/ok, 104