quickbooks - pos document
DESCRIPTION
Quickbooks POSTRANSCRIPT
PDG Software
QuickBooks Pointof Sale Guide


PDG Software, Inc.1751 Montreal Circle, Suite BTucker, Georgia 30084-6802
Copyright ©1998 - 2007 PDG Software, Inc.; All rights reserved.
PDG Software, Inc. ("PDG Software") retains all ownership rights to the software programs (referred to herein as "Software") offered by PDG Software and related documentation. Use of the Software and related documentation is governed by the license agreement accompanying the Software and applicable copyright law.
THIS DOCUMENTATION IS PROVIDED "AS-IS" WITHOUT WARRANTY OF ANY KIND. IN NO EVENT SHALL PDG SOFTWARE BE LIABLE FOR ANY LOSS OF PROFITS, LOSS OF BUSINESS, LOSS OF USE OR DATA, INTERRUPTION OF BUSINESS, OR FOR INDIRECT, SPECIAL, INCIDENTAL, OR CONSEQUENTIAL DAMAGES OF ANY KIND, ARISING FROM ANY ERROR IN THIS DOCUMENTATION.
PDG Software, Inc.http://www.pdgsoft.com
November, 2007


Contents
Chapter 1 QuickBooks Point of Sale Guide 3Introduction...........................................................................................................3Overview...............................................................................................................4Getting Started ......................................................................................................4
Chapter 2 Configure PDG Commerce Administrator 5Getting Started ......................................................................................................5QuickBooks ..........................................................................................................6QBWC For QuickBooks POS Settings.................................................................8
Chapter 3 Configure QuickBooks Point of Sale 19Configure Departments.......................................................................................19Configure Taxes..................................................................................................20Begin Synchronization........................................................................................22
Chapter 4 Use QuickBooks Web Connector 23Getting Started ....................................................................................................23Viewing Updates in PDG Commerce Administrator .........................................25Viewing Updates in your PDG Commerce Store Front .....................................26Viewing Orders in QuickBooks Point of Sale ....................................................28Troubleshooting ..................................................................................................28
Chapter 5 PDG Commerce Style Tags 31Template Tags.....................................................................................................31Considerations ....................................................................................................34


Chapter 1 QuickBooks Point of Sale Guide
Synchronizing QuickBooks Point of Sale with PDG Commerce using QuickBooks Web Connector
his guide assumes that you have QuickBooks Point of Sale version 5, 6, or 7 installed on your local computer. This guide also assumes that your local computer is connected to the Internet, and that your web site has a
secure connection (access with https). If you require assistance installing QuickBooks Point of Sale, please contact Intuit technical support.
IntroductionIn addition to PDG's integration of QuickBooks Merchant Services and QuickBooks Financial and Accounting Software, PDG merchants can now connect their PDG Commerce enabled store directly with QuickBooks Point of Sale solution.
Utilizing the QuickBooks Web Connector provided by Intuit, PDG Com-merce merchants can communicate directly in near real-time with Quick-Books Point of Sale to exchange customers, products, inventory levels, and sales between their PDG Commerce enabled Web store and their brick-and-mortar retail store.
Merchants can set the Web Connector to connect directly with their store at any time interval they want. Once set, the service will automatically connect to their Web store, upload new products recently added to QuickBooks Point of Sale, update inventory levels for both retail and web sales, and then import all customer and sales information from the Web store into QuickBooks Point of Sale.
T
PDG Software QuickBooks Point of Sale Guide 3

PDG Software
4 PDG Software QuickBo
OverviewThe initial synchronization between QuickBooks Point of Sale and PDG Commerce will import all of your products from QuickBooks Point of Sale to the PDG Commerce program on your web site.
After the initial synchronization, all subsequent updates will follow the same process. First, all products added to QuickBooks Point of Sale since the last synchronization will be imported to PDG Commerce. Second, all products that were updated in QuickBooks Point of Sale since the last synchronization (that already exist in PDG Commerce) will be updated in PDG Commerce. Third, all orders placed through PDG Commerce since the last synchroniza-tion will be imported to QuickBooks Point of Sale. Finally, the inventory totals for products will be checked both in QuickBooks Point of Sale and PDG Commerce to ensure that they were properly updated to reflect all orders.
Getting StartedBefore you begin the setup of PDG Commerce to use the QuickBooks Web Connector, you should visit the QuickBooks Point of Sale page on the PDG Software web site, located at the following address:
http://www.pdgsoft.com/partners/qbpos.htm
On the left side of this page, you will find a video that offers an overview of the integration between QuickBooks Point of Sale and PDG Commerce. This video will briefly explain the synchronization process.
On the right side of this page, you will find a training video that walks you through setting up the real-time synchronizations between QuickBooks Point of Sale and PDG Commerce. You can use this guide as a companion to the training video, as they cover the same information and instructions.
If you have further questions about configuring the integration between QuickBooks Point of Sale and PDG Commerce after watching the training video, please contact PDG technical staff.
oks Point of Sale Guide

Chapter 2 Configure PDG Commerce AdministratorConfigure PDG Commerce Administrator to synchronize with QuickBooks Point of Sale using QuickBooks Web Connector
his chapter explains how to properly configure your PDG Commerce Administrator to communicate with your QuickBooks Point of Sale soft-ware using the QuickBooks Web Connector tool.
Getting StartedTo access the QuickBooks Web Connector settings in your PDG Commerce Administrator, your Commerce program will need to be on patch 4.70.01.101 or higher. To upgrade, visithttp://www.pdgsoft.com/Download/Comm_upgrade.html.
Once you have upgraded your program, log into your Commerce Administra-tor securely (using https:// in the web address), and select the “Secure” option on the Main Menu. In the "Complete URL to a SSL Secure PDG Commerce Executable" field on this page, enter the location of the PDG Commerce exe-cutable on your secure server. The entry in this field might look something like:
https://www.webstorename.com/cgi-bin/commerce.cgi
Once you have entered this information, click the ‘Submit Changes’ button on the page.
T
PDG Software QuickBooks Point of Sale Guide 5

PDG Software
6 PDG Software QuickBo
Return to the Main Menu, and select the “QuickBooks” option.
QuickBooksOn the page that is displayed, you will need to select the appropriate Quick-Books program for use with the QuickBooks Web Connector, and access the appropriate settings page.
QuickBooks Connection/Synchronization Types
In this section, select the “QuickBooks POS” option, and click the ‘Update Active Web Connector Setup' button. Please note that you can only change this setting if you are logged in securely.
General QuickBooks Settings
To access the QuickBooks Web Connector settings for QuickBooks Point of Sale, click the “QuickBooks POS using Web Connector” link in the “General QuickBooks Settings” section of this page.
You can view any specific configuration page linked from this section even if it is not your active QuickBooks Web Connector program. In this case, QuickBooks POS is your active QuickBooks Web Connector program.
oks Point of Sale Guide
PDG Software
The QuickBooks POS using Web Connector link will display the Quick-Books Point of Sale configuration page. This is the same page that is dis-played by clicking the ‘Update Active Web Connector Setup’ button in the previous section.
The QuickBooks Financial using Web Connector link will display the QuickBooks Financial configuration page. Please note that you may not con-figure PDG Commerce to use the QuickBooks Web Connector program with both QuickBooks Point of Sale and QuickBooks Financial at the same time.
If you are using both programs, you should integrate PDG Commerce with QuickBooks Point of Sale, and then configure QuickBooks Point of Sale to communicate with QuickBooks Financial. If you require assistance with that configuration, you should contact Intuit.
The QuickBooks Financial Using PDG Accounting Accelerator link will display the PDG Accounting Accelerator settings page. The PDG Accounting Accelerator is a legacy program for PDG Commerce, as it has been replaced by the ability to connect to QuickBooks Financial using the QuickBooks Web Connector.
The QuickBooks Web Connector Detail Log link will display a page that will assist in troubleshooting import problems. You can find an explanation of this log in the “Troubleshooting” section of the “Use QuickBooks Web Connector” chapter of this guide.
The QBWC Active Session Status field indicates whether or not an active session exists. If the QuickBooks Web Connector program was interrupted or failed for any reason, an active session may be left open. If you are not cur-rently running the QuickBooks Web Connector program, but this field indi-cates that an active session exists, you will need to stop the active session before you can begin another one. To stop an active session, click the ‘Reset Active Session’ button when the QuickBooks Web Connector program is closed.
PDG Commerce only allows one QuickBooks Web Connector update at a time. The active session should only exist when the QuickBooks Web Con-nector is communicating with the PDG Commerce program on your web site. If the connection is closed, but this section of your Commerce Administrator indicates that there is an active session, you should click the ‘Reset Active Session’ button before attempting to begin another synchronization.
The Server Time Adjustment field allows you to determine if your Current Server Time and Local Computer Time are the same. This setting is neces-sary if you will be running the QuickBooks Web Connector program at an interval to synchronize your QuickBooks Point of Sale company with your PDG Commerce web store. If the times do not match, click the 'Synchronize Server/Desktop Times' button. At that point, you will see this portion of the page updated. The Current Server Time and Local Computer Time will be the same, with the Adjusted Server Time displaying the modified server time.
PDG Software QuickBooks Point of Sale Guide 7

PDG Software
8 PDG Software QuickBo
QuickBooks Failed Orders
In this section, you will see orders that failed to import to your QuickBooks Point of Sale, along with error messages if applicable. From this location, you can remove orders from the failed list, or restore them to attempt the order import again.
Resetting Product Import
If you need to clear your progress and restart the product import through the QuickBooks Web Connector, there are three steps:
1. Close the QuickBooks Web Connector program, then click the 'Reset Active Ses-sion' button on the main QuickBooks page in your Commerce Administrator.
2. Select "Maintenance" from the Main Menu of your Commerce Administrator. Click the "Permanently Delete All Products from the Database" link, then click the "Permanently Delete All Product Categories from the Database" link. Click 'OK' for each delete to verify.
Note: This action will delete all product data. It is recommended that you export your products to a CSV file prior to deleting all products and categories. You can find instructions for exporting to a CSV file in the PDG Software Importing/Exporting Guide, available for download athttp://www.pdgsoft.com/docs/ImportExport.pdf.
3. Connect to your web site via FTP, and browse to the PDG_Commerce directory. Find the PDG_QBWC folder, and delete it. Find the qbwc.lock and active.ses-sion files (if they exist), and delete them. Your Commerce Administrator’s QuickBooks Web Connector Settings page should now show that a QBWC ses-sion does not exist. You are now ready to begin a new session.
QBWC For QuickBooks POS SettingsWhen you click the ‘Update Active Web Connector Setup’ button or the “QuickBooks POS using Web Connector” link on the main QuickBooks page in your Commerce Administrator, the “QBWC For QuickBooks POS Set-tings” page will be displayed. On this page, you will need to enter the appro-priate data in each field to connect your PDG Commerce Administrator to your QuickBooks Web Connector.
oks Point of Sale Guide

PDG Software
QBWC For QuickBooks POS Settings
In this section of the page, you will enter the information necessary to connect to your QuickBooks Web Connector, as well as your preferences for order importing to your QuickBooks Point of Sale software.
If you have not already downloaded and installed the QuickBooks Web Con-nector program, you may access it by clicking the “Download the Quick-Books Web Connector” link at the top of this section.
Clicking this link will open a new window allowing you to download the installer program for QuickBooks Web Connector. You should download and install this file to your QuickBooks Point of Sale computer.
The Download PDG Web Connector Configuration File(*.qwc) link should be clicked after you have entered all settings on this page. Make sure that you click the ‘Submit Changes’ button, and the page is refreshed display-ing your saved changes before you click this link, otherwise you will receive an incomplete file. When prompted to download the file (named pdg-pos.qwc), save it to your computer. This file can be deleted after the applica-tion has been successfully added to your QuickBooks Web Connector pro-gram.
You should create a username for the QuickBooks Web Connector User and enter it in this field.
You should create a password for the QuickBooks Web Connector Pass-word and enter it in this field. Record this password for later use.
Note: The user and password configured in these fields will be used to authenticate your connection to the web site when using the QuickBooks Web Connector. This user and password are not connected to your current Quick-Books Point of Sale user accounts.
PDG Software QuickBooks Point of Sale Guide 9
PDG Software
10 PDG Software QuickB
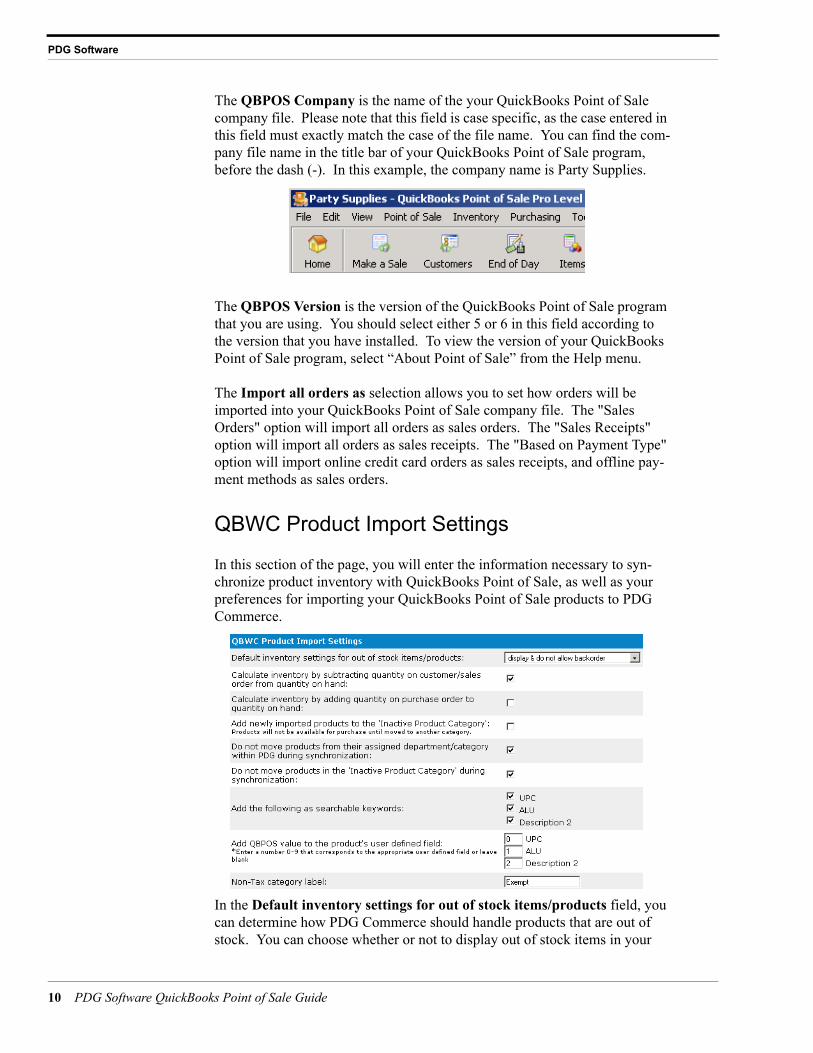
The QBPOS Company is the name of the your QuickBooks Point of Sale company file. Please note that this field is case specific, as the case entered in this field must exactly match the case of the file name. You can find the com-pany file name in the title bar of your QuickBooks Point of Sale program, before the dash (-). In this example, the company name is Party Supplies.
The QBPOS Version is the version of the QuickBooks Point of Sale program that you are using. You should select either 5 or 6 in this field according to the version that you have installed. To view the version of your QuickBooks Point of Sale program, select “About Point of Sale” from the Help menu.
The Import all orders as selection allows you to set how orders will be imported into your QuickBooks Point of Sale company file. The "Sales Orders" option will import all orders as sales orders. The "Sales Receipts" option will import all orders as sales receipts. The "Based on Payment Type" option will import online credit card orders as sales receipts, and offline pay-ment methods as sales orders.
QBWC Product Import Settings
In this section of the page, you will enter the information necessary to syn-chronize product inventory with QuickBooks Point of Sale, as well as your preferences for importing your QuickBooks Point of Sale products to PDG Commerce.
In the Default inventory settings for out of stock items/products field, you can determine how PDG Commerce should handle products that are out of stock. You can choose whether or not to display out of stock items in your
ooks Point of Sale Guide

PDG Software
web store’s product lists, and also whether or not to allow backordering for out of stock products.
In the Calculate inventory by subtracting quantity on customer/sales order from quantity on hand field, you can determine how the product inventory totals maintained in PDG Commerce will be calculated. If this box is not checked, the product inventory totals in PDG Commerce will be set according to the physical inventory in your QuickBooks Point of Sale com-pany. However, it is possible that you have some items on customer order or sales order that have not yet been shipped. In that case, they are still included in the physical inventory total, even though they are no longer available for purchase. If you do not want the product inventory totals in PDG Commerce to include the items on customer order or sales order, check this box to sub-tract those items from the physical inventory.
Note: This check box can only be checked if you are using QuickBooks Point of Sale version 6. This option is not available for version 5.
In the Calculate inventory by adding quantity on purchase order to quan-tity on hand field, you can determine how the product inventory totals main-tained in PDG Commerce will be calculated. If this box is not checked, the product inventory totals in PDG Commerce will be set according to the phys-ical inventory in your QuickBooks Point of Sale company. However, it is possible that you have some items on purchase order that have not yet arrived. In that case, they are not included in the physical inventory total, even though they will soon be available for purchase. If you want the product inventory totals in PDG Commerce to include the items on purchase order, check this box to add those items to the physical inventory.
Check the Add newly imported products to the 'Inactive Product Cate-gory' box if you would like for all new products to be imported to the Inactive Product Category. This option will ensure that new products are not made available for purchase on your web store at the time of synchronization, although they are maintained in your PDG Commerce Administrator. You can move them to an active category at any time after the synchronization with your QuickBooks Point of Sale company file is completed.
Note: Products imported to the Inactive Product Category will not be avail-able for purchase on your web site until they are moved to an active category. If you are planning on selling over 50% of the products in your QuickBooks Point of Sale company file on your web store, you should not check this box for the initial synchronization.
Check the Do not move products from their assigned department/cate-gory within PDG during synchronization box if you have rearranged the products in your PDG Commerce Administrator, and do not want the products reverted to their QuickBooks Point of Sale departments/categories during synchronization.
Note: If you have moved any products into subcategories in PDG Commerce, you should check this box.
PDG Software QuickBooks Point of Sale Guide 11

PDG Software
12 PDG Software QuickB
Check the Do not move products in the 'Inactive Product Category' dur-ing synchronization box if you have moved some products into the Inactive Product Category in PDG Commerce, and do not want the products reverted to their QuickBooks Point of Sale departments/categories during synchroniza-tion.
The Add the following as searchable keywords section allows you to import certain data fields from your QuickBooks Point of Sale company to the Key-words field for PDG Commerce products. The Keywords field for each prod-uct will be accessed during searches, allowing customers to search for individual products on your site based on the fields that you choose to import. You can choose to import the UPC, ALU, and/or Description 2 fields to the Keywords field by checking the appropriate boxes.
The Add QBPOS value to the product's user defined field section allows you to import certain data fields from your QuickBooks Point of Sale com-pany to the User Defined fields for PDG Commerce products. The User Defined fields for each product may be accessed during searches, allowing customers to search for products on your site based on the fields that you choose to import. The User Defined fields may also be searched individually, allowing customers to search using advanced options to locate specific prod-ucts. Finally, the User Defined fields may be displayed individually on the Item, SearchResult, and Multiadd templates, as well as in the Basket. You can choose to import the UPC, ALU, and/or Description 2 fields to the User Defined fields by entering the corresponding User Defined field’s index num-ber (0-9) in the appropriate fields.
In the Non-Tax category label field, you should enter “Exempt.”
Note: You will need to configure sales tax rules in your Commerce Adminis-trator for all applicable tax charges. These tax rules must match the tax items in your QuickBooks Point of Sale company. This requirement is explained in the “Configure QuickBooks Point of Sale” chapter of this guide.
QBWC Product Image Settings
This section allows you to specify how image paths should be created for products imported to your PDG Commerce program. In these fields you will specify the image path and image file type to be used during this process. Once changes are submitted, you will then see an example file name popu-lated to indicate the way in which image paths will be created.
Note: The current versions of QuickBooks Point of Sale software do not store images for products, and will not import images to PDG Commerce. You will need to upload images to your web server through FTP in order to add images using these fields. The images should be uploaded with the appropriate file name according to your settings, and should all use the same file extension (e.g., .gif, .jpg, or .png).
ooks Point of Sale Guide

PDG Software
In the Image file source field, select the field from the QuickBooks Point of Sale company file that should be used to name your full size and thumbnail images. You can choose “use Item Number,” “use UPC,” or “use ALU.” If you do not want to specify images at this time, select “I do not want to use images.”
Note: For UNIX servers, the image and thumbnail filenames and directory paths will be case-specific.
In the Default setting for full size image file section, you should enter the file path from the root directory of your web site to access the full size images in the Directory path for full size image field. For example, if the main folder of your web site contains a folder named images, you should enter /images/. You will need to enter both slashes as they appear in this example. In the Extension for full size image field, enter the file extension to be used for all of the full size images. You will need to enter a period before the extension in this field, such as .jpg, .gif, or .png.
In the Default setting for thumbnail size image file section, you should enter the file path from the root directory of your web site to access the thumbnail images in the Directory path for thumbnail image field. For example, if the main folder of your web site contains a folder named images, you should enter /images/. You will need to enter both slashes as they appear in this example. In the Extension for thumbnail image field, enter the file extension to be used for all of the thumbnail images. You will need to enter a period before the extension in this field, such as .jpg, .gif, or .png.
QBWC Product Style Settings
In this section of the page, you will enter the appropriate information to import products using QuickBooks Point of Sale styles into your PDG Com-merce program. These settings will allow you to display products within the same style on a single page with a drop down menu for each product varia-tion. Each style setting will be imported as a separate product, as they are defined in QuickBooks Point of Sale.
When products in a style group are imported to PDG Commerce, an addi-tional product with an item number beginning with ST- will be created. This product will be used as the item number to display the style group on a single page with a drop down menu. Product attributes to be displayed for the file group should be assigned to the ST- product.
PDG Software QuickBooks Point of Sale Guide 13

PDG Software
14 PDG Software QuickB
Note: You will need to add a PDG Commerce tag to your Item template in order to display the style menu. Please view the "PDG Commerce Style Tags" chapter of this manual for further information.
The Enable style display (based on QB POS styles) checkbox will enable importing of QuickBooks Point of Sale styles. If you have styles defined in QuickBooks Point of Sale for products you want to sell online, you should check this box.
Note: This setting uses three user defined fields. By default, these fields will be User Defined Data 6, User Defined Data 7, and User Defined Data 8. You should not use these fields to contain any other data.
The Add the size/attribute to the product description allows you to deter-mine if the style selection will be displayed as part of the product name during the checkout process. If this box is not checked, only the product name will be displayed during checkout, without the style selection.
The Display order for Attribute/Size field allows you to select which selec-tion should be listed first in the menu for products. If you are using both the Attribute and Size options in QuickBooks Point of Sale, both choices will be displayed in the same drop down menu. You may select which one should be displayed first (i.e., “T-Shirt Small White” or “T-Shirt White Small”).
ooks Point of Sale Guide

PDG Software
Advanced QuickBooks POS Settings
To access the Advanced QuickBooks POS Settings section of the page, click the “Advanced Settings” link at the bottom of the page. This section allows you to configure advanced settings and information for the QuickBooks Point of Sale connection. Please contact PDG Software technical support if you require further assistance with these settings.
The QBPOS Computer is the local computer on which you have Quick-Books Web Connector and QuickBooks Point of Sale installed. By default, this field is set to localhost. If you need to use a different computer name, you may enter it in this field. To determine the name of your computer, right-click the My Computer icon on your desktop, and choose Properties. Click the Net-work Identification tab. The name of your computer on the local network will be listed on this tab.
You should check the Use the same customer for all orders box if you would like for all orders to be imported to your QuickBooks Point of Sale company file with the customer name "PDG Web Order."
Note: It is not necessary to import all orders as the same customer to run reports of Internet sales in your QuickBooks Point of Sale company. The "Cashier" and "Associate" fields will always be set to “Internet Store” for orders placed through PDG Commerce, so you may use those fields to run reports of Internet sales.
PDG Software QuickBooks Point of Sale Guide 15

PDG Software
16 PDG Software QuickB
In the QBPOS Inventory Store field, you will enter the store number of the physical location to which you are synchronizing your inventory. If you want to synchronize with a single store location, you should enter one number between 1 and 10 in this field to indicate which store number should be used, according to how it is entered in your QuickBooks Point of Sale company file. If you would like to synchronize your PDG Commerce product inventory totals with all of your physical stores, you should leave this field blank.
Note: This field may be left blank, or you may enter a single store number. You may not enter more than one store number in this field.
The Do not change inventory settings for existing products box allows you to determine whether or not Commerce products should have their inventory options reset based on the current settings. If you have changed the backorder and out of stock options for any products after the last synchronization, and do not want them to be reset on the next synchronization, you should check this box.
Note: This field affects the out of stock settings for products. Inventory totals are always updated in every synchronization, regardless of this setting.
The Do not change image settings for existing products box allows you to determine whether or not image settings should be modified based on the cur-rent settings. If you have changed the full size or thumbnail image settings for any products after the last synchronization, and do not want them to be reset on the next synchronization, you should check this box.
The DO NOT update the web store section allows you to specify if some fields should not be updated during synchronization. If you have modified the One-line Descriptions (names) of your products since they were originally imported, you can check the Product’s Description box to ensure that they are not overwritten by the QuickBooks Point of Sale settings during synchro-nization. If you have modified the Descriptions (names) of your product cate-gories since they were originally imported, you can check the Category’s/Department’s Description box to ensure that they are not overwritten by the QuickBooks Point of Sale settings during synchronization.
Note: PDG Commerce allows up to 255 characters in the product description and category description fields, whereas QuickBooks Point of Sale allows only 30 characters. If you have extended the descriptions of your products and categories after the import, you should check these boxes.
The Default product weight field will allow you to set a default weight to be used for all products that are imported to PDG Commerce. You should enter a number in this field. It will be used as pounds or kilograms, depending on the setting configured in the “Site Units of Measure” field of the Commere Options field.
ooks Point of Sale Guide
PDG Software
The POS Custom field label fields allow you to map additional fields from QuickBooks Point of Sale to PDG Commerce. You may import up to five additional fields. In the POS Custom field label field, enter the name of the custom field exactly as it is defined in QuickBooks, including the case. In the mapped to PDG field, select the field in PDG Commerce that should be used to contain the field you are importing.
Note: The additional fields must be configured as custom fields in Quick-Books Point of Sale. This feature is not available for additional fields in QuickBooks Point of Sale that are not custom fields.
The Do not update Custom fields on existing products field allows you to specify if the custom fields should not be updated during synchronization. If you have modified the User Defined Fields (containing custom field data) of your products since they were originally imported, you can check the box to ensure that they are not overwritten by the QuickBooks Point of Sale settings during synchronization.
The Item template for styles field allows you to specify a different field for use with QuickBooks Point of Sale style products. You may leave this field blank to use the same Item template displayed for non-style products.
Note: You will need to add a PDG Commerce tag to your Item template in order to display the style menu. Please view the "PDG Commerce Style Tags" chapter of this manual for further information.
The User defined field number (0-9) for QuickBooks POS Description field will determine which user defined field for each product will contain the key that determines which products have the same style. The contents of this user defined field should not be modified. If you have enabled QuickBooks Point of Sale styles, this field will be set to User Defined Data 6 by default.
The User defined field number (0-9) for QuickBooks POS Department Code field will determine which user defined field for each product will con-tain the key that determines which products have the same style. The contents of this user defined field should not be modified. If you have enabled Quick-Books Point of Sale styles, this field will be set to User Defined Data 7 by default.
The User defined field number (0-9) for QuickBooks POS Attribute/Size field will contain the text that will be displayed as a choice in the style drop down menu. The contents of this field may be modified. If you have enabled QuickBooks Point of Sale styles, this field will be set to User Defined Data 8 by default.
PDG Software QuickBooks Point of Sale Guide 17

PDG Software
18 PDG Software QuickB
In the QBPOS Log file field, enter the name of the file to which you want QuickBooks Point of Sale synchronizations logged. The location is assumed to be relative to the PDG_Commerce directory on your web site. PDG Com-merce will automatically create this file with the name you specify here when the first synchronization takes place.
Note: PDG Software suggests saving a copy of the log file then deleting it after performing the first synchronize with your web store. The initial log file may be very large.
When you have finished making all changes to this page, and have submit the changes, click the “Download PDG Web Connector Configuration File(*.qwc)” link. Once you have saved the file, make changes live from the Main Menu
ooks Point of Sale Guide

Chapter 3 Configure QuickBooks Point of Sale
Configure QuickBooks Point of Sale to synchronize with PDG CommerceAdministrator using QuickBooks Web Connector
his chapter explains how to properly configure your QuickBooks Point of Sale software to communicate with your PDG Commerce Administra-tor using the QuickBooks Web Connector tool.
Configure DepartmentsOpen the QuickBooks Point of Sale software on your local computer. From the “Inventory” menu, select the “Department List” option.
T
PDG Software QuickBooks Point of Sale Guide 19

PDG Software
20 PDG Software QuickB
Once the Department List is displayed, you will need to verify that all depart-ments have a three-character code. If any departments have a code of one or two characters, or if any two or more departments use the same code, products will be grouped incorrectly when imported into your PDG Commerce Admin-istrator.
Configure TaxesIn order for the QuickBooks Web Connector to import orders from your PDG Commerce program to your QuickBooks Point of Sale company, you will need to have the appropriate tax rules set up. Any taxes that you collect online must be also exist in QuickBooks Point of Sale.
To set up taxes in QuickBooks Point of Sale, select Preferences from the Edit menu. Next choose Company.
The Company Preferences window will then open. On the left side menu of this window, select Sales Tax.
ooks Point of Sale Guide

PDG Software
In this window, you will need to configure tax locations for your web store. Record the names of your tax locations, ensuring that the case and spacing are correct. Also record whether or not shipping is taxable.
Note: You must enter the tax location names in your PDG Commerce Admin-istrator for tax rules. You cannot use a tax code as the sales tax name for PDG Commerce.
Return to your PDG Commerce Administrator. Once you have logged in, go to the Sales Tax section from the Main Menu. Create any other required tax rules, ensuring that the case and spacing exactly match the tax location entered in QuickBooks Point of Sale. The tax percentage, as well as the Tax Shipping setting must also match. In this example, the tax would be named “GA Sales Tax”
PDG Software QuickBooks Point of Sale Guide 21

PDG Software
22 PDG Software QuickB
After adding sales tax rules, make changes live from the Main Menu.
You can find further instructions for creating tax rules in the PDG Commerce User Guide, available for download athttp://www.pdgsoft.com/docs/Comm_4_UserGuide.pdf.
Begin SynchronizationIn the next section, we will walk through the synchronization process. We will use item 109 in the sample item list below as an example in the walk through. Note that the value in the “Item #” field will be used as the sku num-ber in your PDG Commerce Administrator.
ooks Point of Sale Guide
Chapter 4 Use QuickBooks Web Connector
Use QuickBooks Web Connector to synchronize PDG Commerce Administrator with QuickBooks Point of Sale
his chapter explains how the QuickBooks Web Connector will synchro-nize your QuickBooks Point of Sale company with your PDG Commerce Administrator. You will be able to synchronize products and inventory
totals between the two programs, as well as importing orders from your PDG Commerce Administrator to your QuickBooks Point of Sale company.
Getting StartedYou will download a QWC file from the PDG Commerce Administrator that you must install before your first synchronization. Once you have saved the file to your computer, double-click it to open it.
Note: You may be prompted to log in when you open the QWC file the first time. If so, enter the username and password of an Administrator account for your QuickBooks Point of Sale company file.
T
PDG Software QuickBooks Point of Sale Guide 23

PDG Software
24 PDG Software QuickB
To begin the synchronization process, open the QuickBooks Web Connector program on your local computer.
On the first screen, check the box next to the appropriate application name. The application name will be assigned according to the “Web Site Name” field in the “Company Information” section of your Commerce Administrator. If you would like to enable the Auto-Run feature, check the box in the “Auto-Run” field, and select a time interval in the “Every_Min” field. Click the ‘Update Selected’ button to begin the synchronize import.
Note: You should not enable the Auto-Run feature until after your first suc-cessful import of your products.
Note: Your computer must remain connected to the Internet in order to use the Auto-Run feature. If at any time the computer is disconnected from the Inter-net, the Auto-Run interval scheduled during that time will not occur.
Once the “Total Progress” bar has reached 100 percent, click the ‘Exit’ button to close the QuickBooks Web Connector program. The synchronization is now complete. If you would like to view a summary of the import, or if you received any errors, click the “Click for More Information” link.
Note: The progress bar may not indicate a true percentage amount, as the product and order portions of the synchronize are calculated separately.
ooks Point of Sale Guide

PDG Software
Viewing Updates in PDG CommerceAdministrator
Now that you have synchronized your products and orders, you may view the new settings in your Commerce Administrator. From the Main Menu, click the “Products” link. On the page that is displayed, click the ‘Inventory’ but-ton. On the next page, click a product category link to view inventory by product.
In this example, you will see product 109, which now has the same inventory amount in the PDG Commerce Administrator as it does in the “On-hand Qty” field in the QuickBooks Point of Sale company.
Note: All products in your QuickBooks Point of Sale company file will be imported to PDG Commerce. Any products that you see in the store that you do not wish to sell online should be moved to the Inactive (*STG) category. These products will not be available for purchase through your web store. You should not delete these products from your PDG Commerce Administra-tor, as they will be imported again each time you synchronize the programs.
PDG Software QuickBooks Point of Sale Guide 25

PDG Software
26 PDG Software QuickB
Viewing Updates in your PDG Commerce Store Front
Next, you can walk through a test order in your PDG Commerce store front to see the products that have been added. To do that, access your PDG Com-merce welcome page, at http://www.webstorename.com/commerce.html.
In the blue box on the left side of the page, click the “Basic Functions” link. On the page that is displayed, click the ‘Enter Store’ button. You will be taken to the main product categories page of your store front.
The categories displayed on this page have names entered from the “Dept Name” field for each department in the QuickBooks Point of Sale program. Product 109 is located in the Princess category.
Clicking on a category name will take you to the product listing for that cate-gory. From that page, you can click the name or thumbnail of a product to continue to the product’s item details page.
Product 109 has a product name corresponding to the “Description 1” field in the QuickBooks Point of Sale company, and a price corresponding to the “Regular Sales Price” field in the QuickBooks Point of Sale company.
ooks Point of Sale Guide

PDG Software
Clicking the ‘Submit’ button will add the product to the basket. From there you may continue through the checkout process. On the receipt page, you will see the product’s details displayed again.
PDG Software QuickBooks Point of Sale Guide 27

PDG Software
28 PDG Software QuickB
Viewing Orders in QuickBooks Point of SaleAfter the next Web Connector synchronize, you may view the new orders in your QuickBooks Point of Sale company. Open the company file, and click the ‘Sales Receipts’ or ‘Sales Orders’ button on the main page. You will then see the new orders from your PDG Commerce program available in the list.
TroubleshootingYou can check the status of products and orders after a synchronization by clicking the “QuickBooks Web Connector Detail Log” link on the main QuickBooks page in your Commerce Administrator.
ooks Point of Sale Guide
PDG Software
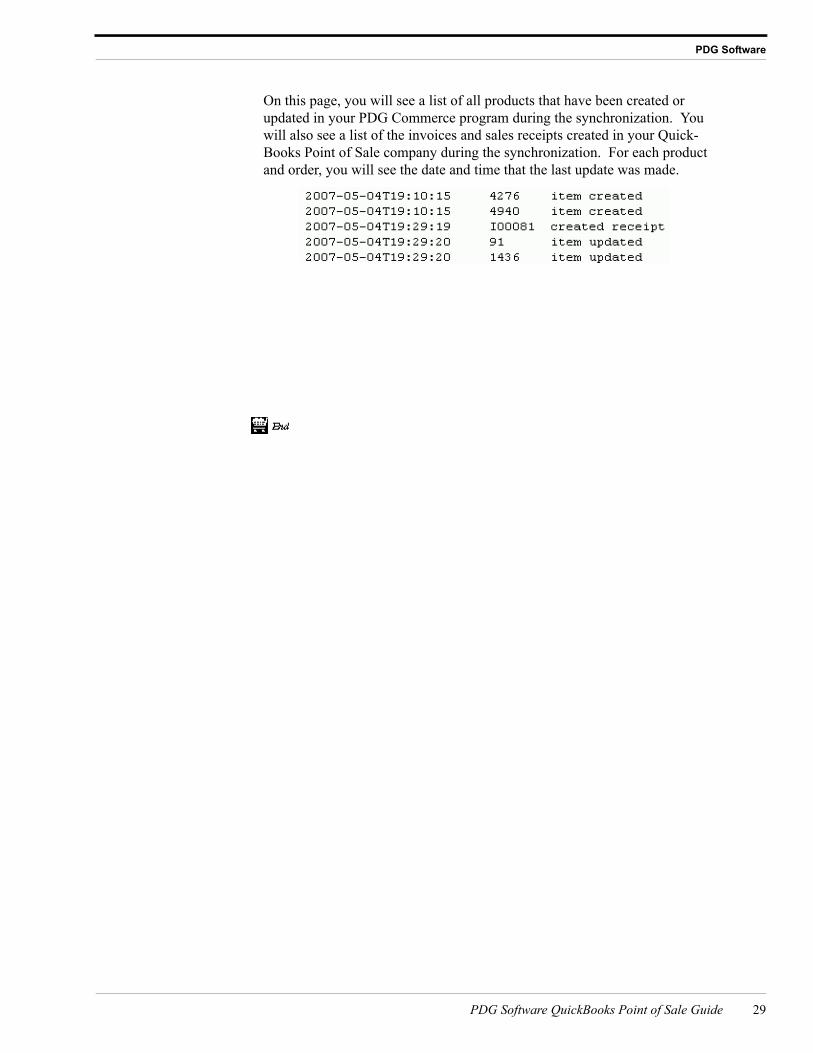
On this page, you will see a list of all products that have been created or updated in your PDG Commerce program during the synchronization. You will also see a list of the invoices and sales receipts created in your Quick-Books Point of Sale company during the synchronization. For each product and order, you will see the date and time that the last update was made.
PDG Software QuickBooks Point of Sale Guide 29

PDG Software
30 PDG Software QuickB
ooks Point of Sale Guide
Chapter 5 PDG Commerce Style Tags
Configuring PDG Commerce templates to display QuickBooks Point of Sale style options.
his chapter explains how to use PDG Commerce tags to control the dis-play of the Item template that provides a drop down menu of the style choices. Please note that you may either use the default Item template for
your PDG Commerce program to display the menu, or create a new Item tem-plate to be used for style products.
Template TagsThe following tags are available for use on the Style Item template:
<!---QBPOS_STYLE_DROP_DOWN--->
This tag will create a drop down menu containing the different style options for the product group. By default, this menu will contain the text entered in the User Defined Data 8 field. If you want to use a different field, you may specify that in the Advanced Settings section of the “QBWC For QuickBooks POS Settings” page in your Commerce Administrator. This tag must appear in the template as:
<!---QBPOS_STYLE_DROP_DOWN--->
‘STYLE’ Tags
When used in the Style Item HTML template, the STYLE tags will list the style products for the current style grouping. Each style choice exists as a separate product in your Commerce Administrator. If a style group contains nine products, the HTML code and PDG tags located inside the STYLE sec-
T
PDG Software QuickBooks Point of Sale Guide 31

PDG Software
32 PDG Software QuickB
tion will be repeated nine times, once for each product. The STYLE tags will display all product style choices in the same fashion.
These tags must appear in the HTML template file as:
<select name=stylekey><option value="">Select Style/Size</option><!---BEGIN_STYLE---><option value="!---SKU---">[style display data]</option><!---END_STYLE---></select>
The tags that may be used between the STYLE tags in the Style Item HTML template (i.e., the style display data) are as follows:
<!---SKU---> Tag
This tag is replaced by the sku number of the style selection product. This tag must be used as the option value setting in the drop down menu, but may also be used as part of the style display data. The tag must appear in the template file as:
!---SKU---or<!---SKU--->
<!---DESC---> Tag
This tag is replaced by the name of the style selection product. The name of the product is saved in the “One-Line Description” field in the product details of your Commerce Administrator. The tag must appear in the template file as:
<!---DESC--->
<!---PRICE---> Tag
This tag is replaced by the price of the style selection product. The tag must appear in the template file as:
<!---PRICE--->
ooks Point of Sale Guide

PDG Software
<!---TEXT---> Tag
This tag is replaced by the long description of the style selection product. The long description is saved in the “Specific Product Text” field in the product details of your Commerce Administrator. The tag must appear in the template file as:
<!---TEXT--->
<!---INV---> Tag
This tag is replaced by the inventory status of the style selection product. There are two ways to display inventory. In the Commerce Options section of your Commerce Administrator, there is a checkbox named “Display Inven-tory Amount.” If this box is checked, a number will be displayed, indicating the total number of items remaining in stock. If the box is not checked, an inventory status message will be displayed, such as “Available” or “Out of Stock.” The tag must appear in the template file as:
<!---INV--->
<!---WEIGHT---> Tag
This tag is replaced by the weight of the style selection product. This tag must appear in the template file as:
<!---WEIGHT--->
<!---USERDEF Tag
This tag is replaced by the corresponding User Defined Data field for the style selection product. This tag should include an index number to indicate which of the ten user defined fields should be used. The tag must appear in the tem-plate file as:
<!---USERDEF0--->,<!---USERDEF1--->,<!---USERDEF2--->,etc.
PDG Software QuickBooks Point of Sale Guide 33

PDG Software
34 PDG Software QuickB
ConsiderationsAny tags available for use on the Search Results template may be used within the STYLE tags. You can find a detailed explanation of each tag in the “HTML Template Files” chapter of the PDG Commerce Technical Reference Guide, available for download athttp://www.pdgsoft.com/docs/Comm_4_TechRef.pdf.
Specifically for the select menu that will display the drop down menu of style choices, it is suggested that you use only the tags listed in this chapter. Other tags available for use within the STYLE tags may include HTML code for for-matting, which would prevent proper operation of the drop down menu.
ooks Point of Sale Guide