quilt diagram - benartex · note: if this benartex pattern is included in a kit, any questions...
TRANSCRIPT
Note: If this Benartex pattern is included in a kit, any
questions about the kit should be addressed to the vendor from whom you bought it.
benartex, llc. • 132 West 36th street, 4th floor neW York, nY 10018 • t: 212-840-3250 • WWW.benartex.comthe quilt shown is a digital representation. actual fabric repeats will vary from design shown.
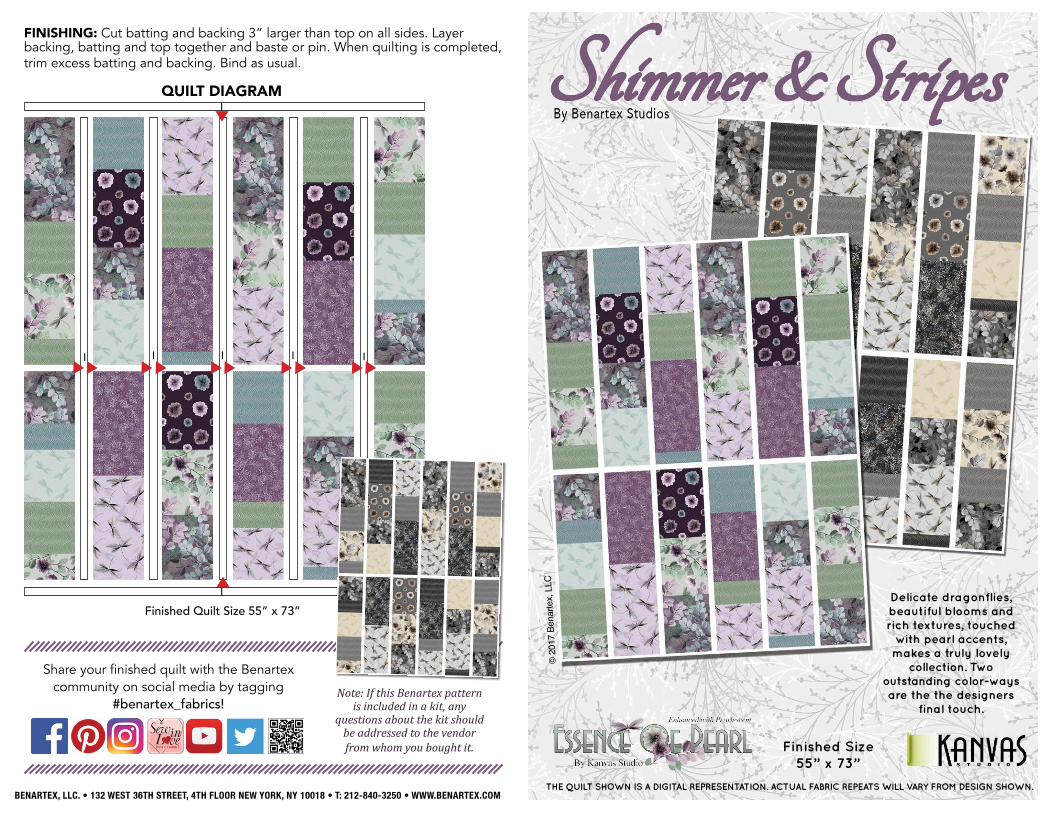
QUILT DIAGRAM
Finished Quilt Size 55” x 73”
Share your finished quilt with the Benartex community on social media by tagging
#benartex_fabrics!
FINISHING: Cut batting and backing 3” larger than top on all sides. Layer backing, batting and top together and baste or pin. When quilting is completed, trim excess batting and backing. Bind as usual.
delicate dragonflies, beautiful blooms and rich textures, touched
with pearl accents, makes a truly lovely
collection. two outstanding color-ways are the the designers
final touch.
finished size55” x 73”
I I I I I
I
I
© 20
17 B
enar
tex,
LLC

A
SAMPLE KEY/SKU QTY CUT
(3) 8½” x WOF strips, subcut (5) 8½” squares (2) 8½” x 16½” rectangles (1) 8½” x 10½” rectangles
WOF = Width OF FaBriC | *SeW StripS via ShOrt endS
Sheer Leaves8727p-62 Lavender8727p-11 Smokey Gray
3/4 yd
Ctree Blossoms8726p-06 Lavender8726p-07 ecru
1/2 yd
dWind Wave8728p-54 Seafoam8728p-11 Charcoal
1/4 yd
e(2) 8½” x WOF strips, subcut (1) 8½” squares (3) 8½” x 10½” rectangles
dragonfly Silhouette8731p-04 Light Sage8731p-07 ecru
1/2 yd
FFloating Blossoms8729p-66 purple8729p-11 Stone Gray
1/4 yd
G
tossed Sprigs8733p-62 purpleQueen anns Lace8730p-12 Black
1/2 yd
h
(2) 8½” x WOF strips, subcut (3) 8½” x 12½” rectangles (1) 8½” x 16½” rectangles (1) 8½” square
dragonfly dream8732p-06 Lilac8732p-13 dove
1/2 yd
(1) 8½” x WOF strips, subcut (3) 8½” x 12½” rectangles
i
(2) 1 ½” x WOF strips, subcut (6) 1 ½” x 8 ½” rectangles(16) 1 ½” x WOF strips*, sashing & borders(7) 2 ¼” x WOF strips*, Binding
Colors For Quilters3000h-09 White 1-3/8 yd
1. Quilt CenterSew together quilt using A-H 8-1/2” squares and rectangles following the diagram below. Sew (1) I 1-1/2” x 8-1/2” sashing strip in between each row as shown in diagram.
B
(2) 8½” x WOF strips, subcut (1) 8½” x 6½” rectangles (1) 8½” x 10½” rectangles (2) 8½” x 4½” rectangles (5) 8½” squares
Wind Wave8728p-40 Sage8728p-13 Steel
1/2 yd
(2) 8½” x WOF strips, subcut (5) 8½” x 10½” rectangles (1) 8½” x 4½” rectangles
(1) 8½” x WOF strips, subcut (2) 8½” squares (3) 8½” x 2½” strips (1) 8½” x 4½” rectangles
(2) 8½” x WOF strips, subcut (3) 8½” x 16½” rectangles (1) 8½” x 12½” rectangles
TexT in purple represenTs purple color-way
I I I I I I
B
BB
B
B B
B
B
D
D
D
D
D
B
FF
F
G
G
G
G
E
E
E
E
H
H
H
H
H
C
C
C
C
C
C
A A
A
A
A
A
A
A
D
2. Sashing & Borders: Following the Quilt diagram on the last page, sew (1) I 1 ½” x 71 ½” strip in-between each row and (1) to left side and (1) to the right side of QUILT CENTER. then sew (1) I 1 ½” x 55 ½” strip to the top and bottom of QUILT CENTER.