quilt magician manual updated 4-23-12 - tinlizzie18.com · locate your sd card and plug it into...
TRANSCRIPT

Users Manual

Quilt Magician manual is to help you learn the buttons and features of the Quilt Magician. We will show you screens and help you learn to set Quilt area, Pattern Boxes, Place Patterns, and size and position pat-terns for stitching out. We will also cover some of the Parameters and Constants used to control the stitching with the robotics.
Designers Patterns
Janie Mullen Janesville Wisconsin® All patterns under copyright
JoAnn HoffmanHill City, South DakotaCompuQuilter Designs www.compuquilterdesigns.comWebsite www.dakota-designs.com® All patterns under copyright
Jessica SchickDIGI-TECHwww.digitechpatterns.com® All patterns under copyright
® TinLizzie18
First print Feb 2012Second Print 23 April 2012
Quilt Magician will read the following fi le formats QCC, QLI, or DXF

3
Table of ContentsSection 1: Getting Started
Getting Started ............................................................................................. pg 4 First things First ........................................................................................... pg 5
Section 2: Initial Start-up
Initial Start up .............................................................................................. pg 6
Setting Quilt Block and Panto Designs ....................................................... pg 7
Section 3: Button Overview Home Button .............................................................................................. pg 8
Tablet Button ............................................................................................... pg 16
Magnifying Glass ........................................................................................ pg 19
Run Buttons ................................................................................................. pg 19
Section 4: Editing
Editing Your Pattern .................................................................................... pg 20
Running a Pattern ....................................................................................... pg 22
Section 5: Trouble Shooting
Remote ......................................................................................................... pg 24
Robot (Black Motor Box) ........................................................................... pg 25
USB Jump Drive Help ................................................................................ pg 26
4
Section 1: Getting StartedThis manual will cover everything you will need to know to RUN your Quilt Magician™. (If you have not yet installed the Quilt Magician™ on your frame, please refer to the “Installation Instructions”.) With “Step by Step” sections, you will feel comfortable using your system in no time.
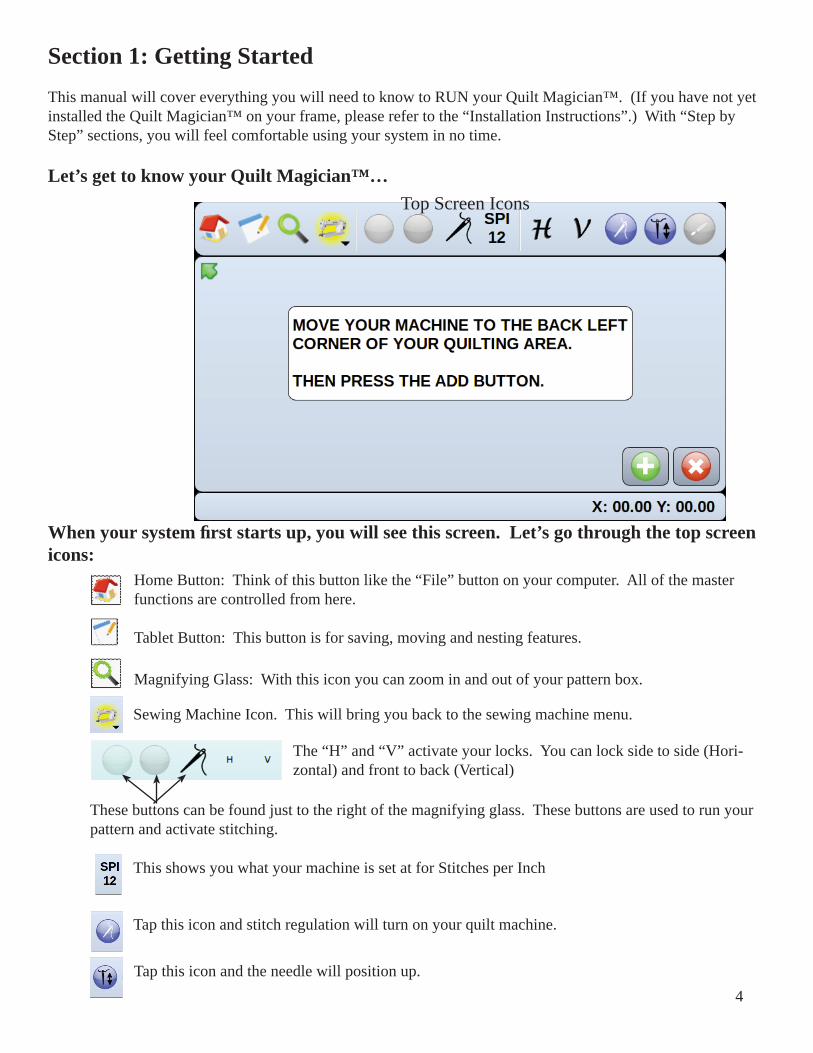
Let’s get to know your Quilt Magician™…Top Screen Icons
When your system fi rst starts up, you will see this screen. Let’s go through the top screen icons:
Home Button: Think of this button like the “File” button on your computer. All of the master functions are controlled from here.
Tablet Button: This button is for saving, moving and nesting features.
Magnifying Glass: With this icon you can zoom in and out of your pattern box.
The “H” and “V” activate your locks. You can lock side to side (Hori-zontal) and front to back (Vertical)
These buttons can be found just to the right of the magnifying glass. These buttons are used to run your pattern and activate stitching.
Sewing Machine Icon. This will bring you back to the sewing machine menu.
Tap this icon and stitch regulation will turn on your quilt machine.
Tap this icon and the needle will position up.
This shows you what your machine is set at for Stitches per Inch
5
The next pages will go through, in detail, how to run your system and an in depth over-view of each button and its functions. Note: The edit button will not be seen in all the photos in this manual but it will be on your screen.
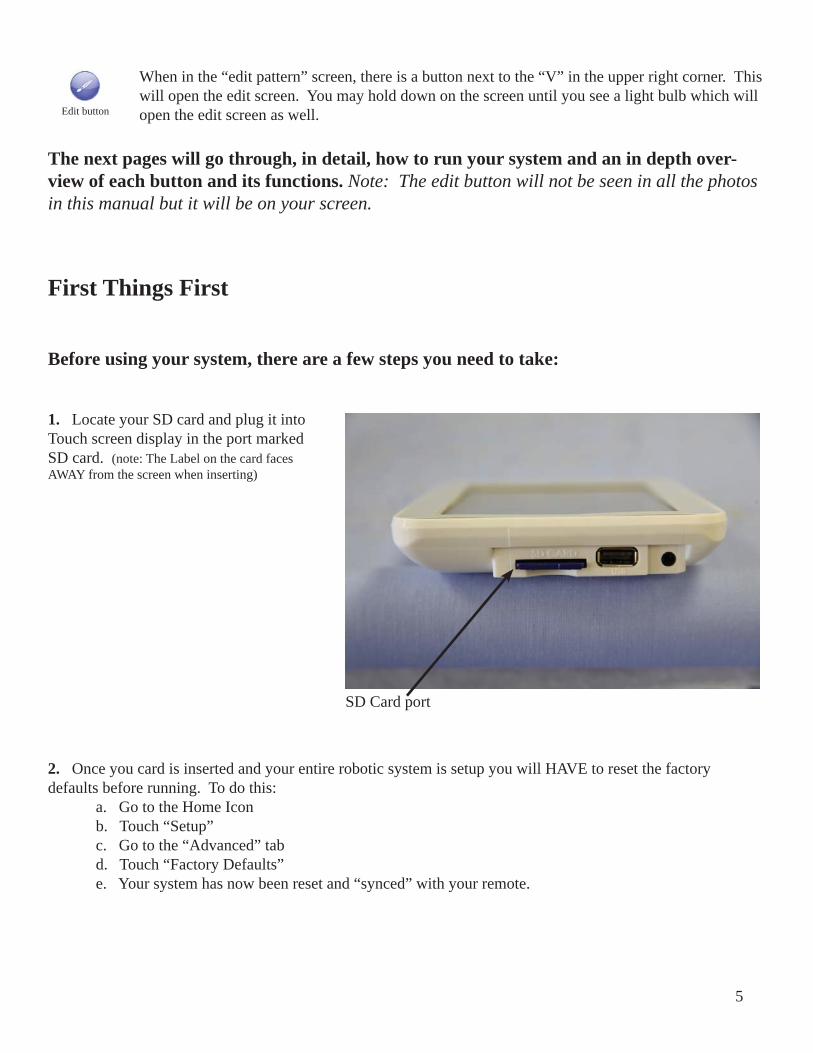
When in the “edit pattern” screen, there is a button next to the “V” in the upper right corner. This will open the edit screen. You may hold down on the screen until you see a light bulb which will open the edit screen as well.Edit button
Before using your system, there are a few steps you need to take:
1. Locate your SD card and plug it into Touch screen display in the port marked SD card. (note: The Label on the card faces AWAY from the screen when inserting)
2. Once you card is inserted and your entire robotic system is setup you will HAVE to reset the factory defaults before running. To do this: a. Go to the Home Icon b. Touch “Setup” c. Go to the “Advanced” tab d. Touch “Factory Defaults” e. Your system has now been reset and “synced” with your remote.
First Things First
SD Card port
6
Section 2: Initial Start-up
For your initial startup you need to run a few test patterns to ensure everything is setup properly. To run the test patterns follow these steps:
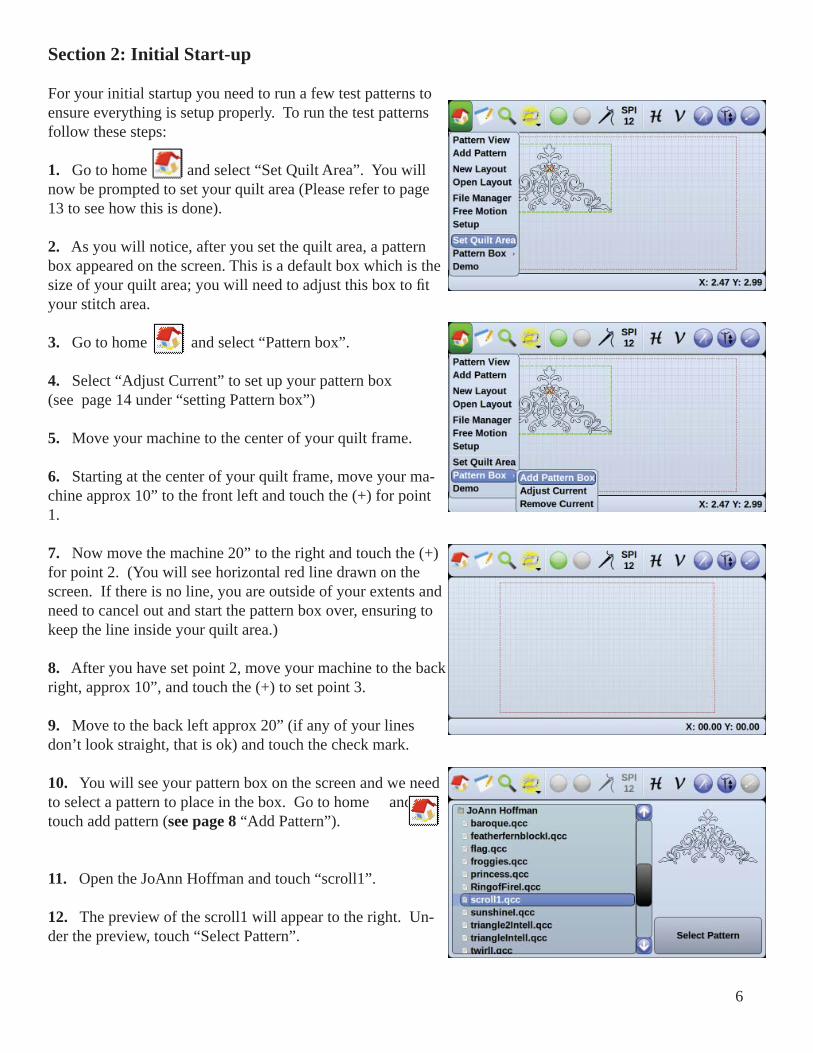
1. Go to home and select “Set Quilt Area”. You will now be prompted to set your quilt area (Please refer to page 13 to see how this is done).
2. As you will notice, after you set the quilt area, a pattern box appeared on the screen. This is a default box which is the size of your quilt area; you will need to adjust this box to fi t your stitch area.
3. Go to home and select “Pattern box”.
4. Select “Adjust Current” to set up your pattern box (see page 14 under “setting Pattern box”)
5. Move your machine to the center of your quilt frame.
6. Starting at the center of your quilt frame, move your ma-chine approx 10” to the front left and touch the (+) for point 1.
7. Now move the machine 20” to the right and touch the (+) for point 2. (You will see horizontal red line drawn on the screen. If there is no line, you are outside of your extents and need to cancel out and start the pattern box over, ensuring to keep the line inside your quilt area.)
8. After you have set point 2, move your machine to the back right, approx 10”, and touch the (+) to set point 3.
9. Move to the back left approx 20” (if any of your lines don’t look straight, that is ok) and touch the check mark.
10. You will see your pattern box on the screen and we need to select a pattern to place in the box. Go to home and touch add pattern (see page 8 “Add Pattern”).
11. Open the JoAnn Hoffman and touch “scroll1”.
12. The preview of the scroll1 will appear to the right. Un-der the preview, touch “Select Pattern”.

7
13. Your scroll1 may be too small for your pattern box, this is ok.
14. Touch the green light to the right of the magnifying glass and your machine will trace through the pattern (see page 22 under “when running a pattern”).
15. Did you have any errors come up? If so, go to page 24 and go through the trouble shooting steps. If no errors go to step 22.
16. If no errors occurred, we now want to activate stitch-ing. Touch the needle with thread at the top right of the screen. If it turns green you are ready to go.
17. Unthread your needle and run the pattern just as you had before. Your pattern should run through exactly the same as last time, but should be stitching now.
18. If no errors come up then your system is ready to go, load different pattern boxes and become familiar with how the system works before you put on an offi cial quilt.
Setting up a Quilt Block:
1. After setting your quilt area (see pg 13), you are now ready to set a pattern box. Remember, just after you have set your “Quilt Area”, the default pattern box that appears is the size of your quilt area. You can use this as your pat-tern box or you can “Adjust Current” and make a specifi c sized pattern box.
2. When setting up your fi rst pattern box, after setting the “Quilt Area”, always select the “Adjust Current” option for setting a pattern box.
3. Set up the respective pattern box (see pg 13 for setting a pattern box) then select the pattern you want to place in the pattern box (see pg 8 under add pattern).
4. Edit your pattern however you would like (see pg 20) by bringing up the edit menu and selecting your desired editing option.

8
5. Once you have fi nished editing your pattern to your de-sired liking, run the pattern (see pg 22 under “When running a pattern”).
Setting up a Pantograph style pattern
1. When setting up a pantograph, you will use the same steps as setting your quilt block (see above), except you will repeat the pattern the desired times to fi ll your pattern box (see page 20 under repeat).
2. After you have repeated the desired amount of times, notice a few things:
a. Each pattern you have repeated has a green circle at the beginning of the pattern and a red (X) at the end of the pattern. You don’t want any circles or (X)’s in the center of your repeats because this means you will have jump stitch-es. b. The machine will always move left to right, if your circles are on the right and the (X) is on the left, you will need to mirror the pattern. NOTE: It is important you mirror the pattern before you repeat it, or you will run into issues.
3. You are now ready to run (See pg 22 under “When run-ning a pattern”).
4. NOTE: Even though you are able to set up several pattern boxes at one time, the system will only run the pat-tern box you have showing on the screen. Once that box is fi nished you will need to move to the new screen to run the other pattern boxes you have setup.
Section 3: Button Overview
Home menu:
Pattern view: takes you to your edit pattern screen. Here you will see any patterns you have added to your pattern box and will be able to edit them as needed. (for editing options see page 20)
Add pattern: Opens the pattern selection screen and allows you to add a pattern. You can have as many patterns as you like in each pattern box.
Circle forStart
(X) forFinish
9
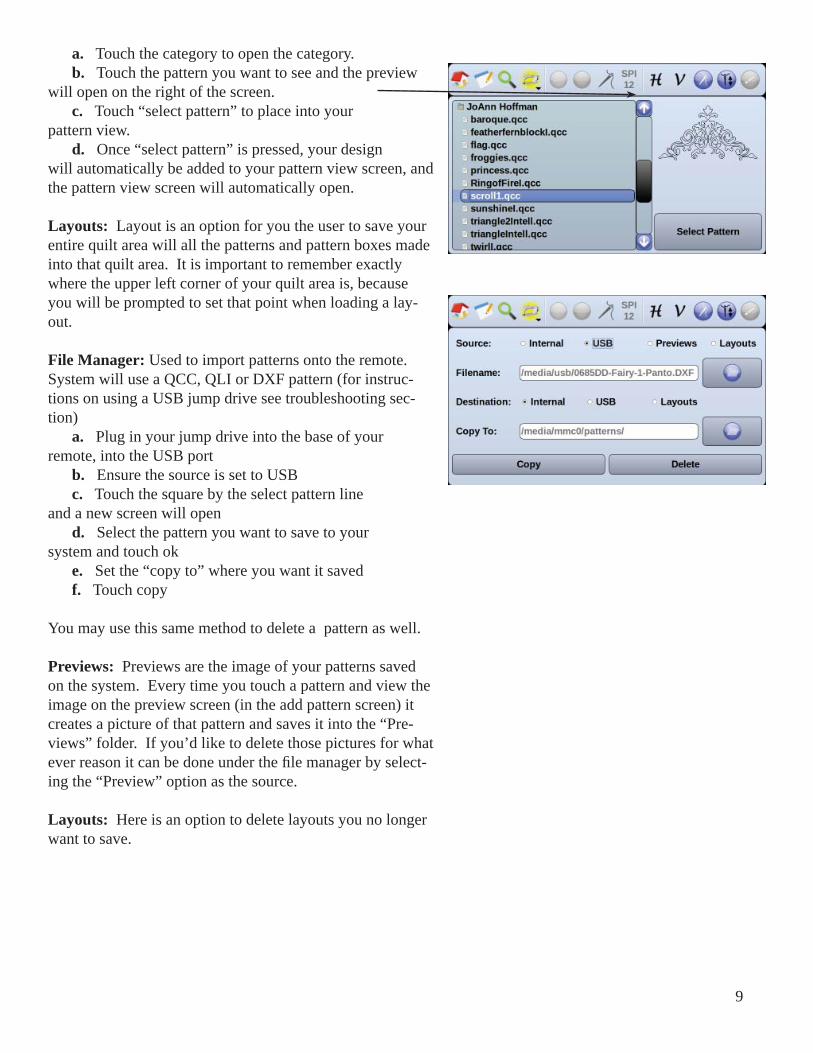
a. Touch the category to open the category. b. Touch the pattern you want to see and the preview will open on the right of the screen. c. Touch “select pattern” to place into your pattern view. d. Once “select pattern” is pressed, your design will automatically be added to your pattern view screen, and the pattern view screen will automatically open.
Layouts: Layout is an option for you the user to save your entire quilt area will all the patterns and pattern boxes made into that quilt area. It is important to remember exactly where the upper left corner of your quilt area is, because you will be prompted to set that point when loading a lay-out.
File Manager: Used to import patterns onto the remote. System will use a QCC, QLI or DXF pattern (for instruc-tions on using a USB jump drive see troubleshooting sec-tion) a. Plug in your jump drive into the base of your remote, into the USB port b. Ensure the source is set to USB c. Touch the square by the select pattern line and a new screen will open d. Select the pattern you want to save to your system and touch ok e. Set the “copy to” where you want it saved f. Touch copy
You may use this same method to delete a pattern as well.
Previews: Previews are the image of your patterns saved on the system. Every time you touch a pattern and view the image on the preview screen (in the add pattern screen) it creates a picture of that pattern and saves it into the “Pre-views” folder. If you’d like to delete those pictures for what ever reason it can be done under the fi le manager by select-ing the “Preview” option as the source. Layouts: Here is an option to delete layouts you no longer want to save.
10
Free motion: Allows you to record your machine move-ments and save them. NOTE: in order to see what you are recording, your movements need to be within your set quilt area. ALSO NOTE: You do not have to stitch in order to record your movements. To Free Motion: a. Touch start b. Move your machine how you want c. When fi nished touch stop d. If you like what you see, touch save and it will save your design to the bottom of your list in the “Add Pattern” screen.
Setup: System settings and updates will be done here
Updates:
When you receive your update, you will copy the “tar.gz” fi le directly to the USB drive. Touch “update system”, this will automatically fi nd the new update fi le and update for you. (see pg 26)
The other two update options, (update program, update robot)are only used to downgrade if needed. You will be on the phone with a tech support person if you ever need to use these two options.
Calibrate screen: If the calibration is off, touch this button and follow the on screen steps to re-calibrate.
System info: Will inform you the current software versions
Motors Forward: Most systems have the motor box mounted to the front or fabric side of the frame. You would be directed to mount the motor box on the back or non fab-ric side if required by your setup.Motor box in the font this button should read motor forward.Motor box in the back this button should read motor reverse
11
Parameters:Length is deactivated because it is controlled by your respec-tive stitch regulation
Max Speed Your machine speed is controlled by your touch screen display. You can set the max speed in the parameters and know exactly what the speed is going to be when you go to run. This speed will also be displayed on the “running pat-tern” screen and can be adjusted from there.
Min Speed This is the slowest you want your system to run. We recommend keeping it in the 1-2 range.
Lock: Number of lock stitches you want at the beginning and end of each pattern
Needle: Sets the speed the needle will run when needle up/down is pressed. By adjusting this higher, your needle will needle up/down faster. By setting this slower your needle will up/down slower. This defaults to medium (5).
Constants:
X & Y Power: These should default to 30. If you hear a slight vibration you can adjust these down a bit, but you really shouldn’t need to touch these at all.

12
Time out: When the motors are locked, this is the time in seconds they will stay locked for. NOTE: If your machine is moving, this timer resets until it detects the machine no longer moving, then the timer starts counting from 100 again. Every time the machine is moved, this timer will reset until the machine stops again.E Stop: E Stop is in a protection in place to ensure if anything is in the way of the machine’s movement, that the machine will stop. The default value is a good tested value, but this may be adjusted up to make the system more robust. NOTE when adjusting up, if the needle is ever stuck in the fabric and the robot goes to move, you may break the needle or tear your fabric, be cautious when adjusting this number.Margin: This will set an area from the edge of your pattern box towards the center that your pattern will not extend past.Jump Stitch: When 2 patterns are on the screen and your end point of 1 and start point of 2 aren’t in the same place, the machine will move from point 1 to point 2 without stitching. Adjust this number to the length of jump stitch you fi nd acceptable. For example, with jump stitches set to “0” it will always ask you to cut the thread. If you want it to jump stitch up to 6” automatically (without asking to cut the thread), and any jump stitch above 6” it will ask you to cut, set your jump stitch to 6”. Acceleration determines how quickly your robot will move in and out of the corners. Think of this as the mini-mum speed your robot will run, if set to max it will really “jump” out of the corners. If set to the min it will “creep” out of the corners. Factory setting is medium (5)Curvature: When going around a curve this is how quickly the system will go around the curve. The higher the number the faster it will go, the lower the number the slower it will go around the curve.Lead line: This will be the speed your machine will move to the start point. This is separate from the max speed, the lead line has it’s own speed.Increment: In the “move” feature, you can move the pat-tern in set increments using the arrow keys at the bottom of the screen (when using the move feature). This incre-ment will apply to how far the patter moves every time you touch one of the arrows. Test tab can be used to test left/right movement and front/back movement. This will ensure all motor functions are working properly. Confi guration: This is only for factory use.
13
If you did not want to set the Quilt Area, touch the “X” to cancel out. If the area has not yet been set, you will be required to set it and can’t cancel out until it is set.
Set Quilt Area: This is the entire area that can be quilted at any time. It will ask you to move to the upper left corner of your quilt area and touch the (+) key, then it will ask you to move to the lower right and touch the (+) key. It will then give you the width and the height of your area. This is to ensure the system knows where your rails are and doesn’t run into one of them.
a. After setting your quilt area, it will automatically become the Pattern Box. (see “adjust current” below for options)
b. If you have not yet set the quilt area and you try to add a pattern or do a pattern box, you will be required to set the area fi rst.
Set pattern box: This is your individual pattern box you are setting. It may be the same size as your quilt area, it may be a smaller quilt block.
The fi rst 2 points of your pattern box are going to set what is called a “base line”. This determines which way your pattern will be inserted into the pattern box.
You need to ALWAYS set your pattern box points counter clock wise. If you want your base line to be at the bottom and your pat-tern inserted right side up, set the lower left and right hand points. If you want your baseline to be at the top and the pattern inserted upside down, set the baseline at the back right and back left.

14
Adjust current: After you set your quilt area a default pat-tern box will appear, you have a few options: a. Use the Quilt Area as your pattern box and do not set a new pattern box. b. Select “Adjust Current” and set a new pattern box.
1. If setting a pattern box different then your Quilt Area, select the “Adjust Current” option under “Pattern Box”.
2. Move your machine to the fi rst point of your pat-tern box. Don’t forget the fi rst two points of your pattern box make your baseline. Also ensure you set your points counter-clockwise. a. You should see a red cross hair on the screen. If you do not, you are outside your quilt area.
3. Once you have moved your machine to point 1, press the (+) key. The touch screen will now say to move to the next point. Remember to move in a counter-clockwise motion.
4. As you move to your next point, you will see a red line being drawn on the screen; this is the base line of your pattern box. If you do not see this line, you are outside of your quilt area.
15
5. Touch the (+) for your second point and then move to the third point. Every pattern box requires three points.
6. If you are setting a triangle and the third point is your last point; touch the check mark for the third point. The check mark will add your last point and fi nish your pattern box. A line will automatically draw from your last point to your fi rst point for you.
7. If you are making something with more then 3 points, after pressing the (+) for point 3, move to point 4.
8. If point 4 is your last point, touch the check mark and it will automatically add the fourth point for you and give you width and height dimensions for the pat-tern box.
Add Pattern box: You can do as many pattern boxes as you want. When you add a pattern box it will show you in the pattern view how many boxes you have by: PB 2 of 3. It will show in the upper corners of your screen which pattern box is which way. If you are on pattern box #2 and you have 3 pattern boxes, at the top it will say “PB 2 of 3”. In the left corner you will have an arrow that says “PB1” and in the right corner you will have an arrow that says “PB3”. To move to a different pattern box you have 2 options
16
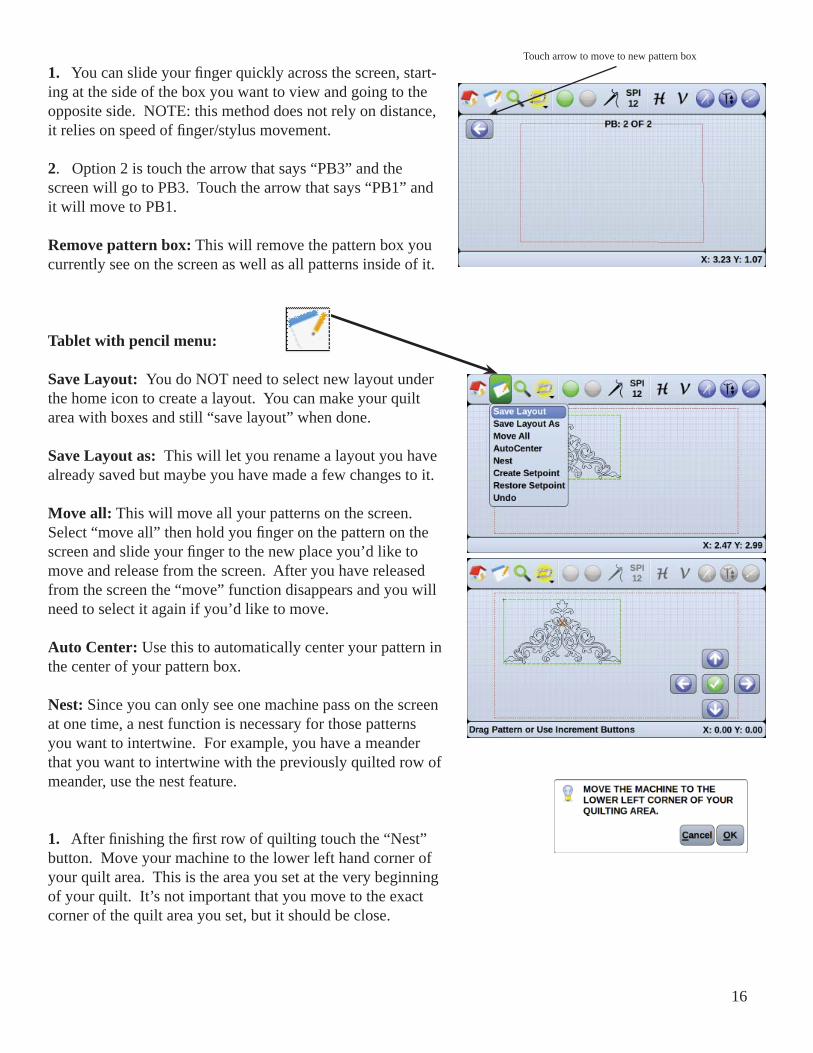
1. You can slide your fi nger quickly across the screen, start-ing at the side of the box you want to view and going to the opposite side. NOTE: this method does not rely on distance, it relies on speed of fi nger/stylus movement.
2. Option 2 is touch the arrow that says “PB3” and the screen will go to PB3. Touch the arrow that says “PB1” and it will move to PB1.
Remove pattern box: This will remove the pattern box you currently see on the screen as well as all patterns inside of it.
Tablet with pencil menu:
Save Layout: You do NOT need to select new layout under the home icon to create a layout. You can make your quilt area with boxes and still “save layout” when done.
Save Layout as: This will let you rename a layout you have already saved but maybe you have made a few changes to it.
Move all: This will move all your patterns on the screen. Select “move all” then hold you fi nger on the pattern on the screen and slide your fi nger to the new place you’d like to move and release from the screen. After you have released from the screen the “move” function disappears and you will need to select it again if you’d like to move.
Auto Center: Use this to automatically center your pattern in the center of your pattern box.
Nest: Since you can only see one machine pass on the screen at one time, a nest function is necessary for those patterns you want to intertwine. For example, you have a meander that you want to intertwine with the previously quilted row of meander, use the nest feature.
1. After fi nishing the fi rst row of quilting touch the “Nest” button. Move your machine to the lower left hand corner of your quilt area. This is the area you set at the very beginning of your quilt. It’s not important that you move to the exact corner of the quilt area you set, but it should be close.
Touch arrow to move to new pattern box
17
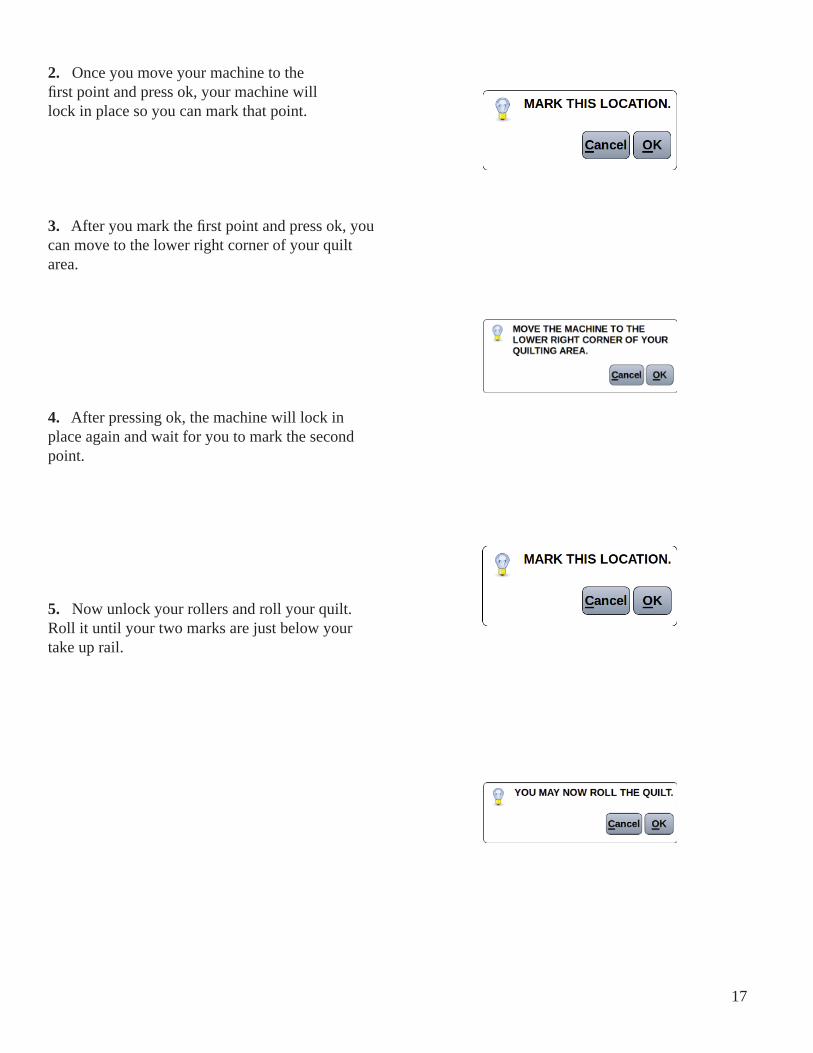
2. Once you move your machine to the fi rst point and press ok, your machine will lock in place so you can mark that point.
3. After you mark the fi rst point and press ok, you can move to the lower right corner of your quilt area.
4. After pressing ok, the machine will lock in place again and wait for you to mark the second point.
5. Now unlock your rollers and roll your quilt. Roll it until your two marks are just below your take up rail.
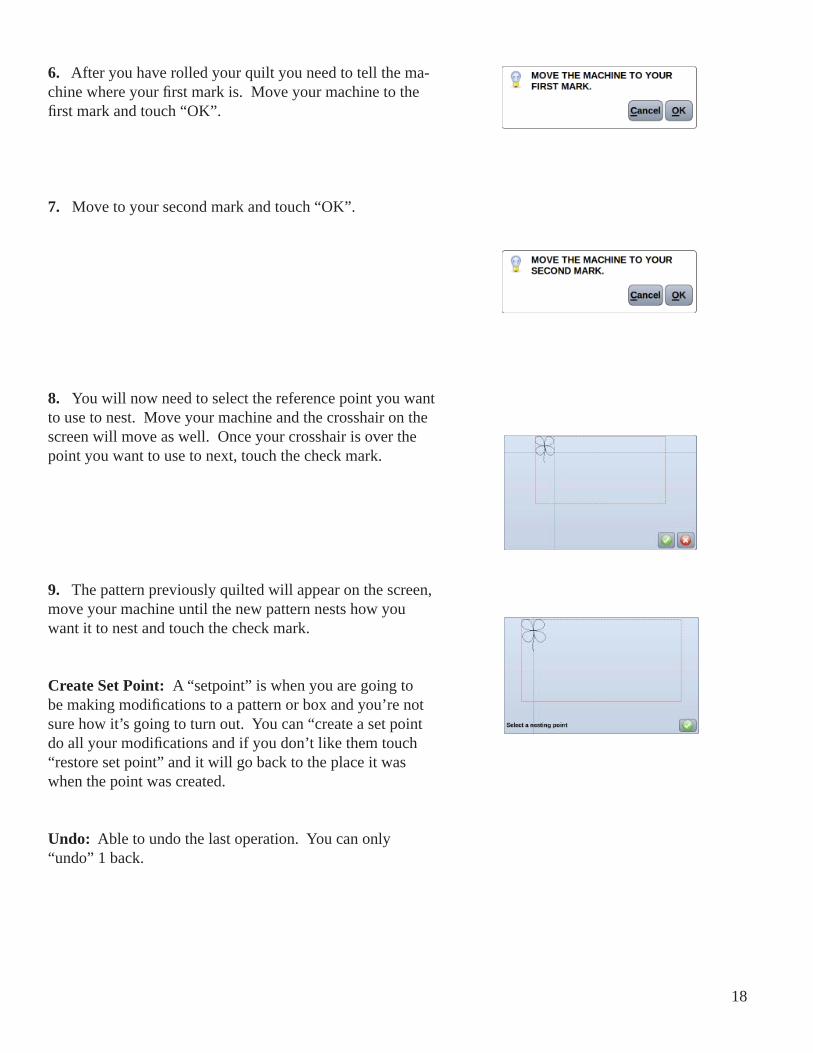
18
6. After you have rolled your quilt you need to tell the ma-chine where your fi rst mark is. Move your machine to the fi rst mark and touch “OK”.
7. Move to your second mark and touch “OK”.
8. You will now need to select the reference point you want to use to nest. Move your machine and the crosshair on the screen will move as well. Once your crosshair is over the point you want to use to next, touch the check mark.
9. The pattern previously quilted will appear on the screen, move your machine until the new pattern nests how you want it to nest and touch the check mark.
Create Set Point: A “setpoint” is when you are going to be making modifi cations to a pattern or box and you’re not sure how it’s going to turn out. You can “create a set point do all your modifi cations and if you don’t like them touch “restore set point” and it will go back to the place it was when the point was created.
Undo: Able to undo the last operation. You can only “undo” 1 back.

19
Magnifying Glass:
Zoom all: Automatically zooms back to the pattern box sizePan: When zoomed in, if you need to pan to a different part of the screen, touch the screen and drag your fi nger and the screen will move. (note: this is not the pattern moving, it is your viewpoint of the screen moving)
Green Light: Runs the pattern. You must be in the pattern view screen with a pattern loaded to use the green light
Red light: Stops the pattern. You must be running a pat-tern in order to stop a pattern
Needle with thread: Has been disable on the newer ESP machines... This is to enable stitching on the older machines with a stitcher box. If it is green, stitching is en-abled. If it is not green stitching is not enabled. You may pause a pattern and enable/disable stitching while a pattern is running if you’d like.
SPI with a number: This is for ESP machines and shows the current stitches per inch of the machine. You can change this value by taping, a window will open that you can use to change this setting.
Horizontal lock: Will lock your machine horizontally so you can only move it vertically. (Note: If your time out is set to 100 seconds, it will only stay locked for 100 seconds when the machine is stationary…when the machine is moving this counter resets)(see timeout on pg 6).
Vertical lock: Will lock your machine vertically so you can only move it horizontally (Note: if your time out is set to 100 seconds, it will only stay locked for 100 seconds when the machine is stationary…when the machine is moving this counter resets)(see timeout on pg 8).
Blue button with white needle: Tapping this will start the stitch regulation turning on your machine.
Blue button with black needle: Will position the needle up.
20
Section 4: Editing
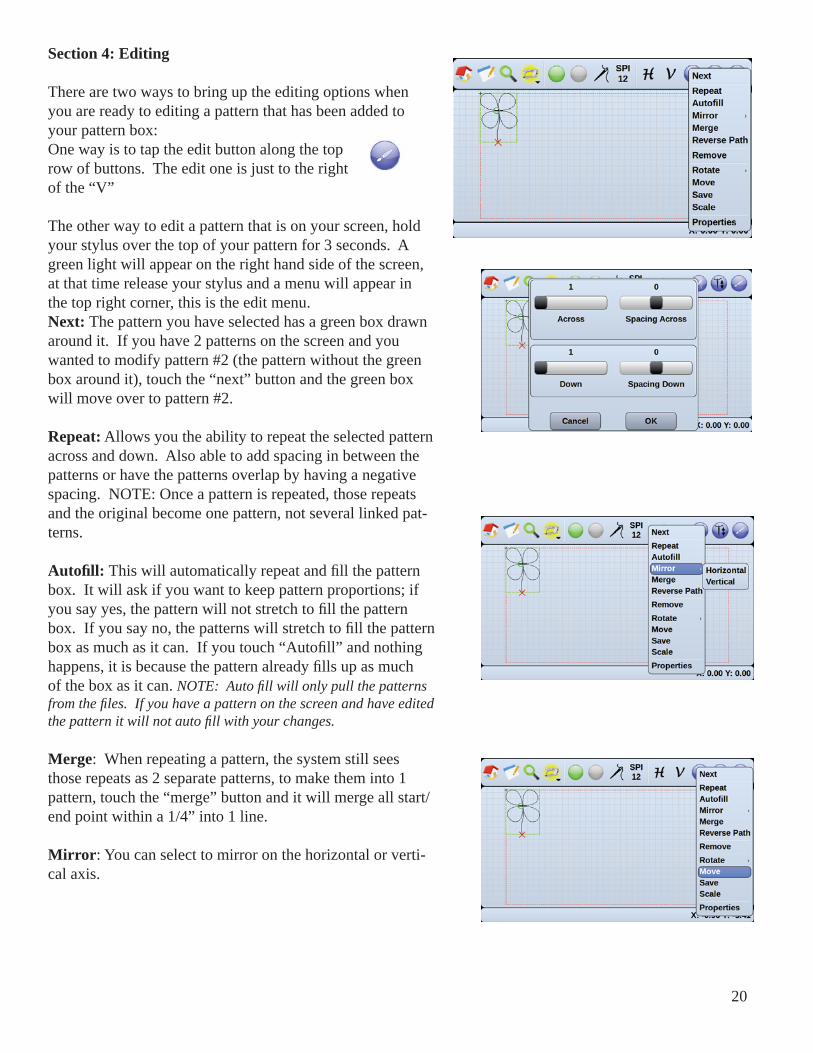
There are two ways to bring up the editing options when you are ready to editing a pattern that has been added to your pattern box:One way is to tap the edit button along the top row of buttons. The edit one is just to the right of the “V”
The other way to edit a pattern that is on your screen, hold your stylus over the top of your pattern for 3 seconds. A green light will appear on the right hand side of the screen, at that time release your stylus and a menu will appear in the top right corner, this is the edit menu.Next: The pattern you have selected has a green box drawn around it. If you have 2 patterns on the screen and you wanted to modify pattern #2 (the pattern without the green box around it), touch the “next” button and the green box will move over to pattern #2.
Repeat: Allows you the ability to repeat the selected pattern across and down. Also able to add spacing in between the patterns or have the patterns overlap by having a negative spacing. NOTE: Once a pattern is repeated, those repeats and the original become one pattern, not several linked pat-terns.
Autofi ll: This will automatically repeat and fi ll the pattern box. It will ask if you want to keep pattern proportions; if you say yes, the pattern will not stretch to fi ll the pattern box. If you say no, the patterns will stretch to fi ll the pattern box as much as it can. If you touch “Autofi ll” and nothing happens, it is because the pattern already fi lls up as much of the box as it can. NOTE: Auto fi ll will only pull the patterns from the fi les. If you have a pattern on the screen and have edited the pattern it will not auto fi ll with your changes.
Merge: When repeating a pattern, the system still sees those repeats as 2 separate patterns, to make them into 1 pattern, touch the “merge” button and it will merge all start/end point within a 1/4” into 1 line.
Mirror: You can select to mirror on the horizontal or verti-cal axis.

21
Move: When move is selected, arrow keys will appear in the lower right corner which the user can use to get a pattern exactly to a place they want it to be. The “increment” (how far the pattern moves in that direction) that is used every-time an arrow key is pressed correlates to the “increment” found under the “constants” under setup.
If you have a pattern on the screen repeated several times and you only want to move 1 of the patterns not all of them, you will need to take a different approach. When you repeat a pattern, the original pattern and the repeats become all one pattern, so it’s not possible to move just one of the portions of the repeat, because it is all one pattern. You will need to insert the pattern several times in order to move just one individual pattern.
Remove: Will remove the current pattern that is in the green box.
Rotate: You may either select a specifi c rotation by touch-ing “Select” and typing in the rotation you want. Also on the “select” page there is a check box that says “counter-clockwise”, if checked your pattern will rotate counter-clockwise instead of clockwise when you select the rotation. Another option for rotation is touching rotate 90 deg CW (clockwise) or 90 deg CCW (counter clockwise).
Save: When modifying a pattern, if you would like to save that specifi c design for a later date, you can touch the save button, name it what you would like and the system will place it at the bottom of the patterns list.
Scale: Smartscale: will try and fi t the pattern inside your pattern box as best it can without going over the edge of the box. It will also give you the option to keep or not keep propor-tions of the pattern. Note: Scaling can take over a minute, be patient.
Manual Scale: You also can manually scale by using the sliders on the top and right side of the screen. When fi n-ished touch “OK”.
In the upper right corner there is a lock button. You can use this to lock both sliders together so that as you move one the other will move the same amount. To lock touch the icon the icon will turn green to show locked. Unlock it touch it again and the icon will turn white.

22
If you have 2 or more patterns and you select “scale”, the pat-tern you are currently scaling will be black and all others will be blue.
PropertiesLocal start X & Y: Telling you from the upper left corner of your pattern box where the start point is.
“set start point” moves the start of the pattern. The “move all” option will move ALL patterns on the screen. If this box is unchecked it will only move the current pattern that is se-lected.
Width & Height: You can set the exact size of your pattern using these keys. Touch the box and a key pad will appear and type the desired size.
When running a pattern:When you touch the green light to run a pattern you have 3 options:
Cancel because you didn’t want to run the pattern
Ok to run the pattern from the start
Set start: If your pattern is only ½ fi nished and you needed to re-start at a specifi c place, touch the “set start” button and move your machine to that point where you want it to start and the machine will start from that point.
Once you press ok, the machine will move to the start point and stitch once. You may then move your machine and pull up your bobbin thread.

23
When you press ok, the machine will automatically move back to the start point and do your selected lock stitch (see pg 8 for lock stitches). After doing the lock stitches, it will run the pattern.
If your thread breaks while running, touch the pause but-ton on the screen and touch thread break. Re-thread the machine and move your machine to the place where the thread broke. Don’t worry if you’re off the line a bit, the machine will pull in to be exactly on the line. If that is the place you want to start, touch yes, pull up the bobbin thread and then start and it will continue from that point.
If your thread breaks and you don’t notice until the pattern is completely fi nished, you can easily restart. Re-thread the machine and touch the “Green Light” to run your pat-tern. Now touch “Set Start” and move your machine to where the thread broke. Your machine will start the pat-tern from that place and continue on (see pg 17).
If you want to completely stop a pattern for any reason, touch the pause button on the screen then the Red light at the top of the screen.
Adjusting Speed or Stitch Length
To adjust the stitch length you must stop the machine from stitching to make this adjustment. Use the stitch length adjustment on your machine to make the adjustment then start your machine stitching again.
To adjust the speeds of your robot on the right side of your screen you will see two arrows the up arrow will speed your machine up and the down arrow will slow the ma-chine down. Any time your Quilt Magician™ is running, this will control the speed.
NOTE: For those intricate designs set your speed a bit slower. For those less intricate designs you can set your speed higher.

24
Section 5: Troubleshooting
Remote Trouble Shooting
Q: When setting my quilt area, I do not get a width or height for my area.A: Ensure that both of your belts are attached correctly. Next check under “Setup”, the motors should read “Motor Fwd” (if the black motor box is mounted on the front) and “Motor Rev” (if the motor box is mounted to the back). SEE MOTOR BOX TROUBLE SHOOTING FOR MORE INFORMATION.
Q: When running I frequently get motor errors.A: 1. First step is to check your belt tension. Push your machine as far back on the frame as possible. Place your fi nger in-between the black belt on the side of the carriage, about 12 inches from the motor box. The belt that is farthest away from the carriage, push it away from the carriage. From rest to where the belt it tight, it should only travel about 1/2” - 1”. If it travels more it needs to be tightened. Now check the white belt tension. Place you machine all the way to the right / left of your frame. Go to the center (again, leave the machine at the side) and and push the white belt down towards the ground. From rest to tight when pressing it down, it should travel about 1” - 2”. If it travels farther, this belt needs to be tightened.2. If adjusting the belts doesn’t fi x the errors, go into the setup screen to the ADVANCED tab. Touch “factory defaults” and follow the on-screen prompts.
Q: When I insert my pattern into the pattern box, it is coming in upside down or sideways and I want it straight up and down.A: The pattern will always rotate to your baseline (see set pattern box pg 14)
Q: When setting a pattern box I get an error that says “Pattern Box lines can not cross”.A: This happens when setting your pattern box and lines are crossing, or you set a point by touching the (+) key, then without moving the machine, the check mark right after. Touching the check mark adds a point as well as fi nishes the pattern box. If you accidentally touch the (+) mark for the 4th point, just nudge the machine a bit and touch the check mark, this will ensure it’s not putting a point on top of the previous point. Also your pattern box will automatically draw a line from your last point to your fi rst point for you, you do not have to close the box. Make sure you are not moving the machine and setting points on lines that have already been created, if you see a line on the screen, you can not go over the top of that line.
Q: When using the handle bars and starting stitch regulation, the machine does not stitch.A: Do all other handle bar functions work? Needle up/down? Manual mode? If everything else works, it is an encoder issue or an encoder cable issue. Check to ensure your cables are fully plugged in. Check the encoder testing lights, when you move your machine left to right does the light fl icker? When you move it front to back does the light fl icker? If it doesn’t fl icker in one of the directions, but does in the other, then it is either a cable or encoder issue and contact your dealer for support.
Q: When I activate regulated mode using the handle bars, my stitch regulation is erratic, sometimes it works and sometimes it doesn’t.A: Check your encoder cable wires, and ensure they are all securely plugged in. Then check the encoder wheels, move the machine front to back and left to right, does the wheel turn 100% of the time. If it does not, you will need to clean your wheels and the rails. If the wheel does turn 100% of the time, there is a problem with your encoder or your encoder wire and contact your dealer for support.
25
Robot (Black motor Box) Trouble Shooting
Q: When running, I get an error and the machine stops and will not continue.A: When running, if an error comes up and the system stops completely because of the error, it may be a few things.1. Your belt tension is too loose.2. Your belt brackets are incorrectly attached.3. The constants for your system need to be adjusted (see below).4. You are running over a cable, or something is preventing the system from moving.
ADJUSTING CONSTANTSAfter your system has been setup properly, you system should be good to go, but if you are hearing vibration noises from your belts or getting an “axis” error you can fi x that by using these steps:
1. While the system is running, touch both the belts and fi nd out which is vibrating.2. You can tighten your belts a touch and it should clean up the sound.3. If you feel your belts are already at a good tension you can adjust your constants4. Go into HOME—SETUP—CONSTANTS5. Think about this like Trigonometry Math class “X Axis” is left-right, “Y axis” is top-bottom. If your X belt is vibrating or giving an error turn the number down a bit (go in increments of 10). 6. You can either slide the slider or you can touch just below the slider and it will move in increments of 10. Q: When setting my Quilt Area I don’t get a width, height or both.A: There are a few things to check:
1. Ensure your belts are both attached correctly, and that the pulleys are activating on the belt correctly. This can be checked by moving the machine forward and back, does the pulley on the top of the motor box turn? Move the machine left to right, does the pulley on the back side turn?2. Go to the setup and under the “Updates” tab, ensure it says “Motors Fwd” (if the motor box is mounted at the front).3. If you set your “Quilt Area” backwards do you get a width and height? For example, when it says go to the back left, you need to go to the front right. Then to the front left, then to the back left. Do you get values now? If you do, go into the setup and change the motor placement as mentioned in step 2.4. Activate the “Horizontal Locks” (see pg 19), does your machine lock horizontally? Activate the vertical locks, does the machine lock vertically? If these both lock, but you continue to have no reading when setting the “Quilt Area”, contact your dealer for support.
26
USB Jump Drive Help
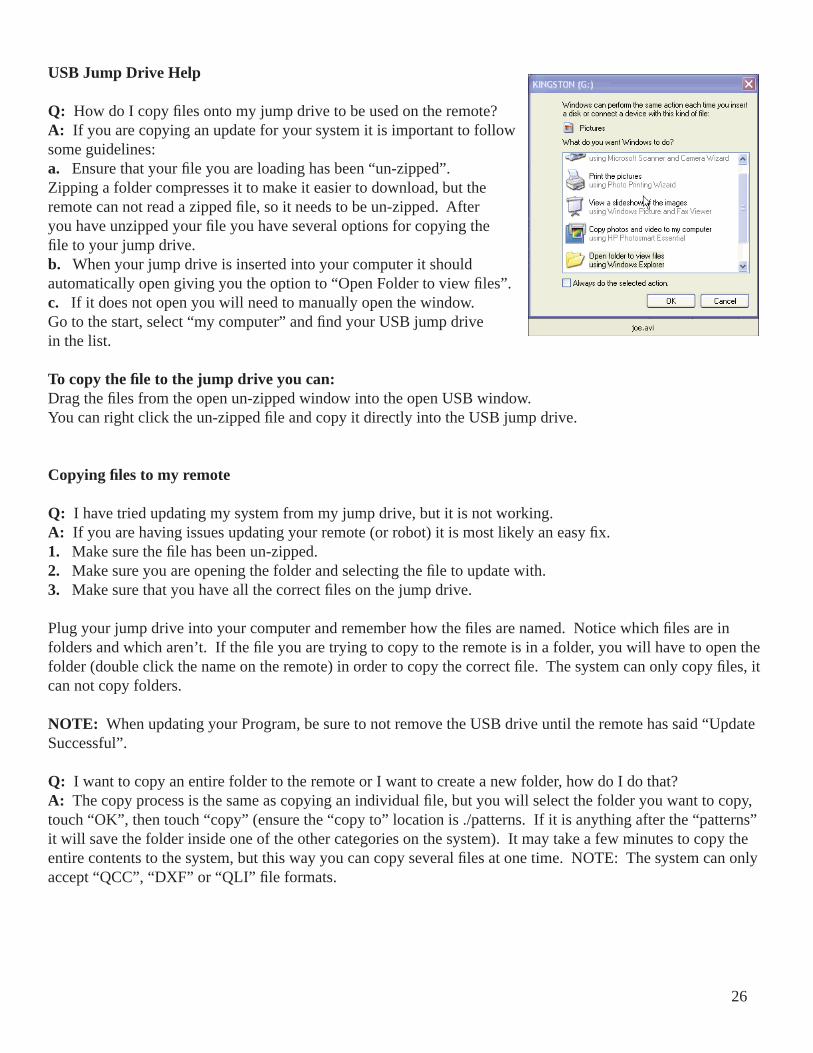
Q: How do I copy fi les onto my jump drive to be used on the remote?A: If you are copying an update for your system it is important to follow some guidelines:a. Ensure that your fi le you are loading has been “un-zipped”. Zipping a folder compresses it to make it easier to download, but the remote can not read a zipped fi le, so it needs to be un-zipped. After you have unzipped your fi le you have several options for copying the fi le to your jump drive. b. When your jump drive is inserted into your computer it should automatically open giving you the option to “Open Folder to view fi les”. c. If it does not open you will need to manually open the window. Go to the start, select “my computer” and fi nd your USB jump drive in the list.
To copy the fi le to the jump drive you can:Drag the fi les from the open un-zipped window into the open USB window.You can right click the un-zipped fi le and copy it directly into the USB jump drive.
Copying fi les to my remote
Q: I have tried updating my system from my jump drive, but it is not working.A: If you are having issues updating your remote (or robot) it is most likely an easy fi x. 1. Make sure the fi le has been un-zipped.2. Make sure you are opening the folder and selecting the fi le to update with.3. Make sure that you have all the correct fi les on the jump drive.
Plug your jump drive into your computer and remember how the fi les are named. Notice which fi les are in folders and which aren’t. If the fi le you are trying to copy to the remote is in a folder, you will have to open the folder (double click the name on the remote) in order to copy the correct fi le. The system can only copy fi les, it can not copy folders.
NOTE: When updating your Program, be sure to not remove the USB drive until the remote has said “Update Successful”.
Q: I want to copy an entire folder to the remote or I want to create a new folder, how do I do that?A: The copy process is the same as copying an individual fi le, but you will select the folder you want to copy, touch “OK”, then touch “copy” (ensure the “copy to” location is ./patterns. If it is anything after the “patterns” it will save the folder inside one of the other categories on the system). It may take a few minutes to copy the entire contents to the system, but this way you can copy several fi les at one time. NOTE: The system can only accept “QCC”, “DXF” or “QLI” fi le formats.

27